Internally, this chassis is a beauty. The side panels are covered in dampening materials to lower noise levels and the overall layout is extremely clever.


At the front are the three high quality 140mm intake fans which ensure high levels of airflow. These are controlled to low, medium or high speeds by a switch on the outside of the case. Each of these fans ends in a 3 pin header, which is connected to a molex adapter.


The top of the chassis is home to a cage system which is cooled directly by a fan at the rear of the chassis. This tray has slots for hard drives which connect directly to a sata power and data board at the other side.

The other side of this PCB contains SATA header connectors. The extra length cables (which are supplied) can be hooked in here and then attached directly to the motherboard.


There is another one of these hard drive bays at the bottom of the case, which is removable (see above).

Underneath the top drive bay section is another 140mm exhaust fan which is connected to another 3 pin header and molex connector adapter. Lian Li have adopted their clever PCI mounting system which is based around little levers, these are pulled back to allow the fitting of graphics card and other devices. When they are fitted they are pushed ‘forward' to lock. These levers are made of metal and can withstand some serious abuse, unlike other similar designs we have seen adopted in competitor cases.

All of these fans can be hooked into a control board which resides at the top/rear of the case. Every fan which is connected here can be speed controlled by the external knob.

The reverse side of the case has many holes cut into it to allow for routing of cables. There is also a large area cut into the aluminum to allow access to motherboard CPU backplates.


Installing the system is as straightforward as it gets and we think the hard drive installation method is easily one of the best we have seen. You connect a runner device to the hard drive, slide it into the bay and then lock the drive in place with little stoppers on either side. There is a bracket for a 2.5 inch drive which works in an identical manner.


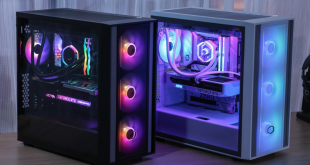
Installing the system only took a matter of minutes, and with the added space offered thanks to the size of the design, we had plenty of room to work around the motherboard area – the tray is also removable so you can fit the motherboard outside the case if you wish.
There are a lot of cables to route, especially with all the connectors running from the fans at both front and rear locations, but after a little time, the system build can look great. We removed the bottom drive bay as we wanted this space for our 1200w PSU and cabling.