Before we can install the EFZ-120HA5 there is some assembly required. The retention bracket is made of of three separate pieces of steel that require the use of 4 small screws to complete the assembly. Once the bracket is assembled we use another 2 screws to secure the bracket to the base of the heatsink.


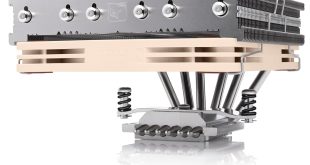
These images show the cooler with the retention bracket attached. This gets us one step closer to the actual installation of the EFZ-120HA5.


The EFZ-120HA5 uses a universal back plate for all processor types. There are holes cut in the back plate for each different CPU socket type. We then use the four threaded posts, four steel nuts and four washers to complete the final step of our preparation.


Now that preparation is completed we place the back plate in position with the four threaded posts inserted through the appropriate mounting holes on the motherboard.


Next we carefully position the heatsink on our processor making sure the holes line up with four threaded posts. Once correctly orientated we place a small steel washer over each of the four posts before completing the installation with the four spring loaded nuts.
AMD users are going to have to hold the heat sink in place with enough force that they can successfully tighten the spring loaded nuts. In theory this sounds simple but the placement of these nuts is directly below the tower, which does not leave much room for fingers, especially with the pressure required to secure the spring loaded nuts.
Intel users would not have to deal with this inconvenience because the mounting holes are further apart.