We installed the Zotac H55 Mini-ITX Motherboard into the chassis. There is no cutout in the motherboard tray as it also forms the back panel so you need to make sure you install the cooler back plate before you install the motherboard.
For those who plan to use a stock cooler, though, this won't be an issue. We had a little trouble getting the I/O shield securely into place because of the thickness of the aluminium surrounding the hole. But after a few minutes of squeezing and pushing we managed to get it securely into place.
We tried using a different I/O shield from a Gigabyte motherboard and had no trouble getting it to fit, so it is obviously a problem unique to this particular I/O shield design.

Next, we installed the Antec TruePower 550W power supply into the system by screwing it into the bracket which is secured to the back panel. If you wish, you can remove the bracket from the back panel and attach it to the power supply before sliding it in through the hole in the back but this isn't really necessary.
Although there isn't any provision for cable routing, there is plenty of space in front of the power supply where you can tie up cables from a non-modular power supply. We found the bar that crosses the middle of the system very useful for cable routing as a number of cables can be routed under this, facilitating a tidy build.

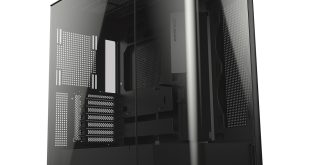
Installing the graphics card into the system was very simple, despite having to use regular screws rather than thumbscrews. There is a reasonable amount of room in the chassis for long graphics cards like the HIS Radeon HD 5830 Turbo. Those who want to use longer graphics cards may encounter issues though, especially if the power connectors are on the end of the card like our HD 5830.
Bear in mind, though, that a graphics card this long will impede airflow through the chassis if you're planning to add an exhaust fan on the left of the case. So it's probably a good idea to install a 120mm exhaust fan into the roof to improve the thermal environment.

For our test system we installed a Samsung B123L/BSBP Blu-Ray drive into the system, one of the best value drives on the market. This required us to unscrew the optical drive bay from the 2.5″ bay on top and then screw the drive into place. Unfortunately this didn't line up properly with the optical drive bezel button, making it extremely difficult to get the drive to eject.
We decided to try a LG DVD Writer instead which lined up perfectly as the eject button is less elaborate.


Installing a hard drive into the system is very simple, requiring us to slide the drive into the hard drive caddy and then securing it using four thumbscrews. The drive caddies have anti-vibration washers to ensure that noise is reduced. Installing a 2.5″ drive is almost as simple, requiring four screws through the HDD caddy.

We decided to use a Coolit ECO A.L.C. CPU cooler in this case as the physical dimensions are small. We combined this with a Noctua P14 fan to keep noise to a minimum and attached it using Noctua's rubber fan mounts to prevent vibrations. It was a little difficult to get the top panel back in place after attaching the cooler but we managed it in the end.