If you have been following our Intel NUC 9 Extreme water cooling project over the last couple of months, you will know that the system has come a long way. Part 5 is the final video in the series where we will find out whether all of our hard work and effort water cooling the Compute Element card has paid off. Will we see an improvement in performance?
In the fifth and final video of the Intel NUC 9 Extreme water cooling project, I finish off all those small niggling little jobs that you often put off, believing they will only take five minutes to complete when actually they last for hours. However insignificant these small jobs may seem, they must be completed to get the final system built up and to test the performance of our custom water cooling.
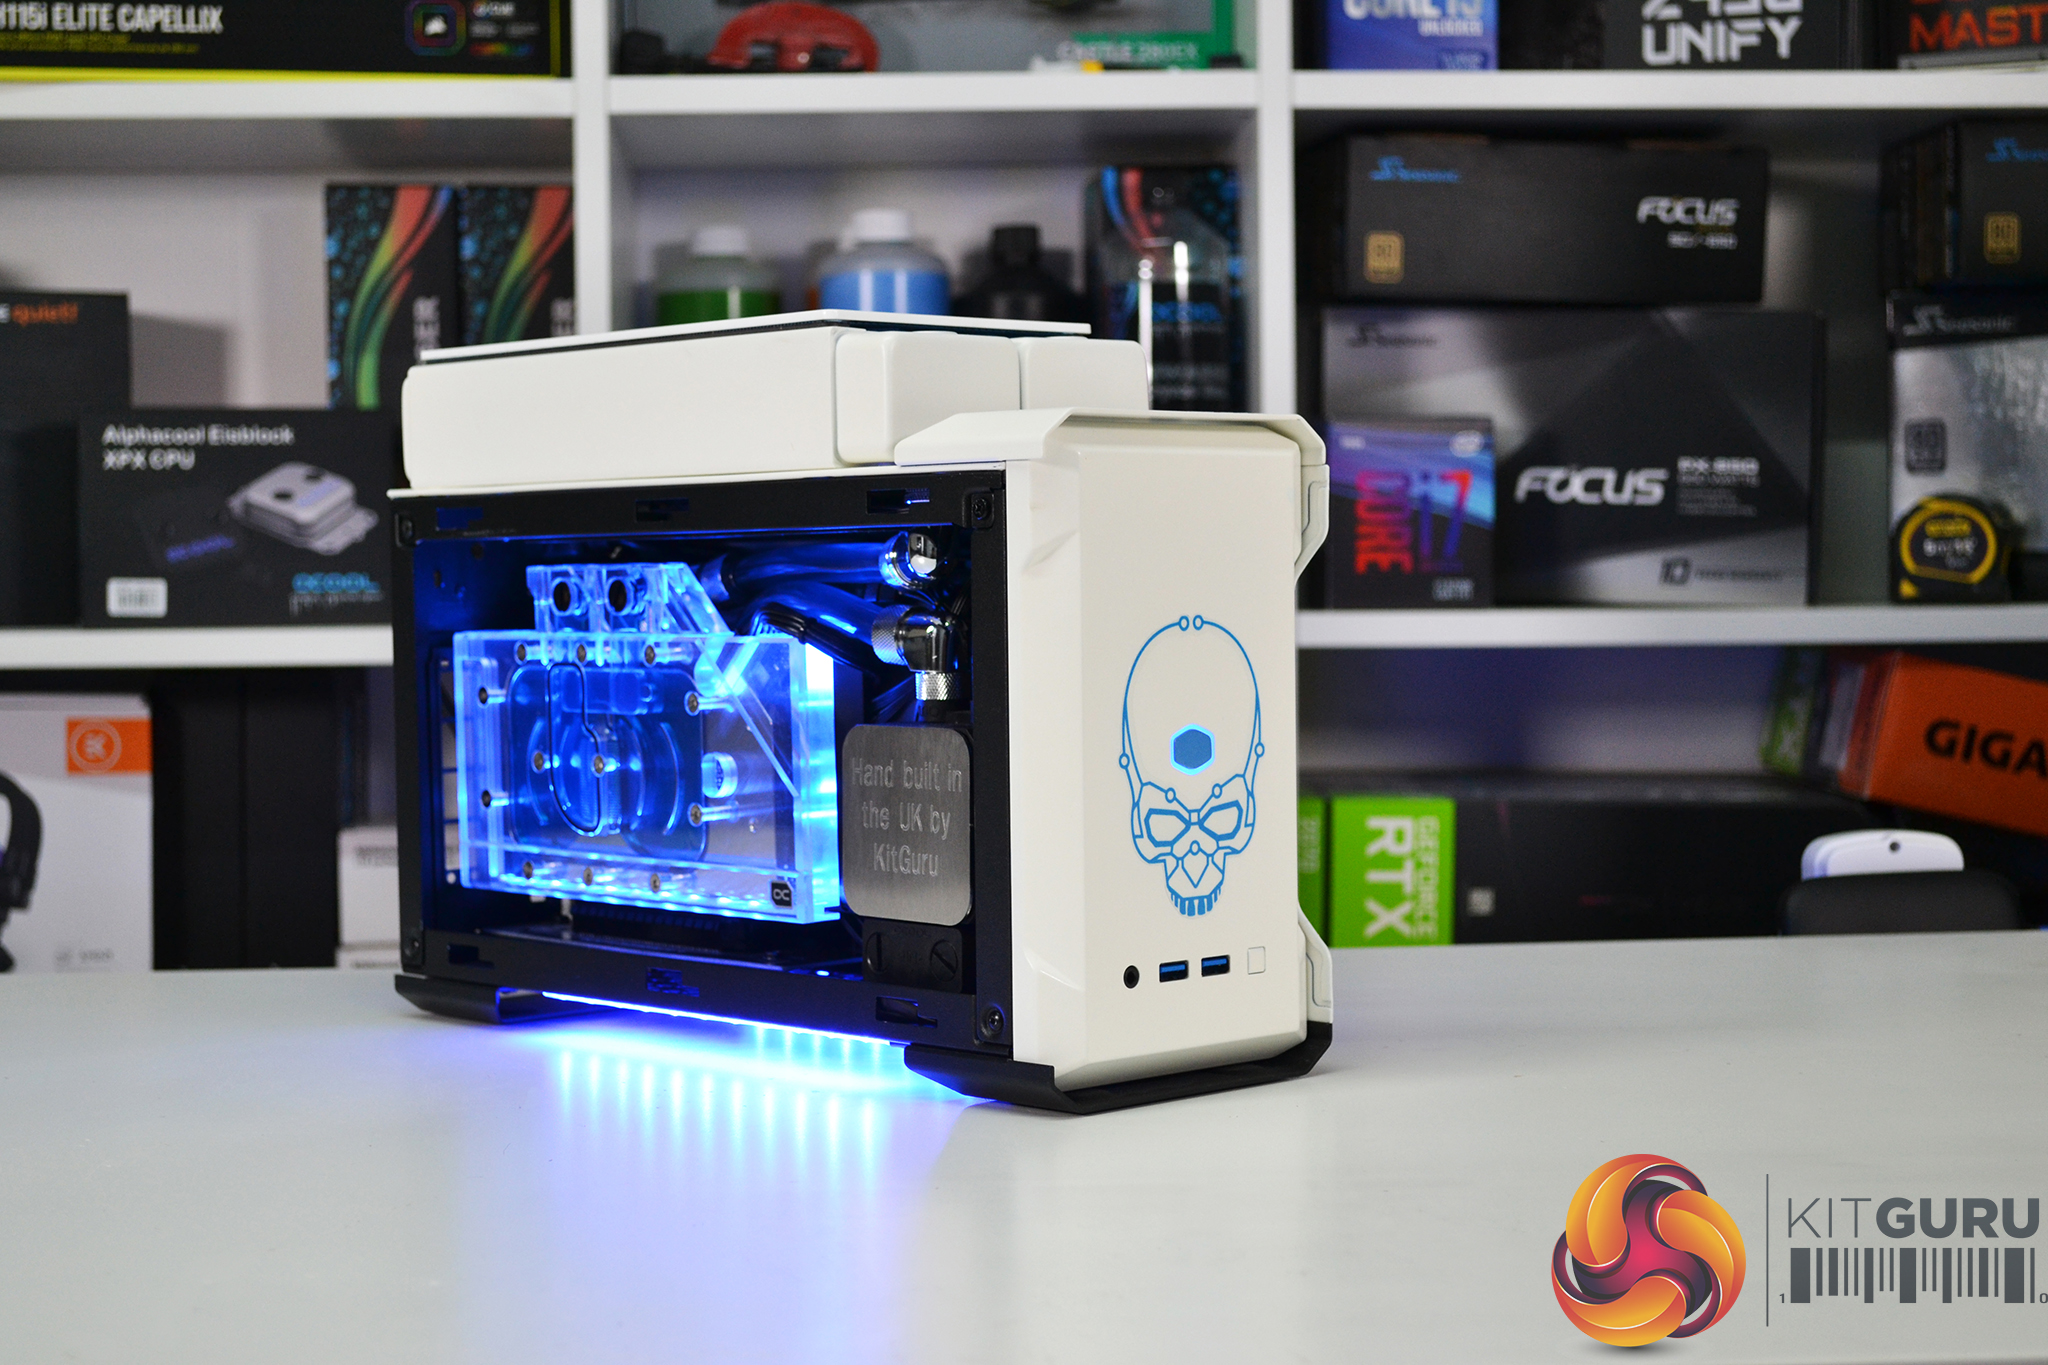
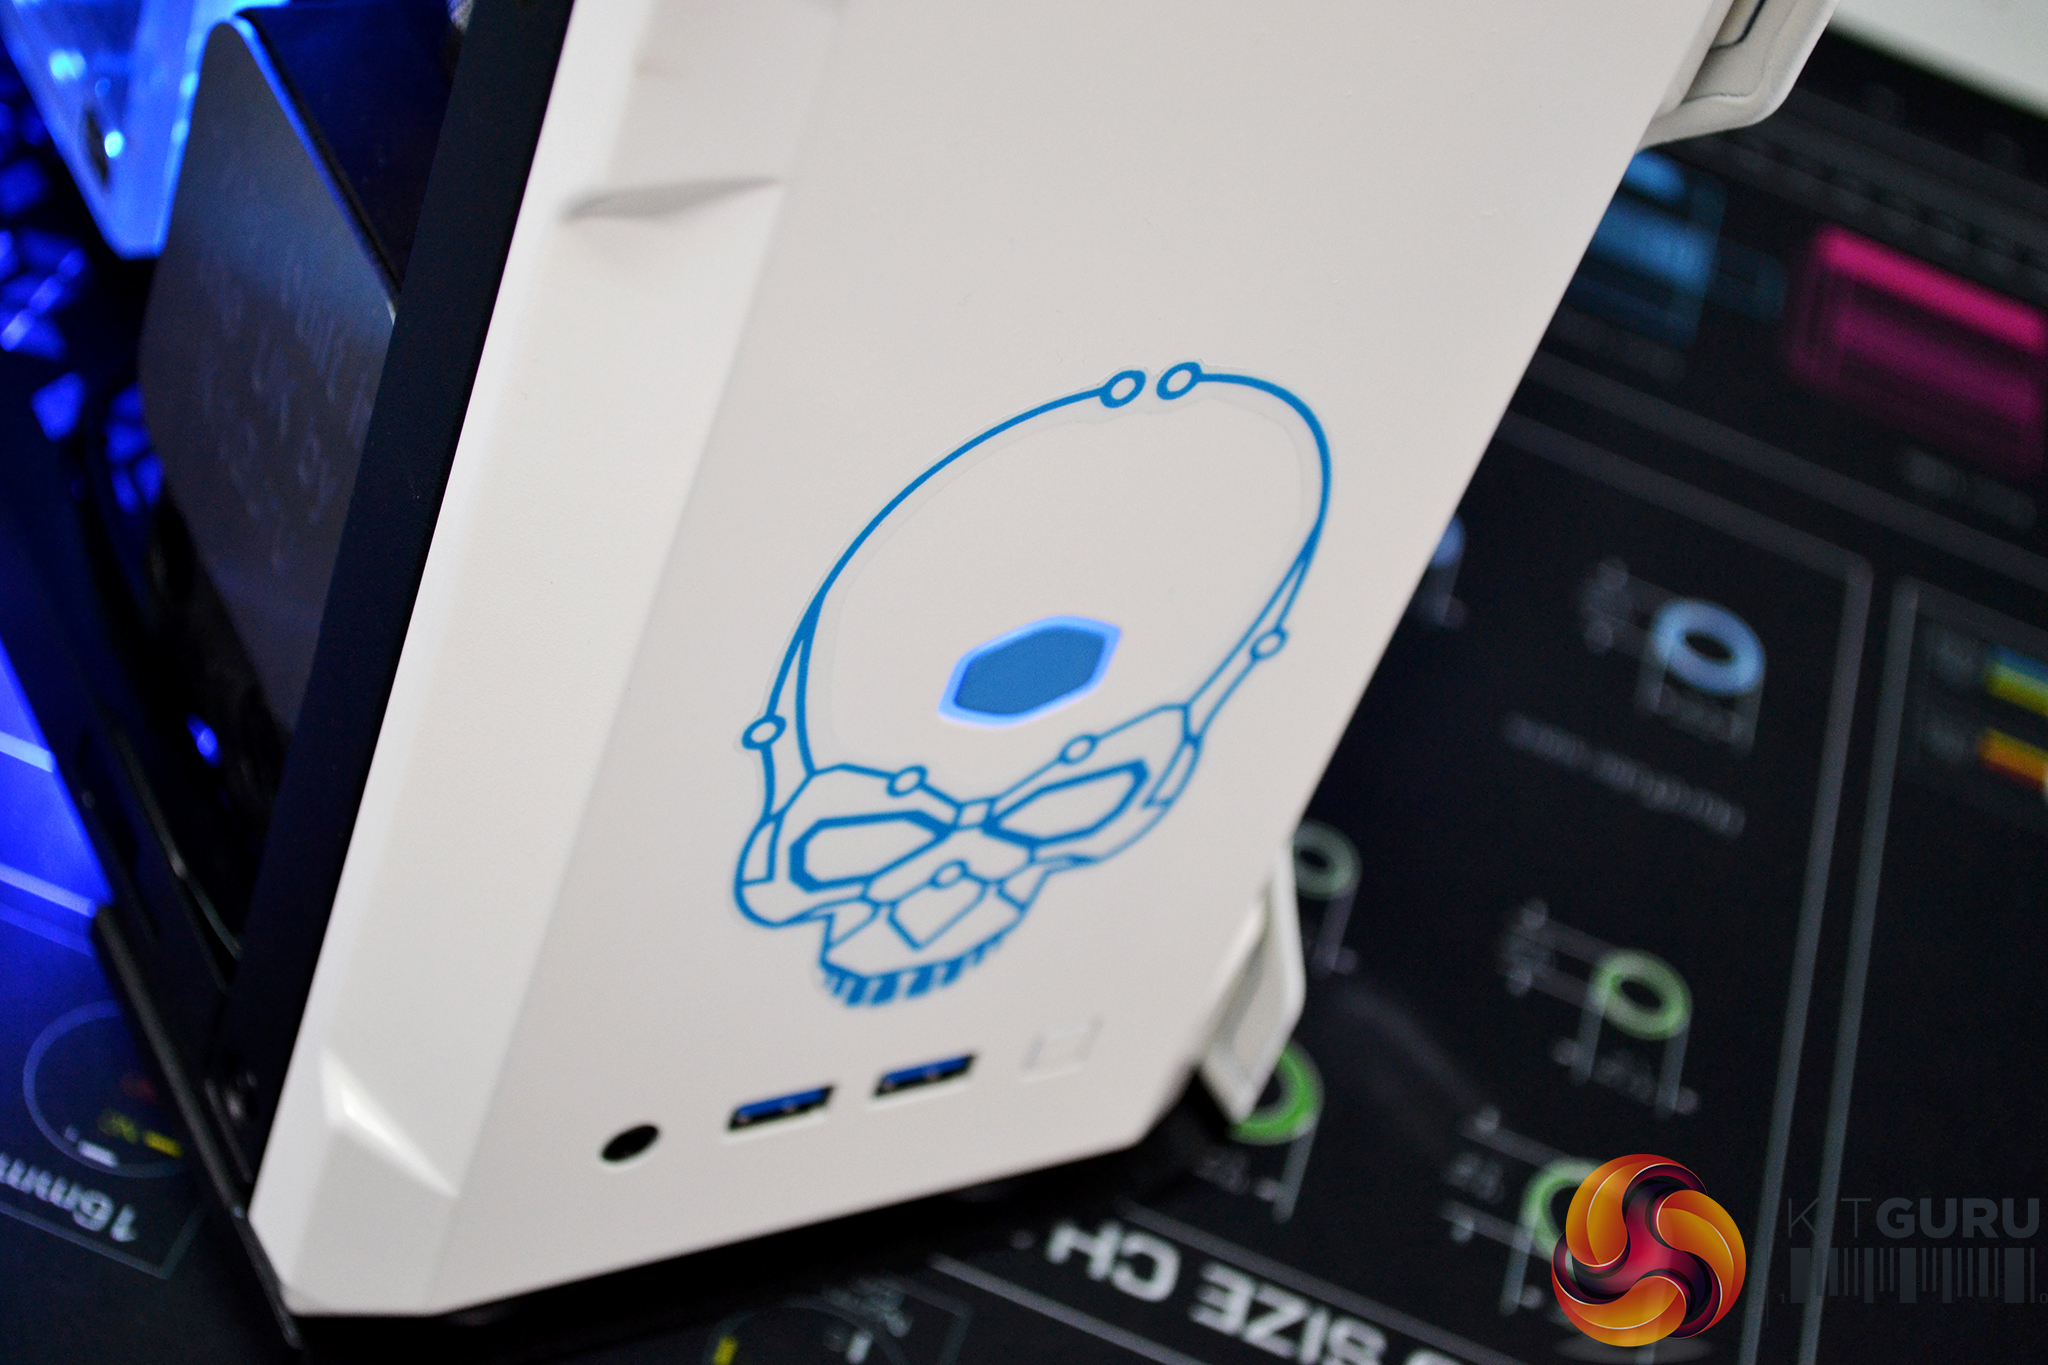
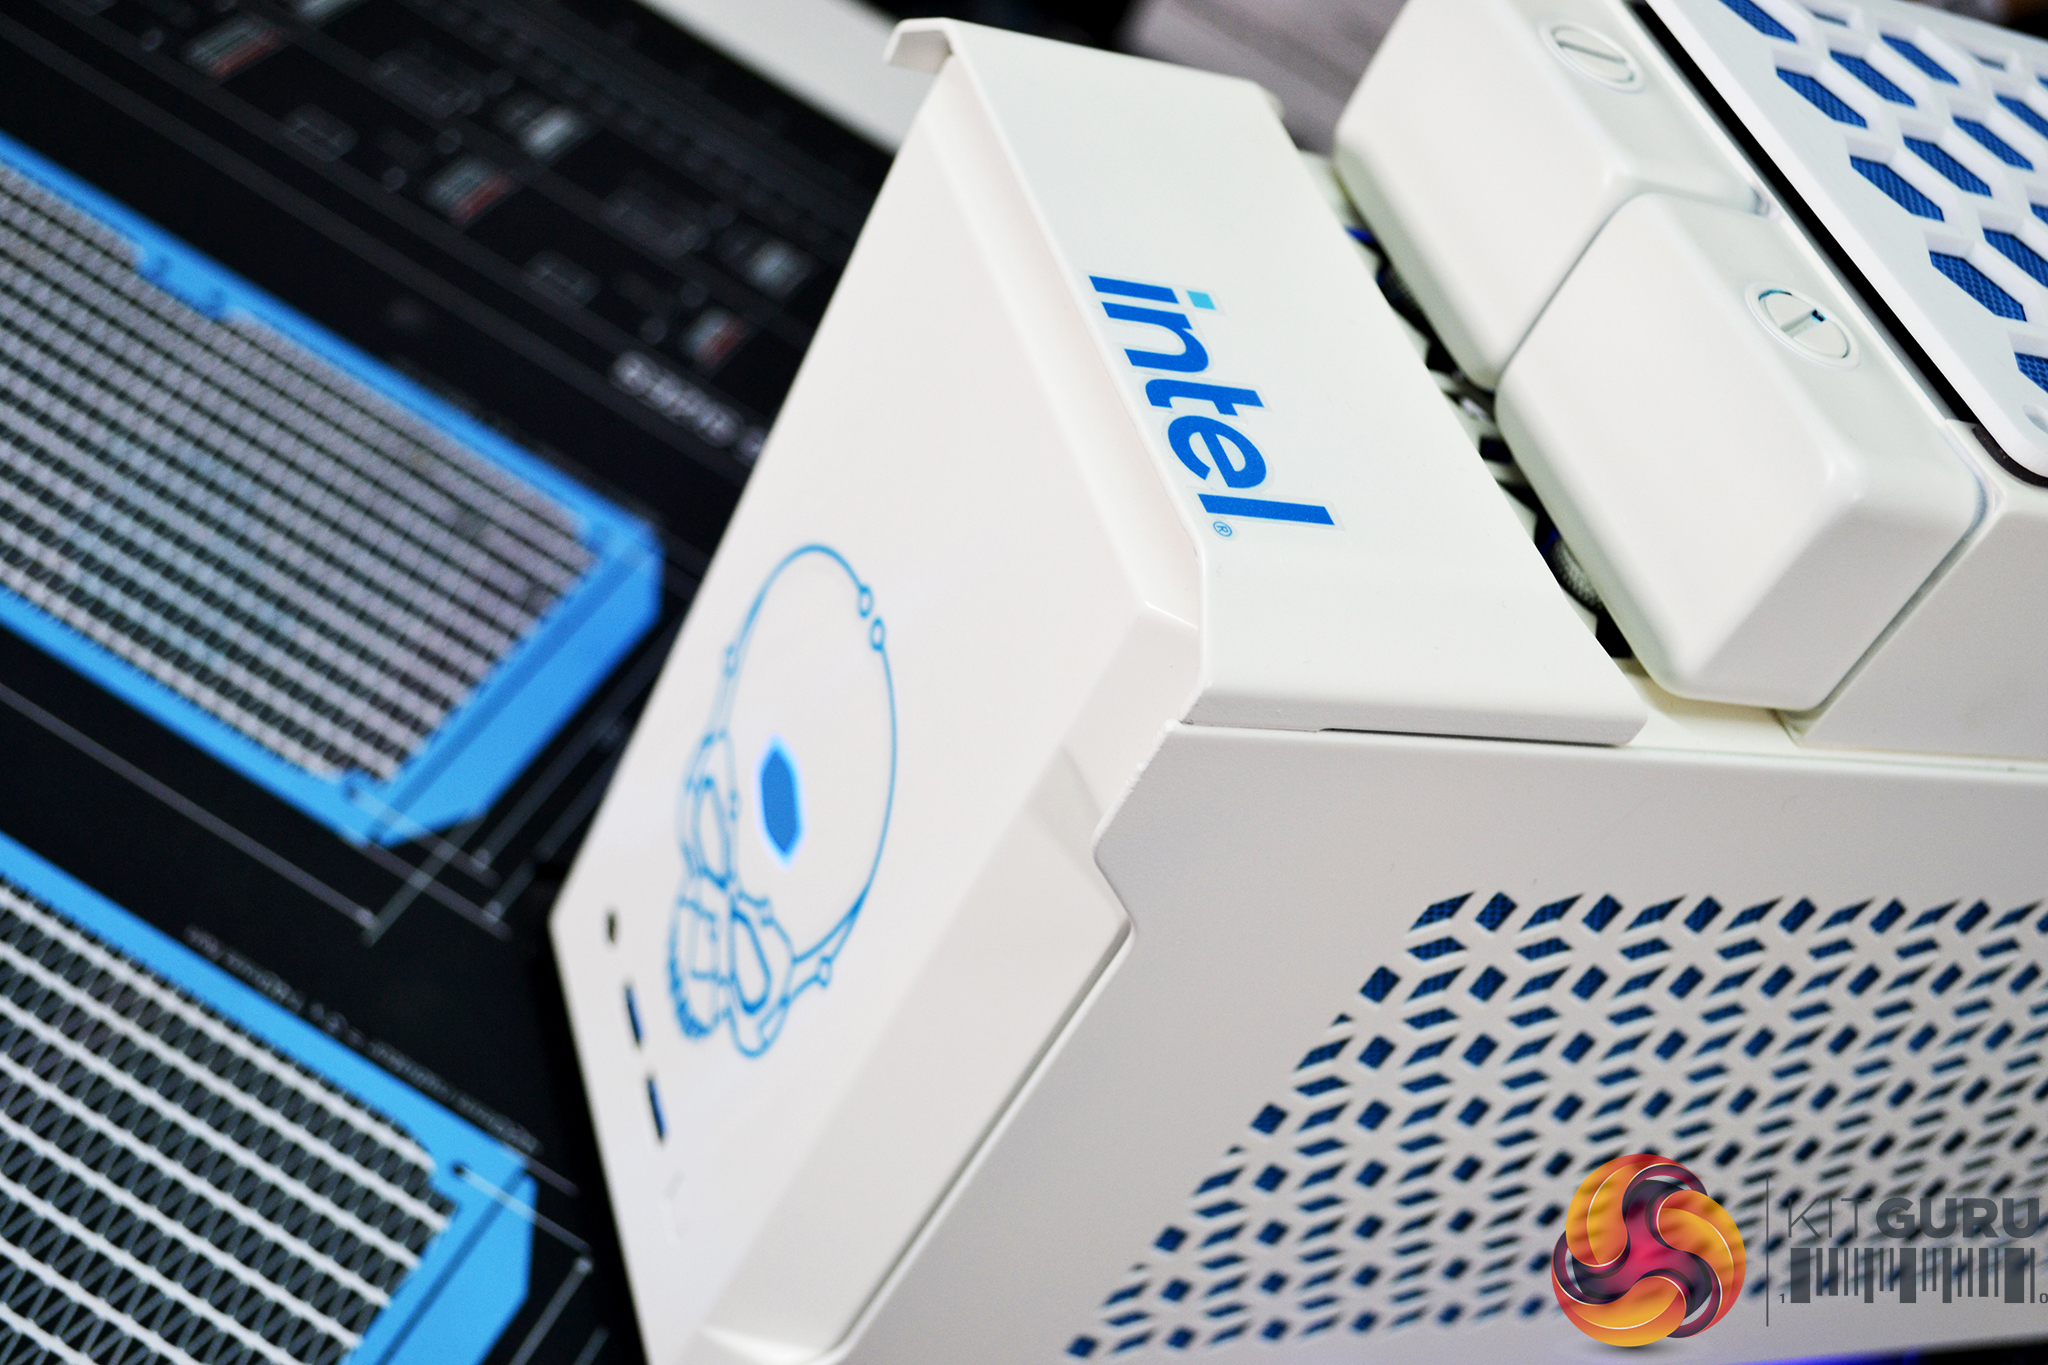
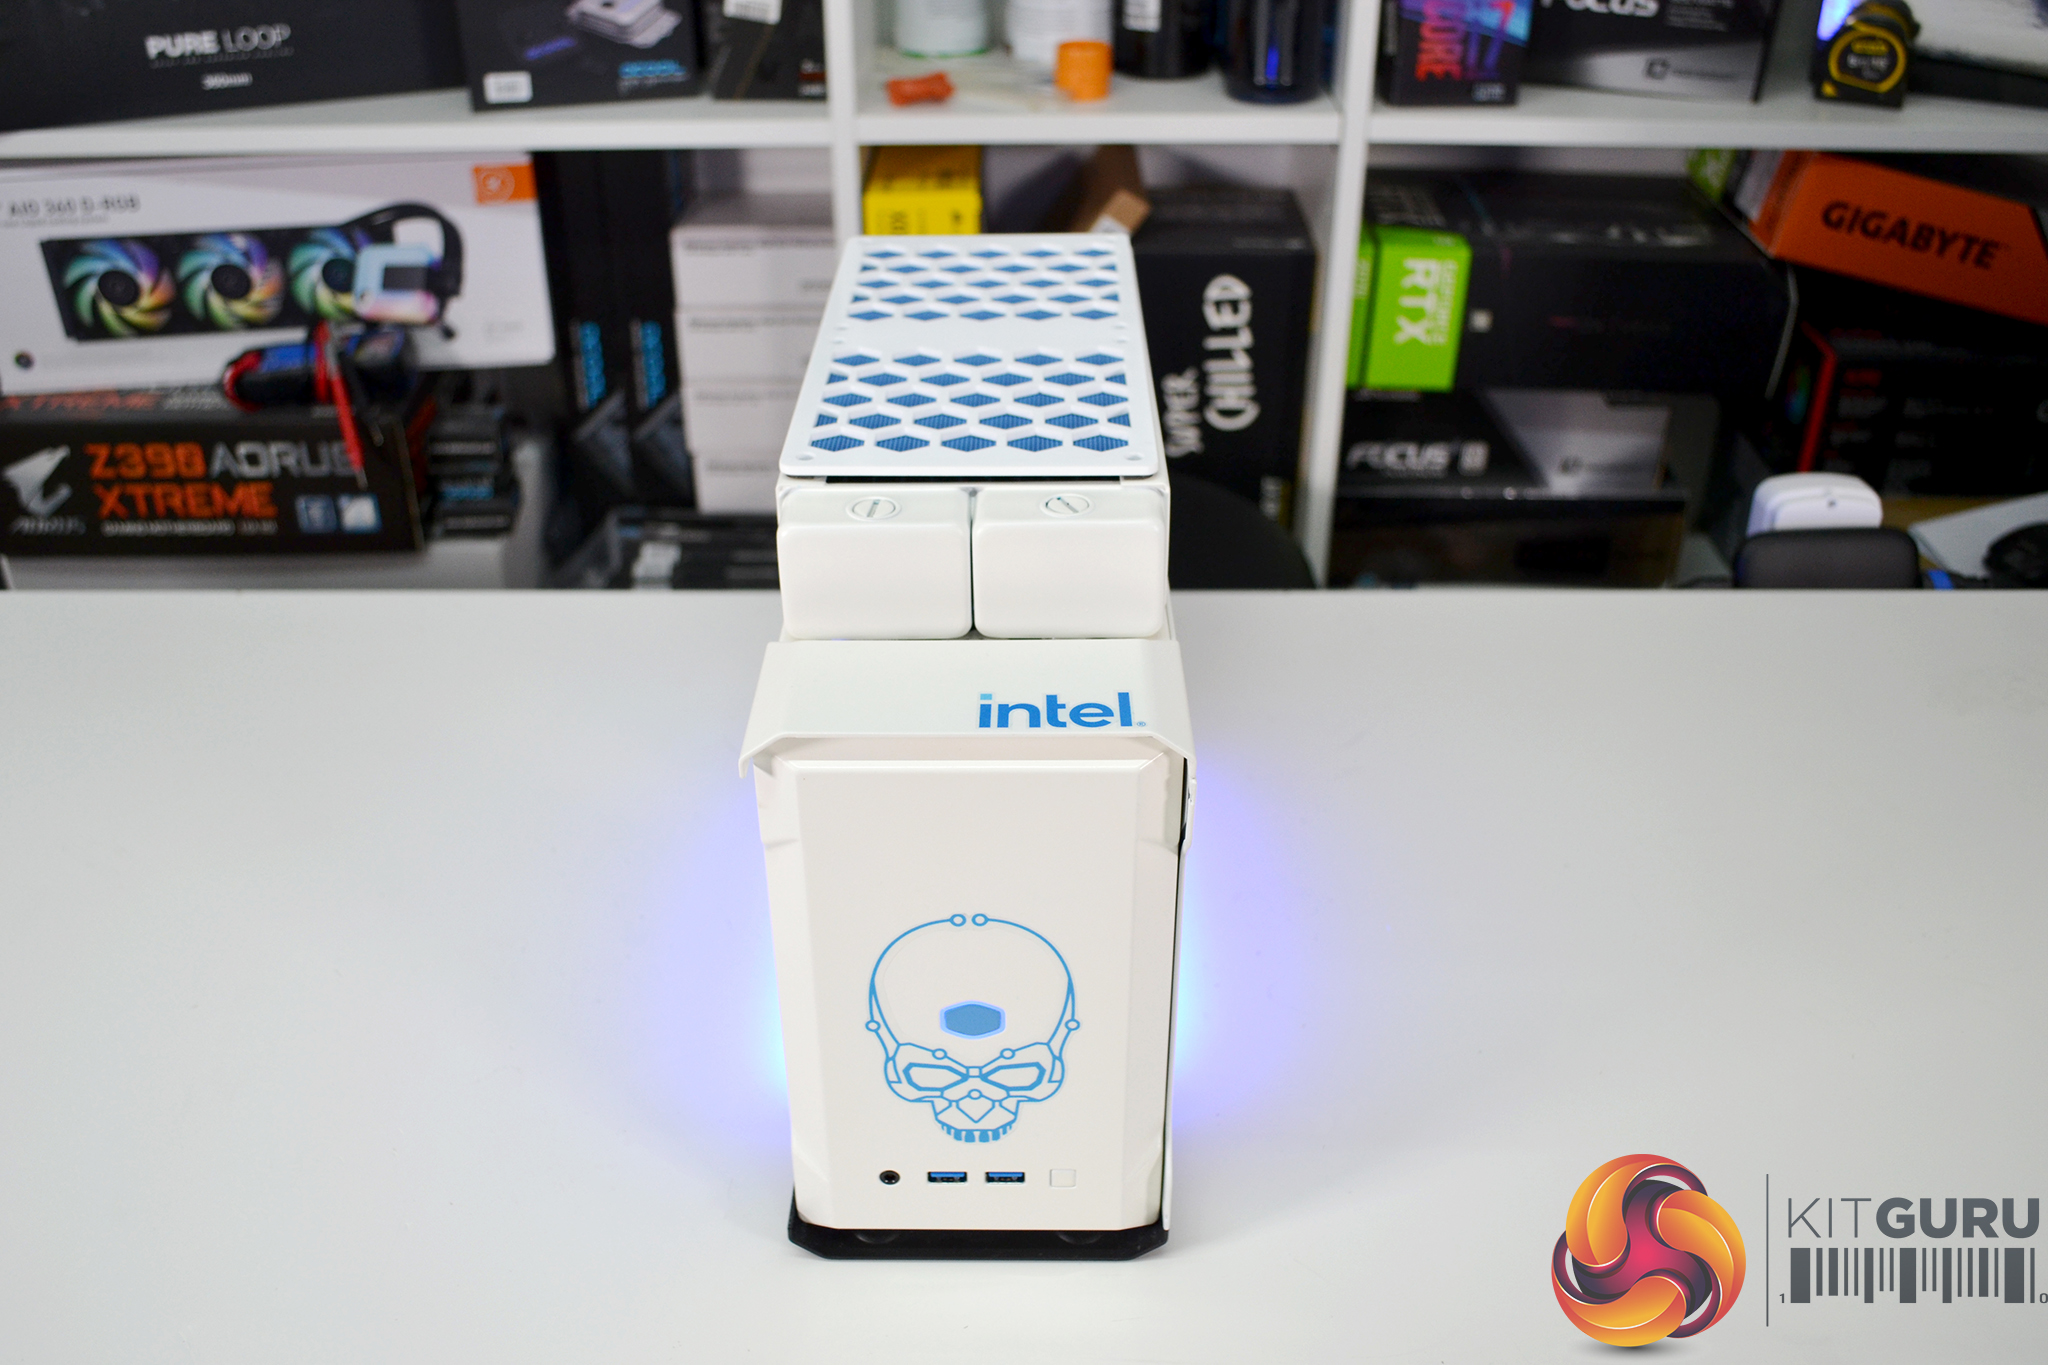
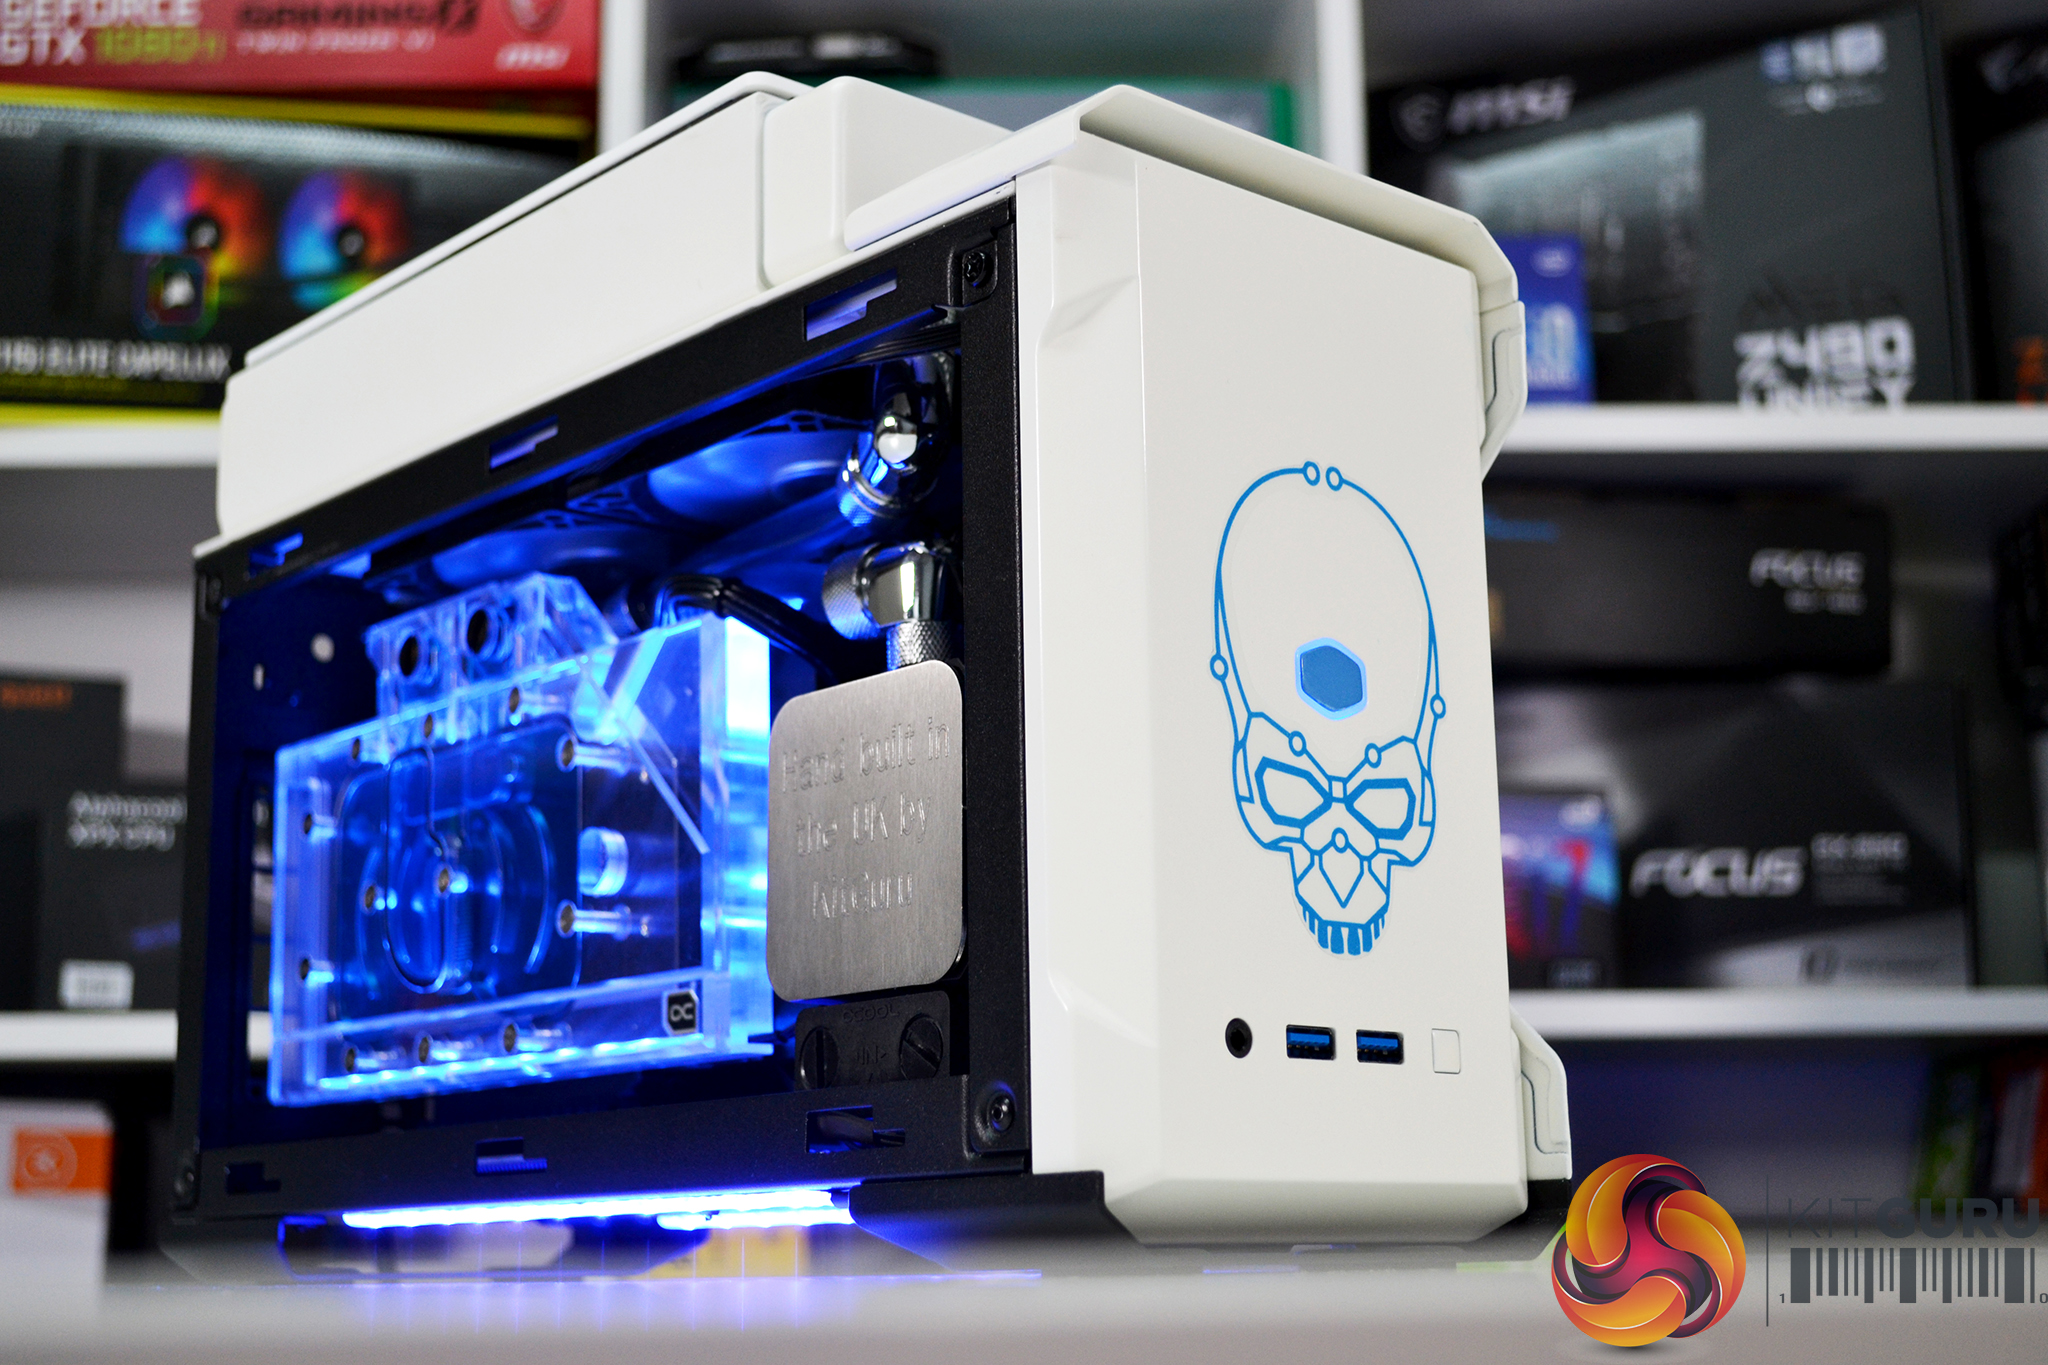
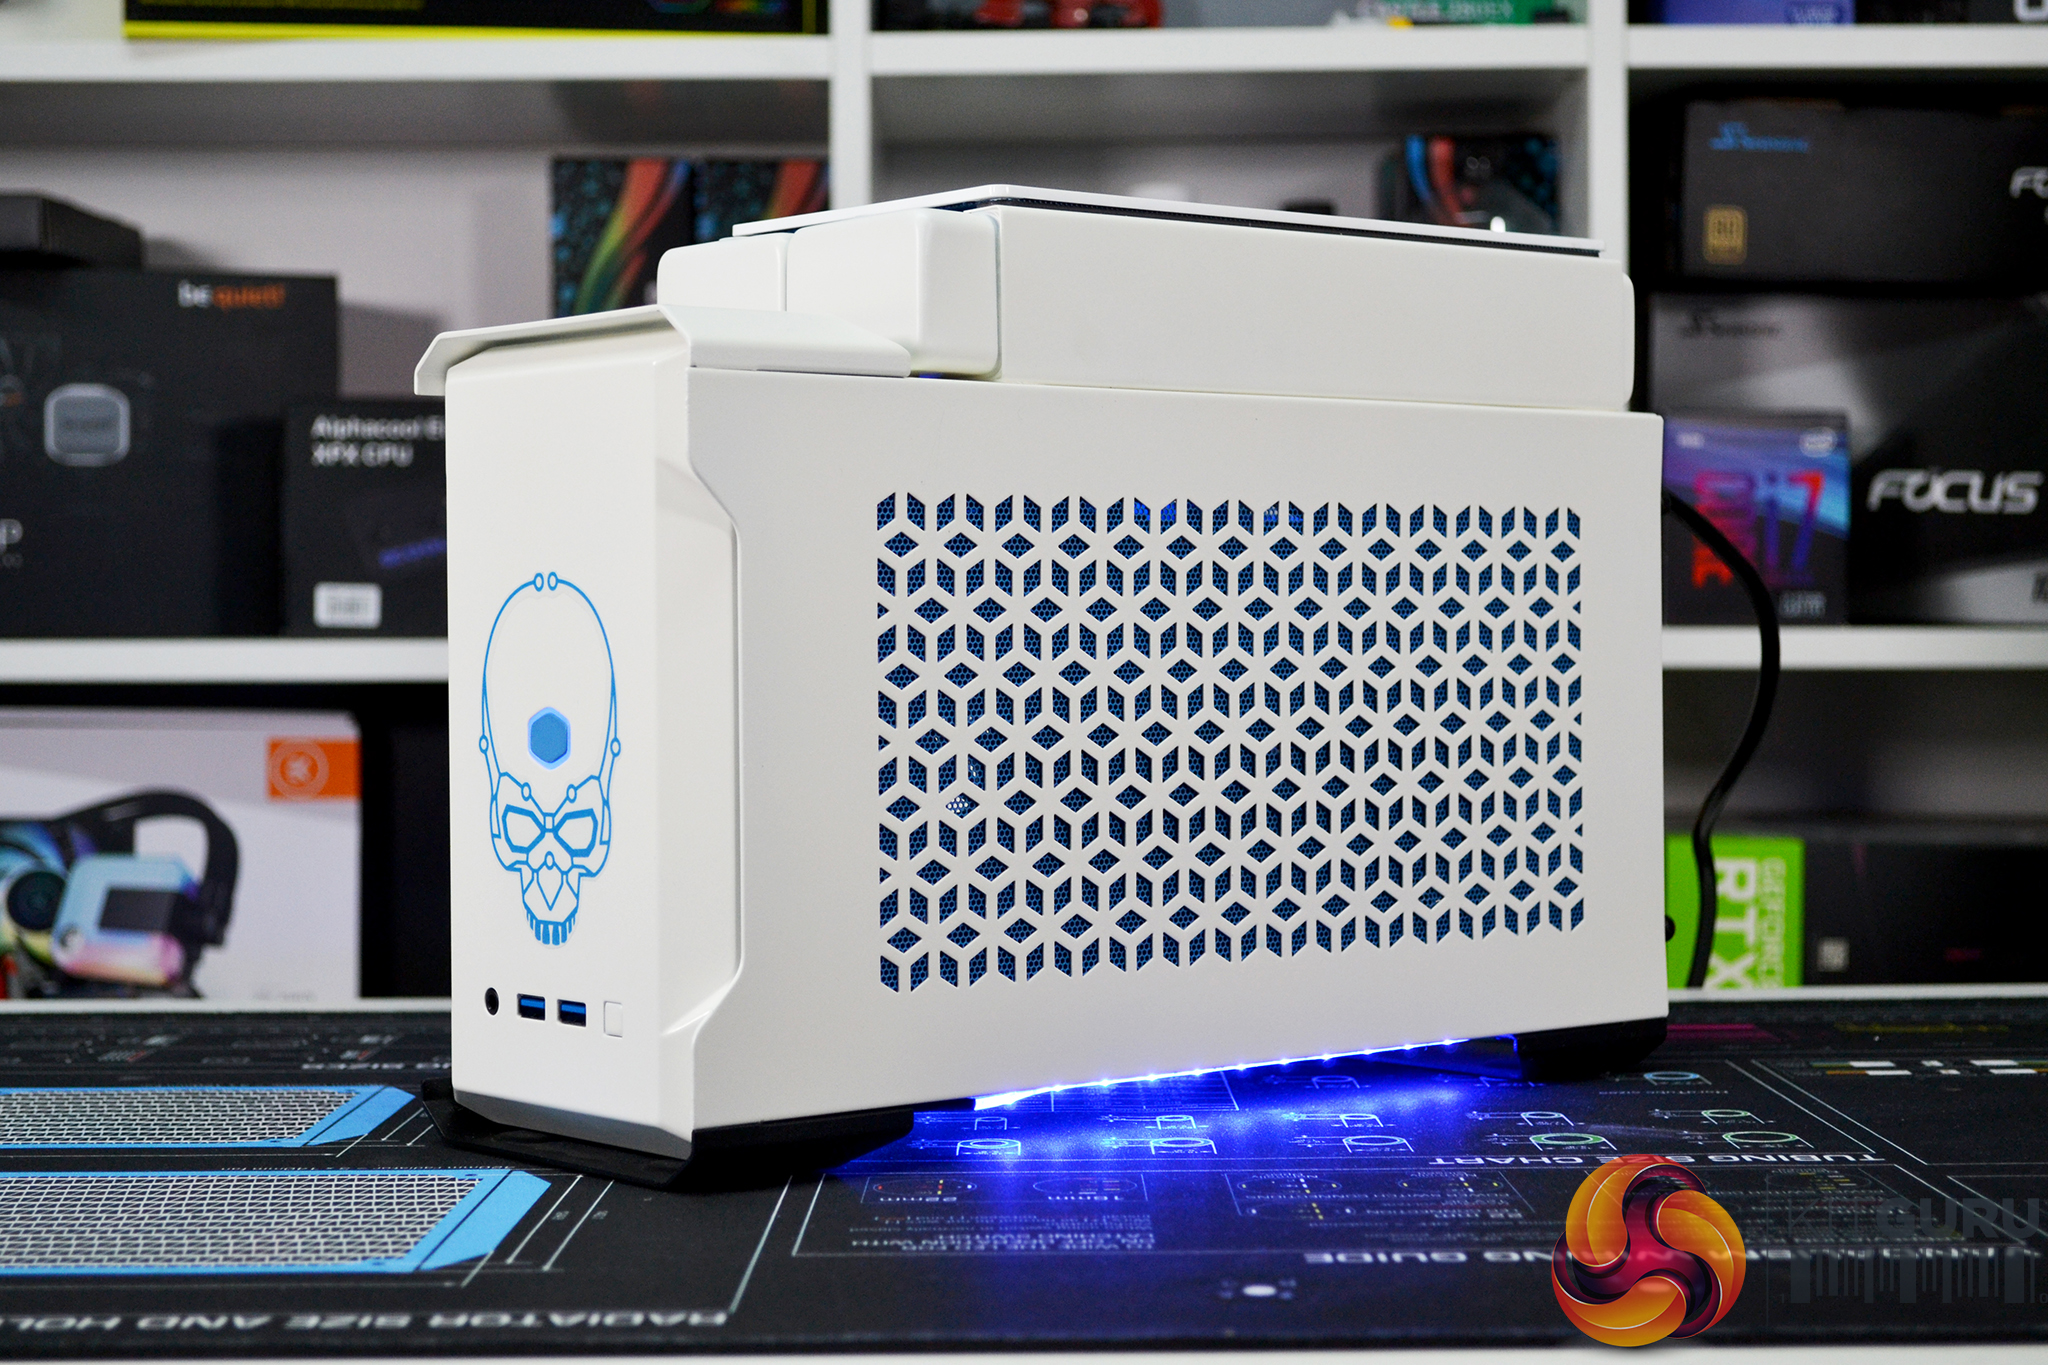
The video kicks off by looking at some DIY transfers or stickers printed on transparent self-adhesive paper – something that can be done at home with your normal inkjet printer. Getting hold of professionally printed transfers online for a reasonable price and delivered quickly, isn't as easy as it may seem, so I decided to print my own and they turned out better than I had expected. The front of the system now sports a Ghost Canyon-style skull transfer and stuck to the little spoiler on top of the chassis is a new Intel logo to break up the mass of white.
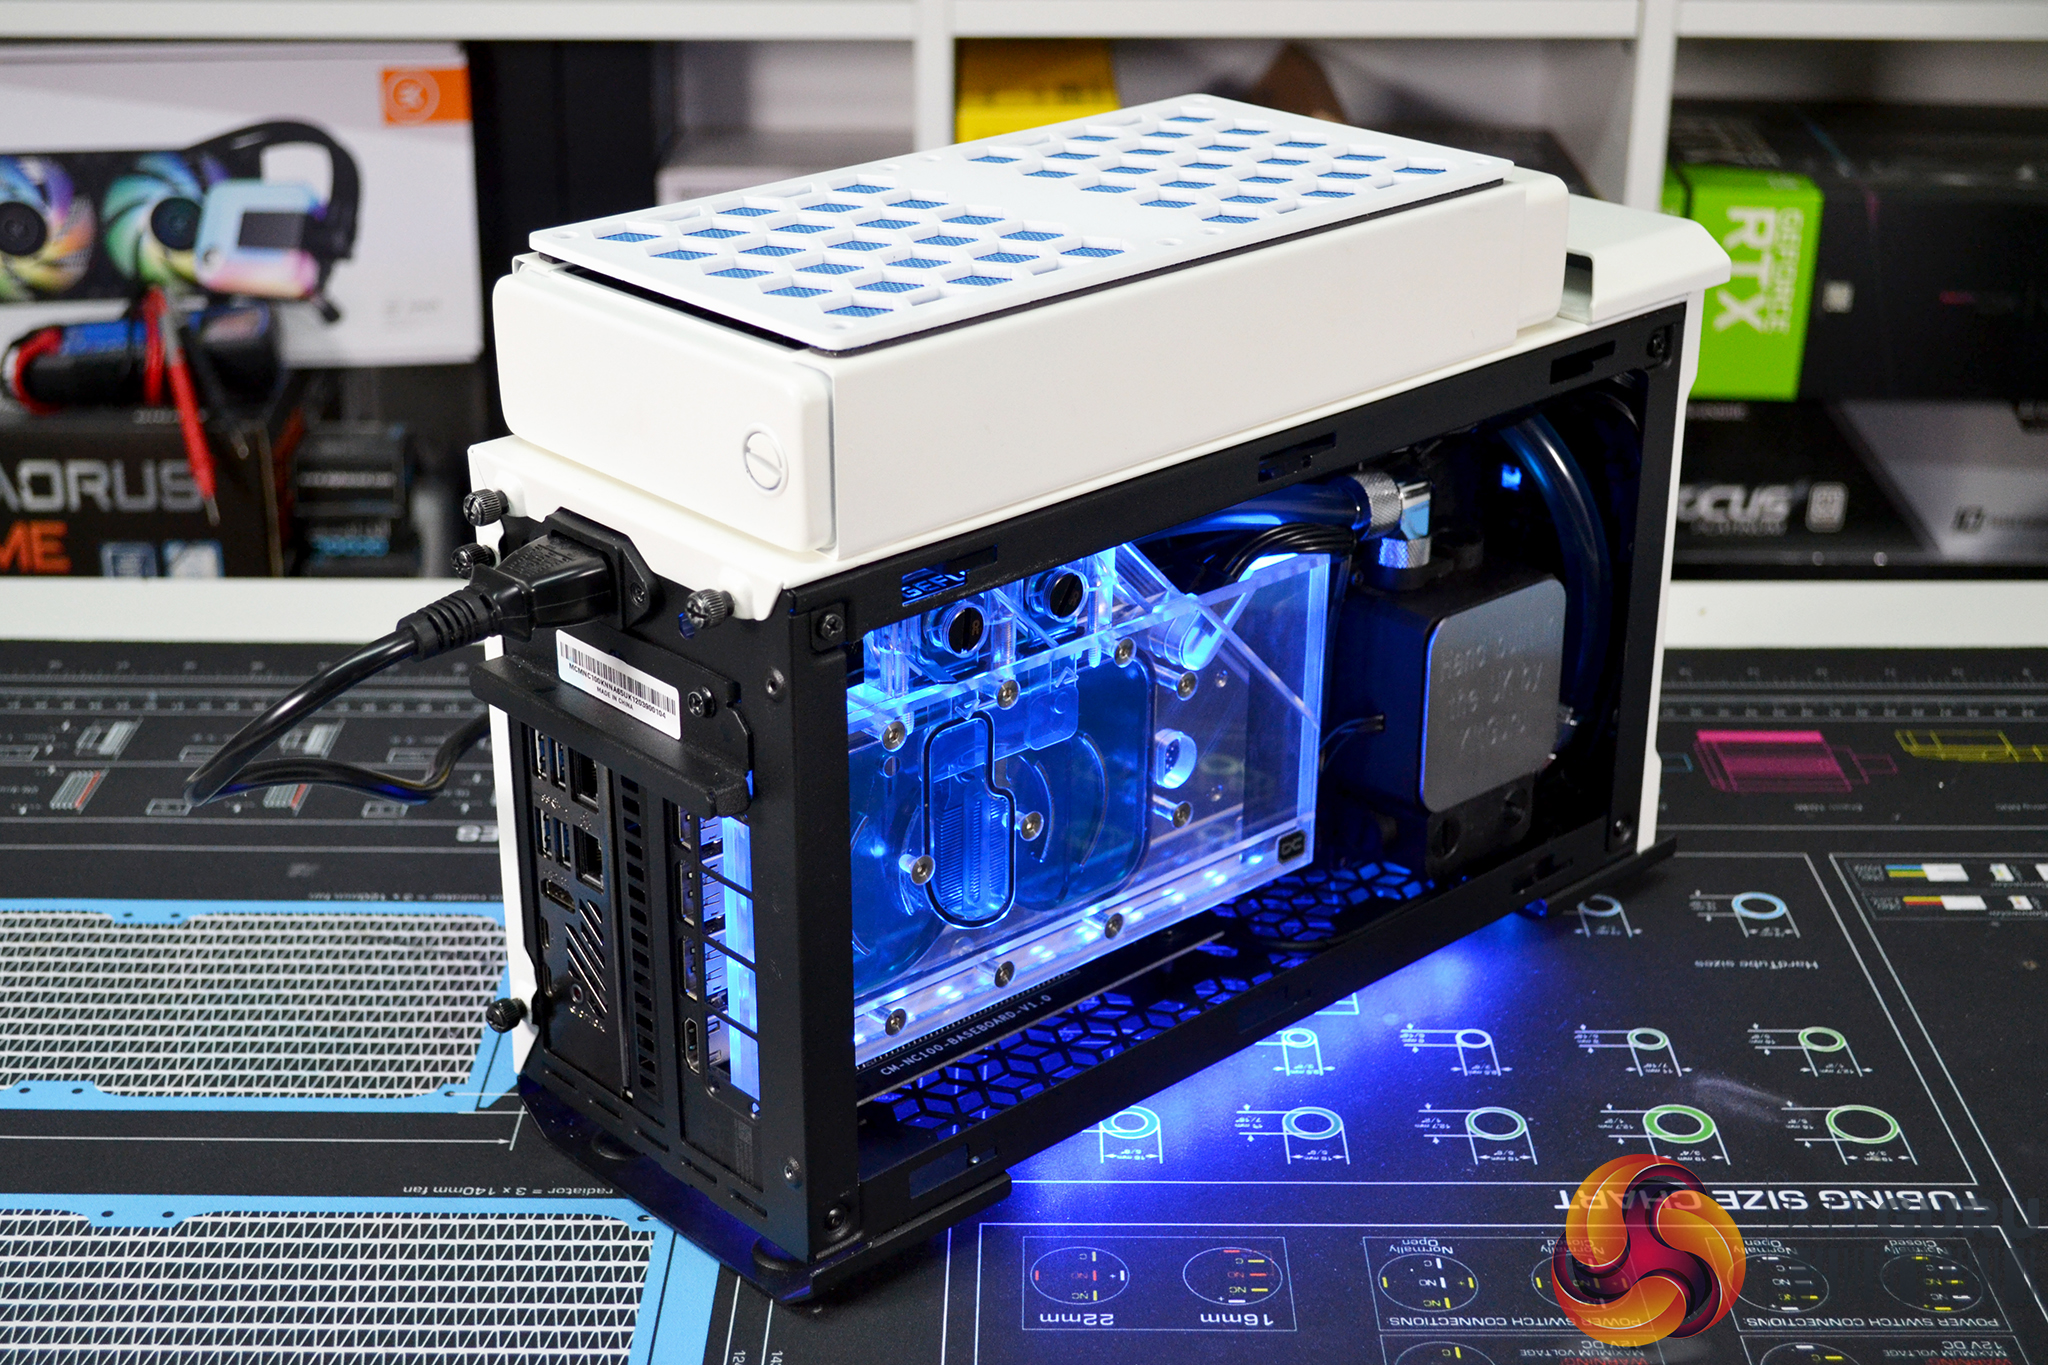
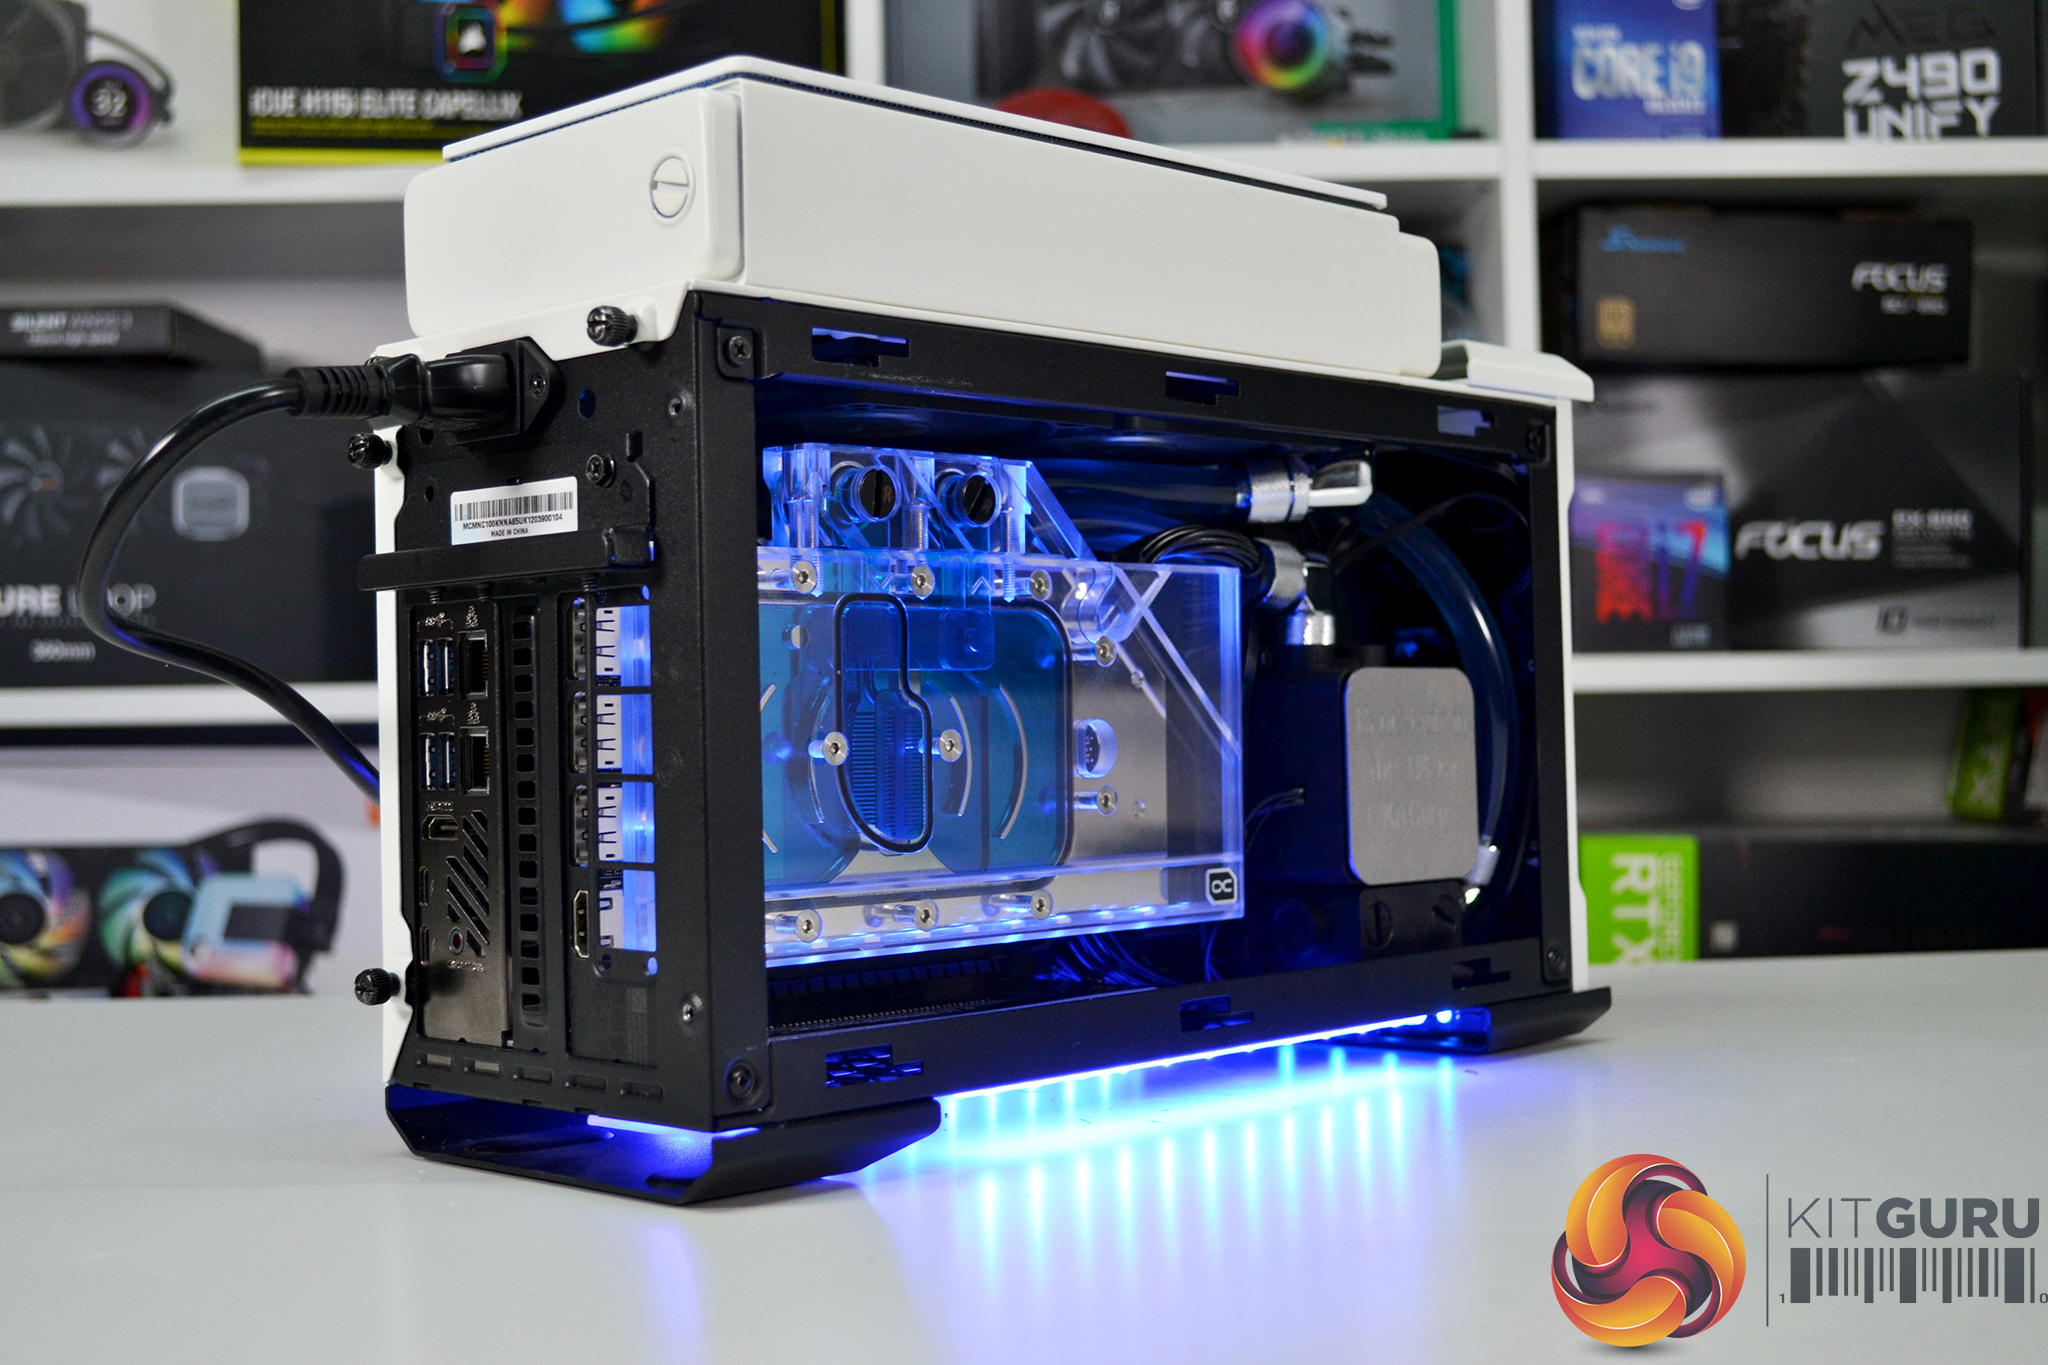
When building a custom system, there are usually wiring mods to be done, which applies to this project too. I made a custom length 12-pin PCIe cable which meant I could do away with that bulky 2 x 8-pin to 12-pin adaptor which neatens the system up significantly. Also, the multi-coloured wires from the Alphacool water DDC pump had to go so I replaced those with custom length black cables. Everything that connects to power now hooks up directly to the PSU so there are no Molex or SATA power cables in sight.
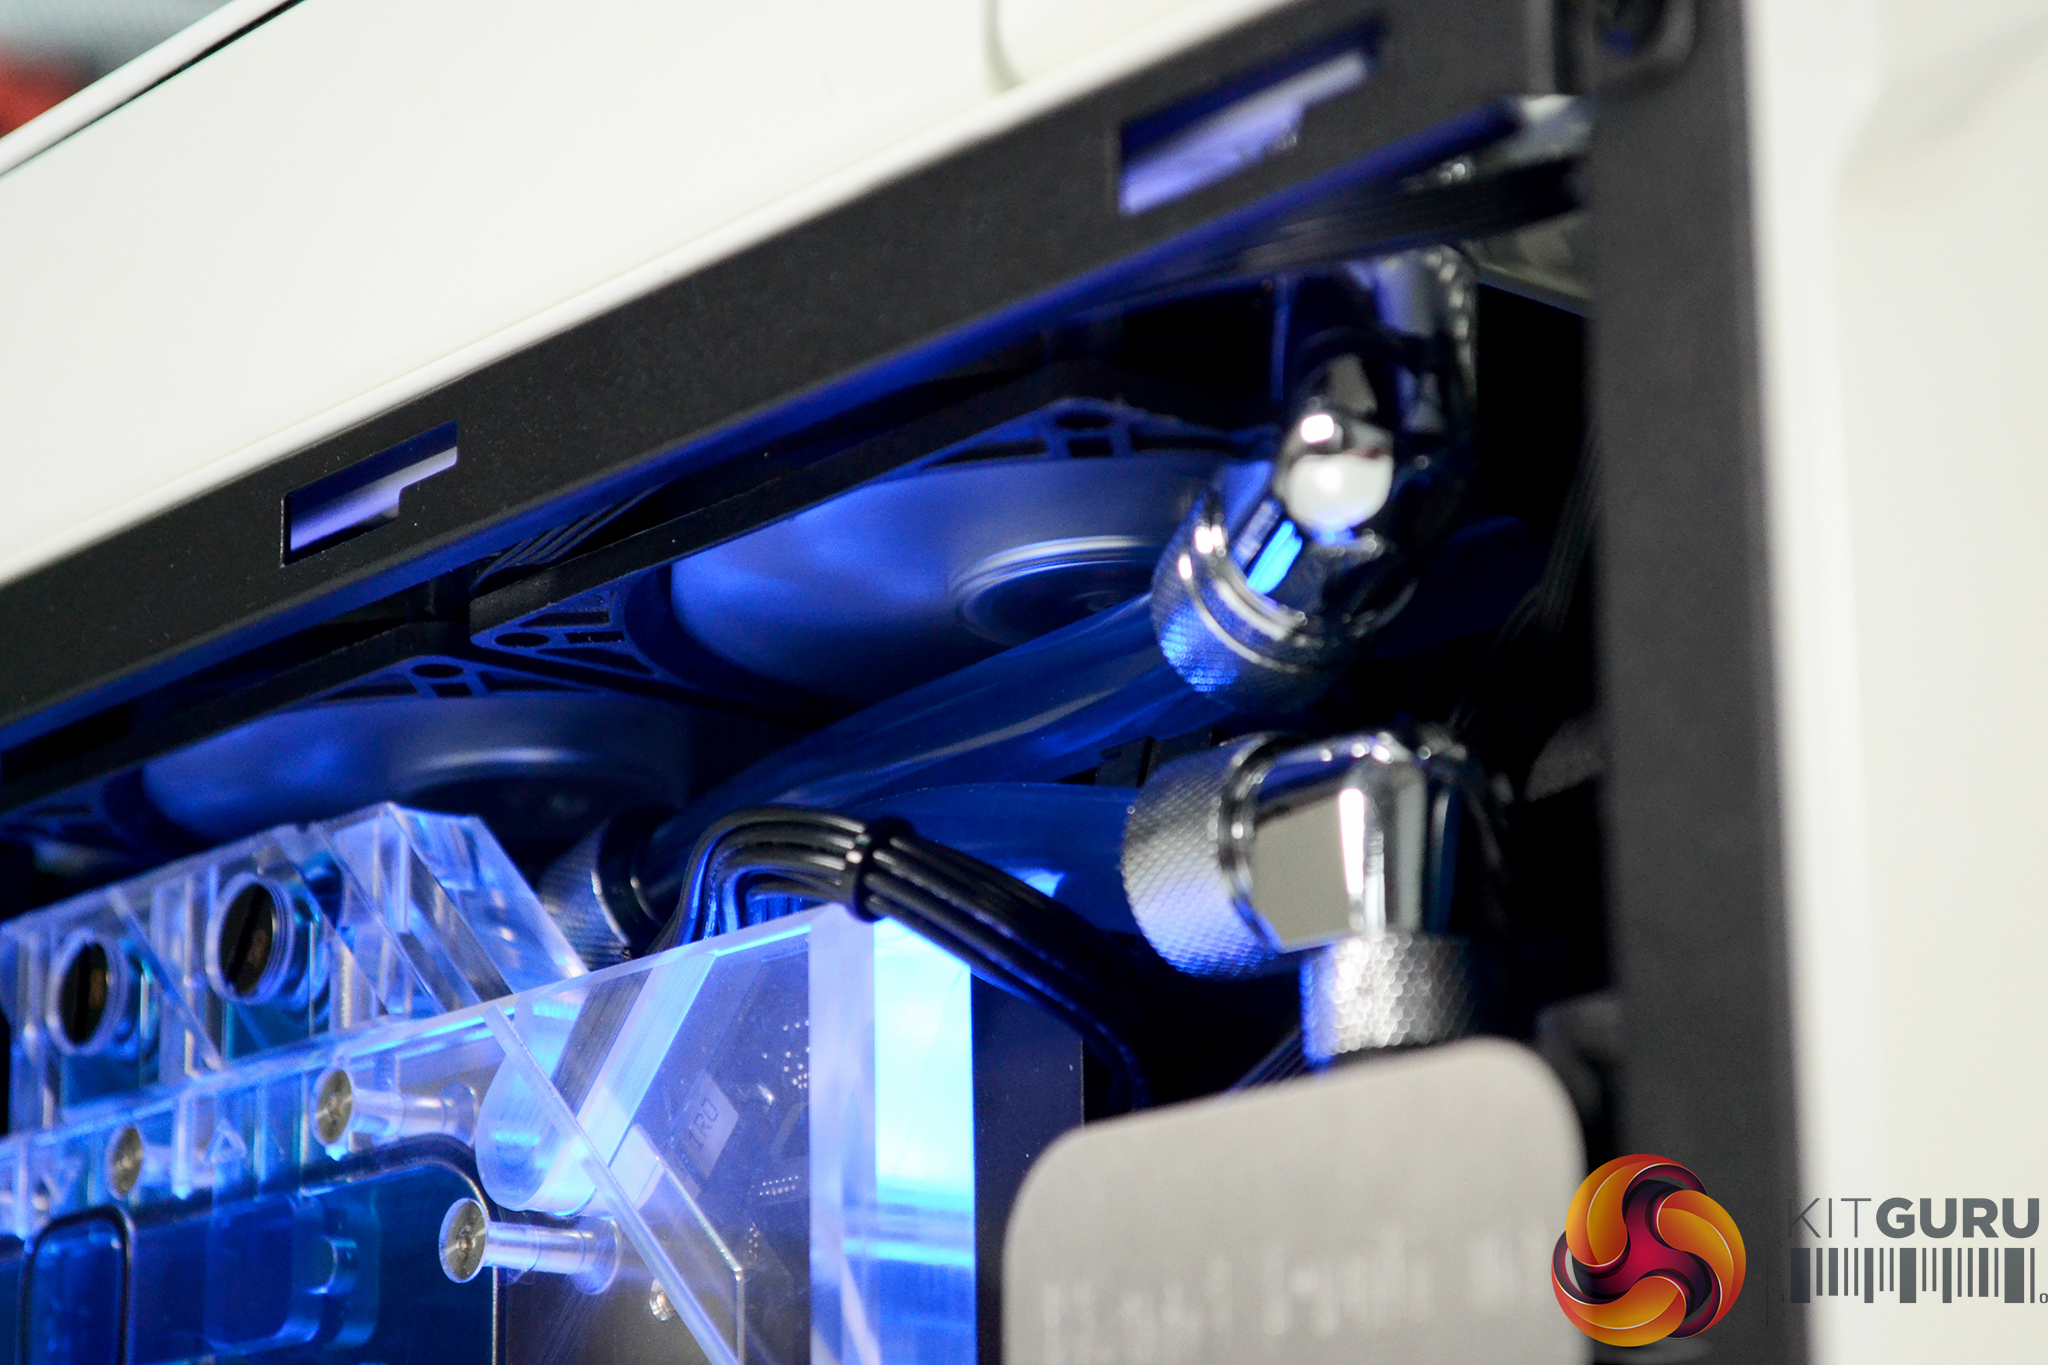
The final mod to the case was to add some custom “underglow” blue LED lighting strips. Once all the mods were completed, it was time to try out or own bespoke NUC 9 Extreme Compute Element copper CPU heat spreader and mounting bracket for the Alphacool CPU water block. The copper heat spreader was bonded to the CPU much like the HIS of a desktop CPU. Our stainless steel CPU block upper mounting bracket fits perfectly and we managed to retain the stock backplate (with a slight mod) and used the stock Alphacool fixings to attach the water block to the Compute element.
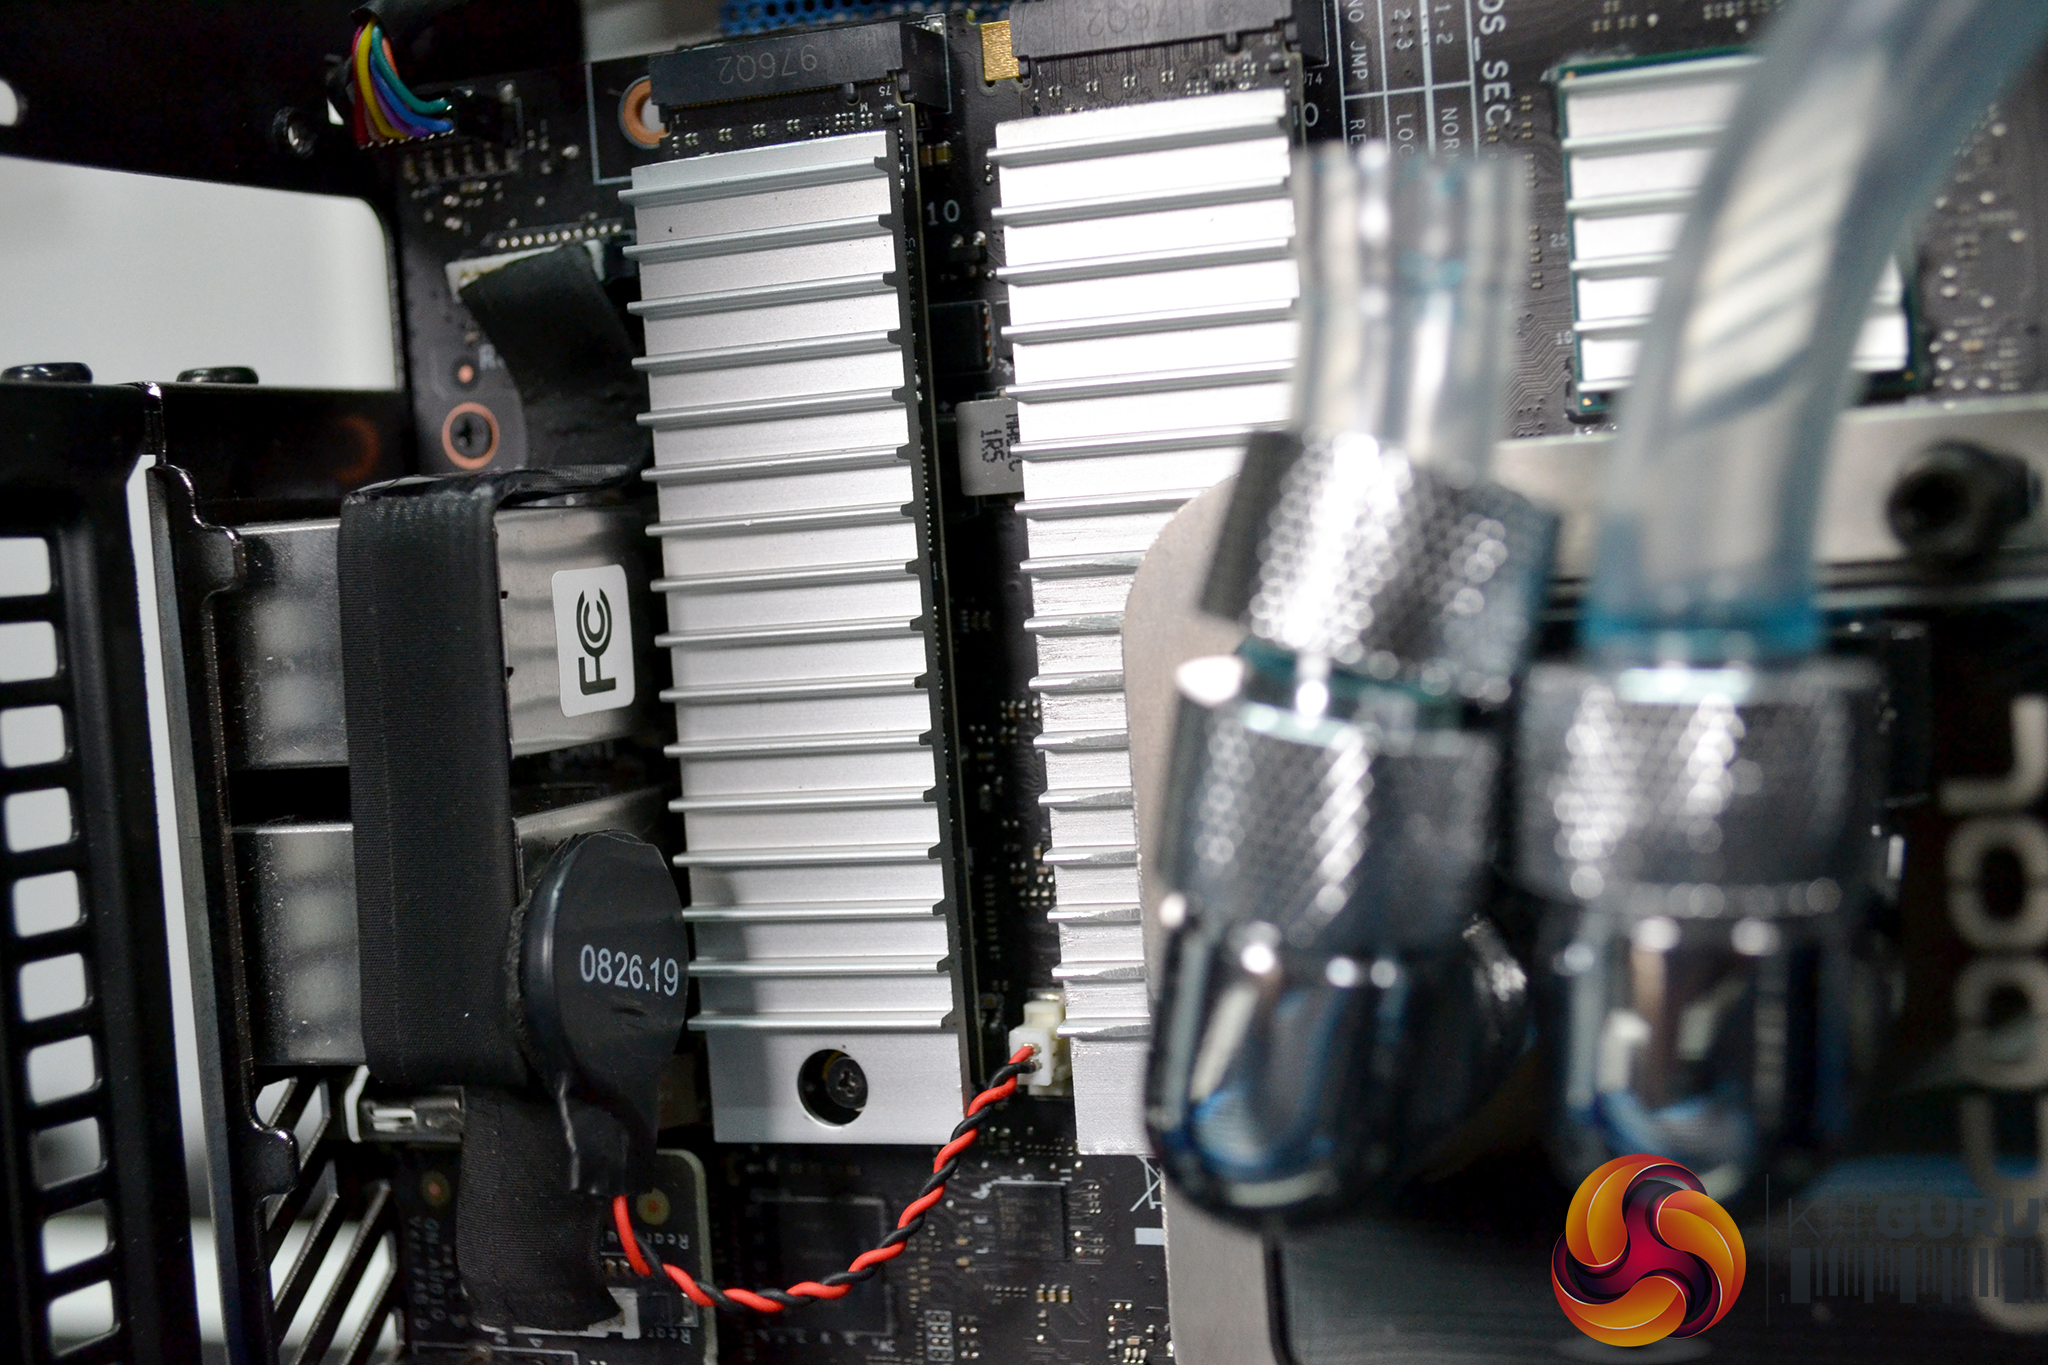
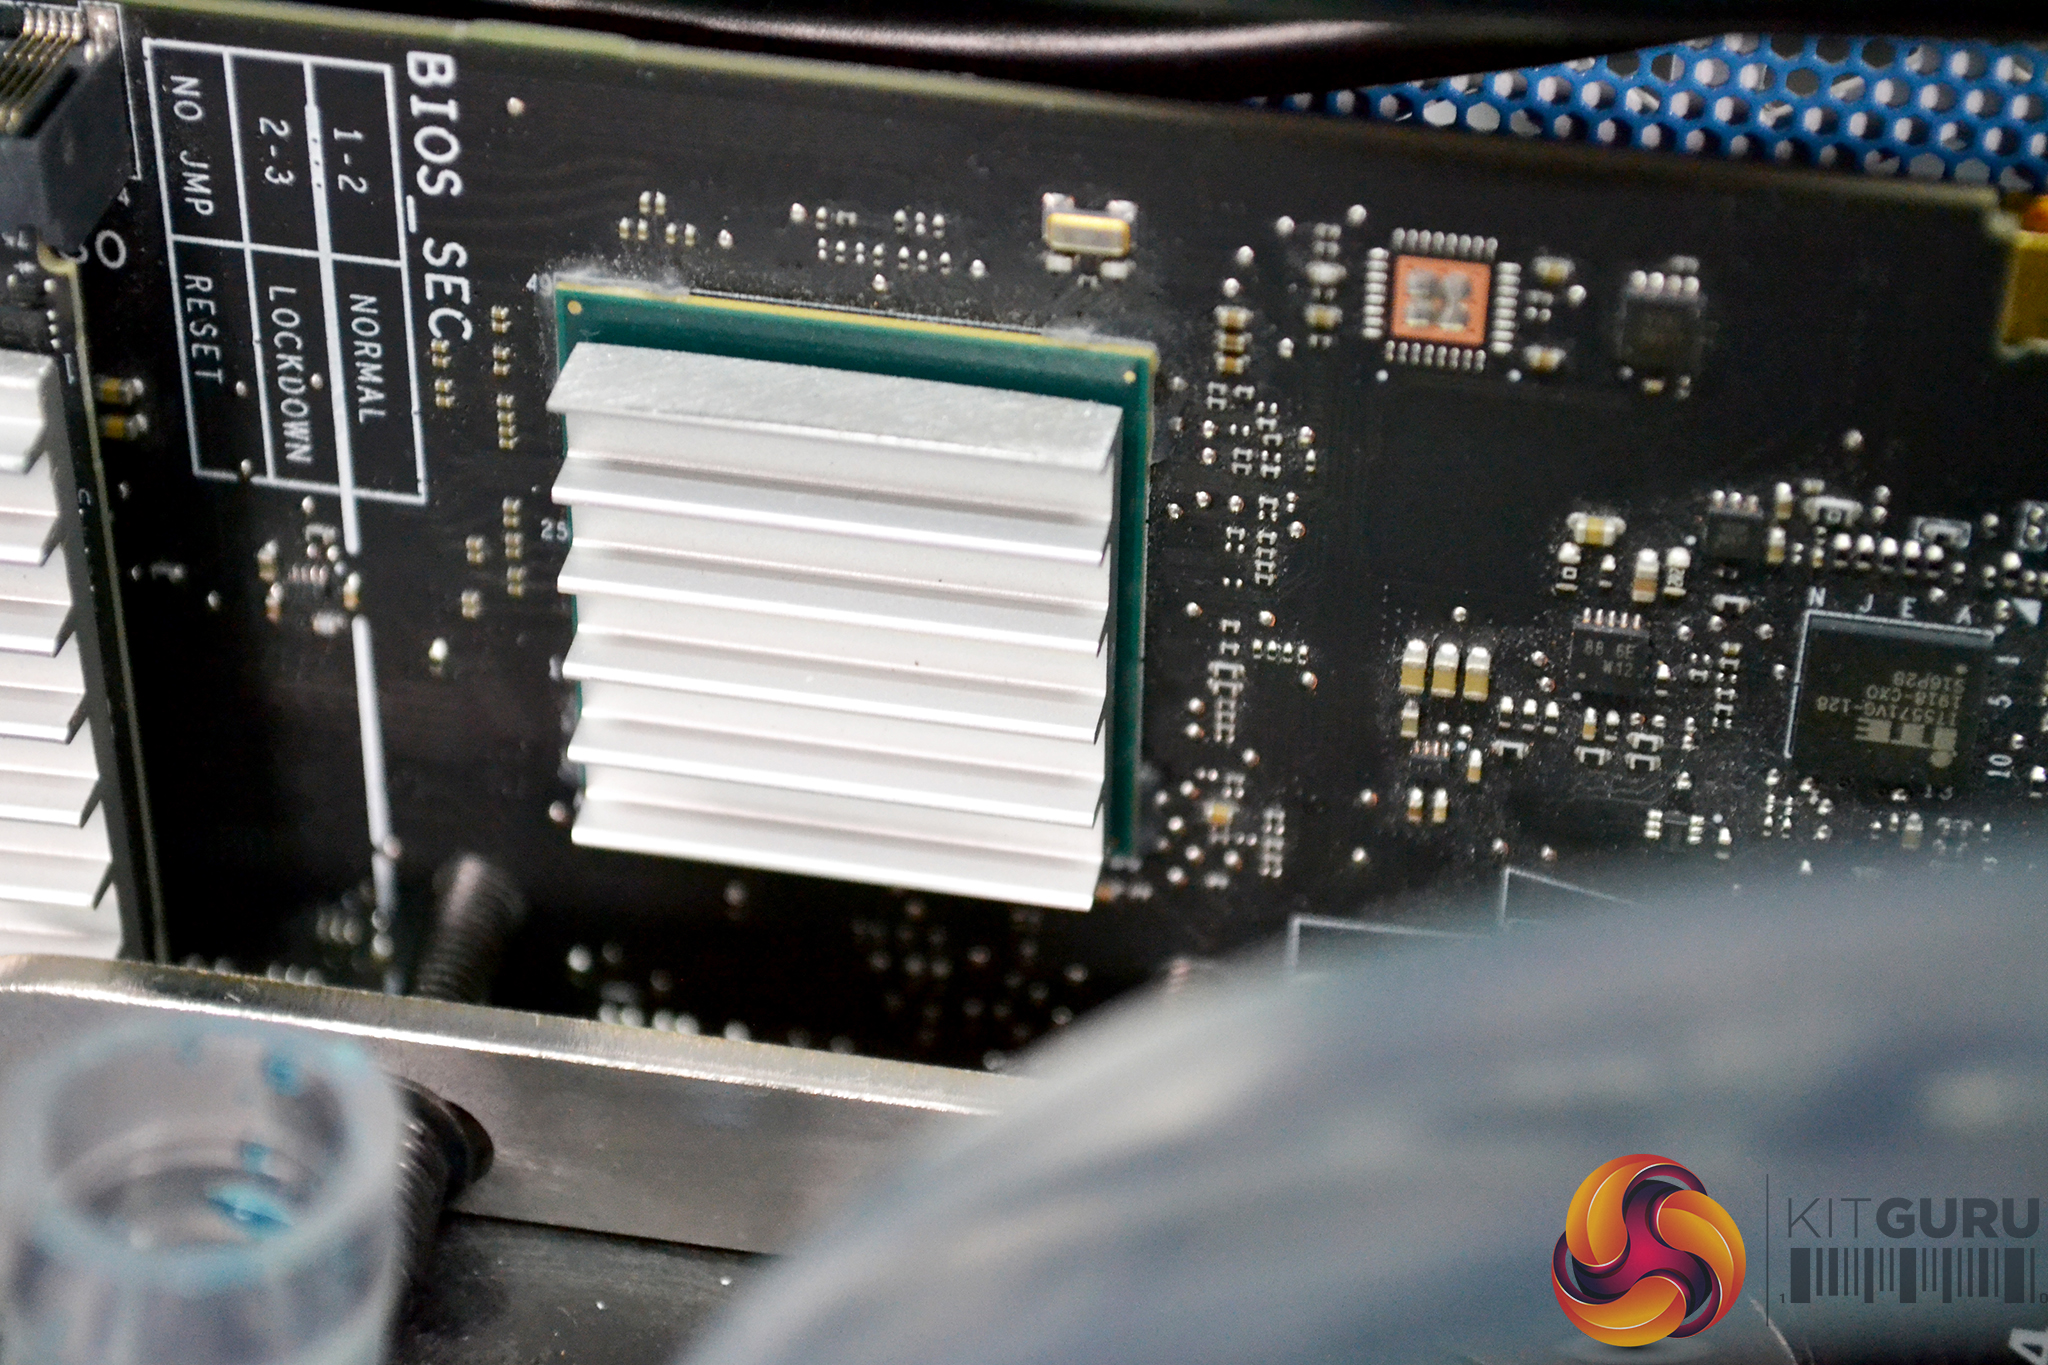
Our custom heat spreader and mounting bracket fit as intended, the stock Intel M.2 heatsinks were modified to fit the system in its new configuration and a leftover piece of aluminium was used to make a small heatsink for the chipset. To help distribute heat evenly across the VRM, we made a small copper heat spreader and then the system was ready to be built up for the final time!

Thermals and Performance Testing
With the system rebuilt in its final configuration, we can move on to the thermal and performance tests. Any temperature readings are presented as delta which means the ambient room temperature has been deducted from the actual component temperature reading. The fan speed of the water-cooled configuration has been adjusted to represent the same noise level as the stock system for a fair comparison.
Test system specification
- Motherboard/CPU: Intel NUC 9 Extreme Compute Element / Core i9 9980HK
- Memory: 32GB (2 x 8GB Modules) Skill Ripjaws DDR4-3200 SO-DIMM
- Graphics Card: Nvidia GeForce RTX 3080 Founders Edition
- 1st Storage Device: 2TB WD Black SN750 PCIe Gen3 x 4 NVMe M.2 SSD
- 2nd Storage Device: 2TB WD Black SN750 PCIe Gen3 x 4 NVMe M.2 SSD
- Case: Modified Cooler Master NC100
- System Fans: 2 x 92mm Cooler Master
- Power Supply: Modified Seasonic Focus SGX-650
Custom cooling hardware:
- Custom copper CPU heat spreader
- Bespoke water block mounting bracket
- CPU water block: Alphacool NexXxoS XP³ Light – Black V.2
- Graphics card water block: Eisblock Aurora GPX-N RTX 3080 FE with backplate
- Tubing: AlphaTube HF 13/10 (3/8″ID) – Ultra Clear
- Fittings: Eiszapfen 13/10mm compression G1/4 – chrome
Thermal testing results and analysis
To kick off the tests we begin with simple thermal performance tests using AIDA64 to determine what, if any improvement has been made over the stock Intel air-cooled vapor chamber solution.
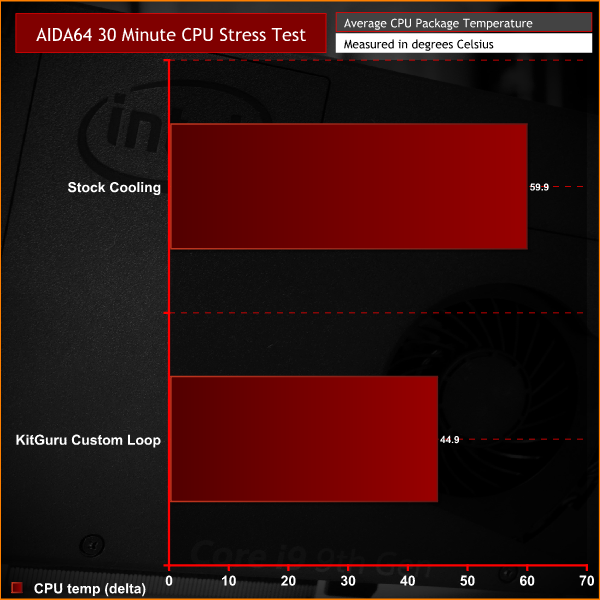
As you can clearly see, our custom water cooling has significantly improved the thermals performance of the Intel Core i9-9980HK CPU with a reduction in the average CPU package temperature of 15⁰C during the 30 minute CPU stress test.
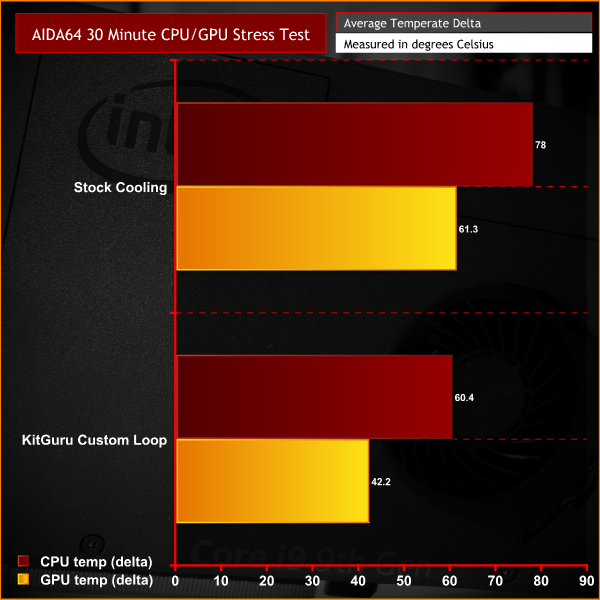
For the second AIDA64 stress test we add the GPU and memory for an analysis of the full system thermal performance using our custom water cooling. With 100% load on both the CPU and GPU, the result is very impressive with a reduction in the temperature of 17.6⁰C (CPU) and 19.1⁰C (GPU) compared with the stock Intel and Nvidia cooling solutions.
Productivity performance
Before running any gaming benchmarks, we took a quick look at how the improved thermals affected system performance and productivity tasks. Since there has been a significant improvement in the CPU temperature, we can run the Core i9-9980HK CPU at a 105W long duration power limit. This was impossible with stock cooling as the CPU would quickly reach the 100⁰C temperature threshold and throttle the frequency.
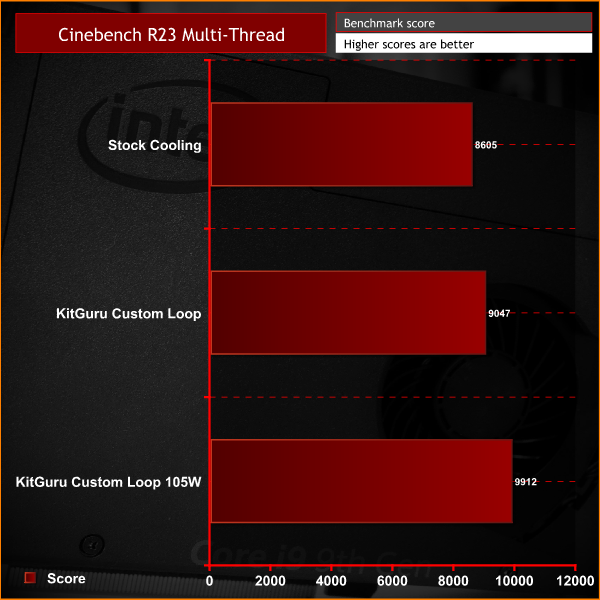
There is a noticeable uplift in Cinebench R23 benchmark performance with the CPU water-cooled. Even at the stock 65W long duration power limit, Cinebench R23 benchmark records an increase of 442 Multi-thread points and a notable 15% (1,307 points) performance increase with the sustained CPU power limit at 105W.
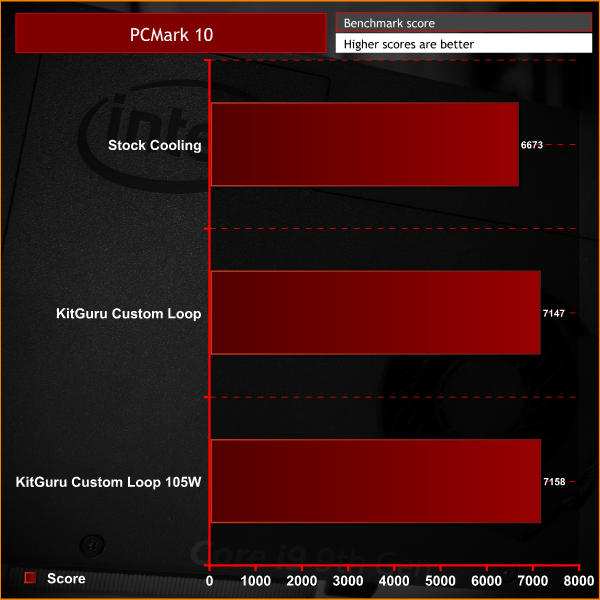
PCMark 10 benchmark shows an increase in performance with the system water-cooled but still in the 65W sustained CPU power mode, at 105W the increase in performance isn't as impressive as Cinebench but it still shows that water cooling the CPU improves overall system performance.
Gaming performance
At the beginning of this project, the aim was to finish with a tiny form factor genuine high-end gaming PC that was fully water-cooled, and one that would perform better than stock. To test whether the idea was successful, we ran a series of gaming benchmarks using built-in benchmark tools as well as running 3DMark benchmarks both before and after water cooling to compare performance.
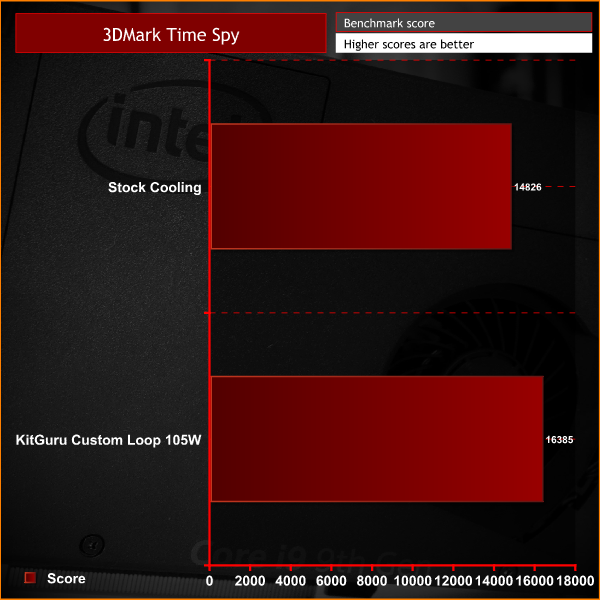
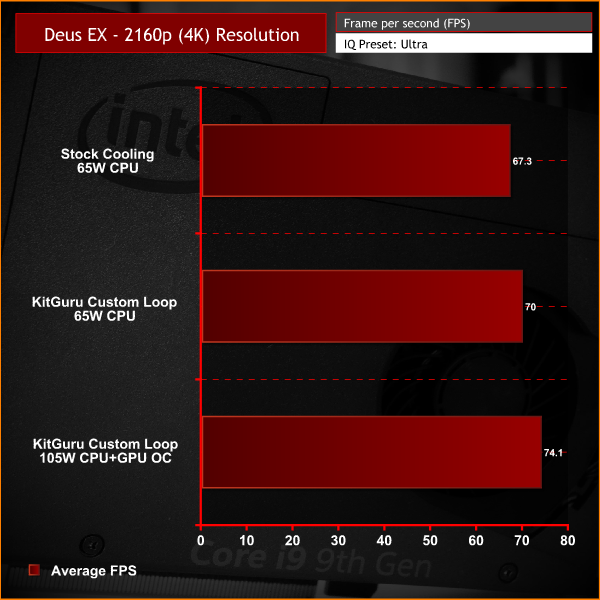
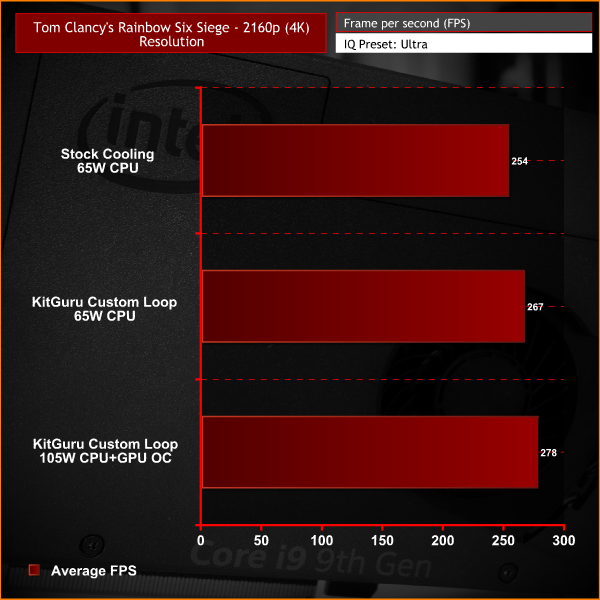
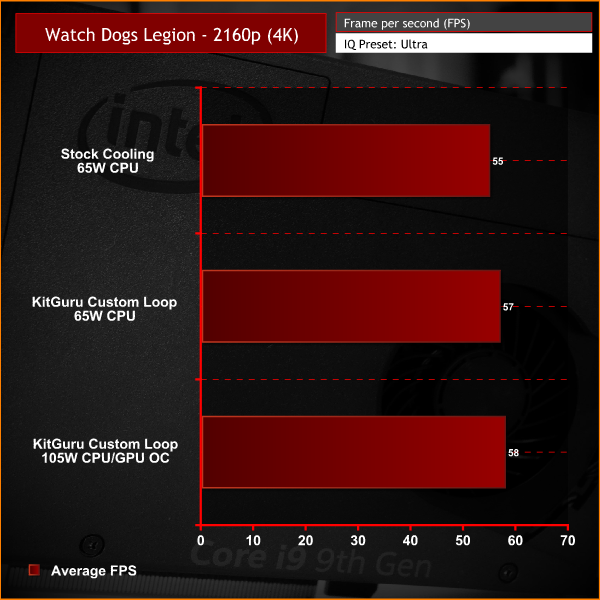
Because the custom water cooling has significantly improved thermals of the CPU and GPU, as well as the 105W CPU power mode, we added an overclock of 100MHz core frequency and 500MHz memory to the GPU. With the stock CPU and GPU cooling, overclocking the system increased temperature very quickly which reduced performance due to the dynamic way that the Nvidia core frequency works.
However, with the GPU and CPU water cooled this was no longer an issue and in some titles, such as older fast-paced multiplayer games like Tom Clancy’s Rainbow Six Siege, we saw up to 10% improvement to average FPS. The performance increase in newer games, such as Watch Dogs: Legion, wasn’t as high but still, a 5% FPS increase at 4K (2160p) resolution is not to be sniffed at.
Closing Thoughts
At the beginning of this project, we were quietly confident that our custom NUC 9 Extreme Compute Element water cooling would be a success to a certain extent, but we were pleasantly surprised with the final results which made all the hard work and effort that we put into the project worthwhile. The reduction in temperature and the performance boost in productivity and gaming was very rewarding for us to see.
As we all know, water cooling has its advantages and this was certainly shown here. The only downside to it is that we couldn’t quite fit all of the water cooling components inside the chassis which would have been the perfect outcome. Nevertheless, once the case was painted and modded, the externally mounted radiator didn’t look too much out of place and it is something I could probably live with due to the significant reduction in system temperature and the performance boost that it brought.
Before starting this project, I had not really explored small form factor systems in any detail, I had built the odd mini-ITX system in the past but this project really opened my eyes to how much systems can be shrunk down in size these days but still pack an awesome punch when it comes to performance in both productivity and gaming.

The improvement we saw in productivity meant that this system was genuinely on par with some high-end desktop systems I have worked on. It would make the perfect partner for someone that needs a true high-performance system for maybe editing photos or video on the go and could be easily connected to a hotel TV or portable monitor to enjoy some gaming while away on business trips or holidays even.
In terms of the gaming performance, this is a very capable machine. Our tests at 4K resolution showed the Watch Dogs: Legion benchmark almost hitting an average 60FPS at 4K with the Ultra graphics preset – something that is even difficult to achieve on some high-end gaming desktops, which is very impressive from a tiny form factor system such as this.
Find out more here:
INTEL INNOVATION: intel.com/innovation
VISIT INTEL: https://www.youtube.com/channel/UCk7SjrXVXAj8m8BLgzh6dGA
VISIT INTEL TECHNOLOGY: https://www.youtube.com/channel/UC_9tBCeHdBG13If451X7FRw
GHOST CANYON: https://simplynuc.co.uk/ghost-canyon/
SCAN: https://www.scan.co.uk/shops/intel/ghost-canyon-nuc
EBUYER: https://www.ebuyer.com/store/Components/cat/Barebones/Intel
KitGuru says: This is where the Intel NUC 9 Extreme water cooling project comes to an end. It's been exciting and eventful and has taught me a lot about how to use the available space inside a small form factor chassis like this. Would you guys be interested in building a NUC 9 based system in the future? if so, would you go down the water cooling route too?