


If you are fortunate enough to have bought a new AMD graphics card, then today's review will be of particular interest. Arctic have just released a cooling solution which is compatible with the new range of AMD graphics cards, including the latest award winning HD7970 and HD7950. The idea is simple – replace your cooler and benefit from reduced noise and temperatures.
AMD have worked hard to enhance their reference cooling solution, and while their latest coolers for the HD7970 and HD7950 are a noted improvement, they still lag behind third party solutions from companies such as XFX and Sapphire.
The ARCTIC Accelero Xtreme 7970 should be a further step up from even these cooling solutions, offering the best performance available on the market.

| Max. Cooling Capacity | 300 Watts |
|---|---|
| Heatpipe | Ø 6 mm x 5 |
| Heatsink Material | Aluminum fins x 84, thickness 0.3 mm |
| Fan (mm) | 92 mm, 900 – 2,000 RPM (controlled by PWM) x 3 fans |
| Bearing | Fluid Dynamic Bearing |
| Noise Level | 0.5 Sone |
| Current, Voltage | 0.12A / 12V |
| Power Consumption | 4.32W |
| Dimensions (Product) | 288 (L) x 104 (W) x 54 (H) mm |
| Net Weight | 653 g |
| Limited Warranty | 6 years |
| Accessories | |
| Heatsink | 31 pcs |
| Screw (M2) | 4 pcs |
| Spacer (3.0 mm) | 4 pcs |
| Spacer (3.5 mm) | 4 pcs |
| Insulation Tape | 5 pcs |
| G-1 Thermal Glue (2.0 g Grey Compound) | 1 bag |
| G-1 Thermal Glue (2.0 g White Compound) | 1 bag |
| Mixing Wand | 1 pc |
| 4-Pin Fan Power Adapter | 1 pc |
| VGA Bracket | 1 pc |
| GPU Back Plate | 1 pc |
| EVA Foam | 1 pc |
| itemnumber | DCACO-V15G300-BL |
| UPC | 0872767005617 |
| Gross Weight | 1.6 kg |

The ARCTIC Accelero Xtreme 7970 arrives in a tough plastic container which fully exposes the product to the customer. Nice idea for a retail store.


The package contents are extensive, with all the necessary heat sinks, backplate, cables, spacers and thermal glue needed for installation. Surprisingly there was no user manual supplied and after checking with ARCTIC, they told us that this packaging is ‘green', so the instructions have to be downloaded directly from their website.
I really think this is a problem for some customers, especially as the installation of this cooler isn't a straightforward 5 minute process. Arctic should at least supply a little sheet of paper with a URL link. As it stands, the customer has to find the product on the Arctic website then locate the PDF file for download. We will look at the installation in more detail, shortly.
The ARCTIC Accelero Xtreme 7970 Cooler supports:
| Series | Chip |
|---|---|
| 7000 |
7970,
7950,
7870,
|
| 6000 |
6970,
6950,
6870,
6850,
|
| 5000 |
5870,
5850,
|
It is worth pointing out that ARCTIC highlight the cooler may not fit on some modified board layout configurations. The table above only applies to AMD's reference board designs.


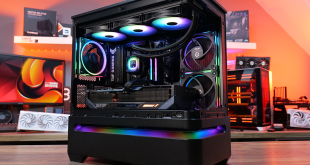
The cooler itself is constructed from tough plastics and metal. It is capable of handling up to 300 watts of heat. It is based around 5 x 6mm heatpipes which link into 84 aluminum fins, with a thickness of 0.3mm each. The three ARCTIC branded fans are 92mm and run at a maximum of 2,000 rpm. They are PWM controlled. The fans are fluid dynamic bearing and require 4.32W of power.
The cooler measures 288mm (L) x 104mm (W) x 54mm (H) and weighs 653 grams.


The construction of the cooler is up to ARCTIC's usual standard, which we rate as excellent.

As we mentioned earlier, we were slightly disappointed to see that ARCTIC didn't include any installation instructions in the box. This means the customer has to head over to ARCTIC's website, locate the product then locate the PDF download from the support/download section of their website. It really isn't ideal.


The first step is to remove all the screws from the back of the HD7970 as shown above. We are using a reference, engineering sample AMD HD7970 for this review today.

Don't forget to remove any screws on the I/O panel, which may hold the reference cooler in place.


When all the screws are removed, carefully pull the PCB away from the cooler. Don't apply too much pressure on one corner of PCB, or it could snap. Its highly unlikely, but I suggest pulling apart gently from the center, then prising the ends apart if the card is unwilling to separate.


Clean the thermal paste from the GPU core with a soft cloth, or tissue.
The following step can be important, because later we need to adhere heatsinks to various parts of the card. if all of the previous ‘gunk' is not removed from the surface, then the glue won't adhere properly. We suggest using an eraser to clean the components, as shown above. It can take 10 minutes or so, but is well worth the time. Try not to rub your finger over all the components unnecessarily as static could (in theory) damage some of the components.

ARCTIC include some insulation tape with the card, which you can place over some of the components as shown above. This can protect against short circuiting.


ARCTIC include a pad of foam which protects the rear of the PCB against the proprietary backplate. One side of this contains a strip of adhesive Mylar film, which attaches to the backplate. If you adhere the pad to the PCB then it can be slightly more difficult moving the backplate around to line up the mounting holes.


The next step is to locate the cooler spacers and screws. Set these to the side carefully. The HD7970, 7950, 7870, 7850, 6970, 6950, 6870, 6850, 6790, 5870, 5850 and 5830 only need the 3mm white spacers shown above.


Flip the cooler over to expose the mounting base. Be careful not to touch the base directly as ARCTIC pre-apply thermal paste here. Locate the four white spacers and use the adhesive tape to stick them onto the mounting plate as shown above. The correct hole to use is the inner most of the three grouped holes. Not the one at the very inner position, on its own. Double check that the spacers are correctly positioned, while looking directly down at the head of the base.
They can be moved a little by hand without coming loose. Note, that if these aren't mounted correctly at this stage, then the screws won't feed through properly, and lock from the back of the graphics card PCB.


The next stage is to remove the mounting plate on the graphics card. Simply unscrew two screws holding it in place. Hold the screws in a secure place for a few minutes.

Place the plate over the center of the card, above the GPU Core. This can be used as a visualisation before mounting heatsinks to the graphics card. You will notice that the memory chip at the very bottom of the card won't accept a full sized heatsink, or it will block the mounting of the cooler plate, from above. The mounting plate can be reattached now, back in place for the next stage.


ARCTIC supply two packets of adhesive compound, which have to be mixed together, one is white and the other gray. We used one of the plastic sections of the shipping container to mix. Make sure to squeeze both bags thoroughly. ARCTIC include a ‘magic wand', which is basically a plastic spatula for mixing and applying the thermal glue.

The compound has to be mixed by hand for 5 minutes. It is important to time this fairly accurately, otherwise it won't work as well as it should. After this is done, then you need to wait for a further 15 minutes before applying the thermal glue to the heatsinks.

ARCTIC state in their instructions to apply the thermal glue generously to the components on the card. I have to admit I felt happier applying the glue to the bottom of the heatsinks directly. This means it is less likely to get all over the card.

Above, the heatsinks glued in place. Note the smaller heatsink on the bottom memory chip, positioned at the outside. As we explained earlier this is to ensure the cooler mounting plate won't get obstructed.


Various parts of the card can accept heatsinks, as shown above. Be careful when positioning the heatsinks as some of the surface areas are very small. Again we always applied paste to the bottom of the heatsinks, rather than directly to card components as stated in the instructions. It leads to a cleaner install.

Every PCB design will be slightly different, but our reference HD7970 looked like the above, when finished. At this stage you need to wait for a further 5 hours for the glue to completely dry. We left the card overnight and it was ready in the morning.


Carefully line up the PCB with the cooler mounting plate, ensuring you don't hit against any of the heatsinks on the memory (take your time closing the base in). Then feed the screws from the backplate through from the back of the card, to the front and into the mounting plate as detailed earlier. This can take a few minutes.
As a last minute precaution, ensure you adhered the foam pad to the ARCTIC back plate before screwing it, otherwise you can fry the card.


Don't forget to attach the fans to the power connector, or use a molex cable with the ARCTIC adapter.

Finally mount the cooler by screwing in alternatively. So screw A first (3 rotations) , then follow with B, then C, then D. Repeat until they are all in tight.
Overall, this certainly isn't an easy process for an inexperienced enthusiast user, but if you take time and follow all the steps carefully, the card can be ready for action next day.
On this page we present some super high resolution images of the product taken with the 24.5MP Nikon D3X camera and 24-70mm ED lens. These will take much longer to open due to the dimensions, especially on slower connections. If you use these pictures on another site or publication, please credit Kitguru.net as the owner/source. You can right click and ‘save as’ to your computer to view later.


Today we are testing the card in a Intel Core i7 990x system, which is CPU watercooled and running at 4.8ghz. Room temperatures were maintained at 23c throughout.
Test System:
Processor: Intel Core i7 990x @ 4.8ghz.
Cooler: Danger Den Watercooling.
Motherboard: Asus Rampage III Black Edition.
Memory: 12GB GSKILL 2133mhz Memory.
Power Supply: Corsair AX1200W.
Hard Drives: Patriot Pyro 120GB & 2TB Samsung hard drive.
Optical Drive: Asus BluRay drive.
Graphics: AMD HD7970 with reference cooler and ARCTIC Accelero Xtreme 7970 Cooler.


The cooler is significantly better than the AMD reference solution, as expected. The idle temperatures drop from 36c to 30c, and when gaming, they drop from 79c to 60c. Very noticeable differences.

AMD reference coolers take some time to return the core to idle temperatures, often a couple of minutes, or more, depending on the environment. The ARCTIC Accelero Xtreme 7970 returns the HD7970 core to idle within 30 seconds. The reference AMD cooler takes 75 seconds to perform the same task. Bear in mind that the variables between the coolers at the same moment in time are often 20c+.
We have changed our method of measuring noise levels. We have built a system inside a Lian Li chassis with no case fans and have used a fanless cooler on our CPU. We are using a heatpipe based passive power supply and an Intel SSD to keep noise levels to a minimum. The motherboard is also passively cooled. This gives us a build with completely passive cooling and it means we can measure noise of just the graphics card inside the system when we run looped 3dMark tests. Ambient noise in the room is around 20-25dBa. We measure from a distance of around 1 meter from the closed chassis and 4 foot from the ground to mirror a real world situation.
Why do this? Well this means we can eliminate secondary noise pollution in the test room and concentrate on only the video card. It also brings us slightly closer to industry standards, such as DIN 45635.
KitGuru noise guide
10dBA – Normal Breathing/Rustling Leaves
20-25dBA – Whisper
30dBA – High Quality Computer fan
40dBA – A Bubbling Brook, or a Refridgerator
50dBA – Normal Conversation
60dBA – Laughter
70dBA – Vacuum Cleaner or Hairdryer
80dBA – City Traffic or a Garbage Disposal
90dBA – Motorcycle or Lawnmower
100dBA – MP3 player at maximum output
110dBA – Orchestra
120dBA – Front row rock concert/Jet Engine
130dBA – Threshold of Pain
140dBA – Military Jet takeoff/Gunshot (close range)
160dBA – Instant Perforation of eardrum

Very impressive results, lowering the noise from ‘clearly audible' to ‘whisper quiet' when gaming. The enthusiast audience are going to love this cooling system, especially if they are sensitive to fan noise.
If you have just purchased a brand new HD7970 or HD7950 then this cooler will be particularly interesting. The ARCTIC Accelero Xtreme 7970 is an exceptional cooling solution, often running with a 20c lower overhead than the reference solution. It is worth bearing in mind that even if you own an older AMD graphics card such as the 6970, 6950, 6870, 6850, 6790, 5870, 5850 and 5830, then this cooler will work fine.
It is not just the cooling performance that is improved however, the noise emissions are significantly lower, especially when gaming. The Accelero Xtreme 7970 is unlikely to be heard at all inside an enthusiast chassis, unlike the reference AMD card, which is clearly audible when tasked. The three fans spin slowly, generating a high level of airflow with minimal noise emissions.
The build quality is up to the standard we would expect from ARCTIC, and the bundle is extensive. The only extras you need are a screwdriver, eraser and a lot of time. This leads me into the only real negative I can mention. The install procedure is lengthy and not ideal for an inexperienced user. It doesn't help that ARCTIC decided to make the lengthy install support literature available only online, which adds a little to the confusion.
If you are very inexperienced and have just bought a new video card, then we would be surprised if you would feel happy following the long drawn out install procedure, highlighted earlier in this review. This really is a shame, because the end result is fabulous and well worthy of the time involved. The purchasing decision will really fall down to the individual, anyone with confidence and experience won't have a problem following the fitting procedure.
Just be aware that once you start fitting the cooler, there will be at least a 6 hour time frame when you can't use the card. This is the minimum time for the install and then for the glue to completely dry. I would recommend a mid afternoon start, with the goal of using the system again in the morning.
It is a great cooler, and the design, and attention to detail is first class. It just might be a little complex for some people.
You can buy the ARCTIC Accelero Xtreme 7970 Cooler direct from ARCTIC over here for $97.95.

ARIA in the UK also stock ARCTIC products over here. No listing yet for the Accelero Xtreme 7970, but it might appear shortly.
Pros:
- Fantastic end result.
- Quiet.
- 20C+ cooler than reference cooling solution.
- Great build quality.
Cons:
- No instructions in the box.
- Quite expensive.
- Fairly length and complex install procedure.
Kitguru says: If you want the ultimate air cooling for your AMD graphics card, this is about as good as it gets.

wow thats wicked!
Excellent, but boy thats expensive, about £70 when it hits in UK I reckon!
Its a great video card, but im not sure about that install, seems to take forever and im not that confident. was going to get a 7950, but I might just opt for a sapphire card which has a good cooler already. ill probably kill the card completely
Hi, I just installed all the heatsinks on mine card, except this one: http://i.imgur.com/Iyr2N.jpg
Do I need to install the last one to the blank slot aswell or not? Seems like you’ve put it in but I’m wondering if it may cause some kind of conflict.
Hey. Nice review, though I got a question. I got the cooler today aswell, I’ve put all the heatsinks except this one http://i.imgur.com/Iyr2N.jpg because seems like mine board does not have a component and neither does your. Do I still need to put it there?
The installed cooler pics seem to show the weight of the heatsink bending the plastic cooler, did you have another pic of it in the case? The design worries me as it puts all the weight to one side and when installed I imagine that could look pretty precarious.
I have the Artic Cooling Accelero Twin Turbo II. The smaller 250 watt two-fan version of this cooler for my Sapphire Flex 6950. I agree that the install seems very hard, but there are two thing s you can do to make things easier: 1) get an eElmer,s glue stick ( glue in a lipstick type container ) 2) get some Artic Silver or other brand thermal adhesive glue. Artic Silver’s glue dries in 3 minutes, not 5 hours.
The stupid little washers that go between the card the spacers are a monumental pain in the butt. If you have the glue stick, you will be able to use it to attach the washers you screw up because their glue sticks to your fingers before you get the washer to your card. You will see what I mean. I got two done right and used the Elmer’s on the other two. It made no difference. The Elmer’s only has to hold the spacer to the washer until the cooler is finally attached to the card. I tried gently moving the spacers and couldn’t tell which had the original glue and which had the Elmer’s, they were all stuck just fine. If you go with Artic Silver epoxy, realize it is permanent. This might scare you, but when you realize that you would have to be a complete moron to not be able to fit the perfect sized heat sink to the ram chip, your blood pressure will go down. I guarantee you can do it and you will still have 3 minutes to to make any minor adjustments to make your heat sinks line up with laser precision. I knocked 11C off my idle and 18C of my load ( Heaven DX11- GPU maxed ). The original sapphire cooler was quiet, but didn’t cool anywhere near the reviewed specs. My system is in a Silverstone Raven II case ( 3 180mm fans on the bottom firing up), so there were no excuses for the poor cooling performance of Sapphire’s original cooler. The Artic Cooling GPU coolers are excellent and well worth the effort.
just ordered one, looks great.
At last they included a set of heatsinks, the last coolers they launched didn’t and the VRMS got too hot.
@ Yopa – I just followed the instructions for the 7970, but I dont think you need that heatsink really in that position as you say.
@ Omegared – its actually pretty secure, but there will always be a little bit of movement as the cooler is basically only secured with 4 screws from the back.
Just bought one today, looking forward to getting it 🙂 will use the review for the install, thanks !
Bought one this morning after reading this, great looking product. never done this before, but looks easy enough, if time consuming.
Hello, I’ve order this cooler also but i got a simple question.
I really don’t understand from the PDF manual where to apply the Insulation Tape.
It must be applied on the VRMs only ?
The only area of importance would be close to the ram heatsinks, to the right. but I really dont think you need it at all on the 7970 if you are careful with the heatsink application.
Guys,
Has anyone purchased this Acelero 7070 in the UK yet? I cannot find anyone who is even advertising it, isually QuietPC does, but they arnt yet wither 🙁 Where have you purchased from?
Hi Guys.
Can you please tell me where you purchased from in the UK, I cannot find anyone who is stocking this yet..?
Thanks!
I think you can order direct from ARCTIC to the UK…. on their website.
Could any of the owner of the Arctic Accelero Extreme 7970 send me the pdf file for the installation? I could not find it on the Arctic website.
“The compound has to be mixed by hand for 5 minutes. It is important to time this fairly accurately, otherwise it won’t work as well as it should. After this is done, then you need to wait for a further 15 minutes before applying the thermal glue to the heatsinks.”
NO. You apply the glue within 15 minutes. That is a fatal mistake for those installing the cooler according to the instructions provided here.
No you don’t …. you need to let the mixed compound bond for 15 minutes. you dont apply the glue that quickly. This is epoxy glue not instant bond, it needs to bond the two elements before adhering to the parts supplied.
My temp on my hd 7970 where a lot lower than this test my card was running at 90c with the ref cooler. But now it runs at 44c max and vrm,s at 47c max. The adhesive now is it one tube and you can apply straight away and takes under 1 hour it took 20 mins for me. What a great bit of kit. Ps it is big so you will need a big case