Today we are reviewing the new Aerocool Strike-X One Advance chassis. Aimed at the budget market, the Strike-X One Advance ships with two fans pre-installed and support for up to 6 storage drives … all combined with an aggressive looking design. So, is the Strike-X One Advance worth its £30 asking price?

Specifications:
- All black chassis interior
- Supports Long VGA Cards up to 400mm
- Dust filter for PSU
- 4 x ODD screw-less kit
- 6 x 5 1/4″ < 3 1/2″ convertor brackets
- Cable Routing Management
- Pre-drilled CPU holes for easy mounting of CPU coolers
- Motherboard Support: Micro ATX/ATX Dimensions: 440mm (H) x 180mm (W) x 475mm (D)
- Drive Bays: 4 x 5.25″ (Exposed) / 6 x 3.5″ HDD or 2.5 HDD
- I/O Ports: 2x USB3.0 / Audio+Mic
The Aerocool Strike-X One Advance ships in a plain box, protected by layers of Styrofoam.
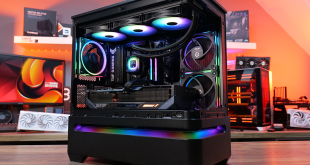
We can immediately see the Strike-X One Advance has an aggressive design, in line with the rest of the Strike-X family.
There are four removable drive plates and a large X covers a mesh panel.
Up top and on the side we can see large mesh cut-outs to facilitate the installation of additional fans.


The Strike-X One Advance's front I/O panel houses a Reset button, two USB 3.0 ports, audio and mic jacks and a Power button.
The red Strike-X emblem stands out with its red outlines. Moving down gives us a better look at the large X cut-out in the front panel.
At the very bottom of the case we can see the Aerocool brand name.

Turning the case around gives us a better view of the large mesh cut-outs in the side panel. Users can install either two 120 mm or two 140 mm fans to further improve the airflow to both the CPU and GPU.

Around the back we catch a glimpse of one of the two pre-installed fans.
Aerocool have chosen to use the same method of securing expansion cards that we recently saw on the Strike-X Xtreme Black Edition. The plastic cover swings open to allow for the installation of expansion cards from outside the case.

The right-hand side of the case reveals a mesh cut-out behind the CPU cut-out. Although this is unlikely to improve airflow within the case, it does show Aerocool's desire to maintain a symmetric design.

Flipping the case on its side shows the removable dust filter underneath the power supply.
The four plastic feet provide plenty of clearance, a plus for users who place their systems on a carpet floor.


Removing the front panel reveals a 120 mm front in-take fan.
Aerocool uses drive caddies which are held in place by a lock mechanism on the side. As a result, the front panel has a large open space behind it which can be utilized to improve airflow in the case.
The back of the front panel houses the I/O panel and a layer of foam padding which serves to dampen noise levels and as a dust filter.
The front panel's face plates are held in place with clips and can be removed from the front of the case.

Moving to the side we can see four rubber feet, used to reduce vibrations from the power supply.
Directly above the power supply is the relatively large CPU cut-out to facilitate the installation of a cooler without removing the motherboard.
To the left of the CPU cut-out is the second pre-installed 120 mm fan. This fan is rated to deliver 39cfm of airflow at 1,200 RPM with a maximum noise level of 23 dBa.
Three cable management holes can be seen above the box of accessories.
This side view of the case gives us a better look at the lock mechanism for 2.25″, 3.5″ and 5.25″ drives. Rotating the lock lets users remove it completely. Simply lining the pins up with the drives’ mounting holes and returning the lock to its original position firmly secures the drive.

A closer look at the expansion slots reveals Aerocool have chosen to use brackets that snap off and cannot be replaced.
The pre-installed fan comes with both a 3-pin connector and a Molex connector.

Removing the box of accessories gives us a better look at the drive cages.
The front in-take fan is secured with a hard drive converter that can also be used to secure a hard drive or optical drive in one of the drive bays. It is possible to install two additional 120 mm fans above and under the front in-take fan.
Aerocool have designed the drive cage to also offer the option of installing another three 120 mm fans on the other side of the drive cage. This allows for the installation of an impressive 6 front in-take fans.
With the box out of the way we can also see the fourth cable management hole in the center of the case.
Like the Aerocool Strike-X Xtreme Black Edition that we reviewed on KitGuru, the bottom cable management hole is curved.

From a lower angle we can see the large mesh in the roof of the case. Users can install two 120 mm fans or a 240 mm slim radiator, provided the motherboard does not block the fans.

The back of the motherboard tray shows there are only limited cable tie point available for cable management, with the majority adjacent to the cable management holes in the center.


Aerocool provide hard drive converters to install both 2.25″ and 3.5″ drives.
As is standard, 2.25″ drives are secured with screws underneath the converter, whereas 3.5″ drives are held in place with screws on the side.
Interestingly, users can install a fan on the opposite side of the converter to cool the drive. Alternatively, unused converters can be used to install additional front in-take fans.


As always, we aim to find out how forgiving the case is. As such, we deliberately stack cables and only apply basic cable management.
The lack of a CPU power cable cut-out above the motherboard means users are forced to route the cable across the motherboard.
The bottom of the case can turn into a mess relatively quick, especially if numerous drives are used.
The limited number of cable management options at the back of the case means users will need to take special care when assembling the system to avoid restricting the air flow to the components.
We are using the Cooler Master Hyper 103 cooler to keep our Intel Core i7 3770k cool and perform our tests with the CPU at its default clock speed before then overclocking it to 4.6GHz with the voltage set to 1.3v.
Test System:
- Processor: Intel Core i7 3770k
- Motherboard: Asus P8Z77-V LX2
- Memory: 16GB G.Skill Ares Blue
- Graphics Card: Sapphire HD 7790 2GB GDDR5 OC
- Power Supply: Seasonic G-Series 650W
- Chassis: Aerocool Strike-X One Advance
- Monitor: Acer X243HQ
- Boot Drive: Intel SSD 510
- Storage Drive: 2TB Seagate Barracuda
System validation can be found here.
Software:
- CPUID HW Monitor 1.23
- CPUID CPU-Z 1.65
- Prime95 v27.1
- Furmark 1.11.0
We are testing the Aerocool Strike-X One Advance's performance as follows:
- Room temperature is kept at 22° throughout our tests.
- The CPU Fan is set to 100% to eliminate inconsistencies as a result of PWM control.
- Idle temperatures are obtained after booting the PC and idling on the desktop for 30 minutes.
- CPU load temperatures are obtained after running Prime95′s Small FTTs test for 15 minutes.
- GPU load temperatures are obtained after running Furmark’s Burn-In Test for 15 minutes.
- To measure noise levels we disable the CPU fans and GPU fan.
We tied up the cables in the bottom of the case to ensure nothing obstructs the path of airflow to our components.


Despite the lack of cable management options to keep the motherboard, the Strike-X One Advance offers good cooling performance. The unimpeded airflow of the front in-take fan certainly does help to keep ambient and CPU temperatures down.
We measure from a distance of around 1 meter from the closed chassis and 4 foot from the ground to mirror a real world situation. Ambient noise in the room measures close to the limits of our sound meter at 30dBa.
The minimum readings for our acoustics tests are obtained with the fans running at 5V. For our maximum readings the fans were left running at 12V. The CPU and GPU fans are manually disconnected to eliminate unwanted noise.
KitGuru noise guide
10dBA – Normal Breathing/Rustling Leaves
20-25dBA – Whisper
30dBA – High Quality Computer fan
40dBA – A Bubbling Brook, or a Refridgerator
50dBA – Normal Conversation
60dBA – Laughter
70dBA – Vacuum Cleaner or Hairdryer
80dBA – City Traffic or a Garbage Disposal
90dBA – Motorcycle or Lawnmower
100dBA – MP3 player at maximum output
110dBA – Orchestra
120dBA – Front row rock concert/Jet Engine
130dBA – Threshold of Pain
140dBA – Military Jet takeoff/Gunshot (close range)
160dBA – Instant Perforation of eardrum

Running at 5V the fans produce only minimal noise. At 12V this increases to 38.4dBa. This makes the fans noticeable but not overly loud. All in all, the use of two strategically placed fans helps to keep noise levels in check.
Overall, the Aerocool Strike-X One Advance has left us with mixed feelings. In terms of build quality we feel the Strike-X One Advance is a step back when compared to the Strike-X Xtreme Black Edition and Dead Silent Gaming Cube that we have reviewed in the past.
Our main gripe with the Strike-X One Advance is the lack of cable management options behind the motherboard tray and no option to route the CPU power cable behind the motherboard tray. We imagine a small cut-out above the motherboard tray would not raise production costs by any significant amount.
Being able to use the hard drive converters to mount drives and fans is clever, though the rotation of the drives limits the available fan mounting options on the inside of the case.
When it comes to the thermal dynamics and noise levels of the case we have no complaints. In fact, the Strike-X One Advance performed very well considering its low asking price.
At the end of the day we appreciate the effort Aerocool has put into providing those on a very tight budget with a case that offers great cooling performance and an aggressive design. Considering the Strike-X One Advance's asking price of £30 inc vat., we feel it is definitely worth considering.
Pros:
- Inexpensive.
- Great cooling performance.
- Clever mounting system for drives and fans.
Cons:
- Side panels flex rather easily.
- Lack of cable management options.
- No CPU power cable cut-out.
- Snap-off expansion slot covers.
KitGuru says: A worthwhile consideration for those on a very tight budget.