

To get our build started we have to install the appropriate motherboard standoffs to match the type and size of the board used in our build. After somewhat of a struggle aligning the motherboard properly we were successful in installing our Asus motherboard.
The only reason we can think of for this issue would be the fact that the chassis is constructed of thin metal. If not handled with care it could easily twist ever so slightly causing things to not align properly. We have also decided to include the CoolIT ECO in this build to help keep CPU temperatures nice and low as the Beta EVO only comes with 1 front 120mm intake fan.
This will also allow users thinking about liquid cooling their CPU to see what type of space they have to play with if using the Beta EVO in their system build.


When it’s time to install our hard drive all that is required is attaching a rail on either side of our drive and then slide the drive into the drive cage without the need for any tools.


Optical drive installations are also a tool free procedure. We just pop out the bay cover, slide the Optical drive in place and the secure it’s position with the locking mechanism as pictured below.

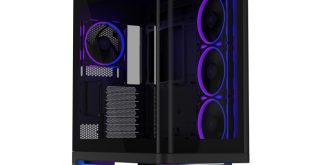
The next 2 images show our components installed inside the Beta EVO as well as the finished appearance once the side panels were put back in place. So let’s get to the good stuff and run a couple of tests to see what the temperatures are like inside the Beta EVO.


Good review Steve, t he case looks decent, but that thermaltake reviewed here yesterday seems a better deal.
Shame they are using such thin metals on the chassis, I dont think id buy another case like this, I had one last year and it was poor. ill spend more this time and aim higher.
I quite like the shape, but the metal thinness puts me off. nice review
Well at least the hack on their server hasnt put them off sending out samples 🙂 Good review steve. bit surprised on the material thinness as other people said. I had a cheap antec chassis and I noticed the same issue when building the system, the flexing. I think id spend more money on a better chassis next time.
Seems an OK product, but the market is so competitive now. I cant see this selling wonderfully. Thermaltake and Silverstone have some great, low cost chassis out lately.
Anyone seen this available in europe?
People need to understand that when cases like this are released at such a budget, corners will be cost. its normally on materials – such as t his. seems a fine case for the price. would suit a young kid or someone on a tight budget.
I think id give this one a miss. looks ok, but think people need to spend more to get something decent. would be good for a second build. or testing rig/server at home.
I am not sure I like the looks of this,. the insides are good however, which would be more important at this price point.
I gotta be honest, I think this is a really ugly looking case. not much work went into the appearance.
@ Tri Color – what do you think is ugly? I had a good look at the pictures steve took and it looks fine to me. not sure I buy into the ridges at the top, but apart from that, it seems ok.
Its just a really ugly looking front fascia. the vented bits look out of place and the shape and posture of the overall design. Its not very pretty. I appreciate the cost but it would put me off buying it.
We were given price updates. You can get it for $60 from NZXT or as low as $45 @ Tiger Direct
Good review, great case! I used this case for my SLI build (2 x GTX260, AMD 955BE, 6gb DDR2, CoolerMaster Hyper212+) and I couldn’t be happier. True, the metal is a bit thin, but I’m not using the case to hold up my car when changing a flat, so it’s a non-issue. For the price (I paid US $29 after rebate plus free shipping), this case can’t be beat! It would be nice if they included more than the single front 120mm fan……