


The installation of the TherMax Eclipse II is not difficult but it does require some time and the motherboard has to be removed from the case, even if the motherboard tray is cut open behind the CPU area. The pre-installed retention bracket on the cooler is ready for use with socket 775/1156/1366 Intel processors and with socket AM2/939 AMD processors. Socket AM3 AMD processor owners will have to install two additional brackets on the stock bracket.

The backplate is universal for all sockets, you only have to install the screws and secure them with the nuts on the correct holes of the backplate for your CPU socket. The end user has to make sure that the plastic coated side of the backplate will be the one touching the back of your motherboard and sadly there is no warning about this.
With the plastic coating being entirely invisible as well, we can only hope that not many people will install the backplate with the metallic side touching the back of their motherboards.


After placing a small amount of thermal paste on the CPU and the backplate behind the motherboard the user only has to carefully place the cooler on the CPU, aligning the screws with the holes on the retention bracket of the cooler. Afterwards the cooler can be secured into place with the four provided spring thumbscrews.
Unfortunately it is impossible to use a screwdriver when installing the cooler on anything else but an Intel processor and the screws have to be tightened as tight as possible by hand. Even when installing the cooler on an Intel processor the user need a very long reach flat heat screwdriver, which many people are highly unlikely to possess.
This is why the motherboard will have to be removed from any case in order to ensure the safe installation of the cooler. Furthermore, the Intel-oriented part of the retention bracket might cause compatibility problems when installing on an AMD processor since they extrude towards the sides of the socket. There were no compatibility problems whatsoever when we installed the cooler on our Gigabyte MA770T-UD3P motherboard.


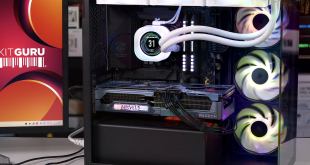
After the massive cooler is installed on the motherboard, one or both 120mm cooling fans have to be installed. The installation of the fans is an easy process. By installing four rubber studs on the fan mounting holes, the fans can be secured on the cooler by inserting the rubber stud inside the cooler fin cuts.

It may be a little difficult to install and remove the fans, however it is a secure method and will reduce the vibrations coming from the spinning fan. The installation of the fan might block access to the RAM slots of certain motherboards, therefore we recommend installing you RAM prior to the installation of the fans.
ill pass, that cooler sounds awful for noise. why no dB ratings in this reviwe, they are useful
Disappointed a little with this review, the testing is good until we get to the noise. I am told by the reviewer that it is loud but ive nothing to compare it against. I would like to know just how loud the fans are in a dB rating, especially as the new kitguru system is without a doubt the best on the net for noise measurements.
Not impressed with the cooler, its a brute force solution, decent looking cooler but putting on two high spinning fans seems such the wrong way to do it. Shame about noise levels but im guessing high 40dbs/low 50dbs
Hello, sorry about lack of DBa measurements, our dedicated room is in a specific location and our specialist equipment is also not in a location that ironlaw can get to.
Hard to know if id be able to use it, but if its painfully loud then id pass. the thermaltake contac 29 is cheaper and very quiet for instance.
Why dont they sell a version for less money without the fans and let users add their own high quality solutions?
Our IT guy in work has this on a test bed as he is constantly bringing in things for home and making sure he has time to play with the latest stuff.
Id say on hearing it, it must be at least 50db. its quite bad.
Its a competitive market, they dropped the ball with the noise aspect. No need for that anymore, maybe 10 years ago sure. we have too many good low noise, high performance coolers in 2010.
50db? lol, come on Spire, lets get with the plan 🙂
so around £30, you get two fans most people wont be happy with, then have to buy two more, which is another £12. best just getting the corsair A70 or thermaltake frio
noise doens’t bother me, performance is what i need 🙂
Hi, Vivianne from Spire here. 1. Would it be better if we’d include a PWM and PCI fan speed control unit? 2. Or would you rather have low speed fans? 3. Or would you prefer purchasing your own fans?
Hi Vivianne. I am all for performance cooling, and I can deal with a limited amount of noise, but I think you should maybe sell two versions.
Version 1: the heatsink and a controller with the two fans. even charge £2 more to compensate for the controller, so we can vary the speeds. Its a little like the Thermaltake Frio. have you heard it on full? I think kitguru reviewed it and it rated at 60DB? they used their heads and offered a controller so you could fine tune the noise and cooling yourself.
Version 2: Just sell the heatsink as it looks quite good, then users can add their own fan(s).
I would be happy with a low and high speed settings, two decent 120mm fans on low can generally cool anything, even overclocked CPUS. the heatsink looks good.
Vivianne its a tough call really. if you dont sell it with a fan or two then people will complain they need to spend more, even if you drop the price.
What I think is the best option is to either sell it with one fan with a variable controller. If you lose the second fan, im sure the price could be kept the same. then people can add another fan later.
If this is not what you want another option would be to sell it with two fans with low and high settings , and charge a little more.
The cooler looks good, and the fans are decent looking units, but in 2010 people want some kind of control, especially if the default is LOUD!. Id be interested in this cooler, but its not an option for me with the noise being described as loud. There are so many coolers out now with reasonable cooling and not much noise.
Id go with the current version, add a controller to each fan, like FRIO has. call it the DELUXE model. Then offer the heatsink on its own to people who already have fans at home, and charge less. I think you would get a lot of sales from both.
Its a good review, but without DB ratings and the reviewer saying its LOUD, its very hard to judge.
I would however immediately advise SPIRE to offer a controller knob for each fan, even if it costs more to the end user. people LOVE control over fan noise. this means hardcore overclockers like SVEN can crank it when gaming, and can easily lower the fan speed later when watching a movie for instance.
Forcing people today to have just a LOUD setting, is not going to work to get sales.
Incidetnally great review Kitguru, ill hold off buying one of these until the fans get sorted, and its nice to see SPIRE on the thread discussions and wanting advise. thats good customer relations.
Hello Vivanne. I don’t know costs to you as a company, but I would suggest you spend more on the fans and even if it raises the price a little charge more. or offer a top quality fan with controller instead of two fans without. that sounds like it would balance out and you could maintain the current pricing?
Great review KitGuru, just got home for my KG fix 🙂
Good honest review Ironlaw, I like the testing and the honesty with the readers. Also im very impressed to see SPIRE asking us for our views.
I think it has already been said, I overclock like hell, and I do it on water, but ive owned loud heatsink/fan combos before, its why I moved to water ! offer a low setting at least, then people who are overclocking but who aren’t going mad can still get a good performance to noise ratio. lack of controls isnt good.
Don’t listen to these dumdums on here Vivianne… 50db is not very loud considering the performance. Not to mention the fact that these people here are talking about it being 2010 and needing quiet fans, yes it is 2010 and if you don’t have a motherboard that can control your fan speed via bios then you maybe need to look in the mobo mirror. Can’t wait to get this thing, who else offers two high-speed fans included for this price?? seriously. I hope she doesn’t listen to you numbnuts.
Bought this cooler last year as I wanted Noctua performance but not for Noctua prices. I had to buy this from Amazon because I couldnt find a stockist in the UK. It cost me £40 which i didnt mind considering all the 4 pipe heatsink coolers are sitting around £35 i didnt mind the slight increase in price.
The install on an AMD machine is a b*tch. However if you can put up with the install, the rewards of this CPU cooler is awesome. I ended up buying me a front mounted fan controller (£11) off Amazon as well but im sure the cheaper ones that sit inside the cases for £5 will be just as effective.
Very good performer, but yes a little loud but when gaming I dont notice it at all. The problem with my set was that the fans were rated at 2200rpm but they were spinning at 2400rpm. With the purchase of the fan controller now this is not an issue at all.
Performance wise i have a Phenom II X4 965BE @ 3.8ghz. Arctic Cooler 64pro had it idle at 49c and load at 65c. This spire has it idle at 35c and full load at 49c. Not bad for a full 15c drop in temps. Gaming has it sitting between 42c and 45c
If i could reccomend some stuff to spire i would say
1) Find a UK stockist. The Noctua is selling at £72 and if you can offer a cooler that performs just as well as that for £40 you should be able to fill a good niche market.
2) The fans are very good high performance fans but really need to have some form of control or temp sense option. Being on full ~2200rpm just wont sell your coolers. 50db is very loud, especially when just browsing the internet or doing tasks which dont need the fans spinning at 100%.
3) When u guys decide to do the Eclipse III try to make it CPU friendly for both AMD and Intel.
4) Get better instructions. If needed, make a youtube video. It will take your marketing deparment around 30mins to do for a quick 5min tutorial yet provide your customers with another reason of why to endorse your product to the rest of the community.
I managed to get this cooler off eBay around May of 2010, was a guy in Canada selling it (I’m in the US), so it was a sweet find! Managed to get it cheaper than it would’ve been had I waited another 5 or so months for it to become available… Anyways not the point 🙂
I first used this on a Gigabyte 890GPA-UD3H. I installed the bracket as per the instructions and they INDEED SUCK ASS. However, when I got this ASRock 890FX Deluxe3, I changed up how they want you to do it. They require the long bolts to go through the backplate; have a small thumb nut installed with a collar to keep the bolts from sliding out, which the collar then fits into the mounting holes for alignment; after the bolts are through the motherboard you then screw on ANOTHER thumb nut to keep everything from falling off the board o_0; after which you mount the cooler, with the bolts passing through it’s hold down plate; then screw on large thumb nuts (with flat head screwdriver slots, which you can’t GET a screwdriver too due to the fins) with springs to help keep equal tension across the whole CPU heat spreader :\
So what I did: eliminate that first thumb nut on the back of the motherboard (the one with the collar) and used it on the business side of the board. It works so much better this way and also puts the backplate in contact with the motherboard for (IMO) better support 🙂
My next plan is to turn /everything/ around, so the spring equipped thumb nuts are on the back side of the motherboard. Of course, this would require a case with a motherboard tray cut out for easy backplate swapping, otherwise there wouldn’t be enough clearance 😉 But I won’t attempt this until I have to remove the HSF for either a review of another or replacing the CPU.
Finally: The fans are QUITE, if you don’t run them full speed! My ASRock board has some fan header problems where it runs them full speed and won’t regulate it, so I moved the fans over to another one (not on the CPU header sadly) which DOES work. I run them at 930rpm and it keeps my 555BE (stock clocked since it’s a cripple) at only 3c over AMBIENT temperature! Under load it only raises around 4C (I shite you not!) and I love it 😀 I’m interested to see how a quad or six core does with it heh
[/long post]