

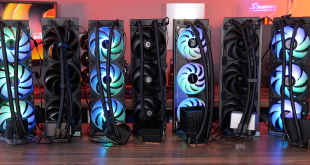
The retention mechanism isn't quite as simple as that used on the H100i, making the installation process a little more complicated. There is a detailed installation guide included, though, which improves the situation somewhat.

The first step of the installation process is to prepare the retention ring for the motherboard socket. This involves affixing clips onto the four corners, in the correct orientation for the socket in question.

Next, the backplate needs to be prepared, by pushing the screw threads into the correct holes. Then, it can be affixed to the back of the motherboard using the foam pads provided. We found that the backplate conflicted with a component on the back of our motherboard, meaning that it wouldn't lay completely flat. We were forced to modify the backplate to account for this, cutting off one of the corners.

Then, the retention ring can be attached to the pump head using the provided clip, and the thumbscrews can be put into place. The radiator can then be installed into the case.

Finally, the CPU block can be secured down onto the motherboard. The fans and pump also need to be connected via the 4-pin and 3-pin headers provided.
Another one? I just bought their H100i – damn!
Kick ass !
───▄▀▀▀▄▄▄▄▄▄▄▀▀▀▄───
───█▒▒░░░░░░░░░▒▒█───
────█░░█░░░░░█░░█────
─▄▄──█░░░▀█▀░░░█──▄▄─
█░░█─▀▄░░░░░░░▄▀─█░░█
It is certainly great for noise emissions and cooling, but the H100i is a superior build quality unit IMO
Its huge, Id love it, but Id need a new case, or just leave this hanging out the back of it. which might be ok as my case is under a desk with the back pointed away from me.
I have a 3770k and this review points out the variables between some of them. my friend also has a 3770k and his runs 7c cooler with the same Noctua D14 cooler. Must be some of the earlier 3770k’s run very hot. We both get the same overclock to 4.9ghz so its all good.
H110 seems excellent to me, id be tempted, just so I could see some of my motherboard through the case window ! My D14 blocks everything. only downside with that cooler.
How about some accurate dimensions for the radiator? I’m sure a lot of people want to see if it will fit in their case…
i like this