


If you are in the market for a new system based on the Z77 platform then today's review product will be of interest. The Gigabyte Z77X-UP7 motherboard is a flagship product set to target the wealthy high end enthusiast audience who want to accept no compromises. Is this the ultimate Z77 motherboard?
We have reviewed many high end Z77 motherboards in recent months, but very few of these cost in excess of £300. Gigabyte are not holding anything back with this board – if you want the best Z77 motherboard then they want this to be your first choice. It incorporates an ‘industry leading' 32+3+2 Phase CPU power design with a true ‘all digital' PWM.

Overclockers will be wetting themselves to get their hands on this board, as it incorporates 32 CPU phases, plus 3 for Intel HD graphics and another 2 for VTT phases. Gigabyte claim the motherboard is able to deliver 2,000W of power which is an incredible statistic. The Z77X-UP7 uses an All Digital Engine to deliver the ultimate level of power to the 3rd generation Core processors.
The Z77X-UP7 also supports Quad Crossfire and Quad SLI. When four cards are in operation across the PCI Express 3.0 ports, they can run in an x8 configuration. We will obviously take a closer look at the motherboard later in the review.
|
CPU Support
|
Intel® 22nm 3rd and 2nd gen Core™ CPUs
|
 |
|
CPU Socket
|
LGA 1155
|
|
|
Chipset
|
Intel Z77 chipset
|
|
|
Graphics Interface
|
2*PCI-E 3.0 x16 slot (or 4*PCI-E 3.0 x8) + 1*PCI-E 3.0 x16
|
|
|
Display Interface
|
HDMI, DVI, RGB, Display Port
|
|
|
Memory Type
|
2 Channel DDR3
|
|
|
Memory DIMM
|
4*DDR3
|
|
|
Expansion Slots
|
2*PCI-E x 1
|
|
|
SATA connectors
|
6*SATA 3 + 4*SATA 2
|
|
|
SATA RAID
|
RAID 0,1,5,10
|
|
|
USB
|
10*USB3.0+4*USB2.0
|
|
|
Audio / LAN
|
8-channel HD / GbE LAN*2
|
|
|
Form Factor (mm)
|
E-ATX (305×264)
|

The Gigabyte Z77X-UP7 motherboard ships in a very large box which is indicative of a flagship product. It is double the depth and beautifully finished.

The gatefold box opens up to expose the Gigabyte Z77X-UP7 behind a tough plastic productive cover. The other side of the box lists some of the key specifications and selling points.

We sometimes comment on half hearted bundles, but we certainly can't claim that Gigabyte haven't fully loaded this box ! The Gigabyte Z77X-UP7 includes a huge variety of cables including a USB 3.0 drive bay, Crossfire, SLI x2, SLI x3 and SLI x4 connectors. There are also two wireless antenna, I/O backplate, a Gigabyte case badge, user manual, driver and software discs and a plethora of SATA cables.


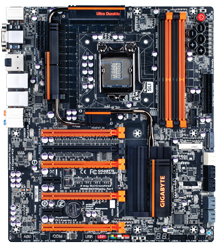
The Gigabyte Z77X-UP7 is certainly a looker. The bright orange slots and ports look fantastic against the black PCB. Being a motorbike fanatic I was immediately reminded of Austrian bike manufacturer, KTM. This board is based on the E-ATX form factor, measuring 30.5 cm x 26.4 cm.

The Z77 platform is a dual channel memory architecture, and there are four slots on this board supporting up to 32GB of non-ECC DDR3 memory. The company officially list support at 1066/1333/1600/2400+OC, but as we find out later this can be safely ignored. There is full support for Intel XMP memory modules.


Internal I/O connectors are:
- 1 x 24-pin ATX main power connector
- 2 x 8-pin ATX 12V power connectors
- 1 x PCIe power connector
- 6 x SATA 6Gb/s connectors
- 4 x SATA 3Gb/s connectors
- 1 x mSATA connector
- 1 x CPU fan header
- 6 x system fan headers
- 1 x front panel header
- 1 x front panel audio header
- 1 x S/PDIF Out header
- 1 x S/PDIF In header
- 2 x USB 3.0/2.0 headers
- 2 x USB 2.0/1.1 headers
- 1 x serial port header
- 1 x Clear CMOS jumper
- 1 x power button
- 1 x reset button
- 1 x Clear CMOS button
- 1 x Gear button
- 1 x CPU BCLK Down button
- 1 x CPU BCLK Up button
- 1 x CPU Ratio Down button
- 1 x CPU Ratio Up button
- 1 x onboard voltage measurement module
- 2 x BIOS switches
- 1 x LN2 switch

The CPU socket is surrounded by a three way heatsink which cools the VRM's. As we mentioned earlier in the review the Z77X-UP7 incorporates a hefty 32+3+2 Phase CPU power design.

Close to the CPU socket are not one, but two 8 pin power connectors. It is very unusual to see this on a single socket Z77 motherboard.


There are buttons on the board, for overclocking ‘on the fly'. You can adjust both BCLK and CPU multipler without rebooting into the BIOS. Ideal if you are chasing benchmarking records and don't want to deal with system boot failures. Power, reset and CMOS clear buttons are all included on the board so you can run this easily on a table without a case.

Close to the SATA ports is an mSATA slot, ideal if you want to install a small boot drive without connecting up any SATA drives. We recommend this one in particular if you are interested.

When you are finished overclocking and trying to break benchmark records this board could easily work as a high powered server board. There are no less than 9 SATA ports available via two Marvell 88SE9172 chips. Six of these are SATA 6Gbps capable (white and grey), and the other three are SATA 3 Gbps capable (black). There is support for RAID 0, RAID 1, RAID 5 and RAID 10.

There are four orange PCI e slots which can be used for QUAD Crossfire and QUAD SLi configurations. Gigabyte have included a single black slot on this board which bypasses the PLX chip for potentially more performance.

The back I/O panel has a PS/2 port for keyboard and mouse and no less than 6 USB 3.0 ports. There are also VGA, DVI, HDMI and DisplayPort connectors for onboard graphics and two Gigabit lan connectors. Audio ports are included at the far right.


The Gigabyte Z77X-UP7 really is a fantastic looking motherboard and will look great in a high end, windowed chassis with orange LED lighting.
On this page we present some super high resolution images of the product taken with the 24.5MP Nikon D3X camera and 24-70mm ED lens. These will take much longer to open due to the dimensions, especially on slower connections. If you use these pictures on another site or publication, please credit Kitguru.net as the owner/source. You can right click and ‘save as’ to your computer to view later.


The Gigabyte Z77X-UP7 UEFI BIOS is certainly fully featured and is split into six main sections.

The System menu gives an overview of the BIOS revision number, date and language.

The BIOS Features panel is important as you can configure the priority of the attached drives. There are various other settings relating to the Boot process here.

The Peripherals menu gives full control over the SATA device configuration and USB, Audio and LAN controllers.

Power Management can be used to wake up the system at specific times.

The last main panel can be used to save and load optimised default settings. There is also an option to load and save profiles you may configure yourself. Underneath this panel is the Q-Flash panel which is used to update the motherboard to the latest revision.

The dedicated overclocking section of this BIOS has every option you could ever want, and then some. The M.I.T. Current status panel is useful to get an overview of your current CPU speeds and installed memory configurations.


The system defaulted to 1,333mhz memory, a safe boot setting. We are using the new ultra fast Corsair Dominator Platinum 2,666mhz so we want to change this as soon as possible.

I have said it before, but I will say it again. I wish Gigabyte would put these sections into a single, scrollable panel. It isn't a major issue, but I spend so much time navigating between these interconnected menus that it becomes a little irritating.

The 3D Power Control panel has a myriad of settings to adjust the loadline calibration. We didn't actually need to play with this too much during testing to get great results with mainstream coolers.

The Core voltage section inside ‘advanced voltage settings'.

DRAM Voltage settings. Why not combine all of these into a single menu?

Overclocking with the Gigabyte Z77X-UP7 is very productive, and rather straightforward. We did manage to get a 5.3ghz post at 1.37 volts, but our 3770k needs a lot more voltage at 5ghz+ than I would be happy with without adopting some seriously high end cooling. A 4.9ghz clock speed was 100% stable with the Corsair H100 and 1.35 volts, although the CPU did get a little hot. We always validate our results as it is very easy to ‘claim' an extremely high overclock even if it is useless in the real world.
I would be happier running at 4.8ghz 24/7 as we only need 1.28 volts with our particular 3770k engineering sample.
For the productivity and synthetic sections of the review today we are going to compare the Gigabyte Z77X-UP7 system against a variety of other systems and processors that we have tested in recent months. This gives an ideal overview of how this system will slot into the marketplace.
The gaming part of the article however will be a direct comparison against the ASRock Z77 OC Formula system we built using the exact same partnering components. We reviewed this last week. As a matter of interest we also add results from our long term Core i7 970 system running at 4.6ghz. This system is listed at the bottom of this page.
Main Test System:
Processor: Intel Core i7 3770k (@ 4.8ghz for gaming tests)
Motherboard: Gigabyte Z77X-UP7
Cooler: Corsair H100
Memory: 16GB Corsair Dominator Platinum 2,666mhz
Graphics Card: KFA2 GTX680 OC LTD
Power Supply: Corsair 850W
Optical Drive: Asus BluRay Drive
Chassis: Lian Li X2000FN
Monitors: Dell U3011
Boot Drive: Intel 510 120GB
Secondary Drive: Patriot 240GB WildFire
Comparison Test Systems:
Processor: Intel Core i7 3770k
Motherboard: ASrock Z77 OC Formula
Cooler: Corsair H100
Memory: 16GB Corsair Dominator Platinum 2,666mhz
Graphics Card: KFA2 GTX680 OC LTD
Power Supply: Corsair 850W
Optical Drive: Asus BluRay Drive
Chassis: Lian Li X2000FN
Monitors: Dell U3011
Boot Drive: Intel 510 120GB
Secondary Drive: Patriot 240GB WildFire
Processors: Intel E5 2687W x 2
Motherboard: Asus Z9 PE-D8 WS
Coolers: Corsair H80 x2
Memory: 64GB Kingston Predator 1,600mhz 9-9-9-24 1T
Graphics Card: Sapphire HD7970 6GB Toxic Edition (1,200mhz core 1,600mhz memory).
Power Supply: Seasonic 1000W Platinum Modular
Optical Drive: Asus BluRay Drive
Chassis: Lian Li X2000FN
Monitors: Dell U3011, 3x Ilyama ProLite E2472HDD
Boot Drive: Corsair 240GB Neutron GTX SSD
Secondary Drive: Corsair 240GB Neutron SSD
Intel E5 2660
Motherboard: Gigabyte X79S-UP5-WIFI
Cooler: Corsair H100
Memory: 16GB G.Skill ARES 2,133mhz @ 9-11-10-28
Graphics Card: Sapphire HD7970 6GB Toxic Edition (1,200mhz core 1,600mhz memory).
Power Supply: Corsair AX1200
Optical Drive: Asus BluRay Drive
Chassis: Lian Li X2000a
Boot Drive: Intel 510 120GB
Secondary Drive: Patriot 240GB WildFire
Intel i7 3960X EE
Motherboard: Asus P9X79 WS WorkStation
Cooler: Corsair H100
Memory: 8GB Corsair Dominator GT8 2400mhz memory
Graphics Card: Sapphire HD7970 6GB Toxic Edition (1,200mhz core 1,600mhz memory).
Power Supply: ADATA 1200W
Optical Drive: Asus BluRay Drive
Chassis: Cooler Master Cosmos 2
Monitors: Dell U3011, 3x Ilyama ProLite E2472HDD
Boot Drive: Crucial C300 128GB SSD
Secondary Drive: Patriot 240GB Pyro SE
Intel i7 3820
Motherboard: ASRock Extreme4-M
Cooler: Intel reference cooler
Memory: 8GB Corsair GTX8 @ 2133mhz
Power Supply: ADATA 1200W
Chassis: Lian Li PC60
Monitors: Dell U3011/La Cie 730
Boot Drive: Crucial C300
Secondary Drive: Patriot Pyro SE 240GB
AMD FX 8150 Black Edition
Processor: AMD FX 8150 Black Edition
Motherboard: Gigabyte 990FXA-UD7
Cooler: Noctua NH D14
Memory: G-SKill Ripjaws 1600mhz 8GB (2x 4GB)
Power Supply: ADATA 1200W
Chassis: SilverStone Raven 3
Boot Drive: Intel 40GB SSD
Secondary Drive: Patriot 120GB WildFire
Intel Core i7 990X
Processor: Intel Core i7 990x
Cooler: Corsair H100
Motherboard: Gigabyte G1 Assassin
Memory: Kingston HyperX 6GB
Drives: Crucial RealSSD C300 256GB
Power Supply: Corsair AX1200
Chassis: Antec Twelve Hundred
Core i7 970 @ 4.6ghz
Graphics: Sapphire HD7970 6GB Toxic Edition (1,200mhz core 1,600mhz memory).
Cooling: Coolit Vantage
Motherboard: MSI X58A-GD65
Chassis: Thermaltake Level 10 GT
Power Supply: Corsair AX1200
Memory: 6GB ADATA @ 2133mhz 9-10-9-32
Storage: Kingston SSDNow V+ 512GB Gen 2 SSD (Storage) / Crucial RealSSD C300 256GB (OS boot)
Intel Core i7 2700k
Processor: Intel Core i7 2700k
Cooling: ThermalTake Frio OCK
Motherboard: Gigabyte GA-Z68AP-D3 Z68 Motherboard
Chassis: Silverstone Raven 3.
Power Supply: Corsair 850W.
Memory: Corsair 1600mhz memory
Storage: Intel 80GB SSD (boot) / Patriot Wildfire 120GB SSD.
Intel Core i7 2600k
Processor: Intel Core i7 2600k
Motherboard: ASRock Fatal1ty Z68 Professional Gen 3
Cooler: Intel XTS-100H
Memory: ADATA 1600mhz DDR3 8GB (2x4GB)
Power Supply: Thermaltake Toughpower 850W
Boot Drive: Intel 510 SSD 250GB
Intel Core i5 2500k
Processor: Intel Core i7 2500k
Motherboard: Gigabyte GA-Z68AP-D3 Z68 Motherboard
Cooler: Arctic Cooling Freezer Xtreme Rev.2 CPU Cooler
Memory: Corsair 1600mhz memory 8GB (2x4GB)
Power Supply: Corsair 850W.
Boot Drive: Patriot Pyro 120GB SSD.
AMD Phenom II X6 1100T
Processor: AMD Phenom II X6 1100T
Motherboard: Gigabyte 990FXA-UD7
Cooler: Noctua NH D14
Memory: G-SKill Ripjaws 1600mhz 8GB (2x 4GB)
Power Supply: ADATA 1200W
Chassis: SilverStone Raven 3
Boot Drive: Intel 40GB SSD
Secondary Drive: Patriot 120GB WildFire.
Kitguru Gaming Comparison System:
Processor: Intel Core i7 3770k @ 4.8ghz
Graphics Card: KFA2 GTX680 OC LTD
Motherboard: ASrock Z77 OC Formula
Cooler: Corsair H100
Memory: 16GB Corsair Dominator Platinum 2,666mhz
Power Supply: Corsair 850W
Optical Drive: Asus BluRay Drive
Chassis: Lian Li X2000FN
Monitors: Dell U3011
Boot Drive: Intel 510 120GB
Secondary Drive: Patriot 240GB WildFire
Kitguru Gaming Comparison System 2:
Processor: Core i7 970 @ 4.6ghz
Graphics Card: KFA2 GTX680 OC LTD
Cooling: Coolit Vantage
Motherboard: MSI X58A-GD65
Chassis: Thermaltake Level 10 GT
Power Supply: Corsair AX1200
Memory: 6GB ADATA @ 2133mhz 9-10-9-32
Storage: Kingston SSDNow V+ 512GB Gen 2 SSD (Storage) / Crucial RealSSD C300 256GB (OS boot)
Software:
3DMark Vantage
3DMark 11
PCMark7
CrystalDiskMark
ATTO Disk Benchmark
SiSoft Sandra
3DStudio Max
Cinebench
Media Espresso
Handbrake 9.5
Unigine Heaven Benchmark
HQV Benchmark 2.0
Total War: Shogun 2
F1 2012
Sleeping Dogs
Dirt ShowDown
Max Payne 3
PCMark 7 includes 7 PC tests for Windows 7, combining more than 25 individual workloads covering storage, computation, image and video manipulation, web browsing and gaming. Specifically designed to cover the full range of PC hardware from netbooks and tablets to notebooks and desktops, PCMark 7 offers complete PC performance testing for Windows 7 for home and business use.


At reference clock speeds the system scores 5,482 points, which is very impressive.
Futuremark released 3DMark Vantage, on April 28, 2008. It is a benchmark based upon DirectX 10, and therefore will only run under Windows Vista (Service Pack 1 is stated as a requirement) and Windows 7. This is the first edition where the feature-restricted, free of charge version could not be used any number of times. 1280×1024 resolution was used with performance settings.


The overall score of 43,556 is an impressive result, especially considering that the system isn't overclocked for these early tests.
3DMark 11 is designed for testing DirectX 11 hardware running on Windows 7 and Windows Vista the benchmark includes six all new benchmark tests that make extensive use of all the new features in DirectX 11 including tessellation, compute shaders and multi-threading.
After running the tests 3DMark gives your system a score with larger numbers indicating better performance. Trusted by gamers worldwide to give accurate and unbiased results, 3DMark 11 is the best way to test DirectX 11 under game-like loads.
If you want to learn more about this benchmark, or to buy it yourself, head over to this page.


At reference clock speeds the overall system score is 11,066 points, which is impressive considering we are using a single GPU GTX680 graphics card.
Unigine provides an interesting way to test hardware. It can be easily adapted to various projects due to its elaborated software design and flexible toolset. A lot of their customers claim that they have never seen such extremely-effective code, which is so easy to understand.
Heaven Benchmark is a DirectX 11 GPU benchmark based on advanced Unigine engine from Unigine Corp. It reveals the enchanting magic of floating islands with a tiny village hidden in the cloudy skies. Interactive mode provides emerging experience of exploring the intricate world of steampunk.
Efficient and well-architected framework makes Unigine highly scalable:
- Multiple API (DirectX 9 / DirectX 10 / DirectX 11 / OpenGL) render
- Cross-platform: MS Windows (XP, Vista, Windows 7) / Linux
- Full support of 32bit and 64bit systems
- Multicore CPU support
- Little / big endian support (ready for game consoles)
- Powerful C++ API
- Comprehensive performance profiling system
- Flexible XML-based data structures
We use the following settings: 1920×1080 resolution. Anti Aliasing off. Anisotrophy 4, Tessellation normal. Shaders High. Stereo 3D disabled. API: Direct X 11.


At non-overclocked settings, the system scores an average of over 100 frames per second, which is excellent considering the high resolution and settings we are using.
HQV Benchmark 2.0 is an updated version of the original tool and it consists of various video clips and test patterns which are designed to evalute motion correction, de-interlacing, decoding, noise reduction, detail enhancement and film cadence detection.
There are two versions of the program, standard definition on DVD and high definition on Bluray. As our audience will be concentrating on HD content so will we.
This has a total of 39 video tests which is increased from 23 in the original and the scoring is also up from a total of 130 to 210. As hardware and software gets more complicated, the software has been tuned to make sure we can thoroughly maximise our analysis.
Read our initial analysis over here.
| KFA2 GTX680 Ltd OC | |
|
Dial
|
4 |
| Dial with static pattern | 5 |
| Gray Bars | 5 |
| Violin | 5 |
| Stadium 2:2 | 5 |
| Stadium 3:2 | 5 |
| Horizontal Text Scroll | 3 |
| Vertical Text Scroll | 5 |
| Transition to 3:2 Lock | 5 |
| Transition to 2:2 Lock | 0 |
|
2:2:2:4 24 FPS DVCAM Video
|
5 |
|
2:3:3:2 24 FPS DVCam Video
|
5 |
|
3:2:3:2:2 24 FOS Vari-Speed
|
5 |
|
5:5 FPS Animation
|
5 |
|
6:4 12 FPS Animation
|
5 |
|
8:7 8 FPS Animation
|
5 |
|
Interlace Chroma Problem (ICP)
|
5 |
|
Chroma Upsampling Error (CUE)
|
5 |
|
Random Noise: Sailboat
|
5 |
|
Random Noise: Flower
|
5 |
|
Random Noise: Sunrise
|
5 |
|
Random Noise: Harbour Night
|
5 |
|
Scrolling Text
|
5 |
|
Roller Coaster
|
5 |
|
Ferris Wheel
|
5 |
|
Bridge Traffic
|
5 |
|
Text Pattern/ Scrolling Text
|
5 |
|
Roller Coaster
|
5 |
|
Ferris Wheel
|
5 |
|
Bridge Traffic
|
5 |
|
Luminance Frequency Bands
|
5 |
|
Chrominance Frequency Bands
|
5 |
| Vanishing Text | 5 |
|
Resolution Enhancement
|
15 |
|
Theme Park
|
5 |
| Driftwood | 5 |
|
Ferris Wheel
|
5 |
|
Skin Tones
|
5 |
| Total | 192 |
The hardware scores 192 points out of a possible 210 which is excellent.
SiSoftware Sandra (the System ANalyser, Diagnostic and Reporting Assistant) is an information & diagnostic utility. It should provide most of the information (including undocumented) you need to know about your hardware, software and other devices whether hardware or software.
Sandra is a (girl’s) name of Greek origin that means “defender”, “helper of mankind”. We think that’s quite fitting.
It works along the lines of other Windows utilities, however it tries to go beyond them and show you more of what’s really going on. Giving the user the ability to draw comparisons at both a high and low-level. You can get information about the CPU, chipset, video adapter, ports, printers, sound card, memory, network, Windows internals, AGP, PCI, PCI-X, PCIe (PCI Express), database, USB, USB2, 1394/Firewire, etc.
Native ports for all major operating systems are available:
- Windows XP, 2003/R2, Vista, 7, 2008/R2 (x86)
- Windows XP, 2003/R2, Vista, 7, 2008/R2 (x64)
- Windows 2003/R2, 2008/R2* (IA64)
- Windows Mobile 5.x (ARM CE 5.01)
- Windows Mobile 6.x (ARM CE 5.02)
All major technologies are supported and taken advantage of:
- SMP – Multi-Processor
- MC – Multi-Core
- SMT/HT – Hyper-Threading
- MMX, SSE, SSE2, SSE3, SSSE3, SSE 4.1, SSE 4.2, AVX, FMA – Multi-Media instructions
- GPGPU, DirectX, OpenGL – Graphics
- NUMA – Non-Uniform Memory Access
- AMD64/EM64T/x64 – 64-bit extensions to x86
- IA64 – Intel* Itanium 64-bit


The performance from the Gigabyte Z77X-UP7 is exceptional. Interestingly, the Corsair Dominator Platinum 2,666mhz scores a little higher in the Gigabyte Z77X-UP7 than it did in the ASRock Formula OC at the same timings.
CINEBENCH R11.5 64 Bit is a real-world cross platform test suite that evaluates your computer’s performance capabilities. CINEBENCH is based on MAXON’s award-winning animation software CINEMA 4D, which is used extensively by studios and production houses worldwide for 3D content creation. MAXON software has been used in blockbuster movies such as Spider-Man, Star Wars, The Chronicles of Narnia and many more.
CINEBENCH is the perfect tool to compare CPU and graphics performance across various systems and platforms (Windows and Mac OS X). And best of all: It’s completely free.


The i7 3770k is an excellent processor for 3D rendering duties, especially when overclocked to 4.8ghz. At default clock speeds it outperforms the AMD FX8150 when that chip is overclocked to 4.8ghz. Obviously there are considerable price differences, but it shows how far ahead the Intel cores are right now (4 Intel v 8 AMD).
Crystalmark is a useful benchmark to measure theoretical performance levels of hard drives and SSD’s. We are using V3.0 x64. The Patriot Wildfire SSD drive is on test today.

These are excellent results and almost close to class leading for this particular drive.

ATTO Disk Benchmark results indicate around 550MB/s peak read and 515 MB/s peak write speeds.
V2011 is the first release of 3DStudio Max to fully support the Windows 7 operating system. This is a professional level tool that many people use for work purposes and our test will show any possible differences between board design today.
Autodesk 3ds Max Design 2011 software offers compelling new techniques to help bring designs to life by aggregating data, iterating ideas, and presenting the results.
Streamlined, more intelligent data exchange workflows and innovative new modeling and visualization tools help significantly increase designers’ creativity and productivity, enabling them to better explore, validate, and communicate the stories behind their designs.
Major new features:
- Slate: A node based material editor.
- Quicksilver: Hardware renderer with multithreaded rendering engine that utilizes both CPU and GPU.
- Extended Graphite Modeling Toolset
- 3ds Max Composite: A HDRI-capable compositor based on Autodesk Toxik.
- Viewport Canvas toolset for 3D and 2D texture painting directly in the viewport
- Object Painting: use 3D geometry as ‘brushes’ on other geometry
- Character Animation Toolkit (CAT): now integrated as part of the base package
- Autodesk Material Library: Over 1200 new photometrically accurate shaders
- Additional file format support: includes native support for Sketchup, Inventor
- FBX file linking
- Save to Previous Release (2010)
We created a new 8200×3200 scene and recorded the time for the hardware to finalise the render.

A single second faster than the same system running via the ASRock Z77 OC Formula motherboard. A final score of 5 minutes and 54 seconds is fantastic.
CyberLink MediaEspresso 6 is the successor to CyberLink MediaShow Espresso 5.5. With its further optimized CPU/GPU-acceleration, MediaEspresso is an even faster way to convert not only your video but also your music and image files between a wide range of popular formats.
Now you can easily playback and display your favourite movies, songs and photos not just on your mobile phone, iPad, PSP, Xbox, or Youtube and Facebook channels but also on the newly launched iPhone 4. Compile, convert and enjoy images and songs on any of your computing devices and enhance your videos with CyberLink’s built-in TrueTheater Technology.
New and Improved Features
- Ultra Fast Media Conversion – With support from the Intel Core i-Series processor family, ATI Stream & NVIDIA CUDA, MediaEspresso’s Batch-Conversion function enables multiple files to be transcoded simultaneously.
- Smart Detect Technology – MediaEspresso 6 automatically detects the type of portable device connected to the PC and selects the best multimedia profile to begin the conversion without the need for user’s intervention.
- Direct Sync to Portable Devices – Video, audio and image files can be transferred in a few easy steps to mobile phones including those from Acer, BlackBerry, HTC, Samsung, LG, Nokia, Motorola, Sony Ericsson, and Palm, as well as Sony Walkman and PSP devices.
- Enhanced Video Quality – CyberLink TrueTheater Denoise and Lighting enables the enhancement of video quality through optical noise filters and automatic brightness adjustment.
- Video, Music and Image File Conversion – Convert not only videos to popular formats such as AVI, MPEG, MKV, H.264/AVC, and FLV at the click of a button, but also images such as JPEG and PNG and music files like WMA, MP3 and M4A.
- Online Sharing – Conversion to video formats used by popular social networking websites and a direct upload feature means posting videos to Facebook and YouTube has never been easier.
For our testing today we are converting a 3.3GB 720p MKV file (2h:12mins) to Apple Mp4 format for playback on a portable device. This is a common procedure for many people and will give a good indication of system power. We are using the newest version which has been optimised for Sandybridge processors.

Hardware acceleration is enabled, to call on the CUDA power of the GTX680.


The Gigabyte Z77X-UP7 system finishes the encoding task 4 seconds quicker than the same system running via the ASRock Z77 OC Formula motherboard.
Handbrake is a fantastic free program which we wanted to include to confirm findings with Media Espresso, earlier in the review. HandBrake is an open-source, GPL-licensed, multiplatform, multithreaded video transcoder, available for MacOS X, Linux and Windows.
We used the latest V 0.9.5 for testing today across all platforms. We encoded an DVD.MPG file.

The system completes the same task a couple of seconds faster than the same components paired up with the ASRock Z77 OC Formula.
Shogun 2 is set in 16th-century feudal Japan, in the aftermath of the Ōnin War. The country is fractured into rival clans led by local warlords, each fighting for control. The player takes on the role of one of these warlords, with the goal of dominating other factions and claiming his rule over Japan. The standard edition of the game will feature a total of eight factions (plus a ninth faction for the tutorial), each with a unique starting position and different political and military strengths.


Very similar results between the Gigabyte and ASRock Z77 systems. The older i7 970 overclocked system is noticeably slower at both resolutions.
F1 2012 is a video game developed by Codemasters. It is based on the 2012 Formula One season, and is the sequel to F1 2010 and F1 2011. It is the fourth Formula One game developed by the Codemasters studios after the company renewed its licence to develop the official games of the series. It was announced on March 18, 2012, co-inciding with the first race of the 2012 season. The game features all twelve teams and twenty-four drivers competing in the 2012 season (except for mid-season changes), as well as the twenty circuits and Grands Prix — including the brand new Circuit of the Americas in Austin, Texas — included in the championship.


We configured the system to use 16xQ CSAA and selected the ULTRA preset for maximum eye candy.

Performance with this engine is exemplary, averaging 140 frames per second.
Dirt Showdown is the latest title in the franchise from Codemasters, based around the famous Colin McRae racing game series, although it no longer uses his name, since he passed away in 2007.


We selected the ULTRA preset and also toggled on 16x QCSAA, enough to bring most systems to a frame rate slideshow.

A demanding game, especially as such high image quality settings. The Core i7 970 system is a little juddery, dropping to 23 frames per second a couple of times. The Gigabyte and ASRock Z77 systems are closely matched, although the Gigabyte system has a very slight edge.
Sleeping Dogs started development as an original title, but was announced in 2009 as True Crime: Hong Kong, the third installment and a reboot of the True Crime series. As a result of the game’s high development budget and delays, it was canceled by Activision Blizzard in 2011. Six months later, it was announced that Square Enix had picked up the publishing rights to the game, but the game was renamed Sleeping Dogs in 2012 since Square Enix did not purchase the True Crime name rights.

We are using the highest possible image quality settings at 1080p, including the high resolution texture pack, which is available as an optional extra.

This game is not playable at these settings on the overclocked Core i7 970 system, but it is on the newer Gigabyte and ASRock Z77 systems. Fantastic results.
Max Payne 3 is a third-person shooter in which the player assumes the role of its titular character, Max Payne. Max Payne 3 features a similar over-the-shoulder camera as its predecessors, with the addition of a cover mechanic, while also retaining much of the same run-and-gun style of gameplay. Max Payne 3 also marks the return of bullet-time in action sequences, for which the franchise is notable. In bullet-time it is possible to see every bullet strike an enemy in detail. New to the series is a “Last Stand” mechanic, which gives the player a grace period after losing all health during which time the player may kill the enemy that wounded them in order to continue playing, however this mechanic is only usable if the player has one or more bottles of painkillers in their possession.

We enable Direct X 11, and maximised all the texture, shader and shadow settings. FXAA is set to very high, and MSAA to 4x with 16x anisotropic filtering. The total demand is 1421MB of memory.

One of my favourites games in the last year and it runs fantastic on the Nvidia GTX680. Excellent frame rates for these demanding settings.
Power consumption is very important today, with people more aware of the rising costs of living. Adopting a more efficient computer will reduce the cost across a year. That said, someone running an overclocked, overvolted system will not be that concerned with power consumption.
We used a calibrated meter to measure the power at the wall. No monitors were factored into the readings. All systems included the same graphics card, memory configuration and hard drive population.
We measured wattage at the socket when running Cinebench R11.5 64 bit which loads all cores to 100% utilisation. The graphics card was inactive during the reading.

When we overclock the Core i7 3770k to 4.8ghz it demands 230 watts of power at the socket. It drops to around 120 watts when idle.
The Gigabyte Z77X-UP7 is a monster of a motherboard, priced to cater for the ultra high end, overclocking audience.
Make no mistake, this isn't designed to meet a specific price point, as Gigabyte have pulled out all the stops to create a one of a kind flagship product. At a retail price of £310 inc vat there is no doubt that only a small portion of the enthusiast audience will be able to afford the Z77X-UP7.
First impressions are worth discussing, because it isn't often that we see such a beautifully designed product. The bright, yet seductive orange colour scheme will always remind me of Austrian motorbike maker KTM, not a bad thing as they make some of the finest motorbikes on the market. I really do love the appearance of this motherboard, and it would look fabulous inside a high end windowed case with orange LED lighting throughout.
Gigabyte have adopted a 32+3+2 phase power design which is probably the finest on the market right now. This is supported by very high grade heatsinks on the VRM's and these are easily removed if Liquid Nitrogen is your cooling material of choice. Gigabyte say this board can handle 2,000W of power delivery and it costs an inordinate lot of money to produce the Z77X-UP7, so the hefty price tag is certainly justified.
Overclocking the 3770k was very easily, and we achieved a 5.3ghz post, although the voltage was very high and we wouldn't be happy running like this for any length of time. Getting this board stable at 5.2ghz would be possible, with high end water cooling.
In the end we opted for a 4.8ghz-4.9ghz figure which would be usable with a high end ‘mainstream' cooler such as the Corsair H100. Obviously every 3770k sample will be slightly different.
Our test results verify that the board delivers the ultimate performance on the Z77 platform, even outperforming the excellent ASRock Z77 OC Formula motherboard which we reviewed a short while ago. Memory bandwidth with Corsair Dominator Platinum at 2,666mhz produced a result of almost 31Gb/s, this is a class leading result for a dual channel platform.
The connectivity of the Z77X-UP7 is also well worth a mention. There are two Gigabit LAN ports onboard, and a plethora of SATA and USB connectors. The board is designed to be used outside a case as there are reset, power, CMOS clear and OC buttons available at the fingertips. Gigabyte are also using the PLX8747 chip which gives another 48 PCI express lanes for additional gaming performance.
The only negative point I could mention, would be Gigabyte's insistence on splitting the overclocking voltage and tweak options into around 5 or 6 different BIOS panels. I find it slows me down when changing settings, as you have to constantly press the ESC key to get back out to the main menu interface to navigate to the next section. Just ditch all these panels and put the controls into a single scrollable panel. Please?
In closing, we have no hesitation in recommending this motherboard, if you have £300 to spare and want the best Z77 motherboard on the market, then this is the one to get.

ARIA are the cheapest in the United Kingdom right now, offering the board for £299.99 inc vat.
Pros:
- No expense spared design including a class leading power deliver design.
- Looks beautiful.
- connectivity.
- OC buttons on the PCB.
- overclocks very easily.
Cons:
- Expensive.
- put all the BIOS overclocking options into a single panel, not 5+
Kitguru says: One of the finest motherboards we have tested to date and probably the leading board for the Z77 platform.


Well colour me impressed with that one.
Thats a hell of a Z77 motherboard, with a price tag to match. I heard they broke a 7 ghz record with this board on LN2.
Its a heck of a talking point, even if its more expensive than many of the flagship X79 boards.
My last gigabyte motherboard was great, but I opted for ASUS this time around as I had a few issues with the bios on the gigabyte board defaulting the memory to 1333mhz on every hard post up.
Bought one, but ill enter the competition too, as im greedy 🙂
Thats a sublime piece of engineering. very costly, but nice to see companies pushing the boundaries.
that is not a motherboard, it’s a monster-board LOL
it must be very easy for this board to overclock a k-series sandy or ivy.. nice color theme as well but I still wish gigabyte offer something in red…
This board is going on my Christmas list …
Dear Santa…
KaaaBOOMM And the song changes to Who let the dawg out, NO No its Who let the BIG DAWG BEAST OUT? So who said Christmas doesn’t come in JULY!!! hell-o income tax check lol?