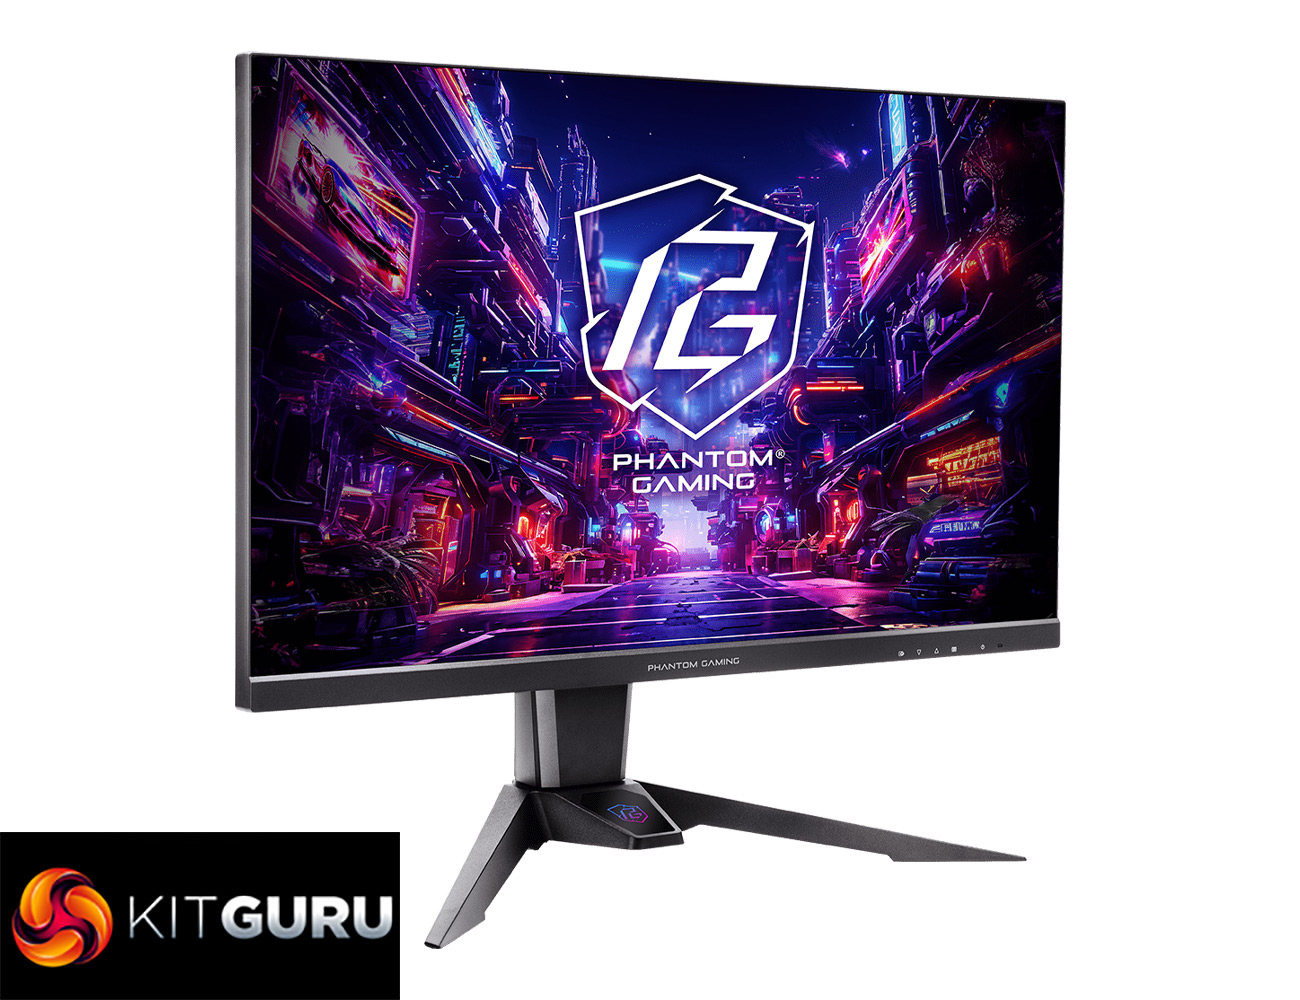
After checking out a lot of high-end monitors recently – including a bevy of high refresh-rate OLED screens – today we are looking at something more mainstream from a relative newcomer to the monitor market. The ASRock PG27QFT2A offers a 2560×1440 resolution, 180Hz refresh-rate IPS panel for a price of £220 here in the UK, so it's firmly targeting the mass market. We put it through its paces today and find out just how well it performs.
Its spec may be relatively conventional, but there's no doubt that 1440p 144Hz+ is firmly becoming the new entry level for PC gamers, so it's great to see more and more options that are sensibly priced. The ASRock PG27QFT2A is one such screen, but it also has a trick up its sleeve to help set it apart from the competition, as you can actually use the monitor stand as a WiFi antenna. How useful that sounds to you will depend entirely on your WiFi situation, as many gamers play wired, but it is certainly a unique feature we have never seen before!
Timestamps
00:00 Intro
00:54 Design overview
02:28 I/O and OSD
04:01 Panel analysis
05:03 Can we improve the colour balance?
07:33 Calibrated performance
08:42 Response time testing
10:00 UFO images
10:53 Real-world gaming experience
11:59 Built-in WiFi antenna testing
13:00 Closing thoughts
Specification:
- Panel Size: 27 (inch)
- Curvature: Flat
- Aspect Ratio: 16:9
- Viewing Area: 596.736(H) x 335.664(V)
- Pixel Pitch: 0.2331 (mm)
- Panel Type: IPS
- Display Surface: Anti-Glare
- Color Space: 99% sRGB / 90% DCI-P3
- Resolution: QHD (2,560 x 1,440)
- Refresh Rate: 180Hz (Max.)
- Brightness: 400 cd/m² (Typ.)
- Contrast Ratio: 1000:1 (Typ.)
- View Angle: 178°(H) / 178°(V)
- Display Colors: 1.07B
- Response Time: 1ms(MPRT), 5ms(GTG)
- Flicker-free: Yes
- Low Blue Light: Yes
- Unique Feature: Integrated Wi-Fi Antenna (7dBi) – Compatible with Wi-Fi 4/5/6/6E/7
- I/O Ports:
- 2 x HDMI™ 2.0
- 1 x DisplayPort™ 1.4
- 1 x Earphone Jack
- Speaker: 2W x 2
- 100~240Vac, 50/60Hz, 1.5A
- Power Consumption (Max): ≦55W;
- Power Saving: ≦0.5W;
- Power Off: ≦0.3W
- Tilt Adjustment: -5° ~ +20°
- Swivel Adjustment: -20° ~ +20°
- Height Adjustment: 0~100 mm
- VESA Mounting: Plate Type: 100 x 100mm (4 screw holes)
- Screw Type: M4 x 12 mm
- Dimension with Stand: 614x542x258 (mm)
- Dimension without Stand: 614x366x72 (mm)
- Net Weight with Stand: 7.7kg
- Net Weight without Stand: 5.45kg
- Gross Weight: 9.7kg
- Accessories:
- 1 x HDMI v2.0
- 1 x DP v1.4
- 1 x US PowerCord
- 1 x Quick Start Guide
- 1 x Wi-Fi Antenna Cables Set
- 1 x Phantom Gaming Cable Sleeve
- Certificate:
- VESA DisplayHDR™ 400
- AMD FreeSync™
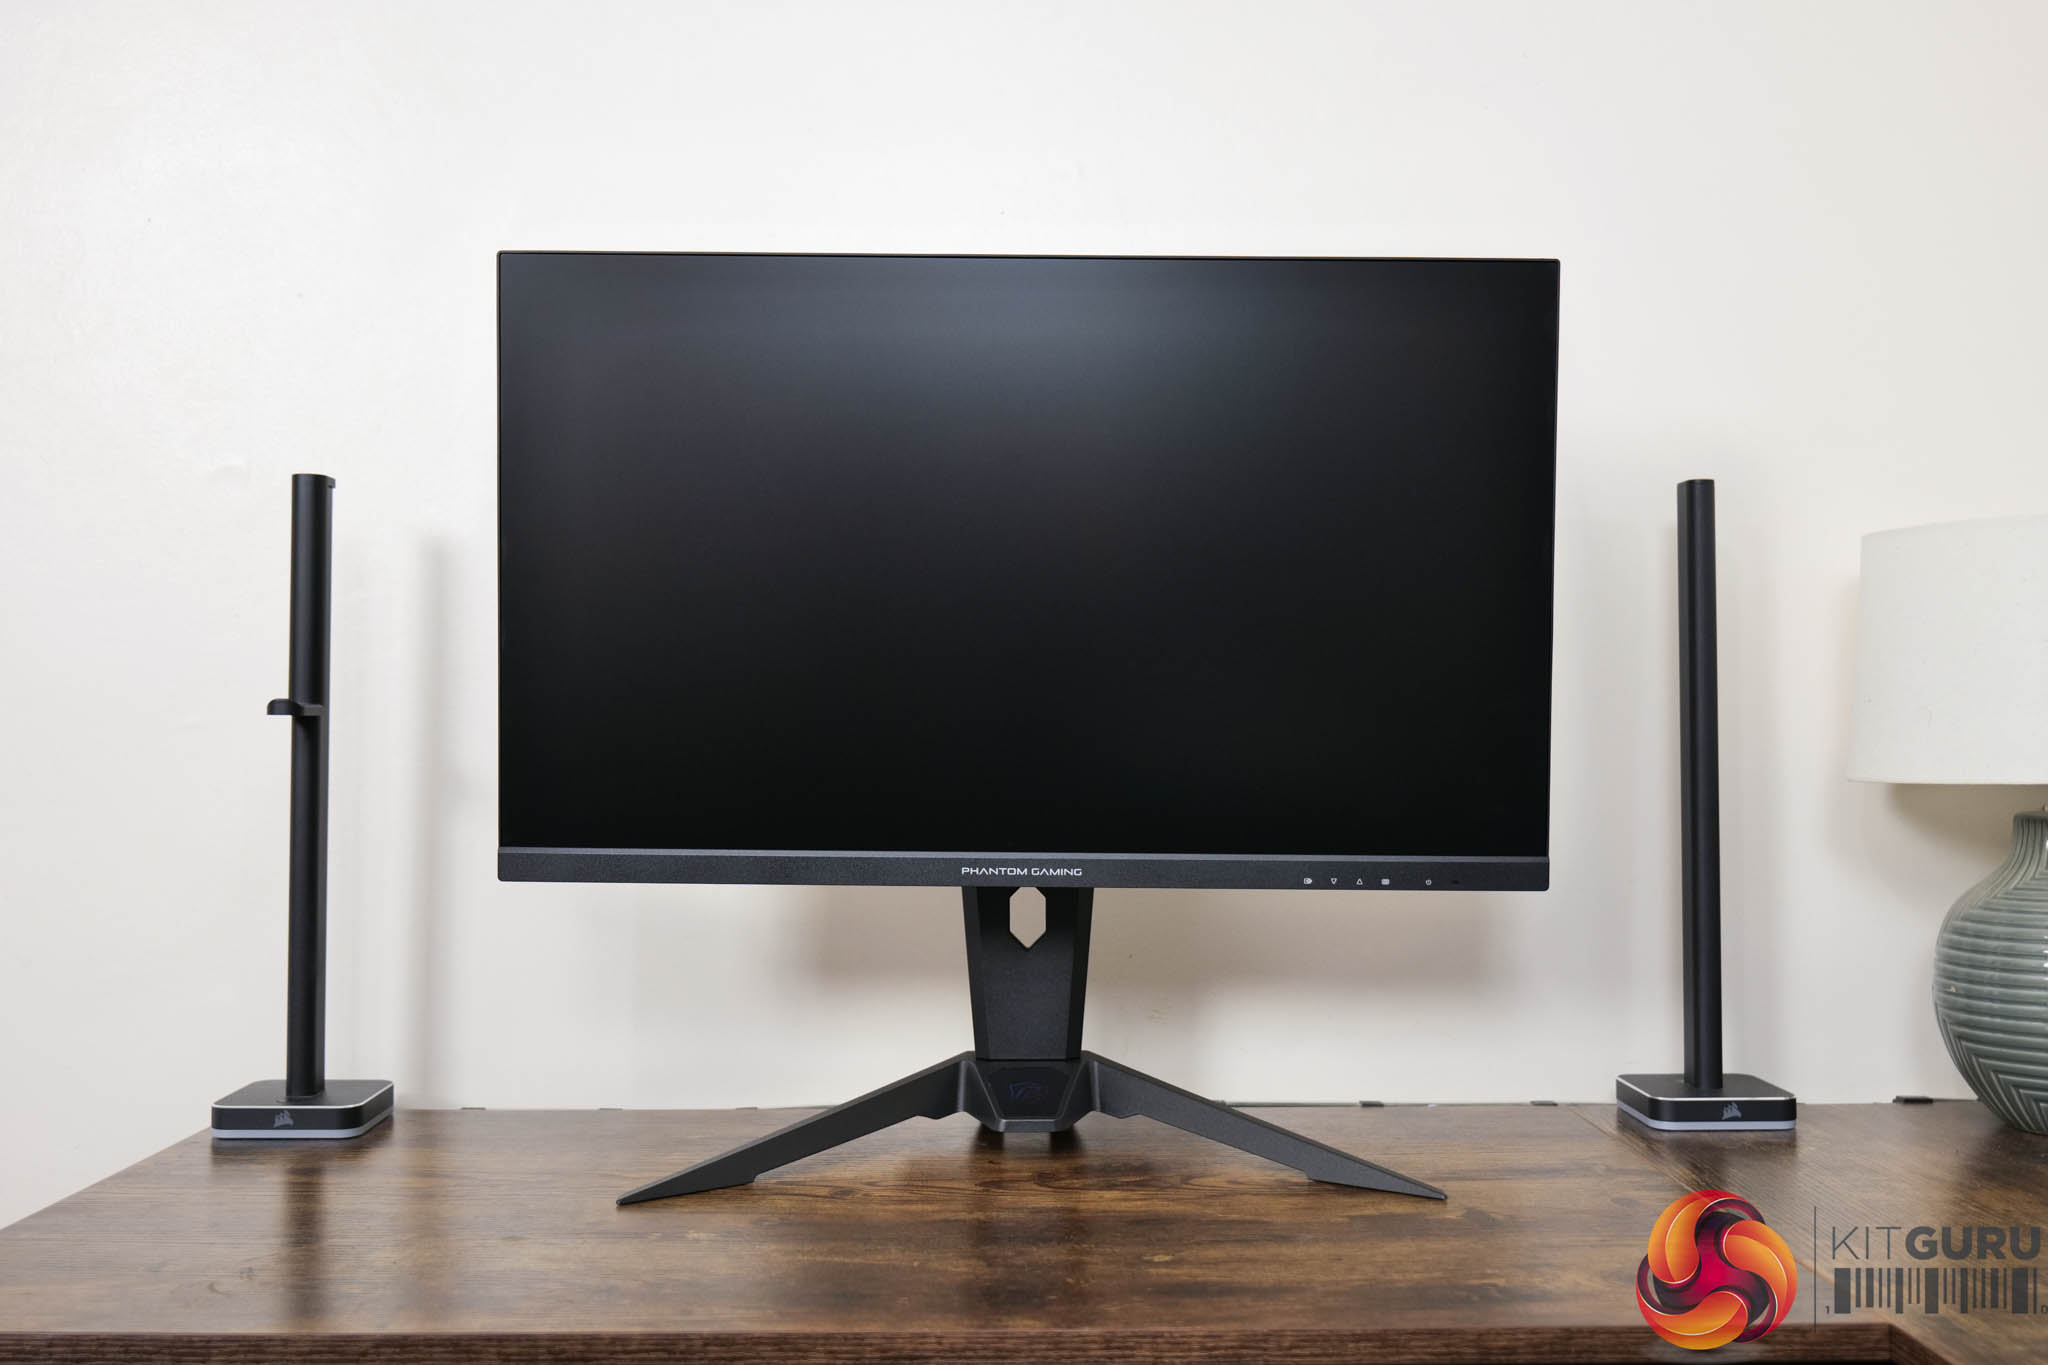
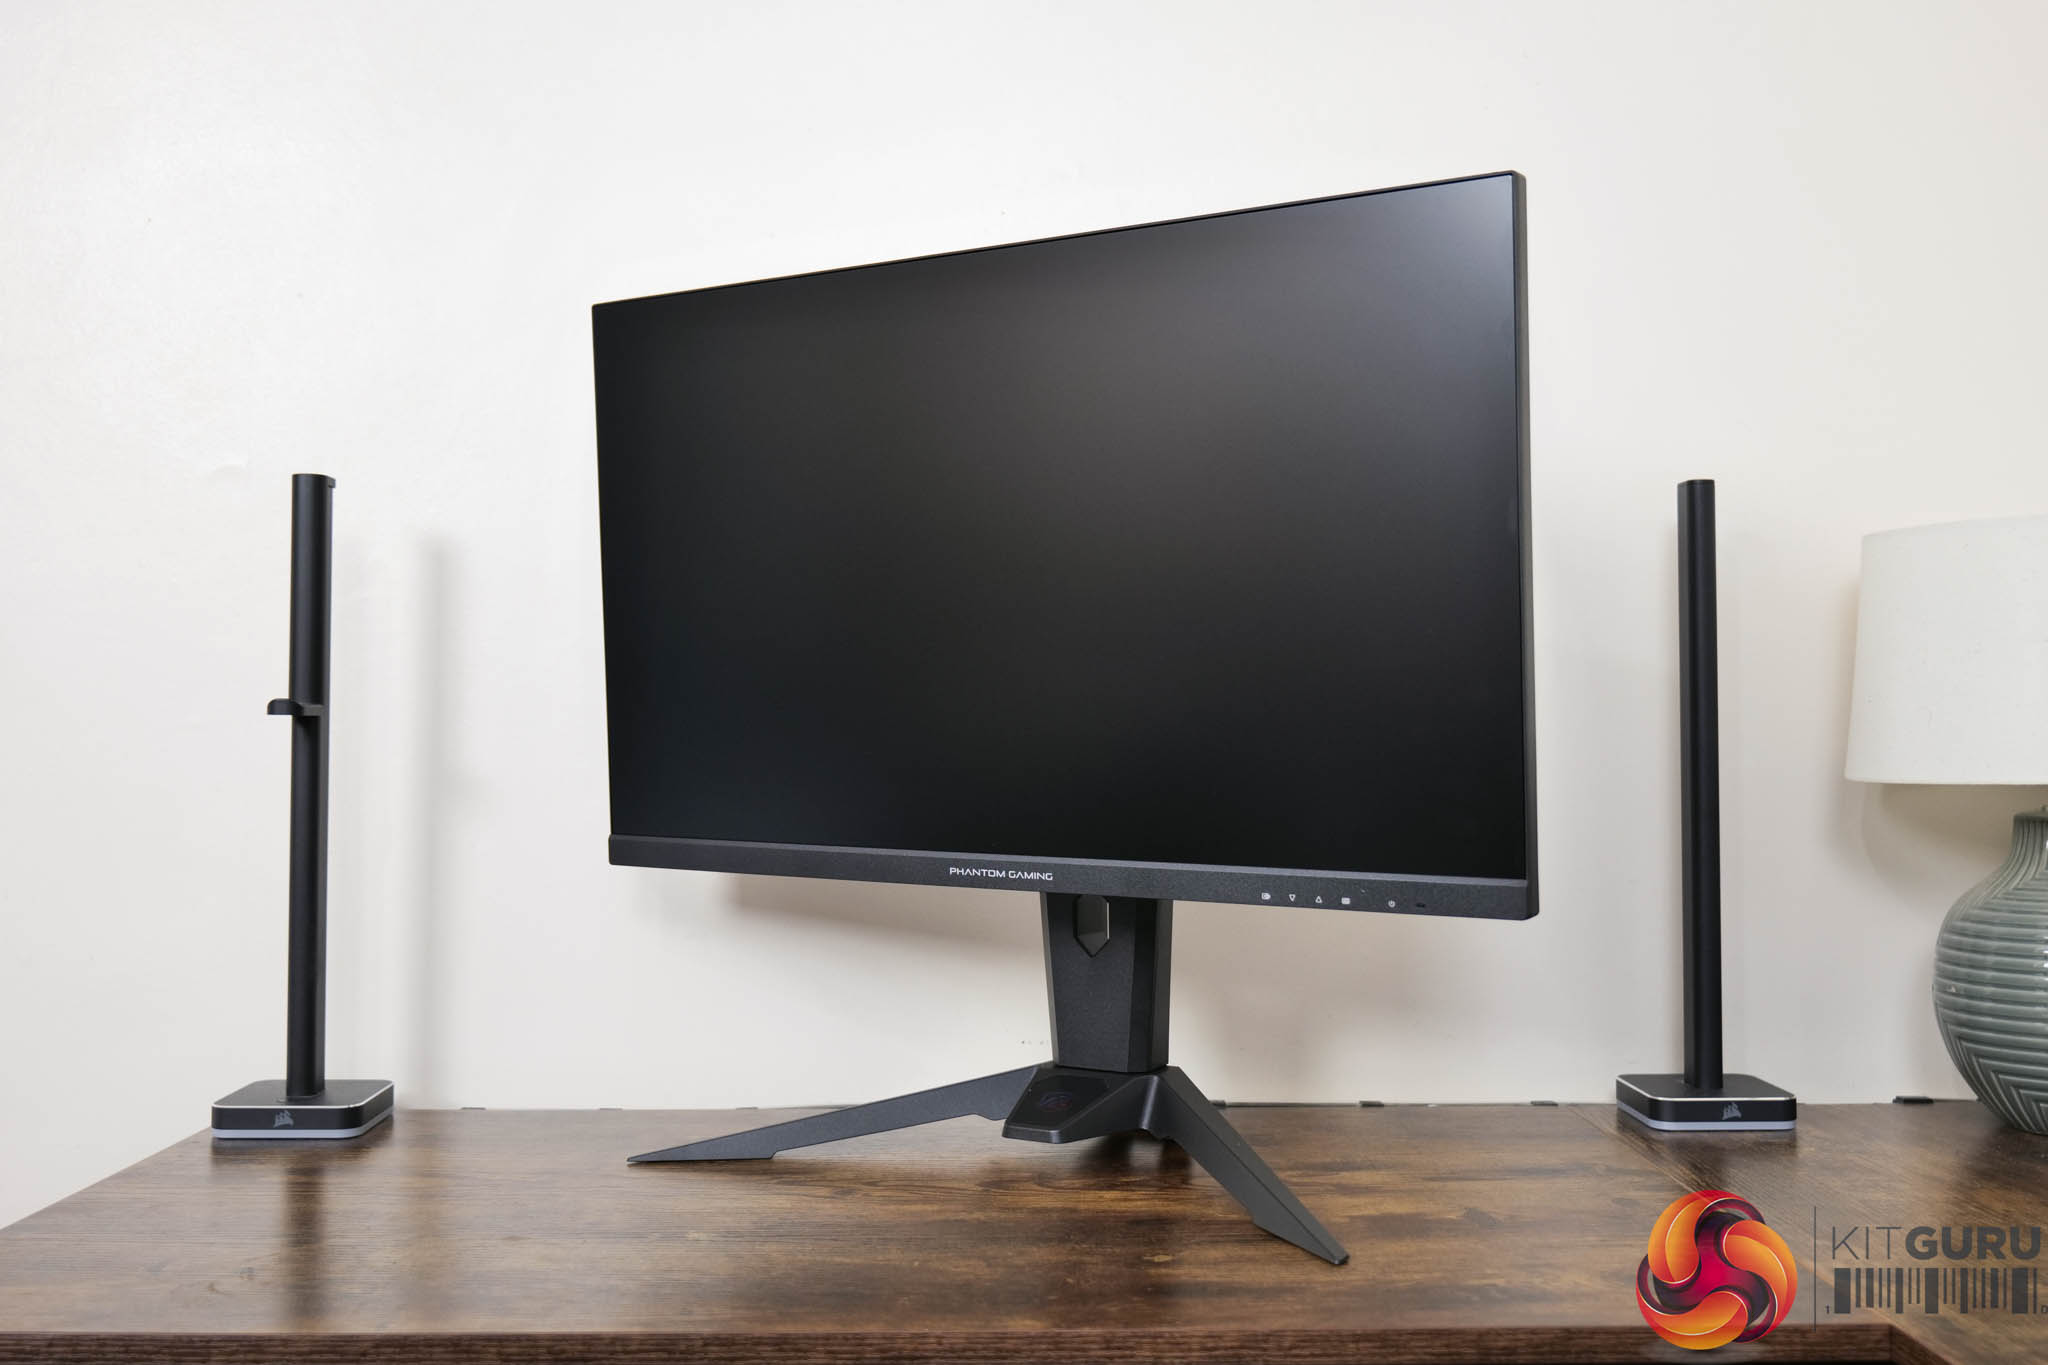
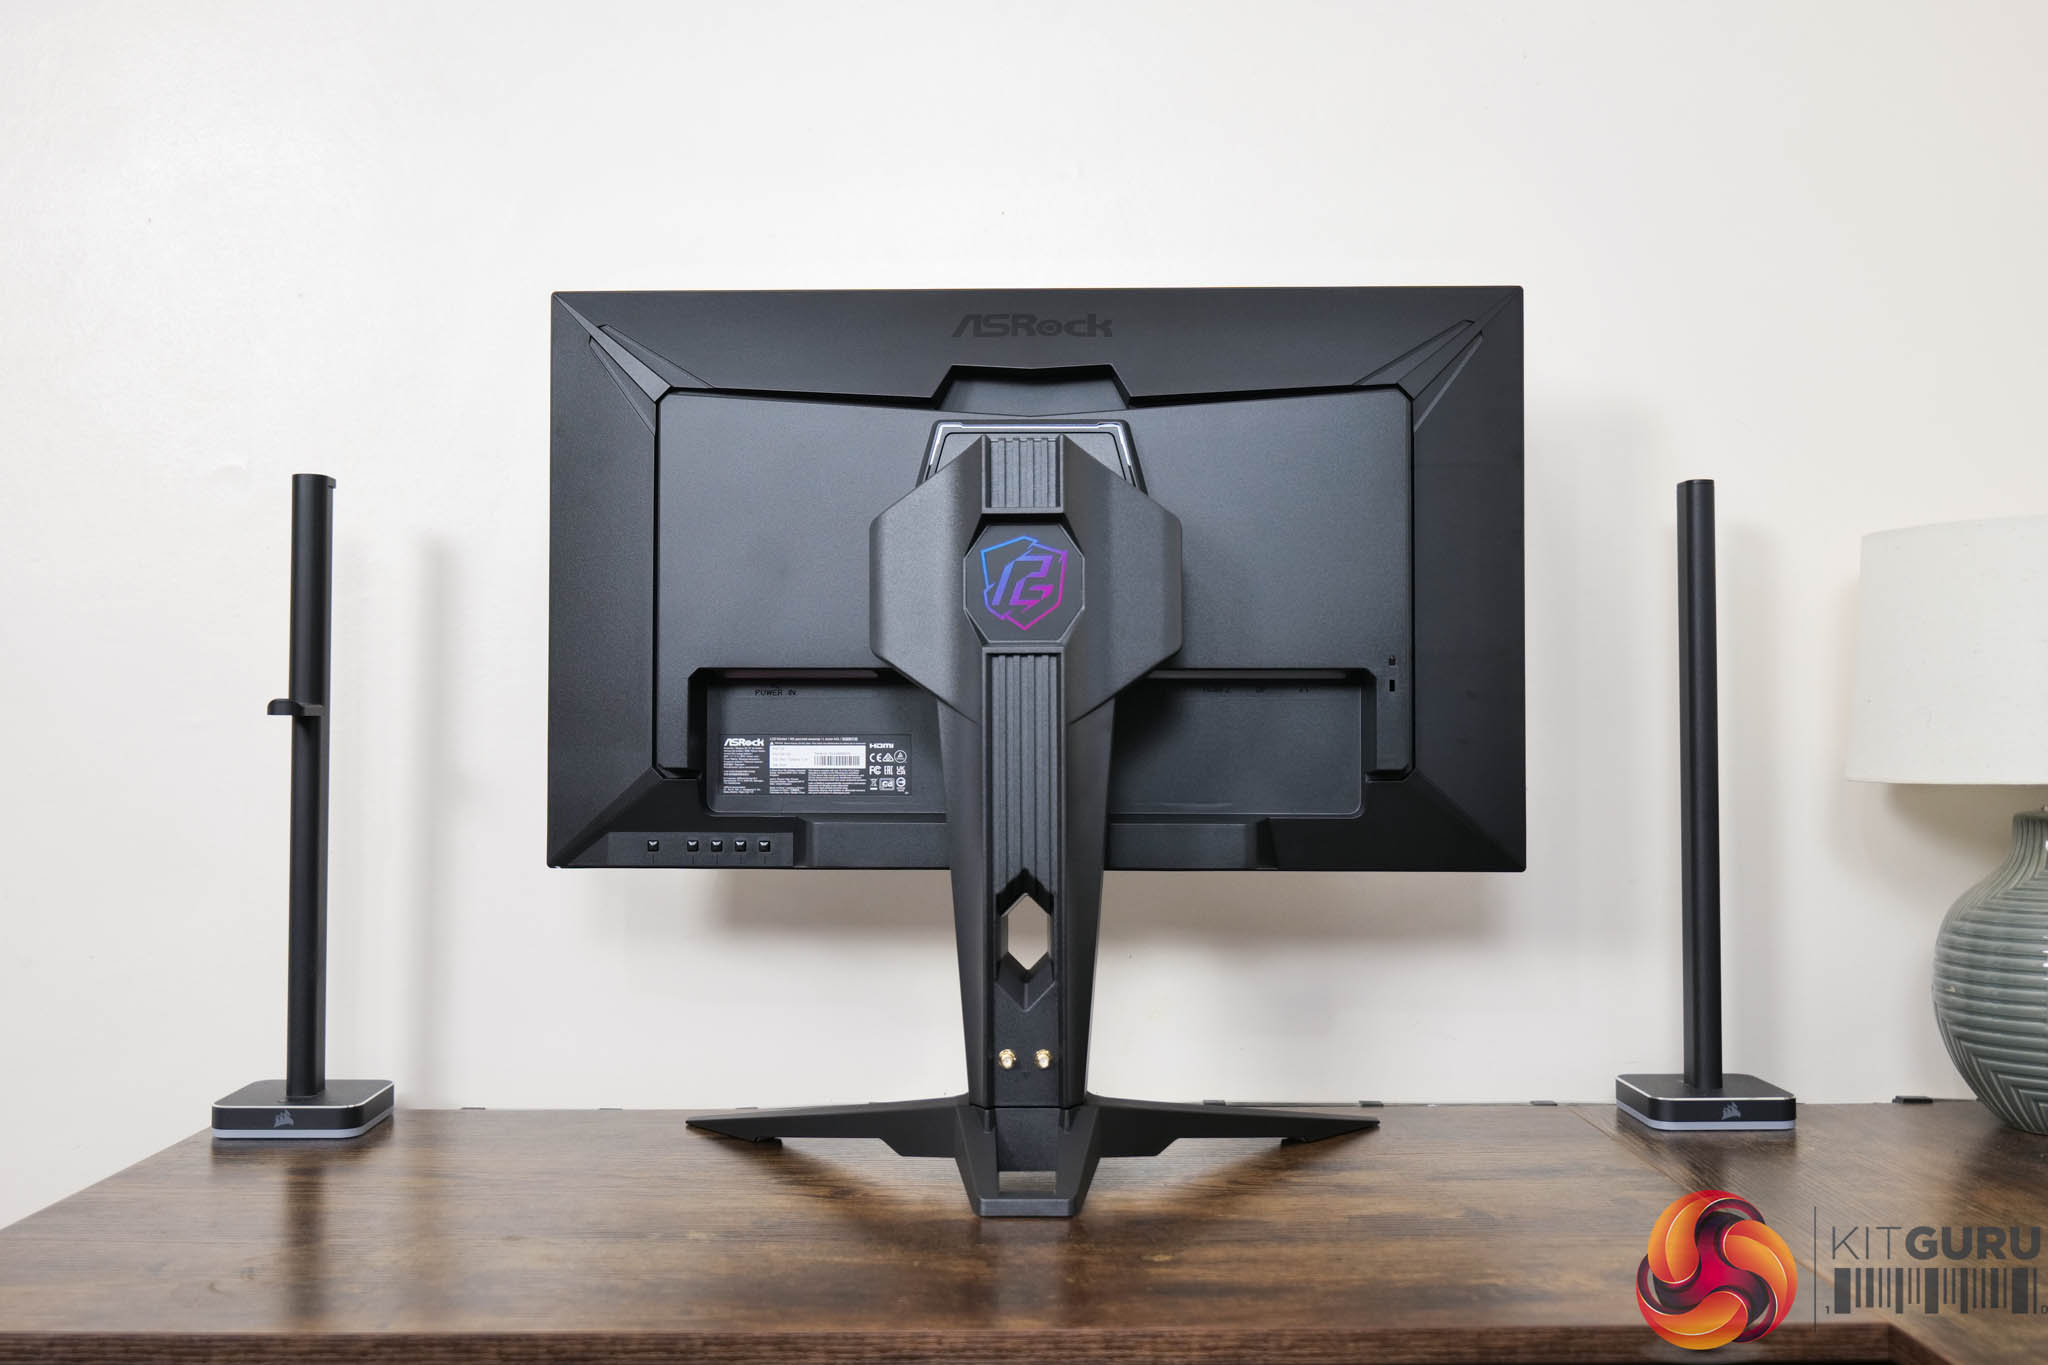
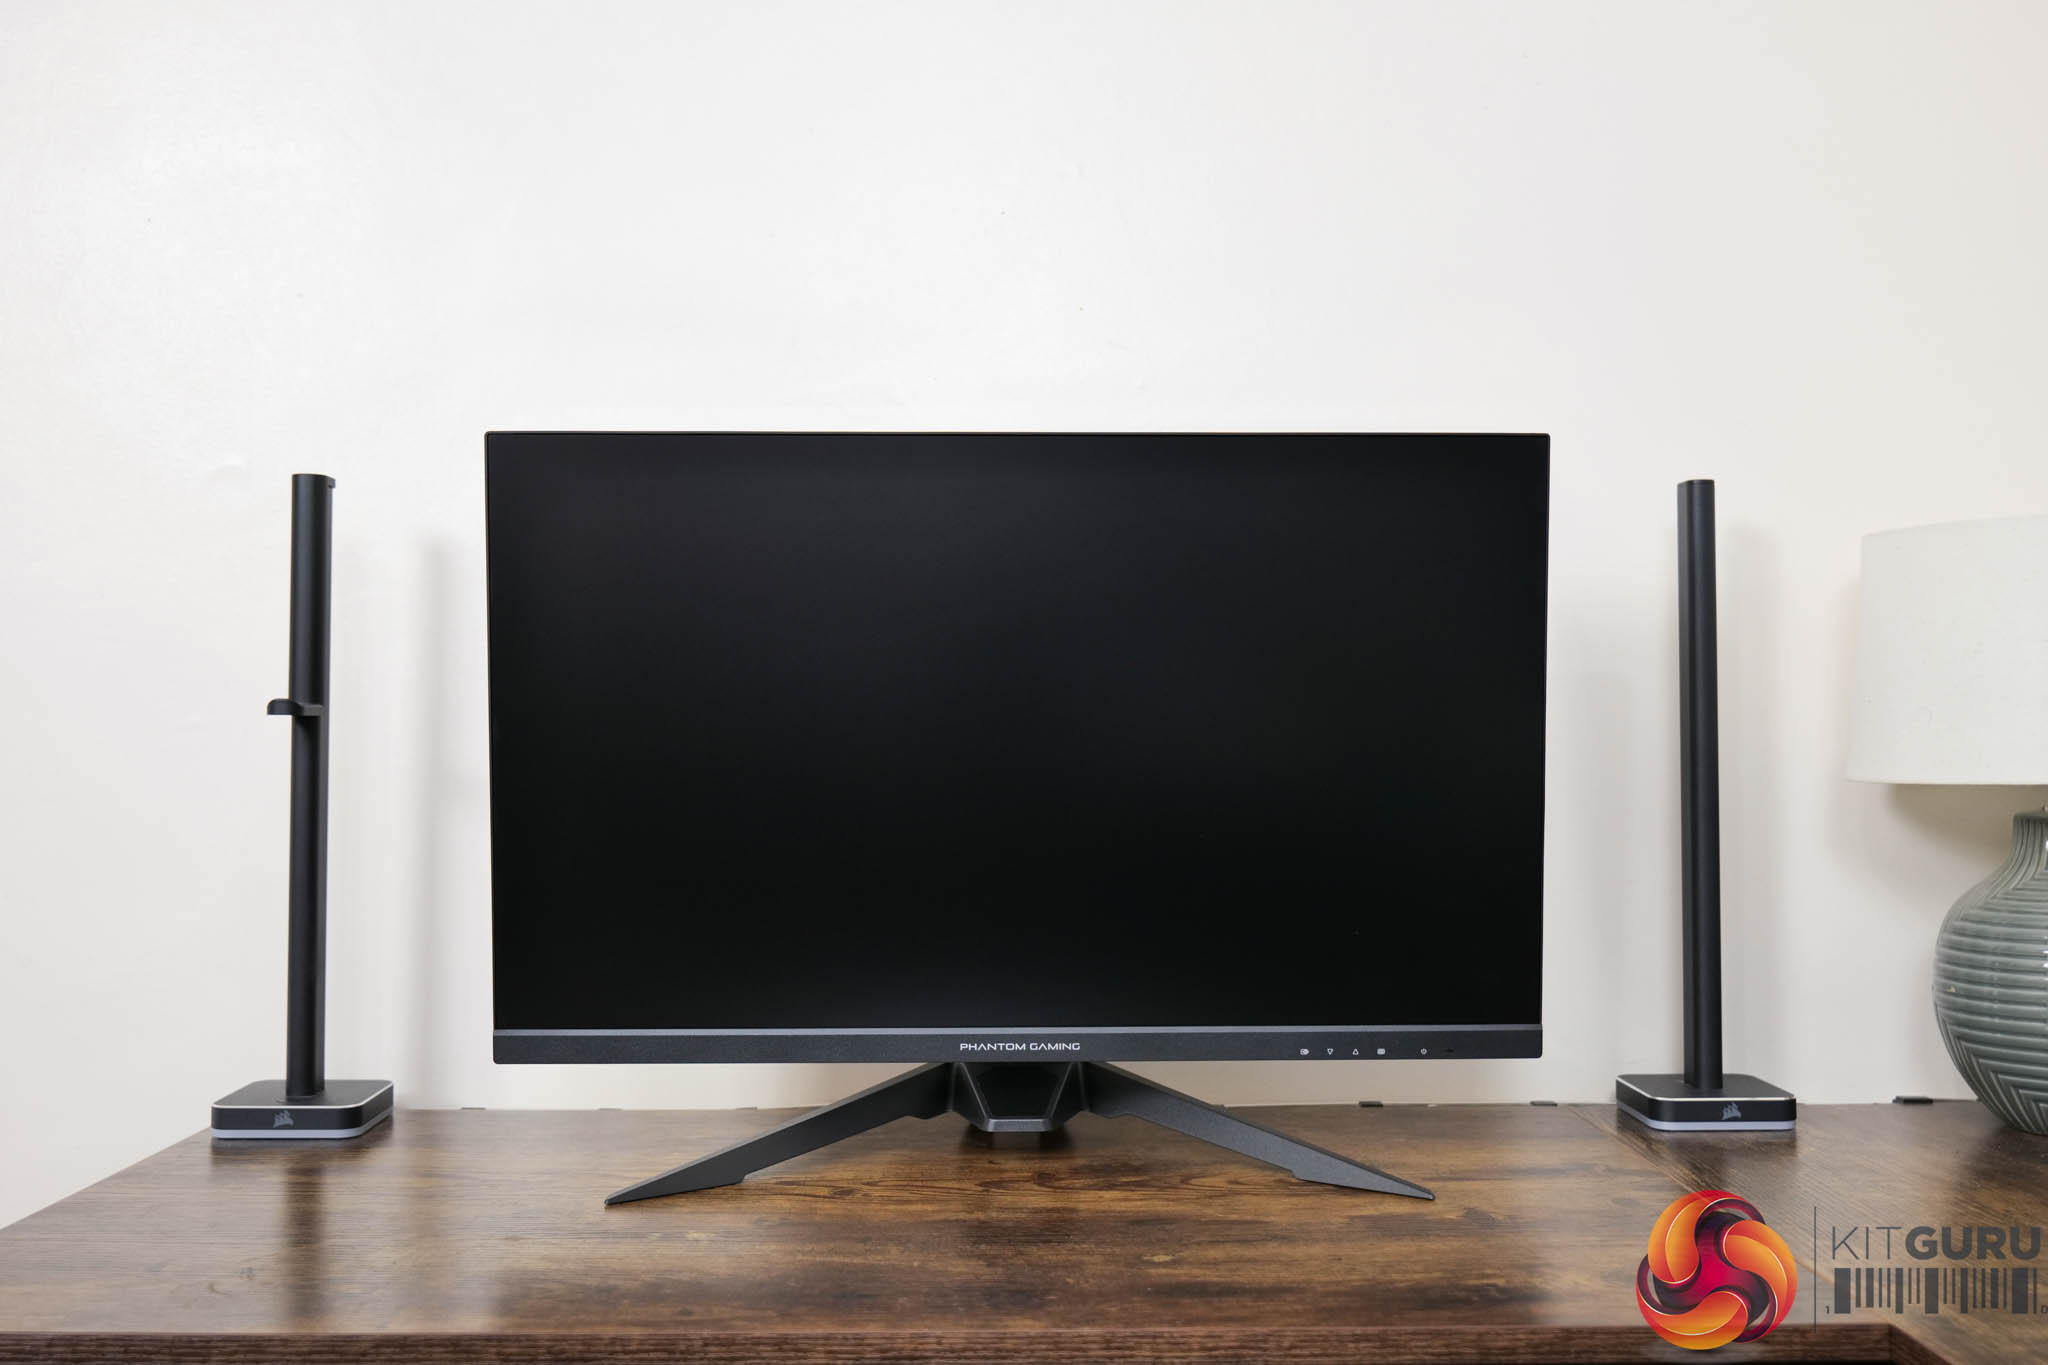
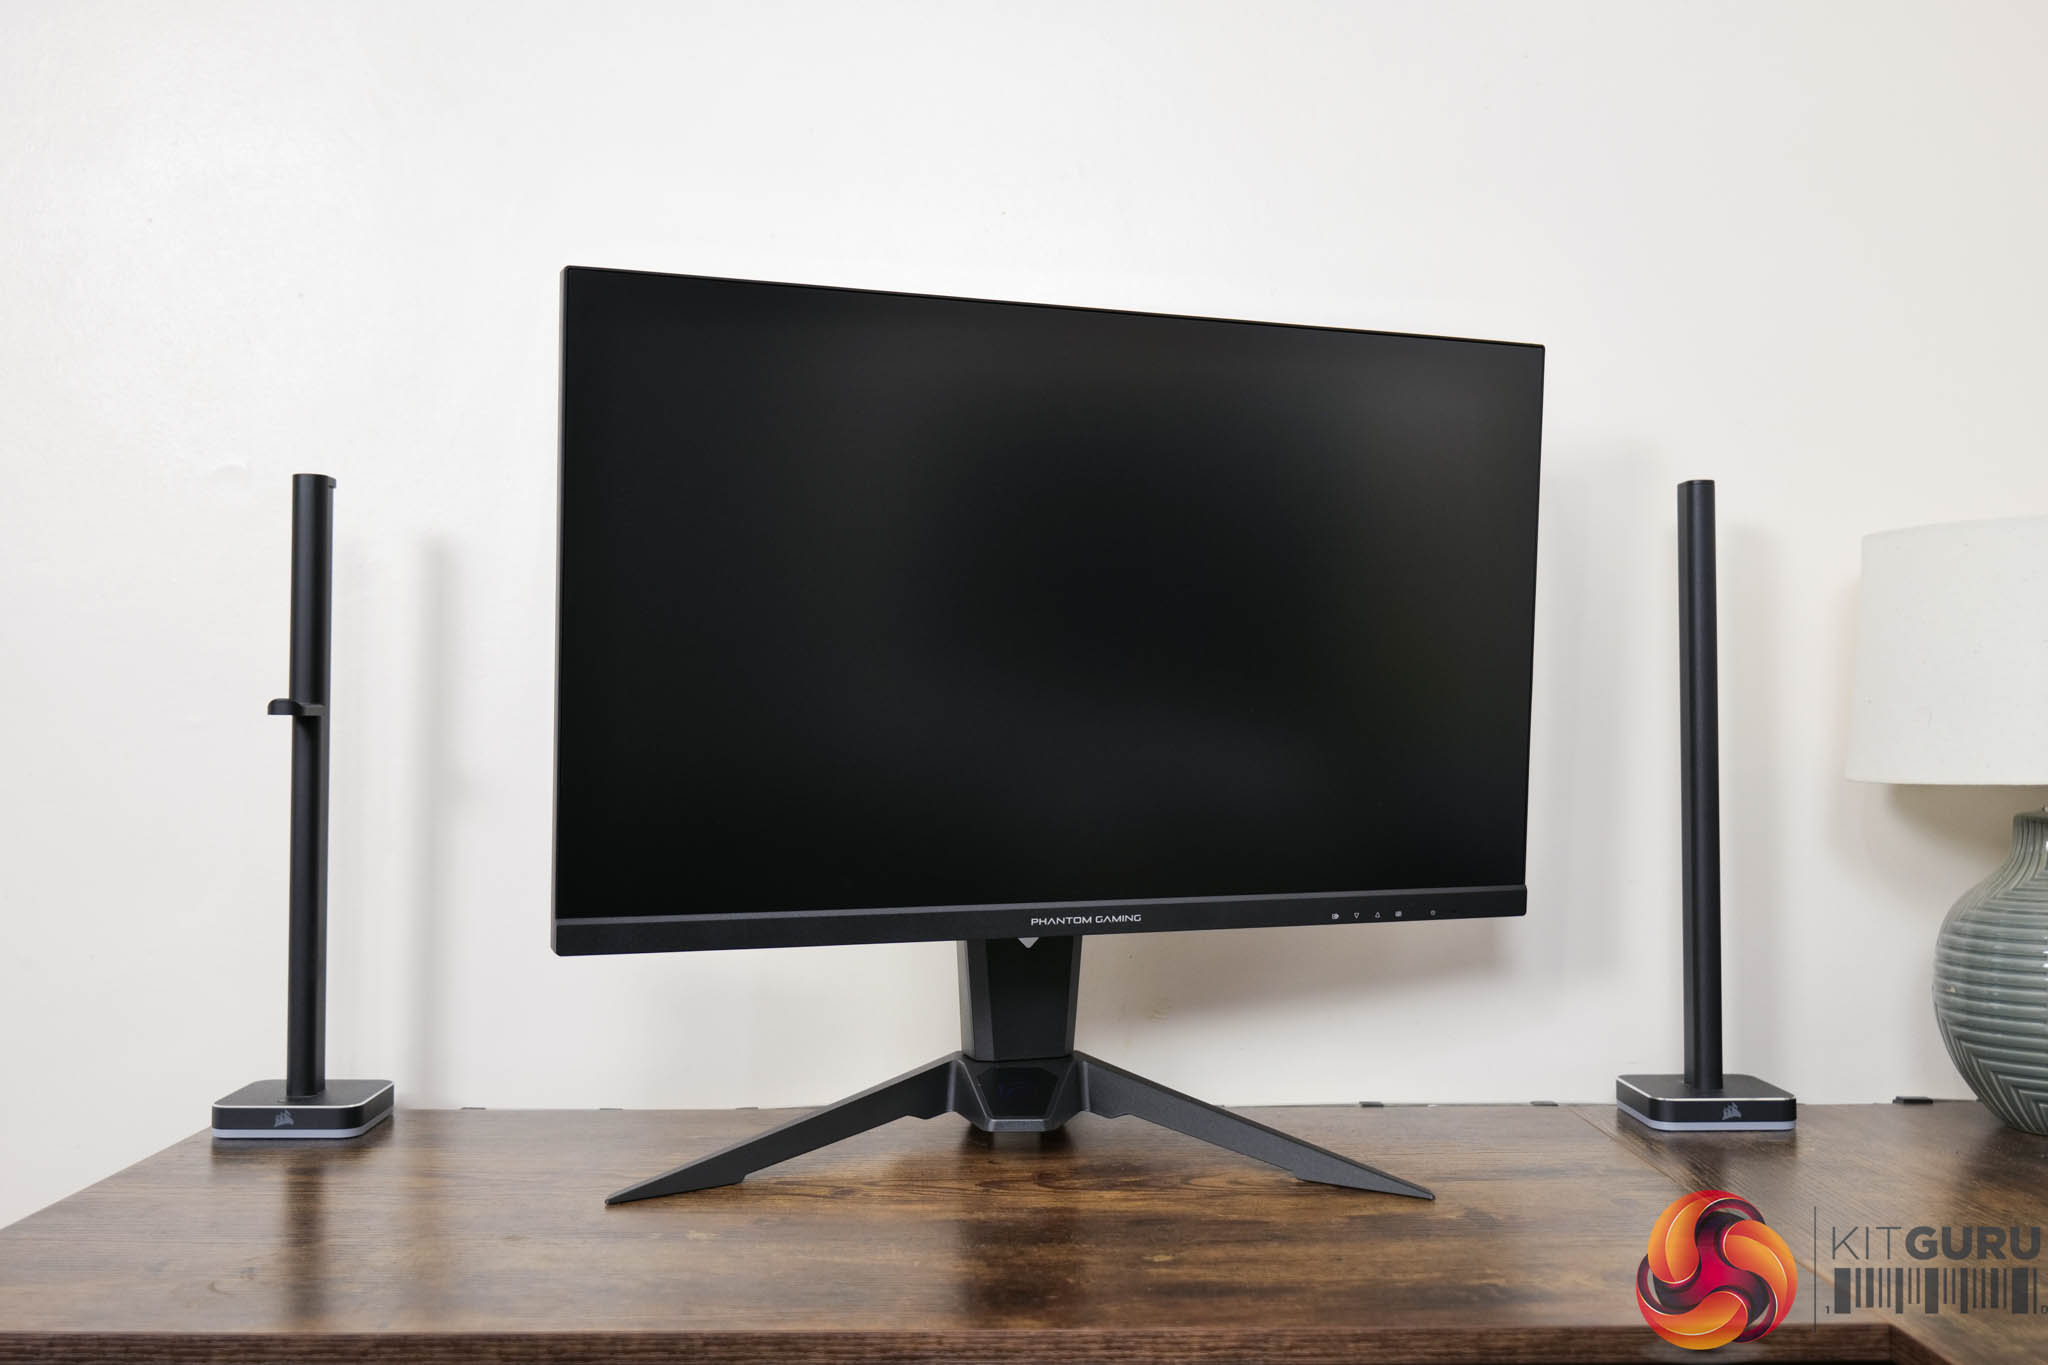
Kicking things off with the design of the ASRock PG27QFT2A, this is a relatively conventional-looking monitor. ASRock has opted for a three-sided ‘frameless' design on the front, while the chin is a bit thicker, measuring approximately 20mm. Round the back we can see a relatively simple matte black plastic design, thought the Phantom Gaming (PG) logo adds a splash of colour.
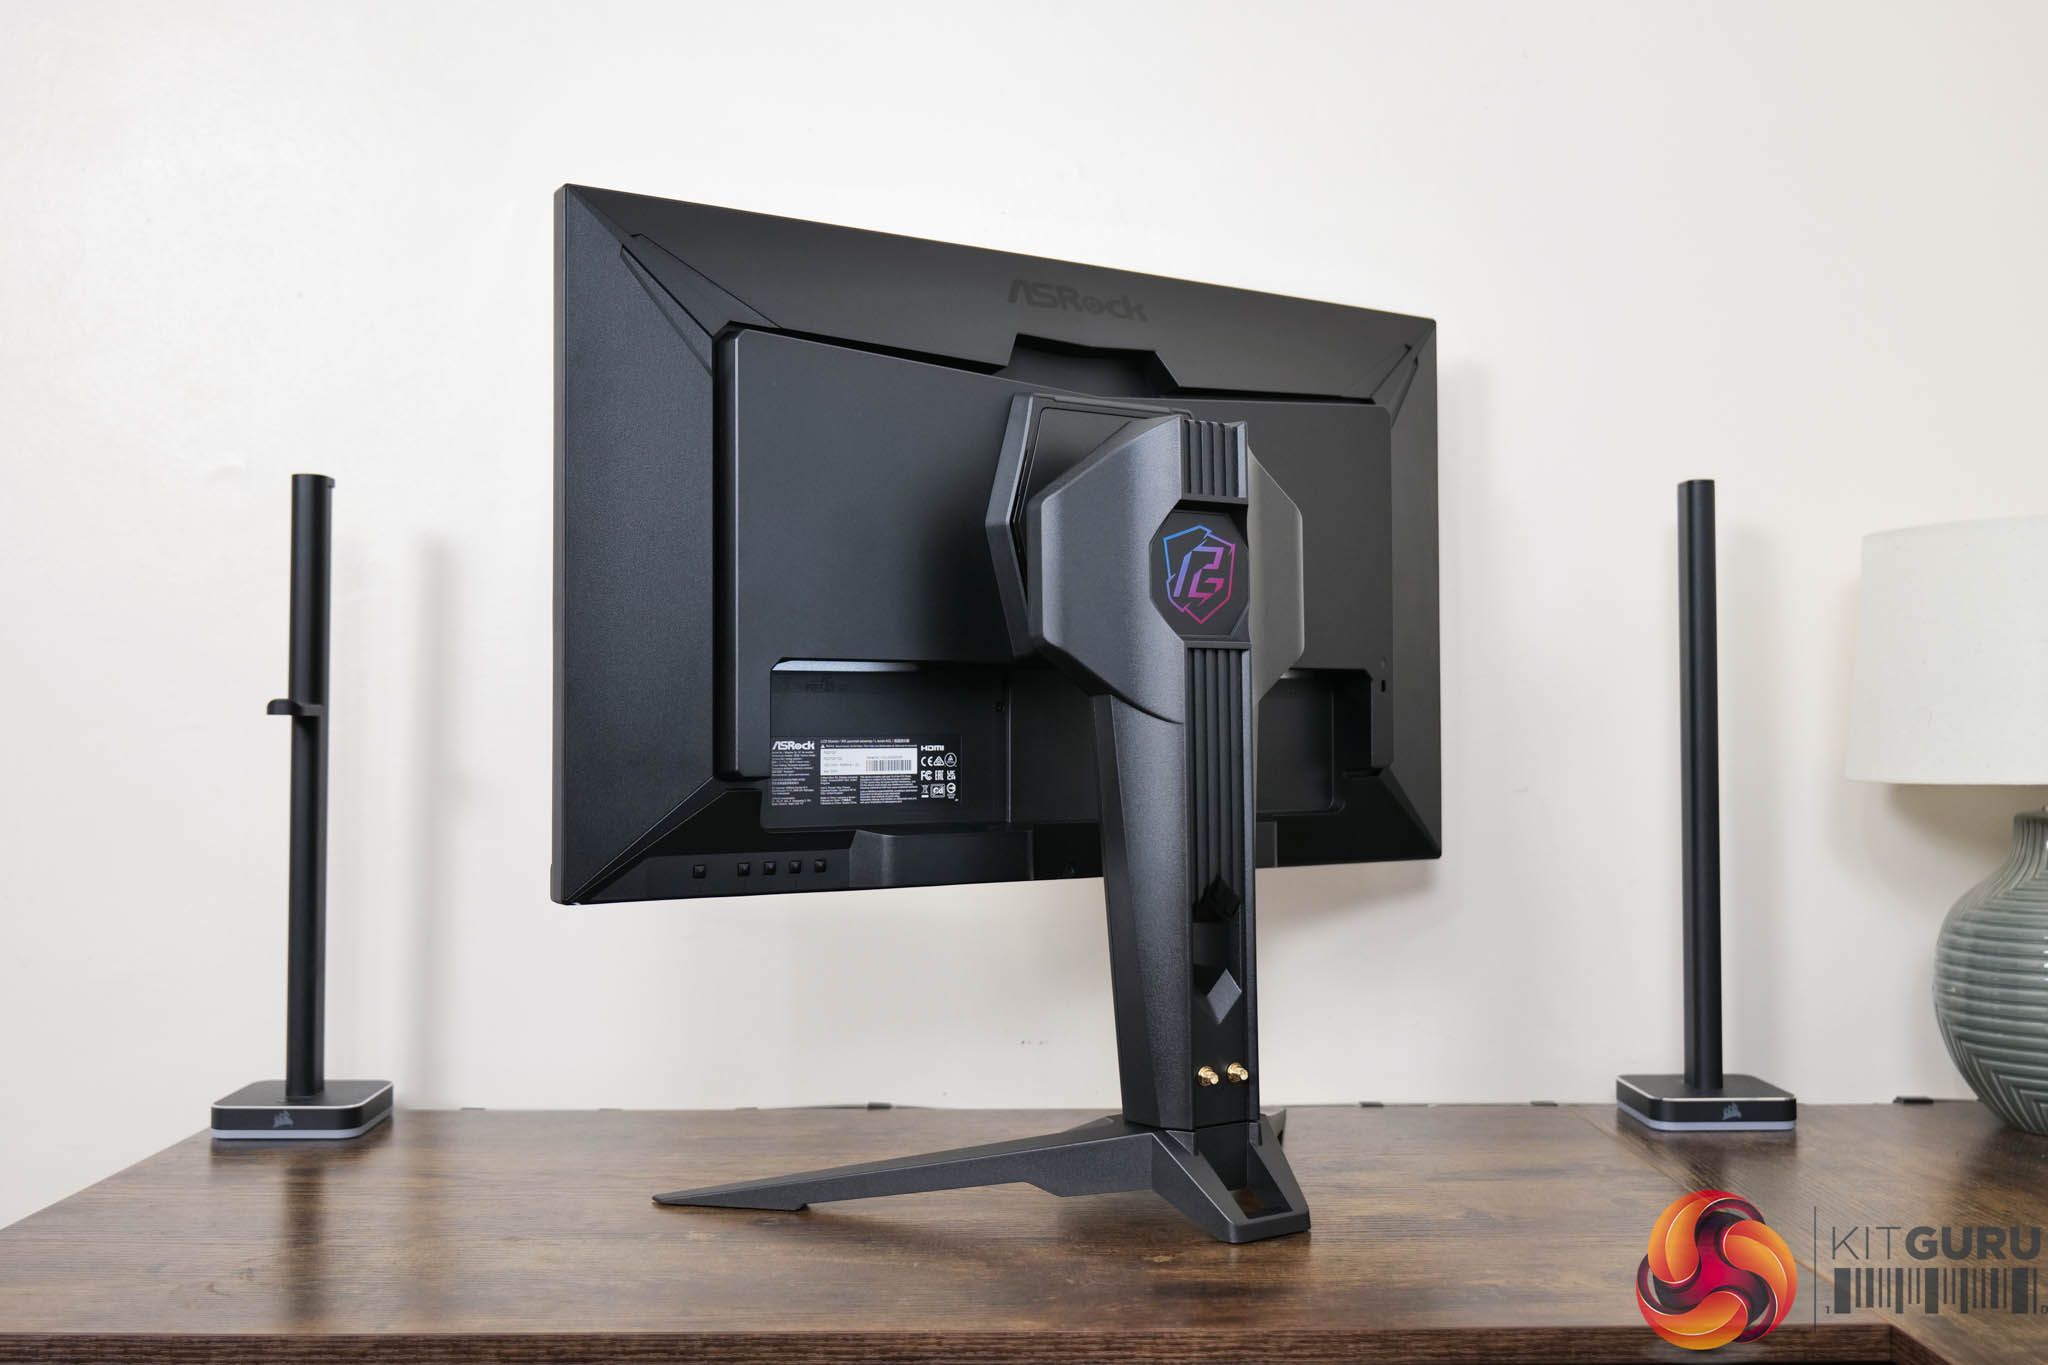
The stand, you will note, is relatively chunky and that may well have something to do with the built-in WiFi antenna capabilities, though it also means the monitor feels reassuringly sturdy. ASRock is using a traditional v-shaped foot, and that measures approximately 45cm across.
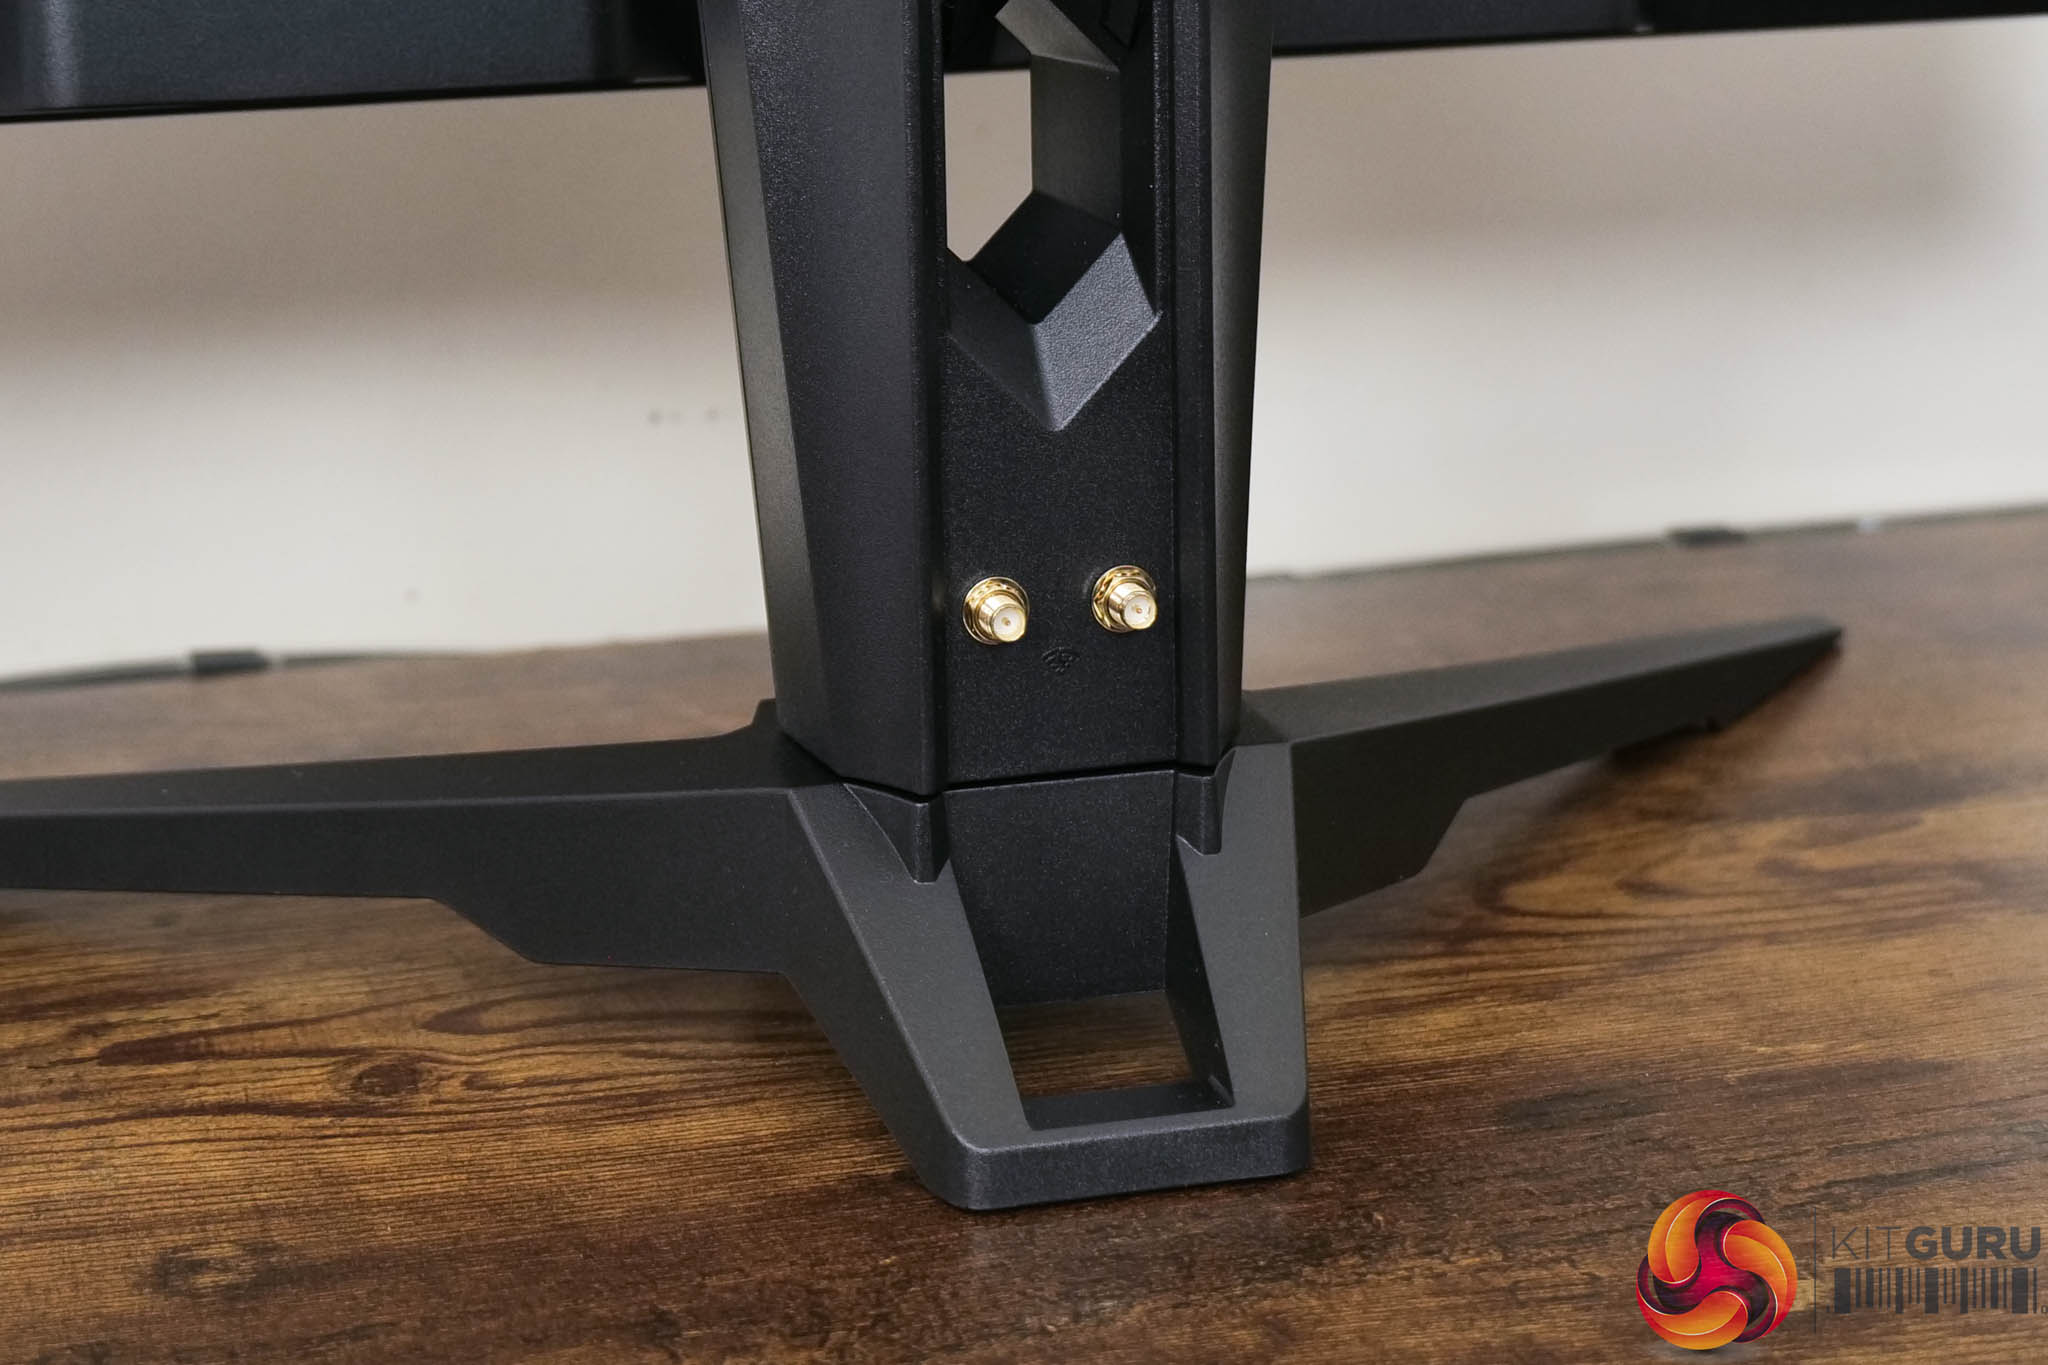
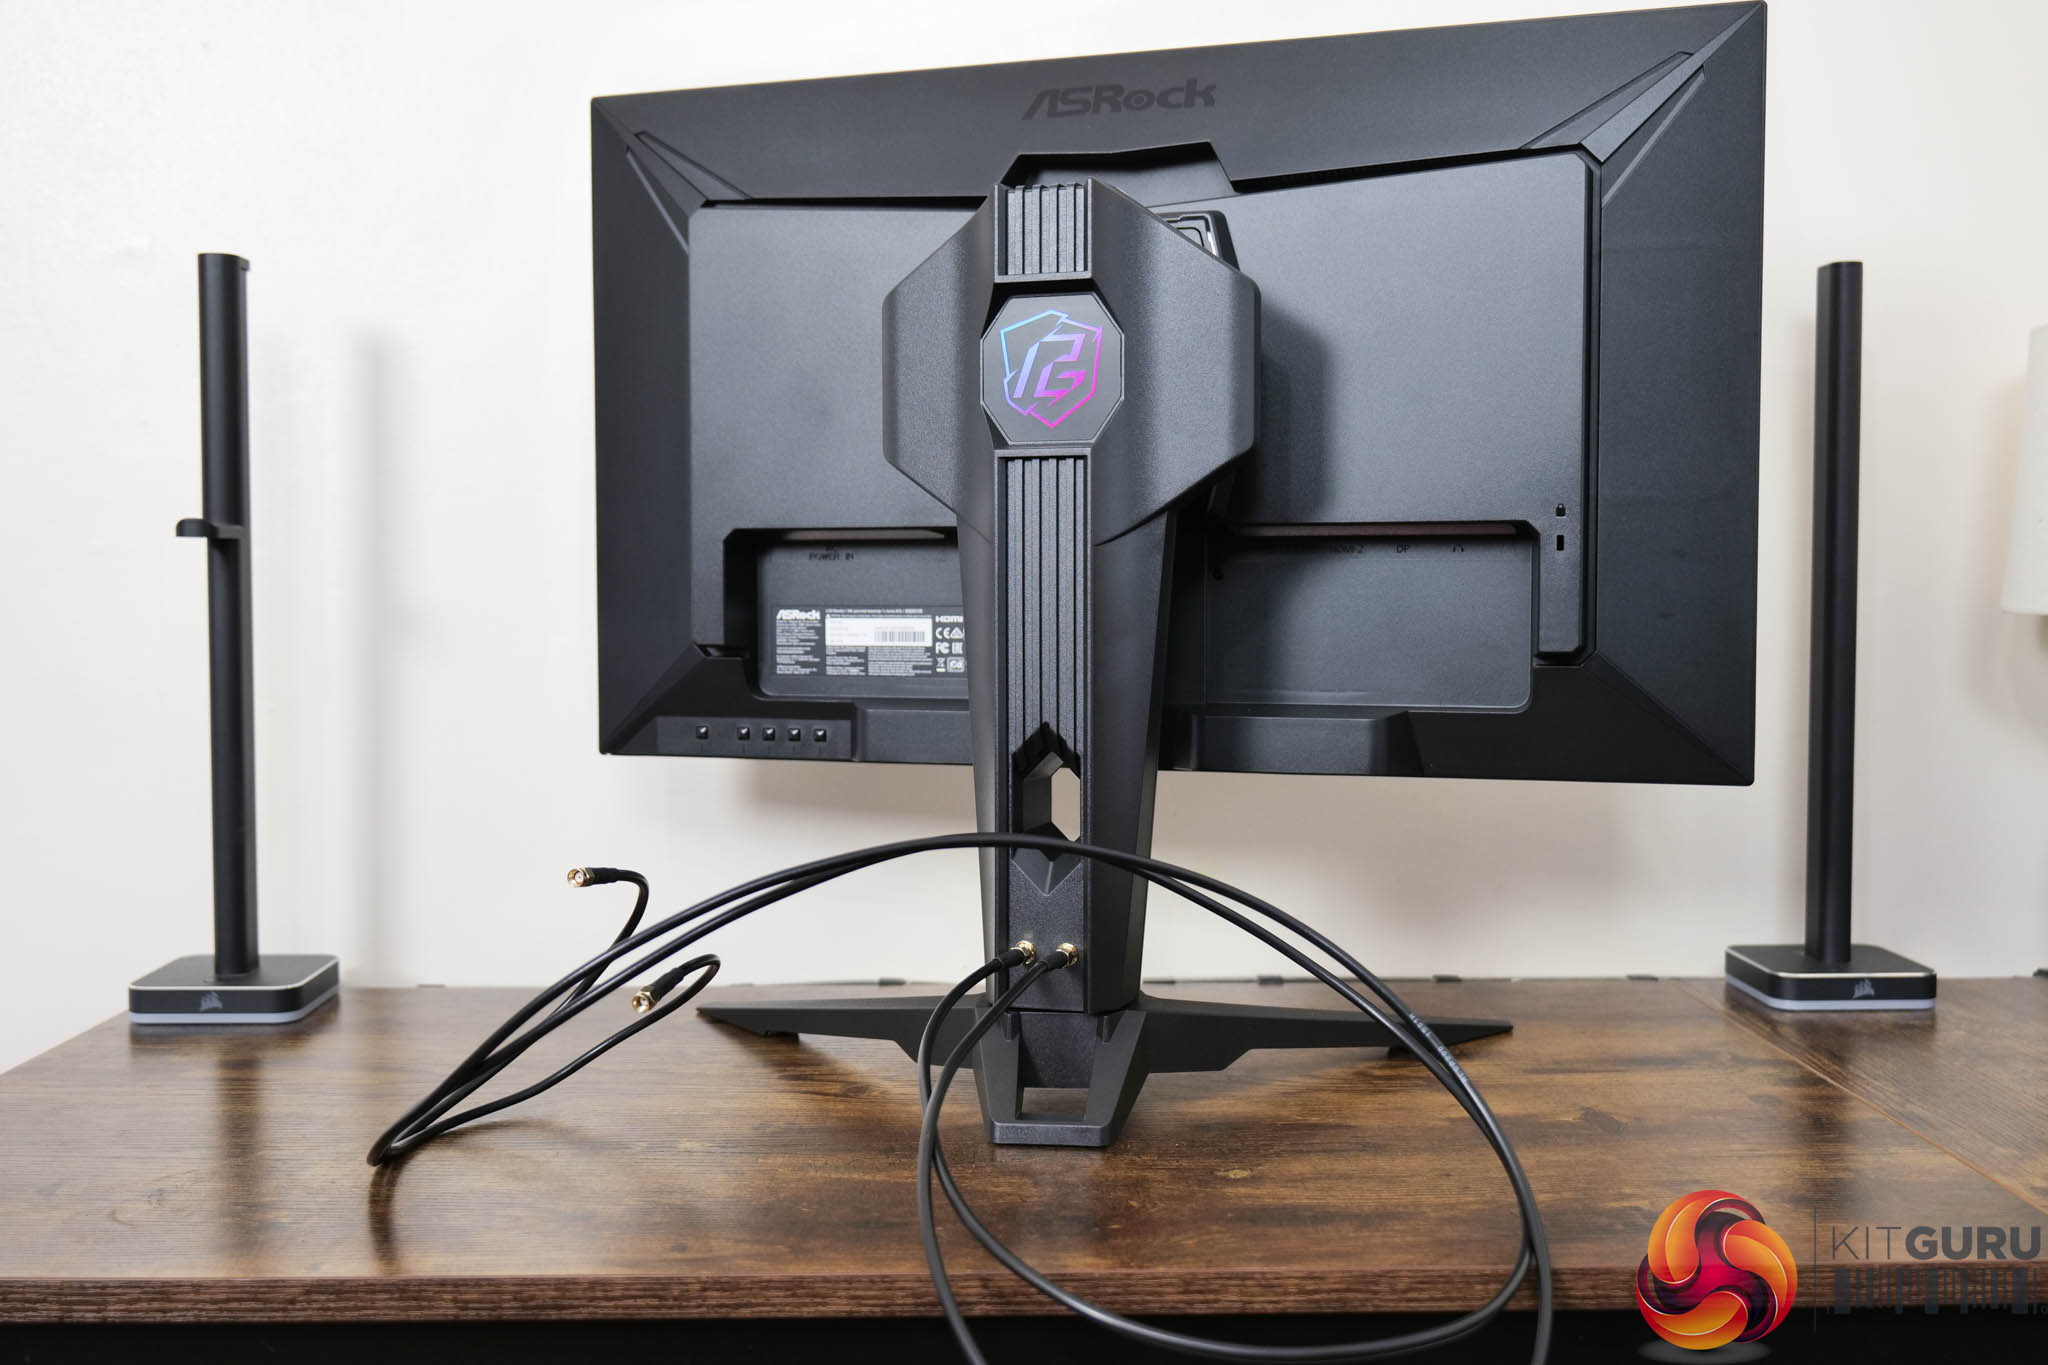
On the back of the stand you get a closer look at the WiFi antenna connectors, and the cables that come supplied with the monitor to screw into your motherboard or WiFi card.
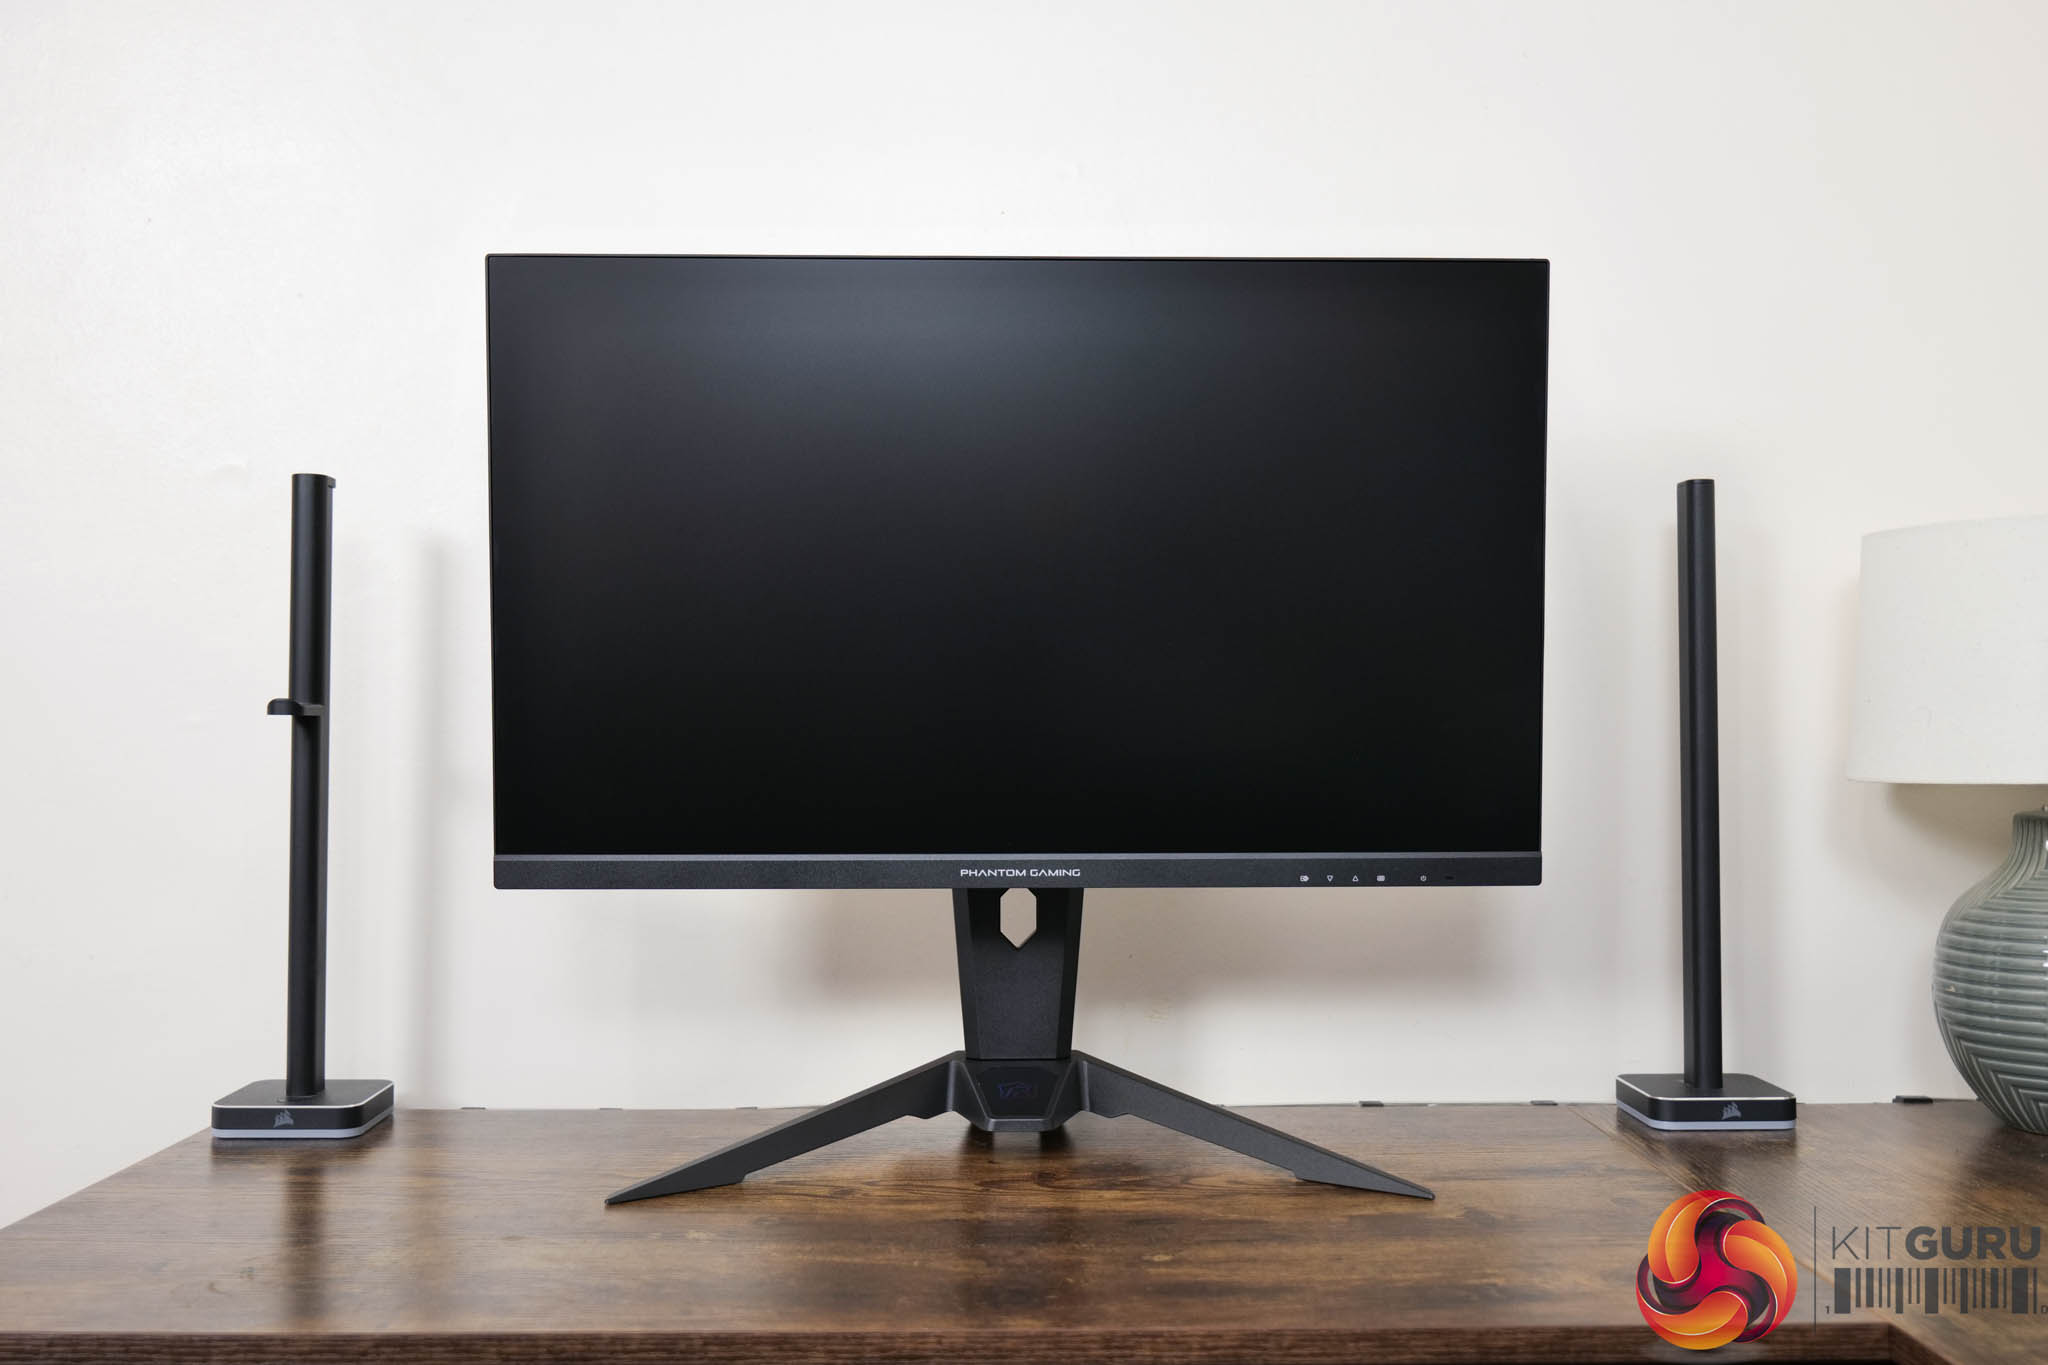
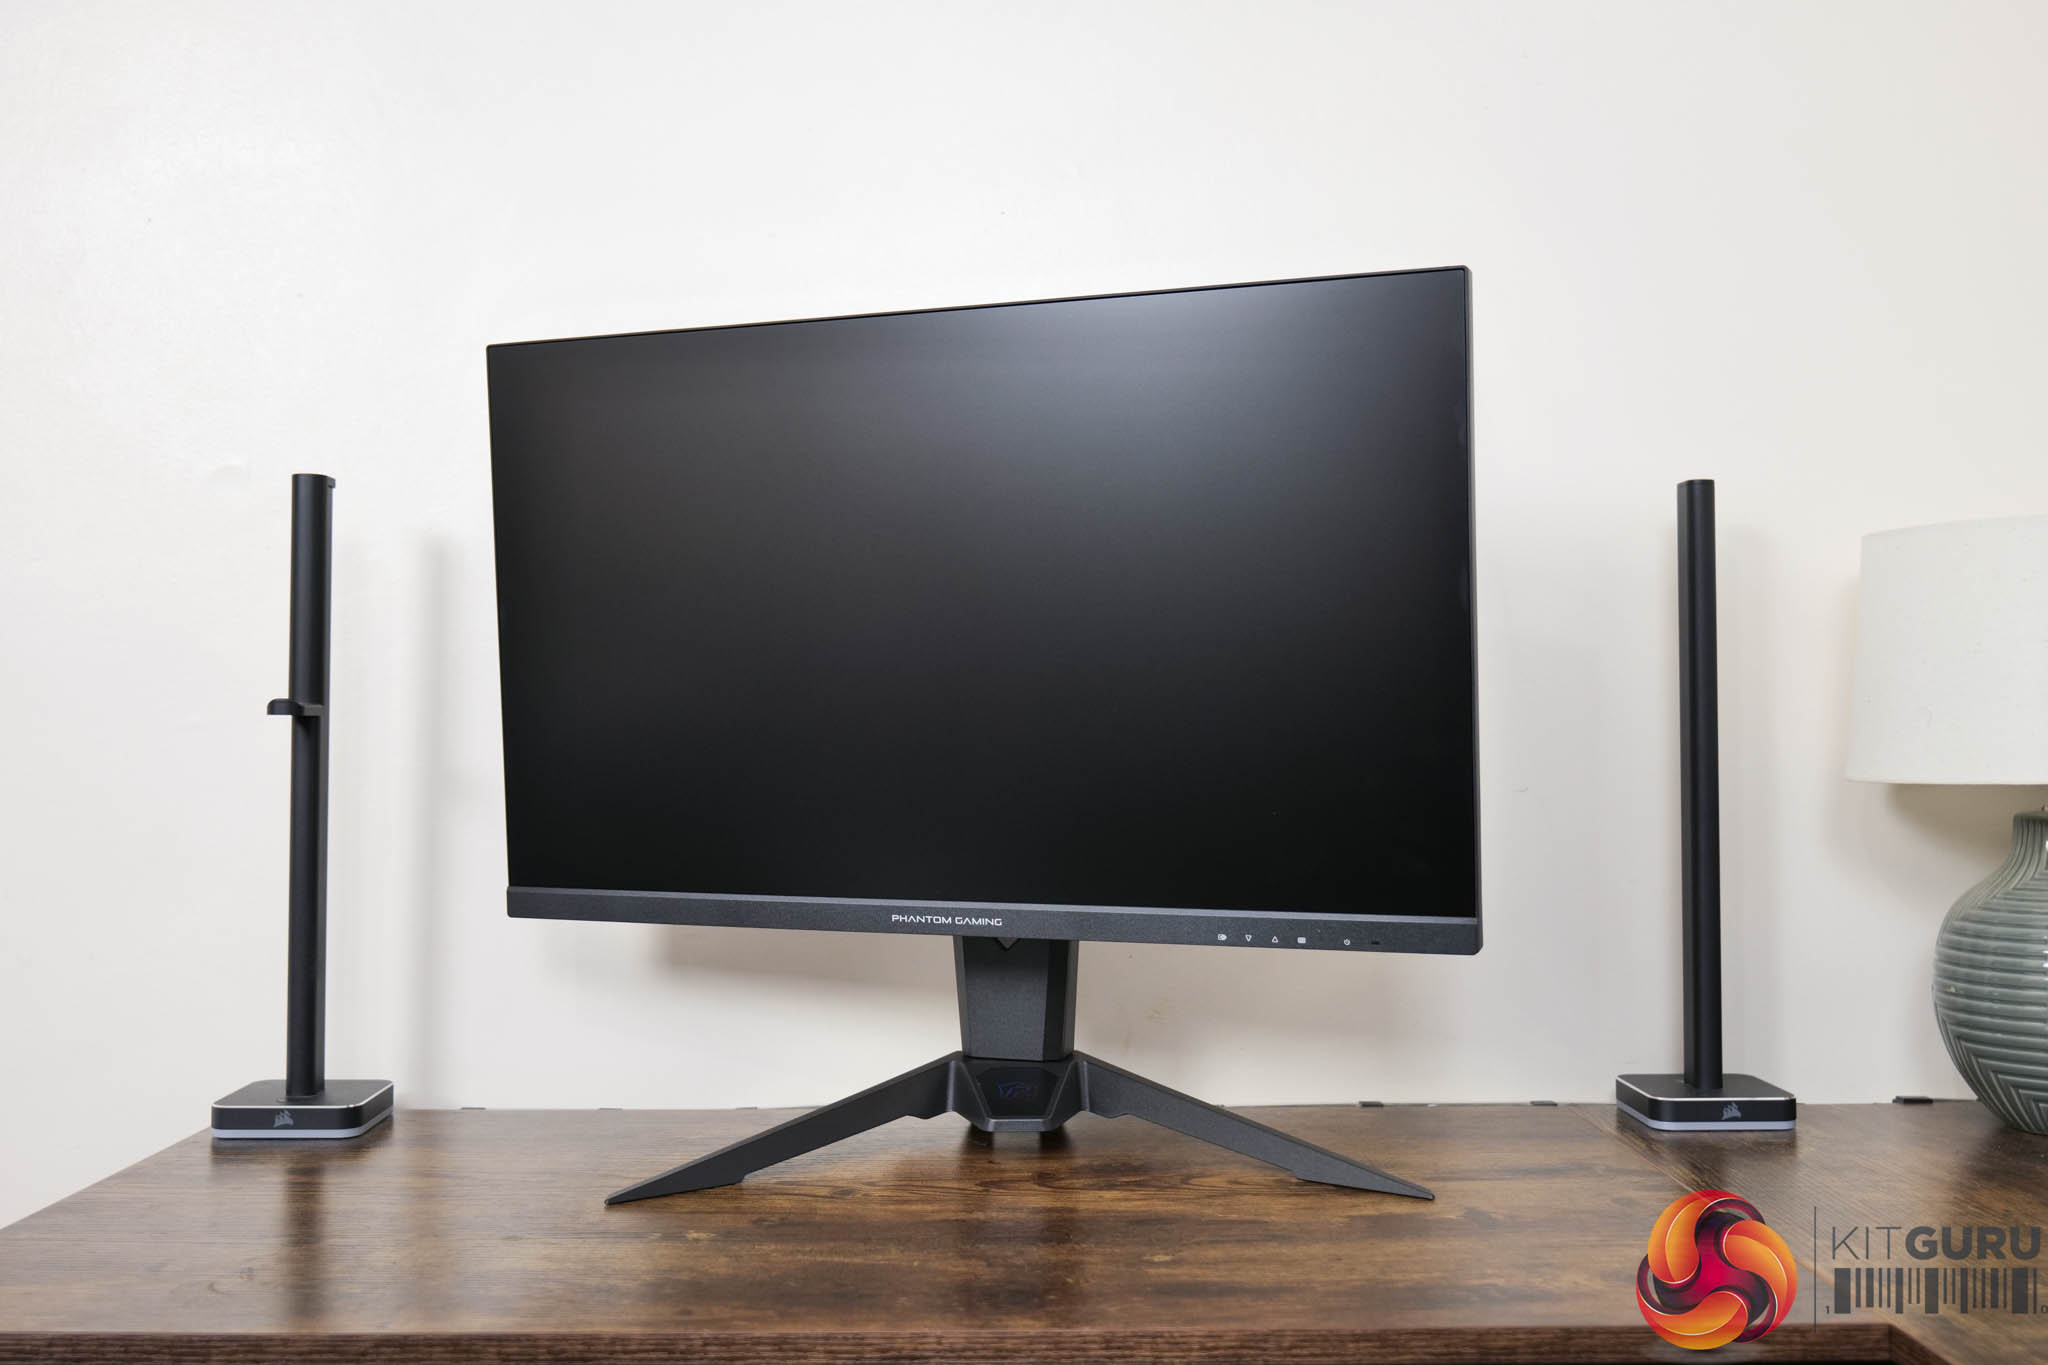
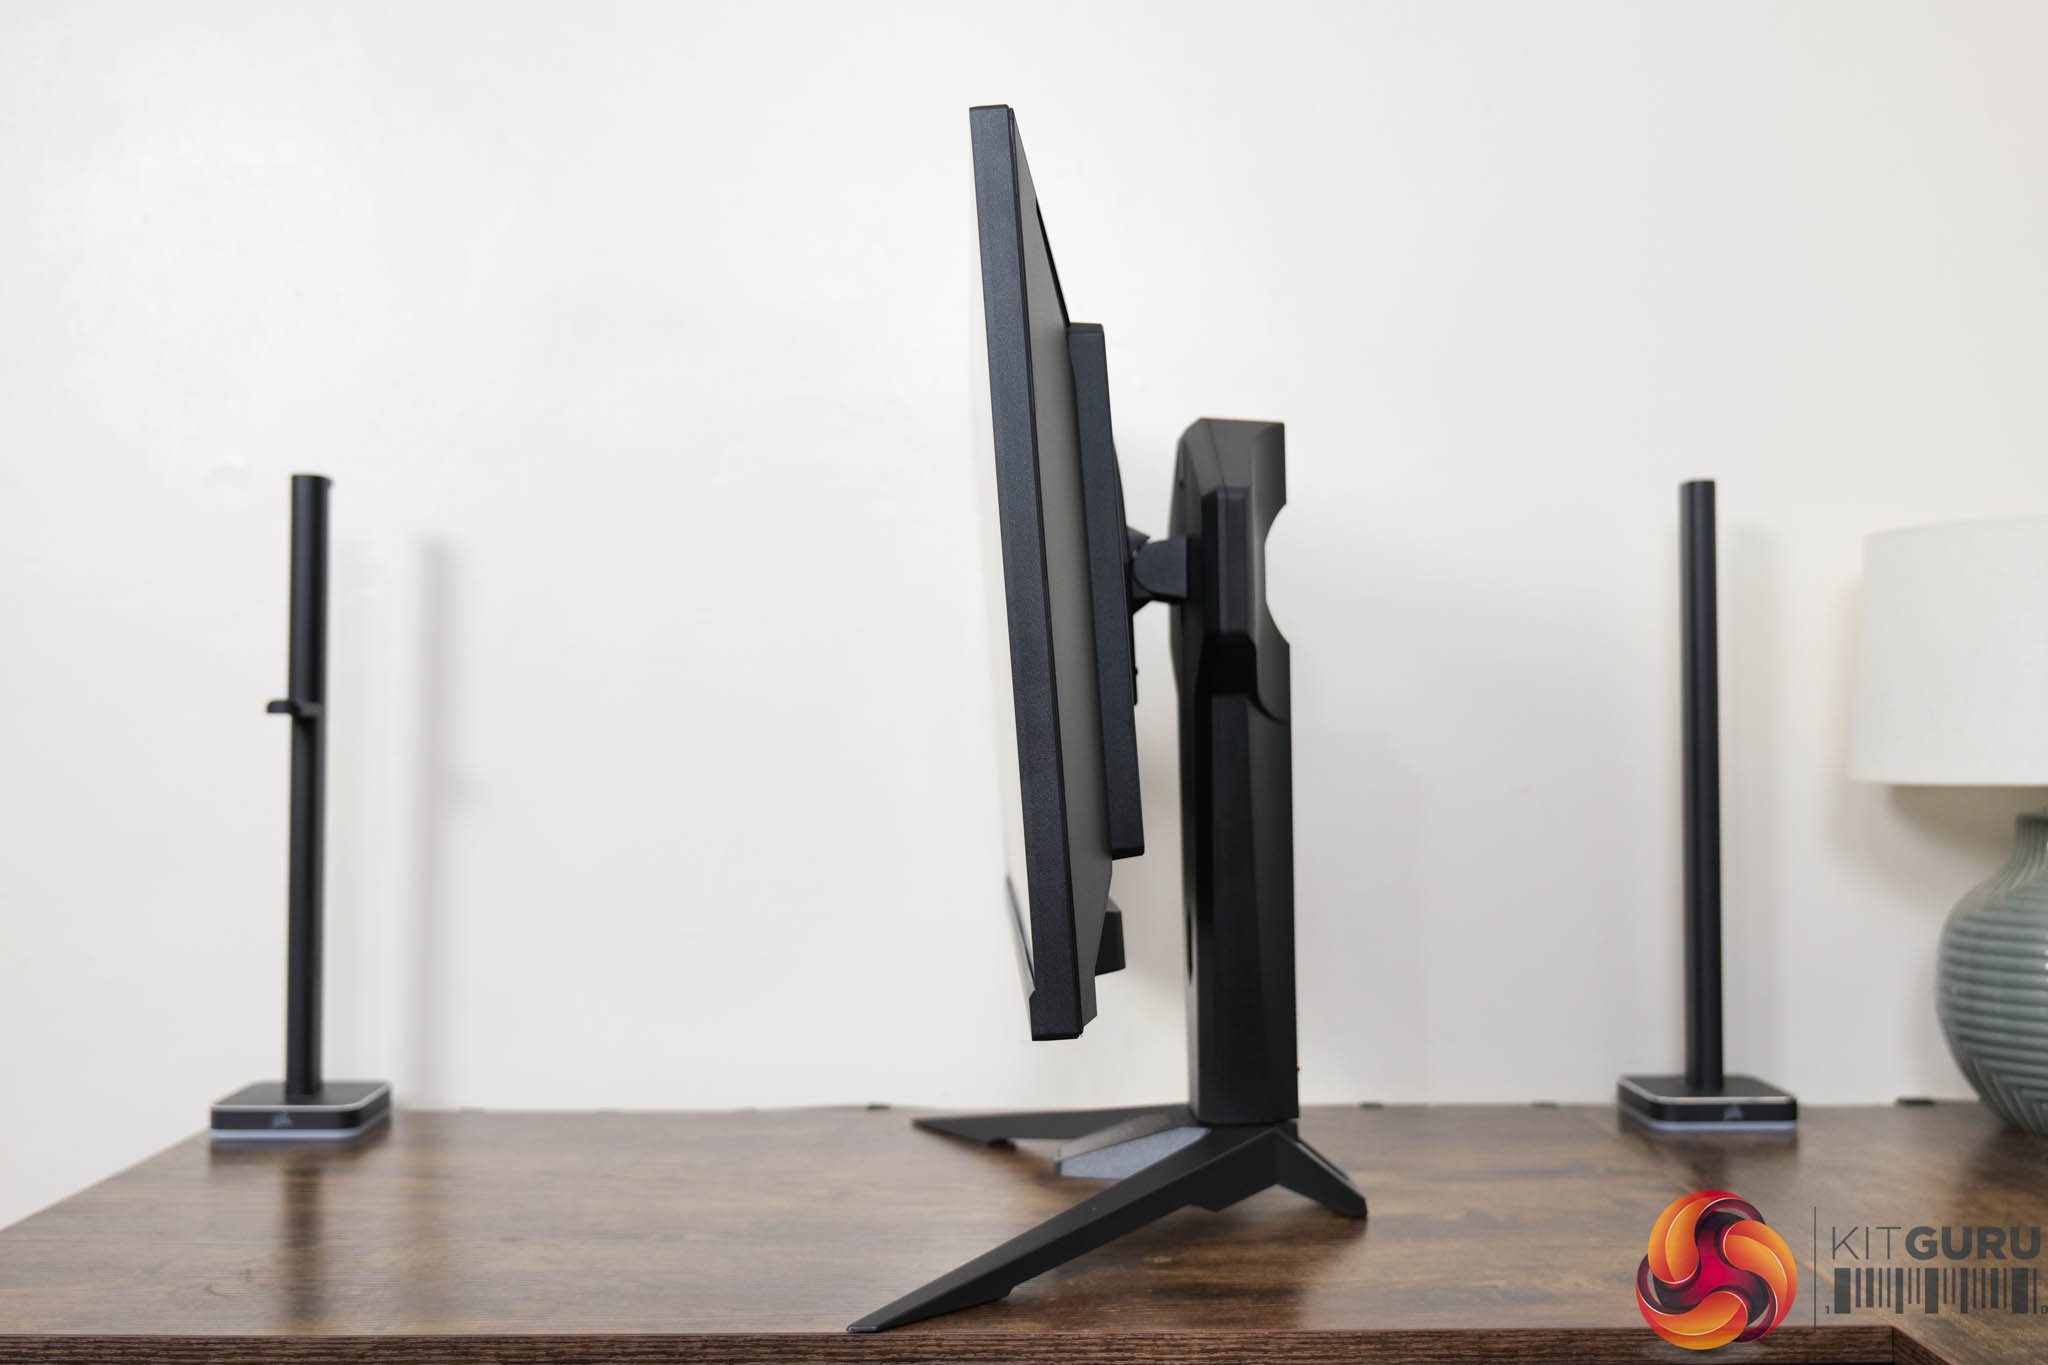
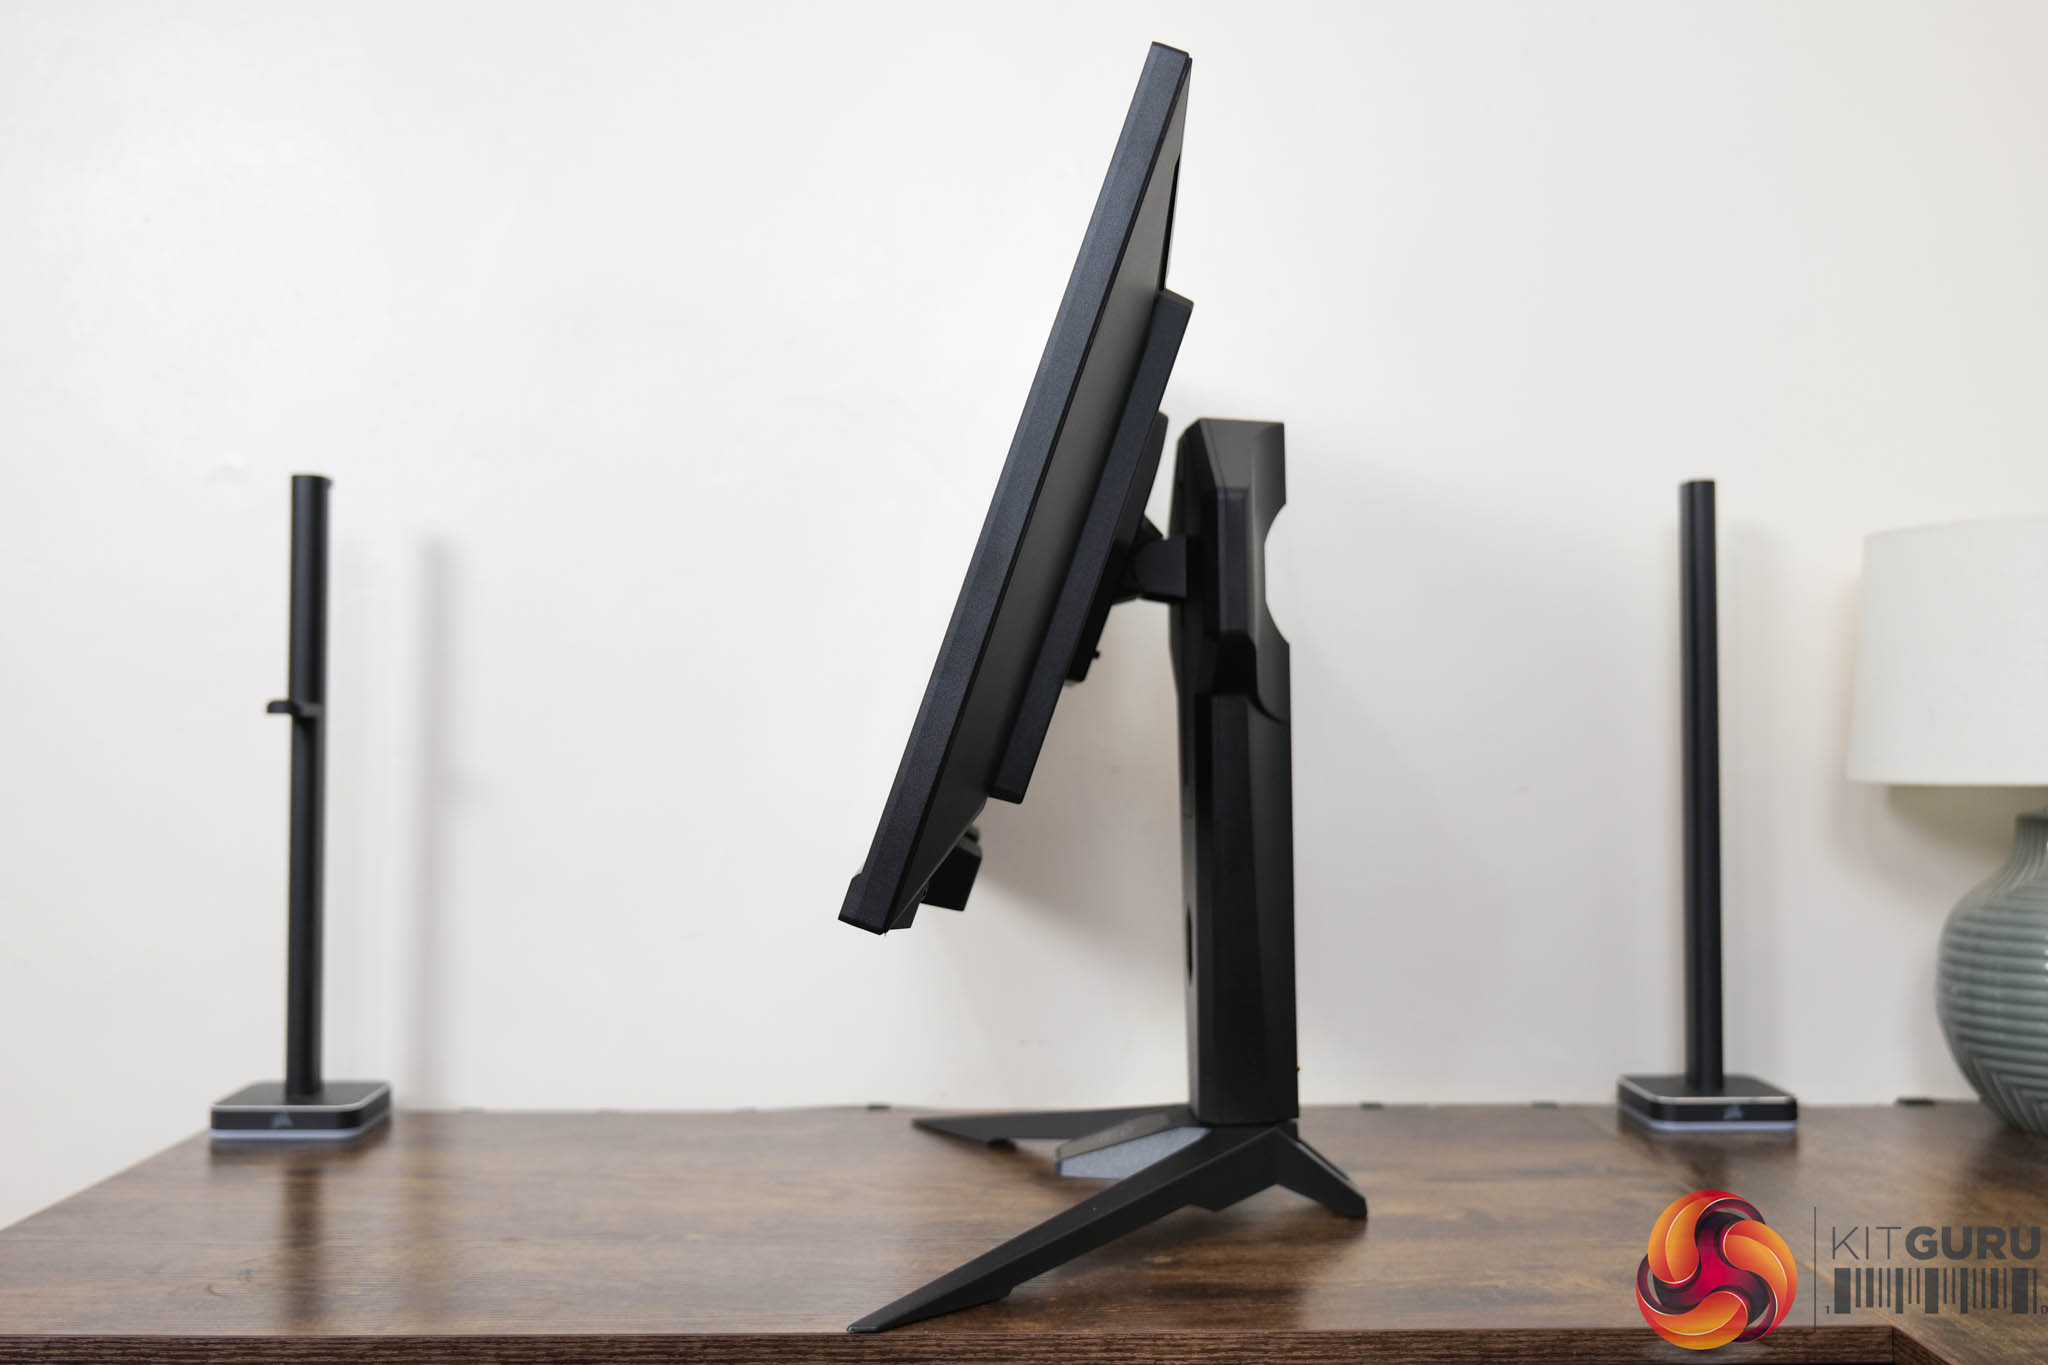
The stand also features a reasonable amount of ergonomic adjustments, including up to 100mm of height adjustment, 20 degrees of swivel both left and right, and then tilt from -5 to +20 degrees. There's no pivot functionality here, though VESA 100×100 mounting options are supported.
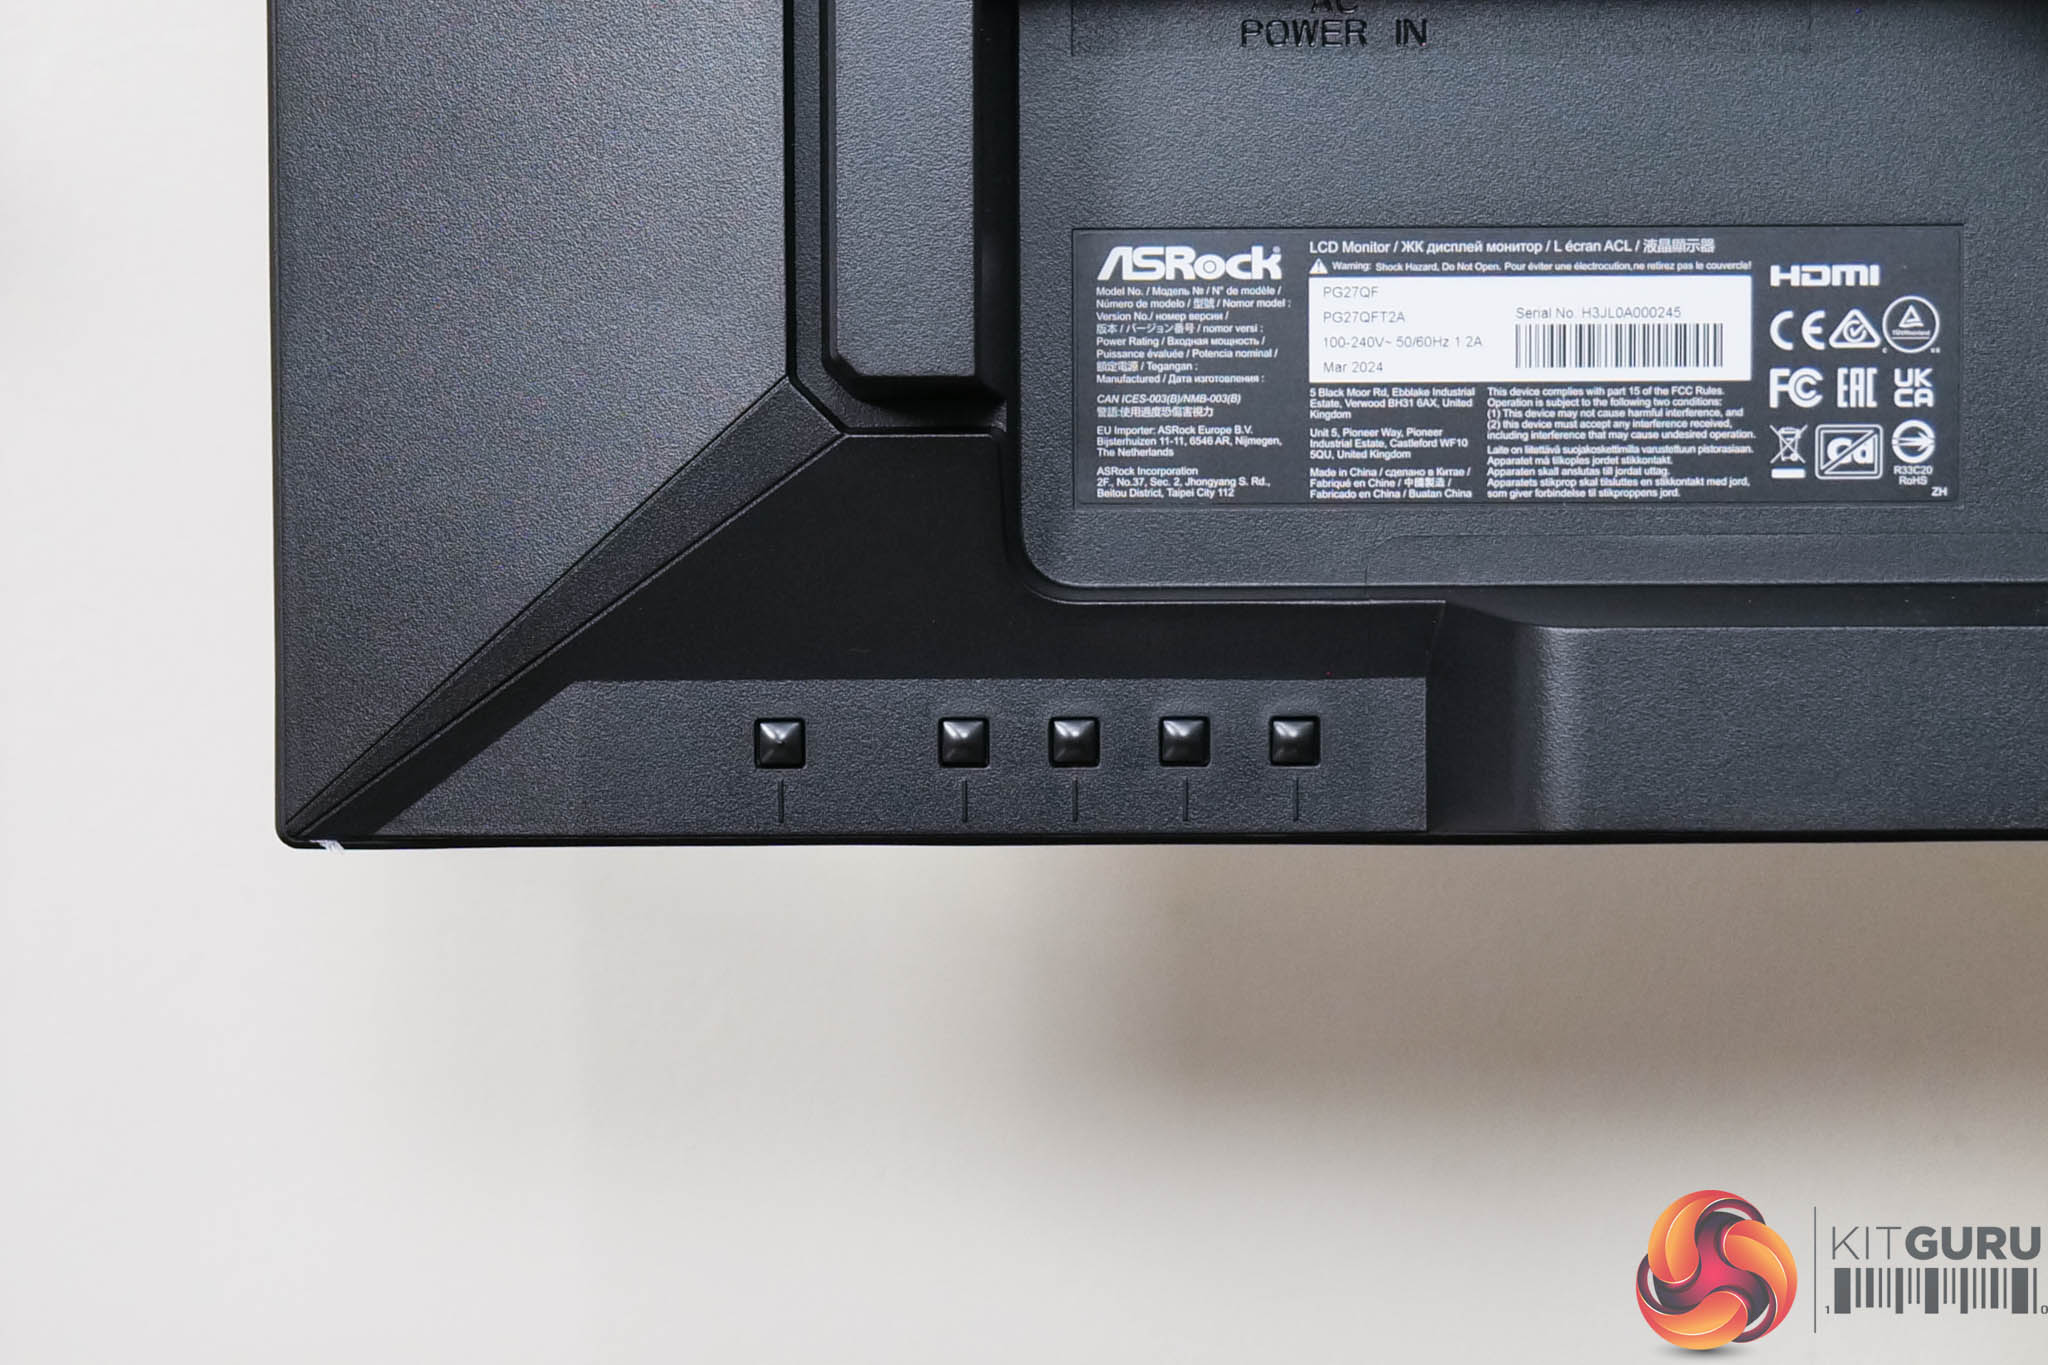
Unfortunately, like many screens around this price point, ASRock is not using a joystick to navigate the OSD, instead relying on five small buttons positioned on the back of the screen. We take a look at the OSD on the next page.
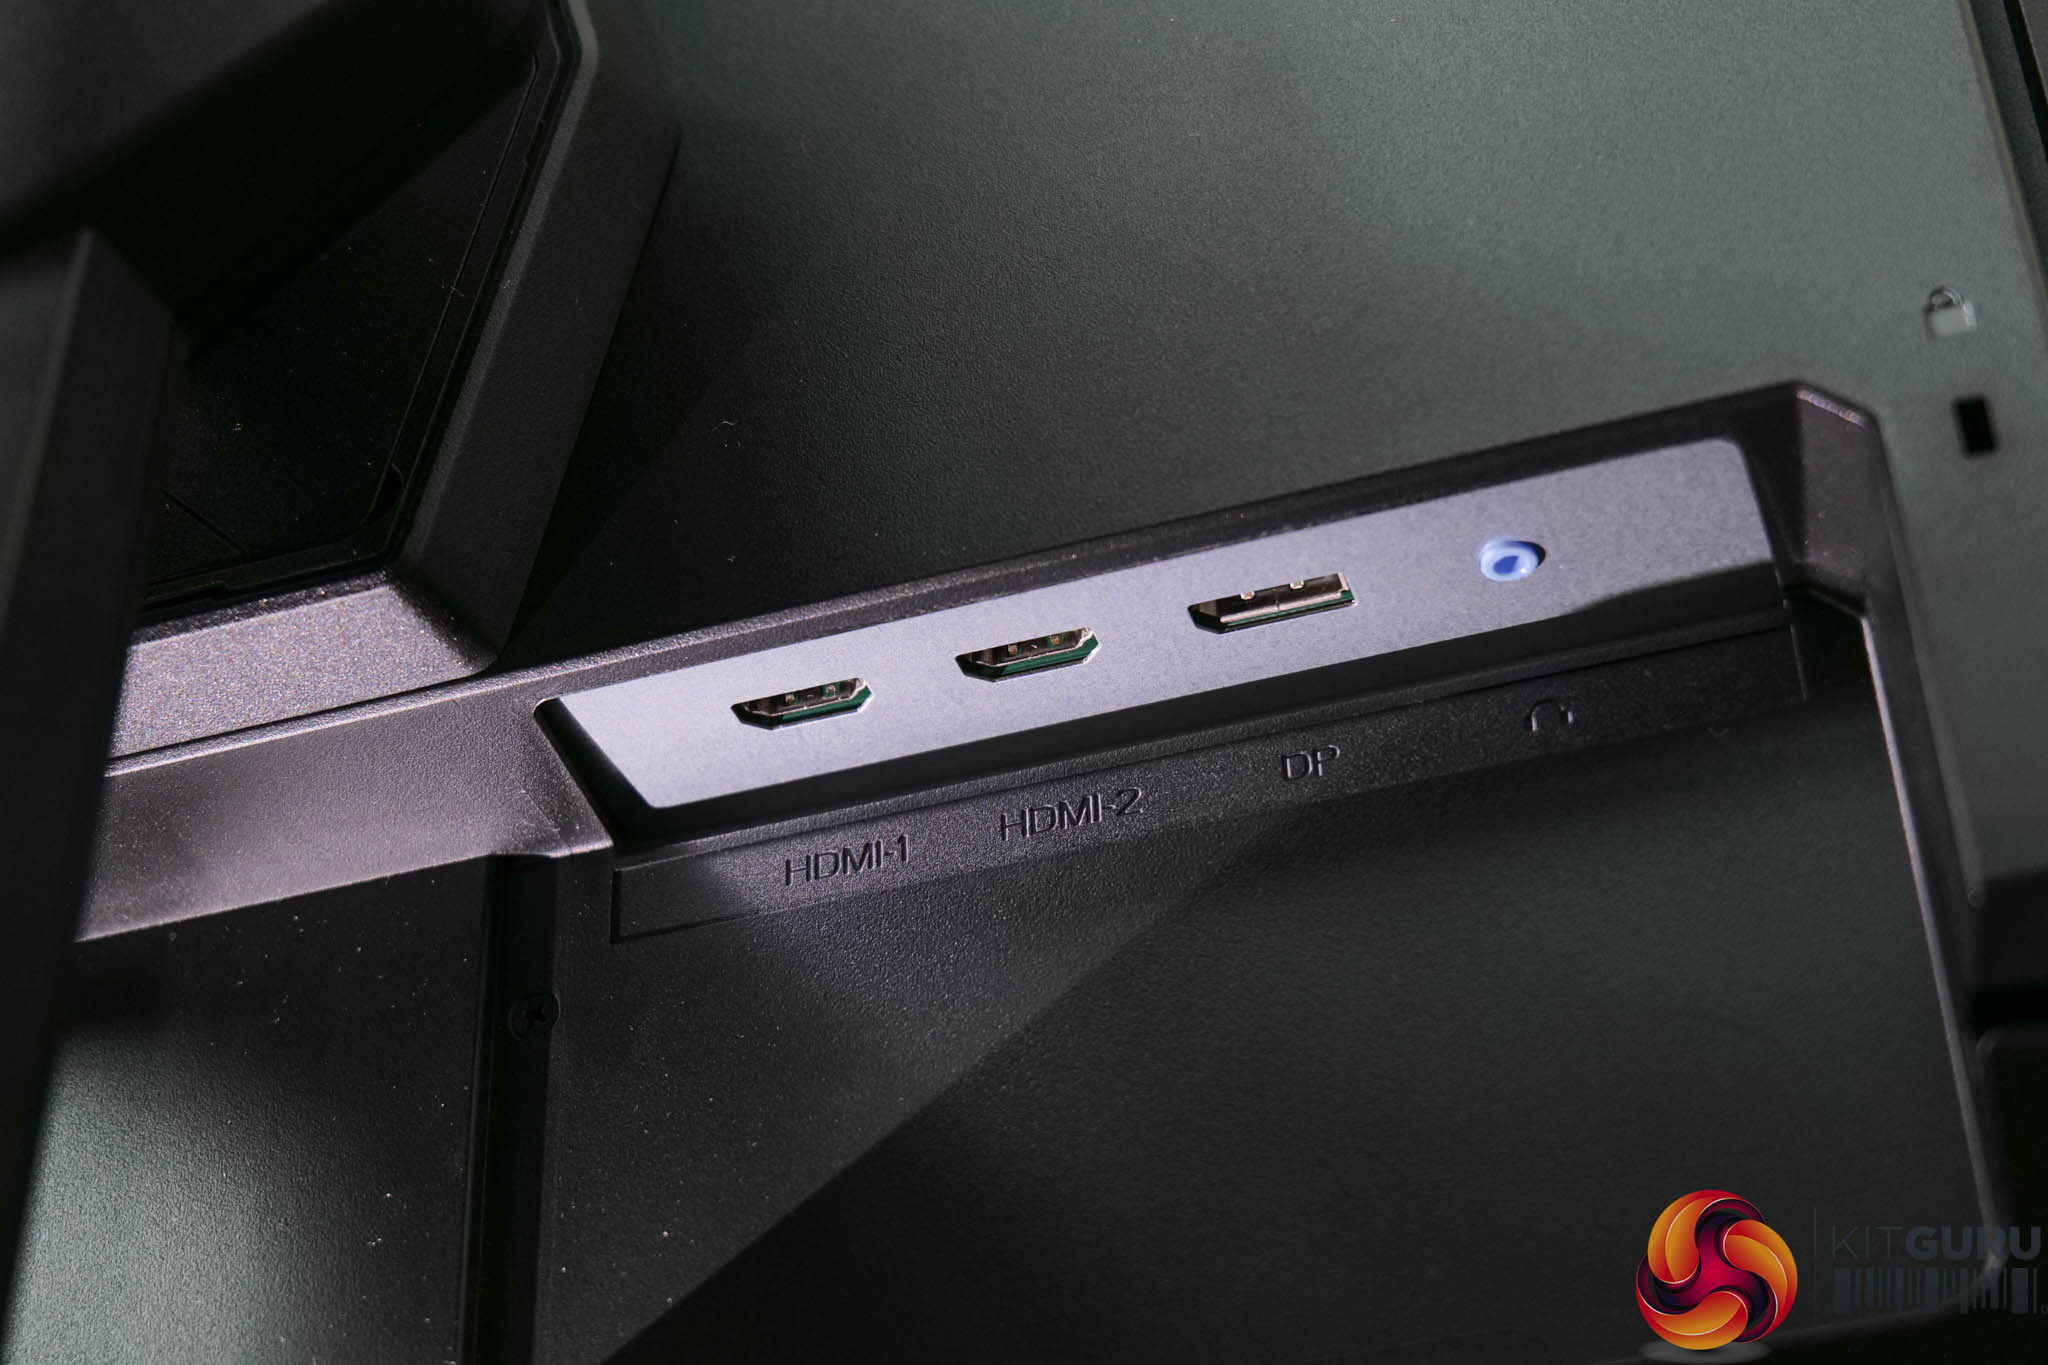
Connectivity options are also very basic, with just 2x HDMI 2.0 ports, one DisplayPort 1.4 and an audio jack, so there's no modern creature comforts like USB Type-A ports, let alone USB-C, or KVM functionality here.
Being the first ASRock monitor I have reviewed, I wasn't sure what to expect from the OSD. It's split in to five main tabs as you can see here:
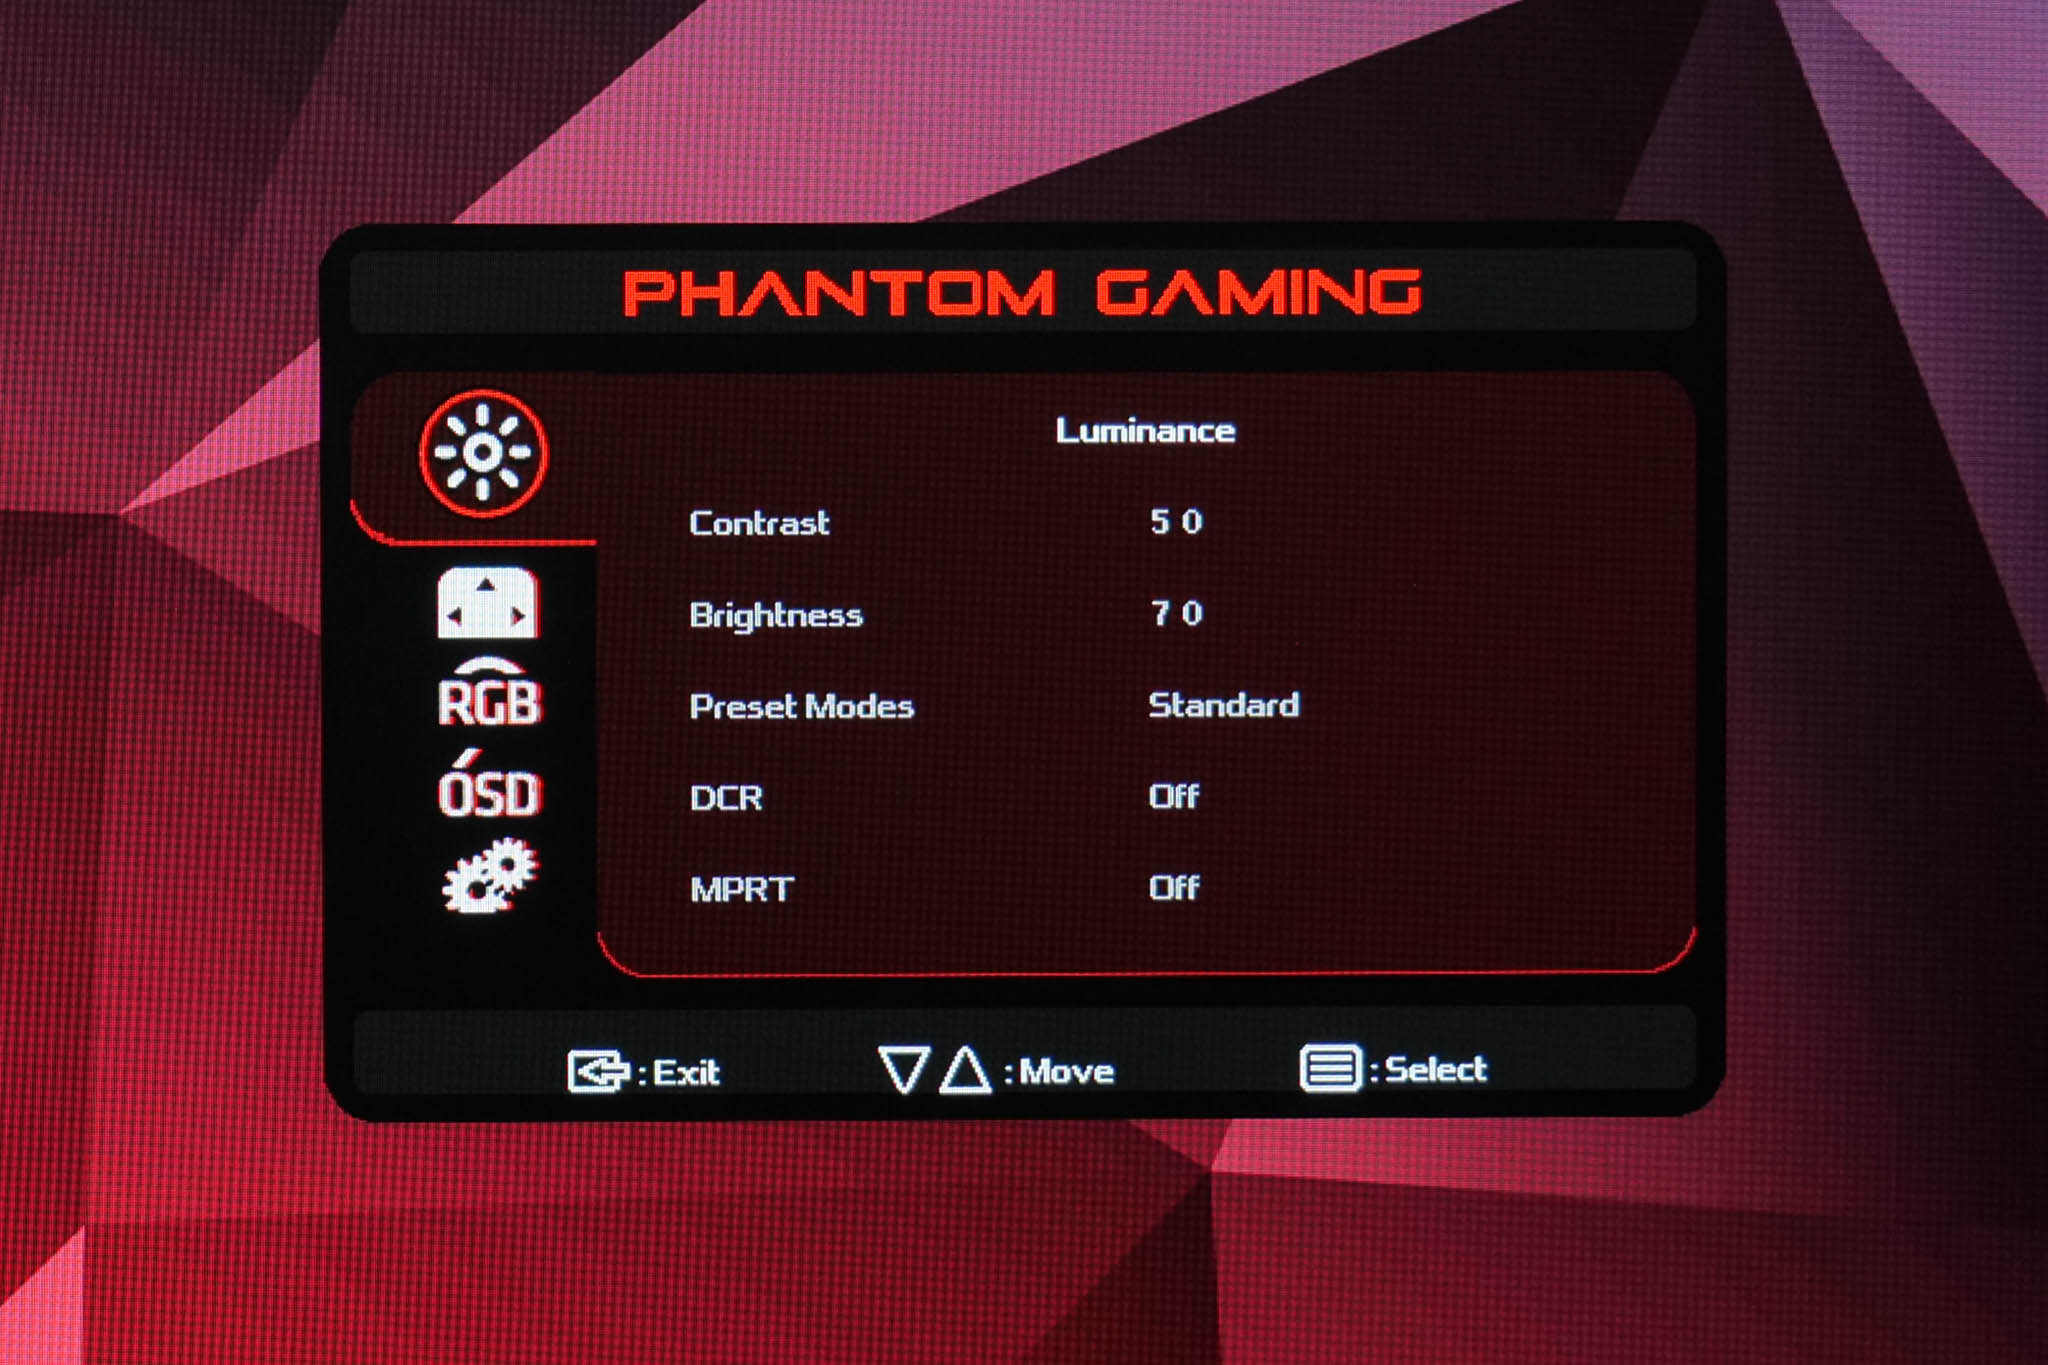
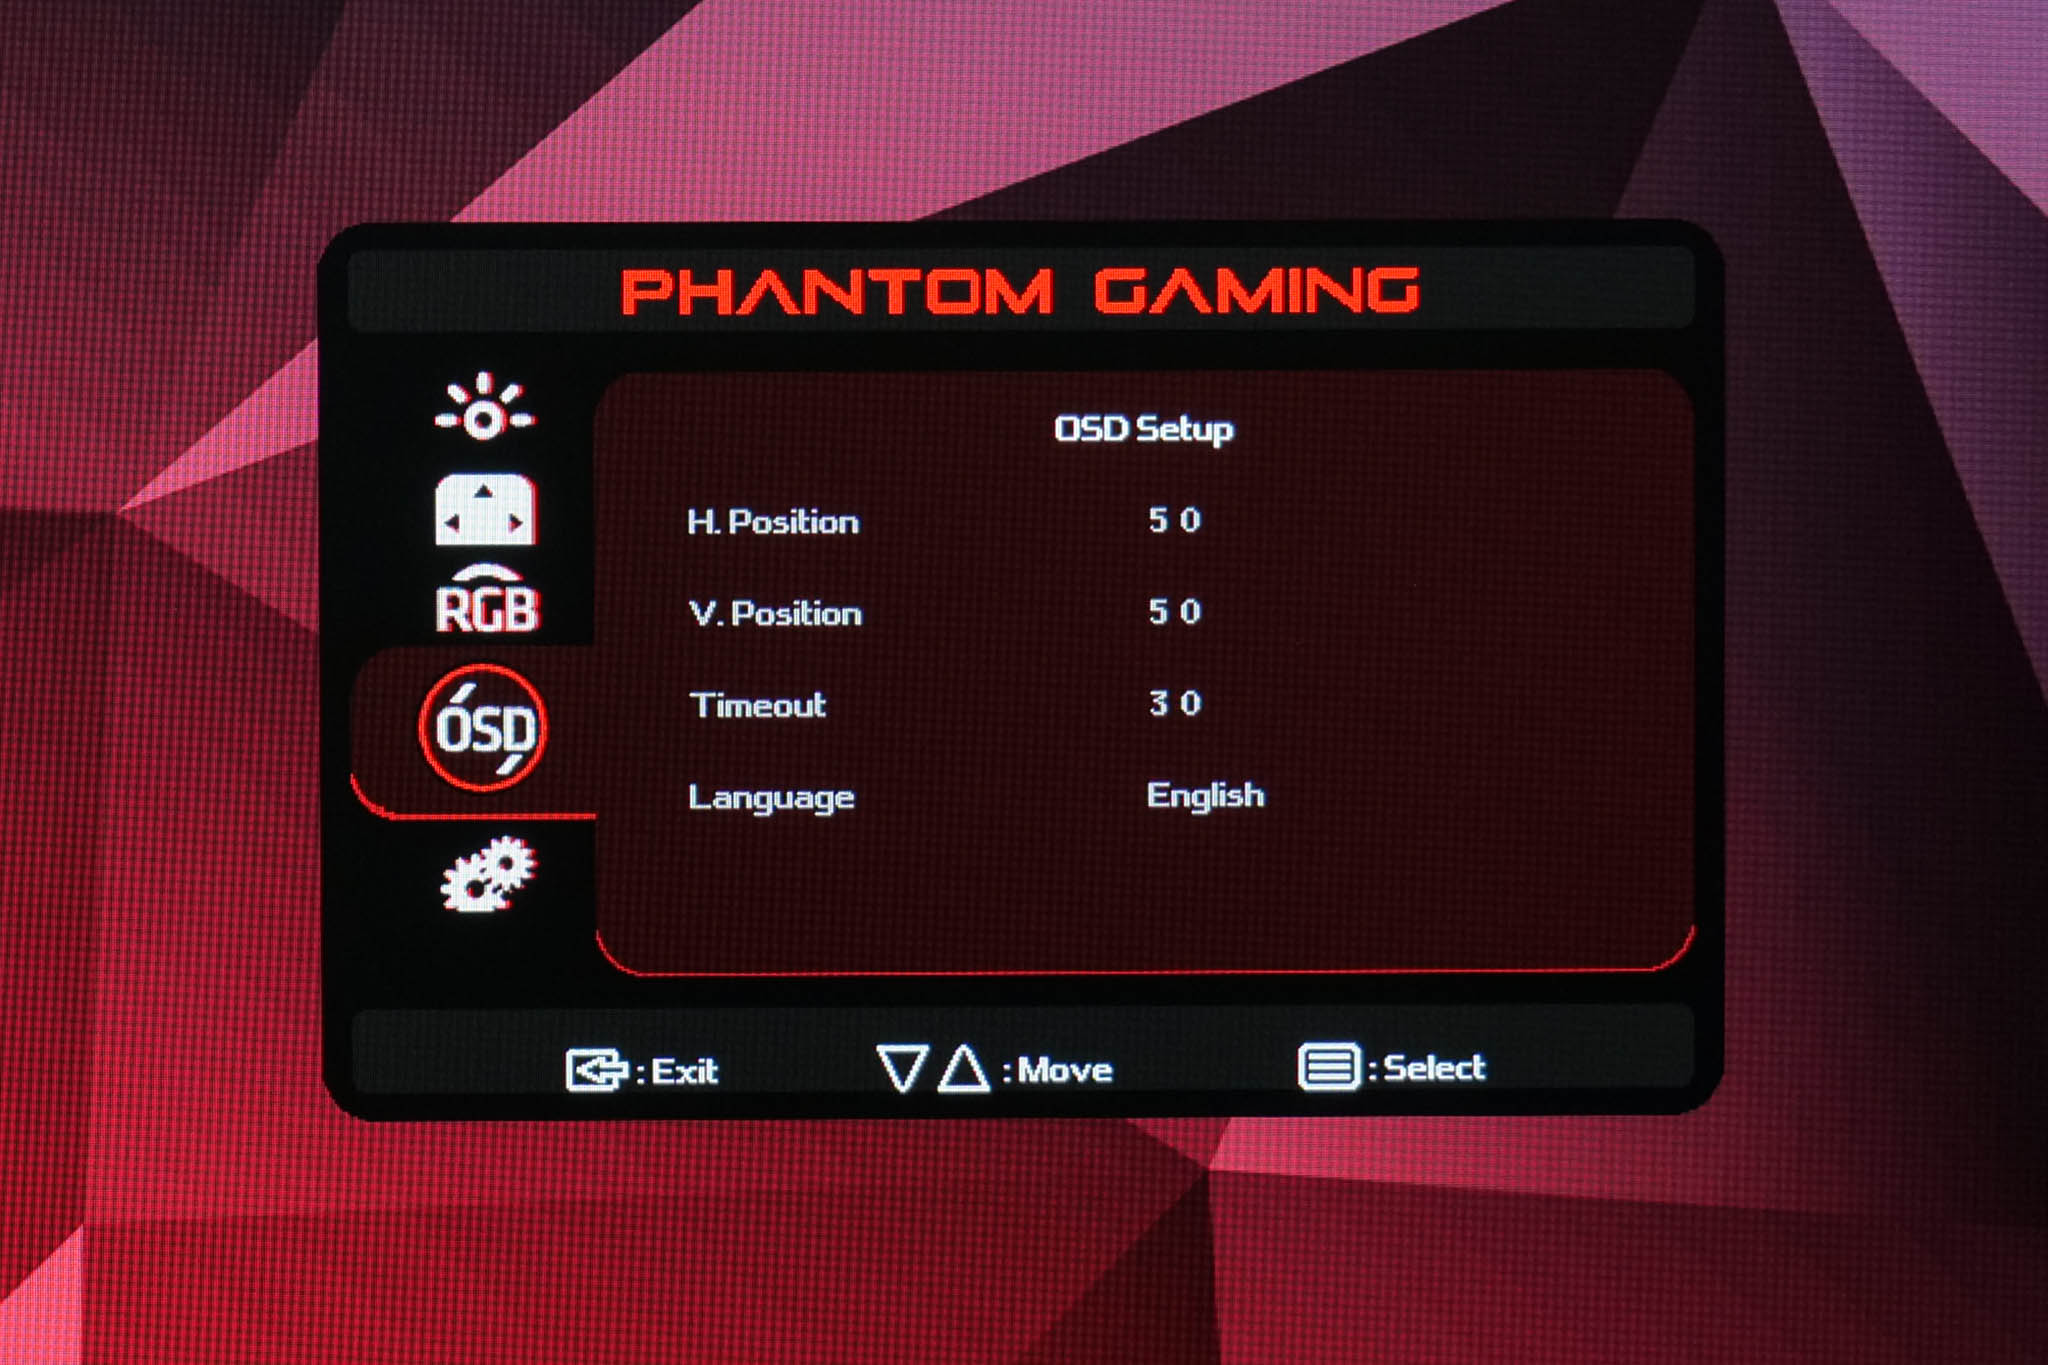
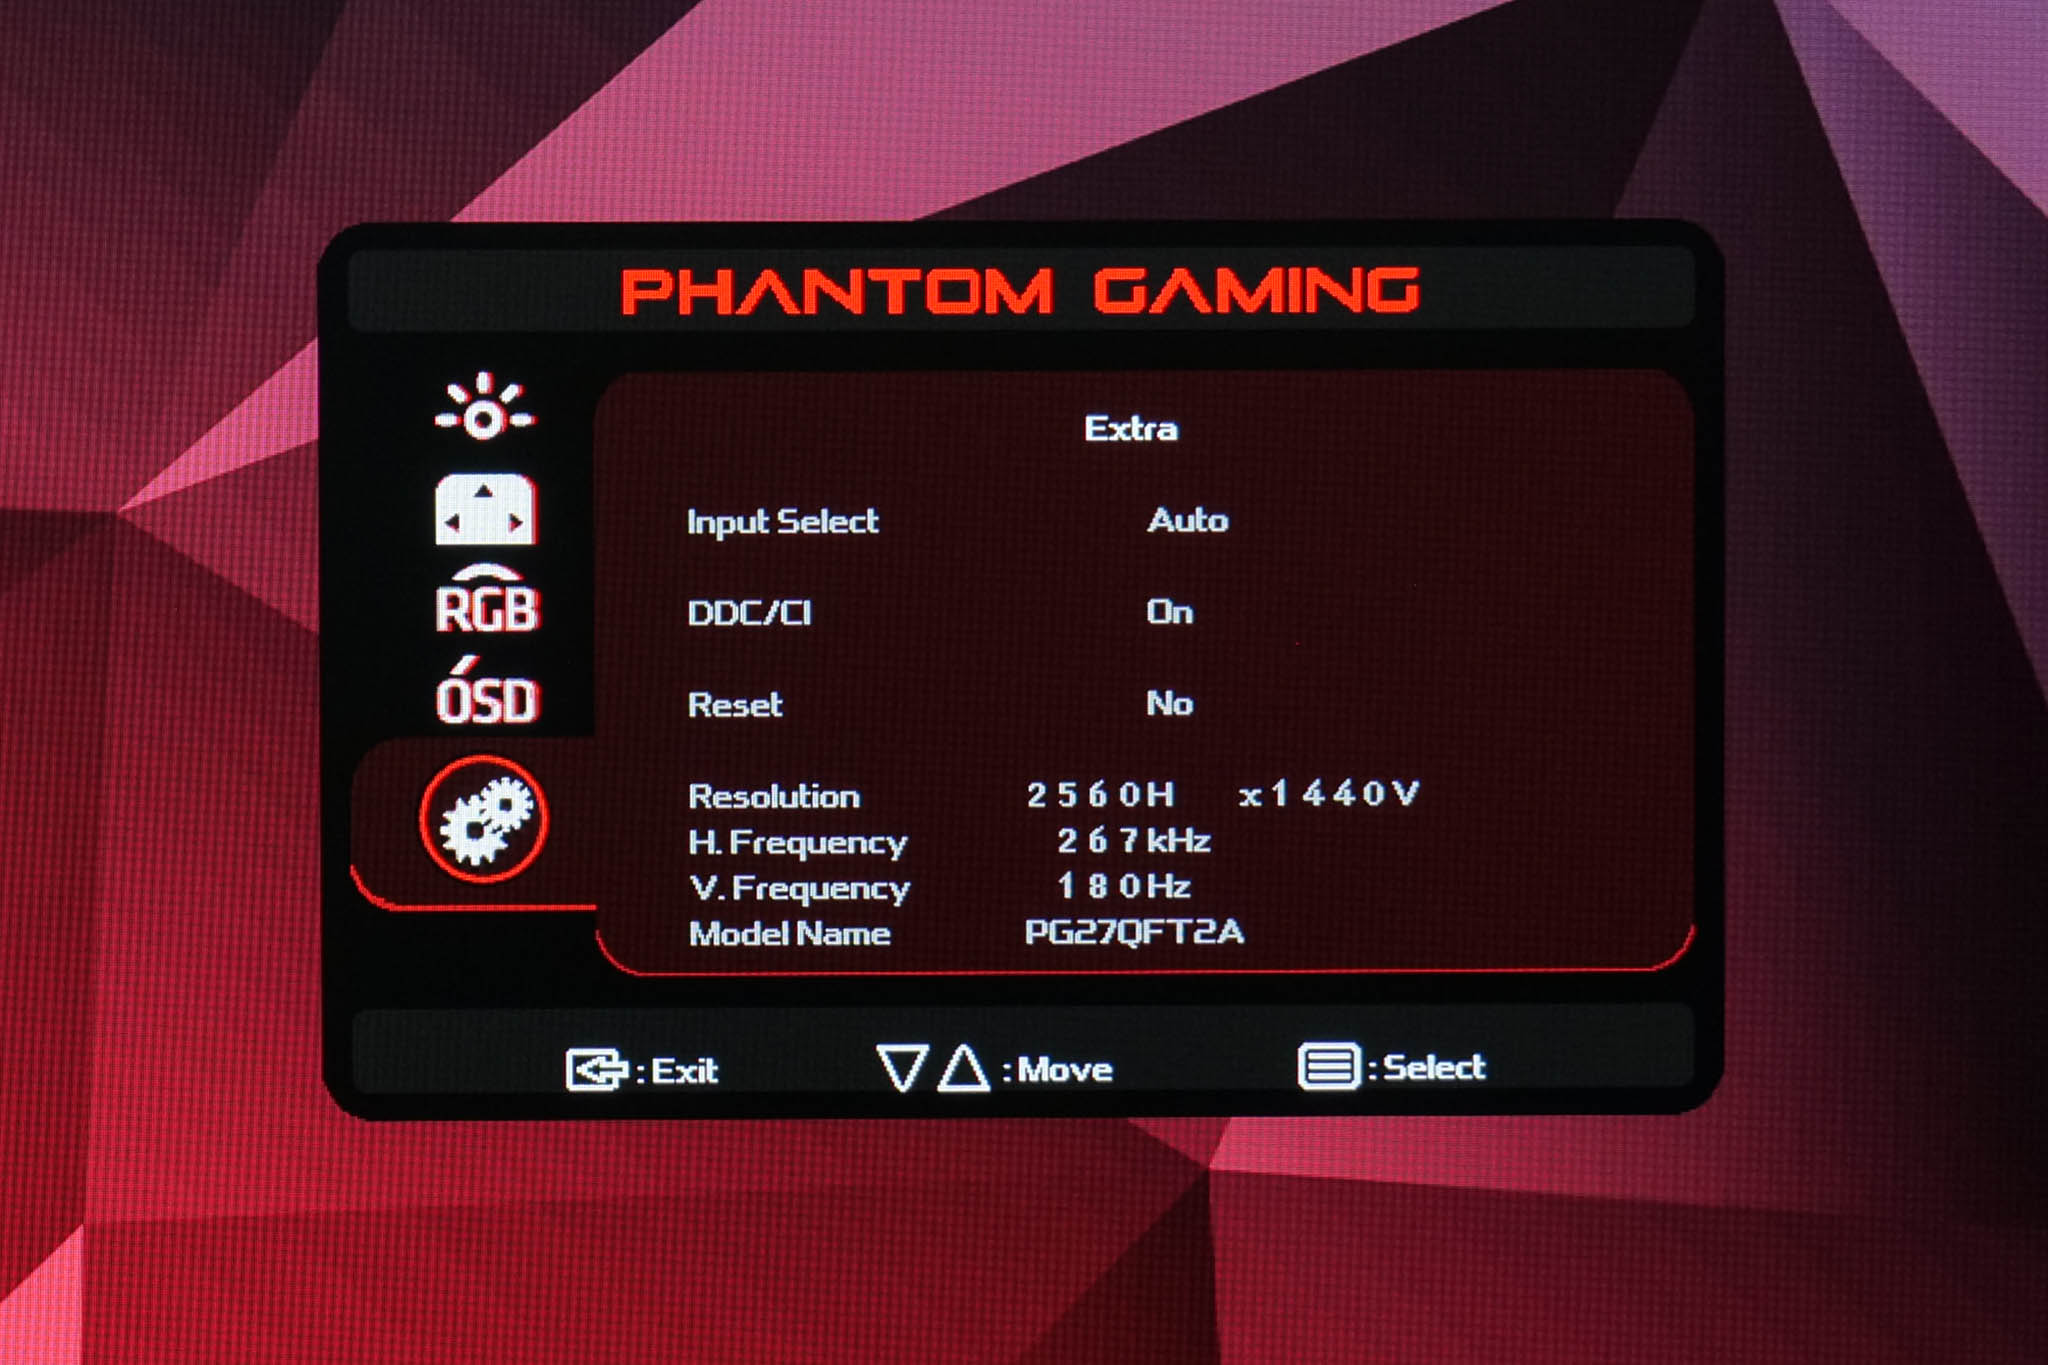
There's no denying it's a pretty basic OSD system. For starters, to put it politely it looks quite ‘old-school' and could definitely use a freshen up to look a bit more modern. Primarily, however, it just lacks a number of features most people would expect – things like an sRGB mode, on-screen crosshair and gamma settings are all missing to just three examples. Overdrive can only be set on or off, so you don't get multiple options, and there's no Windows-based software either. You do of course get core functionality like brightness, user-adjustable colour balance etc, but overall the options are certainly limited.
Our main test involves using an X-Rite i1 Display Pro Plus colorimeter and utilising Portrait Display's Calman Ultimate software. The device sits on top of the screen while the software generates colour tones and patterns, which it compares against predetermined values to work out how accurate the screen is.
The results show:
- A monitor’s maximum brightness in candelas or cd/m2 at various levels set in the OSD.
- A monitor’s contrast ratio at various brightness levels in the OSD.
- Gamut coverage, primarily focusing on sRGB and DCI-P3 colour spaces.
- Greyscale accuracy, measured across 20 shades, with an average colour balance reported.
- The exact gamma levels, with a comparison against preset settings in the OSD.
- The colour accuracy, expressed as a Delta E ratio, with a result under 3 being fine for normal use, and under 2 being great for colour-accurate design work.
We first run these tests with the display in its out-of-the-box state, with all settings on default. If there is an sRGB emulation option or other useful mode then we may test that too. We then calibrate the screen using the Calman Ultimate software and run the tests again.
You can read more about our test methodology HERE.
Default settings
Brightness and Contrast (Full Screen)
| OSD Brightness | White Luminance (cd/m2) | Black Luminance (cd/m2) | Contrast Ratio |
| 0% | 82.9 | 0.055 | 1509:1 |
| 25% | 145.7 | 0.097 | 1502:1 |
| 50% | 207.7 | 0.138 | 1507:1 |
| 75% | 285.1 | 0.19 | 1504:1 |
| 100% | 425.4 | 0.283 | 1502:1 |
Starting our testing with brightness, we see expected but overall decent results from the PG27QFT2A considering it's an affordable IPS monitor. The minimum brightness of 83 nits isn't great, but a peak of 425 is good and slightly above the claimed peak of 400 nits. The low black levels are even more impressive however, resulting in contrast of 1500:1 across the brightness range, which is a really good showing for an IPS panel.
Gamut (CIE 1976)
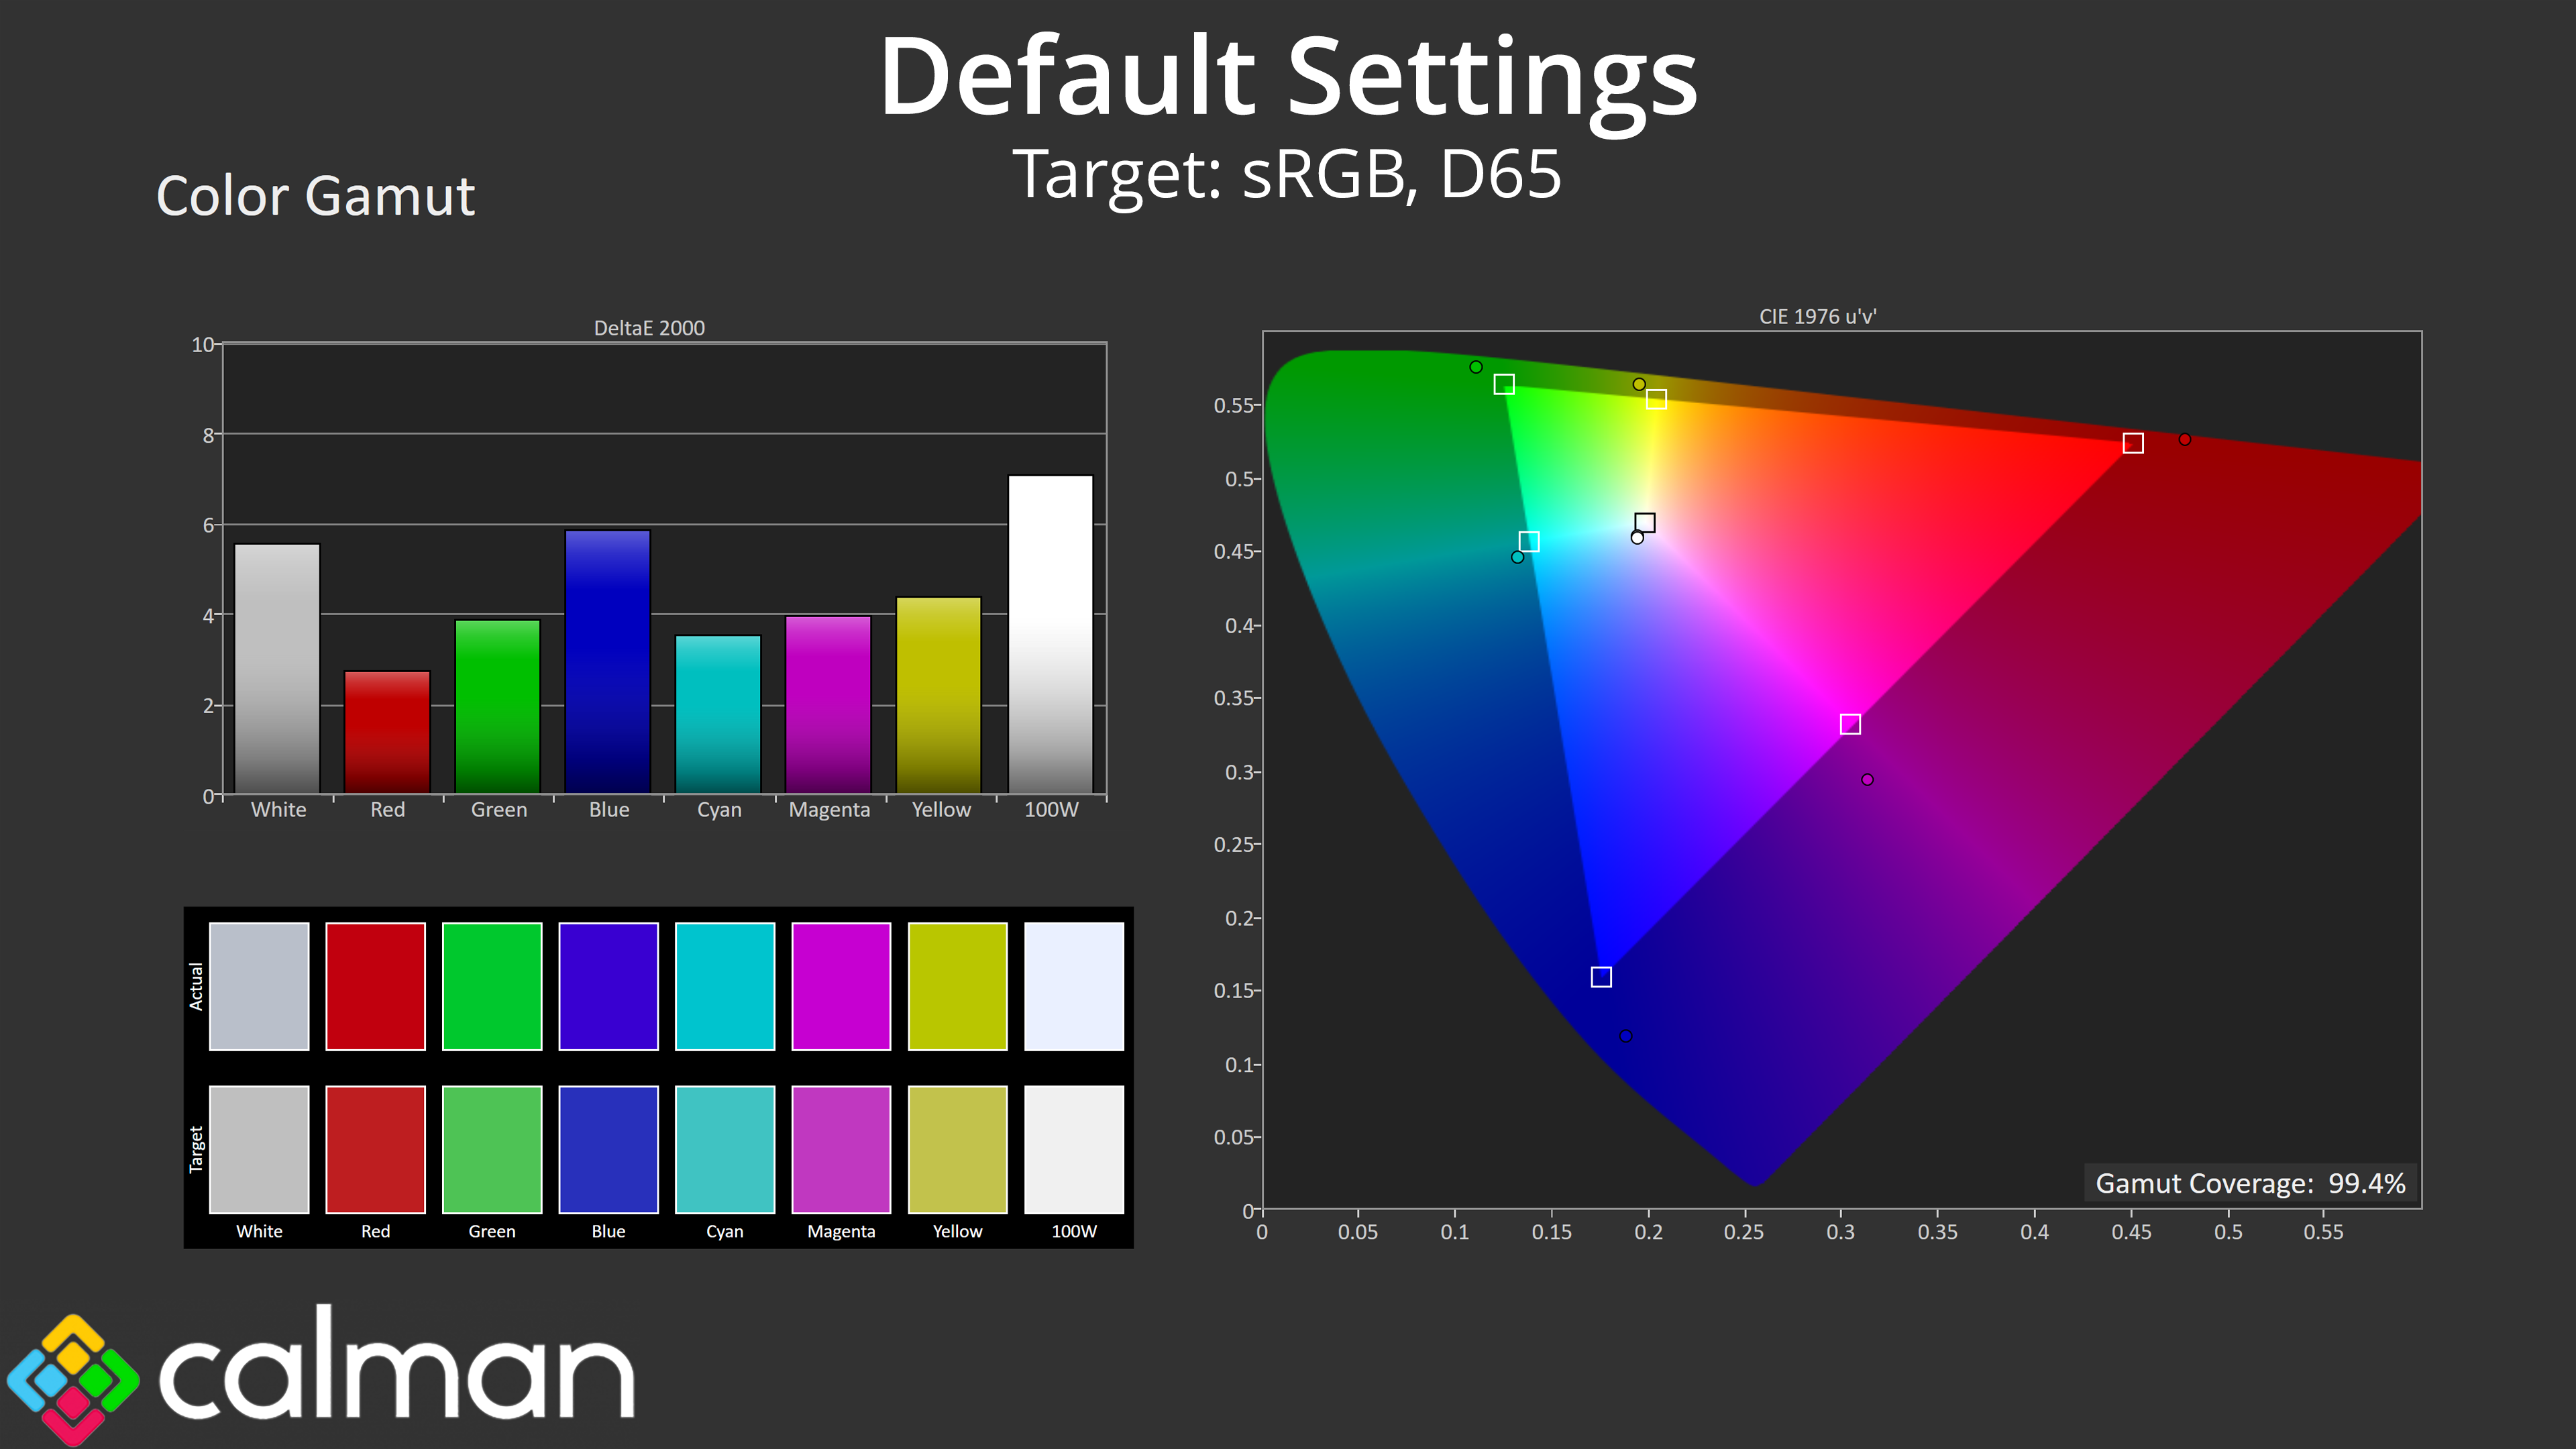
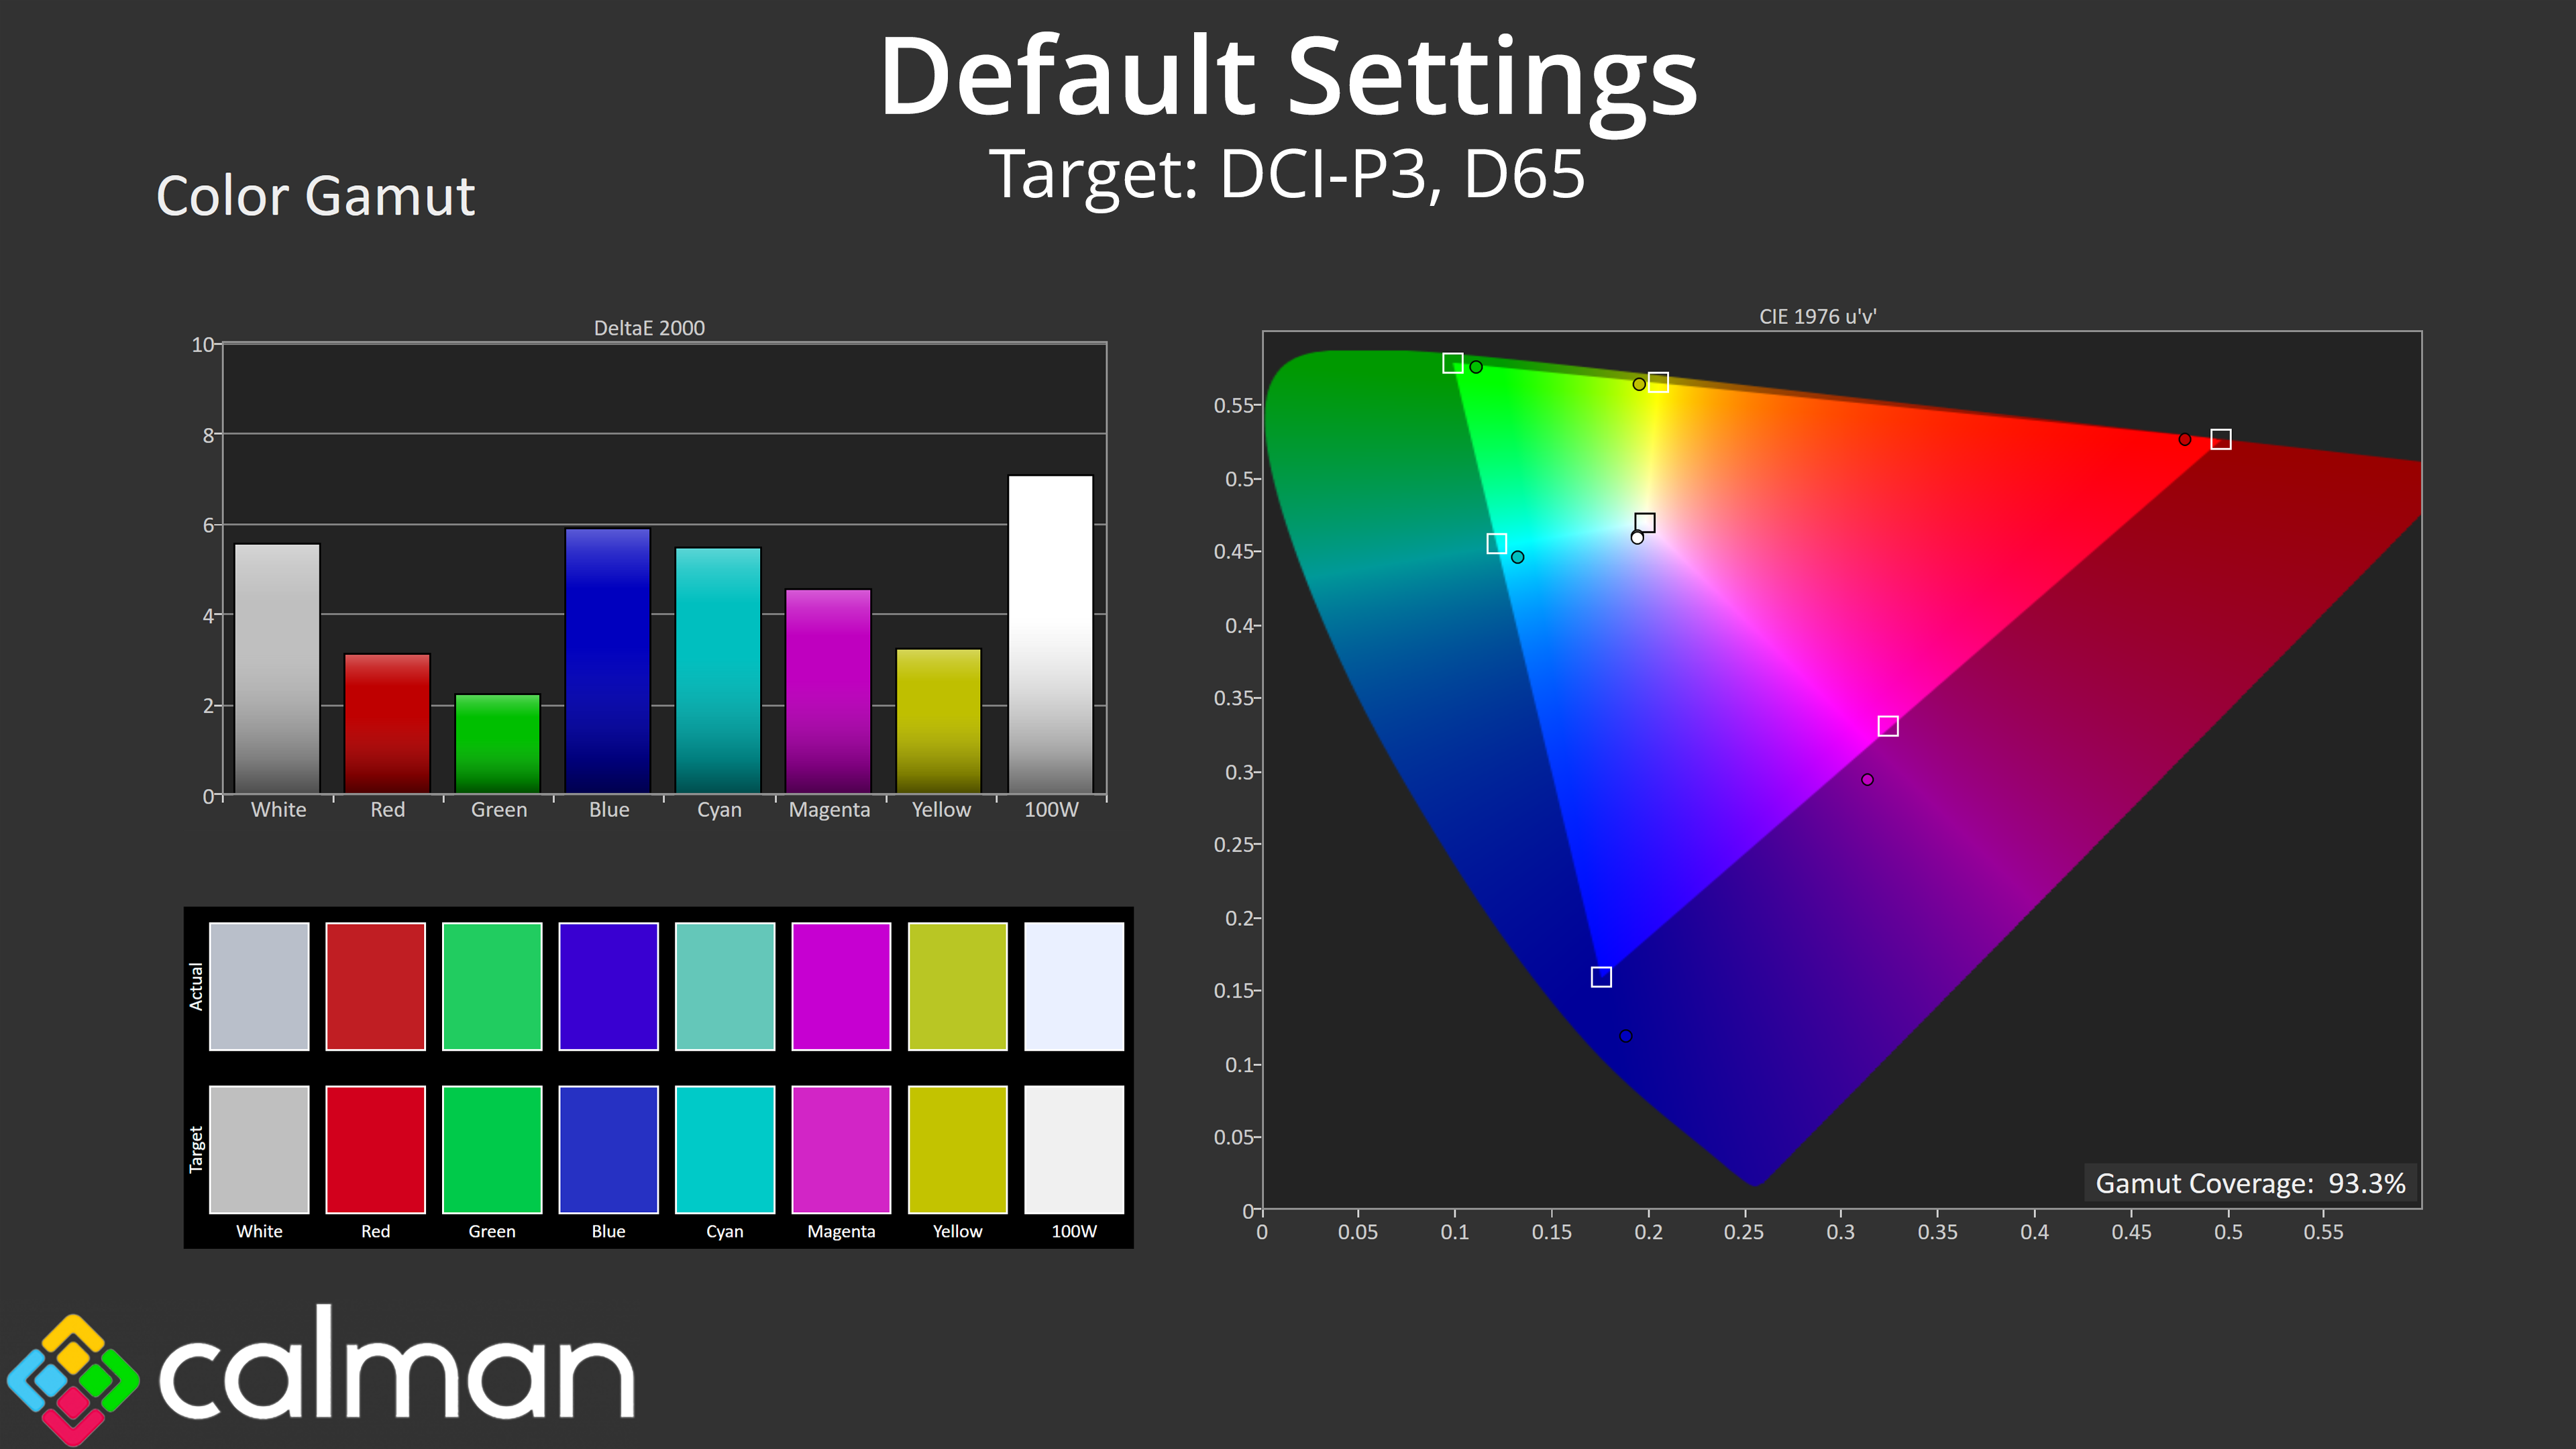
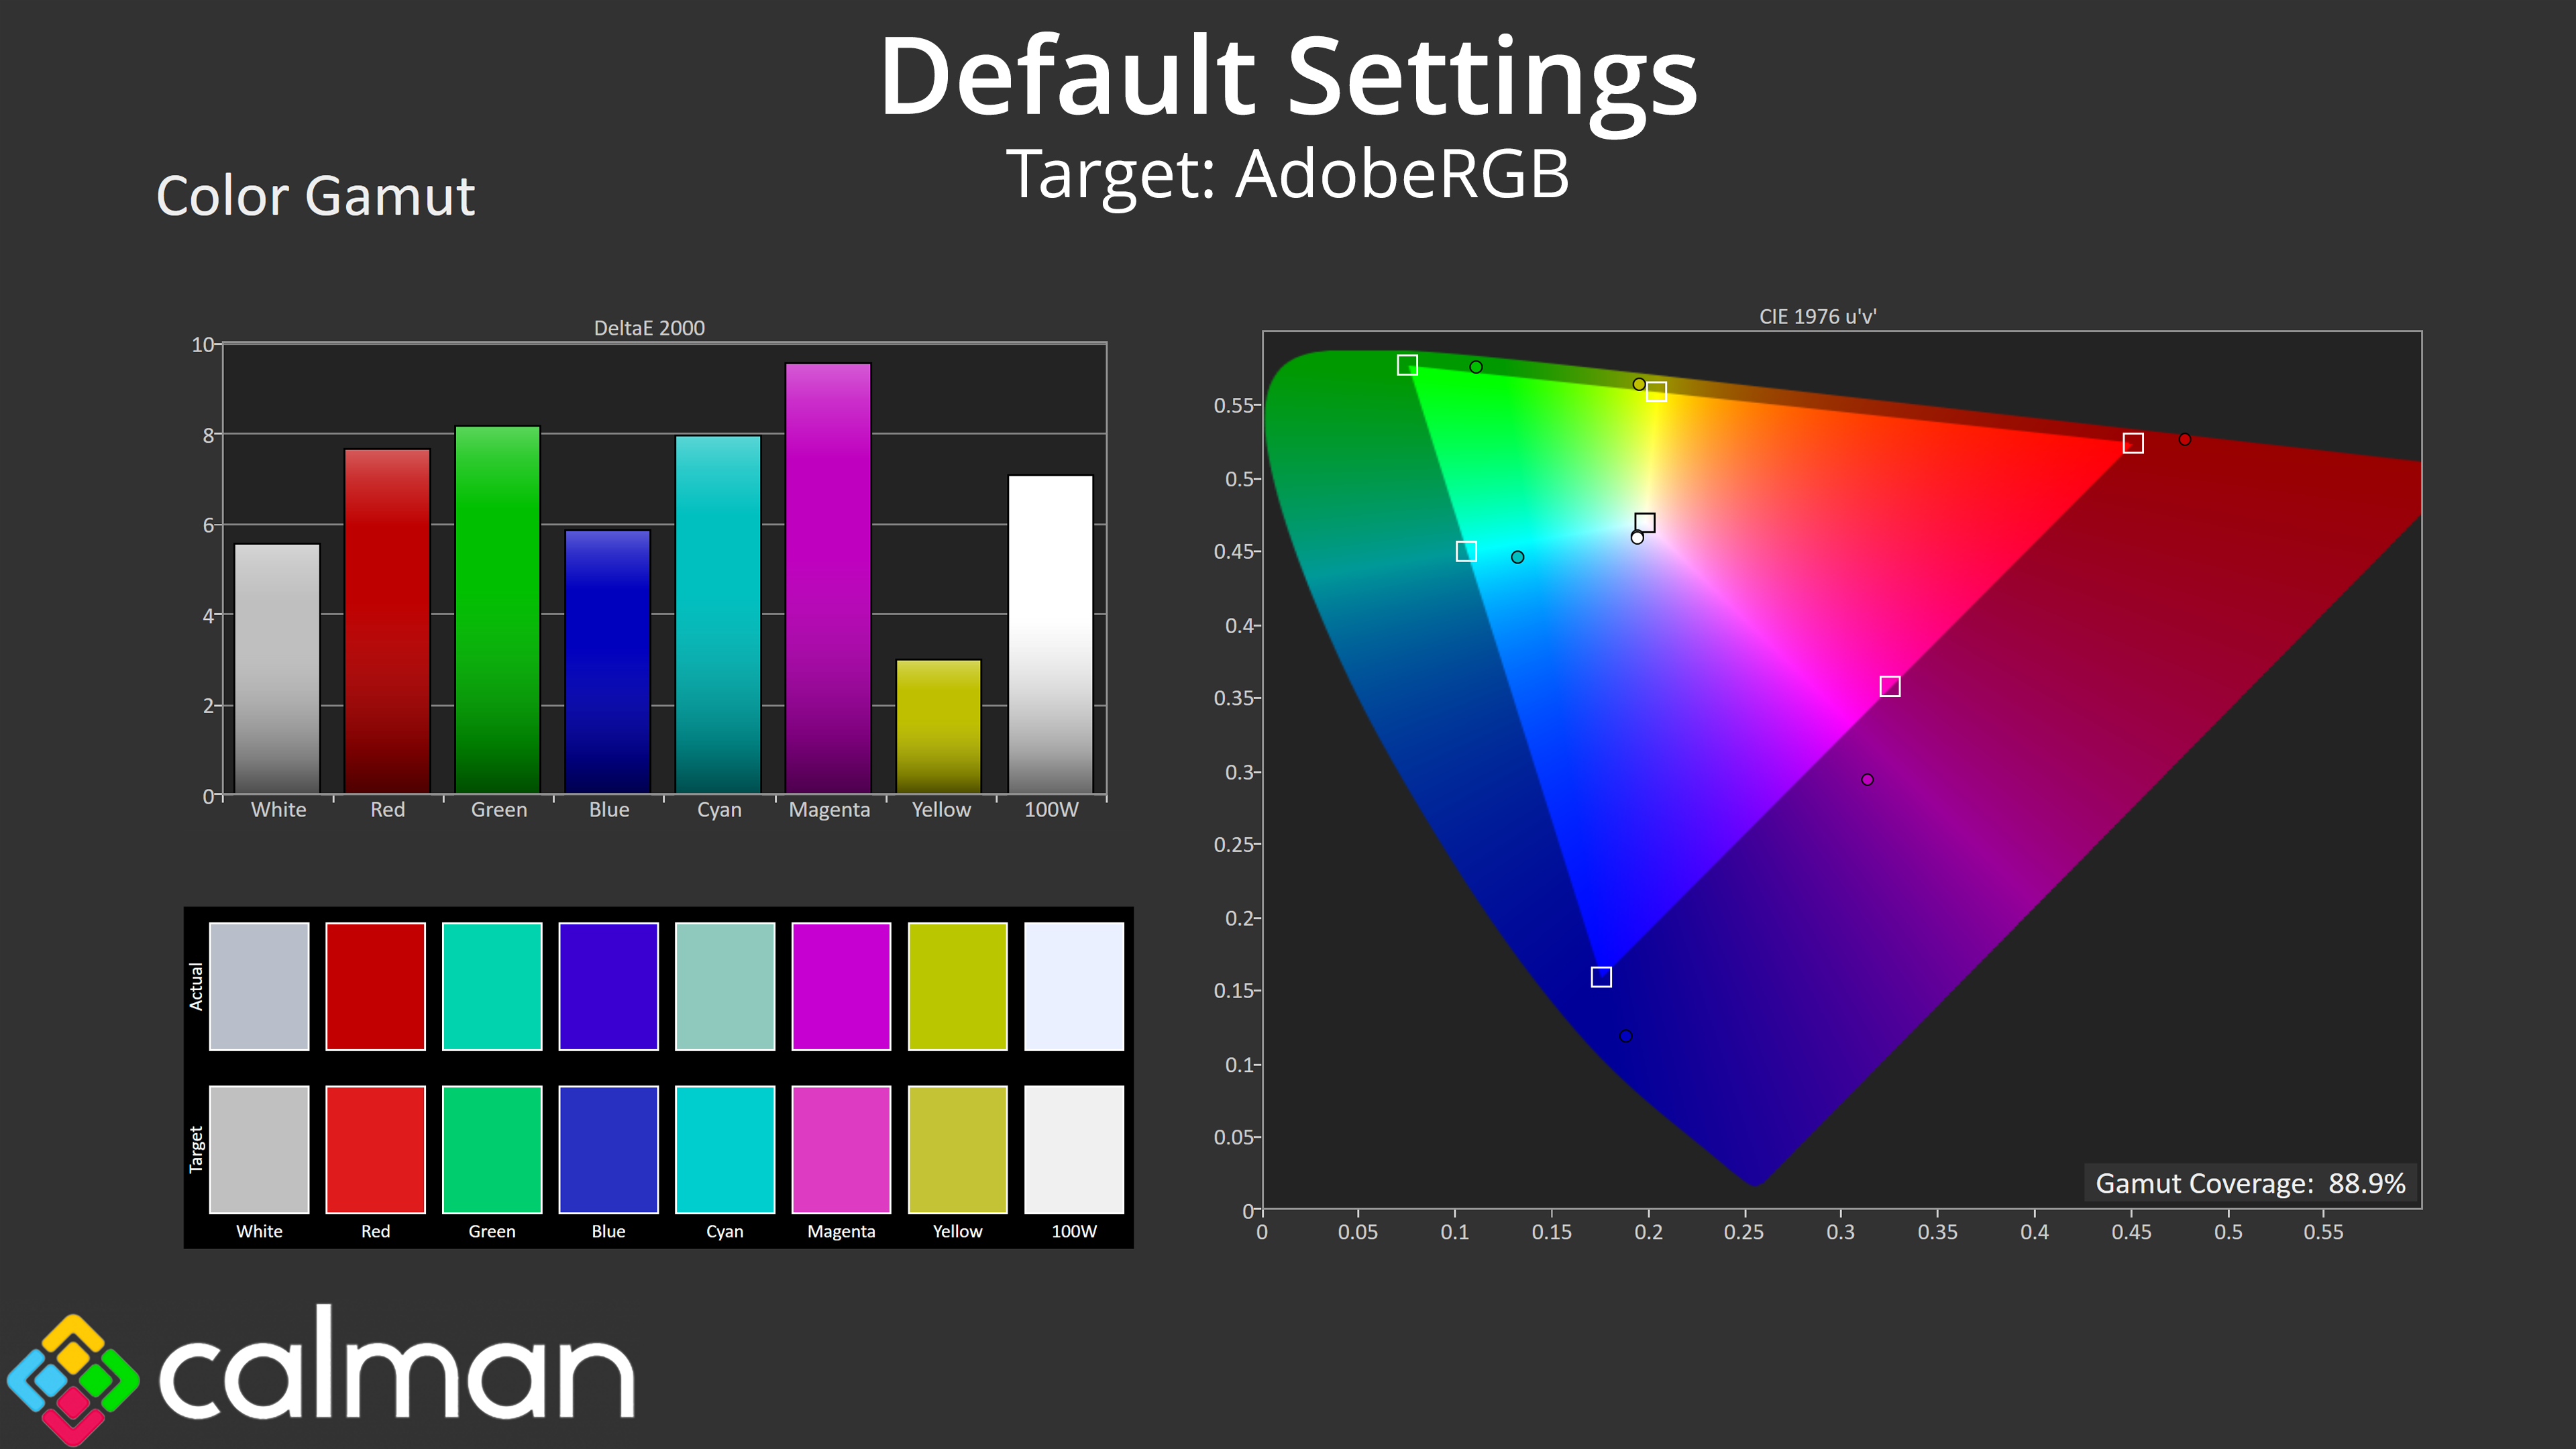

| Colour space | Coverage (%) |
| sRGB | 99.3 |
| DCI-P3 | 93.3 |
| Adobe RGB | 88.9 |
| Rec.2020 | 71.9 |
Gamut is also impressively wide for this calibre of screen. It generally surpasses the sRGB space and delivers 93.3% DCI-P3 coverage, 88.9% AdobeRGB and 71.9% Rec.2020.
Greyscale
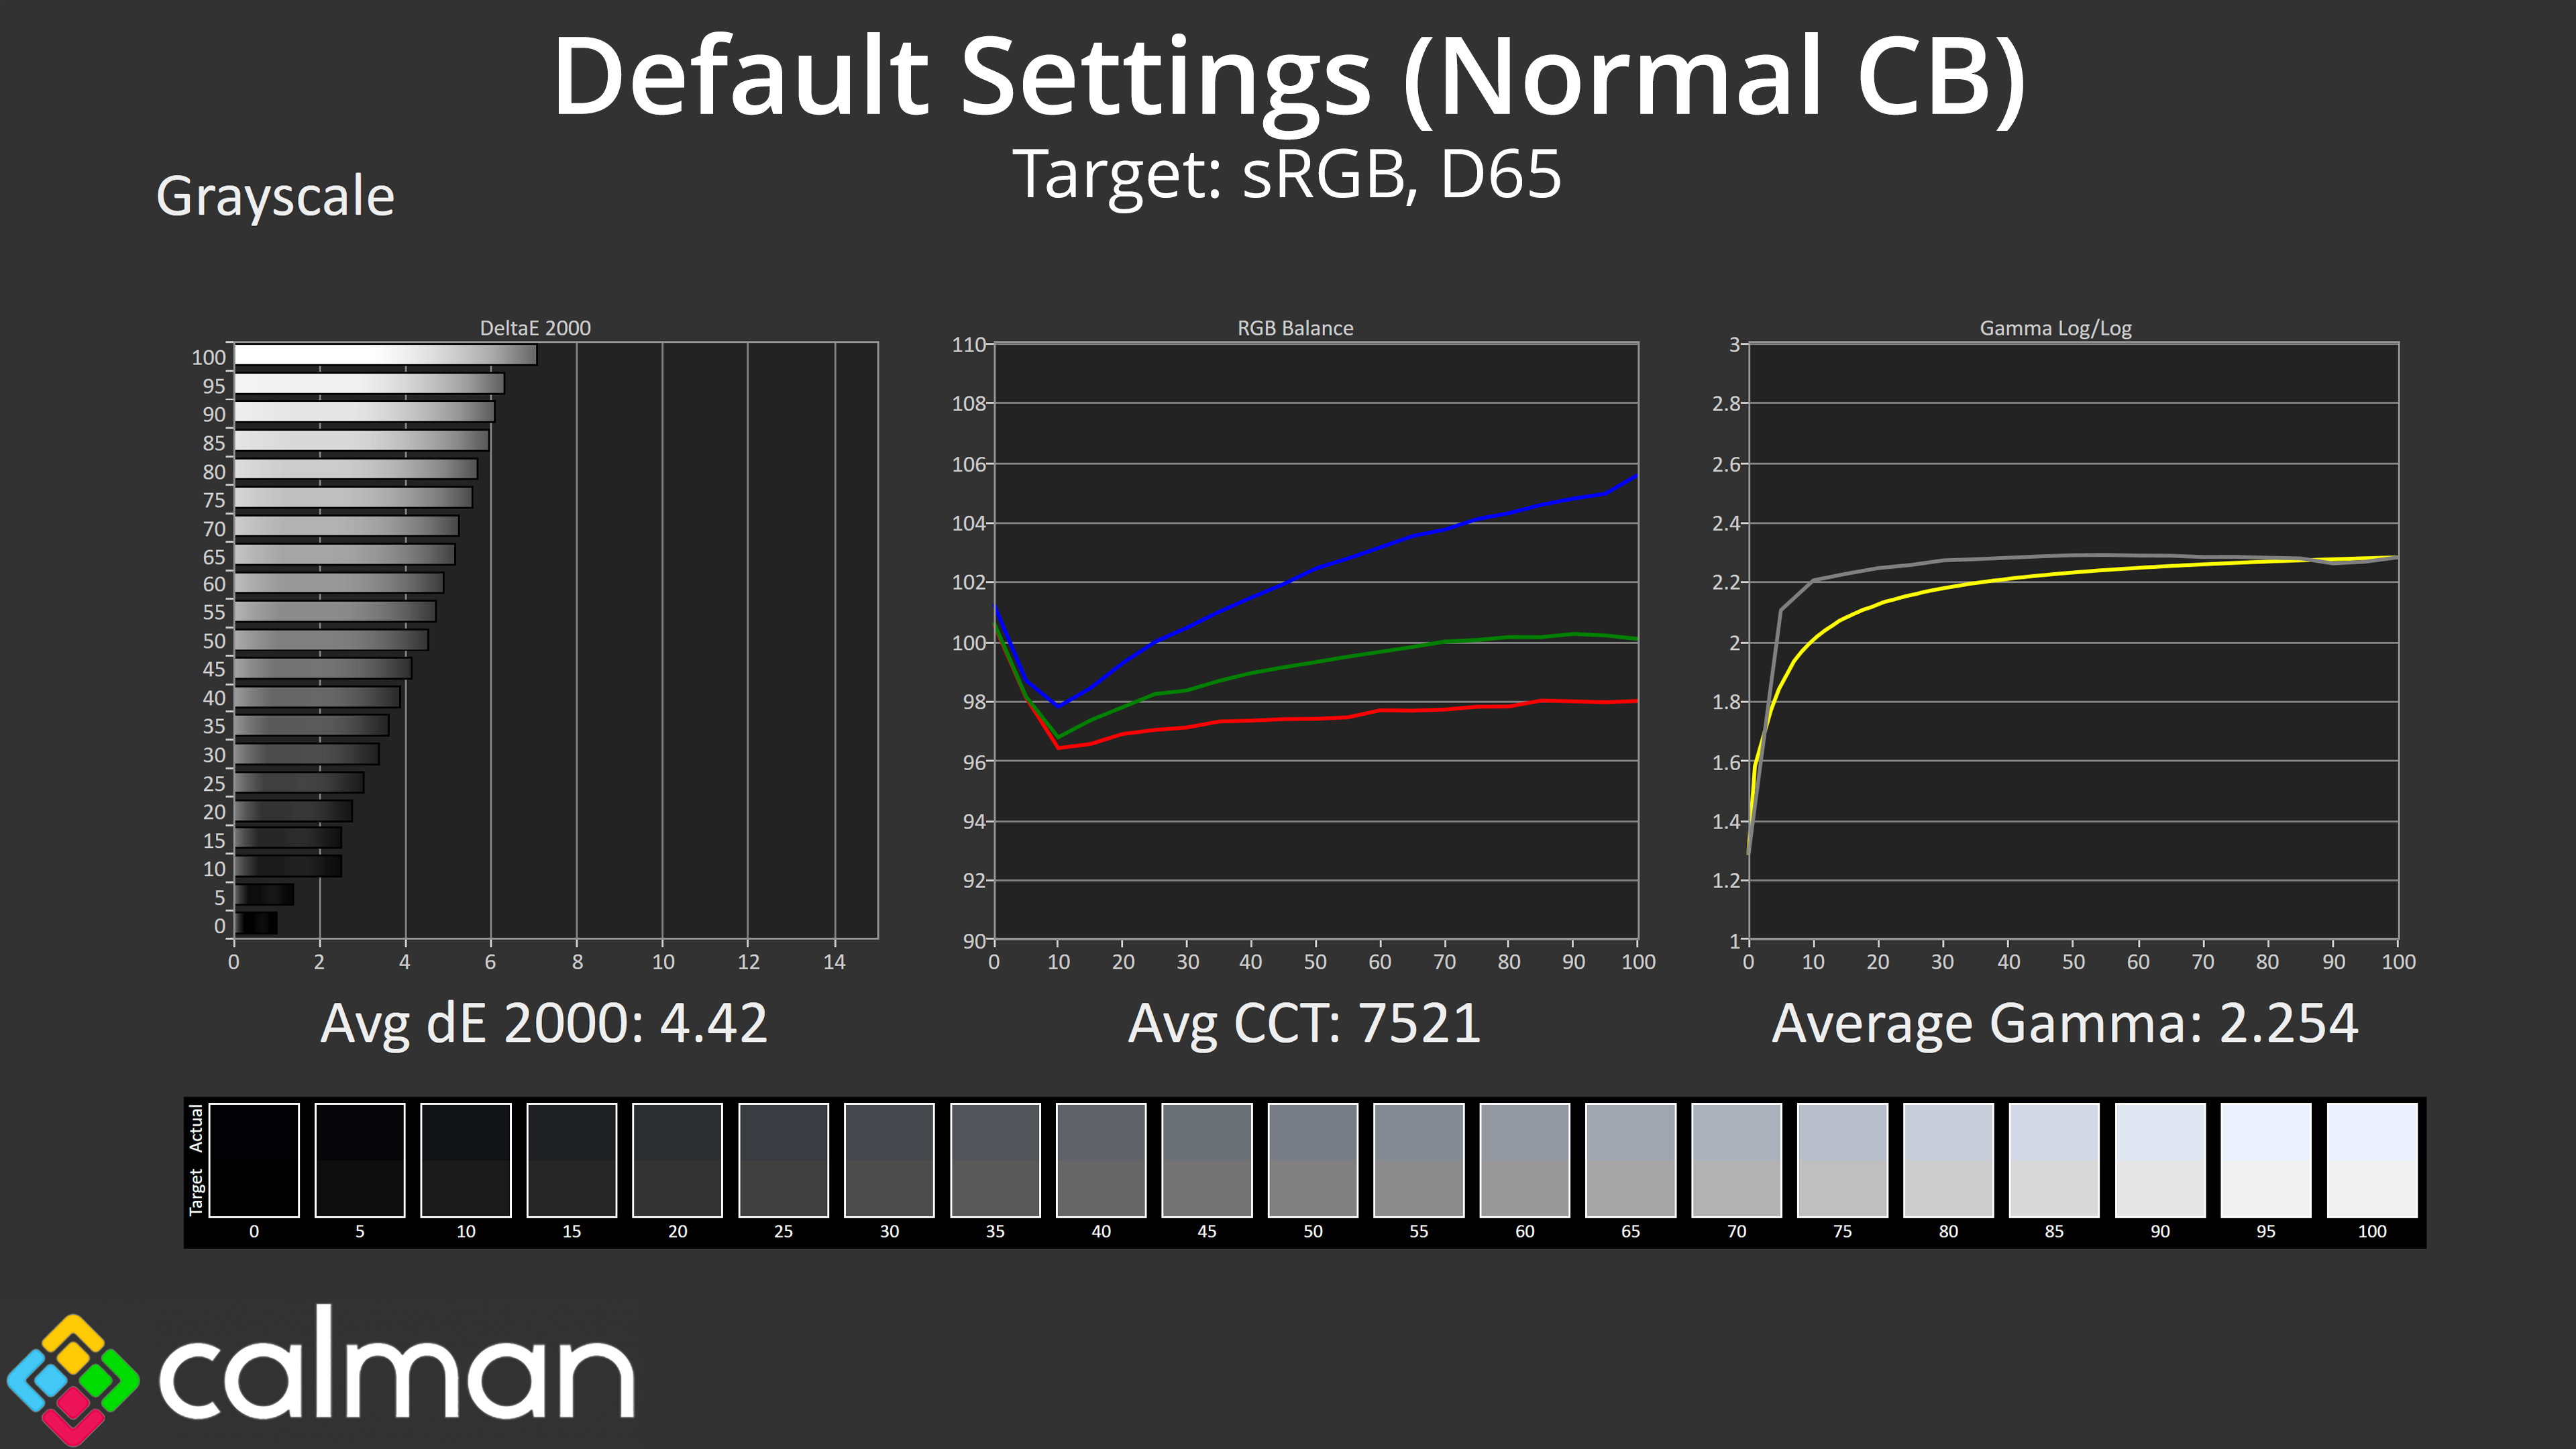
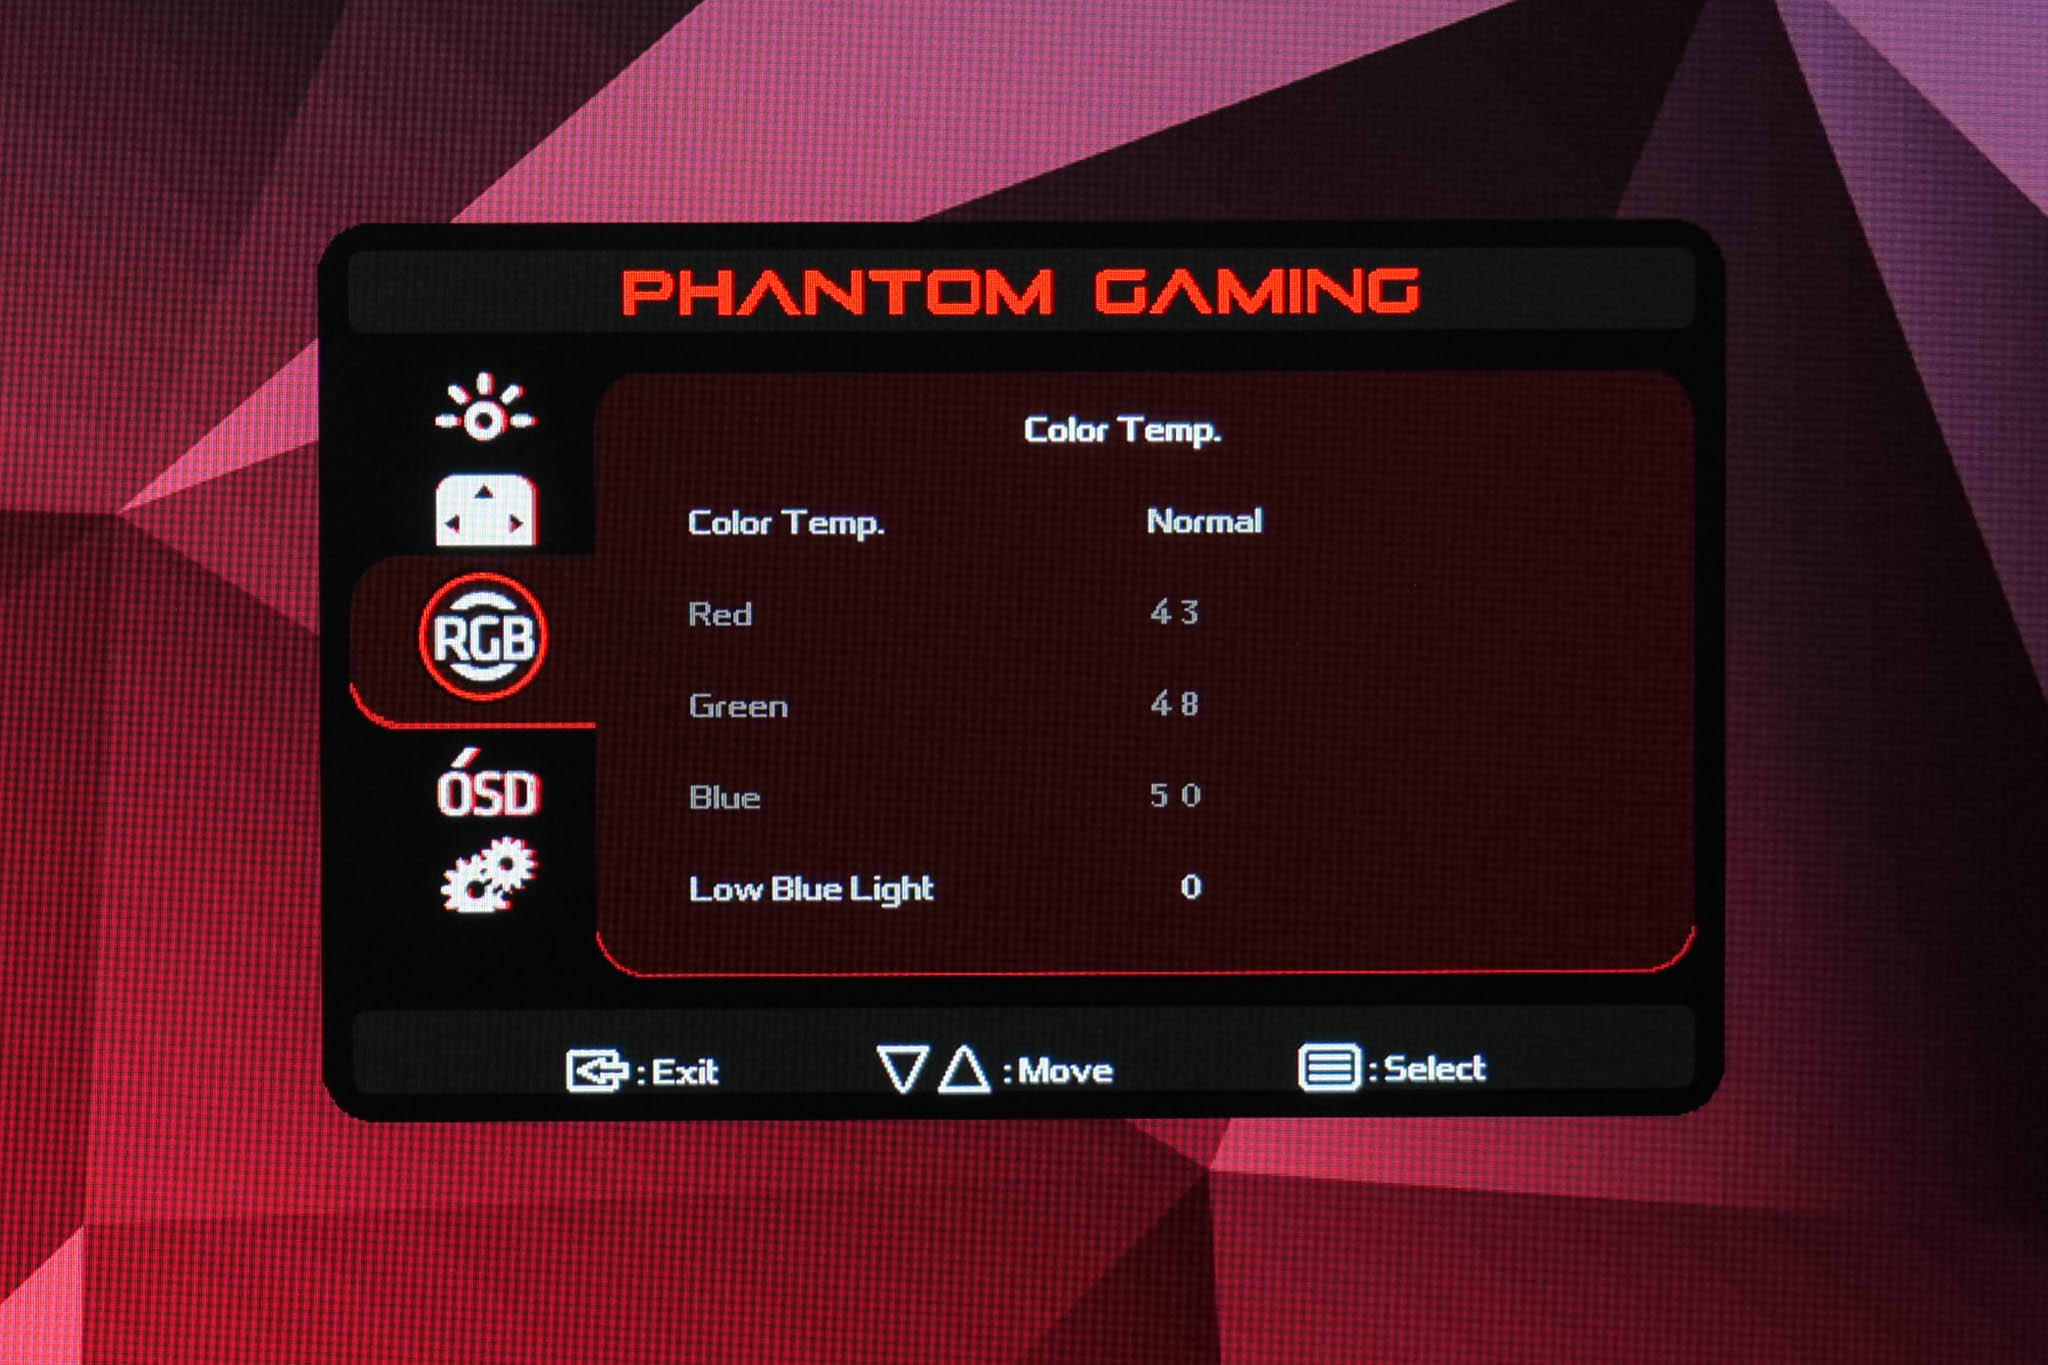
Moving onto greyscale testing, I started using completely default, out of the box settings, which includes using the Normal colour balance preset within the OSD. As you can see, this resulted in a very cool picture, with an average CCT (Correlated Colour Temperature) of 7521K, a 16% deviation from the 6500K target. That results in a fairly high greyscale average deltaE of 4.42, though gamma tracking is at least pleasing accurate, if not just a smidge high.
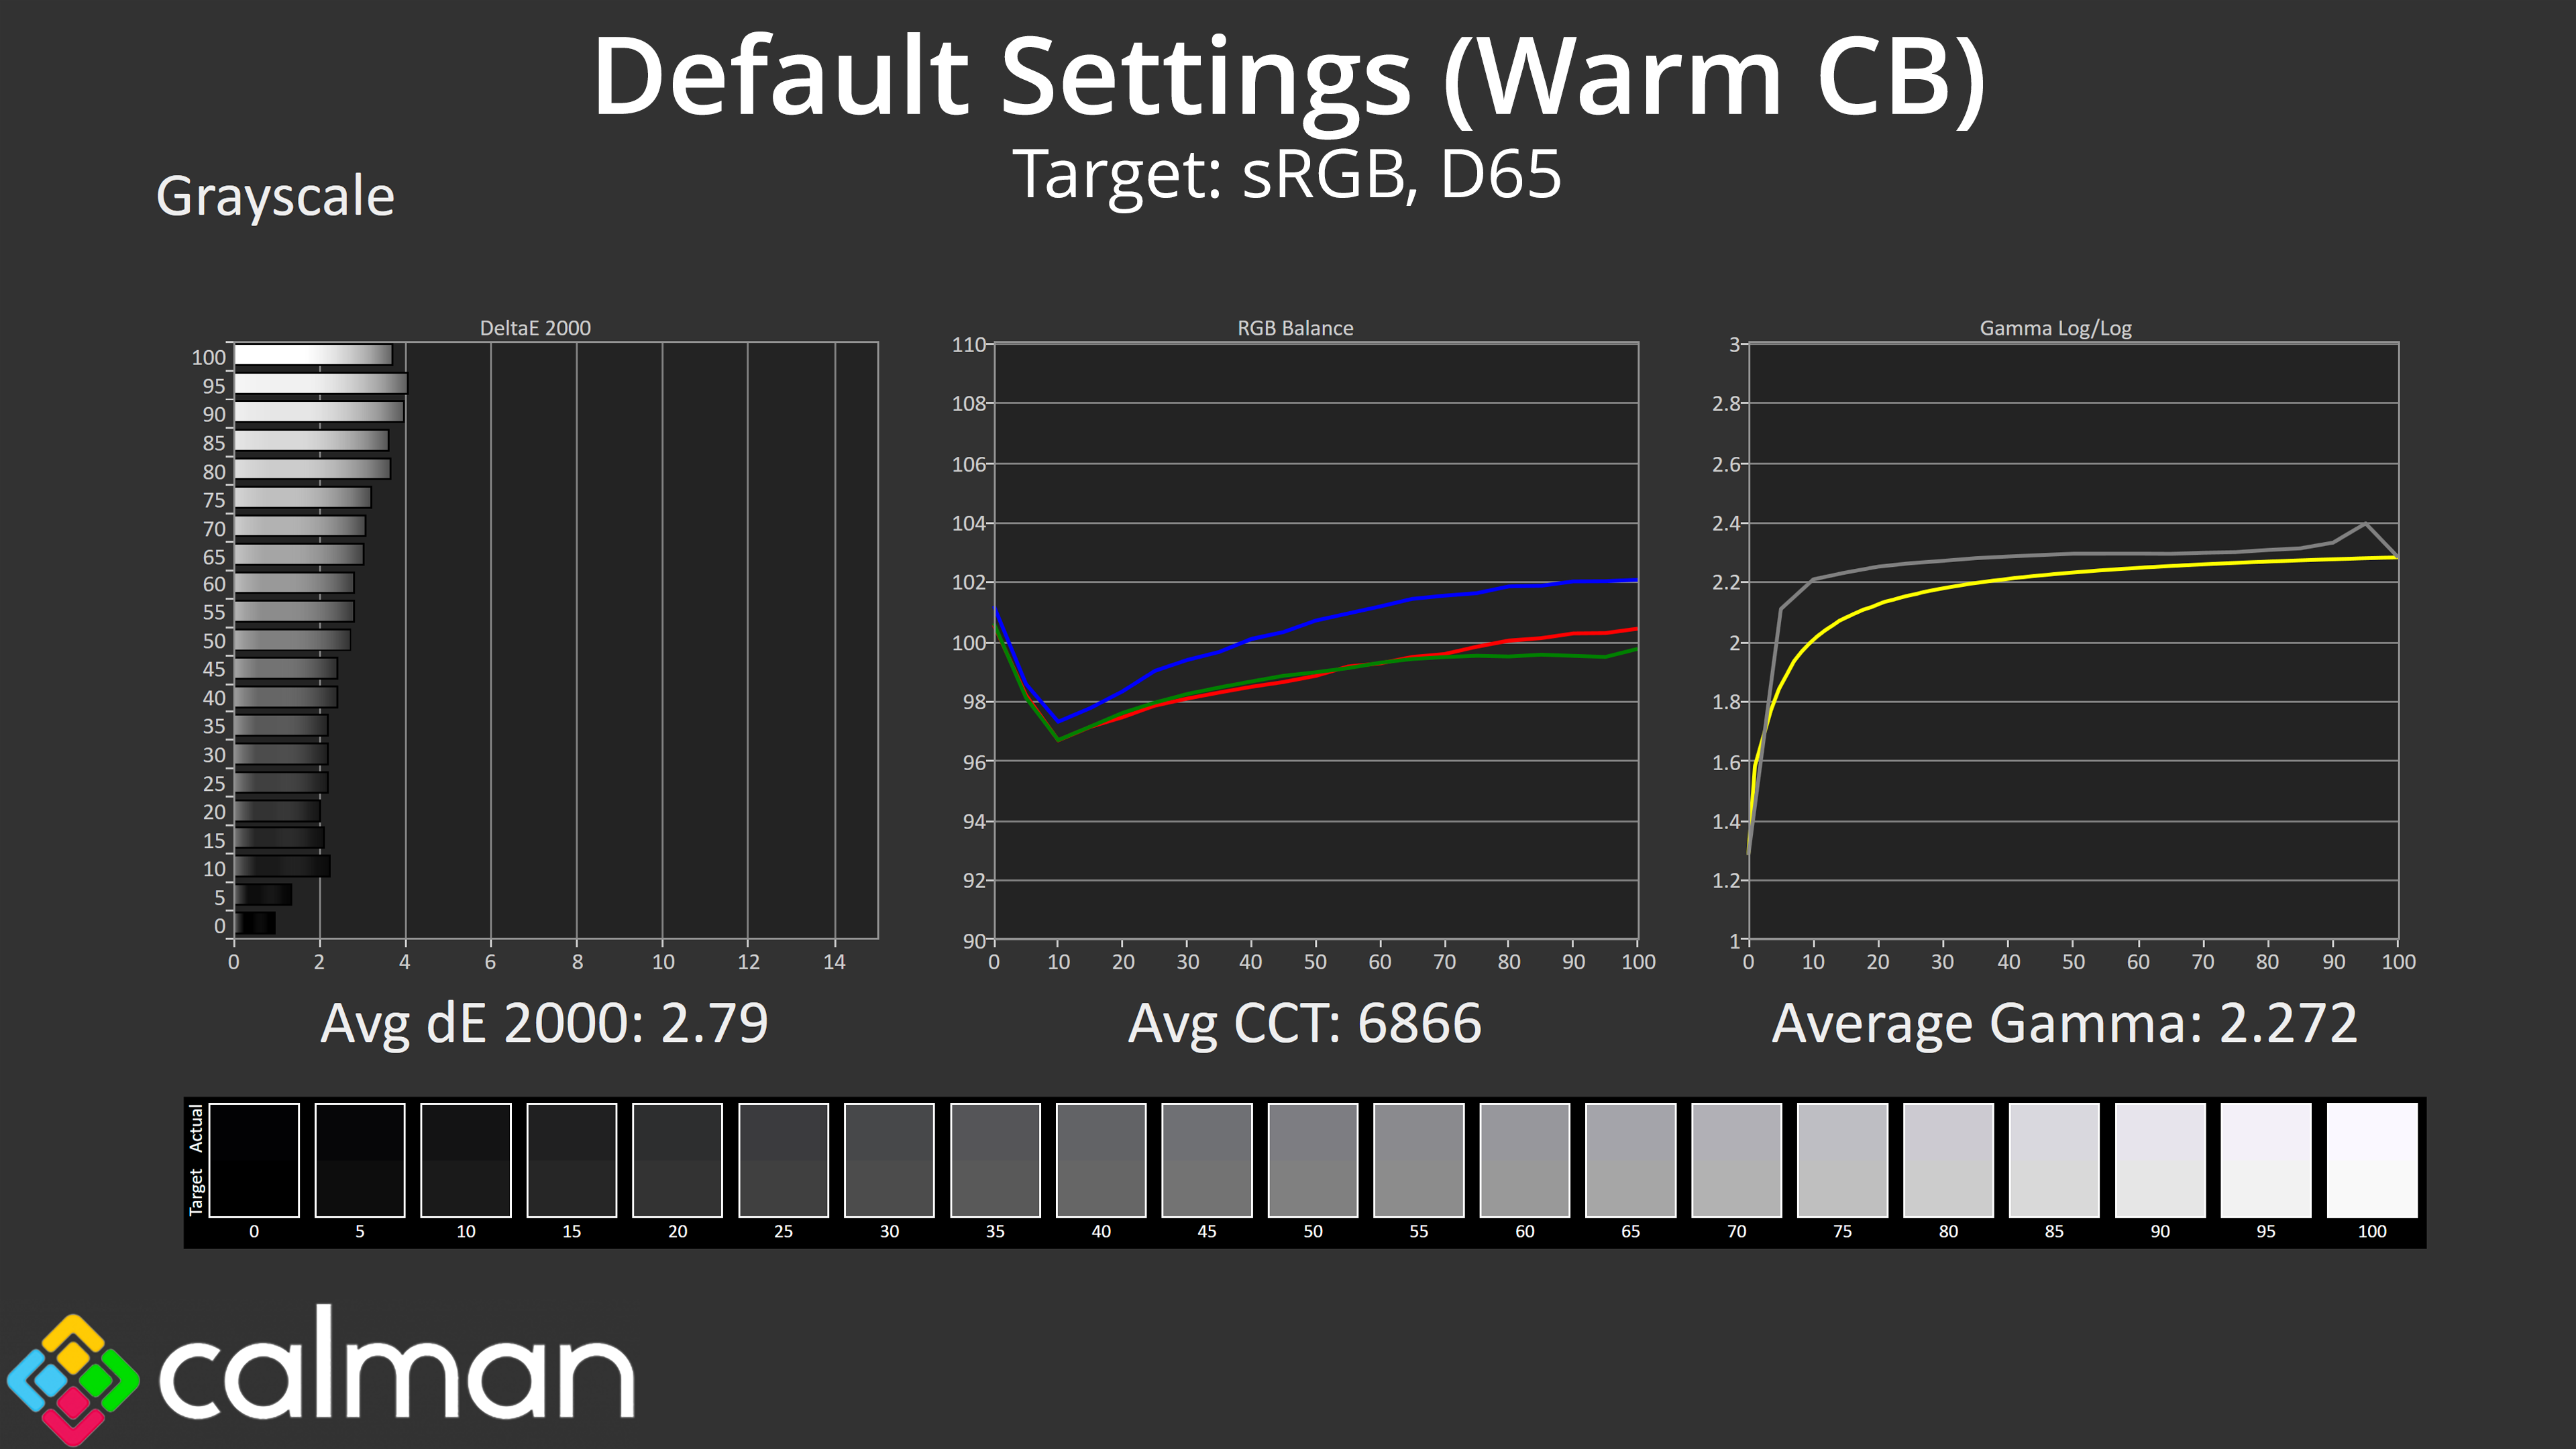
To try and improve matters, I switched to the Warm colour balance preset, and thankfully the results are a big improvement, with a new average CCT of 6866K and greyscale average deltaE of 2.79. Even using the Warm option, colour balance is still a touch cool, so let's try the manual setting…

Using a manual colour balance (Red: 49, Green: 50, Blue: 46) gave me the best results yet. Our average CCT dropped to 6609K, and the new greyscale results are highly impressive. If you aren't able to verify the results of a manual colour balance, the Warm preset will help improve things overall compared to the Normal preset, but I did get even better results from a manual tuning.
Saturation
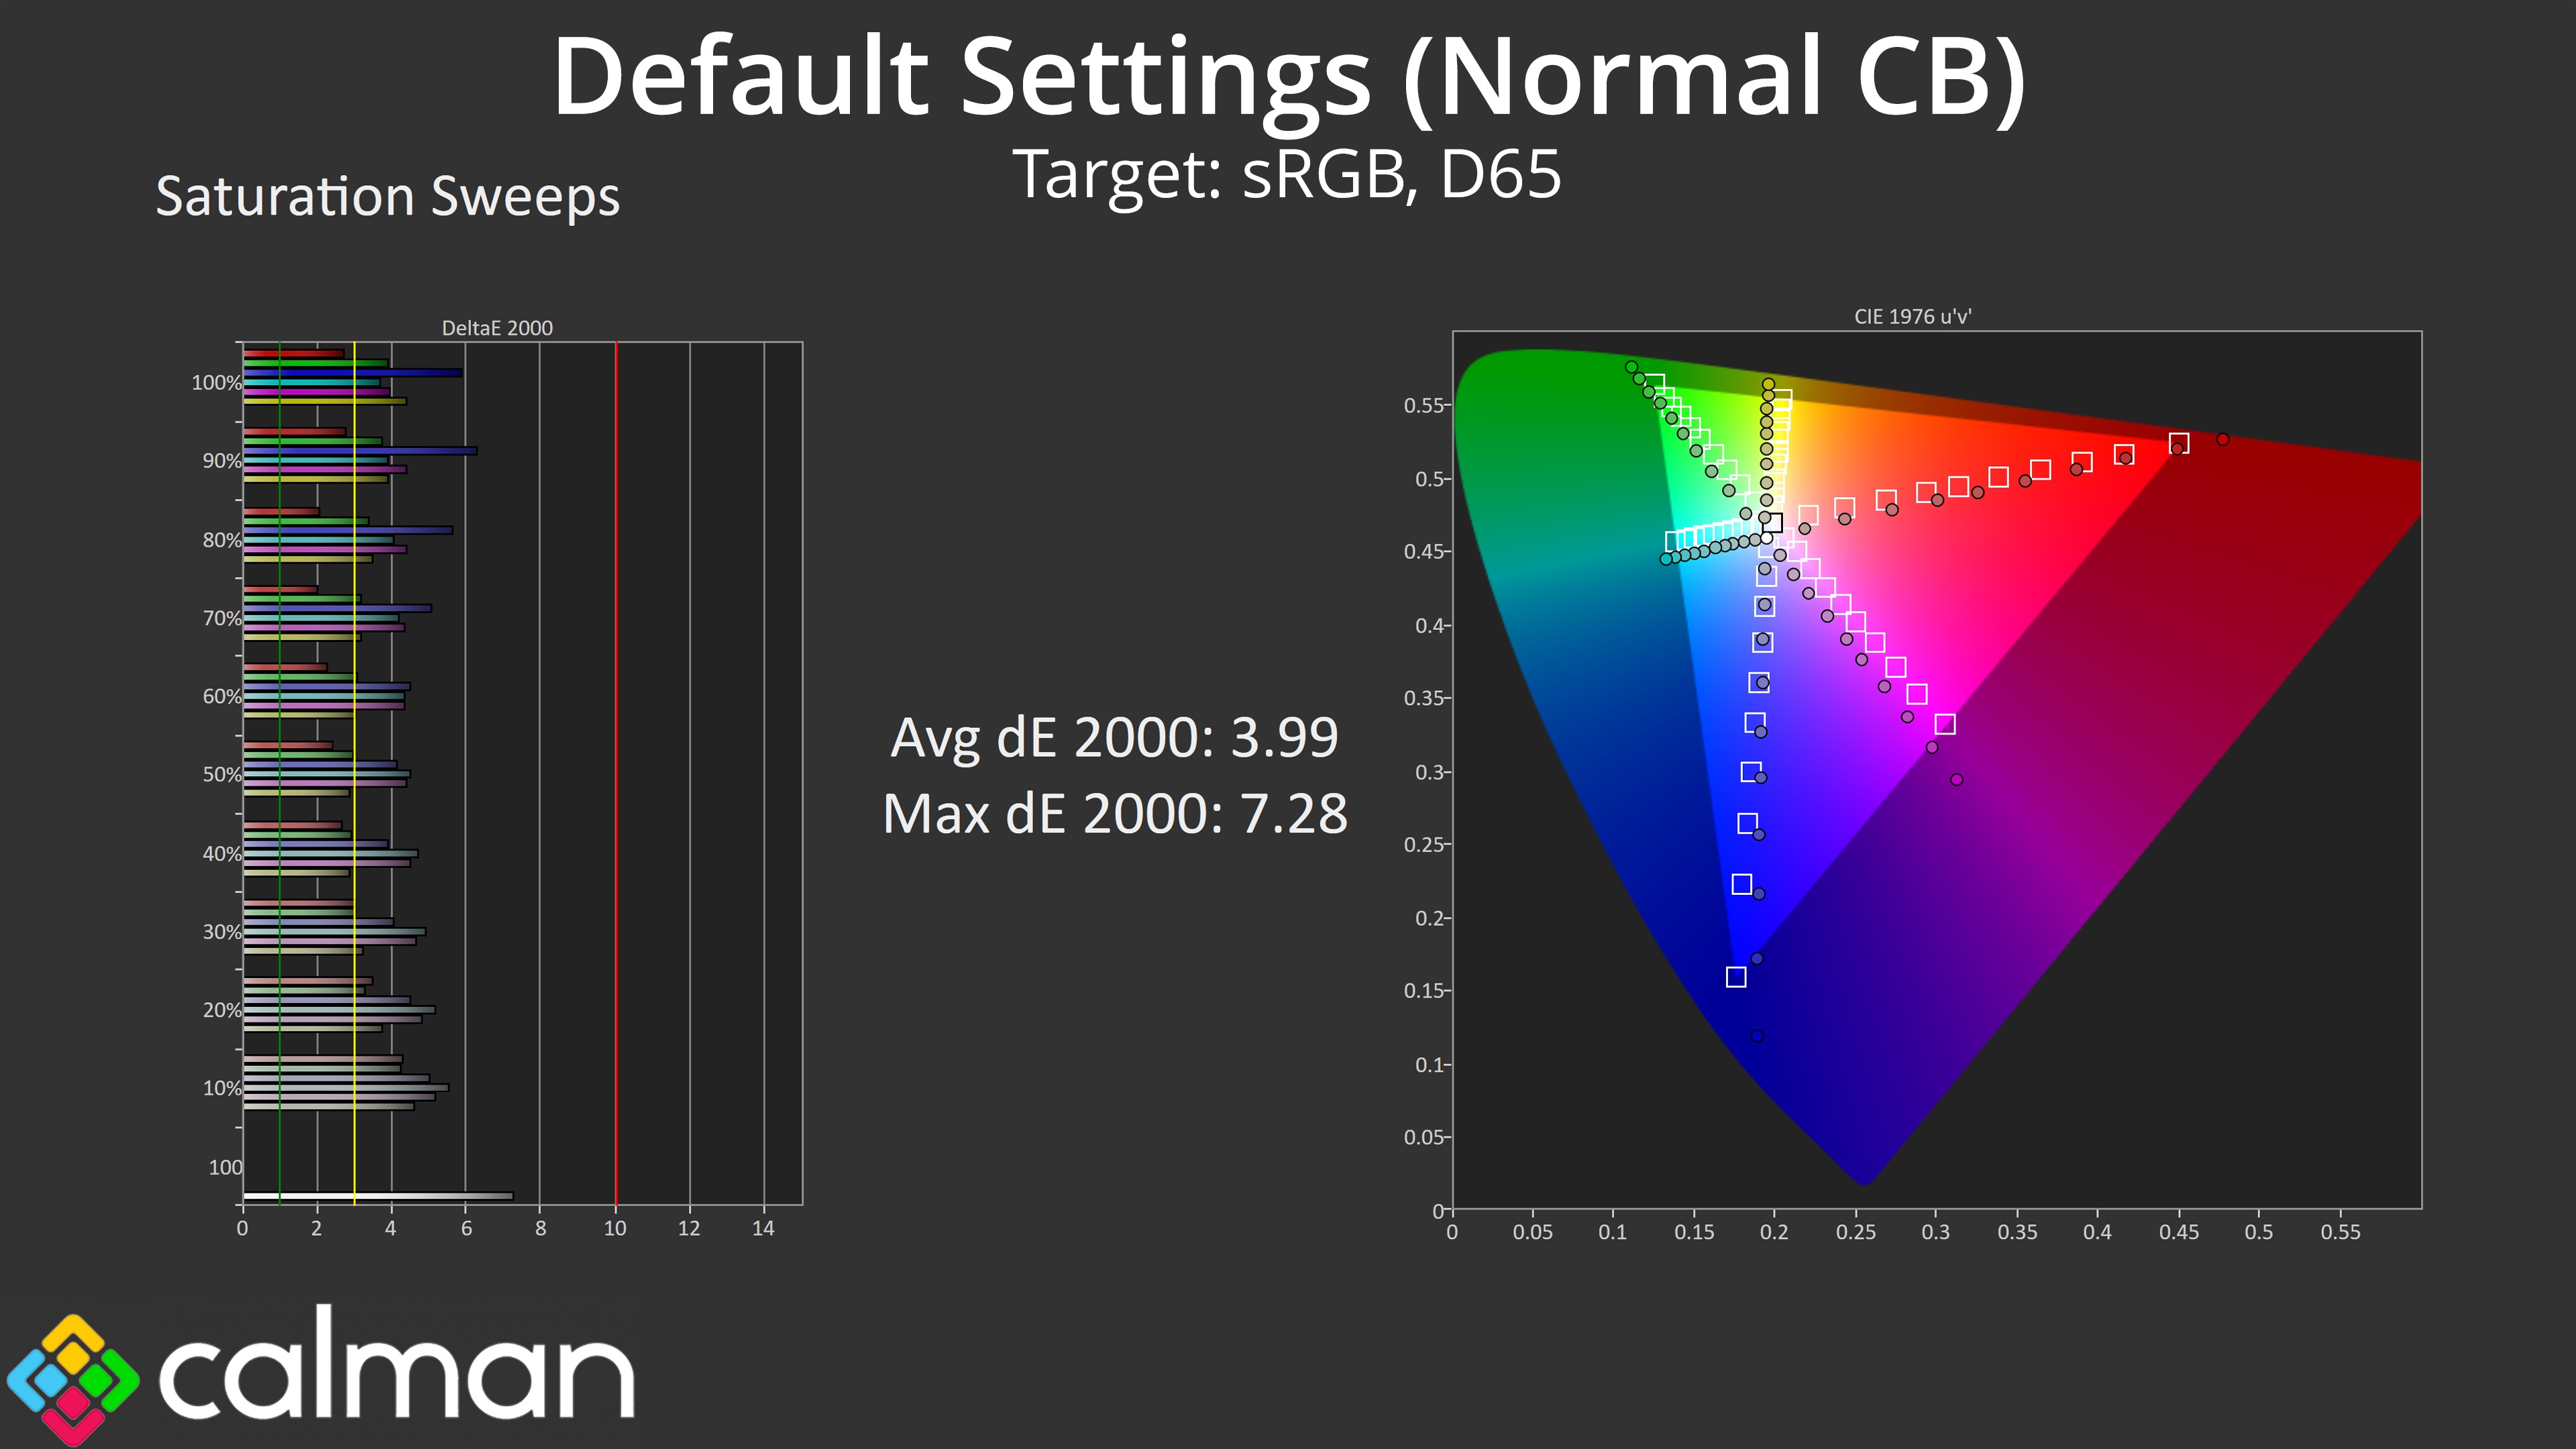

Because of that, I decided to run each test twice – one using the default Normal colour balance, but then again using the Warm colour balance to see what difference is made. With our saturation results, we went from an average dE 2000 of 3.99 using the Normal option, down to 2.9 with the Warm colour balance, a decent result overall but nothing mind-blowing.
Colour Accuracy
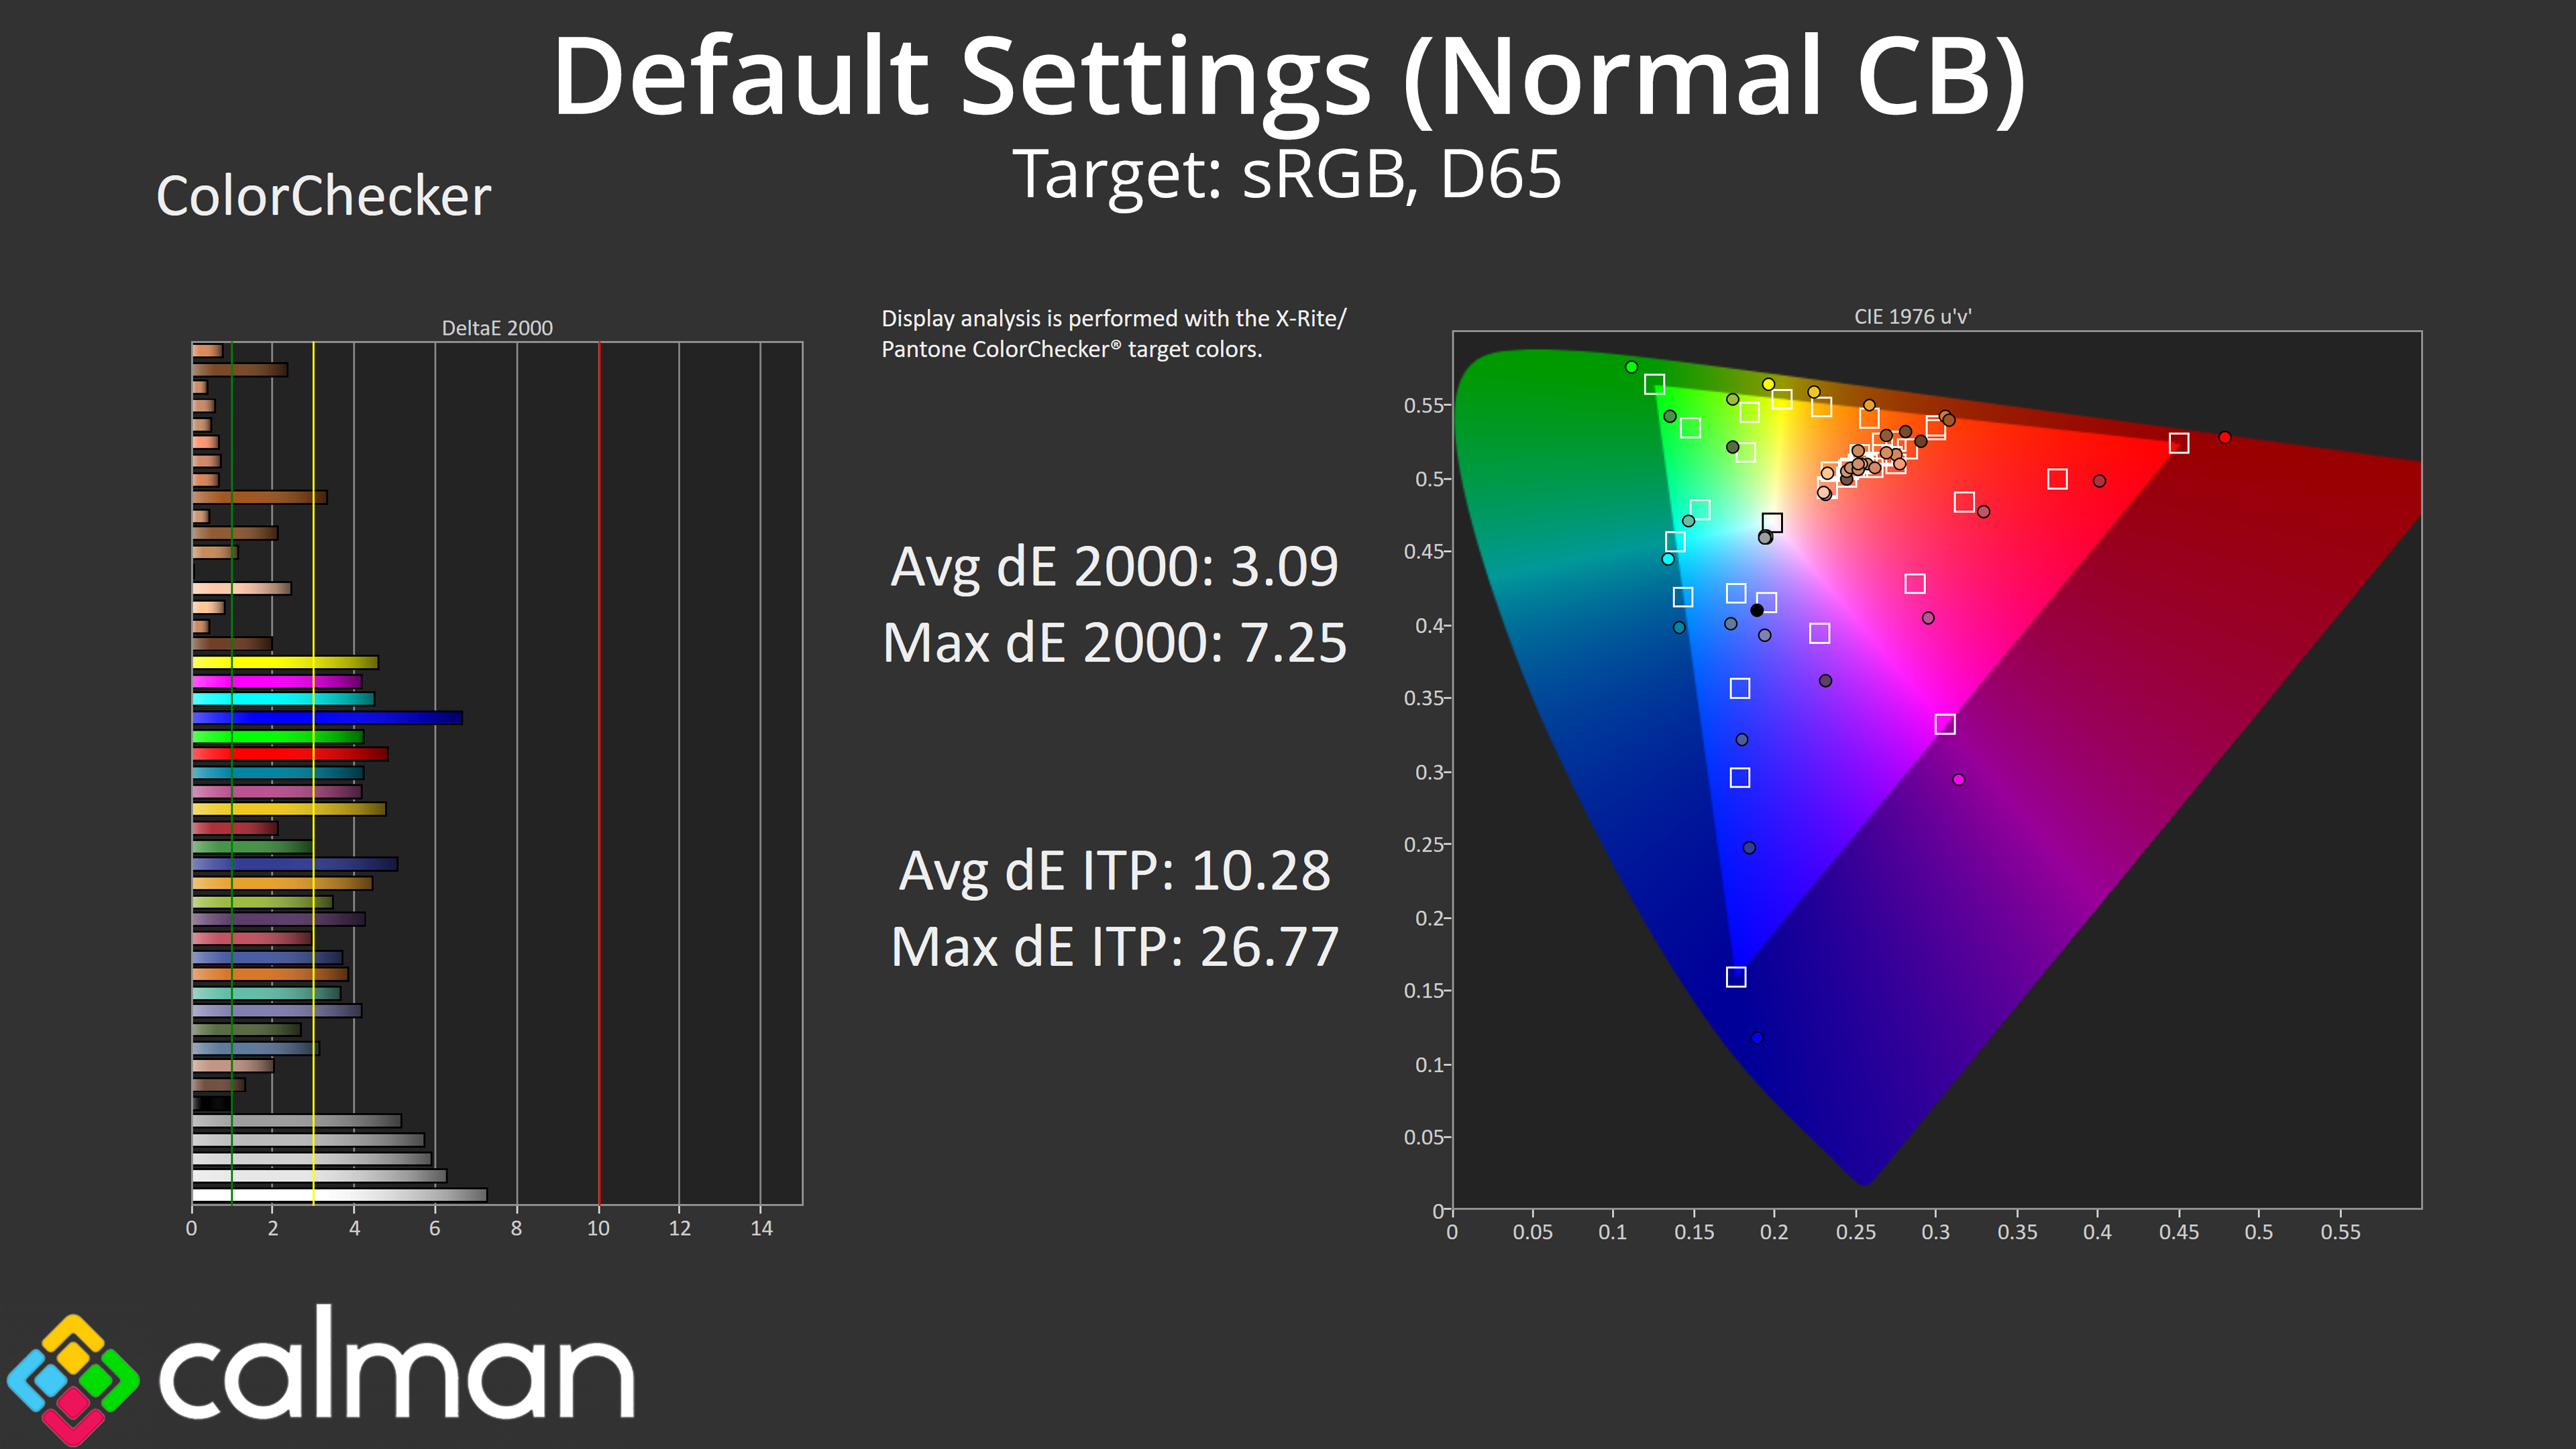
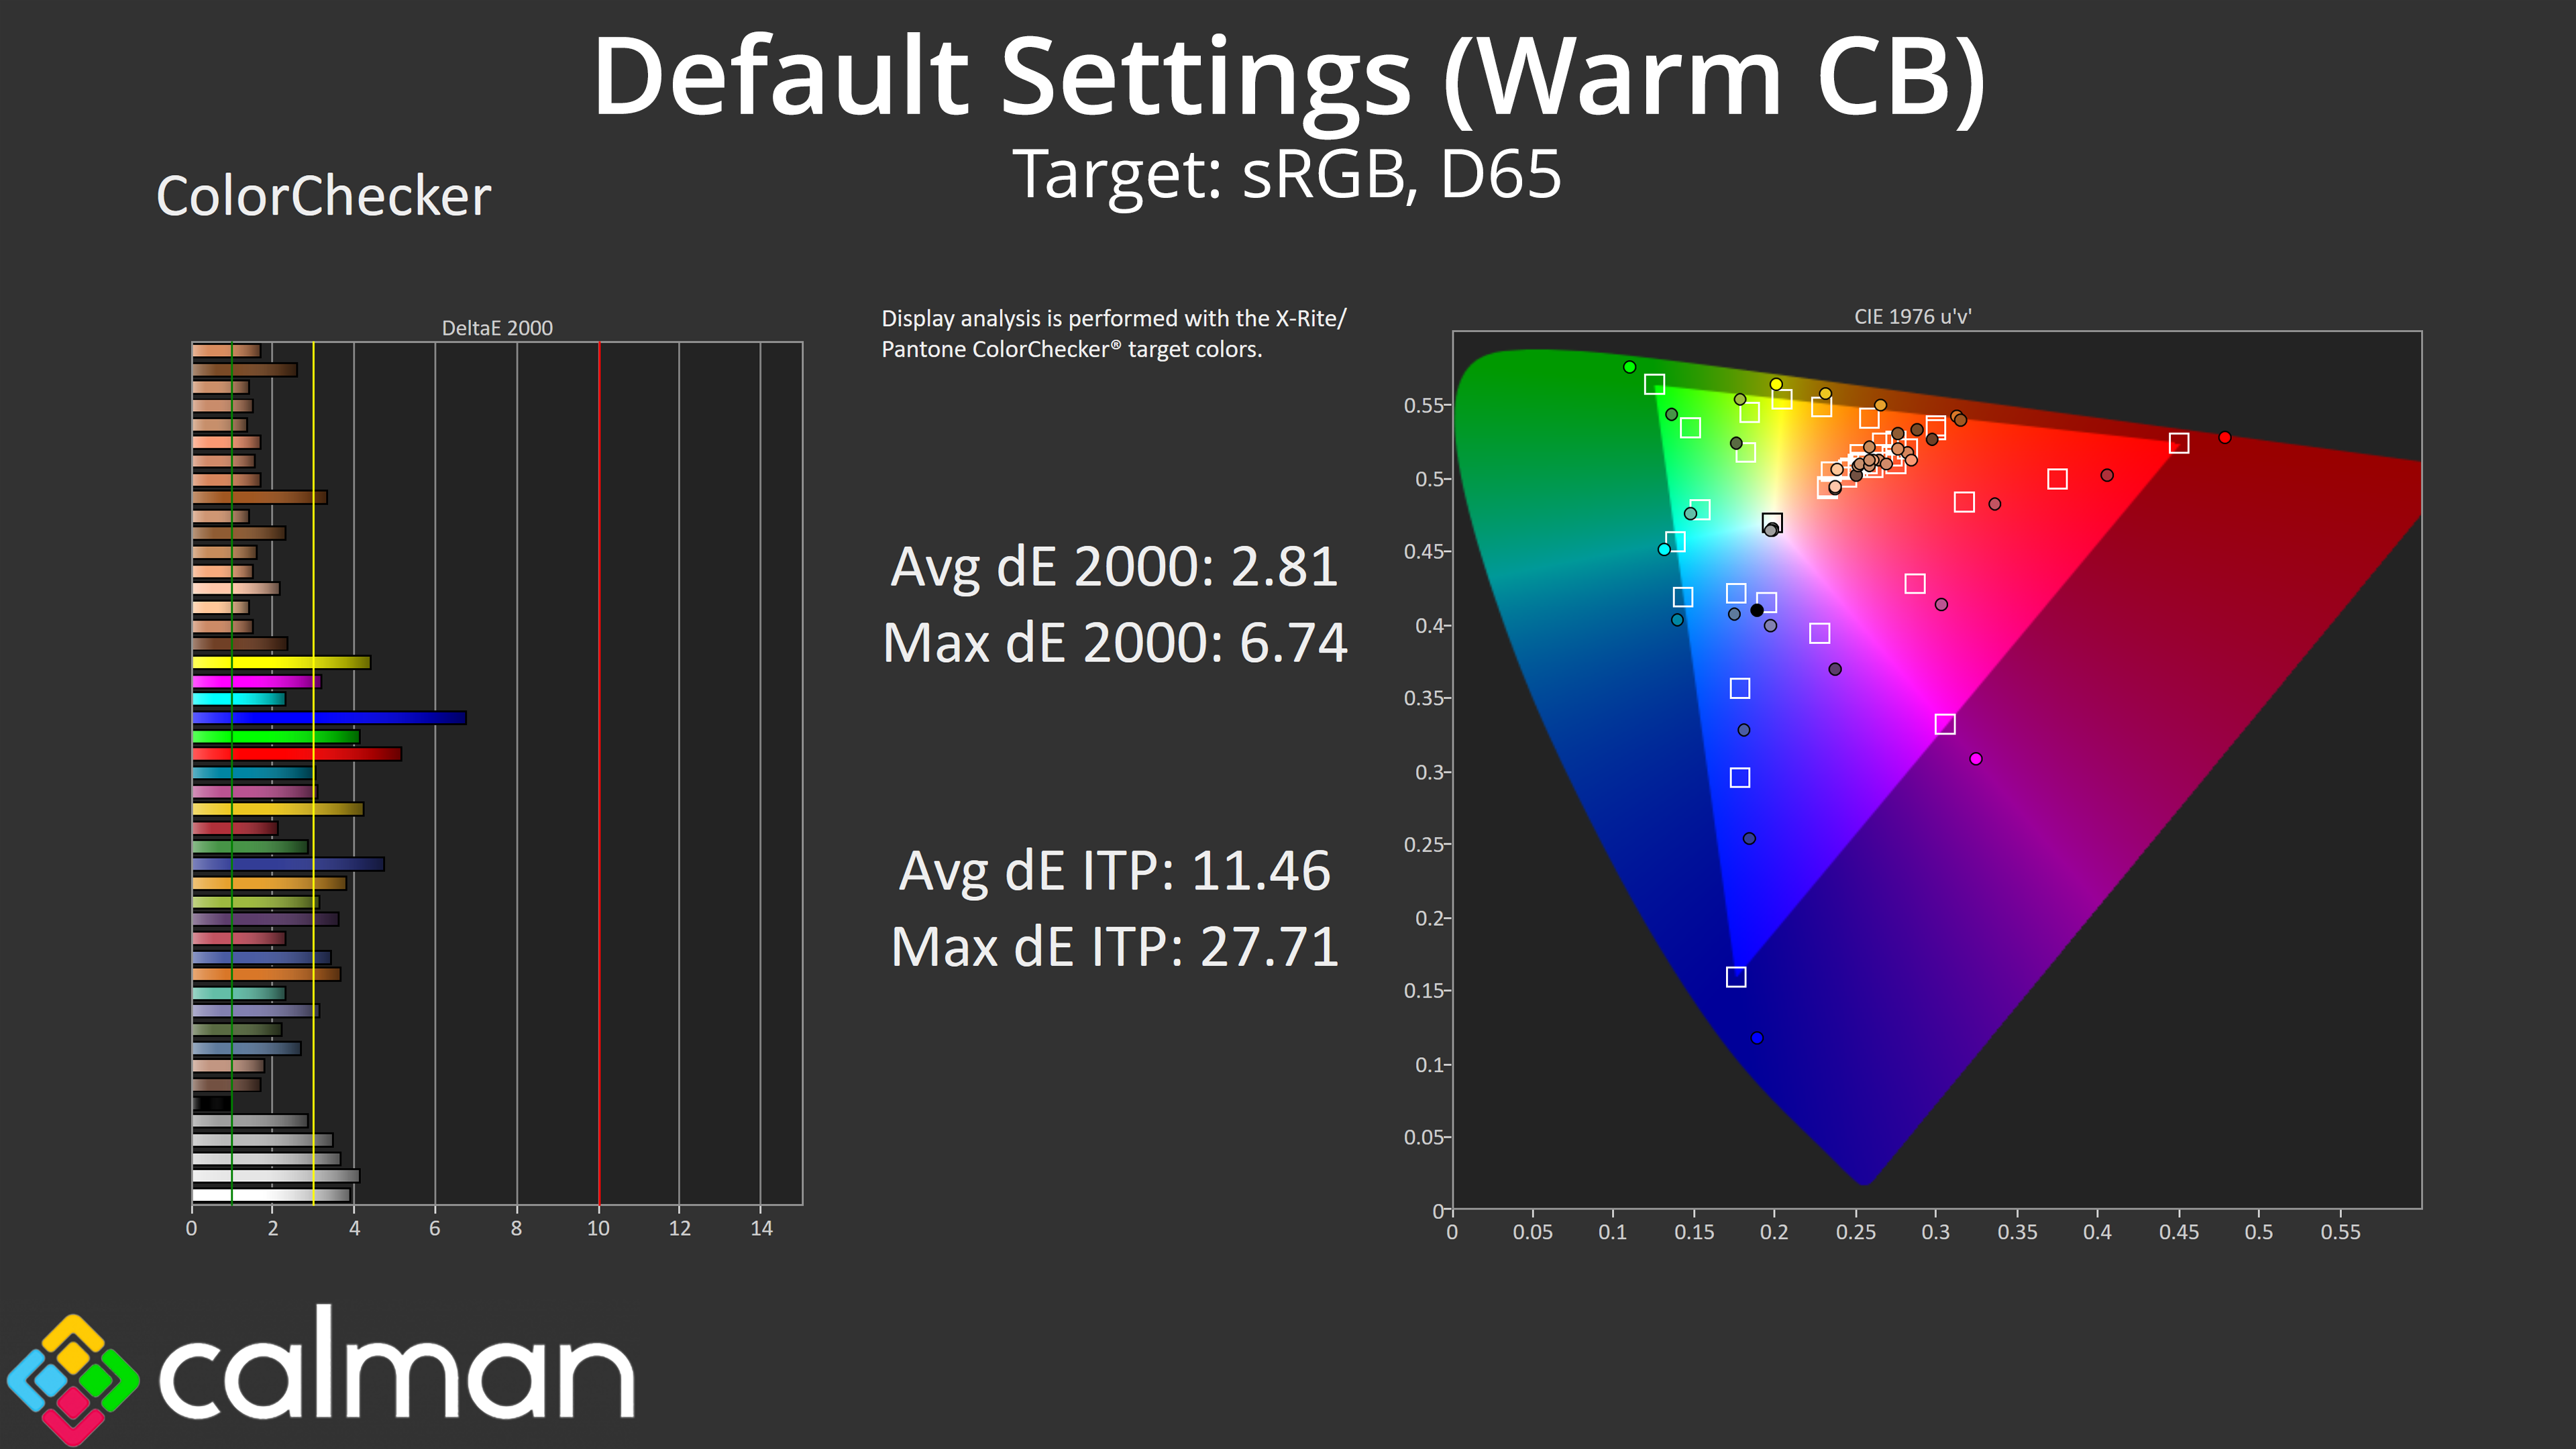
Colour accuracy wasn't affected too much by the difference in colour balance. We saw an average dE 2000 of 3.09 using the Normal option, and just a small improvement to 2.81 when switching to the Warm setting. In both instances, the 100% blue channel is the worst offender as we saw significant over-saturation here.
Calibrated Results
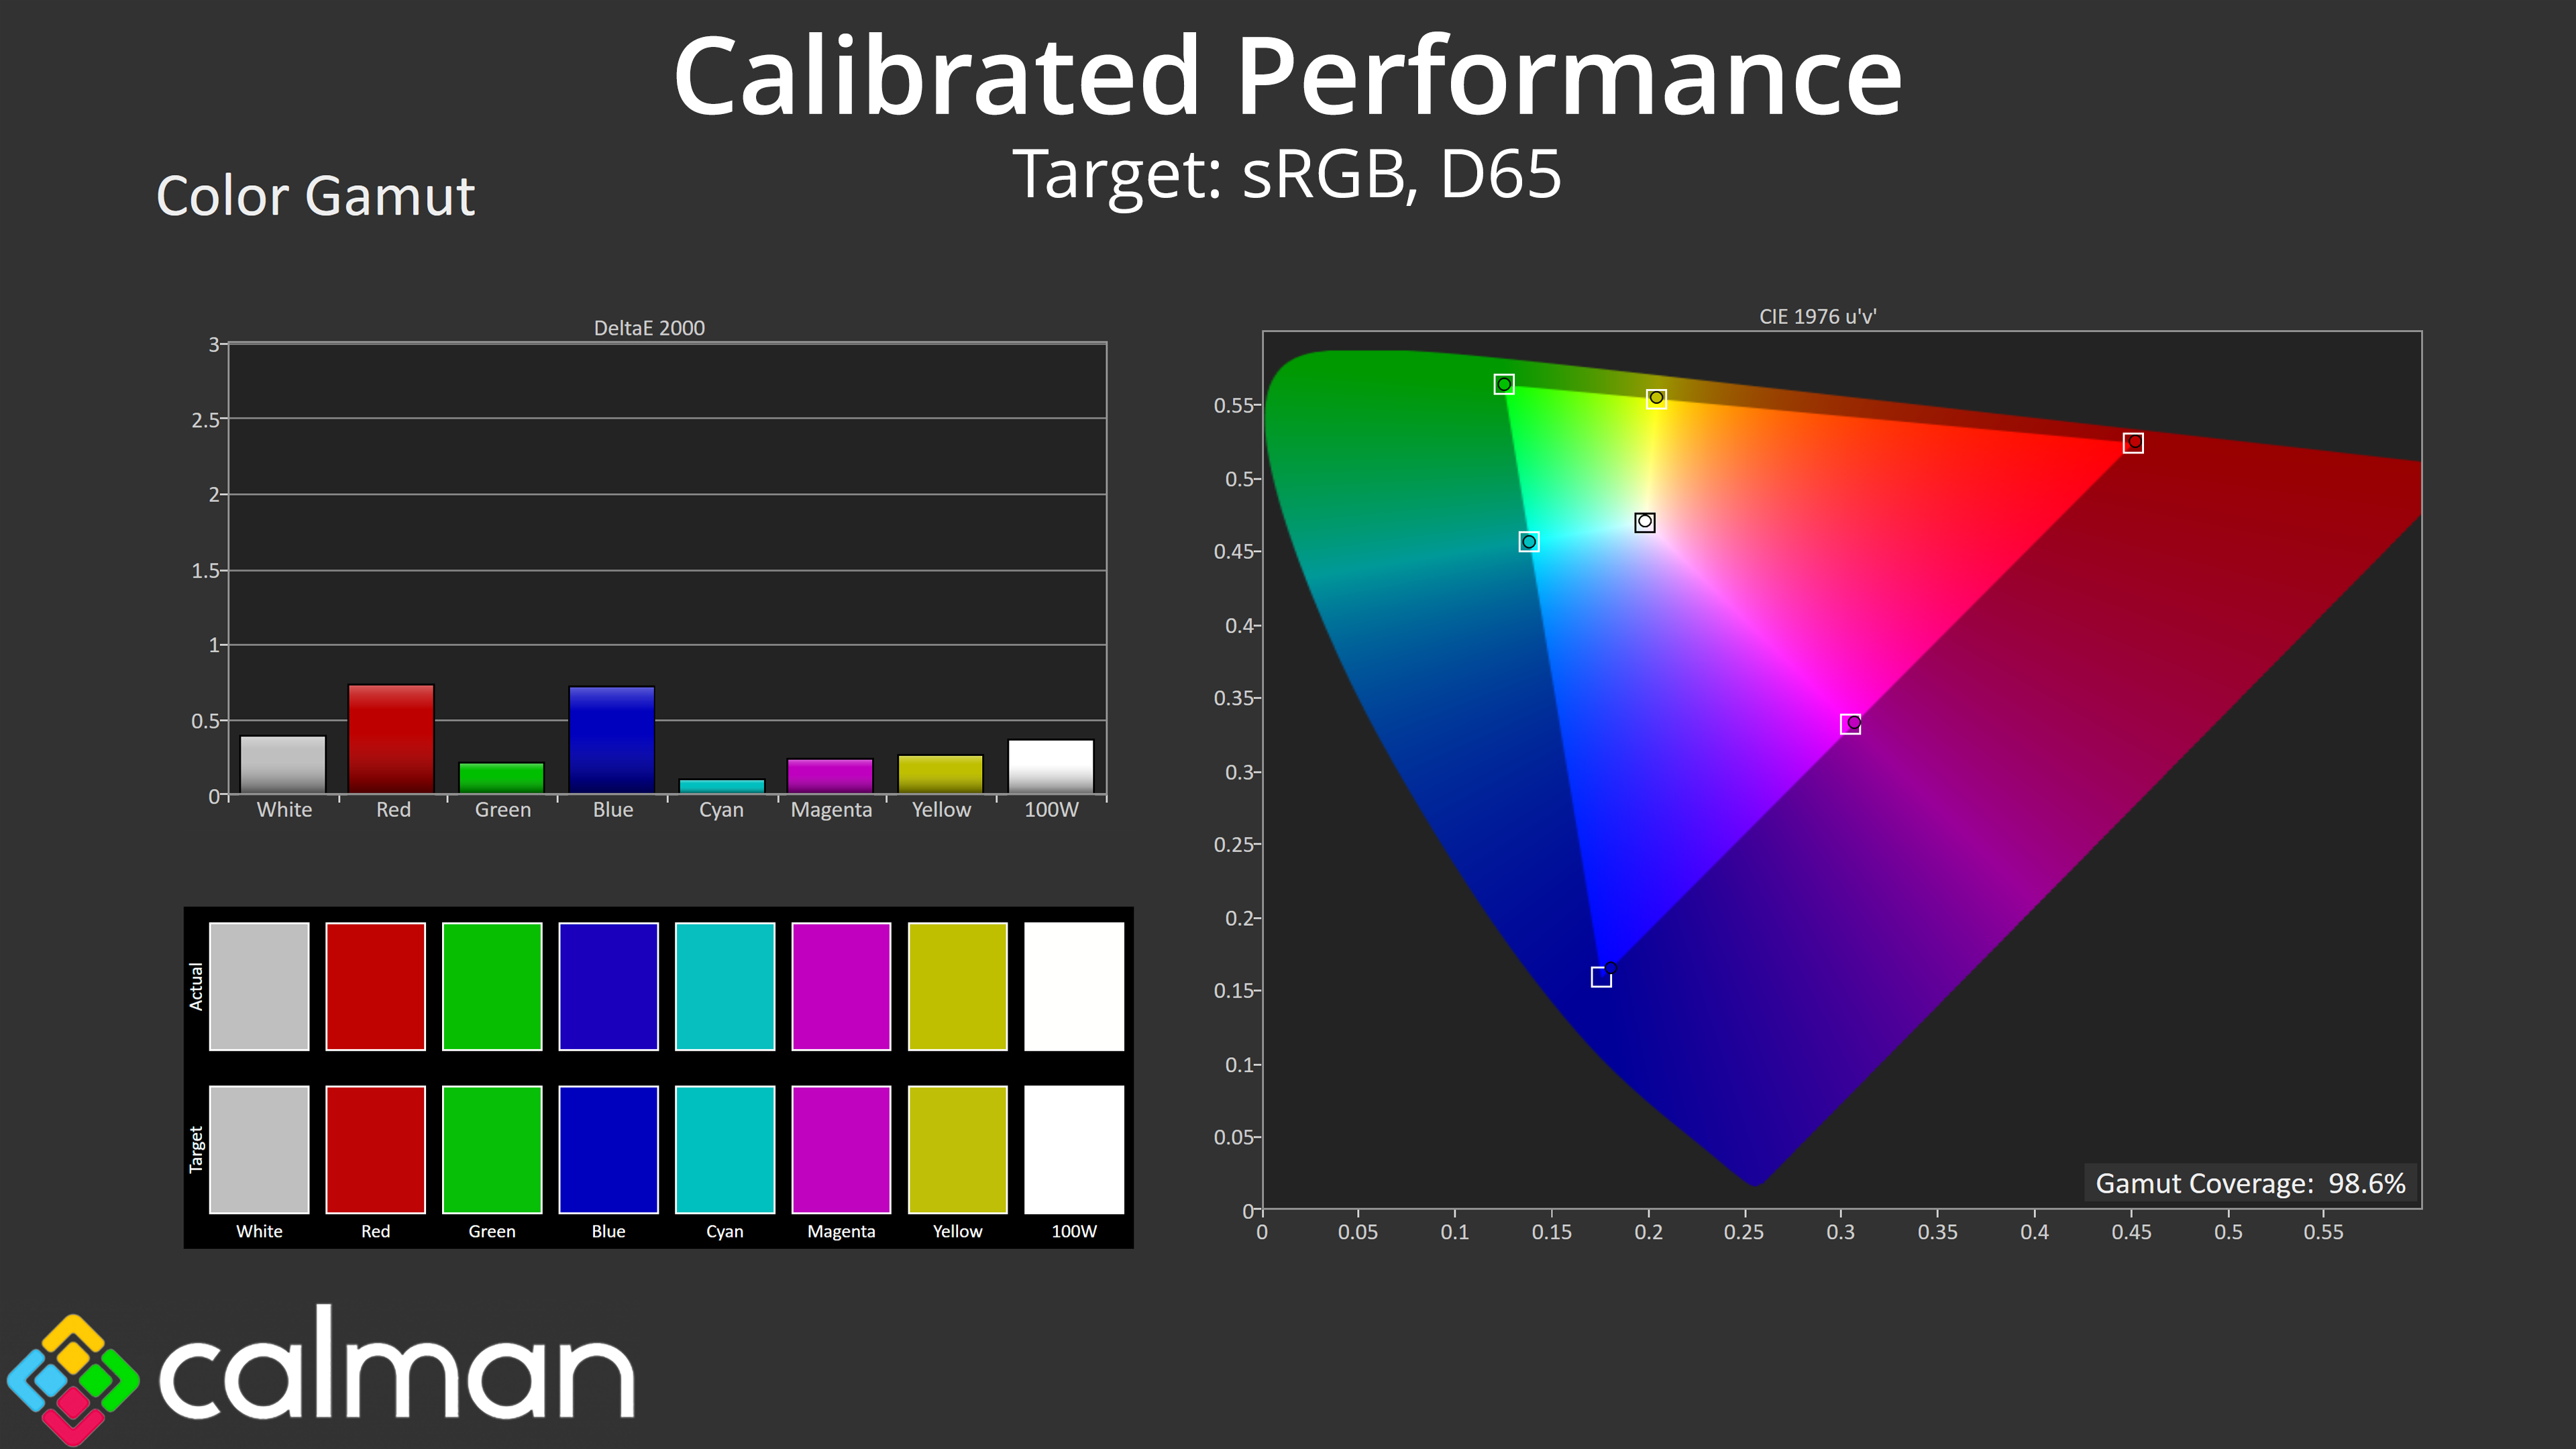
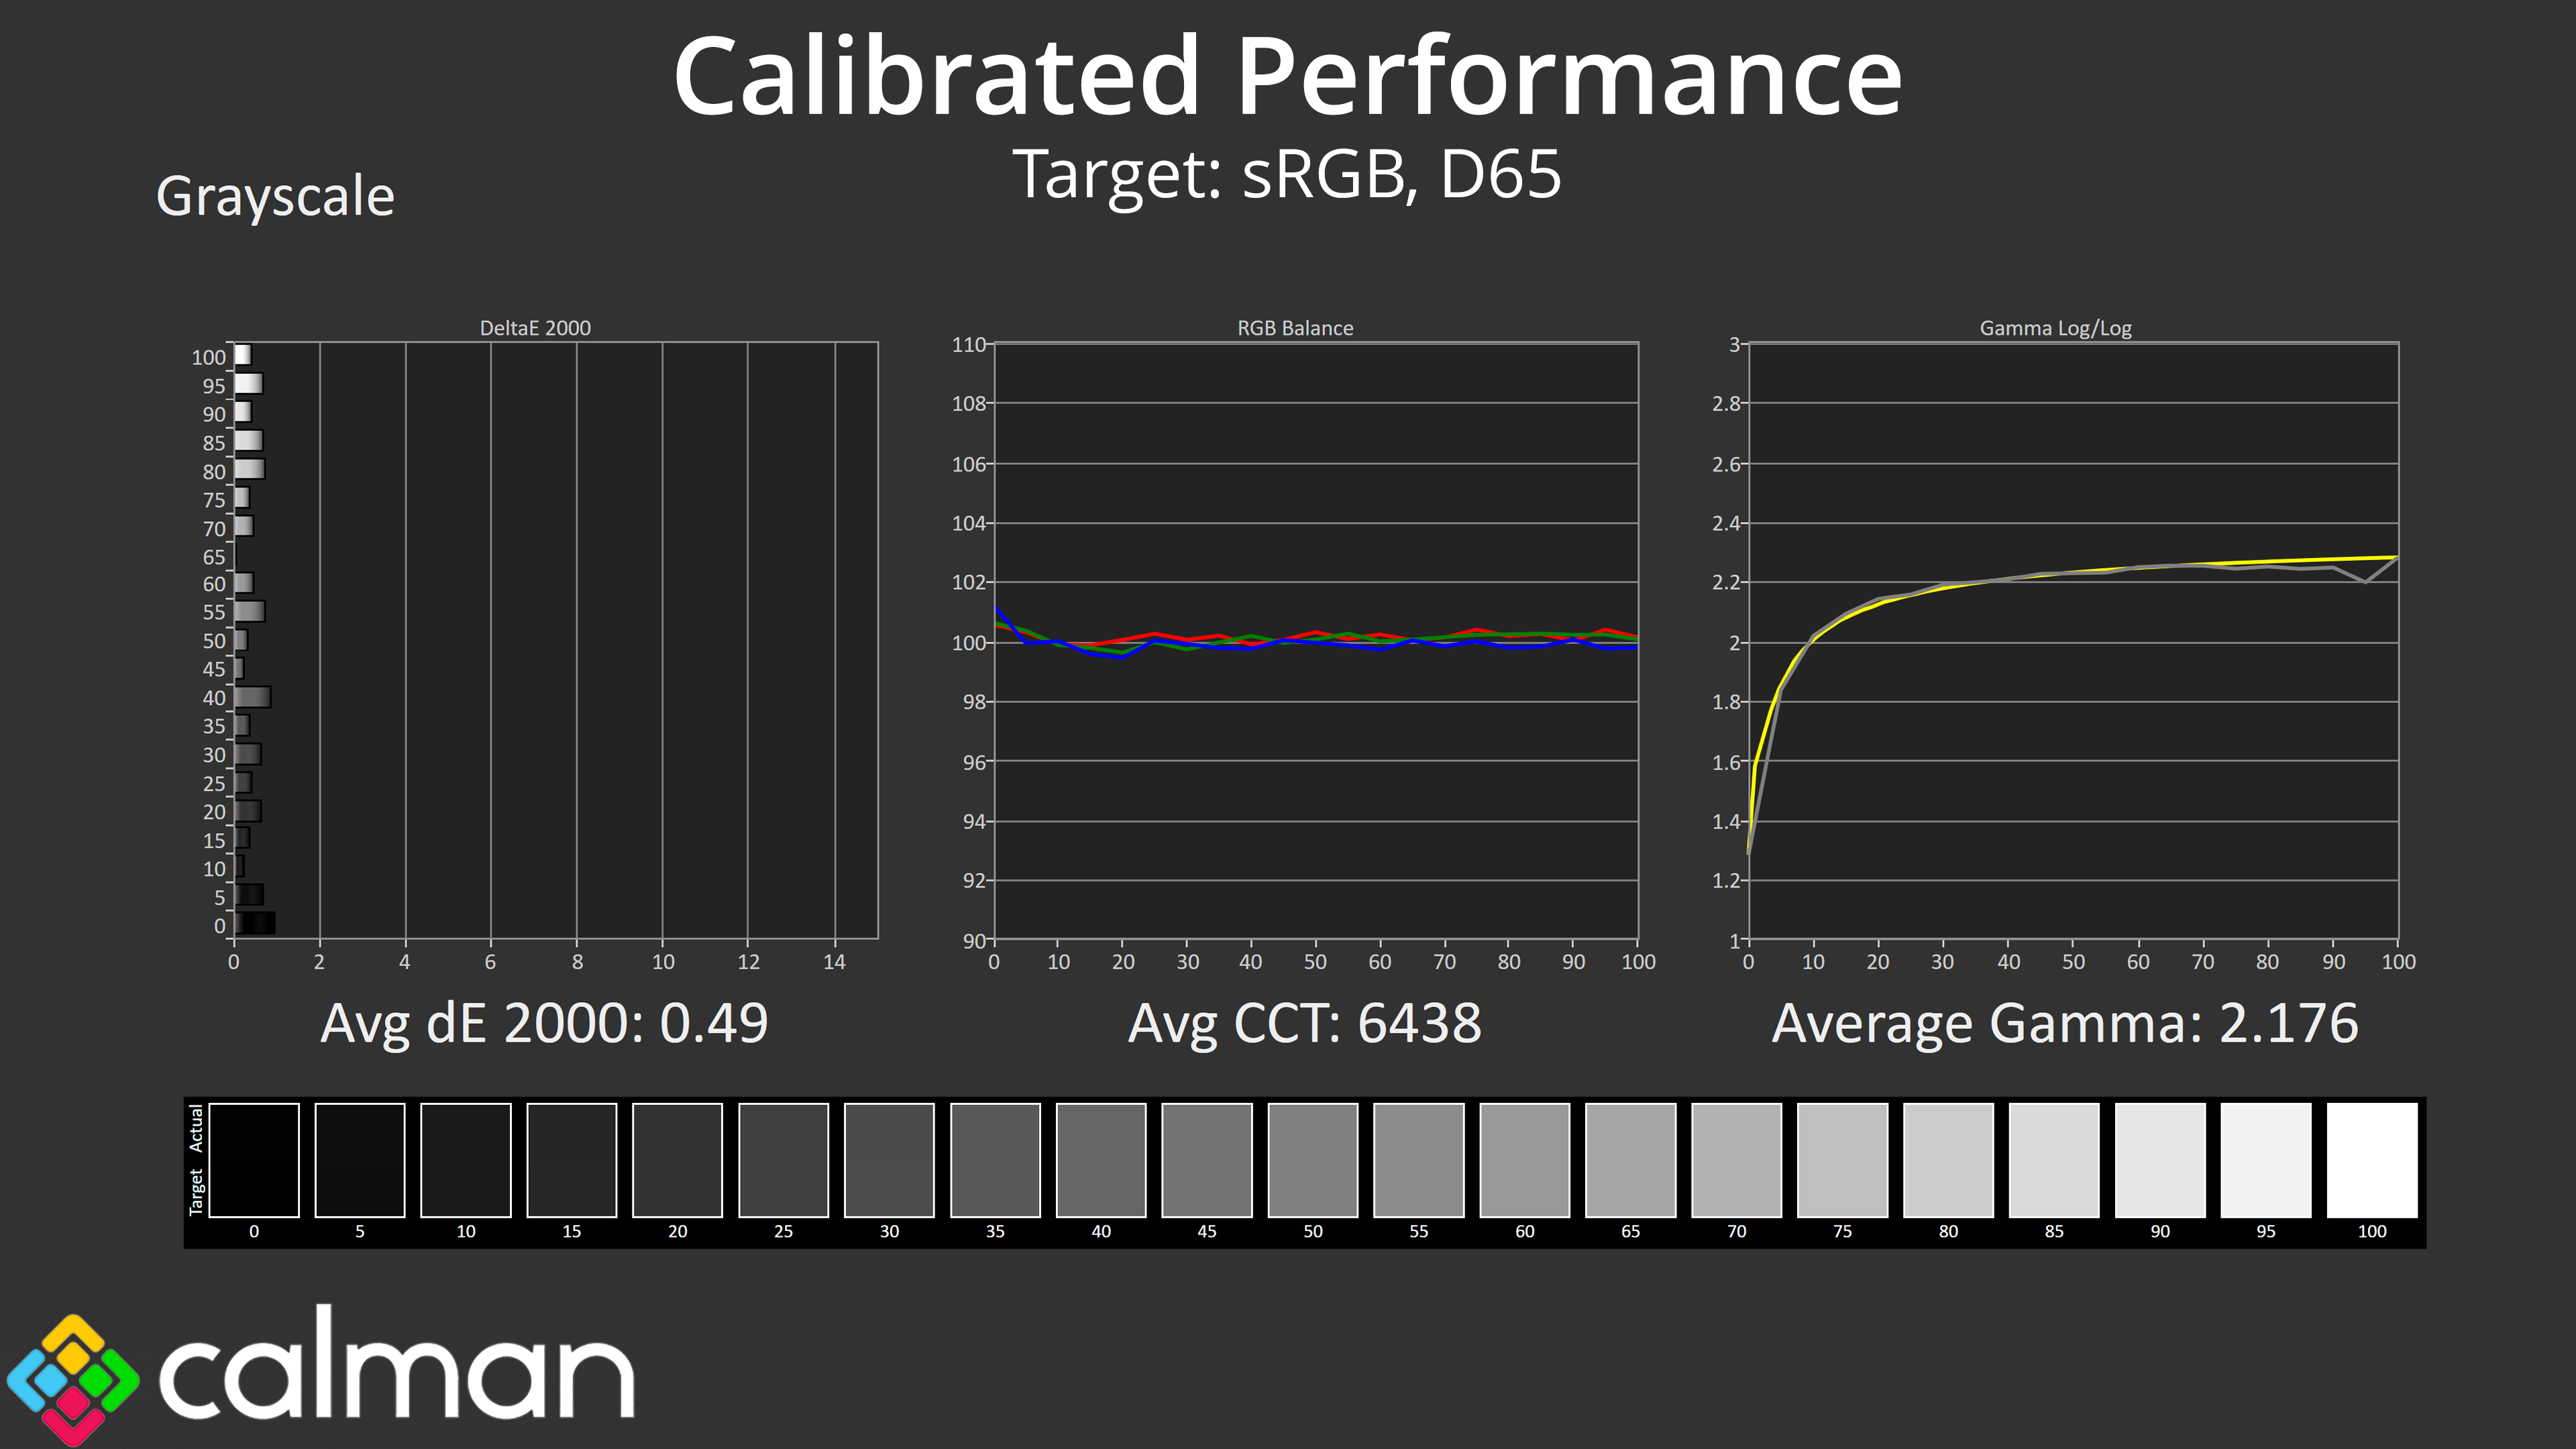
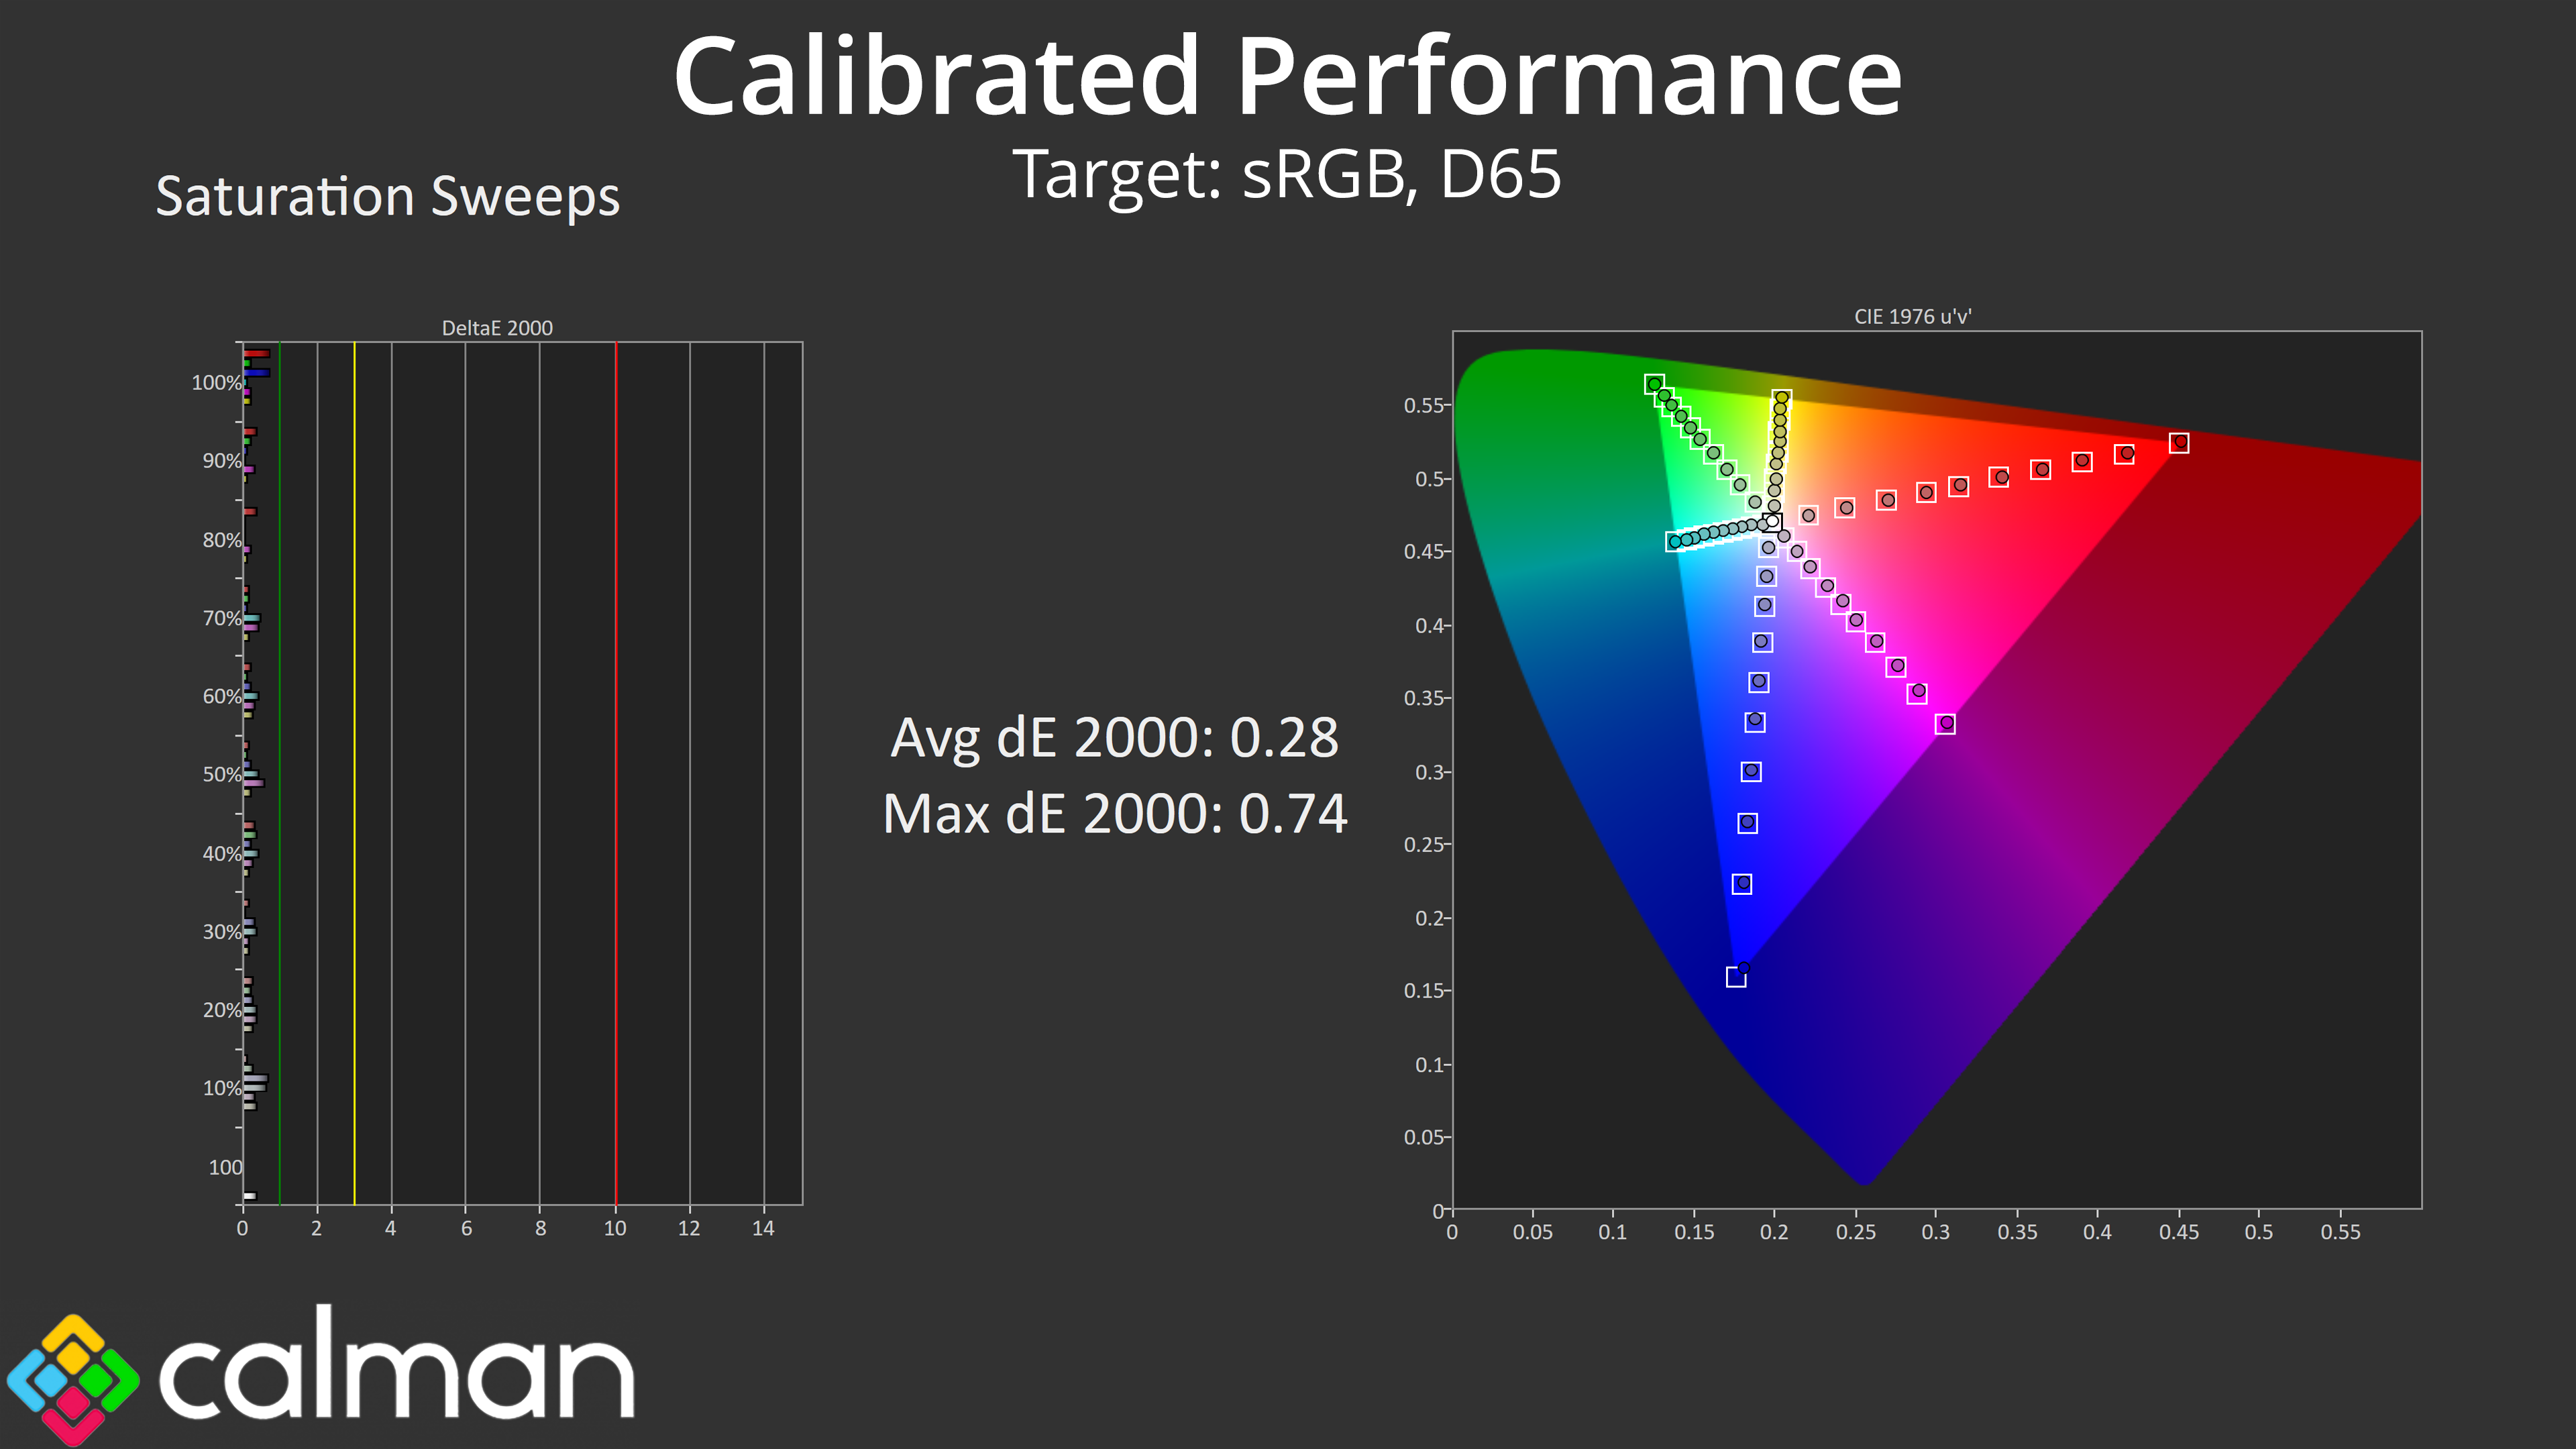
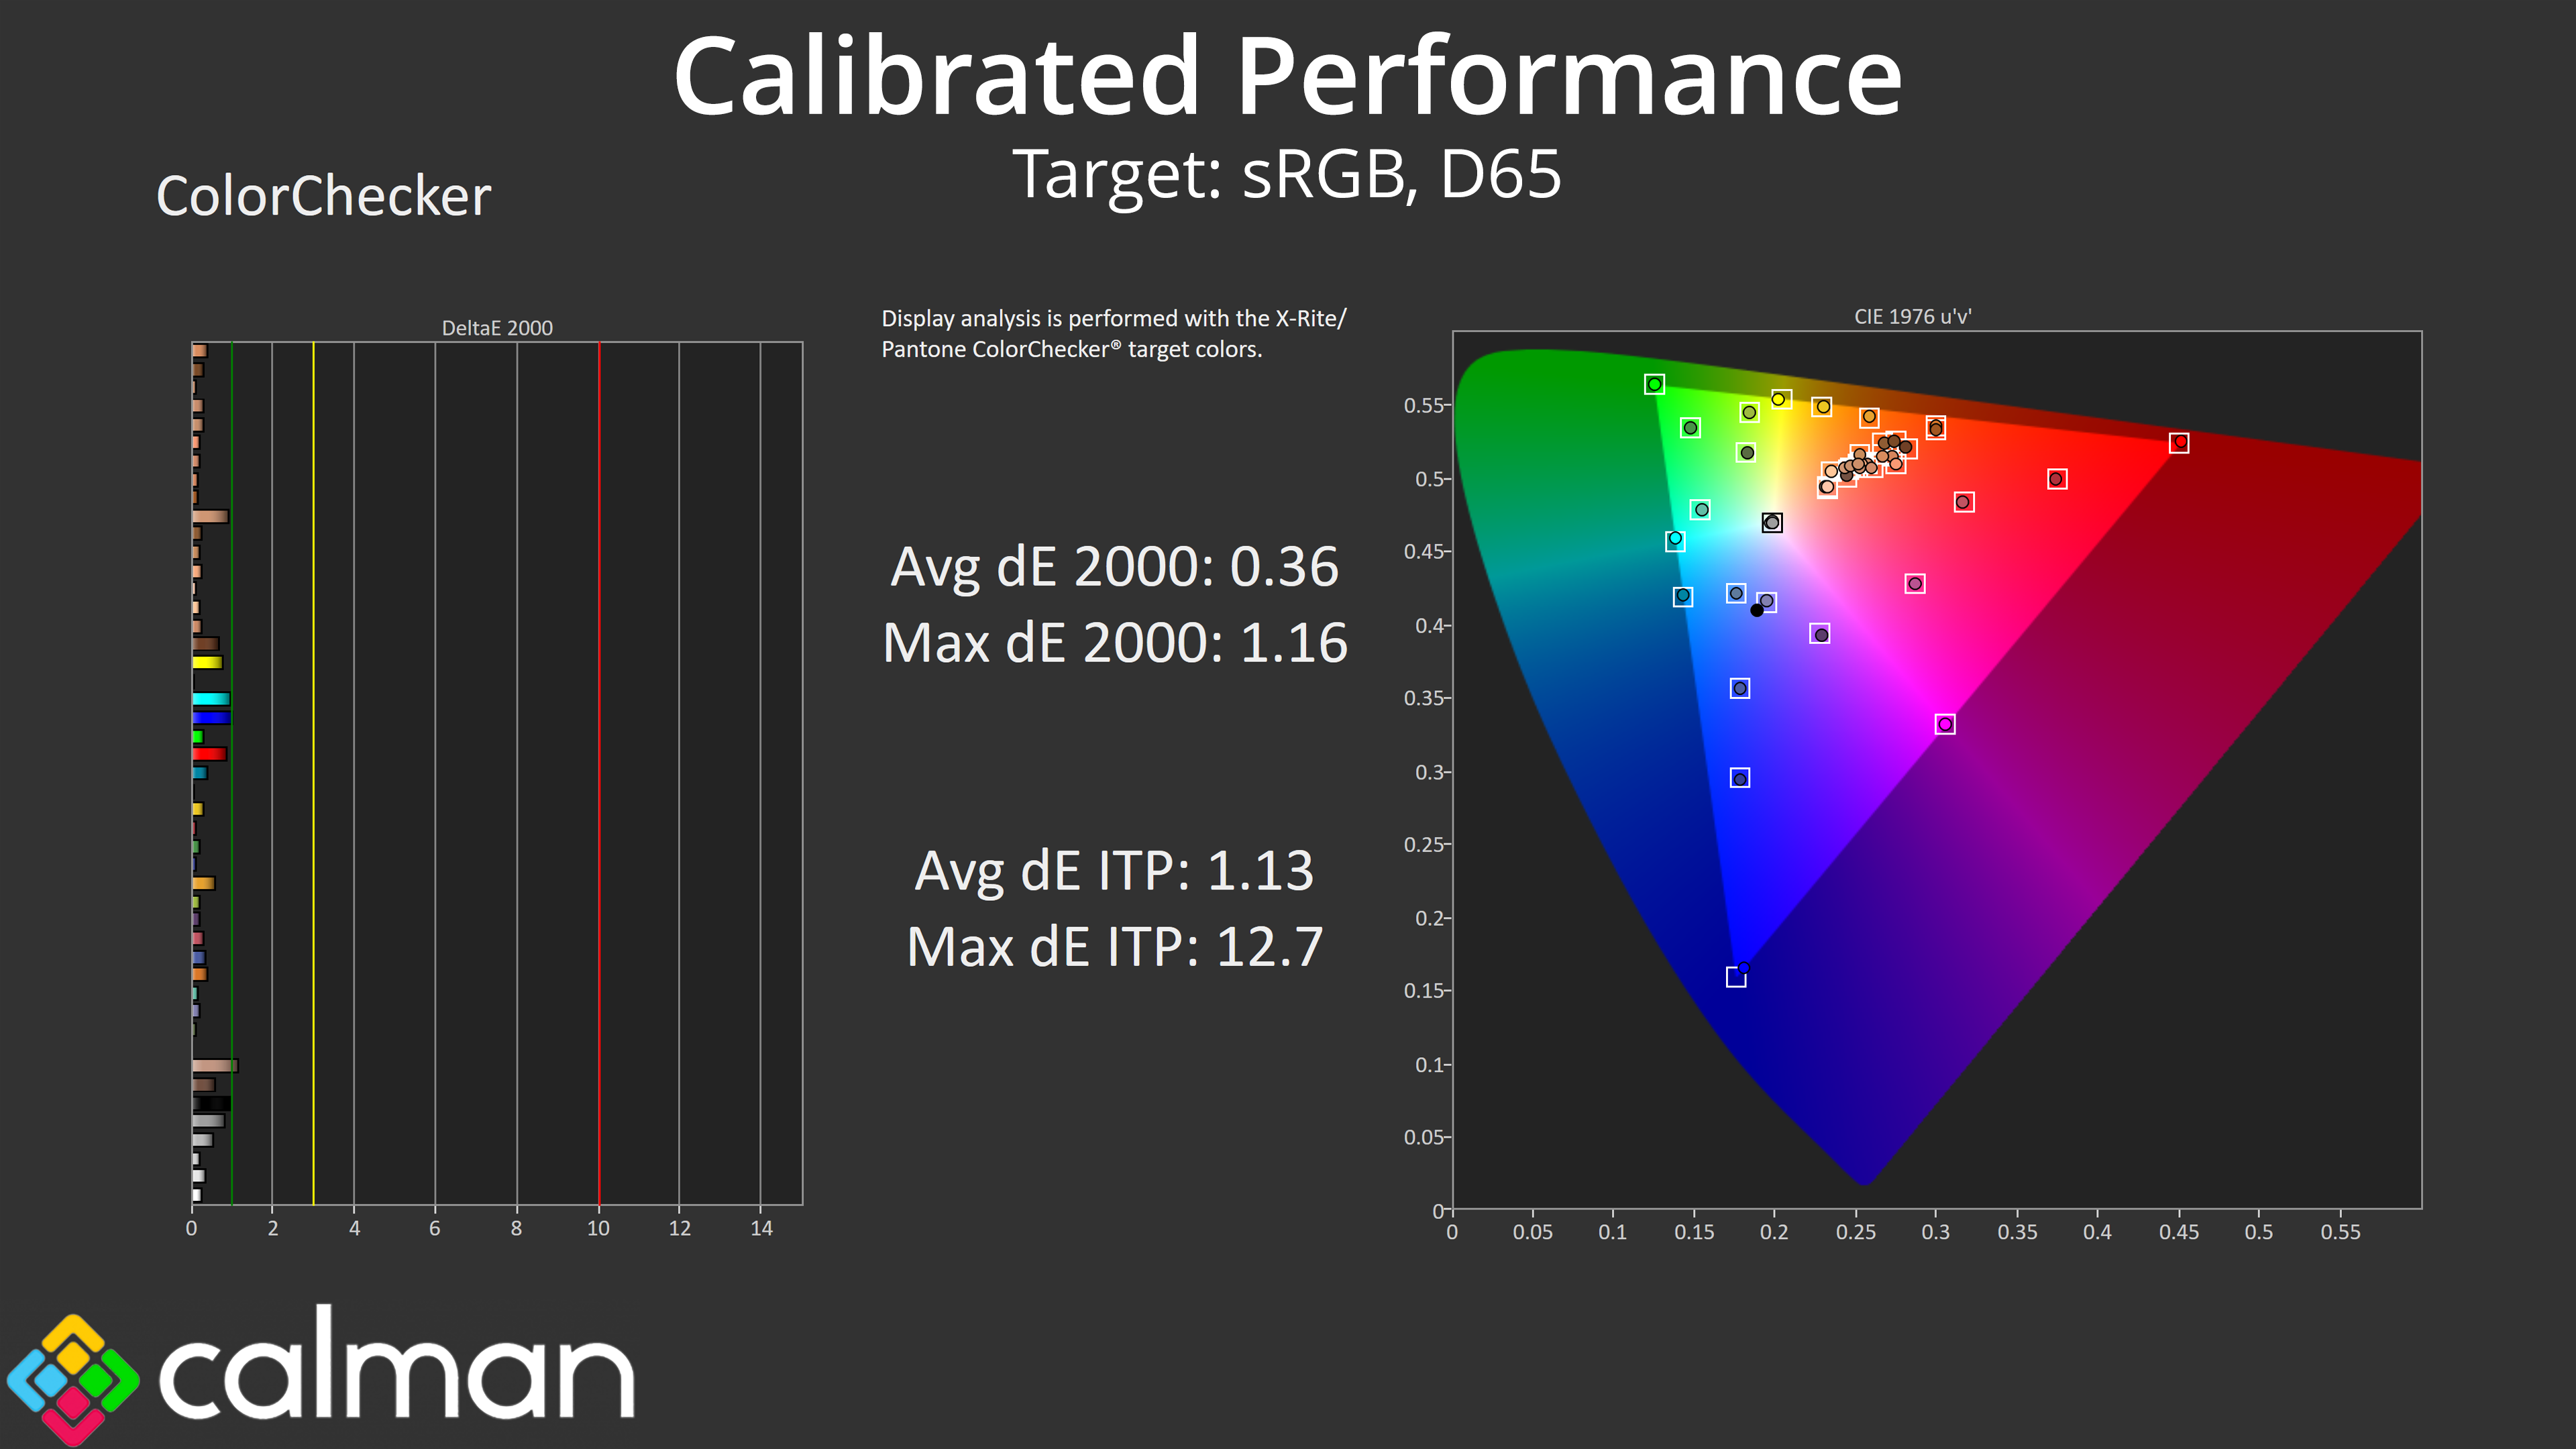
Of course, I did also try a full calibration using Calman Ultimate. This locked in greyscale almost perfectly, with an average dE 2000 of just 0.49, corrected any colour balance errors and also helped gamma tracking. Saturation accuracy also shot up, with an average deltaE of just 0.28, as colour accuracy saw a similar improvement, with an average deltaE of 0.36. It's unlikely anyone buying this monitor will be running a manual calibration as the cost of a colorimeter would be almost the same as the cost of the screen itself, but it goes to show what can be achieved if you have the necessary hardware and software.
Monitor response time testing is a new addition to our reviews, where we use the Open Source Response Time Tool (OSRTT), developed by TechTeamGB. This measures grey-to-grey response times and presents the results in a series of heatmaps, the style of which you may be familiar with from other reviews.
Initial Response Time is the time taken for the panel to transition from one colour to another, where lower values are better. We present the initial response time, so overshoot is not taken into account and is measured separately. We use a fixed RGB 5 tolerance for each transition.
Overshoot is the term given for when a monitor's transition exceeds or goes beyond its target value. So if a monitor was meant to transition from RGB 0 to RGB 55, but it hits RGB 60 before settling back down at RGB 55, that is overshoot. This is presented as RGB values in the heatmaps – i.e. how many RGB values past the intended target were measured.
Visual Response Rating is a metric designed to ‘score' a panel's visual performance, incorporating both response times and overdrive. Fast response times with little to no overshoot will score well, while slow response times or those with significant overshoot will score poorly.
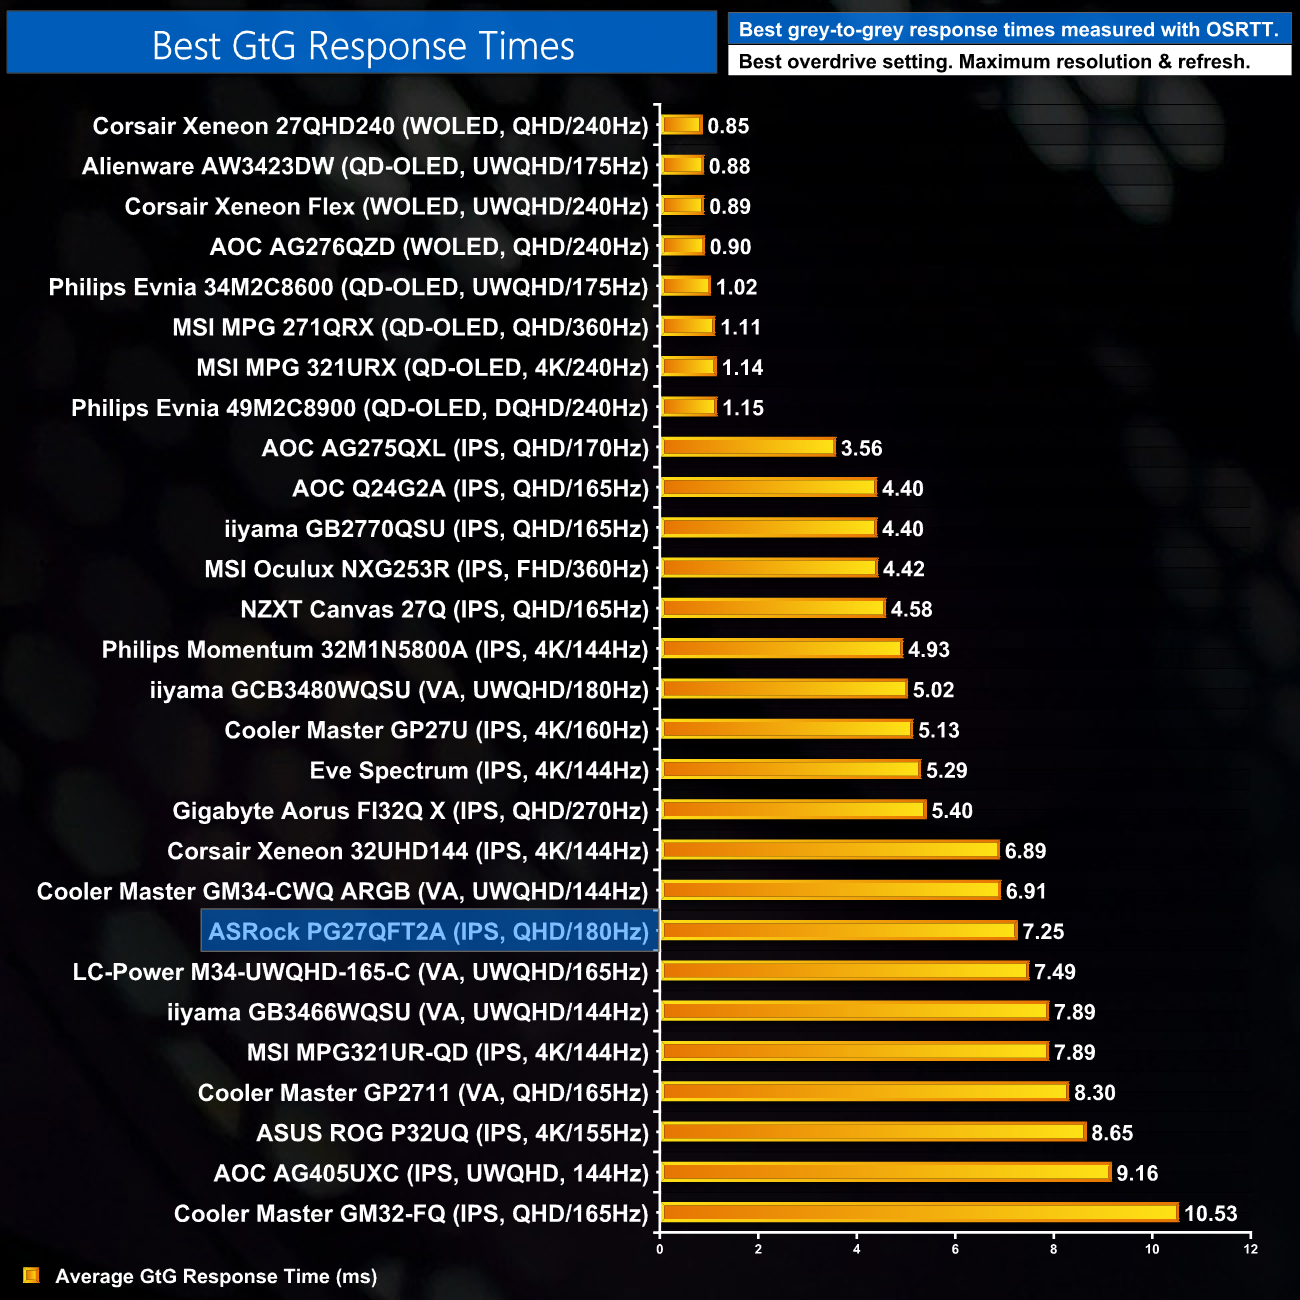
We test the PG27QFT2A at 180Hz, with overdrive on and off.
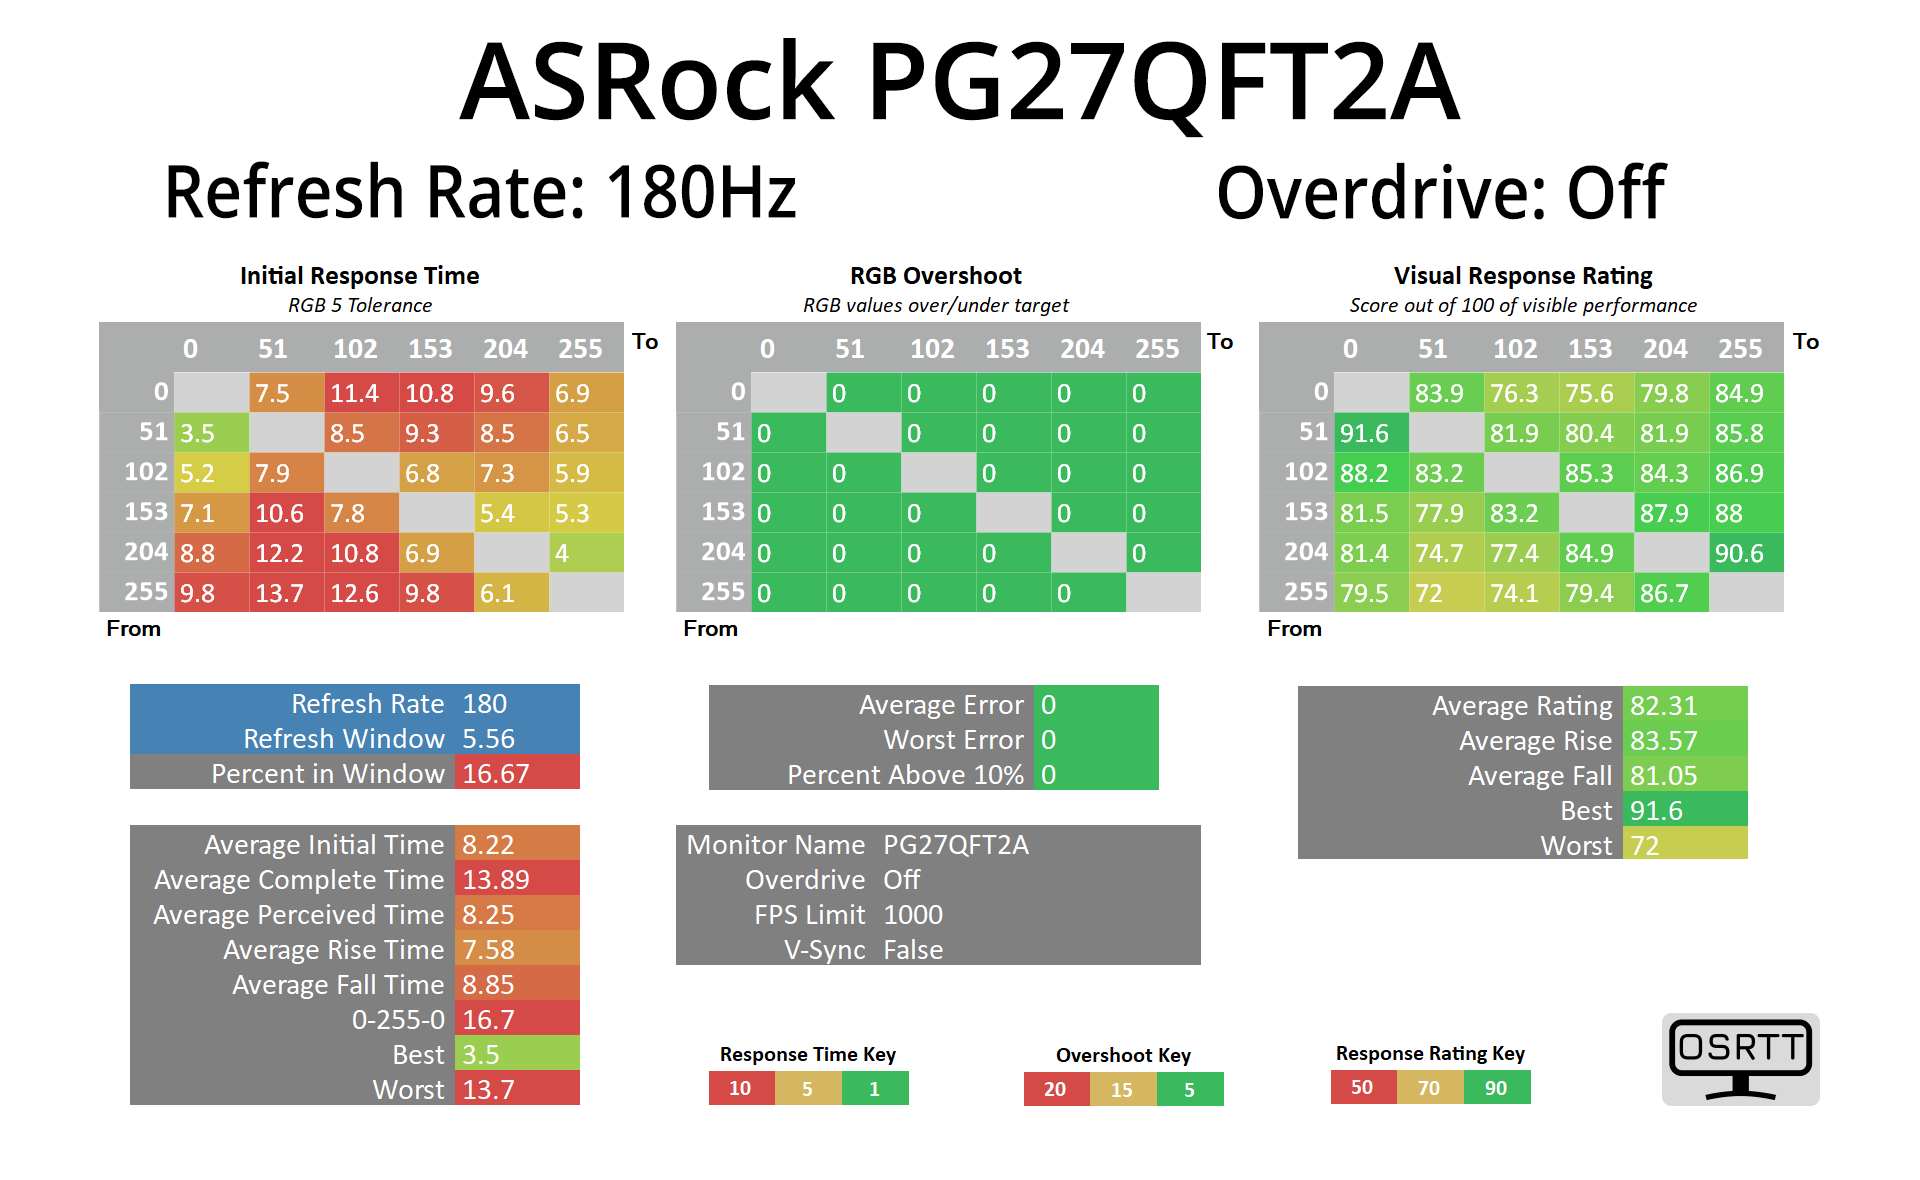
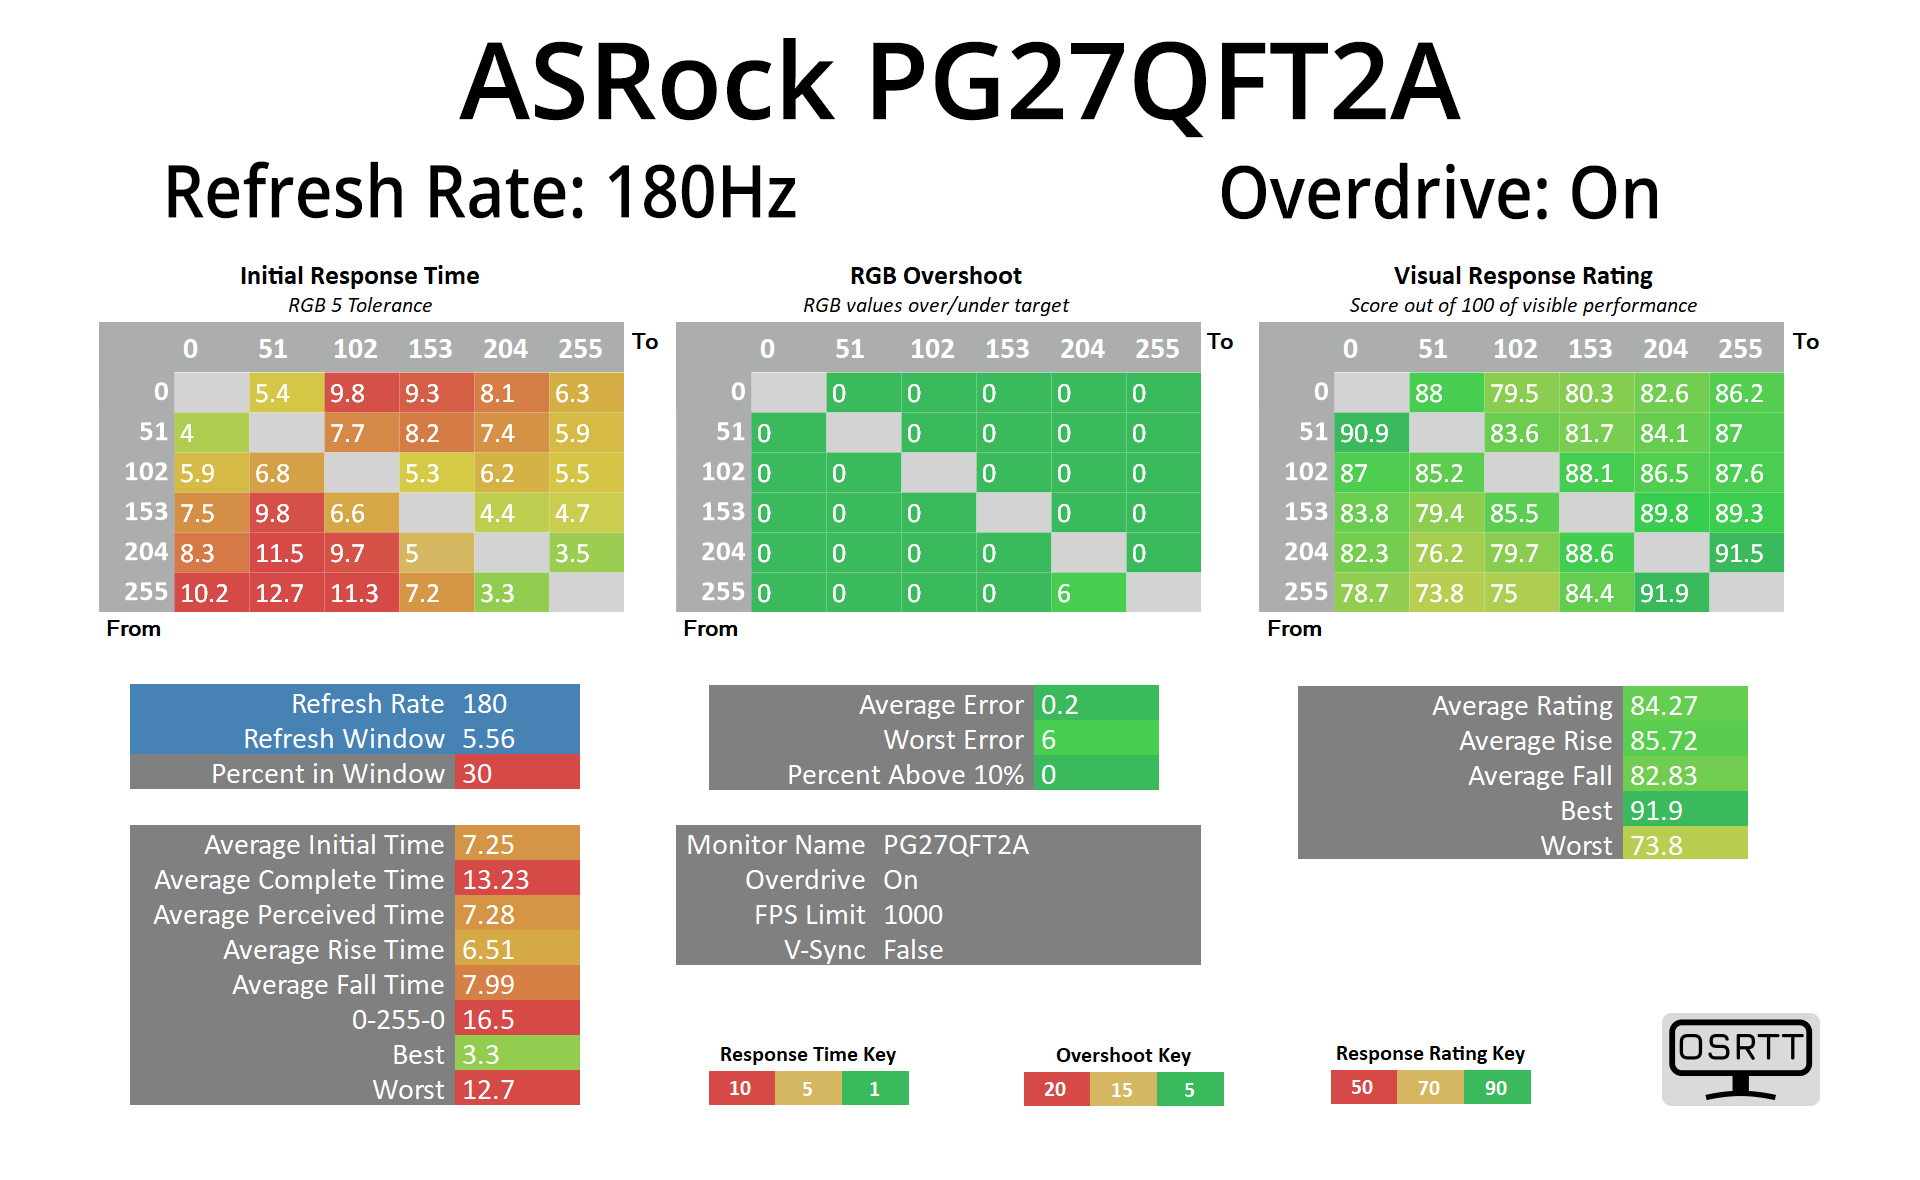
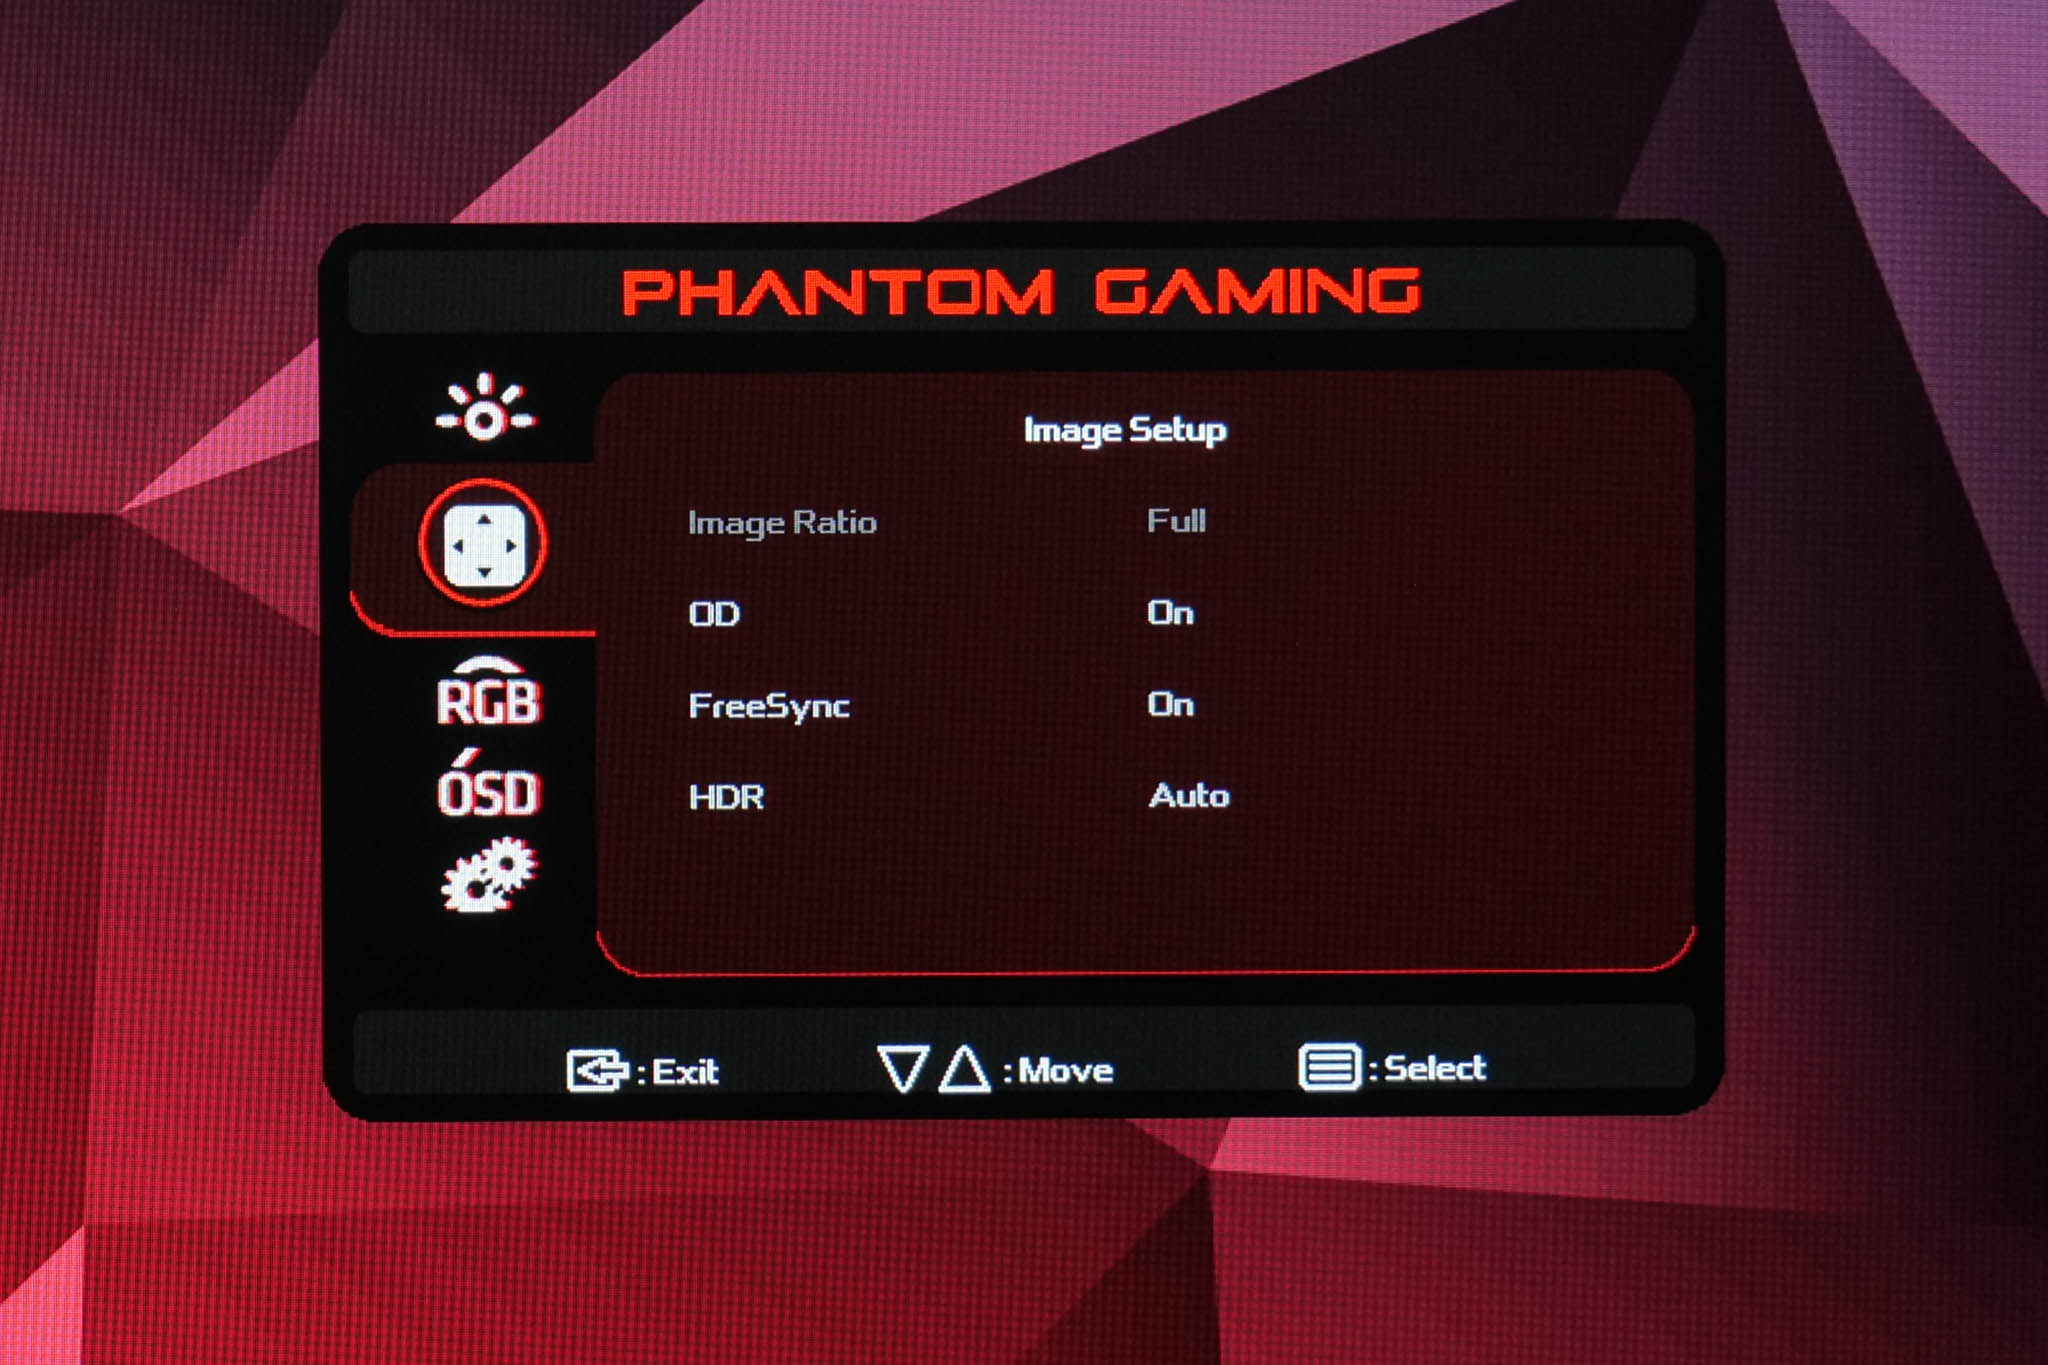
Switching gear to look at response times, the PG27QFT2A is fairly unique in that it doesn't offer various levels of overdrive – it's either ‘on' or ‘off' and that's it. With overdrive off, we see an average response time of 8.22ms, and switching it on improves things to 7.25ms. This is an OK result, we've seen much better from LCDs, but equally we have seen screens that are a fair bit slower. The main thing that stands out to me, however, is that with the overdrive turned on, there's still no overshoot, so ASRock could clearly have pushed things further to get faster response times, so that's a definite missed opportunity.
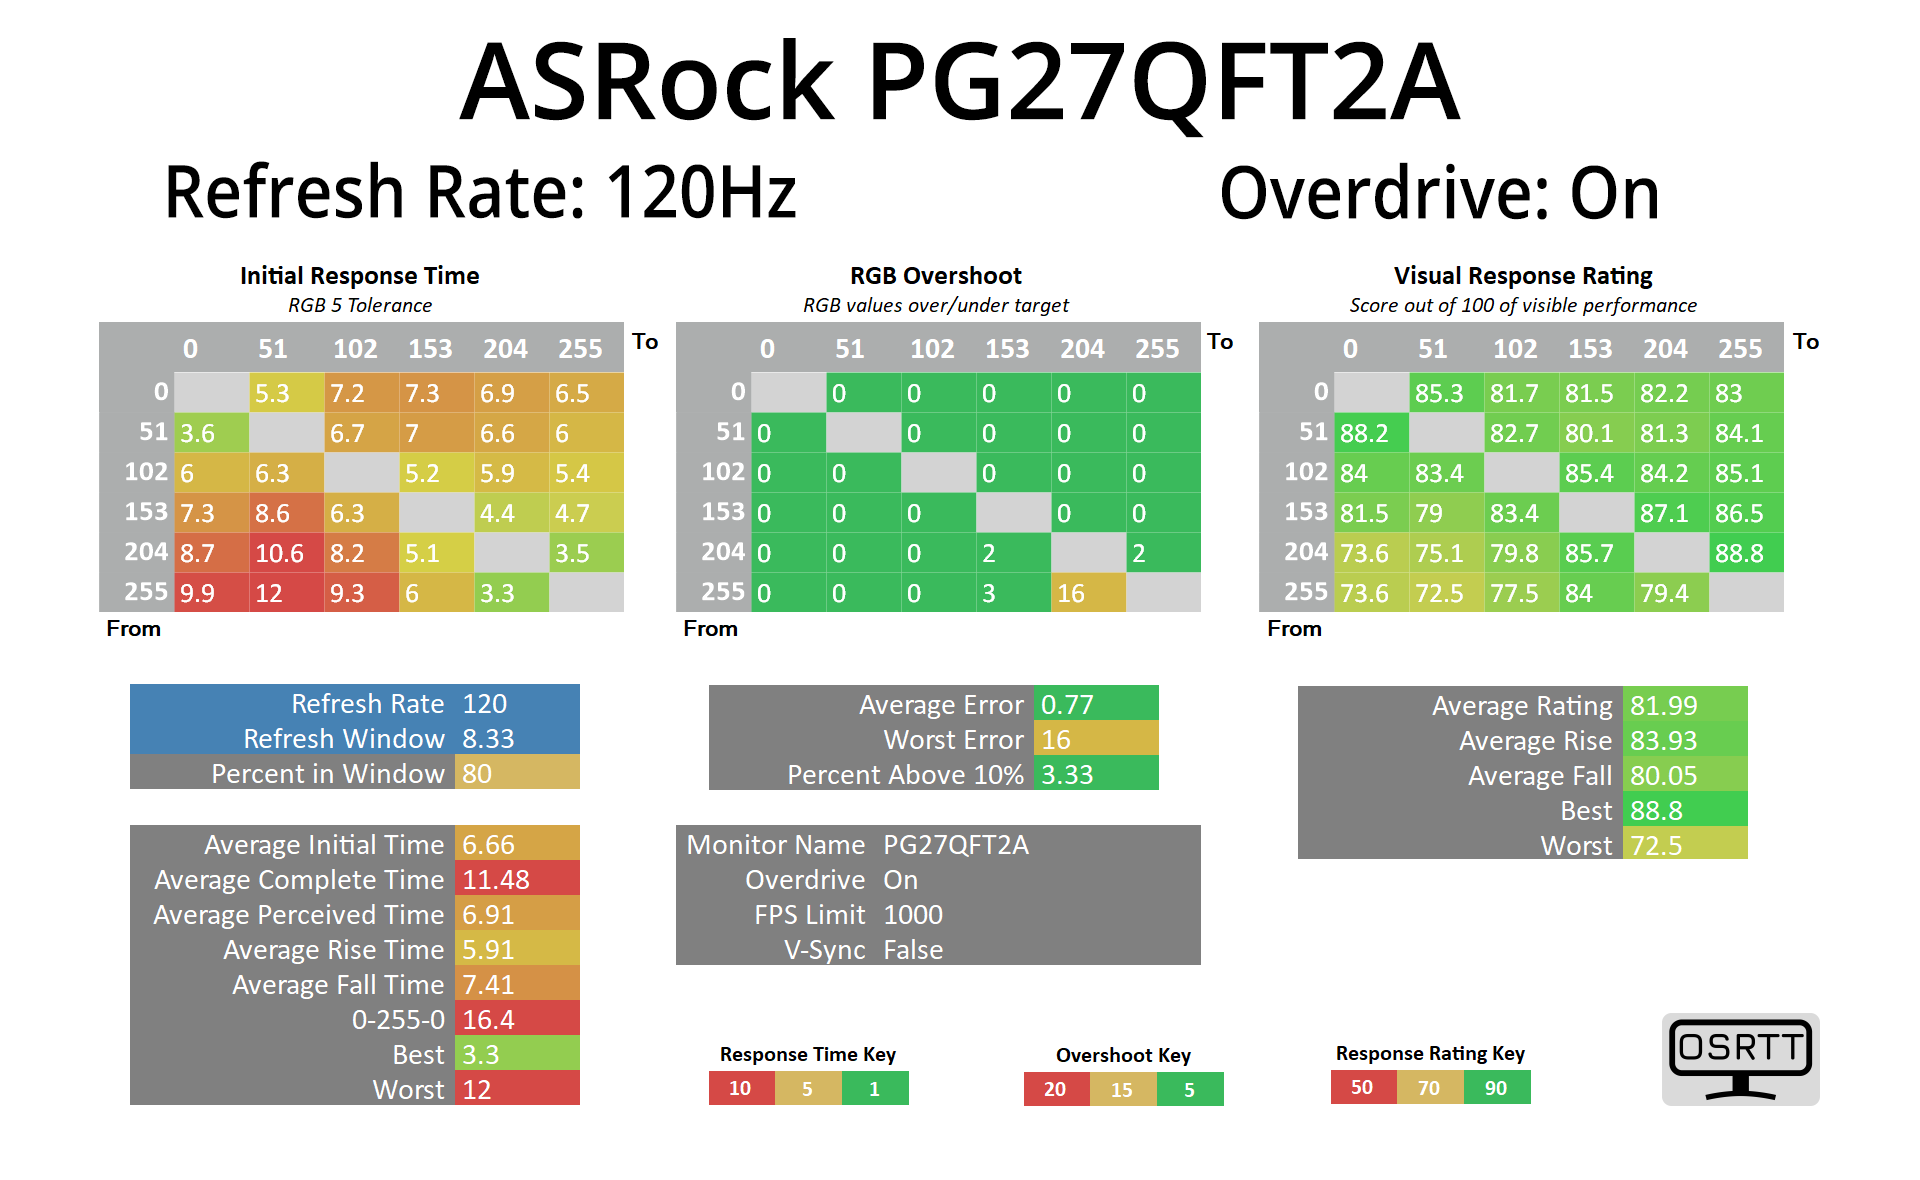
At 120Hz, results do improve as we see an average of 6.66ms and only very minor overshoot in one particular transition when overdrive is turned on.
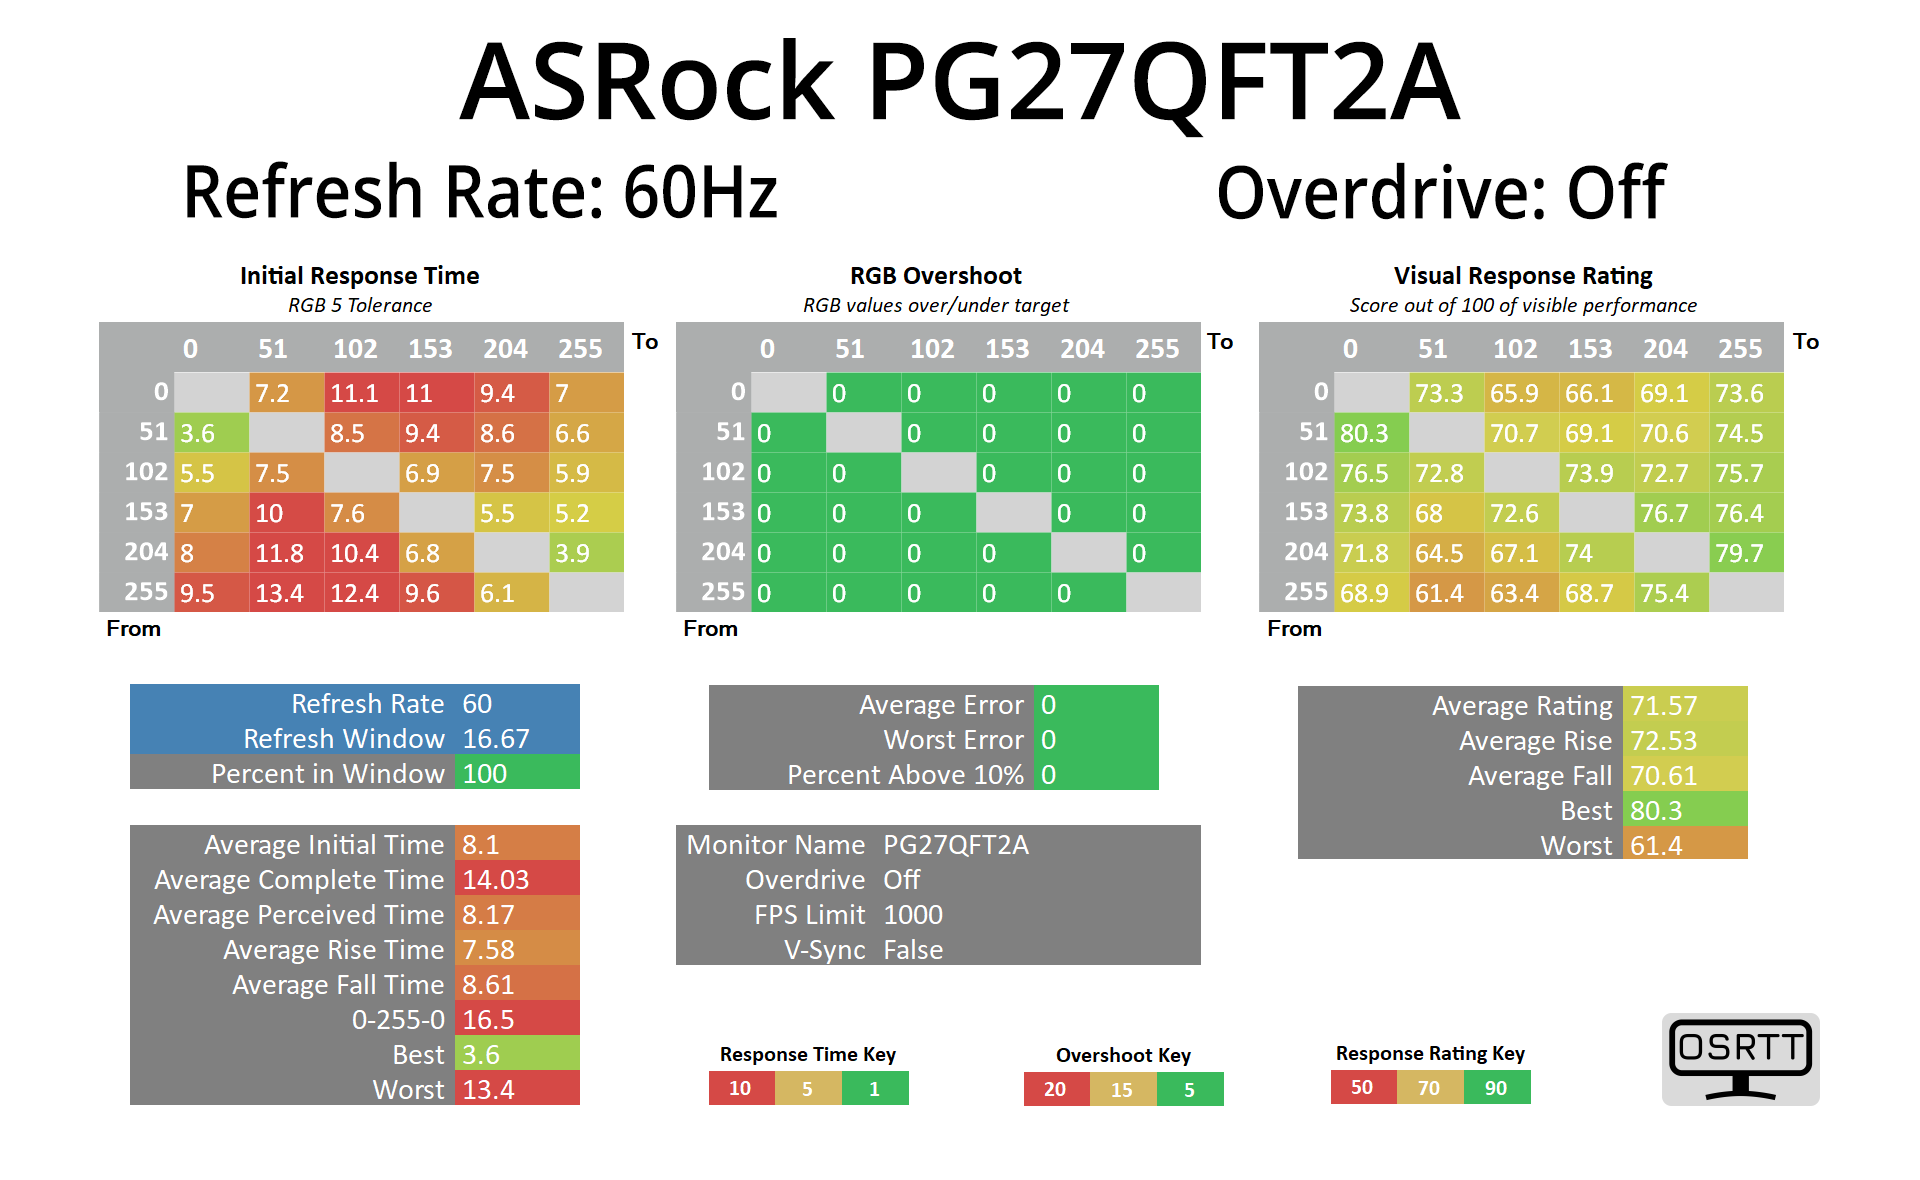
Curiously, when manually setting the refresh rate to 60Hz, overdrive becomes greyed out in the OSD, but even with it off, 100% of transitions occur within the 16.67ms refresh window anyway. Still, it's good to know you can leave overdrive turned on and forget about it.
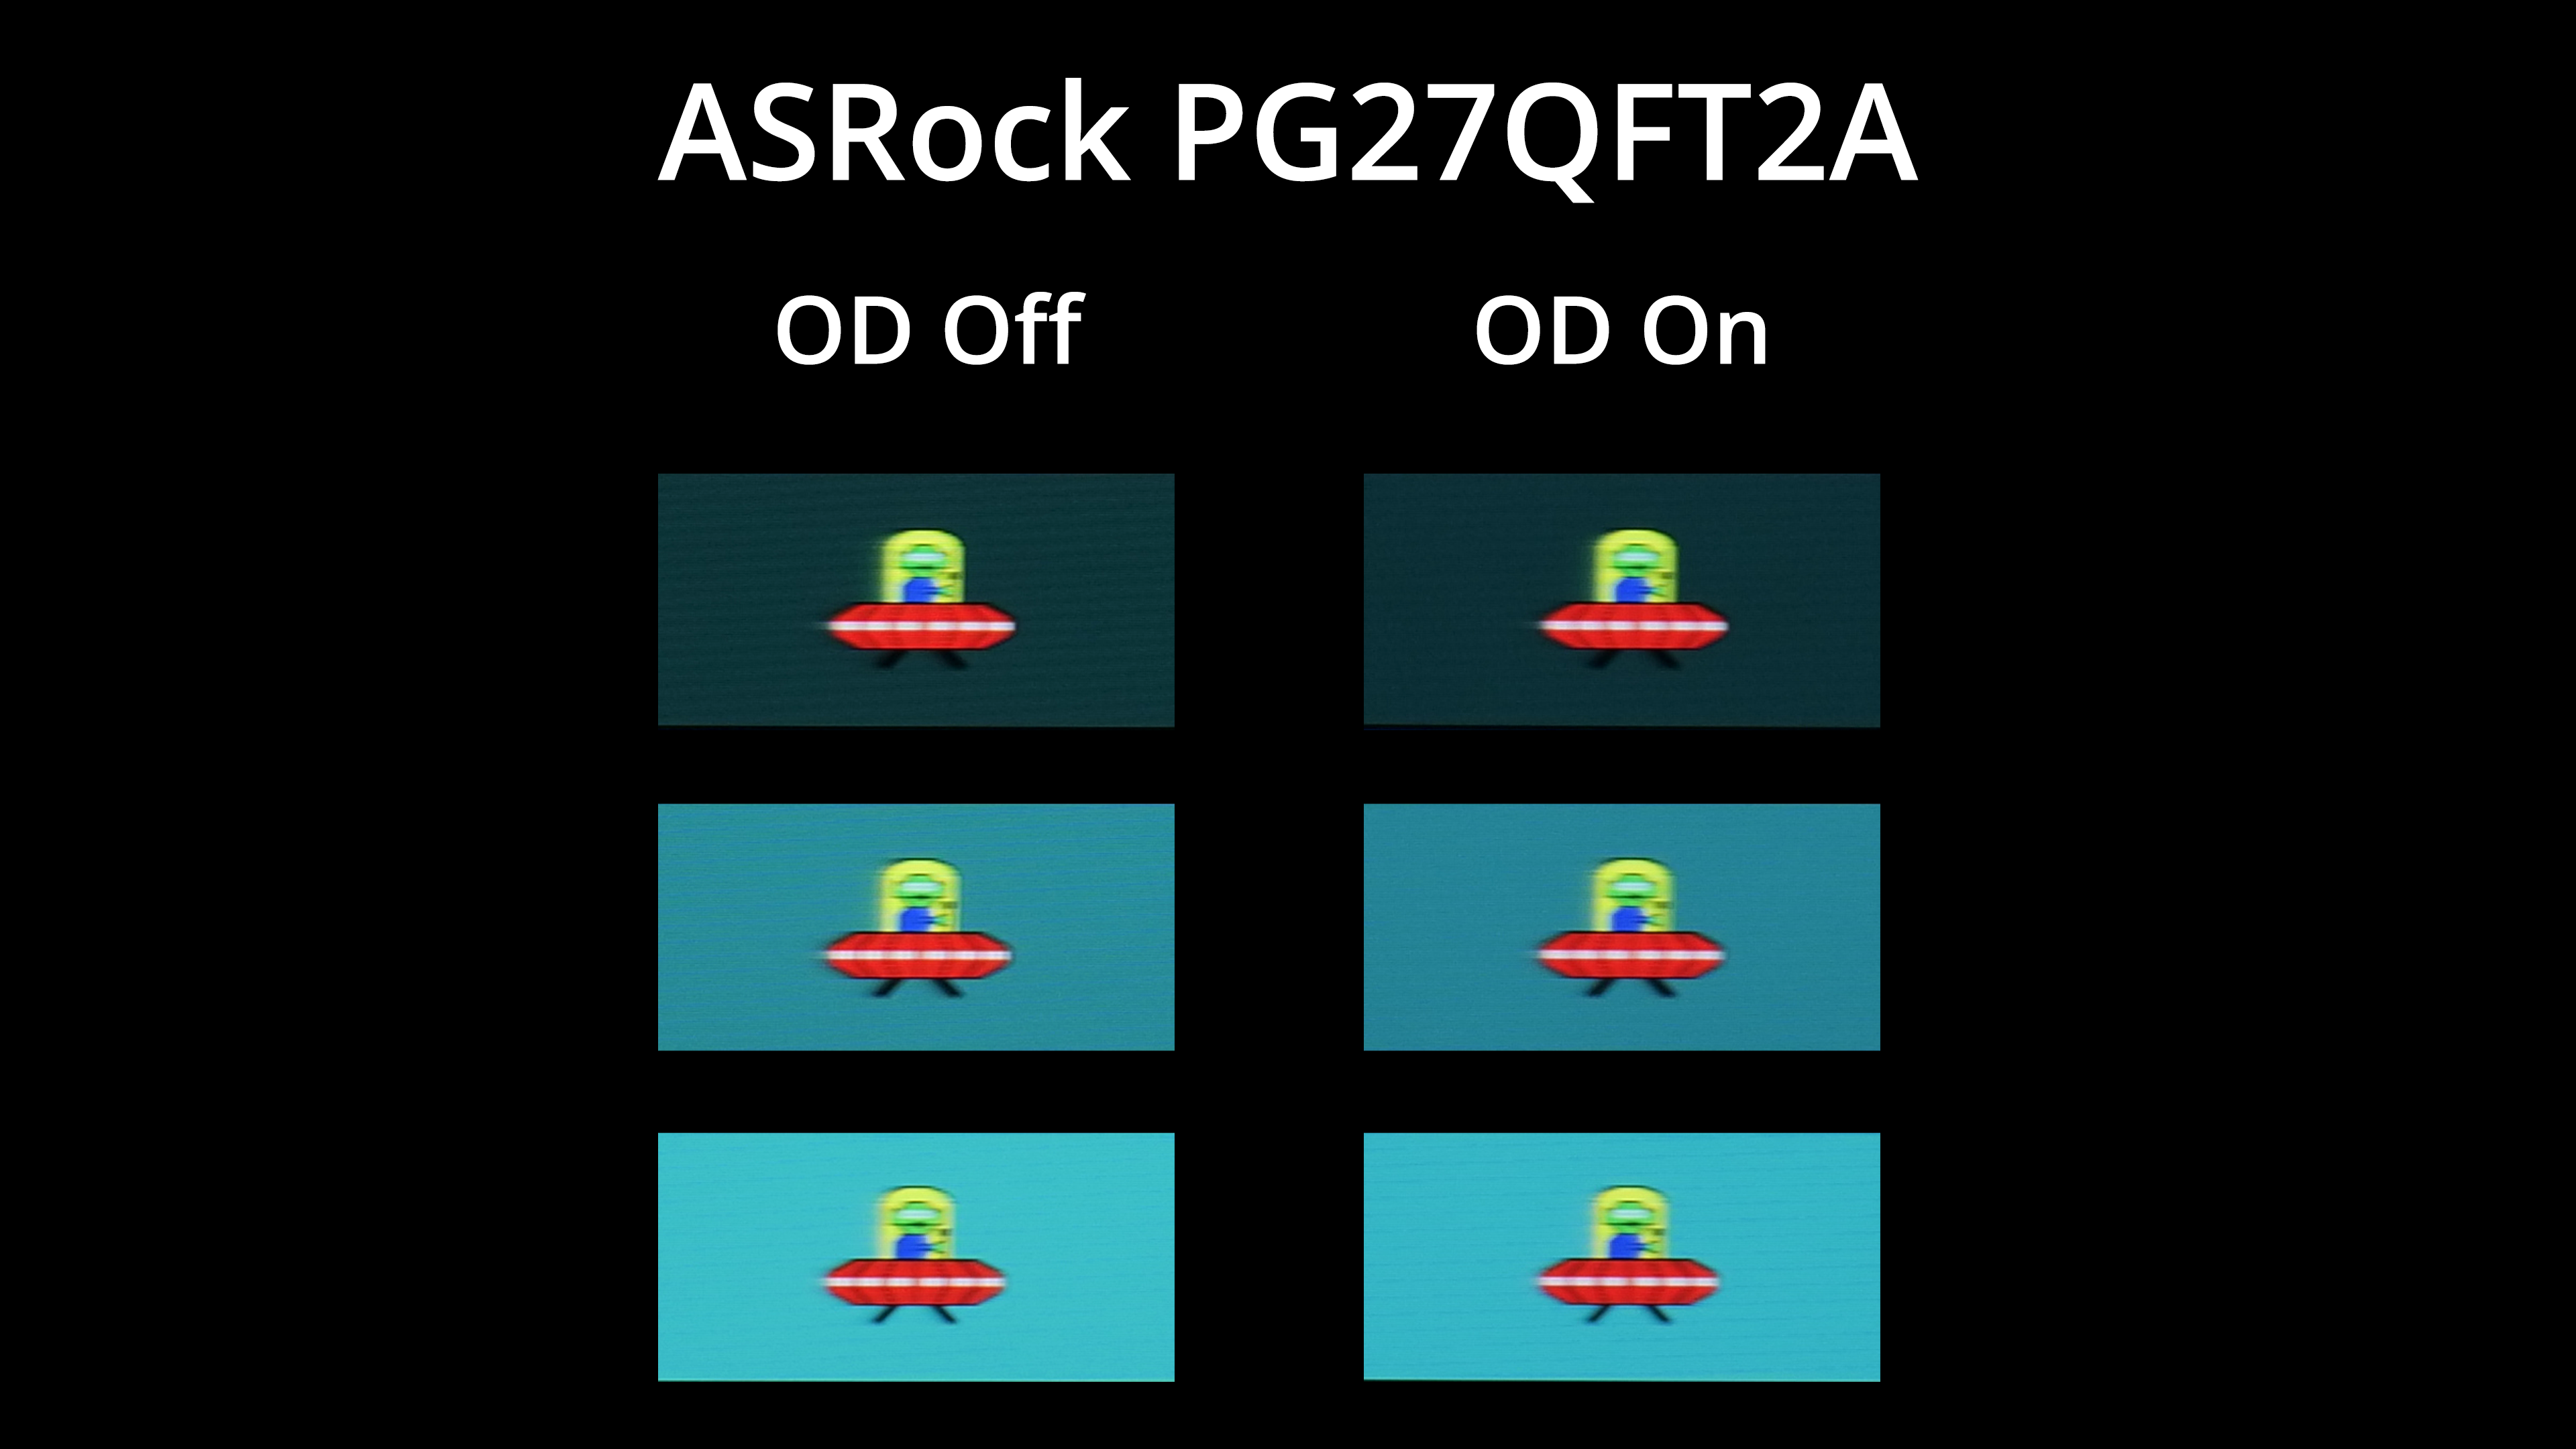
As a visual demo, here we have some pursuit camera images using the BlurBusters UFO test. There's very little visual different between overdrive on or off with the PG27QFT2A – I think there may just a tiny bit less visible ghosting with it on, but we're clutching at straws here, and clearly ASRock needs to add more overdrive modes.

There is also a backlight strobing mode called MPRT that's found within the OSD. This has the usual caveats that adaptive sync must be disabled, and it significantly limits overall brightness (I actually boosted brightness on the image so the effect is more visible here!). It does, however, improve motion clarity quite significantly, with only a small amount of signal crosstalk (presenting as a double image), so that could be worth trying.
Overall, response time performance is pretty middle of the road – if we exclude OLED monitors, that is! As mentioned, we have tested faster LCDs, but it's not hideously slow either.
We again use the Open Source Response Time Tool (OSRTT), developed by TechTeamGB, to report monitor input latency.
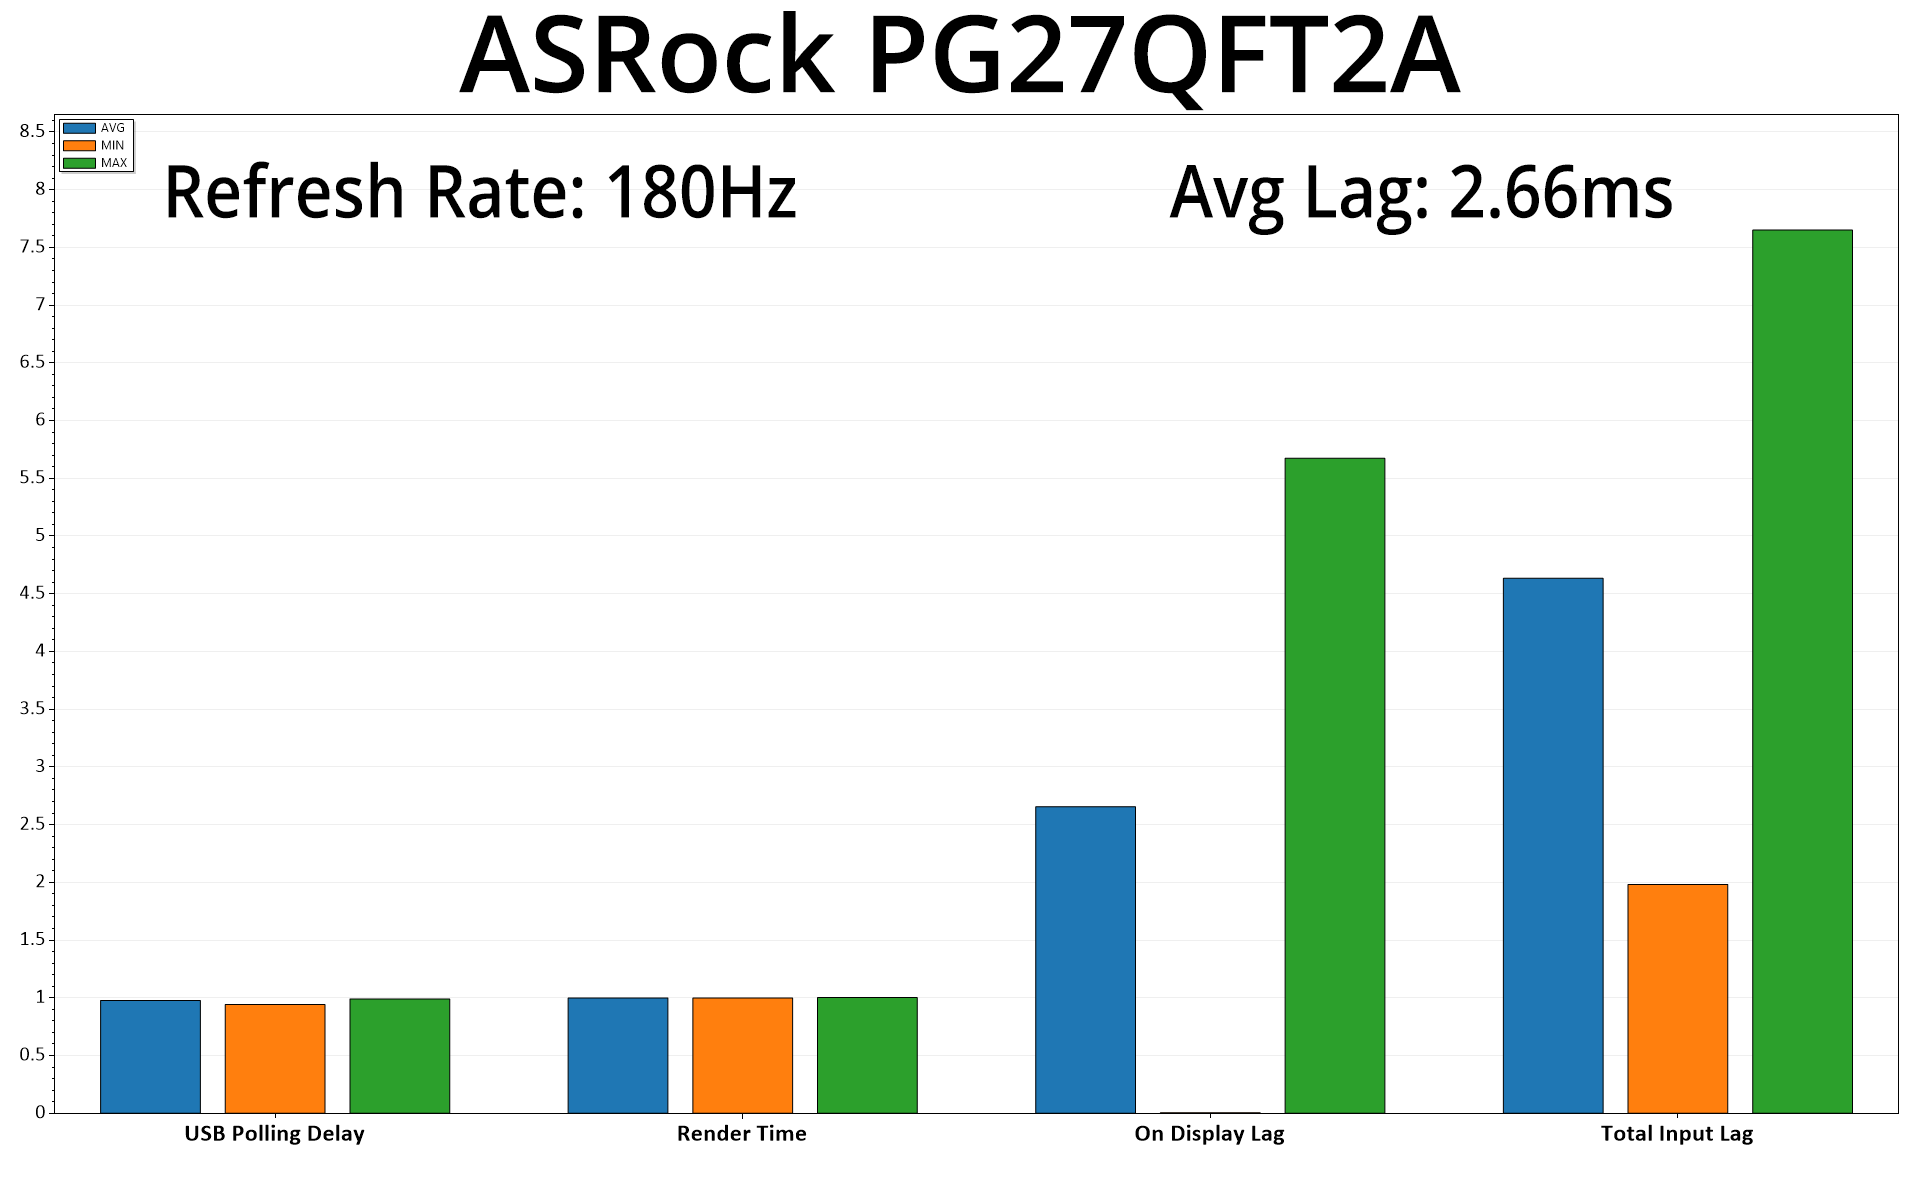
Lastly, for a look at input lag, we saw average display lag hit 2.66ms, so less than half a frame at 180Hz (5.56ms) – no problem at all.
This has been the first ASRock monitor I have ever reviewed and generally the PG27QFT2A is a solid option to have. It's not designed to be an all-singing all-dancing screen, but rather it is targeting the mainstream audience with its 1440p 180Hz panel and £220 asking price.
By and large, the panel performance on offer is decent. It's not the most accurate out of the box – we recommend the Warm colour balance profile instead of the Normal option – and it does lack an sRGB emulation mode to clamp down on over-saturation. However, the range of brightness is solid and contrast is impressive for an IPS panel, hitting 1500:1, so that's good to see. Viewing angles were a bit disappointing however, with the panel looking noticeably dimmer and less vibrant when viewed from the side.
Response time performance follows a similar trend. By enabling overdrive we saw an average grey-to-grey response time of just over 7ms, which is fine but hardly super-fast. The thing is, ASRock hasn't implemented multiple overdrive options – it's either ‘on' or ‘off', and there is clearly scope to push overdrive further and get faster results, so that does feel like a missed opportunity.
ASRock has clearly tried to differentiate itself from the pack with its built-in WiFi antenna, as you can actually connect the stand to your motherboard or WiFi card in an attempt to improve WiFi coverage, and it supports up to WiFi 7. In my testing it did work reasonably well, though performance was basically the same as what I got from a £15 add-on antenna from Amazon, and of course many gamers use Ethernet instead. This feature could certainly appeal to some, but I think it's a fairly niche extra.
All in all, the ASRock PG27QFT2A is a generally decent monitor in a highly competitive area of the market. It hasn't blown me away in any one area, and I think its lack of features (no sRGB emulation mode, absence of USB ports, no multiple overdrive modes) is the biggest drawback here. However, despite its shortcomings this screen does offer a solid all-round experience at a very good price of £220 so it's definitely one to consider, especially if it dropped below the £200 mark during a sale.
We found it for £219 from Laptops Direct HERE.
Discuss on our Facebook page HERE.
Pros
- Very strong contrast for an IPS panel.
- MPRT mode noticeably improves motion clarity.
- Solid build quality.
- Integrated WiFi antenna could appeal to some buyers.
- Affordable at just £220.
Cons
- No sRGB mode.
- Lacks multiple overdrive modes – the panel can clearly be pushed harder than it is.
- No USB ports.
- Viewing angles could be better.
KitGuru says: The ASRock PG27QFT2A isn't perfect, but priced just over £200, it's an affordable option if you're looking to join the 1440p/144Hz+ bandwagon.