

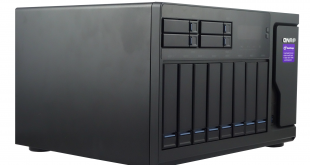
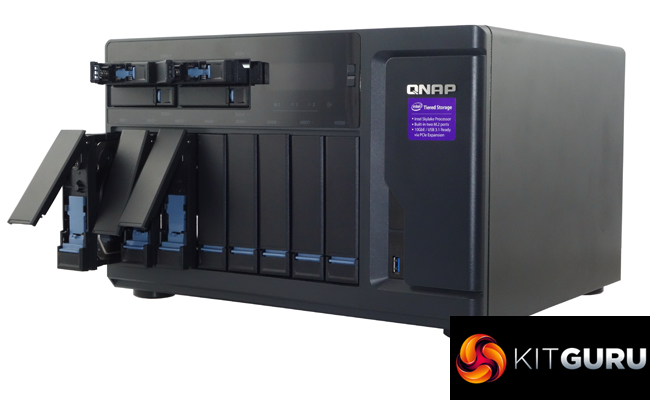
QNAP's TVS-1282 is the flagship 12-bay model of the TVS-x82 high-performance NAS range aimed at SMBs. The TVS-x82 series has been designed to support Tiered Storage, Network Traffic Distribution and Application based Partitioning among others. Powered by an Intel Core i7-7700 quad-core CPU, the TVS-1282 comes with three PCIe Gen 3 expansion slots to boot.
The TVS-x82 family is made up of the TVS-1282 12-bay (8x 3.5in, 4x 2.5in), TVS-882 8-bay (6 x 3.5in, 2 x2.5in) and the 6-bay TVS-682 (4 x 3.5in, 2 x 2.5in). Within each of these model lines there are CPU and memory options to choose from.
The flagship TVS-1282 (in terms of CPU and memory) is the one QNAP kindly supplied for review, the TVS-1282-i7-64G. This is powered by an Intel Core i7-7700 quad-core CPU clocked at 3.6GHz and backed by 64GB of DDR4-2133MHz memory, the maximum amount the motherboard supports. Keeping with the i7 CPU but with only 32GB of memory as standard is the TVS-1282-i7-32G. Next model down the food chain is the TVS-1282-i5-16G, powered by an Intel Core i5-7500 3.4GHz quad-core CPU with 16GB of memory and finally, there is the entry-level unit, the TVS-1282-i3-8G powered by an Intel Core i3-7100, 3.9GHz CPU and 8GB of memory.
But that's not the end of the choices as the TVS-1282-i7-64G, TVS-1282-i7-32G and TVS-1282-i5-16G models are also available with a larger power supply option, 450W instead of the standard 250W one (FSP 250-60PLC). These models are labelled TVS-1282-i7-64G-450W, TVS-1282-i7-32G-450W and the TVS-1282-i5-16G-450W.
The TVS-1282's feature list is mightily impressive. There are three, yep three PCIe Gen 3 slots, a single x8 and a pair of x4 which support various add-in cards such as QNAP's QM2 cards, 10GbE networking and 12G SAS expansion cards. It even supports a dedicated graphics card. Both AMD and Nvidia cards are supported; there's a compatibility list on QNAP's website, and bear in mind that some cards will require that 450W PSU option.
Along with the eight 3.5in and four 2.5in drive bays there are a pair of integrated M.2 SATA slots supporting 2242, 2260, 2280, and 22110 form factor SSDs for caching duties should that be needed. You also get four Gigabit Ethernet ports and three HDMI ports.
Physical Specifications
Processor: Intel Core i7-7700 quad-core, 3.6GHz
Memory: 64GB DDR4-2133MHz
PCIe: 3 x Gen3; 1 x8, 2 x4
Gigabit Ethernet Ports: 4
Rear panel connectors: 4 x USB 3.0, 3 x HDMI, 2 x 6.3mm mic in, 1 x 3.5mm line out, console port
Front panel connectors: 1 x USB 3.0
RAID support: JBOD, RAID 0,1, 5, 6, 10, 50, 60
Cooling: Active; 3 x 8cm chassis cooling, 1 x 9cm CPU cooling
Drive Bays Supported: 12; 8x 3.5in 4 x 2.5in
Maximum hard drive size supported: 3.5in 12TB
Maximum Capacity: 96TB (8 drive bays)
Internal File System support: EXT4
Dimensions (D x W x H): 319.8 x 369.9 x 234.6 mm.
Weight: 11.34kg.
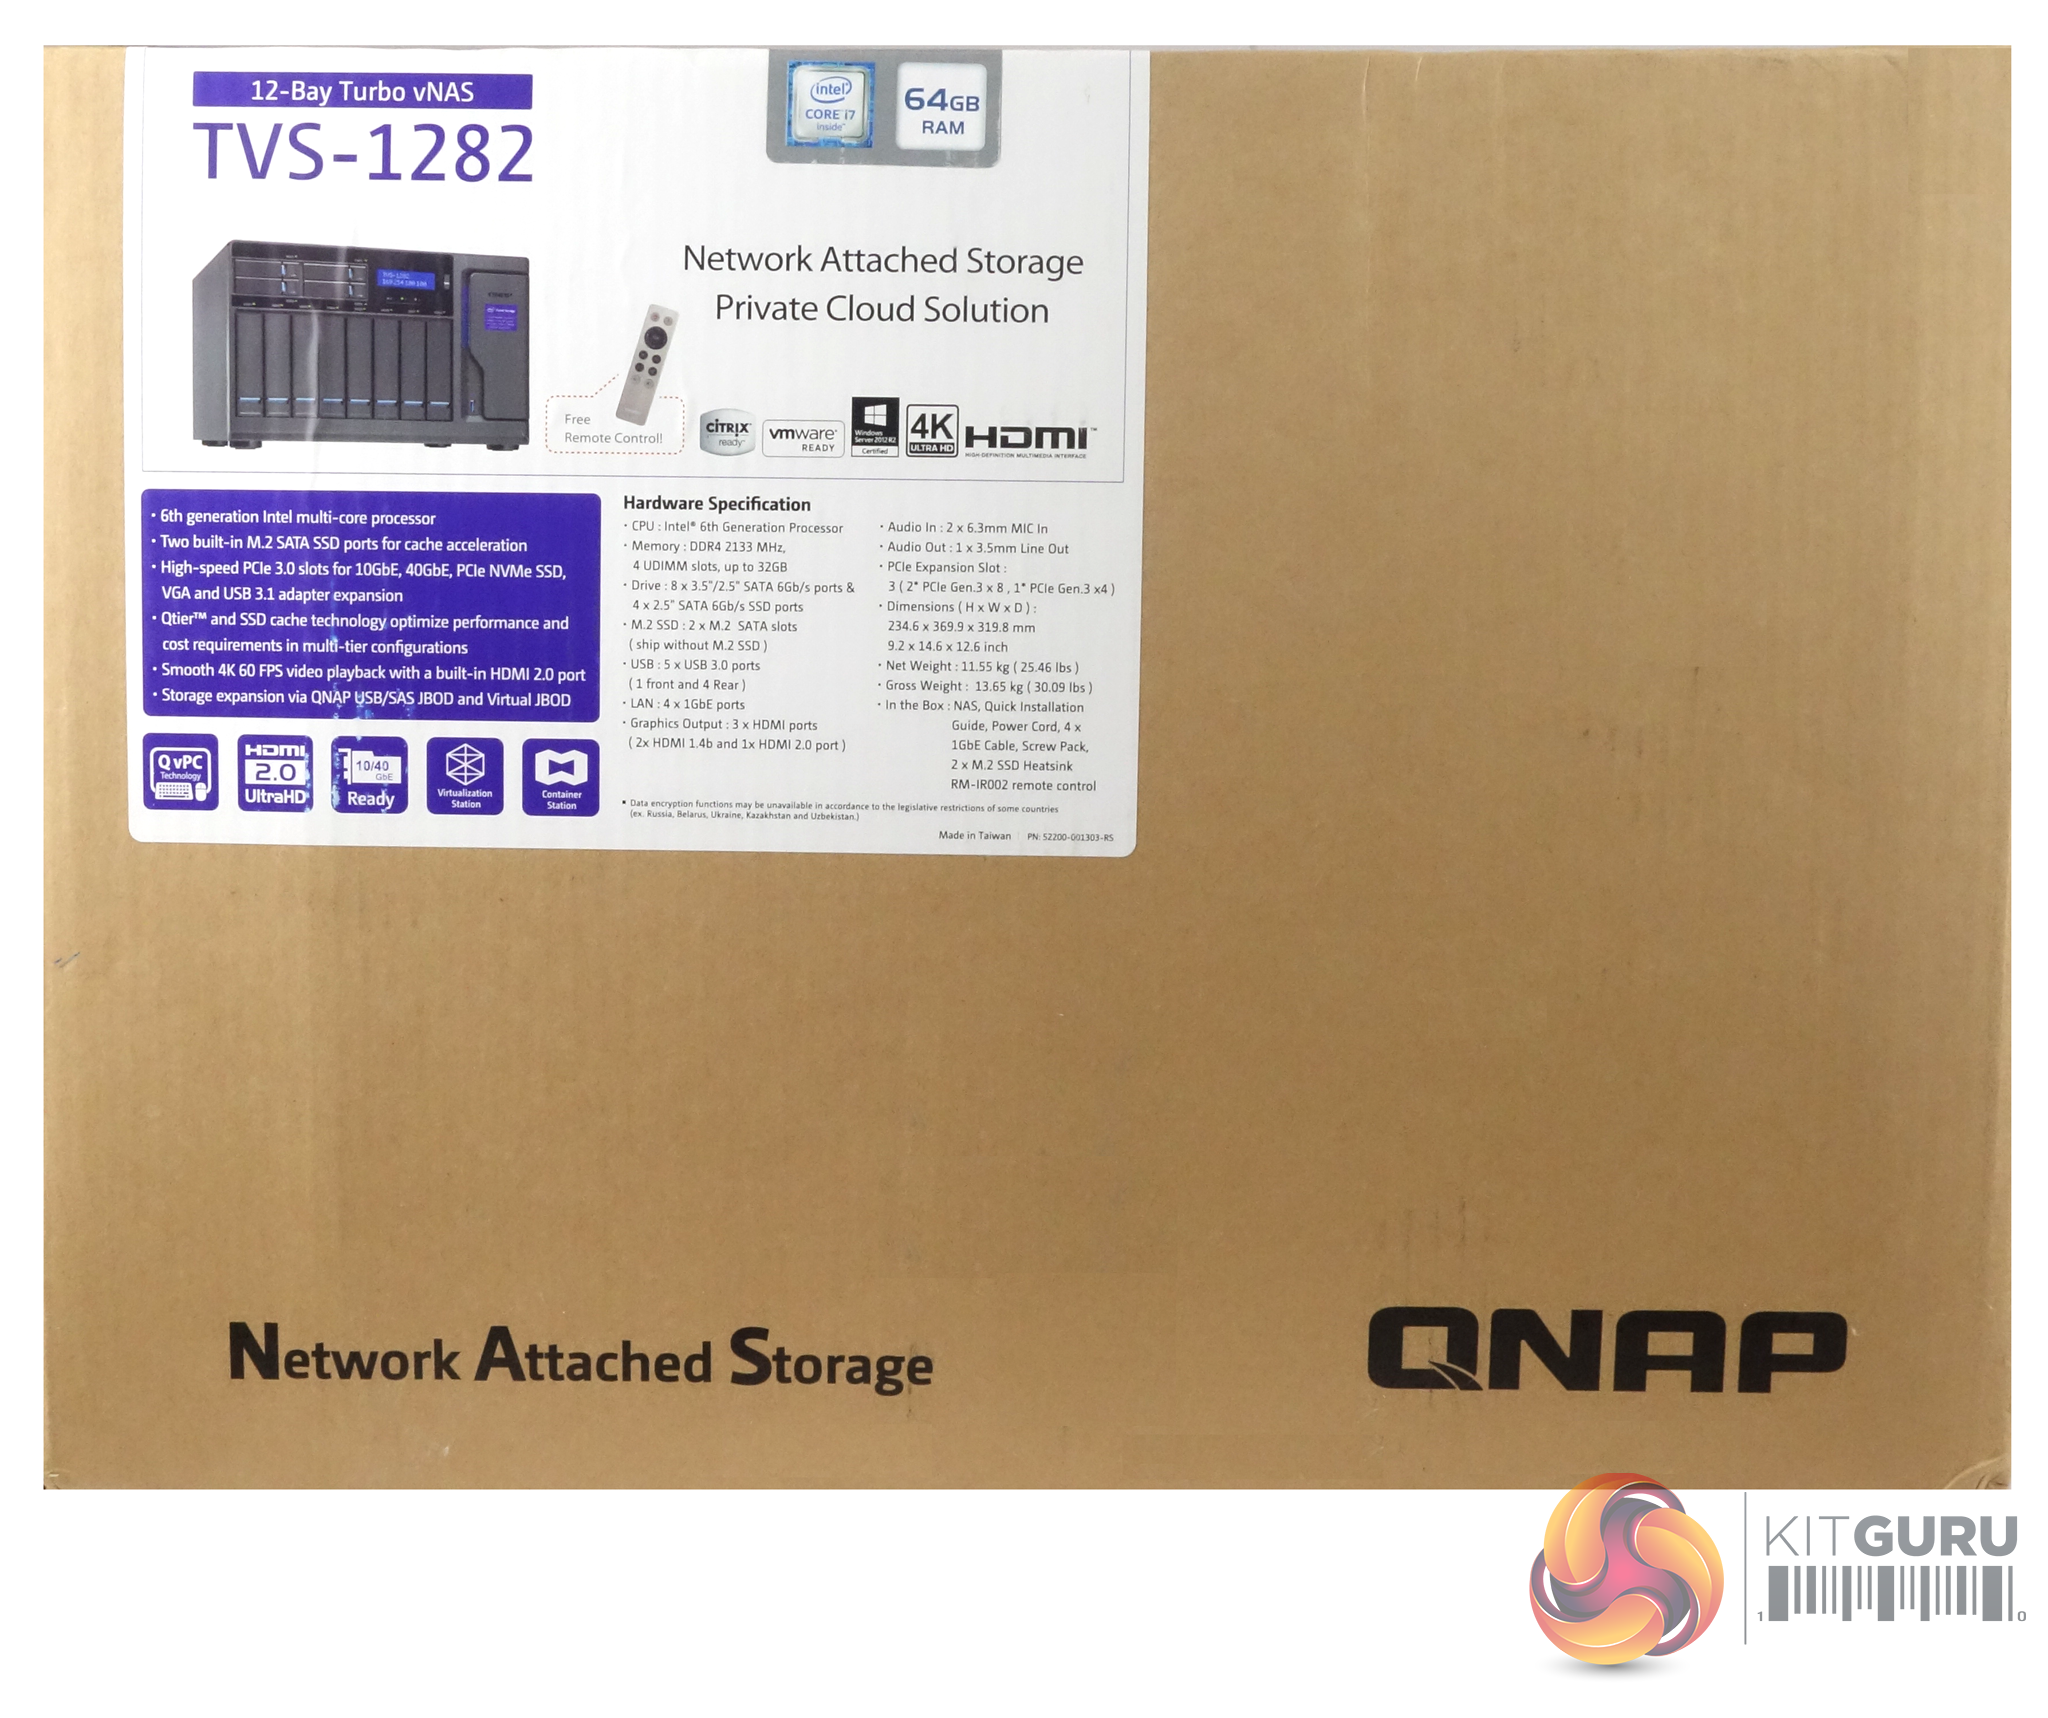
The TVS-1282 comes in a large box with a small but clear image of the unit on the front. Under the image are two information panels, the left hand one lists some of the NAS features while the one on the right displays the hardware specification.
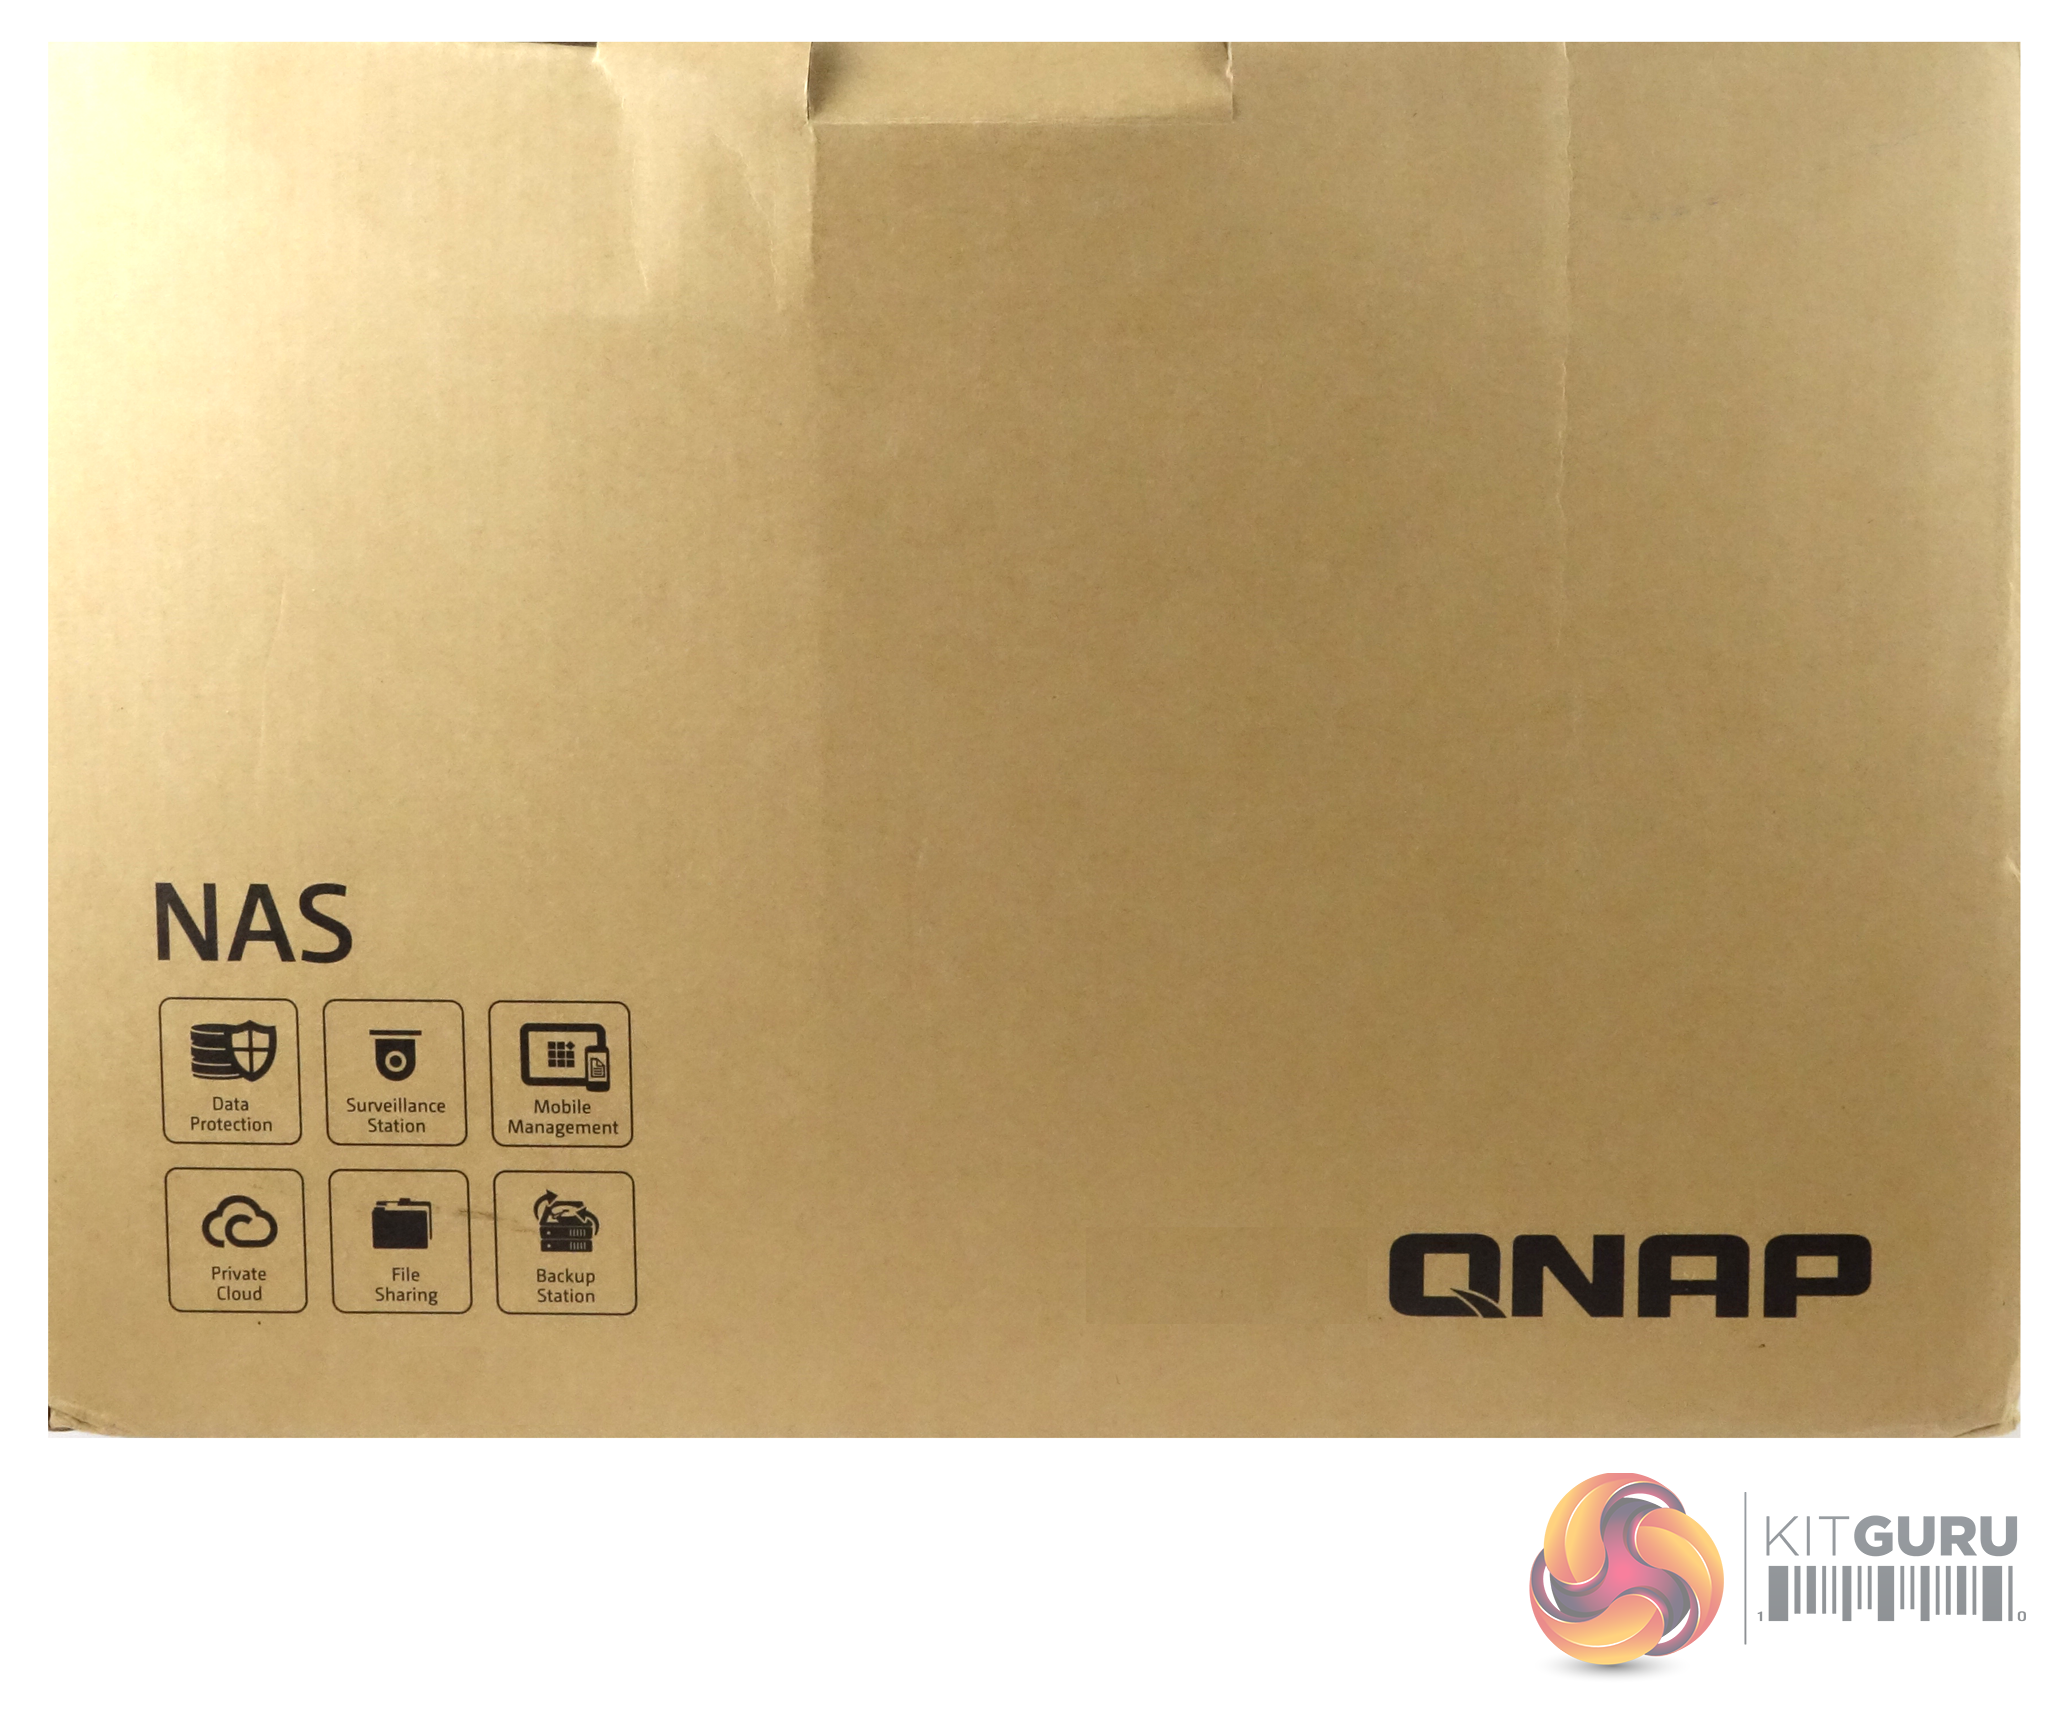
The rear of the box has a group of icons in the bottom left hand corner representing some of the QTS OS features; Data Protection, Surveillance Station, Mobile Management, Private Cloud, File Sharing and Backup Station.
One side of the box just has a group of transportation icons while the other has long line of icons representing the different standards that the device meets.
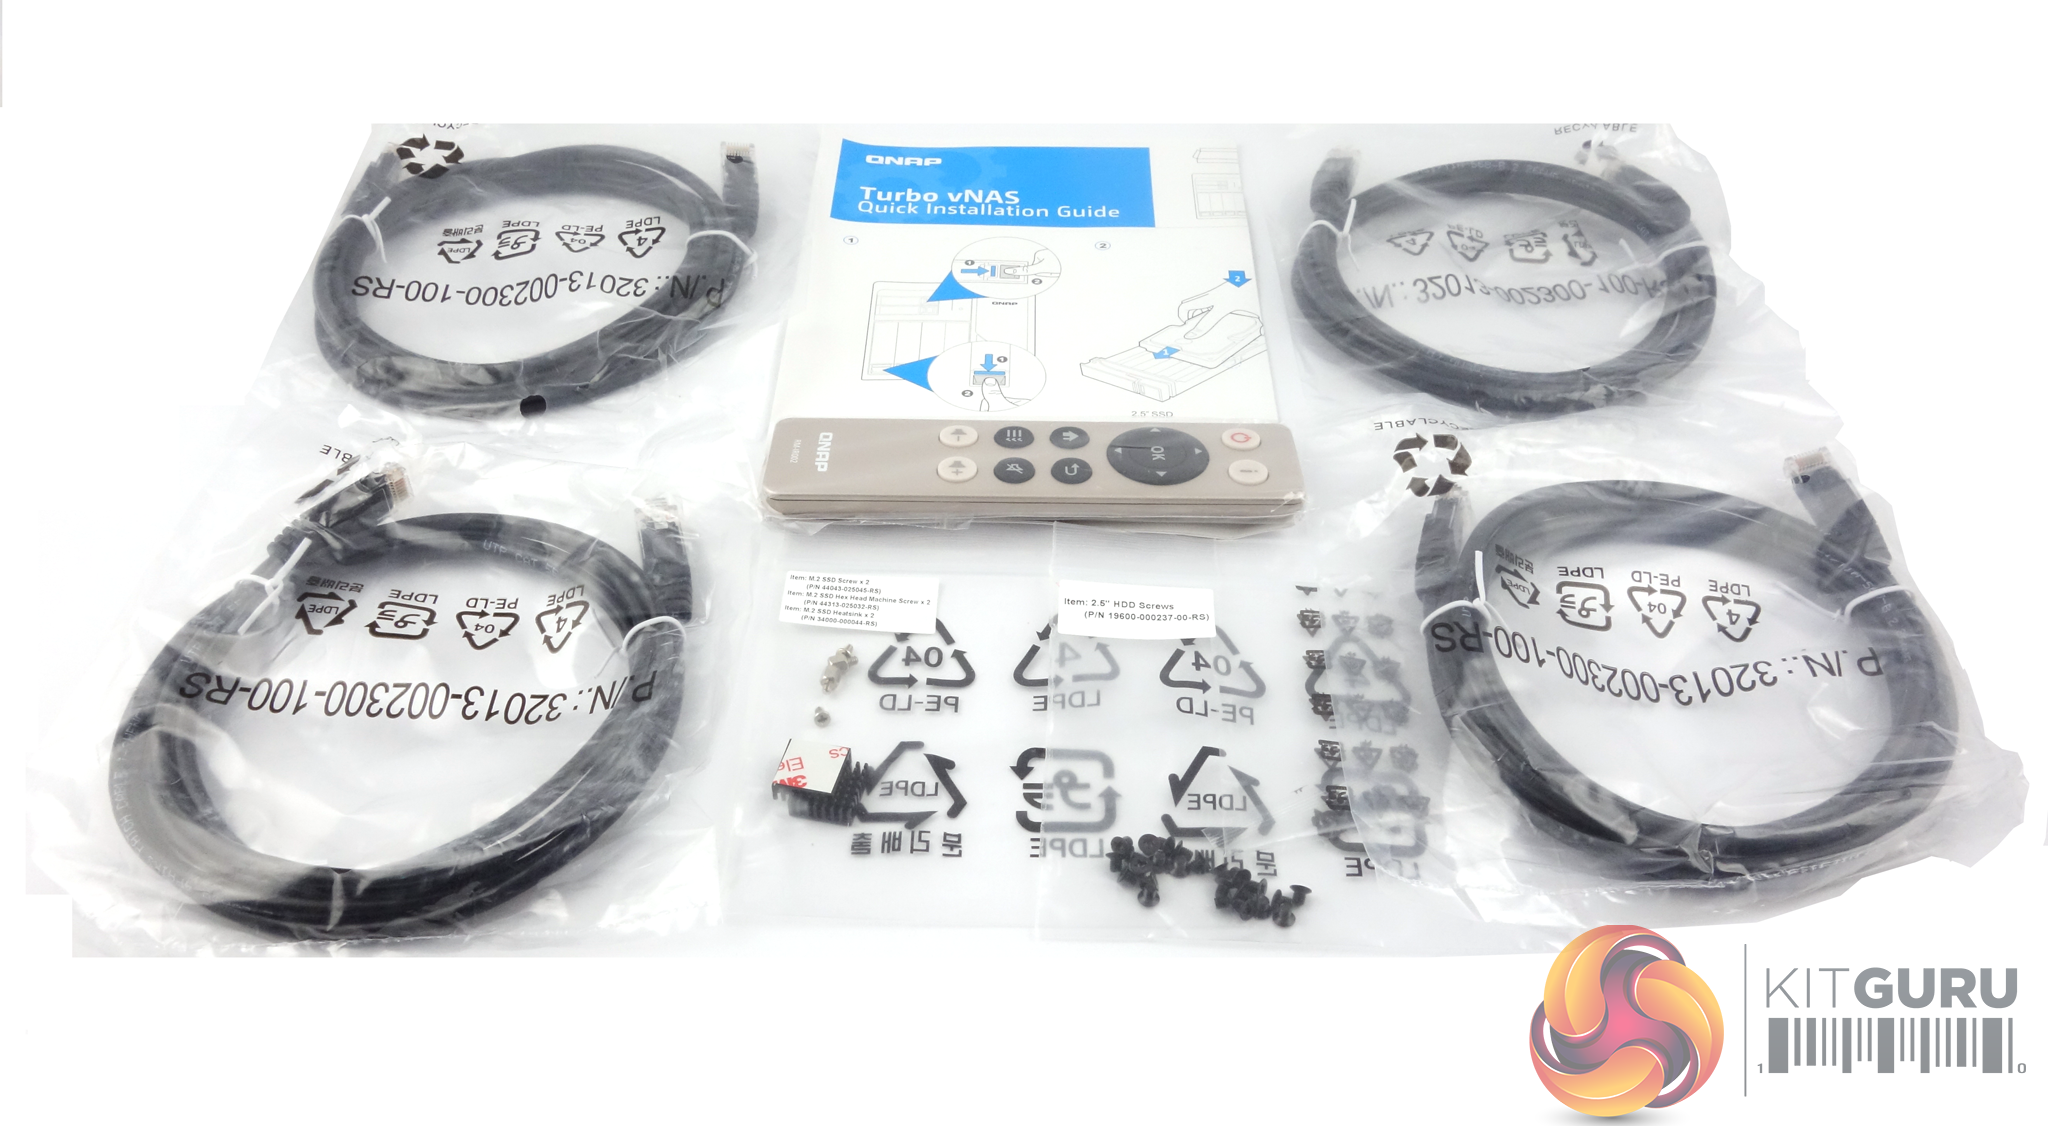
The box bundle is pretty comprehensive; 4 Gigabit Ethernet cables and 24 screws to fix 2.5in drives in all 8 main drive bays. For use with the M.2 ports there are screws and bolts for any drives as well as, and this is a nice inclusion, passive heat sinks for two M.2 drives. Also included is a RM-IR004 IR remote control and a QIG (Quick Installation Guide).
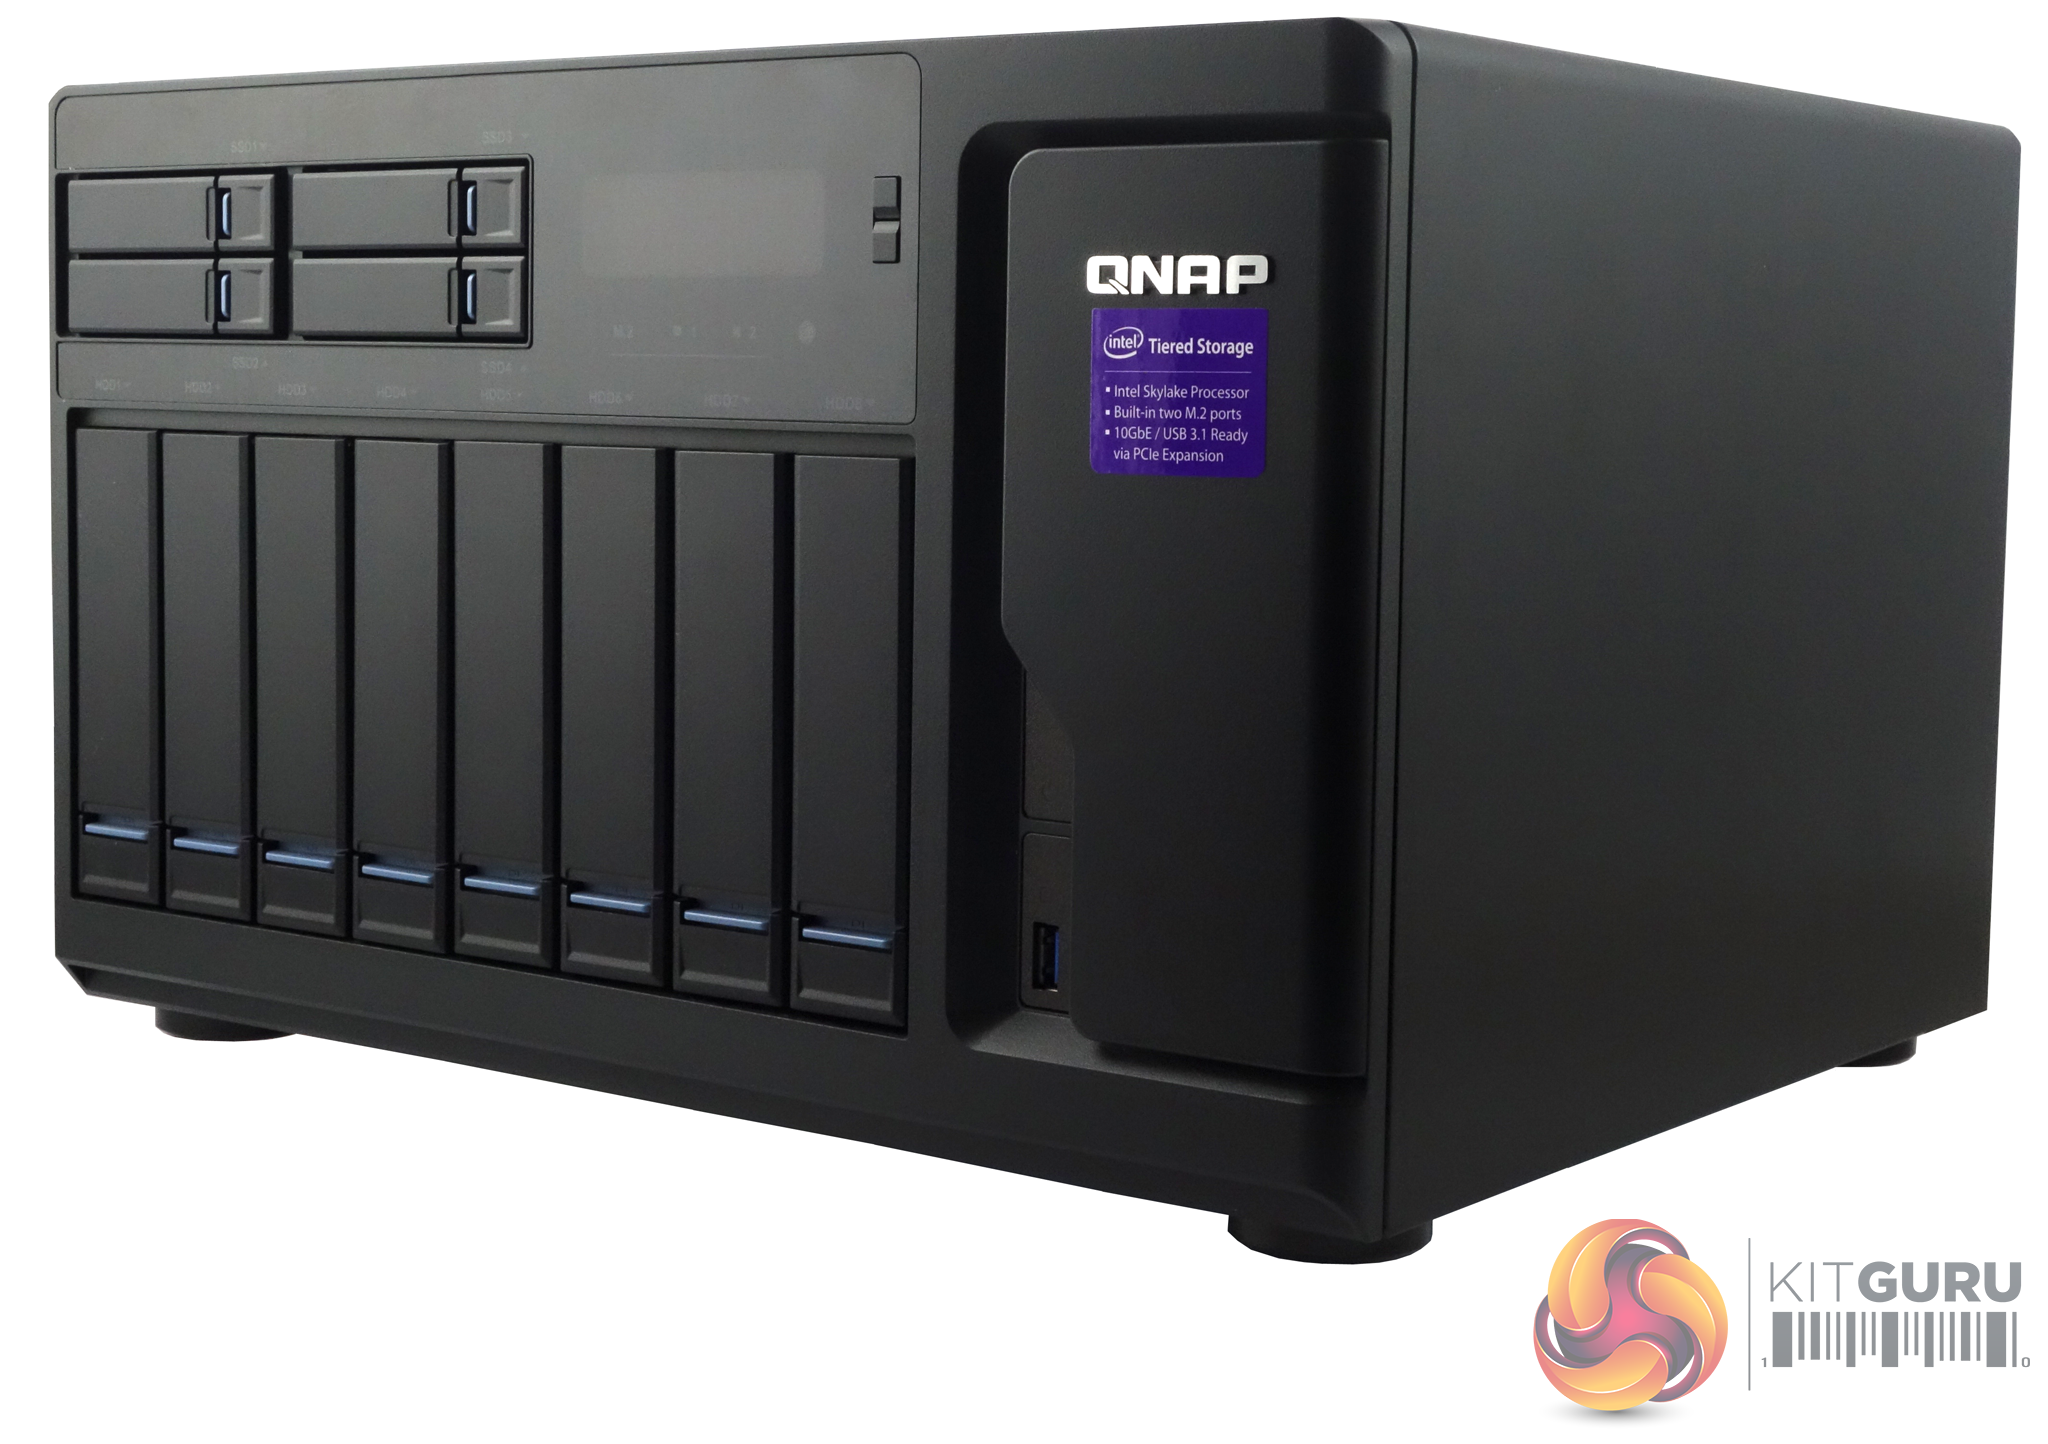
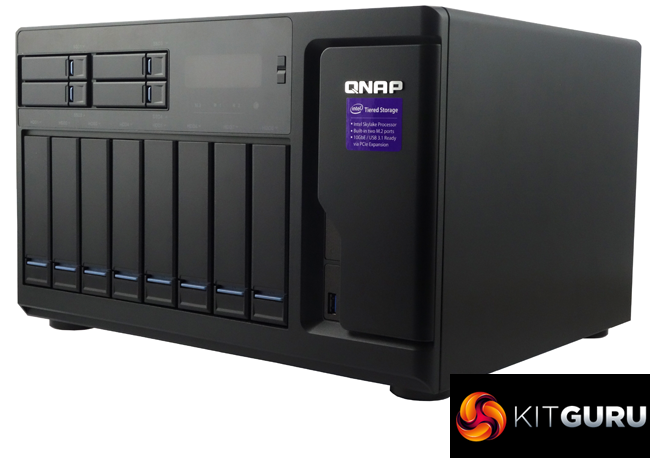
The TVS-1282 is a large tower NAS with its twelve external drive bays split between eight main 3.5in storage bays and four 2.5in bays. The eight main bays are vertically mounted at the base of the unit with the four 2.5in bays very neatly built (2 x 2 horizontally) into the panel above the main bays. These small bays sit next to a LCD panel which displays the NAS IP address as well as other system information on startup as well as any system errors. Using the two buttons next to the display you can also configure the drives and the IP address, subnet mask, gateway and the DNS of LAN1 and 2.
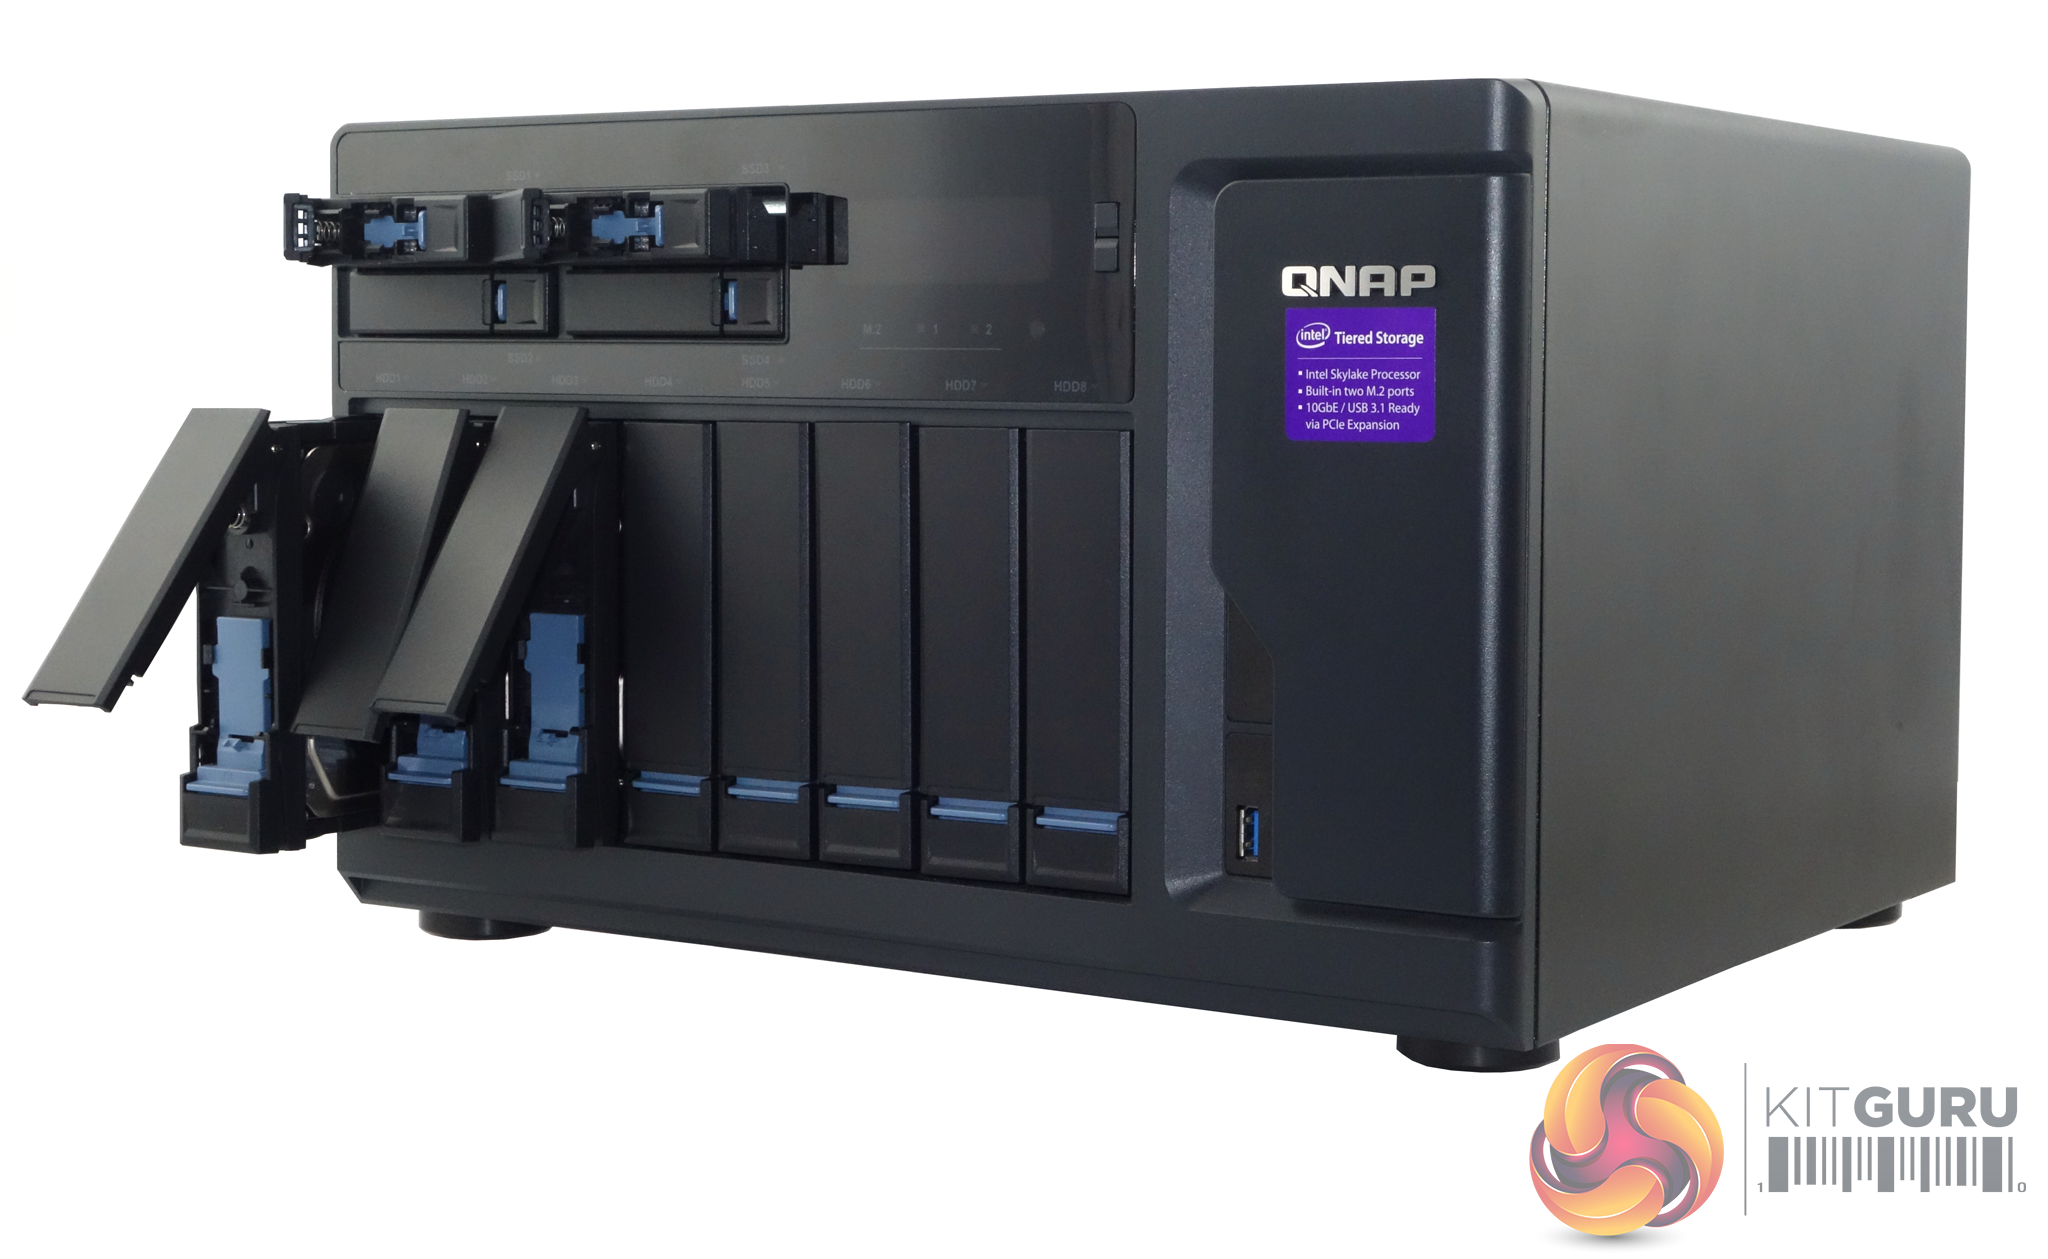
The TVS-1282 doesn't lack in the LED department. The eight main and four 2.5in bays each have an LED displaying drive activity/warnings while under the LCD panel are two activity/warning LEDs for the two internal M.2 drive slots. Under the power button is a system status LED and the One Touch Copy button gets its own LED.
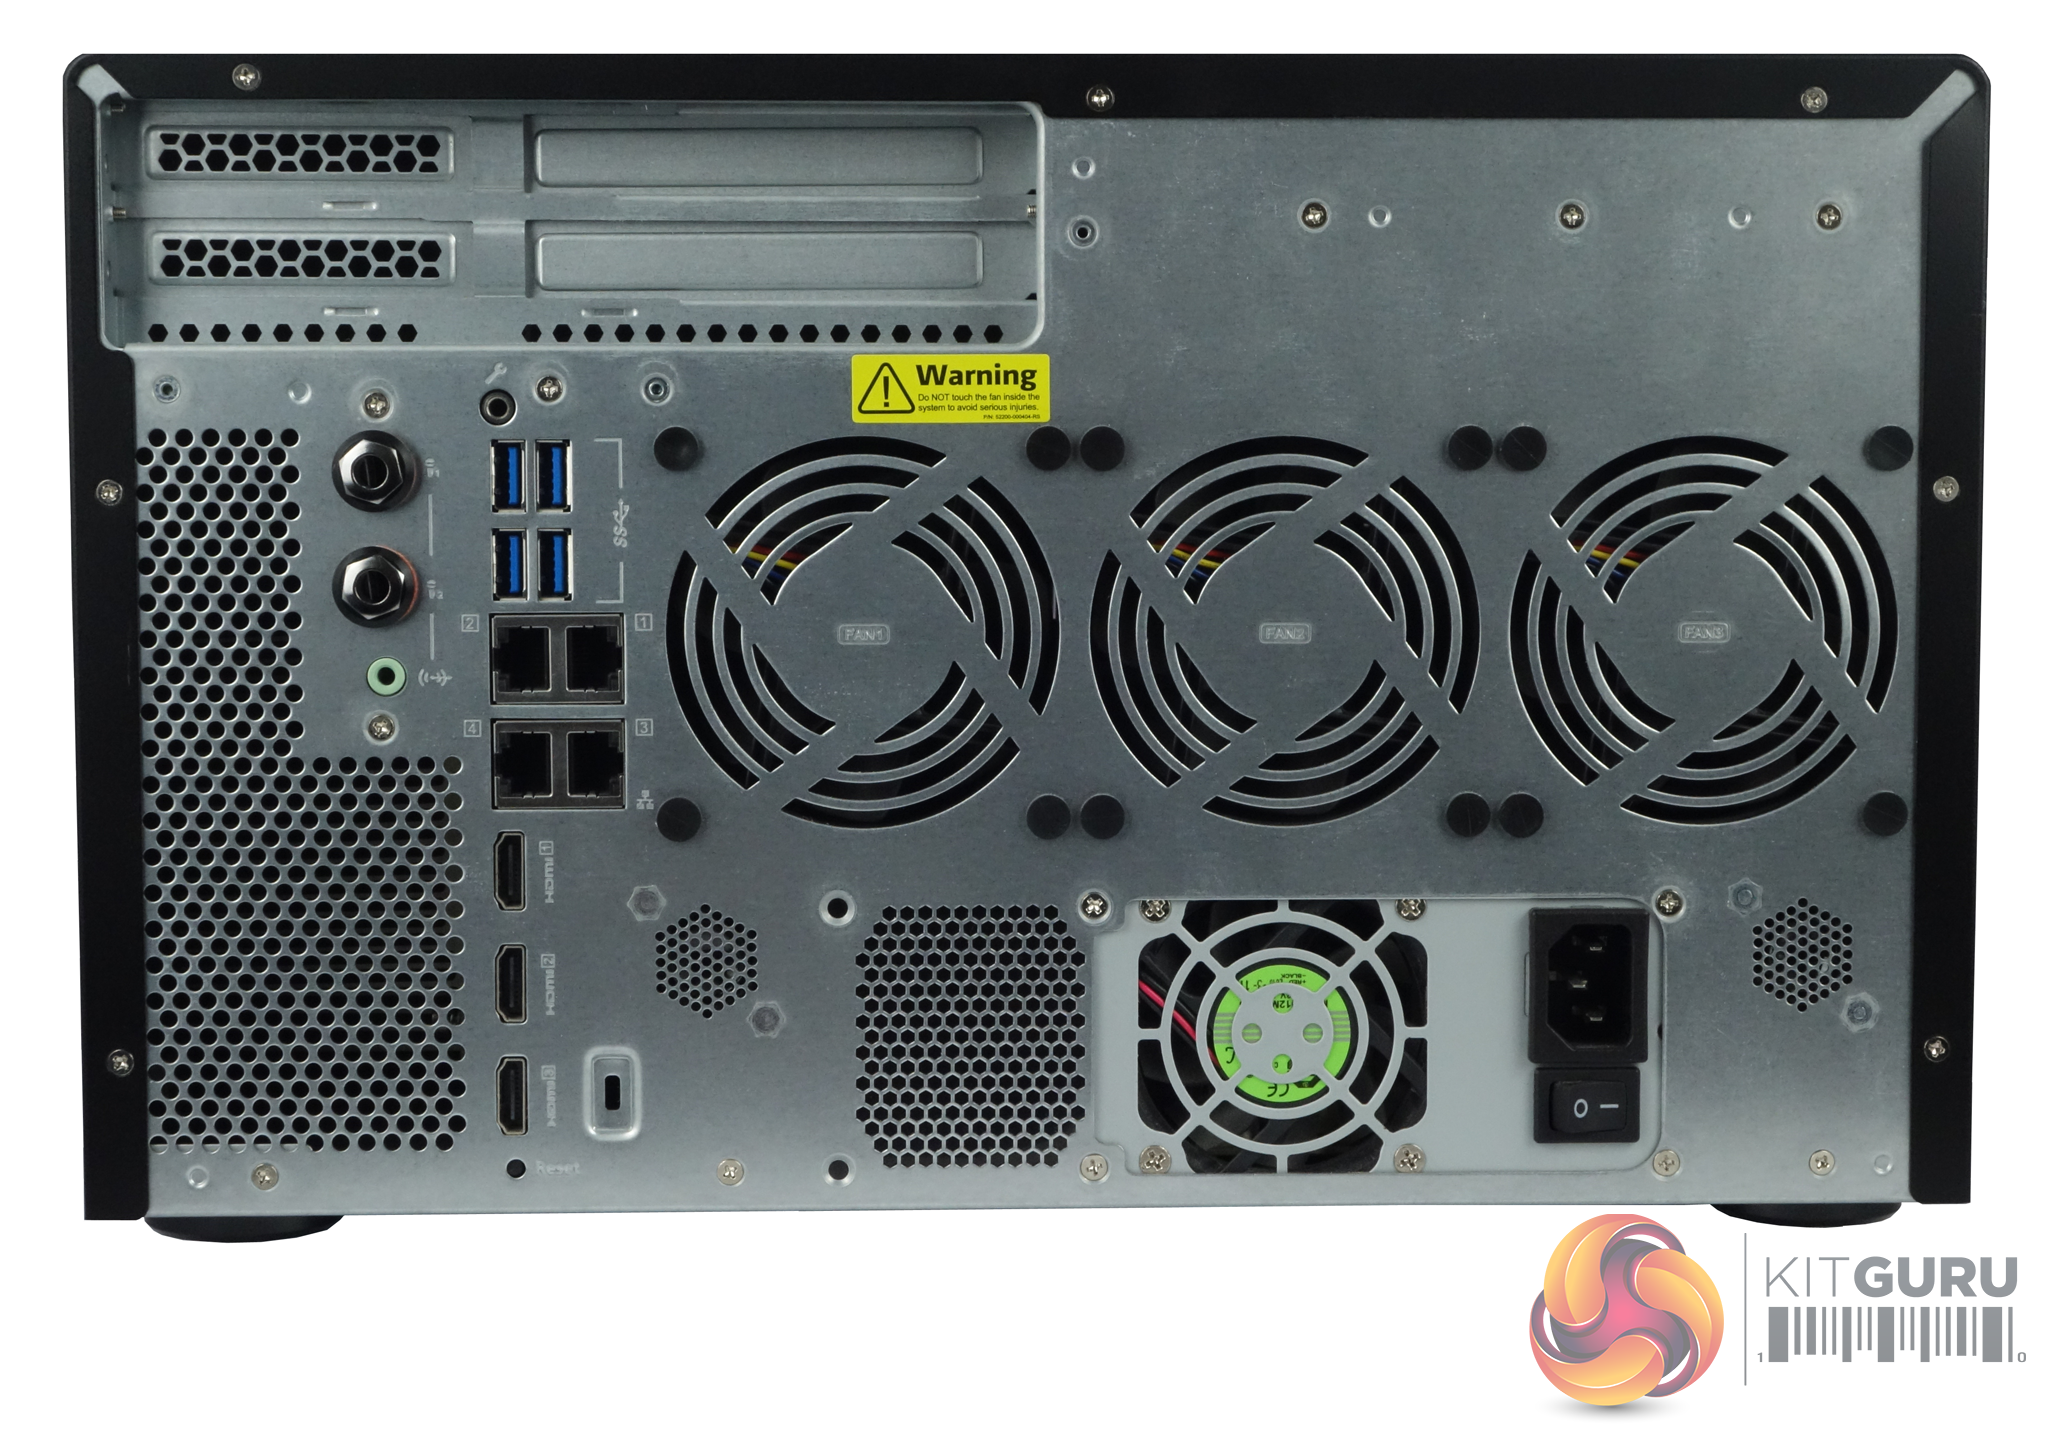
The rear panel of the NAS is a busy area. At the top of the panel are the brackets for the three PCIe slots. Sitting under these are all of the external ports. First up is a pair of vertically mounted 6.3mm microphone and single 3.5mm speaker jacks. Next to these are four USB 3.0 Type A ports, vertically mounted in pairs, under which sit a group of four Gigabit Ethernet ports. Under these are three vertically mounted HDMI ports. To the right of all these ports sit the grills for the three 8cm system cooling fans.
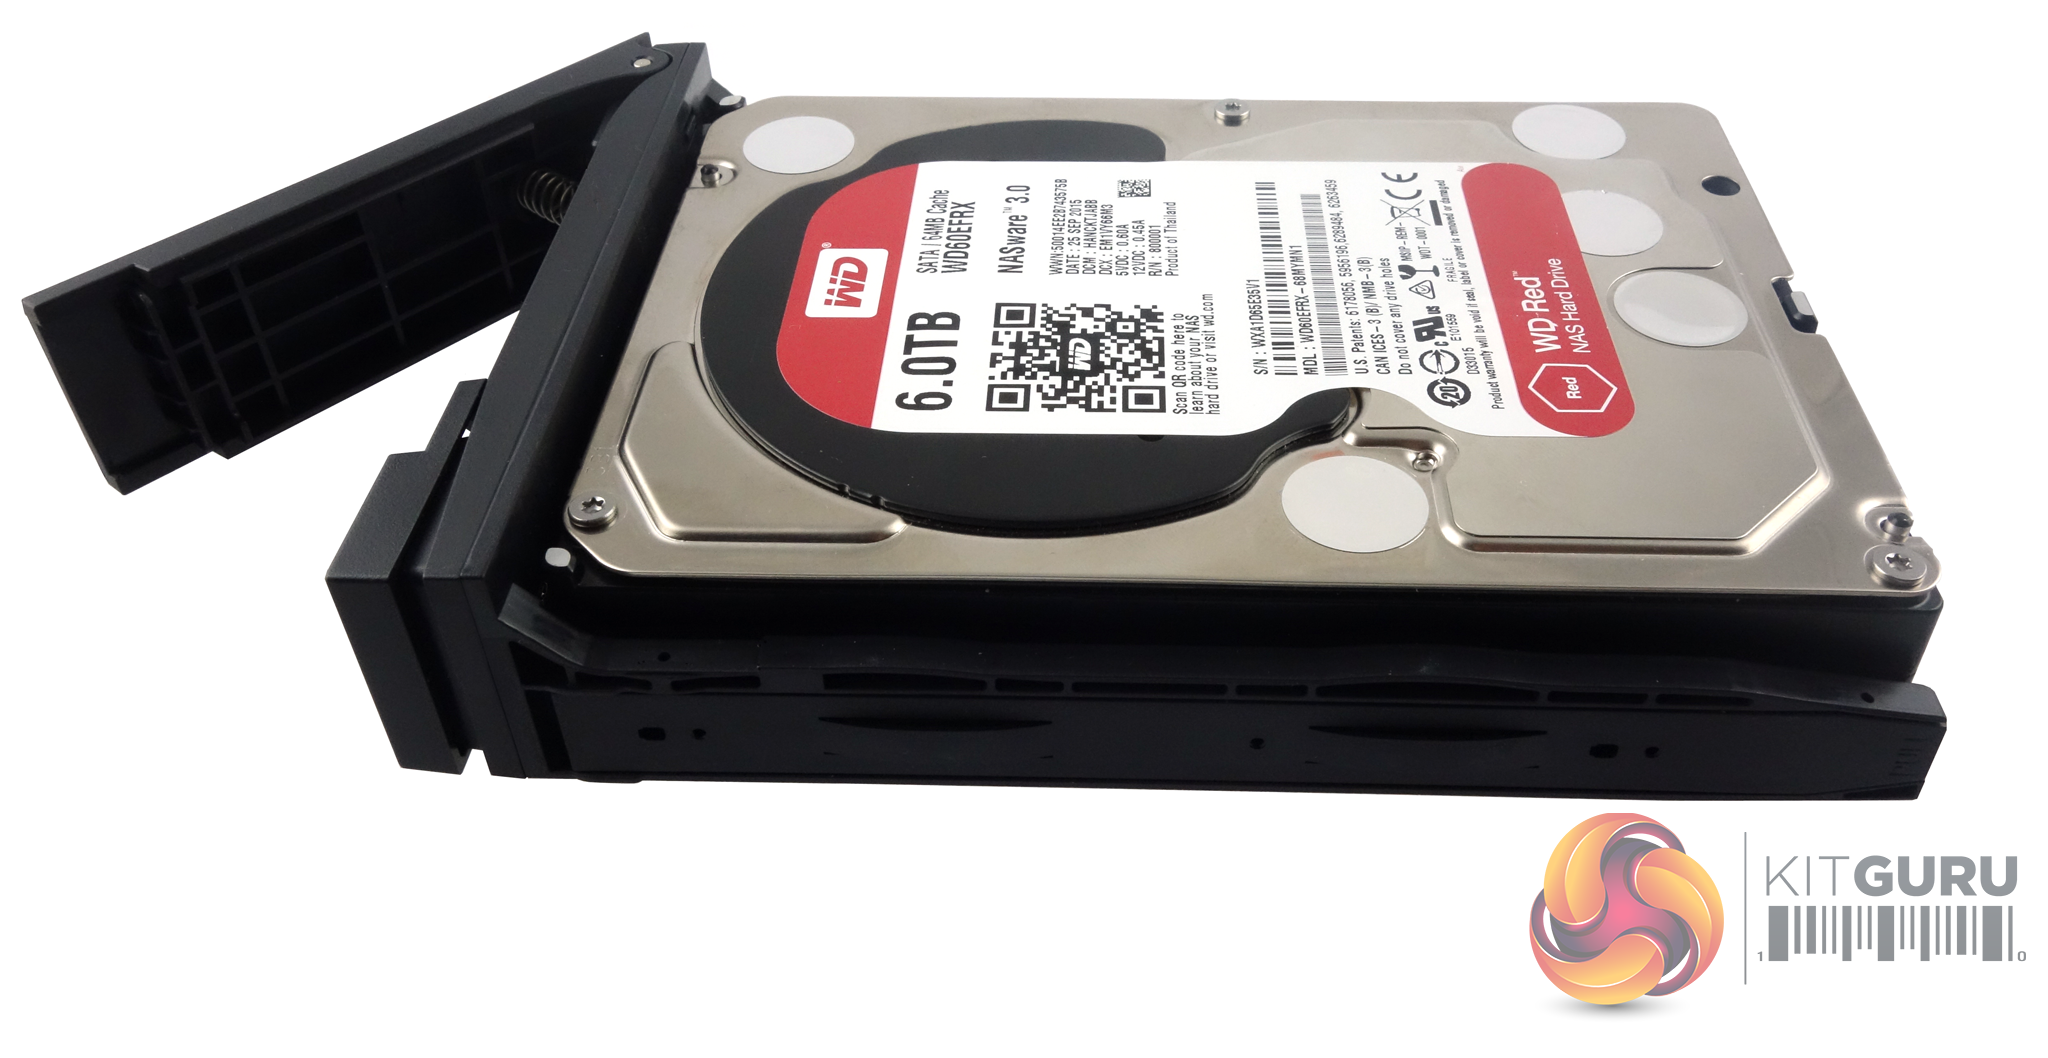
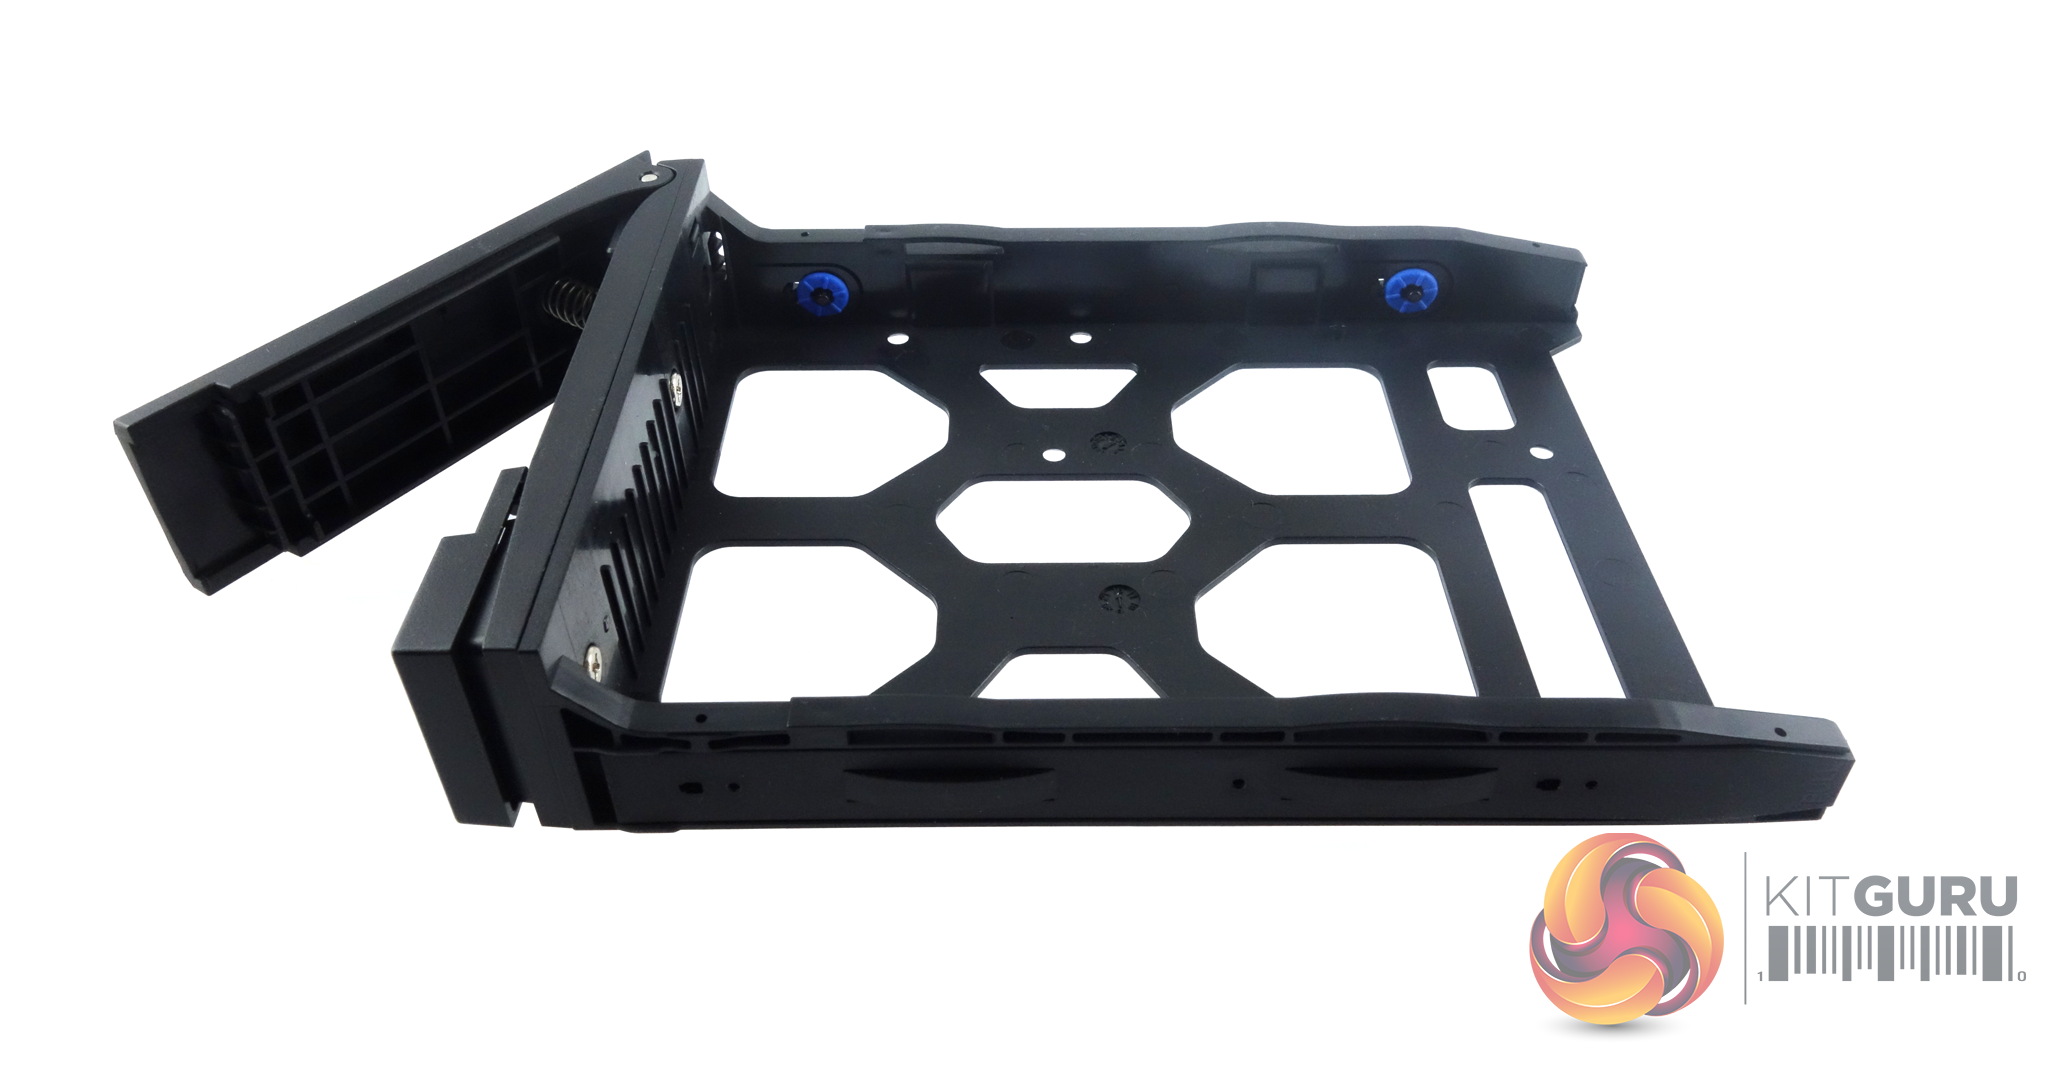
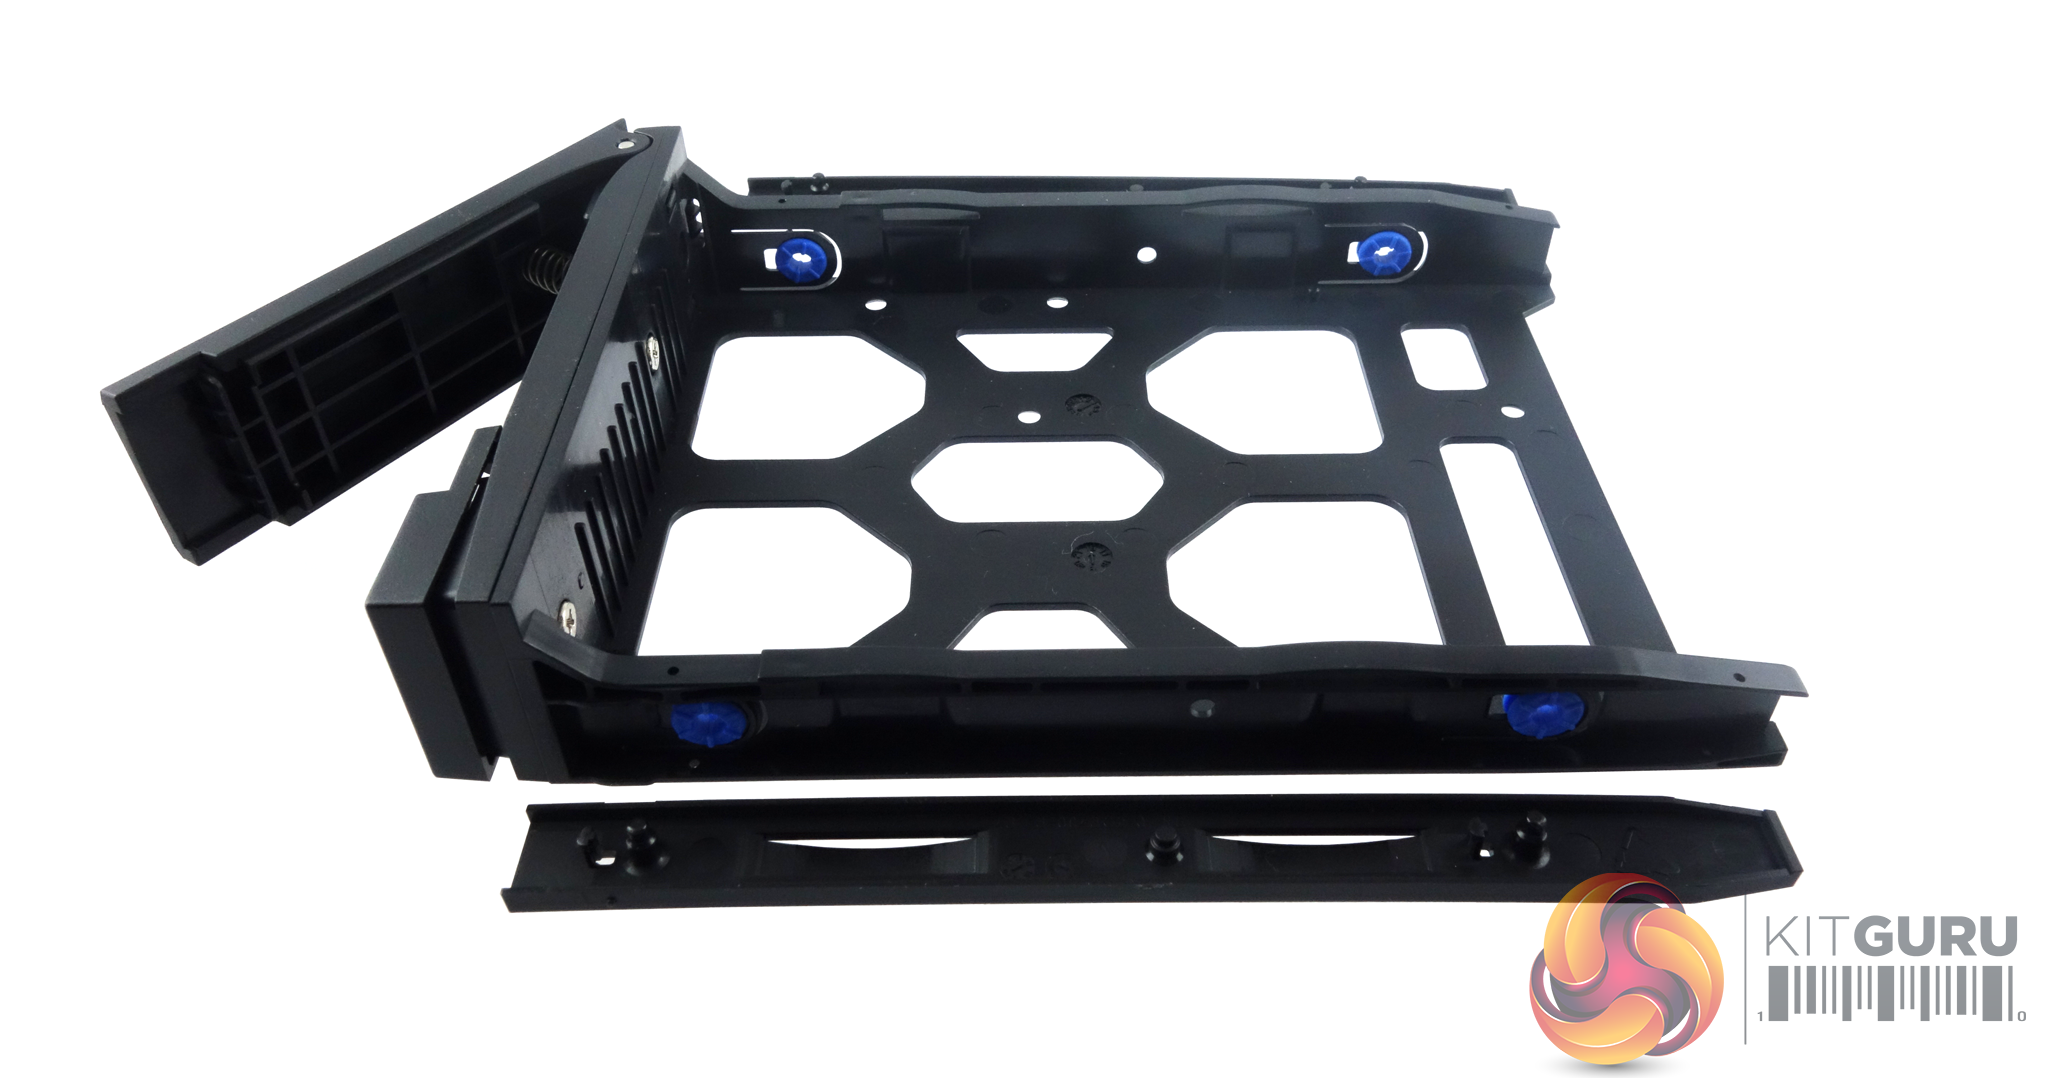
The 3.5in and 2.5in drive trays are made from a decent quality plastic and the built in bay doors have simple but effective sliding latches to lock them in place. To hold the drives in place, the 3.5in trays use a pair of simple plastic strips that fit into grooves in the drive tray’s sides, and each plastic strip has a pair of pins that fit through the tray and into the drive's side mounting holes. These mounting holes in the tray sides have anti-vibration grommets fitted. If you want to make sure the drives are installed firmly, you can use the screws provided to fix the drive via holes in the tray base. 2.5in drives can only be fixed via these holes in the tray base.
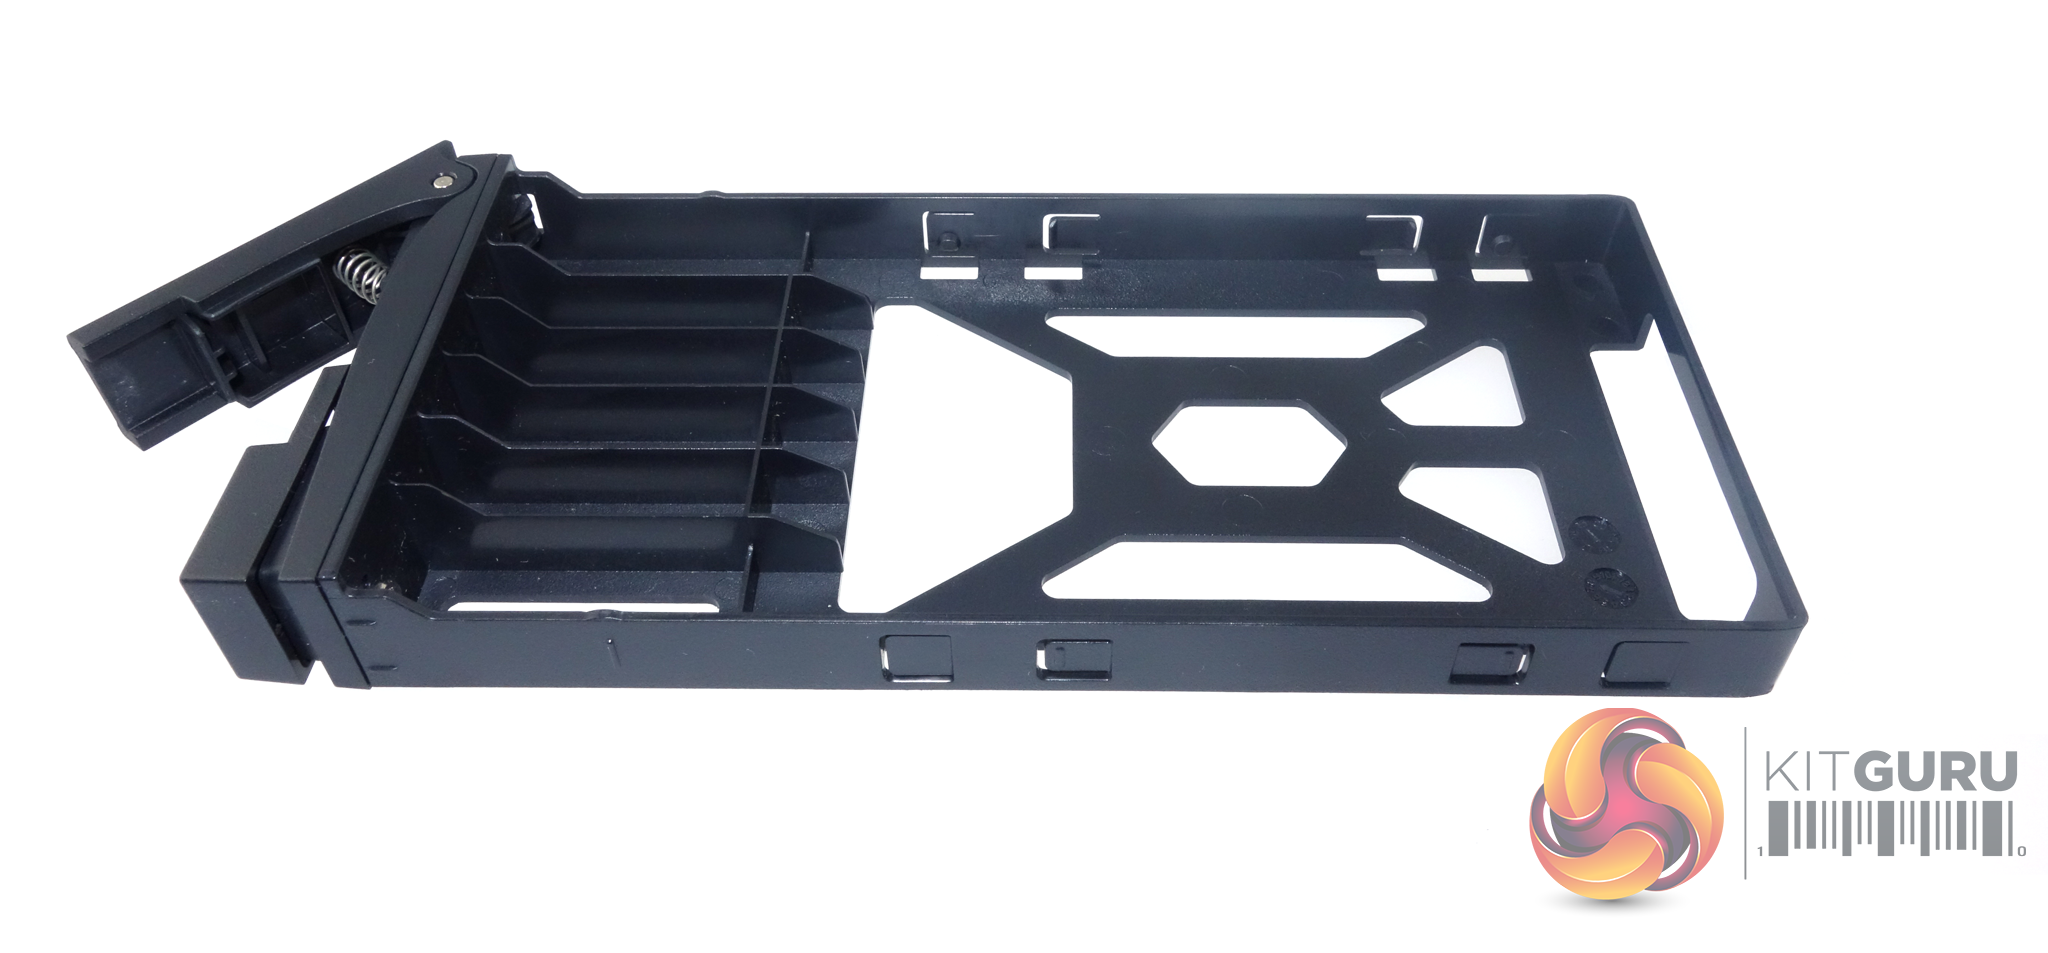
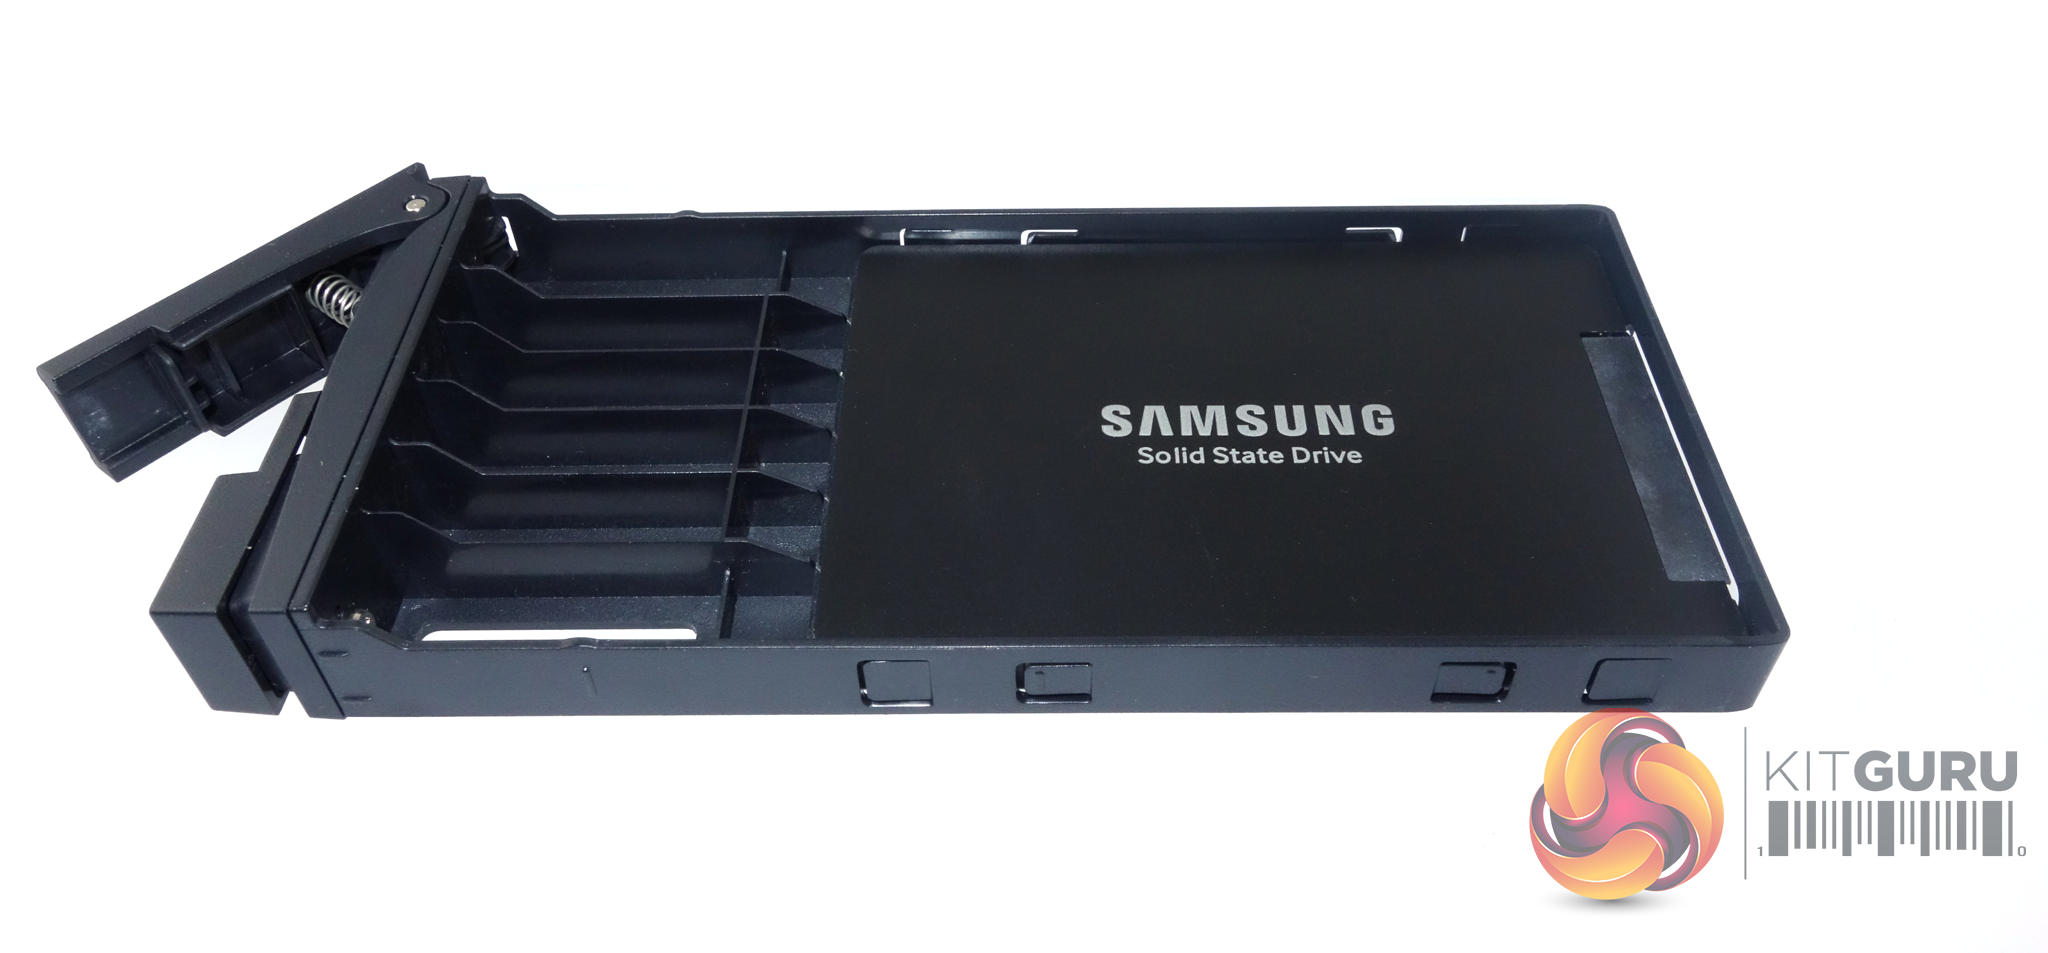
Fixing a drive in the 2.5in bay is a simple matter of just sliding the drive into the tray until it touches the rear of the tray, and then pressing the drive down until you hear a click as it engages four plastic clips moulded into the drive tray side rails.
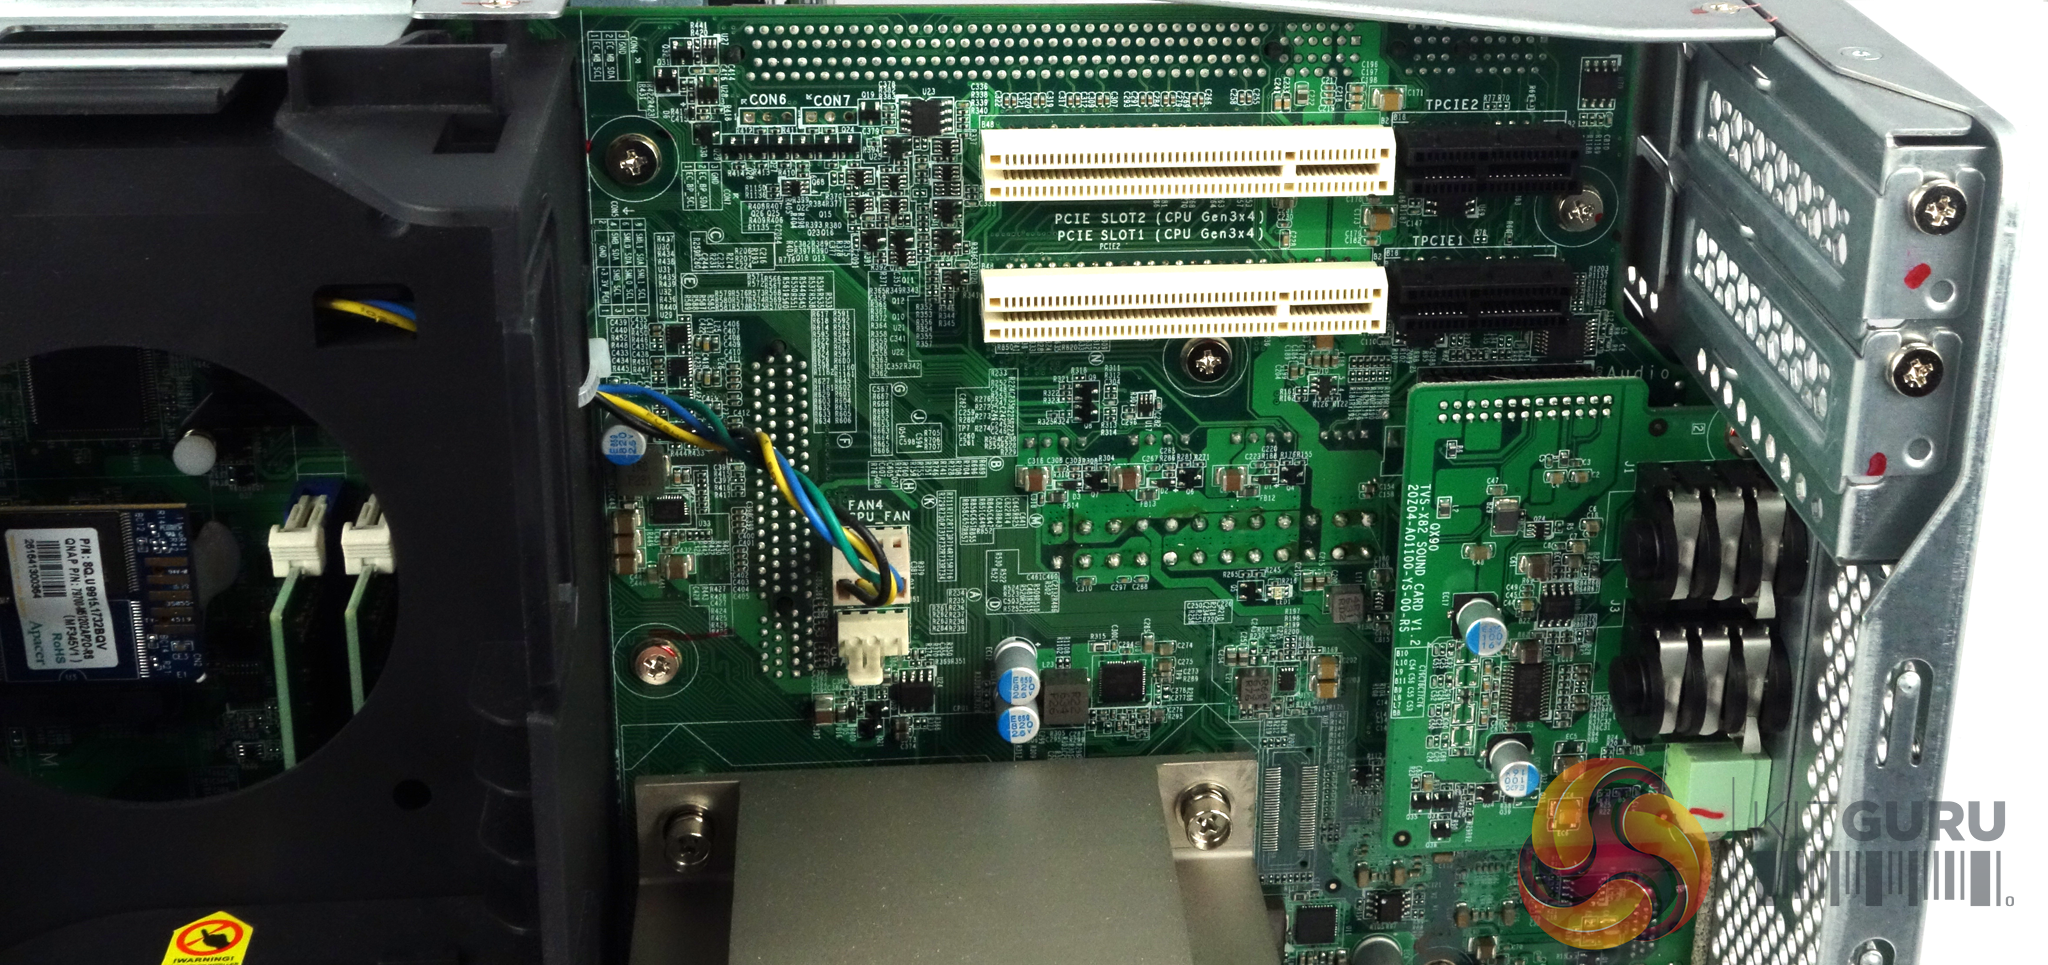
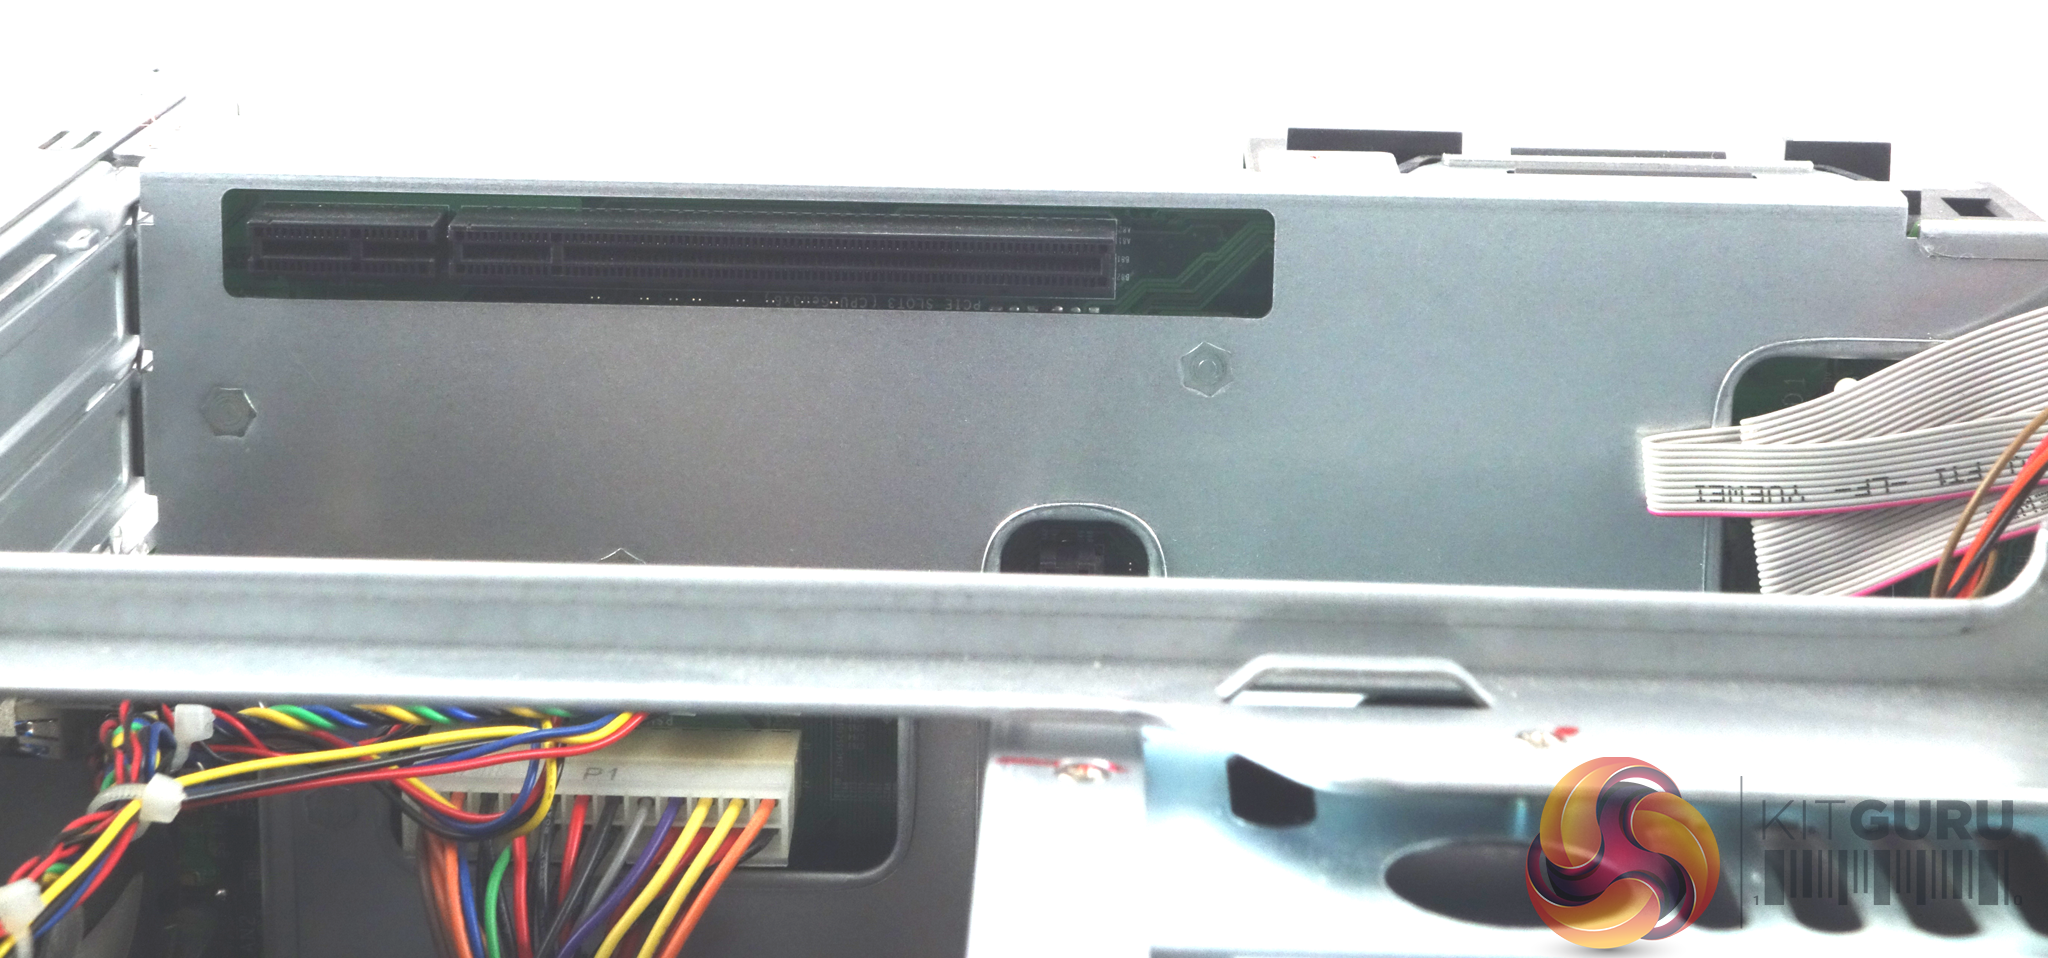
The TVS-1282 comes with three PCIe Gen3 slots. The two x4 slots (coloured white) are on one side of the motherboard while the single x8 slot (coloured black) sits on the other side of the main board. You have to take care when choosing which cards to use in the two x4 slots as there is only 147mm of clearance between the PCIe expansion plates and the shroud for the CPU cooler.
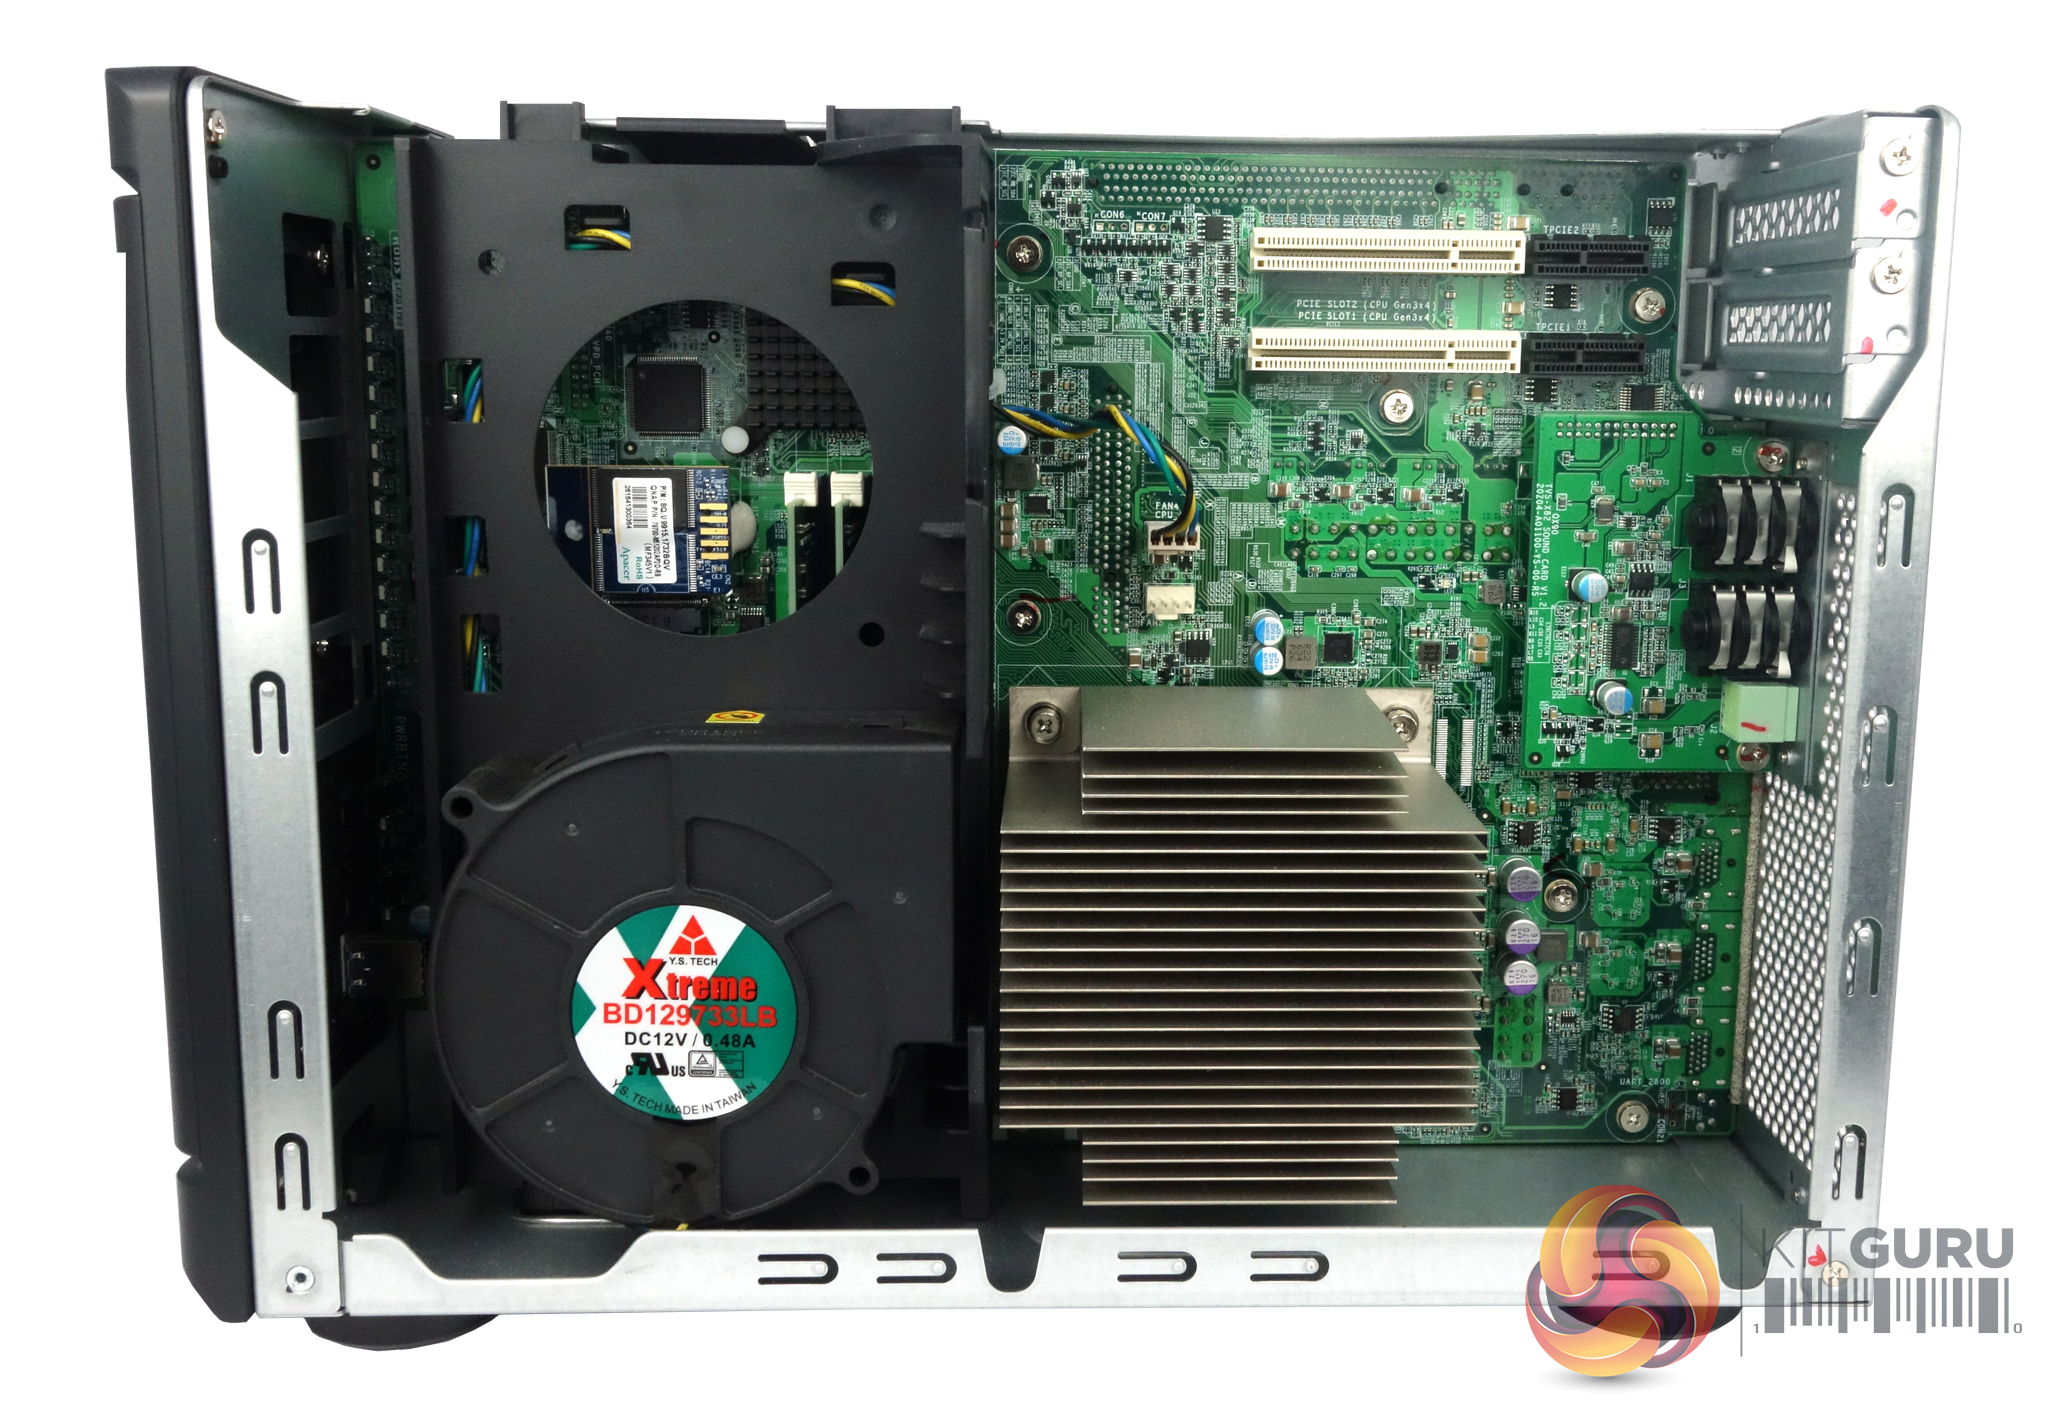
To access the pair of SATA M.2 ports and the memory DIMM slots, you have to remove the CPU cooling shroud for the YS Tech Xtreme BD129733LB 97mm fan. It's an easy job, just undo the screw in the top of the shroud and press a plastic tab to release the shroud, remembering to pull the fan power plug from the motherboard header. The BD129733LB uses 2 ball-bearings and is rated at 2,600rpm with a maximum airflow of 25.6CFM at 40dB (A).
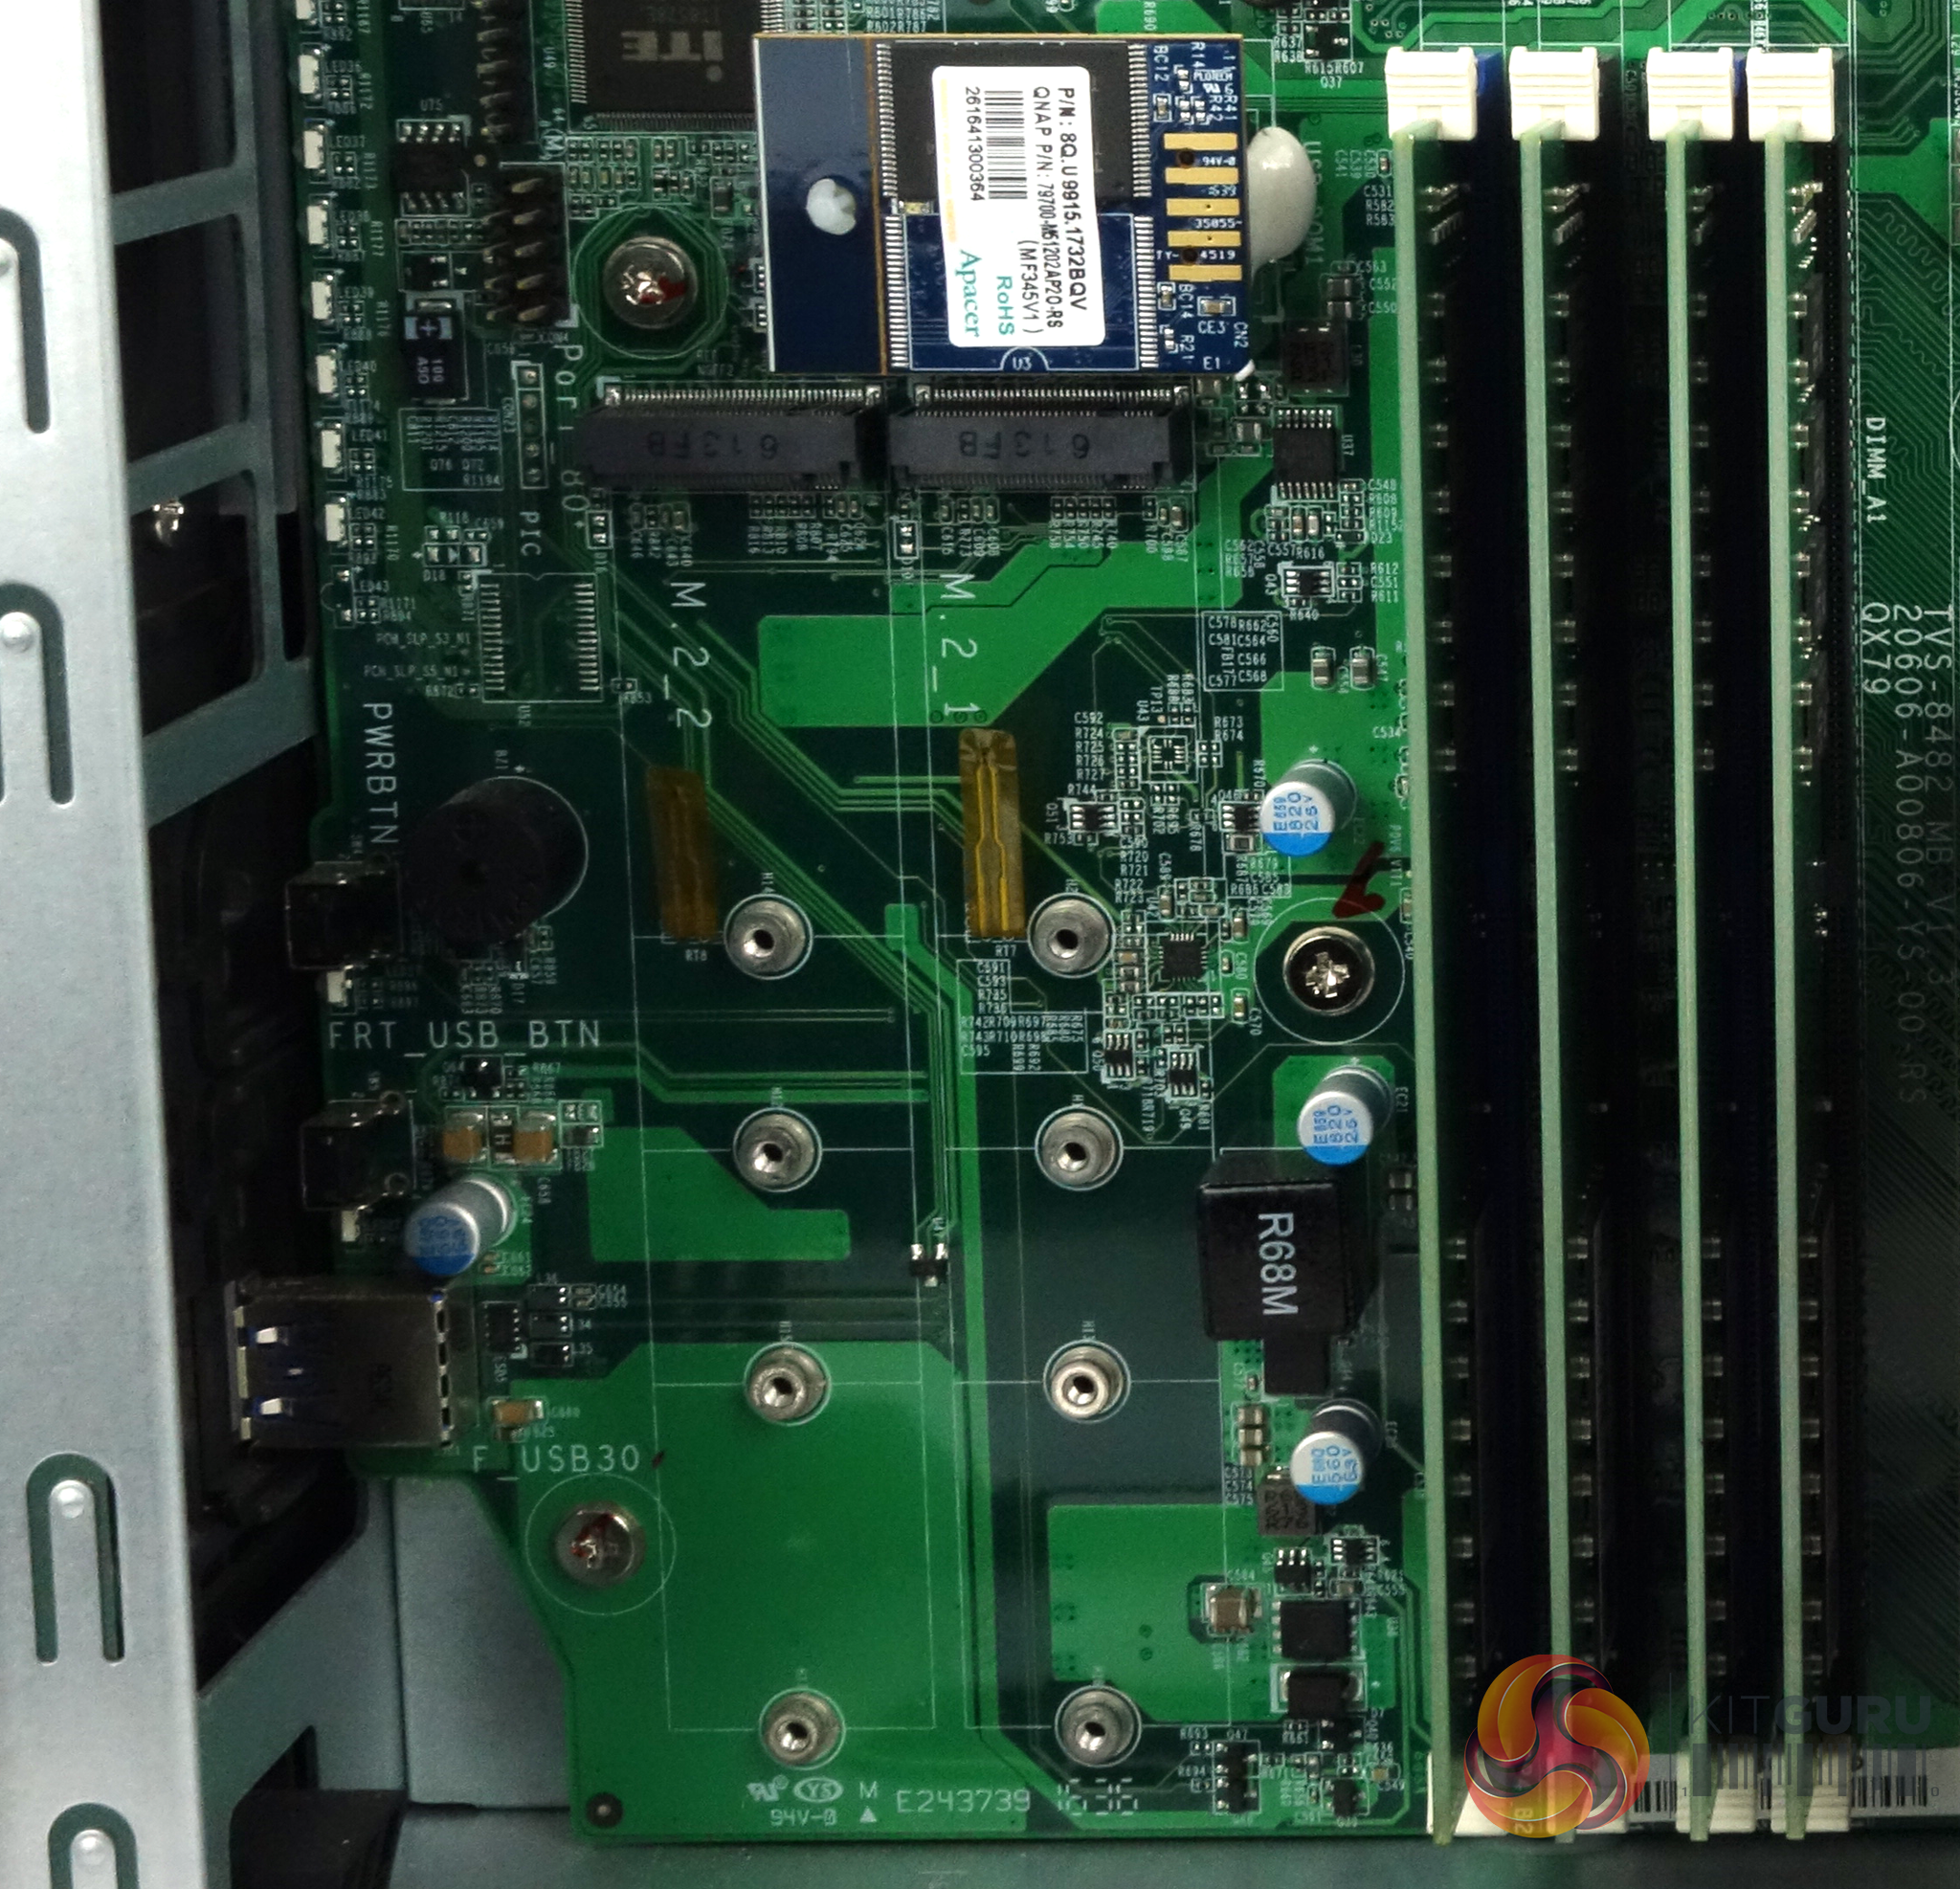
The two M.2 SATA slots are vertically mounted and support 2242, 2260, 2280, and 22110 form factor SSDs. The four memory DIMM slots support a maximum of 64GB of DDR4 memory.
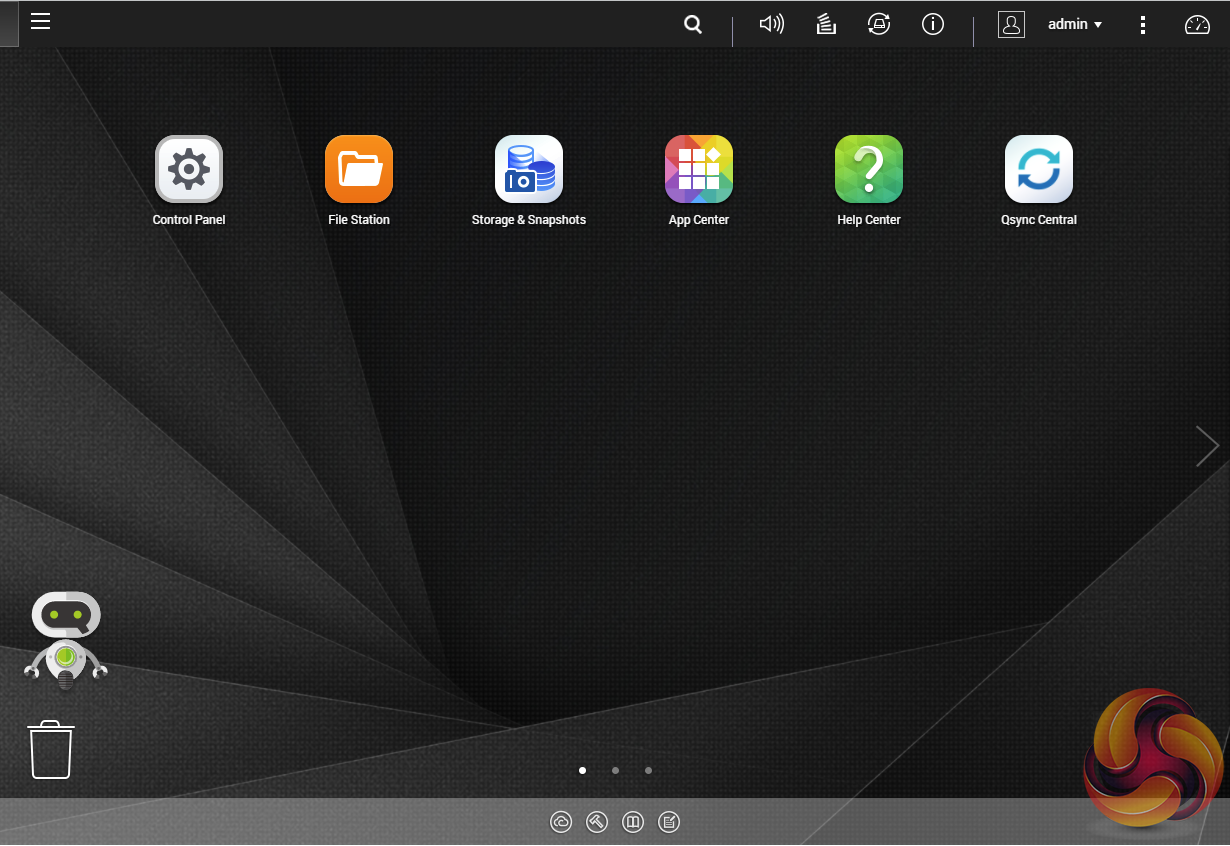
To test the TVS-1282 we used the 4.3.3 (0404) version of QNAP’s QTS OS. QNAP’s QTS is a graphically-rich powerful OS with links to the major functions appearing as icons on the main page.
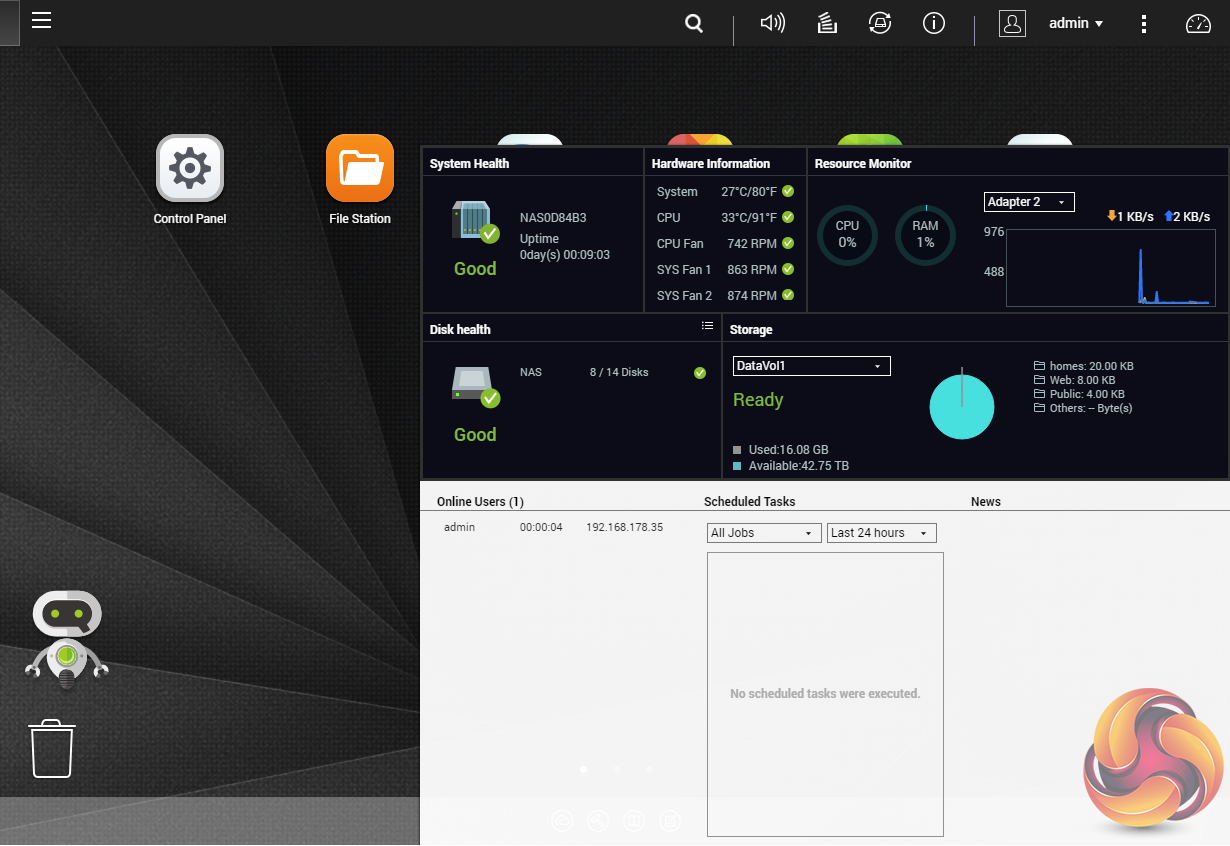
Clicking the icon on the top right of the screen activates the Dashboard page which gives a snapshot of what’s happening with the NAS.
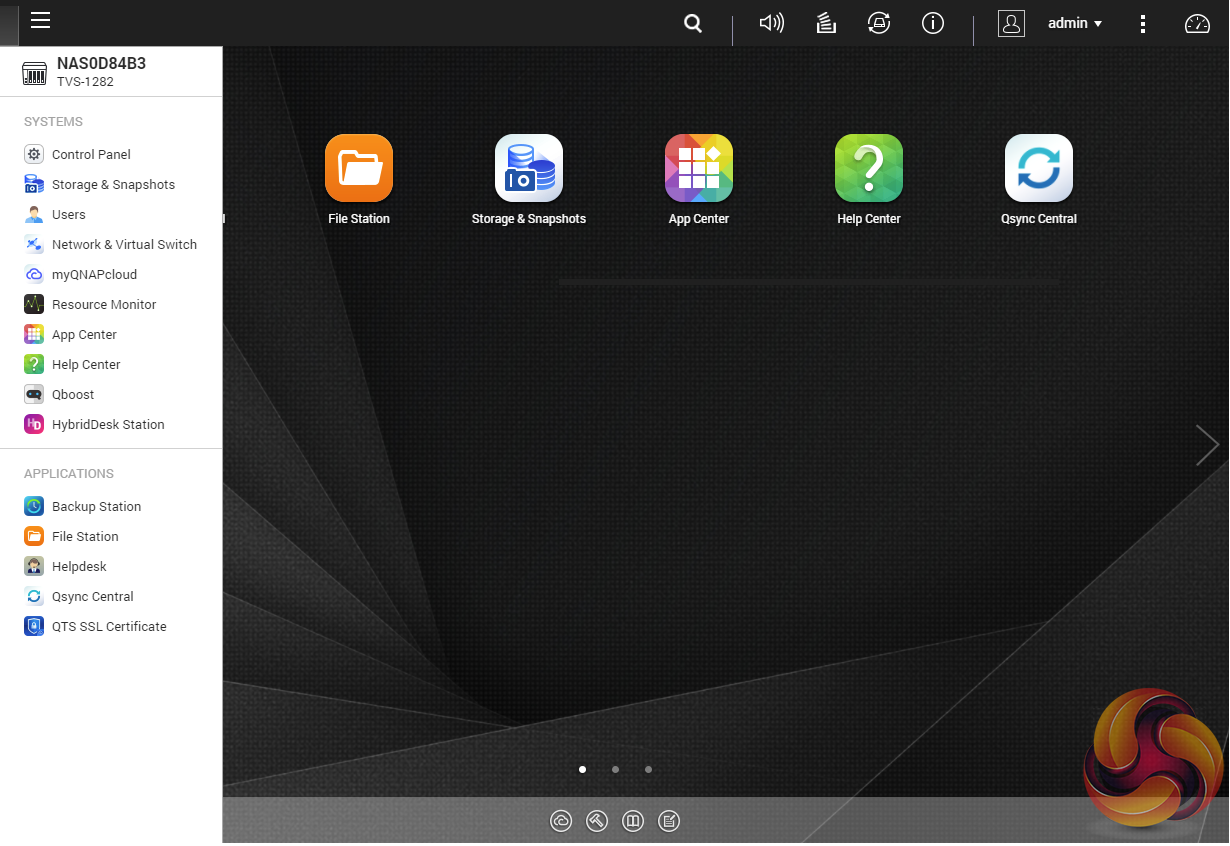
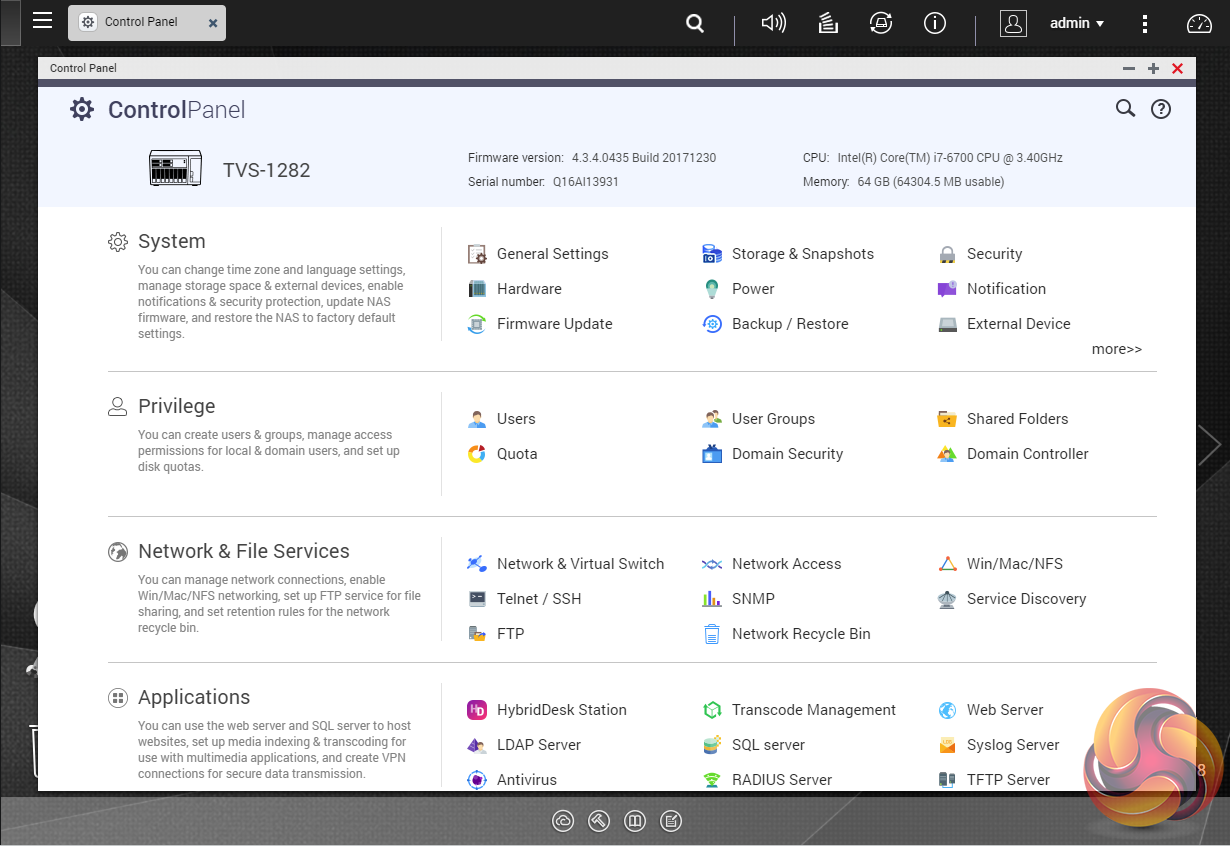
Clicking on the ‘hamburger‘ menu icon at the top left-hand side of the screen drops down a very useful side menu of the most commonly used control panel items. Clicking on the control panel icon on the main menu screen brings the complete control panel window, with all items neatly divided up into sections.
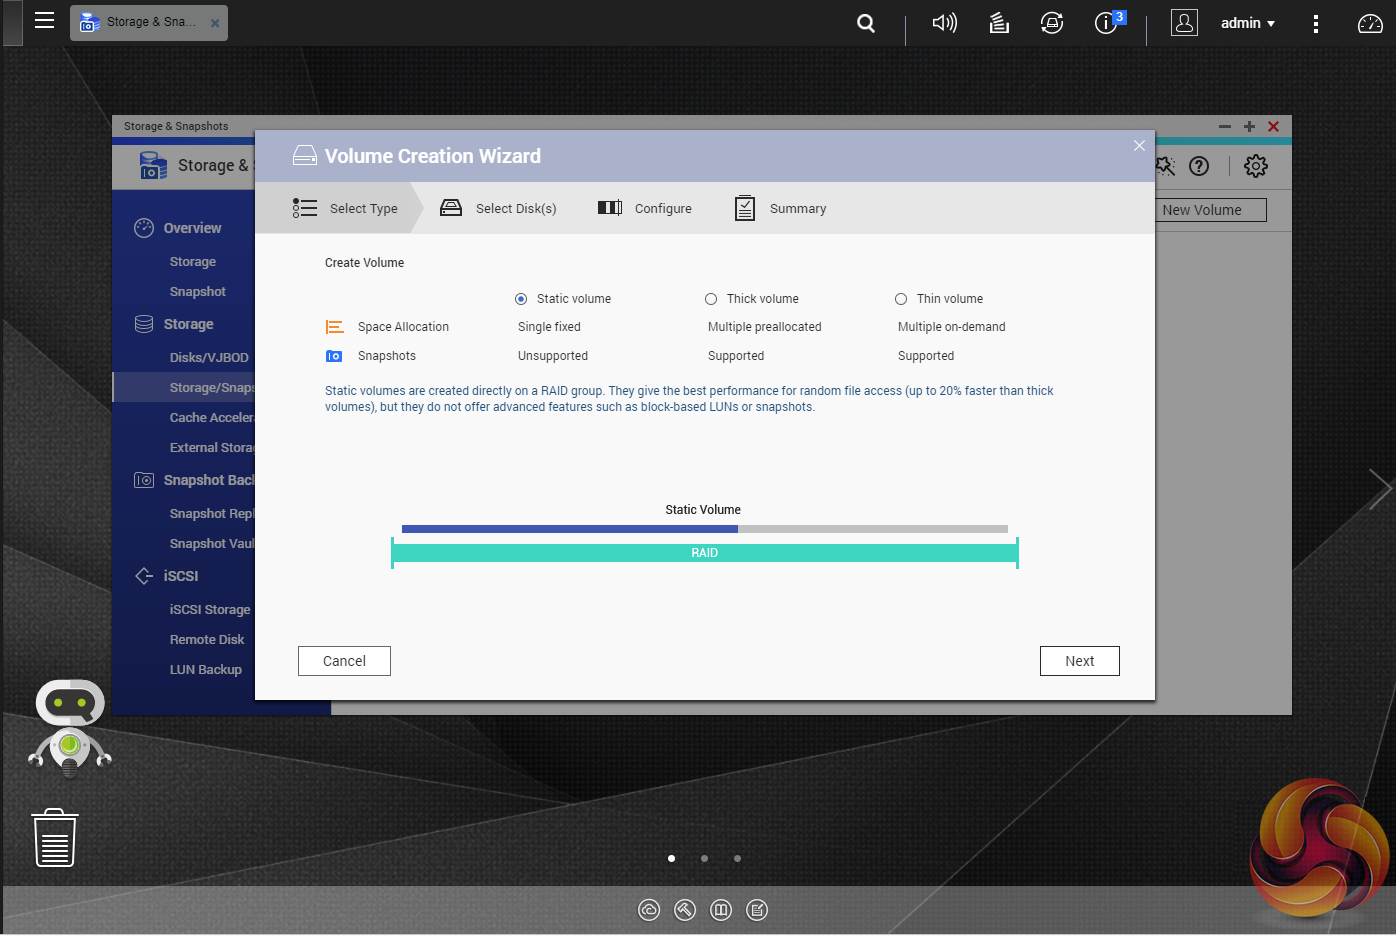
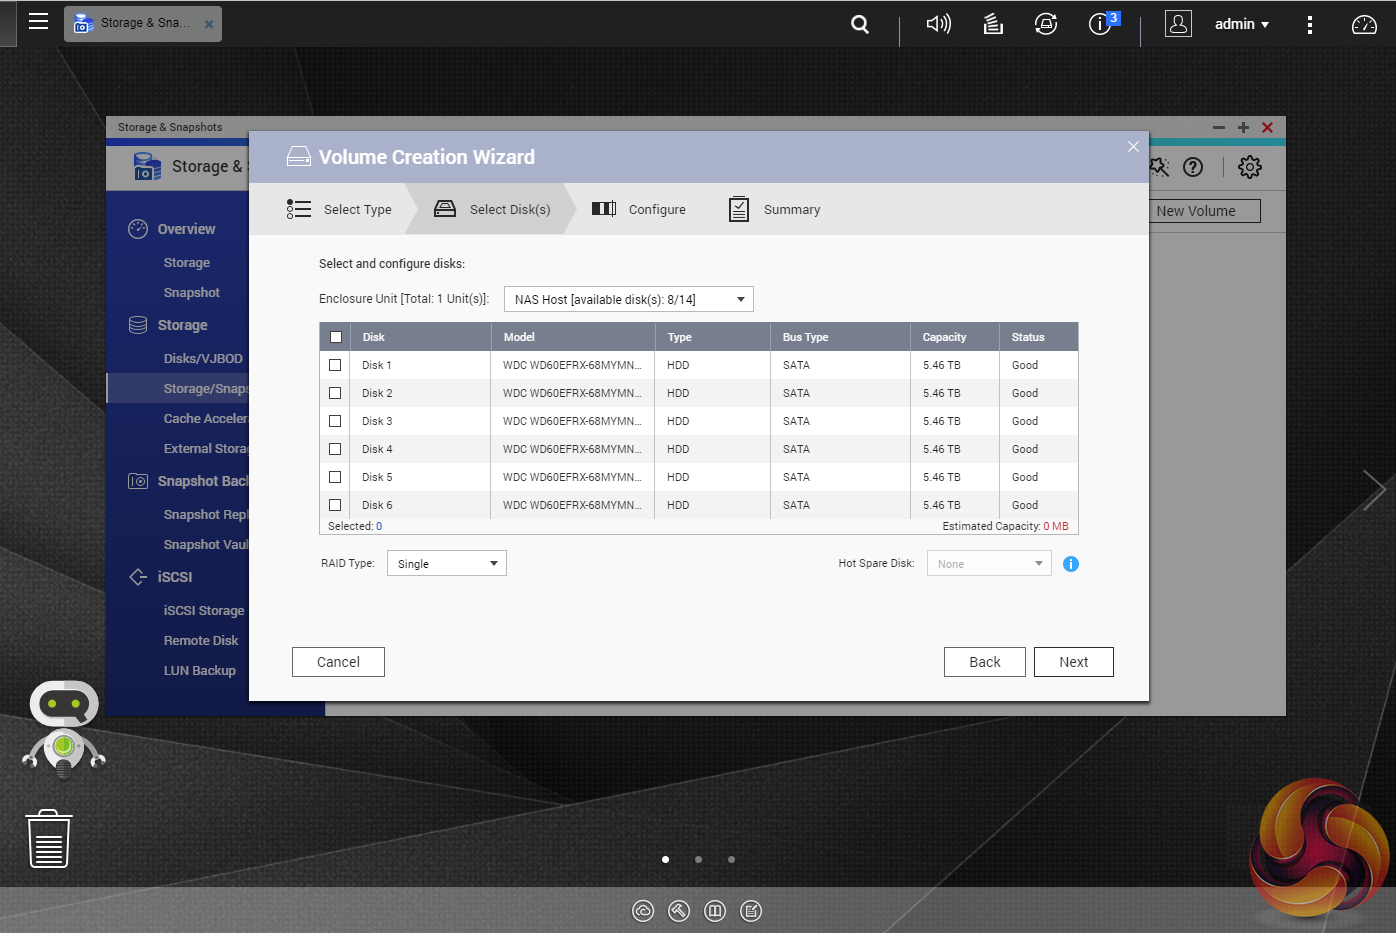
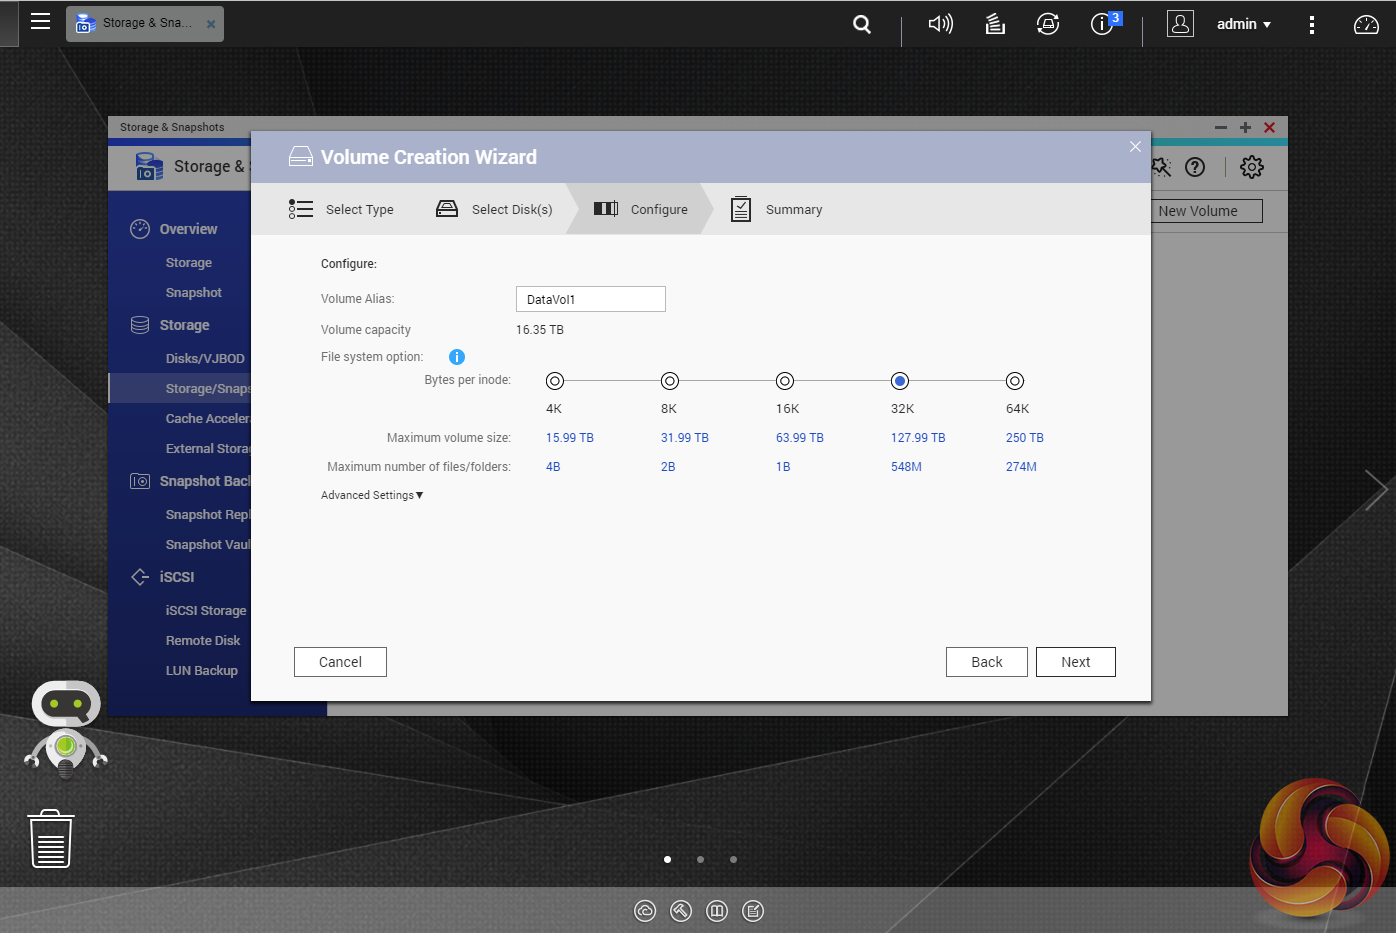
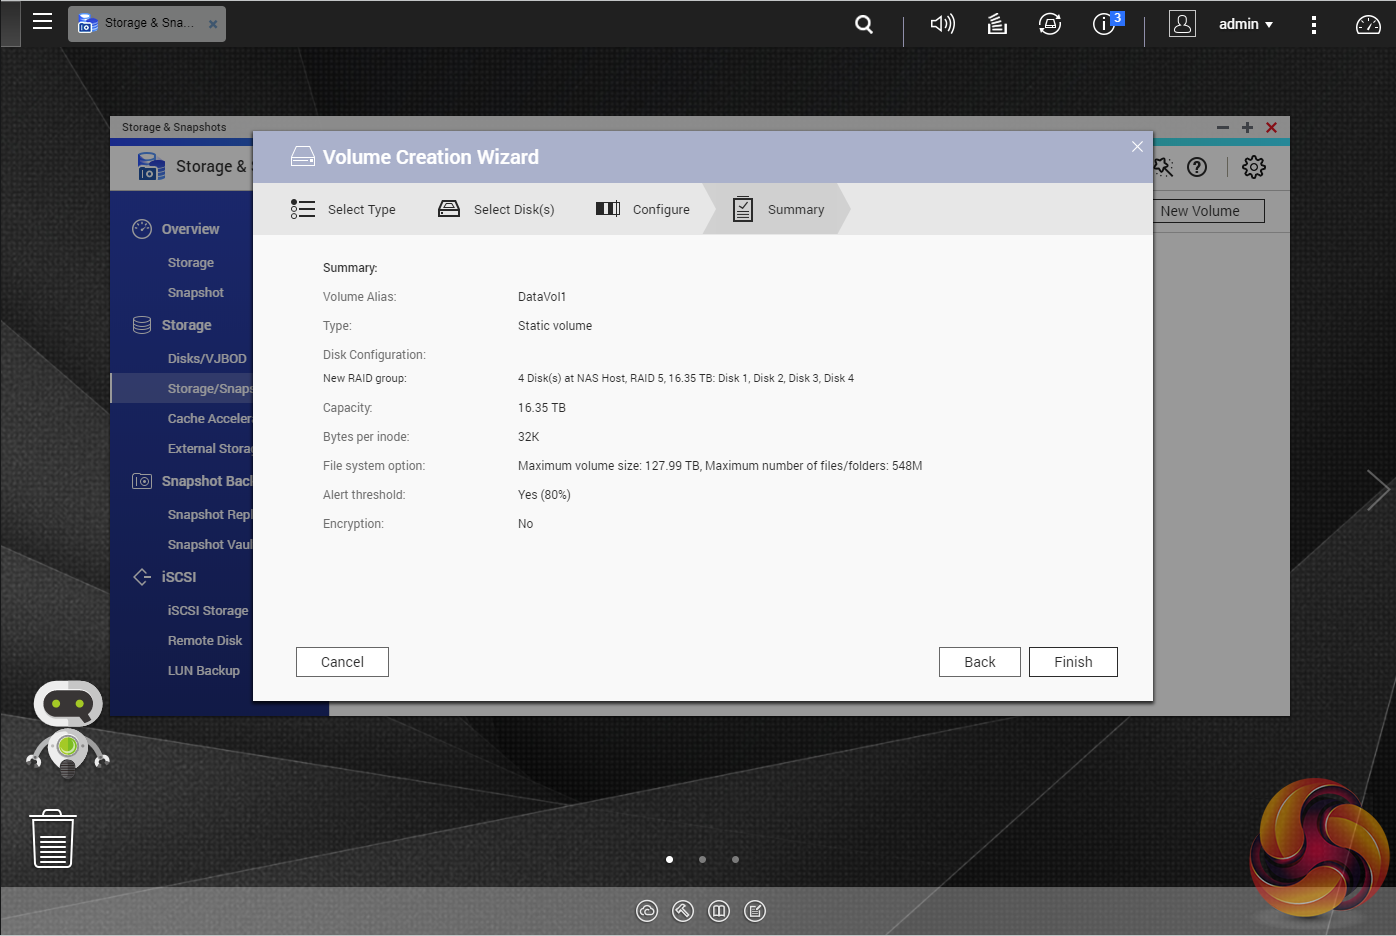
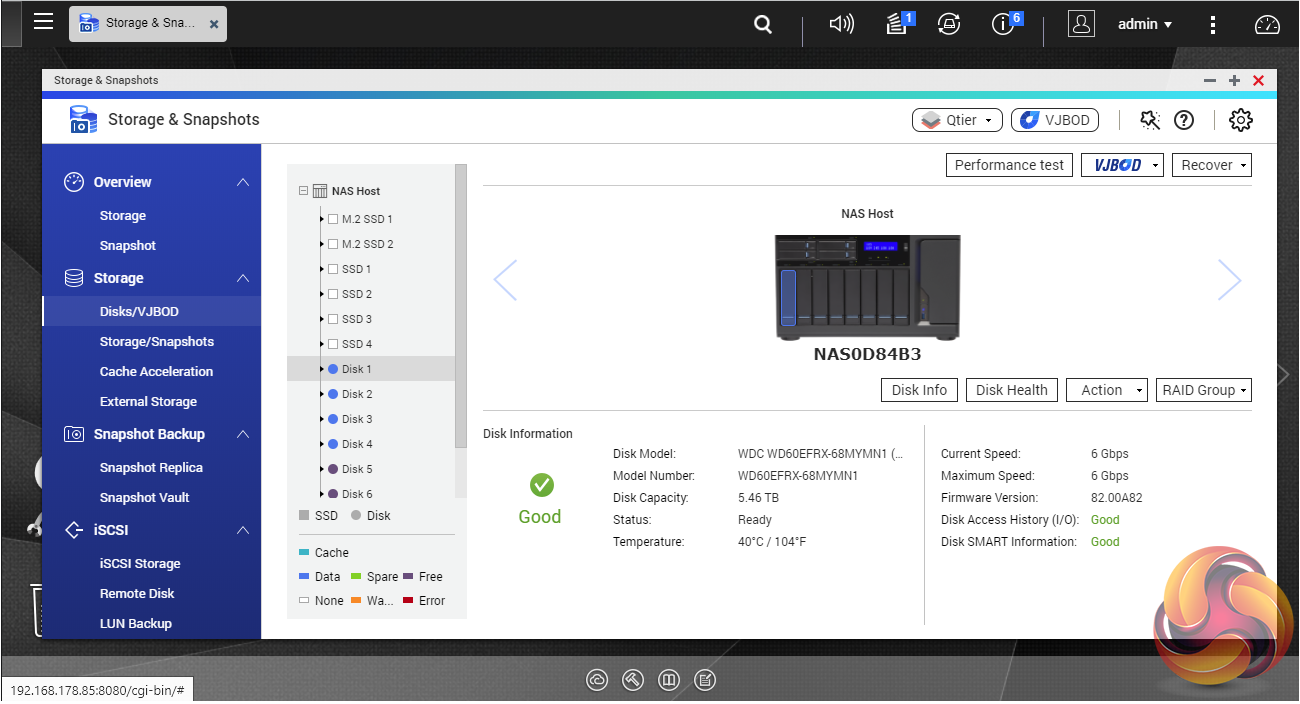
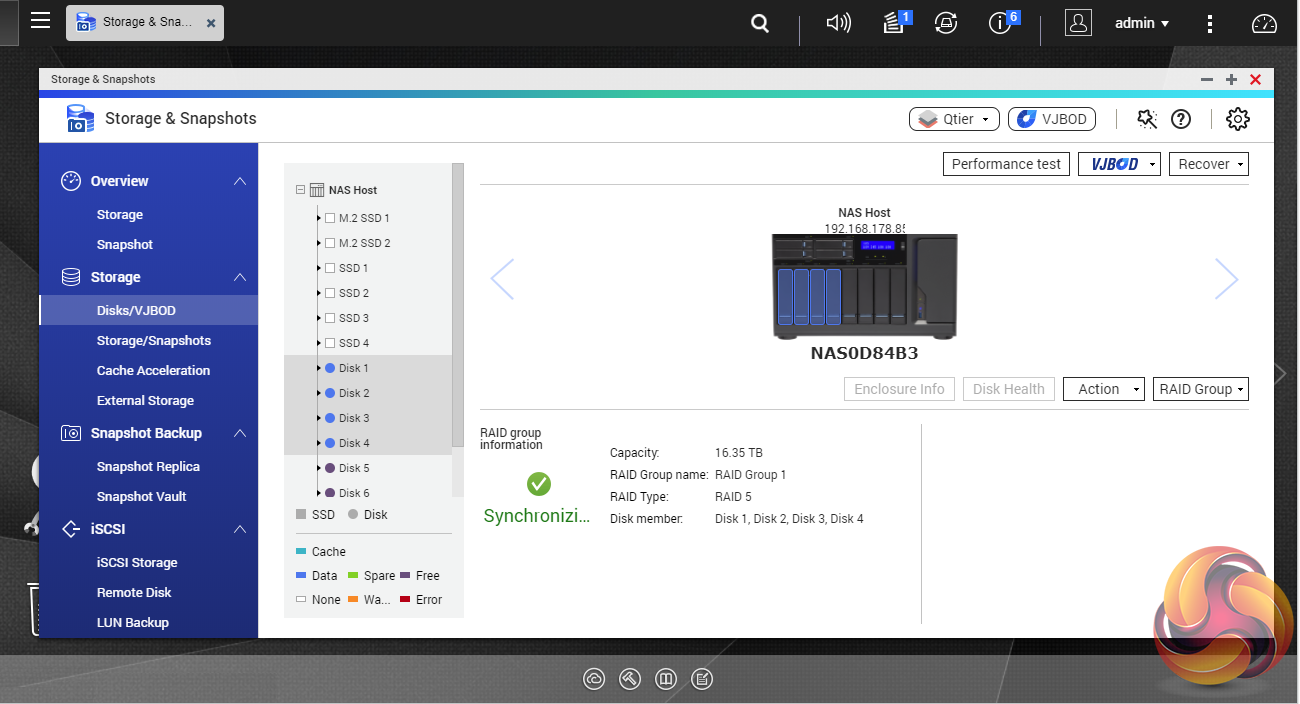
As with any NAS, disk management, RAID and volume creation are at the heart of things and with the TVS-1282 this is a complex affair as there are so many options available. But to QNAP’s credit, setting the storage space(s) up is pretty straightforward thanks to the clear and precise step by step setup pages in QTS.
Using QNAP’s powerful Qtier technology you can set up SSD caching and auto-tiering so storage can be optimised according to how it's being stored and used. Qtier 2.0 analyses I/O read and writes of any storage pools to determine the best course of action; the most active “hot” data is moved to faster performing drives, while the less active “cold” data is migrated to slower but higher capacity drives.
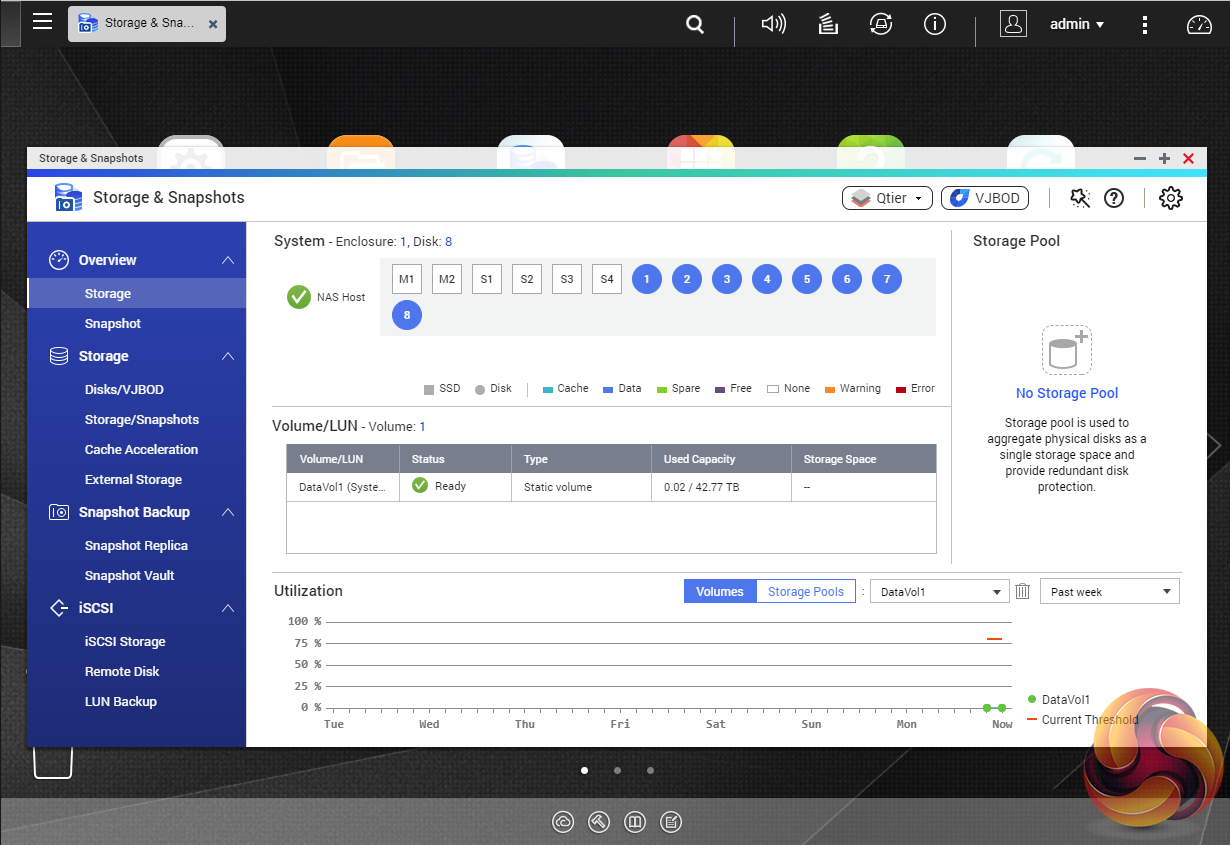
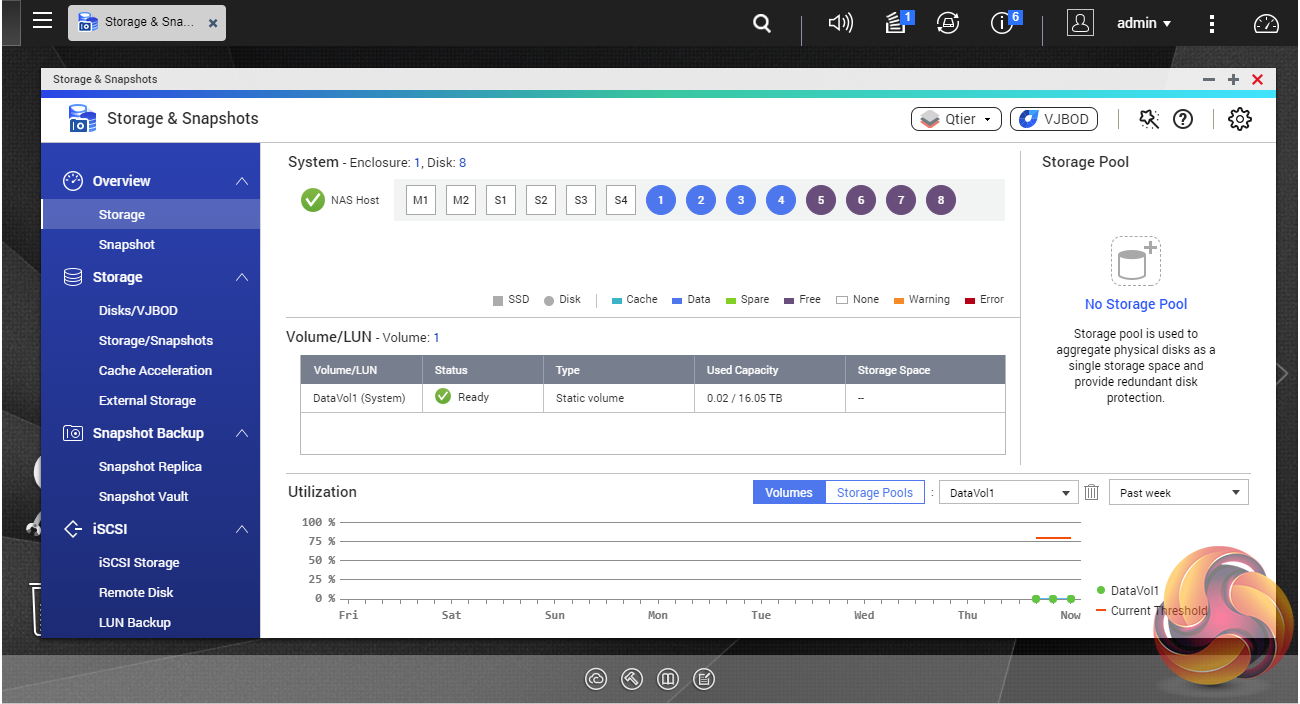
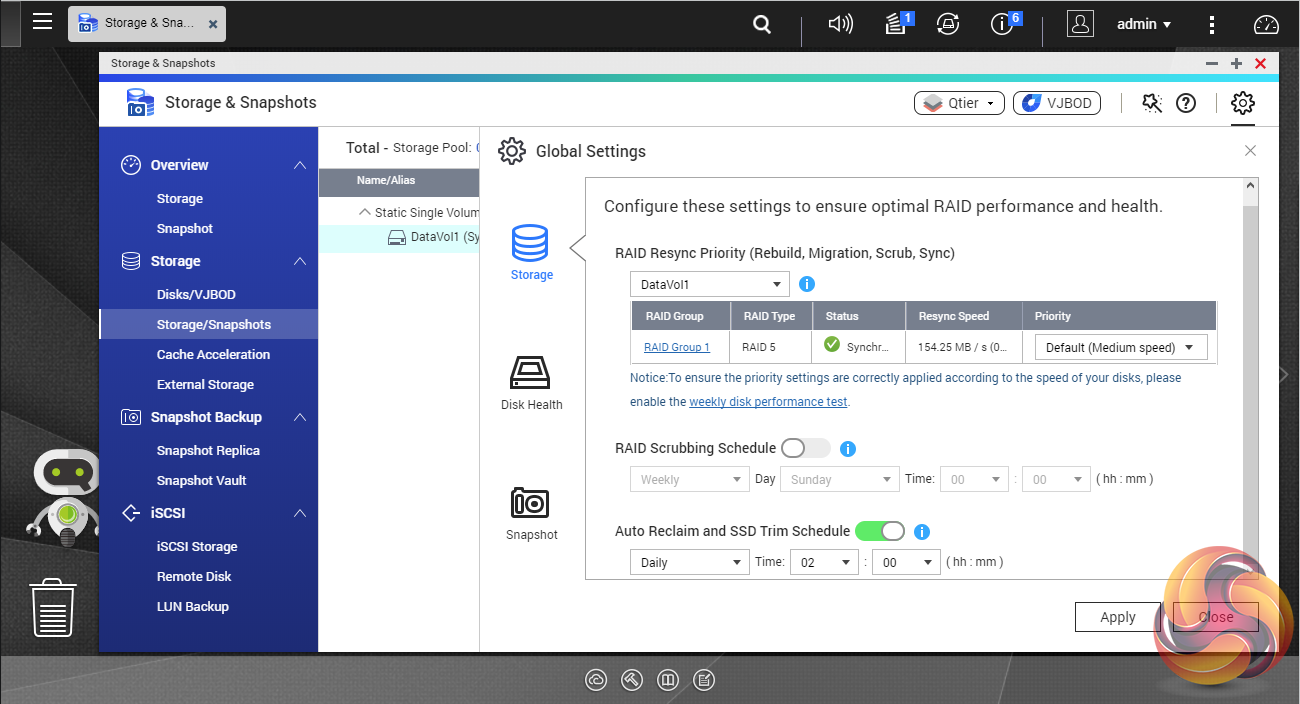
Storage & Snapshots Manager allows the status of all volumes and storage pools to be shown at a glance in a very clear, well laid out manner. Global settings for disks, storage and snapshots can all be adjusted from within the management window.
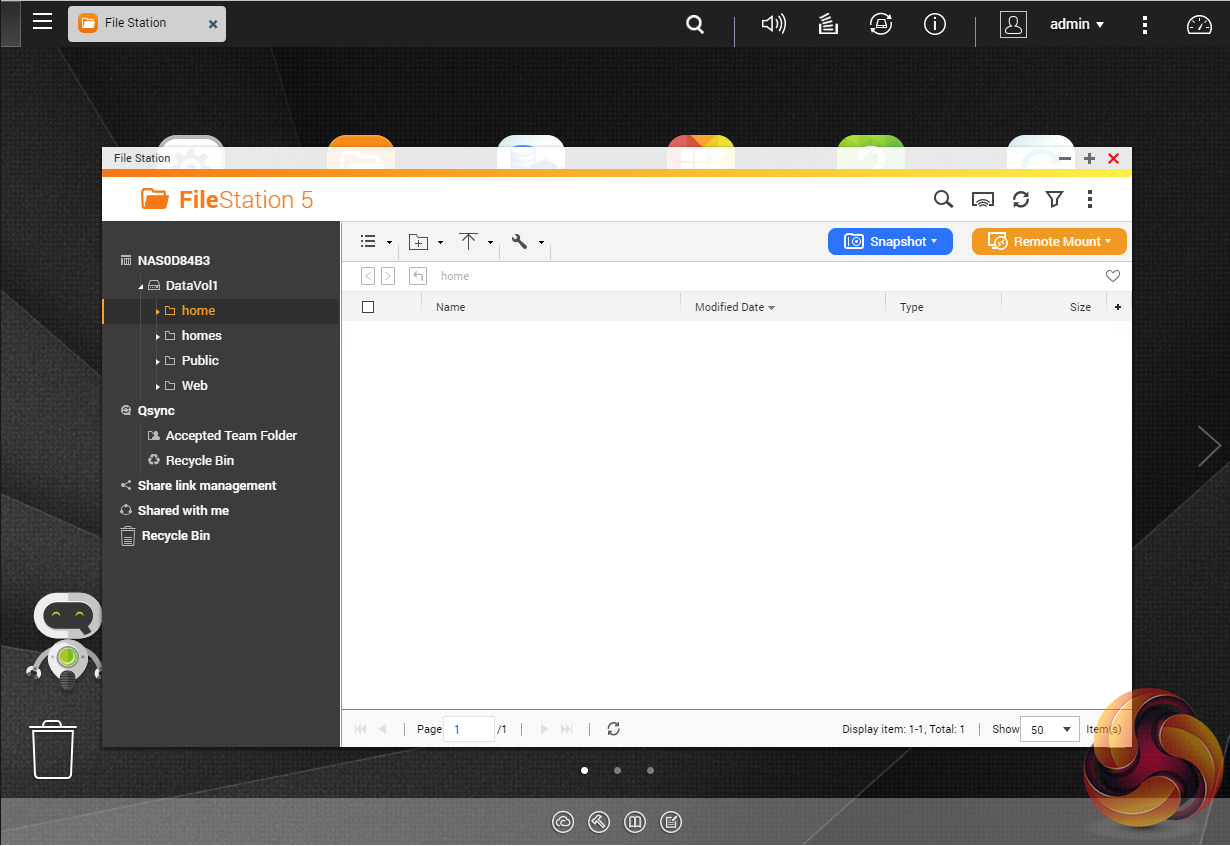
File Station is a complete file management system. It supports browsing and transfer of files from the NAS to public cloud services including Dropbox, Box, Google Drive, Microsoft OneDrive and OneDrive for Business, Yandex Disk, Amazon Drive and HiDrive. It also allows the mounting of shared folders from a remote NAS to a local one via FTP and CIFS/SMB.
Qfiling makes the job of archiving and organising large numbers of files much easier by allowing the setting of various filing conditions and schedules to enable automatic filing jobs.
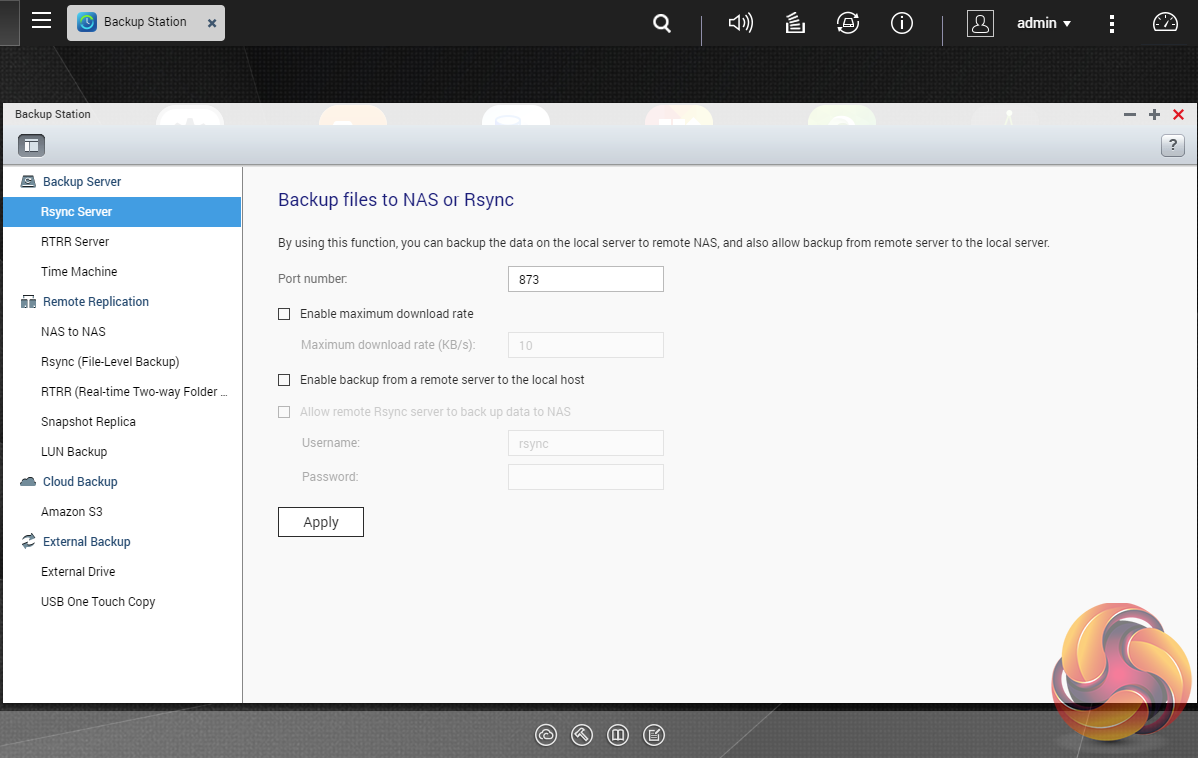
Backup Station allows backing up of data with a wide range of options, including backup servers, cloud storage, and external devices. The One Touch button on the front bezel can be set up to either upload or download files/folders or backup the NAS to an external USB drive. In the Backup Station pages in the QTS you can set up exactly what you want the One Touch system to do.
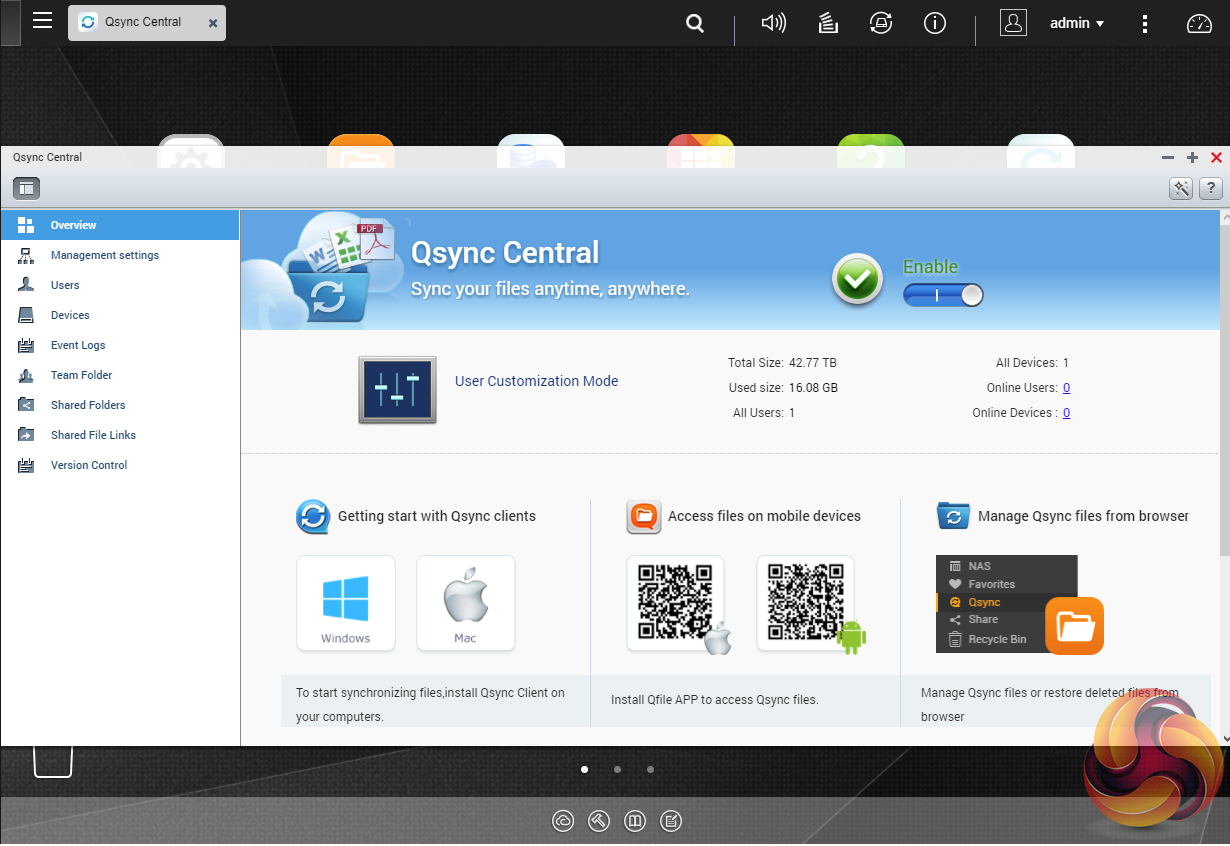
To access files from anywhere there is Qsync Central. Files added to the Qsync folder are available to the local NAS and all devices that are connected to it, including mobile ones.
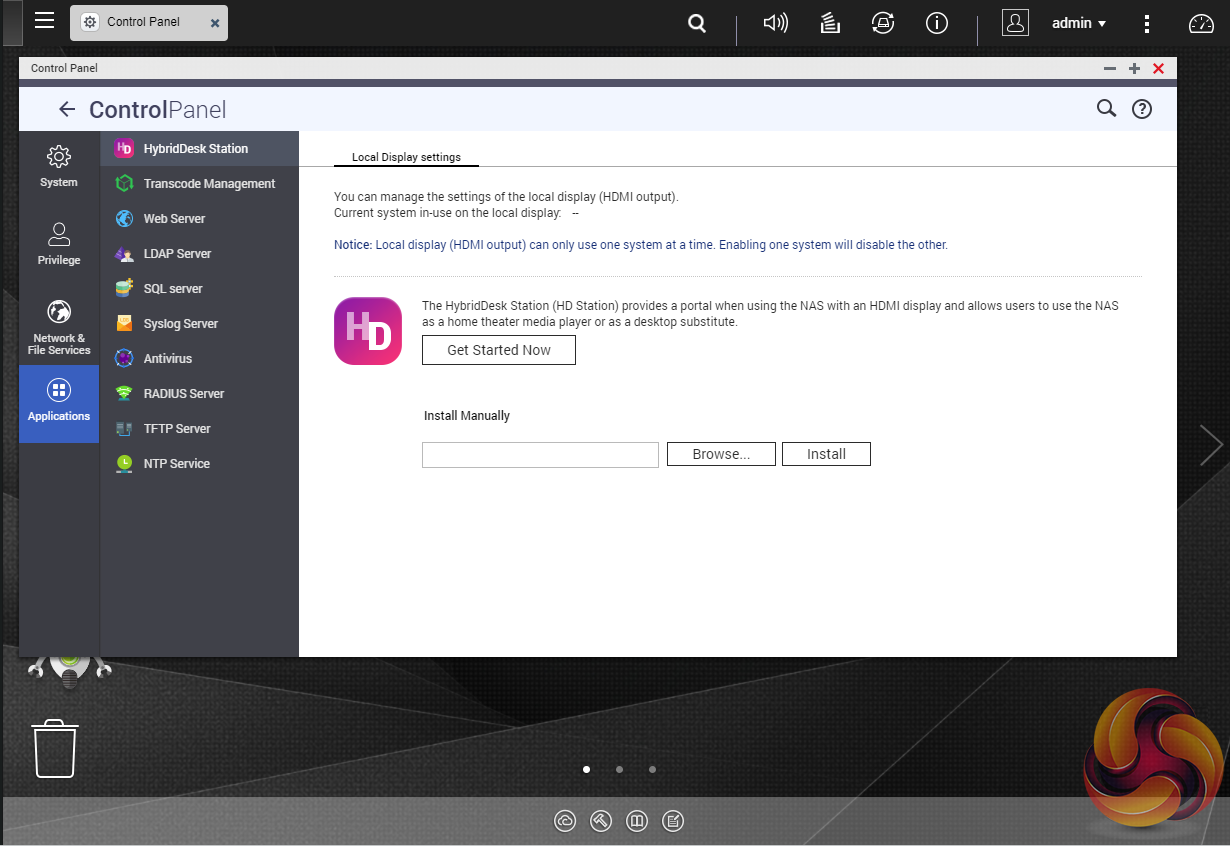
By installing HD Station and then connecting a USB keyboard and mouse together with an HDMI equipped display, the TVS-1282 can be used as a 4K output HTPC with the bonus of not needing a PC to use it. If you don’t have a keyboard or mouse, no problem, by using the bundled Qremote App you can control it with a mobile device.
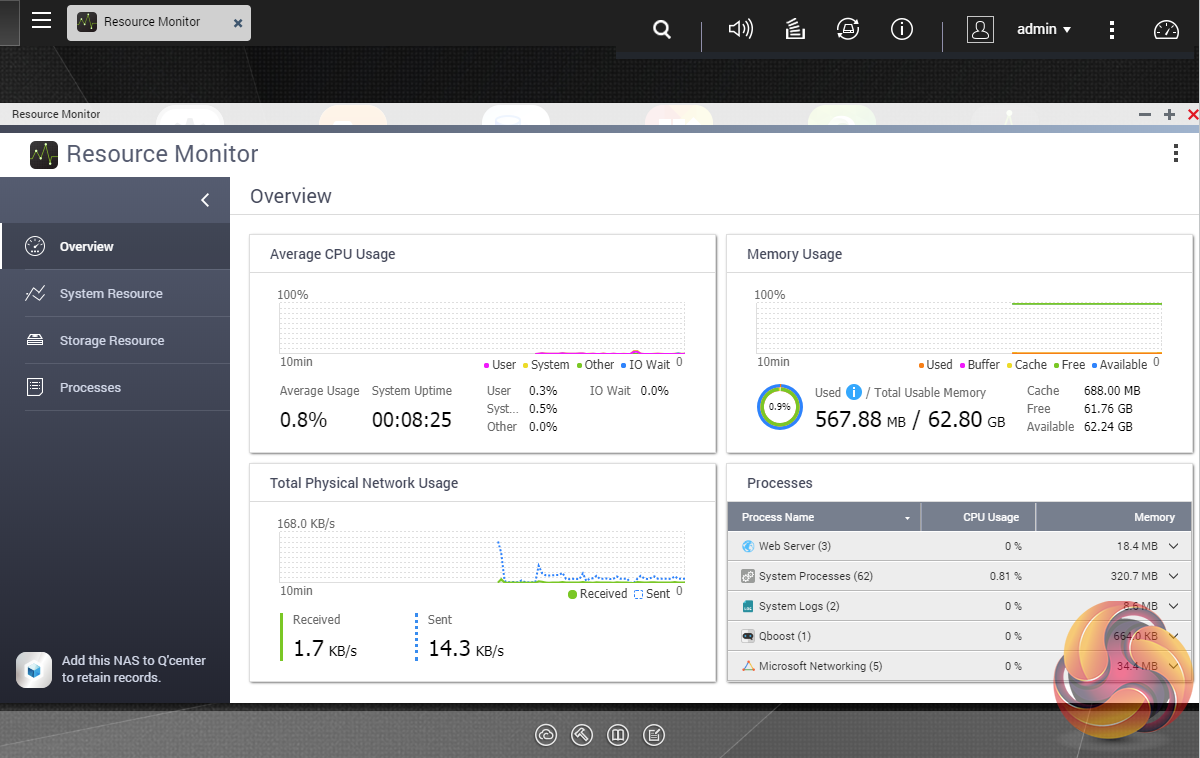
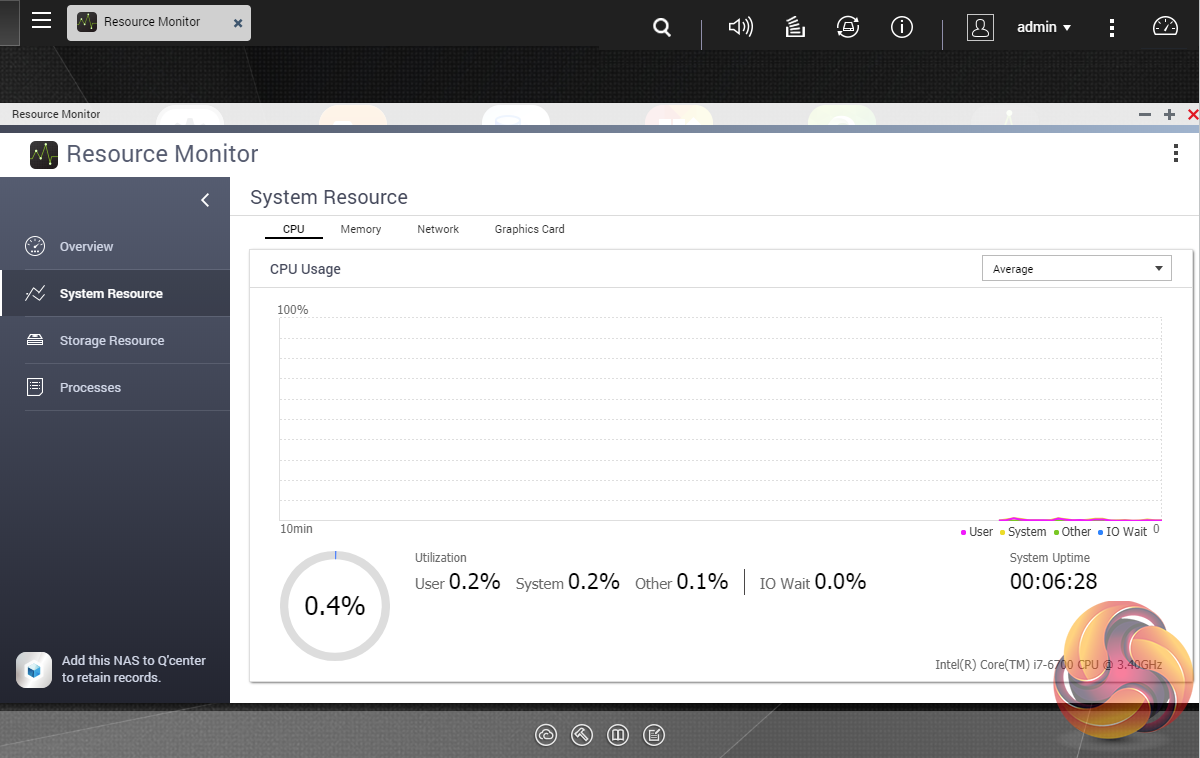

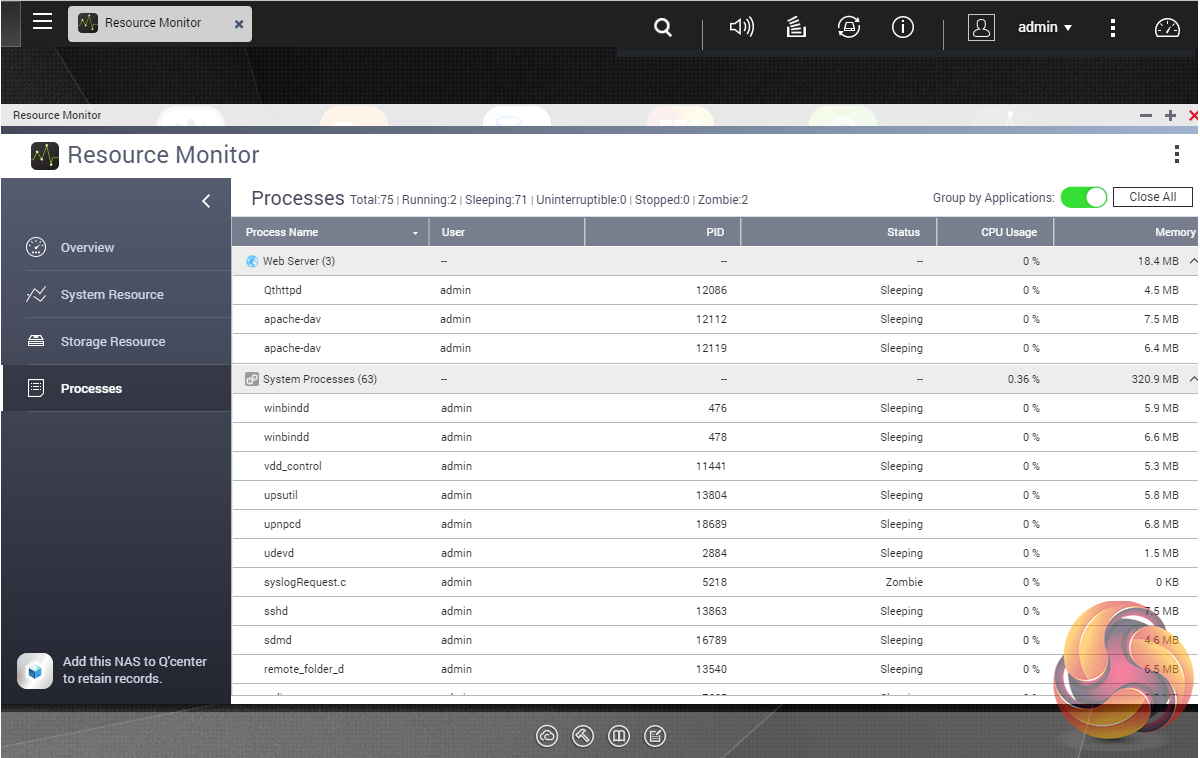
The Resource Monitor is a very useful tool, monitoring elements and offering detailed information on how the storage of the NAS is being used.
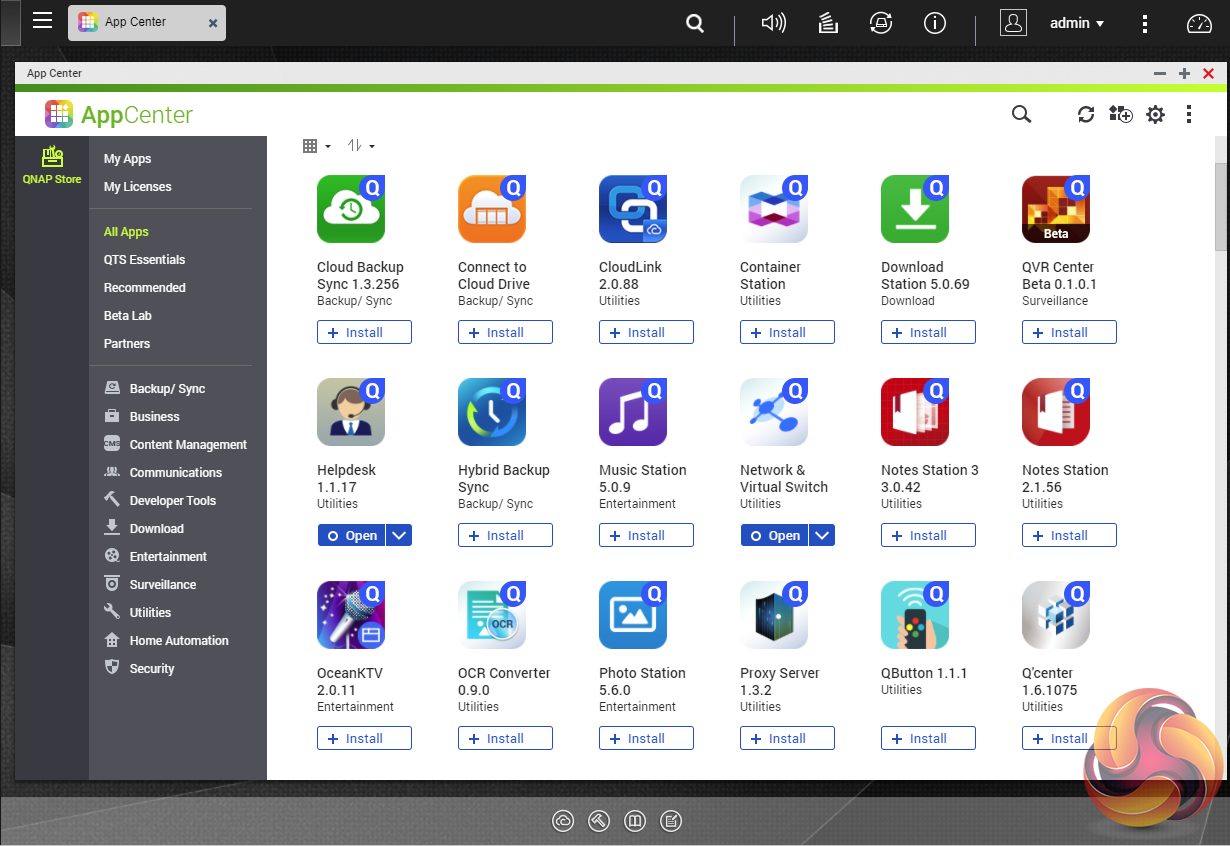
App Center has over 160 apps to choose from covering everything from backups to home automation and pretty much everything in between.
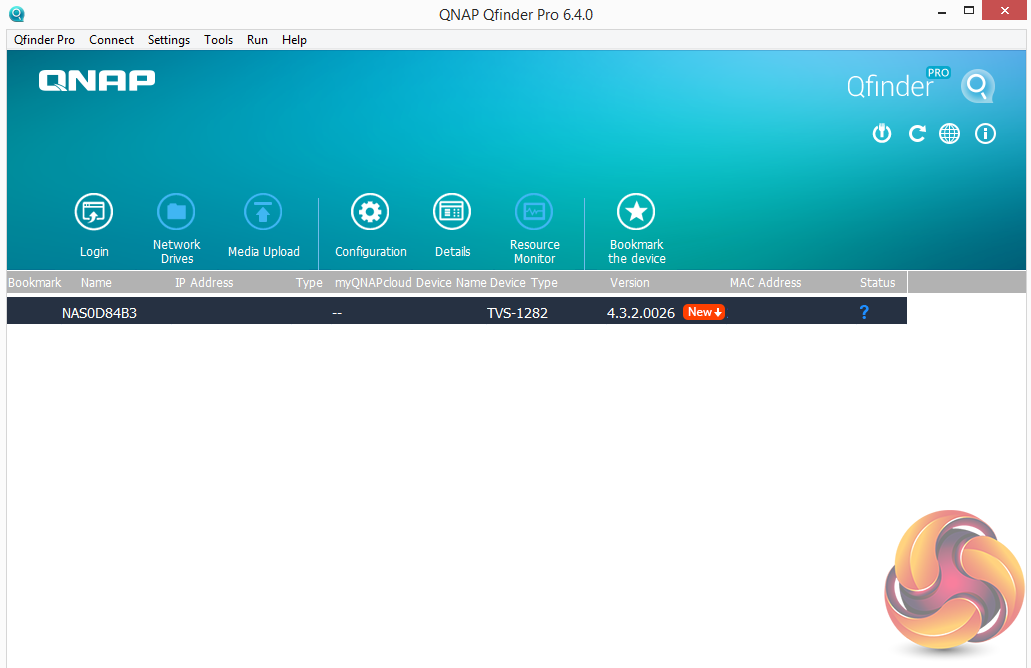
There are two ways of setting up the TVS-1282 – either online by entering the Cloud key which is a sticker on the top of the unit, or by using QNAP’s Qfinder Pro utility which can be downloaded from the QNAP website. Qfinder Pro searches for QNAP devices on the network.
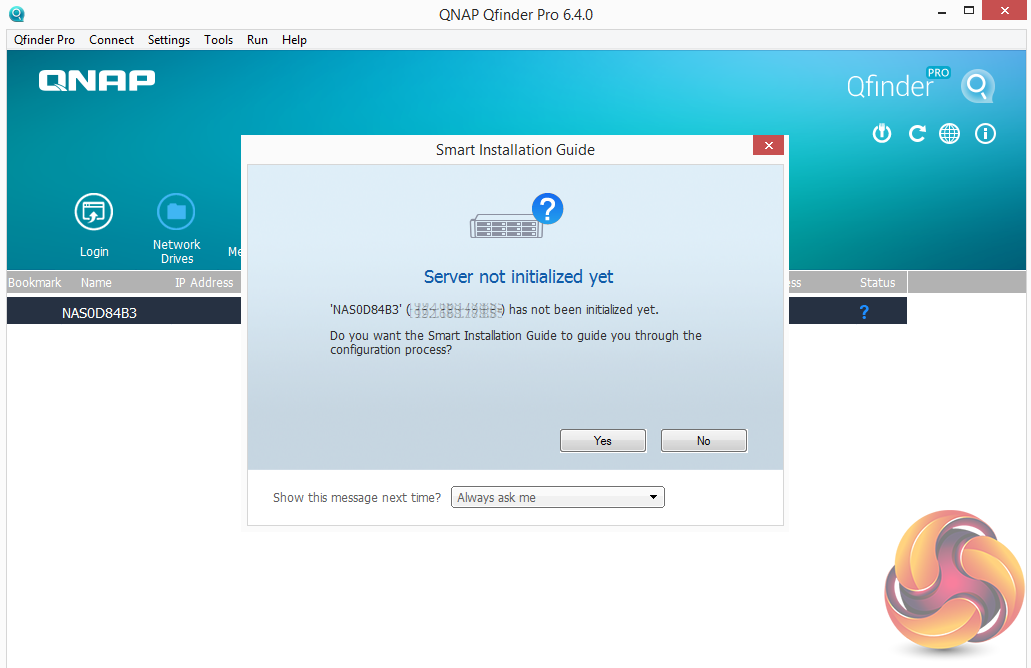
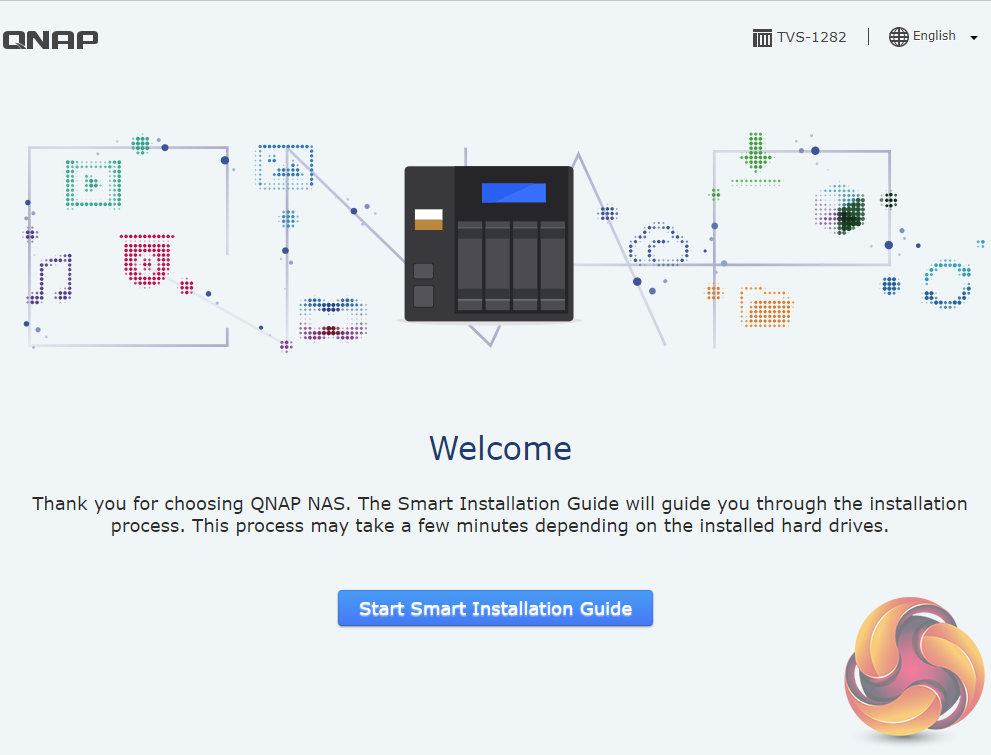
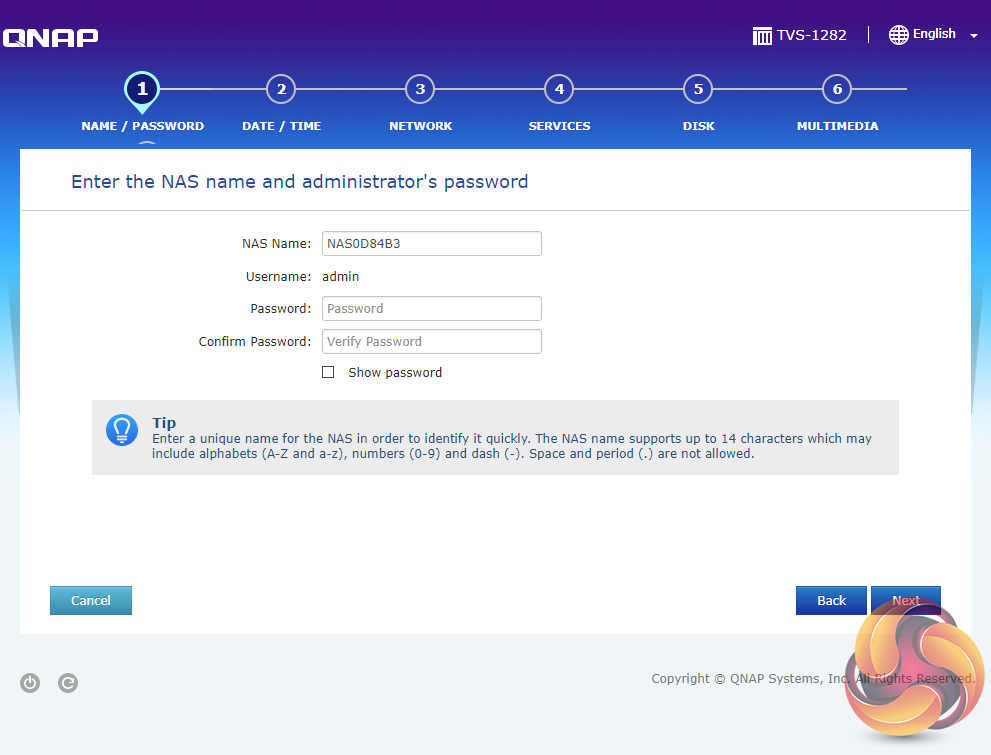

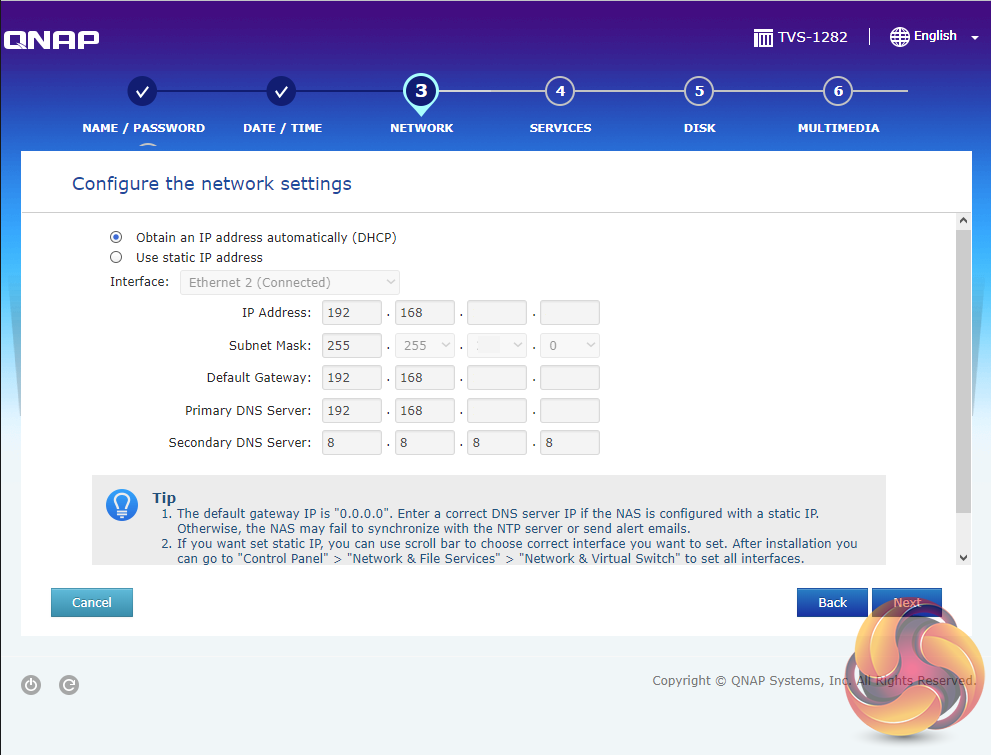

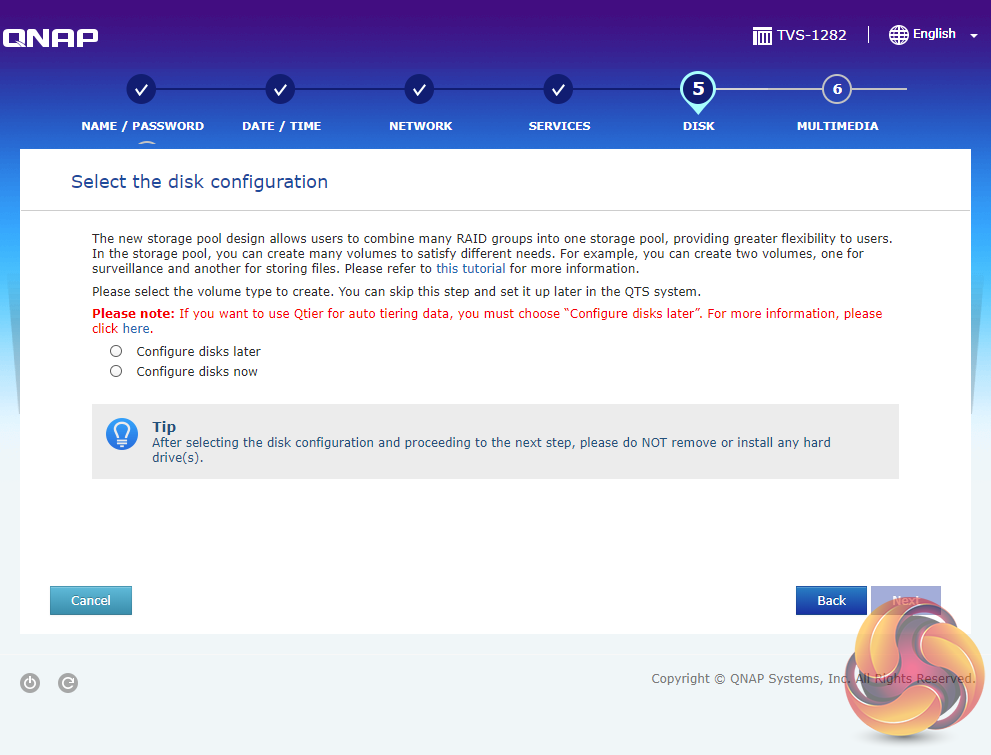

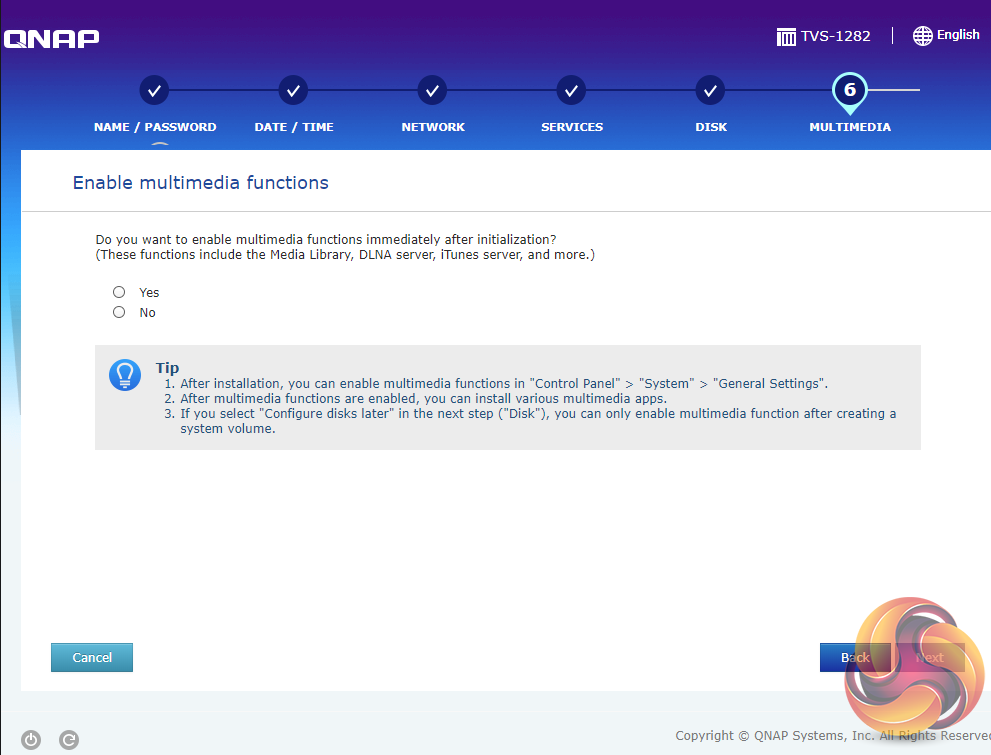
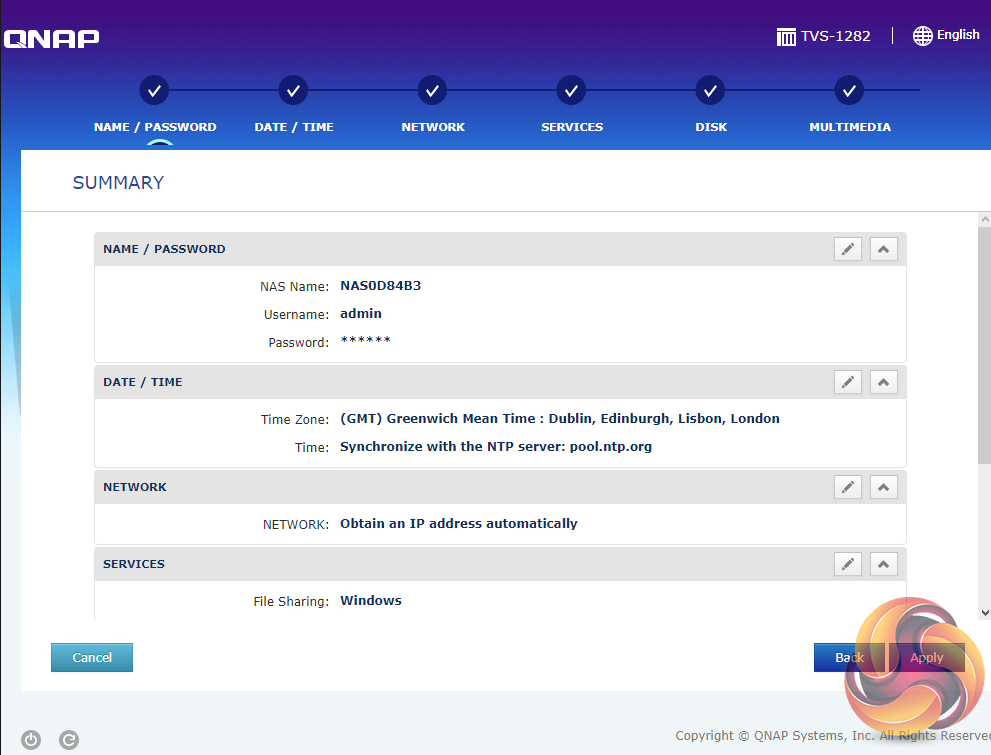
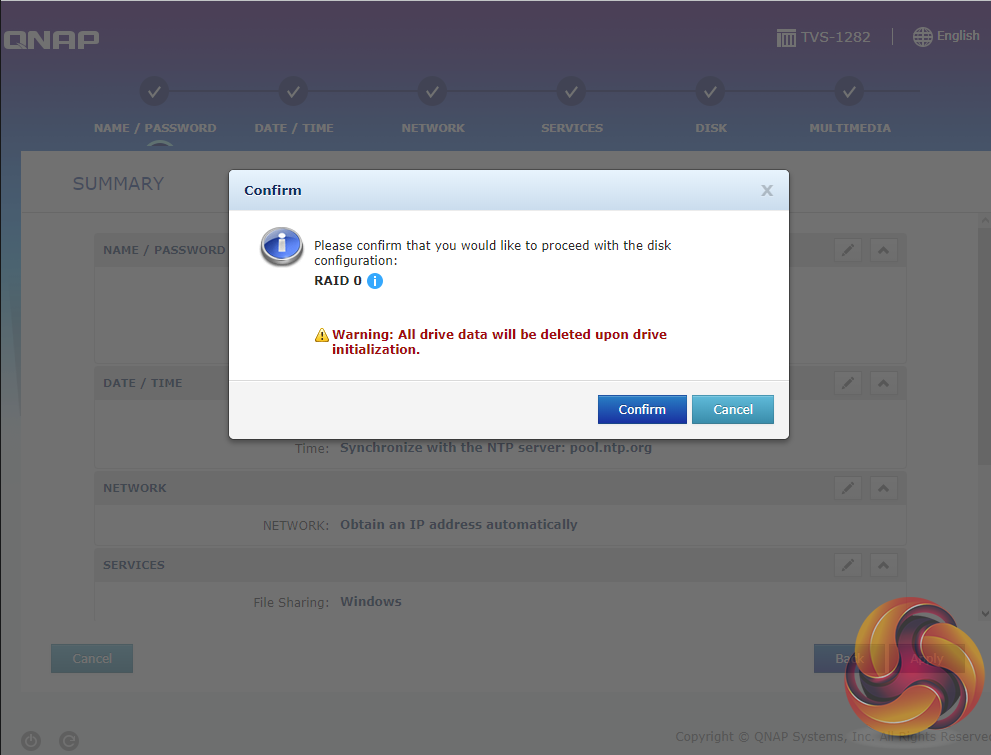
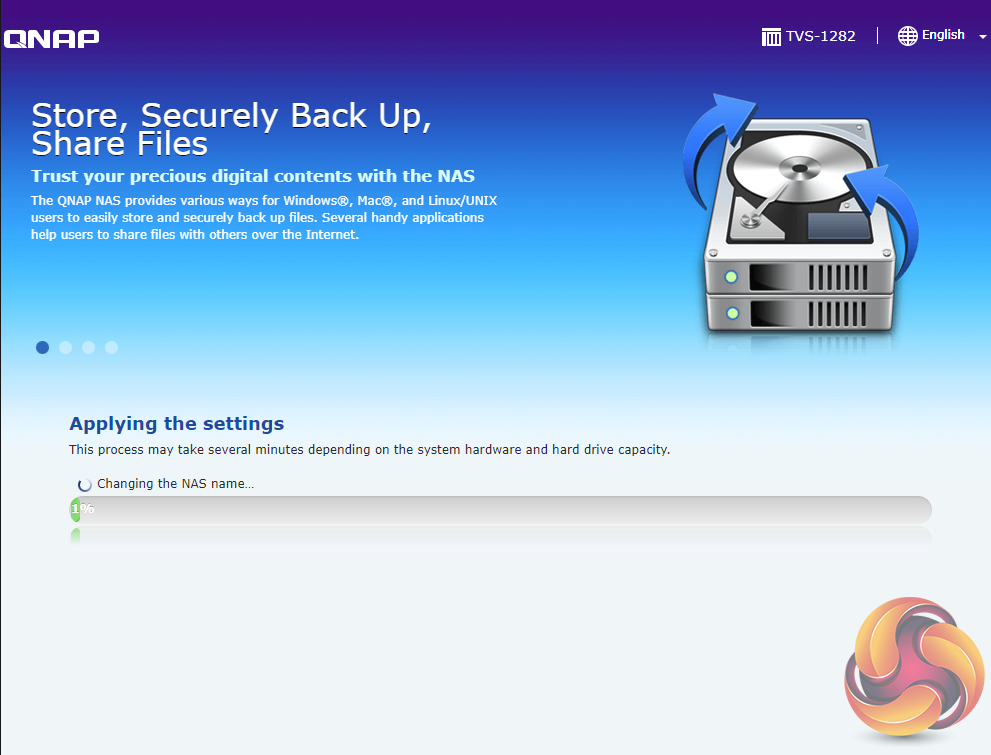
Whichever way you choose to start, it’s just a simple matter of following the installation wizard. During the setup you can enable which OS cross-platform file management service you require; Windows (SMB/CIFS, File Station, FTP), Mac (SMB/CIFS, File Station, FTP) and Linux (NFS, SMB/CIFS, File Station, FTP). At this stage you can also load a few basic apps; Photo Station, Music Station, iTunes Server, DLNA Media Server and Download Station.
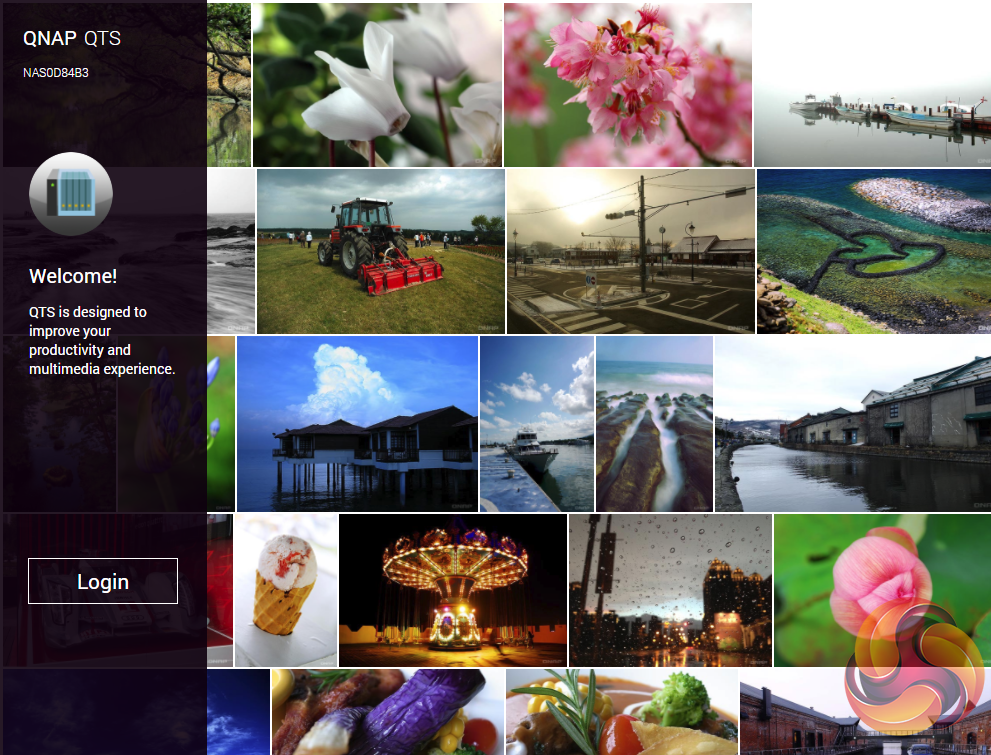
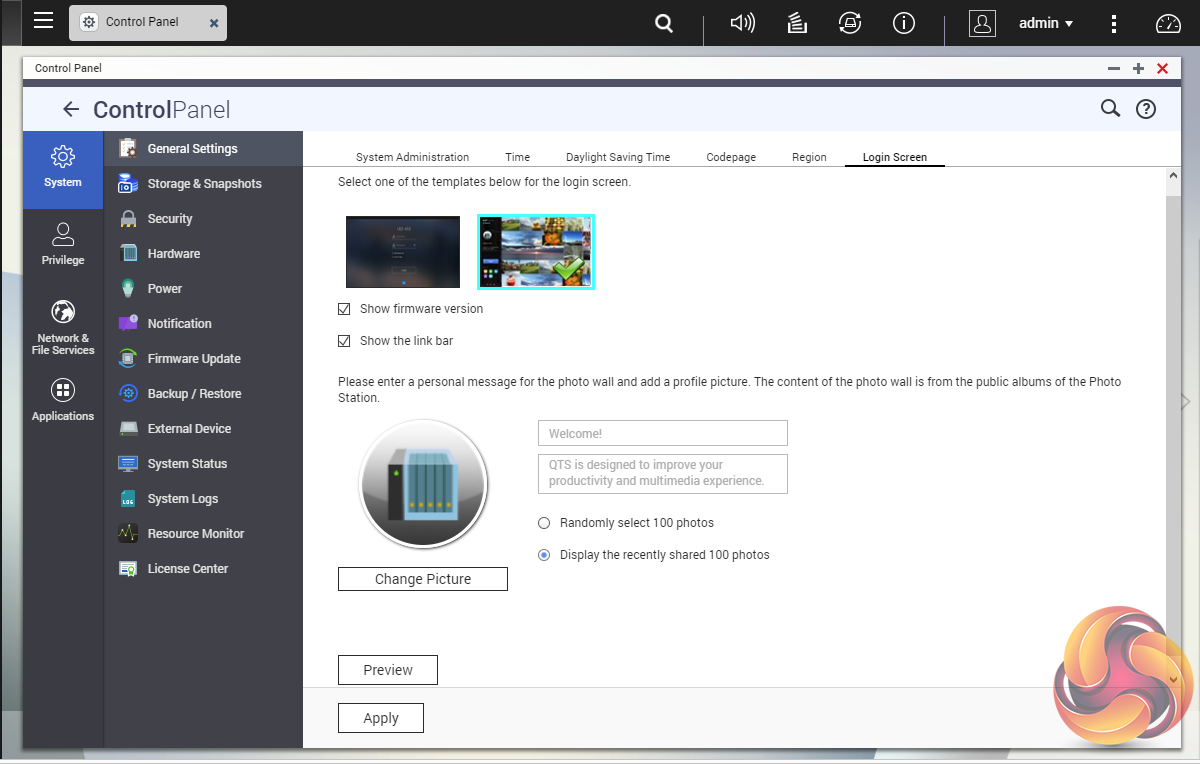
Once the TVS-1282 has finished setting up, you can then get access to the log in screen. The login page can be customised to add your own photographs or corporate logo to the photo wall and messages can be added to the page as well.
To test the TVS-1282 we used eight 6TB Red drives (WD60EFRX, 5,400rpm class, 64MB cache), built into RAID 0, 5, 6, 10, 50 and 60 arrays and then tested with a 1GbE connection. The tests were then repeated using a 10GbE connection.
We also used 4 960GB Samsung 845DC EVO SSDs in the four 2.5in drive bays which were built into RAID 0,5,6 and 10 and tested as normal storage areas, not as cache, again with both 1GbE and 10GbE connections. Although the 845DC EVO isn't on QNAP's compatibility list for the TVS-1282 we were able to build them into RAID arrays without any problems.
For 10GbE testing, QNAP kindly supplied us with a QM2-2P10G1T card to install in the TS-877 while in the test rig we used an ASUS XG-C100C 10GbE card. To connect the two we used a Cat7 cable.
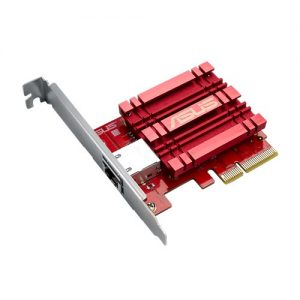
Thanks to Asus for their support with this. You can see more information on this card on the ASUS site, over HERE.
QM2-2P10G1T
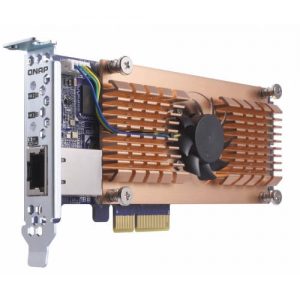
The QM2 family of add-in cards support either SATA or PCIe M.2 SSDs and/or 10GbE networking. The QM2-2P10G1T provides two M.2 2280 PCIe Gen 2 x2 slots as well as a single 10GbE port.
Thanks to QNAP for their support for this. You can see more information on this card on the QNAP site, over HERE.
Software:
Atto Disk Benchmark.
CrystalMark 3.0.3.
IOMeter.
Intel NASPT.
The ATTO Disk Benchmark performance measurement tool is compatible with Microsoft Windows. Measure your storage systems performance with various transfer sizes and test lengths for reads and writes. Several options are available to customize your performance measurement including queue depth, overlapped I/O and even a comparison mode with the option to run continuously.
Use ATTO Disk Benchmark to test any manufacturers RAID controllers, storage controllers, host adapters, hard drives and SSD drives and notice that ATTO products will consistently provide the highest level of performance to your storage.
HDD Testing
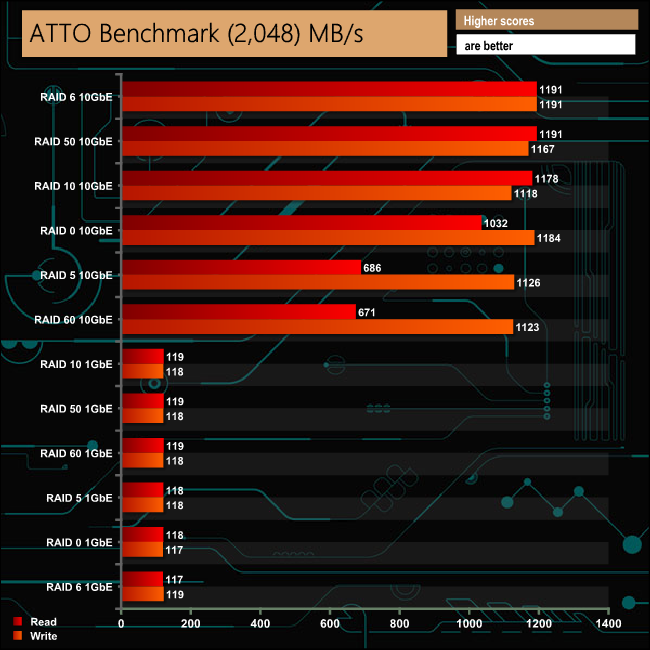
With a single 1GbE connection the TVS-1282 shows excellent consistency across all the arrays tested when using the WD Red drives, with read/write scores at the limit of the connection speed. With a 10GbE connection there is a huge jump in the read/write performance as you might expect, with good consistency in write performance. Read performance, however, does drop off noticeably in RAIDs 5 and 60.
SSD Testing
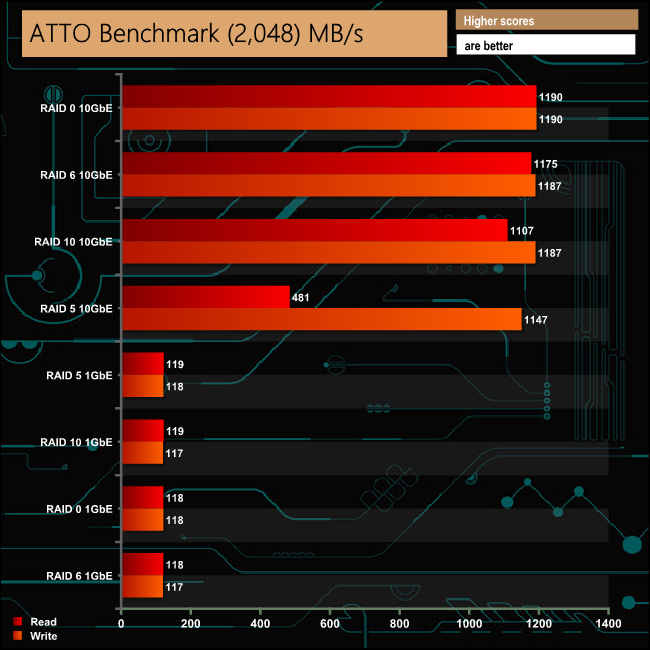
As with the HDD ATTO performance results, the SSD results with a 1GbE connection show excellent consistency across the four RAID arrays, averaging 118.5MB/s for reads and 117.5MB/s for reads, pretty much the limit for the connection speed. Using a 10GbE the performance rockets away with the exception of when the disks are in a RAID 5 array. The RAID 5 write performance is a little down on the other arrays at 1,147MB/s, but at 481MB/s the read performance is way off the mark of the other arrays – however, it's still four times faster than the RAID 5 read performance with a 1GbE connection.
Intel’s NASPT (NAS Performance Toolkit ) is a benchmark tool designed to enable direct measurement of home network attached storage (NAS) performance. NASPT uses a set of real world workload traces (high definition video playback and recording, video rendering/content creation and office productivity) gathered from typical digital home applications to emulate the behaviour of an actual application.
We’ve used some of the video and office apps results to highlight a NAS device’s performance.
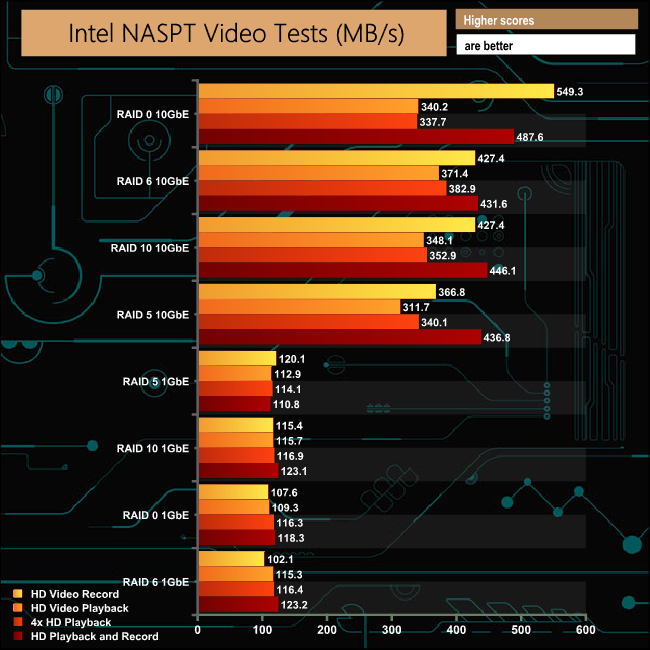
HD Video Playback
This trace represents the playback of a 1.3GB HD video file at 720p using Windows Media Player. The files are accessed sequentially with 256kB user level reads.
4x HD Playback
This trace is built from four copies of the Video Playback test with around 11% sequential accesses.
HD Video Record
Trace writes an 720p MPEG-2 video file to the NAS. The single 1.6GB file is written sequentially using 256kB accesses.
HD Playback and Record
Tests the NAS with simultaneous reads and writes of a 1GB HD Video file in the 720p format.
Content Creation
This trace simulates the creation of a video file using both video and photo editing software using a mix of file types and sizes. 90% of the operations are writes to the NAS with around 40% of these being sequential.
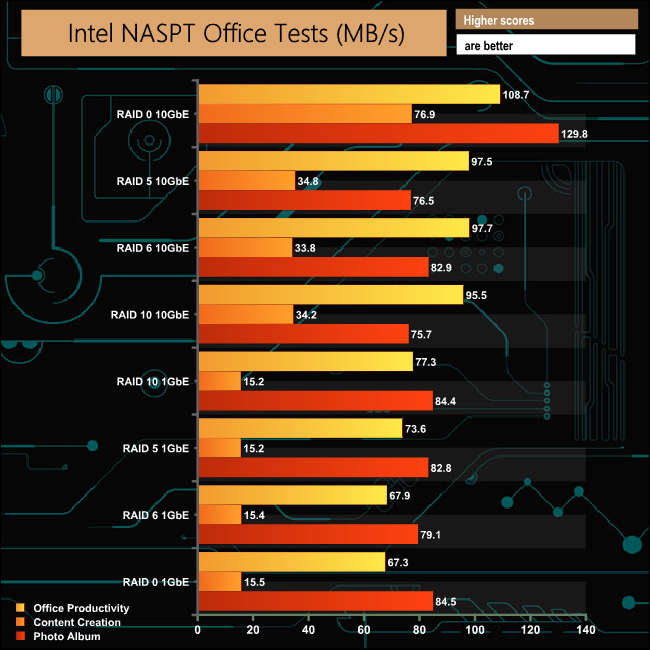
Office Productivity
A trace of typical workday operations. 2.8GB of data made up of 600 files of varying lengths is divided equally between read and writes. 80% of the accesses are sequential.
Photo Album
This simulates the opening and viewing of 169 photos (aprrox 1.2GB). It tests how the NAS deals with a multitude of small files.
HDD Testing
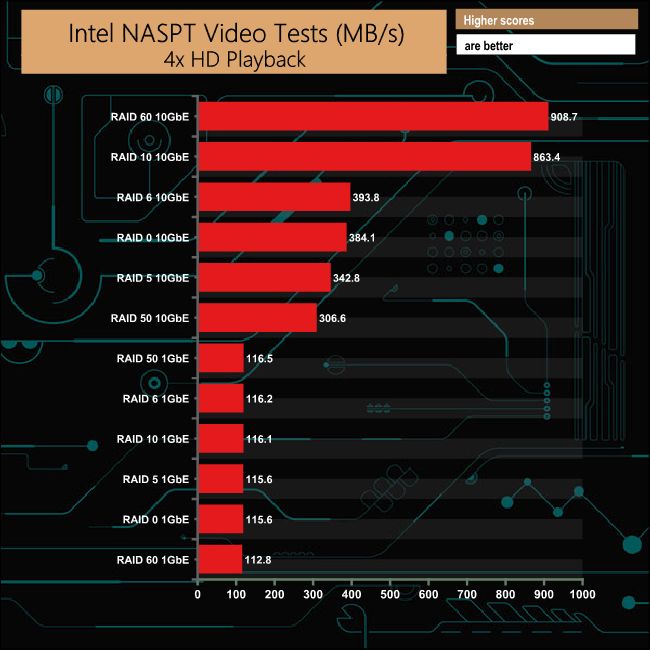
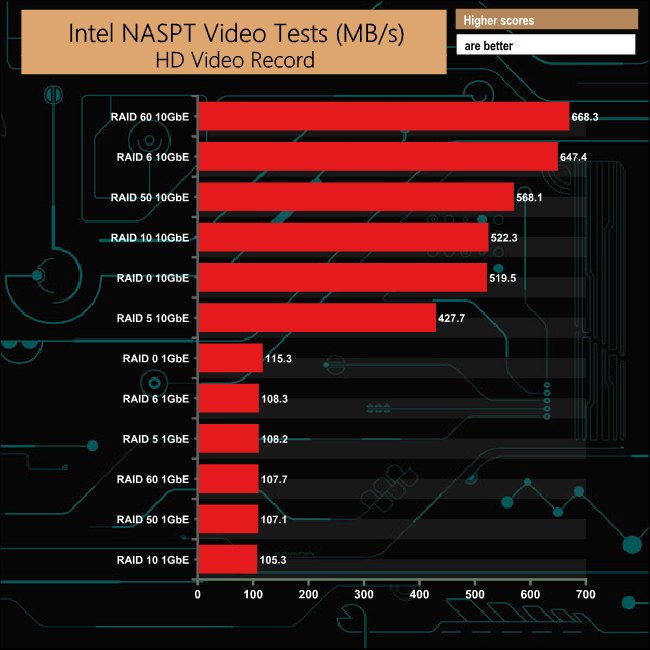
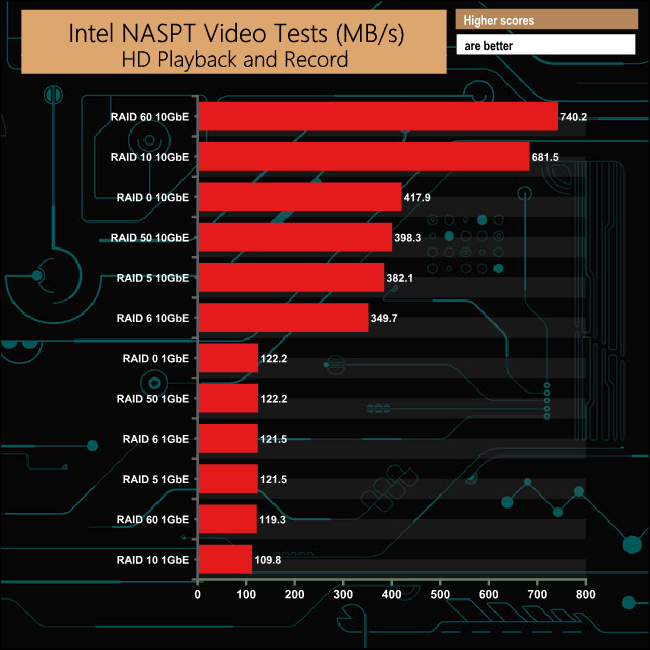
In the four Video tests of Intel's NASPT we used, the performance with the drives built into RAIDs 10 and 60 using a 10GbE connection was very, very impressive. The fastest figures for the two arrays came in the HD Video Playback test with 941MB/s in RAID 60 and 929MB/s in RAID 10. With a 1GbE connection the performance across the arrays is very consistent.
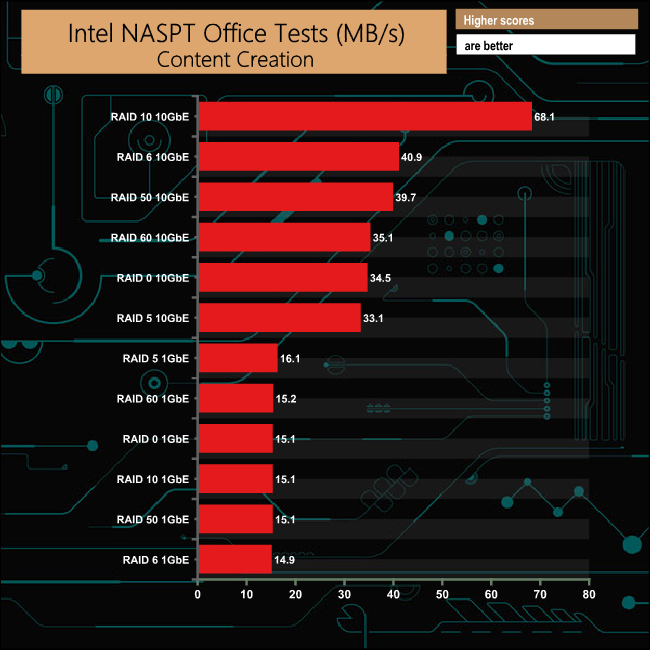
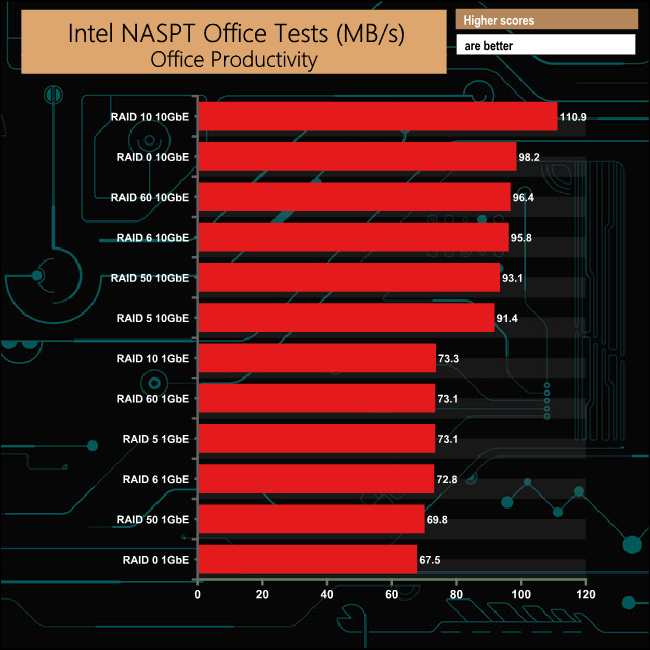
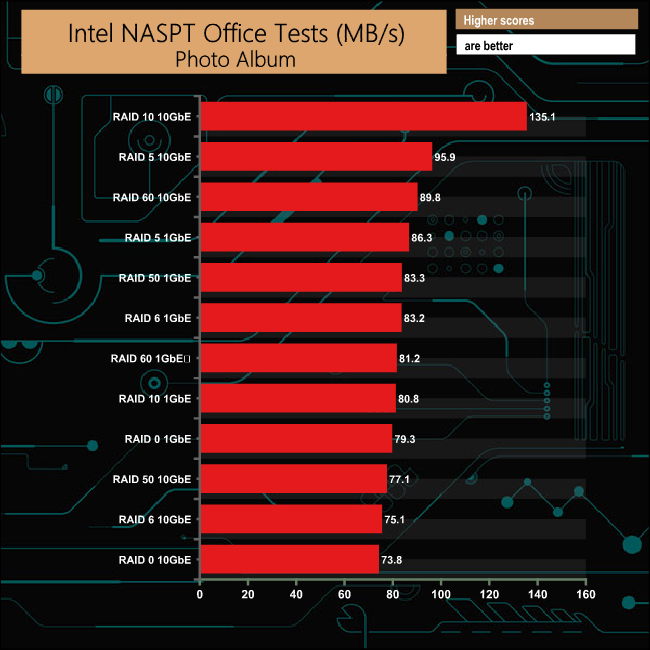
In the NASPT Office tests, the fastest speeds came when the drives were in a RAID 10 array with a 10GbE connection.
SSD Testing
Using the SSD arrays, the fastest performance comes in the HD Video Record and HD Playback and Record tests using a 10GbE connection, although for the HD Video Playback and 4xHD Playback tests, the faster performance comes when the drives are built in a RAID 6 array, again with a 10GbE connection.
Taking the RAID 0 10GbE results out of the equation, the performance across the SSD arrays with both 10GbE and 1GbE connections was pretty consistent.
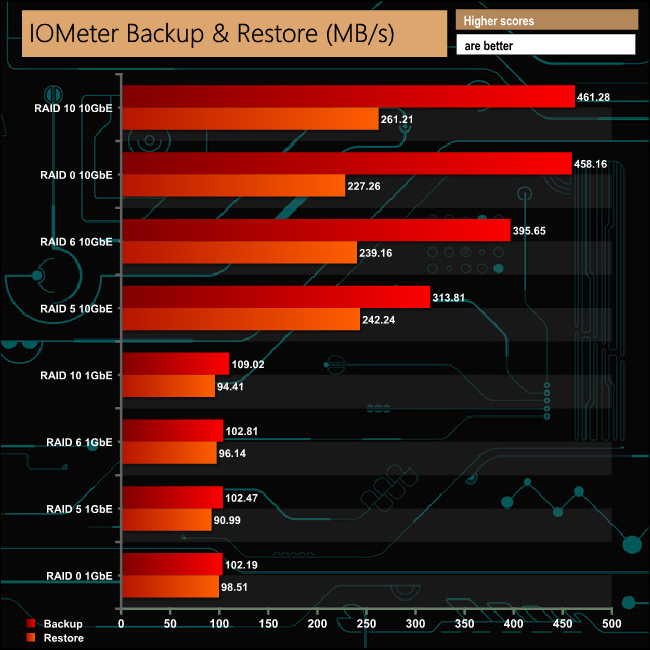
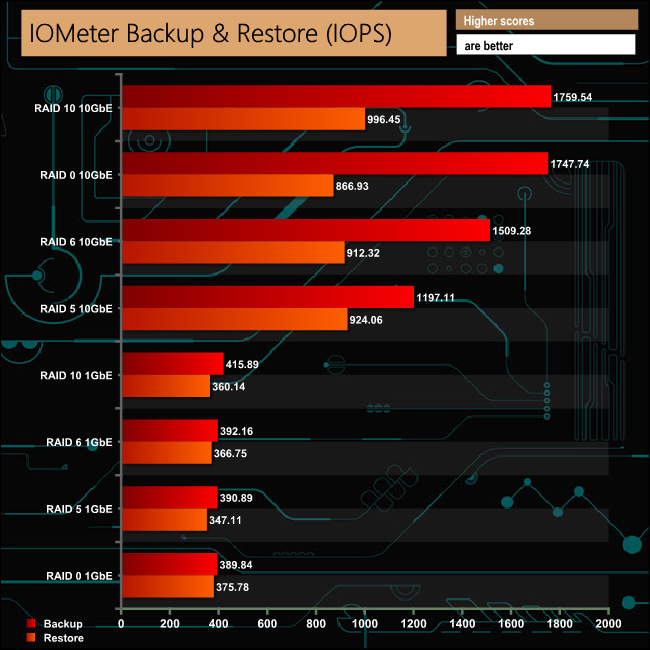
IOMeter is another open source synthetic benchmarking tool which is able to simulate the various loads placed on hard drive and solid state drive technology.
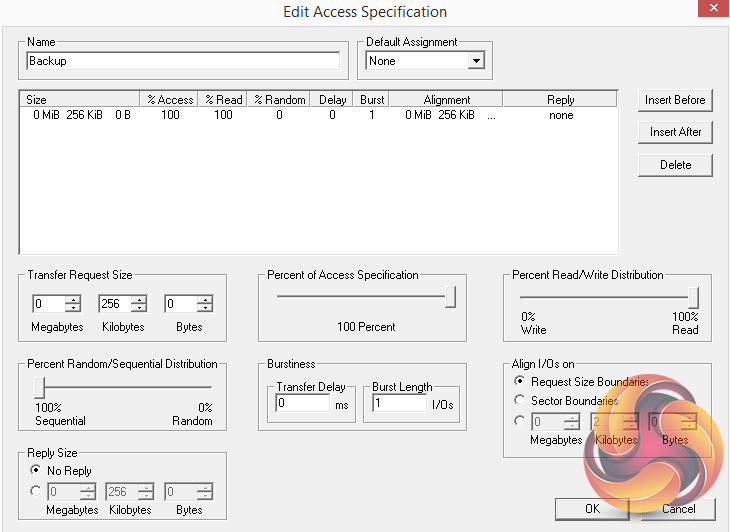
We set IOmeter up (as shown above) to test both backup and restore performance on a 100GB partition.
HDD Testing
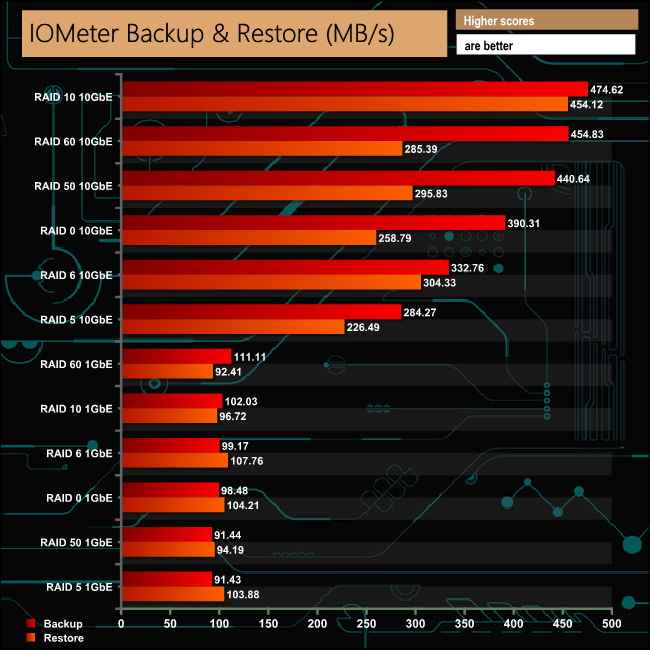
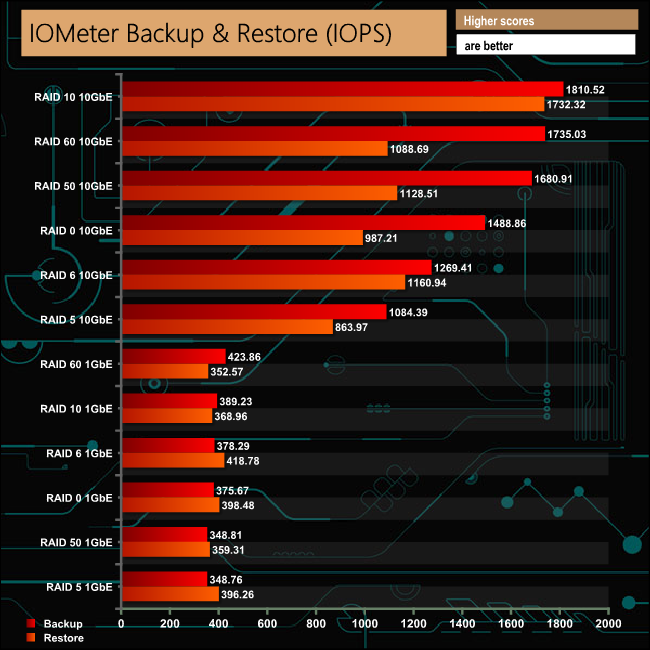
Our backup and restore test were dealt with quickly and efficiently in all the tested HDD arrays and at both connection speeds.
SSD Testing
As with the HDD arrays, our backup and restore tests were handled by the SSD arrays without any problems.
HDD Testing
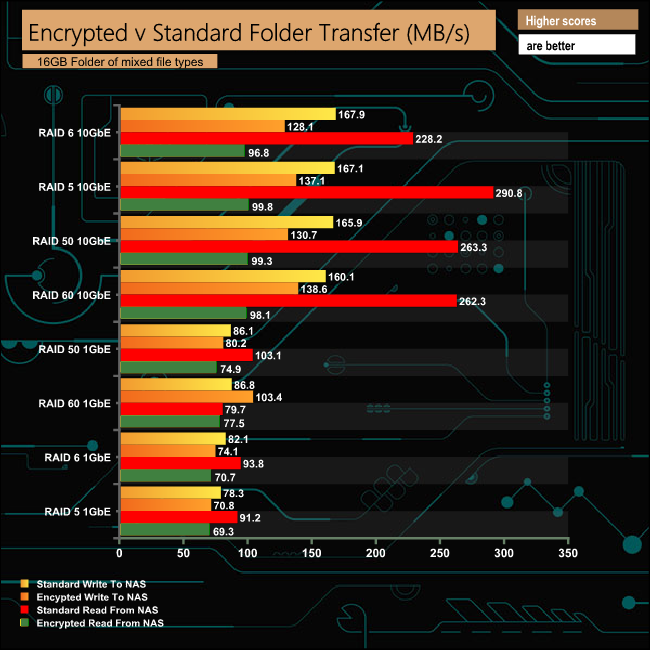
The TVS-1282 seems to be much more efficient when writing encrypted data than reading it. It also appears to handle both encryption read and write duties in a more balanced way with a 1GbE connection than when using a 10GbE one.
SSD Testing

It's a similar story with the SSD RAID arrays, encrypted writes are dealt with more efficiently than reads and the better balanced encryption performance for both is with the slower interface.
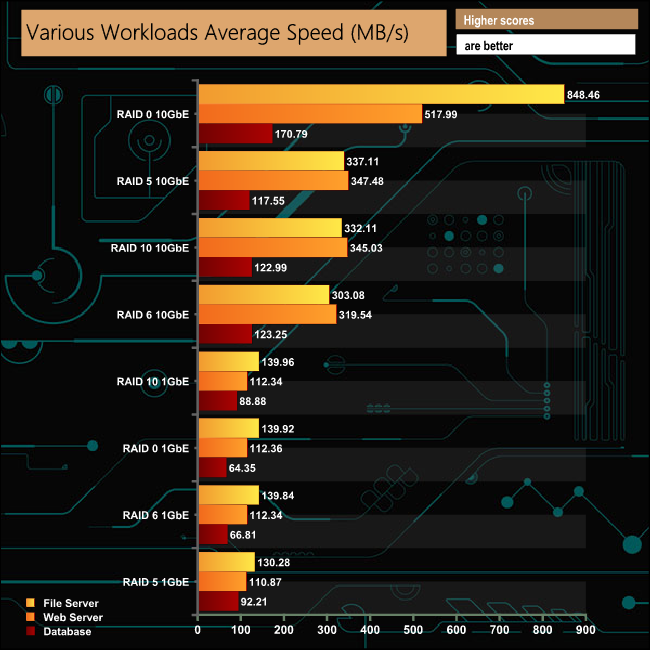
We tested the TVS-1282 in a number of scenarios that it may face in the real world. The settings for these scenarios are as follows.
File Server
512MB file size, 16KB Block size
80% Read 20% Write 100% Random
I/O queue depth 128
Web Server
1GB file size, 16KB Block size
100% Read 0% Write 100% Random
I/O queue depth 64
Database
2GB file size, 4KB Block size
90% Read 10% Write, 90% Random, 10% Sequential
I/O depth 128
HDD Testing
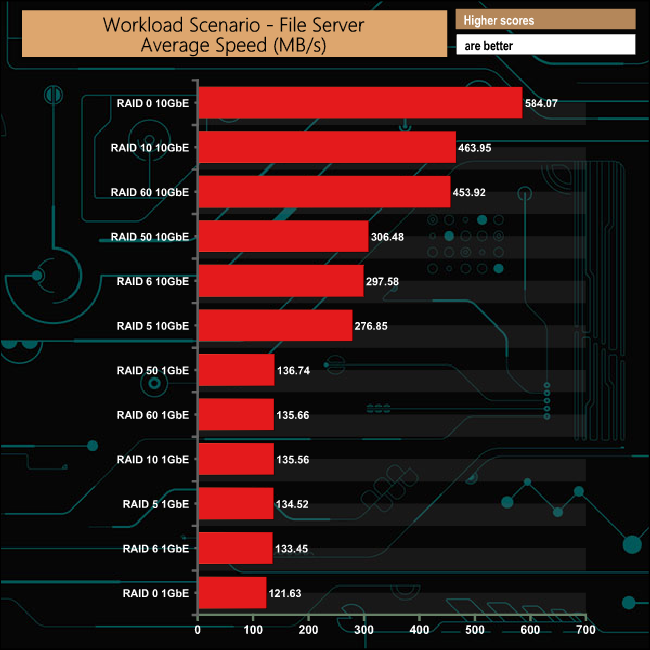
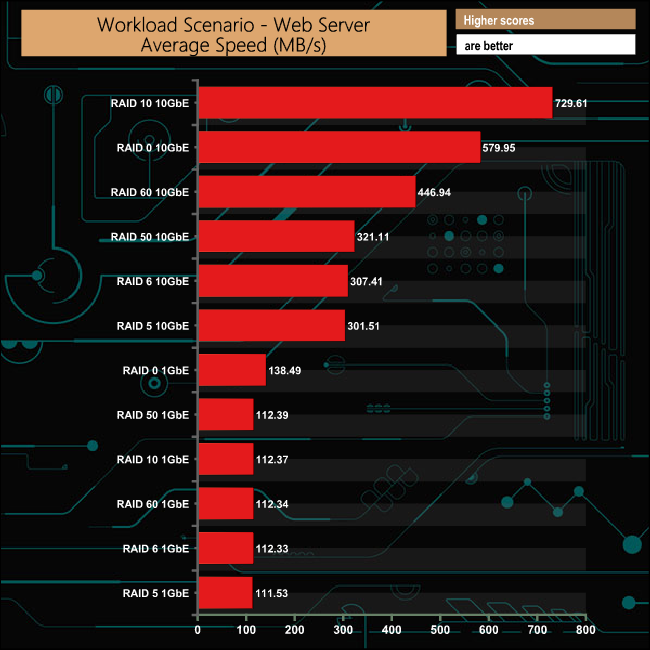
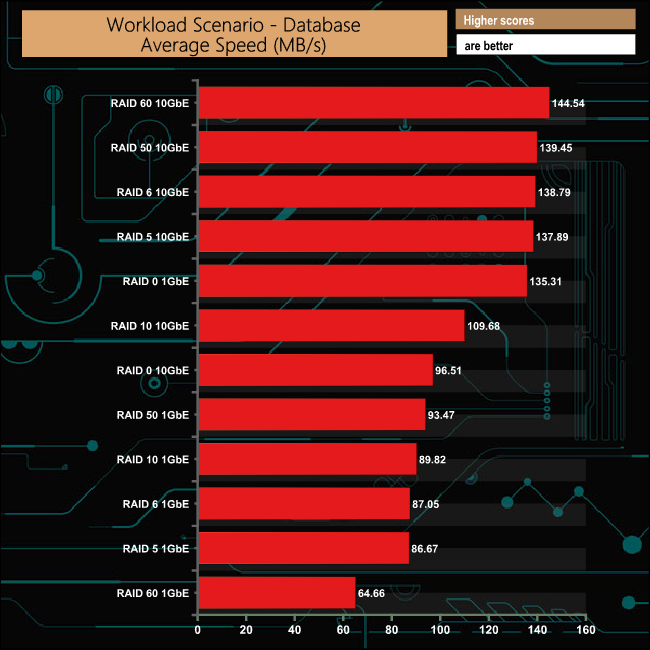
While the File and Web server tests produced much faster average speeds when using a 10GbE connection, the Database test produced results that were a lot closer between the two connection speeds.
SSD Testing
It's the same picture with the SSD arrays, the File and Web server tests produced much faster average speeds when using a 10GbE connection, while the Database test produced results that were a lot closer between the two connection speeds.
To test real life file/folder performance we use a number of different file/folder combinations to test the read and write performance of the NAS device. Using the FastCopy utility to get a MB/s and time taken for each transfer, the data is written from and read back to a 240GB SSD.
We use the following file/folder types:
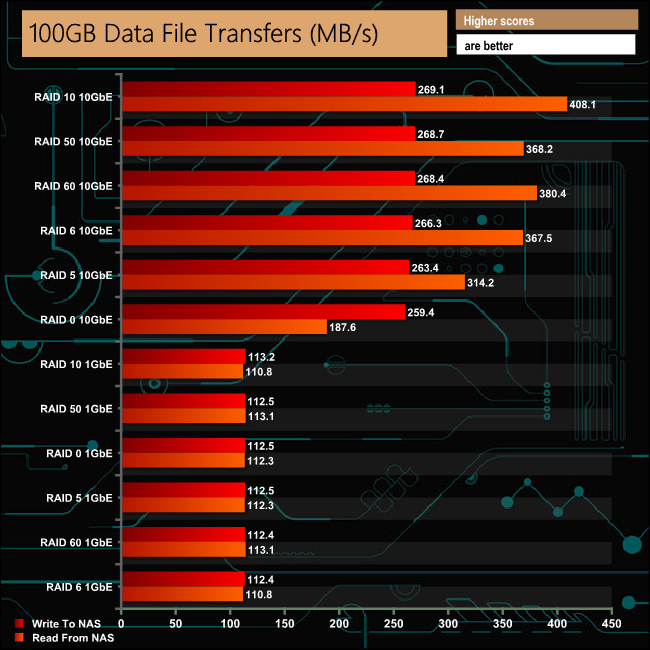
- 100GB data file.
- 60GB ISO image.
- 60GB Steam folder: 29,521 files.
- 50GB Files folder: 28,523 files.
- 12GB Movie folder: 24 files – mix of Blu-ray and 4K files.
- 10GB Photo folder: 621 files – mix of .png, .raw and .jpeg images.
- 10GB Audio folder: 1,483 files – mix of .mp3 and .flac files.
- 5GB (1.5m pixel) image.
- BluRay Movie.
![]()
![]()
![]()
![]()
![]()
Click charts to enlarge
Our real life transfer tests proved no obstacle for any of the HDD arrays regardless of connection speed.
We tested the peak power consumption of a NAS at the wall during a run of CrystalDiskMark 5.0.2 as this version of the benchmark runs the read and write benchmark suites separately, so it's easier to monitor what power the device is using during each function.
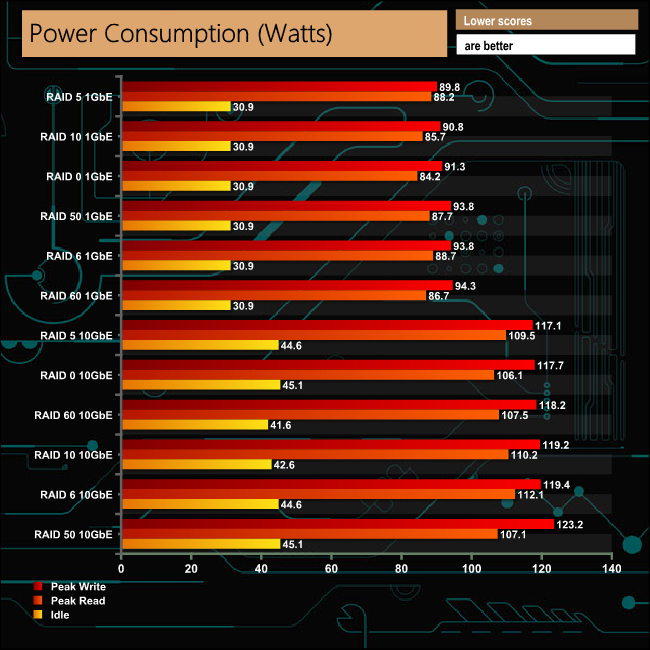
Powered by a CPU with a TDP of 65W, the TVS-1282 is never going to be exactly frugal with its power requirements when actively reading or writing, even with hard drives as power efficient as WD's Red drive is. Adding a 10GbE card to the mix doesn't exactly help matters either.
To say that QNAP's TVS-1282-i7-64G is feature rich is a bit like saying Roger Federer is a bit handy with a tennis racquet. Not only do you get twelve external drive bays, there's also an Intel Core i7-7700 CPU, 64GB of DDR4-2133MHz memory, three PCIe Gen.3 slots; two x4 and a single x8, a pair of SATA M.2 slots, four Gigabit Ethernet ports and last but by no means least, three HDMI ports.
The three Gen.3 PCIe ports give the TVS-1282 a good deal of expandability and a degree of future proofing. They support 10/40 GbE networking adapters, PCIe NVMe SSD and USB 3.1 expansion cards. The x8 PCIe slot even supports dedicated graphics cards, with a full compatibility list is on QNAP's website. If you plan on going down this route, you may well need to choose one of the 450W powered versions of the TVS-1282 (the standard PSU is 250W). One word of caution though, you will need to take care choosing cards for the pair of x4 slots as there is only around 147mm of clearance because of the proximity of the CPU cooling shroud.
Any NAS is only as good as its operating software and the TVS-1282 uses one of the best ones around, QNAP's QTS. It's a quick and easy to install OS with a graphically rich interface which is useful for first time users to navigate around the software – but for the more advanced users, delving beneath the surface reveals a whole host of features including a couple of important ones for data heavy environments; network traffic distribution and tiered storage.
As the TVS-1282 has four 1GbE NICs (plus any additional add-in cards) it can be set up so applications can use dedicated NICs to help alleviate any network traffic distribution problems. Setting up and managing these network connections can be done via the Network & Virtual Switch app which can be downloaded from the QTS App Center. Using QNAP’s powerful Qtier technology you can set up SSD caching and auto-tiering, so storage can be optimised according to how it's being stored and used. Qtier 2.0 analyses I/O read and writes of any storage pools to determine the best course of action; the most active “hot” data is moved to faster performing drives, while the less active “cold” data is migrated to slower but higher capacity drives
The TVS-1282 also usefully supports application based partitioning. When multiple applications are running on the same storage, media throughput tends to drop as the media is busy handling I/O requests from all the applications at once which can cause bottlenecks to occur in data transfers. With application based partitioning, each of the different types of storage supported by the TVS-1282; HDD, M.2 and SSD, can be configured as independent partitions for particular applications which neatly side steps the problem.
Should you start to run out of storage space with the base unit, worry not as the TVS-1282 supports QNAP's UX-500P, UX-800P and REXP-1000 Pro expansion enclosures. Both the UX-500P (5-bay) and the UX-800P (8-bay) units feature hot-swappable bays and connect to the TVS-1282 via one of the rear USB 3.0 ports. Things get a little more complicated with the 10-bay REXP-1000 Pro as it uses a SAS interface so you will need a 12 Gb/s SAS expansion card in the TVS-1282 to be able to connect to it.
We found the QNAP TVS-1282-i7-64G on Span.com for £2,961.60 (inc VAT) HERE.
Pros
- Impressive list of hardware features.
- QTS software.
- Expandability.
Cons
- The two x4 PCIe slots have a card length limit of 147mm
KitGuru says: It's a superb NAS for SMB users with a powerful OS and the ability to expand as any company grows, with support for faster networking and SSD caching should the need arise. The storage capacity can be expanded with expansion enclosures, giving you huge amounts of storage space.

