


Removing the outer cover is as easy as it gets, three simple screws are removed and after pulling backwards on the chassis the whole outer section slides off.

The 600W power supply can be seen from the right side (from front) of the chassis and it comes already installed with all the cables lying loose inside, ready for fitting. This is a welcome upgrade when compared to the older, rather weak 350W unit that was in the SG05 chassis.

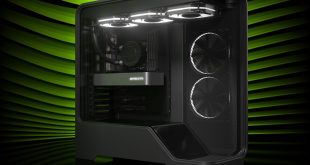
The formidable sight of the Penetrator fan from the inside, you will notice the unusually designed grille system which is created to focus the air in a directly forward motion.


Intel very kindly donated a 655k processor for our build today … we love these processors as they have massive headroom over the reference speeds. We managed to get one overclocked to 5GHZ before with a Noctua NH D14 cooler.


Silverstone have made a NT06-E cooler which fits into this case and while it is passively designed, it utilises air from the Penetrator chassis fan above to aid with cooling. We however opted for a different method and asked Thermaltake for their latest Slim X3 low profile cooler which we liked the look of. It is actively cooled which is always a better idea in my mind if we want to overclock, even if it generates a few more dBa.


The Thermaltake SlimX3 is a tiny little cooler with a dual heatpipe design to aid the reduction of temperatures with fast Core i7 processors. This is built for 1156 slot so suits our build perfectly.

We thought this picture was worth including as you can see just how small the cooler is when next to a Thermaltake Contac 29.


Before mounting the cooler on the processor we have to attach two mounting brackets, which screw onto the underside of the cooler, on both sides. These are then rubber mounted to stop metal from touching the motherboard PCB.

We are using 8GB of Kingston Hyper X DDR1600mhz for our review today which we reviewed in the past. We have found Kingston memory to be very reliable and the heatspreaders help to reduce temperatures in such a small chassis.

The cooler fits perfectly on the board, leaving enough room for ram and graphics card installation on either side. Incidentally, you can use any slot 1156 cooler in this chassis, but it has to be under 117mm in height otherwise it will not fit.

The first thing we do is remove the top fan system which requires the removal of 3 screws. The Silverstone Penetrator then lifts out of the chassis revealing the motherboard mounting area below.


Fitting the motherboard is just like any other system build we have done before, although this particular build only needs 4 fitting screws on each corner of the PCB.

After we remove another section on the front area of the top of the chassis we have access to the hard drive rack mount system which can fit both 3.5 inch and 2.5 inch drives.


Fitting a couple of 2.5 inch drives is easy, they slot under the housing and are attached by several screws on each side. We decided to fit a 2.5 inch 320gb 7,200 mechanical drive for storage and later we also slotted in a 128GB Crucial C300 SSD (review coming shortly) for the Windows 7 operating system, to ensure we weren't waiting long for system boot.
The 3.5 inch bay is supplied with rubber grommets to reduce noise and vibration but there is absolutely no airflow in this area which might prove an issue if you fancy putting in a 10,000 rpm Raptor X as a boot drive.

Once we had our 2.5 inch drive installed, we ran the sata cable down the side of the chassis into the motherboard. It is worth pointing out that you need to use 90 degree sata connectors for these drives as the header will protrude out too far to fit into the drive. Zotac didn't supply any of these cables in their box, but we had a couple in our KitGuru drawer, luckily enough. Silverstone should really consider supplying one of these in the box as they are not something everyone will have handy at home. Factor in a couple of quid for a pair of these if you are ordering them online.


The insertion and removal of graphics cards can be achieved without having to remove the motherboard from the chassis and it is actually not that hard to do, even with a substantially sized board such as the overclocked HD5870 from HIS, seen above. There is a locking mechanism at the back of the chassis which is held by a couple of screws. This reattaches when the card is fitted to ensure no movement takes place. The Silverstone chassis can take dual slot cards so fitting high end boards is easy enough.

The HD5870 falls short of the maximum quoted graphics card design of 12.2 inches (HD5970 size), but as you can see in the image above, the two 6 pin power connectors are hooked into this board from the front, so it is actually taking up almost as much room as a HD5970. We really didn't experience any issues fitting this board, it is almost as painfree as installing the card in a full size case.

Once the graphics card is fitted and all the motherboard headers are connected its time to reclose the chassis up as seen above. It is difficult to keep the internals extremely tidy, but I spent some time and routed them under the front area which is semi sealed so it looks neater in the pictures above.
In reality you could swap out the bundled power supply for any other unit although Silverstone don't recommend it as the cables on this unit have been shortened intentionally to suit the dimensions of this case. The ATX and EPS12V power cables are long but the PCI Express cables for instance are significantly shorter.
There is also room for a slimline optical drive if you wanted to fit one, but we prefer to keep our Windows 7 install on a USB drive for speed and all our files are networked over gigabit, so we have no real need for optical media. I guess a Bluray drive would be an option for media buffs, however we would prefer a self powered USB 2.0 unit such as the Asus SBC 06 D1S U drive we reviewed here. It can be moved around between machines without hassle.

To give you an indication of the size of the Silverstone Sugo SG07, here it is resting on top of the Antec Dark Fleet DF 85 we reviewed last week. Yes, the fully kitted out Noctua NH D14 Austrian Sandwich (with extra 14cm fan to keep our overclocked AMD 1055T cool (4.3ghz) is probably about 2/3 the size of the SG07!
Well those products are a match made in heaven, thats for sure. Great review, thanks.
Those are the chassis designs I love – subtle, yet beautiful. very sexy case.
Cant believe the way they have built the case to take the biggest cards on the market, some full size cases can’t. Great work from Silverstone there.
Saw a review of this a few days ago on bit tech and almost ordered it. This is the tipping point. Love it, thanks for the thorough testing.
Damn, good timing, was looking at this case last week and didnt know if there were any fitting issues. I have the SG05 and really rated it, but its a bit old in the tooth now. 600W PSU here I come !
Silverstone, you rock my world, what a beautiful piece of engineering!
havent had the time to thoroughly read this just yet, but what a lovely looking chassis. cable management looks a nightmare however in such a confined space.
havent had the time to thoroughly read this just yet, but what a lovely looking chassis. cable management looks a nightmare however in such a confined space.
Well that was a very enjoyable afternoon read over here, thanks for taking the time to mix and match such a good pairing.
That 655k is a decent price in the UK, and it seems to overclock without much effort. Might look into copying this system, but maybe using a Sapphire HD5670 ultimate and try and build something basically silent.
I really do love the fact silverstone prefit such a nice PSU into this chassis and it cuts out some of the build effort. the motherboard is a decent price, but are zotac really that good? I would think someone like DFI would offer a better overclocking product.
That is a very nice design from silverstone, im tempted to build something low power with a dual core i5 myself now.
Technically the design from Silverstone is stellar. they have a top mounting fan which is focused and directed in such a strong manner, this basically blasts all the components and forces air out the sides of the case reducing component and ambient temperatures, all in one. very impressive really.
Well while the silverstone chassis impressed me the motherboard caught my eye. 14 USB 2 ports? esata, 300mbit wireless, etc etc.
What a fucking killer product that is !
This system would be perfect for me. what a great idea Zardon. all the components are affordable (well 5870 is a bit much still but …) and they all work great. Excellent review and testing.
Wow…
This should be my next gaming machine – except that I like gigabyte better. Plus I would consider some quad core with NH-C12P-14S as cooler. But not sure if will fit (it is kind a bulky for ITX form factor
Hi Jordan I tried the NH C12p 14 which we also reviewed (great cooler) and while it fits, on this particular Zotac board it blocked the PCI express slot so you have to use the onboard graphics. We have been told by Silverstone since the review went live however that the DFI mini ITX board works fine with this cooler. might be worth looking into……
Thanks for the reply.
Indeed I will look at that one… 🙂
far too much bux for a case howver good. No wonder all the computer market is going downhill. Give me a good case for $40 and a great case for £70. Gold plated with Ahgel wings for a £100. Intels biggest hole in its lineup is an atome with integrated GPU .. I dont think they have anything that will compete against F350APU at least for another 6 months, even then their gfx are normally dreadul.