

Gigabyte X299 UEFI
The UEFI used for Gigabyte's X299 motherboard is almost identical to that found on the Z270 counterpart. As such, we have re-used the bulk of our analysis from the Z270 reviews and updated the text where there are subtle differences.
Firstly, we are pleased to report that our generic wireless mouse worked in the Gigabyte X299 UEFI. Some mice can be troubling with UEFI support, so when a generic wireless unit functions correctly in the interface, that is usually a good sign for overall mouse support.
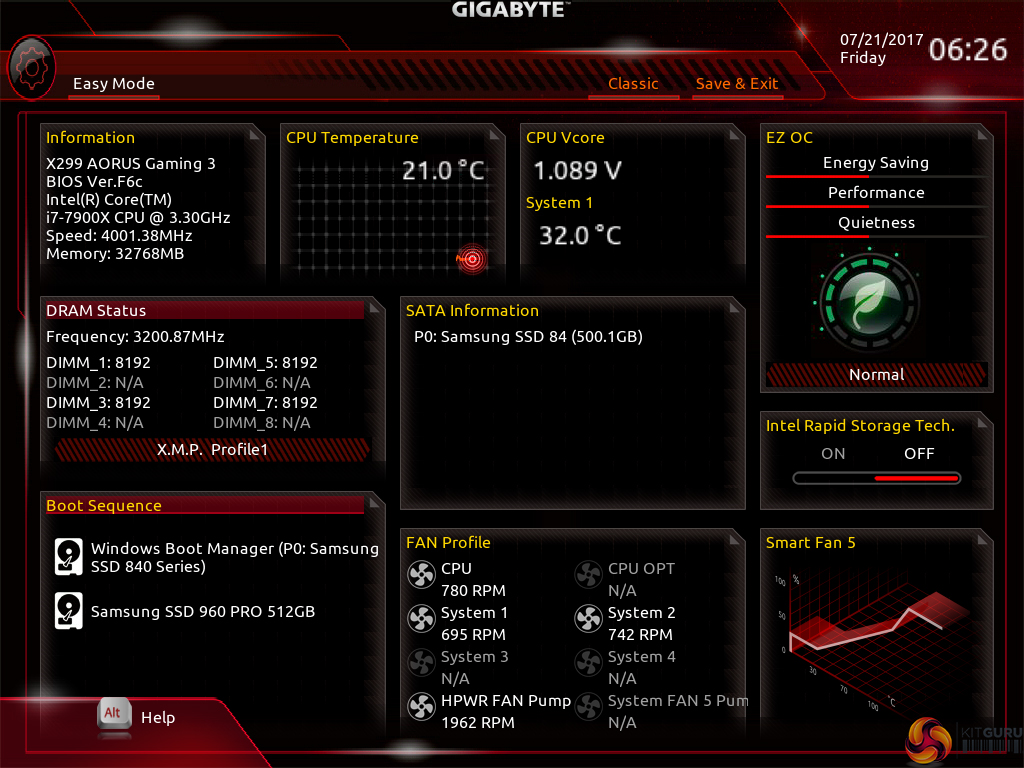
Gigabyte’s Easy Mode page is a solid attempt at categorising a handful of simple settings into a single section. Users can alter the boot sequence, check fan speeds, monitor temperatures and voltages, enable XMP, and change the performance mode without jumping into the deeper (and scarier for less experienced users) UEFI sections.
I don’t have any complaints about Gigabyte’s Easy Mode implementation. It is as good as the versions used by competing vendors.

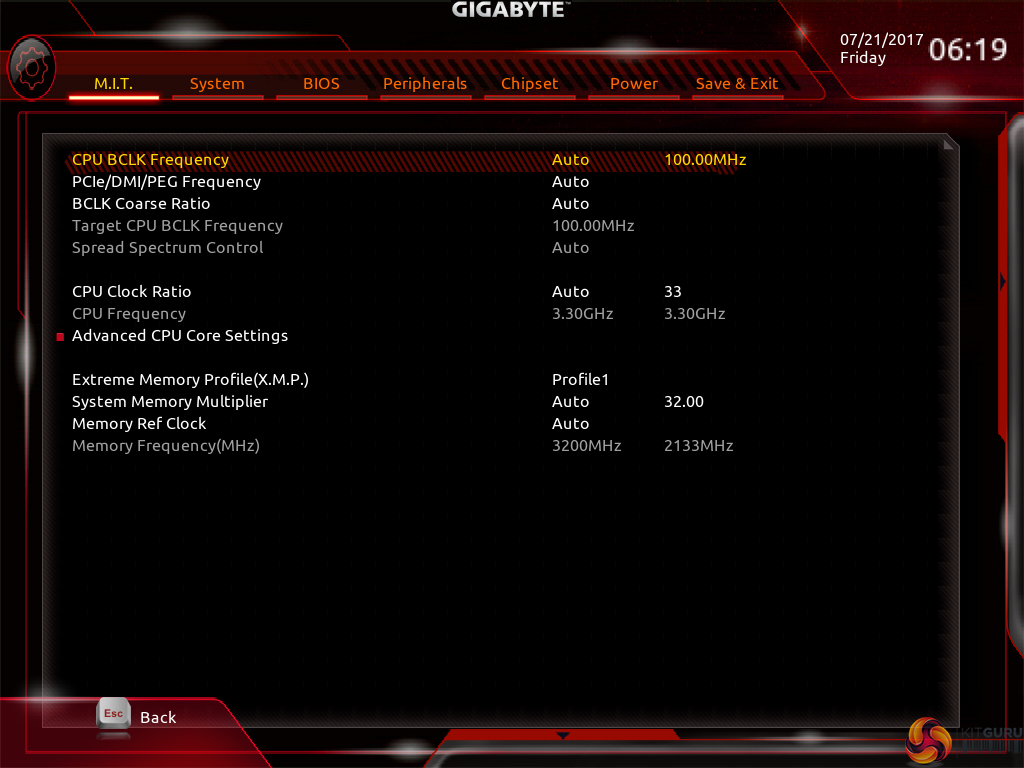


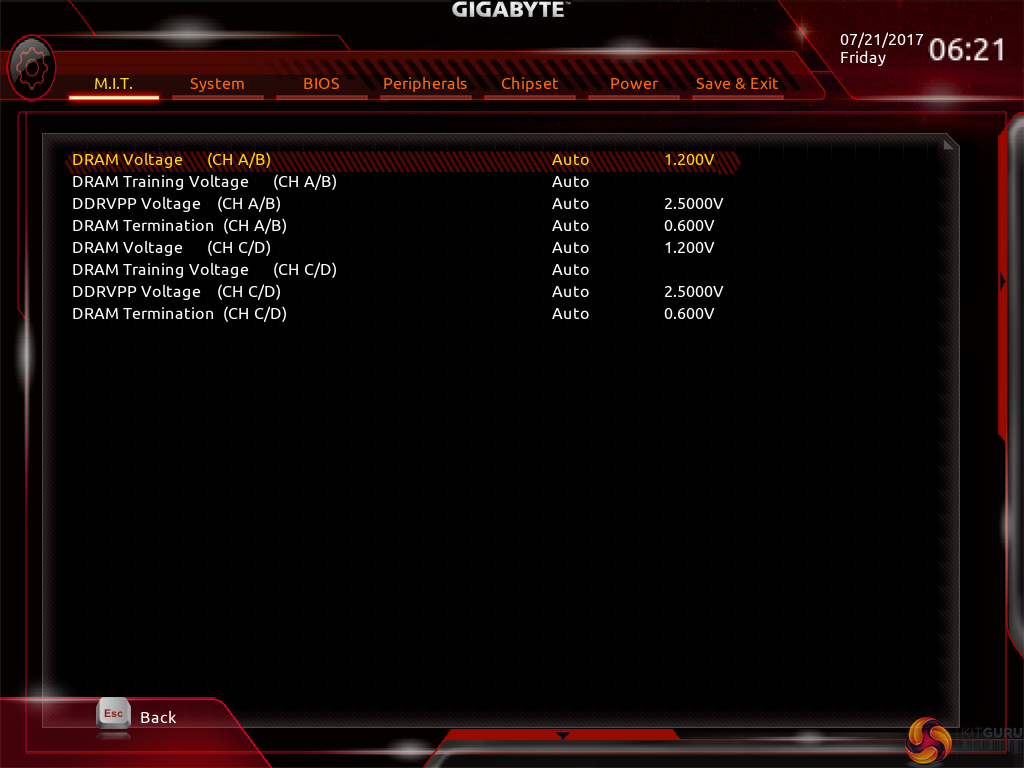
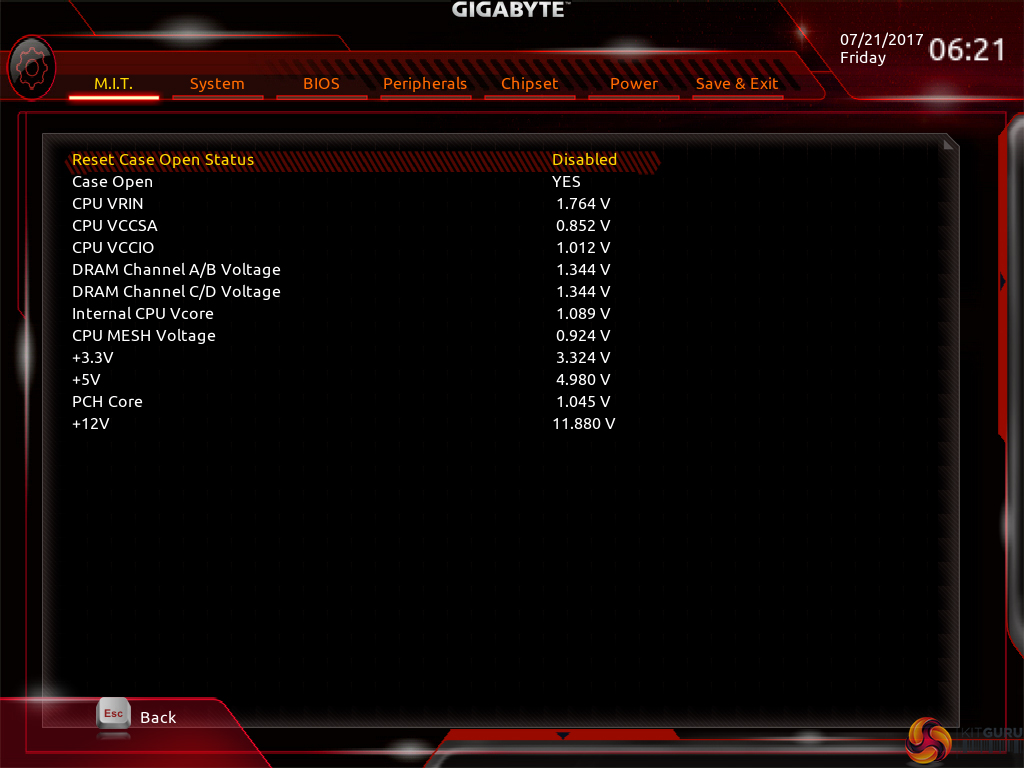
M.I.T. is the main section where parameters relating to voltages, frequencies, and power settings for the system’s main components are found. The Memory and Voltage sections are split from the Frequency subsection, which makes sense until one realises that an entire group of memory settings is replicated in both the Frequency and Memory subsections.
The subsection splitting forces a user to jump back and forth between pages but it also helps to keep the individual subsections tidy and without an overwhelming amount of information on one page (I’m looking at you, ASUS and MSI). Judging whether this sectioned layout or one where most settings are on a single page is better is down to individual preferences, as my colleague Ryan is not particularly fond of jumping between subsections but I personally prefer the segregation.
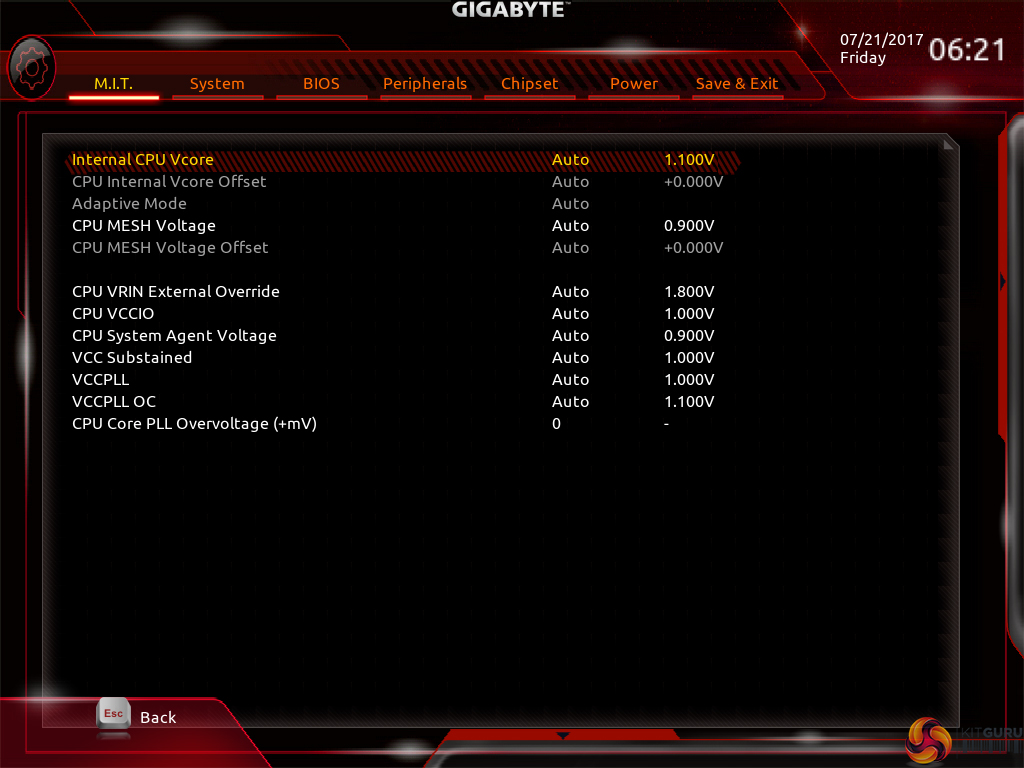
The selection of LLC settings don’t make any sense because there’s no explanation (be it visual or written) as to how the voltage profile is adjusted with each mode. As it happens, our trial-and-error testing suggests that you should use the High LLC setting if you want CPU VCore to stay close to your applied numerical value without a significant overshoot or undershoot. Is this so hard for Gigabyte to write in the UEFI?
There is a help section on the right side of UEFI pages but it must be manually selected to be displayed. Competing motherboard vendors’ approach of permanently displaying valuable information on the right side is better. Memory dividers up to 58x can be selected and enabling XMP is as easy as clicking the button.
M.I.T. works fine overall but it feels very old fashioned and clunky compared to competing vendors' solutions. There are generally no drop-down lists for selecting frequencies and no colour indication is given to highlight a high voltage level.
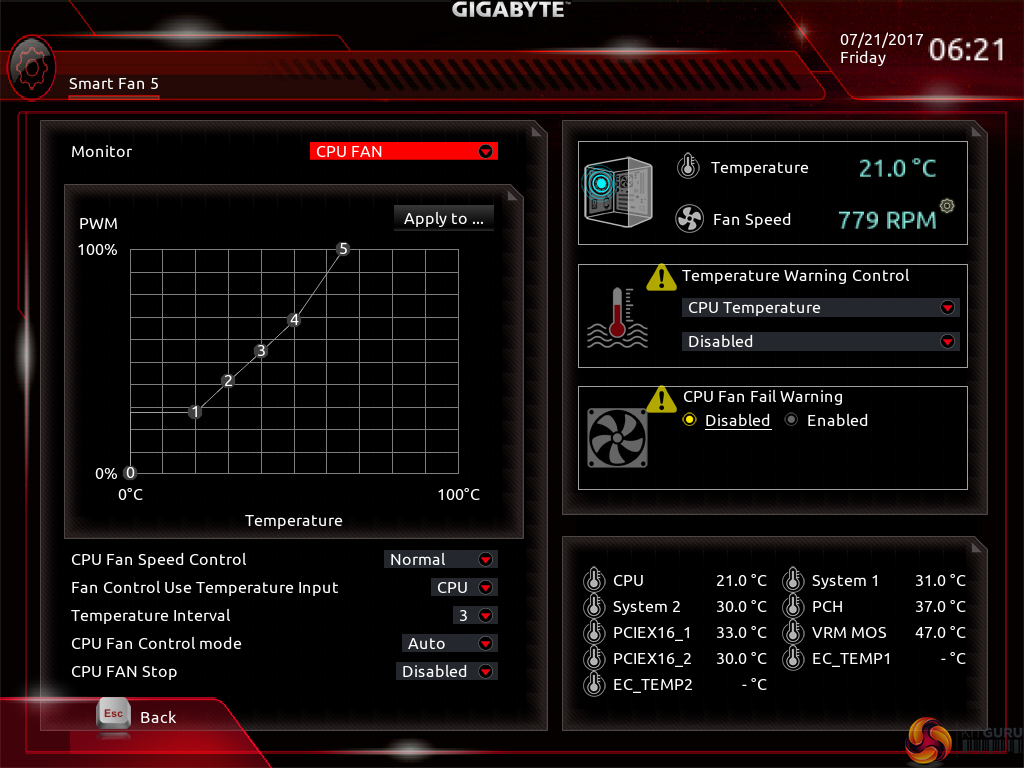
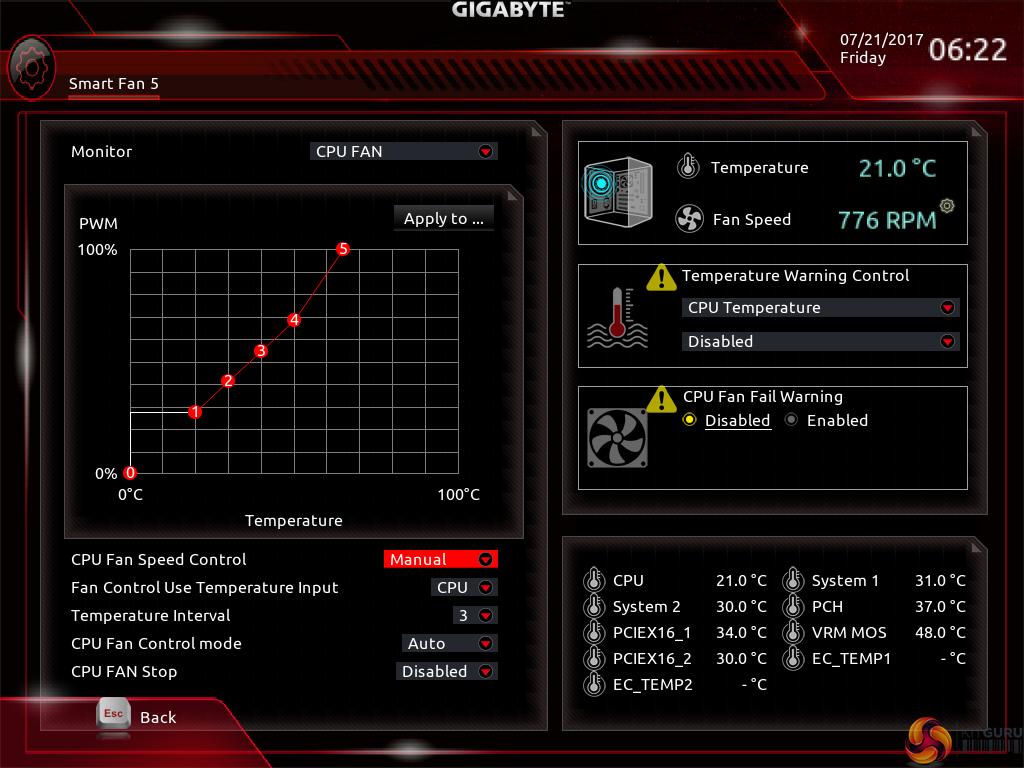


The Smart Fan 5 settings subsection can be accessed from the M.I.T. page. This superb fan control system is the crown jewel for Gigabyte’s UEFI.
All fan headers can be individually selected and their speed profiles can be tweaked. Gigabyte includes several preset fan speed control settings and a choice of temperature monitoring points. The headers can also be set to PWM or Voltage (DC) mode at will, which is ideal for feeding continuous current to a watercooling pump or letting PWM fans adjust their own speed.
It’s the manual fan speed tweaking mode where Smart Fan 5 really shows its worth. Six points on a graph can be used to create the fan speed curve. A level as low as 0% PWM speed down to 0°C is also supported, meaning that you can set the fan to switch off if the system is operating at ambient, or elevated, temperature (provided the fan is able to stop itself spinning).
The temperature monitoring points for fan speed curves are:
- CPU
- System 1
- System 2
- PCH
- PCIe x16_1
- PCIe x16_2
- VRM MOSFET
- External temperature sensor 1
- External temperature sensor 2
Not all the fan headers can interact with all monitoring points (the CPU can only read CPU data, for example) but this range of sensors is superb. A user should be able to comfortably set fan speed adjustments based on relevant data from the CPU, MOSFET, and PCIe slots. If you want to monitor DDR4 and HDD/SSD temperatures, the pair of external thermistor cables can be utilised.
The only noteworthy omission is a graphics card monitoring sensor. It would be good if Gigabyte fed data from its Aorus graphics cards, for example, through to the motherboard-controlled fan headers. PCIE readings in the UEFI relate to the actual slots, not the cards installed in them.

RGB Fusion is Gigabyte’s basic UEFI-based LED colour control tool. Colours can be adjusted in real time and the LED activation mode can be set, but that’s about it. There is a limit to how complex the tool can be given its residence inside the UEFI. The OS version has greater functionality.
With that said, I like to see at least some form of LED control available in the UEFI as it helps to maintain user-defined parameters in the case of an OS reinstall or system corruption that damages the OS-based LED profiles.

Up to eight individual profiles can be saved to the board’s internal memory. Further profiles can be transferred using a storage medium.

Gigabyte’s BIOS updating tool – Q-Flash – is accessed via a hidden tab on the bottom of the screen. I took a few minutes to find its location which was annoying as it would make more sense if there was some reference to it in one of the main pages, such as BIOS.
We could enter different folders within our USB drive using Q-Flash and then update the BIOS with ease. There’s no internet-based BIOS update tool available through the Gigabyte UEFI, as we have seen some competing vendors offer.
UEFI Summary:
Good fan control options through Smart Fan 5 and an ability to control RGB LED settings, albeit in a basic manner, through RGB Fusion are positive points for Gigabyte’s UEFI. The interface was stable throughout our testing and we didn’t seem to be missing any glaring system tuning settings that limited our overclocking capabilities. That is, with the exception of LLC settings that make any sense or have an explanation tied to their operating mode.
Overall styling of the UEFI is older, less interactive, and far less appealing than the solution by ASUS. I found myself relying upon the keyboard for parameter adjustments more than I do in competing UEFI implementations. There’s no ‘special‘ UEFI feature like SSD Secure Erase with ASUS and MSI or ASRock’s and MSI’s System Browser and Board Explorer tools, respectively.
Gigabyte’s current UEFI is certainly a major improvement over the implementation seen on motherboards prior to LGA1151 offerings and the Easy Mode page is a nice addition that can help novices. Fan control functionality is superb and that may be enough of a positive for users to overlook the other negatives.
yawn…..
i was using intel (and only intel) since 2008… but this x299.. no thanks.
i rather buy a threadripper. intel has lost it… too expensive for what it offers.
i am not stupid enough to pay 40% more for 10-20% more real life performance.
and who was the genius that thought using TIM on a high end CPU is a good idea?
my main system is still a x99 but i changed my sandy bridge 2600k system to a ryzen 1700… best CPU deal since 2011. go AMD!!!
AHAHAHAHAAHAHAHHAHA!
AMD SUCKS!