

Automatic CPU Overclocking:

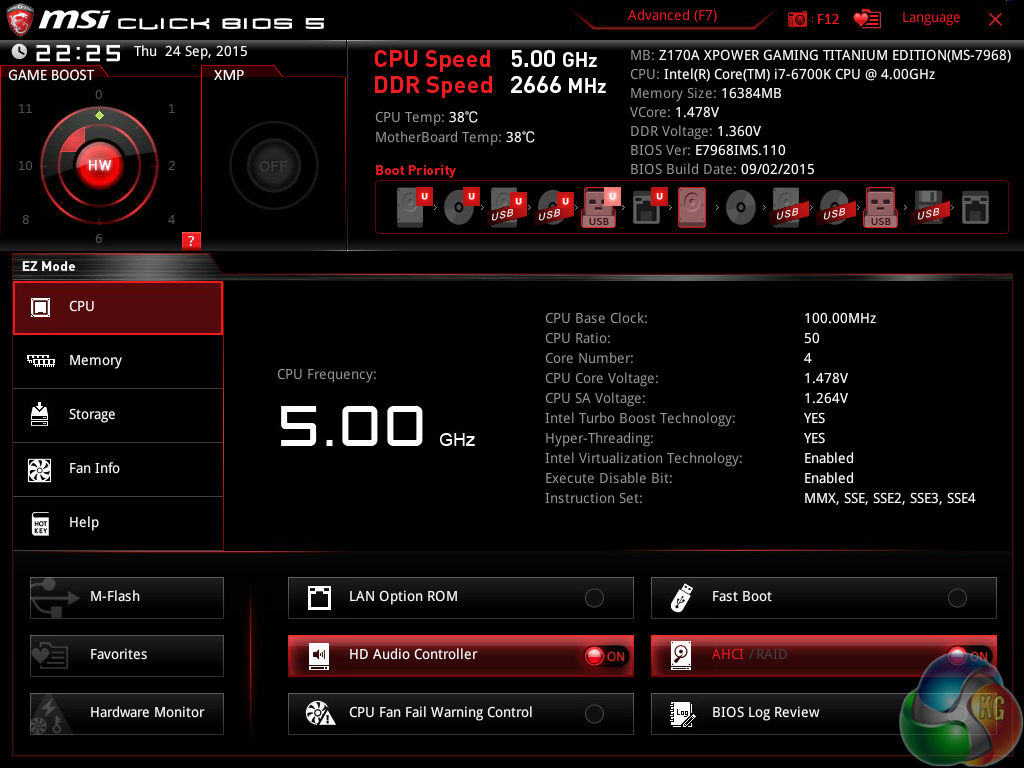
MSI includes a number of worthwhile overclocking presets. All but the highest – 5GHz – overclocking preset maintains XMP functionality if it has already been enabled.
I think the 4.69GHz 6700K profile is likely to be the most used option. A sensible core voltage level of around 1.3-1.32V is applied and the frequency is achievable for many Skylake 6700K CPUs. The DDR4 frequency is overclocked when XMP is enabled, however, so that may cause stability concerns.
We tested the second most aggressive – 4.9GHz – profile and found it to be perfectly stable. We would not advise using this profile without high-end cooling (even more so than 240/280mm AIO liquid coolers) as the core voltage reached over 1.45V, as read by a multimeter.
Manual CPU Overclocking:
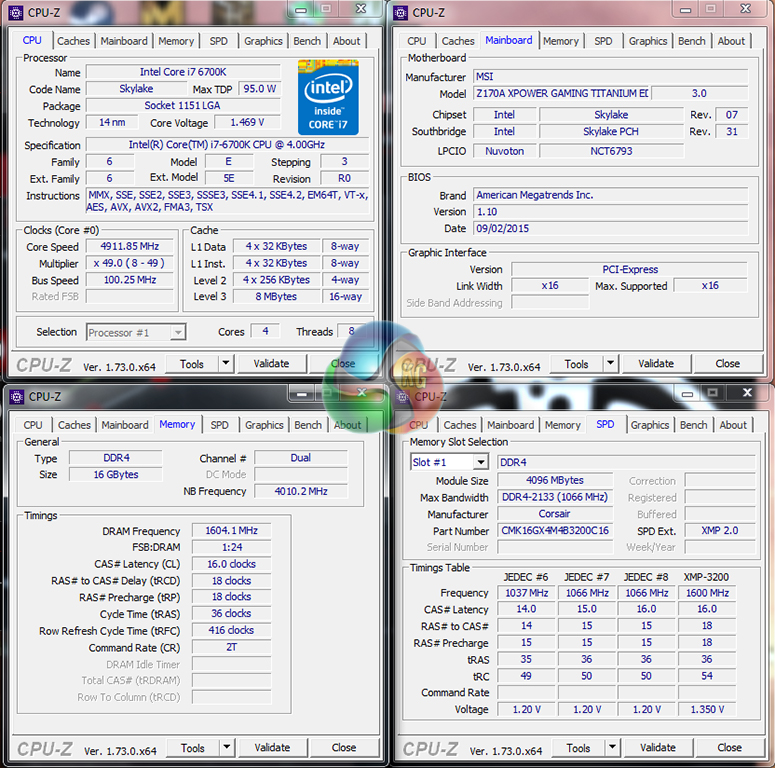
To test the MSI Z170A XPower Gaming Titanium Edition motherboard’s CPU overclocking potential, we first increased the CPU VCore to 1.36V and set the PCH voltage to 1.10V. Our testing allowed a 100% (enthusiast) VDroop setting to be applied by reducing the BIOS-set voltage in comparison to our VCore target. The cache ratio was set to 45x.
Overclocking with the Z170A XPower Titanium motherboard is more difficult than it really ought to be. Manually applying a 1.40V CPU VCore override voltage translates into a load CPU voltage of around 1.44V. 40mV overshoot is far too high for an enthusiast, overclocking motherboard.
The reason for such an overshoot is related to the board's VDroop settings. Applying the VDroop level through the UEFI is not very clear and it is easy to see how many general (not enthusiast) overclockers will quickly get confused by the percentage values. I would have liked to see MSI include some form of worthwhile description to highlight what each VDroop setting will do to the CPU VCore.
I found manual adjustment to be the best method for overcoming the aggressive VDroop settings. That is, manually applying a 100% VDroop setting and reducing the applied VCore to a level where the load voltage reaches one's desired CPU voltage level. I reduced the BIOS-set CPU voltage level to 1.36V in order to feed the CPU with 1.40V (as read by the multimeter) under load.
This workaround should be done automatically in the UEFI – if I manually set a 1.4V VCore override, the other settings should be automatically tweaked to ensure that my chip receives my desired VCore level, not a significantly higher value.
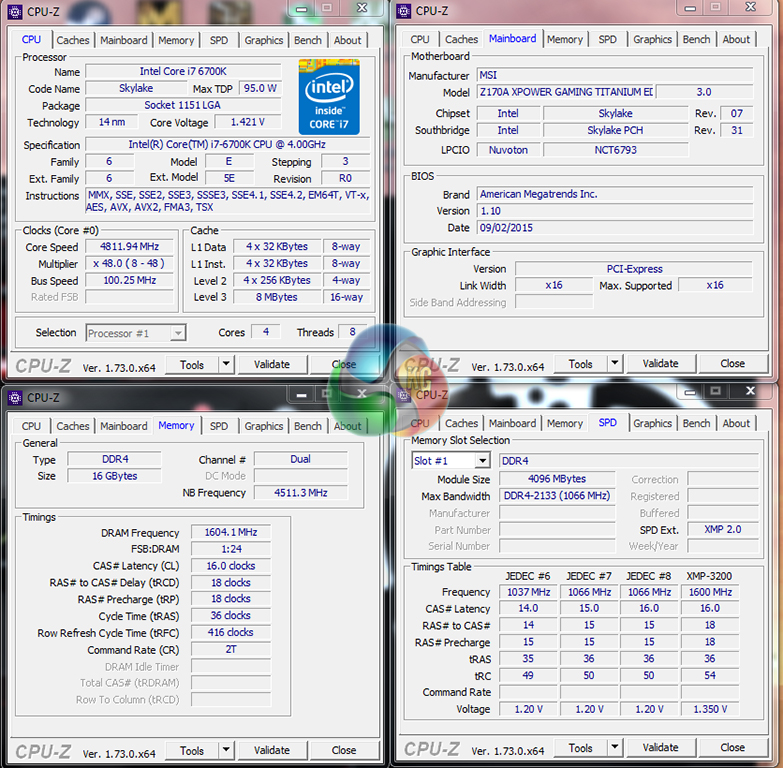
Despite the CPU voltage application difficulties, MSI's Z170A XPower Titanium had no problem taking our Core i7-6700K CPU to 4.8GHz with stability. This was in addition to a 4.5GHz cache frequency and 3.2GHz DDR4 memory.

Allow me to show ~you a genuine way to earn a lot of extra money by finishing basic tasks from your house for few short hours a day — See more info by visiting >MY*&___(DISQUS)*%___ID)
I think you should do some reading before using harsh terms such as “stupid advertising”, perhaps you might even learn something new 😉
https://en.wikipedia.org/wiki/USB#USB_3.1
” The USB 3.1 standard increases the data signaling rate to 10 Gbit/s in the USB 3.1 Gen2 mode, double that of USB 3.0 (referred to as USB 3.1 Gen1)”
The information in that article, the referenced technical documents for which I have examined many times over the past year, says what I have said in the article. ‘USB 3.1 Gen 2’ is 10Gbps. USB 3.0 is 5Gbps and is sometimes referred to as ‘USB 3.1 Gen 1’ (by many vendors, not just MSI, as I clearly pointed out in the article).
5Gbps USB had always been referred to as USB 3.0 (pretty much universally, as far as I can tell) before USB 3.1 entered the consumer limelight. Now that USB 3.1 ports at up to 10Gbps are available, marketing teams are quickly changing the naming structures of their 5Gbps USB 3.0 ports. Even Intel refers to the 5Gbps ports as USB 3.0 connections in their very own chipset diagrams.
I fail to see what there is to learn from the Wikipedia page that I hadn’t already written in the article.
Luke
Sadly, you fail to see quite a lot.
Please expand as I want to make sure that the information is correct and clear.
I wrote what I wrote as there is currently a lot of confusion surrounding the USB interface due to its new forms and speeds. Many consumers do not realise that USB 3.1 *Gen 1* is just another name for the 5Gbps USB 3.0 connection and therefore may make an uninformed purchasing decision thinking that it is actually the 10Gbps USB 3.1 *Gen 2* port being referred to.
Thanks,
Luke
No, what you wrote was “stupid advertising”, implying that it’s fake and wrong, when in fact you were wrong and did not do your homework.
So, in fact, it’s not stupid advertising at all and it’s just the way that the USB Implementers Forum now ALSO refers to the USB 3.0 interface, making it quite official and NOT stupid advertising at all.
The only confusing things are in fact those you wrote and you seem to be the only one confused, but what’s even worse is that you do not willing to admit it and keep thinking you are not wrong.
Anyway, believe whatever you wish and misinform you readers any way you like or can.
audio 115bB… what’s it??
OK we’ll just have to agree to disagree. Intel sells the chipset with USB 3.0 ports (no reference to USB 3.1 Gen 1 – which is the same as USB 3.0 but a different name, as I clearly wrote in the article). If Intel, the chipset provider, sells them as USB 3.0 ports then there is very little reason to change that naming scheme and advertising/marketing would be one of the few reasons to do so. So the word ‘stupid’ in this case points out how there is no need to change the naming scheme of ports that derive from Intel’s Z170 chipset. The word ‘stupid’ doesn’t always need to imply ‘fake or wrong’ as you imply. Those two words are not fact anyway – as is clear by now, they are debatable and the information supplied afterwards is factually correct.
You keep referring to the information as ‘wrong’ when it isn’t. If you read the rest of the sentence and paragraph instead of focussing on two (clearly debatable) words out of over 6000 in the article then you will see what is written is correct, both in terms of naming and speeds. Is USB 3.1 Gen 2 rated at 10Gbps, as written? Yes. Is USB 3.1 Gen 1 the same as USB 3.0 and rated at 5Gbps, as written? Yes. Both of those pieces of information are correct, and not ‘wrong’ as you refer to them.
Anyway, this debate is going nowhere. I have pointed out to readers who know less about the new USB standards that USB 3.1 Gen 1 ports are the same as USB 3.0 5Gbps ports, not the newer USB 3.1 Gen 2 10Gbps ports. It’s clear and there is absolutely no misinformation so now readers can understand how to compare the number of USB 3.1 Gen 1 ports on this board against the number of USB 3.0 ports on other vendors’ boards.
The audio system is based around the Realtek ALC 1150 codec.
Why not dB? Box had the wrong, this is false advertising? Quality is very bad.
MSI’s Audio Boost 3 system uses the Realtek ALC 1150 audio codec which is rated at a SNR of 115dB.
I just have to say… Luke is definitely right. I’m not a member on this site, but I just had to link my google+ so that I could comment on this.
I was hoping to get some feedback from people who bought this board. Instead it’s the standard nerd-fight-fest I should have expected. How sad. Anyway, this is a cool and unique looking motherboard with tons of features that I will never possibly need. I only wish it was $100 less