

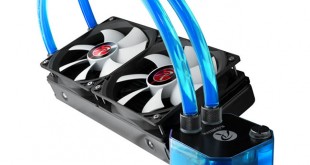
Today we are going to take a look at an interesting water cooling product – the Raijintek Triton, an ‘all in one' CPU cooler. The Triton has been designed to be user upgradable … in fact Raijintek take things a step further and actively encourage users (who have the necessary skills) to customise their loop.
We have reviewed a number of products from Raijintek in the past and have been quite impressed with what they have to offer. It is clear that they are looking to take on the longer established brands in the market with a slightly different take on what is already out there.

Features:
- 240mm Aluminium Radiator
- Low-noise pump with graphite pipe
- Nickel-plated copper cold plate
- Resevoir with 2 Integrated LED's
- Red, Green, Blue or Transparent Coolant
- 2 x 120mm fans, Manually adjustable
- Easy & Secure installation
- Compatible to almost all sockets
Specifications:
- Fan Dimension 120 x 120 x 25 (mm)
- Fan Speed 1000 – 2600 RPM
- Fan Airflow 38.889 – 100.455 CFM
- Fan Air Pressure 0.744 -4.819mm H2O
- Fan Noise Level 21.6 – 41.6 dBA
- Fan Rated output 0.08 – 0.48 A
- Power Consumption 0.96 – 5.76 W
- Connector 3 pin
- Radiator Dimensions 275 x 120 x 32 (mm)
- Radiator Material 100% Aluminium
- Pump Dimensions 38 x 56 x39 (mm)
- Pump Bearingh Type Graphite Pipe and Ceramix Axis
- Pump Q-Max 120L/Hr
- Pump noise 18 dBA
- Pump Life Expectancy 50,000 hours
- Pump Speed 3000 RPM @ 12v DC
- Pump Power 4 W
- Copper Cold Plate
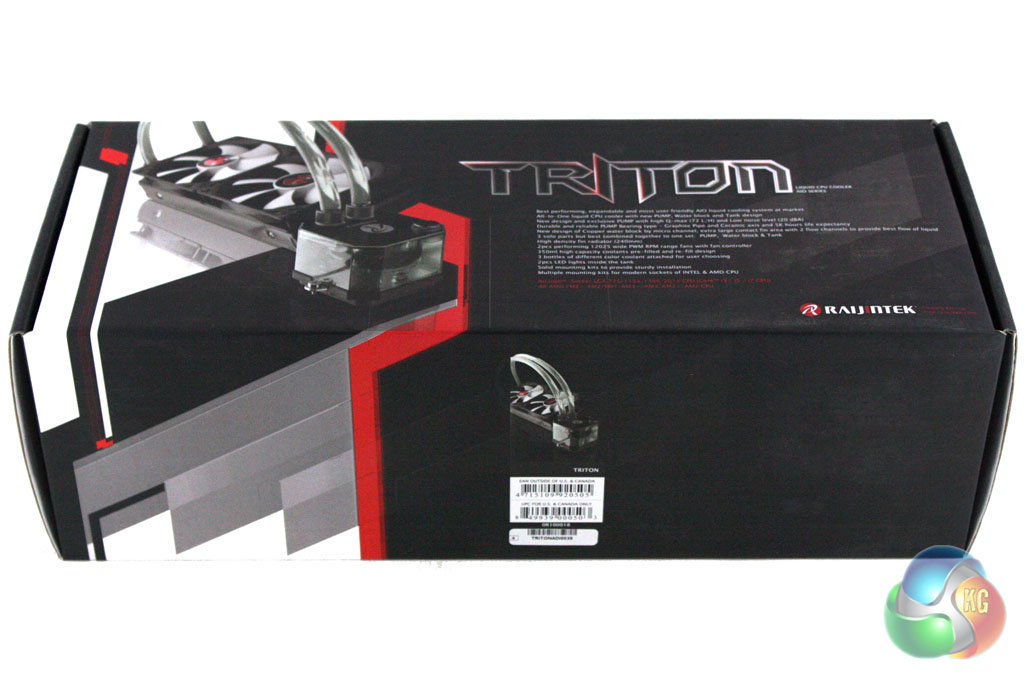
The Raijintek Triton AIO is supplied in a substantial box which reflects the large size of the cooler within. It is decorated in a black, red and white livery with an image of the cooler on the front.
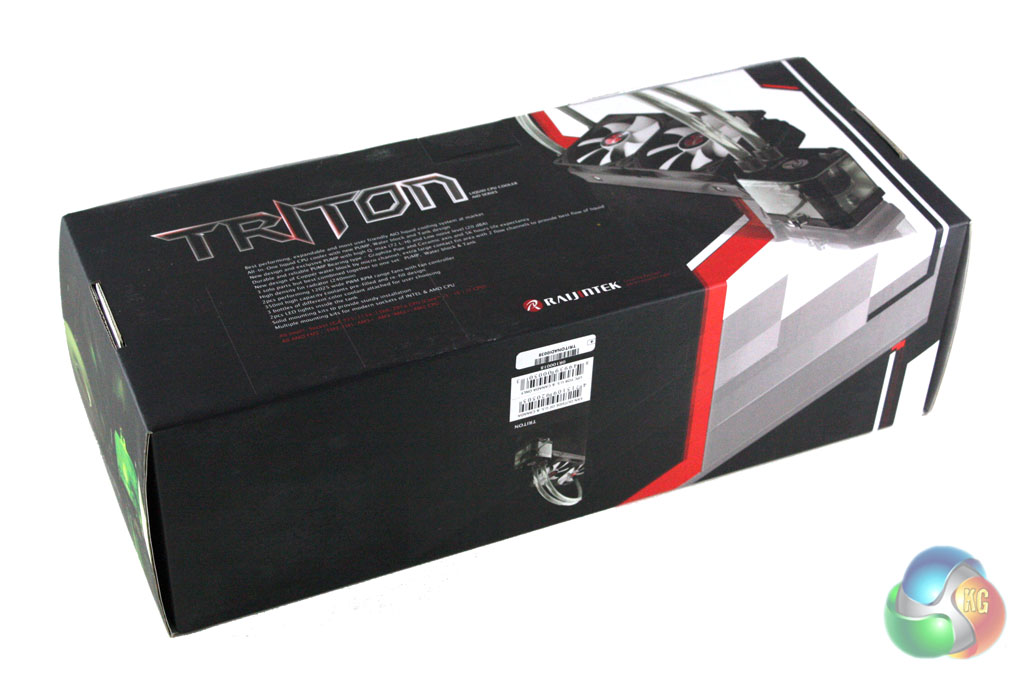
Turing over the box reveals some further details about the cooler within, alongside another picture.
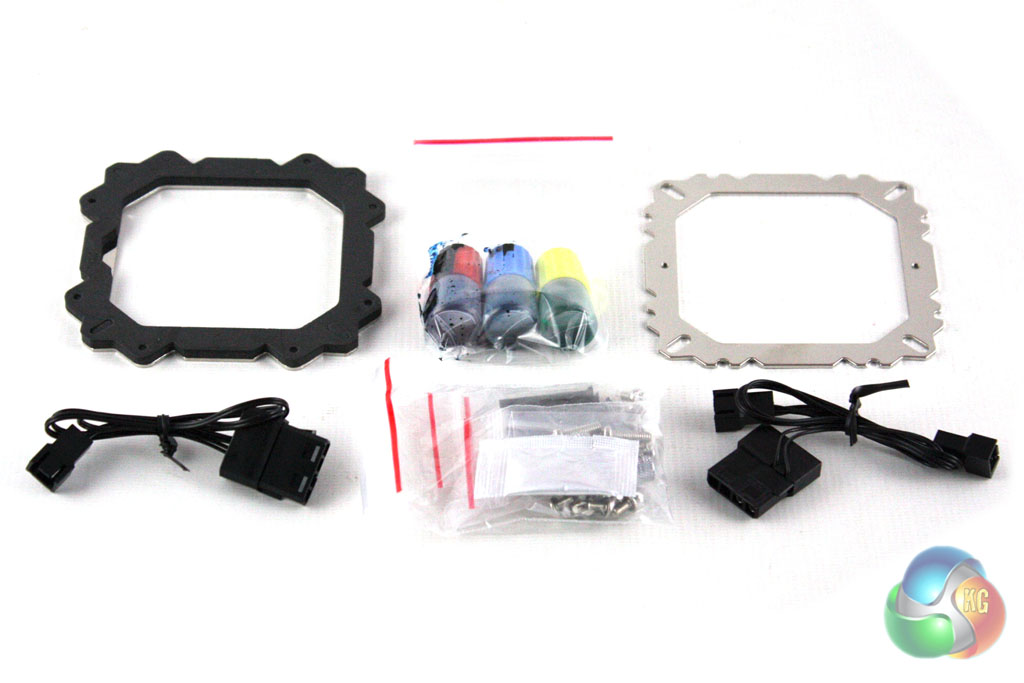
Inside the box we find all of the accessories required to install the cooler onto most current platforms. Raijintek also include two 120mm fans with the cooler and a series of three coloured dyes for the watercooling loop.
It is quite clear from a glance that the Triton is put together in a slightly different manner to most all-in-one liquid coolers. While the assembly may appear more crude and clunky, the inclusion of clear plastic hoses and bulky compression fittings is quite deliberate. These components meet industry size standards so that you can fully customise the loop with other components if required.
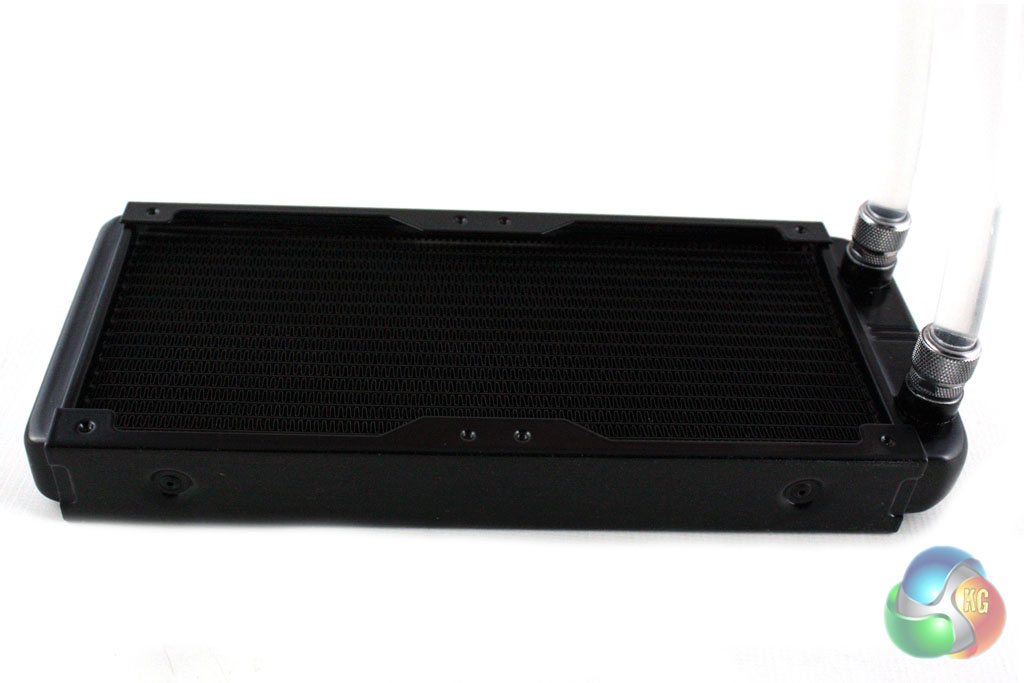
The radiator itself is a 240mm model which measures 32mm thick. This is fairly low profile and should therefore fit in the vast majority of cases which boast support for 240mm radiators. It is worth considering that one of the end tanks of the radiator is slightly larger than most AIO units to accommodate the comparatively large compression fittings used.
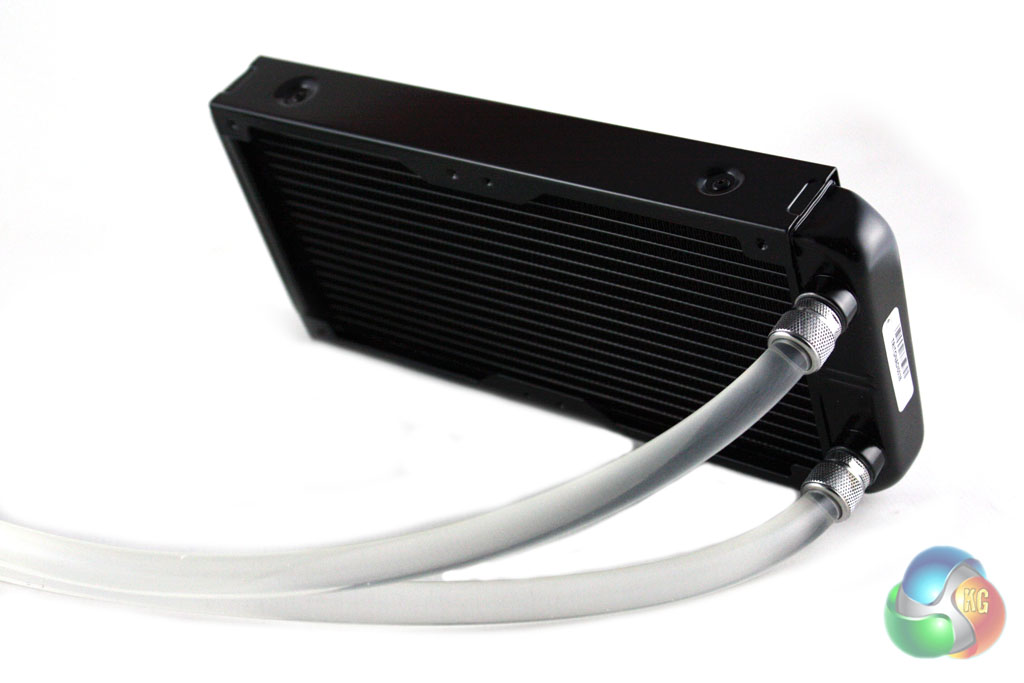
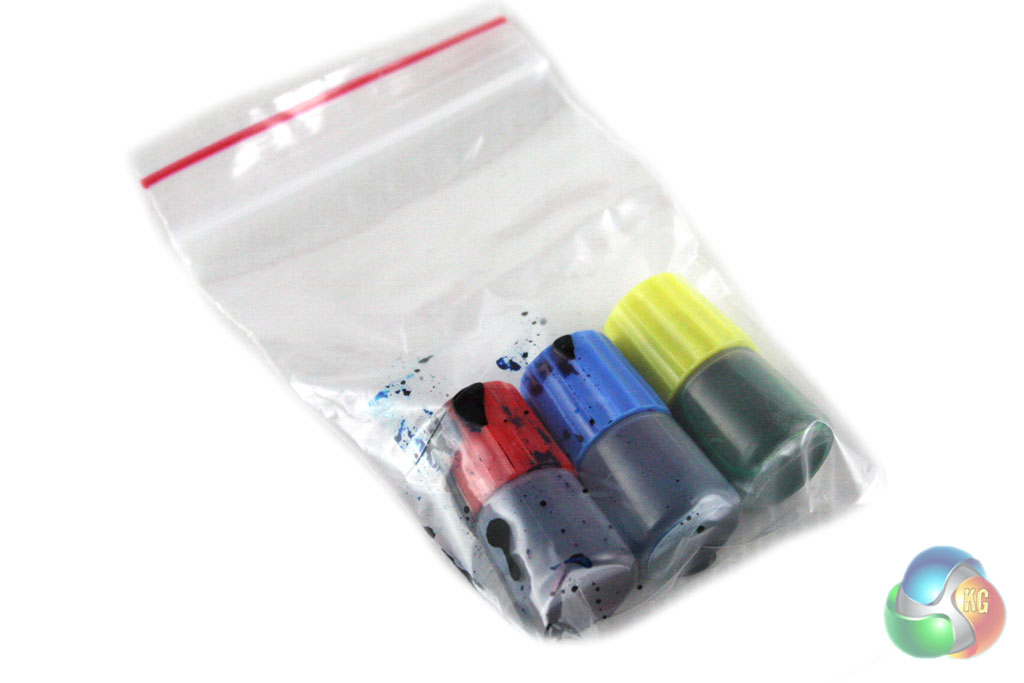
Raijintek have chosen to use clear plastic 8/11mm hoses for the Triton which have clear coolant running through them. That said, they also include red, green and blue dye for this coolant should you want to customise the cooler a little. Adding coolant into the Triton does require the removal of a tamperproof sticker, however the warranty should remain intact unless you cause damage to the cooler.
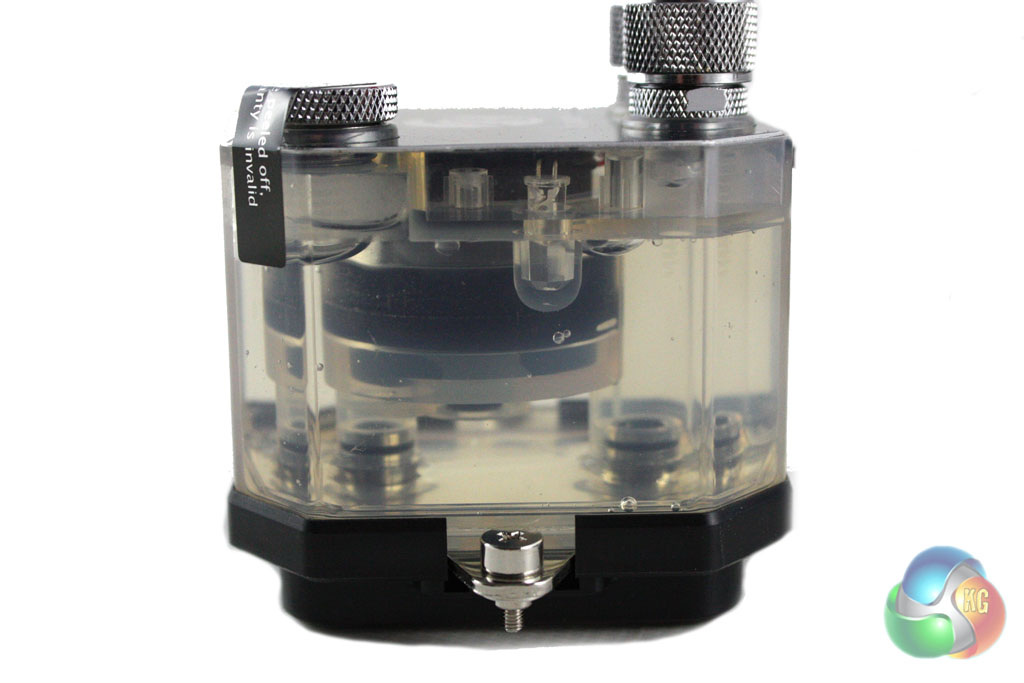
The CPU block and pump unit is also constructed out of clear plastic, meaning that you can see the coolant running through it. Raitjintek has integrated LED lights into this to illuminate the coolant when running. This will look especially good if you choose to use the provided dyes for the coolant. The unit itself is quite large in size – remarkably more so than most all-in-one liquid coolers. This should not cause many issues though as it is not likely to cause any RAM compatibility issues.
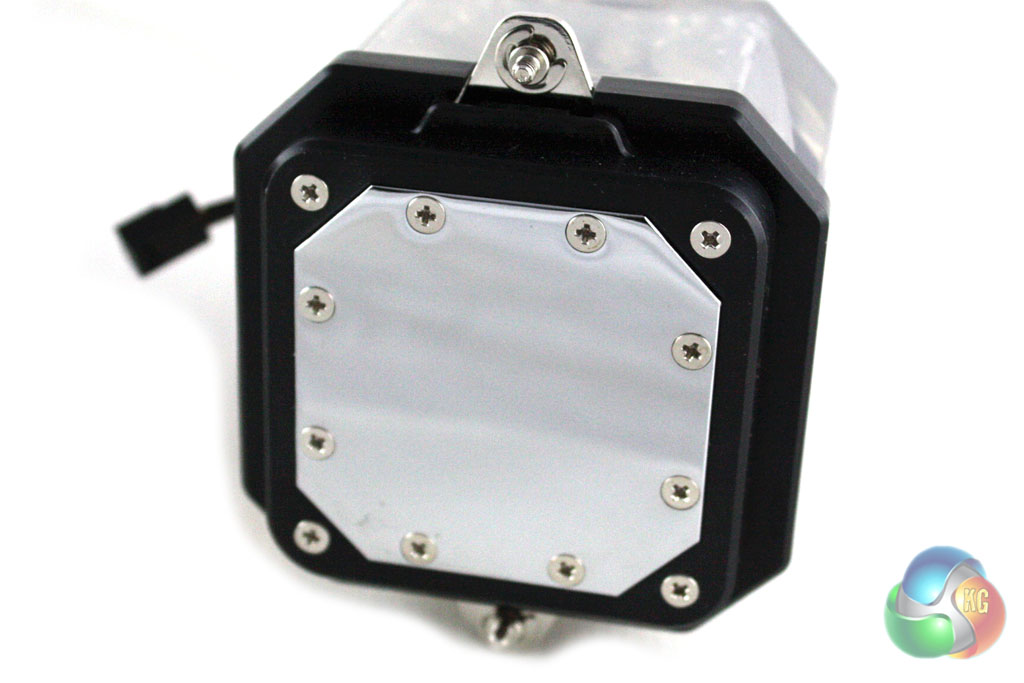
While Raijintek claim that the Triton features a copper cold plate, it would appear that it is actually made from nickel-plated copper. This should not affect the thermal performance, though. The cold-plate itself is octagonal in shape and is secured to the unit with a series of screws spanning the periphery.
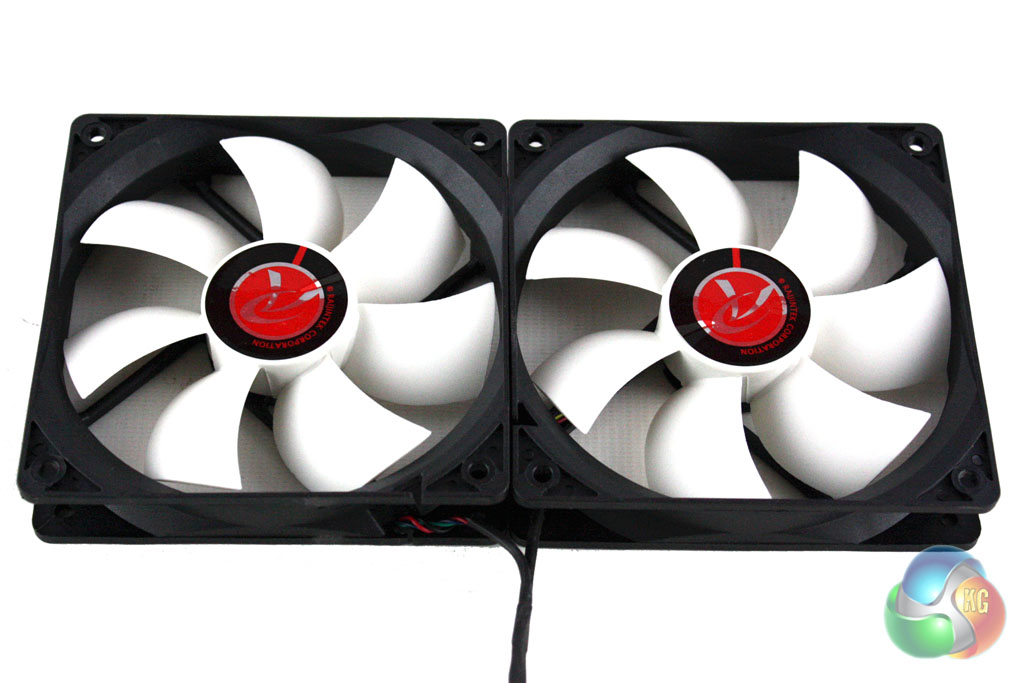
Raijintek include two 120mm fans with the Triton which are quite unusual in design. Both fans are powered through the same cable which keeps them closely tied together. There is another cable protruding from this which features a small variable resistor, allowing you to manually set the speed of the fans.
While we haven't seen this approach before, it will be perfect for those who want to tune their cooler to consistently achieve the best compromise between acoustics and cooling performance.
After experiencing the excellent installation guide which was supplied with the Fractal Design Kelvin S36 (review coming soon), we were somewhat underwhelmed with Raijintek's offering. The user guide is very basic and only features small diagrams and brief instructions. Thankfully the installation procedure is quite simple so this is not a massive issue. We will be documenting the installation process on an Intel Socket 2011 motherboard.
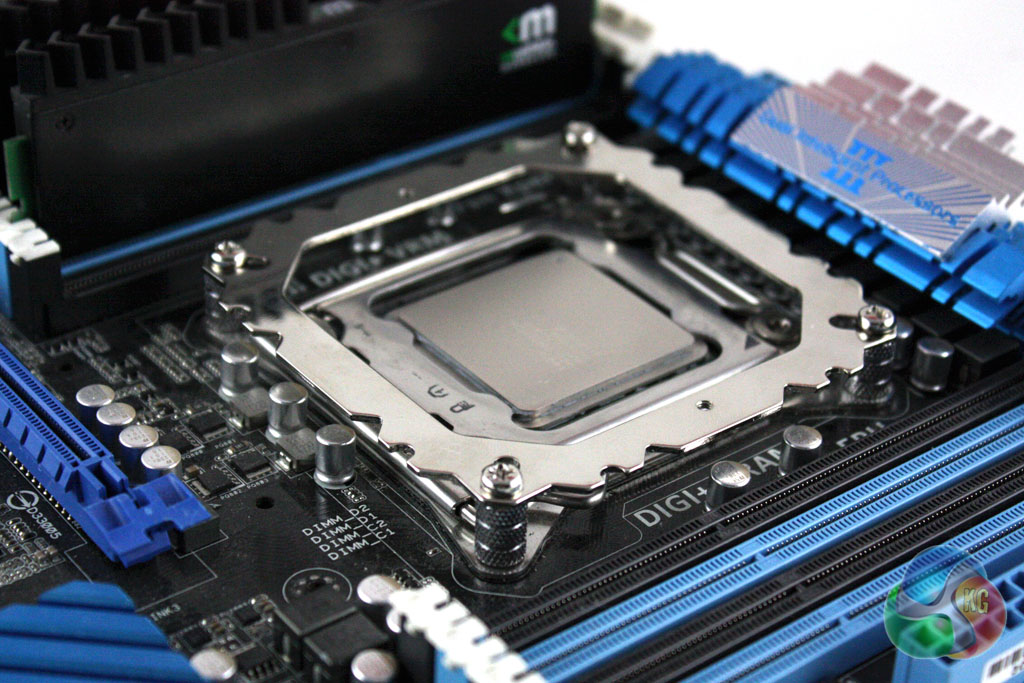
First of all we must install the retention bracket to our motherboard. This requires us to place four standoffs over the screw threads in each corner of the socket, place the bracket on top and secure into place using the four provided screws.
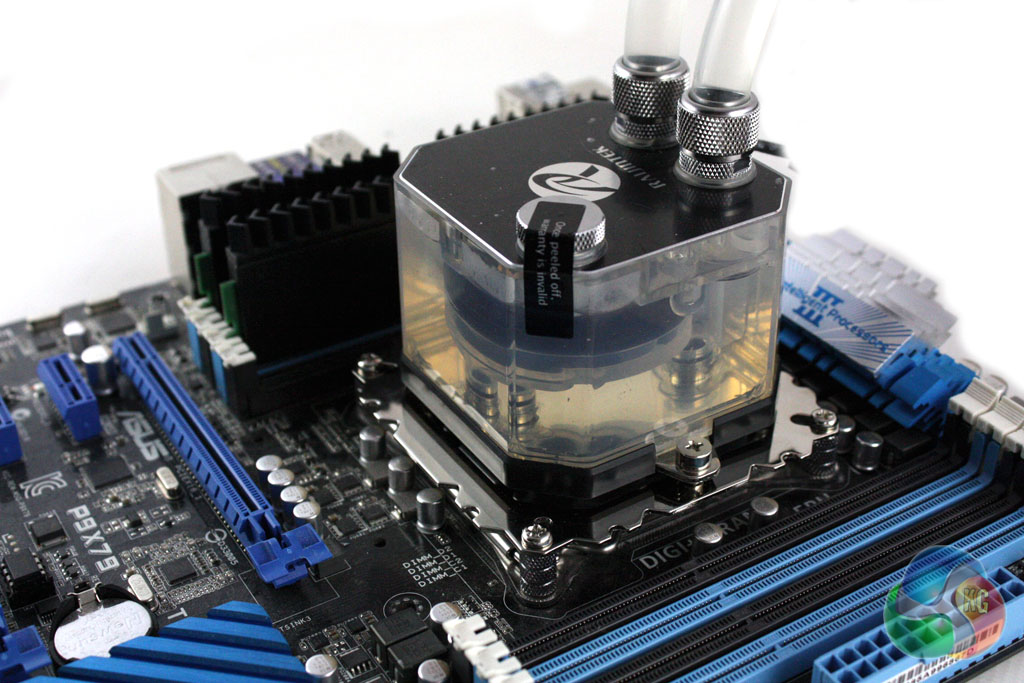
Then we can simply apply the thermal paste to the CPU and screw the CPU block down into place.

Finally we can attach the fans to the inside of the radiator and screw it into the case. It is worth noting that this cooler does not feature anti-kink coils like the Kelvin S36 and the hoses can kink quite easily. We would recommend double checking that the hoses are kink-free after installing the cooler.
To test the performance of the Raijintek Triton, we built a powerful X79 based system on an open test bench to push the cooler to the limits. As we were testing on an open test bench, we directed a Be Quiet! Shadow Wings 120 mm fan at the VRM circuitry to better simulate the airflow generated in a case.
For our extreme tests, we manually overclocked the i7-3930K to 4.7 GHz by increasing the multiplier to 47x, leaving the baseclock set at 100 MHz.
We set Load Line Calibration to ‘High', and increased the CPU Current Capability to 120% with a minor voltage increase. Speed stepping was disabled for both stock and overclocked tests.
We tested the Kelvin with the fans connected to a 12V header on our motherboard.
Coolers Tested
- Raijintek Triton (fans at 1000rpm)
- Raijintek Triton (fans at 2600rpm)
- Fractal Design Kelvin S36 (fans at 12V)
- Cooler Master Nepton 240M (fans at 12V)
- Corsair H105
- Corsair H110 (fans at 12V)
- Corsair H90 (fan at 12V)
- Phanteks PH-TC14PE (fans at 12V)
- Noctua NH-D14 (fans at 12V)
- Processor: Intel Core i7-3930K
- Motherboard: Asus P9X79
- Memory: 16 GB (4 x 4 GB) Mushkin Blackline 1600 MHz
- Thermal Paste: Arctic Cooling MX-2
- Graphics Card: AMD Radeon HD 7950
- Graphics Card (noise tests): HIS Radeon HD 5550 Silence
- Power Supply: Seasonic Platinum P1000W
- Prime 95 (64-bit)
- CPUID Hardware Monitor
For temperature tests we loaded the system for 10 minutes using Prime 95 and recorded the CPU temperature using CPUID HWMonitor. We then restarted the system and left it idling at the desktop for 10 minutes before recording temperatures. The temperatures recorded are based on an ambient temperature of 20 degrees C.
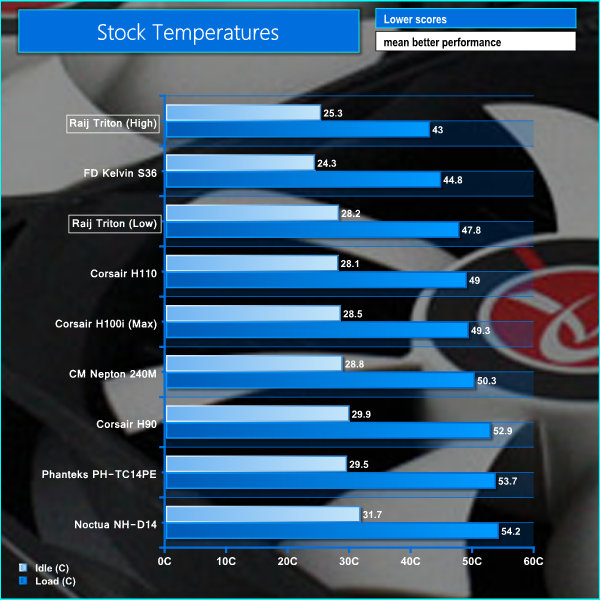
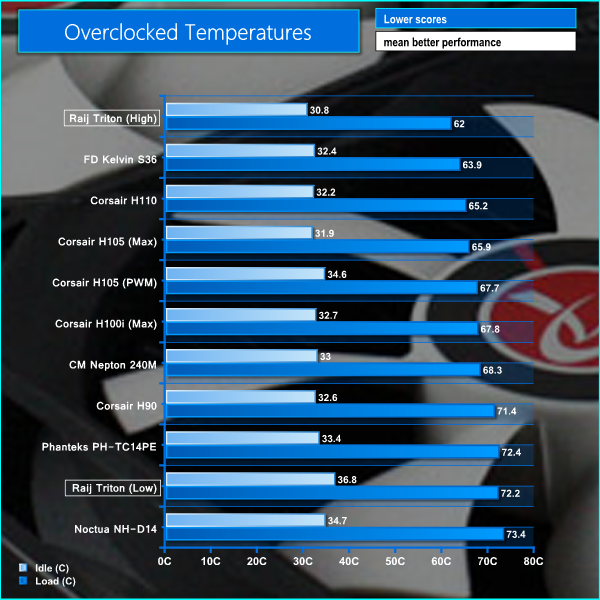
These temperatures are very impressive, showcasing the capability of this cooler. It is quite clear that it struggles a little with low airflow when overclocked as the temperatures were significantly affected in the low fan speed test.
In our noise level tests we switched off all the case fans and replaced the AMD Radeon HD 7950 graphics card with a HD 5550 passive model so were just taking into account the noise generated by the cooler fans themselves.
We measured the noise level with a Digital Noise Level meter at a distance of 1 m from the front of the system.
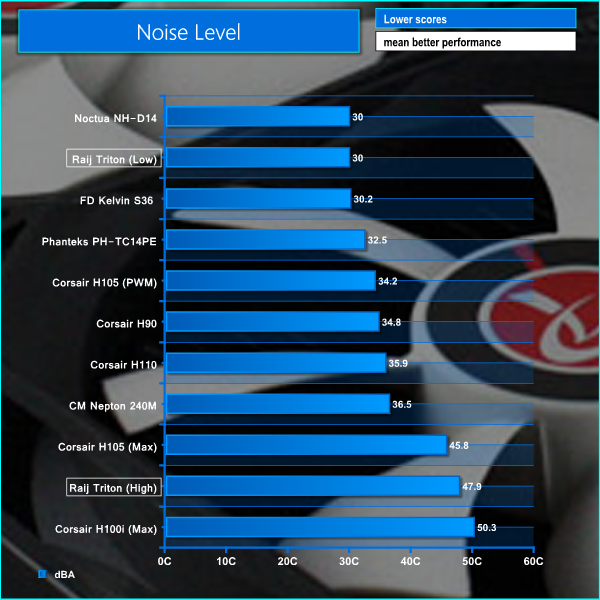
As we can see from the results, the difference in noise level between high and low fan speed is massive. Thankfully the variable fan controller will allow you to tune the cooler to your specific requirements without much trouble.
Overall we are fairly impressed with what the Raijintek Triton all-in-one liquid CPU cooler has to offer. While we imagine the bulk of users will purchase the cooler and install it as is, it offers users the flexibility to customise the water cooling loop and add in other components if required – or simply to add colour to the coolant.
In terms of raw performance, the Triton is impressive on paper. The included fans feature a variable speed controller which allows the user to set up the thermal acoustic balance of the cooler to suit specific needs. Even at the lowest fan setting, the Triton coped with a hot running, overclocked i7-3930K – albeit at high temperatures. While temperatures were significantly lower with the fans at maximum speed, this generated more noise hat we could put up with on a permanent basis.
While the mounting mechanism is not quite as simple as Corsair's, the installation process is fairly simple. A word of warning to less experienced users – the installation guide is pretty poor and does not offer much help.
Perhaps the only disappointing aspect of this cooler is the lack of attention to detail when it comes to design and build quality. The radiator hoses and fan cables feel very cheap indeed and the standard fans are pretty ugly. We would have preferred to see Raijintek using black compression fittings which would better compliment the black CPU block top and the black radiator and fan chassis.
![]()
The Raijintek Triton is available for £70 from Overclockers UK. At this price we feel that it offers excellent value for money, coming in cheaper than every 240mm all-in-one water cooling unit we have tested previously. Even though the build quality of the Triton is not particularly impressive, we imagine that most users will be willing to forgive this considering the fantastic performance.
Discuss on our FACEBOOK page, over HERE.
Pros:
- Impressive cooling performance.
- Excellent value for money.
- Dye included for loop.
- Customisable loop.
- Speed controlled fans included.
Cons:
- Suspect build quality.
- Included fans are not ideal.
KitGuru says: An affordable 240mm water cooler which offers great value for money.

swag
Looks like a decent bit of kit for an entry into WC as it is customisable. Only thing that has stopped me buying an AiO Cooler is that they have dull black hoses. Add in the great perfomance and this looks like a no brainer.
Could this cooler keep my 4690k at 4.6 ghz cool… or i shoulg go air
it actually keeps my i5 4690K cool at 4.6ghz.
i’m doubting you’ll get to 4.6 on air tbh… but who knows, anything is possible.
I’ve been waiting for a while for a review of this cooler to come out, and it’s good to see that it’s a positive one! I’ve been considering this vs the H100i for my next build. The ability to customise it thanks to industry-standard fittings is what’s making me want it.
Would be better to buy the “Core” edition and buy better fans?
I’ve read some discussion on finnish forum that it wouldnt fit Asus Z97-A because of the capacitors on the board are so close to CPU. Anyone got better knowledge of this? I was about to test is as I got mine for Christmas but it was broken when I opened the packaged, and it seems I have to wait until February for a replacement since the store it was bought from was out of stock.
Why would you want that? The stock fans have 4.8 mmH2O static pressure according to its specs, although I have no idea if it’s accurate.
Such a fail review, in every other site i’ve seen the NHD14 only 1 degree c behind the NHD15 which cools better than the H100i at max settings which is loud.
Here you have the H100i beating the NHD14 by almost 5 degrees.. these results are very suspicious. Plus it shows the AIO’S are literally barely any better than large HSF’s and much louder.
I was thinking on installing it push-pull with 4 gentle typhoon.
Heh, I run a i7 4790K at 4.7 GHz, Noctua NH-D14
see that shit…. anything is possible.
what’s your temps Ben?
the stock fans are crap… at least they were for me.
at least the triton is so cheap you don’t have to care too much about just throwing away the fans.
Around 76C Max while playing battlefield hard line. I can hit 90C with Aida 64 / Intel xtu or prime95 stress test. This is probably one of the best overclocking CPU I’ve gotten in the silicon lottery. CPU voltage is 1.30v.
yeah, there’s the difference… Maxed out I don’t go over 56/57c
Great chips tho… I couldn’t get my old 3750K over 4.2ghz. I felt like Intel owed me something better this time. Lol
That’s bad so you couldn’t go past 4.2 and have a stable overclock I guess I got lucky with my three Intel CPUs. I5 3570k i5 4690k and i7 4790k all between 4.5 to 4.7. I could run 4.8 but its not Intel xtu stable on my I7.
Which fans did you install?
i’m using deepcool dead silence fans.. you can see one in my picture in the comments below… i only picked the fans because they matched my build… and it turns out they’re pretty quiet as their name implies.
“AIO’S are literally barely any better than large HSF’s and much louder”
There is this thing called ‘RAM clearance’.
i just bought one for my z97-a asus so i sincerely hope it fits. have you figured out wether it will or not?
Yes I have. It does not fit unless you grind it from the bottom a little. Guaranteed warranty void if installing on z97-a. I put some of the thermal grease on top of the capacitors and installed the pump on cpu. The bottom of the pump was contacting by maybe 1/3 on cpu from the other side and on the other side it was hitting the capacitors. Used a rotary tool to grind maybe 2-3mm away from the side of the bottom of the pump to get it in full contact with cpu.
Does yours have notches on the side of the block like pictured? I’ve been in contact with raijintek and they said it’d be close but they made a new block with notched sides. Wondering if that will make the difference
Not quite sure but I doubt the one I have has bottom like that. From the picture I would say it makes the difference since the notches are deeper than the ones I made myself.
Excellent, thanks for the info. I’ll be posting my results after I receive my cooler (hopefully friday)
Yes you do that please. I can then curse myself for being too hasty.
so far I’m having a great experience with this cooler. It does fit on my asus z97-a motherboard with no modification needed
it fits in there just fine. I found some old pictures and they did indeed change the block design
Have a look on the Raijintek site at just the fans section. Their only 12025 fan has nowhere near that pressure so not sure where they get that from, maybe they’ve doubled it because there’s two of them 🙂
Can i insert it in the Zalman z11 plus?
Hi Phil i just bought this from Overclockers uk and i am really hoping it’s the same unit as you have with the cut outs on the cpu block! I have an Asus Z97-AR MoBo.. as far as i can make out the product codes for the new units are OR100023 (the same as the one i just bought) rather than OR100018.. a lot of the sites selling them show the product code as OS100018/OS100023, which I’m assuming means it’s the OS100018 with updated block! is there anyway some one can confirm this for me only every review I’ve read mentions nothing about there being two different blocks and every picture used on all retailers sites are of the block with out any cut outs, but I’m hoping that’s just because they are old pictures. thanks in advance..
Anyone know if you can possibly use this block in a custom (hardline) water cooling loop? Love the design and I would like to use it for my loop with an additional pump to cool my pc together with a ek gpu block and hard pipes.