

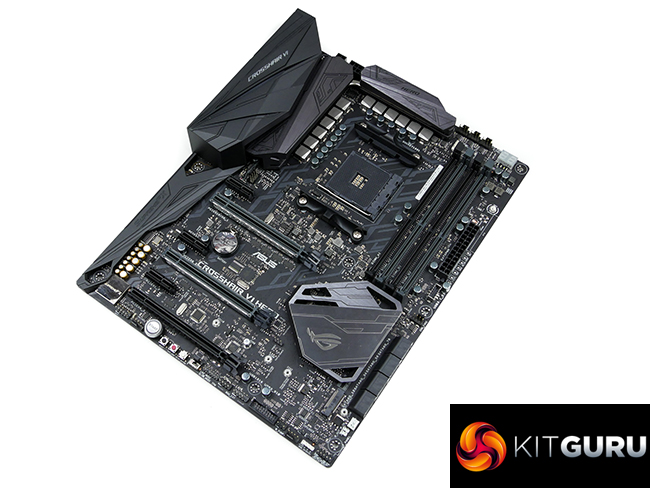
ASUS' Crosshair VI Hero is currently flying the flag for the Republic of Gamers (ROG) range on AMD's new AM4 platform. Sporting the X370 chipset and a healthy power delivery system to feed thirsty Ryzen CPUs, ASUS' premium ATX motherboard also comes equipped with RGB lighting, onboard M.2, and an internal 10Gbps USB 3.1 header.
Bolstered by the feature-heavy nature of AMD's new X370 chipset, the ASUS ROG Crosshair VI Hero is able to tick a number of boxes that will appeal to mainstream enthusiasts and prosumers. There's support for a pair of high-bandwidth graphics cards in CrossFire and SLI, a dozen power delivery phases for the CPU and SOC rails, and controllable RGB lighting alongside two 4-pin strip headers. On the storage side, the Hero sports a single 32Gbps PCIe 3.0 x4 M.2 connector, 10Gbps USB 3.1 from multiple sources, and eight SATA 6Gbps ports for media junkies.
ASUS gives thought to fan control by deploying seven 4-pin headers, each with individual adjustment capability. A unique cooling-driven feature is the inclusion of AM3 mounting holes that allow long-time AMD users to bring their old CPU cooler along for the Ryzen ride. This is particularly useful to consumers who have a CPU cooler or liquid cooling block that hasn't been updated to support AM4 mounting.
With a vast array of features and what looks to be a strong power delivery system, how will ASUS‘ roughly £250 ROG Crosshair VI Hero perform in our testing?
Features (taken from the ASUS product page):
- Aura Sync RGB LED: Stunning synchronised effects and two Aura 4-pin RGB-strip headers
- SupremeFX: Exclusive new codec plus intuitive Sonic Studio III and Sonic Radar III
- Compatible with both AM3/AM4 coolers and LN2 pots
- ROG Water Cooling Zone : Dominate your cooling system
- 5-Way Optimisation: One-click system-wide overclocking.
- Best gaming networking: Intel® Gigabit Ethernet, LANGuard and GameFirst technologies
- Best gaming connectivity: M.2, USB 3.1 front-panel connector and both USB 3.1 Type-A/C
- Best gaming durability: Safeslot and premium components for maximum durability
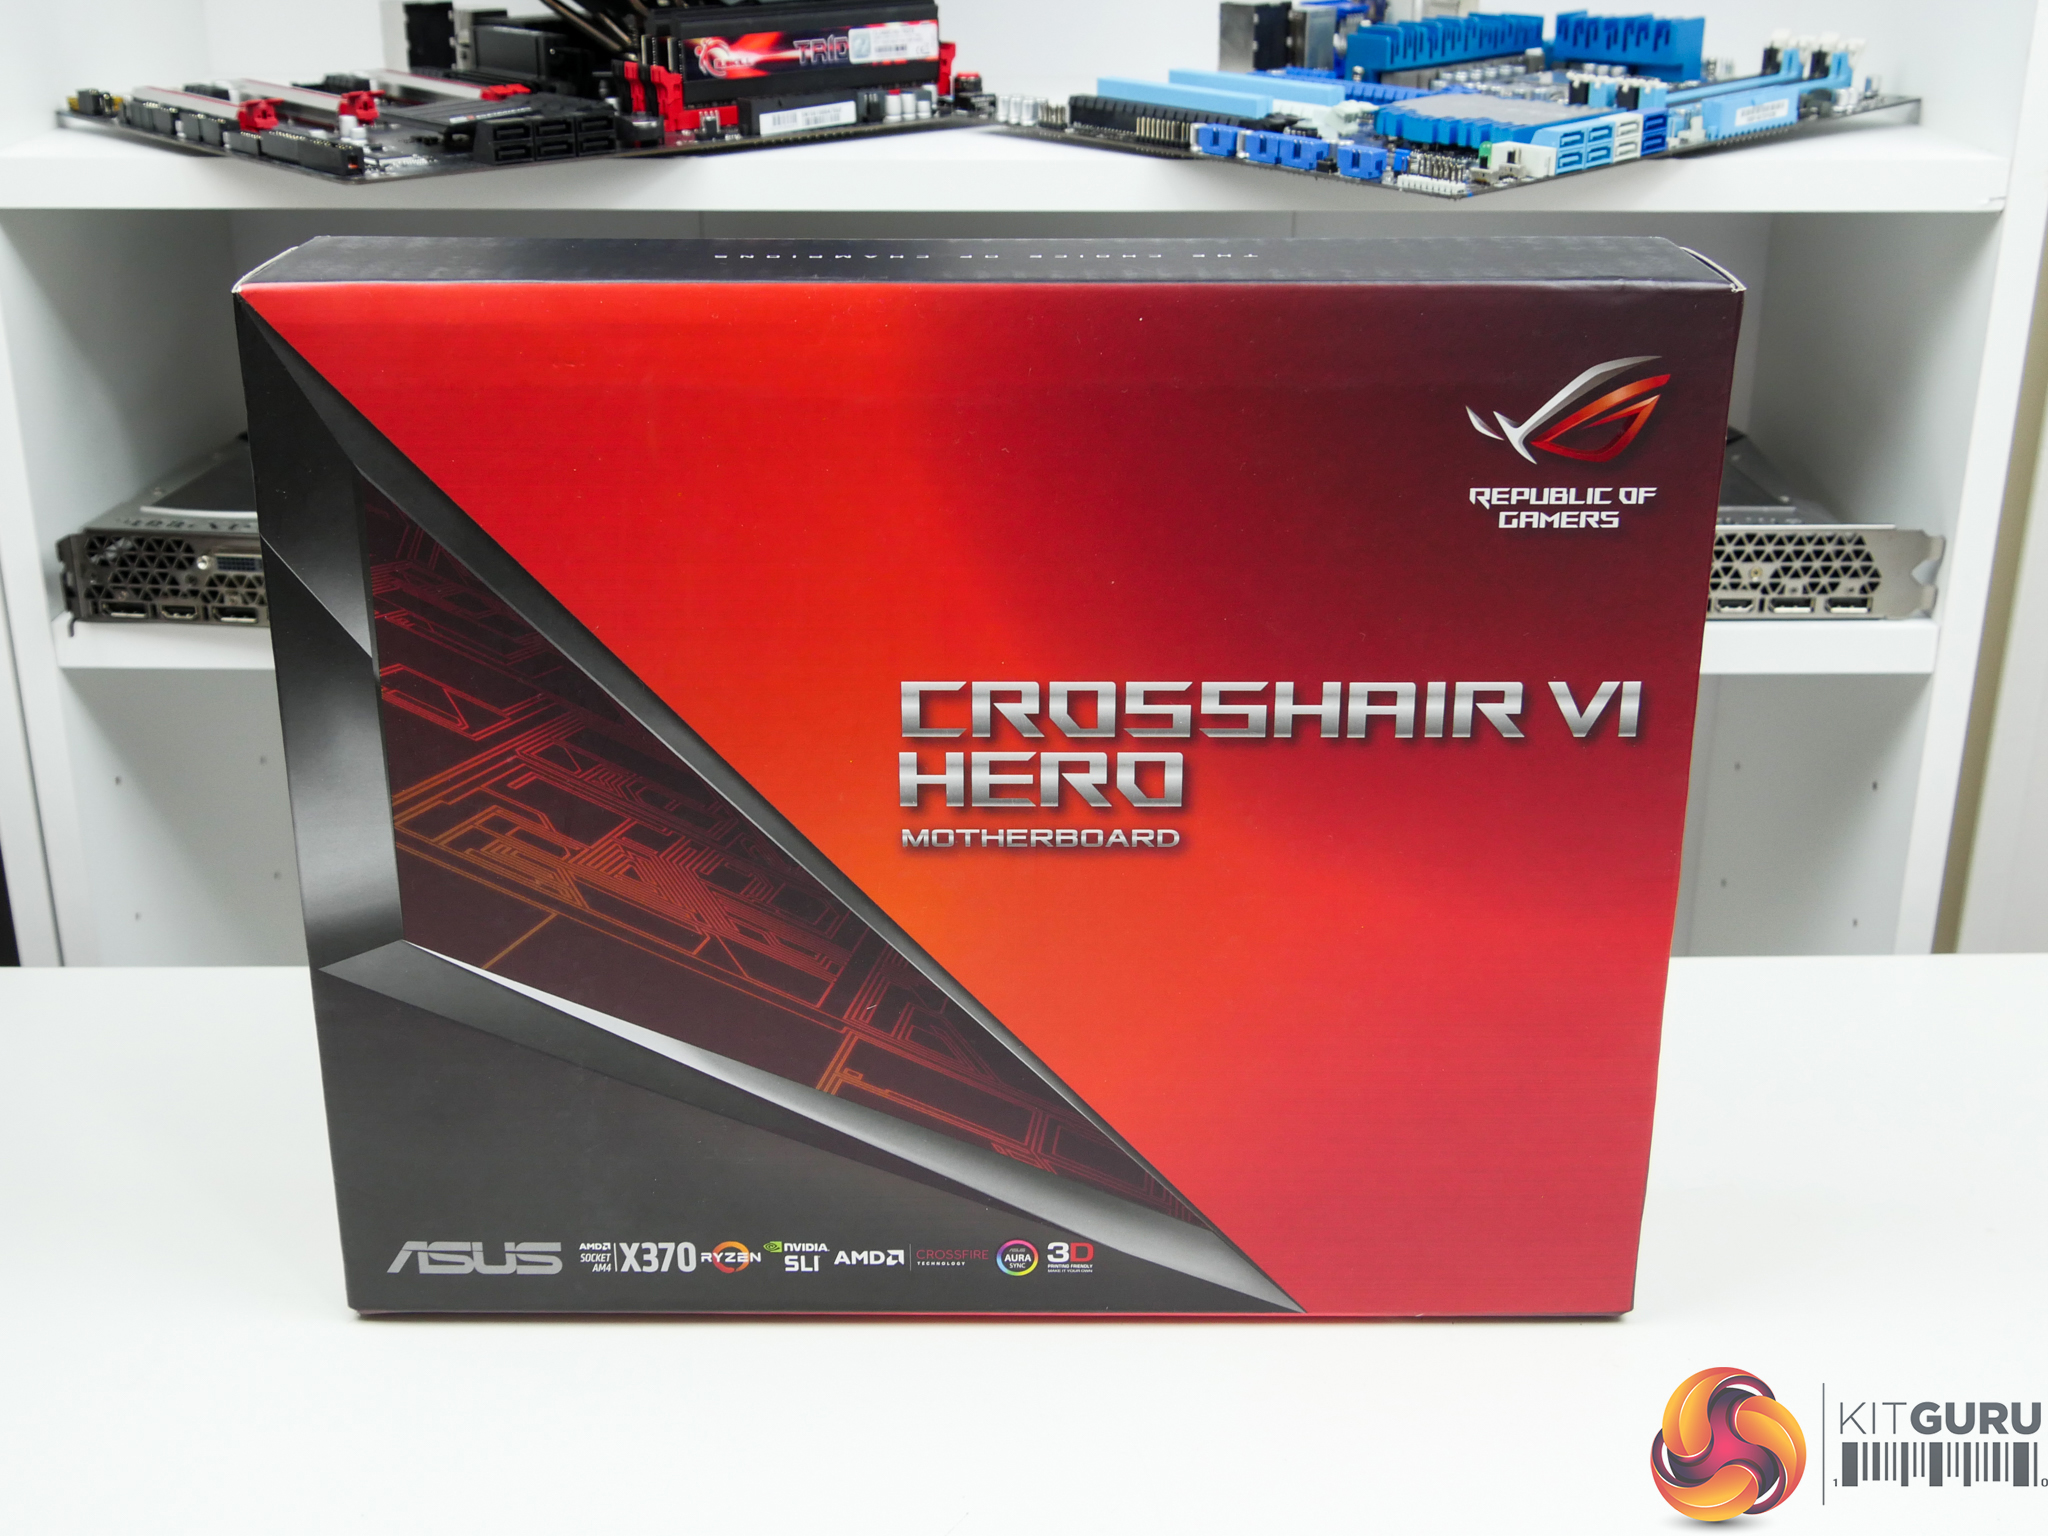
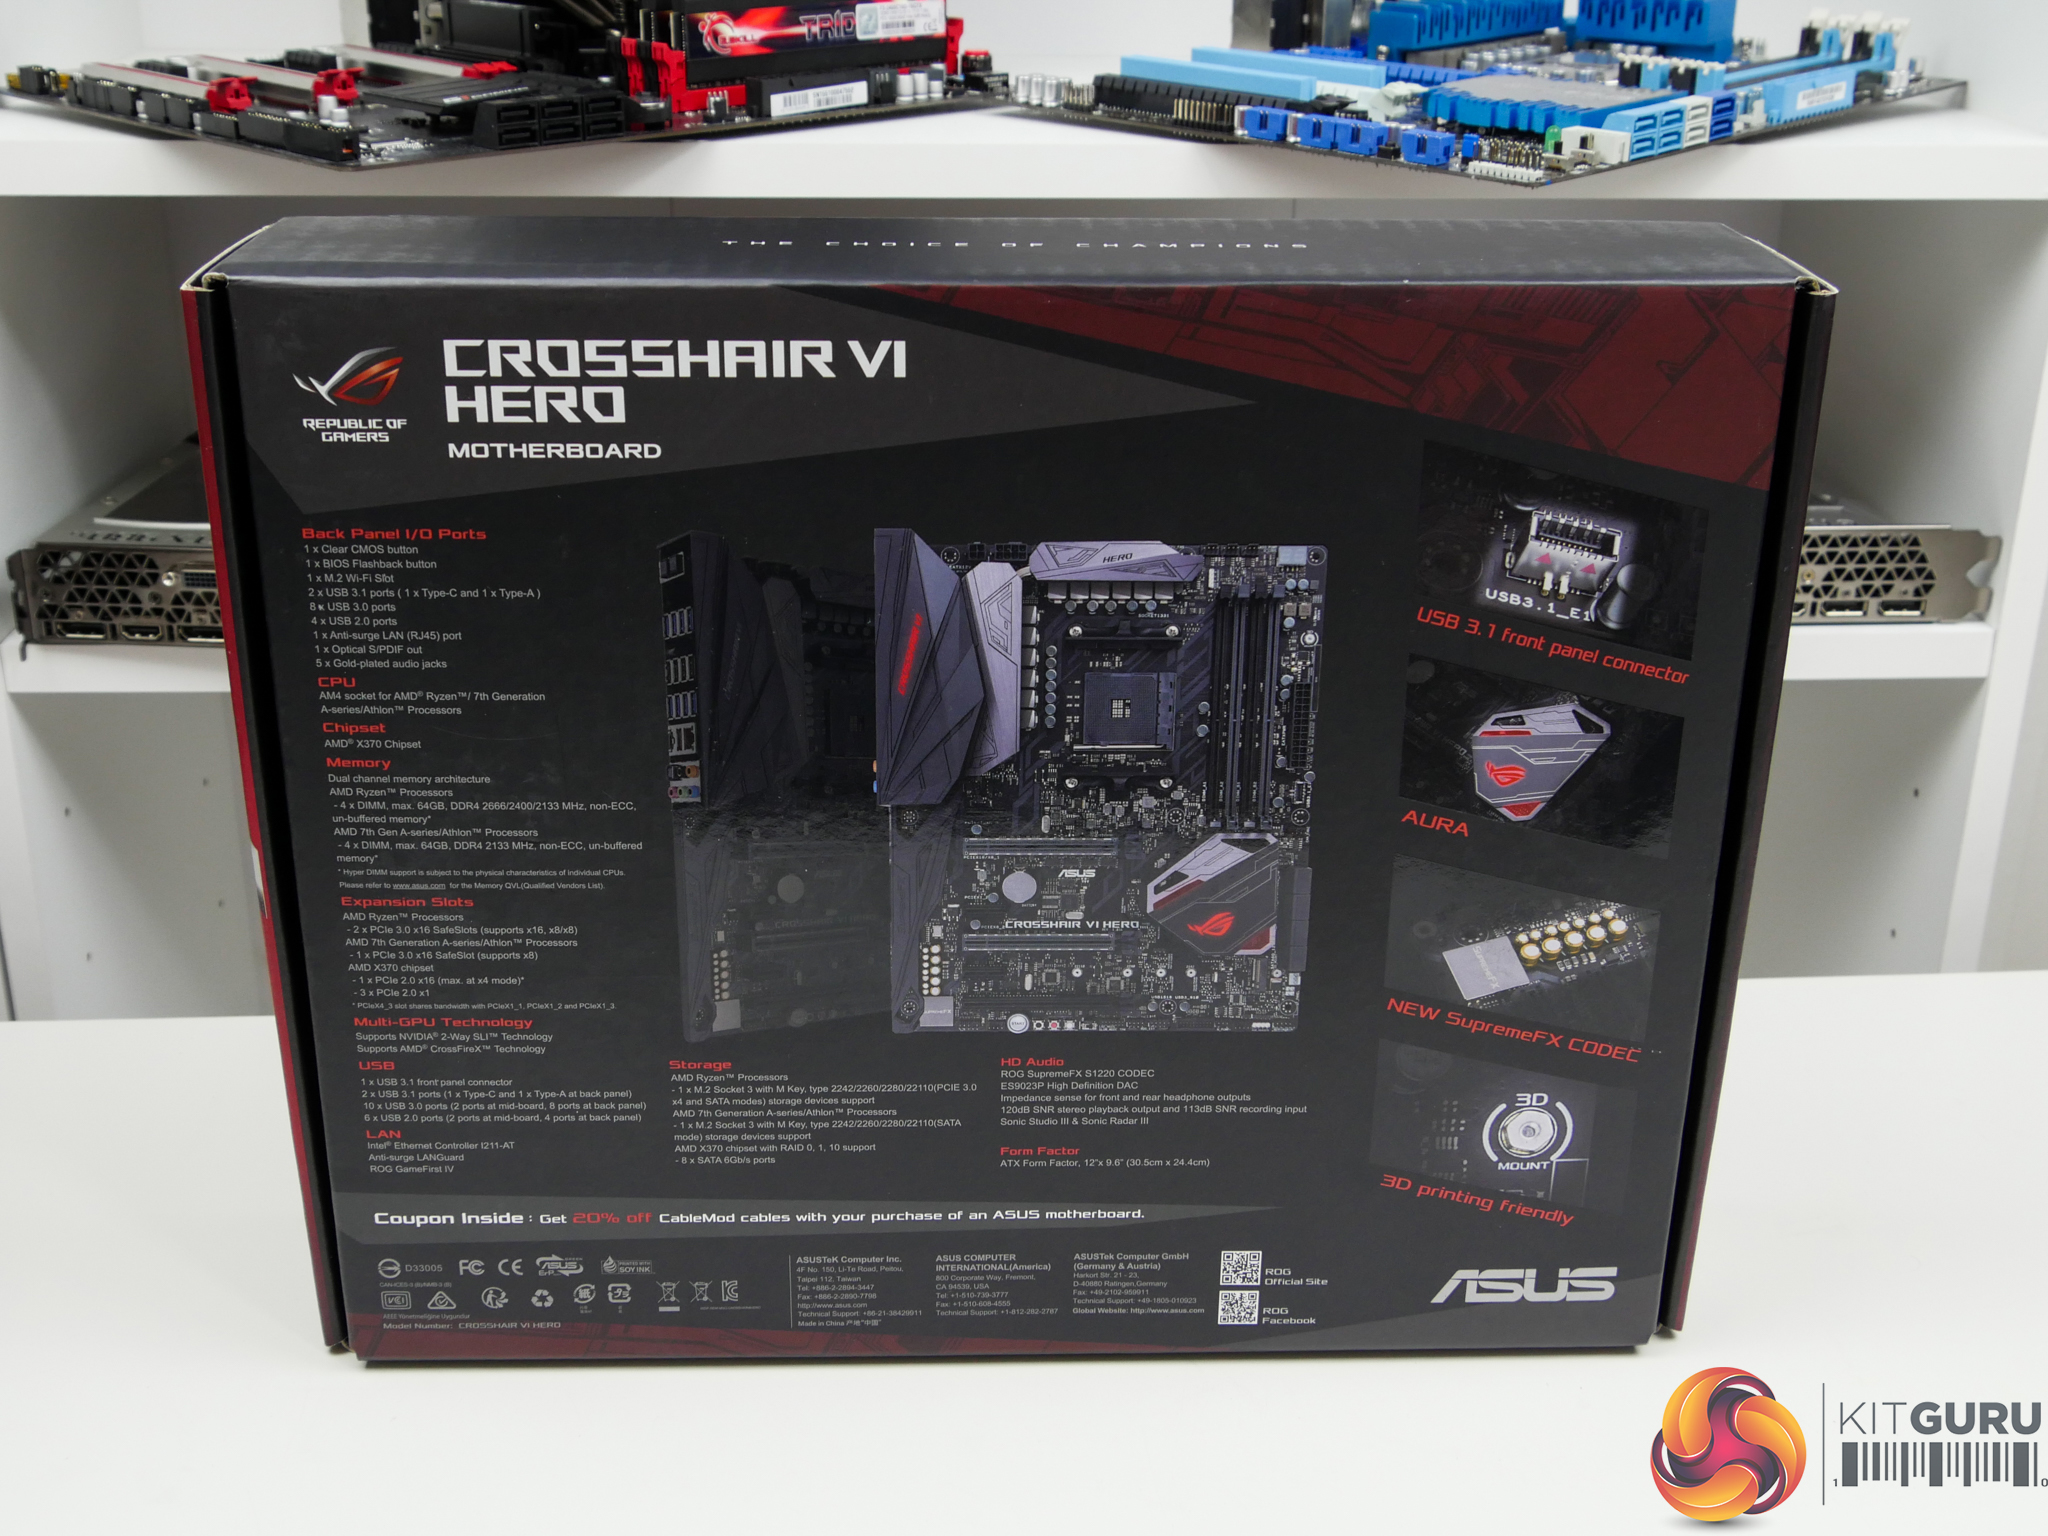
The ASUS Crosshair VI Hero ships in typical ROG packaging. A black and red box highlights the name and key features.
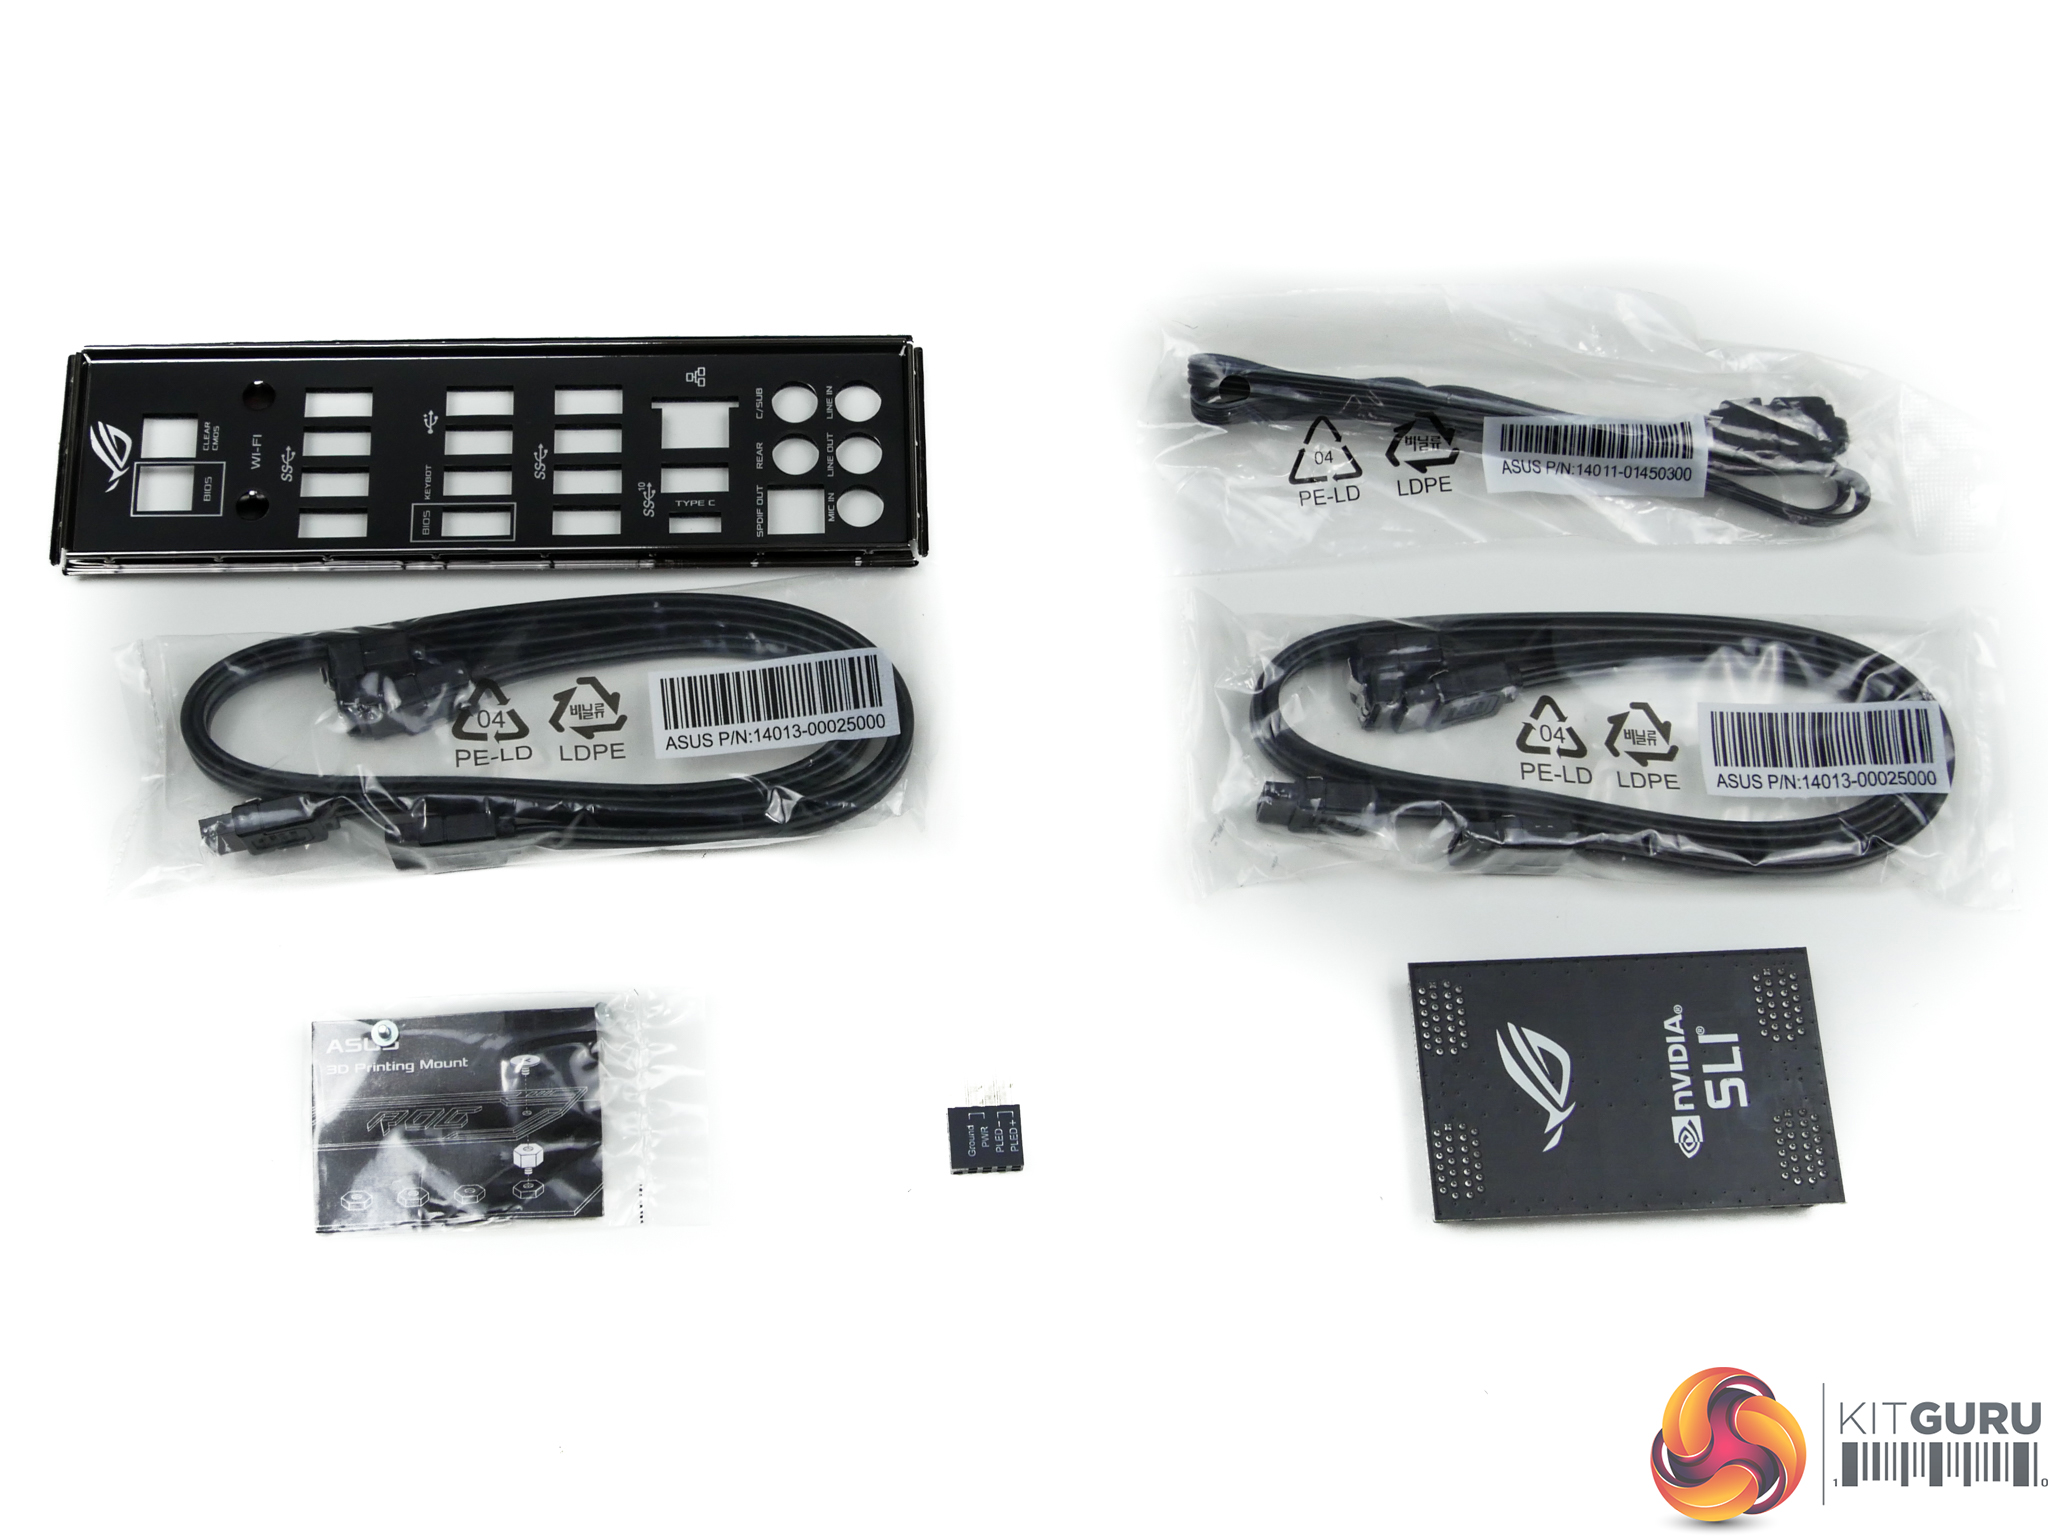

A healthy bundle is supplied with the motherboard, which includes: 4x SATA cables, a Q-Connector block, a HB 2-card SLI bridge, a 4-pin RGB LED extension cable, the rear IO shield, an M.2 screw.
ASUS also includes a sheet of stickers that feature ROG branding.
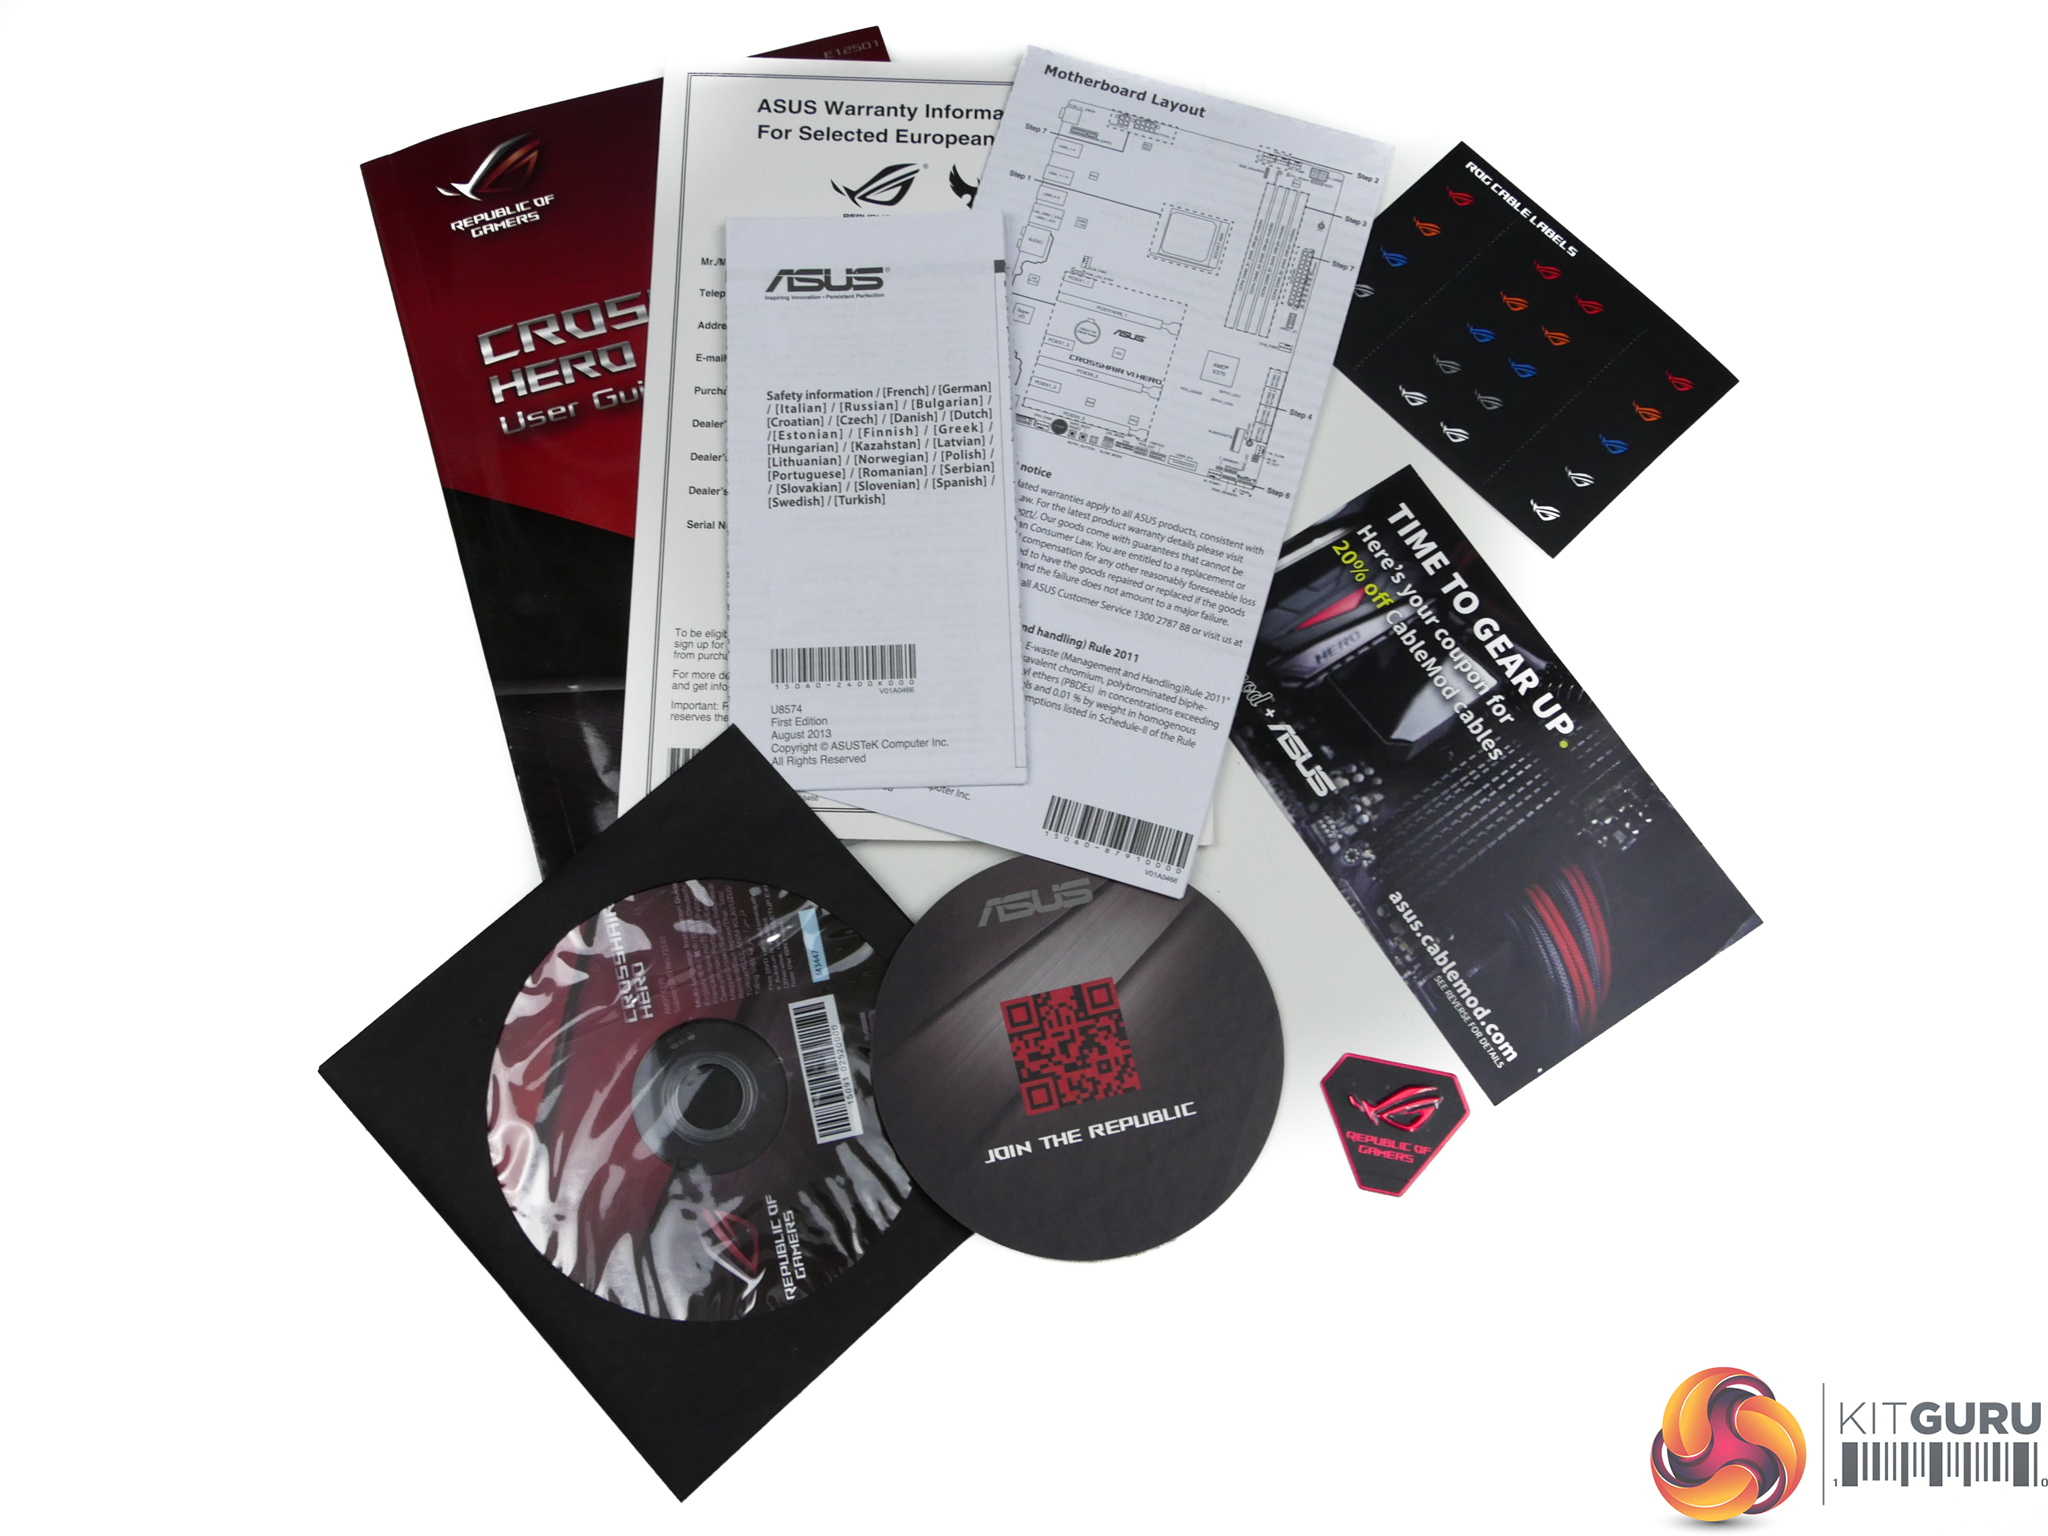
The usual documentation is supplied as well as added stickers, a coaster, and a discount code for CableMod cables.
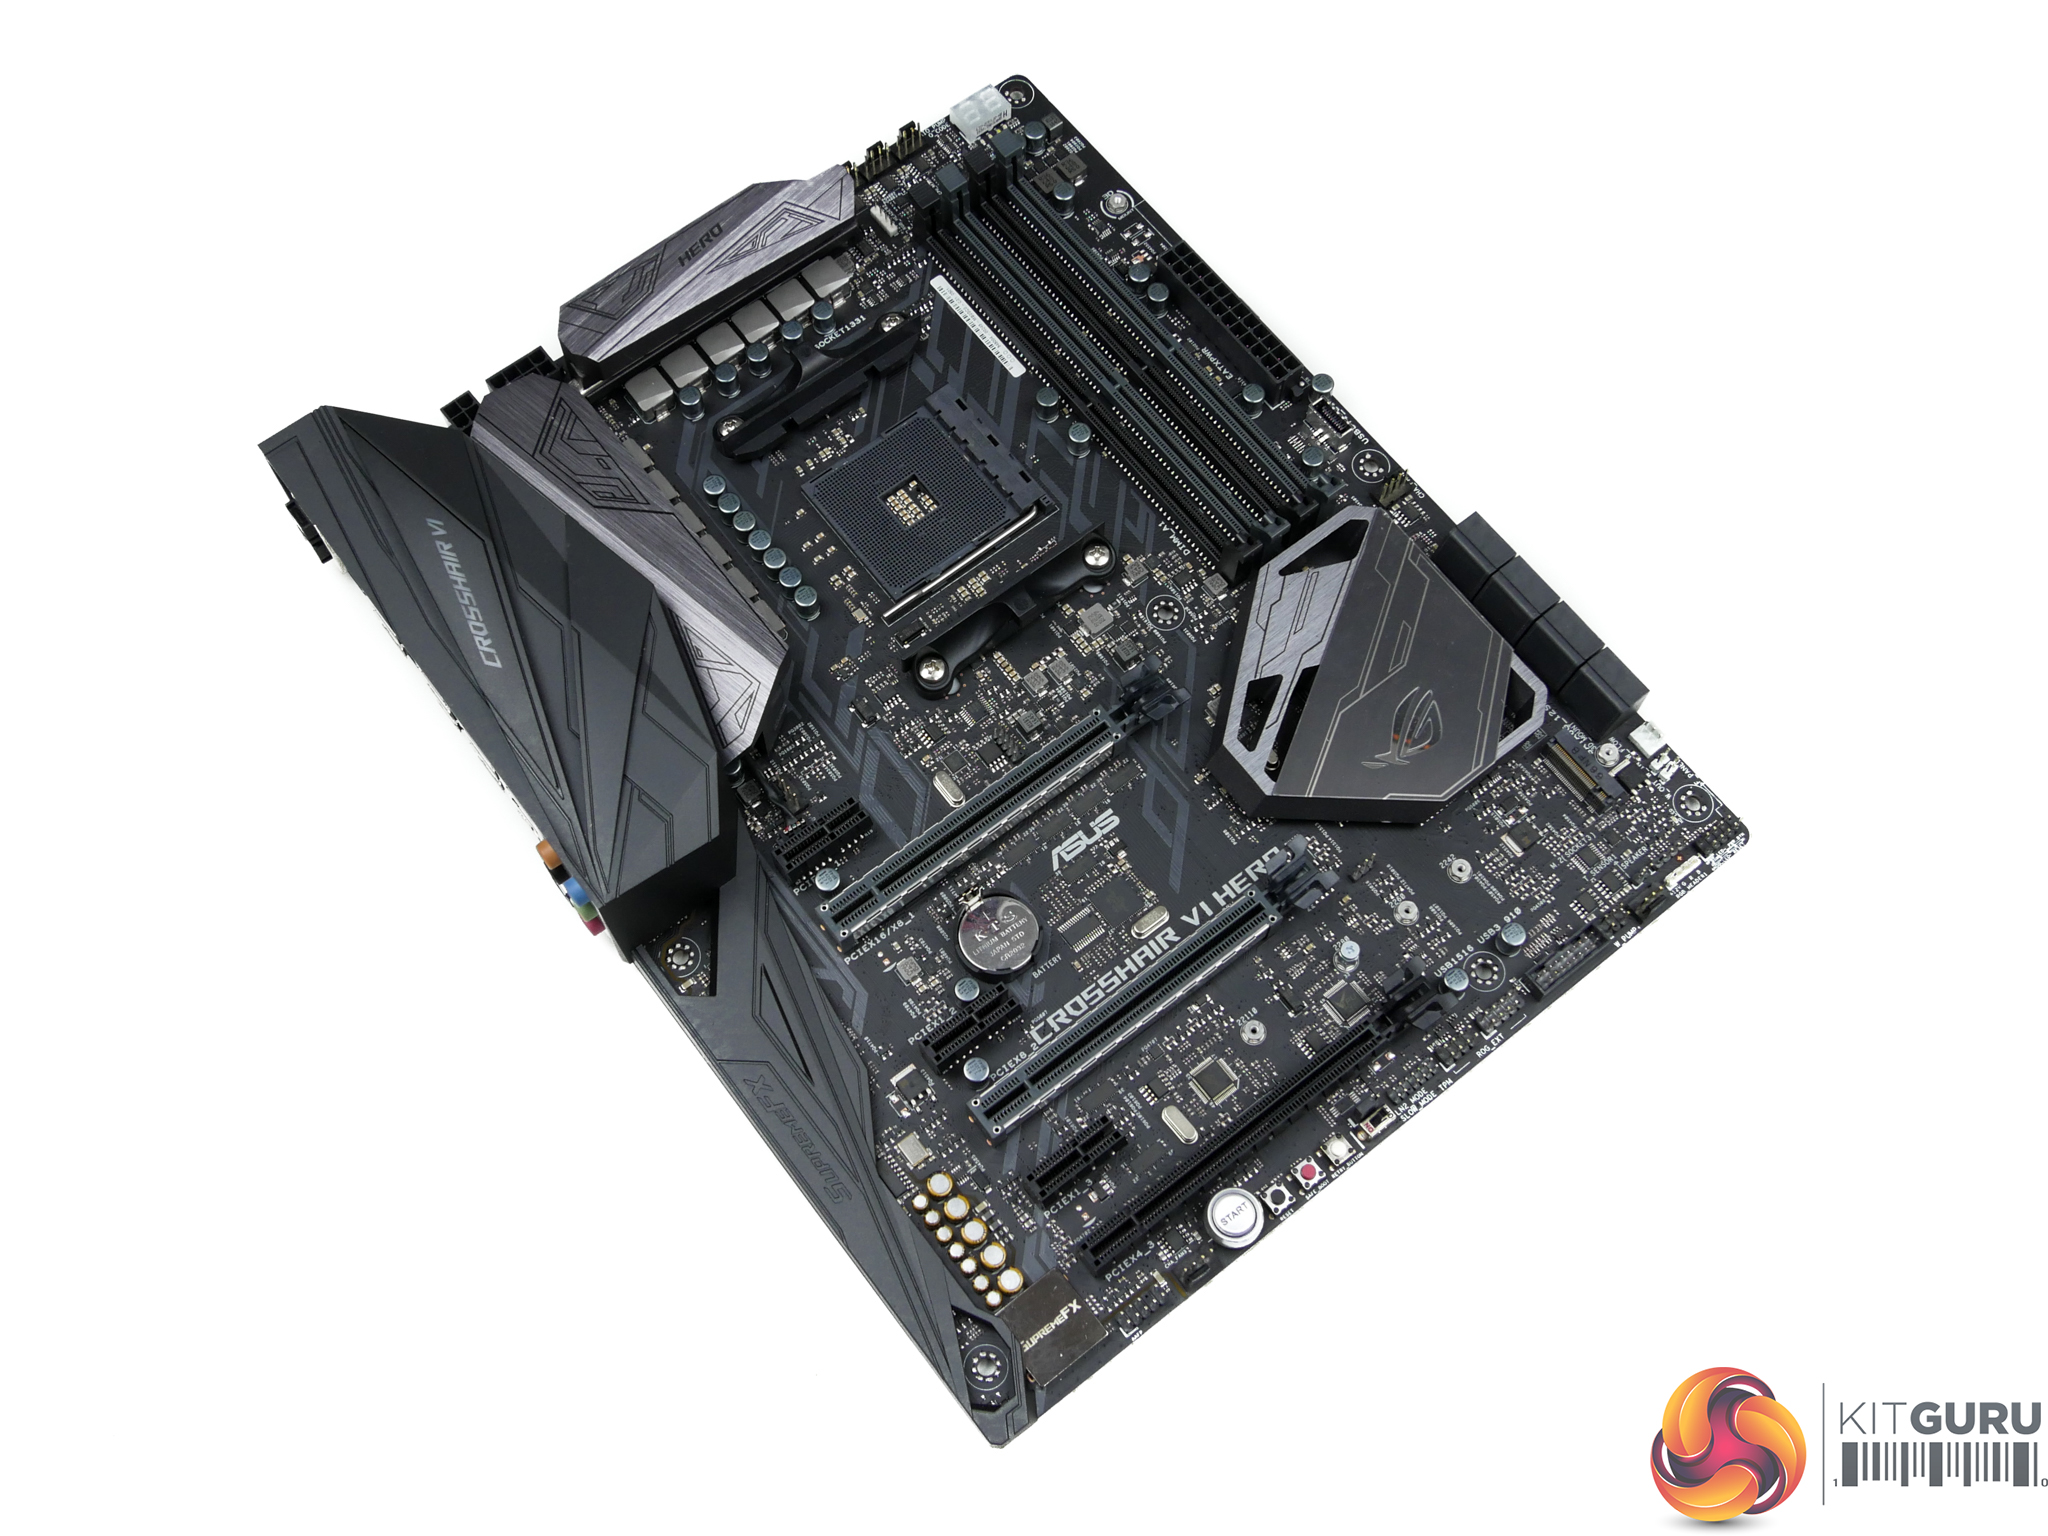
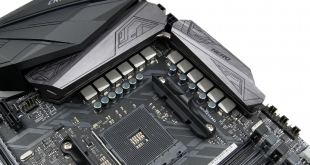
The ASUS ROG Crosshair VI Hero is formed with a dark black and grey colour scheme which is very neutral. I like this decision with some of ASUS' recent ROG motherboards as it allows the hardware to better match other components that the bright red of old does not. Onboard RGB LEDs allow the motherboard to add sprinkles of colour in certain areas.
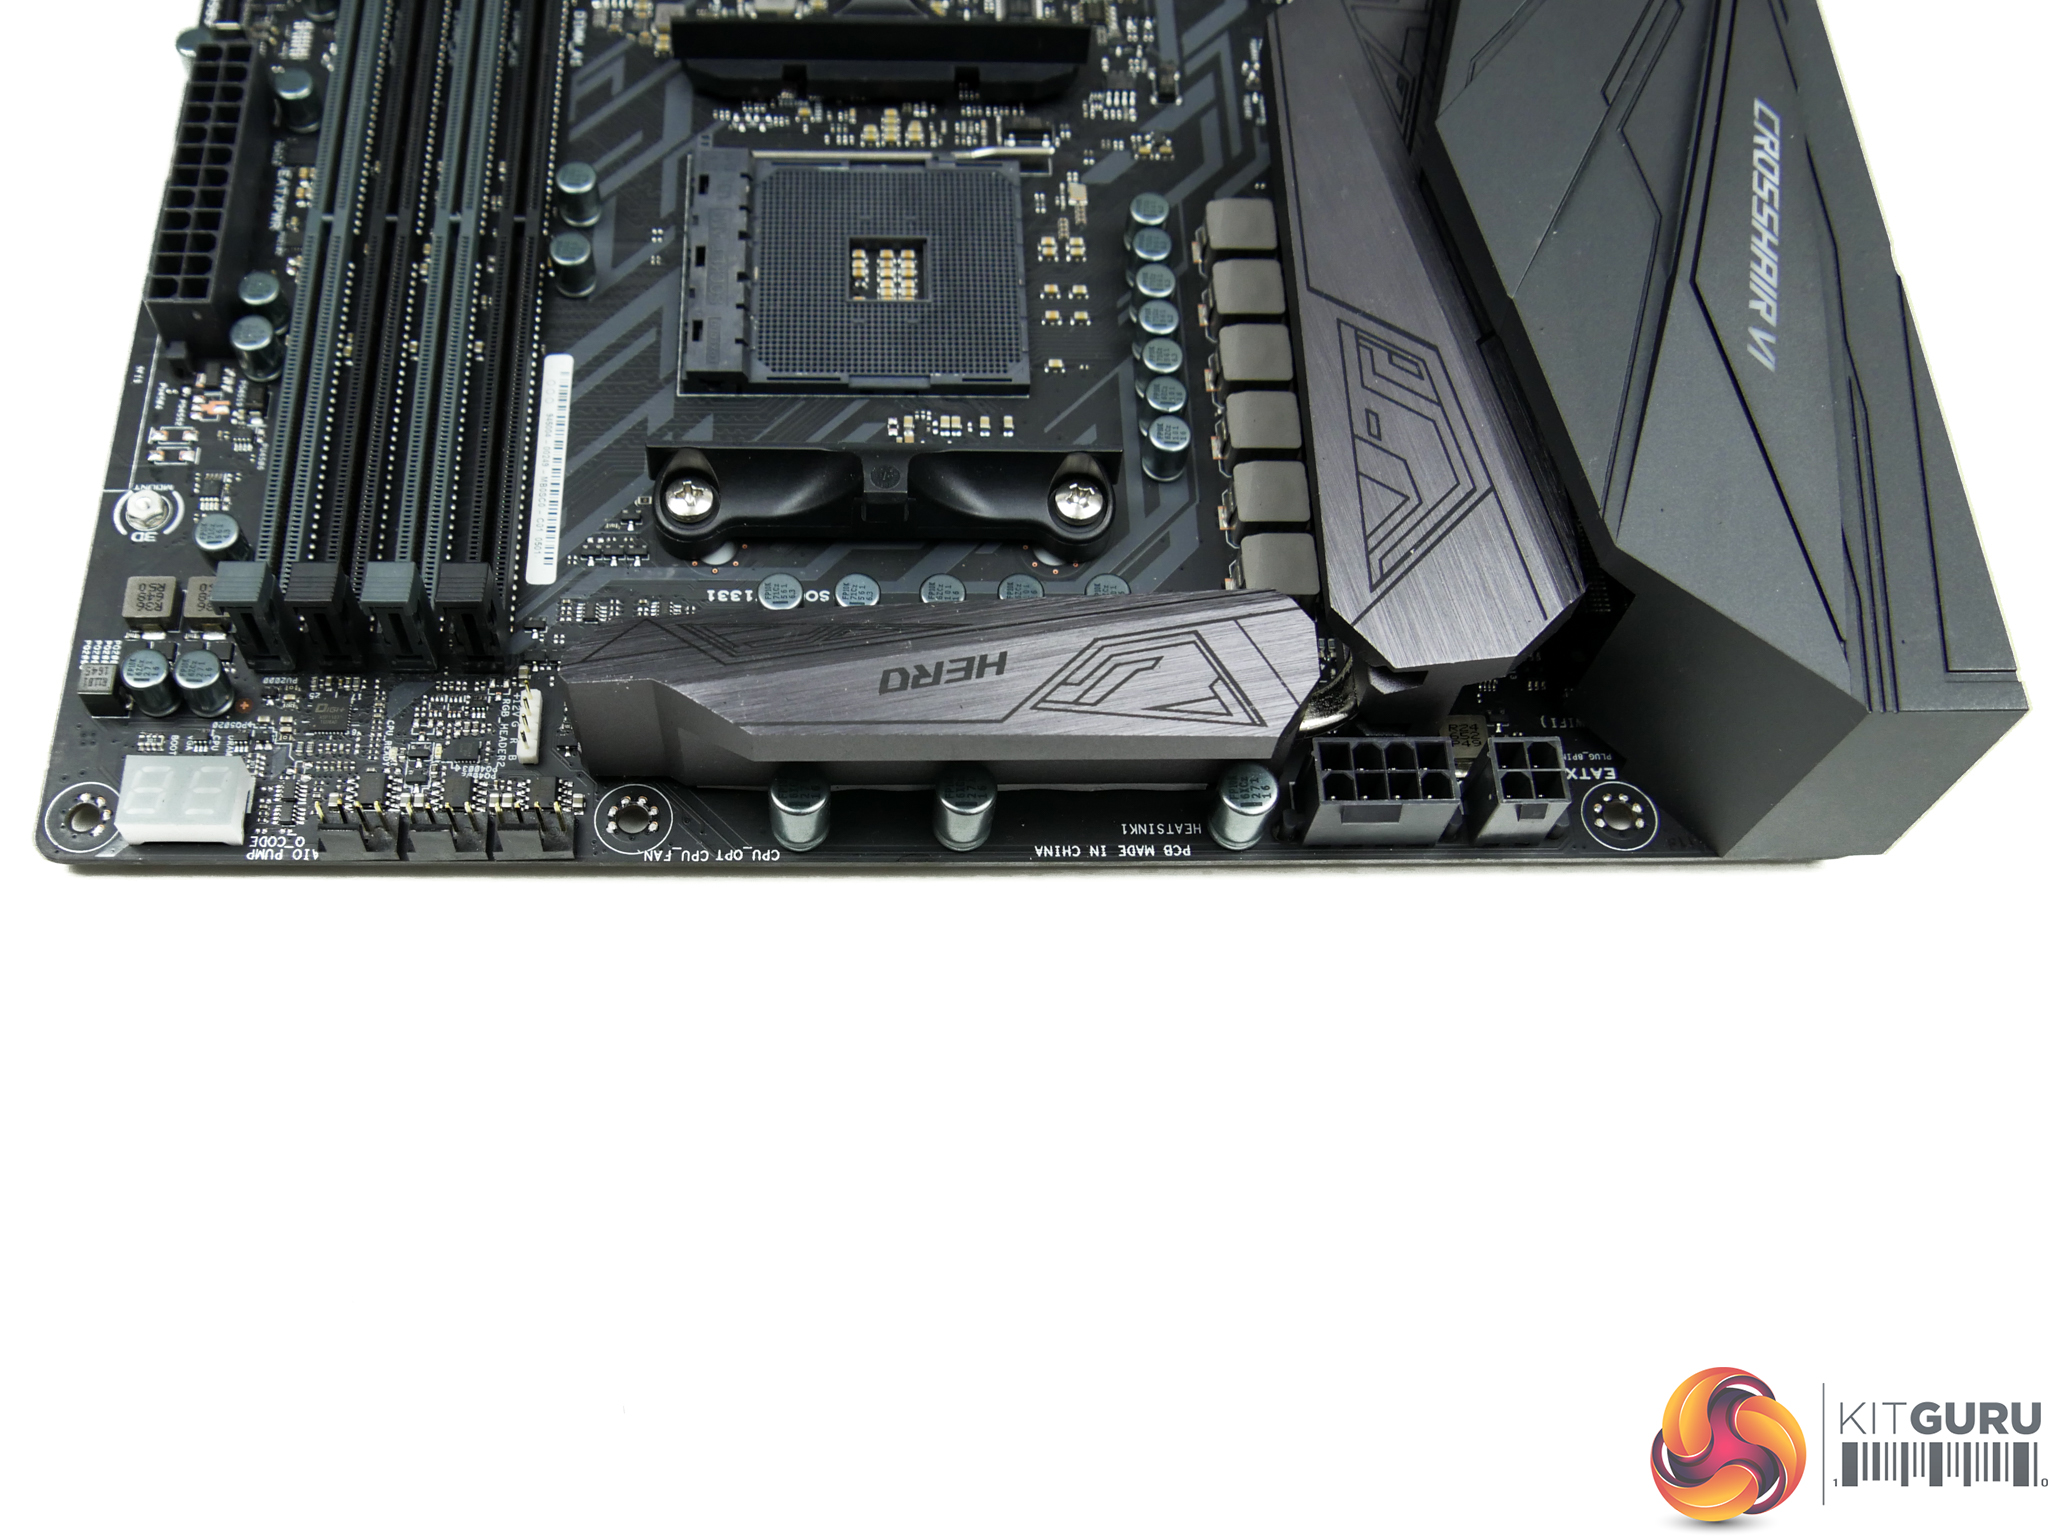
Large heatsinks and onboard buttons show glimpses of the Hero's ROG and overclocking-focused intention. Those sizeable heatsinks will be put to good use by the eight-core Ryzen 7 chips that demand a sizeable amount of power when overclocked.
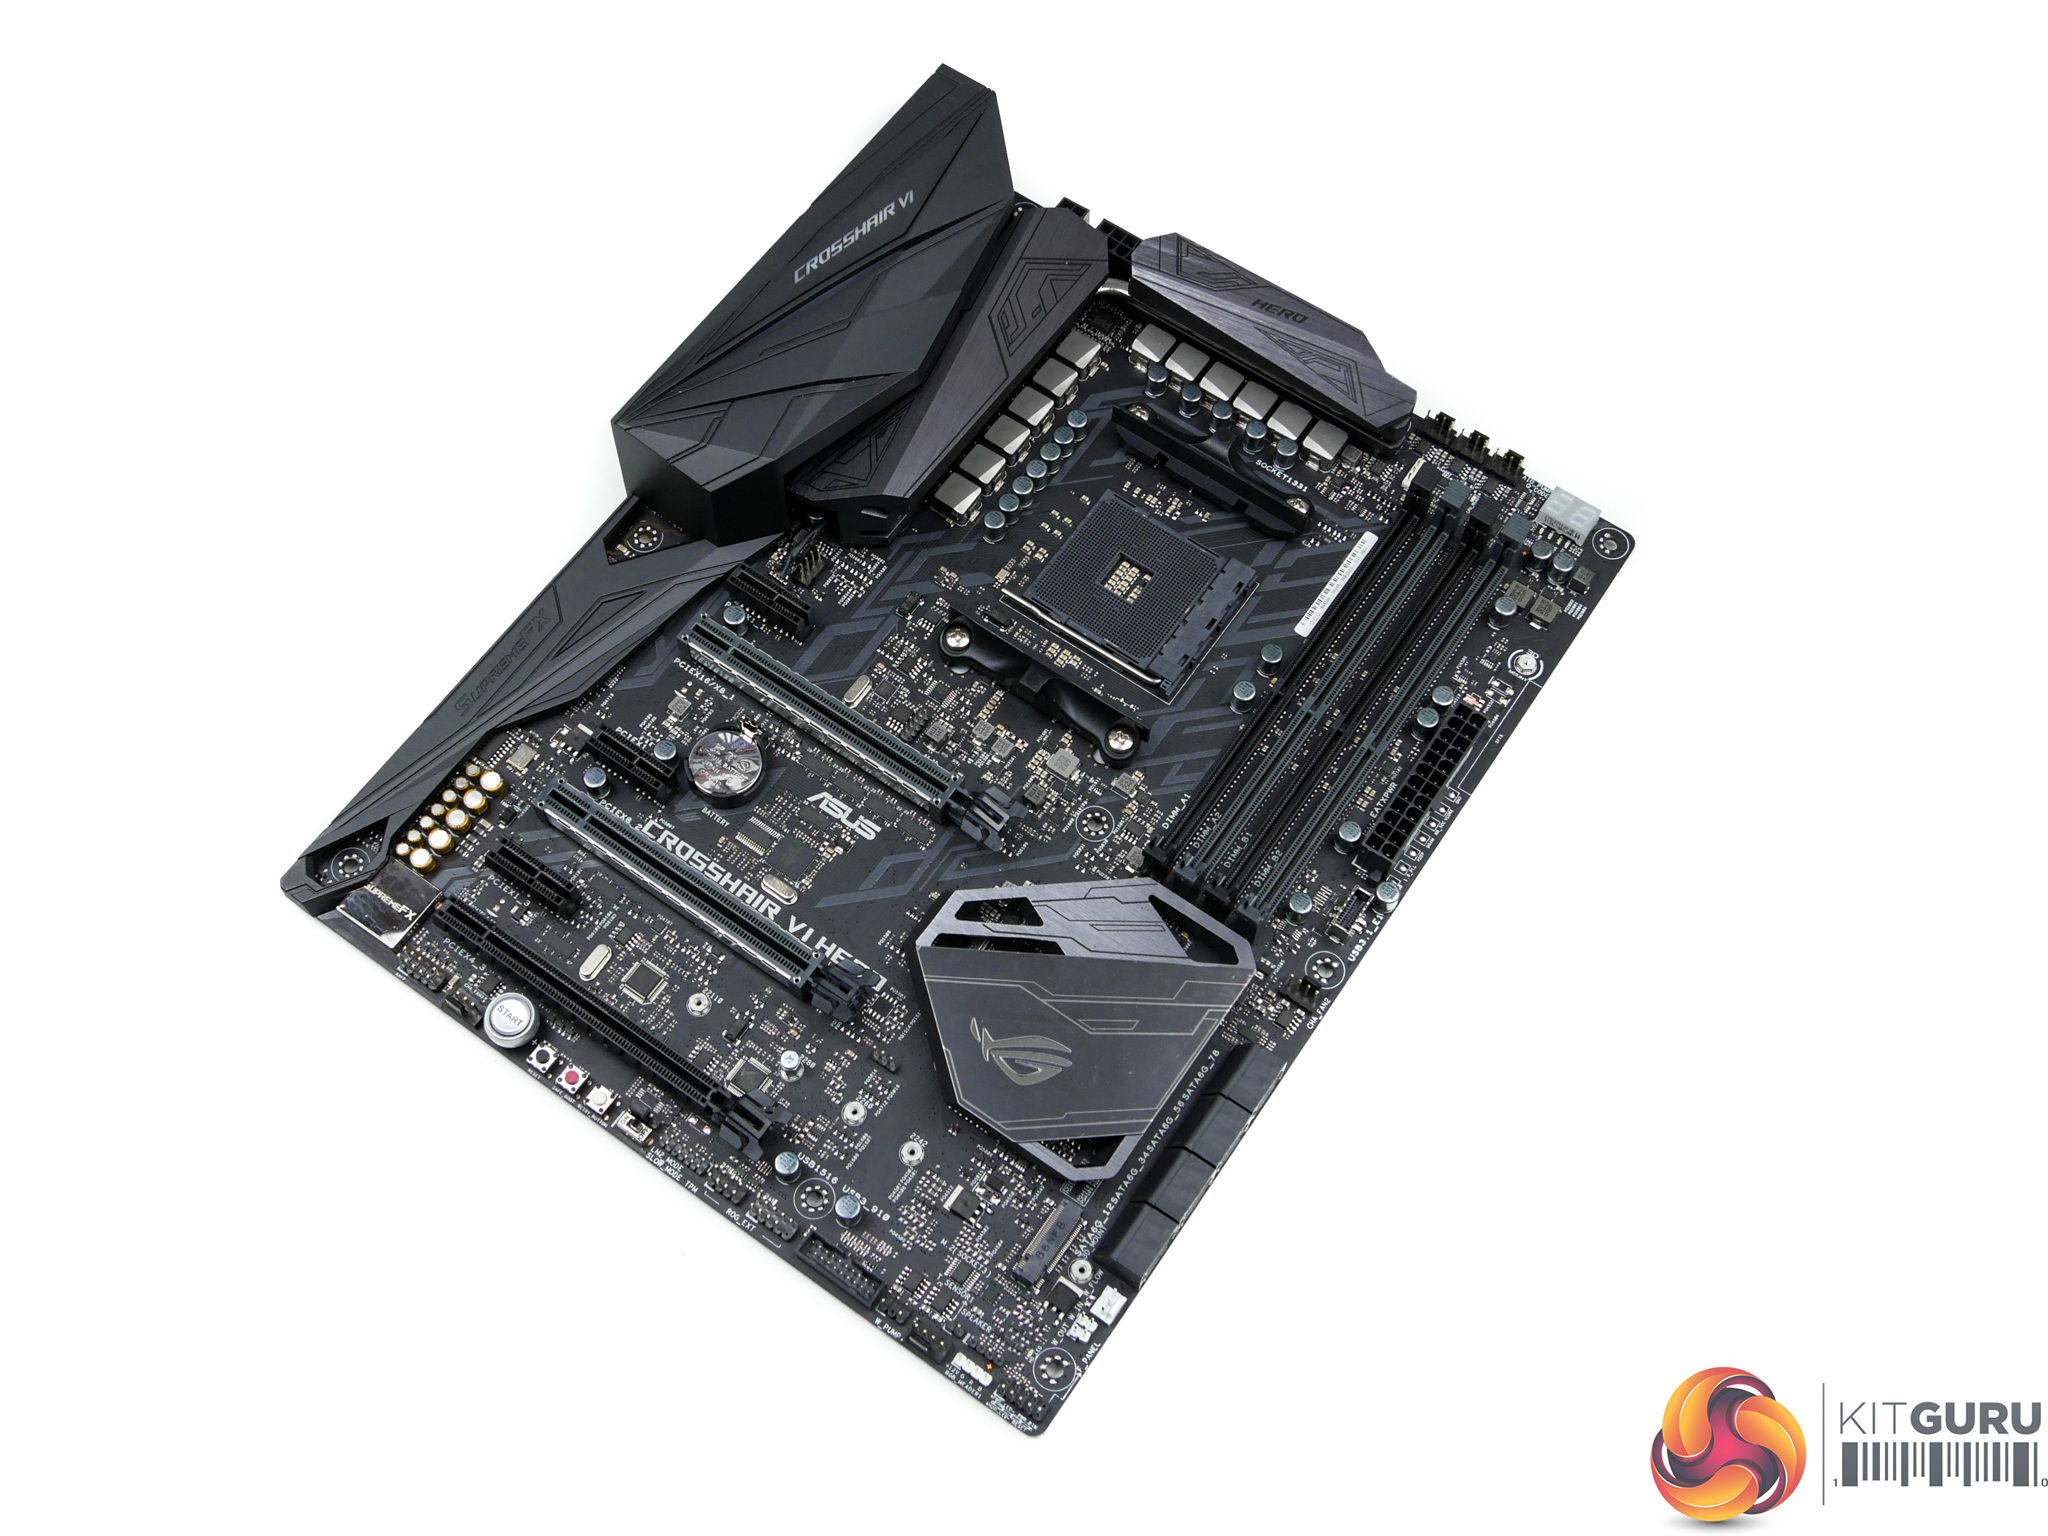
Strengthened PCIe x16 slots and a rear IO cover are noticeable on the Hero. The strengthened slots help to reduce the possibility of GPU sag or a slot breaking during shipping. The rear IO cover is purely aesthetic and features an RGB LED which allows the Crosshair branding to be lit up.
Only two lighting zones are present on the Hero – the rear IO cover and the chipset heatsink. Two RGB strip headers can be used to add further lighting through the use of an external kit.
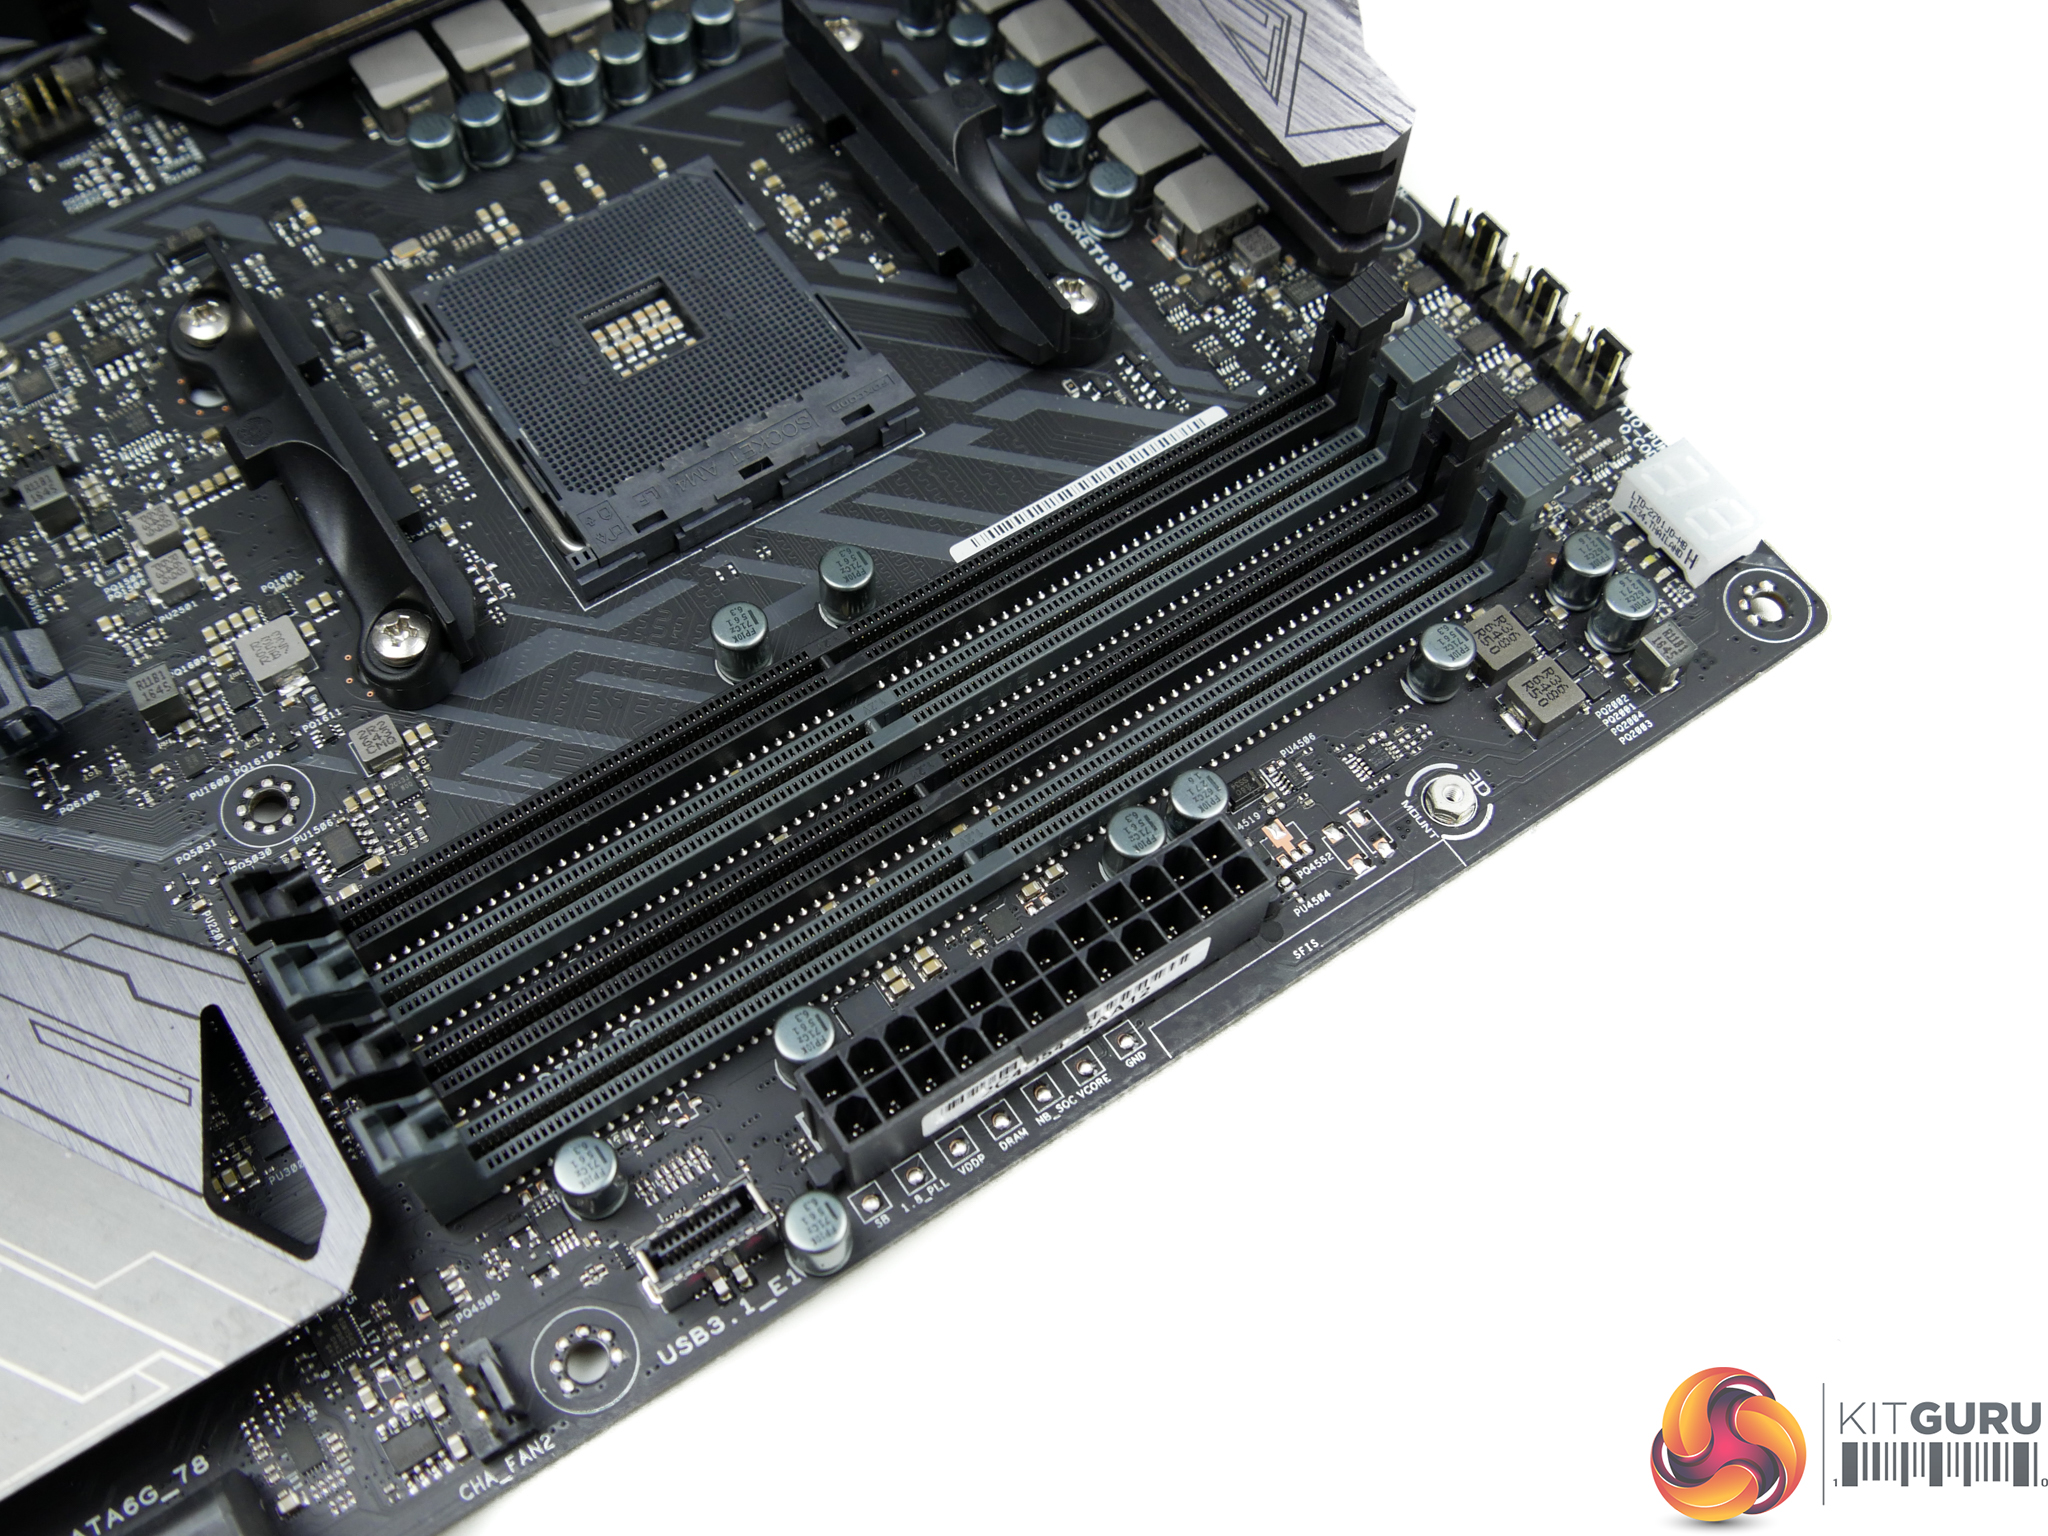
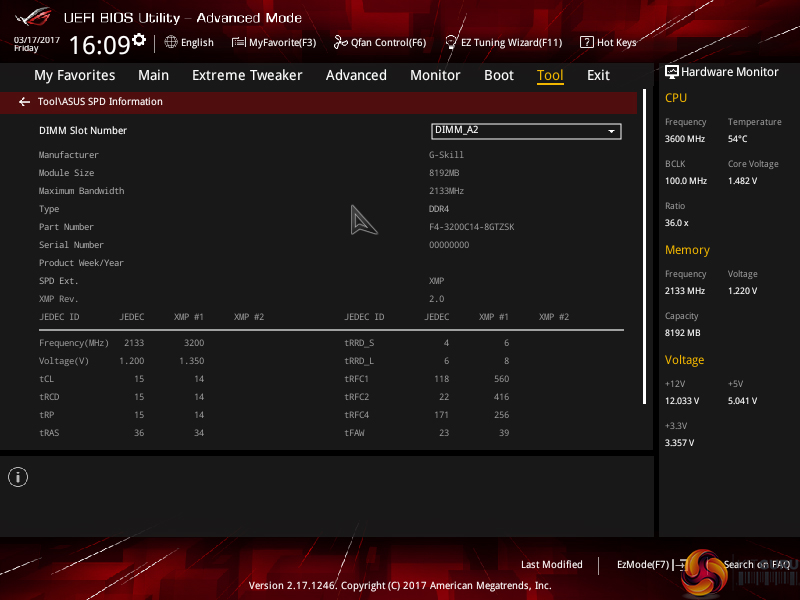
Up to 64GB of DDR4 memory can installed in the single-latch DIMM slots. ASUS quotes support for 3200MHz memory via overclocking but this is currently only possible with certain memory kits due to the infancy of the AM4 platform. We used a 3200MHz G.SKILL Trident Z kit successfully. Faster memory speeds may be possible via overclocking (we have seen reports of 3600MHz) but this involves manual adjustments to the BCLK.
Close to the 24-pin connector are onboard voltage reading points that may prove useful to overclockers or troubleshooting users. Just to the left of those is an internal 10Gbps USB 3.1 Gen 2 header that receives its bandwidth from the X370 chipset. I am yet to see this interface deployed on a chassis but it should be the standard going forward. Kudos to ASUS for supporting it rather than deploying those USB 3.1 connections on the rear panel.
A supplementary 4-pin power connector joins the conventional 8-pin port. This allows additional current to be fed to hungry Ryzen 7 CPUs without overloading a single power connector. That's unlikely to be an issue for users who aren't doing hardcore overclocking but if your PSU has dual CPU connectors, there's no harm in deploying both. The 2-digit debug LED sits next to a bank of 4-pin fan headers assigned for CPU and AIO pump duties, as well as one of the 4-pin RGB headers.
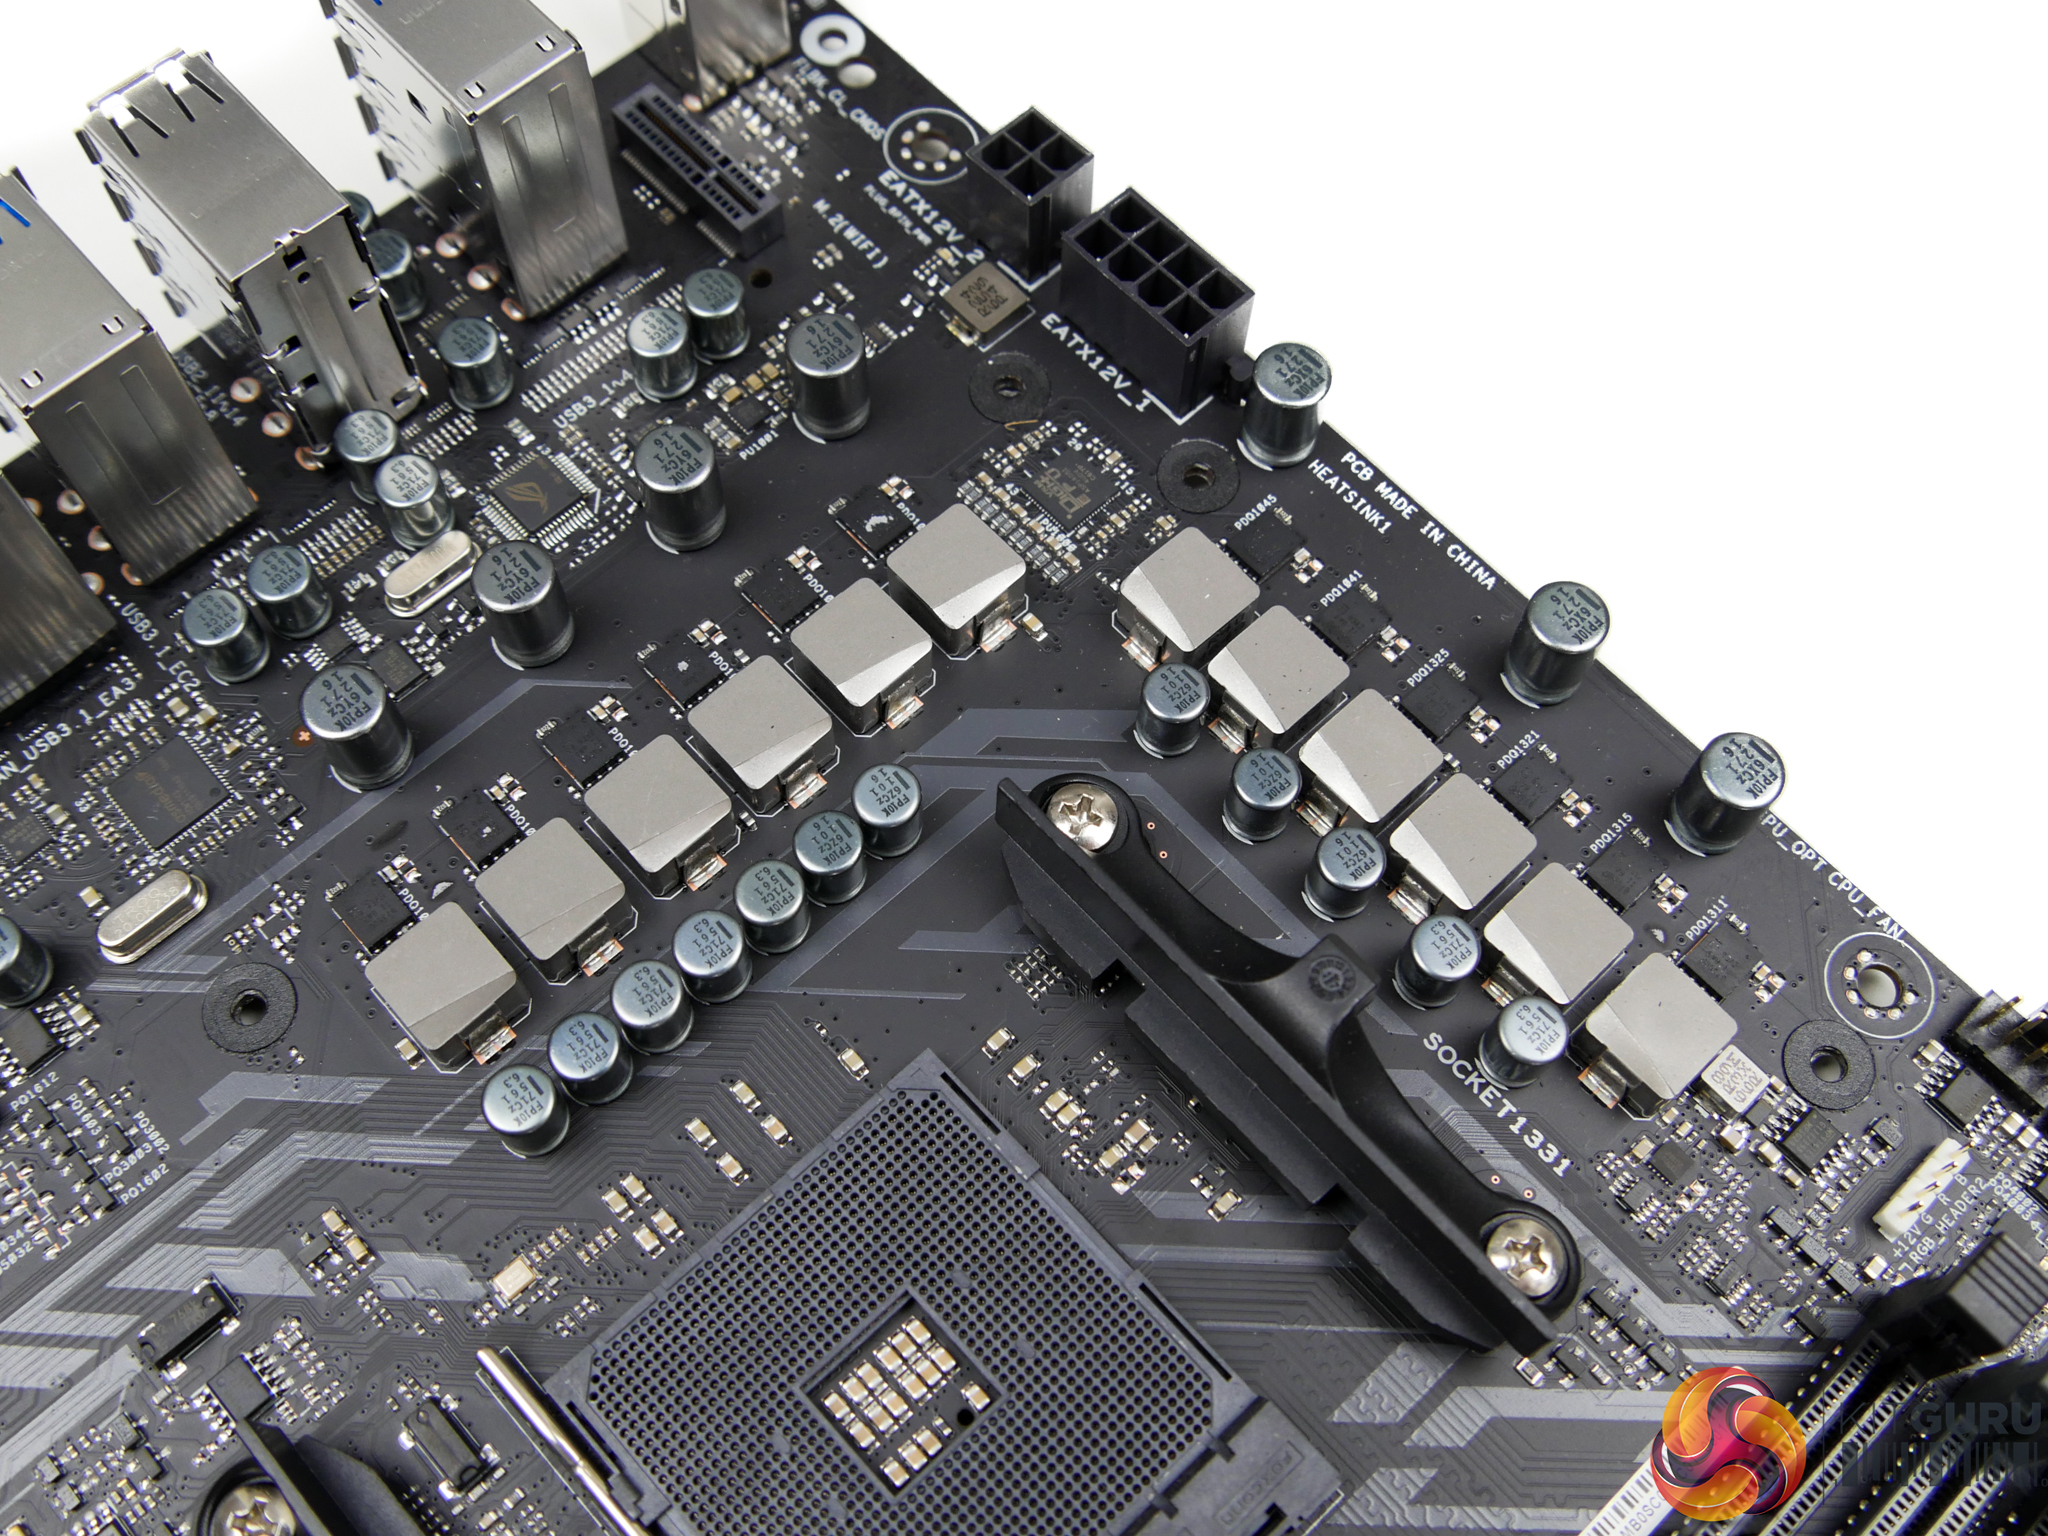
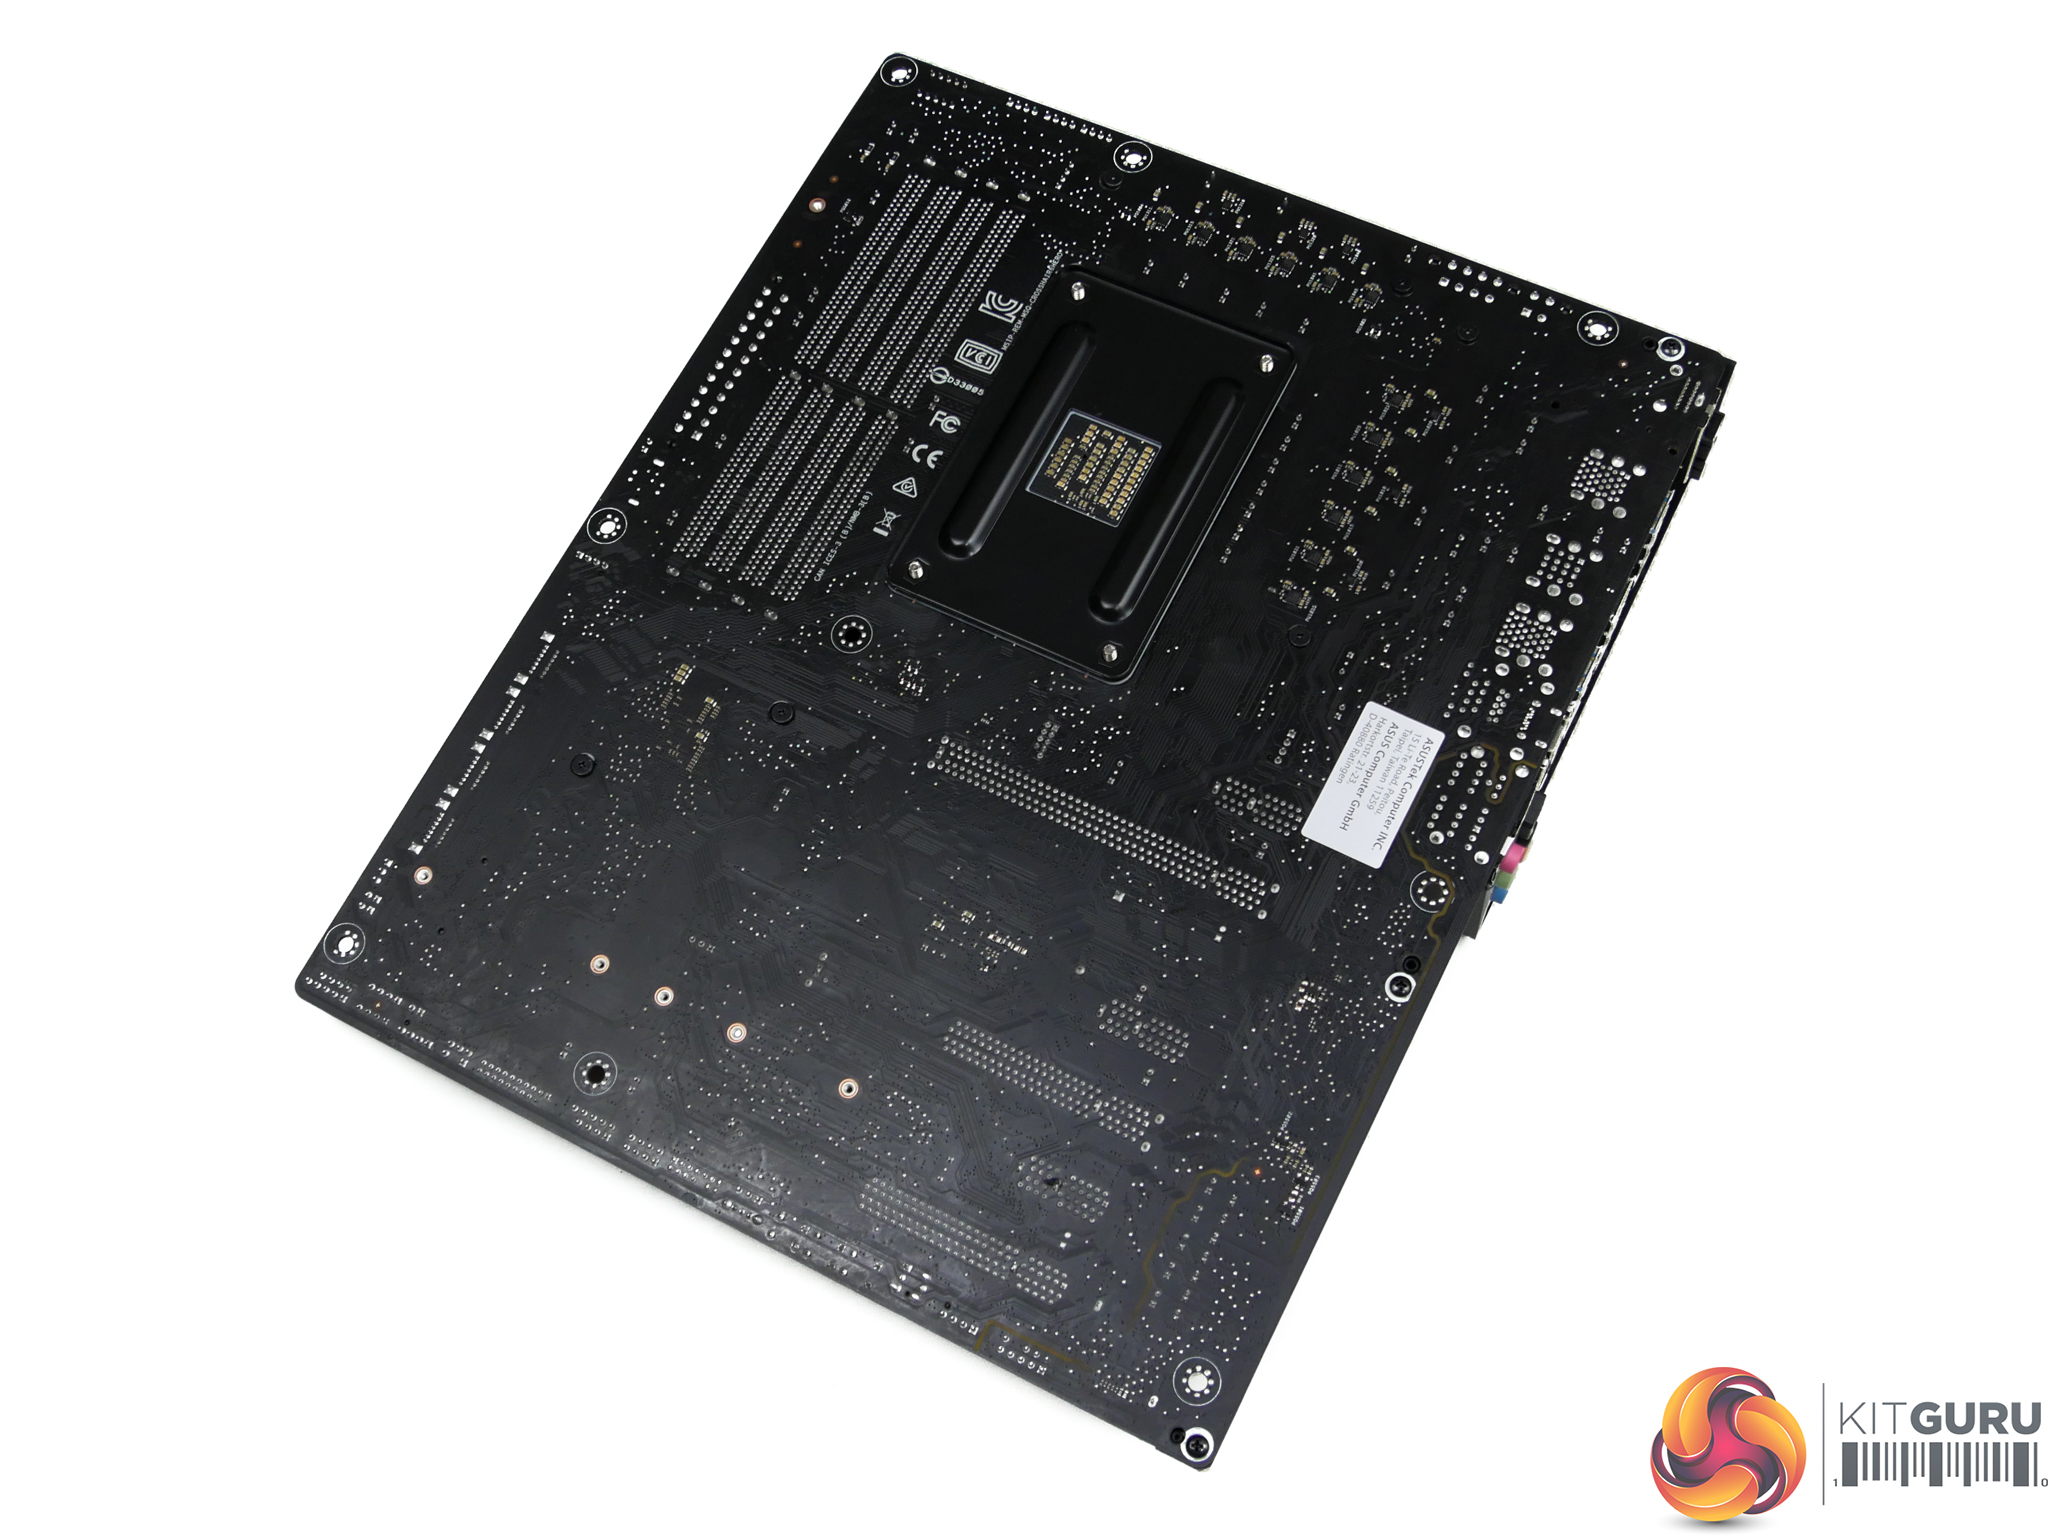
A notable unique point for ASUS is the inclusion of AM3 mounting holes in addition to those assigned AM4 duties. This is convenient for users with a CPU cooler or waterblock that has not been updated with AM4 mounting brackets, or if you bought your cooler second hand and are not eligible to receive the necessary AM4 hardware.
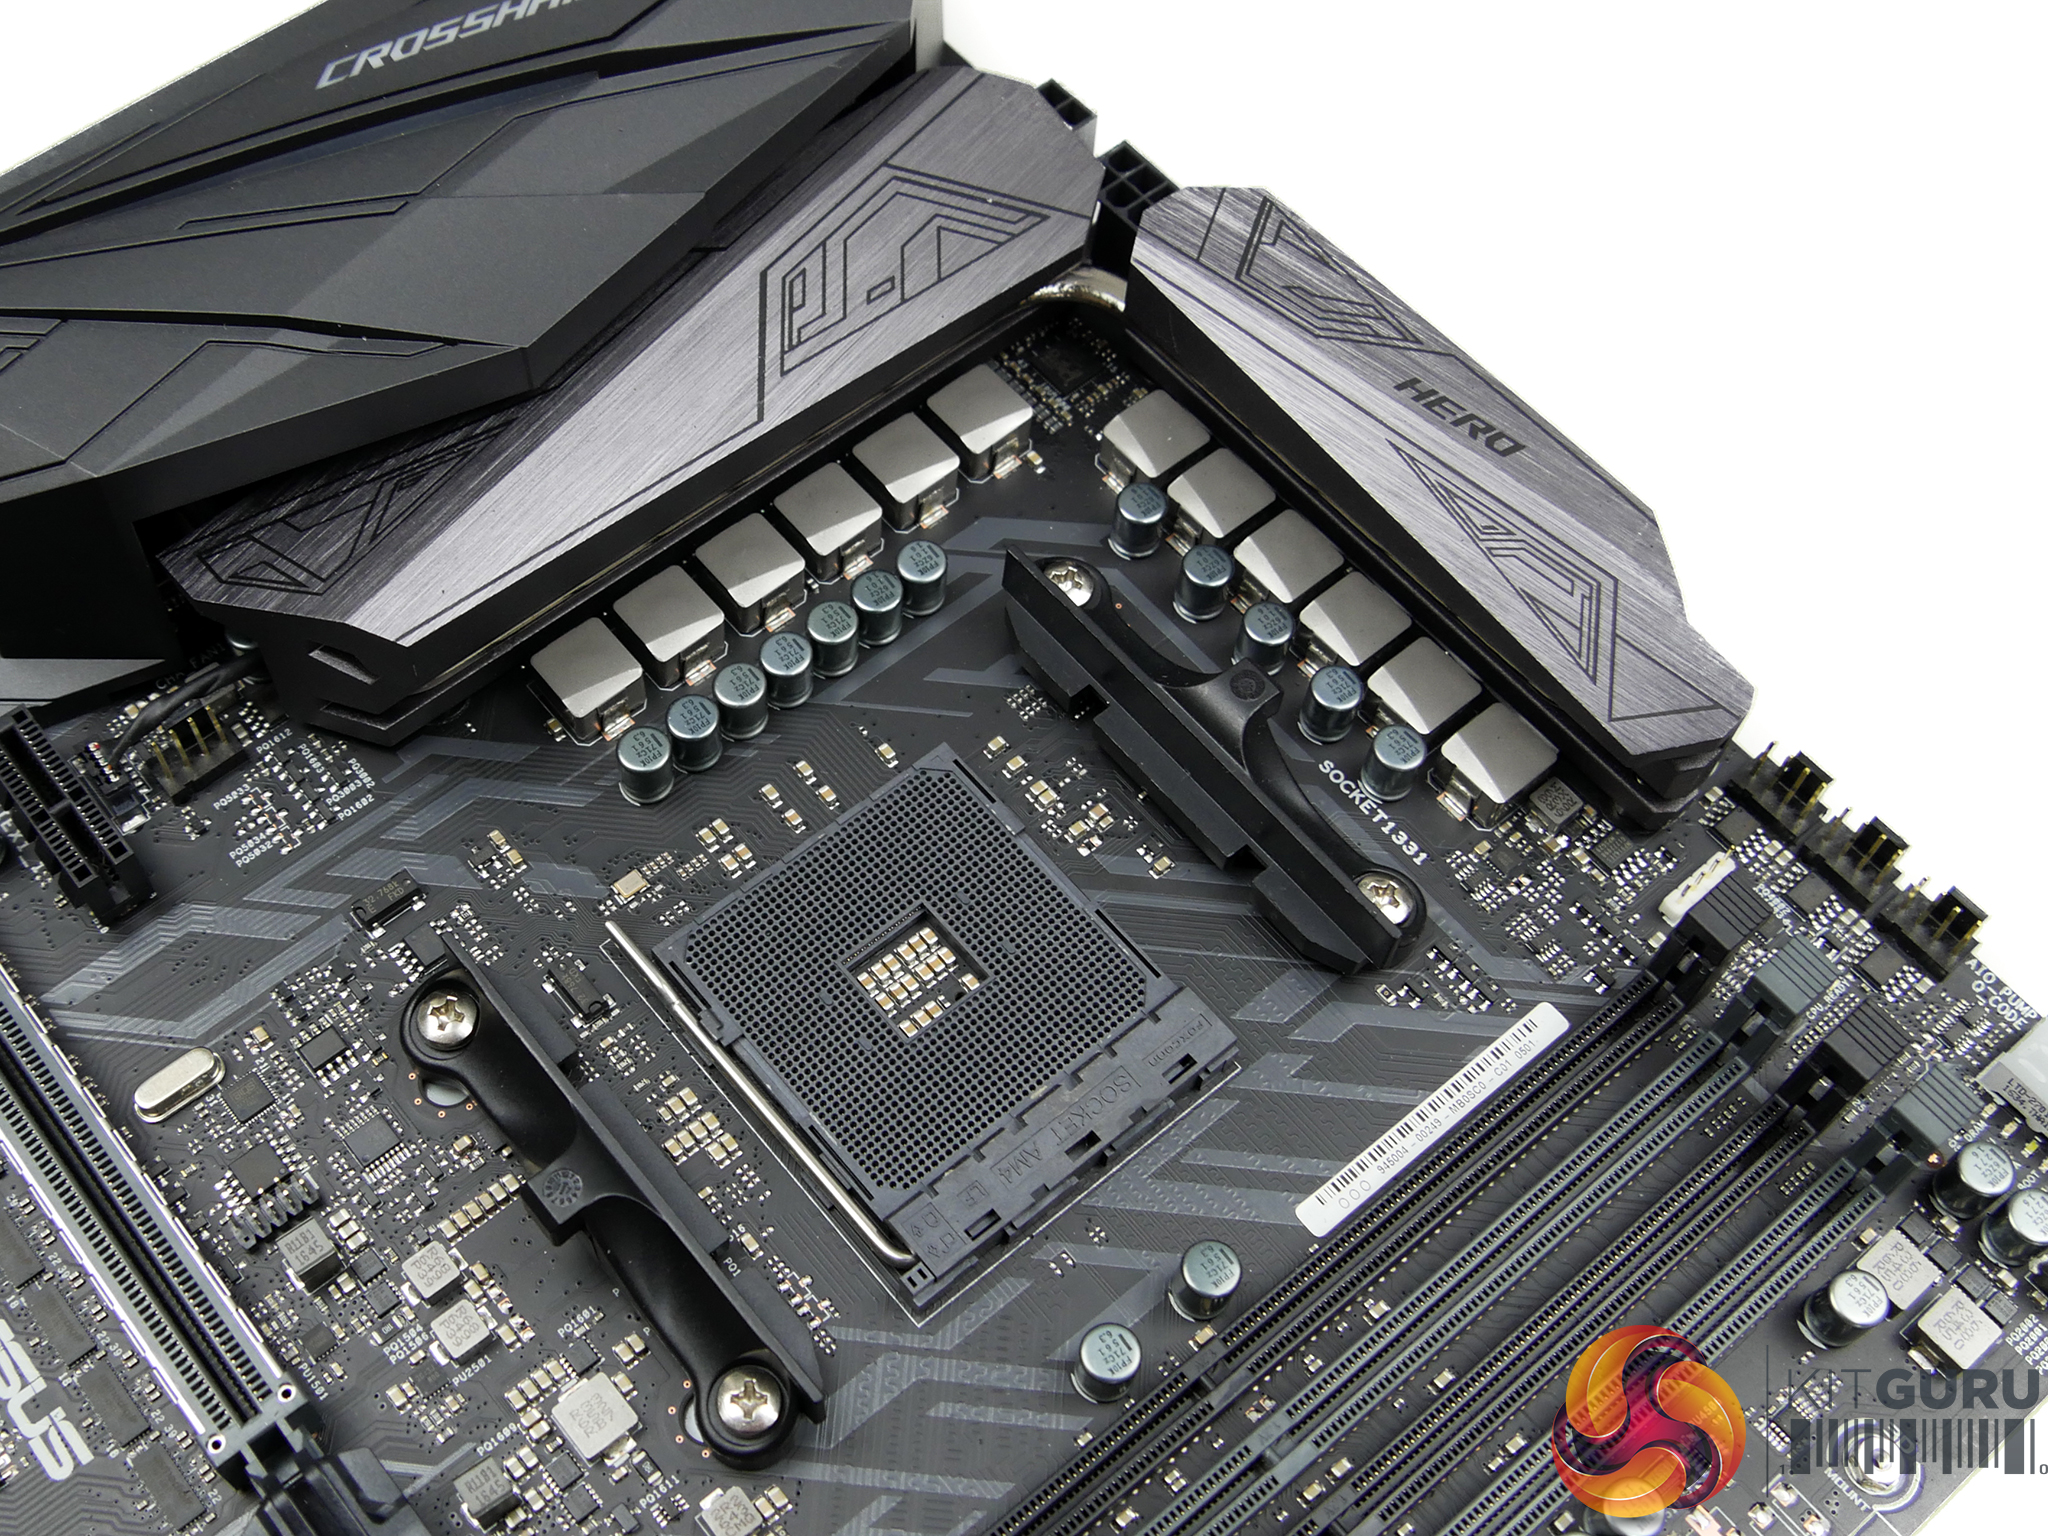
A total of twelve power delivery phases are split between CPU (eight) and SOC (four) voltage duties. ASUS uses a Digi+ EPU ASP1405I PWM controller to manage the twelve 40A Texas Instruments 87350D NexFET power blocks (MOSFETs), twelve rear-mounted International Rectifiers IR3535M drivers, and six IR3599 PWM phase doublers. The R40-marked chokes use a MicroFine alloy construction, according to ASUS, and the capacitors are 10K-rated.
Memory is a two-phase design managed by a Digi+ ASP1103 controller.
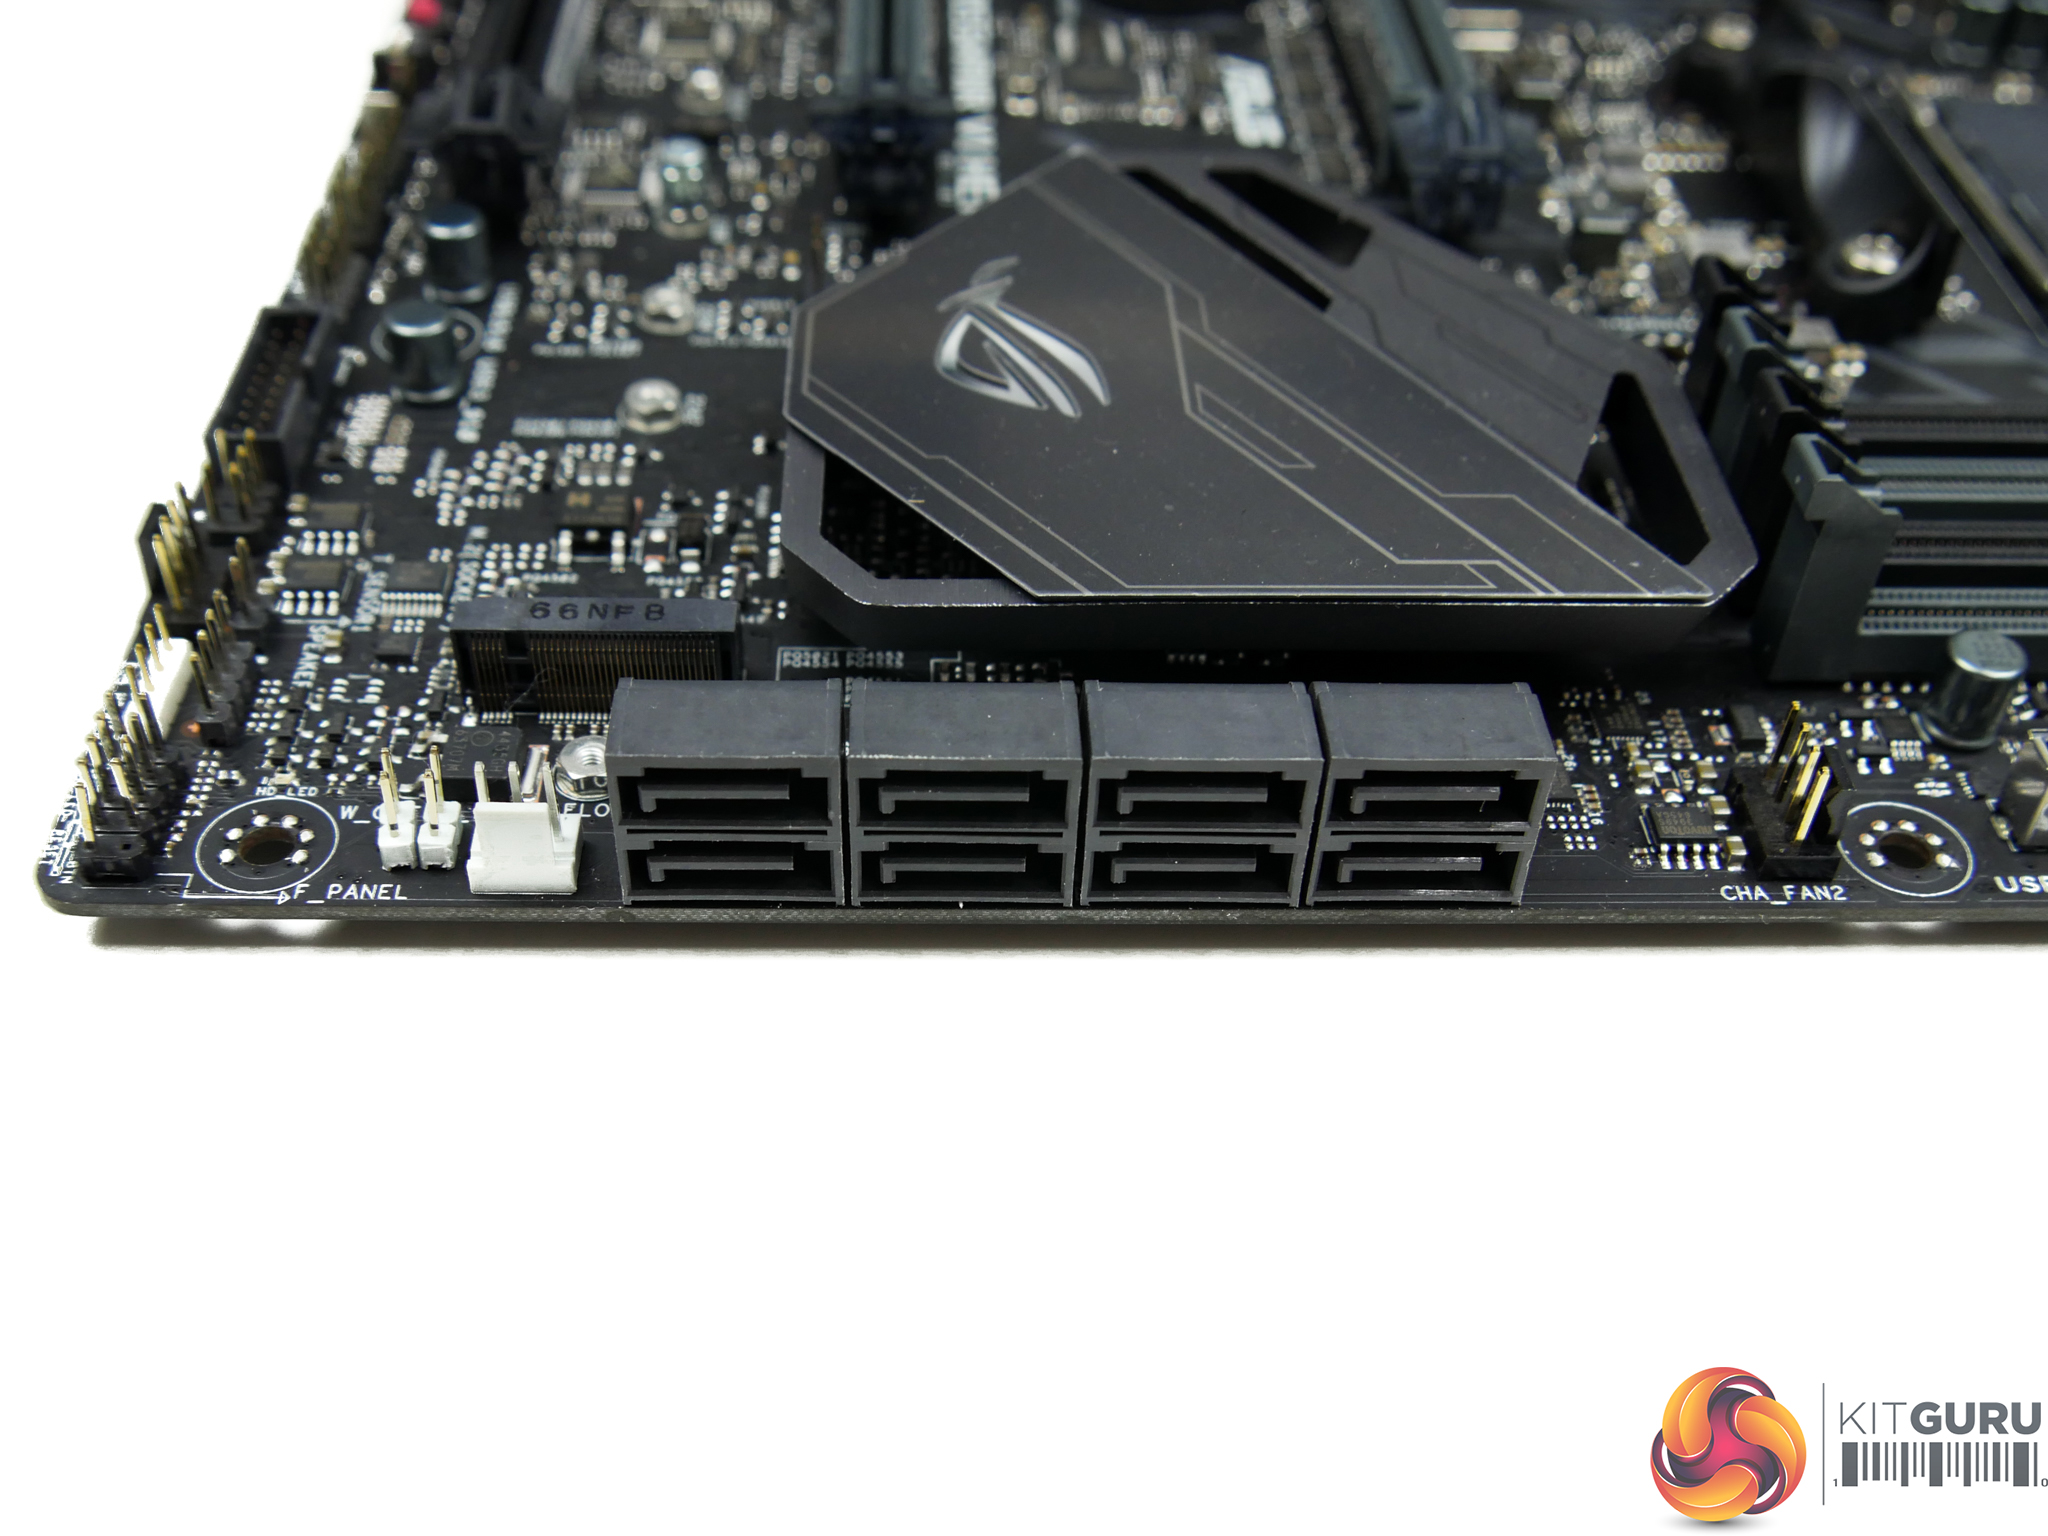
All eight of the right-angled SATA 6Gbps ports are provided by the X370 ‘Promontory' chipset. Every one of the ports can be used at any one time.
There is no U.2 port, which is slightly disappointing given the AM4 platform's potential for prosumer use with Ryzen 7 CPUs. ASUS' omission of SATA-Express makes perfect sense, especially with the onboard USB 3.1 header being provided.
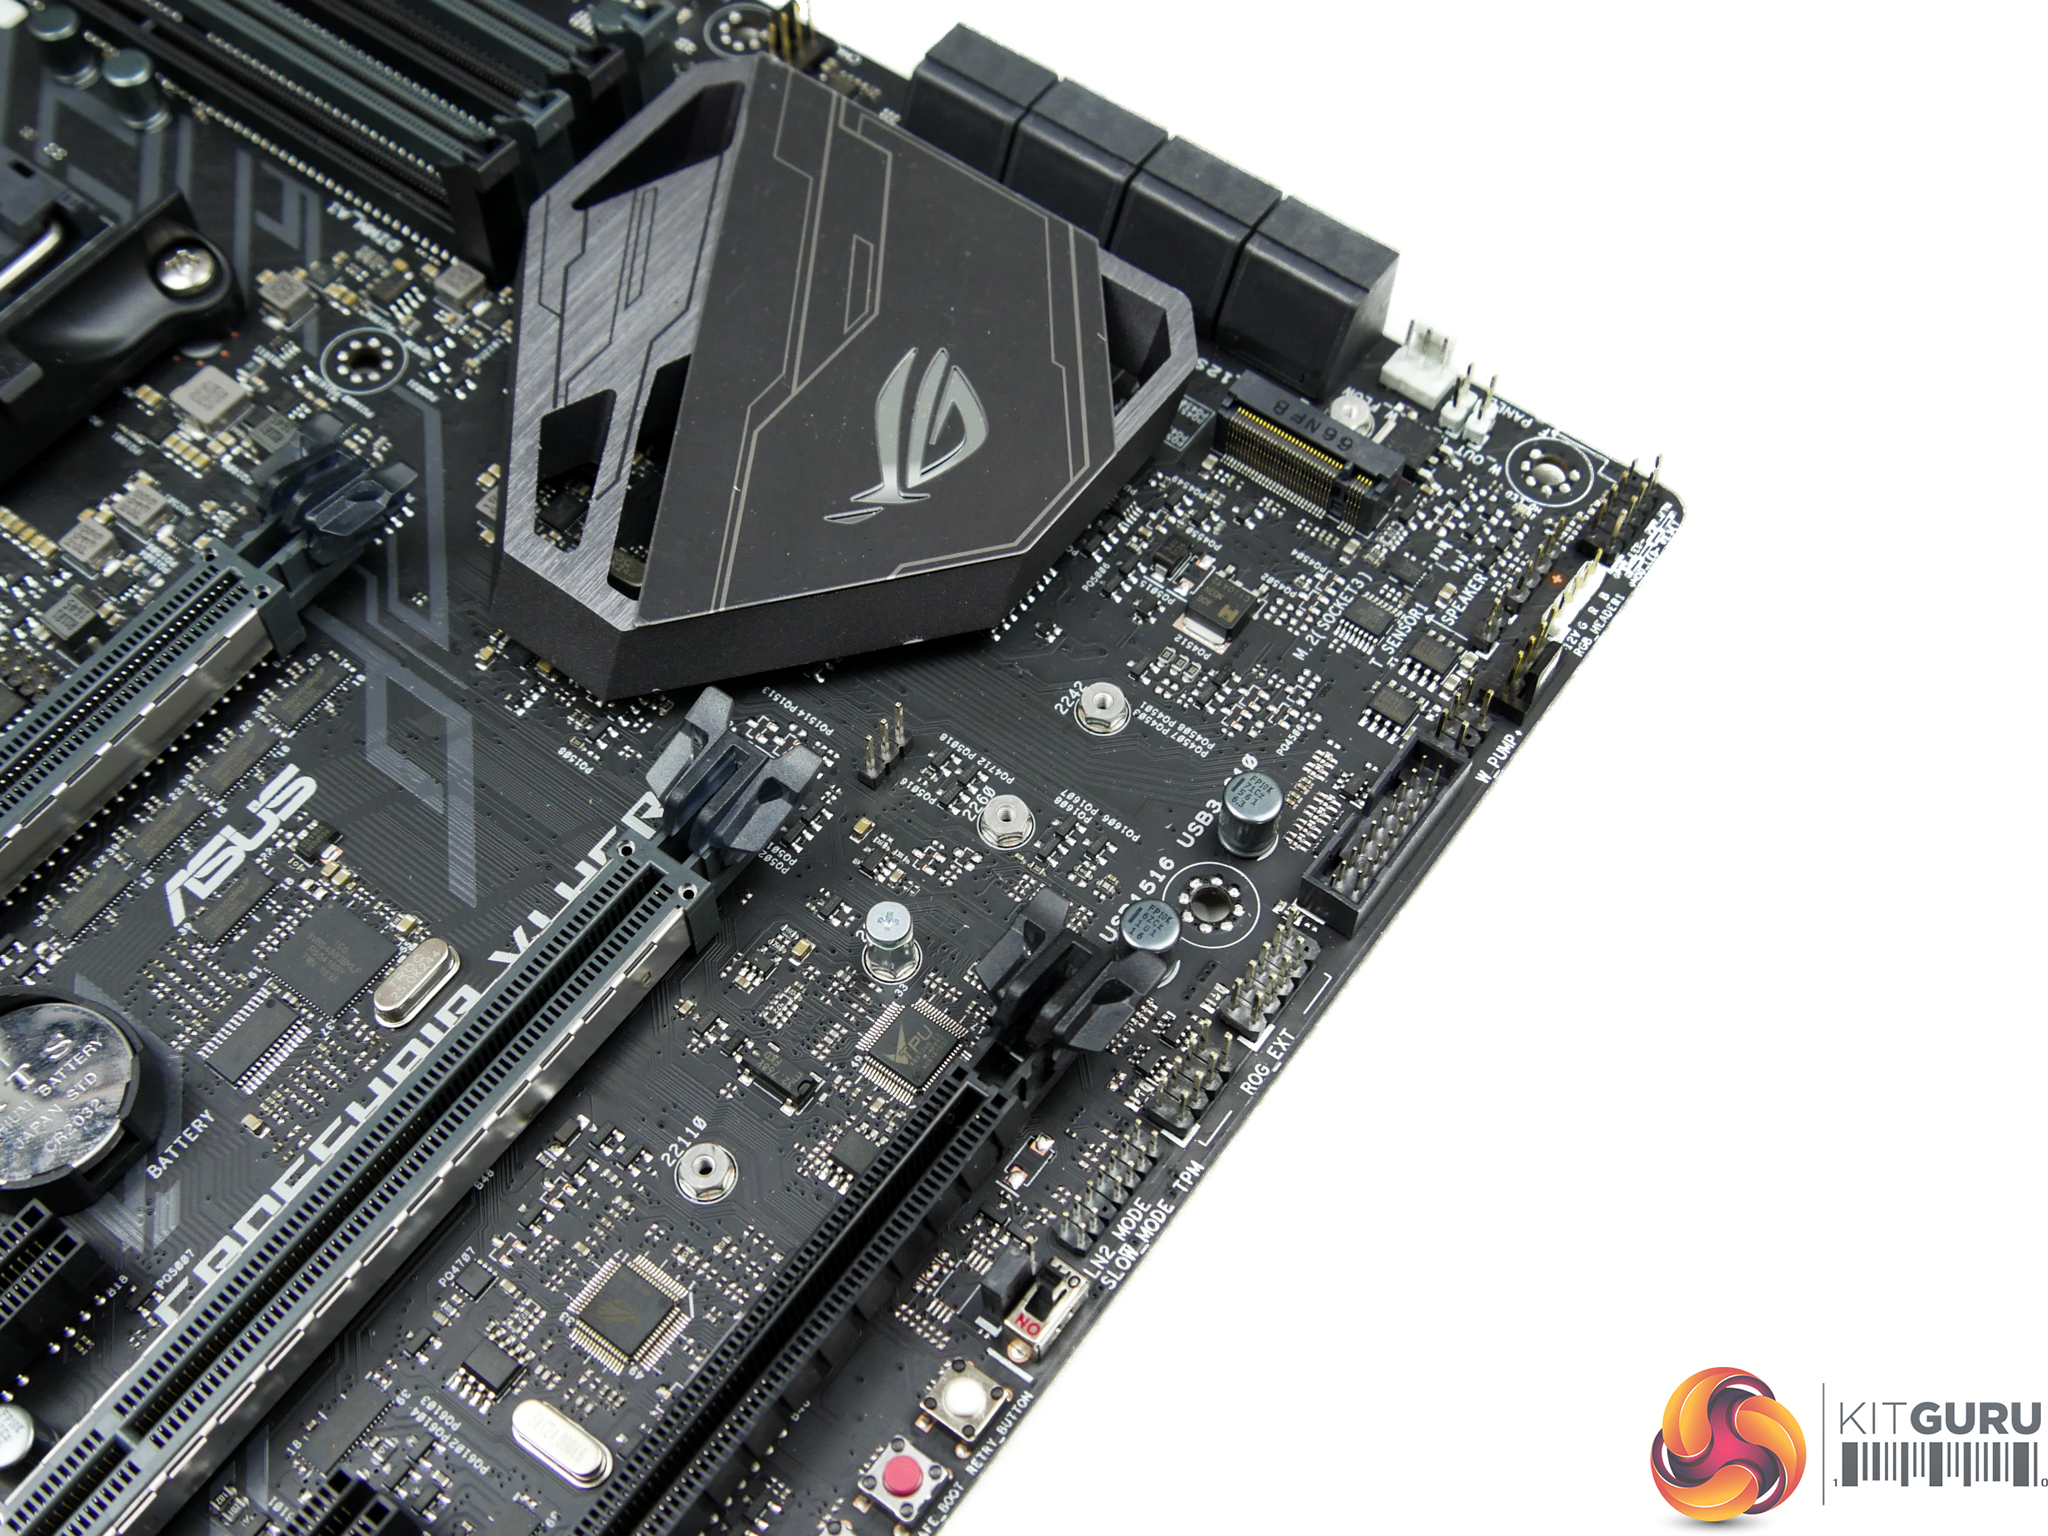
A single 32Gbps PCIe 3.0 x4 NVMe-capable M.2 slot can house drives up to 110mm in length and it can also handle SATA-based M.2 SSDs. The port is given its bandwidth with a direct PCIe 3.0 x4 (or SATA) link to the Ryzen CPU.
The mounting location is both good and bad. It's good because the M.2 SSD is away from a graphics card and is likely to receive less hot exhaust air from one. It is also good because the location means that single-GPU users could install an M.2-to-U.2 adapter and use it without interference. However, the location of the slot means that an ugly green M.2 SSD PCB will be visible for all to see.
I would like to see ASUS give more consideration to M.2 SSD cooling. Thermal throttling under sustained write workloads is a real issue for many fast M.2 PCIe NVMe SSDs. It would be very easy to branch a heatsink off from the chipset cover and would provide additional cooling capacity for an M.2 device.
ASUS provides a 3D printing mount near the M.2 connector with the intention of an end-user printing a fan bracket to cool the SSD. This is not, however, a realistic scenario for most purchasers so a bracket can be purchased for £8-11 from Shapeways. It would be preferable for ASUS to make a batch order to drive down the per-unit price and include the fan bracket by default.

The two primary full-length PCIe slots are given ASUS' SafeSlot treatment that makes them thicker and stronger. These are the two connectors that get their PCIe 3.0 lanes from the CPU and will run at x16/x0 or x8/x8 for CrossFire and SLI. Spacing between them is ideal for 2- or 2.5-slot cards to be given a cooling gap.
Four lanes of PCIe 2.0 bandwidth from the X370 chipset are fed to the lower full-length PCIe slot. This bandwidth is shared with the trio of open-ended PCIe 2.0 x1 slots.
Clearly, high-speed PCIe connectivity is limited on AMD's AM4 platform. If you want to use two graphics cards in SLI alongside a PCIe 3.0 x4 M.2 SSD, there's no more bandwidth for another PCIe Gen 3 SSD.
The usual combination of ports and headers is found along the board's bottom edge. ASUS also provides onboard buttons, sensor points for liquid cooling users, and a 5Gbps USB 3.0 header to partner the internal USB 3.1 connector.
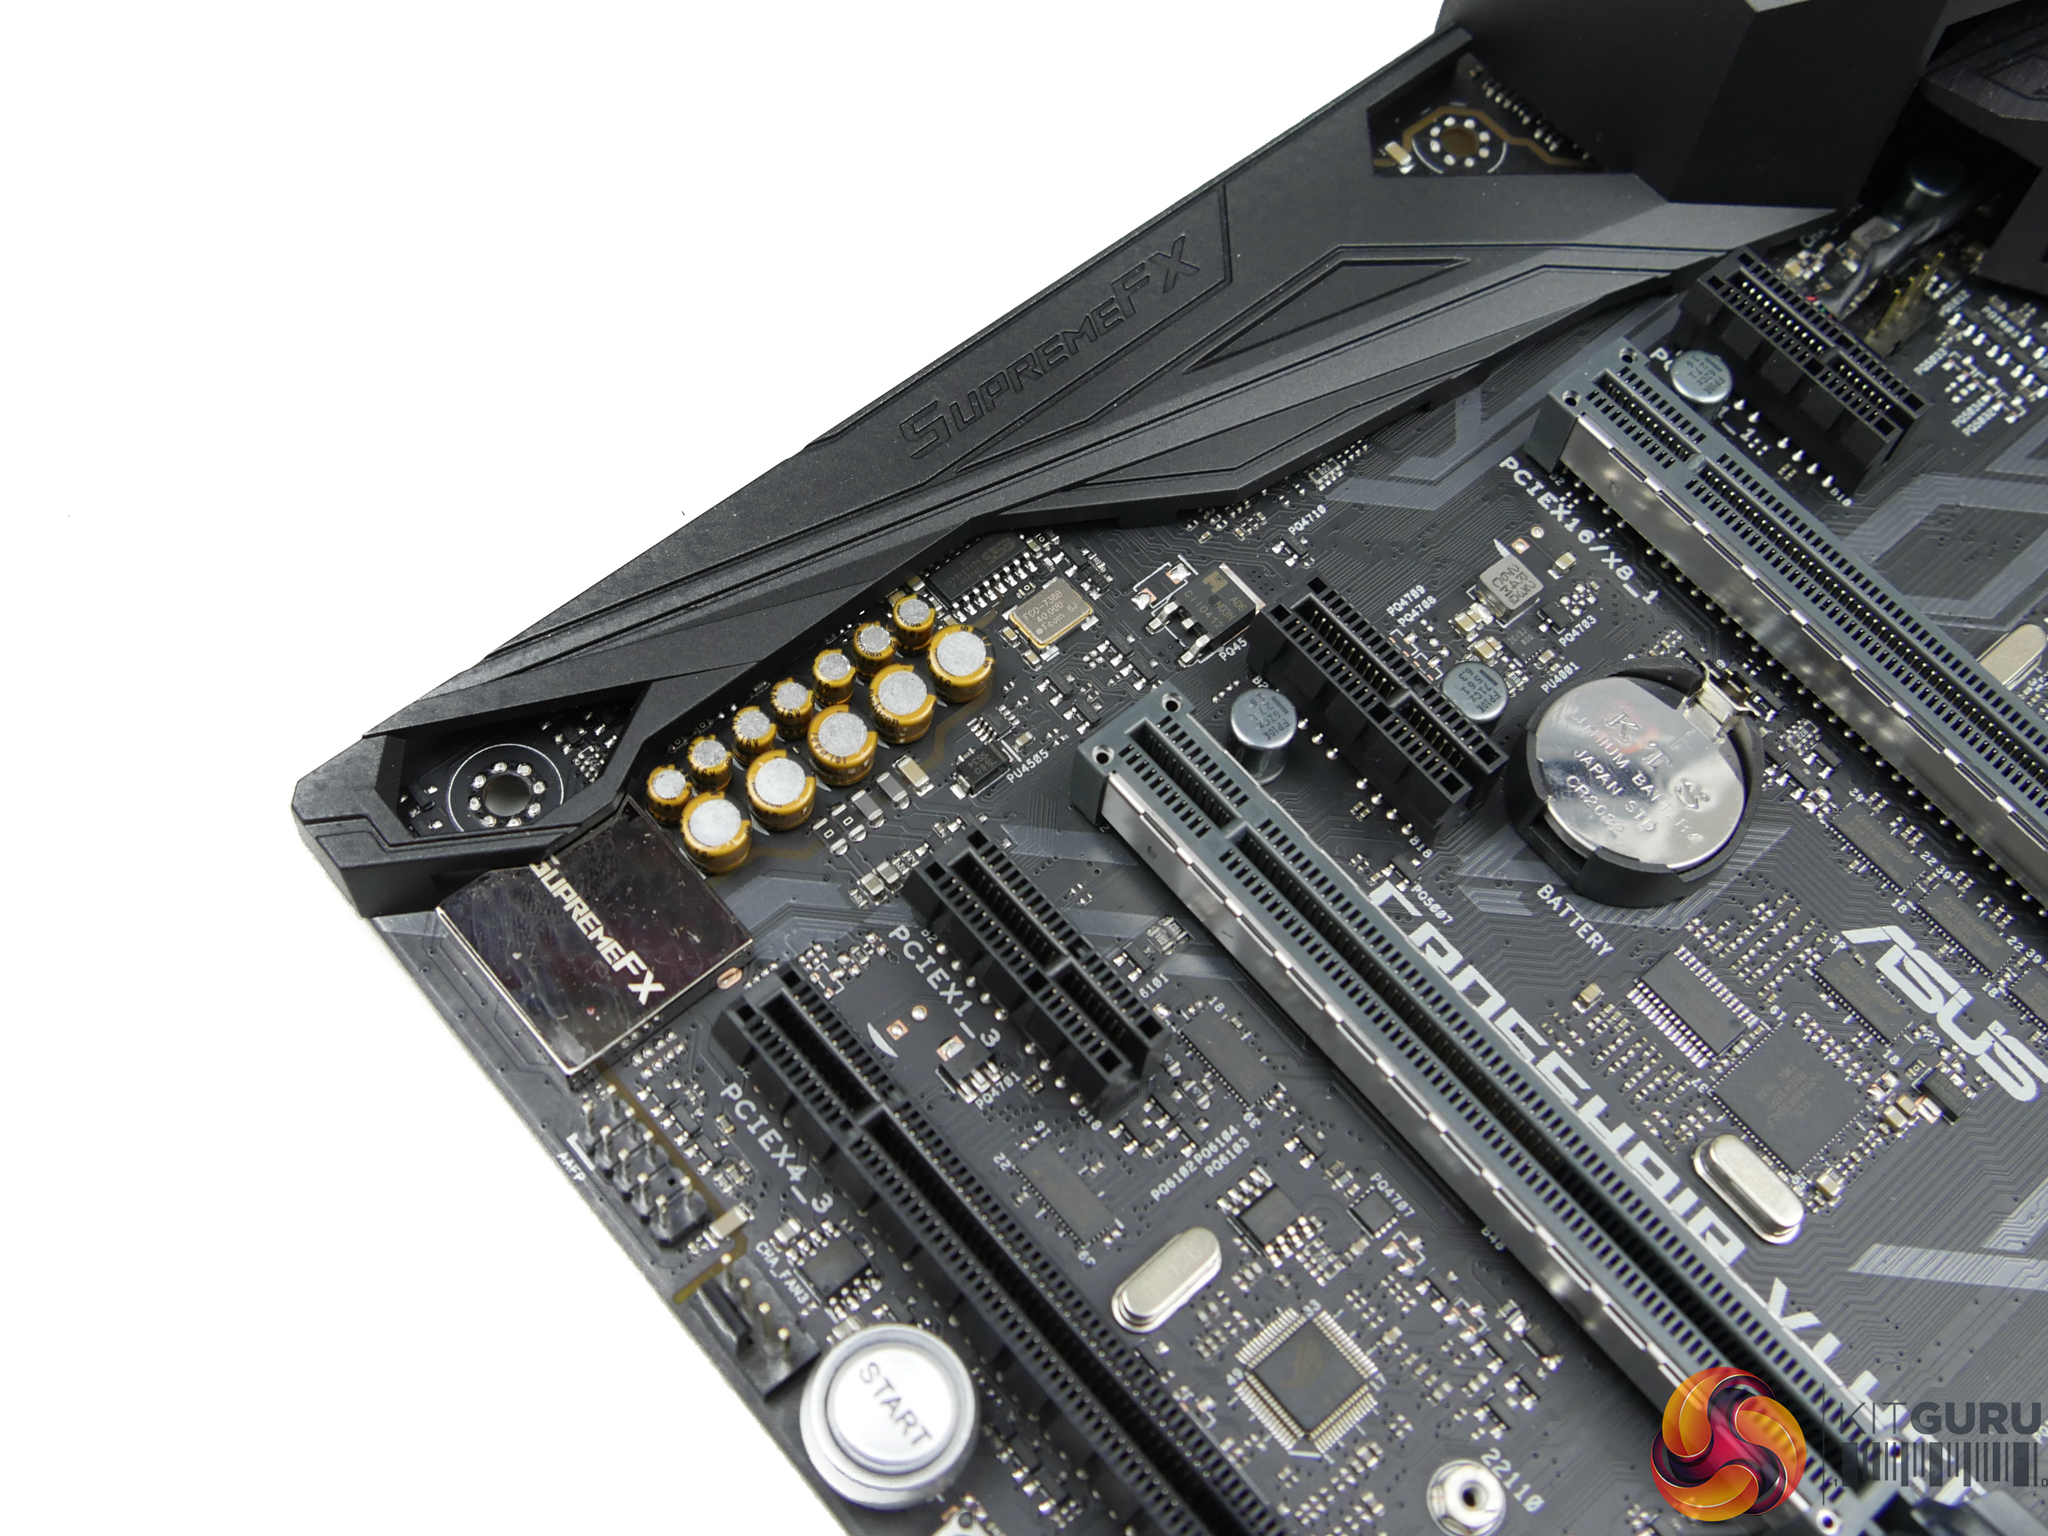
The ROG SupremeFX audio system uses a ‘S1220' codec, Nichicon audio capacitors, an ESS ES9023P DAC, and shielding for the components. Software-based audio features such as Sonic Radar III and Sonic Studio III are supported.
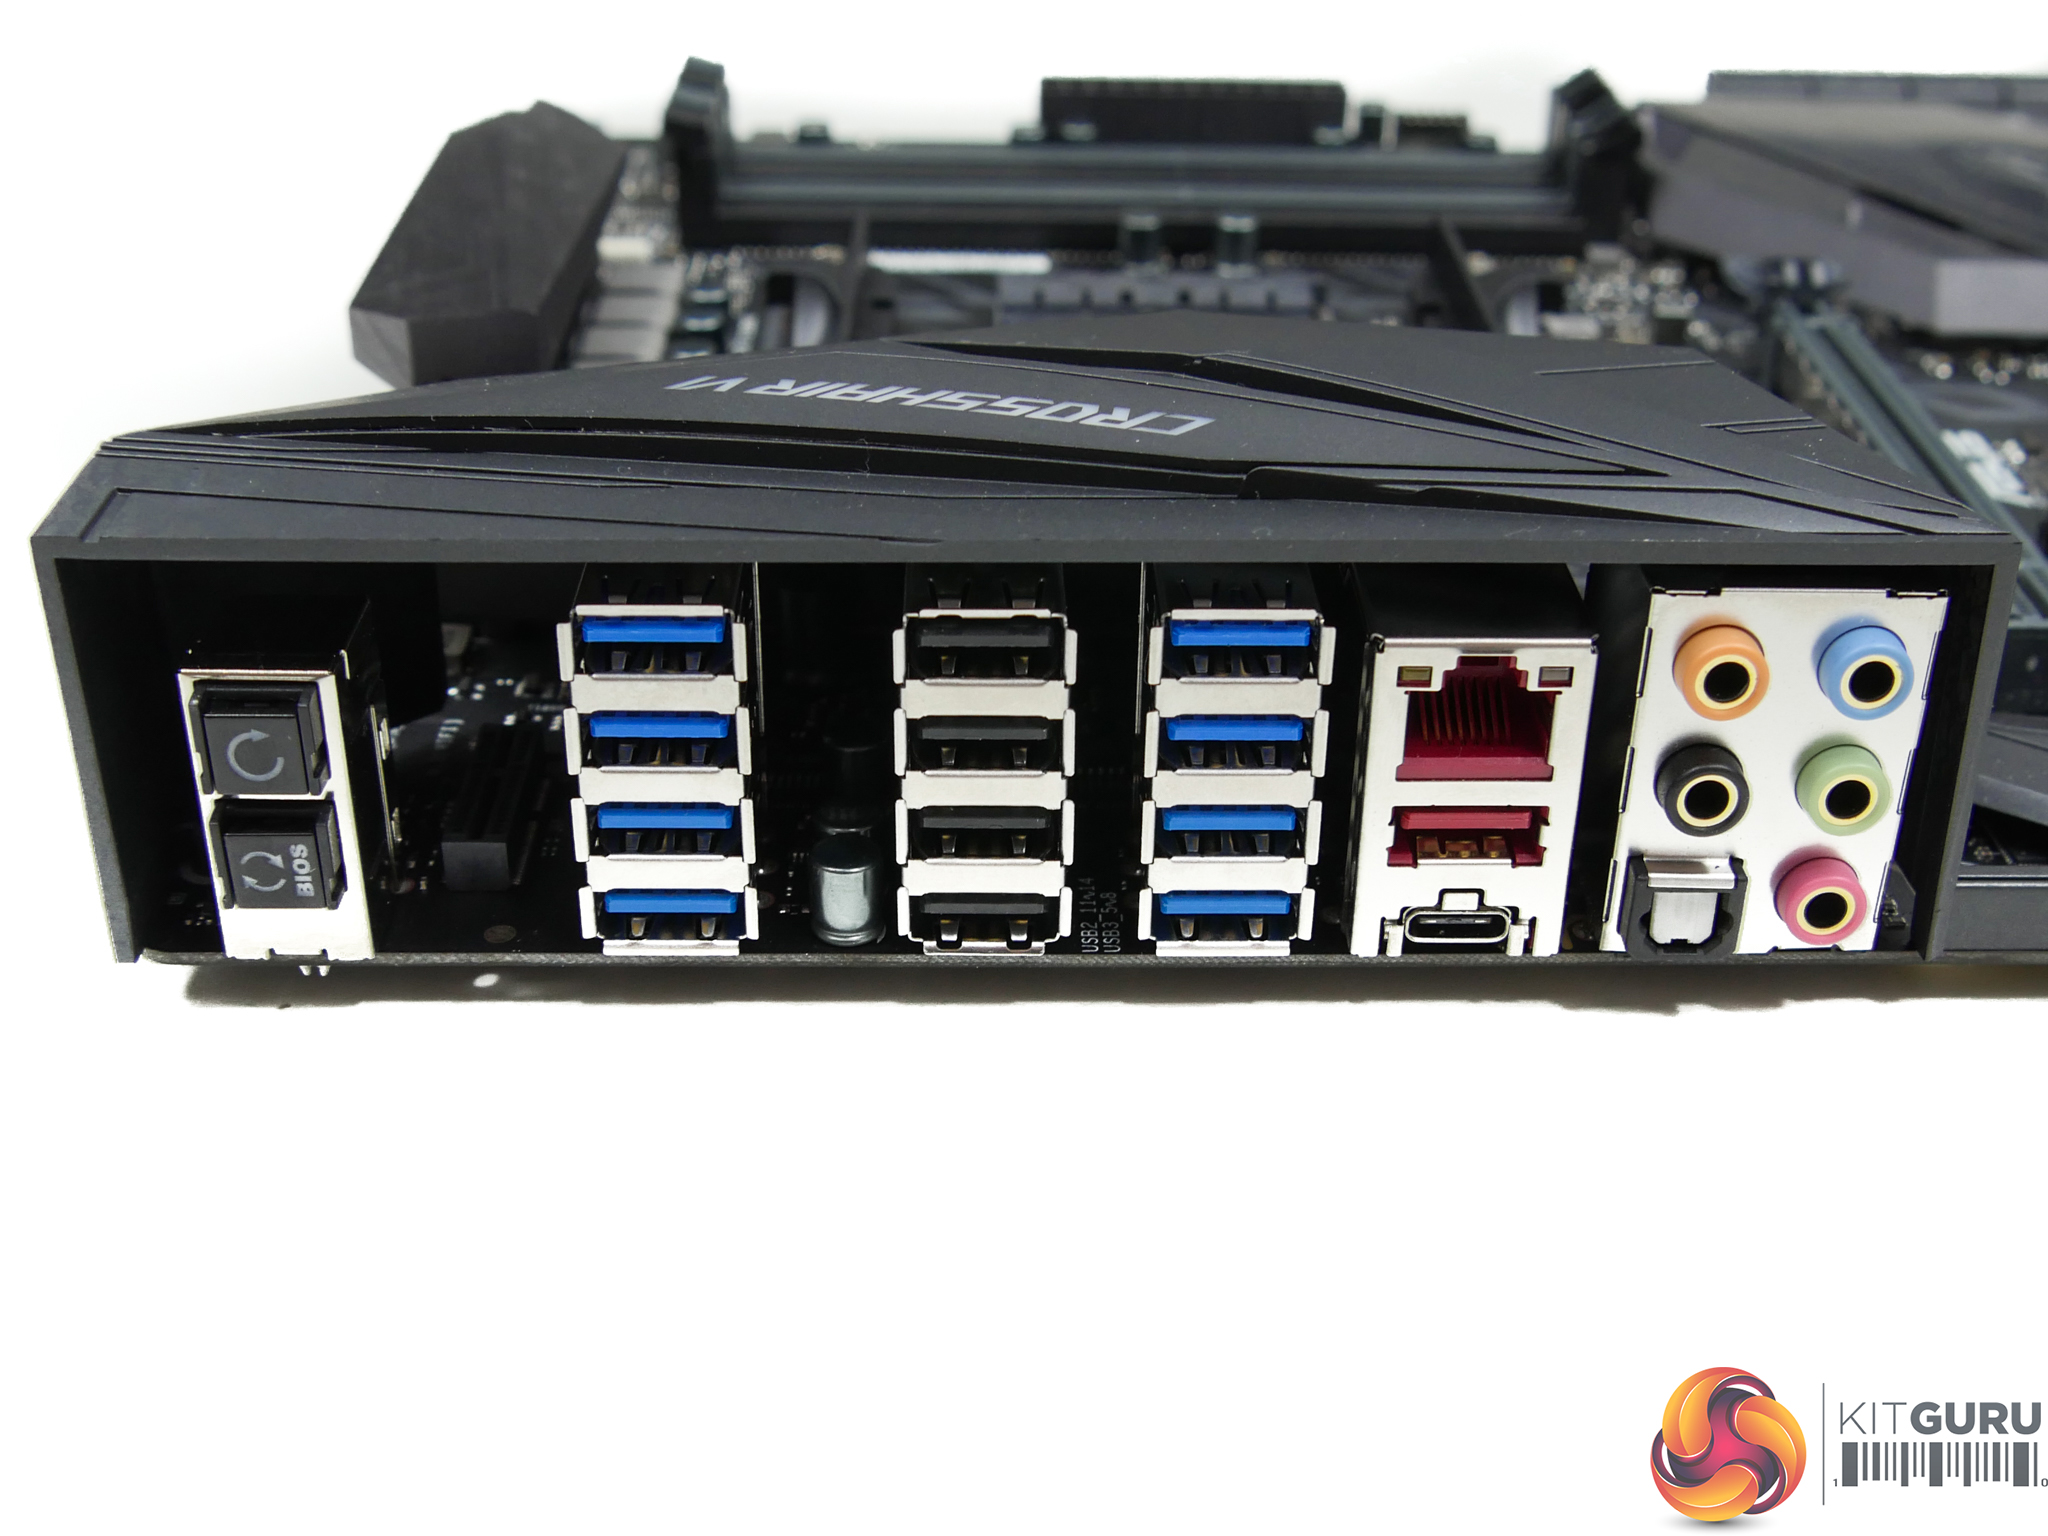
USB ports steal the rear IO show. A total of eight 5Gbps USB 3.0 Type-A ports are delivered from both the Ryzen CPU and the X370 chipset (four from each). Four more USB Type-A ports, this time at 2.0 speeds, are provided by the X370 chipset. I like to see these included for devices that do not need faster links, such as peripherals. The two 10Gbps USB 3.1 Gen 2 ports (Type-C provided by the ASMedia ASM1543 logic) are provided by a PCIe 2.0 x2 ASMedia ASM1143 chipset which is inferior to the ASM2142 revision found on many Z270 motherboards.
Gigabit Ethernet is provided by an Intel I211AT NIC, aided by an ASUS LANGuard component. The standard affair of audio ports join BIOS Flashback and reset (effectively clear CMOS) buttons, which prove useful with the platform in its infancy and still experiencing bugs. No onboard video ports is not a problem in my opinion as it is highly unlikely that this motherboard will be partnered with a future Zen-based APU.
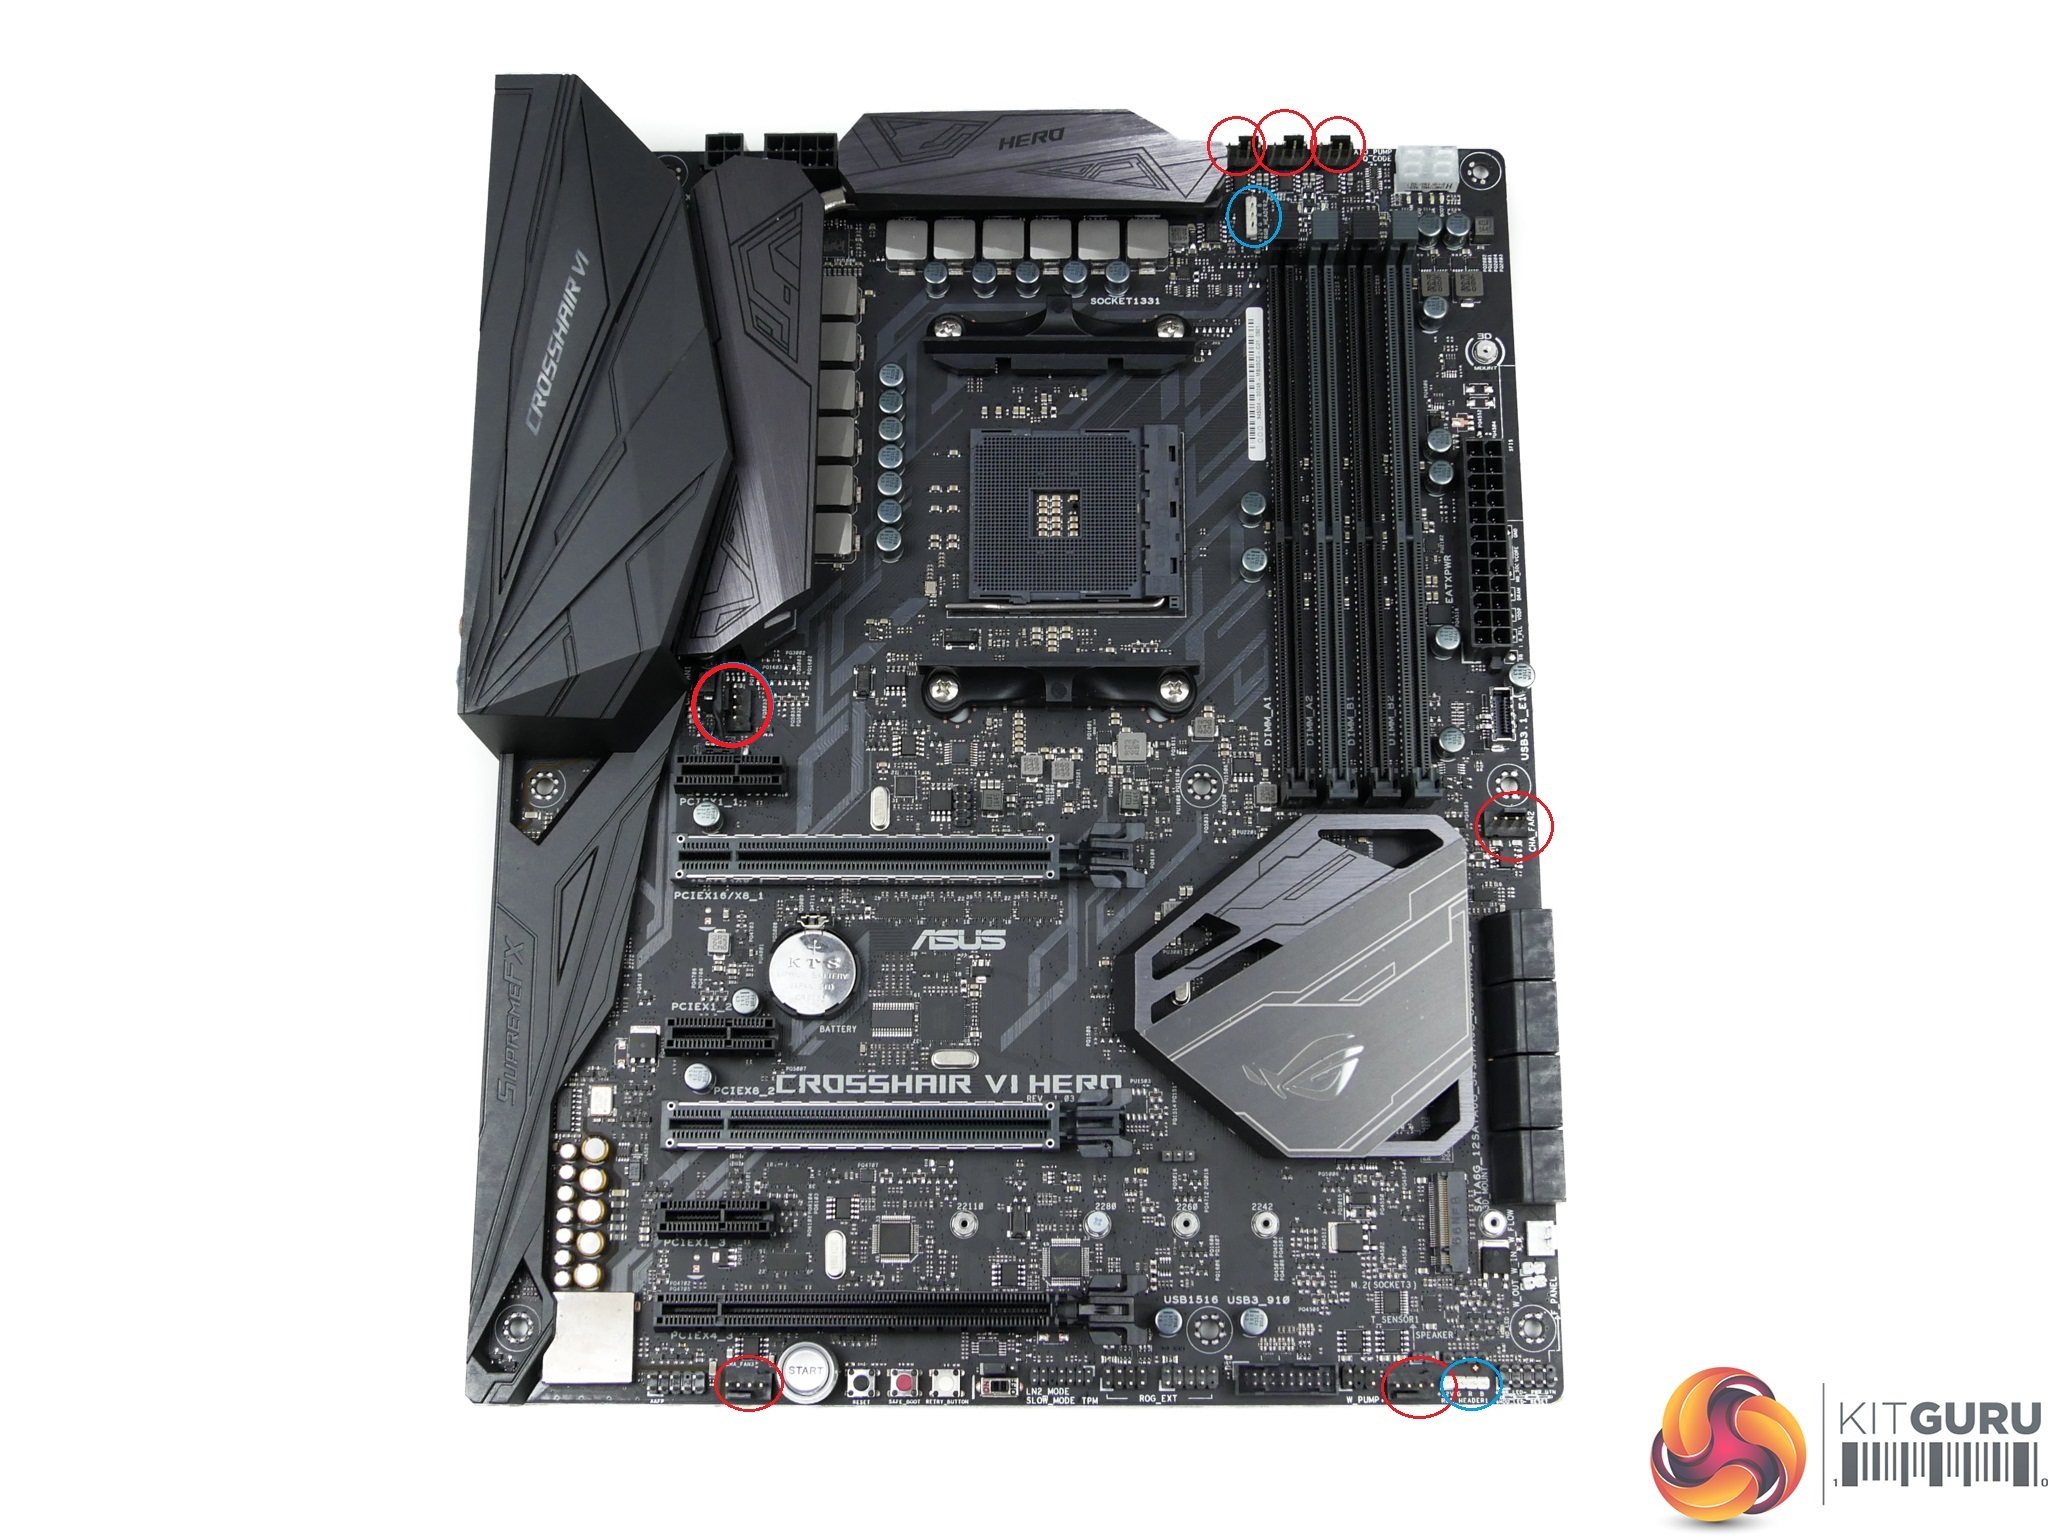
Seven 4-pin fan headers are smartly distributed around the motherboard. The headers support PWM and DC control using the UEFI and OS software. Two 4-pin RGB headers are mounted on opposite sides of the motherboard to aid usability with RGB strips in large cases.
An ITE IT8665E chipset manages monitoring and fan control duties.
ASUS ROG X370 UEFI
The UEFI used on ASUS' X370 motherboard is the same as the interface we have become accustomed to on the vendor's mainstream Intel motherboards (such as the STRIX Z270F Gaming). As such, our analysis follows a very similar tone.

The default entry page for ASUS’ UEFI is EZ Mode. On this page, basic settings relating to fan speeds and boot devices can be adjusted and other important information can be viewed. EZ Mode is simple enough for novice users to not be dissuaded from entering the UEFI.
Hitting F7 allows the Advanced mode to be accessed.
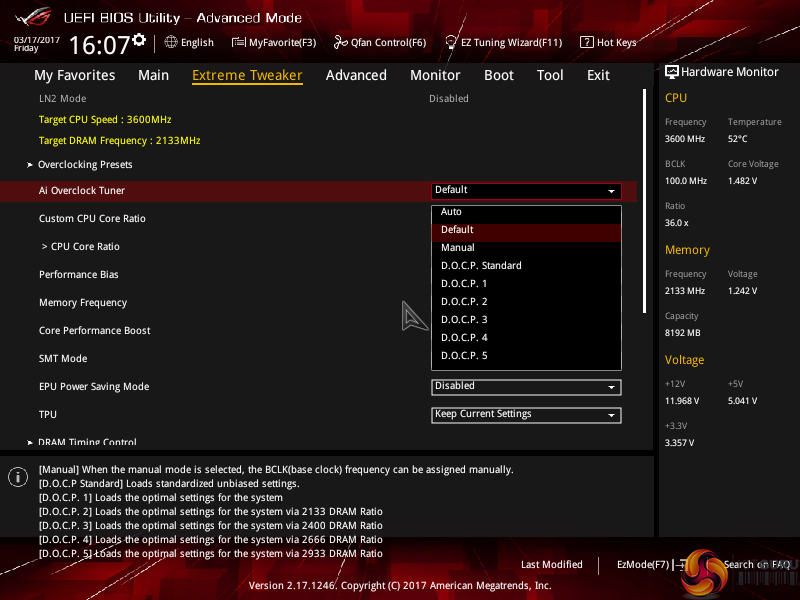
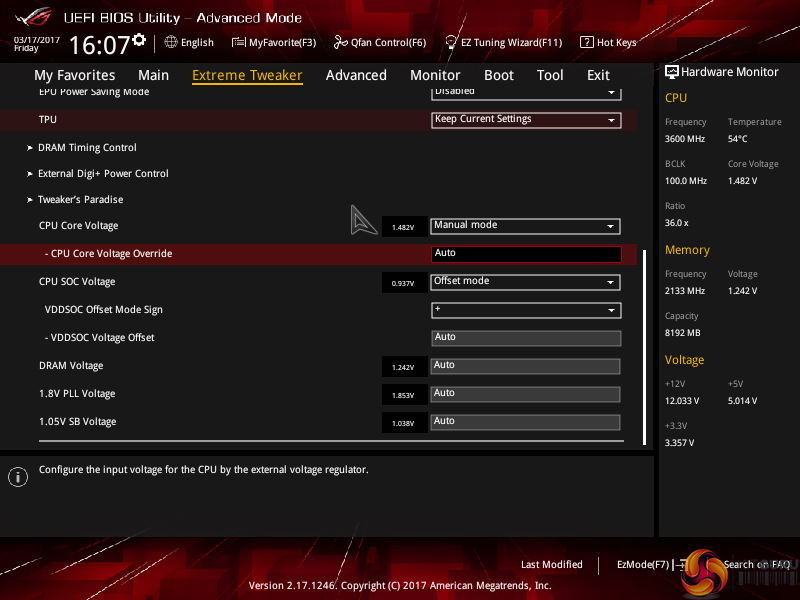
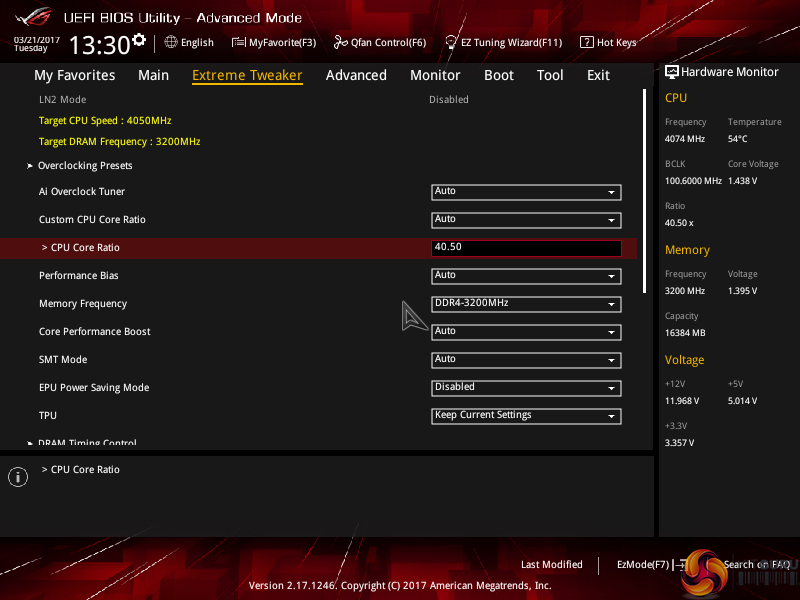
ExtremeTweaker follows the standard layout that we have come to expect from recent ASUS motherboards, and that’s a good thing. Easy access is provided to ratio, frequency, and voltage settings, allowing users to adjust their system parameters with minimal effort.
Different voltage operating modes are available for the CPU, allowing the user to adjust an overclock to their own preference. The modes of interest are: Offset, Manual, and Auto.
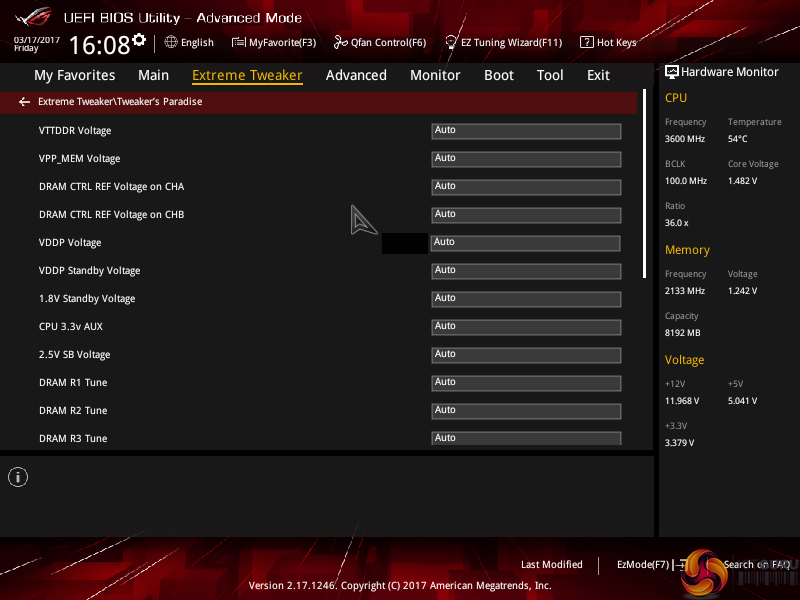
Subsections inside Extreme Tweaker provide users with additional overclocking abilities – External Digi+ Power Control and Tweaker’s Paradise are the focal points.
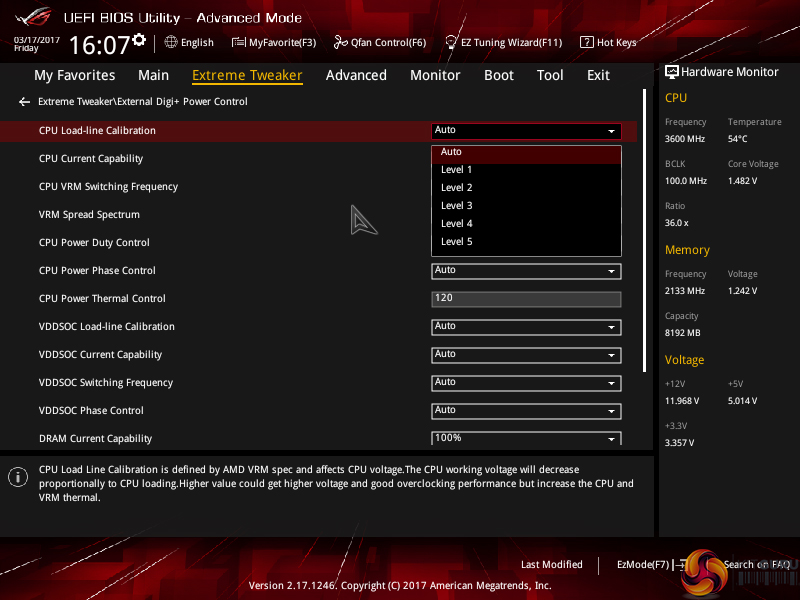
Load-line calibration (LLC) settings can be accessed through the External Digi+ Power Control page. ASUS provides options from level 1 to level 5 and gives a basic explanation of how LLC works. However, ASUS’ explanation of how voltage changes with load is not as good as MSI’s and ASRock’s visual interpretation using a graph. We had to resort to trial and error in order to find the desirable LLC level, which was a waste of time compared to competing vendors' solutions.
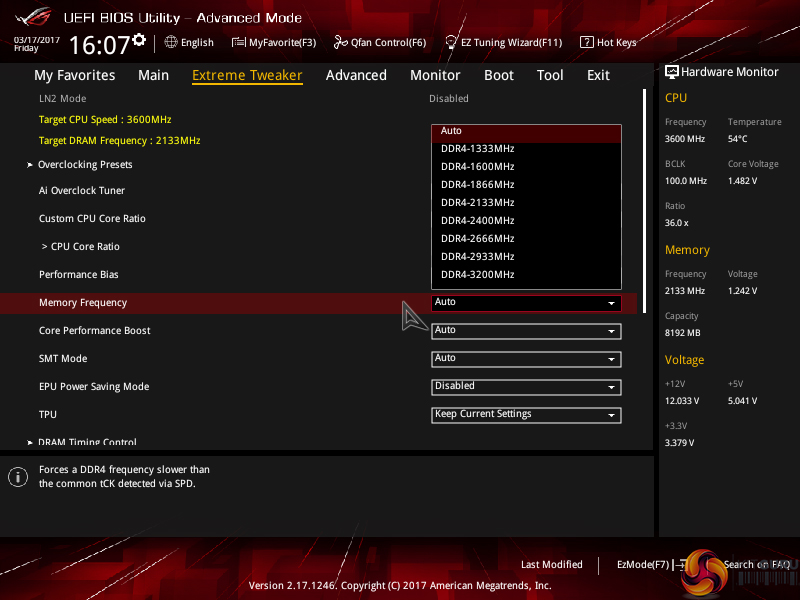
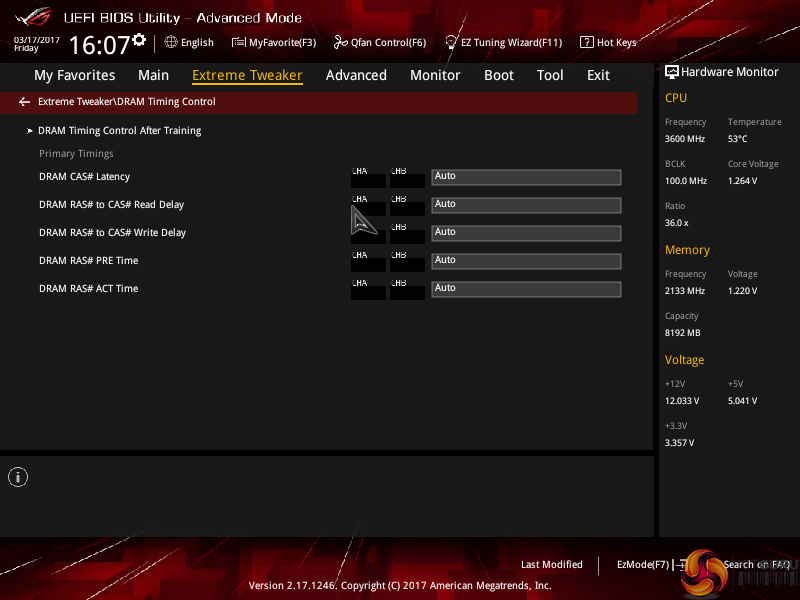
Memory dividers allowing up to 32x can be selected in the drop-down tab. All of the general timings settings are accessible via their own section.
ASUS does not support XMP directly, as MSI and Gigabyte do. Instead, the board vendor opts for a mode called D.O.C.P. which loads what it perceives to be optimal settings in order to hit targetted memory frequencies. Memory dividers up to 32x are selected and the BCLK can be adjusted in order to hit the XMP kit's rated frequency. For example, D.O.C.P. 3 will use a 24x memory divider and 111MHz BCLK to hit 2666MHz on an XMP-2666 kit, whereas D.O.C.P. 1 will load a divider close to the kit's rated XMP frequency and adjust the BCLK to try to hit that value (e.g. 32x divider and 112.5MHz BCLK for XMP-3600 kits).
There is also the D.O.C.P. Standard option which will select a memory divider at the kit's rated frequency or one notch below if there isn't a specific divider for the AMD platform. For example, 3600MHz memory will be set at 3200MHz, 2800MHz DIMMs will go to 2666MHz, and 3200MHz sticks will operate at 3200MHz. This option is, more-or-less, XMP with a different name.
We would advise caution when using D.O.C.P. as we tried to use an XMP-3600 kit using the D.O.C.P. Standard profile and ended up breaking an ROG Crosshair VI Hero motherboard. The BIOS crashed and now the board will not even switch on using the power buttons.
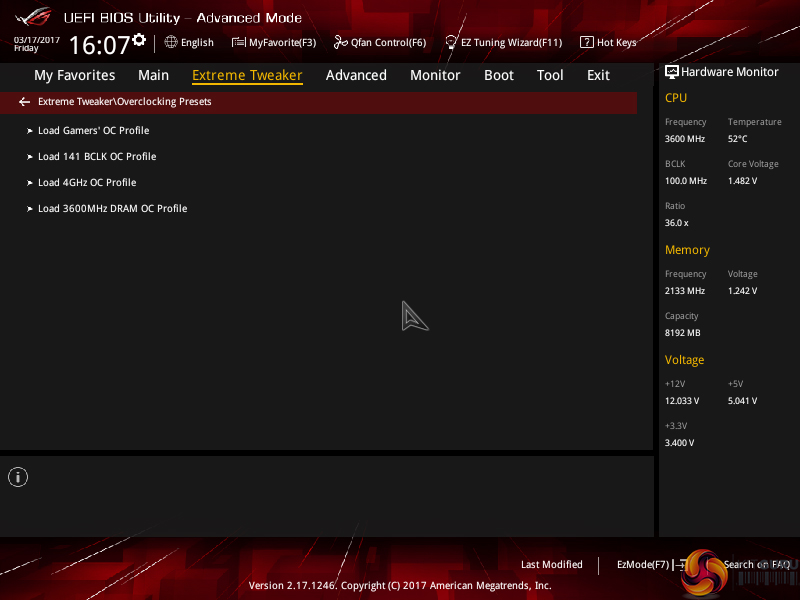
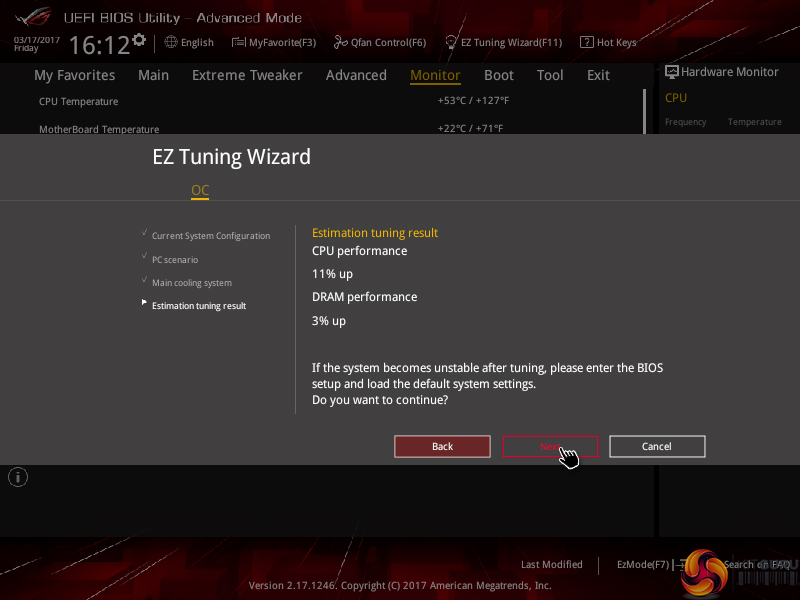
ASUS includes a handful of overclocking presets relating to BCLK, CPU, and memory speed adjustments. The EZ Tuning Wizard also has an ability to increase system speed for novice users but its headroom is limited due to the minimal overclocking potential of the higher-clocked Ryzen 7 1800X.
We would recommend manual overclocking with Ryzen 7 in order to meet your chip's specific requirements. We expect that users purchasing this calibre of motherboard will indeed be doing their own overclocking.
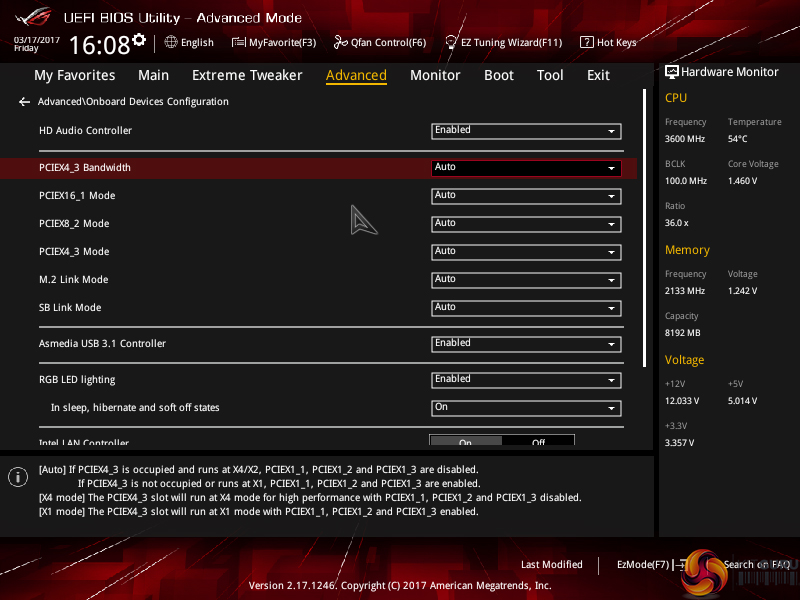
The Advanced tab is where options relating to storage and onboard devices can be adjusted.
Under the Onboard Devices page, operation mode of the M.2 slot can be adjusted in order to get the correct operation. This subsection also provides an option for the onboard RGB lighting to be enabled or disabled during sleep and power-off modes.
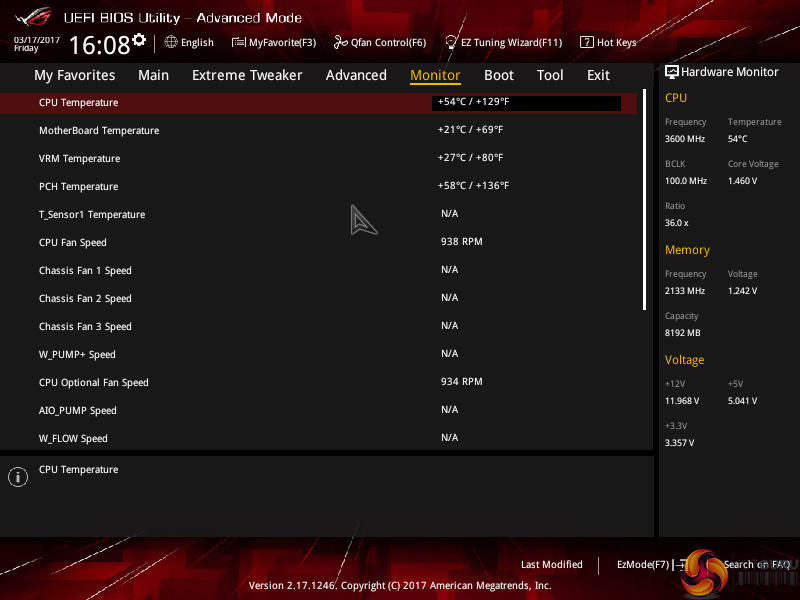
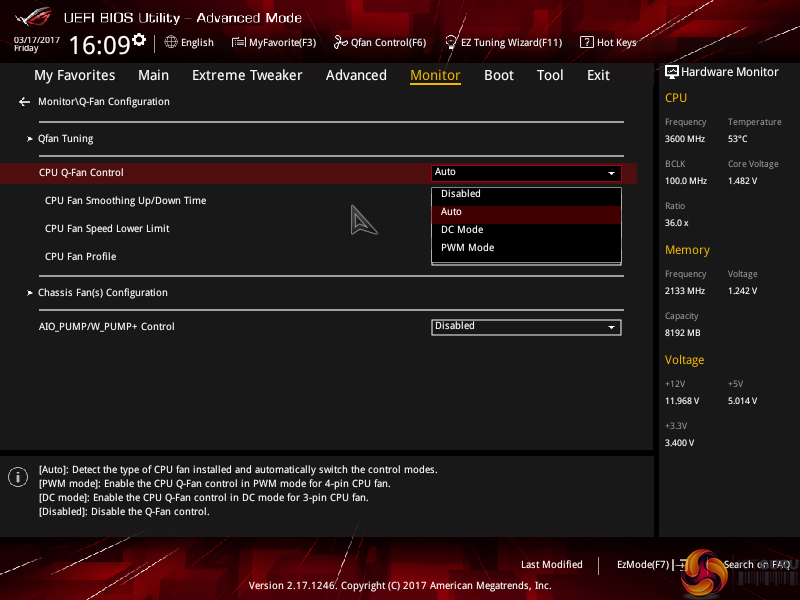
ASUS gives a wealth of information relating to voltages, temperatures, and fan speeds, as displayed in the Monitor UEFI page.
Fan speed control in ASUS’ UEFI is very good, though it is clear that ASUS would prefer you to use the Q-Fan Control option for setting up custom speed curves.
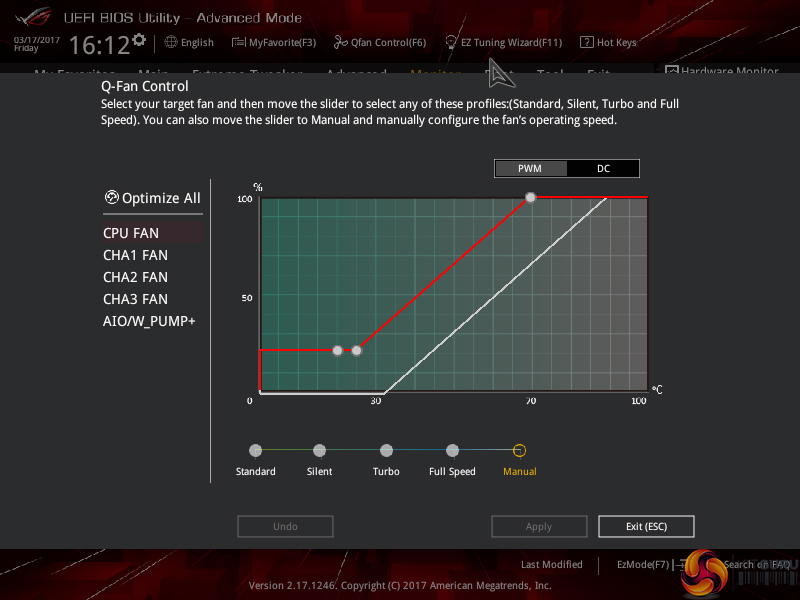
Hitting F6 loads up ASUS’ Q-Fan Control GUI which is a graphical method of adjusting the fan speed curve. Speed curves can be selected and configured for PWM and DC fans.
While the interface is good, it certainly isn’t as strong as Gigabyte’s Smart Fan 5 system which has more granular tuning and better control over temperature relations from motherboard sensors.
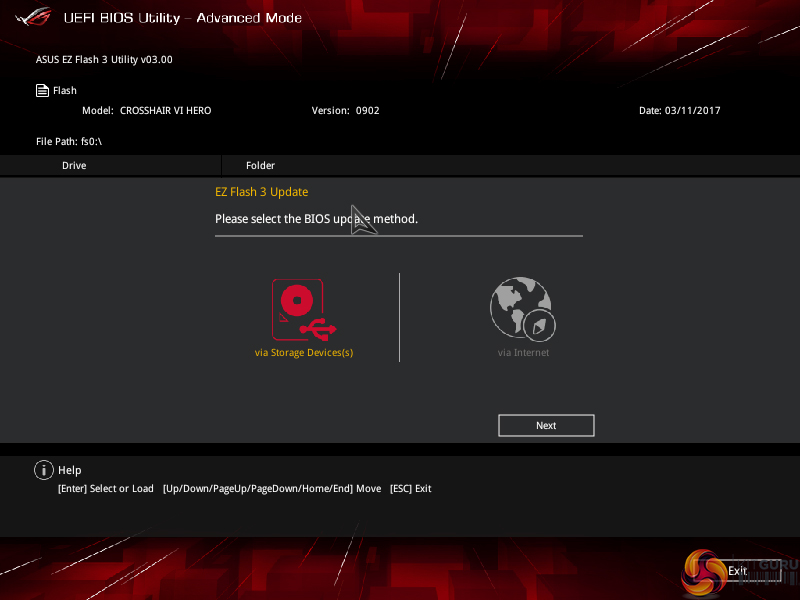
EZ Flash 3 has the ability to update the BIOS using a storage device or over the web.
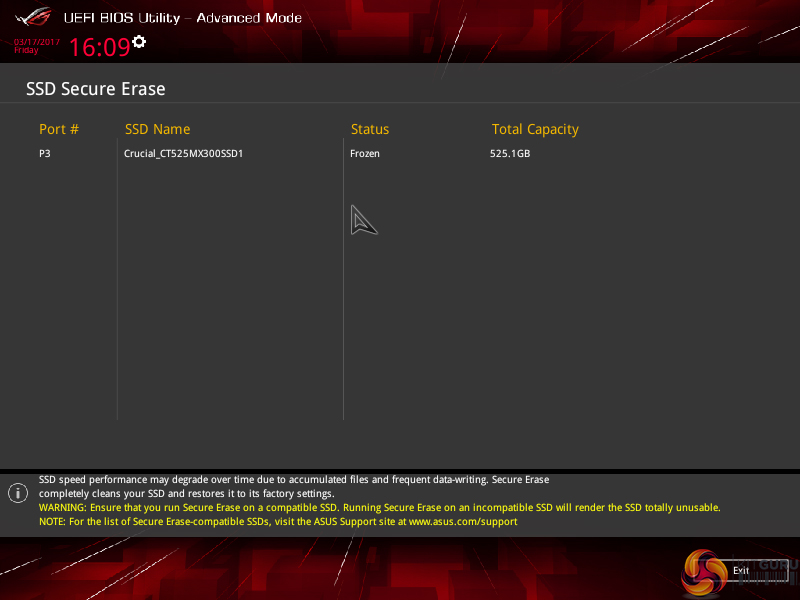
SSD Secure Erase is a useful tool for securely wiping the contents of an SSD if you are selling it on, for example. There is also the possibility that wiping the data will restore performance, though this was more prevalent with older SandForce drives.
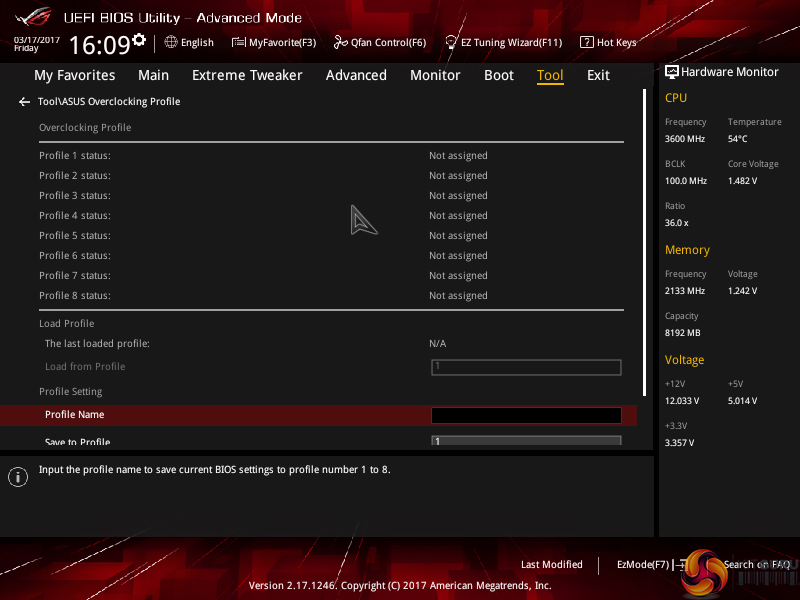
Up to eight settings profiles can be saved and named in the UEFI. Further profiles can be transferred through storage mediums such as a USB flash drive.
UEFI Summary:
ASUS’ overall UEFI is good. The interface is very well laid out, easy to use, and provides plenty of options for system tweaks relating to speeds and voltages. With that said, ASUS seems to be missing out on some updates that competing vendors are providing to bring their UEFI implementations more in-line with the requirements of today.
For example, there is no solution similar to System Browser or Board Explorer, as ASRock and MSI term them, respectively. Such a tool is convenient for basic troubleshooting, such as checking which USB port an external drive is connected to when your system is built and operational (which is relevant given the speed difference between ASMedia, Ryzen, and X370 ports).
Another important omission from ASUS’ UEFI is any form of RGB lighting colour or operating mode control. Gigabyte has a tool that allows basic control of the board’s RGB lighting colour without relying solely on OS-based software. While the OS software is far more comprehensive than a UEFI solution, the UEFI option has the benefit of maintaining its operating settings in the event of an OS crash or clean install. And that’s not even accounting for users who simply refuse to install any vendor-specific software that will take up system resources (that UEFI-based control would not do). ASUS should implement some level of RGB LED control in its UEFI.
With that said, D.O.C.P. is a smart way of tackling the memory frequency challenges with AMD's new platform, even if it does seem to have issues at this early stage in its life. Fan control is also good thanks to each header’s ability to control PWM or DC fans.
Software
The OS software available for ASUS' X370 motherboard is very similar to the offerings available for the vendor's mainstream Intel motherboards (such as the STRIX Z270F Gaming). As such, our analysis follows a very similar tone.
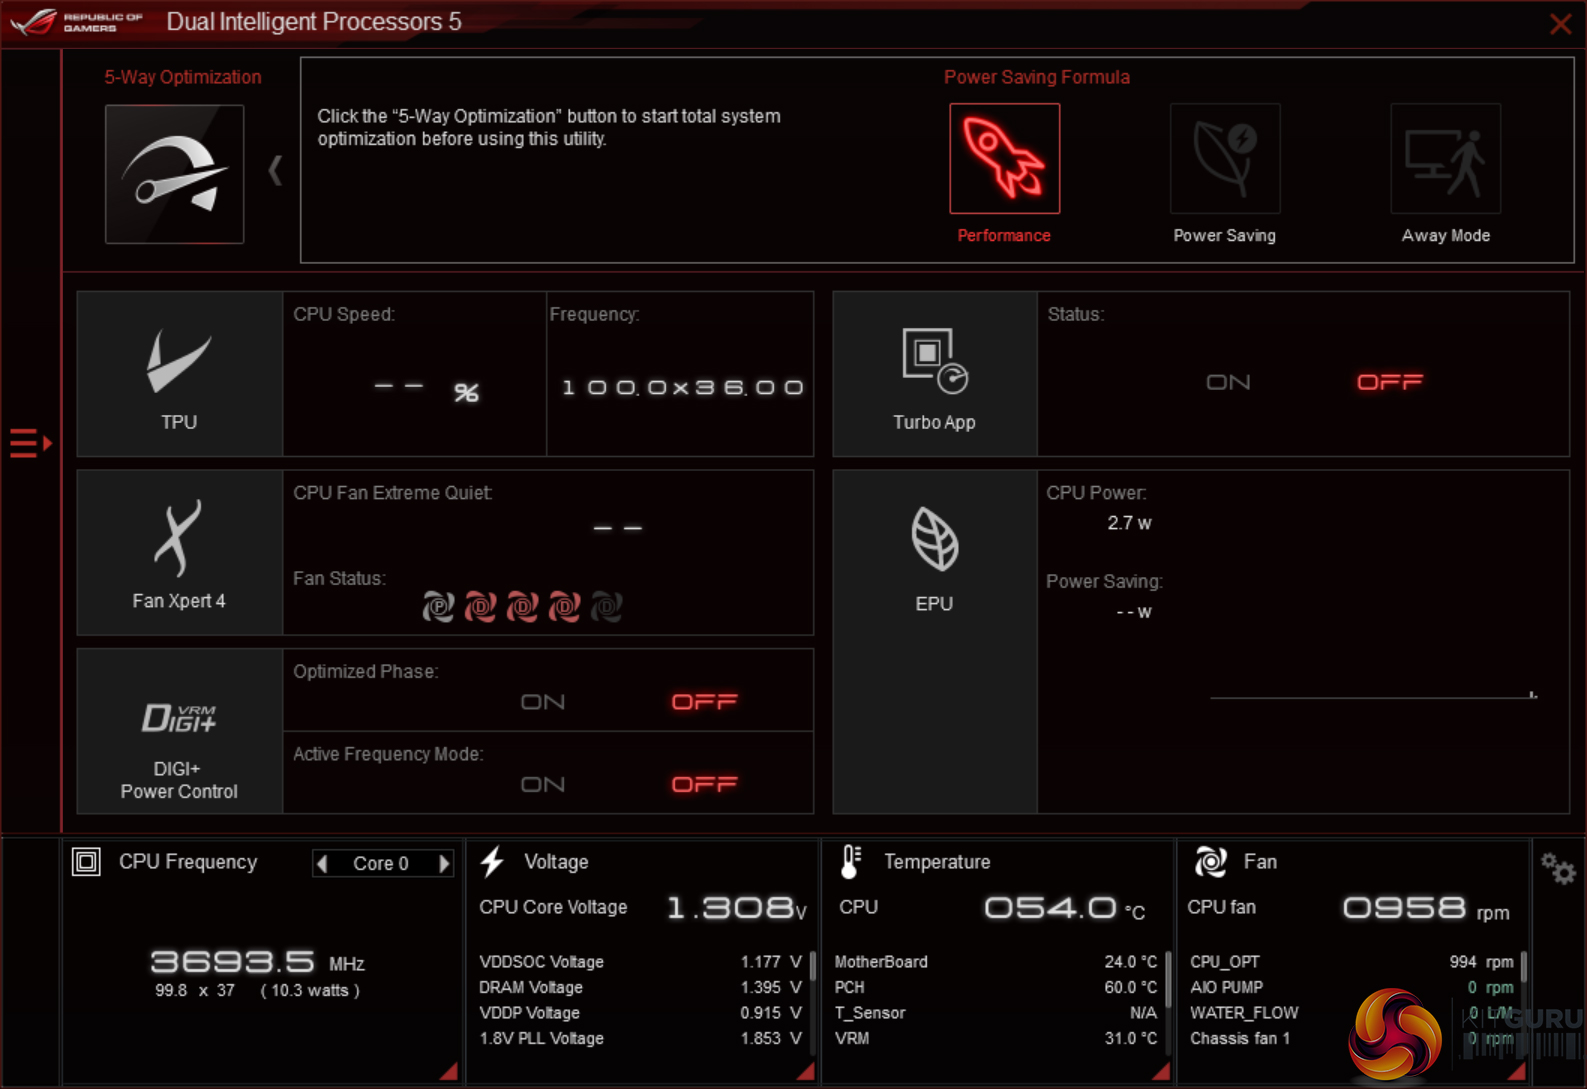
To say that ASUS includes a dizzying amount of software with its motherboards would be an understatement. Thankfully, ASUS uses its AI Suite 3 tool to good effect in managing a large proportion of the software under a single umbrella (though not to the same level that Gigabyte does).
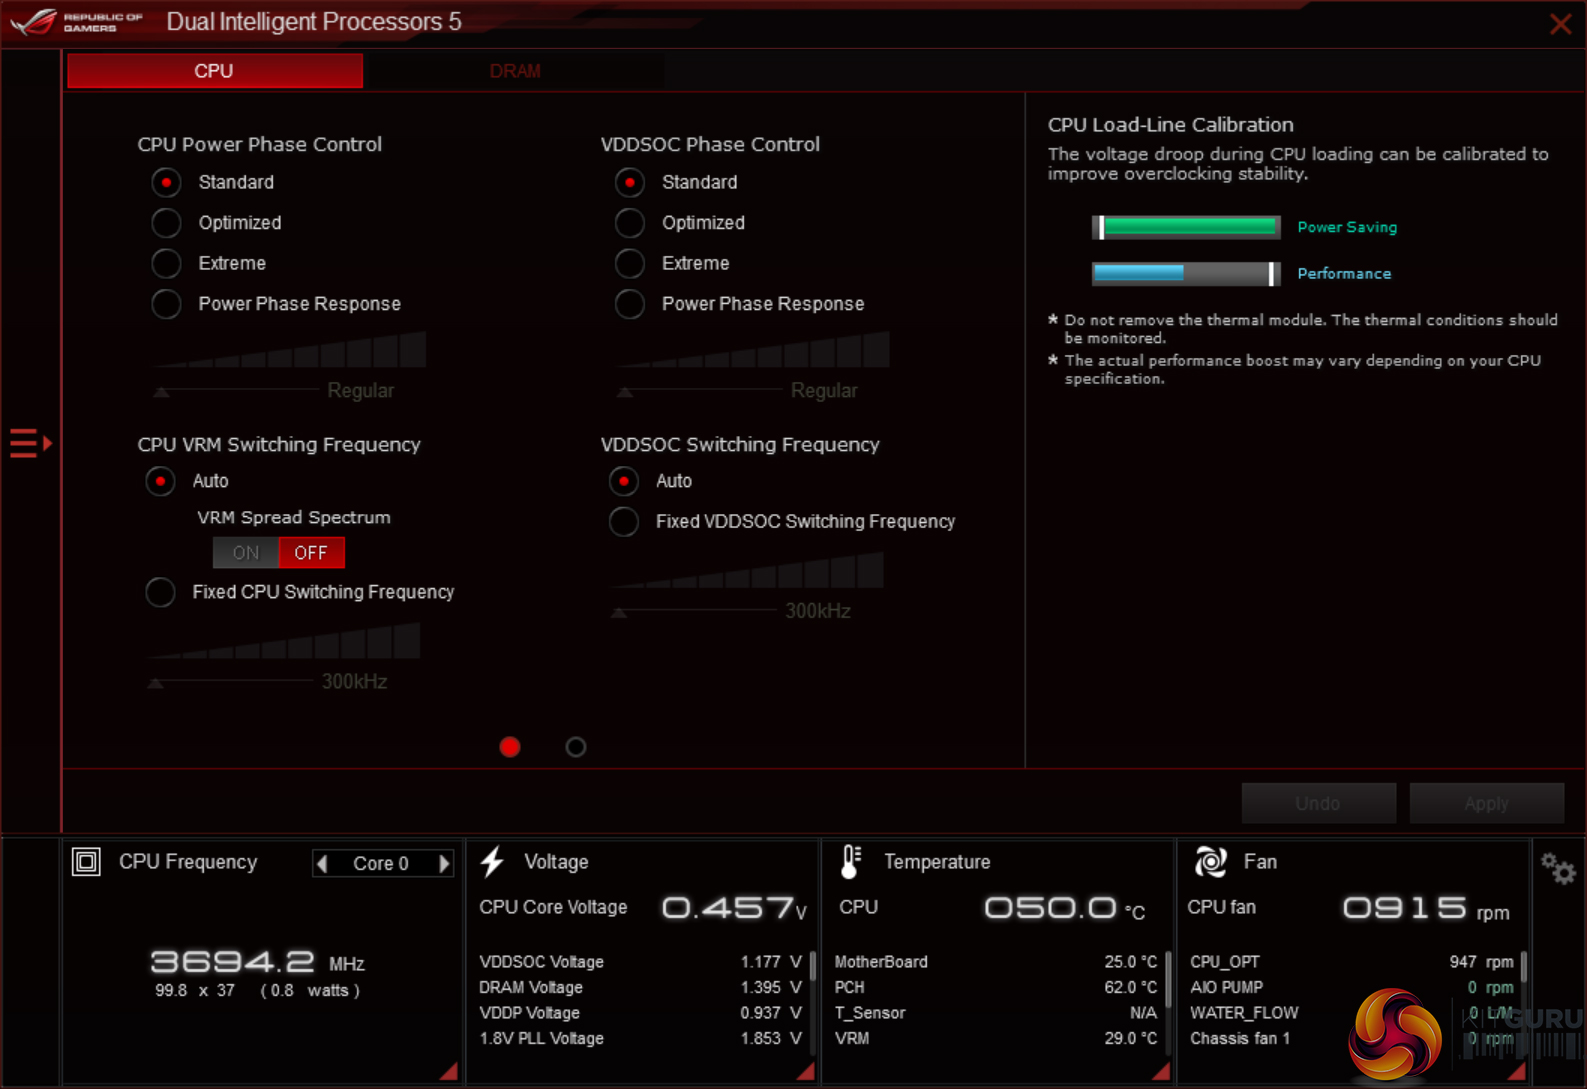
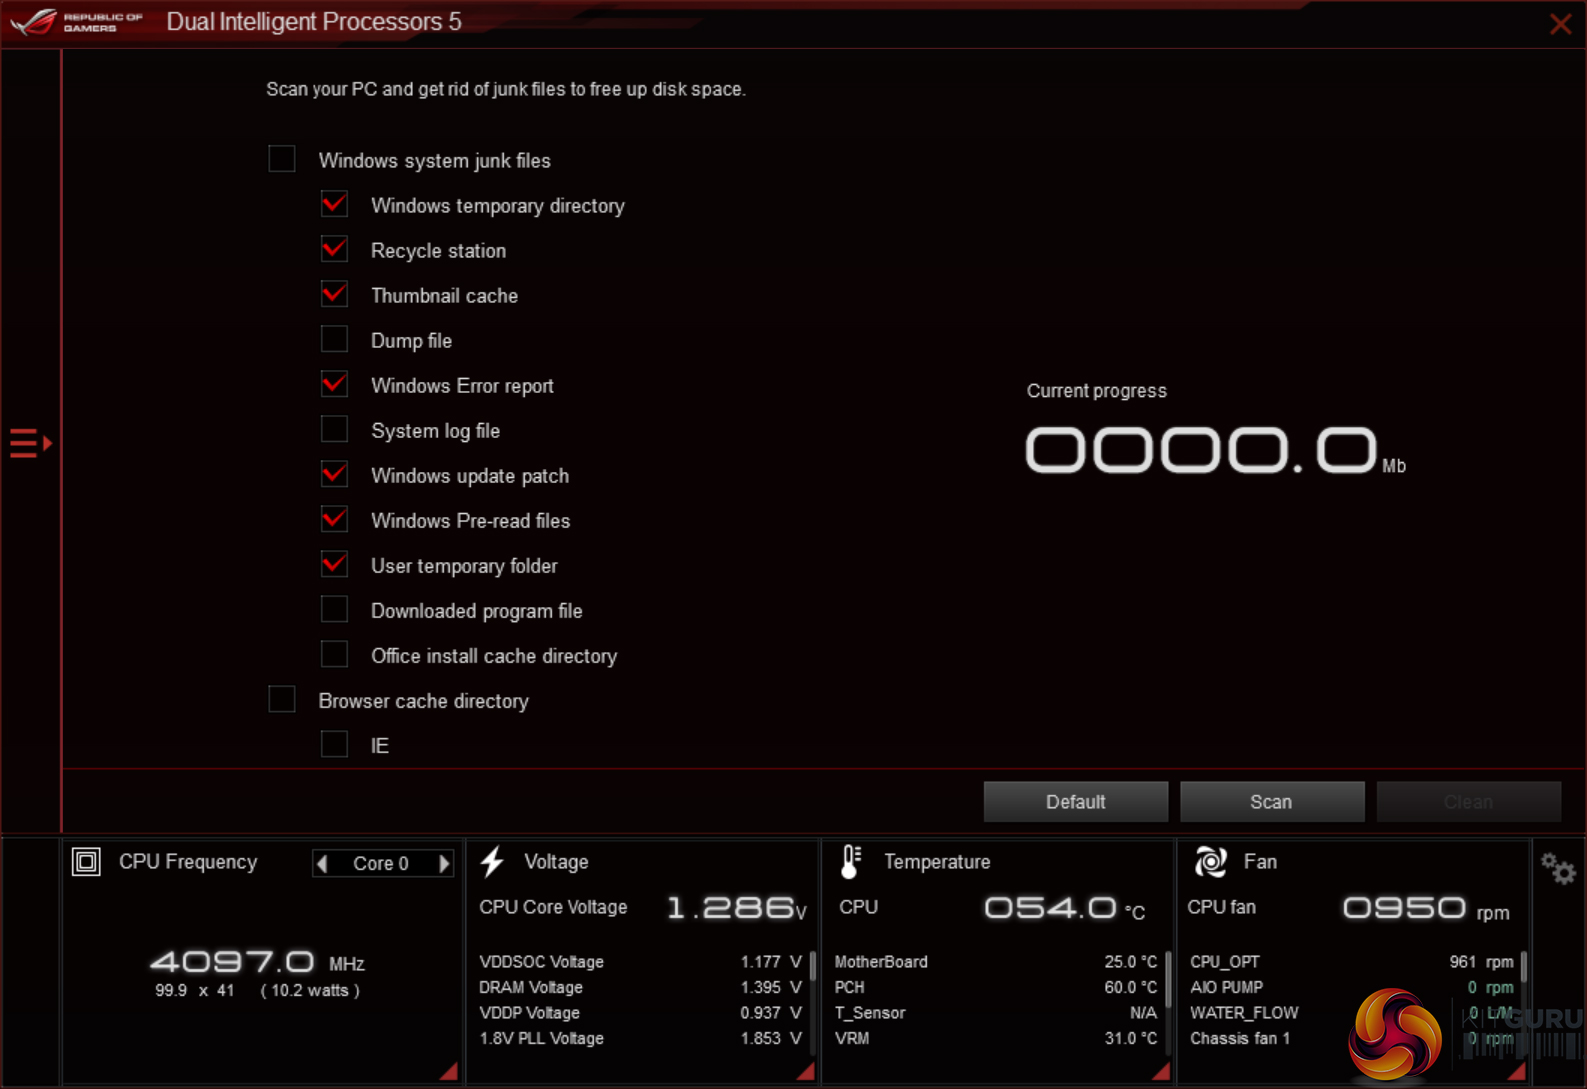
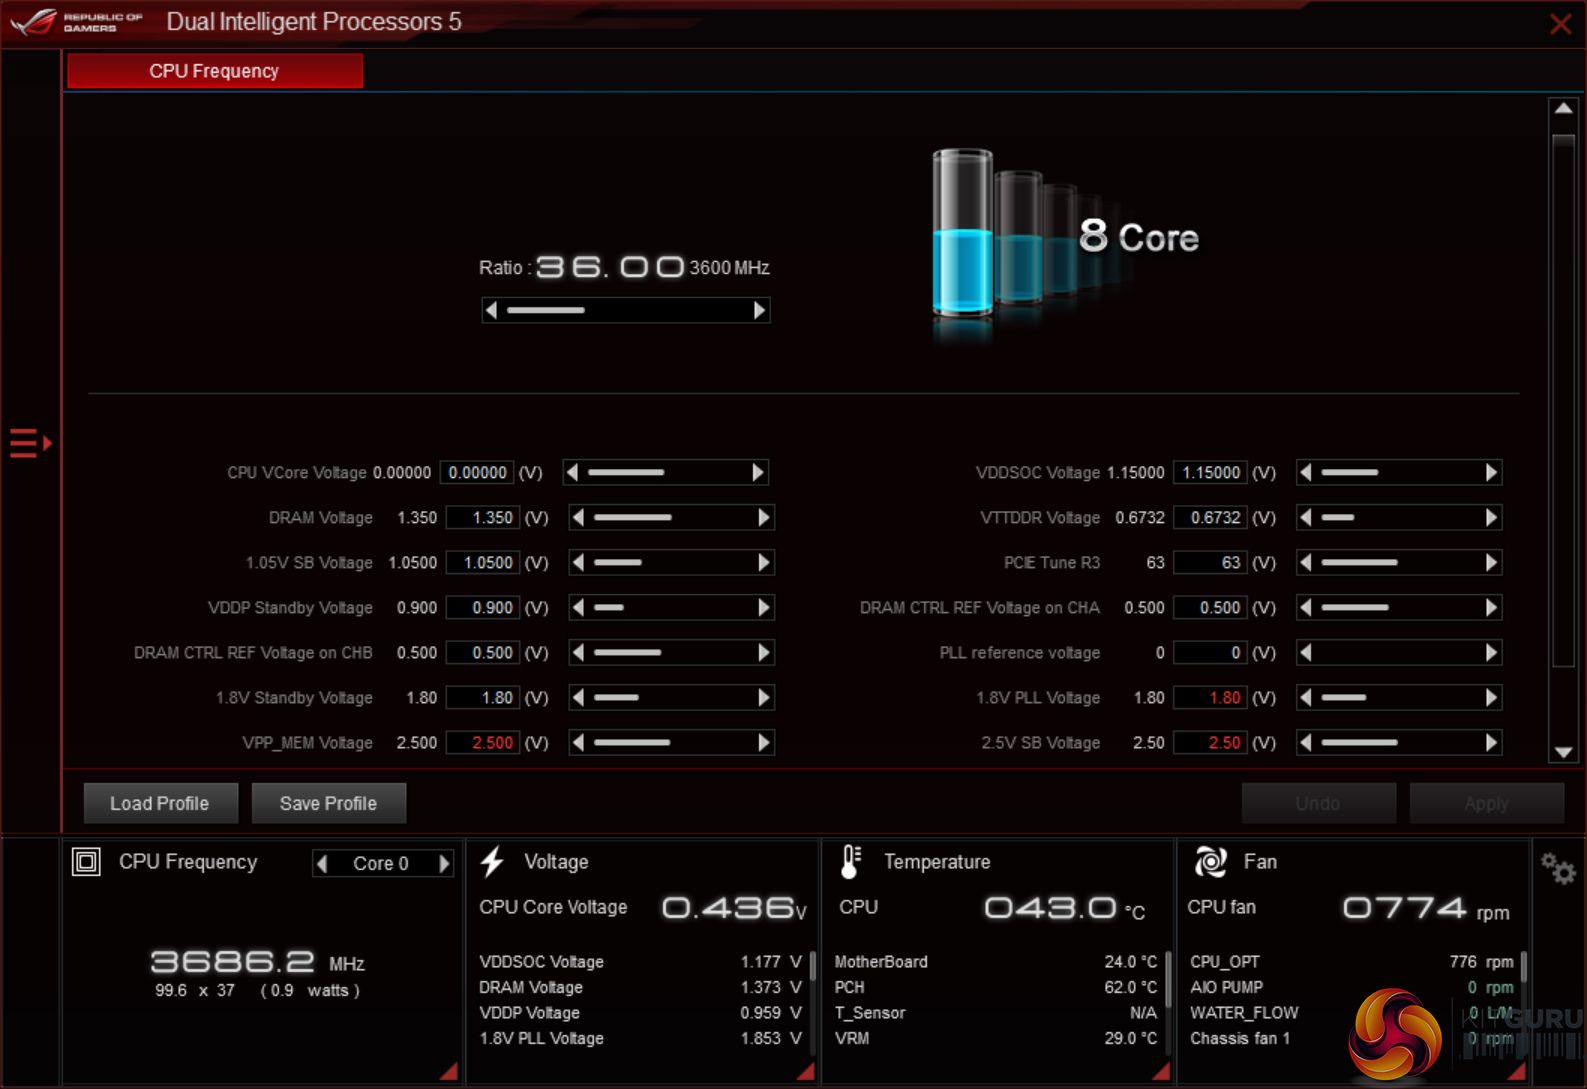
AI Suite 3 is the go-to point for any settings or information relating to system operations. Want to check temperatures and voltages or adjust multipliers for the CPU and speeds of fans? AI Suite 3. Want to speed up certain programs or reduce the amount of RAM-hogging operations on your system? AI Suite 3. Want to check for a BIOS update? AI Suite 3.
Automated system tuning conducted by the 5-way optimisation tool can also be selected inside AI Suite 3.
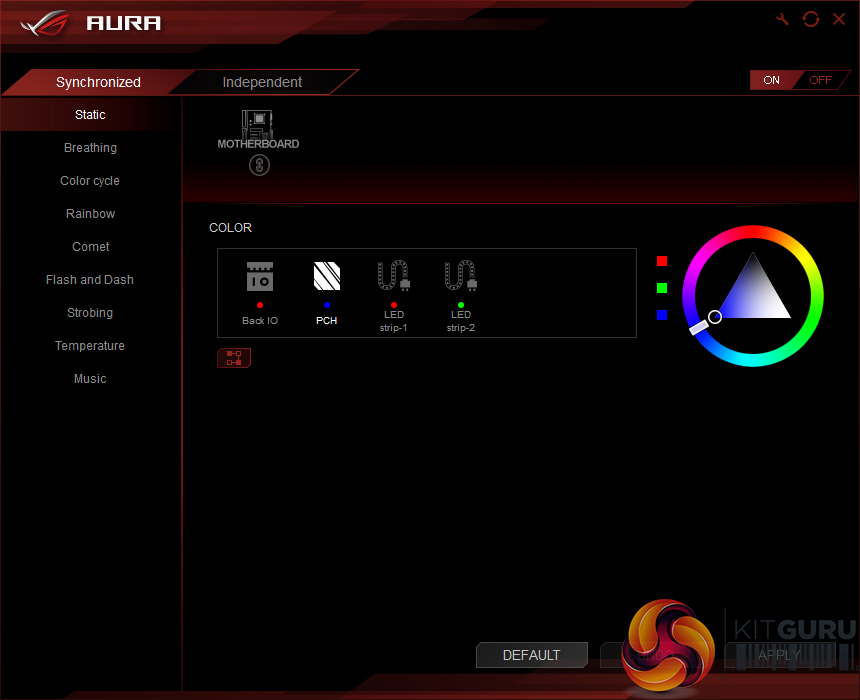
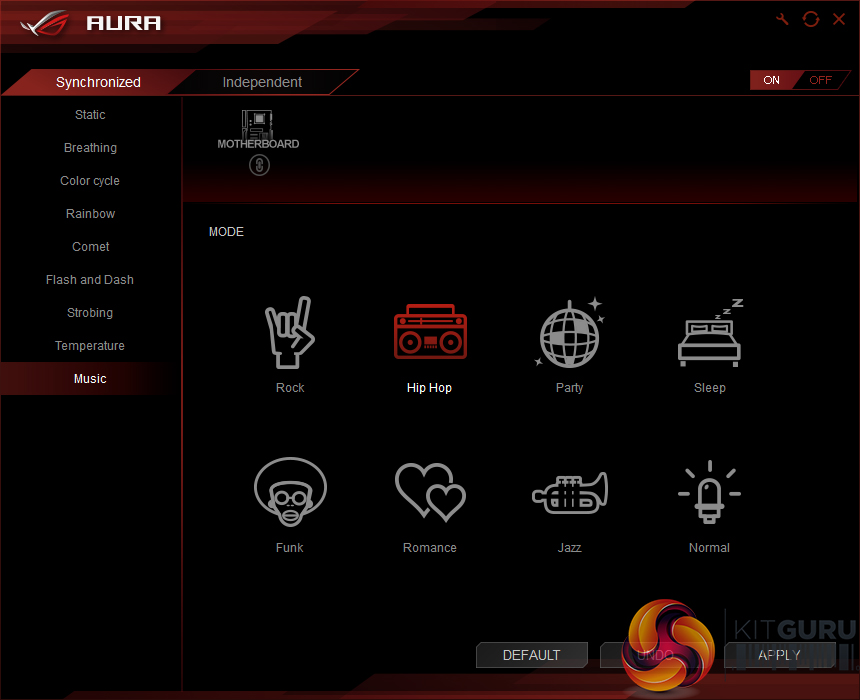
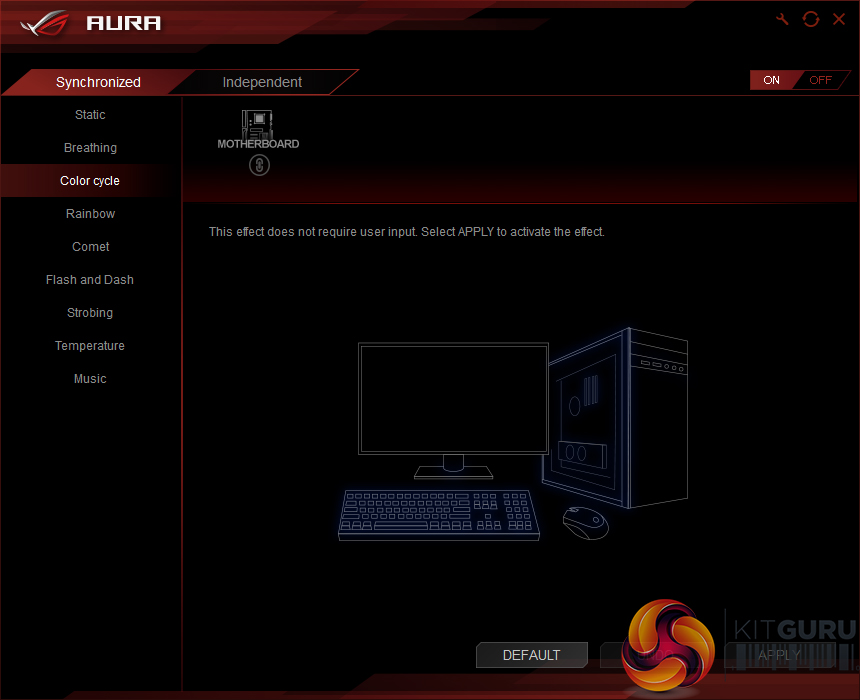
ASUS’ AURA RGB tool is a comprehensive piece of software used for managing the colours and operating parameters of onboard and connected LEDs. LED operating modes can be synchronised with other compatible hardware, such as ASUS graphics cards and even the AMD Wraith Spire CPU cooler, or managed for the motherboard alone.
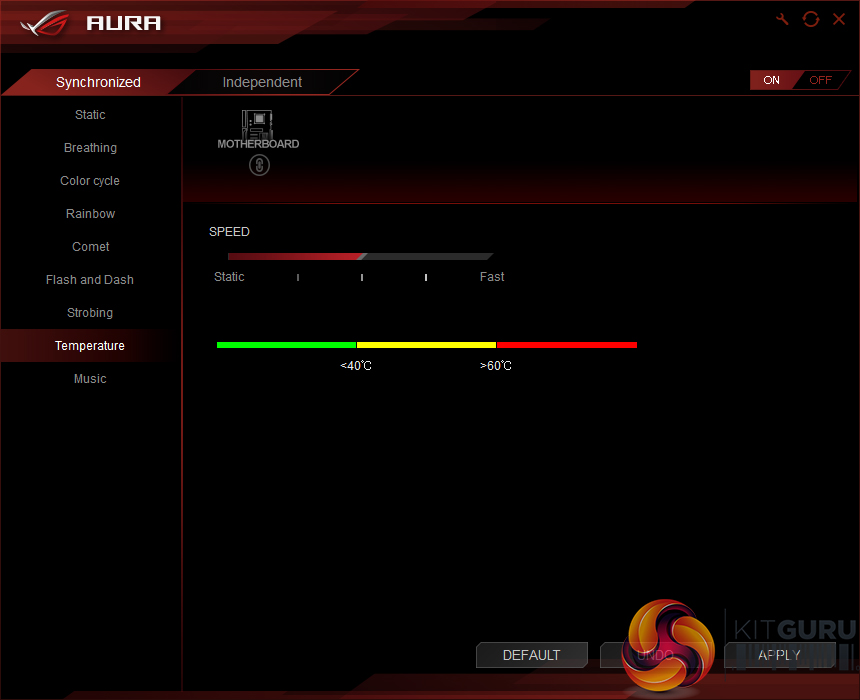
I particularly like the CPU temperature mode that changes the light colour based on processor thermals. This is similar to one of the options in Gigabyte’s ‘intelligent’ RGB Fusion modes (though Gigabyte has additional modes available).
With that said, the layout of AURA is questionable. The colour choice is handled by an outer colour ring and then an inner triangle zone. The ring is meant to provide an estimated colour choice and the triangle allows fine-tuning of the desired colour. Fine in theory, but in practise this can result in the LEDs displaying colours that aren't close to what was chosen due to the inner triangle's bias for dark blacks or bright whites.
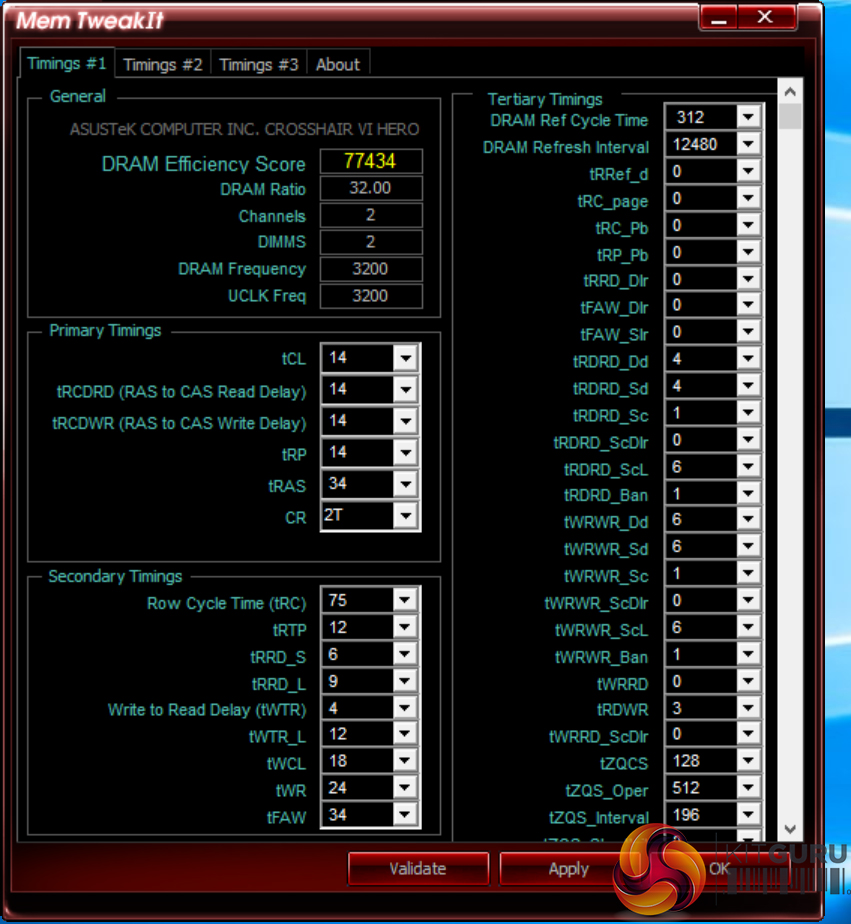
Mem TweakIT deals with information relating to DRAM frequency, timings, and a performance score.
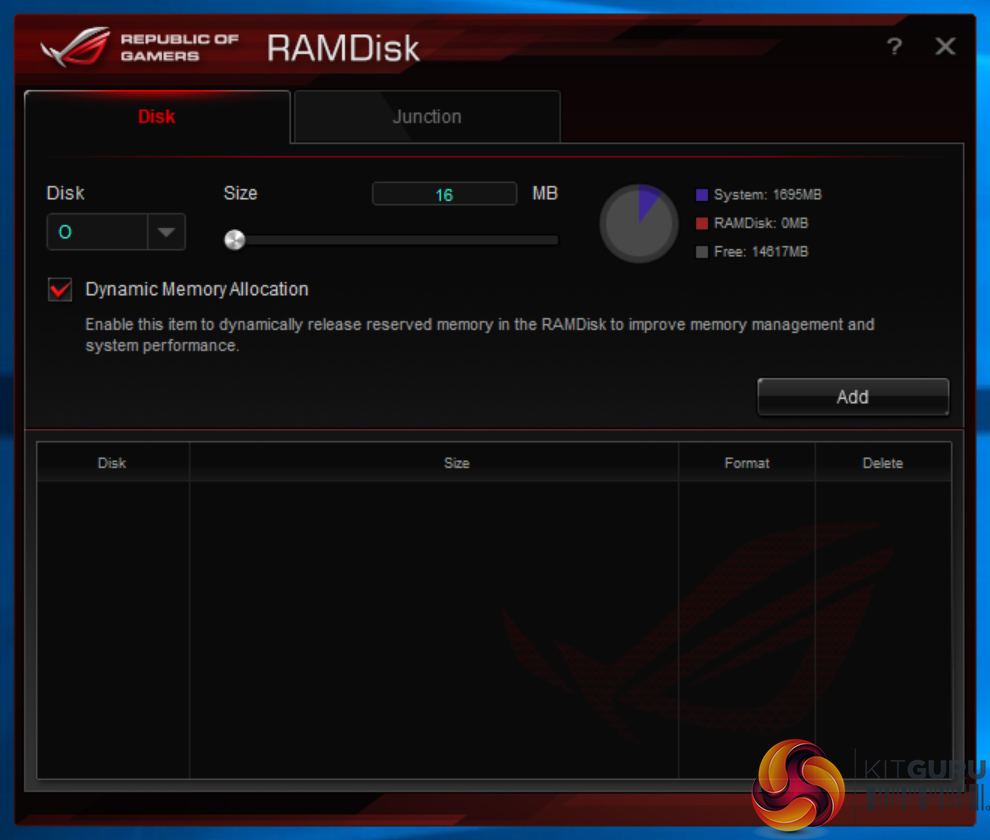

As the name suggests, RAMDisk allows a pool of memory to be allocated as a speedy storage medium using DDR4 RAM.
RAMCache II can be used to allocate a user-chosen amount of RAM to be used as a write cache for transfers from external drives. This is particularly useful if you are transferring data from a fast external flash storage medium to an internal HDD. The pool of DDR4-based cache can be written to at the external drive's maximum transfer rate before being dumped onto the slower internal HDD even if the external device is removed.
More software utilities are available for download directly from ASUS.
OS Software Summary:
The sheer volume and quality of OS-based software that ASUS makes available is impressive. AI Suite 3 is home to the important system-related settings and does a good job at categorising several tools under one single umbrella suite rather than multiple individual shortcuts.
AURA is a solid tool that provides a good degree of RGB customisation in terms of colour and operating modes, provided you can manage the awkward layout of colour traingles. However, more flexibility with respect to ‘intelligent' lighting modes would be welcomed as this is an area where the likes of Gigabyte and NZXT perform well.
RAMCache II and RAMDisk are smart pieces of software that can help to make use of wasted system RAM and provide a speed boost in doing so.
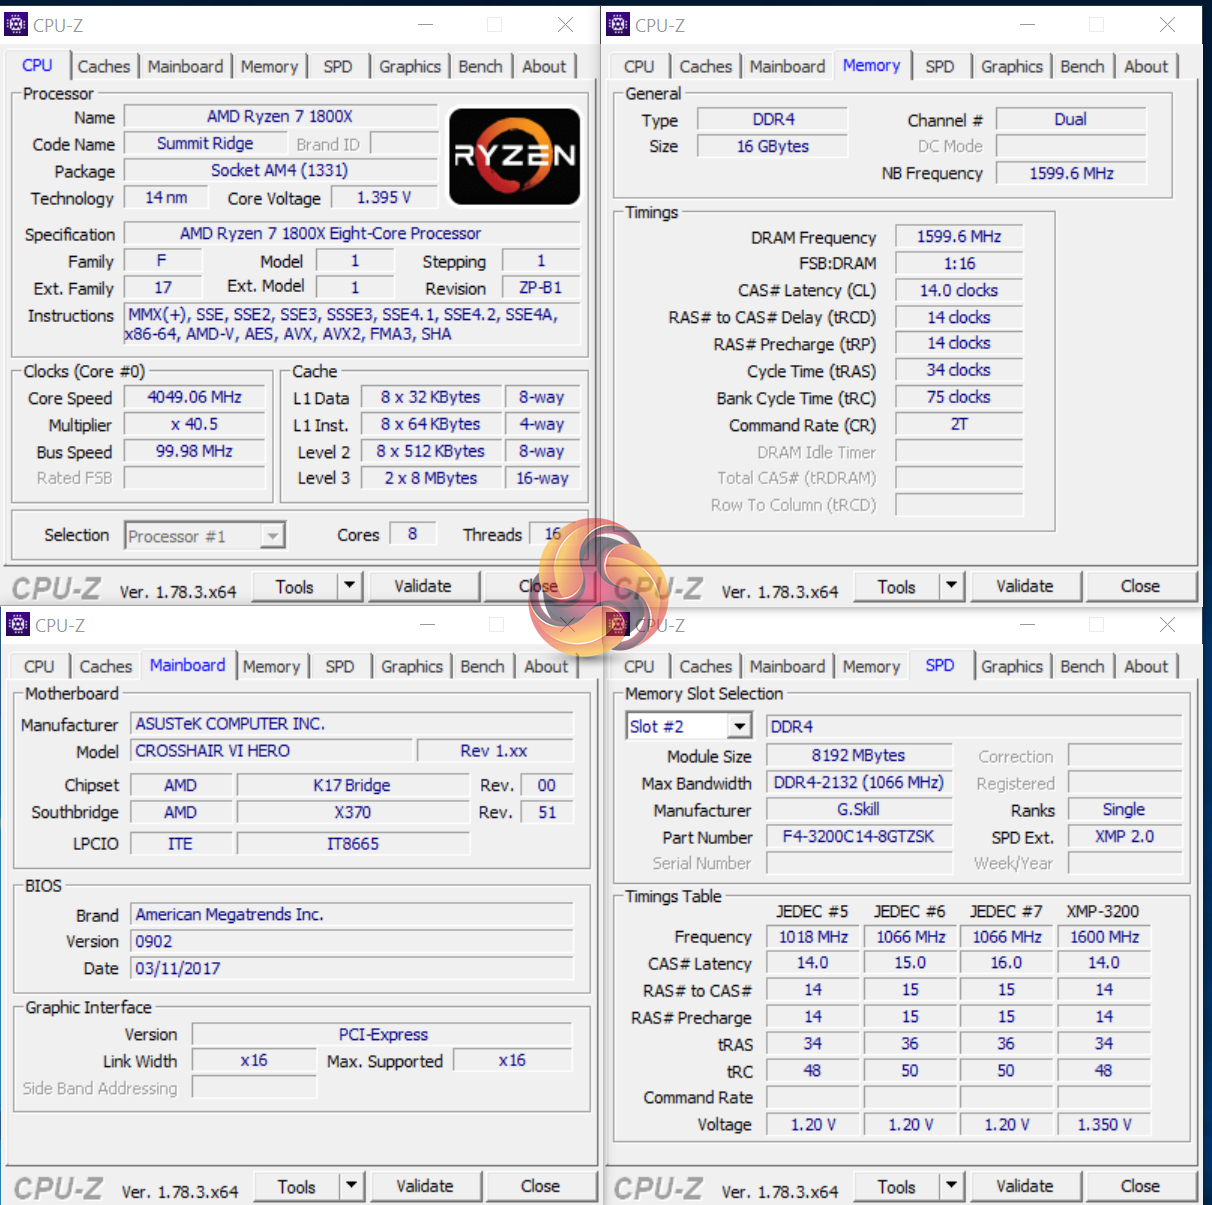
We will be outlining the ASUS ROG Crosshair VI Hero motherboard’s performance with the Ryzen 7 1800X CPU and 16GB of 3200MHz G.Skill TridentZ DDR4 memory.
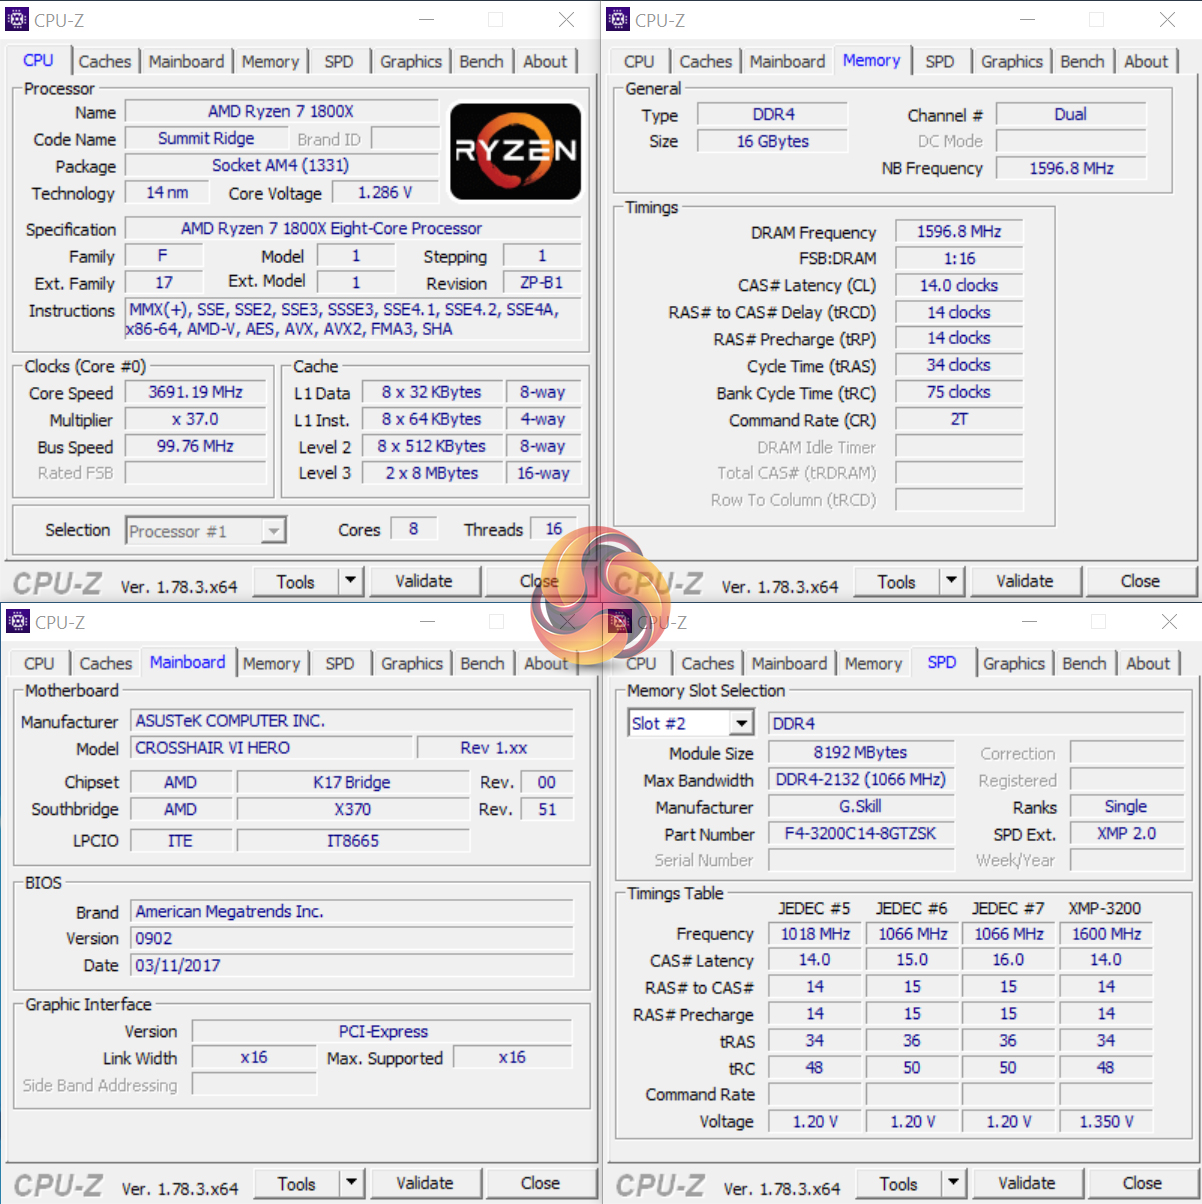
Stock voltage hovered around 1.286V under Cinebench load. This was using the latest 0902 BIOS.
AM4 Motherboard Test System:
- Processor: AMD Ryzen 7 1800X (3.6-4.0GHz + 4.1GHz XFR).
- Memory: 16GB (2x8GB) G.Skill TridentZ 3200MHz 14-14-14-34 DDR4 @ 1.35V.
- Graphics Card: Nvidia GTX Titan X Pascal (custom fan curve to eliminate thermal throttling).
- System Drive: 525GB Crucial MX300 SATA 6Gbps SSD.
- Games Drive: 960GB SK Hynix SE3010 SATA 6Gbps SSD.
- CPU Cooler: Noctua NH-D15.
- Power Supply: Seasonic Platinum 1000W.
- Operating System: Windows 10 Pro 64-bit (Anniversary Update).
Comparison AM4 Motherboards:
- Gigabyte Aorus AX370-Gaming 5.
Software:
- ASUS ROG Crosshair VI Hero BIOS 5704 & 0902 (latest).
- GeForce 378.49 VGA drivers.
Tests:
- Cinebench R15 – All-core CPU benchmark (CPU)
- HandBrake 0.10.5 – Convert 6.27GB 4K video recording using the Normal Profile setting and MP4 container (CPU)
- SiSoft Sandra 2016 SP1 – Processor Arithmetic Test (CPU) and Memory Bandwidth Test (Memory)
- 7-Zip 16.04 – Built-in 7-Zip benchmark test (CPU & Memory)
- 3DMark Fire Strike v1.1 – Fire Strike (1080p) test (Gaming)
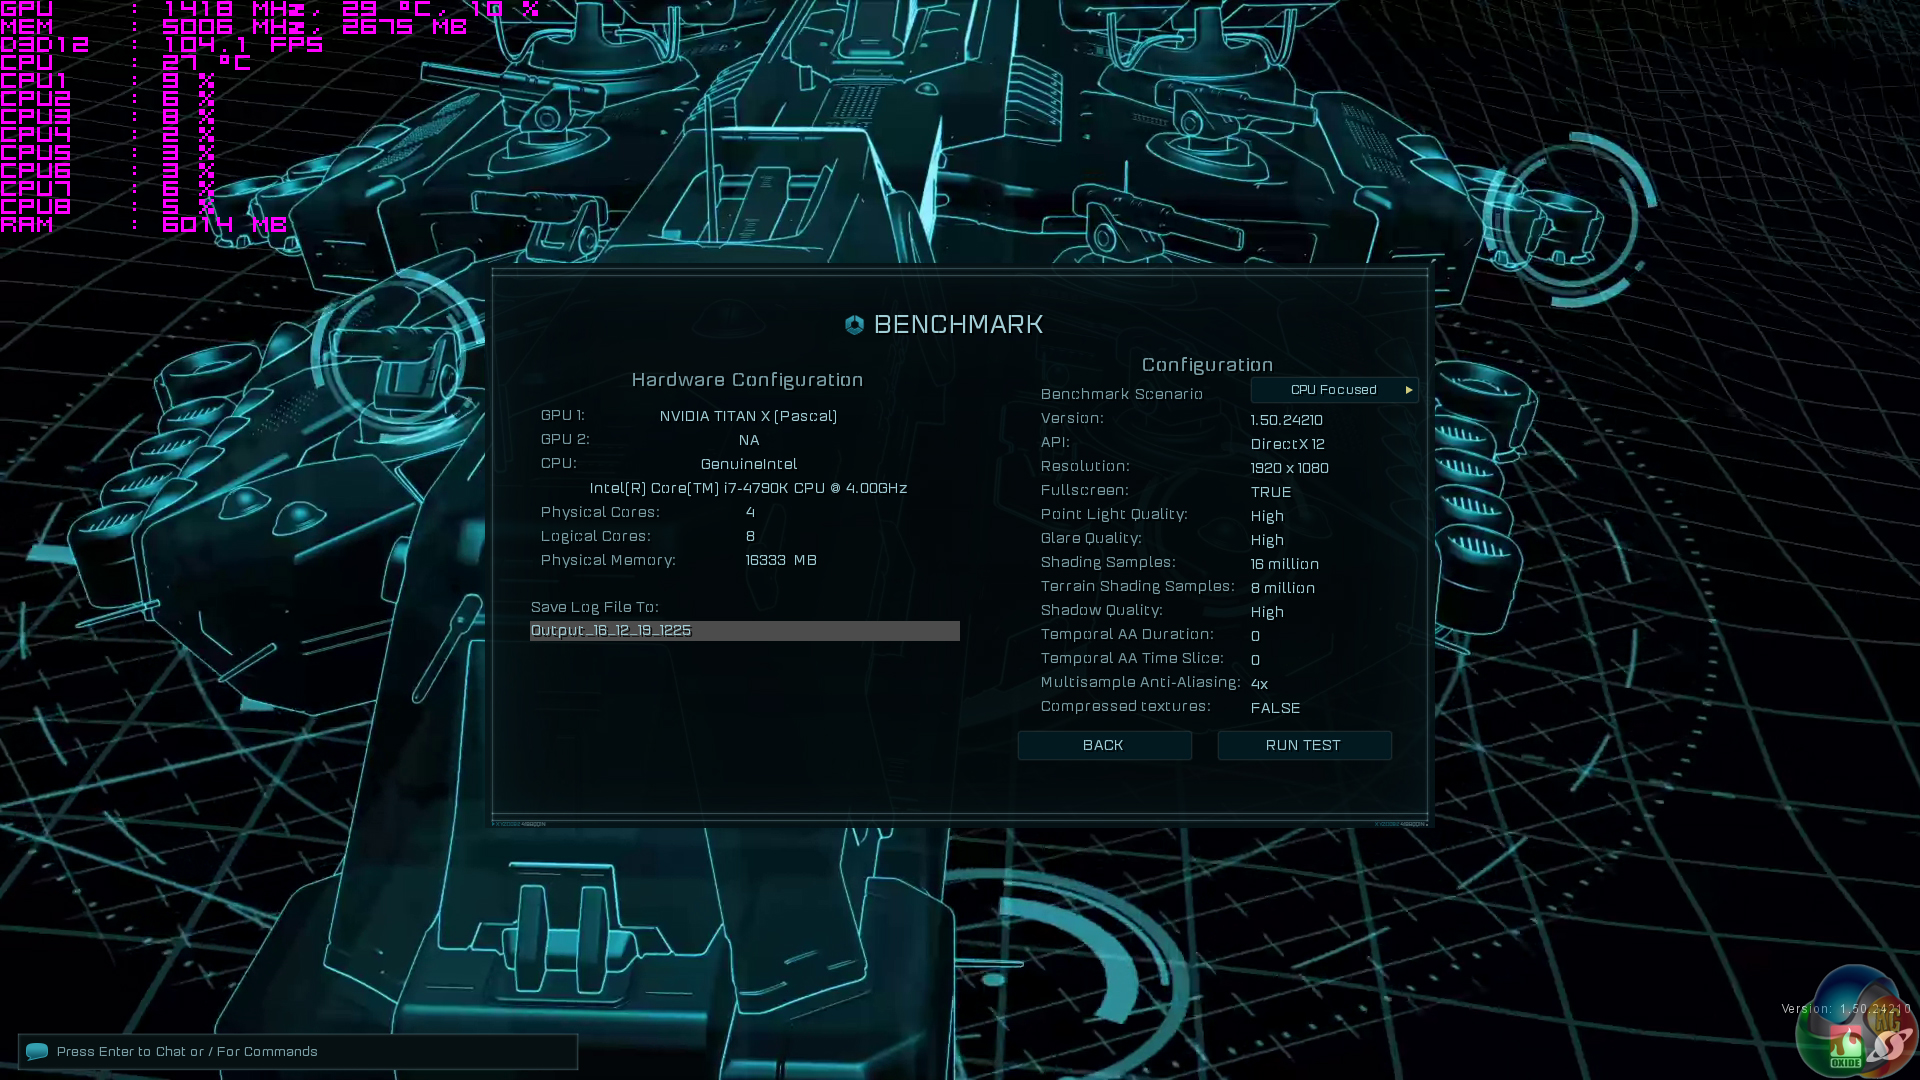
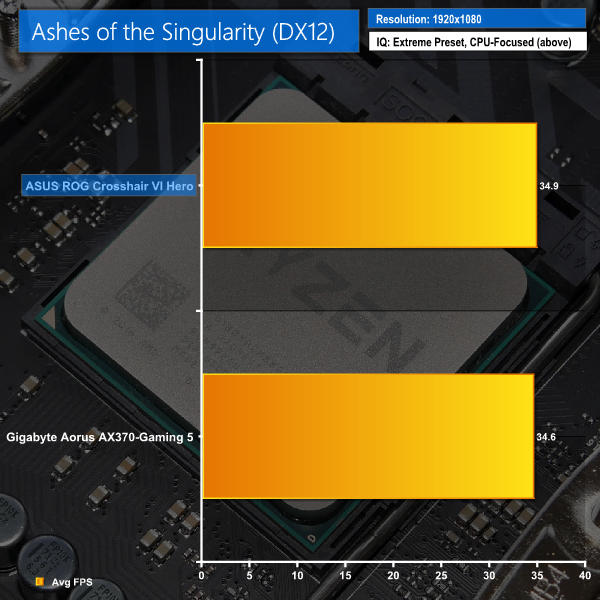
- Ashes of the Singularity – Built-in benchmark tool CPU-Focused test, 1920 x 1080, Extreme quality preset, DX12 version (Gaming)
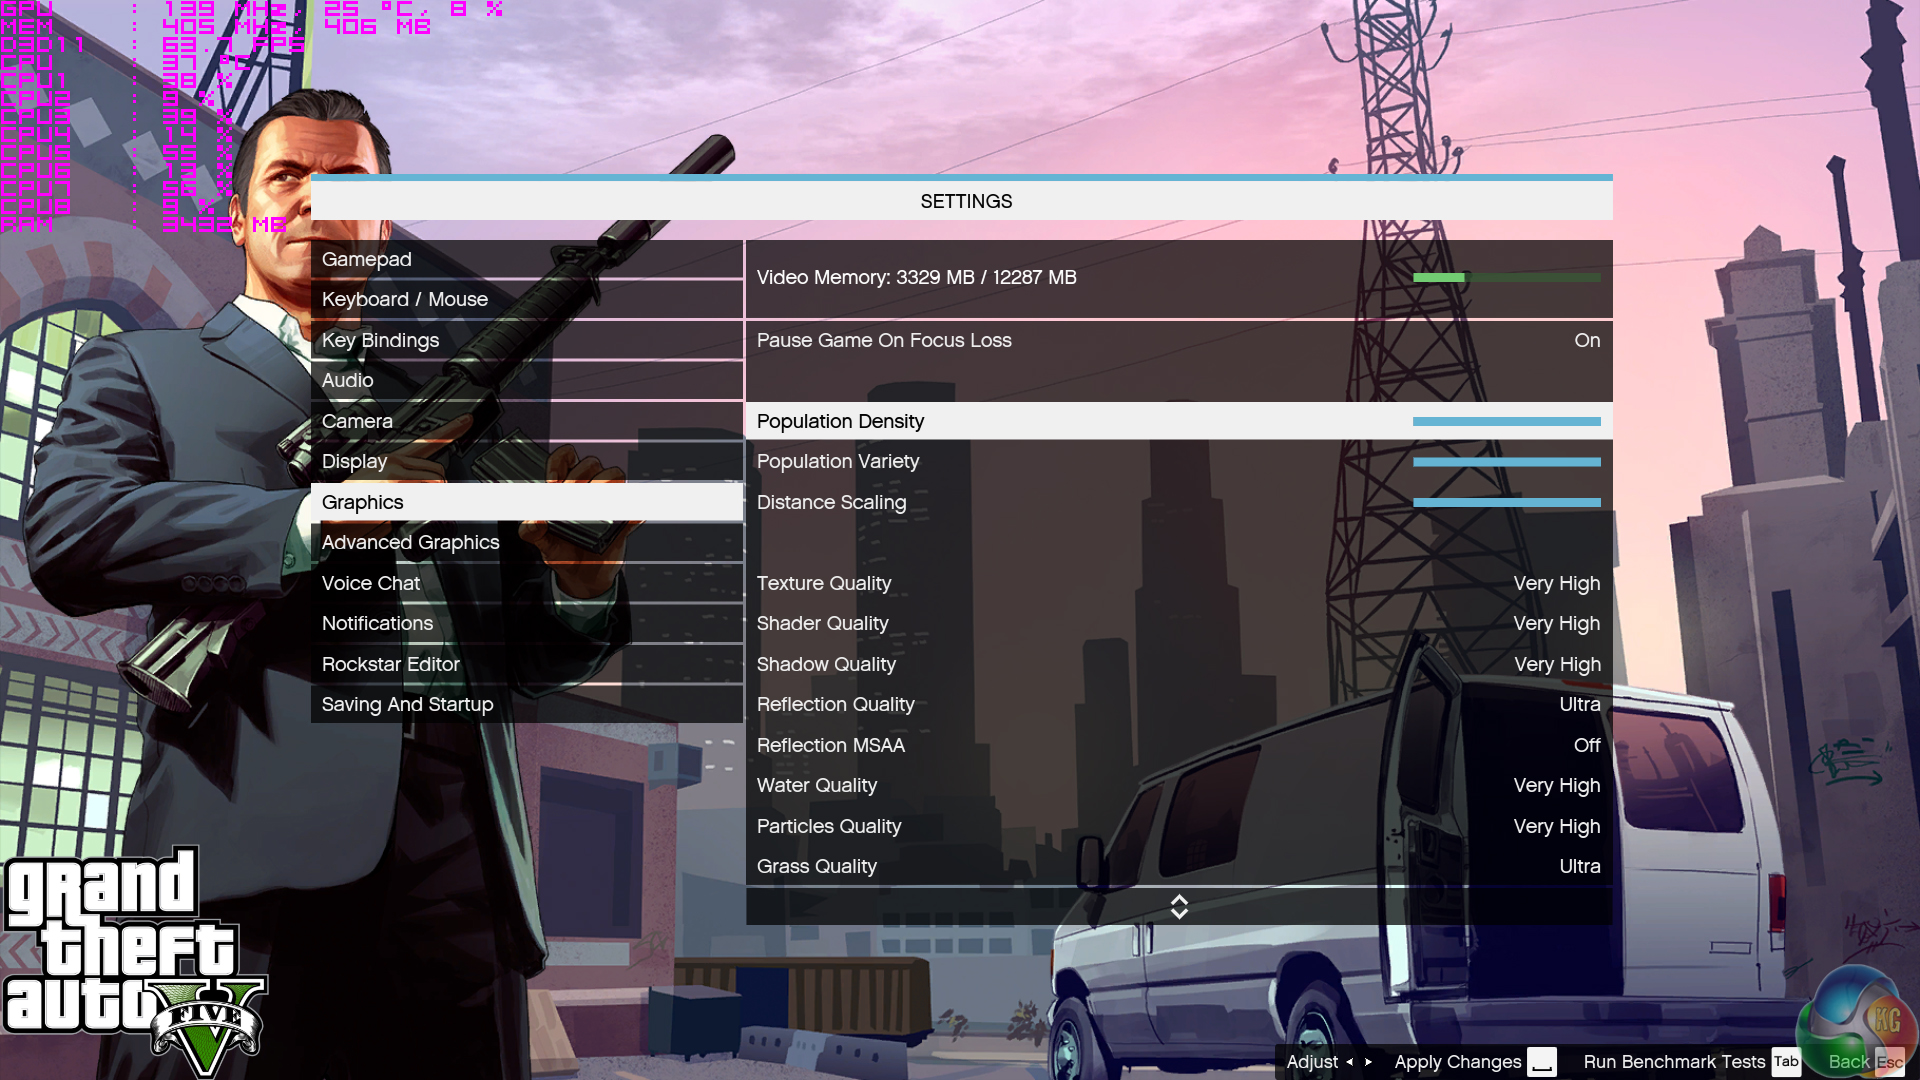
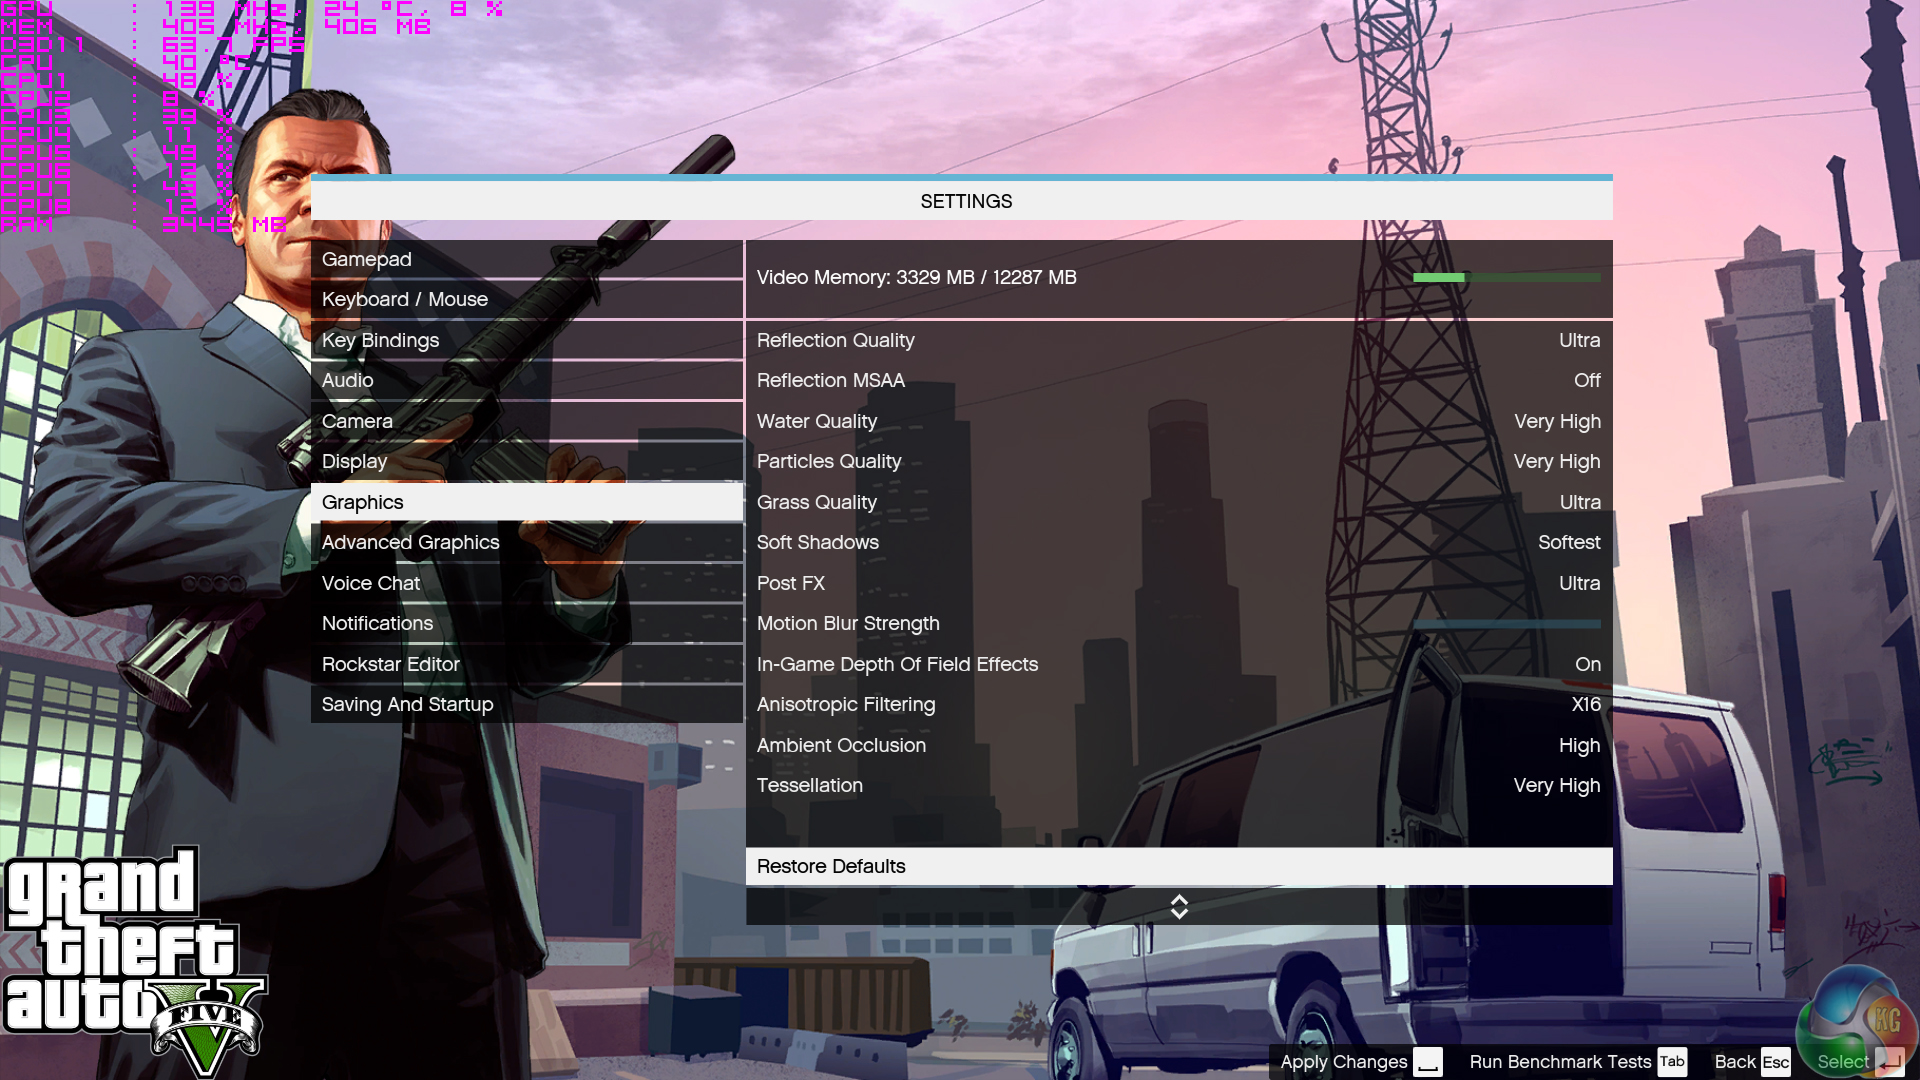
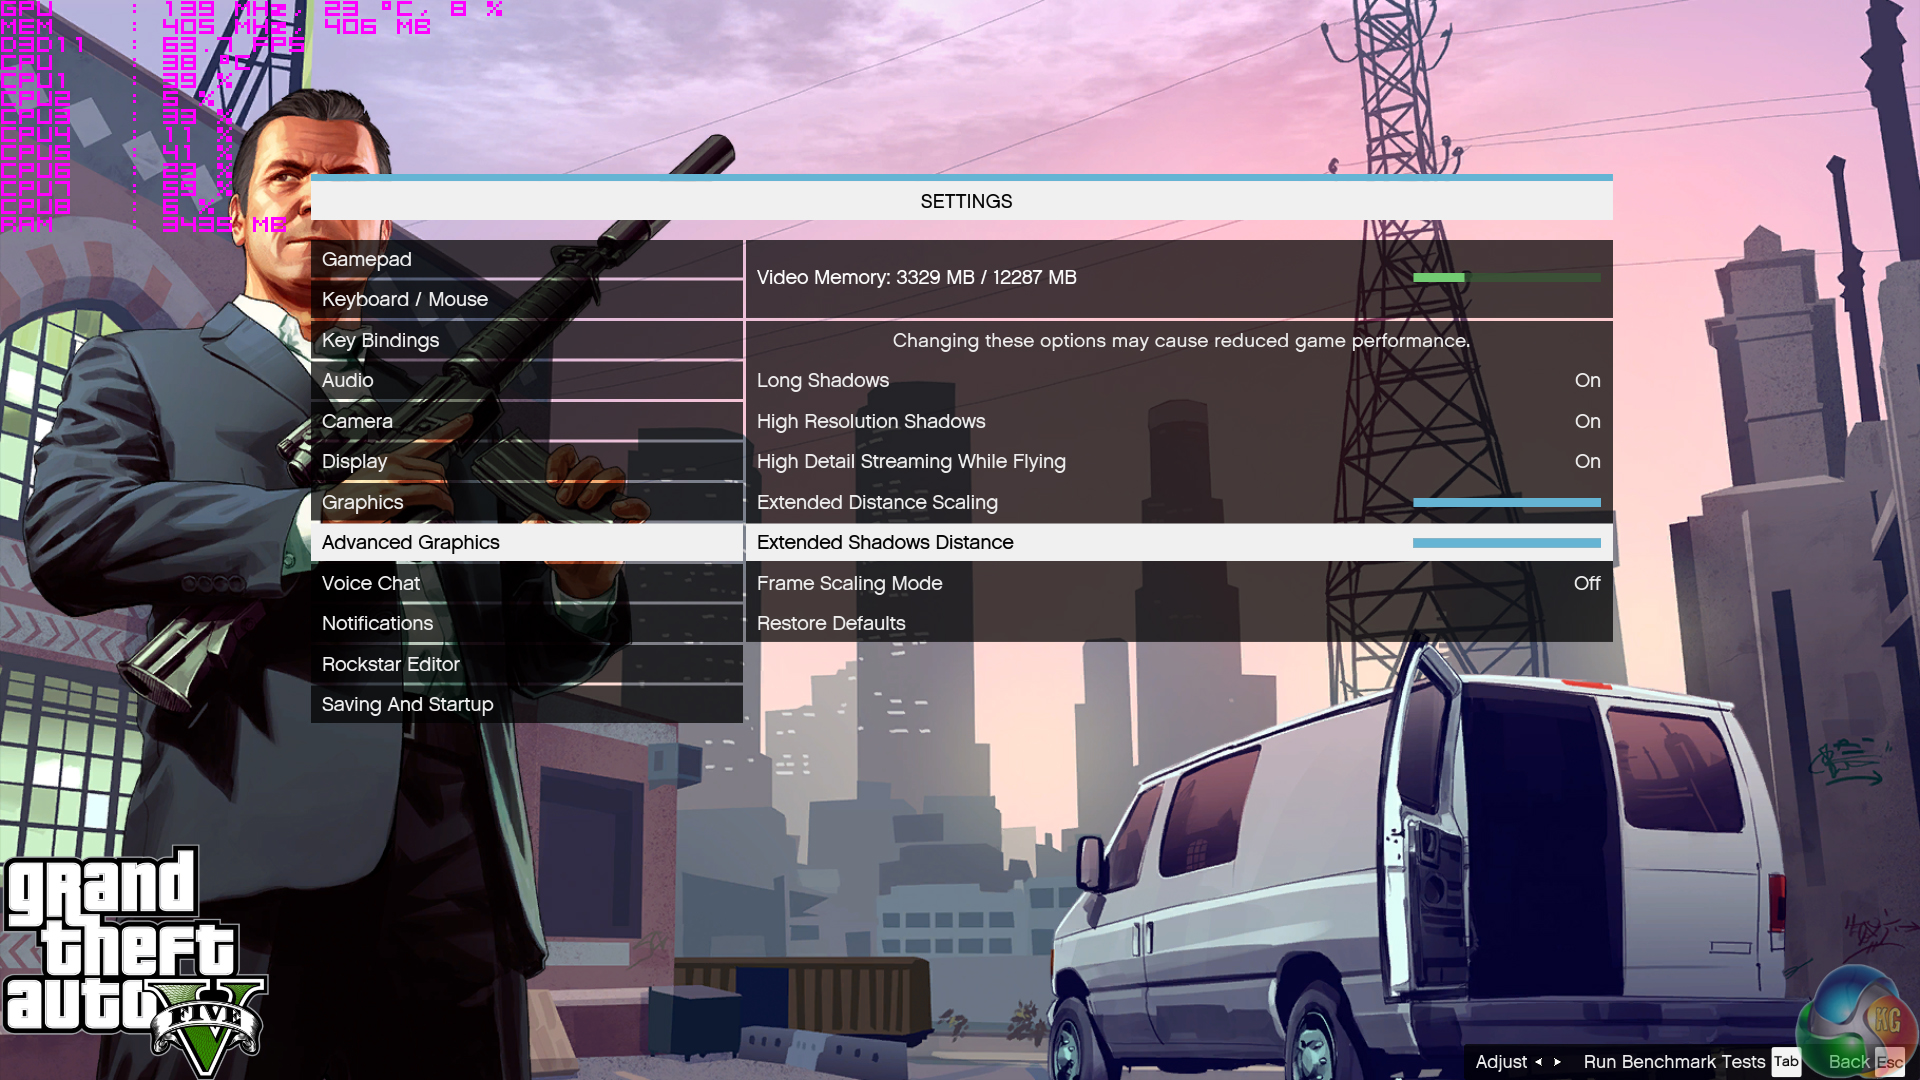
- Grand Theft Auto V – Built-in benchmark tool, 1920 x 1080, Maximum quality settings, Maximum Advanced Graphics (Gaming)
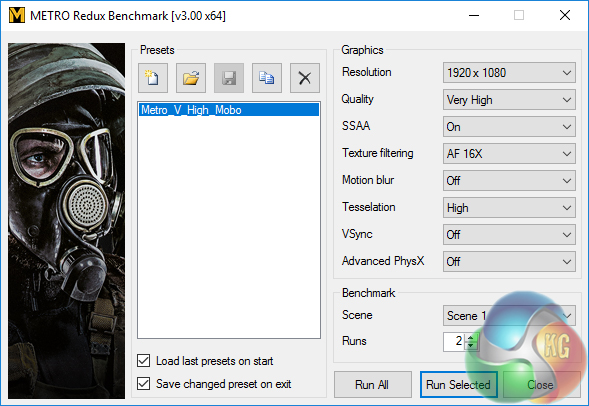
- Metro: Last Light Redux – Built-in benchmark tool, 1920 x 1080, Very High quality, SSAA, AF 16X, Tessellation: High (Gaming)
- ATTO – M.2, USB 3.1, and SATA 6Gbps transfer rates (Motherboard)
- RightMark Audio Analyzer – Record and playback test using a line-in to line-out loopback with a 3.5mm audio cable (Motherboard)
Cinebench R15
Cinebench is an application which renders a photorealistic 3D scene to benchmark a computer’s rendering performance, on one CPU core, all CPU cores or using the GPU. We run the test using the all core CPU mode.

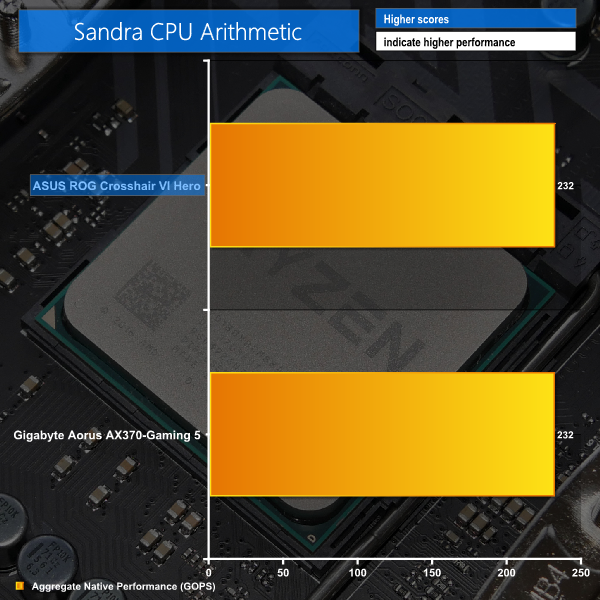
Sandra Processor Arithmetic
SiSoft Sandra 2016 is a multi-function utility program that supports remote analysis, benchmarking and diagnostic features for PCs, servers, mobile devices and networks. We run the application’s processor arithmetic test to gauge the CPU performance on each tested motherboard.
Handbrake Conversion
Handbrake is a free and open-source video transcoding tool that can be used to convert video files between different codecs, formats and resolutions. We measured the average frame rate achieved for a task of converting a 6.27GB 4K video using the Normal Profile setting and MP4 container. The test stresses all CPU cores to 100% and shows an affinity for memory bandwidth.

ASUS' ROG motherboard puts on a strong display in our CPU-driven benchmarks. Cinebench and Sandra Arithmetic numbers are close enough to be called a draw. However, Handbrake performance is consistently around one percent faster on the ASUS motherboard.
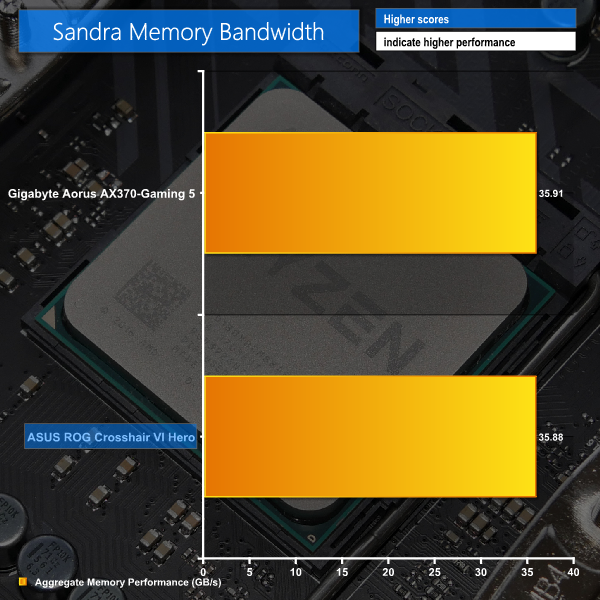
Sandra Memory Bandwidth
SiSoft Sandra 2016 is a multi-function utility program that supports remote analysis, benchmarking and diagnostic features for PCs, servers, mobile devices and networks. We use the SiSoft Sandra memory bandwidth test to provide a set of memory bandwidth results.
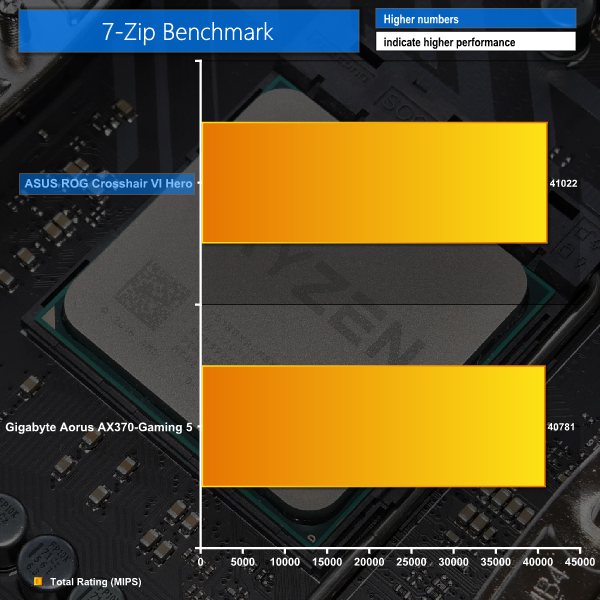
7-Zip
7-Zip is an open source Windows utility for manipulating archives. We measure the Total Rating performance using the built-in benchmark tool. The test stresses all CPU cores to 100% and shows an affinity for memory bandwidth.
ASUS is practically identical to Gigabyte's Aorus board in terms of memory bandwidth delivered. ASUS does not provide a direct way of applying a kit's XMP settings, instead relying upon interpretation from the motherboard vendor's own D.O.C.P. configuration (which is practically XMP). Gigabyte's competitor simply loads up XMP with the correct timings.
The Crosshair VI Hero is a little faster than Gigabyte's Gaming 5 in 7-Zip. The difference here is repeatable but it is minor at around 0.6%.
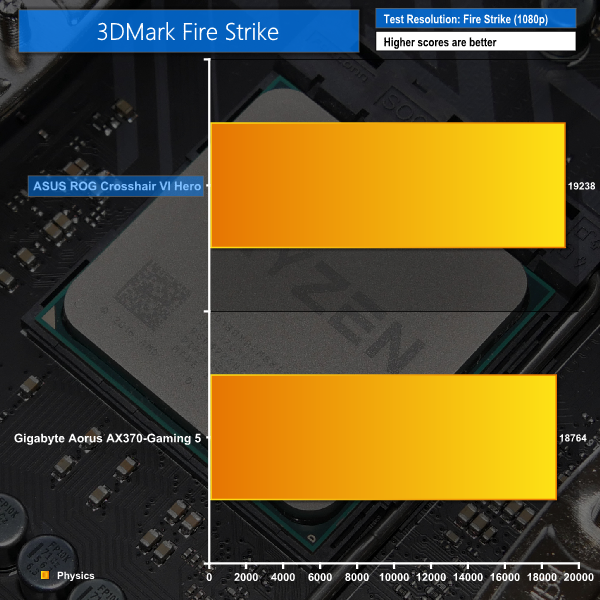
3DMark
3DMark is a multi-platform hardware benchmark designed to test varying resolutions and detail levels of 3D gaming performance. We run the Windows platform test and in particular the Fire Strike benchmark, which is indicative of high-end 1080p PC Gaming.
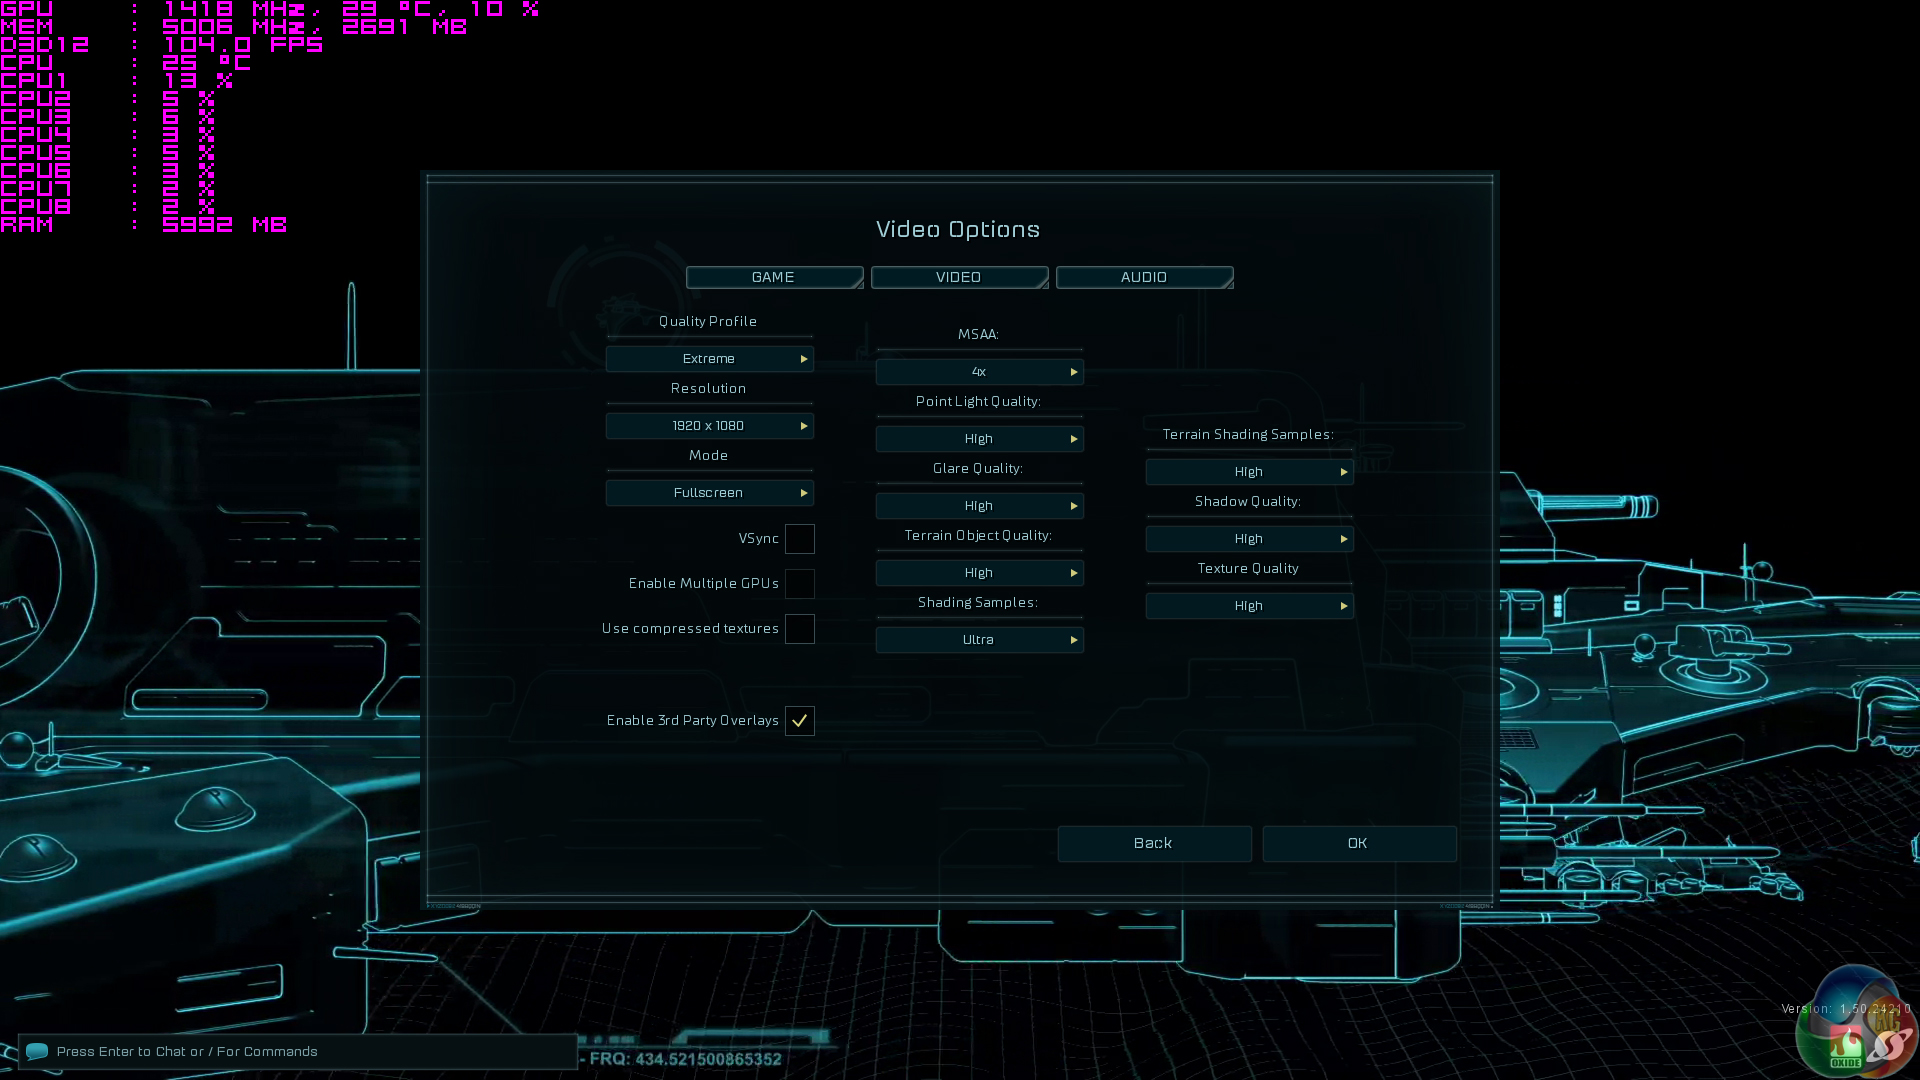
Ashes of the Singularity
Ashes of the Singularity is a Sci-Fi real-time strategy game built for the PC platform. The game includes a built-in benchmark tool and was one of the first available DirectX 12 benchmarks. We run the CPU-focused benchmark using DirectX 12, a 1080p resolution and the Extreme quality preset.
Grand Theft Auto V
Grand Theft Auto V remains an immensely popular game for PC gamers and as such retains its place in our test suite. The well-designed game engine is capable of providing heavy stress to a number of system components, including the GPU, CPU, and Memory, and can highlight performance differences between motherboards. We run the built-in benchmark using a 1080p resolution and generally Maximum quality settings (including Advanced Graphics).


Metro: Last Light Redux
Despite its age, Metro: Last Light Redux remains a punishing title for modern computer hardware. We use the game's built-in benchmark with quality set to Very High, SSAA enabled, AF 16X, and High tessellation.
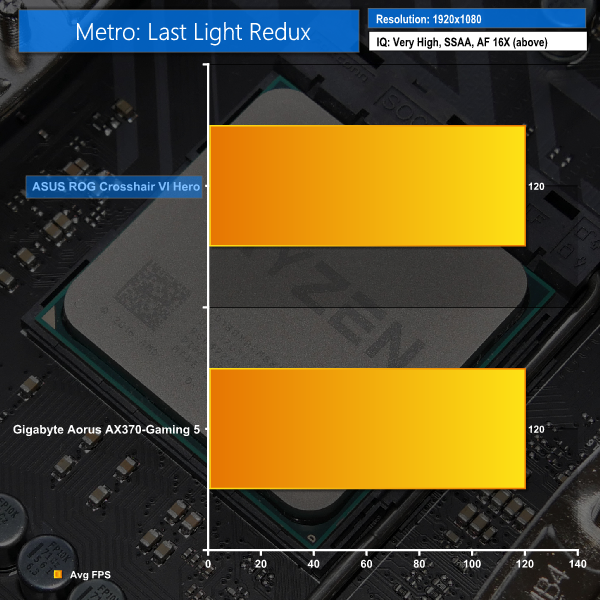
Gaming titles tend to be a little faster for ASUS' Crosshair VI Hero compared to Gigabyte's cheaper AX370-Gaming 5. GTA V rounds up to a higher average frame rate value while 3DMark Fire Strike scores nearly 500 points (around 2.5%) more on the ASUS motherboard.
Manual CPU Overclocking:
To test the ASUS ROG Crosshair VI Hero motherboard’s CPU overclocking potential, we aim to set the CPU voltage close to 1.40V. CPU VCore is set to 1.40V, SOC voltage is set to 1.25V, and we applied the Level 2 LLC setting.
We maintained the DRAM frequency at 3200MHz to take its stability out of the overclocking equation.
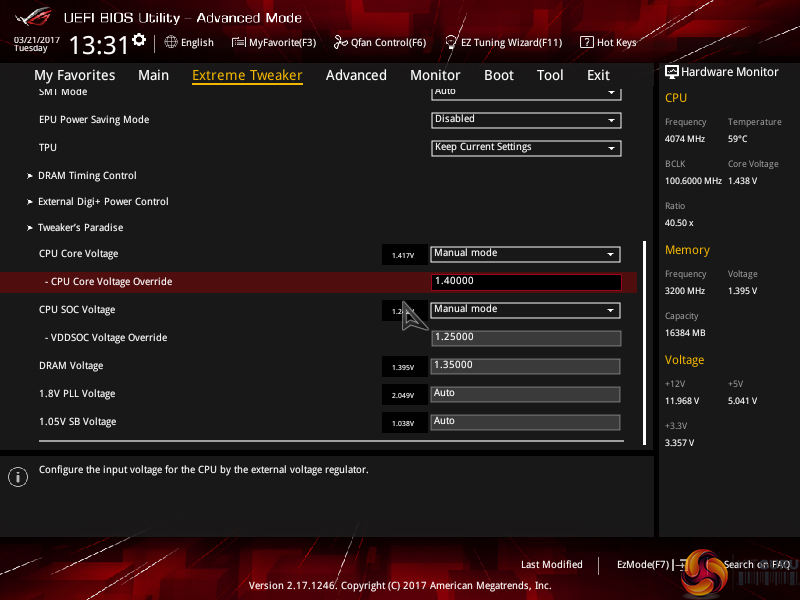

ASUS' logical UEFI layout aids the simplicity of overclocking. The primary settings that should be adjusted, such as the CPU ratio and VCore, are all displayed in the main Extreme Tweaker page. Loadline calibration settings are hidden in the External Digi+ Power Control subsection, probably because the settings provided by ASUS make little sense.
There is no visual or numerical interpretation of how the selected LLC setting will influence CPU VCore. We found Level 3 to provide a voltage far from our targetted level under load. Level 2 tended to deliver around 1.395-1.417V under Cinebench load and around 1.46V when idling. This was using a UEFI-set 1.40V for the CPU VCore. ASUS needs to provide better interpretation of how the LLC settings will influence CPU voltage.
We were able to hit 4.05GHz using around 1.4V CPU VCore, which seems to be the highest level that our Ryzen 7 1800X likes to overclock to. Pushing up to 4.1GHz demands a large increase in voltage and the acceptance of flaky stability. 4.05GHz was Cinebench stable for five back-to-back runs with the ASUS Crosshair VI Hero.
1.40V user-selected CPU VCore and Level 2 LLC allowed 1.395V to be delivered during Cinebench loading. This value sometimes jumped up to the next voltage step which is 1.417V. A 22mV spread in neighbouring voltage steps is higher than I like to see for a £250 motherboard with overclocking as one of its focal points.
Overclocked Performance
As a performance comparison, we have included the results from the Gigabyte Aorus AX370-Gaming 5 AM4 motherboard. The maximum overclocked configuration achieved with each board was a 4050MHz (40.5 x 100MHz) processor frequency whilst using 3200MHz CL14 memory.
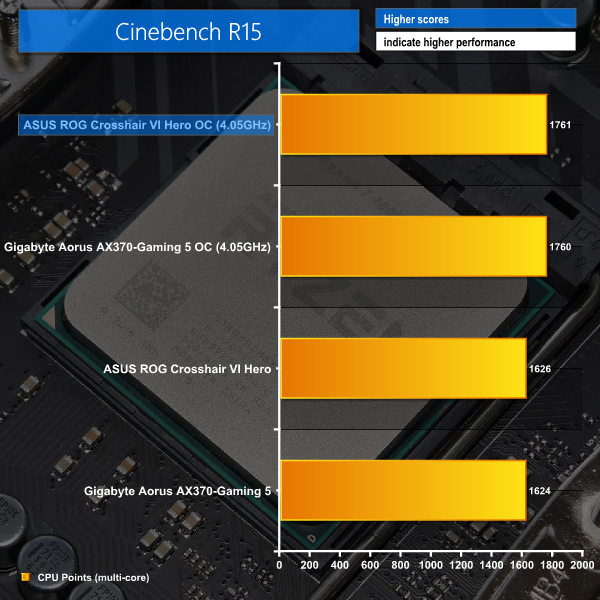
Pushing up from the Ryzen 7 1800X's stock all-core 3.7GHz frequency to a 4.05GHz overclock provided an additional 135 points in Cinebench for the ASUS motherboard. An 8% increase in performance is a decent improvement.
Power
We leave the system to idle on the Windows 10 desktop for 5 minutes before taking a reading. For CPU load results we run Cinebench multi-core and take a reading. The power consumption of our entire test system (at the wall) is shown in the chart.
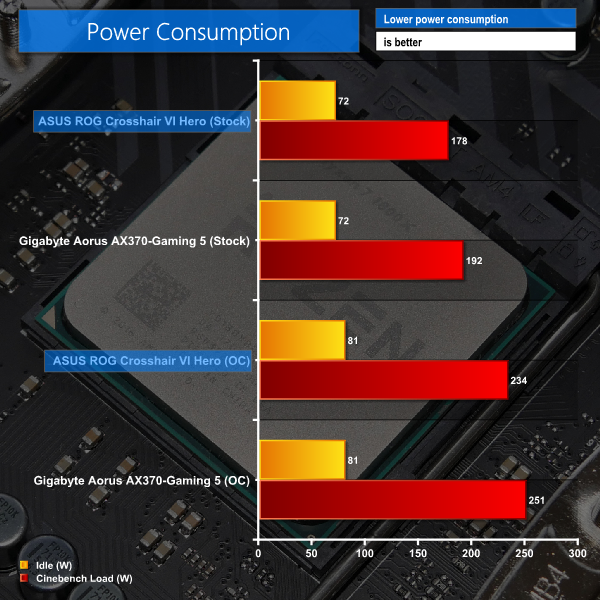
Power consumption for the Crosshair VI Hero was a strength compared to the Gigabyte AX370-Gaming 5. Idle power consumption figures are skewed by the efficiency curve of our 1000W PSU being limited at idle power draw levels. However, the loaded ASUS system draws a little less power than the Gigabyte competitor.
Overclocking the 1800X adds over 50W to the load power draw. With 234W of power being drawn from the wall, much of which will feed through the VRM and CPU, strength of the power delivery system is clearly an important factor for ASUS' Crosshair VI Hero.
ATTO Disk Benchmark
The ATTO disk benchmark is a Windows-based utility for testing storage performance of any storage drive or controller. We use the default benchmark setup.
M.2 PCIe Performance
For M.2 testing we use a Toshiba OCZ RD400 256GB M.2 PCIe NVMe SSD.
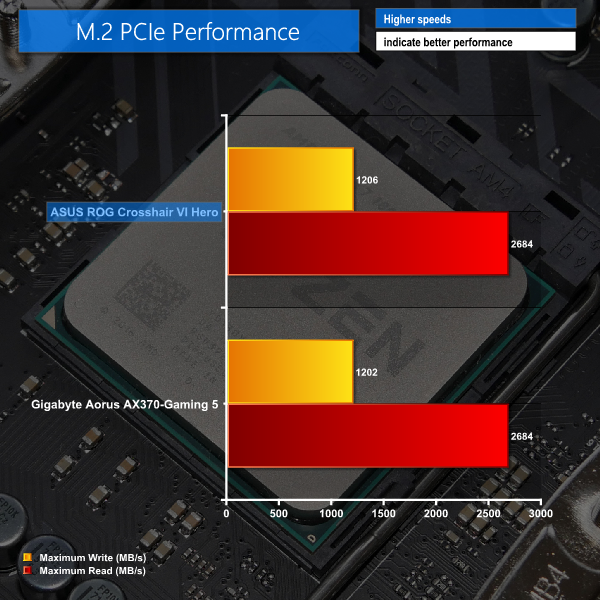
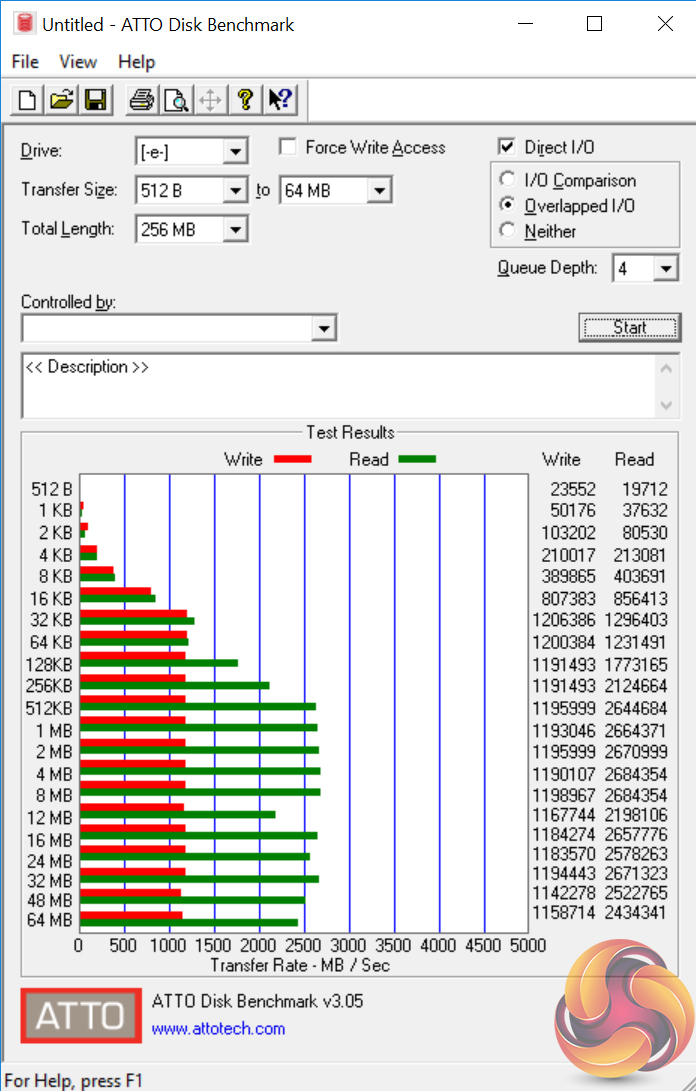
M.2 PCIe NVMe SSD performance is as good as we would expect from our Toshiba OCZ RD400. ASUS does not provide any form of cooling hardware for the M.2 SSD which means that our drive hits 75°C just in the short space of time it takes to run the ATTO disk benchmark.
With longer sustained write workloads, it is likely that the SSD will thermally throttle due to minimal consideration being given to cooling by ASUS.
USB 3.0 Performance
We test USB 3.0 performance using a pair of Corsair Force LE 120GB SSDs in RAID 0 connected to an Icy Box RD2253-U31 2-bay USB 3.1 enclosure powered by an ASMedia ASM1352R controller.
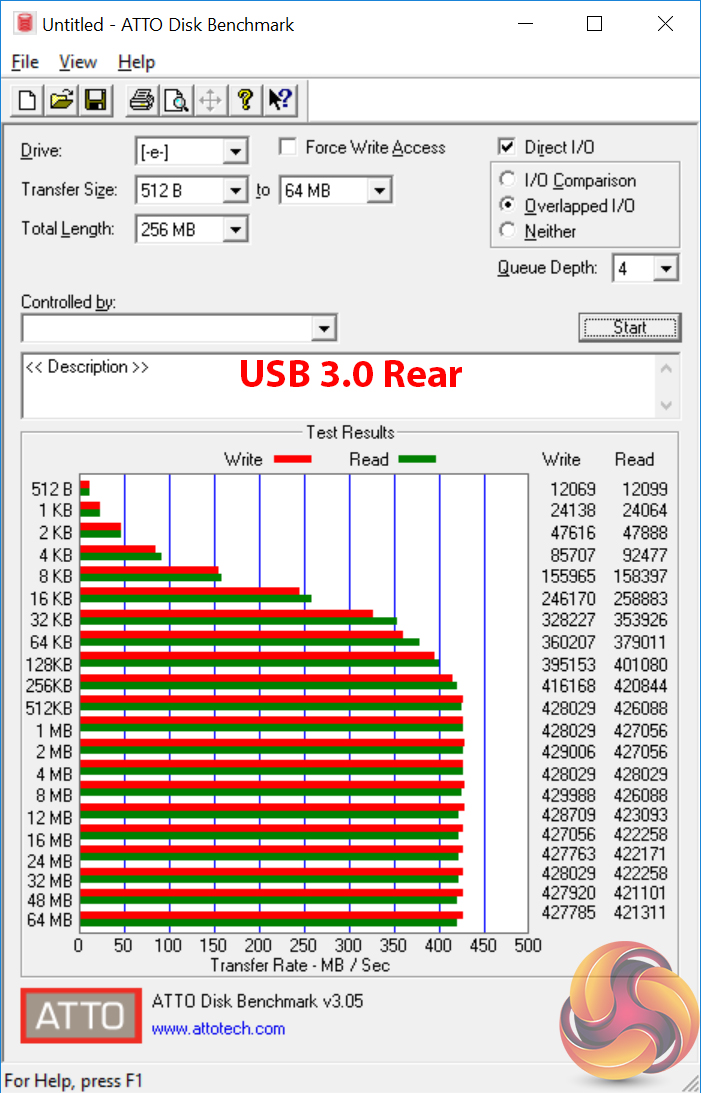
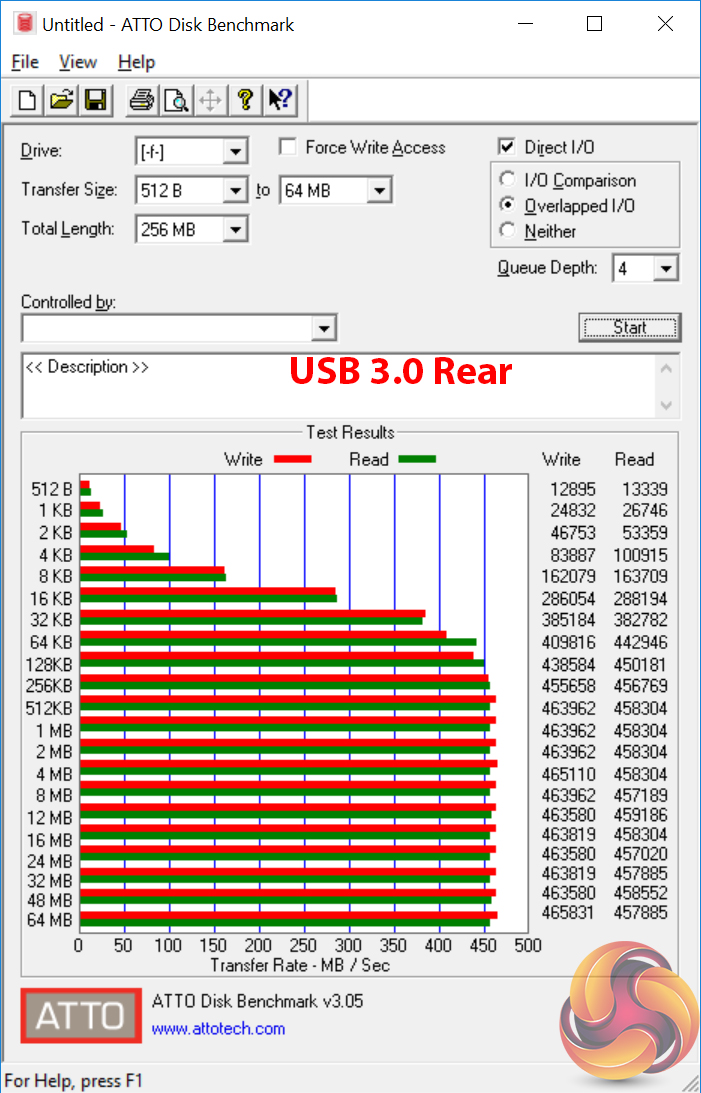
Four of the rear-mounted 5Gbps USB 3.0 ports are fed directly from the Ryzen processor whereas the other four are delivered via the X370 chipset. ASUS does not distinguish between these ports in the user manual and they are all coloured the same shade of blue.
Our testing shows that the ports nearest to the Ethernet port are slightly faster at around 460MBps top speed versus around 430MBps for the other ports.
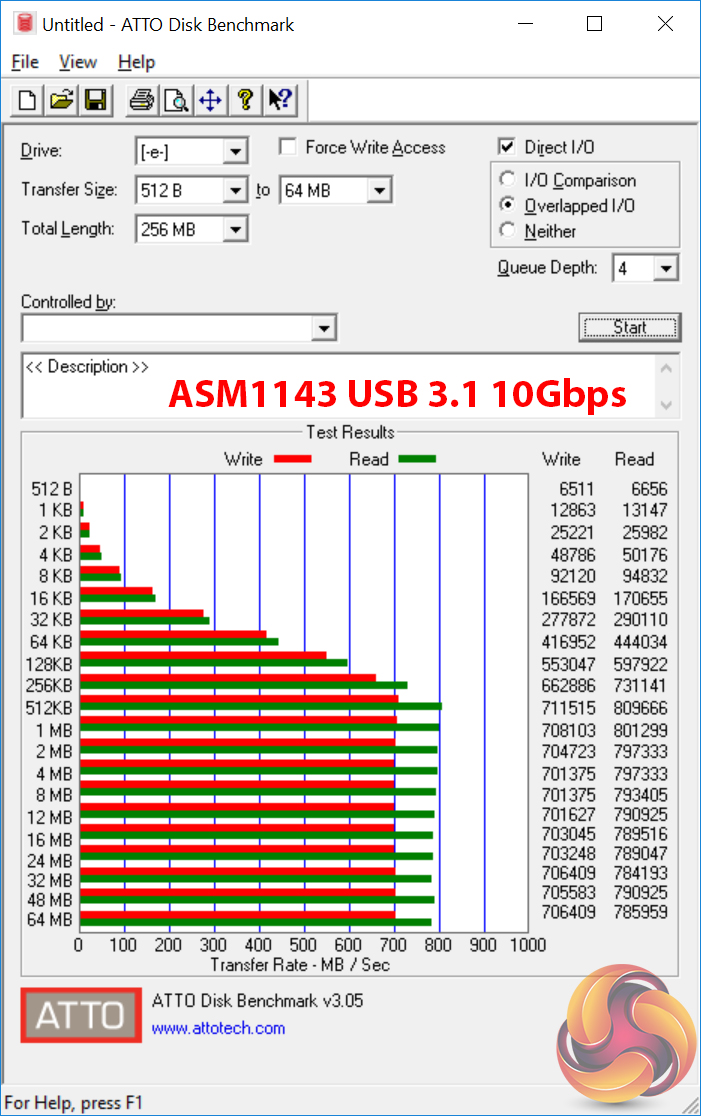
USB 3.1 Performance
We test USB 3.1 performance using a pair of Corsair Force LE 120GB SSDs in RAID 0 connected to an Icy Box RD2253-U31 2-bay USB 3.1 enclosure powered by an ASMedia ASM1352R controller.
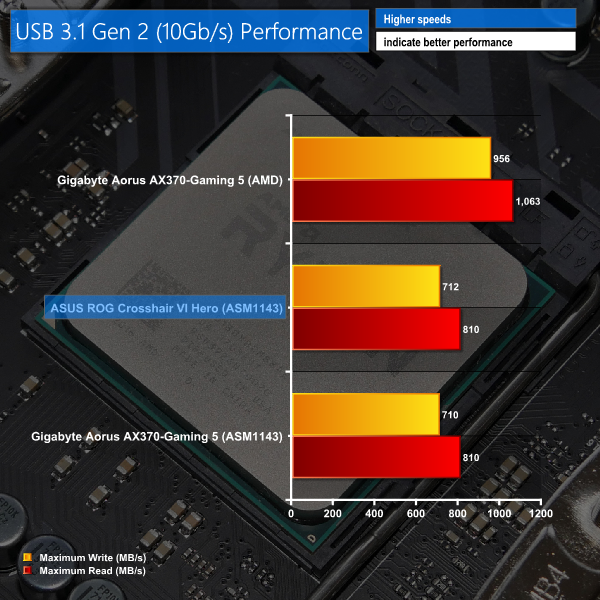
ASUS has chosen to deploy the pair of X370 chipset-based 10Gbps USB 3.1 connections as an internal header. This allows the pair to be used with a compatible chassis but it also inhibits our ability to test their speed (as we do not have said compatible chassis).
The 10Gbps USB 3.1 Gen 2 ports on the rear panel deliver around 700-800MBps sequential transfer speeds due to the use of ASMedia's last-generation ASM1143 PCIe 2.0 x2 chipset. The newer PCIe 3.0 x2 ASM2142 USB 3.1 Gen 2 chipset found on many Z270 motherboards would have been preferable but AMD's use of Gen 2 PCIe lanes on the chipset, rather than Gen 3 like Z170 and Z270, is to blame.
If you want the fastest possible USB 3.1 speeds, look for the chipset-specific ports instead of ones delivered by a host controller from the likes of ASMedia.
SATA 6Gbps Performance
For SATA 6Gbps testing we use a SK Hynix SE3010 960GB SSD.
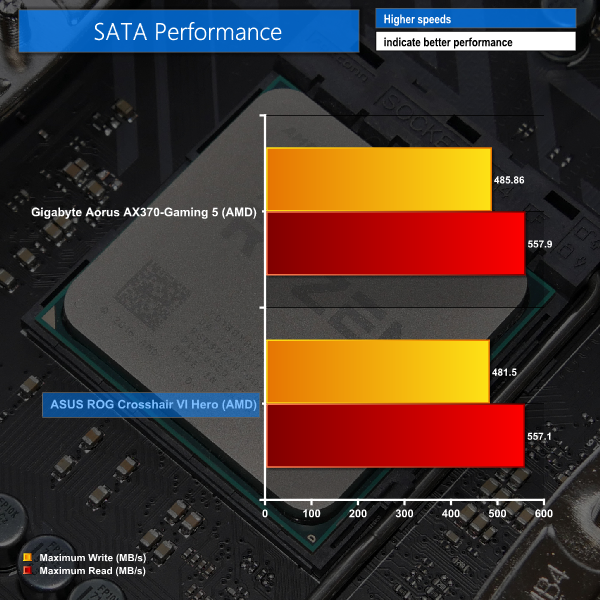
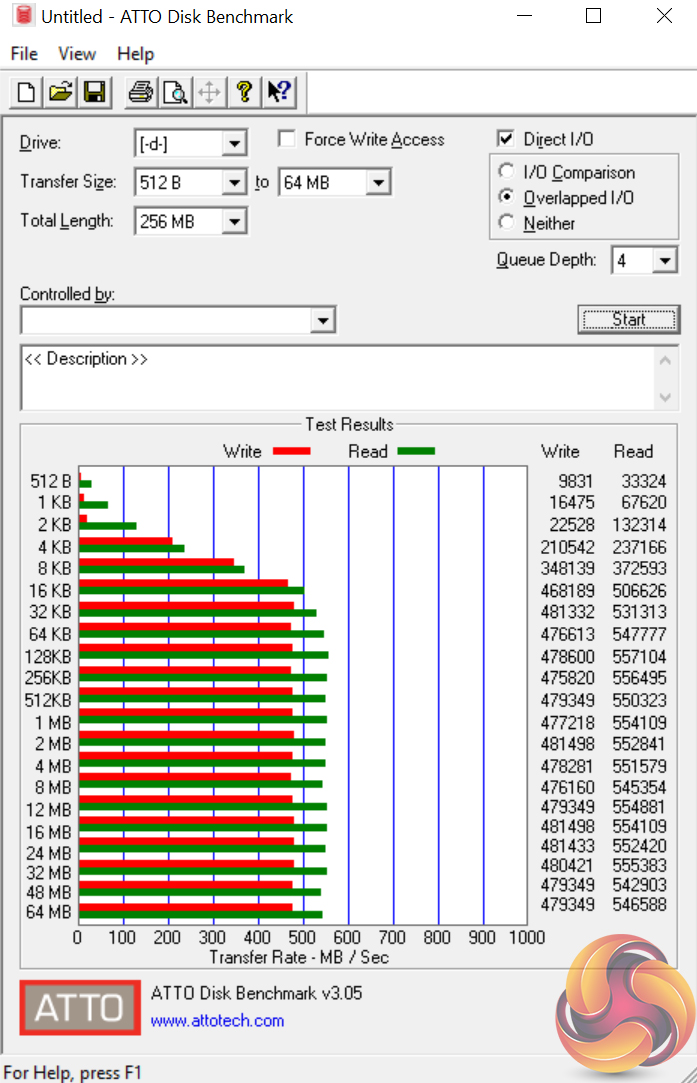
SATA 6Gbps performance shows no cause for concerns.
Audio
Rightmark Audio Analyser is a freeware benchmarking utility designed to objectively test the performance characteristics of audio solutions. We setup a line-in line-out loop and execute the record/playback test before generating the results report you see below. A sampling mode of 24-bit, 192 kHz was tested.
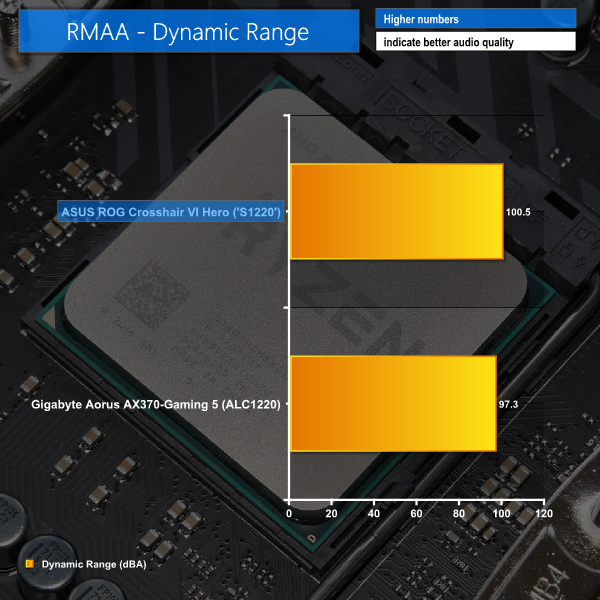
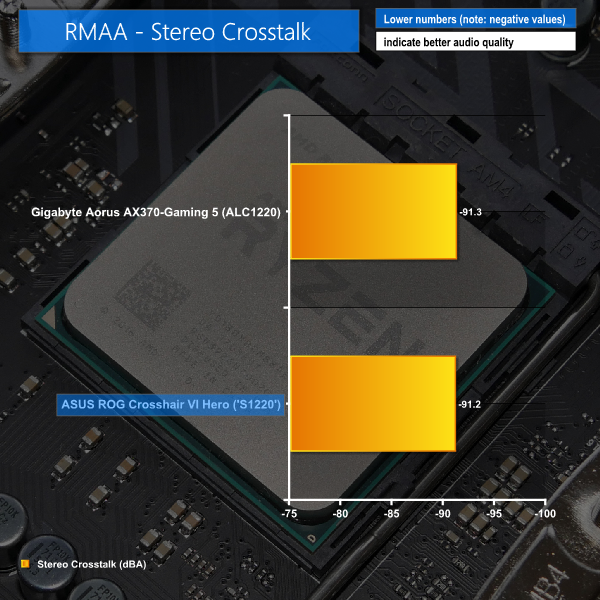
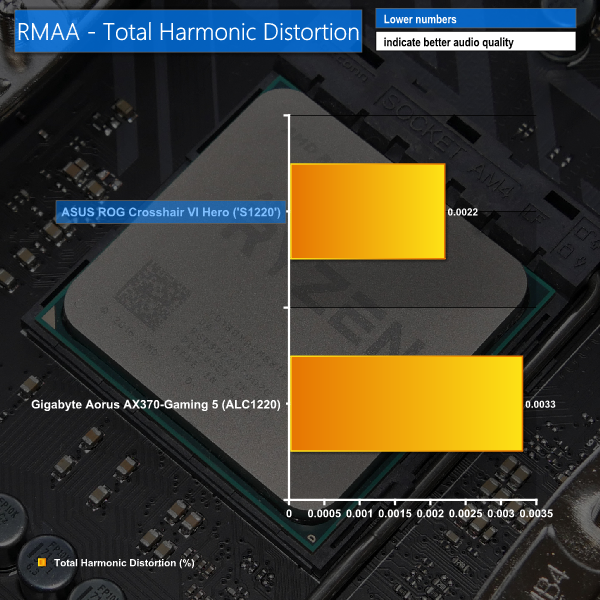
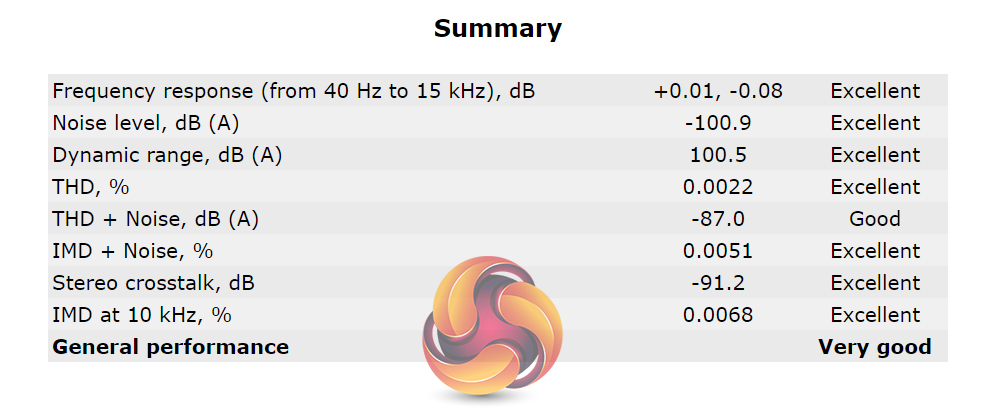
ASUS' ‘S1220'-based SupremeFX audio system delivers very strong results, according to RMAA.
The ASUS ROG Crosshair VI Hero motherboard shows good performance that allows a Ryzen 7 CPU to flex its muscle. Overclocking performance was also solid, with the board managing to take our 1800X to 4.05GHz at a sensible 1.4V (once ASUS' annoying LLC levels are figured out).
On the topic of overclocking, ASUS provides a number of useful tools for tweakers. Onboard voltage monitoring points are extremely useful, as are control buttons and the 2-digit debug LED. UEFI layout is a strength for straightforward overclocking (with the exception of aforementioned LLC complexities).
Overall design is a strength for the Hero. ASUS smartly deploys features of the Ryzen CPUs and X370 chipsets, such as 10Gbps USB 3.1 ports via an internal header and a vast number of 5Gbps USB 3.0 rear connections. There's a 32Gbps PCIe 3.0 x4 M.2 slot with a direct connection to the AM4 CPU, as well as capability with a SATA SSD. However, ASUS has not given enough thought to M.2 SSD cooling using some form of heatsink.
A strong, well-cooled power delivery system will be welcomed by Ryzen 7 users. The chips demand a sizeable amount of power when overclocked and keeping the MOSFETs cooled is important for system longevity. Performance from the audio system was strong and we would have no reservations about using onboard audio on a daily basis with this motherboard.
ASUS includes a pair of 4-pin RGB LED strip headers that can be controlled using AURA software in Windows. I am disappointed to see a lack of UEFI-based control but ASUS deserves praise for including two headers at opposite ends of the motherboard, which is ideal for mounting flexibility. The rear IO and chipset onboard LED zones are minimalistic but work fine.
Stability is an area that ASUS still needs to work on. Our favourite button throughout testing became the clear CMOS button. Getting memory to work at 3200MHz proved to be an art given the absence of an outright XMP solution that we trusted (after D.O.C.P. killed a different C6H sample). We are, however, confident that further BIOS updates will fix issues as the entire platform is still young.
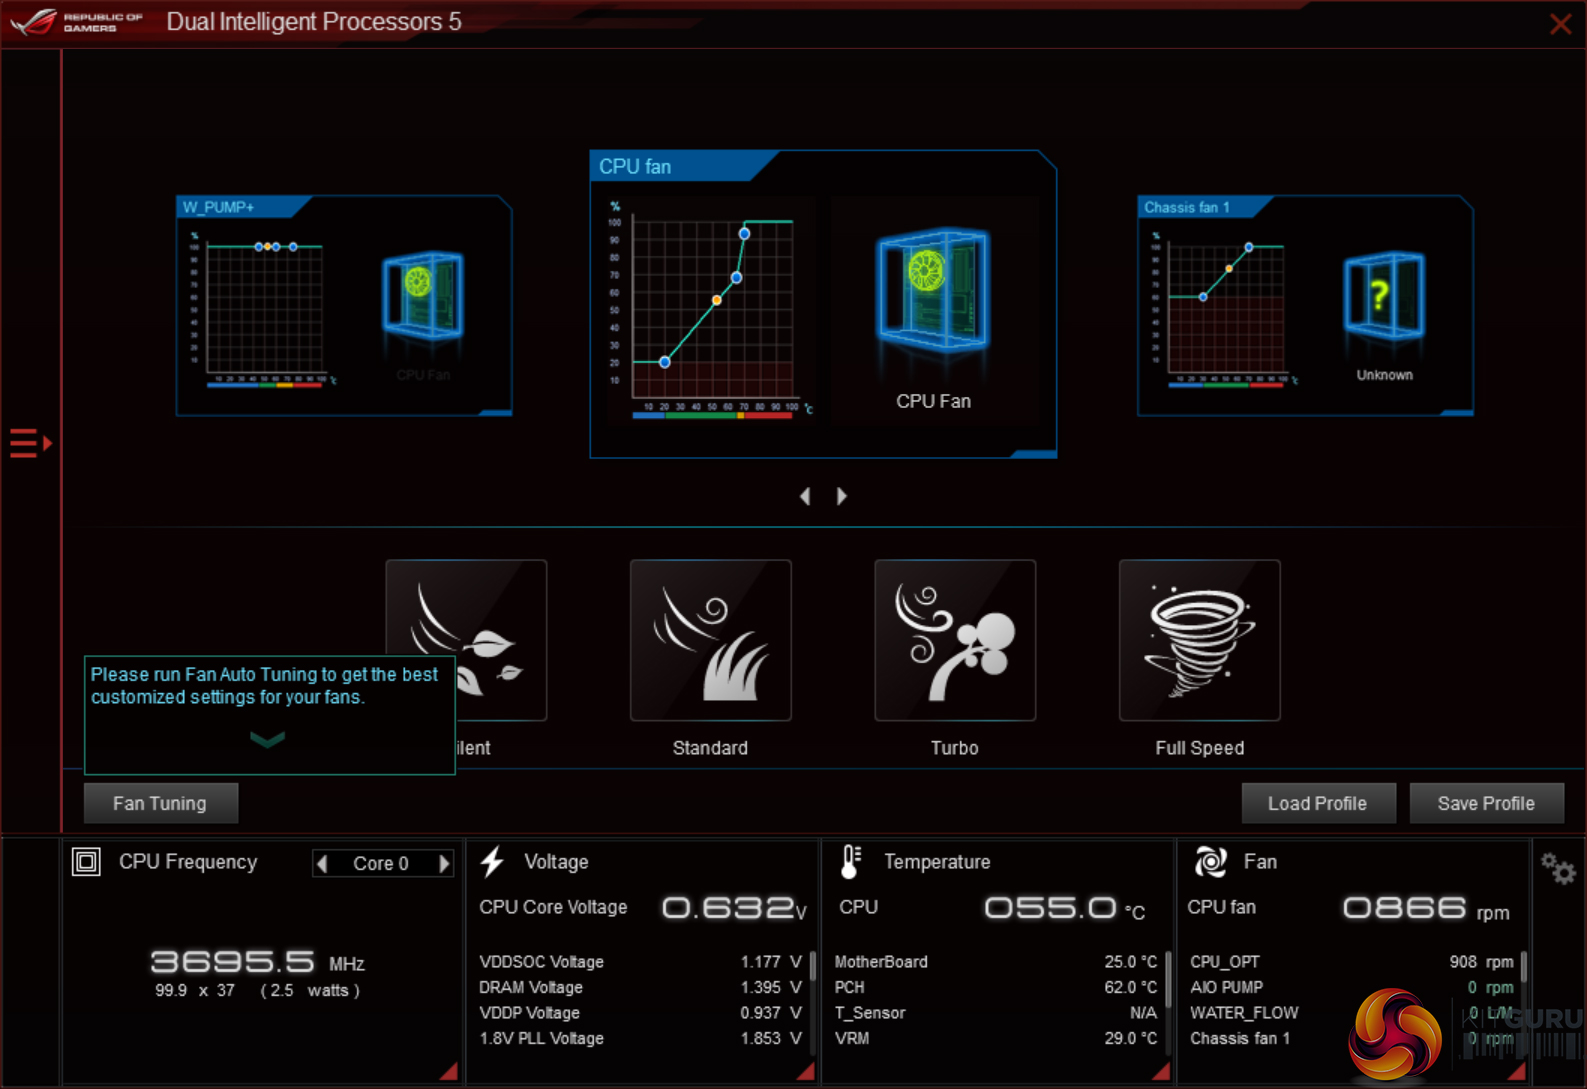
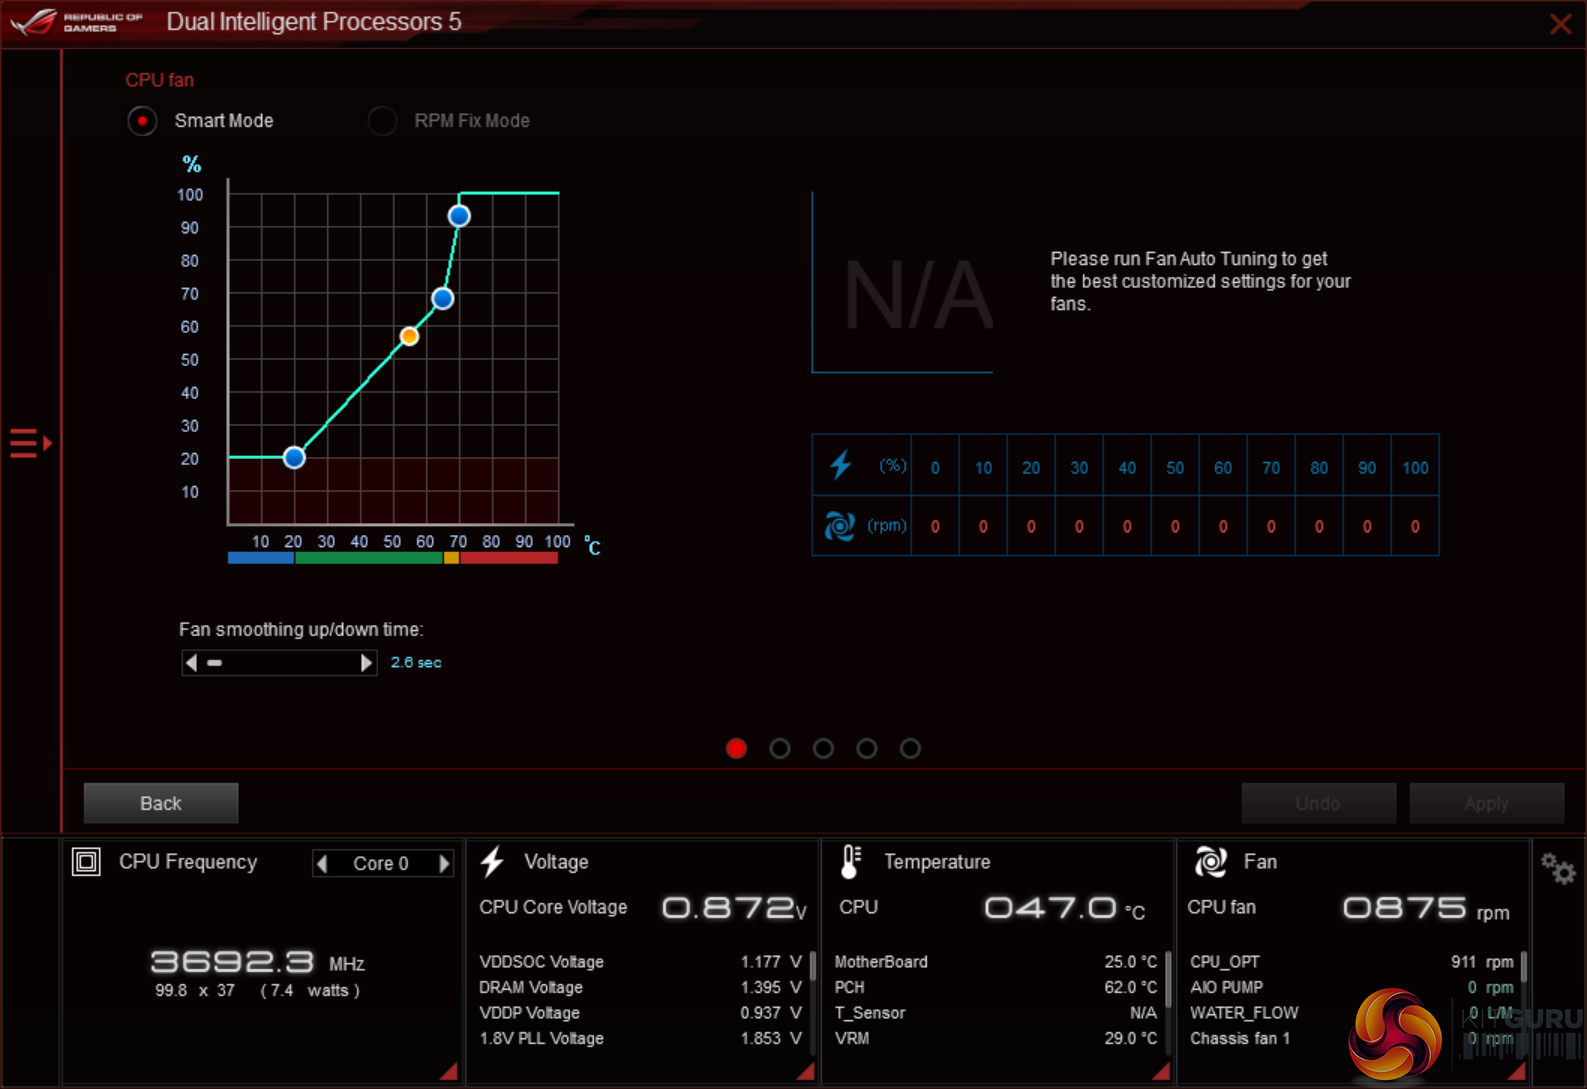
Fan control was good through both the UEFI and OS-based software. ASUS includes a number of software tools that may be of use to niche sections of the purchase base, such as RAMCache which could aid budding videographers.
![]()
The ASUS ROG Crosshair VI Hero is available at Overclockers UK for £259.99.
Discuss on our Facebook page, over HERE.
Pros:
- Worked correctly with high-speed 3200MHz G.SKILL DDR4 with some tweaks.
- Internal 10Gbps USB 3.1 header is a positive.
- A good range of overclocking features – onboard buttons and voltage monitoring points.
- Mounting compatibility for 3D printed accessories.
- Solid fan control with PWM and DC compatibility.
- Two RGB LED headers is good to see.
- Strong set of OS-based software.
Cons:
- Additional UEFI features would be welcomed – AURA RGB LED control especially.
- Very little onboard LED lighting compared to competing products.
- No M.2 cooling or native U.2 connector (M.2 fan bracket purchasable separately).
- Rear 10Gbps USB 3.1 is around 20% slower than AMD- or ASM2142-based ports on competing solutions.
KitGuru says: A strong high-end AM4 offering with a good balance of features and solid overclocking support.

On the M.2 socket you mentioned an ugly green one, I think anyone buying this board will opt for the Samsung 950 or 960 which are a matching black.