The Gigabyte J1900N-D3V is more than a simple motherboard as it replaces the usual chipset and CPU socket with an Intel Celeron J1900 SoC (System on Chip). Add some RAM, storage and a power source and you have the basis for a compact PC which is pretty good going for a price tag around the £65 mark. Other important points are that J1900N-D3V uses the Mini-ITX form factor and the Celeron chip is passively cooled which means that your new PC will be both small and quiet.
Specification:
- CPU Built-in Intel Celeron J1900 2.0GHz.
- Chipset Celeron J1900 is System on Chip.
- Memory Up to 8GB dual channel DDR3L-1333MHz.
Graphics
- 1 x VGA port, supporting maximum resolution of 2560×1600.
- 1 x DVI-D port, supporting maximum resolutions of 1920×1080.
Slots/Ports/Audio
- 1 x PCI slot.
- 1 x Mini PCI Express 2.0 slot.
- Networking 2 x Realtek Gigabit Ethernet.
- SATA 2 x SATA 3Gbps.
- USB 4 x USB 3.0 on I/O panel, 2 x USB 2.0 on mid-board header.
- Audio Realtek ALC887 with 7.1-Channel High Definition Audio.
- Supports S/PDIF output.
Internal I/O Connectors
- 1 x 24-pin ATX main power connector.
- 1 x 4-pin ATX 12V power connector.
- 2 x SATA 3Gb/s connectors.
- 3 x USB 2.0 connectors (supports additional 6 USB 2.0 ports).
- 1 x USB 3.0 connector.
- 1 x 3-pin CPU fan connector.
- 1 x 4-pin system fan connector.
- 1 x Front panel audio connector.
- 1 x Chassis Intrusion connector.
Back Panel I/O Ports
- 2 x PS/2.
- 4 x USB 3.0 ports.
- 1 x VGA port.
- 1 x DVI-D port.
- 2 x LAN (RJ45) port.
- 3 x audio jacks.
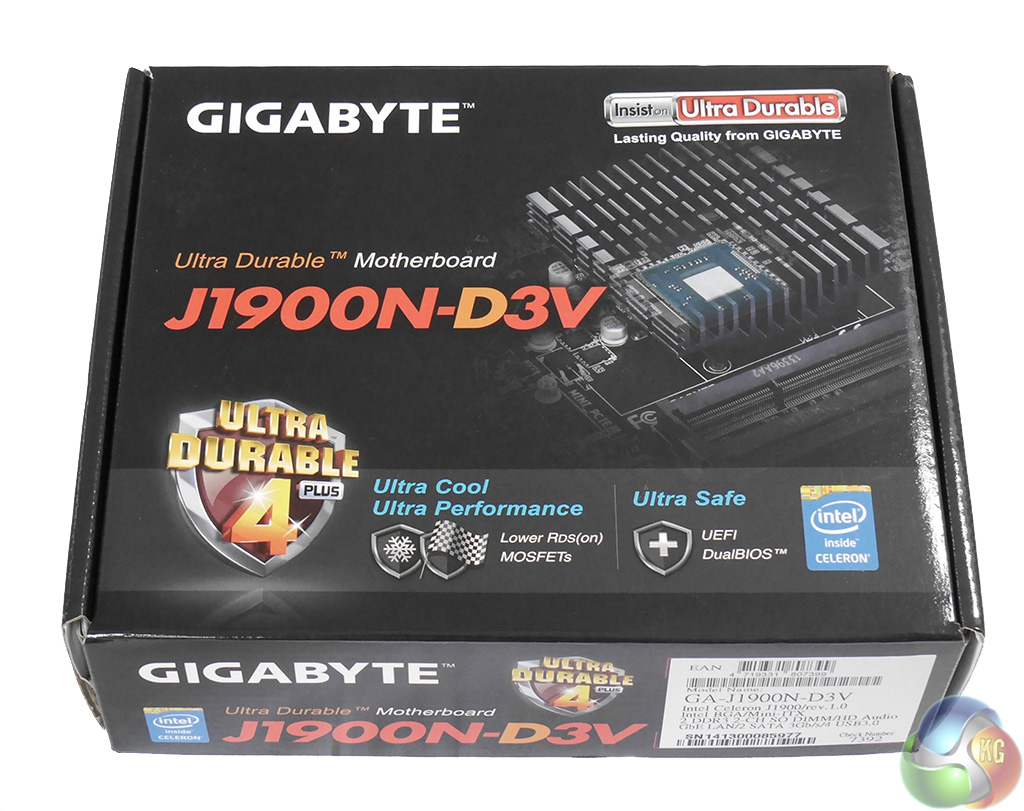
The front of the package for the Gigabyte J1900N-D3V is unusual and shows the Celeron J1900 SoC as you look through the aluminium heatsink. This is especially curious as the J1900 is shown at one corner of the heatsink when it actually sits in the centre.
Frankly I doubt that anyone who is unfamiliar with the J1900N-D3V would have the faintest idea what Gigabyte was attempting to depict. I hope potential customers won't expect a transparent heatsink as they will be sorely disappointed.
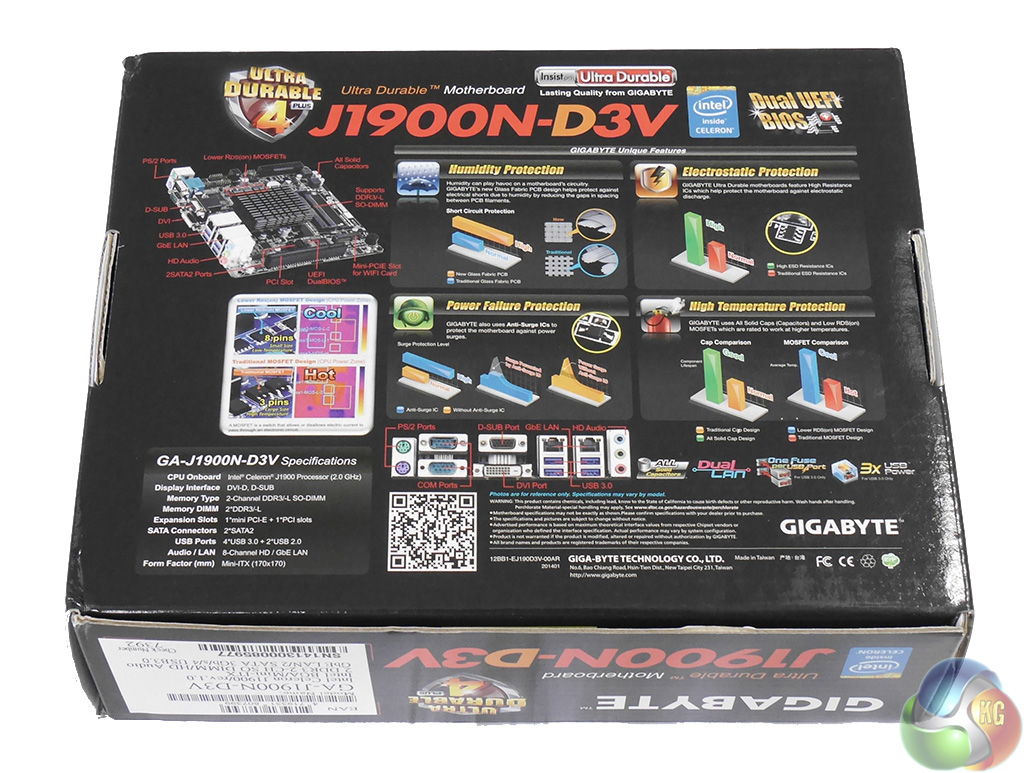
On the back of the package we have a number of coloured bar charts and some explanation about the Ultra Durable 4 Plus features.
This isn't quite as successful as it might be as the box is so small (220mm x 180mm) that you will struggle to read many of the words. This is a shame as the focus on Ultra Durable 4 sets out the stall for J1900N-D3V as it is all about reliability and durability.
This is quite different to Ultra Durables 3 and 5 which focus on superior components for the sake of quality and performance. Ultra Durable 4 is more concerned with high humidity in Asian countries and environmental considerations of that type.
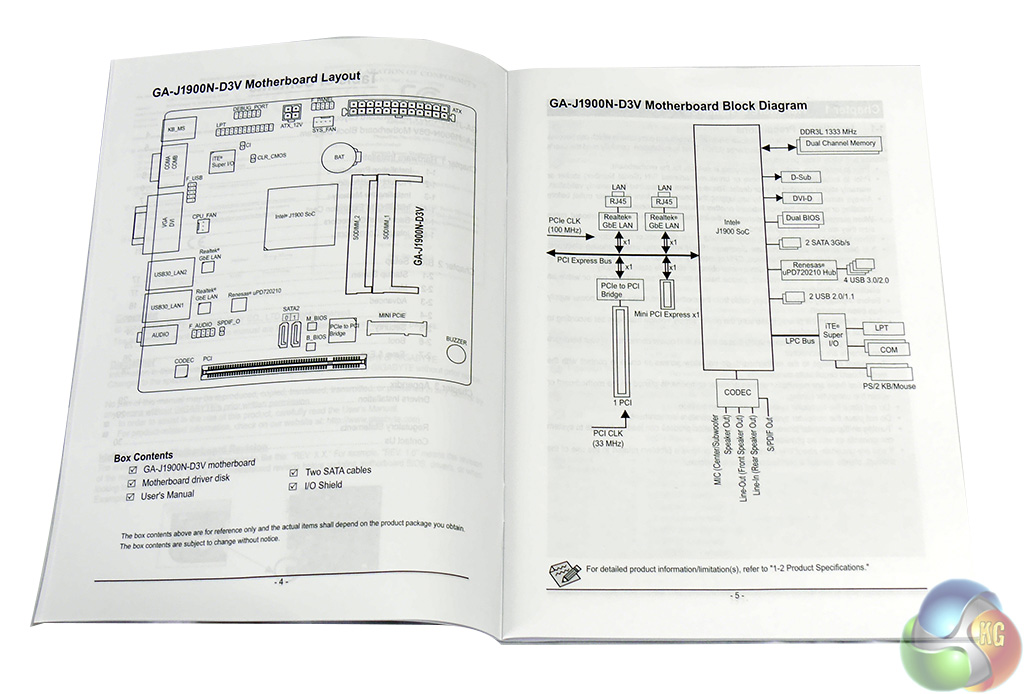
You don't get much in the way of a package of extras with the J1900N-D3V however you do get everything you need. The user guide is fairly basic, there is a driver disc, I/O shield and two SATA cables (one straight and one right angled).
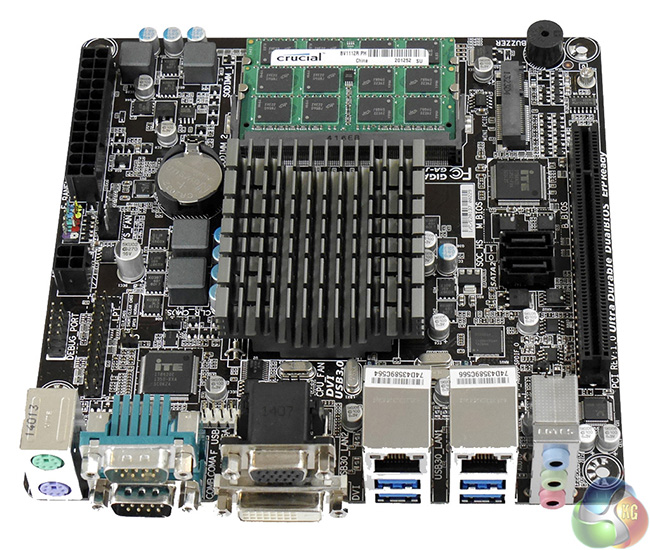
Take a tour around the board…
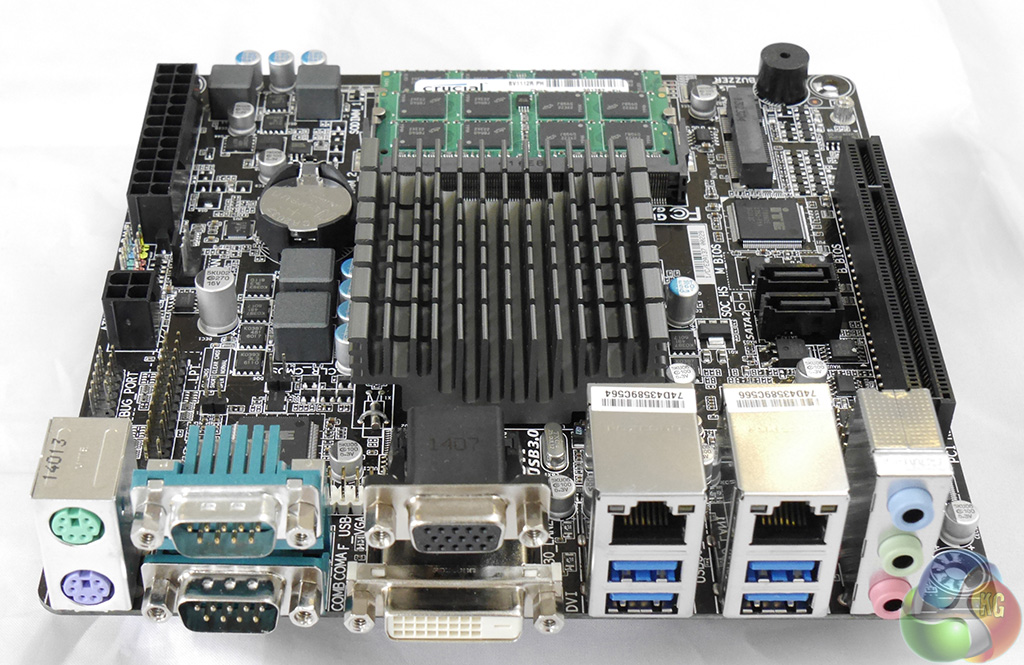
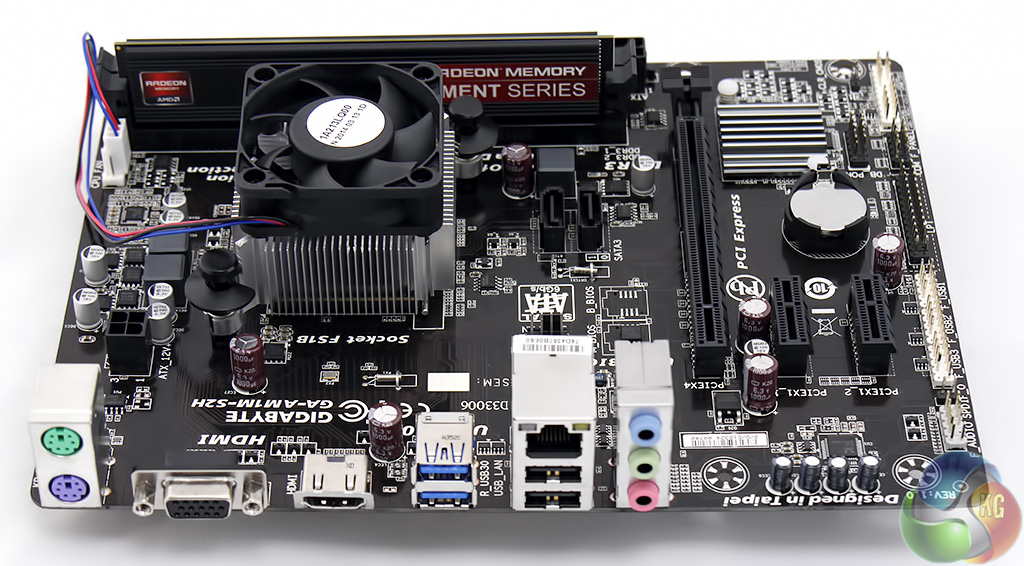
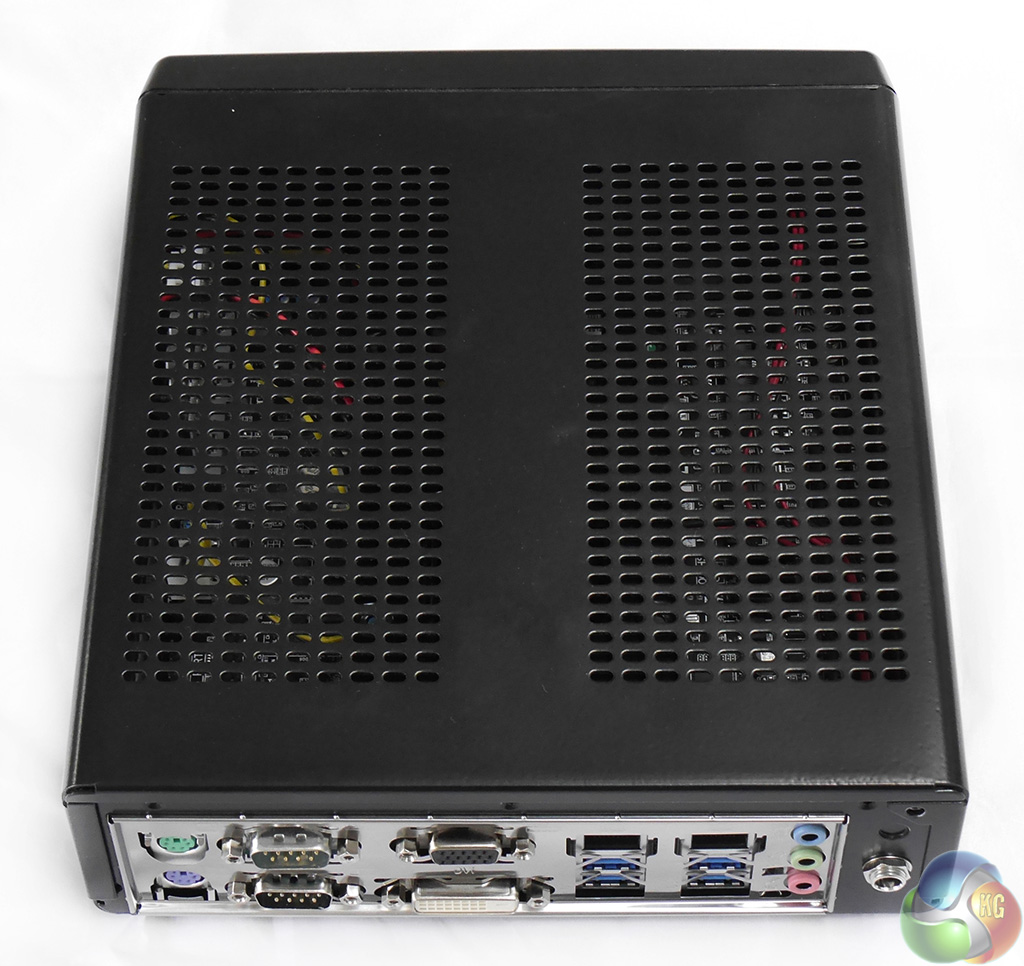
The I/O panel is a strange mixture of the old and the new. There are two PS/2 ports, two Serial ports, DVI-D, VGA, four USB 3.0, dual Gigabit Ethernet and a set of three audio jacks. This is just about adequate for a desktop PC but most people have no need of dual Ethernet and Serial ports have been an irrelevance for at least ten years.
If you are thinking of building the J1900N-D3V into a Media Centre PC you will note the absence of HDMI and would perhaps appreciate S/PDIF output or other audio options. In fairness to Gigabyte there is a mid-board S/PDIF header although you will need to sort out your own cabling and connectors.
To my mind the likeliest market for the Gigabyte J1900N-D3V is for control systems in factories or other industrial settings where they still use Serial control, or perhaps for a controller for digital signs or an information kiosk.
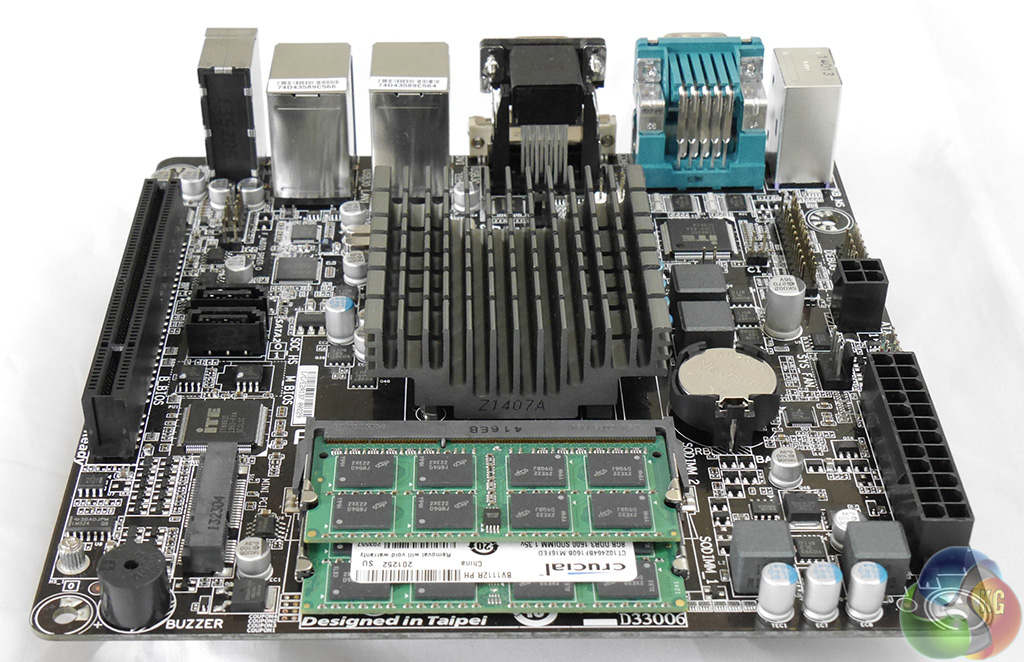
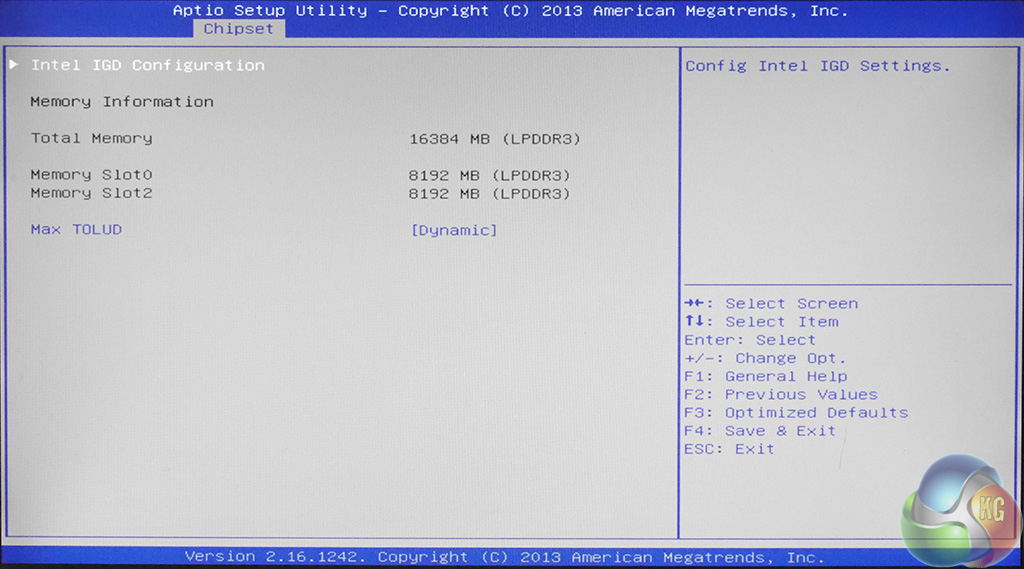
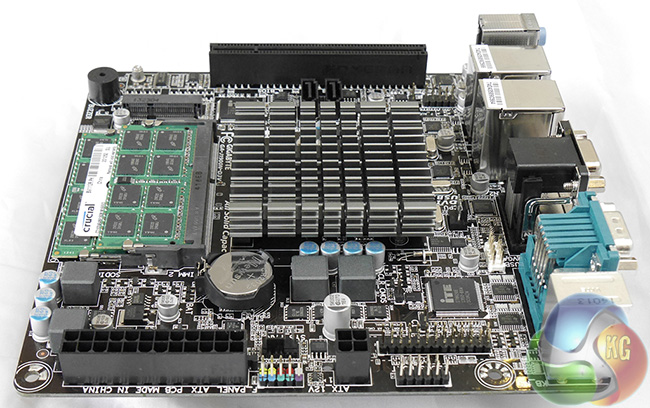
System memory consists of two slots of low voltage laptop DDR3L-1333MHz. Officially the Gigabyte supports up to 8GB of dual channel memory but during my time with this motherboard I had no problem installing 16GB of RAM and seeing it correctly recognised by the BIOS and Windows. You can forget about overclocking as the speed of the memory is locked at 1333MHz.
It makes sense to budget £60 for an 8GB (2x4GB) DDR3L-1600 memory kit to go with this motherboard.
To the left of the memory slots you can see an M.2 Mini PCI Express 2.0 slot which is limited to a card about 28mm long. This means it is too short for an SSD but just right for adding Wi-Fi or Bluetooth.
We often see Mini-ITX motherboards with a single expansion slot that supports a PCI Express graphics card. The Gigabyte J1900N-D3V instead has a legacy PCI slot which will be of no interest to the home PC fraternity but this could be very handy if you want to add, for example, a Parallel port to run your old printer.
Just above the PCI slot there are two SATA 3Gb/s connectors which is all you need for a small form factor PC as there isn't likely to be enough space for more than two drives in a small form factor case.
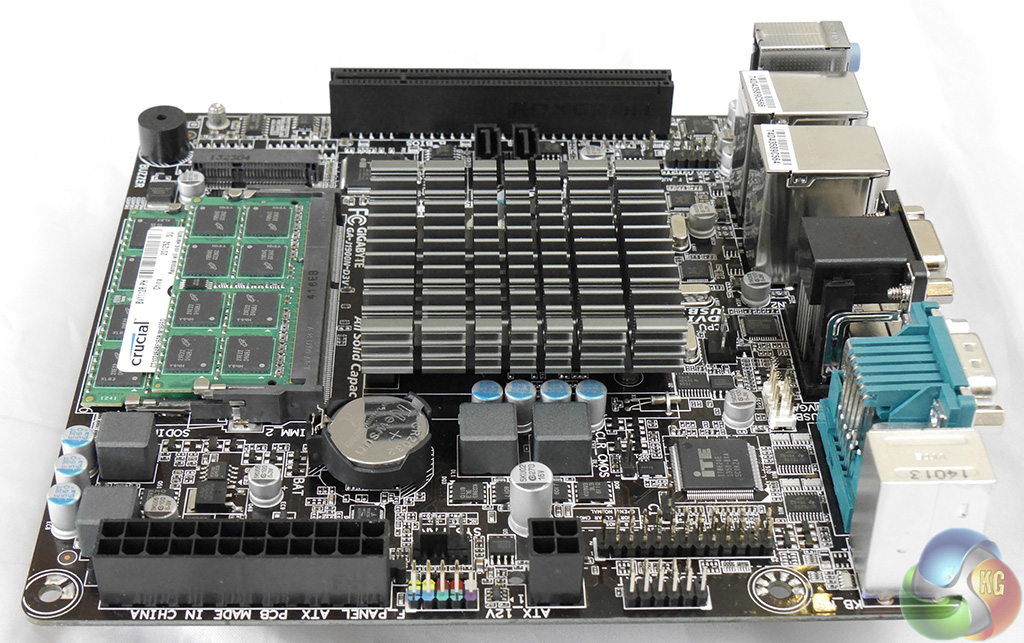
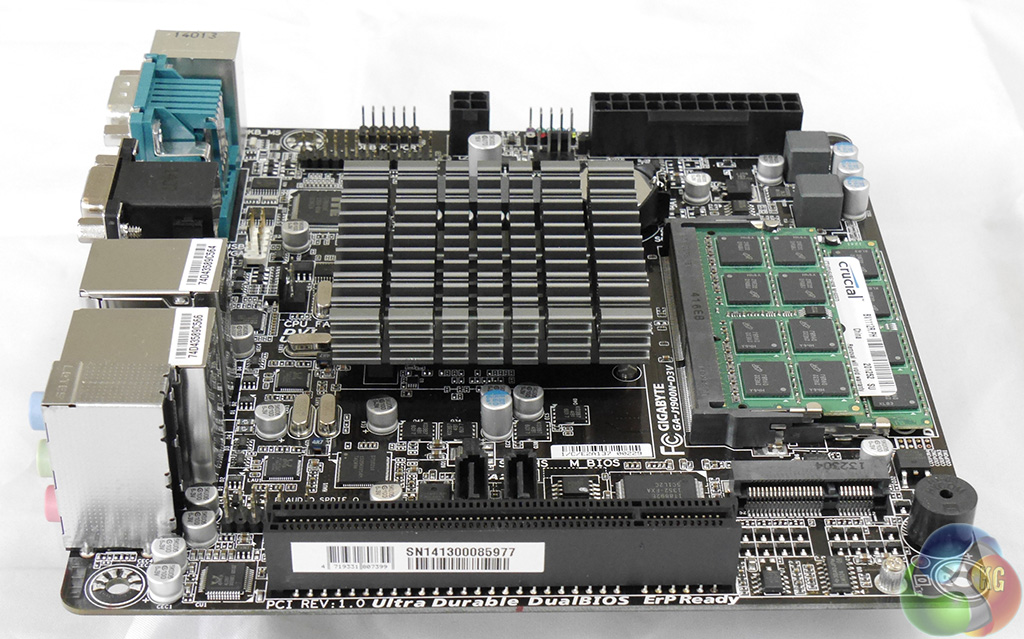
Along one side of the motherboard there are the two ATX power connectors with the latches on the inner face. This helps when you install a motherboard in a tiny case as you will be able to release the latches on the cables.
There is a single mid-board header for two USB 2.0 ports which could be handy if the four USB 3.0 ports on the I/O panel are insufficient for your needs.
While Gigabyte has kept the footprint of the J1900N-D3V to the tiny 170mm x 170mm we expect from Mini ITX the 40mm I/O panel looks taller than necessary as the power and SATA connectors are vertical and there has been no obvious effort to reduce the height of the board.
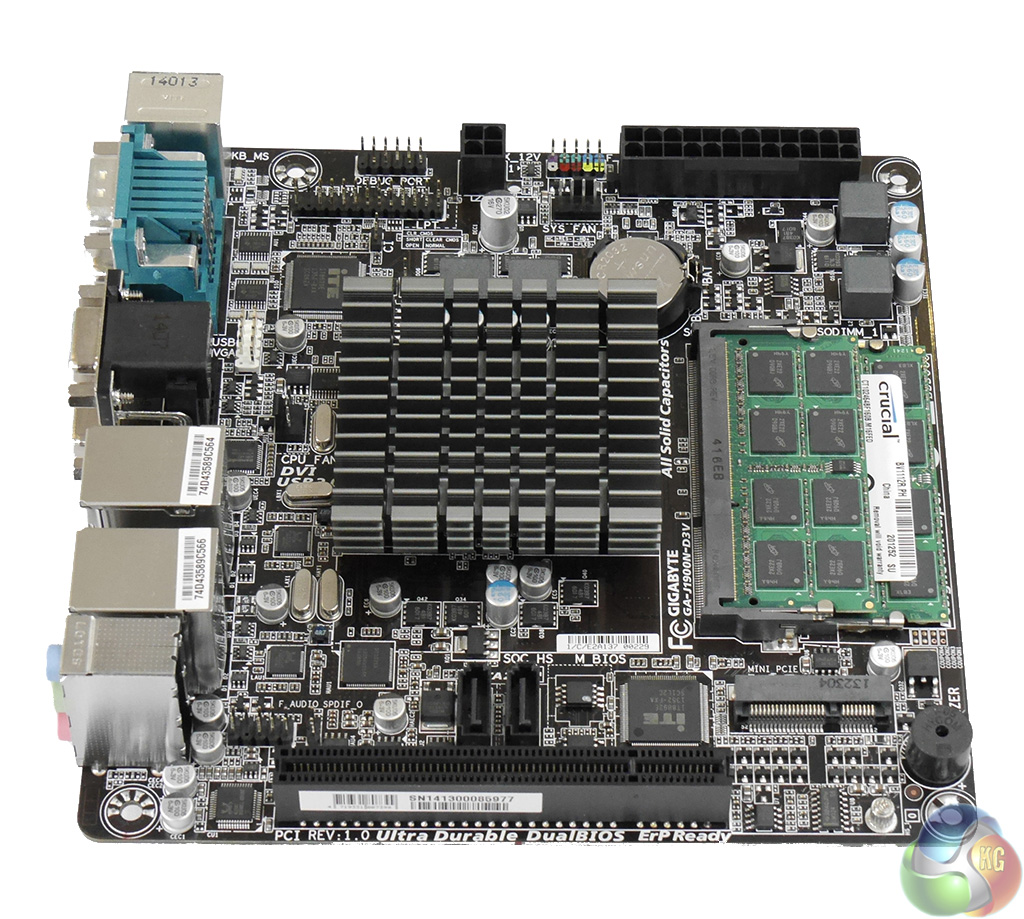

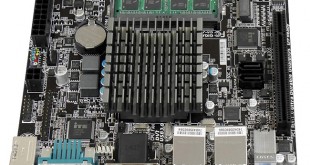
If you look to the left of the finned heatsink you might just be able to see a three pin header labelled ‘CPU fan' which suggests that Gigabyte considered using an active cooling solution for this model.

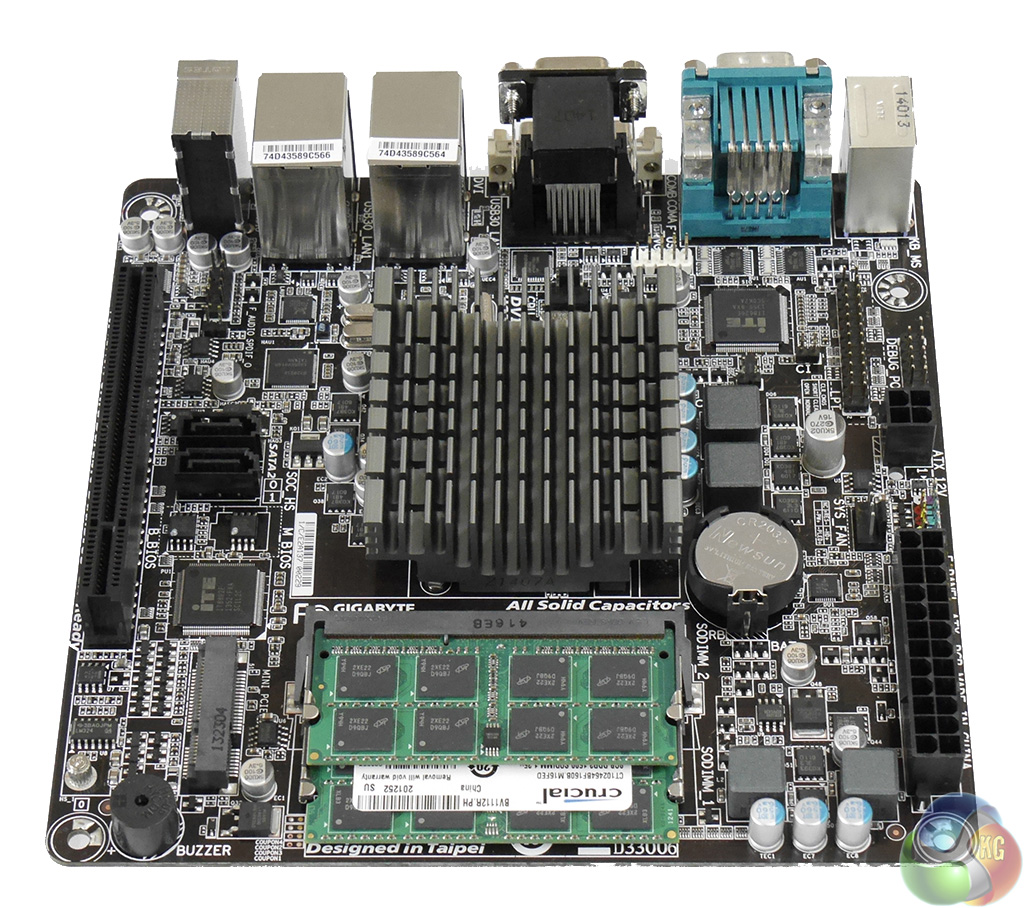
The heatsink is held in place with two steel screws, which is far more satisfactory than the plastic pop pins you often see. With the heatsink removed the Celeron J1900 is revealed in all its glory and looks no larger than a typical chipset, which makes it hard to believe that it is actually a System on Chip.
Intel Celeron J1900 SoC


Intel Bay Trail System on Chip
Intel gives full details of its Celeron J1900 here, however it isn't especially clear that this Celeron is actually a quad core Bay Trail Atom that uses x86-64 architecture with a base speed of 2GHz and a maximum burst speed of 2.41GHz on a single core.
The Intel HD Graphics core has four execution units that run at 688MHz with a maximum dynamic frequency of 854MHz. As far as I can tell this is the same core that was found in many Ivy Bridge processors except, of course, with this take on Celeron J1900 you don't have the option of plugging in a graphics card.
Two other points grab my attention about Celeron J1900. The first is the 10W TDP which is very low and well suited to passive cooling. The second point is that Intel lists the tray price for J1900 at US$82 (when you buy 1,000 processors) which works out to about £50. Either Intel is charging Gigabyte a good deal less than US$82 or Gigabyte is effectively giving us the J1900N-D3V free of charge.
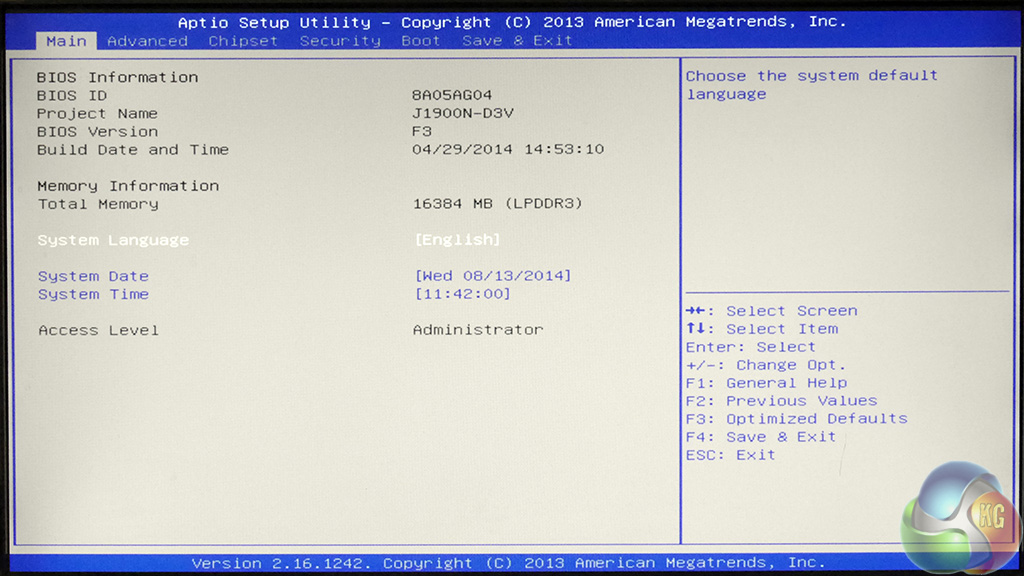


Navigating the olde worlde AMI BIOS is a little tedious as you work your way around with the TAB and arrow keys – this is not a UEFI with mouse control. This has the potential to be a bit of a pain however you don't have to do very much in the BIOS as there are view options at your disposal.
Assuming you have no desire to disable audio or USB you are pretty much limited to using the BIOS to check which drive is connected to which SATA connector, confirming the memory is recognised and setting the boot order of your various devices.
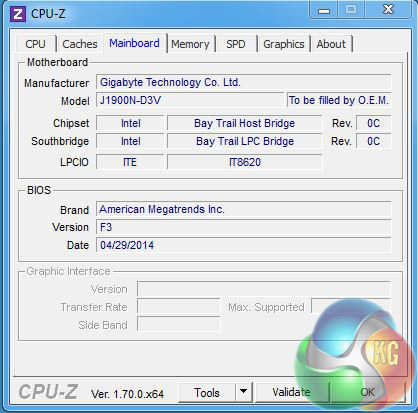
When the J1900N-D3V arrived it was running on BIOS F2 so my first task was to update to version F3. This was more laborious than I expected as the BIOS does not include the Q-Flash utility where you put the update file on a USB flash drive and let the update proceed.
Gigabyte doesn't supply a Windows based .EXE utility to update the BIOS so instead I had to use a bootable USB flash drive to get a DOS prompt and then run an Autoexec command to update the BIOS.
I didn't really have a choice in the matter as Gigabyte states that you should update the BIOS before you install drivers and in particular before you get to such delights as the TXE driver for the Trusted Execution Engine and audio drivers.
Incidentally Gigabyte only supplies drivers for Windows 7, 8 and 8.1 with no mention of Linux.
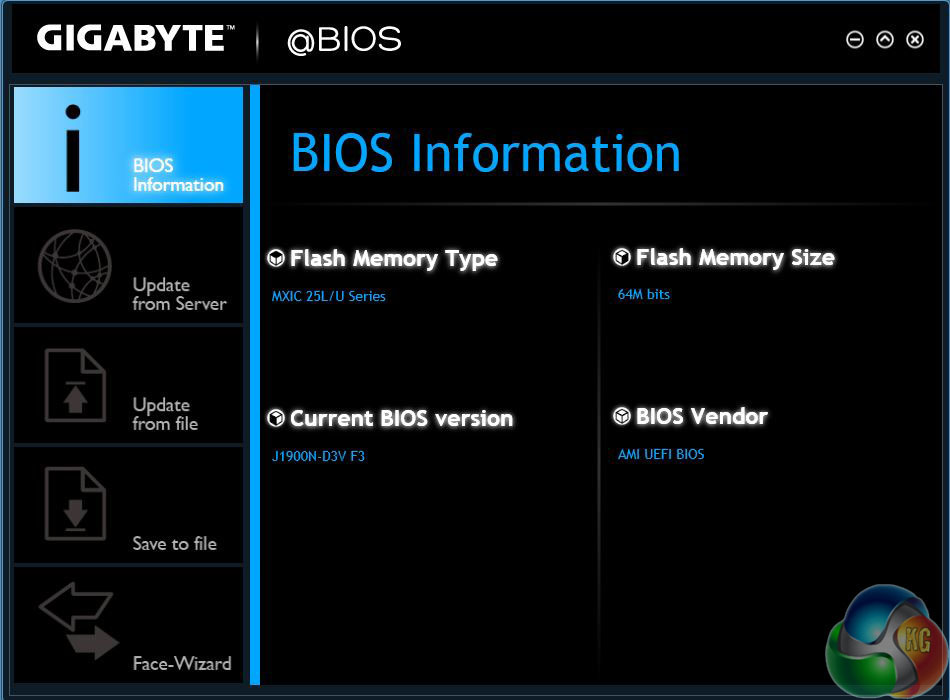
Once I had the Gigabyte running on BIOS F3 with Windows 7 installed I was able to install drivers, update Windows and then drill into the installation disc where I found a utility called Gigabyte App Centre. This consists of a single utility called @BIOS that will be familiar to anyone who has owned a Gigabyte motherboard. I cannot claim that Gigabyte made this part of the process easy but at least it should be easier to update the BIOS in future using the ‘online check' function.

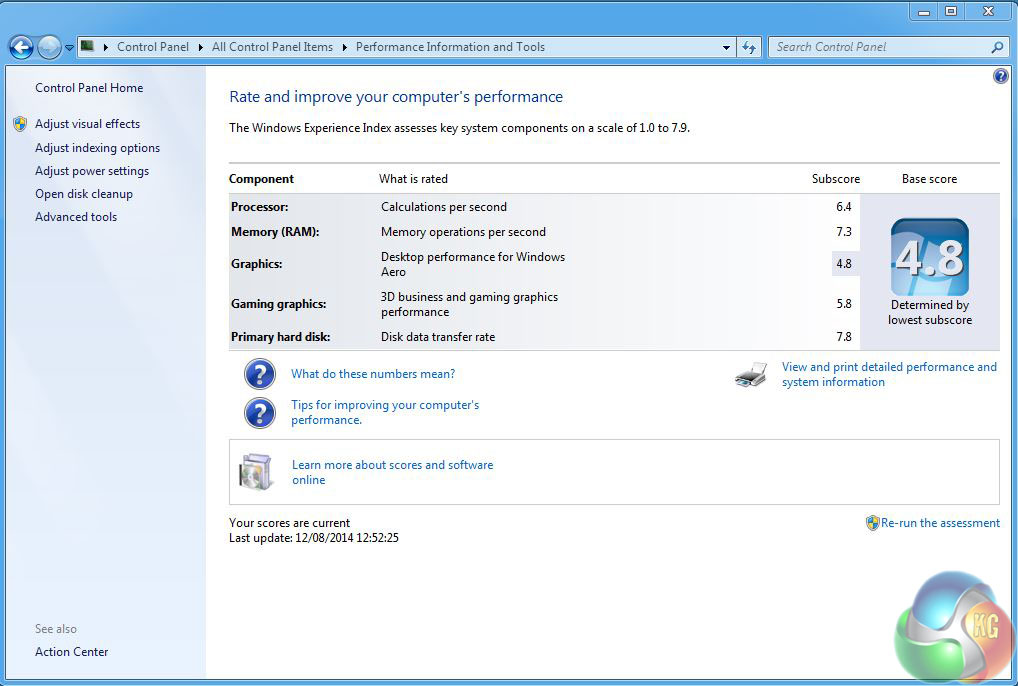
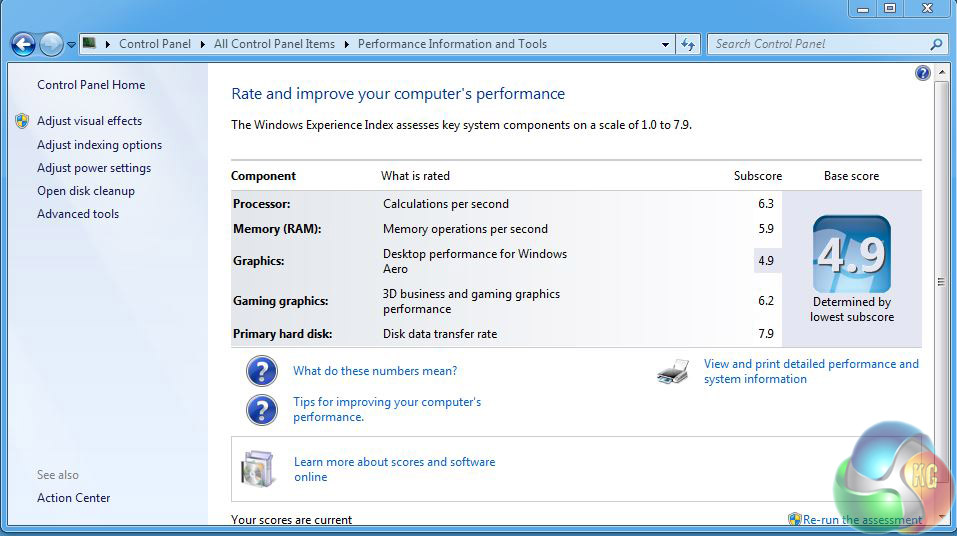
You might find it interesting to compare the Windows Experience Index rating in Windows 7 before and after the installation of Intel graphics drivers. Before the drivers were installed the Celeron J1900 can barely be called a computer but the finished rating of 4.8 doesn't look too bad at all.

The Gigabyte J1900N-D3V is a bit of an oddball but I had the perfect motherboard for comparison in the form of a Gigabyte AM1M-S2H. This Socket AM1 motherboard sells for £24 and the matching Athlon 5350 APU costs £41.50 so the price of motherboard and APU is almost identical to the J1900N-D3V.
There are two notable differences as the AM1M-S2H is larger than Mini-ITX at 225m x 170mm and the 25W TDP of the Kabini APU requires an active cooler.
We built three systems – two as a direct ‘price comparison' and another AMD A10 7850K system to use as a more expensive ‘baseline' that more people will be familiar with.
| System | Gigabyte AM1M-S2H | Gigabyte J1900N-D3V | MSI A88X-G45 Gaming |
| Processor | AMD Athlon 5350 | Embedded Celeron J1900 | AMD A10 7850K |
| Memory | DDR3 1600mhz | DDR 1333L | DDR3 2400mhz |
| Chipset | System On Chip | System On Chip | AMD A88X |
| HDD | Samsung 840 EVO | Samsung 840 EVO | Samsung 840 EVO |
| Graphics | AMD Radeon HD 8400 | Intel HD Graphics | AMD Radeon R7 8 cores |
| Operating system | Windows 7 Pro 64 bit | Windows 7 Pro 64 bit | Windows 7 Pro 64 bit |
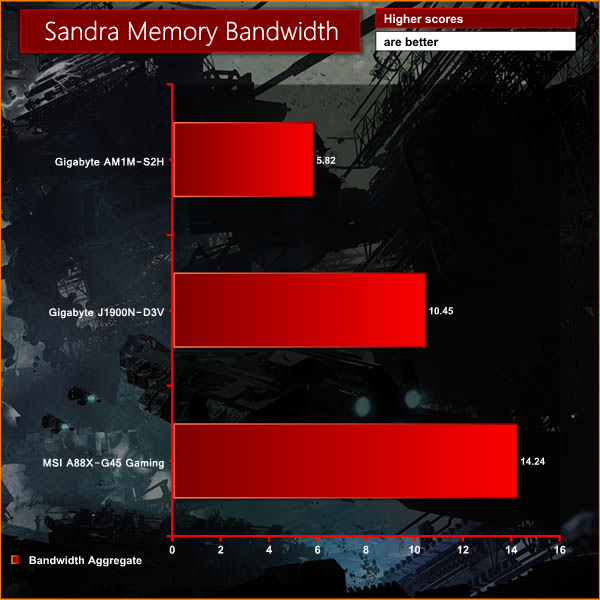
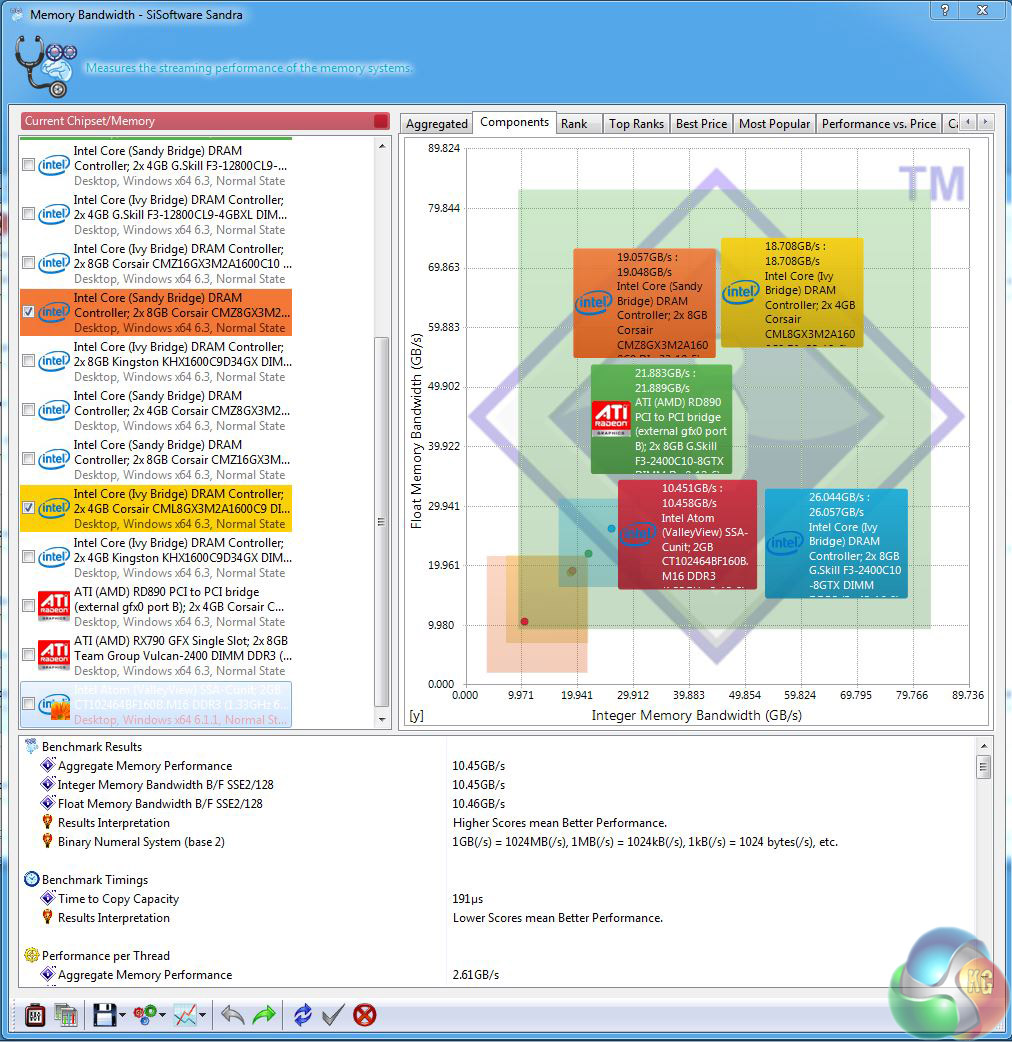
I didn't expect much in the way of performance from the Gigabyte J1900N-D3V system and it is clear from the graphs that the Celeron J1900 has no chance of being a ‘benchmark king.' The memory bandwidth in Sandra looks perfectly OK at 10.45GB/sec and is pretty much double Kabini at 5.82GB/sec, which is explained by Intel using dual channel and AMD opting for single channel.
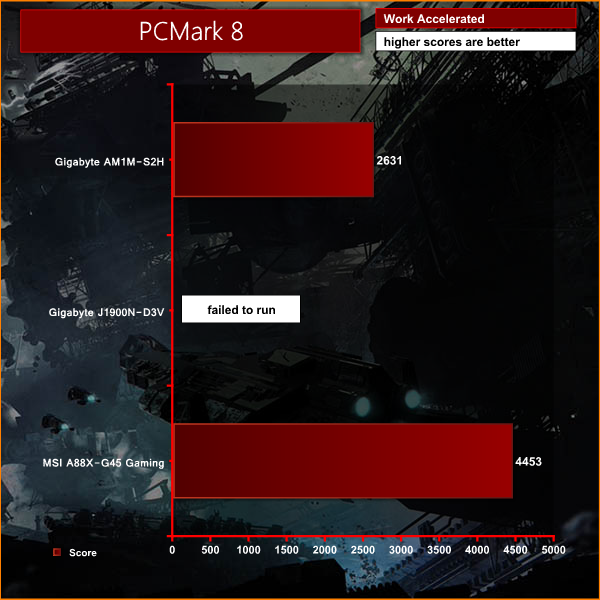
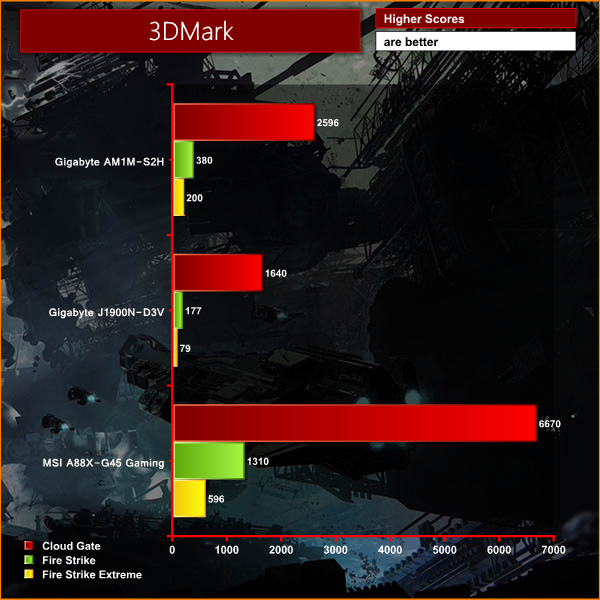
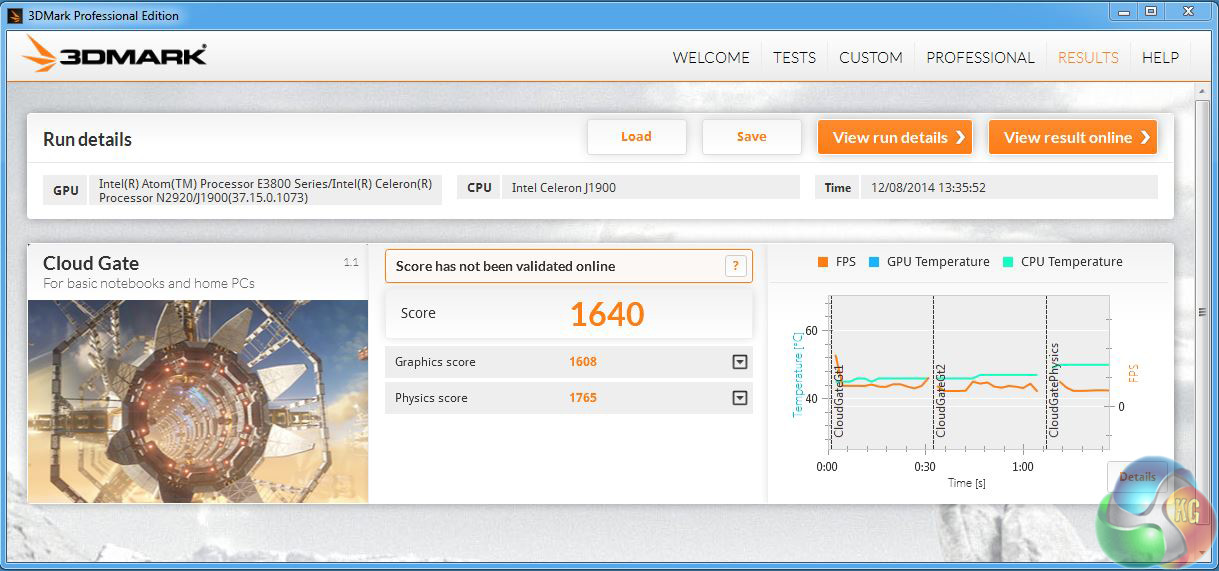
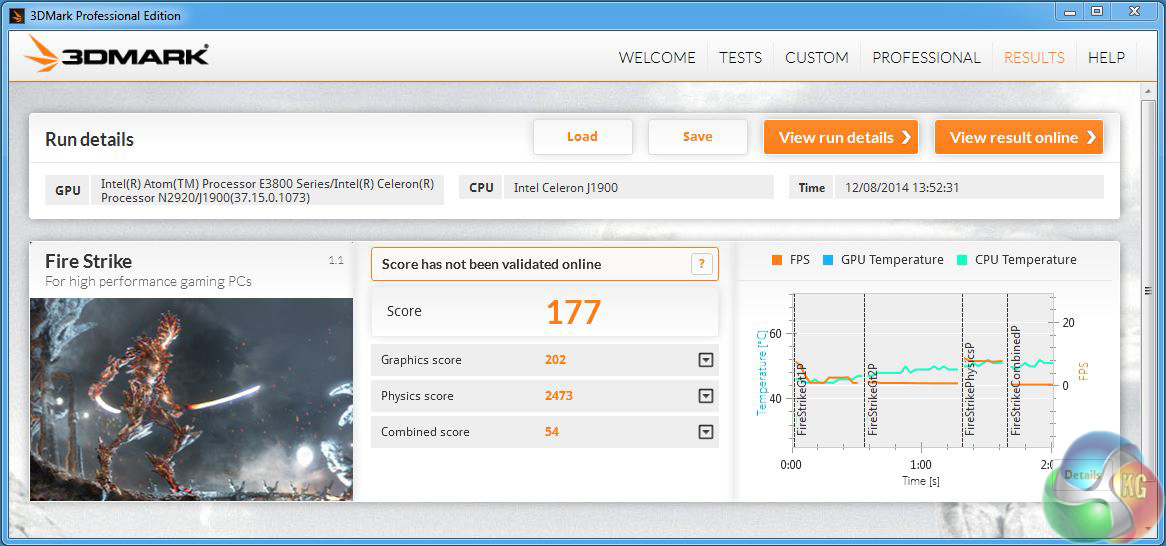
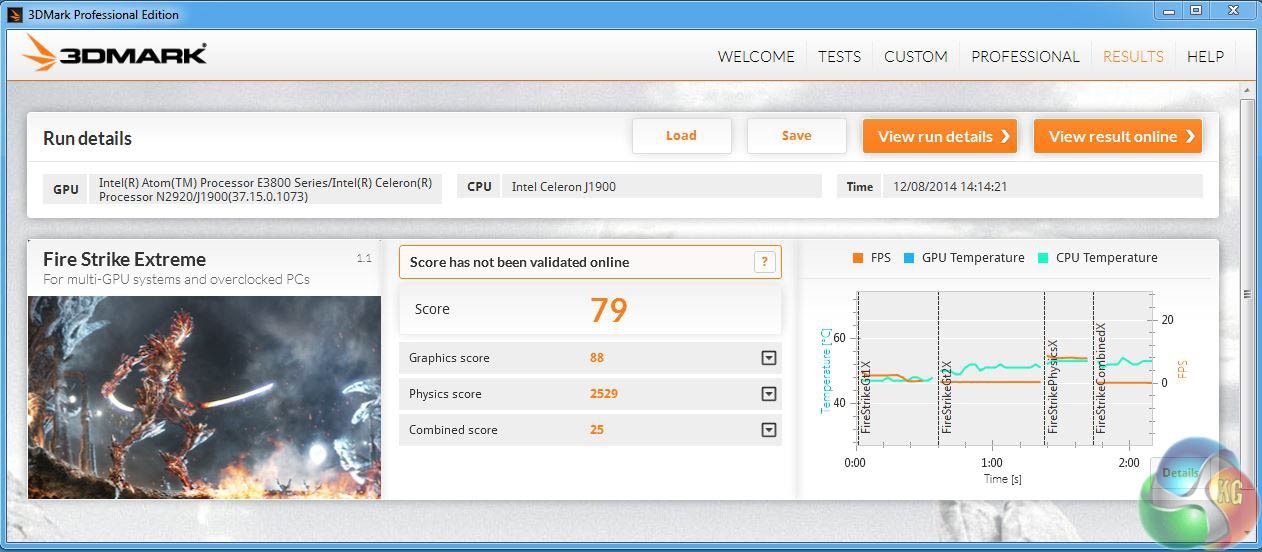
That is pretty much the end of the good news as the Celeron J1900 wouldn't complete PC Mark 8 and delivered poor scores in 3D Mark. If you look at the Physics elements of 3D Mark you'll see that Celeron J1900 and Kabini are pretty much neck-and-neck and about half the performance of the AMD A10-7850K that I included as another comparison.
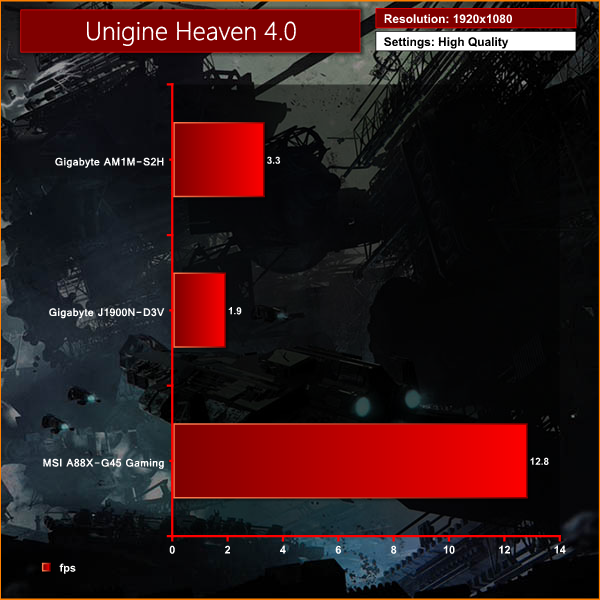
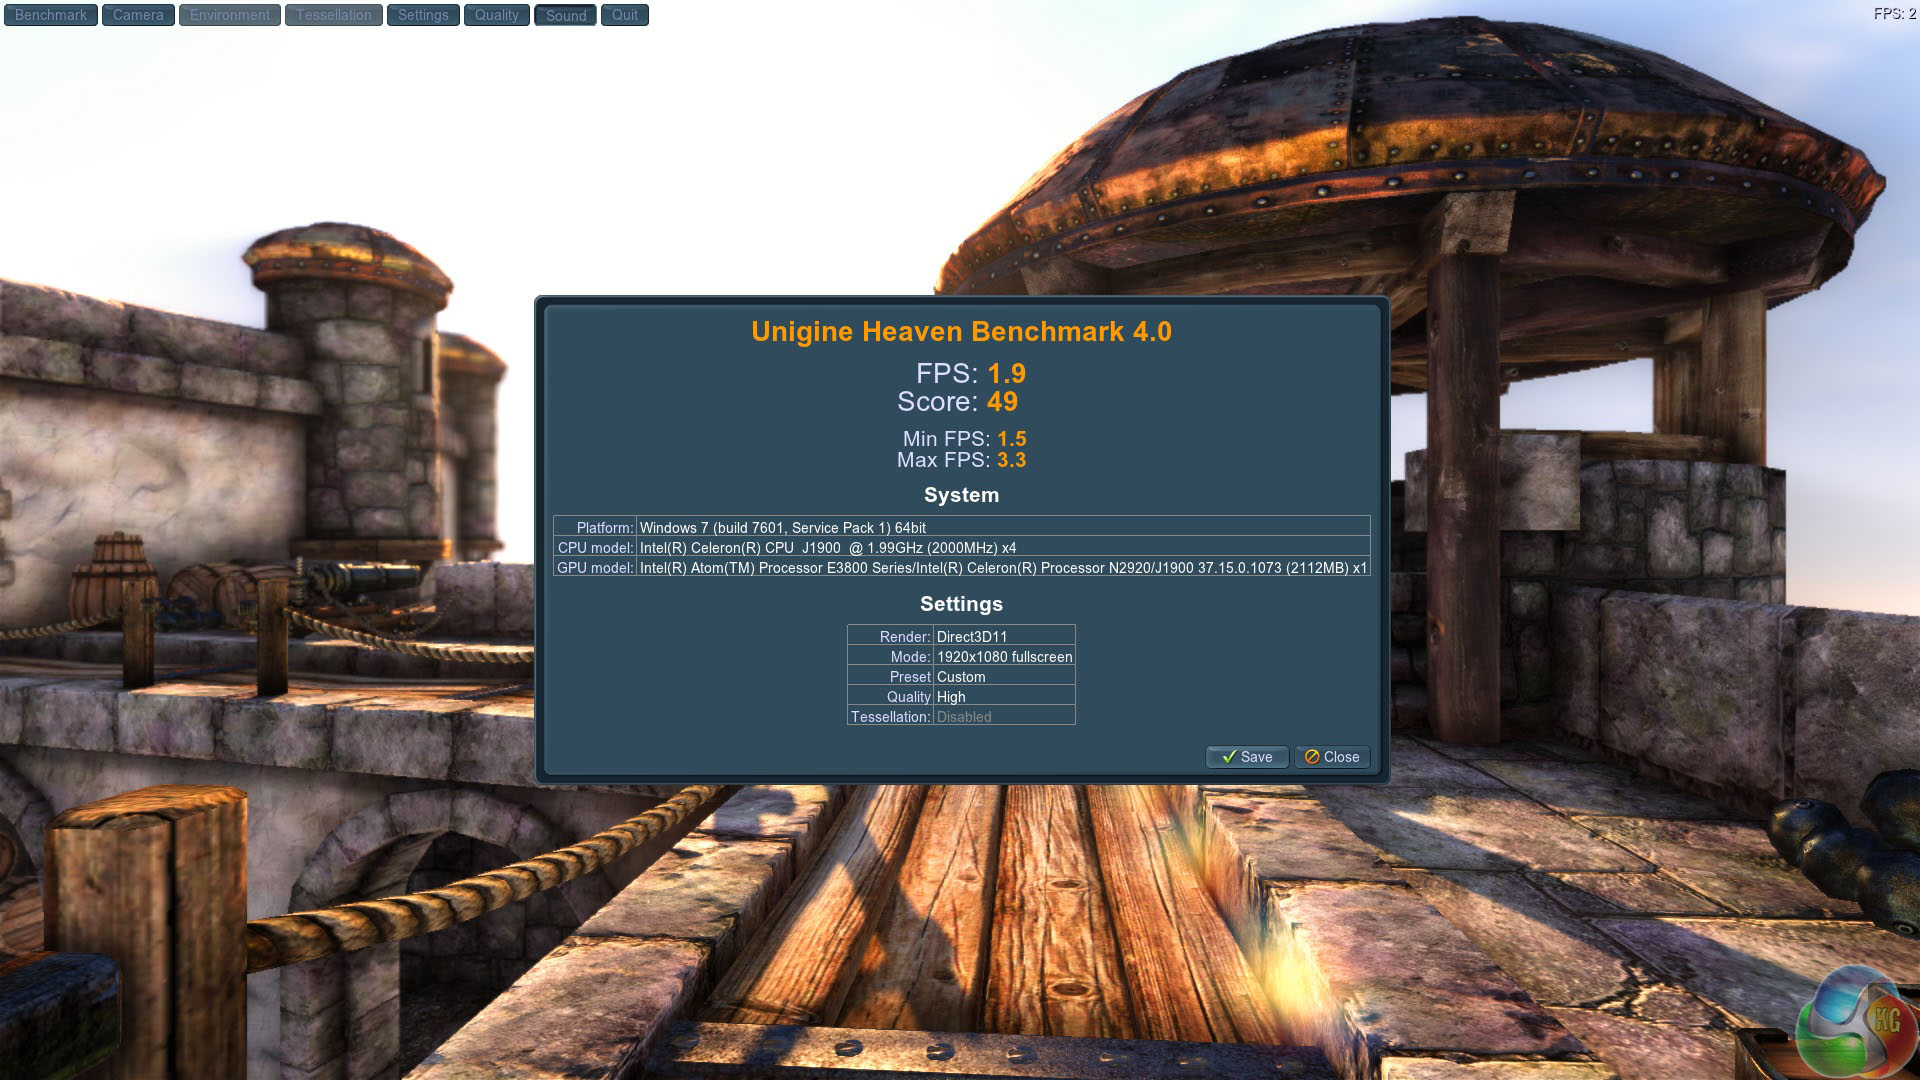
When it comes to graphics performance the Celeron J1900 trails behind the Kabini as the Intel HD Graphics have about half the performance of Radeon HD 8400 or one sixth the level of Kaveri.
Now that's fair enough; no-one is proposing that J1900N-D3V would make a useful gaming PC and I pretty much expected the CPU part of the Celeron would be competent while the graphics would prove to be the weaker part of the package. That is exactly what I saw in 3D Mark.
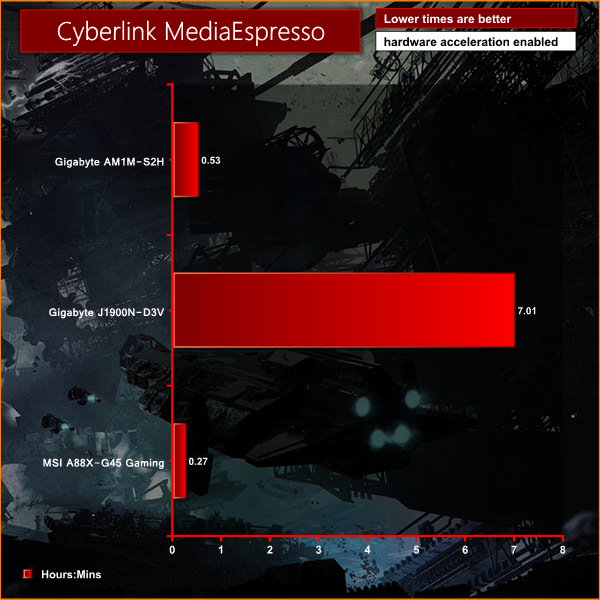
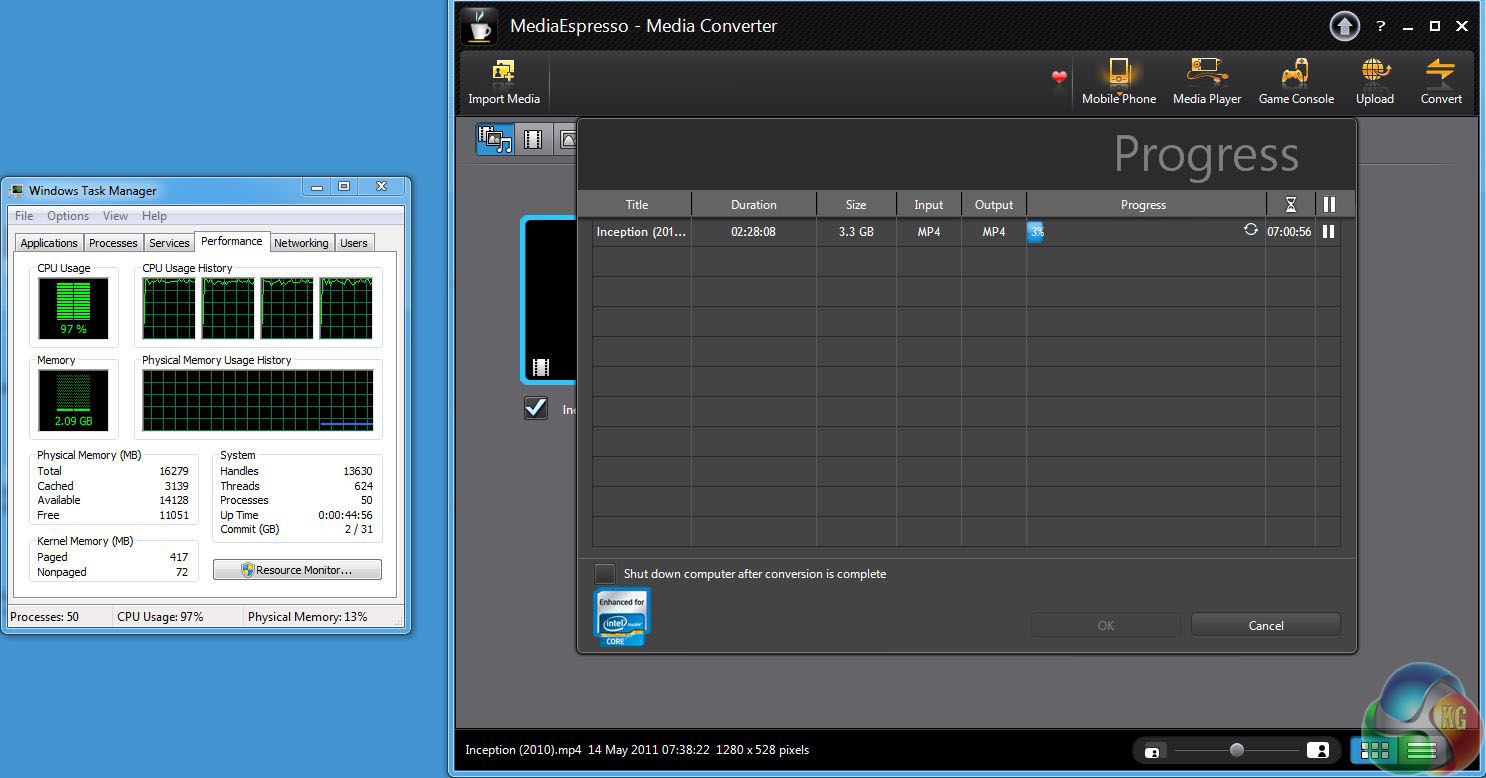
Make no mistake about it, the refusal to complete PC Mark 8 was a bit of a concern, but I also had a strange experience when I ran MediaEspresso. Converting a 3.3GB MKV file to run on an iPhone 4 is a heavy workload and the A10-7850K Kaveri with its 95W TDP took 27 minutes to complete the job. By contrast the Kabini Athlon 5350 took 53 minutes to finish the same job – which is almost exactly twice as long and pretty much what you expect from a low powered and cheap APU.
What I didn't expect was that the Gigabyte J1900N-D3V and Celeron J1900 was scheduled to take over seven hours to run the same test. I say ‘scheduled' as I left the test running for three hours and the predicted time remained constant at 7 hours and 1 minute – so I cancelled the test as the point had been proved.
By any standards the processor in the J1900 is a limp piece of silicon but performance that is eight times slower than the Kabini was utterly unexpected.
Noise levels
This is easy. The J1900N-D3V is passively cooled so provided you use an SSD rather than a hard drive it will be silent. You might think that I have forgotten the fan in the power supply but as you'll see in a moment there is a way around that particular problem.
Power draw

Low power draw is a major strength of Celeron J1900 and hence of this Gigabyte. The power draw at the mains socket was 20W at idle and only rose to 22W under load, which is pretty amazing. During testing I occasionally saw the power draw blip up to 27W.
By contrast the Kabini drew 14W at idle and 28W under load which is also pretty good going but enough of a difference to warrant an active cooler.
What would you do with it?
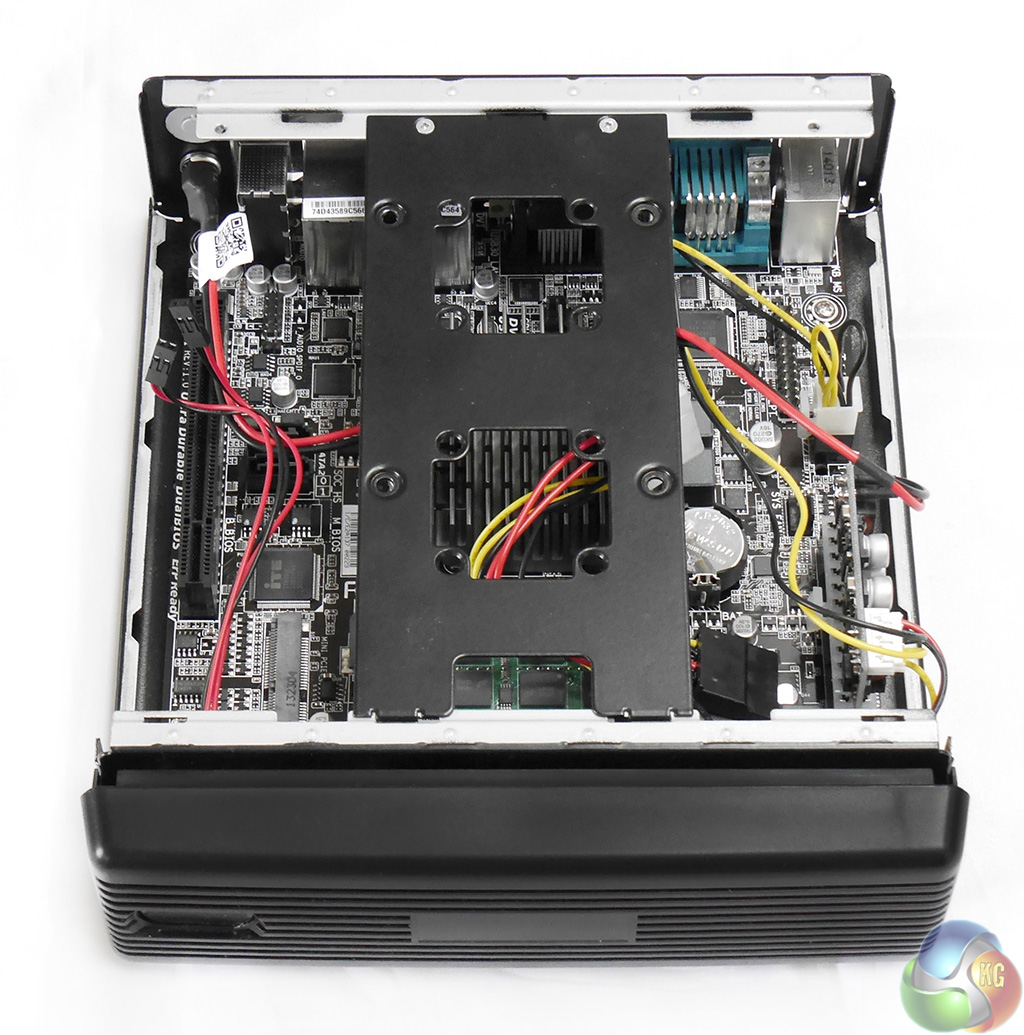

This is a good question and key to the buying decision if you are looking at the Gigabyte J1900N-D3V. The only way this motherboard makes sense is in a tiny, silent, PC that is preferably VESA mounted on the back of the screen. Clearly it cannot perform heavy CPU or GPU workloads but is perfectly adequate for mundane tasks such as watching videos on YouTube and shopping on Amazon.
Building this motherboard into an ATX tower case and using a regular ATX power supply would be pointless.
My personal preference is to use a tiny chassis such as the Mini Box M350 enclosure in conjunction with a picoPSU and an external power brick.
Clearly this puts a huge emphasis on the silence of the J1900N-D3V. There are other passively cooled small form factor motherboards on the market, so the legacy support for Serial devices will also have to appeal to you, or perhaps you insist on Intel hardware to make support and maintenance easier.
The Gigabyte J1900N-D3V is a curious piece of hardware. It packs a Celeron J1900 System-on-Chip that is passively cooled and may well be the quickest PC build you have ever performed. Drop the motherboard in the case – connect a few cables – job done.
The I/O panel of a Mini ITX motherboard is necessarily tight on space so it is a surprise to see that Gigabyte has combined four USB 3.0 ports and dual Gigabit Ethernet with two legacy Serial ports. This legacy theme continues as the on-board expansion slot is PCI rather than PCI Express.
There is no denying the J1900N-D3V is very cheap however it offers little in the way of performance and its major strengths are its tiny power draw and use of passive cooling.
Discuss on our Facebook page, over HERE.
Pros:
- Passive cooling.
- Silent operation.
- 20W power draw, 30W is the absolute maximum.
- Mini-ITX form factor.
- Four USB 3.0 ports.
- Low price.
Cons:
- Curious use of Serial, PS/2 and PCI legacy technology.
- Very low CPU and GPU performance.
KitGuru says: For most of us this motherboard is nothing more than a curiosity but someone, somewhere will pay for this combination of silent operation and support for Serial ports.