

Gigabyte has been pushing its Aorus brand in the motherboard market by outfitting the gaming-calibre motherboards with adjusted styling, enhanced fan control, and increased use of RGB LEDs. We examine the £270 X299 Aorus Gaming 3 to see what one of Gigabyte’s more ‘affordable’ X299 motherboards can offer.
Given its Aorus branding, it comes as no surprise to see the X299 Gaming 3 featuring heavy RGB LED use and an eye-catching design. Digging a little deeper, Gigabyte outlines the motherboard’s support for digital LED strips in addition to the enhanced RGB Fusion app.
Coming in at £270, Gigabyte has plenty of flexibility to offer premium features on the Gaming 3, despite its position towards the more affordable end of the X299 market. As such, there are dual M.2 slots, 10Gbps USB 3.1 Gen 2, Realtek ALC1220-based audio, and an Intel NIC. The International Rectifiers-based VRM and promise of proficient fan control are likely to appeal to performance junkies.
Coming in as one of the more affordable X299 options, can the Gigabyte X299 Aorus Gaming 3 prove itself as a worthy performer for a power-hungry Skylake-X CPU?
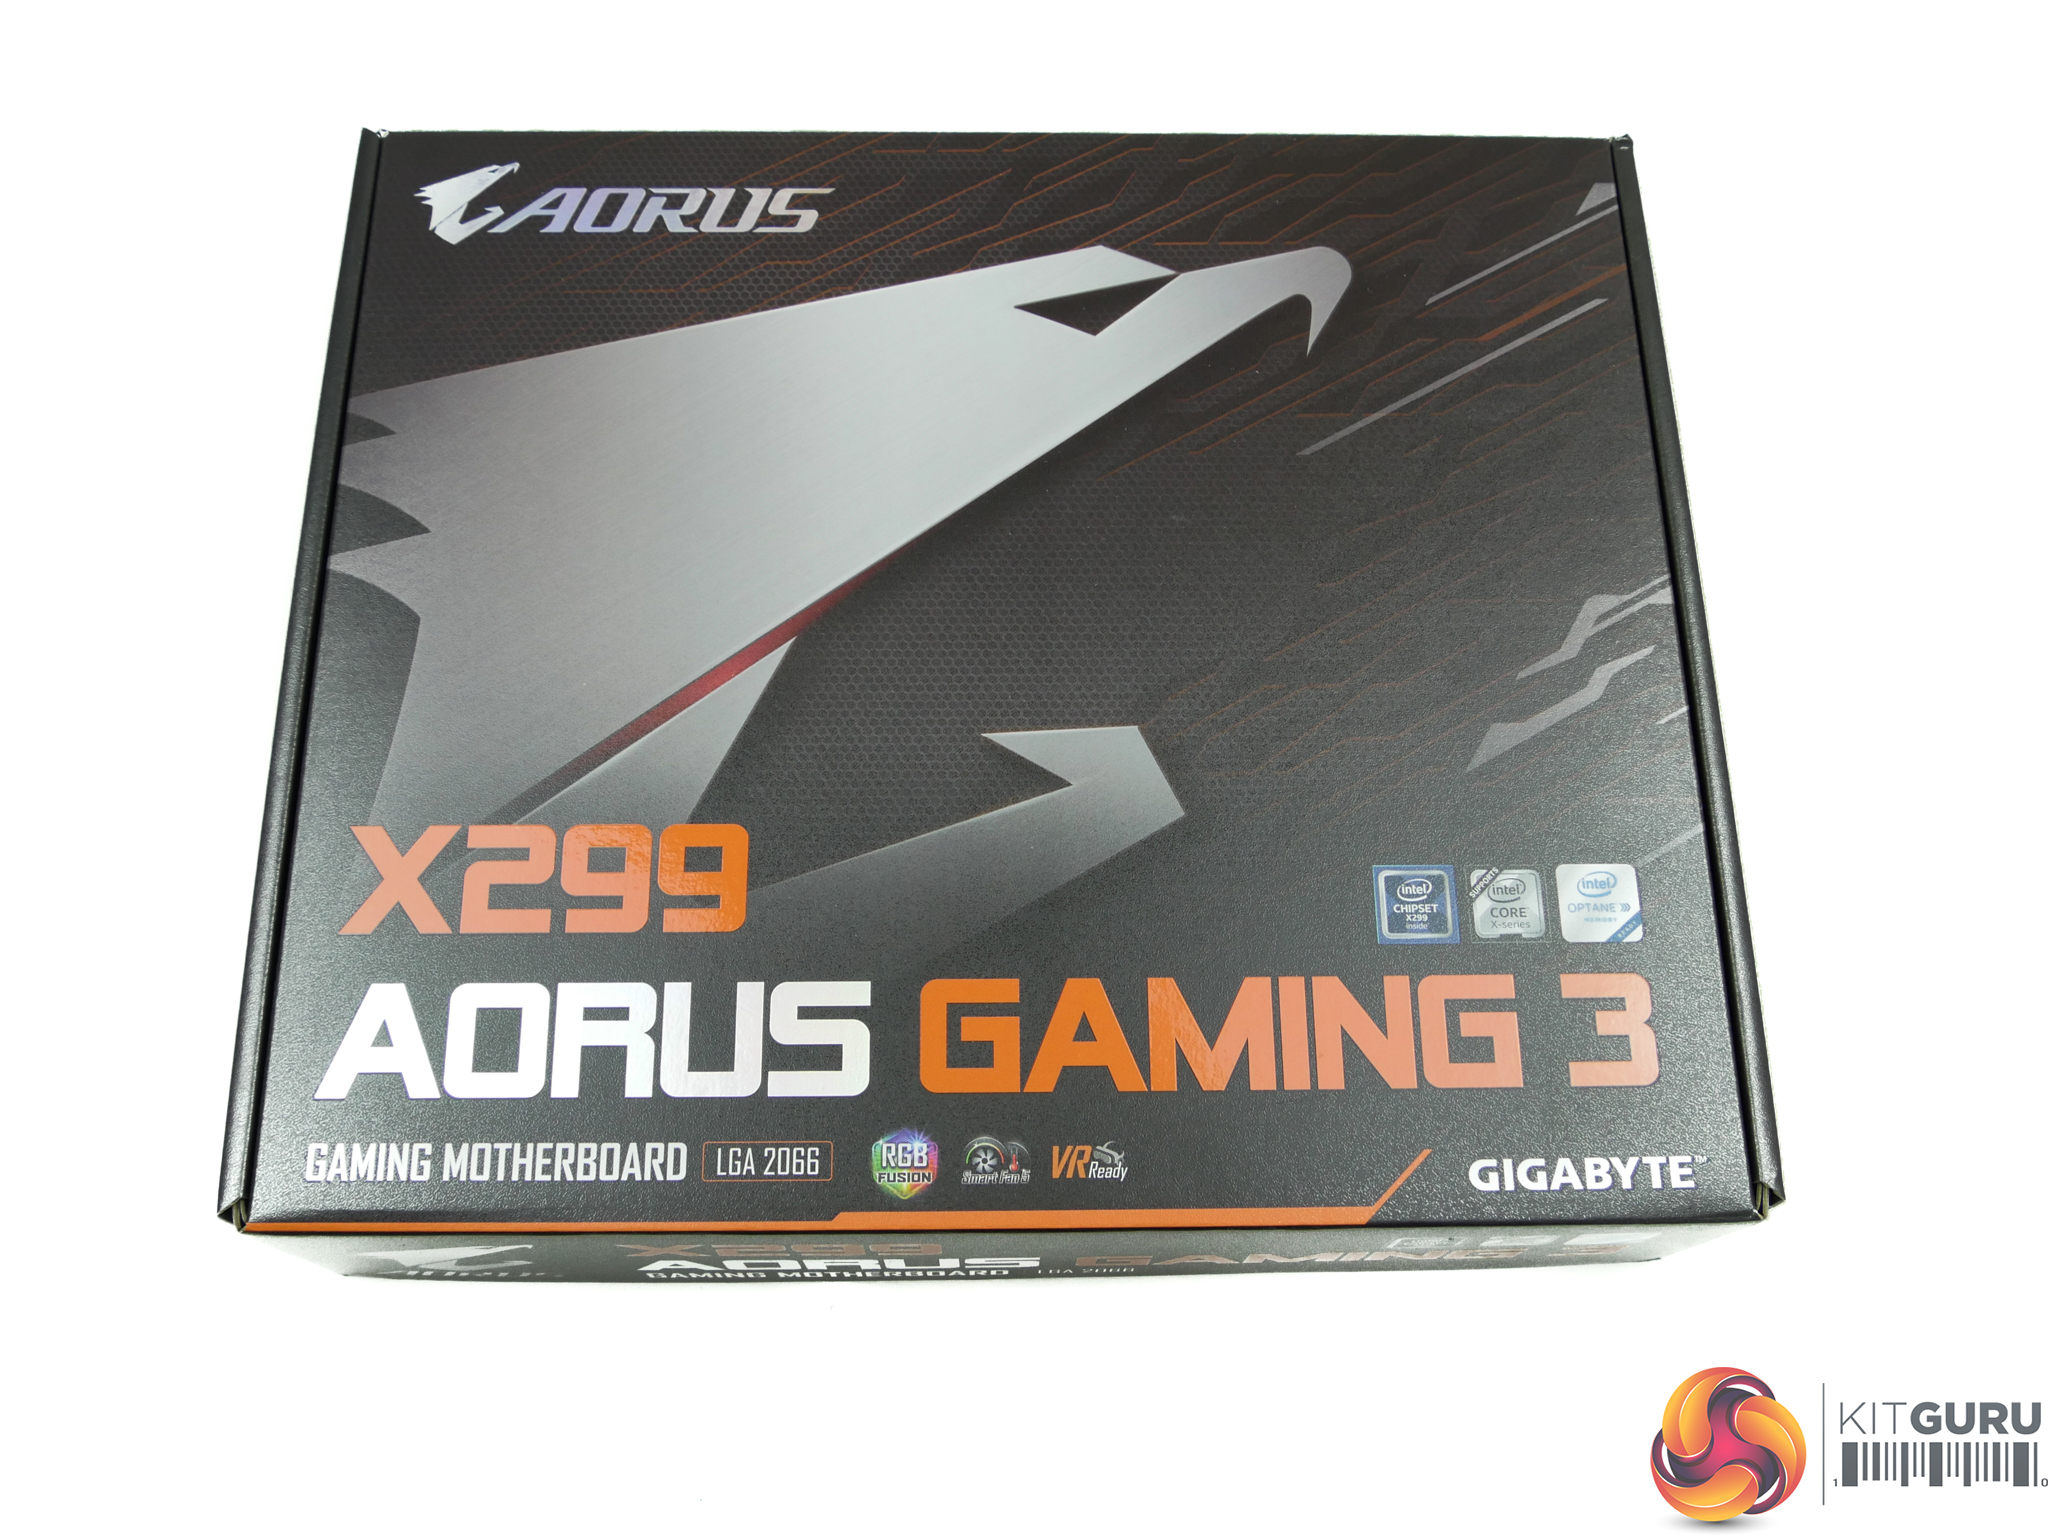
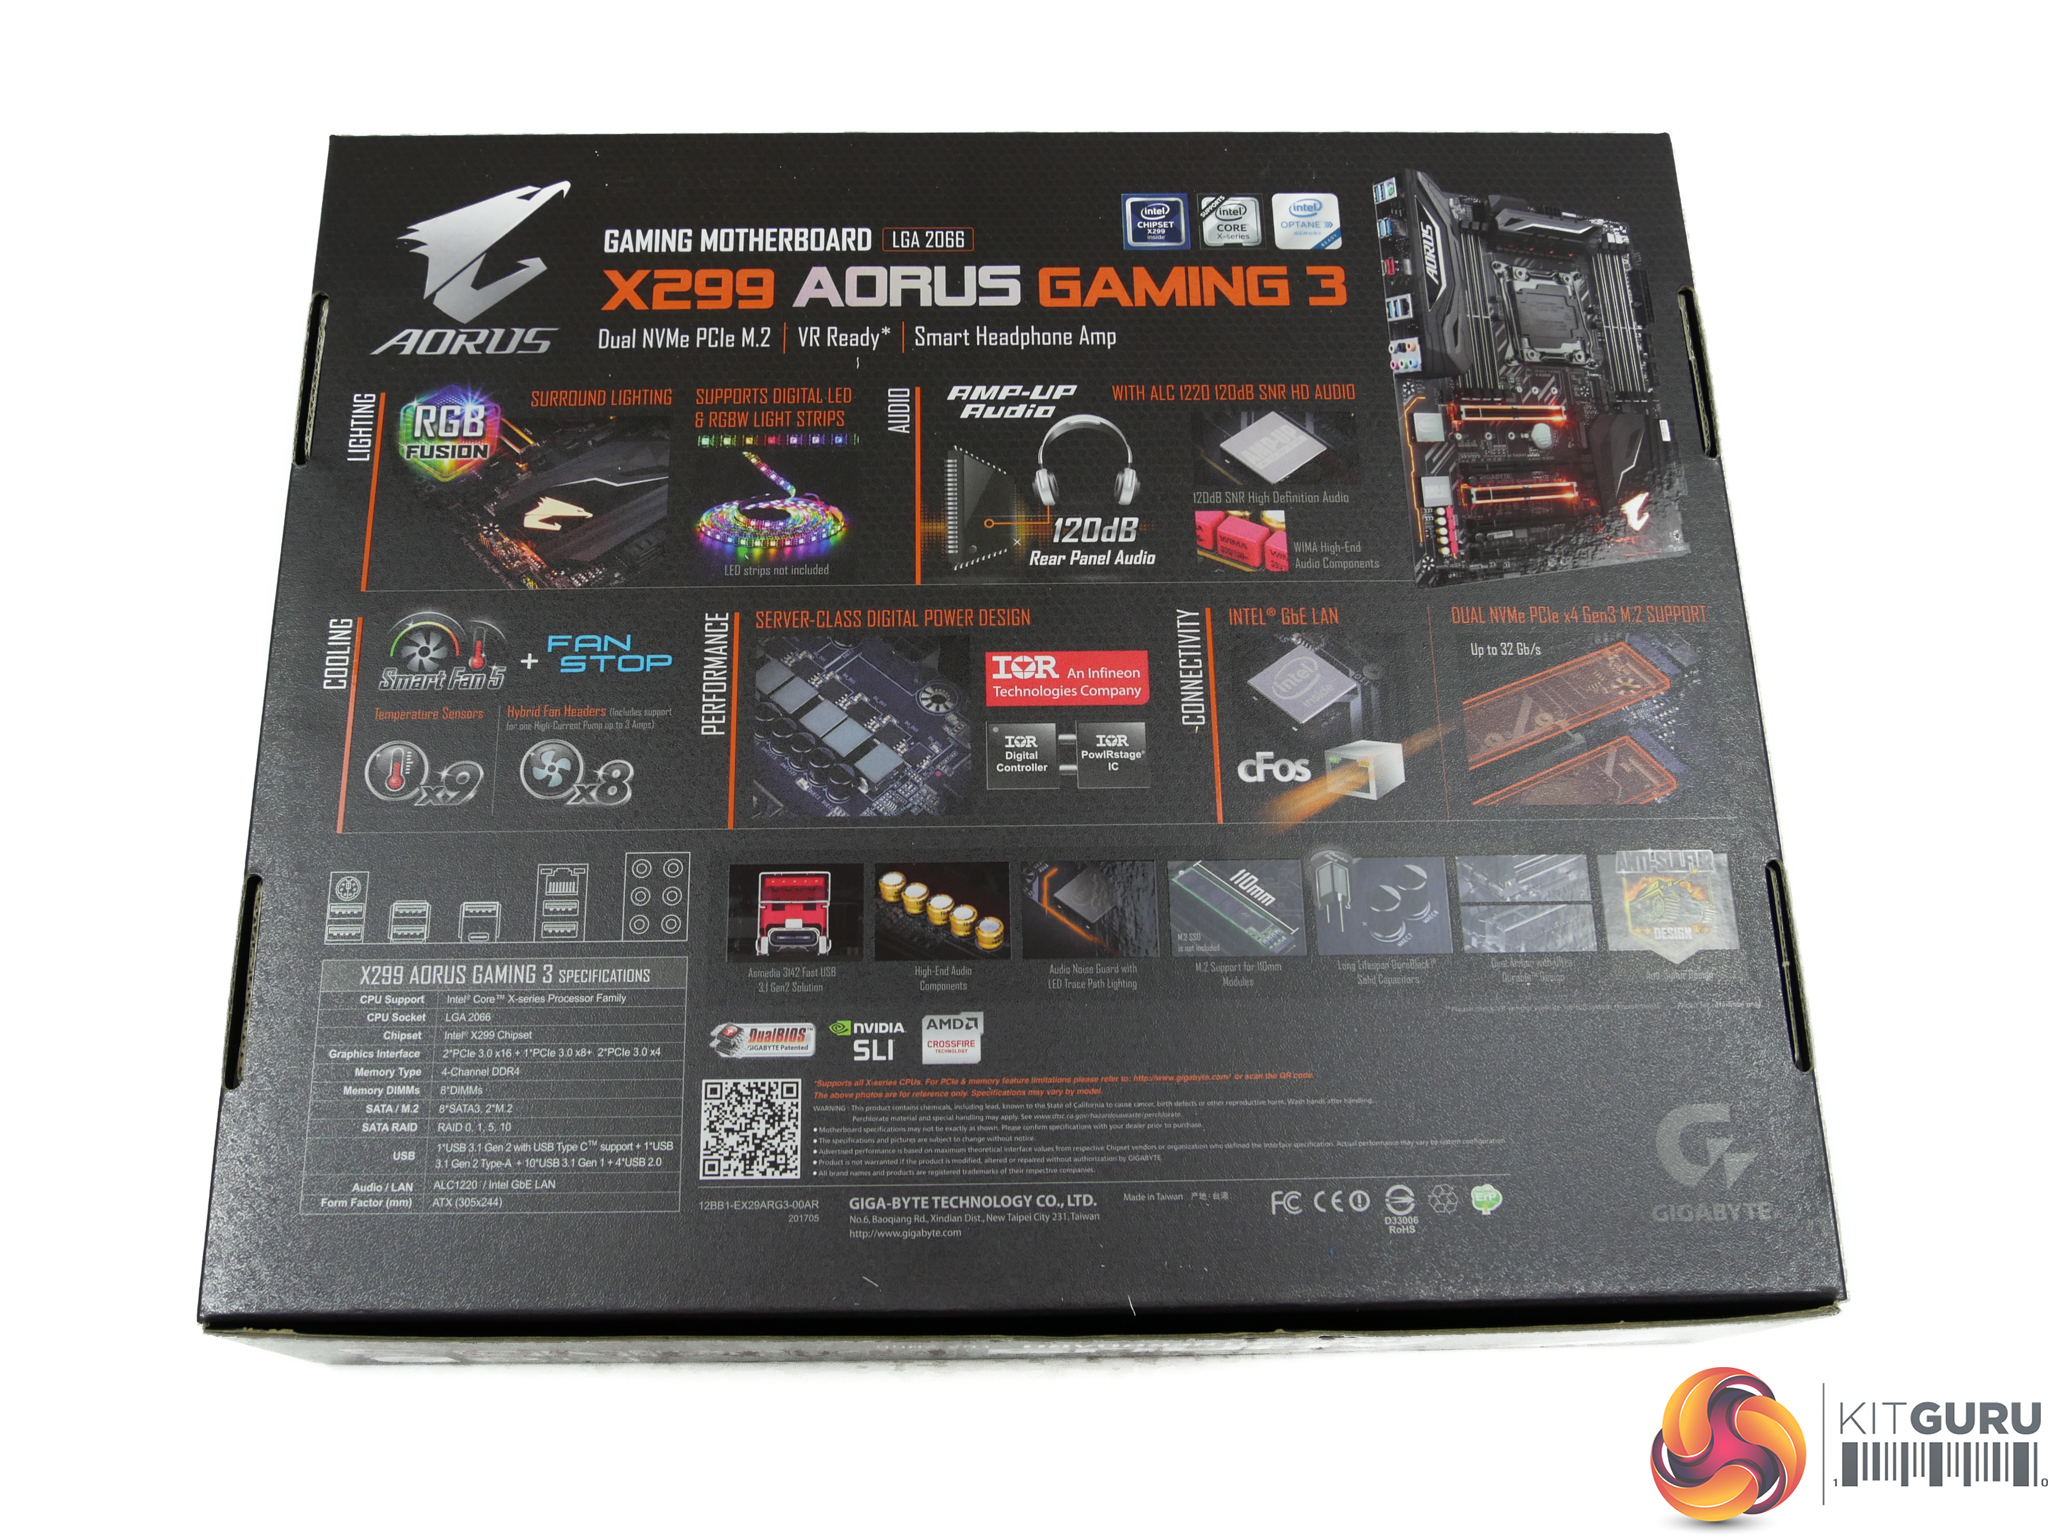
The Aorus bird can be seen on the front of the box while specs are highlighted on the rear.
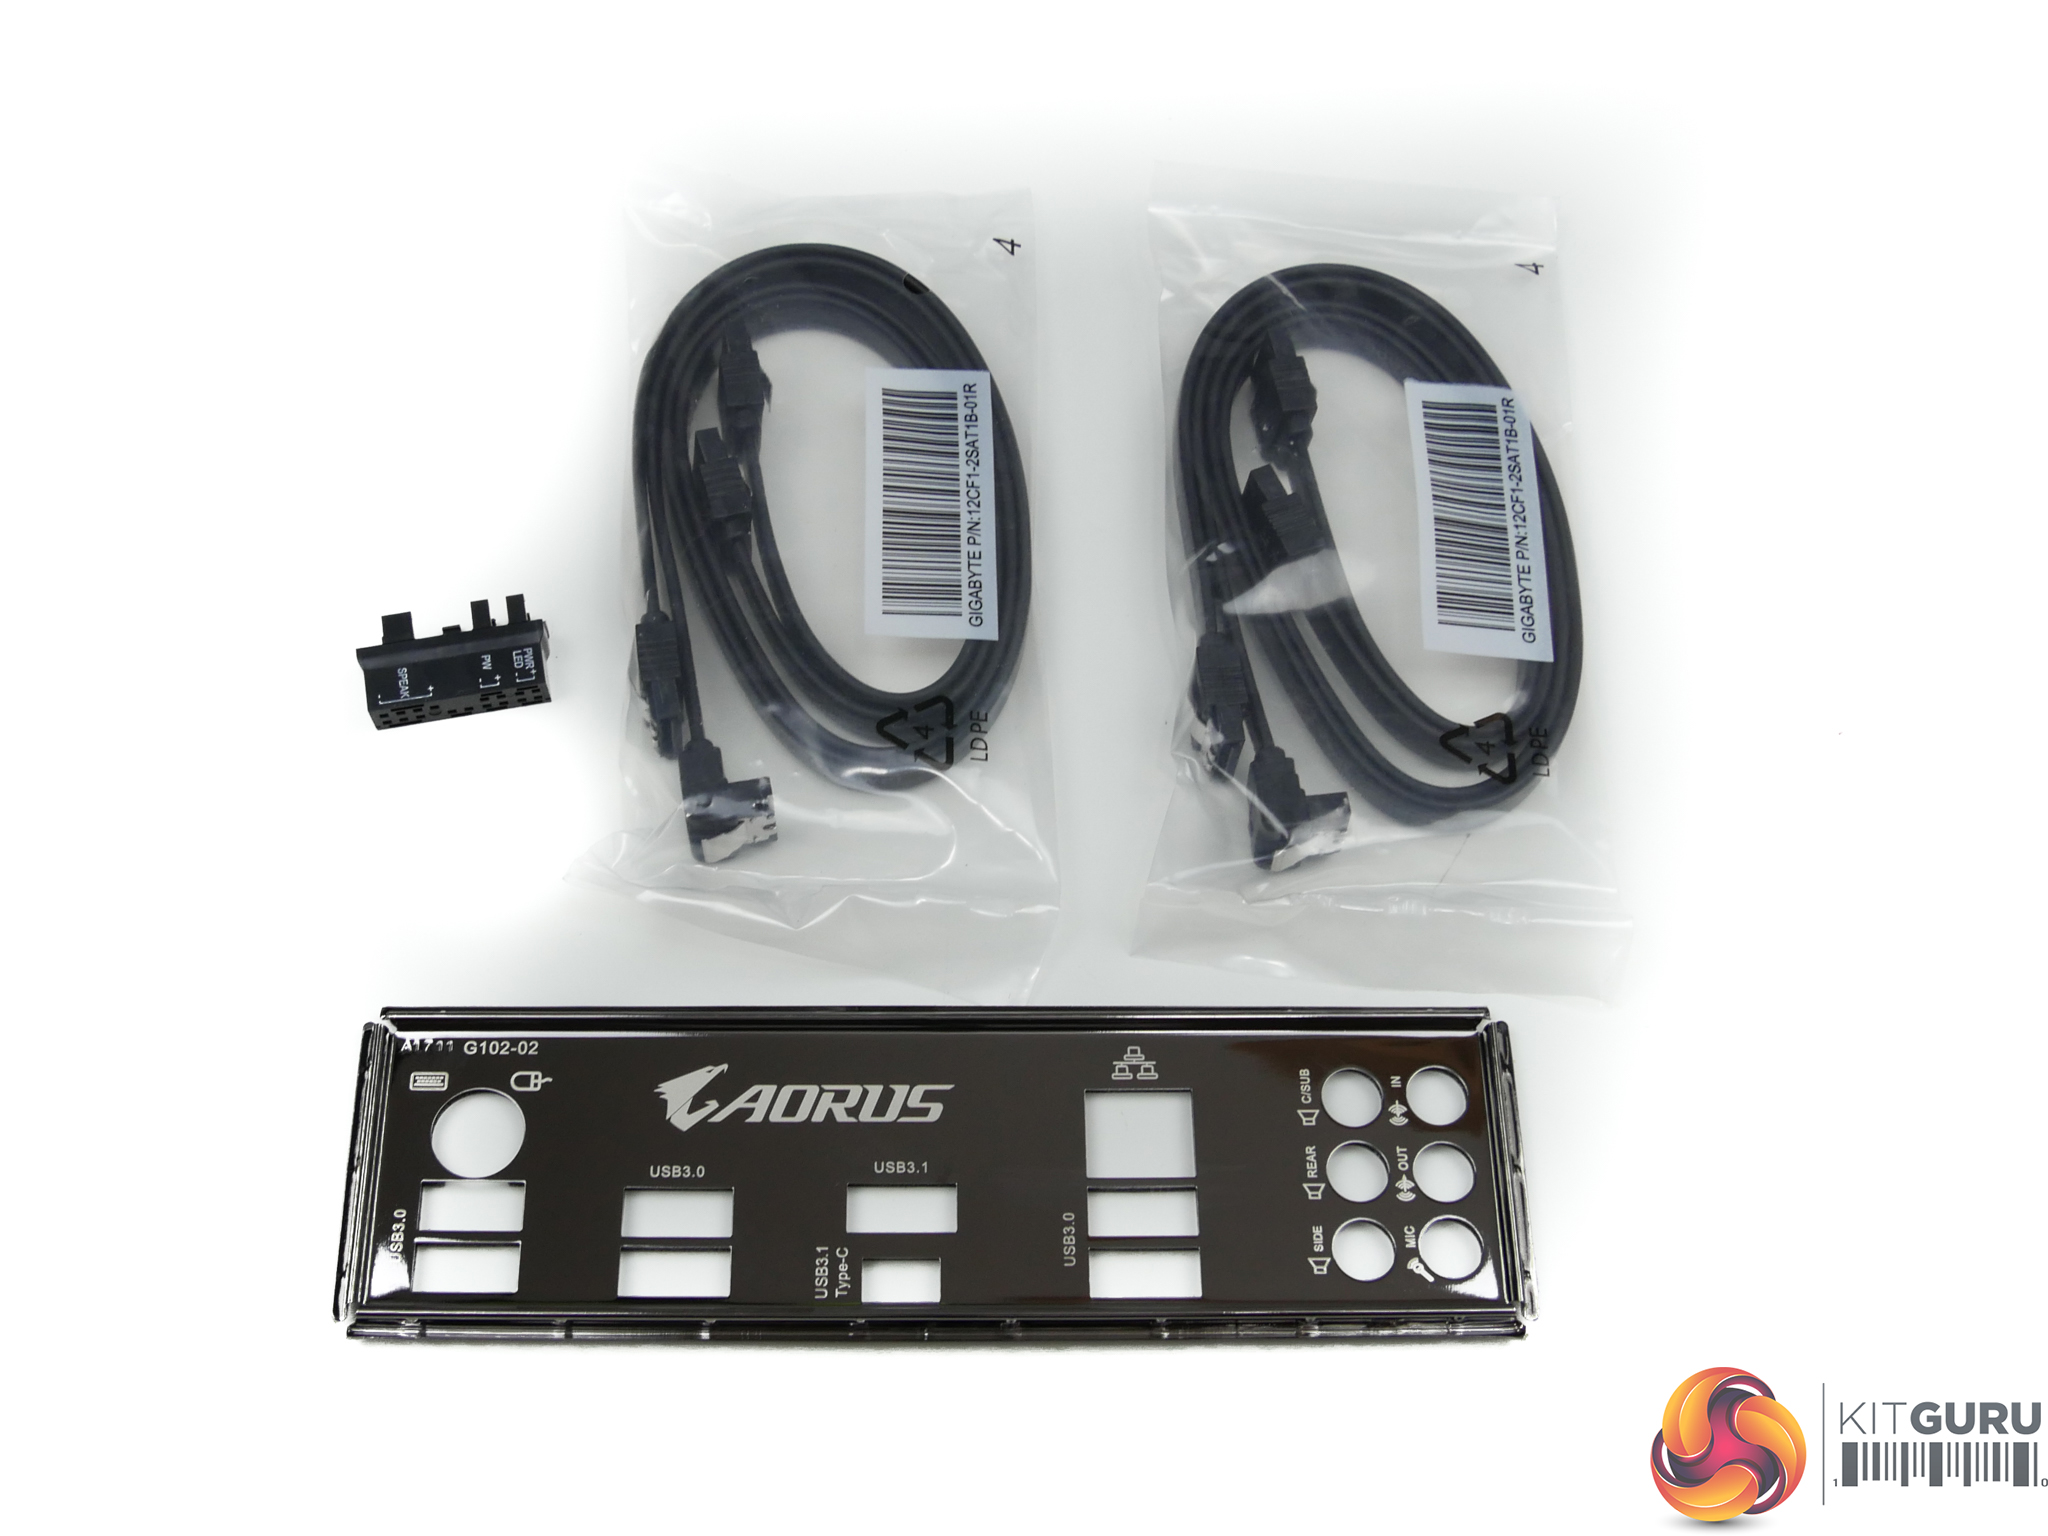
Given the £270 asking price, Gigabyte is not splashing the cash when it comes to bundled items. Four SATA cables, a connector block, and the rear IO shield are all there is in terms of physical accessories. An RGB header extension cable would have been welcomed.
We assume that retail samples will ship with a SLI bridge.

The usual set of documentation is provided alongside a sizeable set of Aorus stickers which includes cable labels and a passport cover.

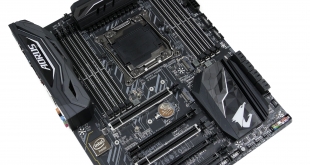
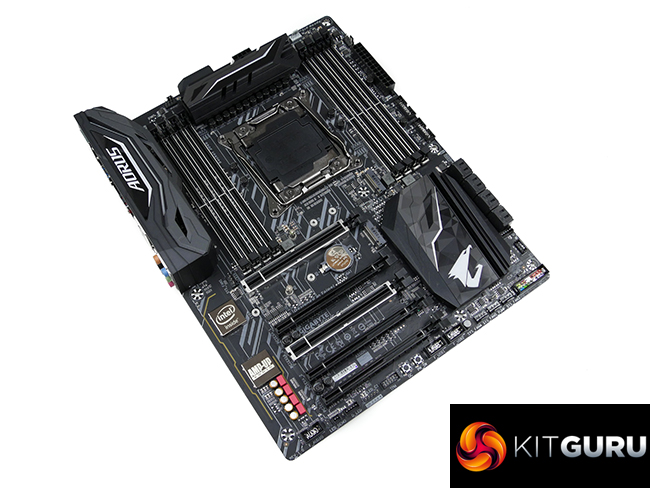
A dark black colour is contrasted by a lighter grey to create the appearance of the Gigabyte X299 Aorus Gaming 3. The board features a rear IO cover with Aorus branding but the Gigabyte name is barely visible and could have easily been positioned on the MOSFET heatsink.
Gigabyte motherboards have been on the market for many years and loyal customers may wish to show off their love for the company.
Gigabyte's RGB LEDs are of a high quality. The controllable lighting zones are:
- PCIe slots
- Audio track
- Chipset heatsink
- VRM heatsink
- 3x LED headers
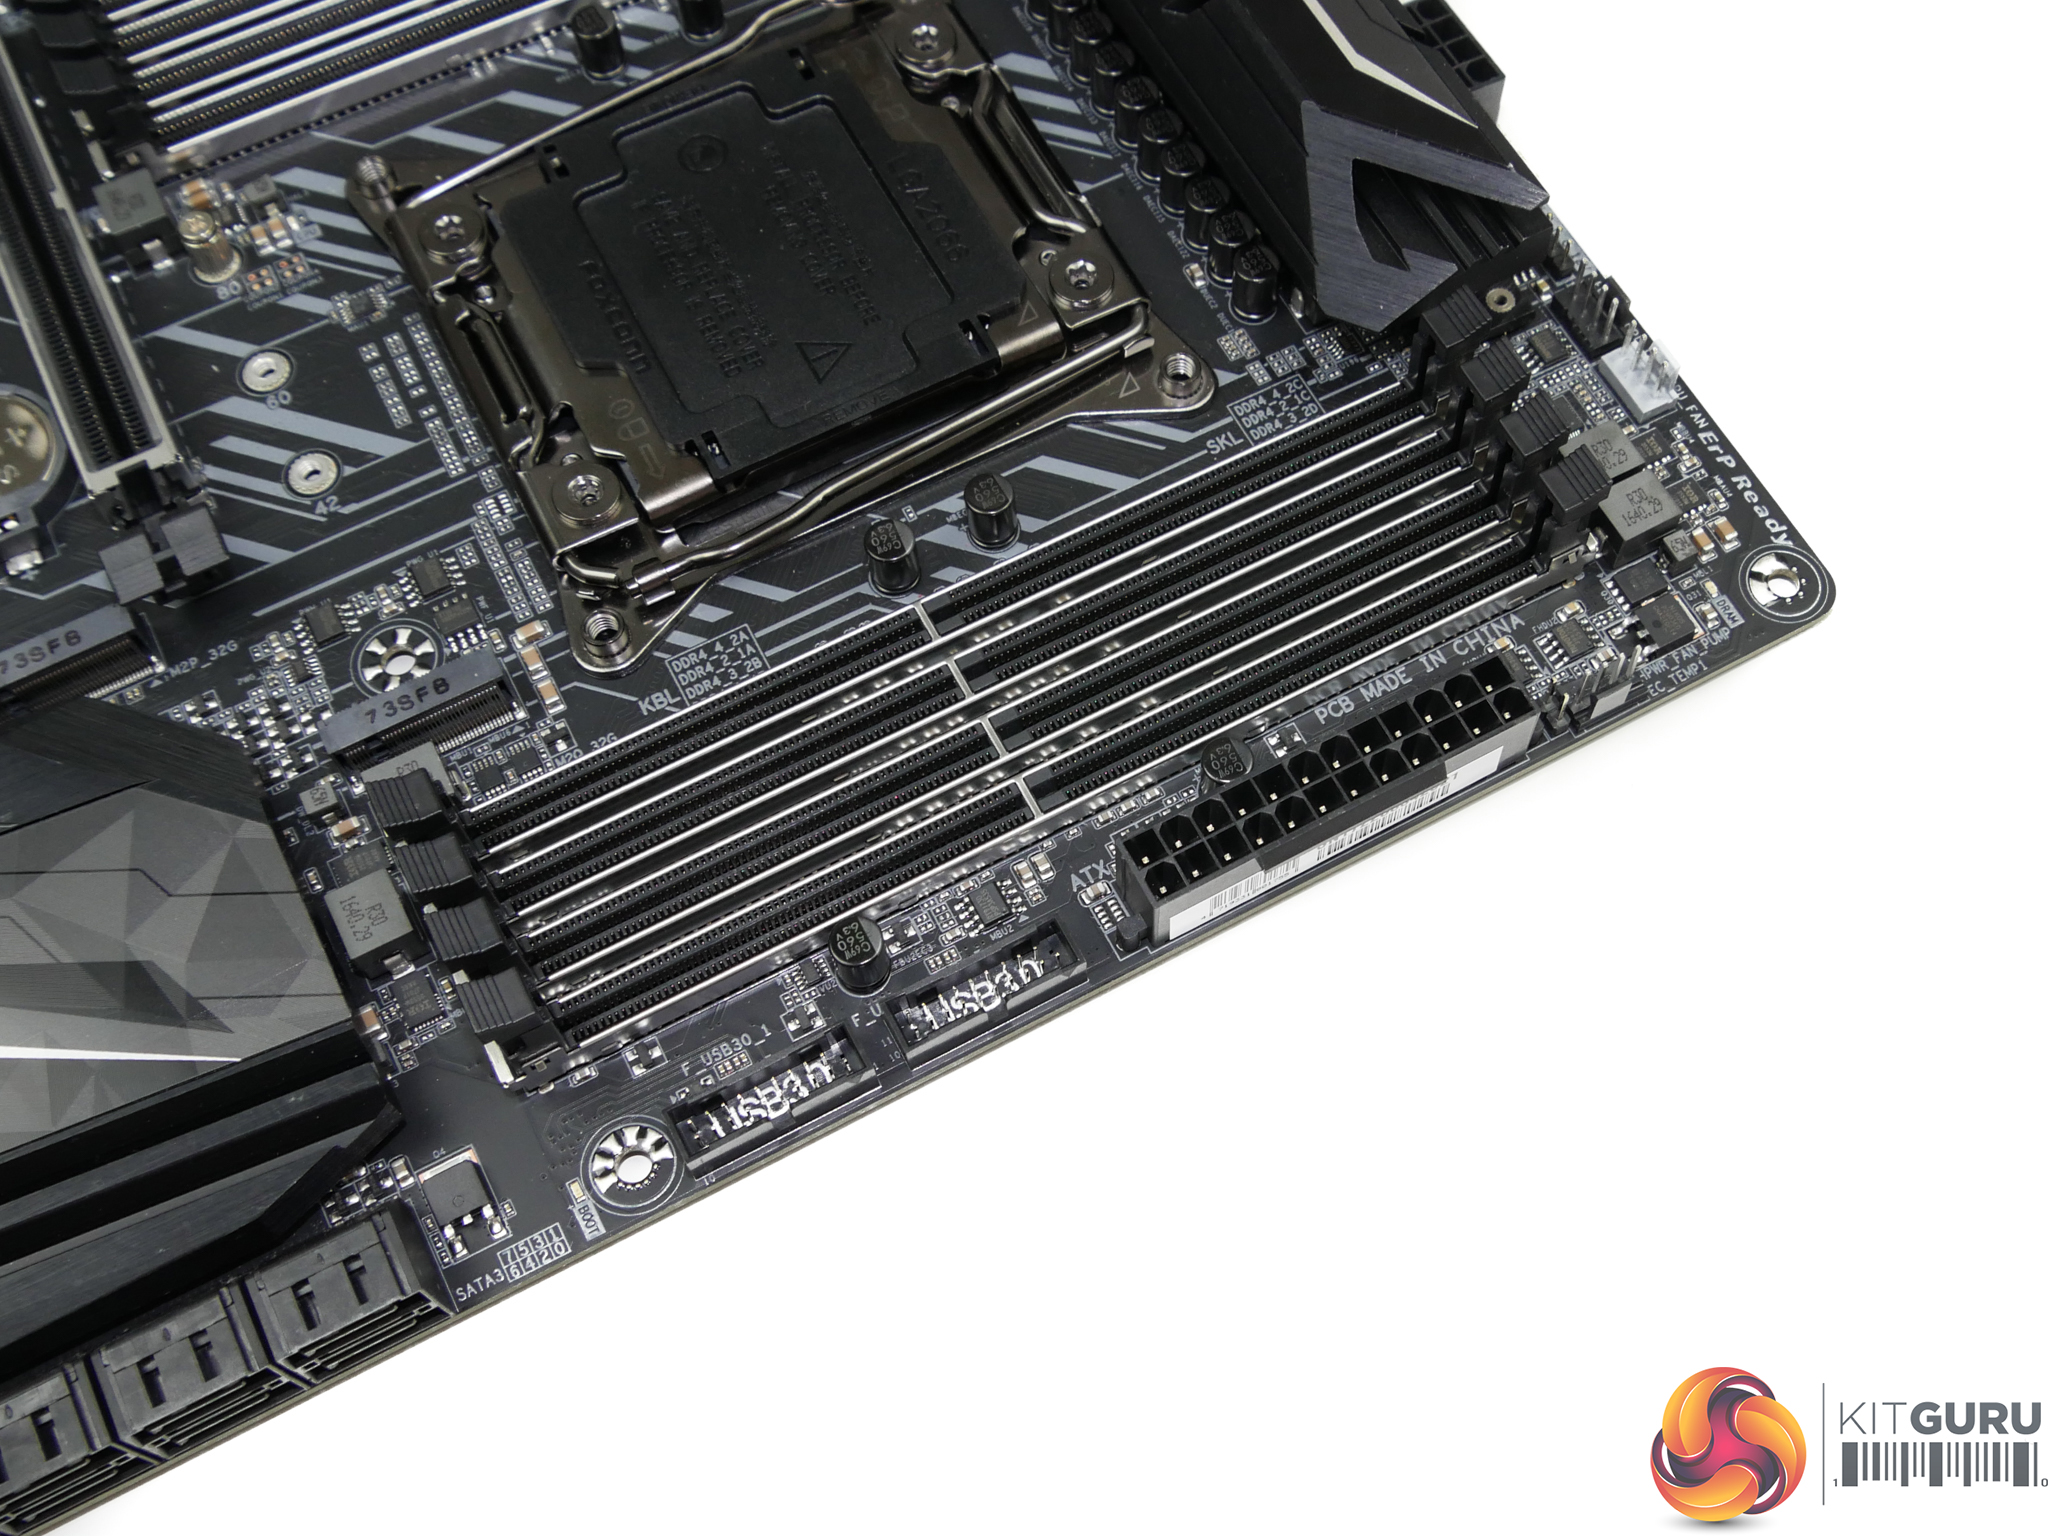
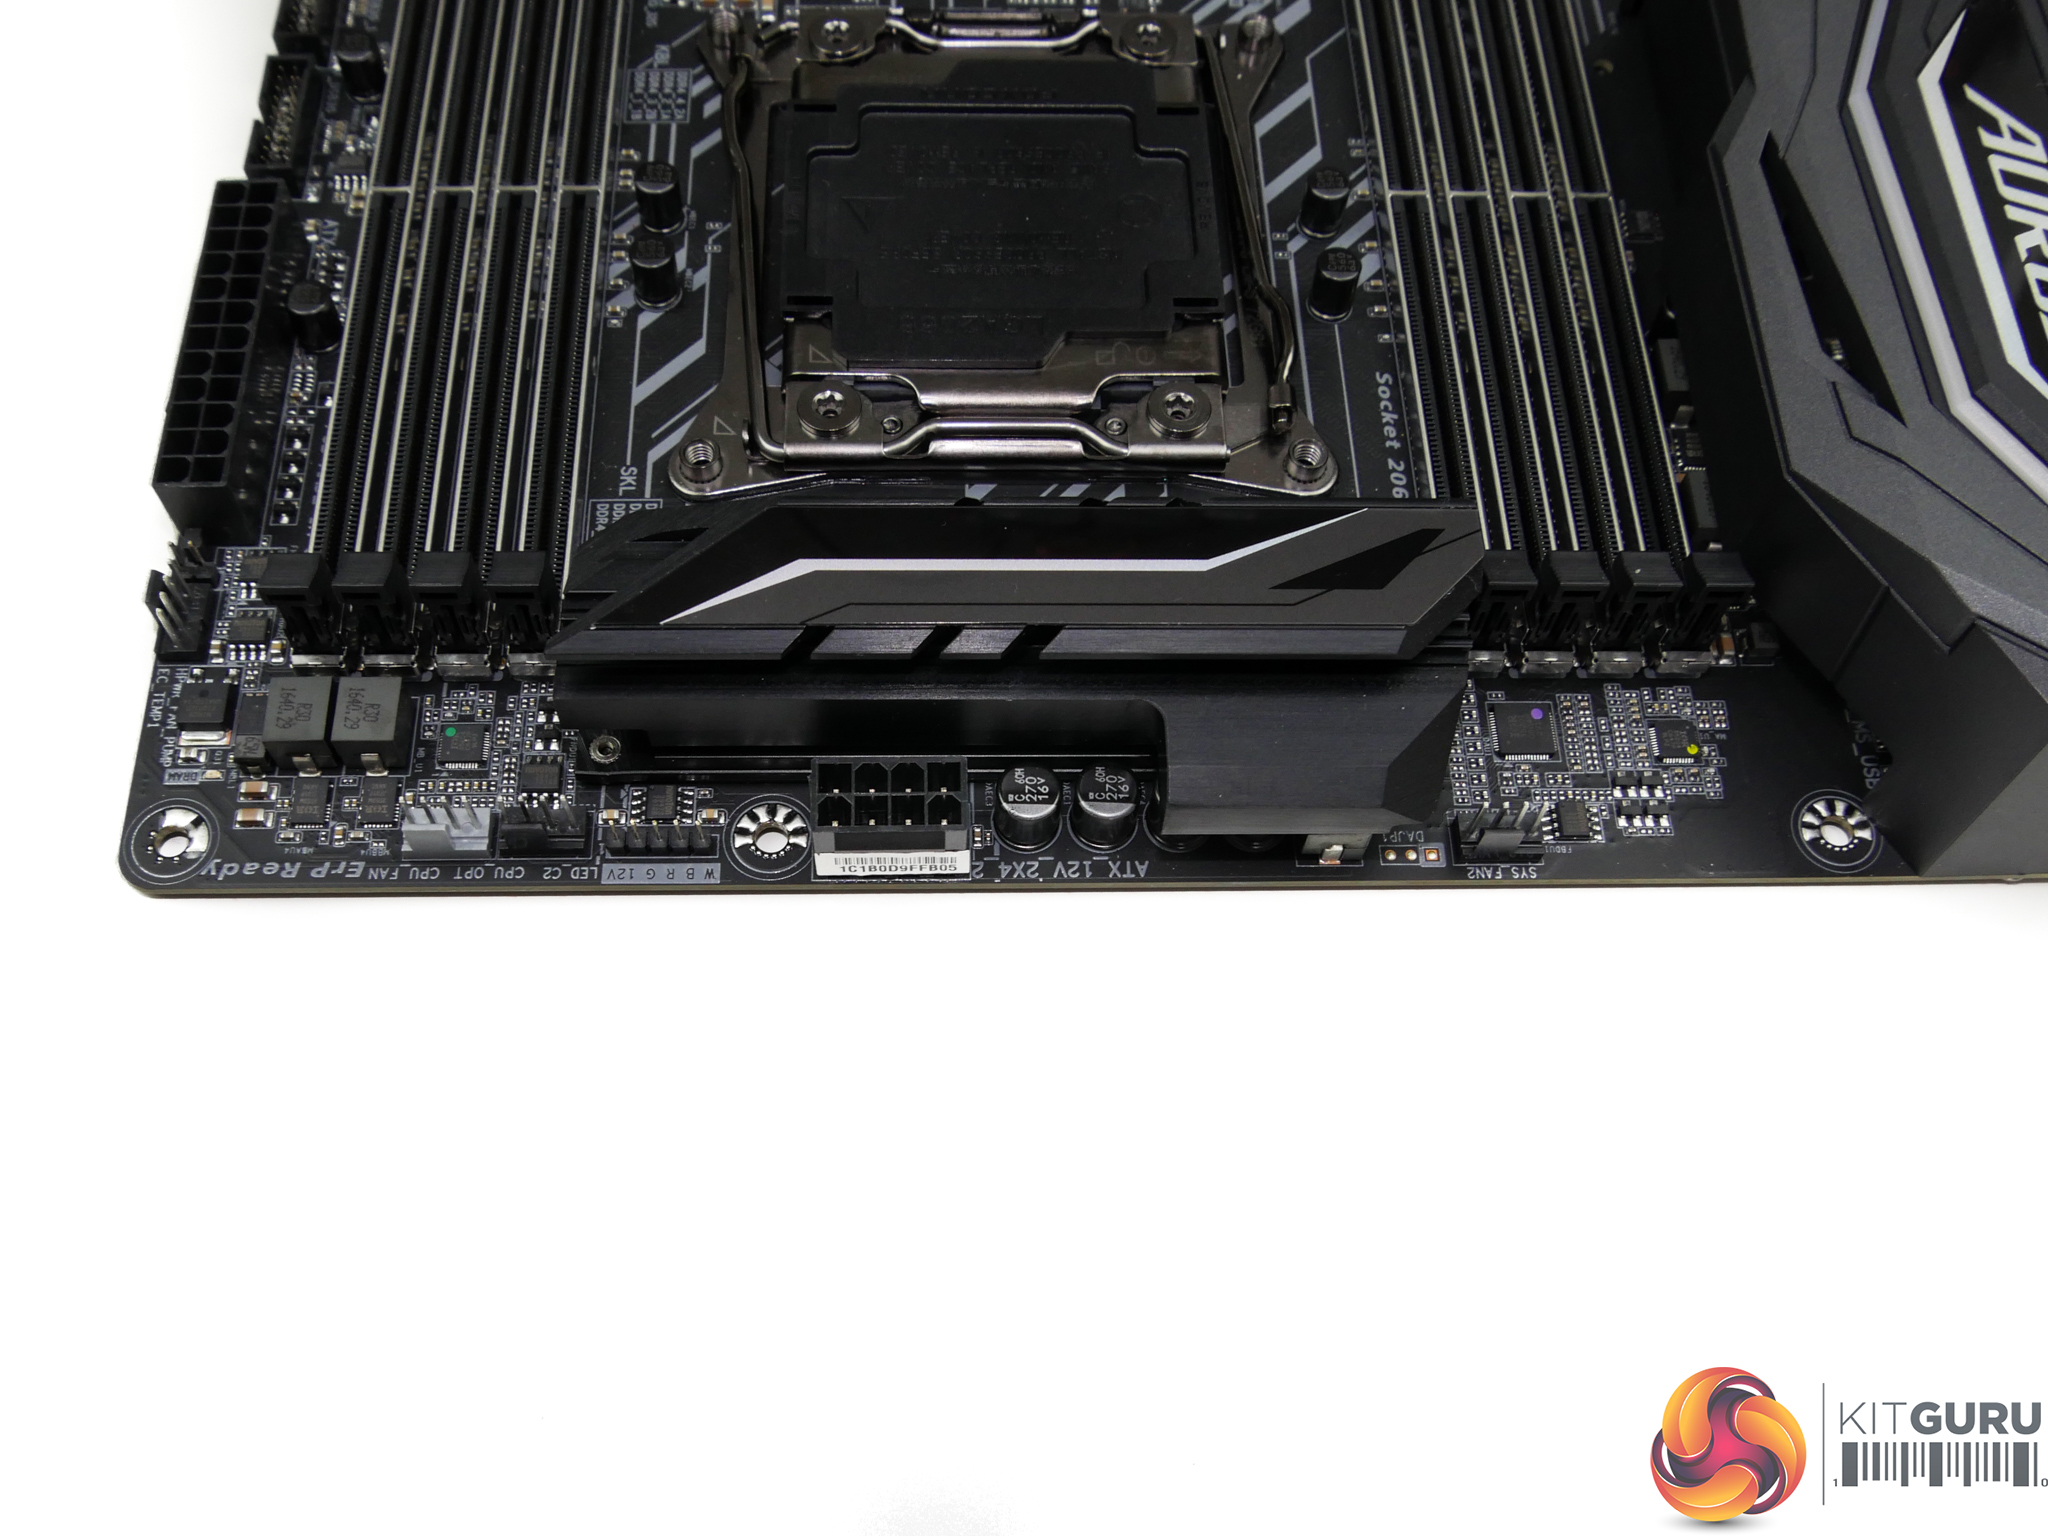
Two internal USB 3.0 5Gbps headers sit next to the 24-pin power connector. A cluster of fan headers is also found in close proximity, making them useful for powering CPU or chassis fans.
There’s no internal 10Gbps USB 3.1 Gen 2 header, which is disappointing for a motherboard of this calibre. The new connector will become standard within this board’s lifespan so it is somewhat short-sighted, or perhaps overly cost-conscious, of Gigabyte not to include the ‘futureproof’ connector.
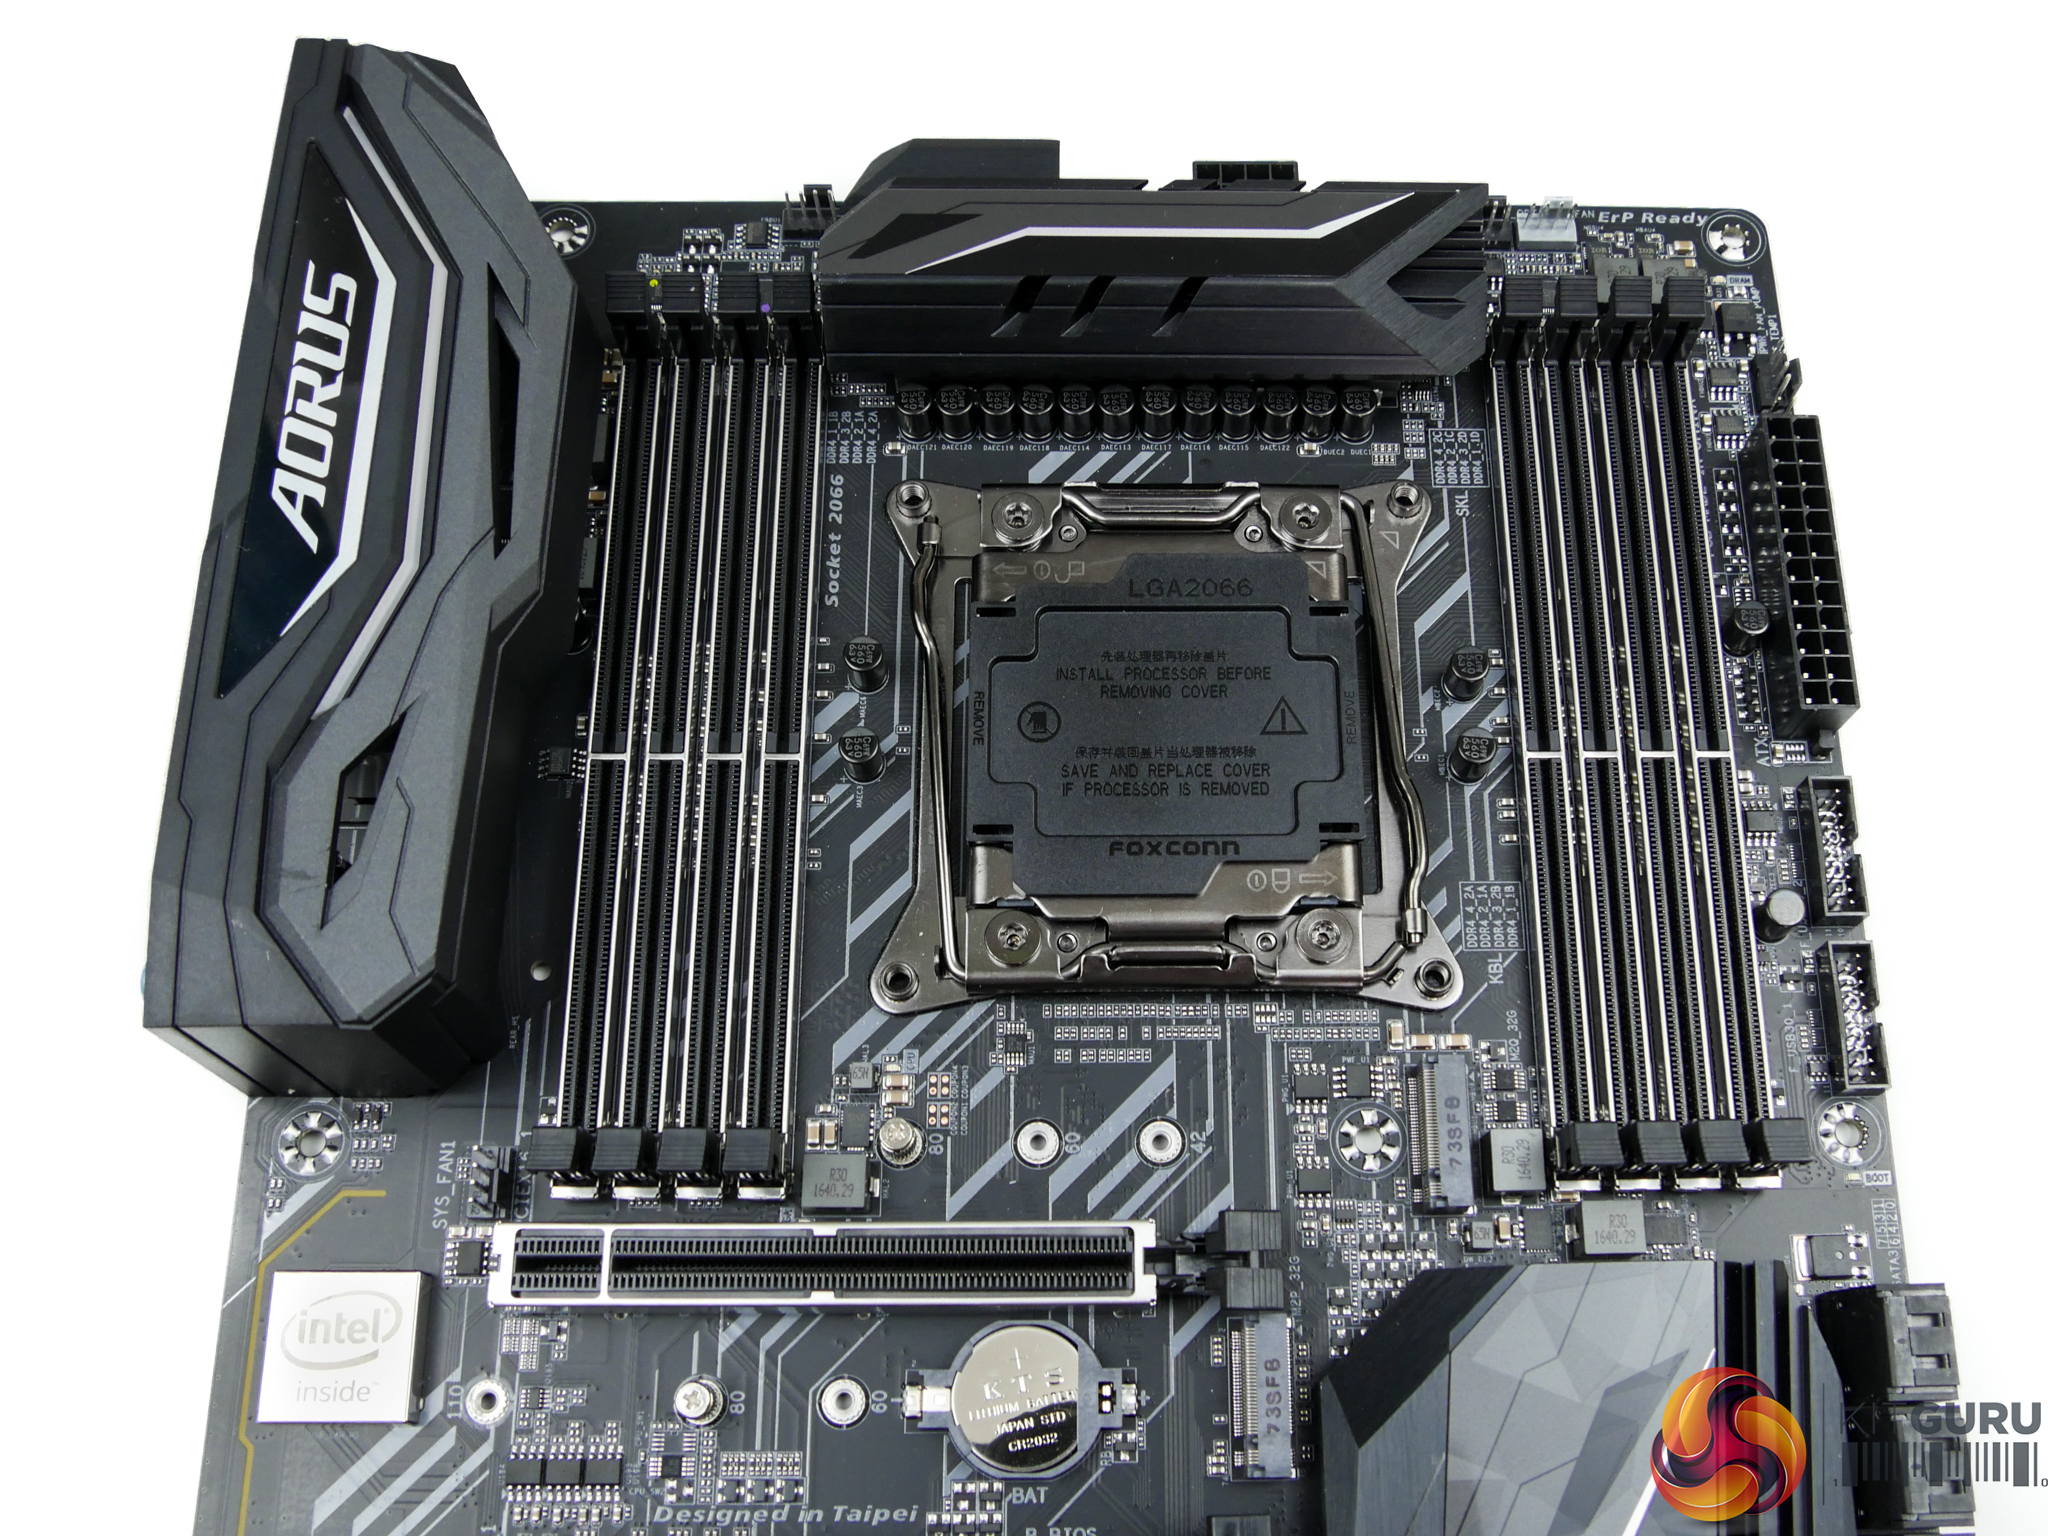
Four DIMM slots are positioned either side of the LGA 2066 socket, making this motherboard quad-channel memory capable with a Skylake-X CPU. Gigabyte conveniently highlights which slots should be used with a Kaby Lake-X CPU and its dual-channel memory support.
The steel-plated DDR4 slots are designed to look good but they also help to mitigate PCB flex when inserting DRAM modules.
Gigabyte uses a decent heatsink to cool the MOSFETs. As is the norm in today’s market, the heatsink is clearly designed with aesthetics as a priority. With that said, the physically-larger design is better than ASUS’ competing offering and the geometry should provide better heat dissipation potential.
Nevertheless, Gigabyte needs to be added to the list of motherboard vendors that really need to improve their performance when it comes to designing effective heatsinks for power-hungry platforms.
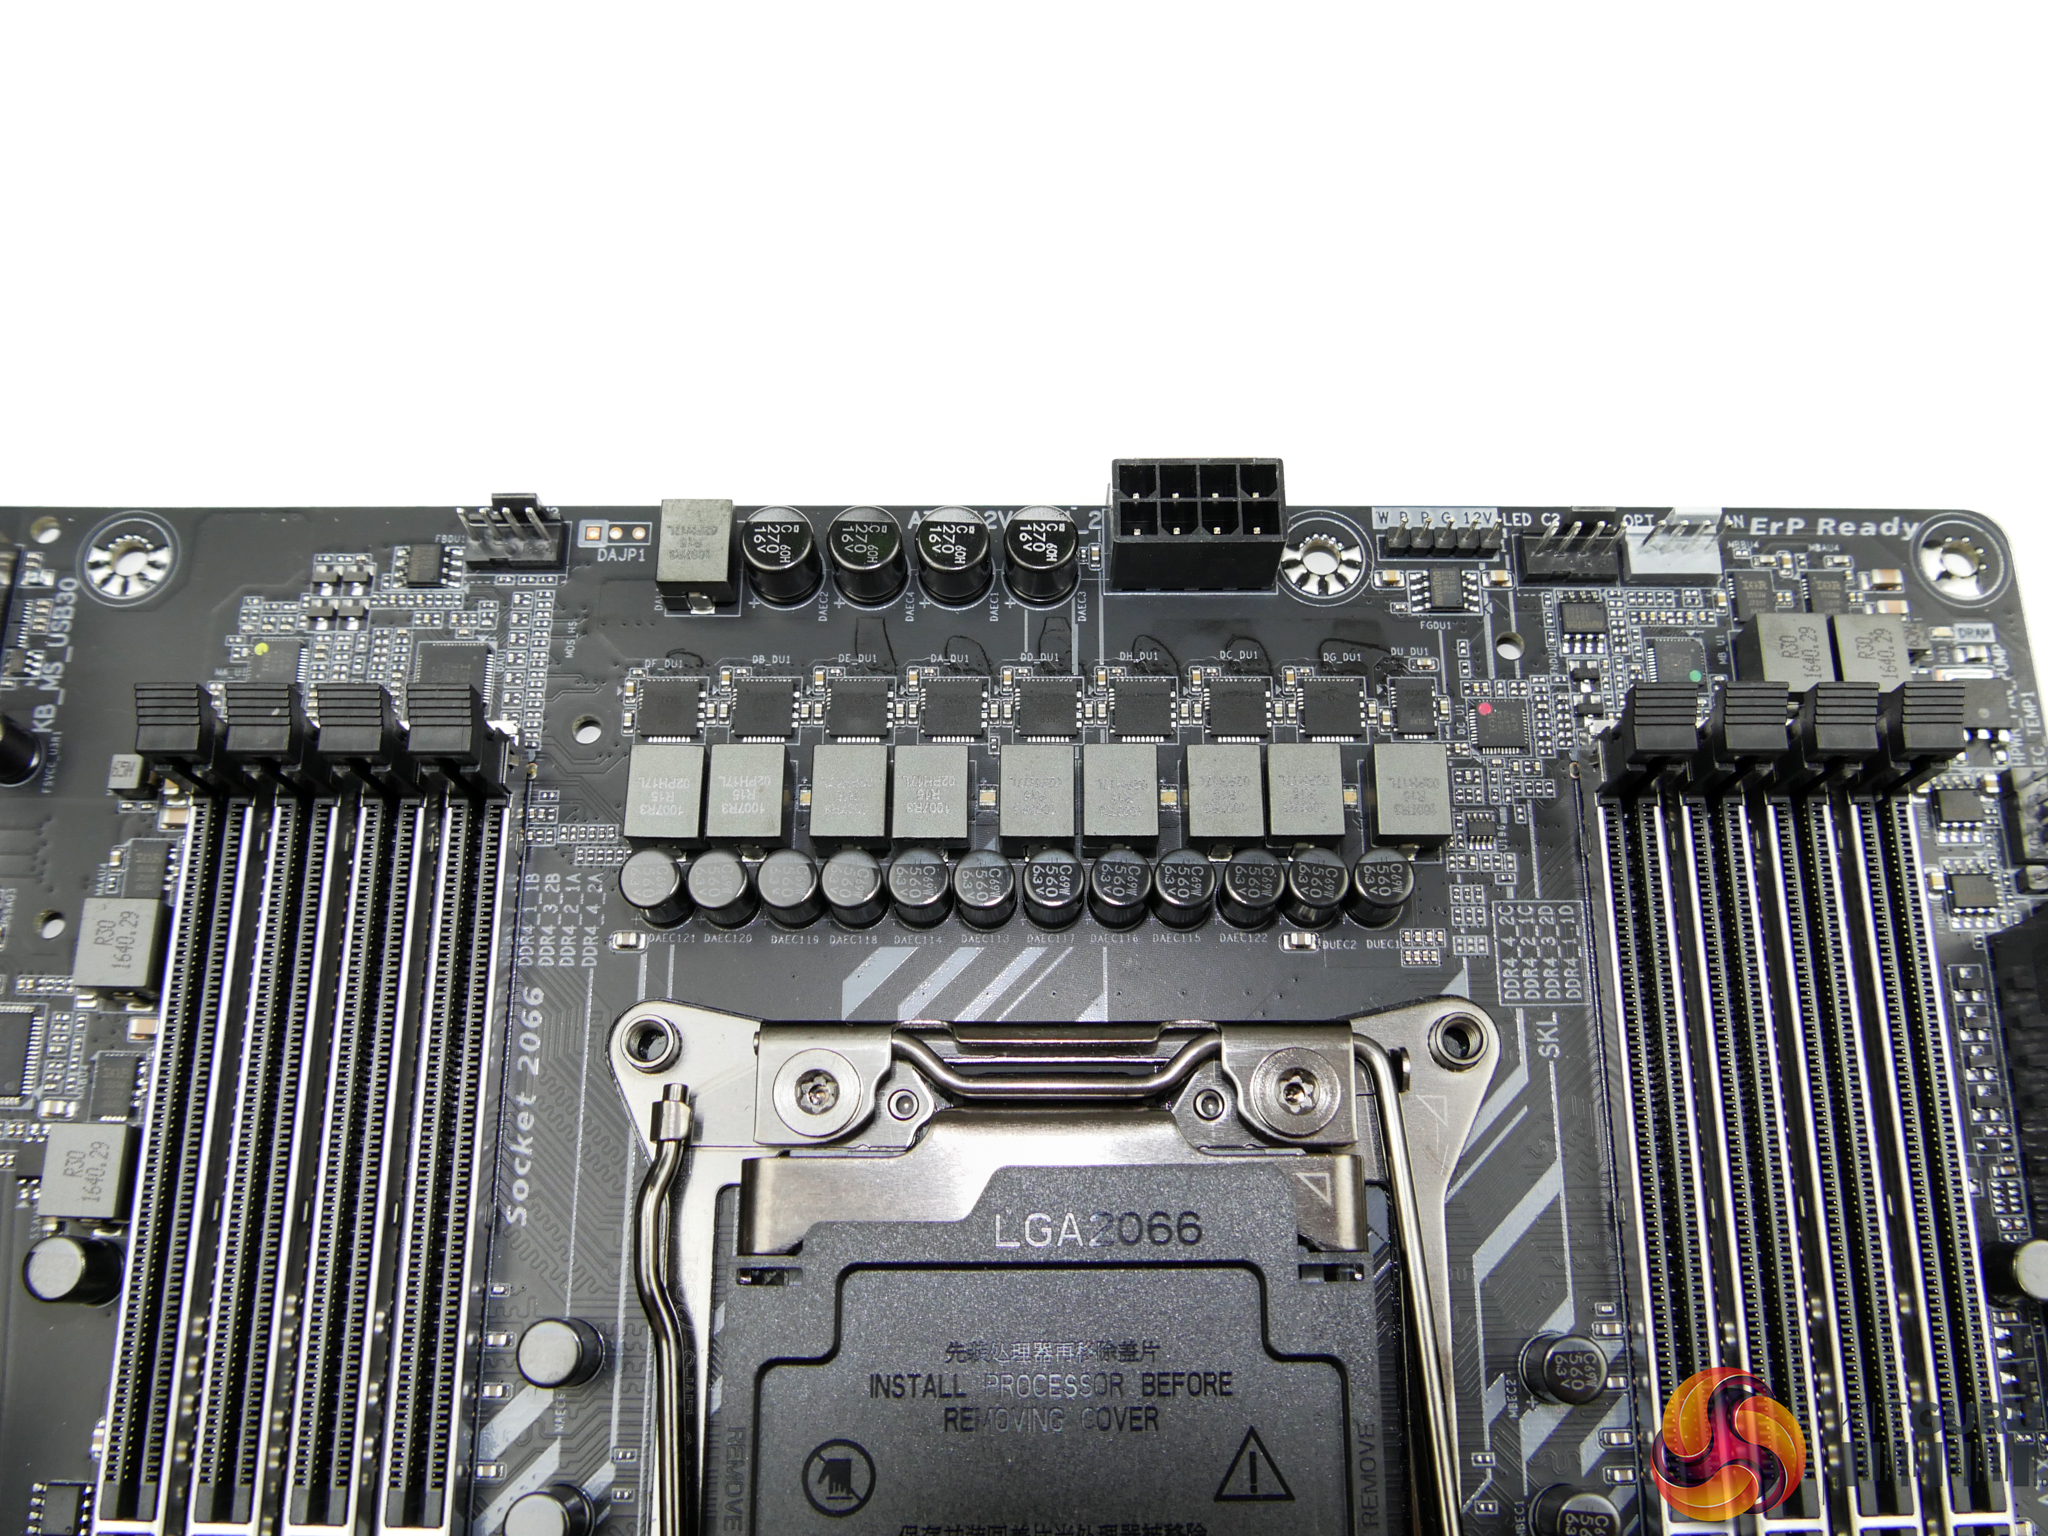
Eight International Rectifiers IR3556M MOSFET solutions are tasked with CPU power delivery duties (that additional IR3553M phase is likely to feed supplementary components). The 50A-rated Integrated PowIRstage solutions are well-respected in the industry and will be perfectly capable of powering even overclocked Skylake-X CPUs (provided they can be cooled adequately).
Primary management is handled by the IR35201 digital PWM controller which looks to be running in 8+0-phase operation. Three additional International Rectifiers digital PWM controllers – all IR35204 units – manage the memory and system sections. Memory looks to be a 2-phase system per DIMM bank which uses IR3553M MOSFETs and R30-marked chokes.
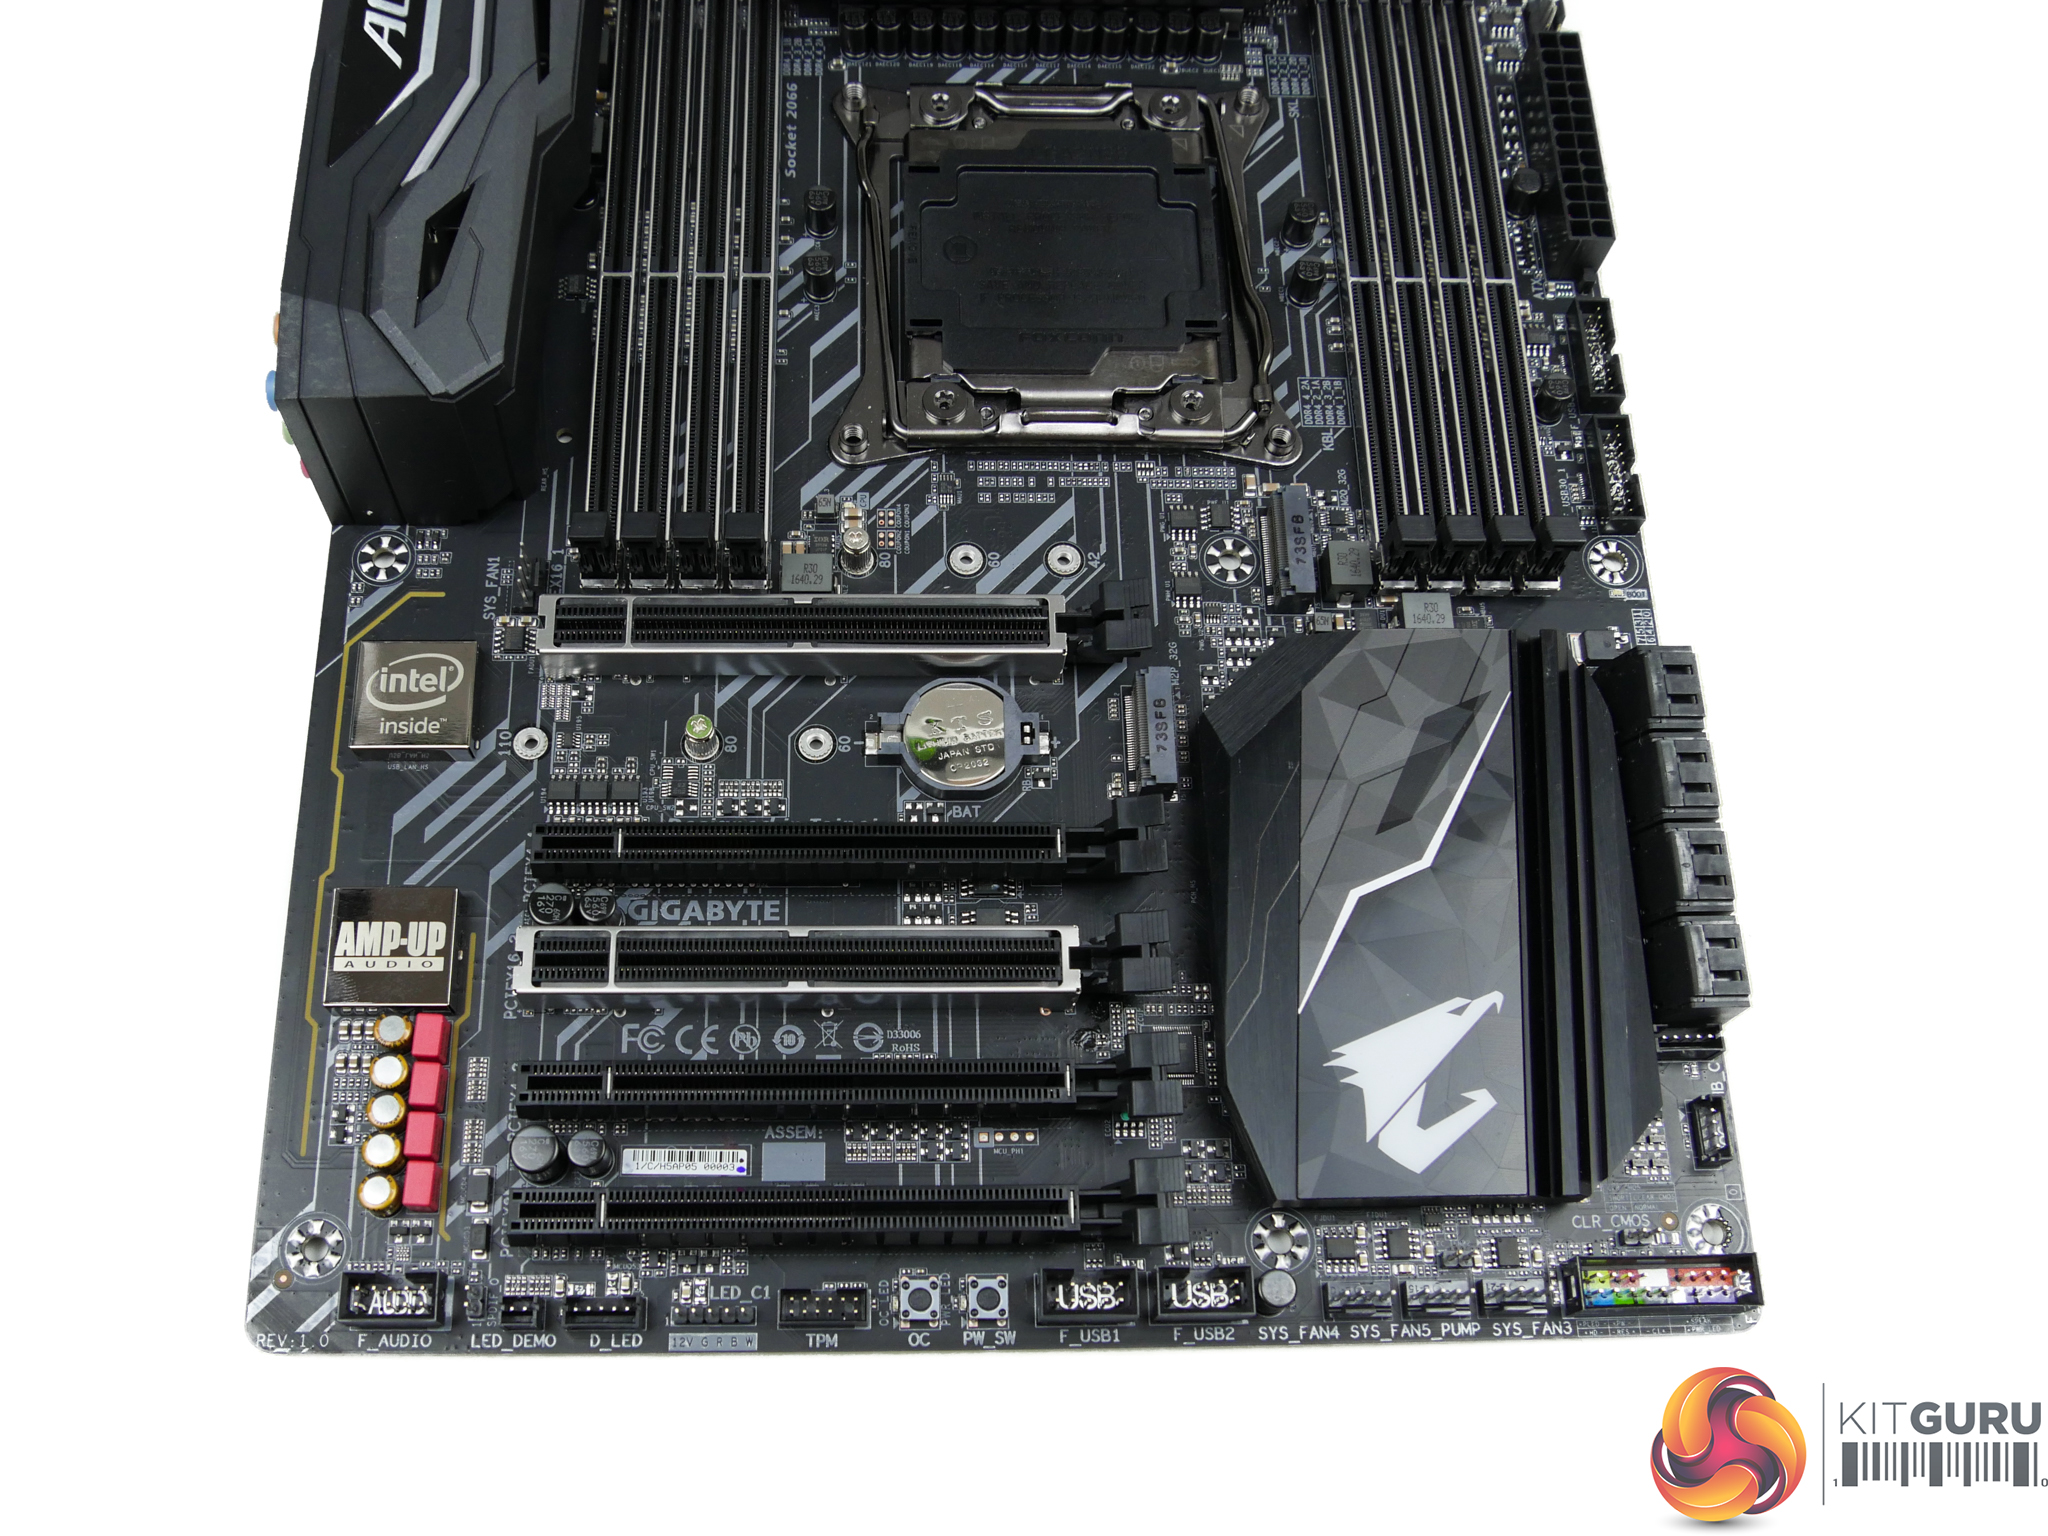
Gigabyte deploys five full-length PCIe slots spread across a six-deep span. The pair of ‘Dual Armor’ metal-reinforced slots are the primary slots that both receive up to 16 Gen 3 lanes from the CPU. The bottom full-length slot is the other high-bandwidth link, receiving up to 8 lanes from a 44-lane chip.
PCIe lane distributions for slots 1, 3, and 5 are x16/x16/x8 for a 44-lane CPU, x16/x8/none for a 28-lane CPU, and x8/x4 when using a 16-lane CPU. That’s right – SLI is not supported with a 16-lane CPU, nor is a full x16 connection to a single GPU. Gigabyte should take plenty of the blame for this but, quite frankly, Kaby Lake-X chips are such stupid products on the X299 platform that it’s hard to throw too much criticism the board vendor’s way.
We checked to make sure that the lack of x16 or x8/x8 support was not a mistake in Gigabyte's product information. It was not a mistake. This is a £270 motherboard that will not support SLI with a 16-lane CPU. That's not good enough, irrelevant of whether the Kaby Lake-X CPUs should or should not exist.
The remaining slots are labelled PCIEX4_1 and PCIEX4_2. The upper four-lane slot (sat below the primary graphics card slot) looks to operate using CPU lanes when a 44- or 28-lane chip is installed. The lower four-lane slot (sat below the secondary steel-plated slot) looks to use four lanes from the chipset.
I would have thought that the latter would share its bandwidth with one of the M.2 connections as that would have been a logical compromise on a rarely-used PCIe expansion slot. However, Gigabyte does not make this clear anywhere in the manual and this will cause confusion for potential customers with heavy PCIe expansion requirements.
Slot layout is likely to be adequate for most users. However, buyers with a pair of 2.5-slot graphics cards, such as Gigabyte’s own Aorus GTX 1080 Ti models, will find all the remaining slots blocked. A supplementary PCIe x1 slot just below the left-hand DIMM bank would have been welcomed.
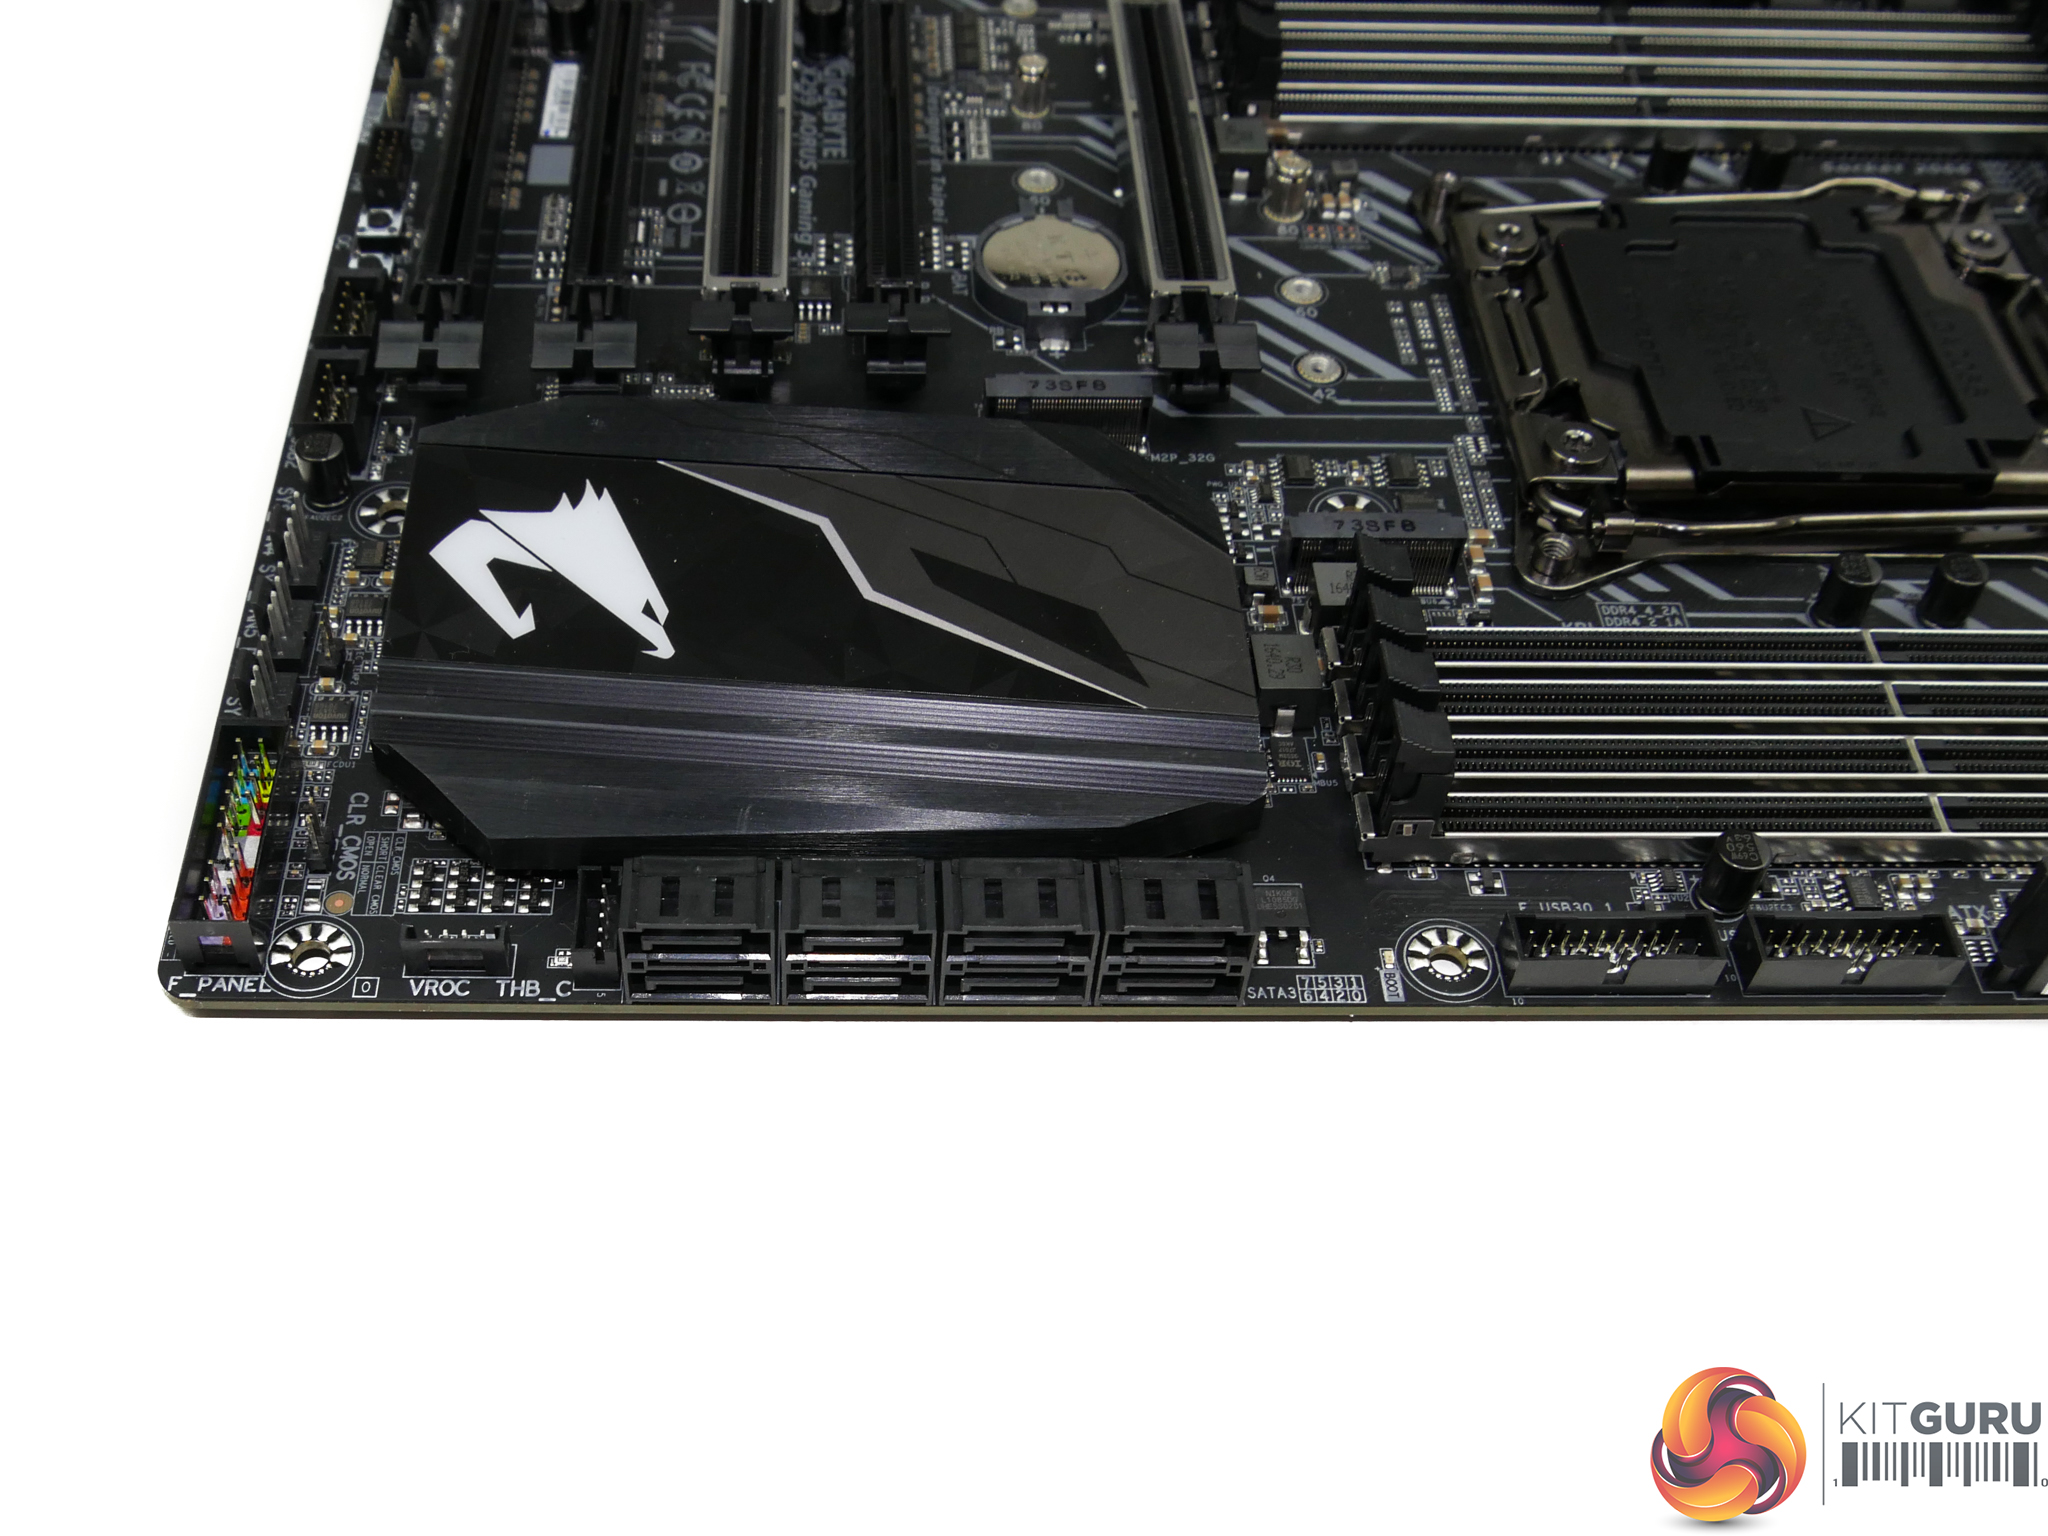
Eight right-angled SATA 6Gbps ports all operate from the X299 chipset. Sat next to the SATA ports are the Thunderbolt and VROC headers.
Both un-cooled M.2 slots can handle up to PCIe 3.0 x4 NVMe SSDs or SATA alternatives. However, only the lower slot (M2P_32G) can do so without significant restrictions elsewhere. Page 18 in Gigabyte’s manual explains the situation well; the lower M.2 slot does not interfere with SATA ports, except stealing the connection from SATA_0 when an M.2 SATA SSD is used.
The upper M.2 slot, however, is clearly placed on a flexible chipset arrangement with the SATA and PCIe lanes. A SATA or a PCIe SSD in the upper M.2 slot will disable SATA ports 4, 5, 6, and 7. That seems excessive, especially in terms of M.2 SATA SSD usage, but it also highlights the X299 PCH flexibility given to motherboard vendors, in addition to the bandwidth restrictions for high-end boards.
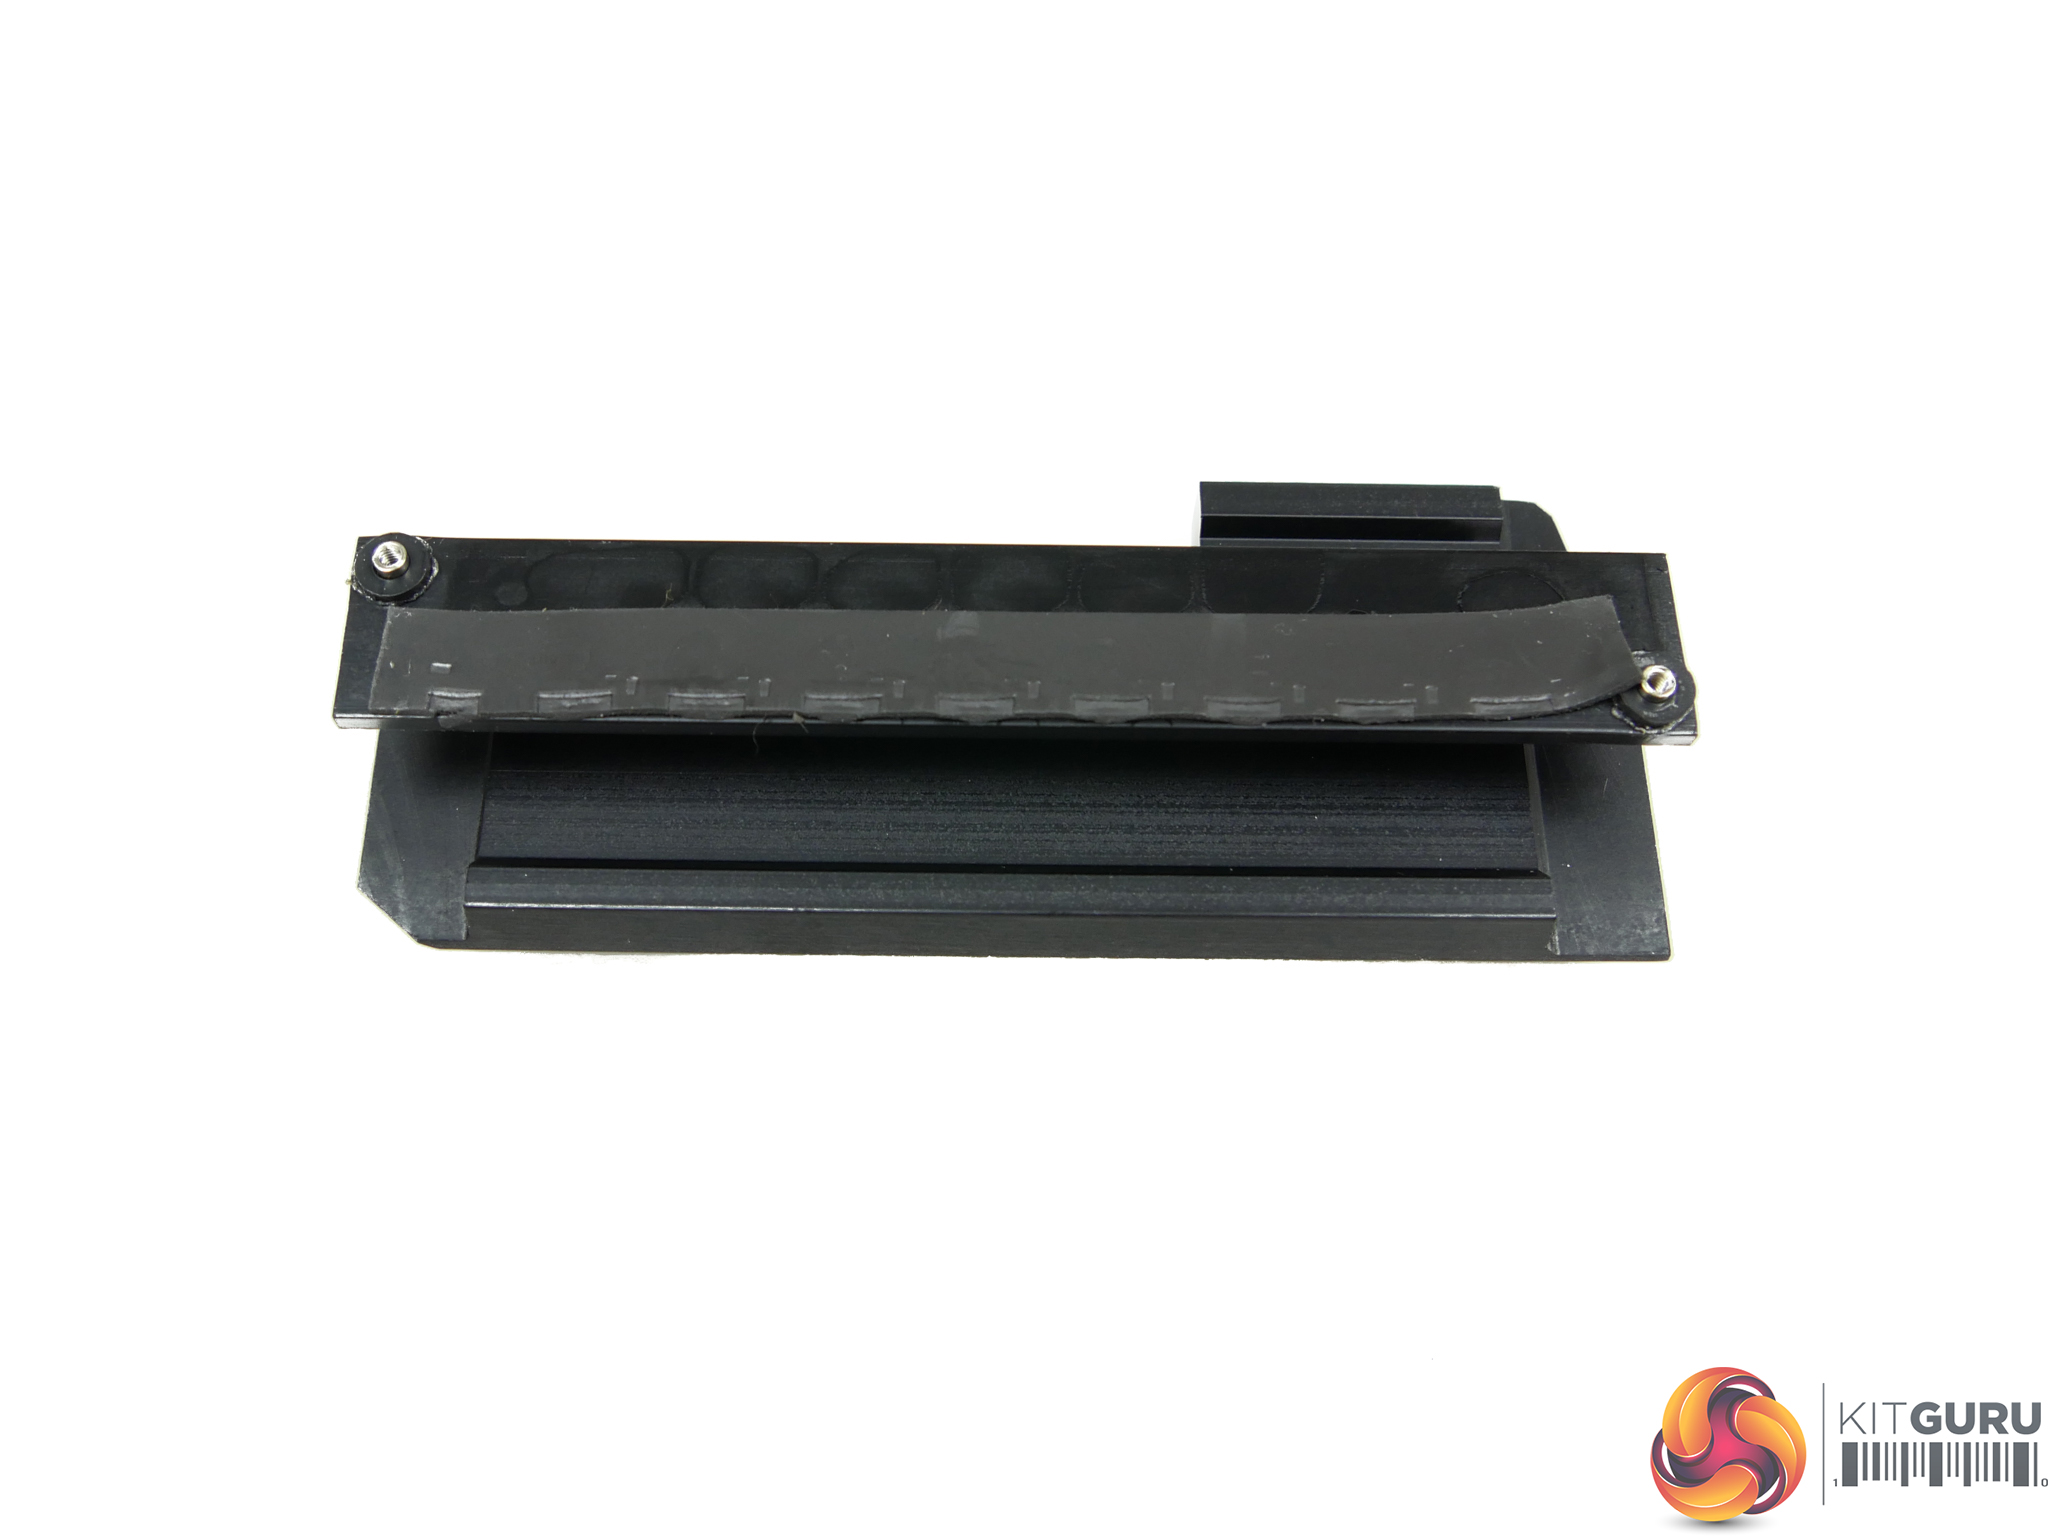
A lack of M.2 SSD cooling is disappointing as this board’s £270 retail price leaves plenty of room in the budget for a basic heatsink, as seen on Gigabyte’s higher-end SKUs. The omission of U.2 is also slightly disappointing but somewhat understandable given the prevalence of fast M.2 SSDs.
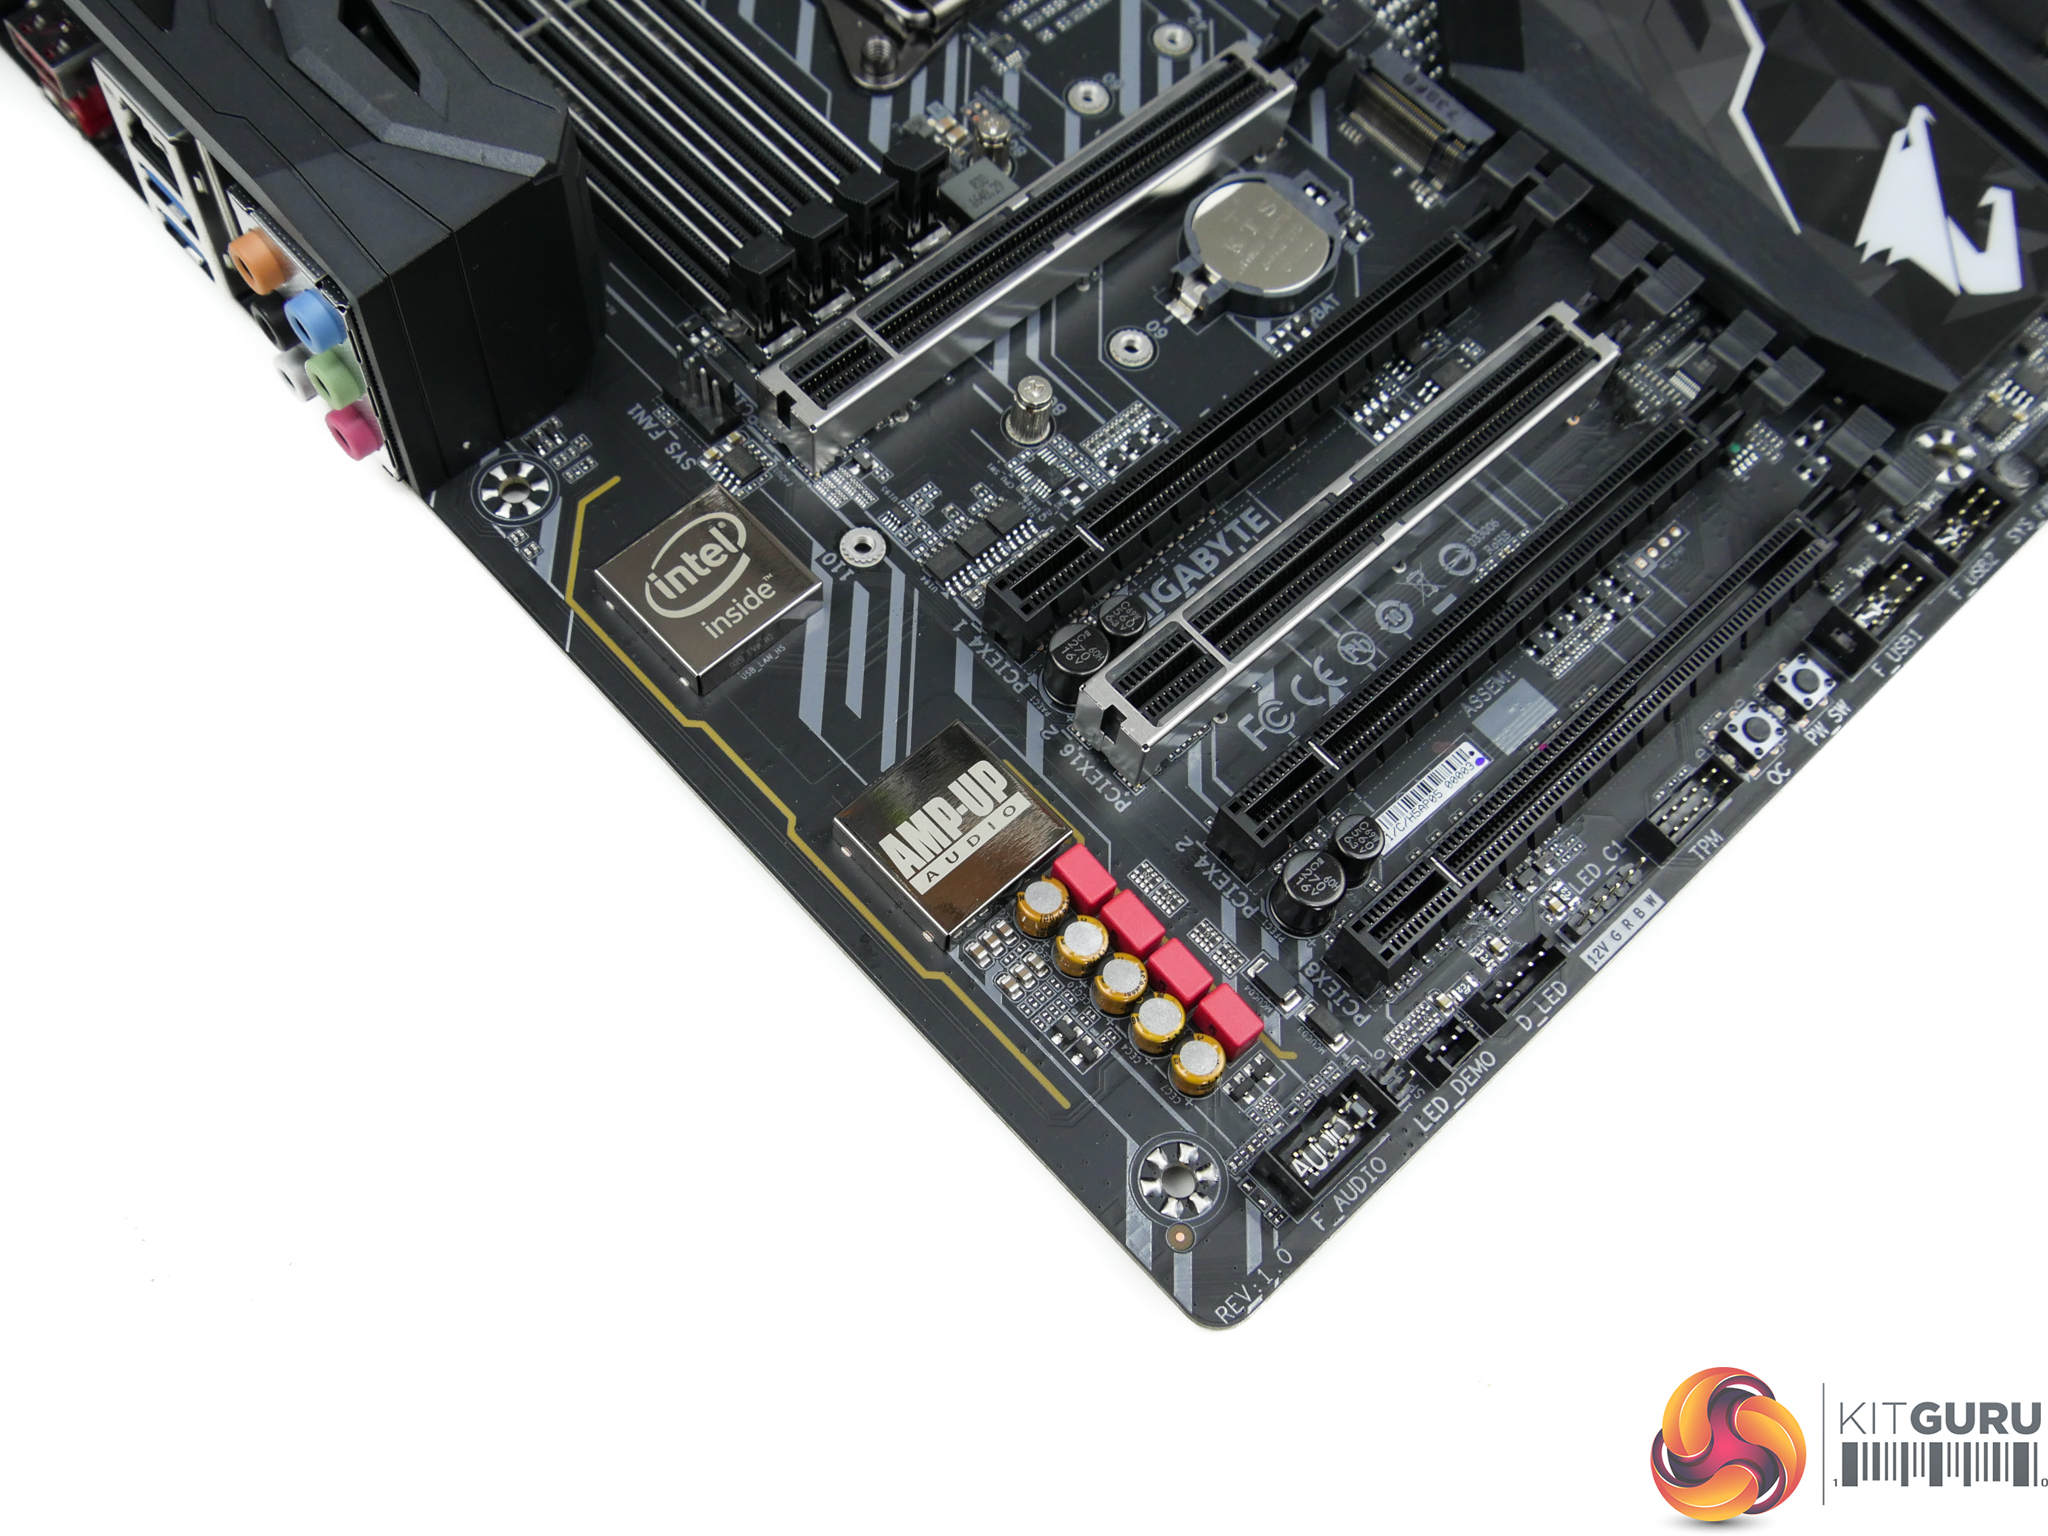
Gigabyte’s AMP-UP audio solution is built around the Realtek ALC1220 audio codec. Nichicon and WIMA audio capacitors are also present and the signals travel along segregated PCB tracks.
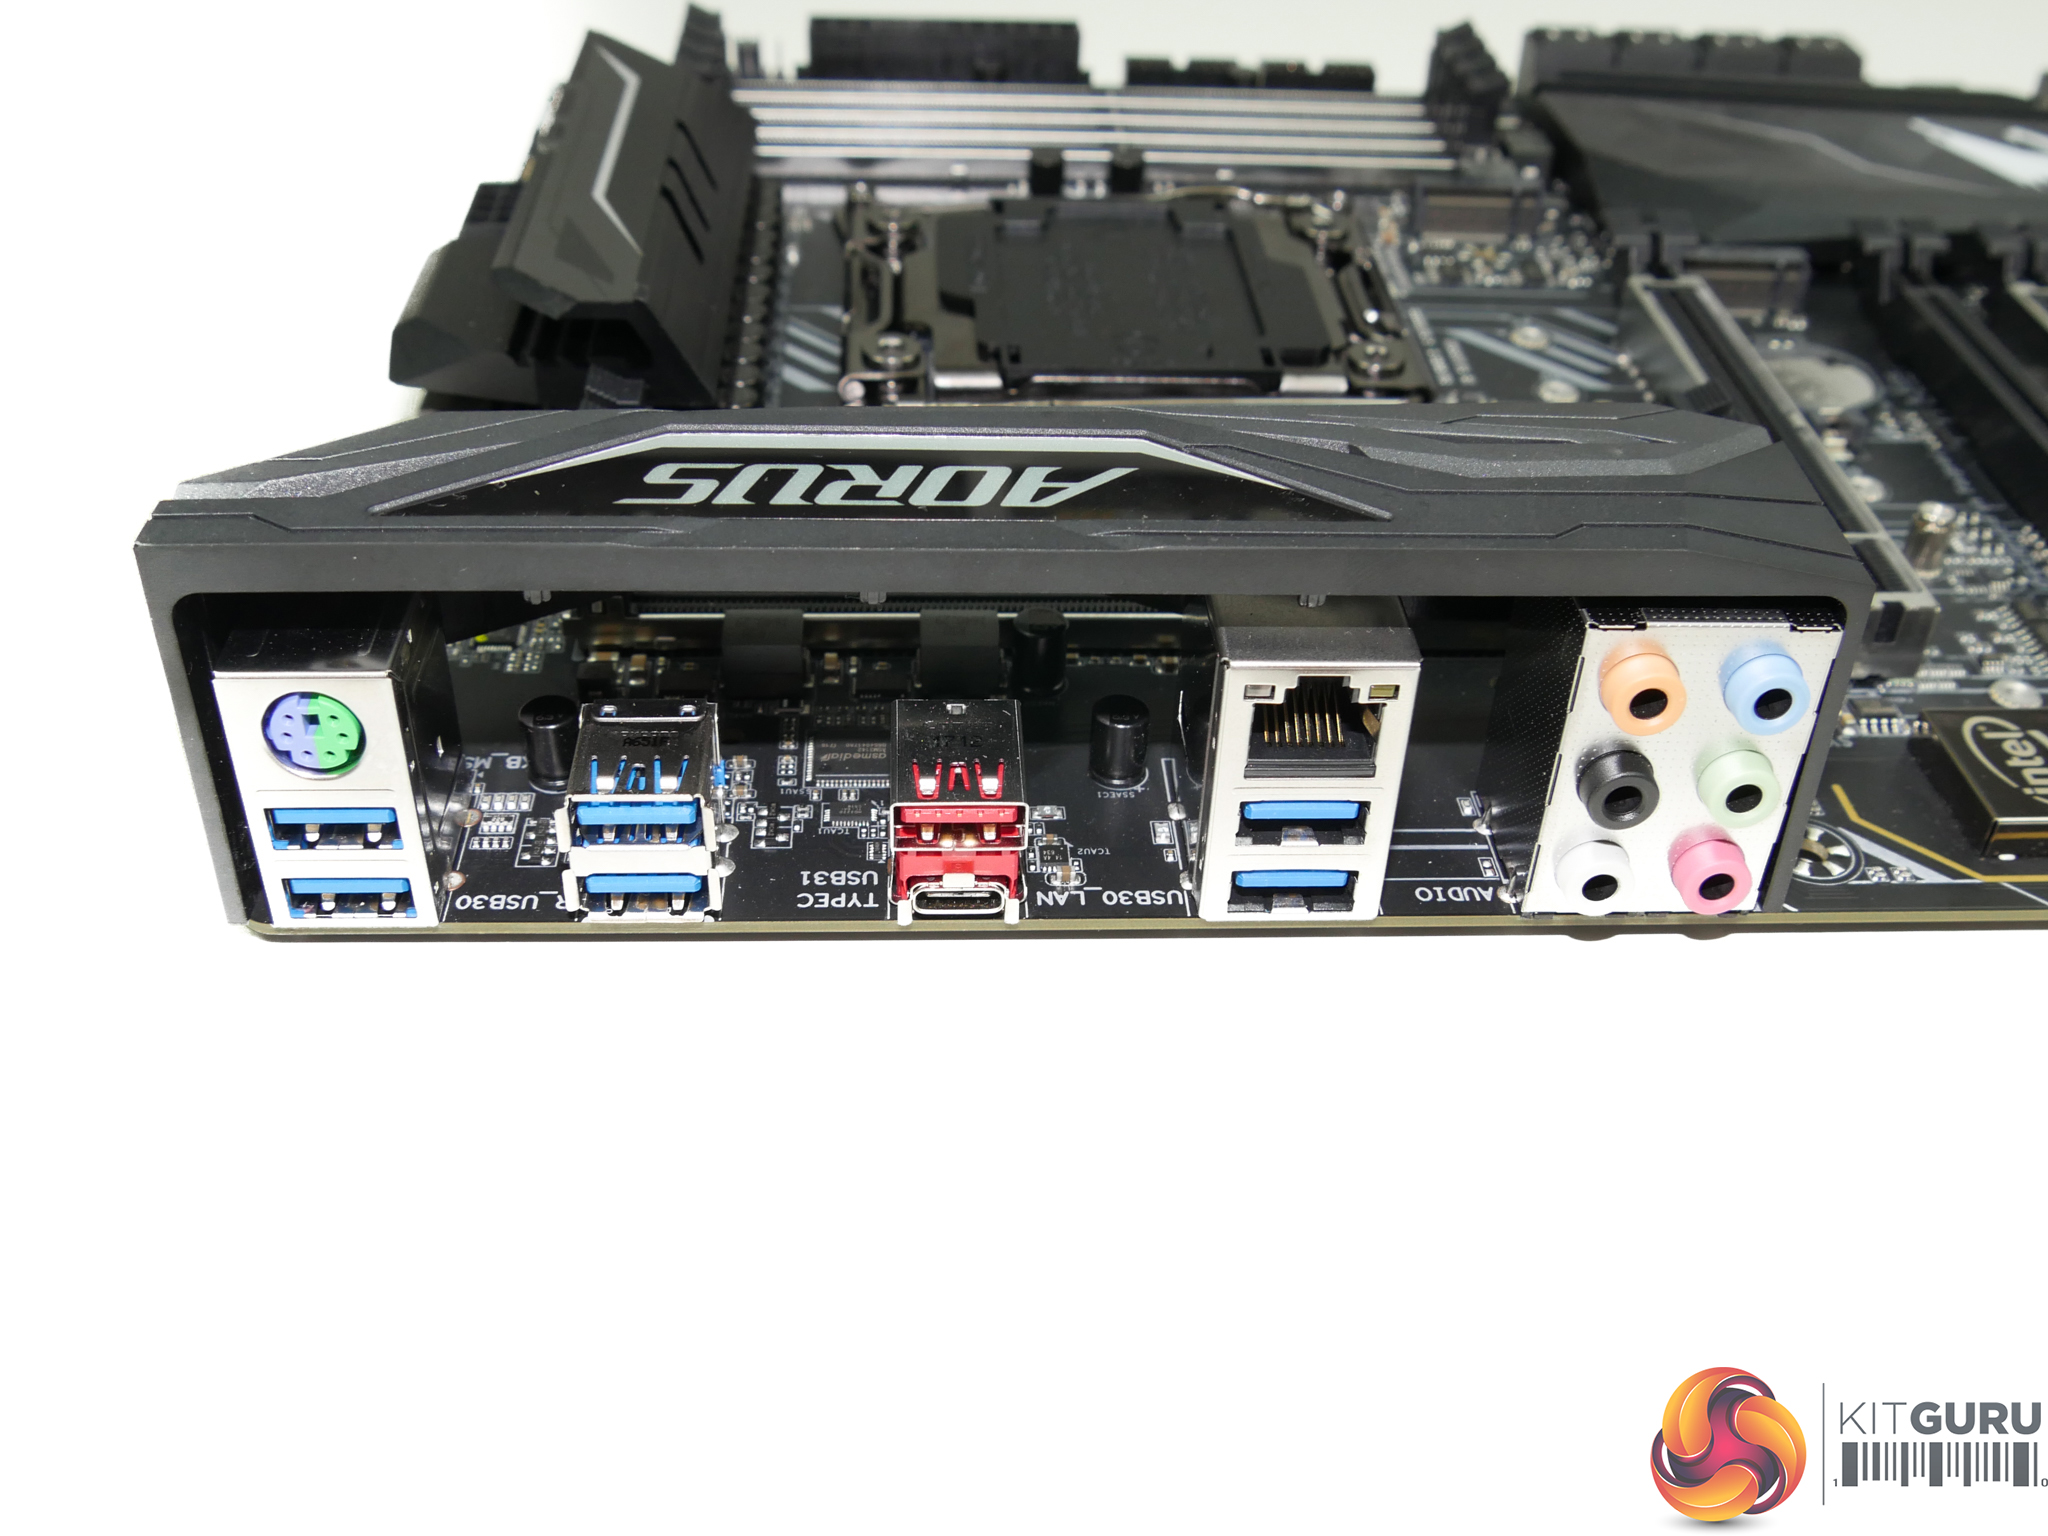
USB ports steal the show on the relatively bare rear IO. Gigabyte deploys six USB 3.0 5Gbps Type-A ports, all of which operate from the X299 chipset. USB 3.1 Gen 2 10Gbps is provided in Type-A and Type-C form using an ASMedia ASM3142 chipset.
A PS/2 port is provided for legacy support while an Intel chipset (likely I219V) is leaned on for GbE. Six 3.5mm audio jacks provide surround sound capability but it is disappointing to see Optical SPDIF out omitted. A rear-mounted clear CMOS button would have been a good addition.
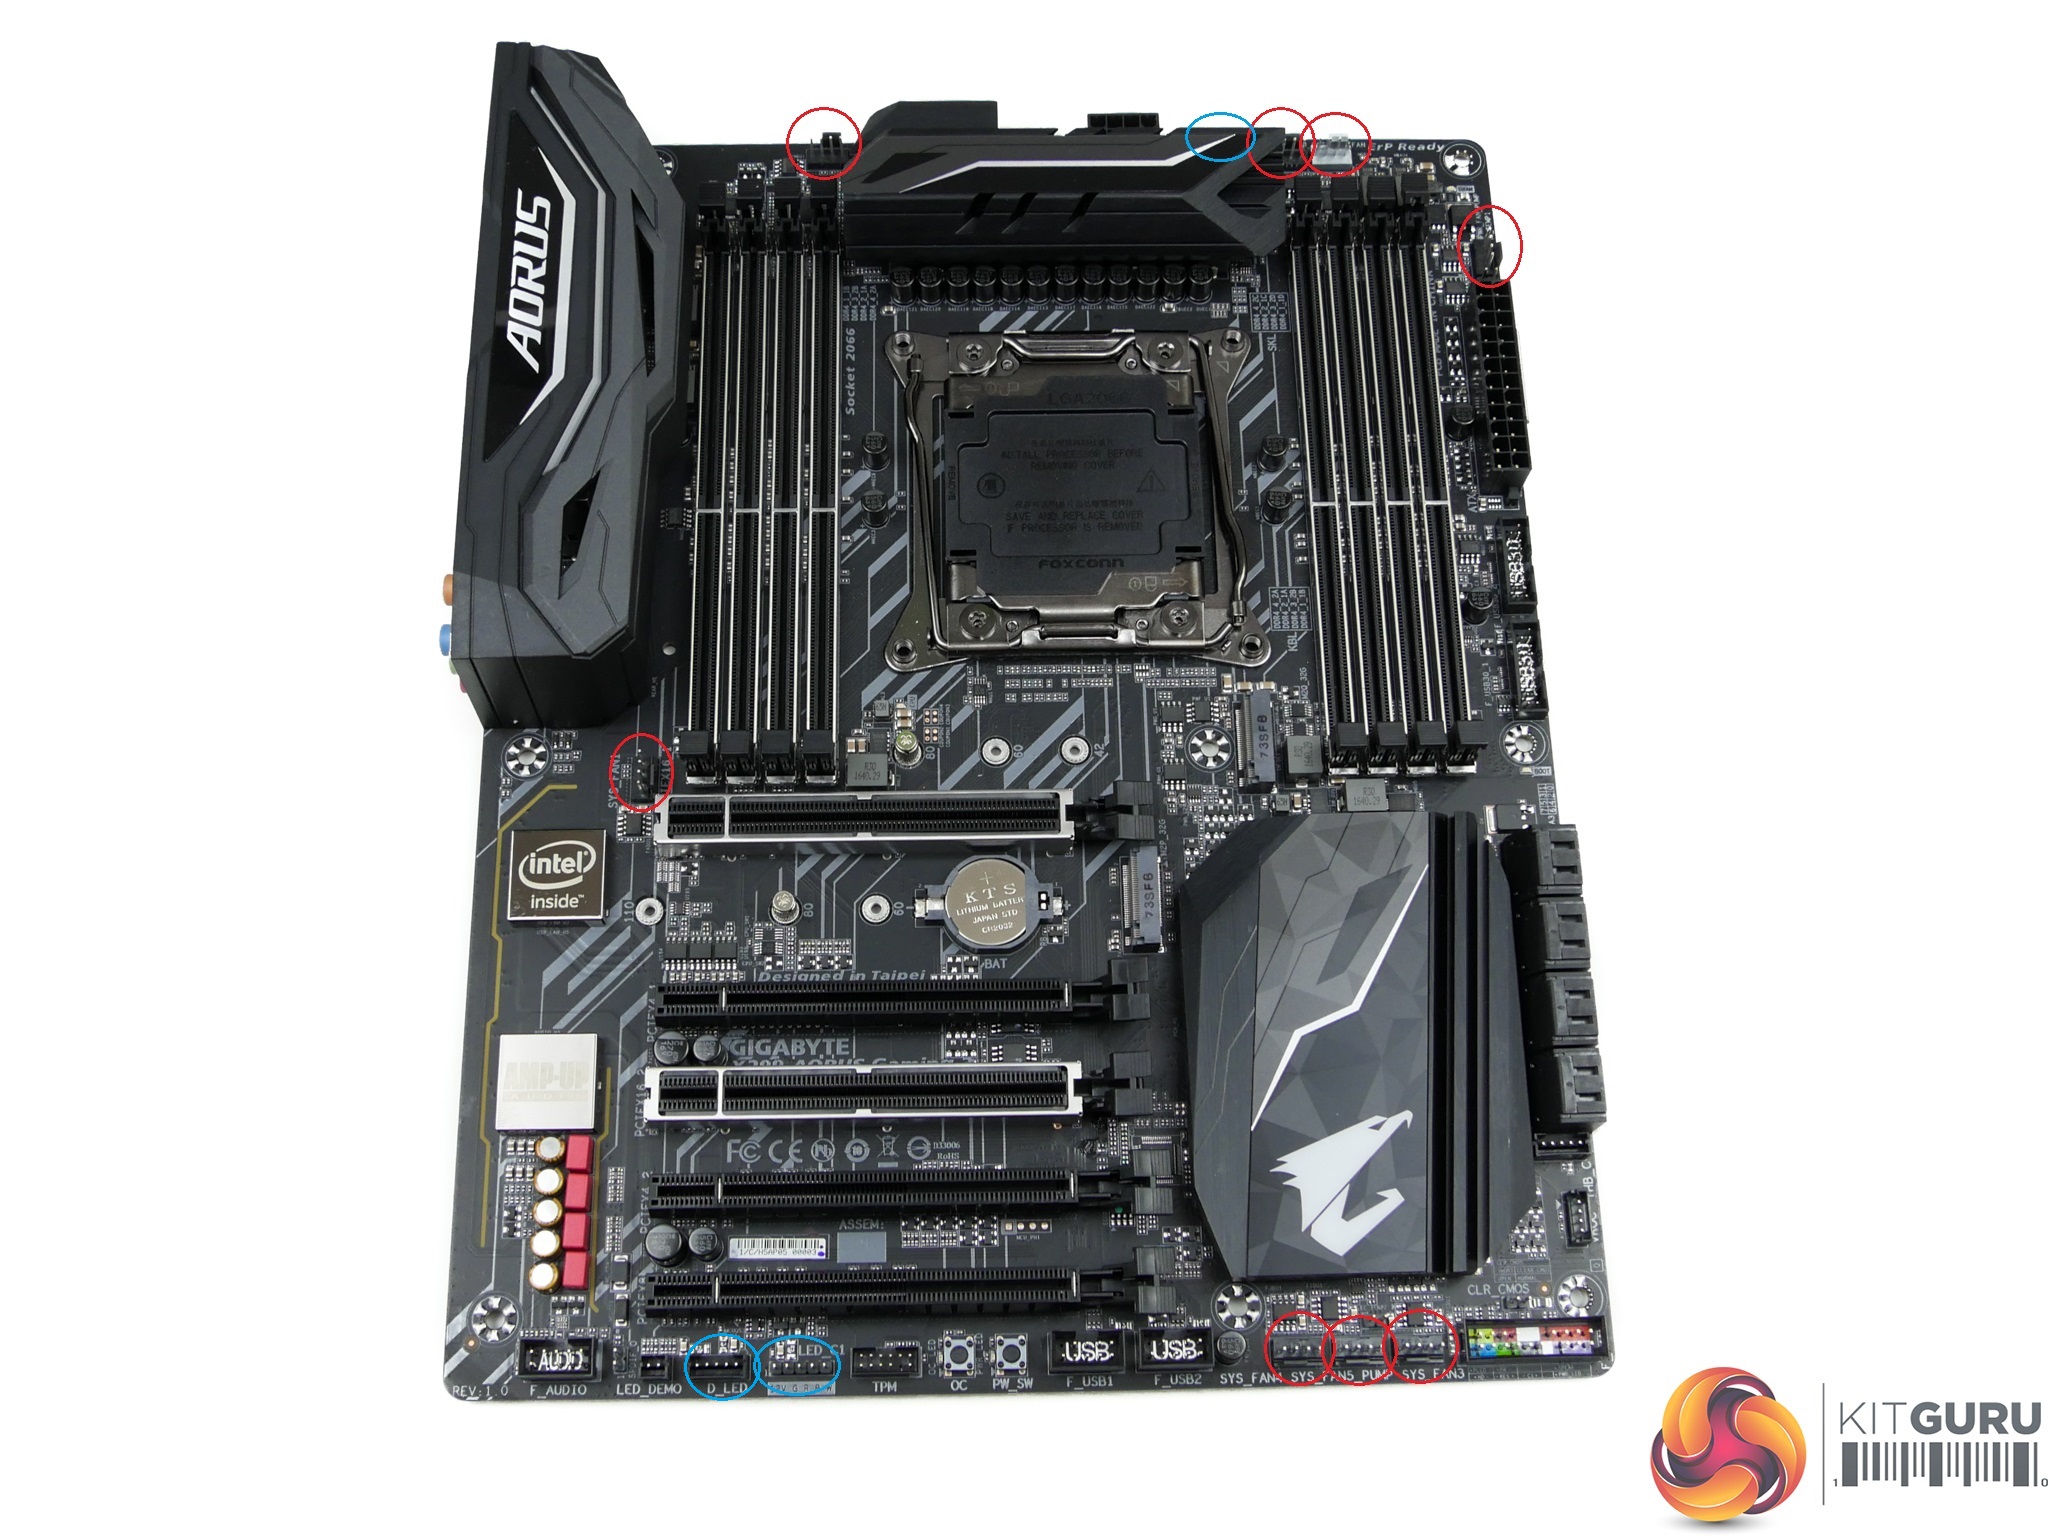
Gigabyte distributes eight 4-pin fan headers across the motherboard, all of which feed into the superb Smart Fan 5 control system and support high current ratings. The controllable fan headers and monitoring are managed by an ITE IT8795E chipset.
Two 5-pin RGBW headers are located on the board – one on the top edge and the other on the bottom edge. There is also a digital LED header on this motherboard.
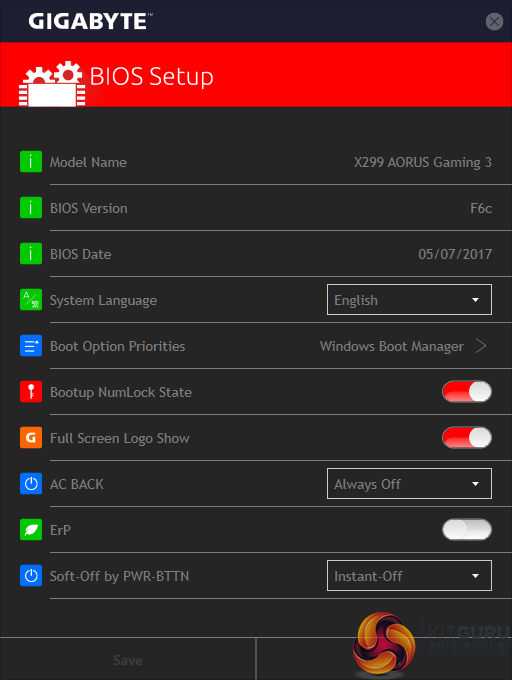
Gigabyte X299 UEFI
The UEFI used for Gigabyte's X299 motherboard is almost identical to that found on the Z270 counterpart. As such, we have re-used the bulk of our analysis from the Z270 reviews and updated the text where there are subtle differences.
Firstly, we are pleased to report that our generic wireless mouse worked in the Gigabyte X299 UEFI. Some mice can be troubling with UEFI support, so when a generic wireless unit functions correctly in the interface, that is usually a good sign for overall mouse support.
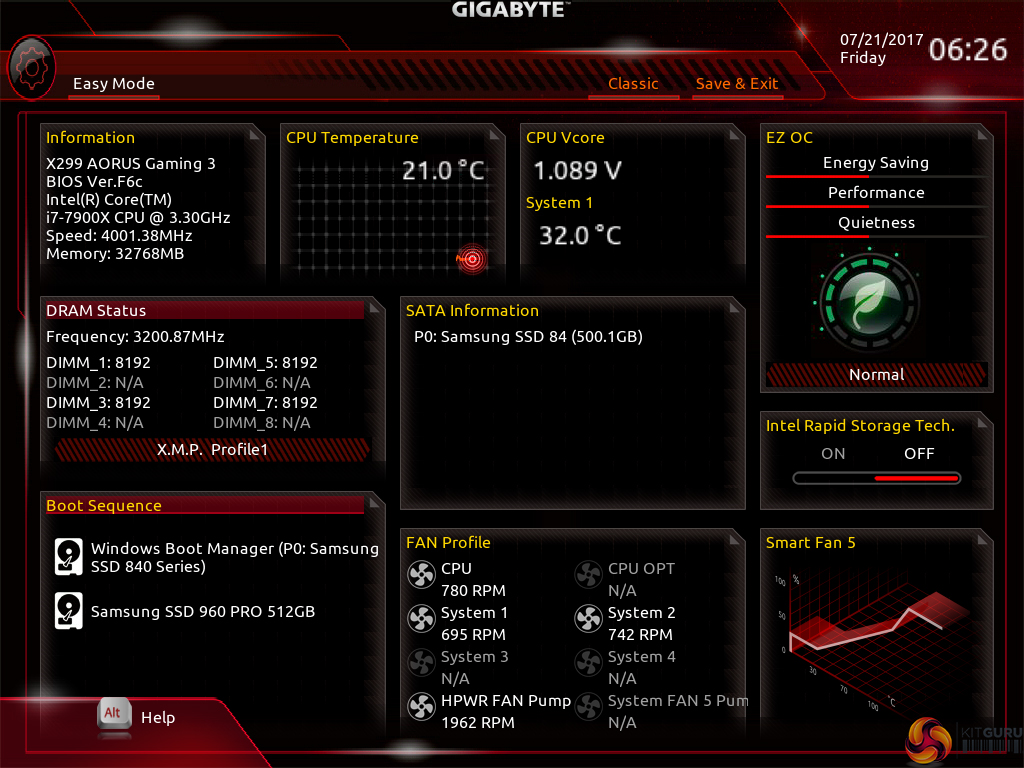
Gigabyte’s Easy Mode page is a solid attempt at categorising a handful of simple settings into a single section. Users can alter the boot sequence, check fan speeds, monitor temperatures and voltages, enable XMP, and change the performance mode without jumping into the deeper (and scarier for less experienced users) UEFI sections.
I don’t have any complaints about Gigabyte’s Easy Mode implementation. It is as good as the versions used by competing vendors.

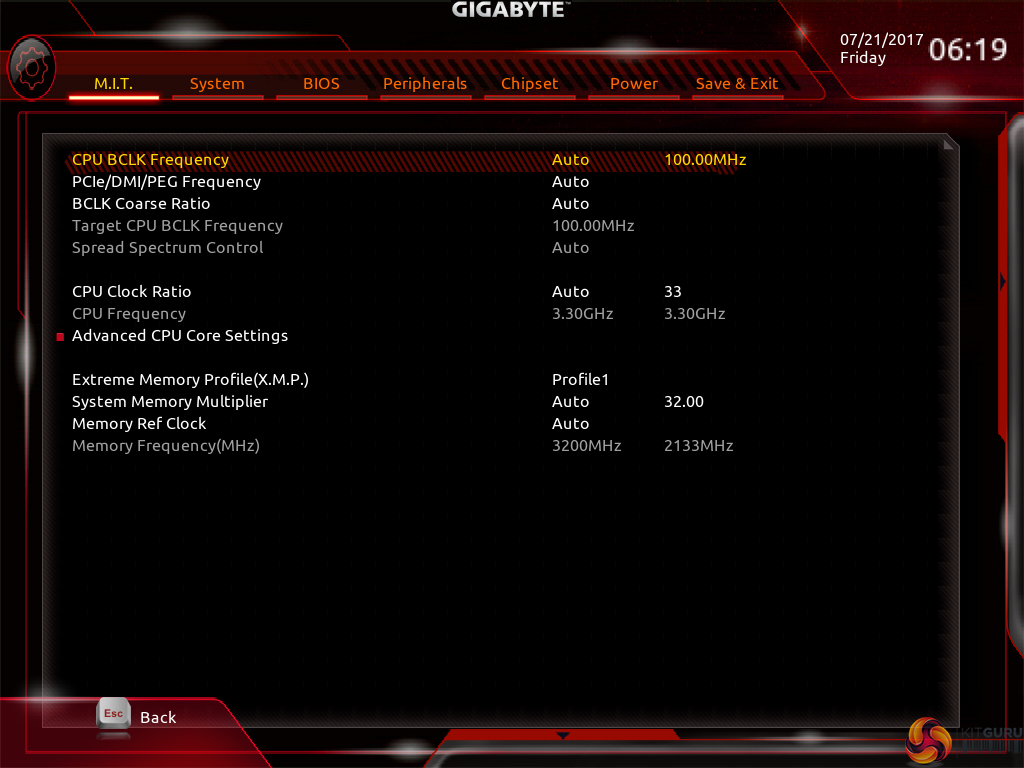

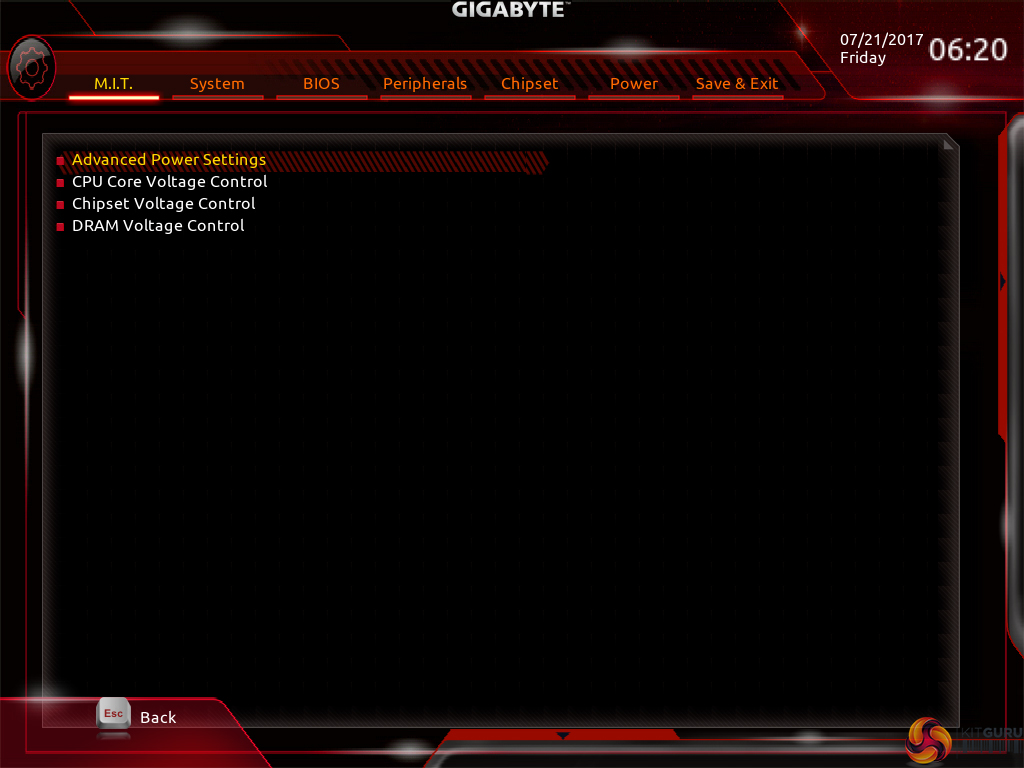

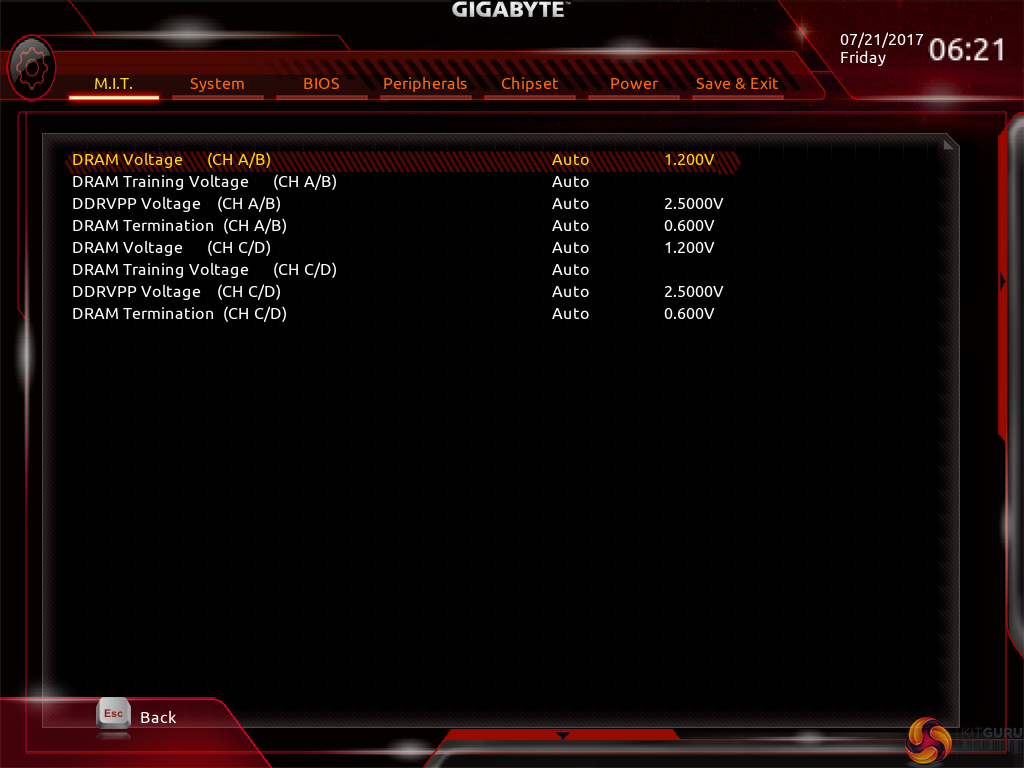
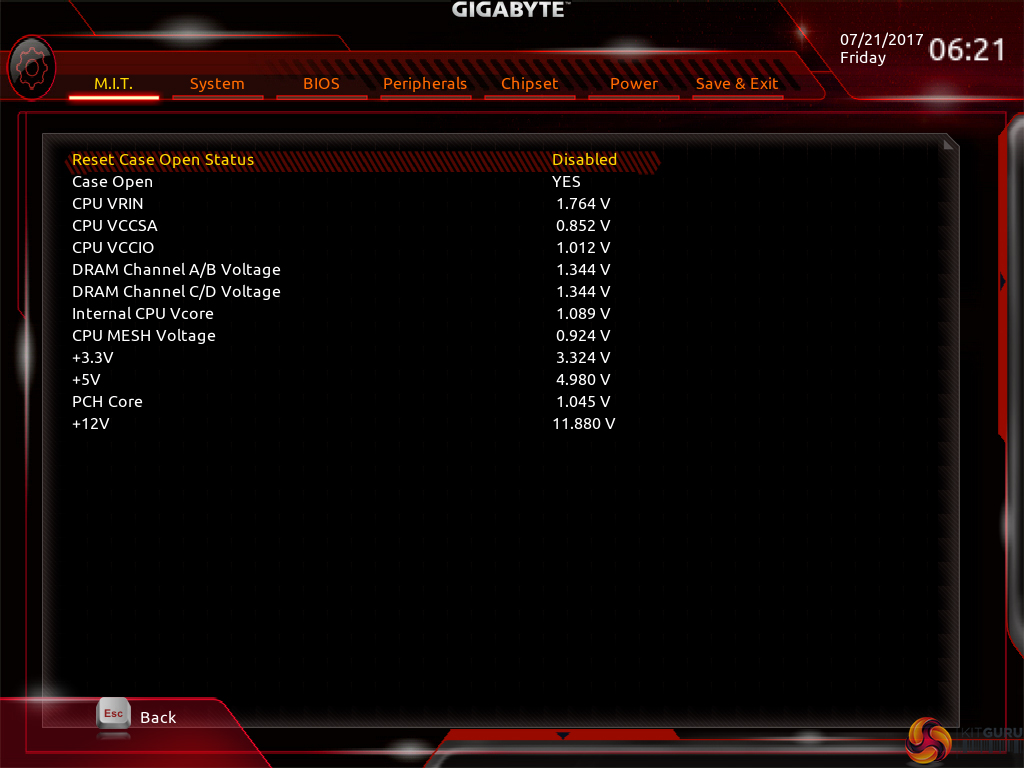
M.I.T. is the main section where parameters relating to voltages, frequencies, and power settings for the system’s main components are found. The Memory and Voltage sections are split from the Frequency subsection, which makes sense until one realises that an entire group of memory settings is replicated in both the Frequency and Memory subsections.
The subsection splitting forces a user to jump back and forth between pages but it also helps to keep the individual subsections tidy and without an overwhelming amount of information on one page (I’m looking at you, ASUS and MSI). Judging whether this sectioned layout or one where most settings are on a single page is better is down to individual preferences, as my colleague Ryan is not particularly fond of jumping between subsections but I personally prefer the segregation.
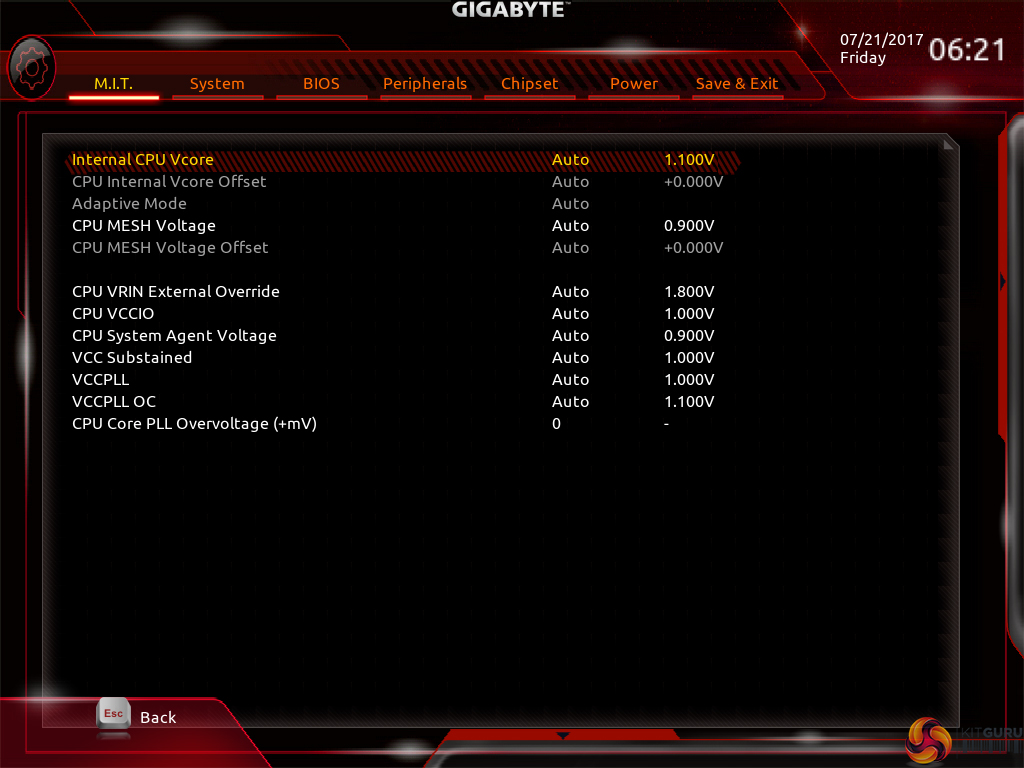
The selection of LLC settings don’t make any sense because there’s no explanation (be it visual or written) as to how the voltage profile is adjusted with each mode. As it happens, our trial-and-error testing suggests that you should use the High LLC setting if you want CPU VCore to stay close to your applied numerical value without a significant overshoot or undershoot. Is this so hard for Gigabyte to write in the UEFI?
There is a help section on the right side of UEFI pages but it must be manually selected to be displayed. Competing motherboard vendors’ approach of permanently displaying valuable information on the right side is better. Memory dividers up to 58x can be selected and enabling XMP is as easy as clicking the button.
M.I.T. works fine overall but it feels very old fashioned and clunky compared to competing vendors' solutions. There are generally no drop-down lists for selecting frequencies and no colour indication is given to highlight a high voltage level.
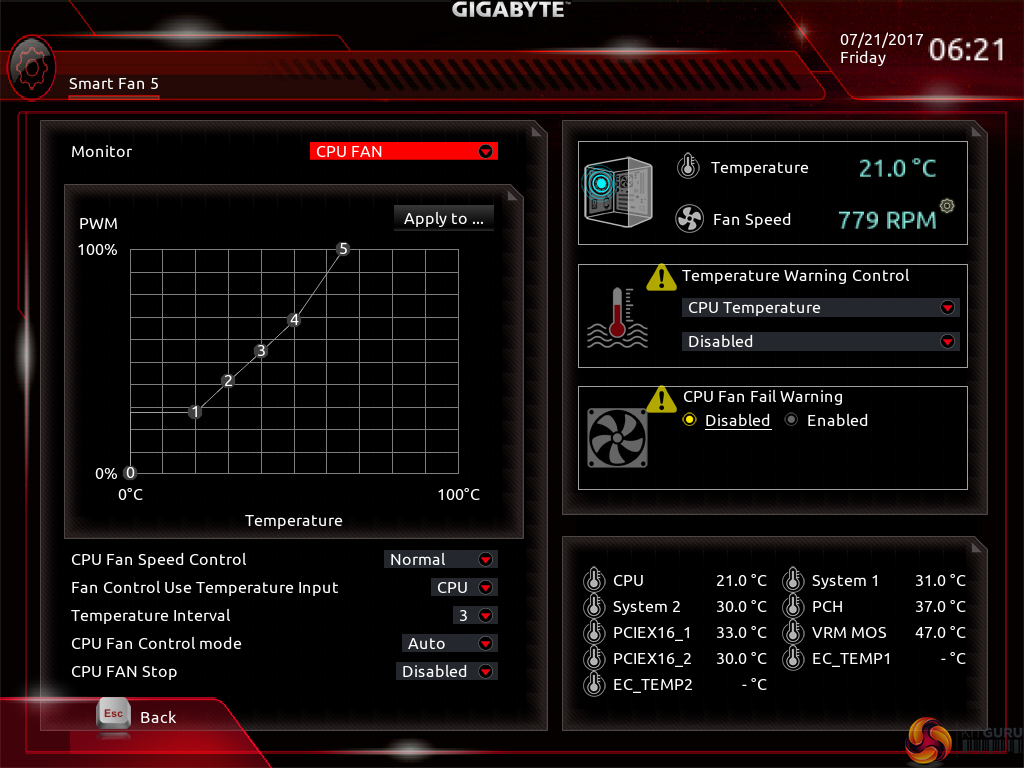
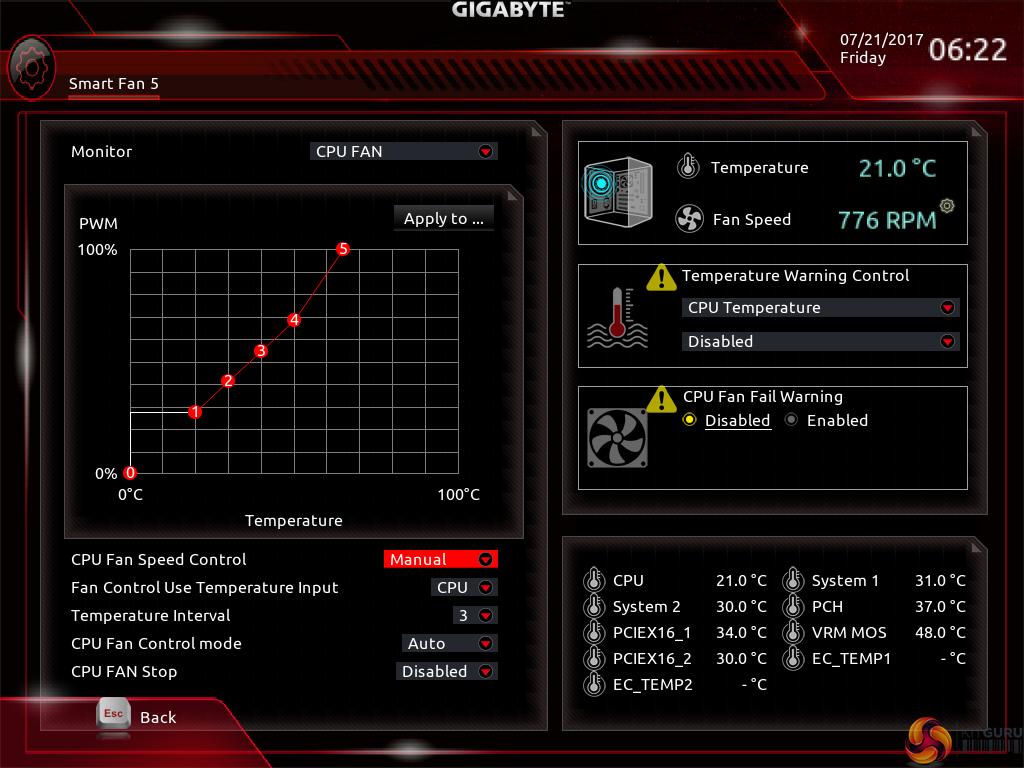


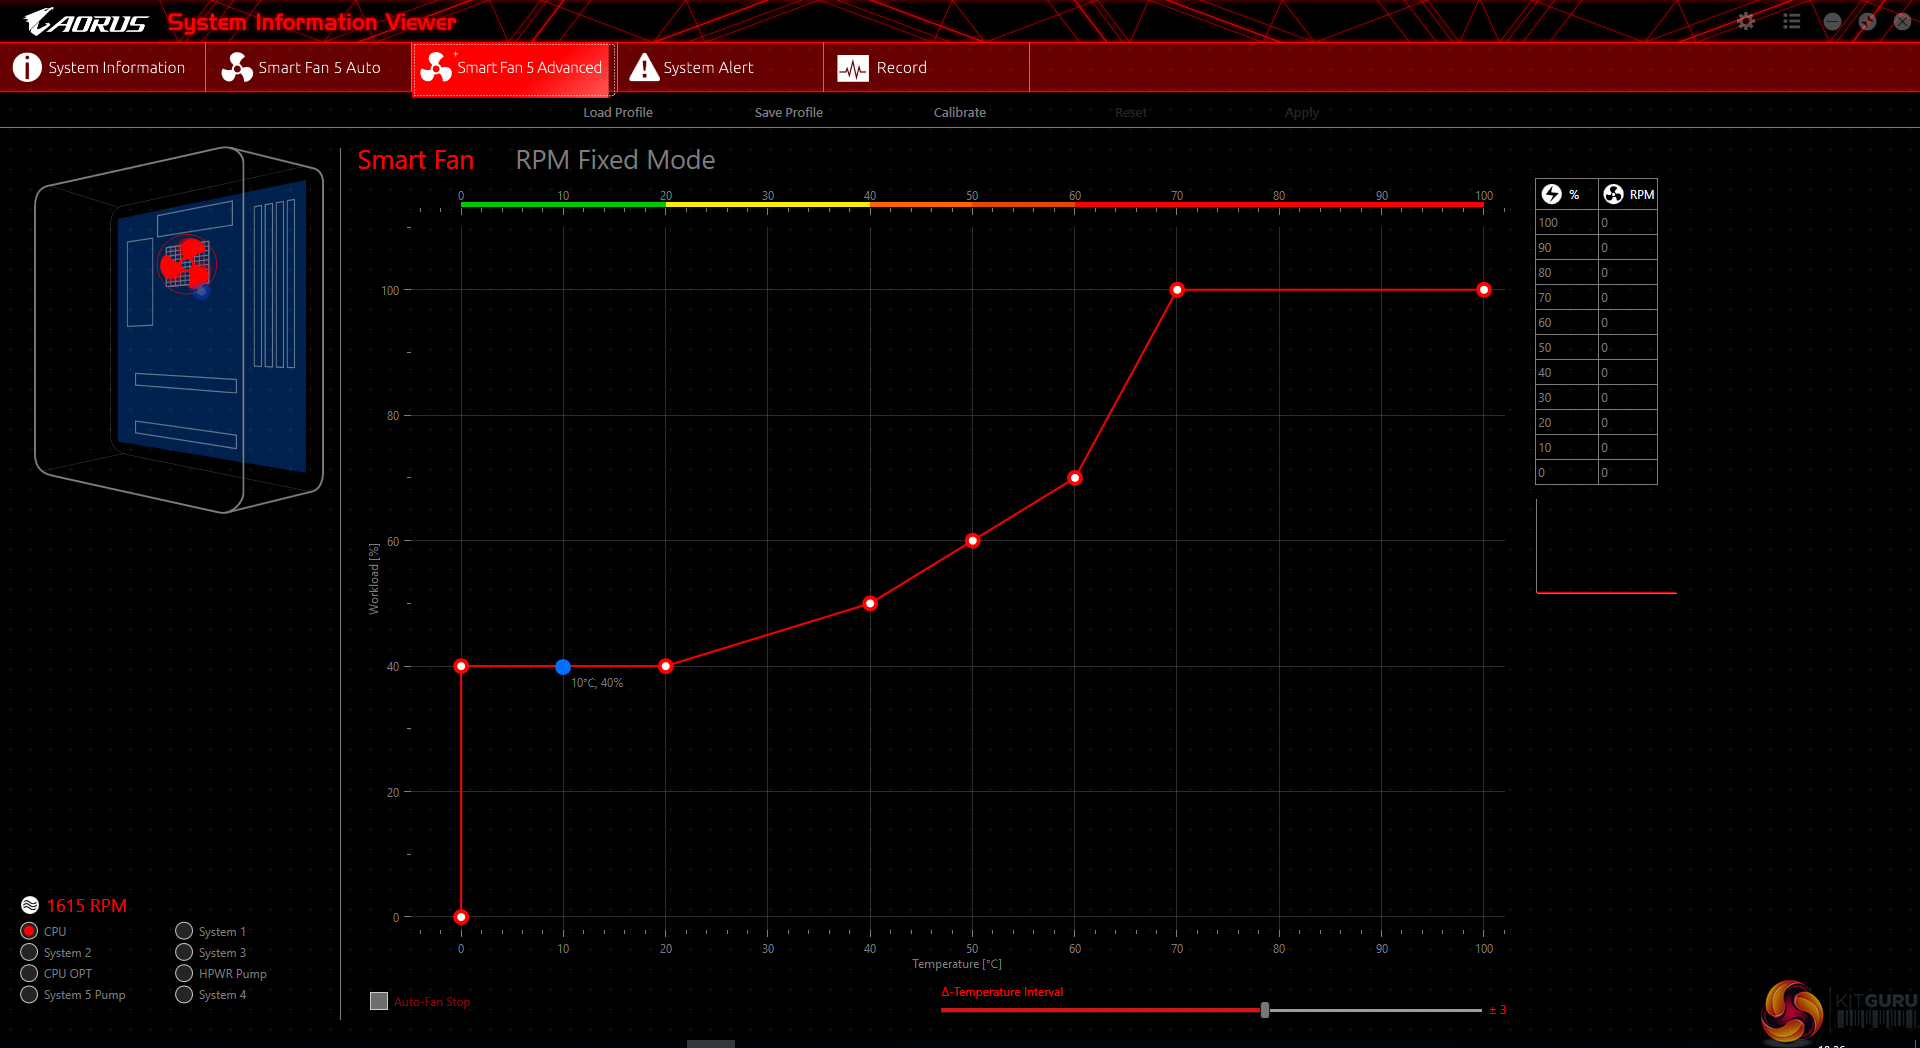
The Smart Fan 5 settings subsection can be accessed from the M.I.T. page. This superb fan control system is the crown jewel for Gigabyte’s UEFI.
All fan headers can be individually selected and their speed profiles can be tweaked. Gigabyte includes several preset fan speed control settings and a choice of temperature monitoring points. The headers can also be set to PWM or Voltage (DC) mode at will, which is ideal for feeding continuous current to a watercooling pump or letting PWM fans adjust their own speed.
It’s the manual fan speed tweaking mode where Smart Fan 5 really shows its worth. Six points on a graph can be used to create the fan speed curve. A level as low as 0% PWM speed down to 0°C is also supported, meaning that you can set the fan to switch off if the system is operating at ambient, or elevated, temperature (provided the fan is able to stop itself spinning).
The temperature monitoring points for fan speed curves are:
- CPU
- System 1
- System 2
- PCH
- PCIe x16_1
- PCIe x16_2
- VRM MOSFET
- External temperature sensor 1
- External temperature sensor 2
Not all the fan headers can interact with all monitoring points (the CPU can only read CPU data, for example) but this range of sensors is superb. A user should be able to comfortably set fan speed adjustments based on relevant data from the CPU, MOSFET, and PCIe slots. If you want to monitor DDR4 and HDD/SSD temperatures, the pair of external thermistor cables can be utilised.
The only noteworthy omission is a graphics card monitoring sensor. It would be good if Gigabyte fed data from its Aorus graphics cards, for example, through to the motherboard-controlled fan headers. PCIE readings in the UEFI relate to the actual slots, not the cards installed in them.

RGB Fusion is Gigabyte’s basic UEFI-based LED colour control tool. Colours can be adjusted in real time and the LED activation mode can be set, but that’s about it. There is a limit to how complex the tool can be given its residence inside the UEFI. The OS version has greater functionality.
With that said, I like to see at least some form of LED control available in the UEFI as it helps to maintain user-defined parameters in the case of an OS reinstall or system corruption that damages the OS-based LED profiles.

Up to eight individual profiles can be saved to the board’s internal memory. Further profiles can be transferred using a storage medium.

Gigabyte’s BIOS updating tool – Q-Flash – is accessed via a hidden tab on the bottom of the screen. I took a few minutes to find its location which was annoying as it would make more sense if there was some reference to it in one of the main pages, such as BIOS.
We could enter different folders within our USB drive using Q-Flash and then update the BIOS with ease. There’s no internet-based BIOS update tool available through the Gigabyte UEFI, as we have seen some competing vendors offer.
UEFI Summary:
Good fan control options through Smart Fan 5 and an ability to control RGB LED settings, albeit in a basic manner, through RGB Fusion are positive points for Gigabyte’s UEFI. The interface was stable throughout our testing and we didn’t seem to be missing any glaring system tuning settings that limited our overclocking capabilities. That is, with the exception of LLC settings that make any sense or have an explanation tied to their operating mode.
Overall styling of the UEFI is older, less interactive, and far less appealing than the solution by ASUS. I found myself relying upon the keyboard for parameter adjustments more than I do in competing UEFI implementations. There’s no ‘special‘ UEFI feature like SSD Secure Erase with ASUS and MSI or ASRock’s and MSI’s System Browser and Board Explorer tools, respectively.
Gigabyte’s current UEFI is certainly a major improvement over the implementation seen on motherboards prior to LGA1151 offerings and the Easy Mode page is a nice addition that can help novices. Fan control functionality is superb and that may be enough of a positive for users to overlook the other negatives.
Software
The software used by Gigabyte is almost identical across its current product range. As such, we have re-used the bulk of our analysis from previous reviews and updated the text where there are subtle differences.
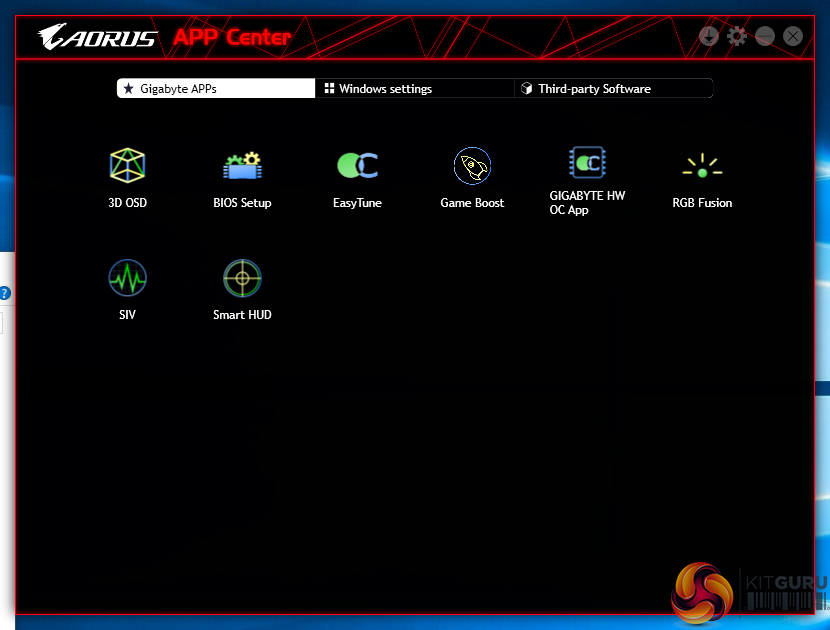
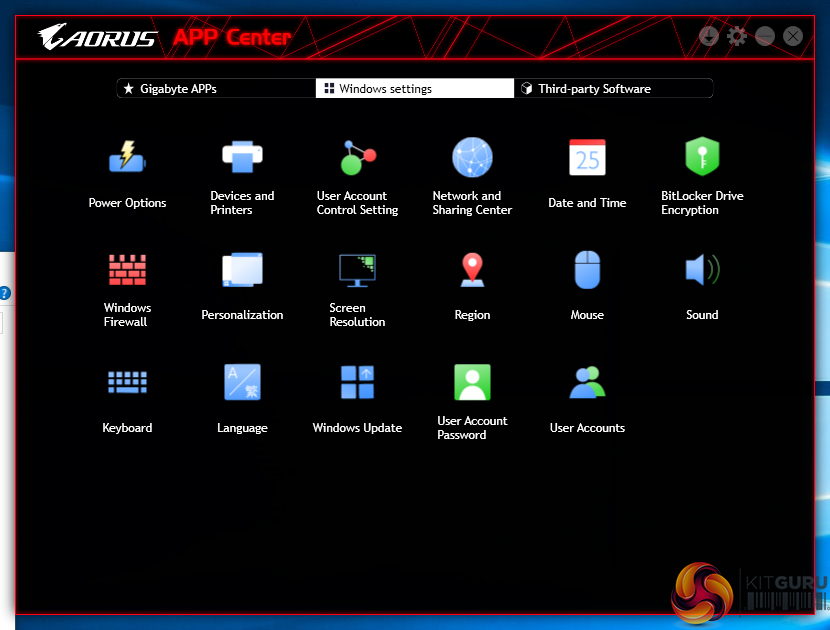
Gigabyte makes a vast number of software utilities available for installation with its motherboards. Thankfully, not all the tools have to be installed and APP Center is a very good method of managing the selected software, as well as third-party apps and Windows settings.
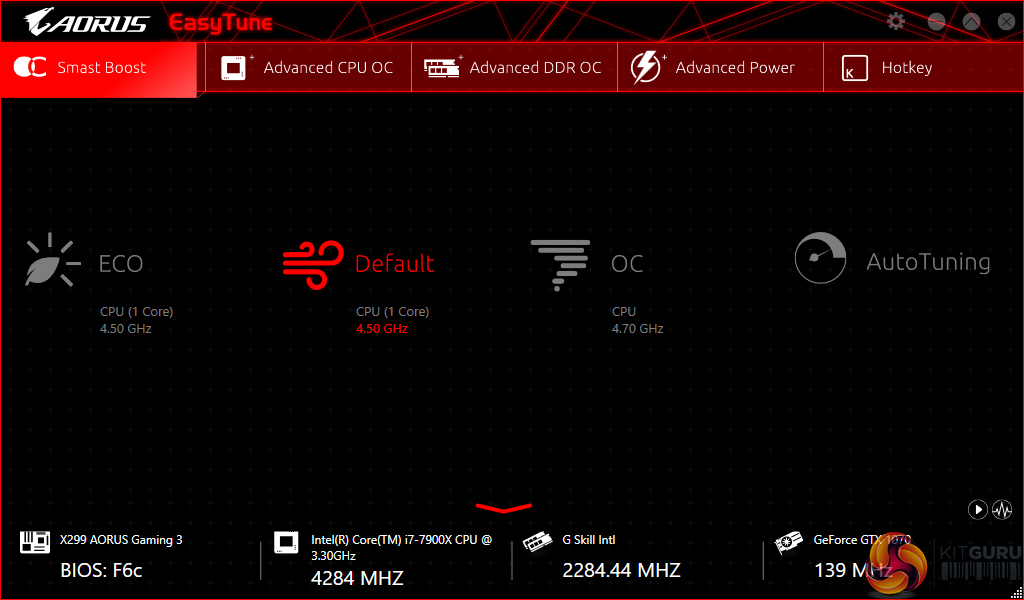
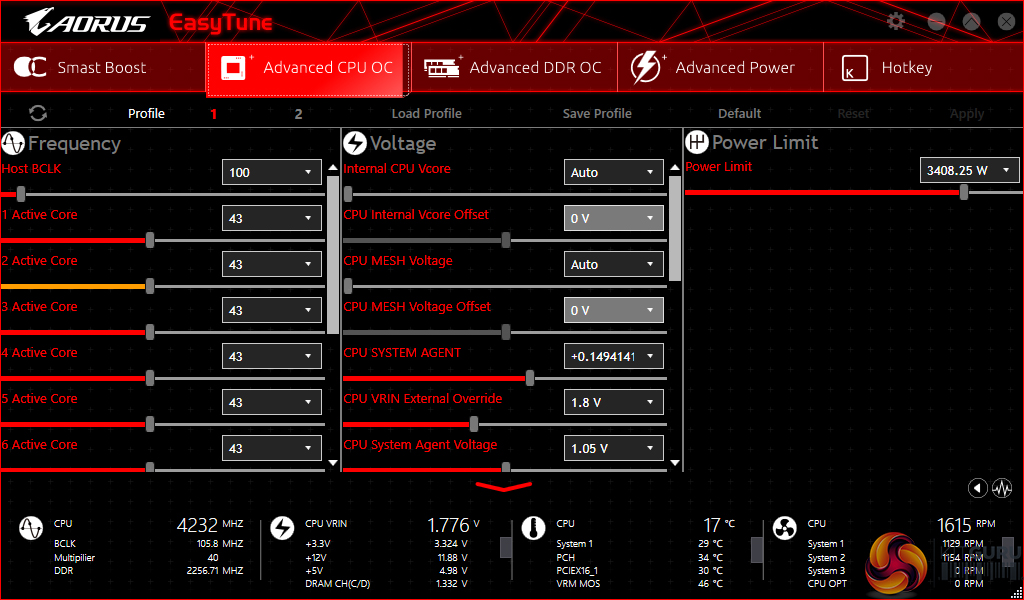
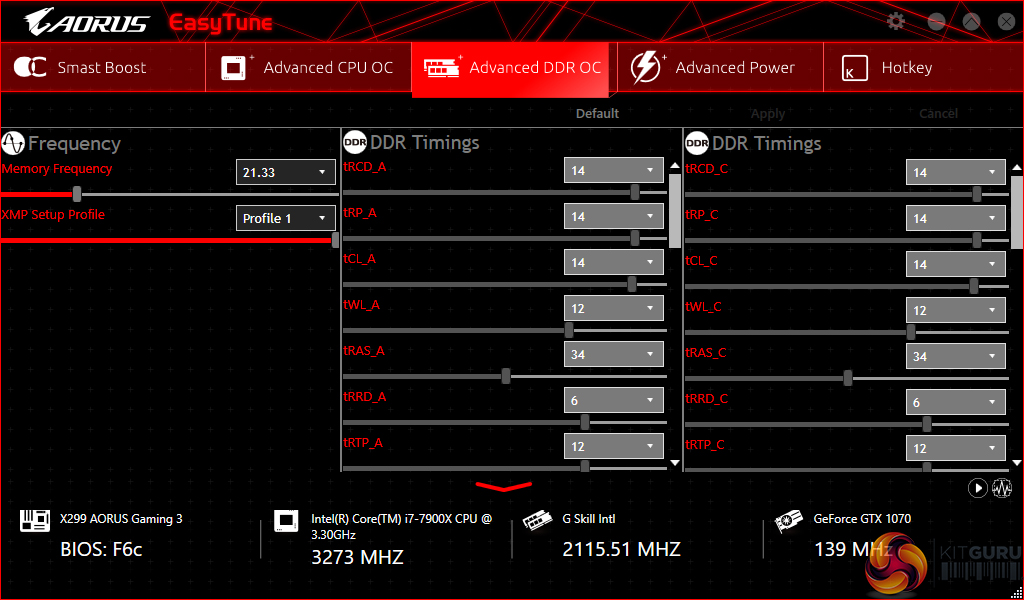
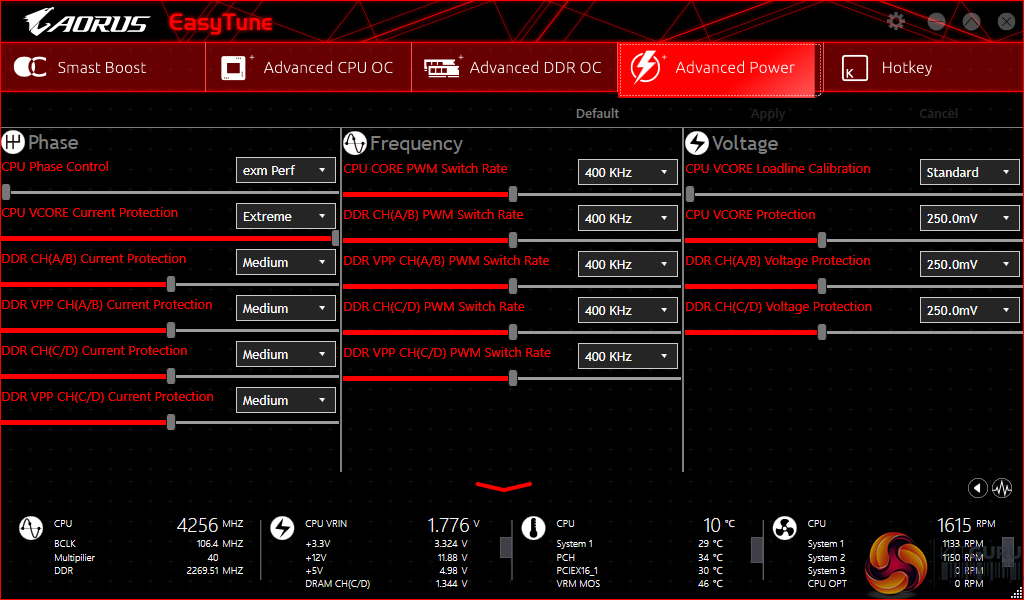
EasyTune is Gigabyte’s tool for managing system operating parameters. The performance profile of the system can be adjusted using EasyTune and there’s also the option to conduct automated system tuning.
Other system settings such as voltages, speeds, and ratios can also be adjusted and saved into profiles.
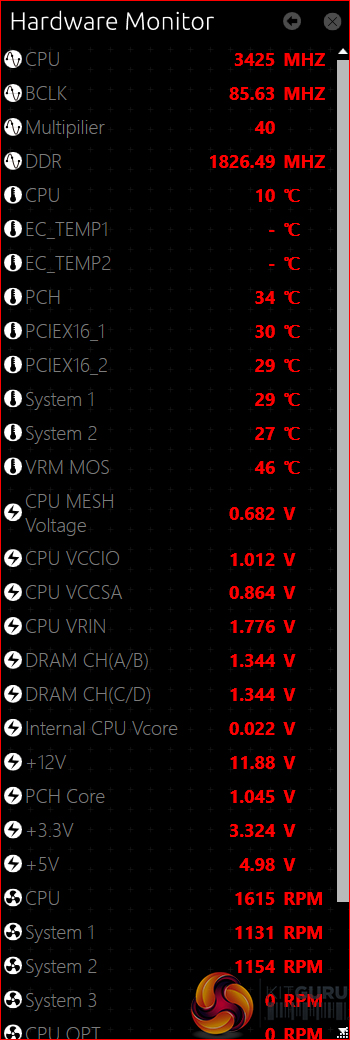
The Hardware Monitor break-out tab is a method for reading a wealth of system information while inside the OS. The quantity of information displayed is good and the readings look to be accurate.
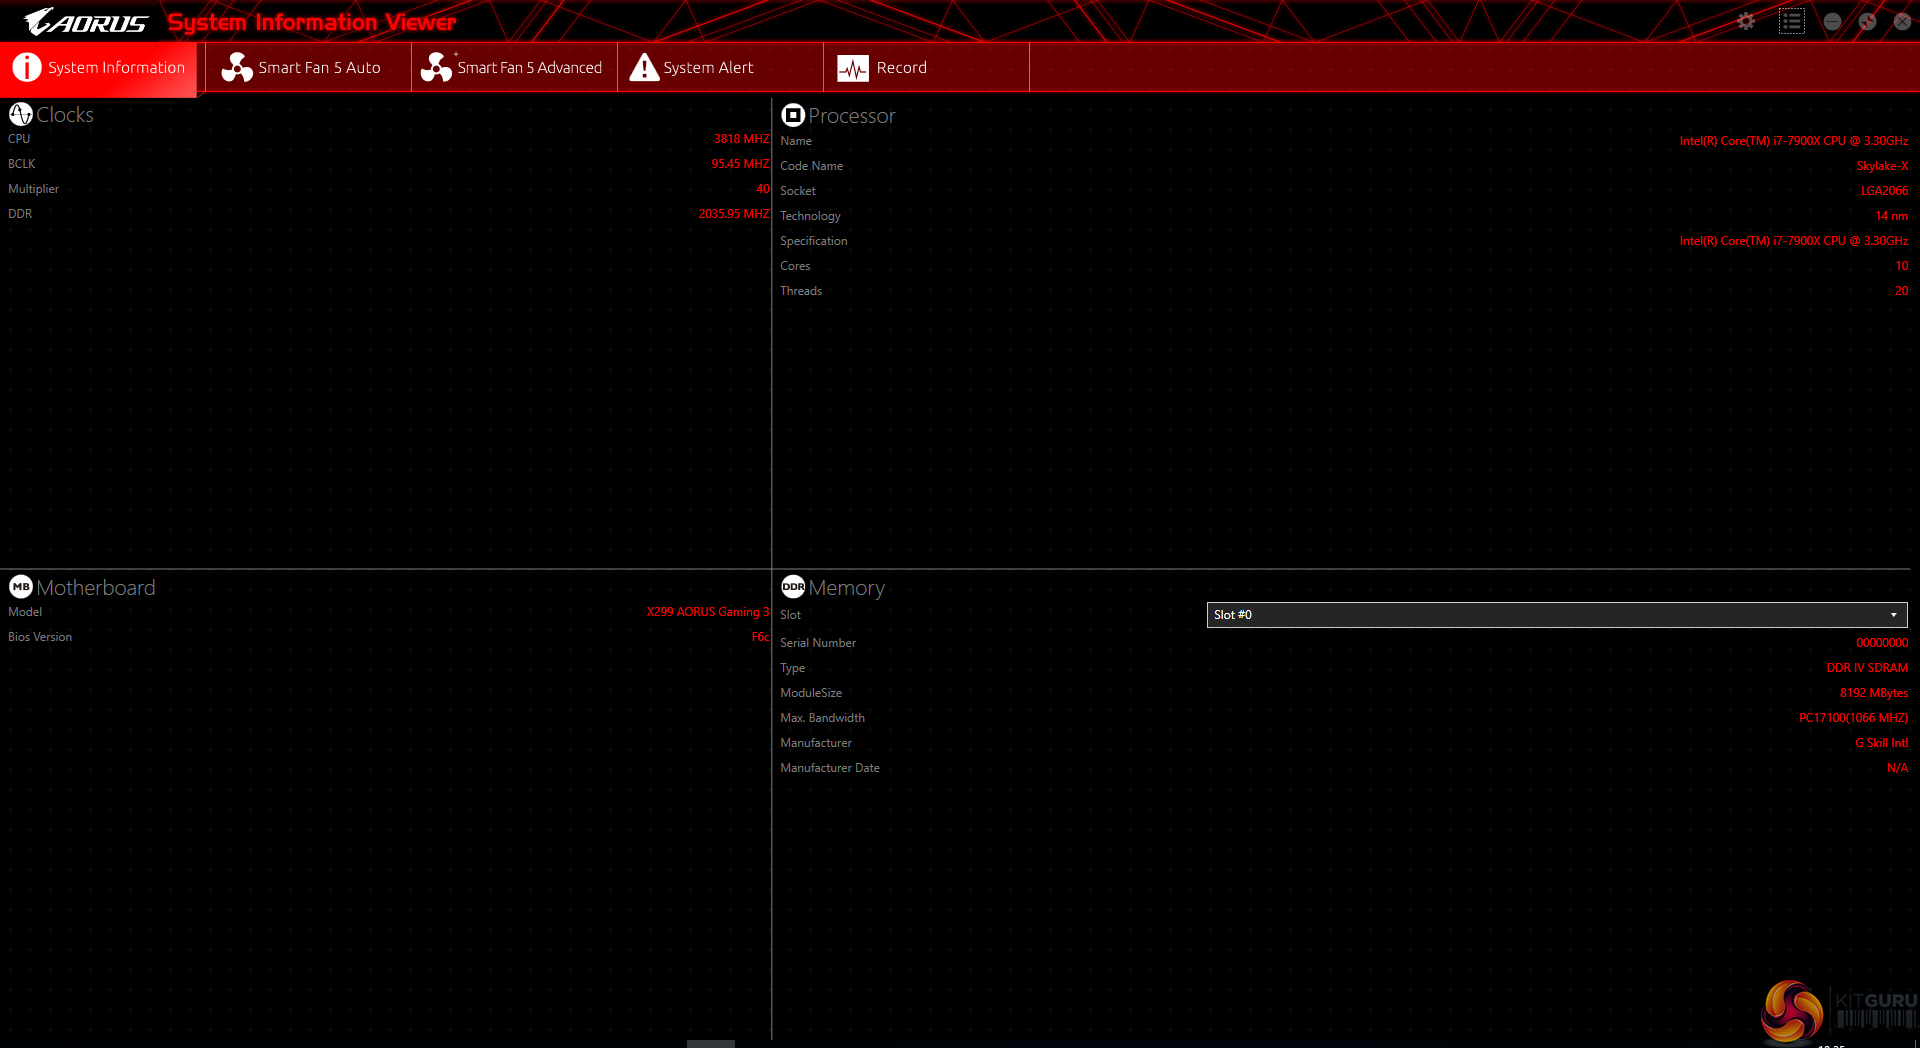
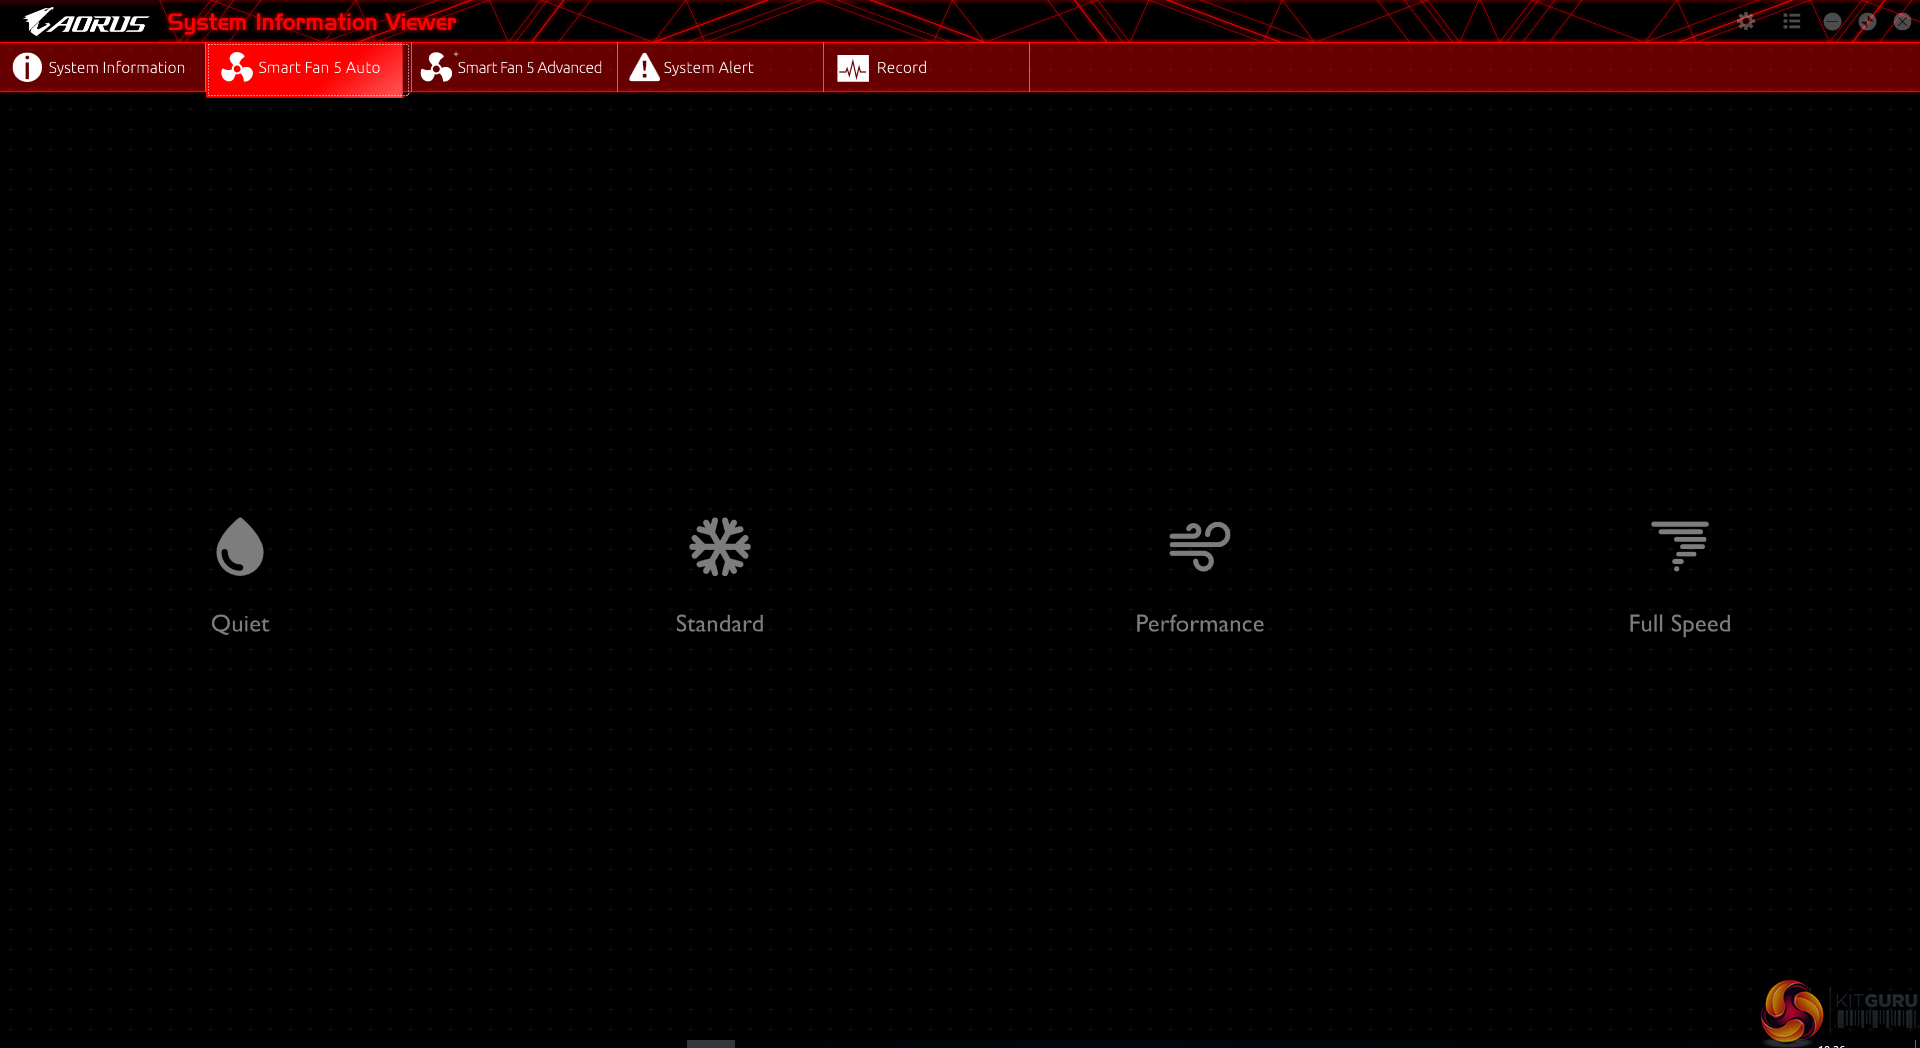

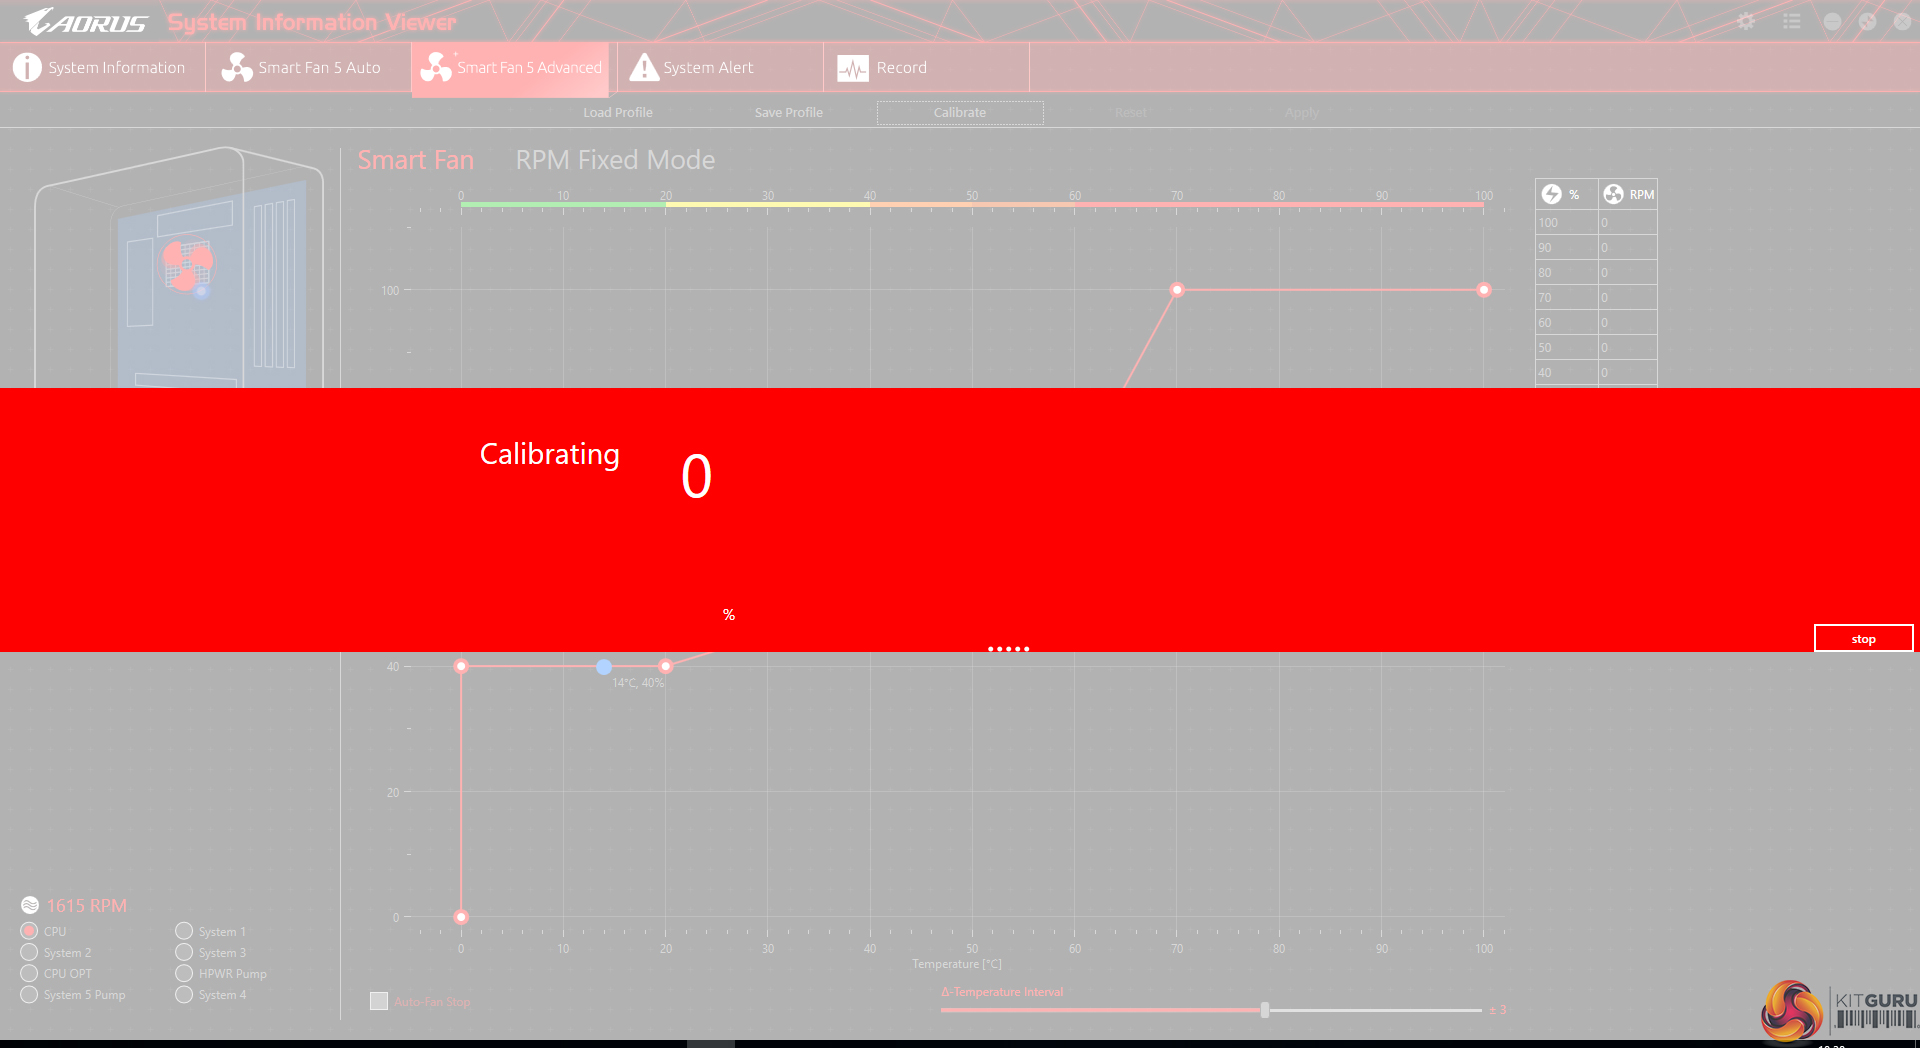
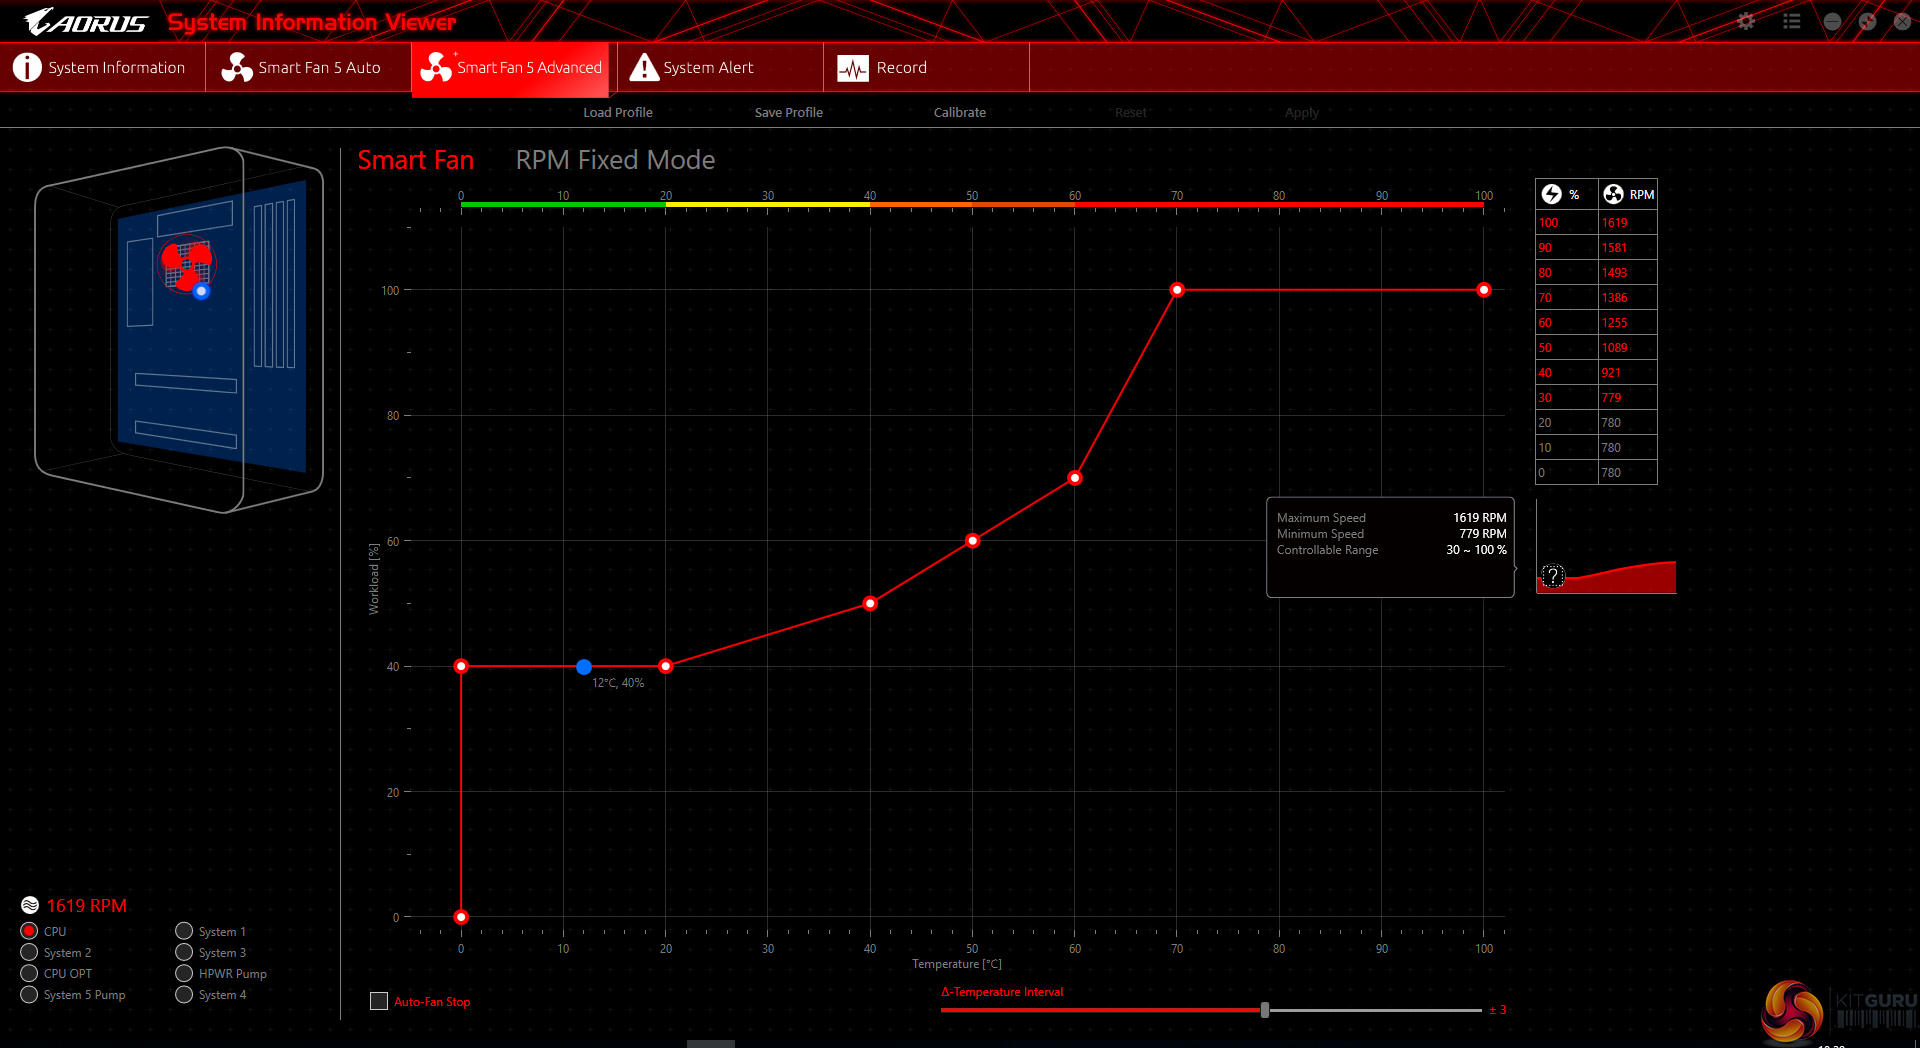
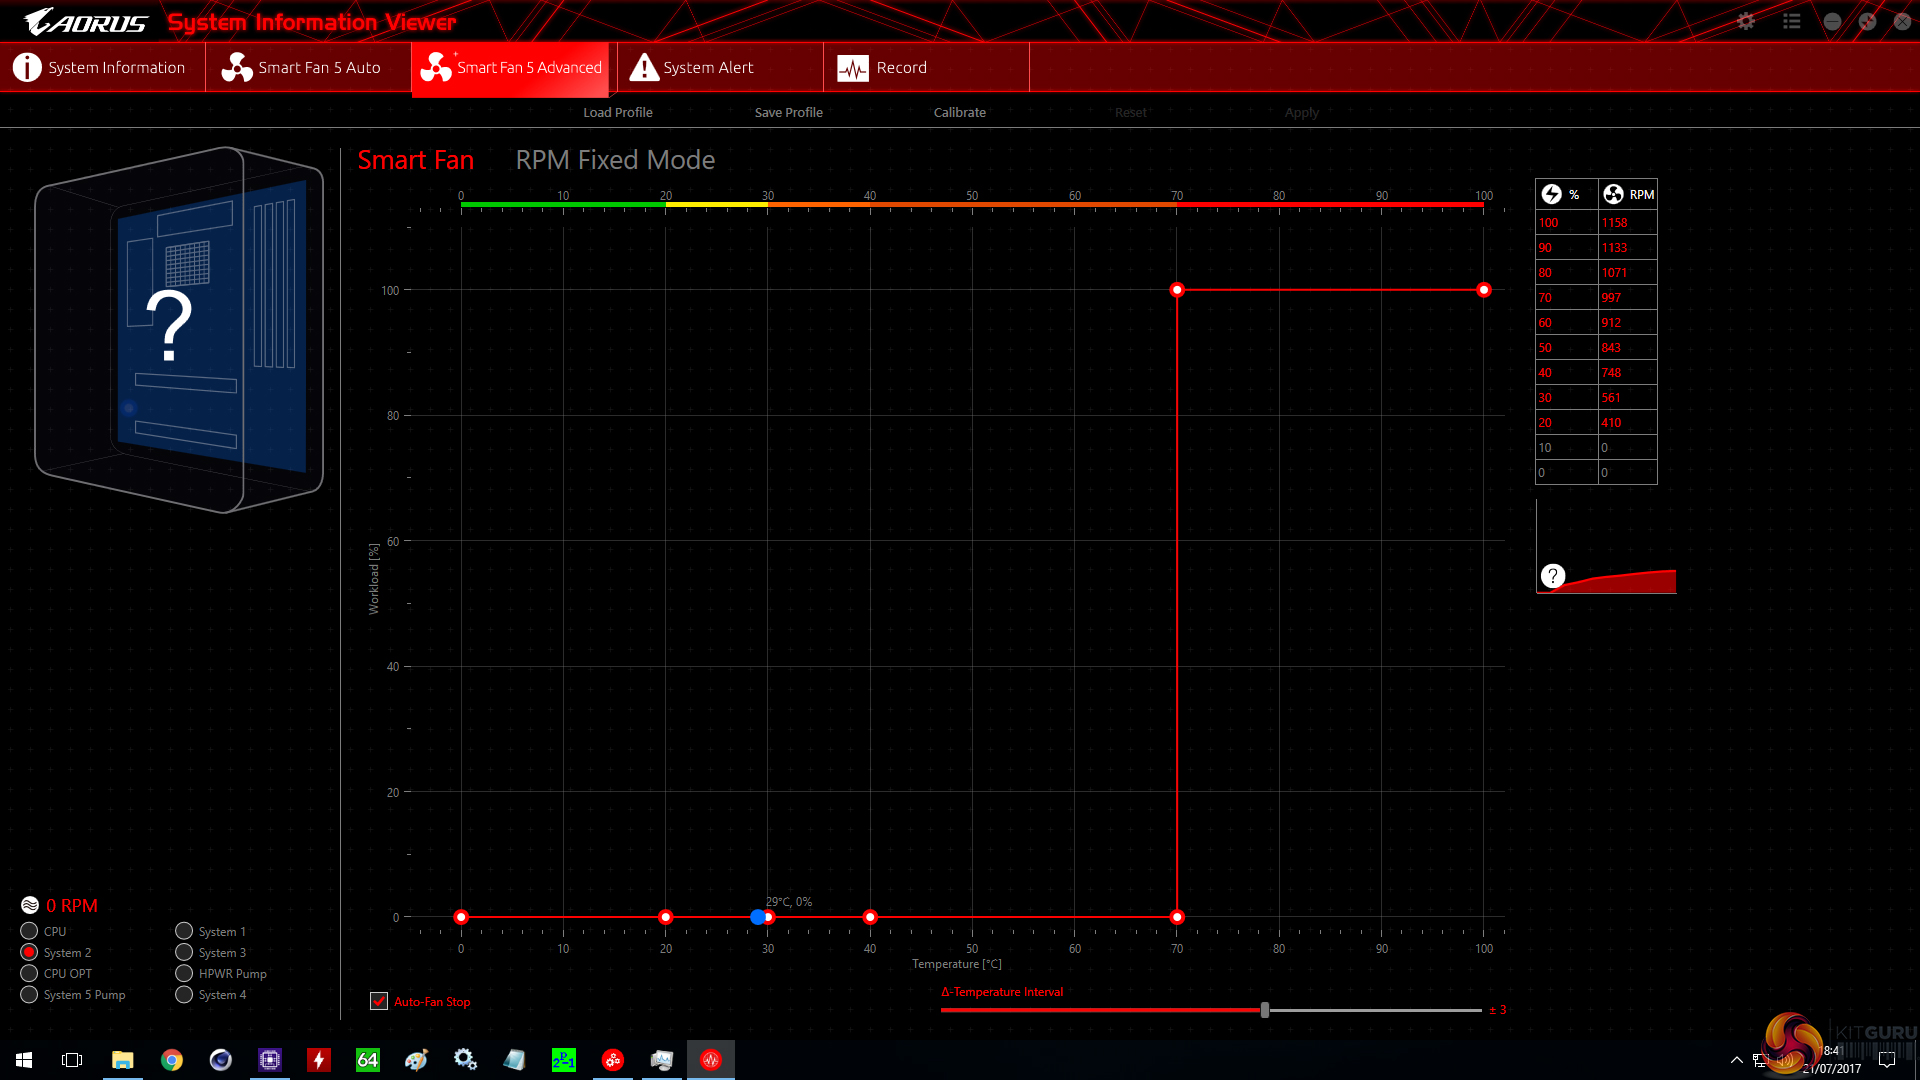
System Information Viewer (SIV) is a similar setup to EasyTune but it is geared towards fan control and system monitoring. Four fan speed profiles can be selected and manual fan control ability is provided in great detail. An 8-point curve can be set for all the motherboard’s fan headers or, alternatively, an RPM-fixed mode can be applied (which custom liquid cooling enthusiasts may appreciate).
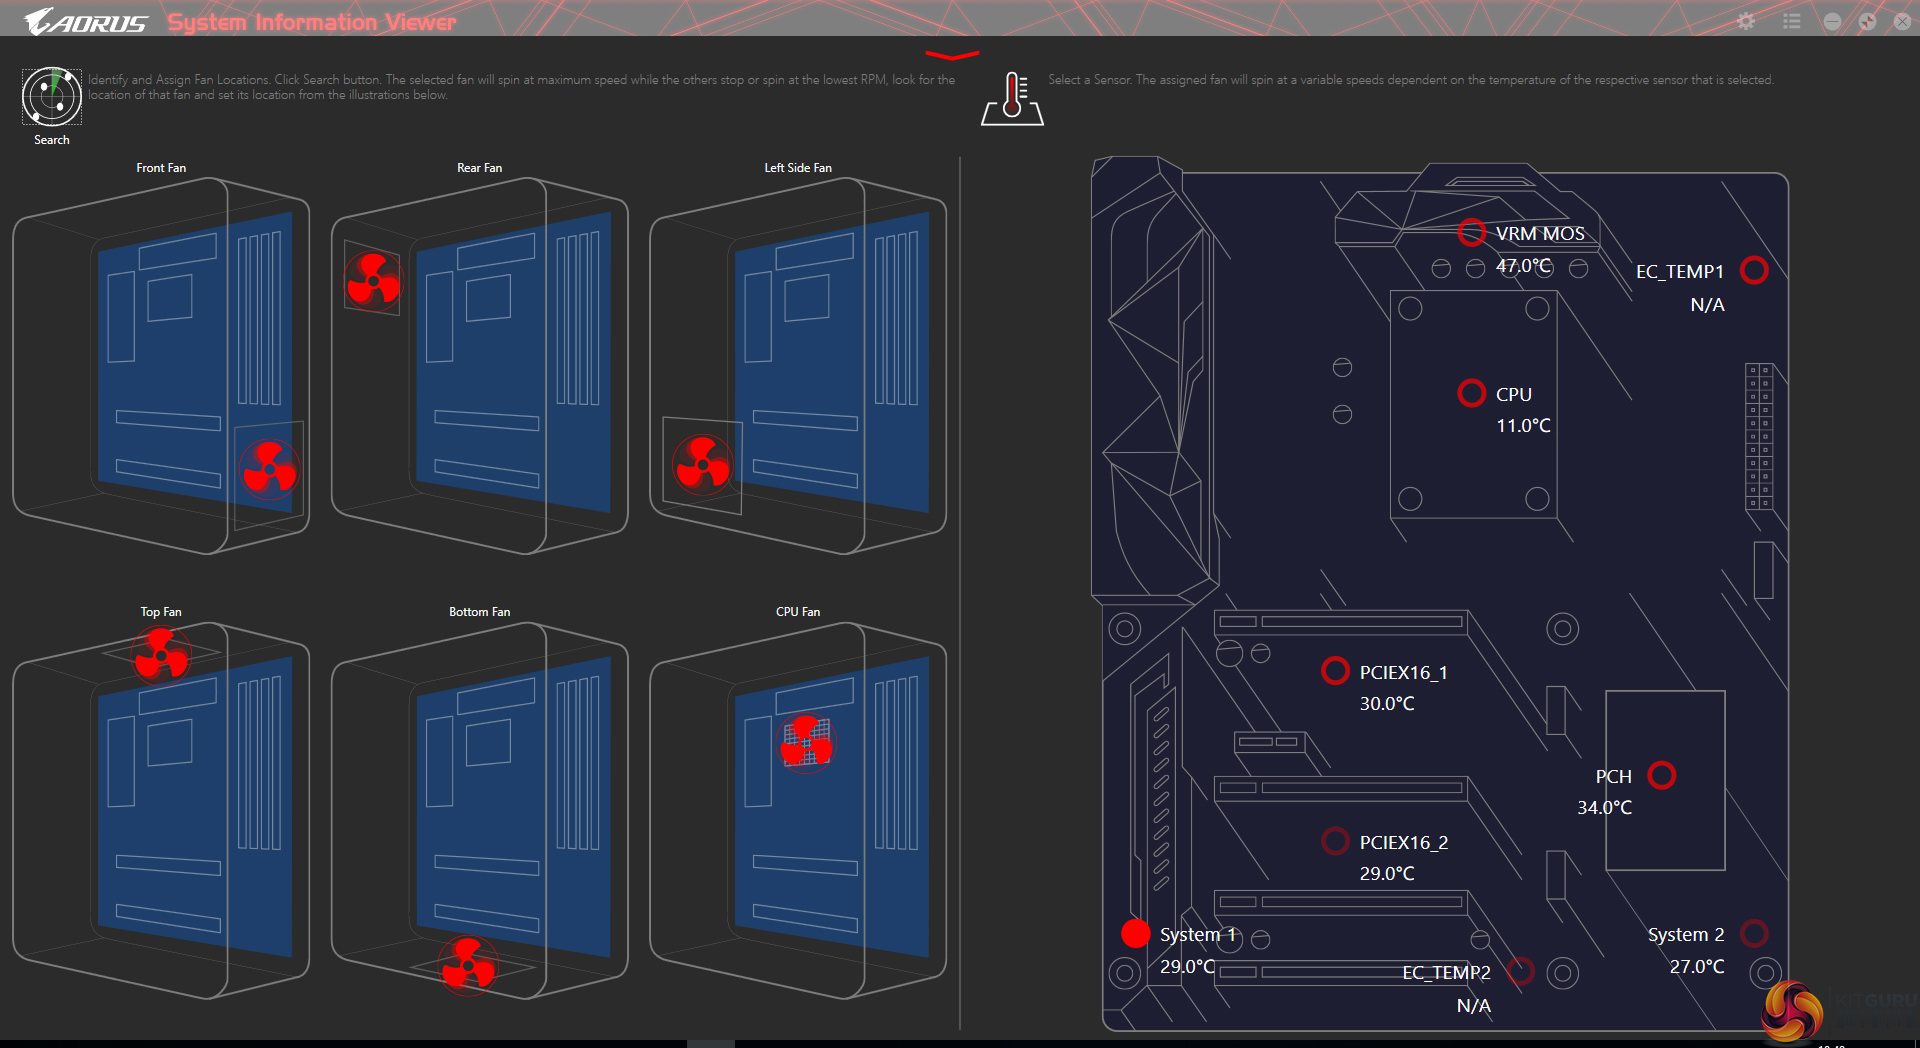
Gigabyte also provides a fan speed calibration option as well as the ability to see fan positions and temperature readings in a visual manner.
System recordings relating to voltages, temperatures, and fan speeds can also be made. This is particularly useful for analysing stability in the form of checking how your system behaves during an extended gaming or video rendering session, for example.
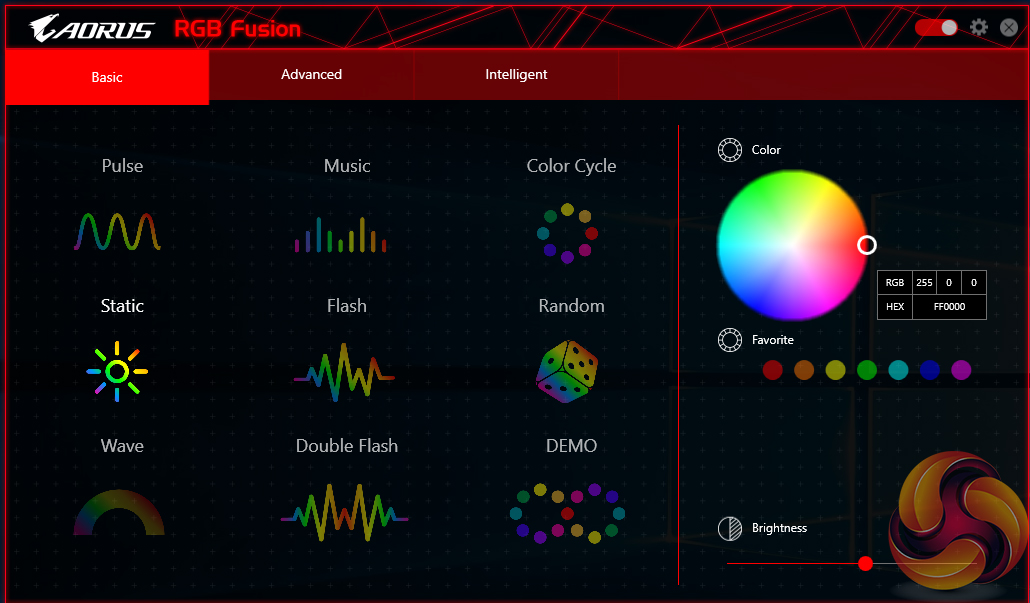
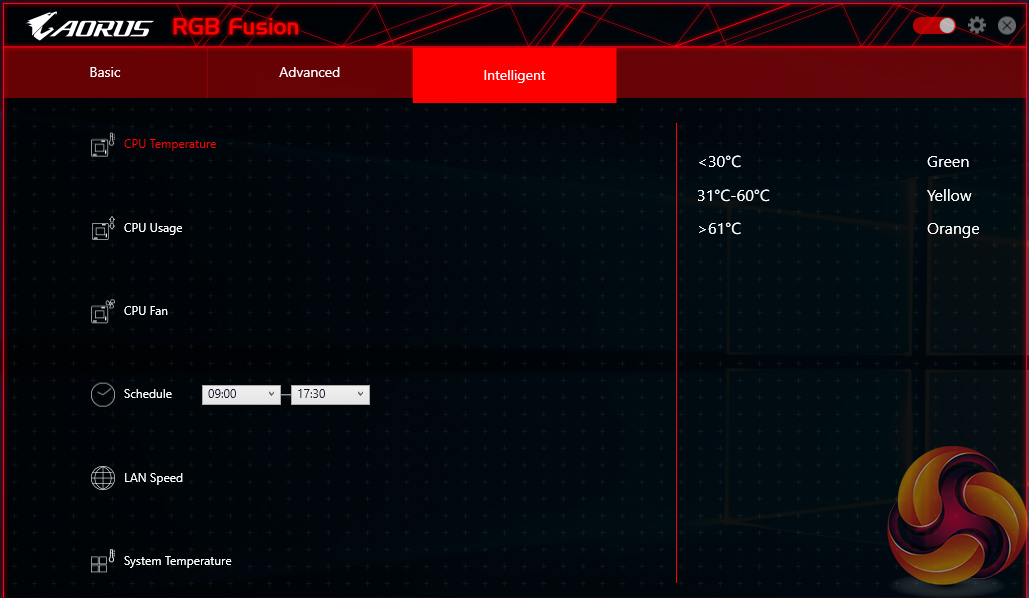
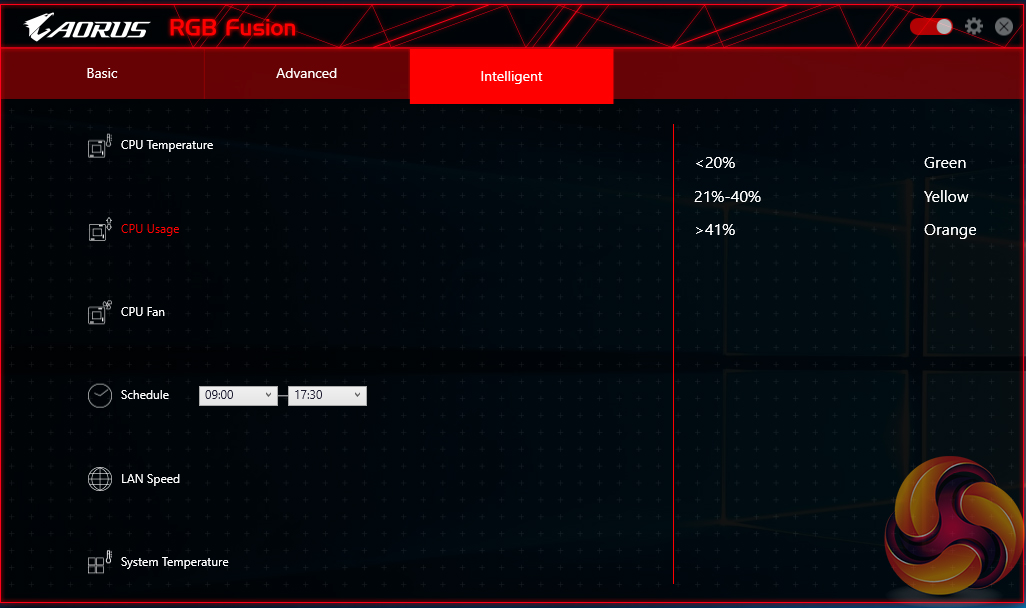
RGB Fusion is Gigabyte’s in-depth LED control application. The Basic tab can be used to activate different LED operation modes and tweak the RGB behaviour. I was particularly fond of the Intelligent mode which adjusts the LED colour profile based on statistics such as the CPU temperature or load, the LAN speed, or even a time schedule.
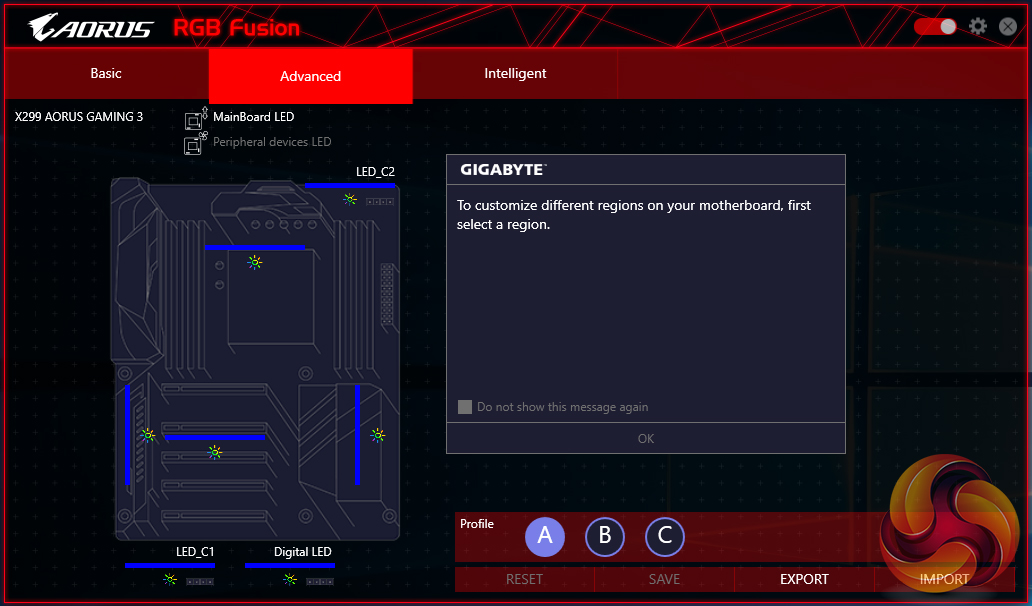
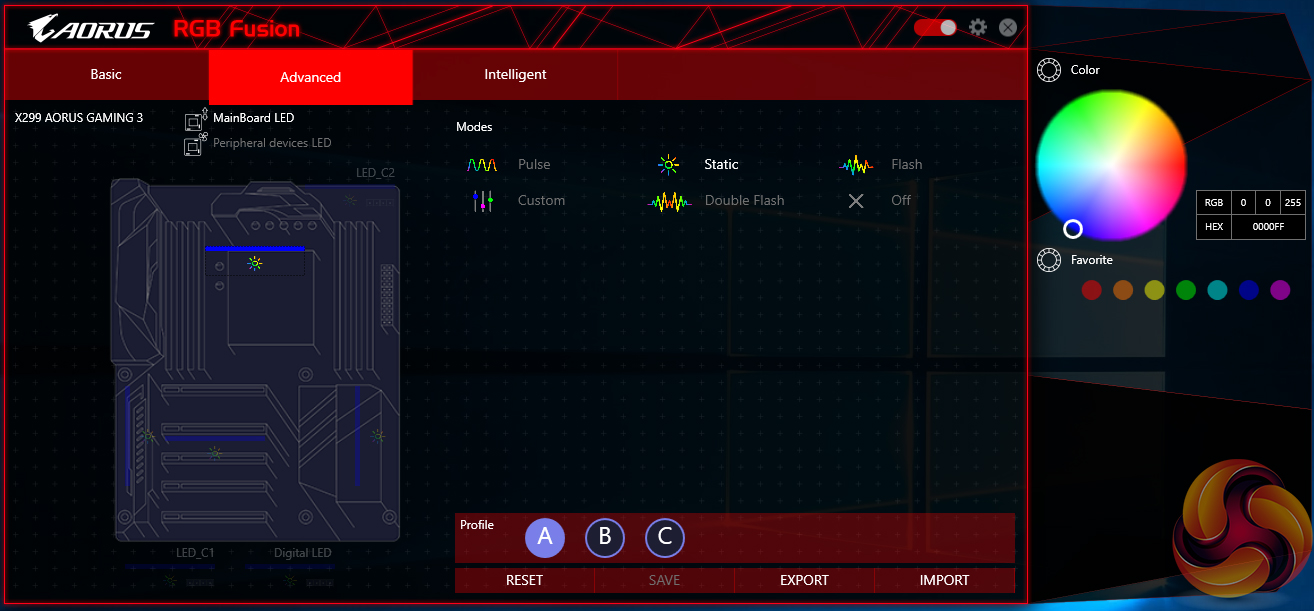
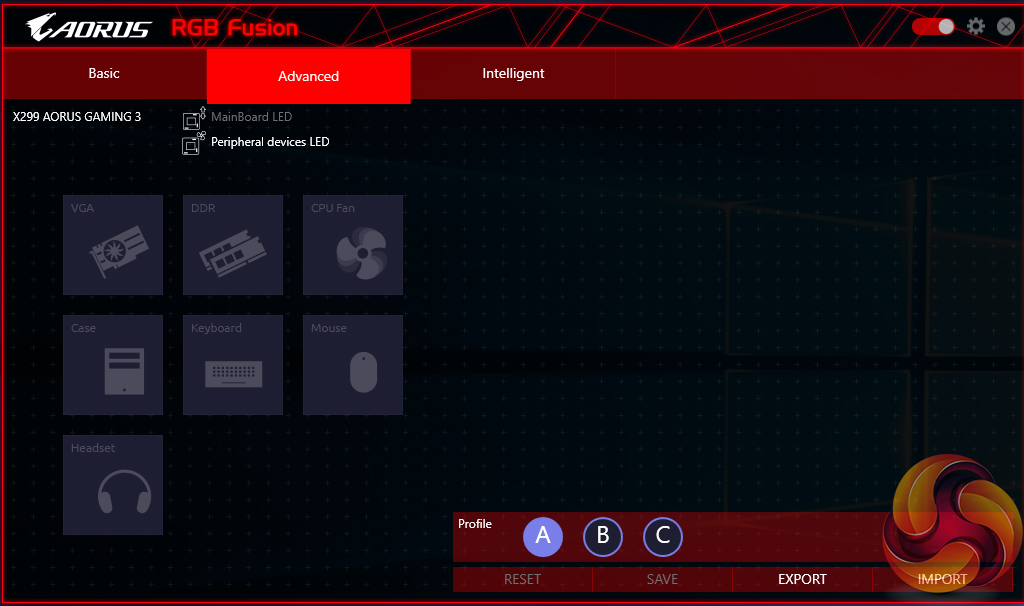
The Advanced section gives more LED control, allowing users to adjust the lighting colour and behaviour for the board’s numerous individual zones (and RGB header). The RGB strips can be set as a different colour to the motherboard. Three individual LED profiles can be saved and they can be exported/imported to share with friends or for backup purposes. RGB Fusion can control the LED profiles of partnering hardware such as an RGB-enabled Aorus graphics card.

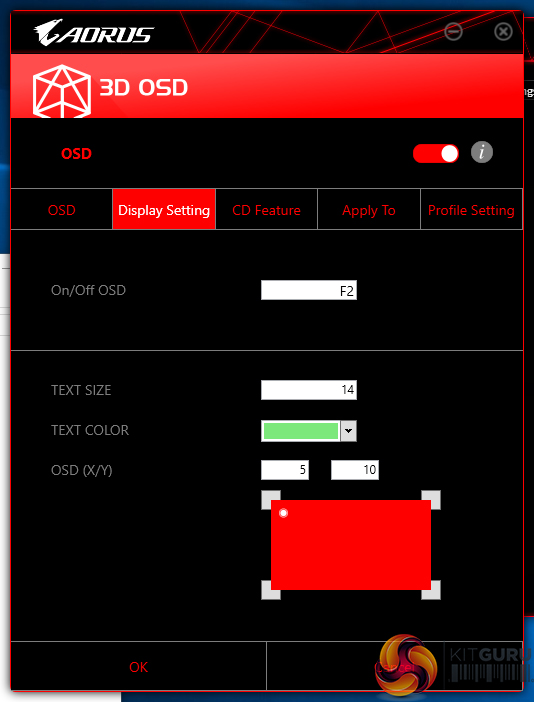

Additional tools include 3D OSD, which is a monitoring overlay similar to MSI Afterburner, as well as Smart HUD.
OS Software Summary:
Gigabyte’s variety of available software tools is strong and the system for managing them through APP Center is smart and efficient. EasyTune can be useful for OS overclockers. SIV should be able to control fan speeds through an easy-to-use OS-based interface.
RGB Fusion is excellent and gives users a sizeable amount of flexibility for tuning their system’s lighting conditions. The LED-adjusting tool is as good as ASUS’ AURA software in some respects and better in many respects (re-programmable RGB header pins and the Intelligent RGB modes).
Some form of RAM drive software tool would have been a nice addition. Overall, though, it is difficult to find criticism for Gigabyte’s strong selection of OS-based software.
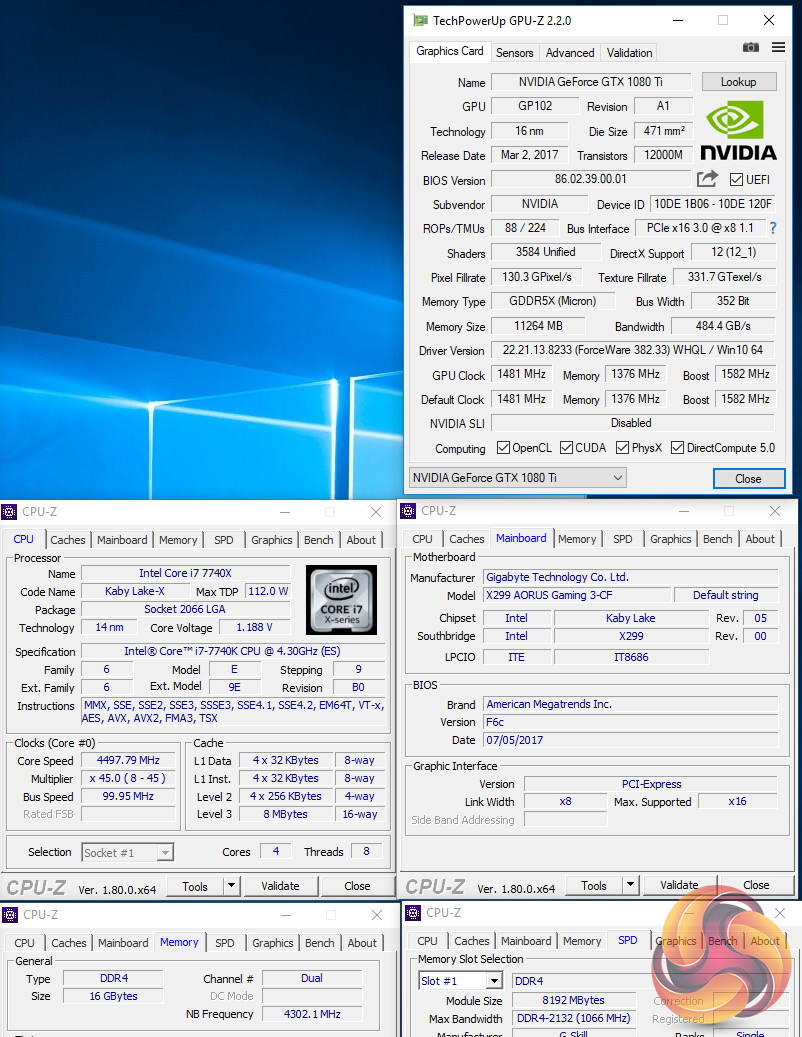
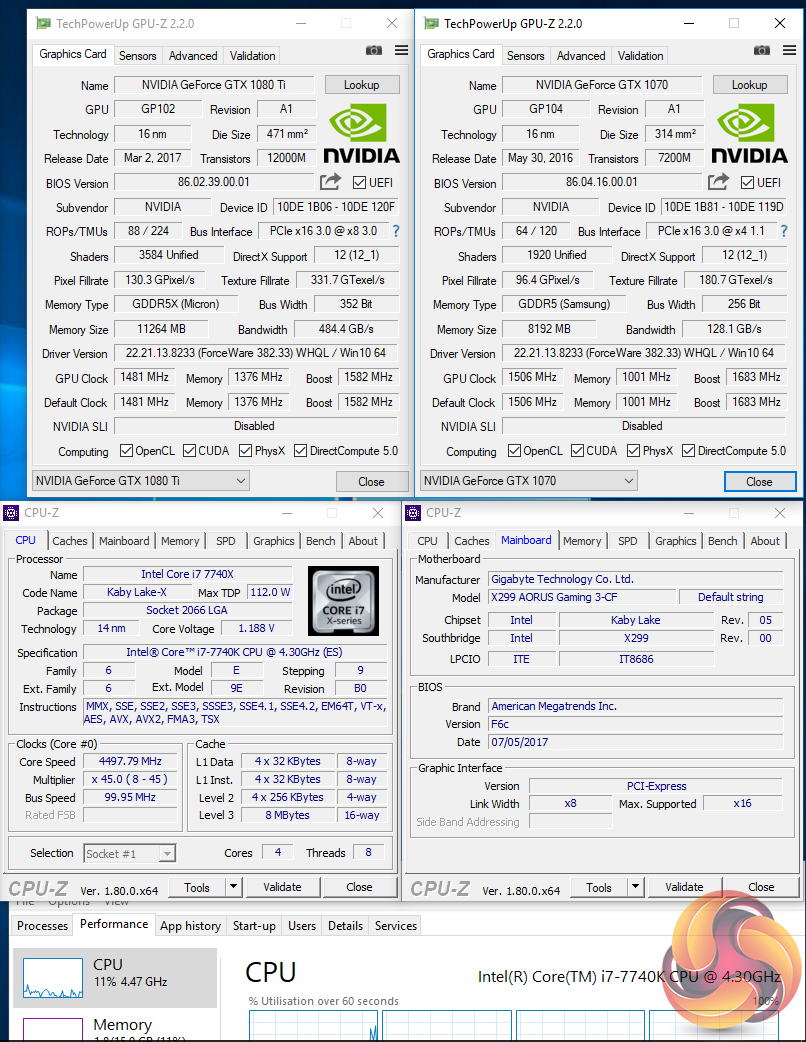
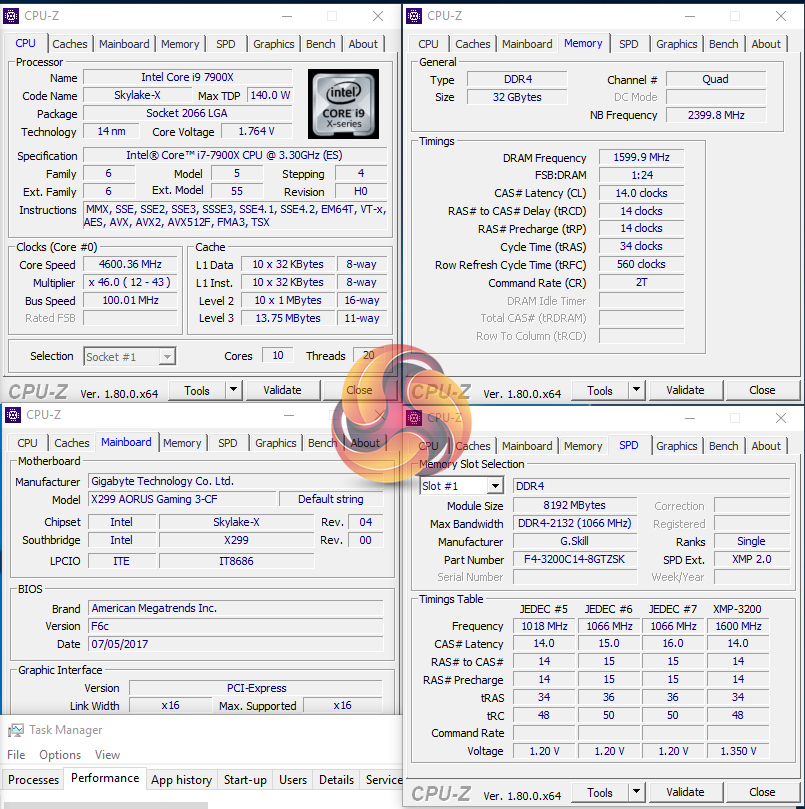
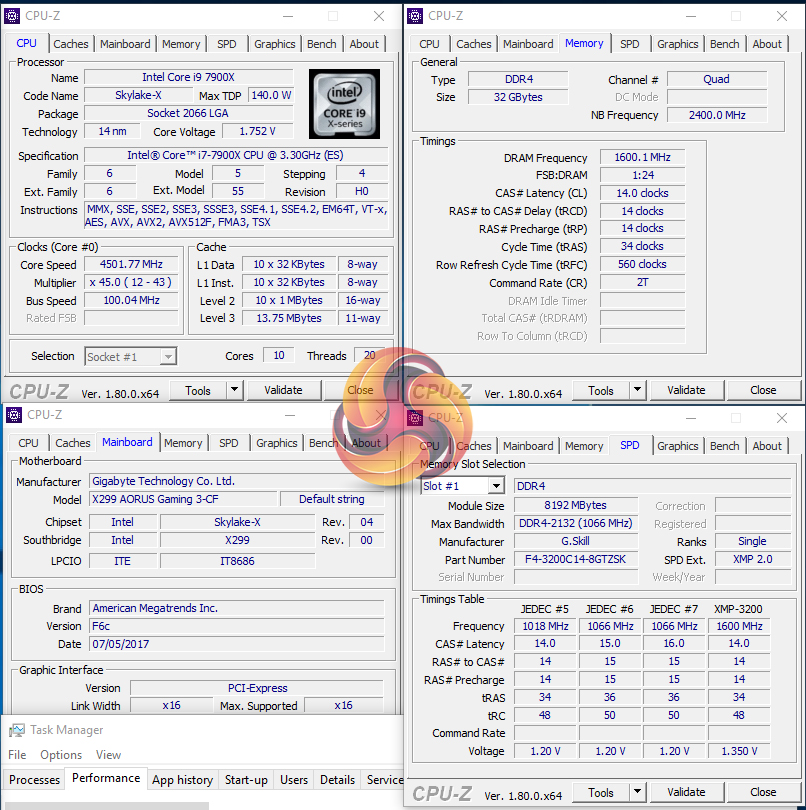
We will be outlining the Gigabyte X299 Aorus Gaming 3 motherboard’s performance with the Intel Core i9-7900X CPU and 32GB of 3200MHz G.Skill Trident Z DDR4 memory.
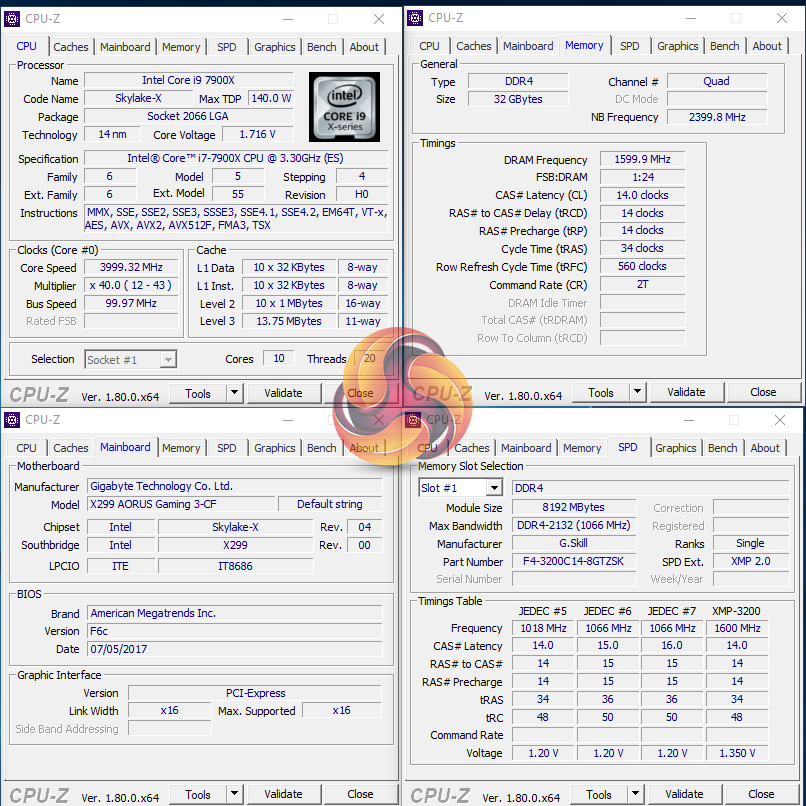
Stock voltage hovered around 1.1V under Cinebench load. This was using the latest F6c BIOS.
X299 Motherboard Test System:
- Processor: Intel Core i9-7900X.
- Memory: 32GB (4x8GB) G.Skill Trident Z 3200MHz 14-14-14-34 DDR4 @ 1.35V.
- Graphics Card: Nvidia GTX 1080 Ti Founder's Edition (custom fan curve to eliminate thermal throttling).
- System Drive: 500GB Samsung 840 SATA 6Gbps SSD.
- Games Drive: 960GB SK Hynix SE3010 SATA 6Gbps SSD.
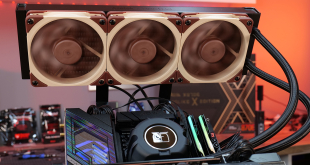
- CPU Cooler: Alphacool Eisbaer 360 3x120mm All-in-One liquid cooler.
- Power Supply: Seasonic Platinum 1000W.
- Case: Corsair Air 540.
- Operating System: Windows 10 Pro 64-bit (Creators' Edition).
Comparison X299 Motherboards:
- ASUS X299-Deluxe.
Software:
- Gigabyte X299 Aorus Gaming 3 BIOS F6c (latest).
- GeForce 382.33 VGA drivers.
Tests:
- Cinebench R15 – All-core CPU benchmark (CPU)
- 7-Zip – Built-in 7-Zip benchmark test (CPU & Memory)
- SiSoft Sandra – Memory Bandwidth Test (Memory).
- AIDA64 Engineer – Memory latency (Memory)
- 3DMark Time Spy – CPU score (Gaming)
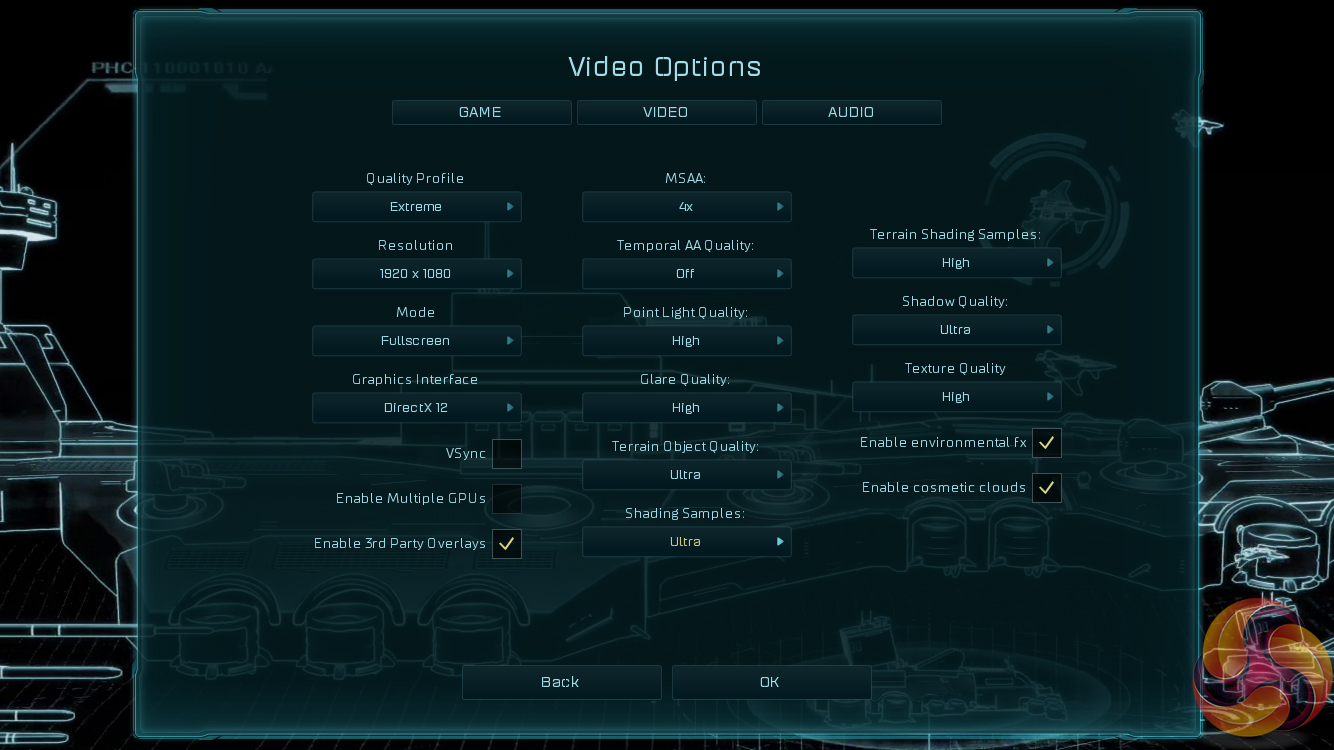
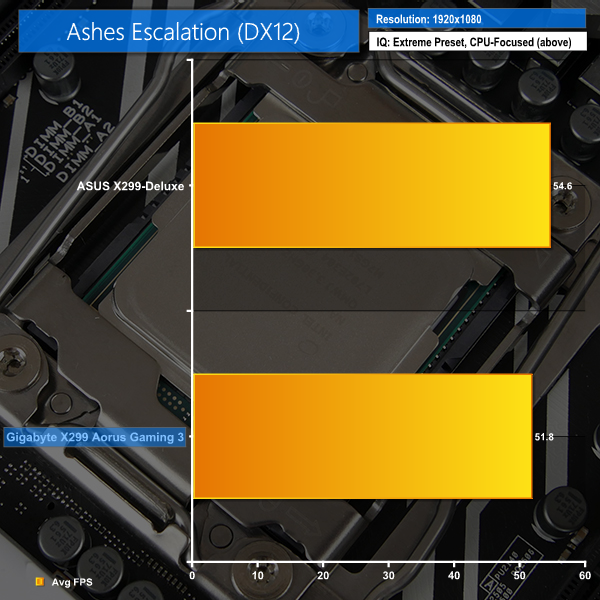
- Ashes of the Singularity Escalation – Built-in benchmark tool CPU-Focused test, 1920 x 1080, Extreme quality preset, DX12 version (Gaming)
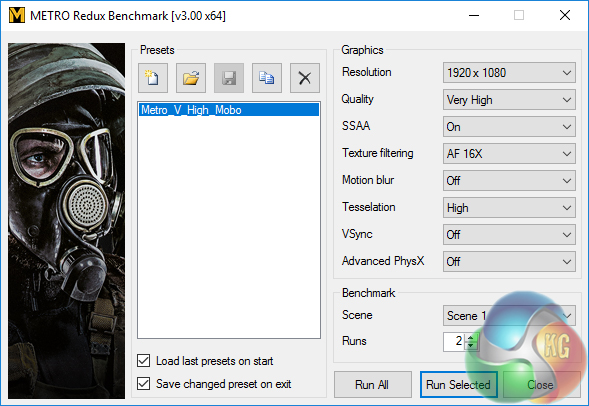
- Metro: Last Light Redux – Built-in benchmark tool, 1920 x 1080, Very High quality, SSAA, AF 16X, Tessellation: High (Gaming)
- ATTO – M.2, USB 3.0, USB 3.1, and SATA 6Gbps transfer rates (Motherboard)
- RightMark Audio Analyzer – Record and playback test using a line-in to line-out loopback with a 3.5mm audio cable (Motherboard)
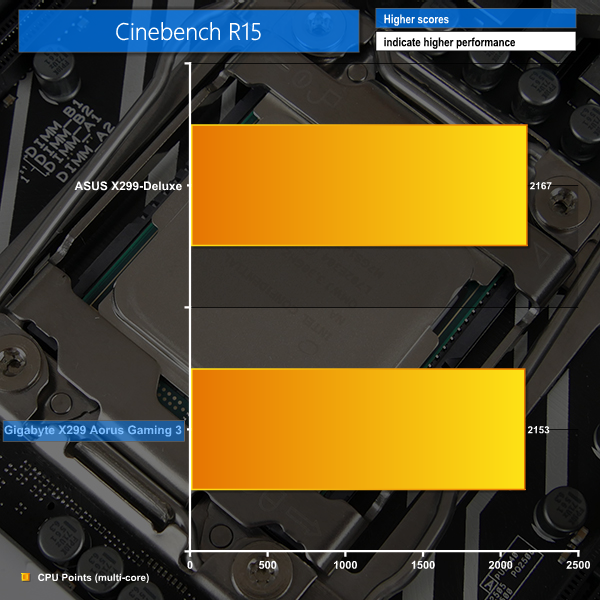
Cinebench R15
Cinebench is an application which renders a photorealistic 3D scene to benchmark a computer’s rendering performance, on one CPU core, all CPU cores or using the GPU. We run the test using the all core CPU mode.
7-Zip
7-Zip is an open source Windows utility for manipulating archives. We measure the Total Rating performance using the built-in benchmark tool. The test stresses all CPU cores to 100% and shows an affinity for memory bandwidth.
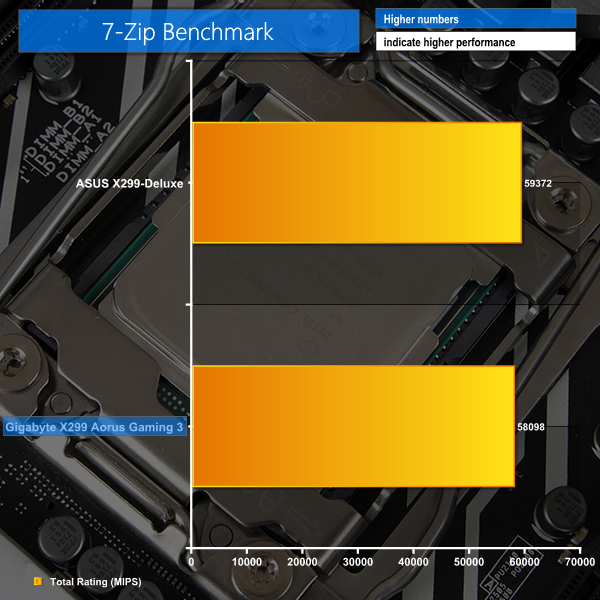
CPU-heavy performance from the Gigabyte board is solid, with the lower cost offering managing to hang with ASUS' expensive X299-Deluxe.
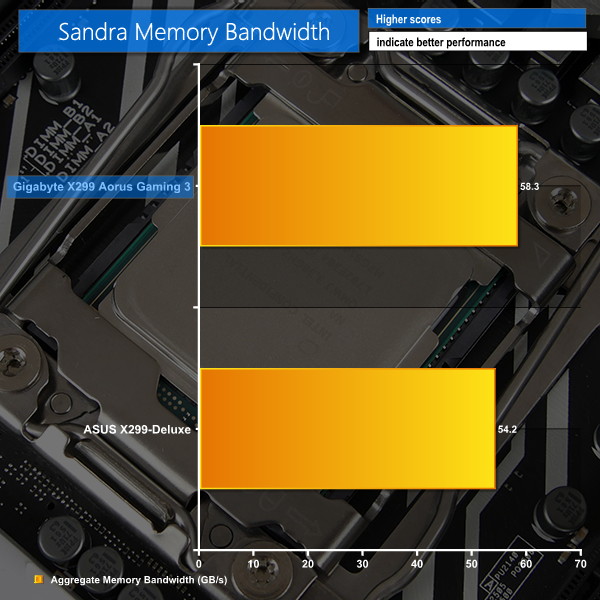
SiSoft Sandra Memory Bandwidth
SiSoft Sandra is a multi-function utility program that supports remote analysis, benchmarking and diagnostic features for PCs, servers, mobile devices and networks. We run the application’s memory bandwidth test.
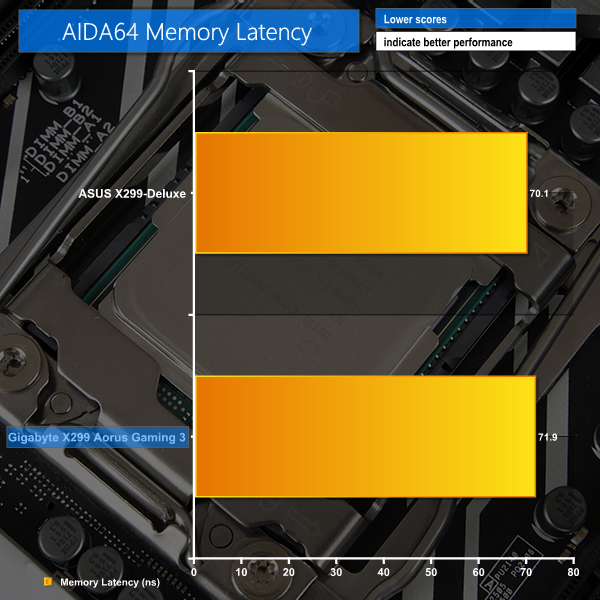
AIDA64 Memory Latency
AIDA64 is a multi-featured software suite for diagnostics, stress testing, benchmarking, software auditing and various other measurement parameters. We use AIDA64 Engineer to benchmark memory latency.
Memory bandwidth is where it should be on the Aorus Gaming 3 – close to 60GBps.
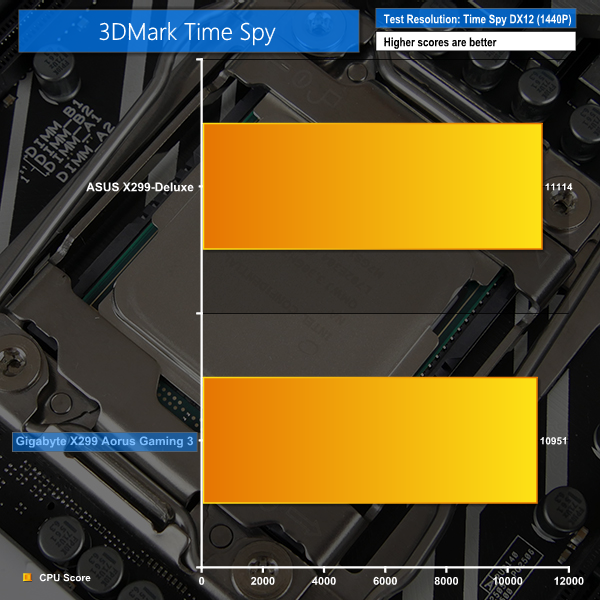
3DMark
3DMark is a multi-platform hardware benchmark designed to test varying resolutions and detail levels of 3D gaming performance. We run the Time Spy benchmark, which is indicative of high-end 1440p PC Gaming with the DX12 API.
Ashes of the Singularity Escalation
Ashes of the Singularity is a Sci-Fi real-time strategy game built for the PC platform. The game includes a built-in benchmark tool and was one of the first available DirectX 12 benchmarks. We run the CPU-focused benchmark using DirectX 12, a 1080p resolution and the Extreme quality preset.
Metro: Last Light Redux
Despite its age, Metro: Last Light Redux remains a punishing title for modern computer hardware. We use the game's built-in benchmark with quality set to Very High, SSAA enabled, AF 16X, and High tessellation.
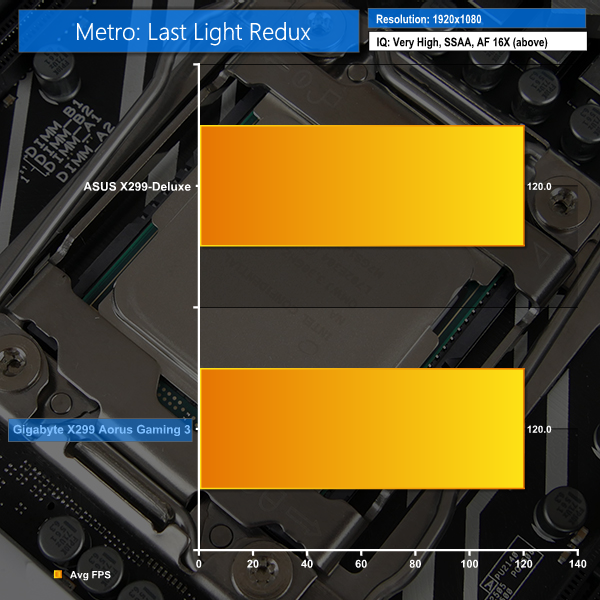
Gaming performance from the Gaming 3 is close to that of ASUS' X299-Deluxe, which is high praise.
Manual CPU Overclocking:
To test the Gigabyte X299 Aorus Gaming 3 motherboard’s CPU overclocking potential, we aim to set the CPU voltage close to 1.20V. CPU VCore is set to 1.20V and we applied the High LLC setting.
We maintained the DRAM frequency at 3200MHz to take its stability out of the overclocking equation.
Overclocking was an unpleasant experience with this motherboard due to the immaturity of its UEFI and the questionable settings decisions made by Gigabyte's BIOS engineers.
Aside from the nonsensical LLC options, taking our Core i9-7900X to its 4.6GHz limit was straightforward. However, stability testing with AIDA 64 showed that the motherboard would not hold the CPU at 4.6GHz and would instead drop by 0.3GHz. We increased the voltage and upped the frequency to 4.7GHz and the same 0.3GHz offset behaviour was observed.
A short period of troubleshooting showed that Gigabyte seems to enable a 3x multiplier AVX offset by default when overclocking the system. So now the solution is simple – just apply a x0 offset, right? Wrong. There is no option in the Gigabyte BIOS to disable the AVX offset and the lowest offset that can be set is 1x.
Put simply, we had to settle for 4.6GHz at 1.2V which would decrease down to 4.5GHz under AVX workloads (4.7GHz backing down to 4.6GHz under AVX was not stable without thermal throttling at 4.7GHz). This is slower than the ASUS X299-Deluxe which could do 4.6GHz in AVX and non-AVX workloads thanks to a more proficient BIOS design.
It is still early days for the X299 platform and I am confident that Gigabyte can fix such minor issues. The underlying power delivery solution looks to be very capable and reported MOSFET temperatures remained below 80°C throughout our testing (which does not use Prime 95).
Overclocked Performance
As a performance comparison, we have included the results from the ASUS X299-Deluxe. The maximum overclocked configuration achieved with each board was a 4600MHz (46 x 100MHz) processor frequency whilst using 3200MHz CL14 memory.
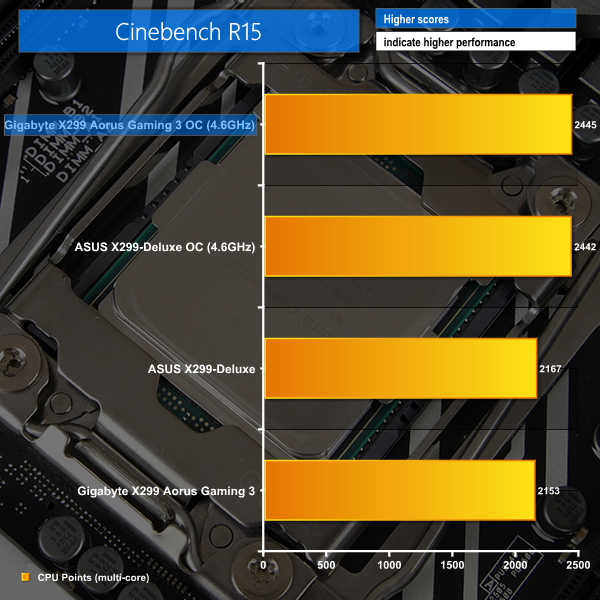
Overclocking nets a strong boost to Cinebench performance.
Power
We leave the system to idle on the Windows 10 desktop for 5 minutes before taking a reading. For CPU load results we run Cinebench multi-core and take a reading. The power consumption of our entire test system (at the wall) is shown in the chart.
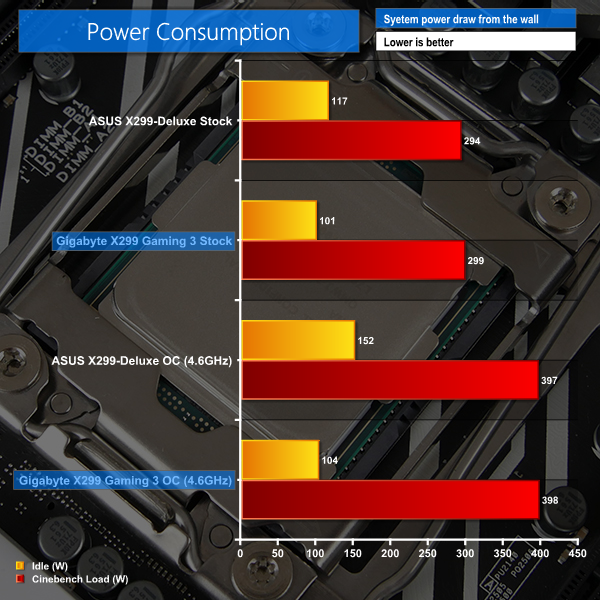
Gigabyte's idle power consumption is superb thanks to the board's proficiency at dropping clock speeds and voltages under low load. Load numbers are also fair for a lower-cost X299 board and prove that the International Rectifiers-based VRM was a smart choice.
ATTO Disk Benchmark
The ATTO disk benchmark is a Windows-based utility for testing storage performance of any storage drive or controller. We use the default benchmark setup.
M.2 PCIe Performance
For M.2 testing we use a Samsung 960 Pro 512GB M.2 PCIe NVMe SSD.
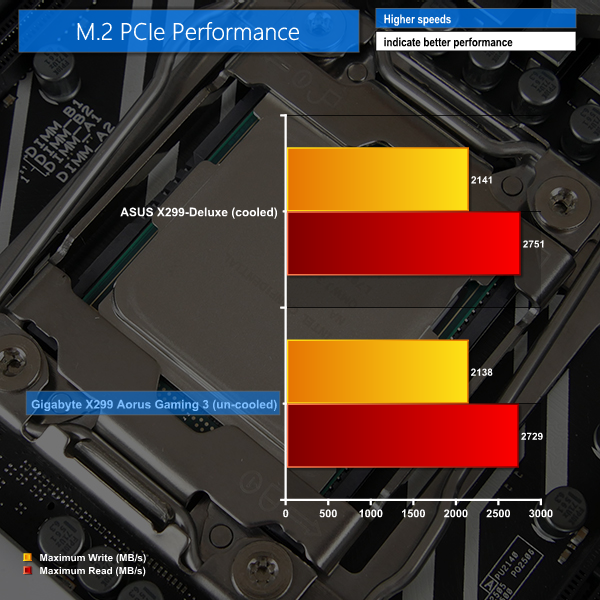
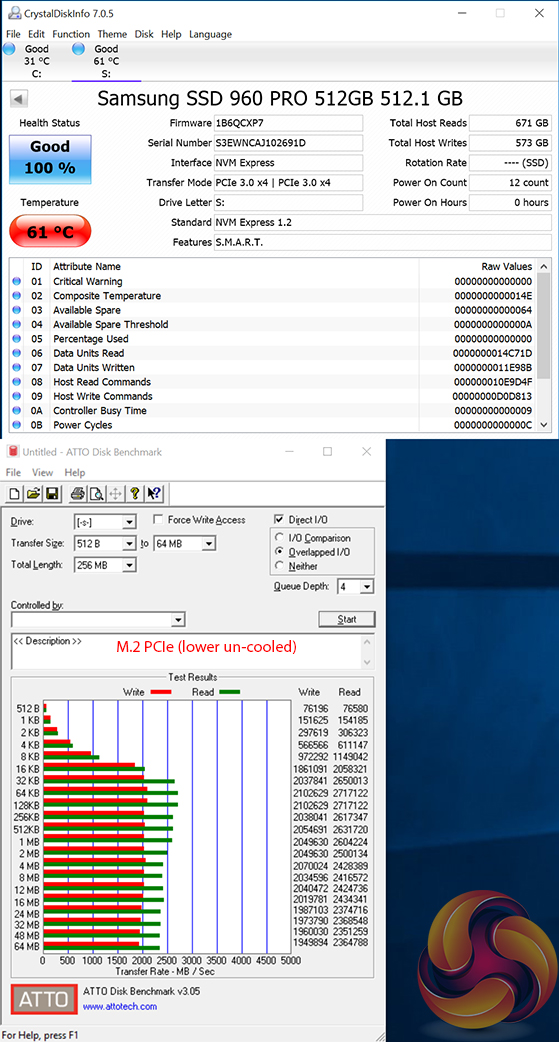
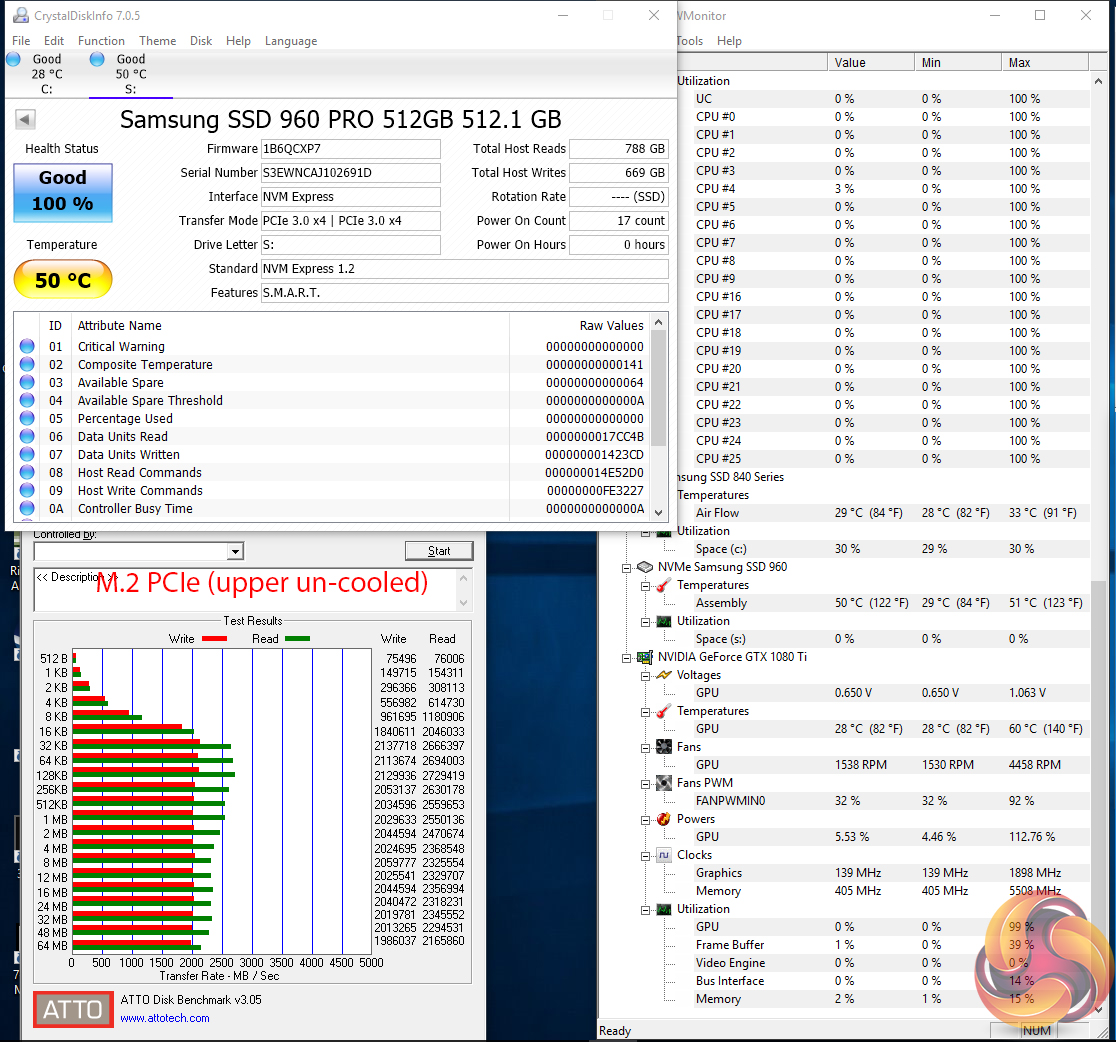
Gigabyte's Gaming 3 has no problems taking our 512GB Samsung 960 Pro to its top speed. The short ATTO benchmark run saw the drive creeping past 60°C when sat in the slot below a high-powered GPU. The open slot, just below the CPU socket, was cooler but still not particularly impressive.
The lack of M.2 cooling via a small heatsink is disappointing as ASUS' solution on competing motherboards can help to wipe up to 10°C off the Samsung 960 Pro temperature, in our testing.
USB 3.0 5Gbps & USB 3.1 Gen 2 10Gbps Performance
We test USB 3.0 5Gbps and USB 3.1 Gen 2 10Gbps performance using a pair of Corsair Force LE 120GB SSDs in RAID 0 connected to an Icy Box RD2253-U31 2-bay USB 3.1 enclosure powered by an ASMedia ASM1352R controller.
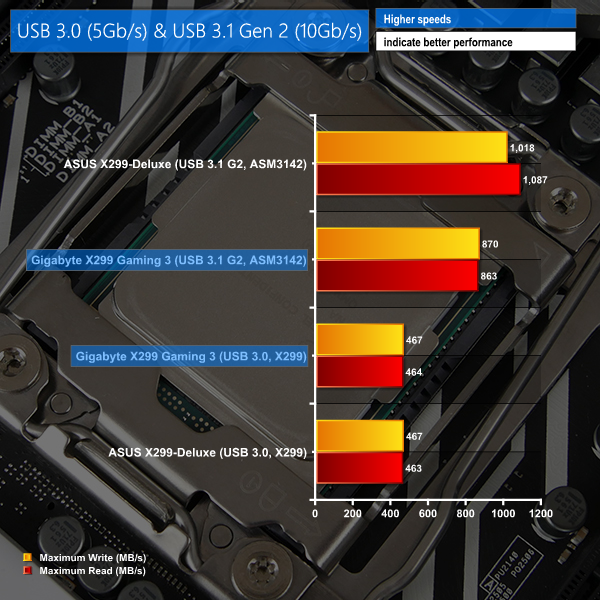
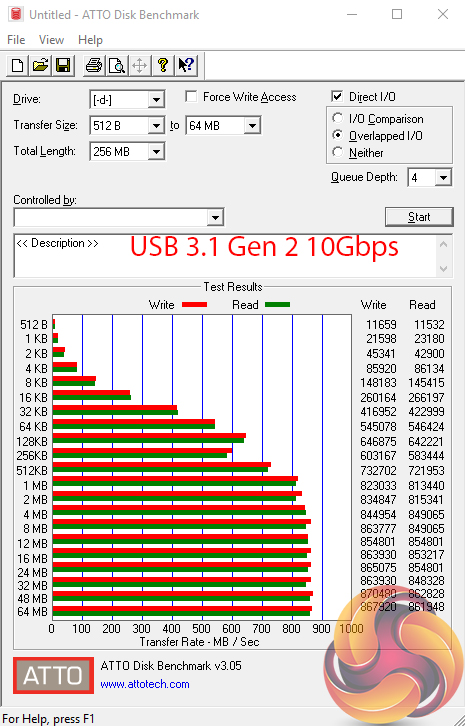
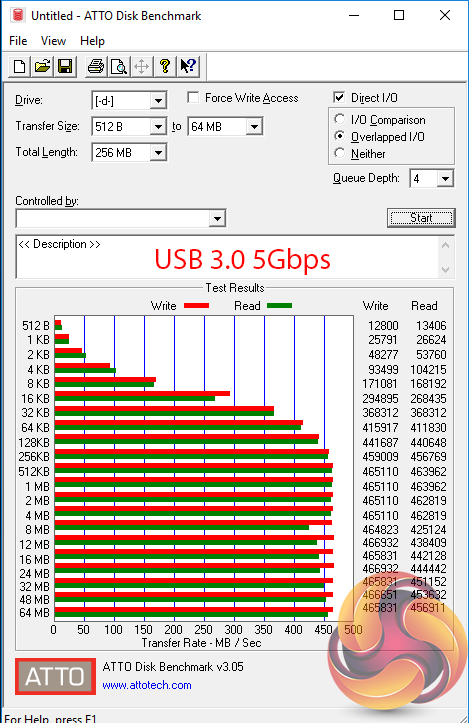
Despite using the same ASMedia-based USB 3.1 Gen 2 10Gbps solution, the Gigabyte board could not keep pace with ASUS' higher-cost offering. It looks like USB 3.1 performance is currently suffering due to early platform issues.
USB 3.0 5Gbps performance is right where it should be, which is unsurprising given the use of X299-based connections.
SATA 6Gbps Performance
For SATA 6Gbps testing we use a SK Hynix SE3010 960GB SSD.
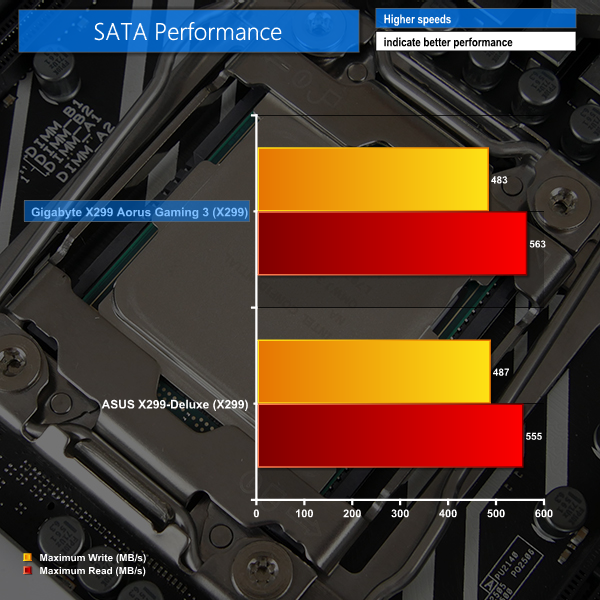
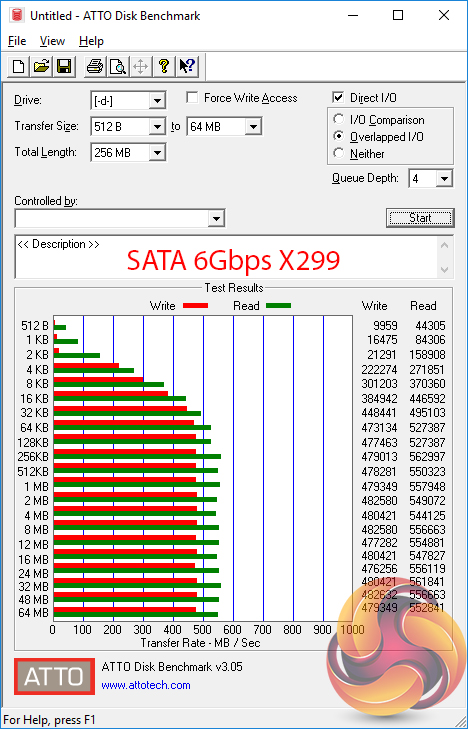
SATA 6Gbps performance is on par.
Audio
Rightmark Audio Analyser is a freeware benchmarking utility designed to objectively test the performance characteristics of audio solutions. We setup a line-in line-out loop and execute the record/playback test before generating the results report you see below. A sampling mode of 24-bit, 192 kHz was tested.
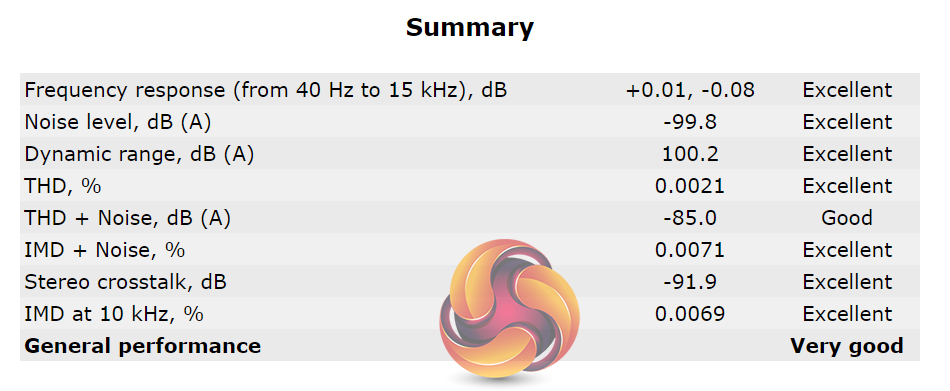
RMAA rates Gigabyte's Realtek ALC1220-based audio solution as ‘Very Good‘ but most of the results scored ‘Excellent‘.
The Gigabyte X299 Aorus Gaming 3 is a cost-effective LGA 2066 motherboard that delivers good performance with an aesthetically-friendly design. Gigabyte invests budget into a premium lighting configuration, superb fan control, and a robust set of power delivery components.
Performance from the Gaming 3 is solid. The £270 board stays within touching distance of the significantly more expensive ASUS X299-Deluxe throughout our testing. Overclocked performance is also solid, provided you have the patience to navigate Gigabyte's ageing UEFI implementation and battle against questionable default settings with limited flexibility.
Once overclocked, however, the power delivery solution held up with our 4.6GHz i9-7900X CPU and sensible stress tests. Reported VRM MOSFET temperatures were fairly high, though none of our testing stressed the system for a period long enough to causes rises to concerning levels.
Gigabyte's decision to use a single 8-pin connector is potentially limiting when 12-18 core CPUs are on the horizon. However, the sub-300W connector caused no issues with our default (not de-lidded) Core i9 overclocked using 1.2-1.25V. A more bizarre move is the lack of single PCIe x16 or 2-card x8/x8 (SLI/CF) support when using a 16-lane CPU such as the i7 7740X.
The inherent connectivity of Intel's X299 PCH translates into a strong feature set for the X299 Aorus Gaming 3. Gigabyte supplements the host of USB 3 and SATA ports with an add-on USB 3.1 Gen 2 chipset and dual M.2 slots. Though we didn't see full 1GBps transfers via USB 3.1 Gen 2, the roughly 870MBps speeds were fine. One notable omission was internal USB 3.1 Gen 2 connectivity for future case front panels.
Performance from the M.2 PCIe slots was also on point, despite the lack of cooling. Our Samsung 960 Pro SSD did, however, get hot in the slot beneath a graphics card.
On the topic of cooling, Gigabyte's Smart Fan 5 system is superb. Eight headers spread around the board are all provided with excellent UEFI- and OS-based control and monitoring capabilities. Smart Fan 5 is a market-leading solution that rivals anything the competing vendors can offer. RGB Fusion also deserves similar praise with its strong range of colour and lighting options in addition to intelligent activation modes that work smartly.
![]()
The Gigabyte X299 Aorus Gaming 3 is available at Overclockers UK for £269.99 (at the time of writing).
At this price point, Gigabyte has tough competition from MSI's X299 Tomahawk and the ASUS X299-A. Unfortunately for Gigabyte, both of those options outgun the X299 Aorus Gaming 3 when it comes to certain features by offering internal USB 3.1 Gen 2 connectivity, at least one cooled M.2 slot, and far less conflict with storage connectivity. ASUS also ups the competition by providing an OLED display.
Smart Fan 5, RGB Fusion, premium power delivery components, and an eye-catching design are strengths for Gigabyte's X299 Aorus Gaming 3 that allow it to remain an option worthy of consideration.
Discuss on our Facebook page, over HERE.
Pros:
- High-quality International Rectifiers power delivery components.
- Plenty of fan headers and Smart Fan 5 is superb.
- RGB Fusion and onboard LEDs are good.
- Decent MOSFET heatsink with some bulk to it.
- OS software offerings are fairly good.
- Digital LED header plus 5-pin RGBW headers.
- DualBIOS for redundancy, which is useful given the immaturity of the X299 platform.
Cons:
- No internal USB 3.1 Gen 2 header.
- No cooling for either of the M.2 slots.
- Graphics card(s) only run at PCIe x8 or PCIe x8/x4 with a 16-lane CPU – no SLI.
- UEFI layout and styling is ageing and somewhat cumbersome to navigate effectively.
- Some default BIOS options interfere with overclocking and reduce performance (AVX offset, for example).
- Secondary M.2 slot disables four SATA ports (!) in PCIe or SATA mode.
KitGuru says: Built around a smart aesthetic design and high-quality power delivery solution, what Gigabyte's X299 Aorus Gaming 3 lacks in features compared to the competition, it makes up for with Smart Fan 5, RGB Fusion, and other usability benefits.

yawn…..
i was using intel (and only intel) since 2008… but this x299.. no thanks.
i rather buy a threadripper. intel has lost it… too expensive for what it offers.
i am not stupid enough to pay 40% more for 10-20% more real life performance.
and who was the genius that thought using TIM on a high end CPU is a good idea?
my main system is still a x99 but i changed my sandy bridge 2600k system to a ryzen 1700… best CPU deal since 2011. go AMD!!!
AHAHAHAHAAHAHAHHAHA!
AMD SUCKS!