be quiet!’s Dark Rock series of coolers has fared well in a fearsome market. In previous generations, a strong balance between noise output and cooling performance has made them desirable products. Can the German company repeat its success with version three of the dual-tower Dark Rock Pro CPU cooler?
Fastening a pair of the company’s highly-regarded SilentWings fans to a sizable dual-tower heatsink, be quiet! is aiming to win over enthusiasts with the Dark Rock Pro 3’s silent operation and worthy cooling performance. And speaking of cooling performance, be quiet! rates the Dark Rock Pro 3 for up to 250W of heat dissipation.
With seven 6mm heatpipes, wave contour aluminium cooling fins, vibration-isolating elements, and a dark black finish, does the be quiet! Dark Rock Pro 3 offer the balanced performance that will make it sought-after to enthusiasts and gamers?

Specifications:
- CPU Socket Compatibility: Intel LGA 775, 1150, 1155, 1156, 1366, 2011 & AMD 754, 939, 940, AM2(+), AM3 (+), FM1, FM2 (+)
- Heatsink Dimensions (L x W x H): 150 x 137 x 163 mm
- Heatsink Material: Aluminium fins
- Base Material: Copper
- Fan Speed (120mm): up to 1700 RPM
- Fan Air Flow (120mm): up to 57.2 CFM
- Fan Air Pressure (120mm): up to 1.23 mm H2O
- Fan Speed (135mm): up to 1400 RPM
- Fan Air Flow (135mm): up to 67.8 CFM
- Fan Air Pressure (135mm): up to 2.1 mm H2O
- Fan Connectors: 4-pin PWM (inc. built-in splitter)
- Warranty: 3 years.
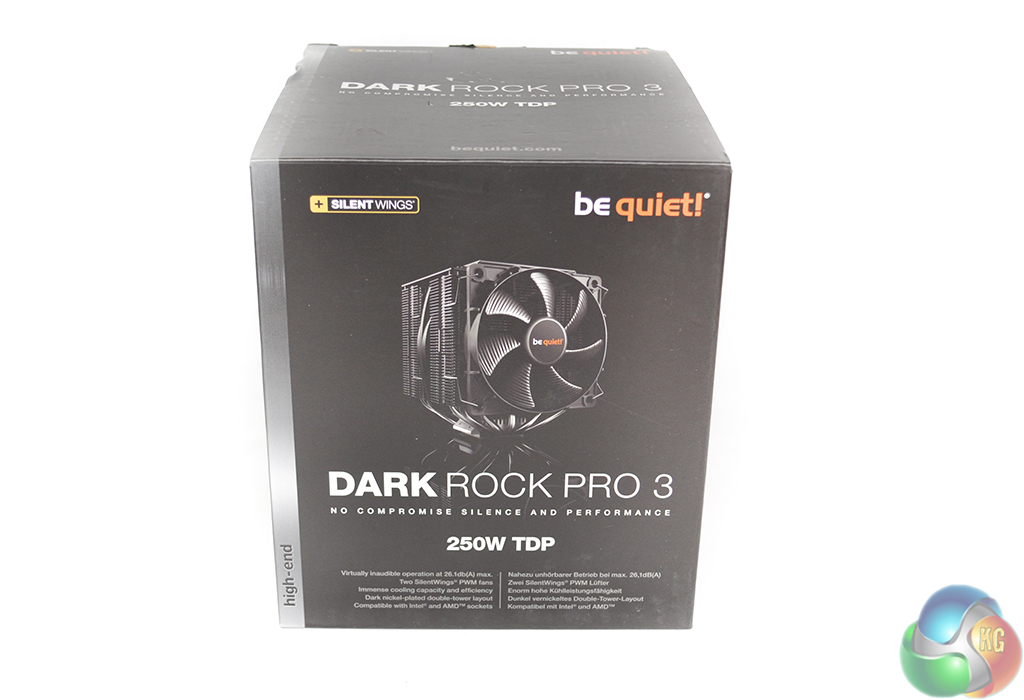
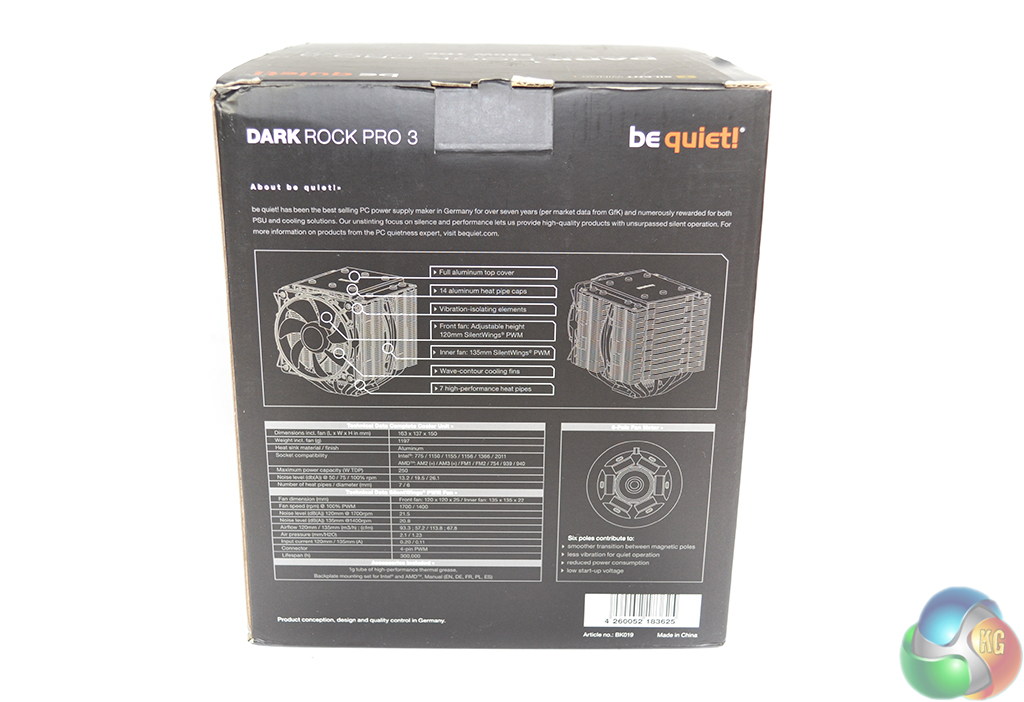
be quiet! packages the Dark Rock Pro 3 in black packaging which outlines the cooler’s key specifications.
The 250W TDP and low-noise operation are pointed out on the packaging’s front side, while an annotated drawing outlines further performance parameters on the box’s rear.
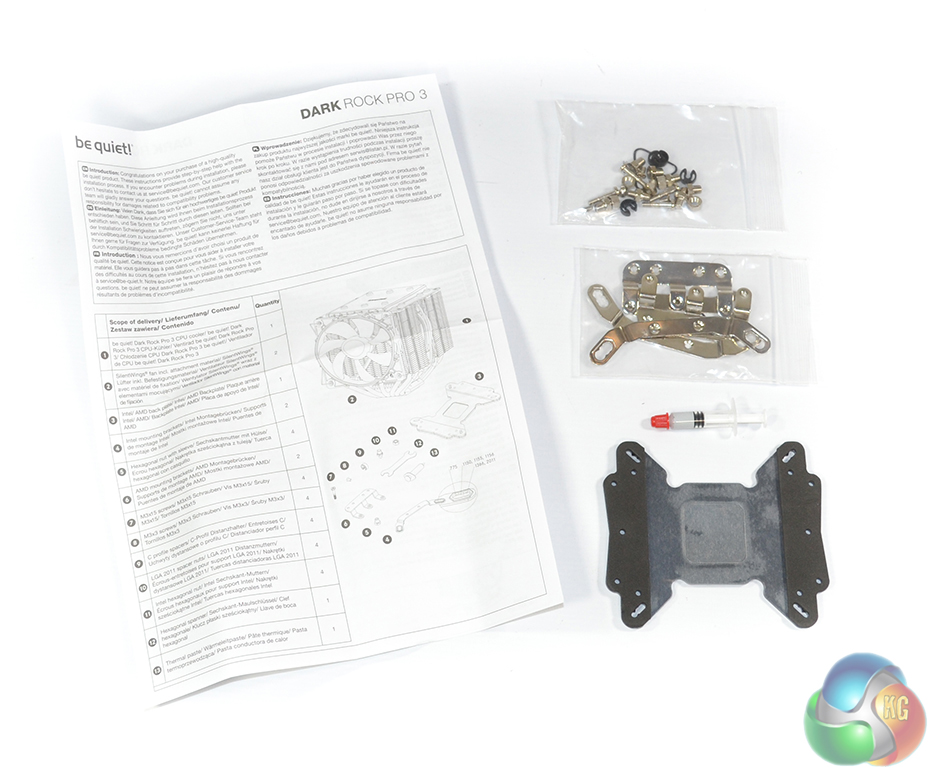
A detailed installation guide accommodates the cooler’s mounting hardware. be quiet! opts for metal mounting hardware to give the 1.2kg unit the best chance of being held securely. All current Intel and AMD sockets are supported by the Dark Rock Pro 3.
A somewhat meager 1g tube of Corning TC-5121 thermal paste completes the bundle.
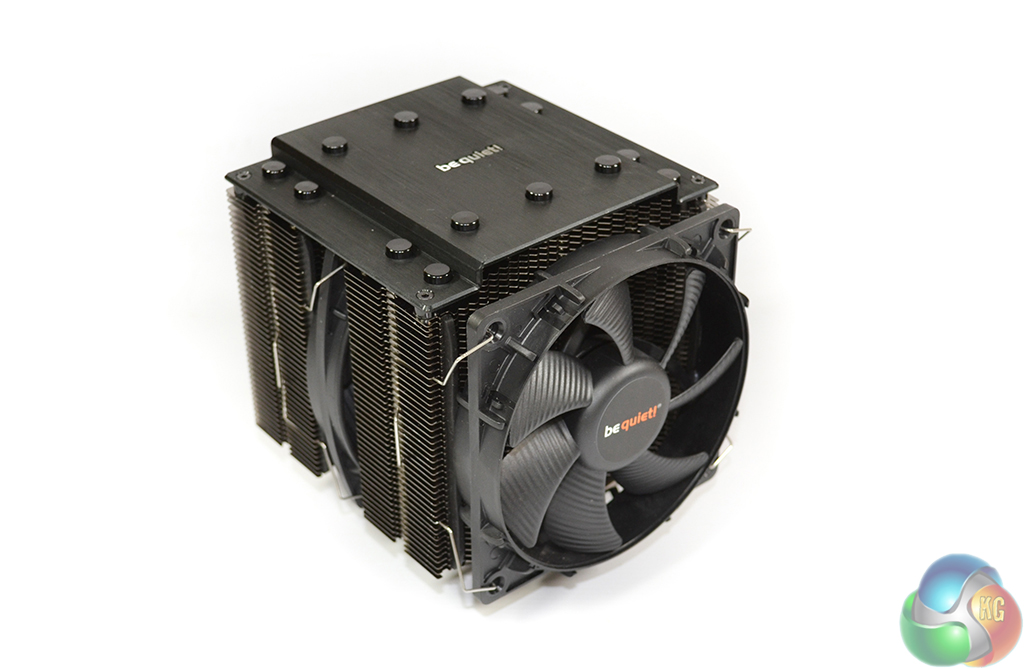
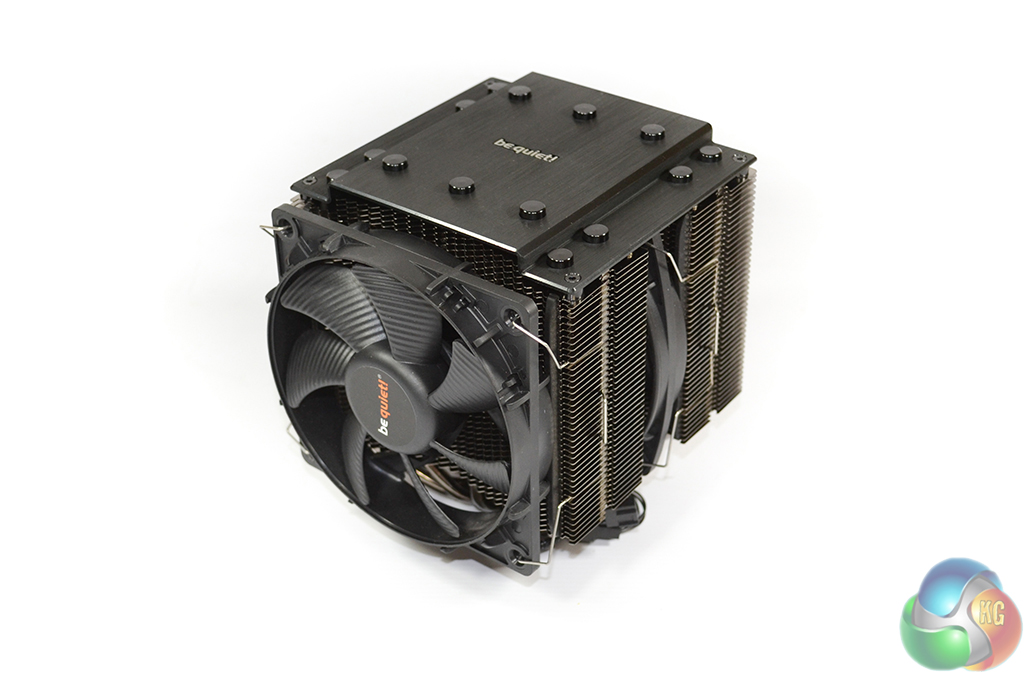
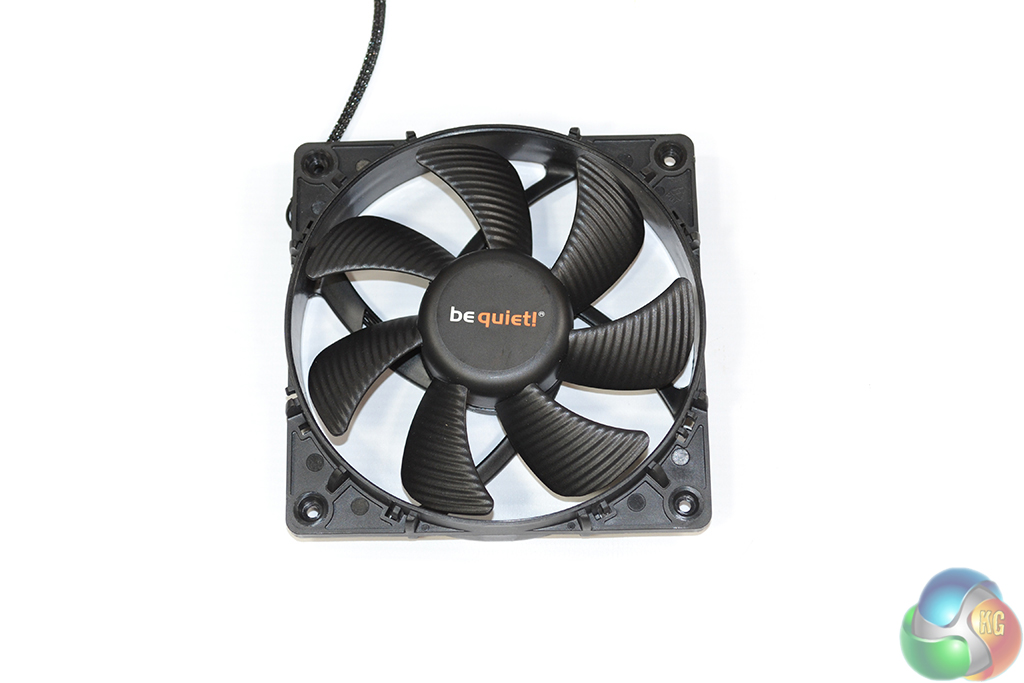
Clipped to the front side of heatsink is a 120mm be quiet! SilentWings PWM fan. The unit rotates at a maximum of 1700 RPM and is capable of shifting up to 57.2 CFM of air for a noise output of 21.5 db(A).
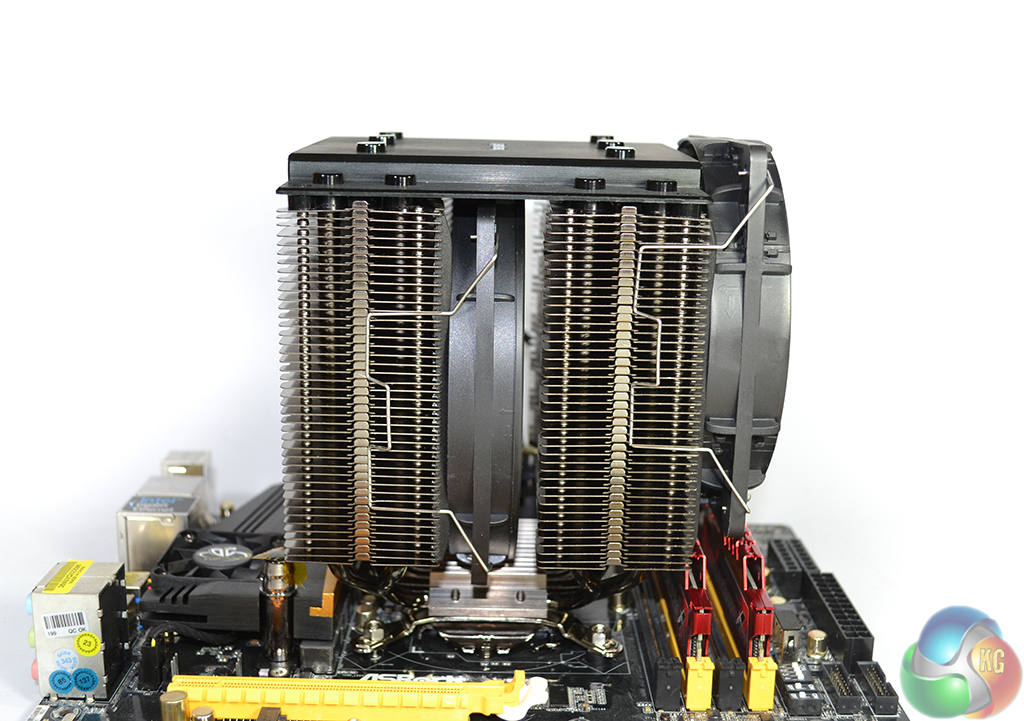
Sandwiched between the 45-strong aluminium fin arrays is another fan – this time a 135mm SilentWings PWM model. The larger unit rotates at the lower rate of 1400 RPM but, thanks to its increased diameter, shifts almost 68 CFM of air for a 20.8 db(A) noise level.
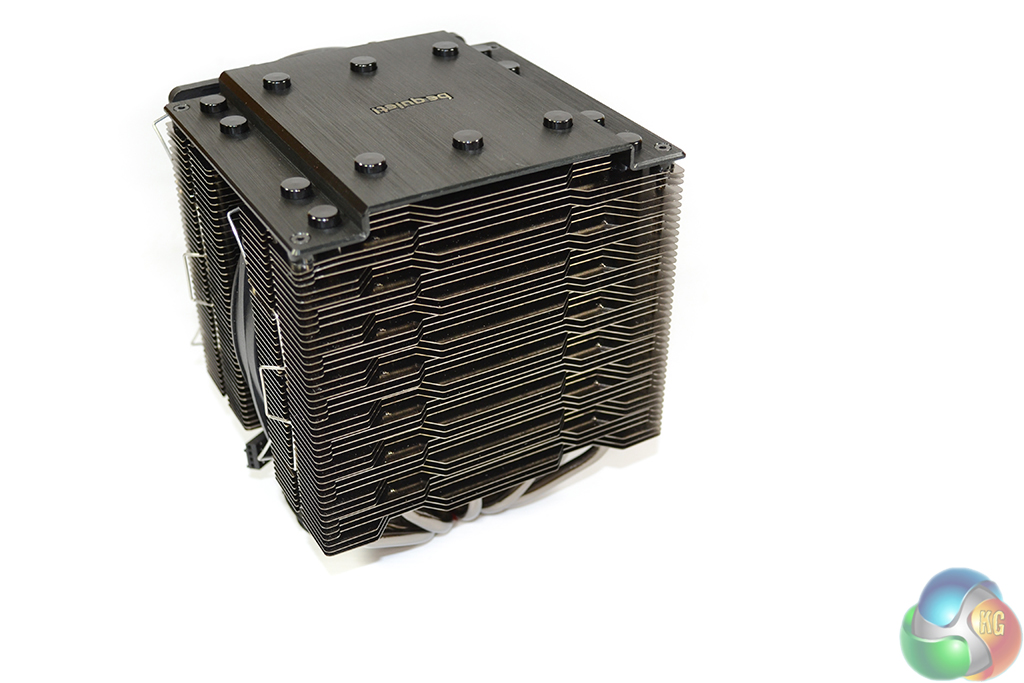
Connecting the two fin arrays is a solid, dark-coloured aluminium plate embossed with the be quiet! logo. The plate enforces equal distance between each tower and, therefore, enhances the heatsink’s structural rigidity.
A valid assumption would be that the aluminium plate acts as additional heat-dissipation surface area. I am, however, slightly skeptical of this suggestion due to the fact that the heatpipes make very limited direct contact with the plate – they are in contact via a separate cap. Equally valid suggestions for the covering plate’s addition would be aesthetics and, perhaps, moderating convection heat transfer from external sources.
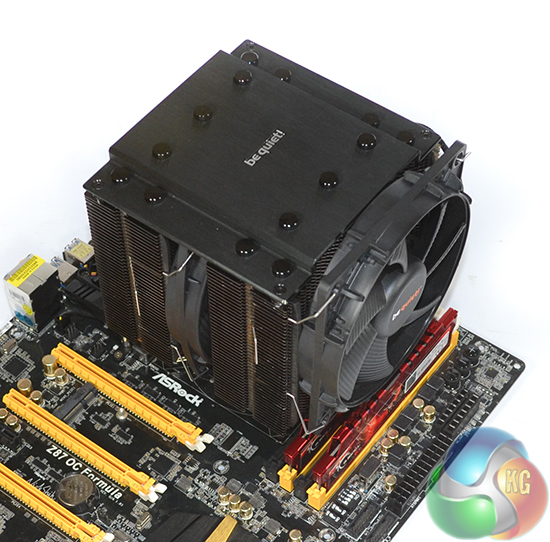
At 150mm in length and 163mm tall, the Dark Rock Pro 3 (DRP 3) clearly has the potential to cause interference with large RAM heatspreaders and VRM heatsinks. be quiet! compensates for this by making the height of the front fan adjustable. Component clearance will be outlined on the installation page.
be quiet! chose not to opt for closing the sides of the fin arrays. It is likely that the company is relying on the relatively high air pressure of the front fan’s flow to penetrate the fin array, rather than spill out of the side. The aluminium top plate should also help reduce air spillage out of the heatsink.
A 22mm-thick fan is installed in the central position. We see no reason to suggest that a ‘standard’ 25mm fan will not fit, provided the mounting points permit and its dimensions are kept within the clearance limit.
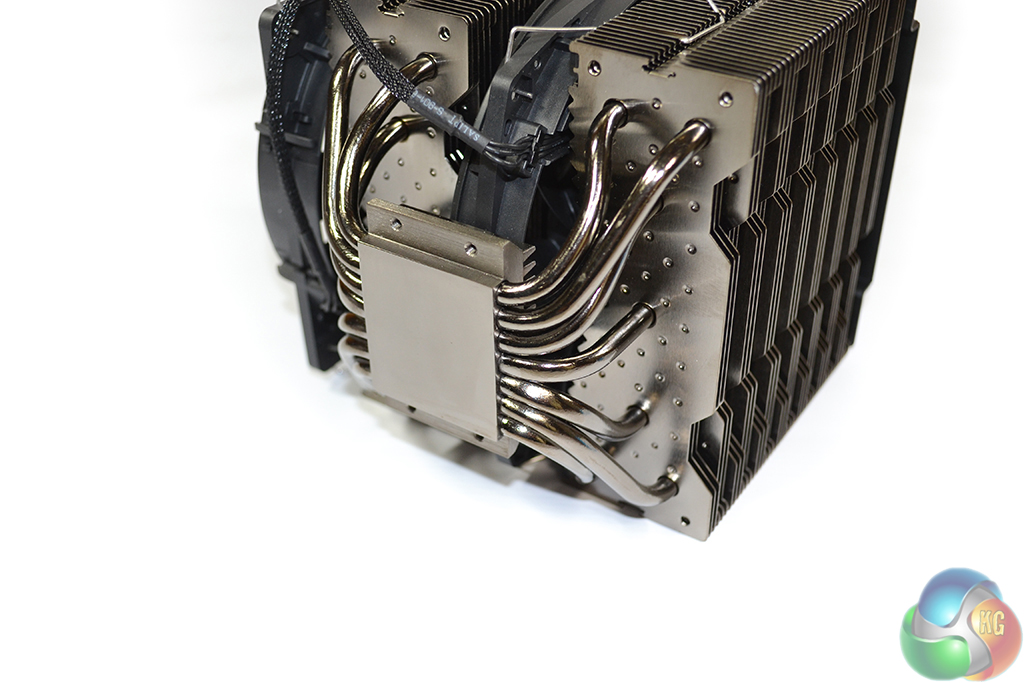
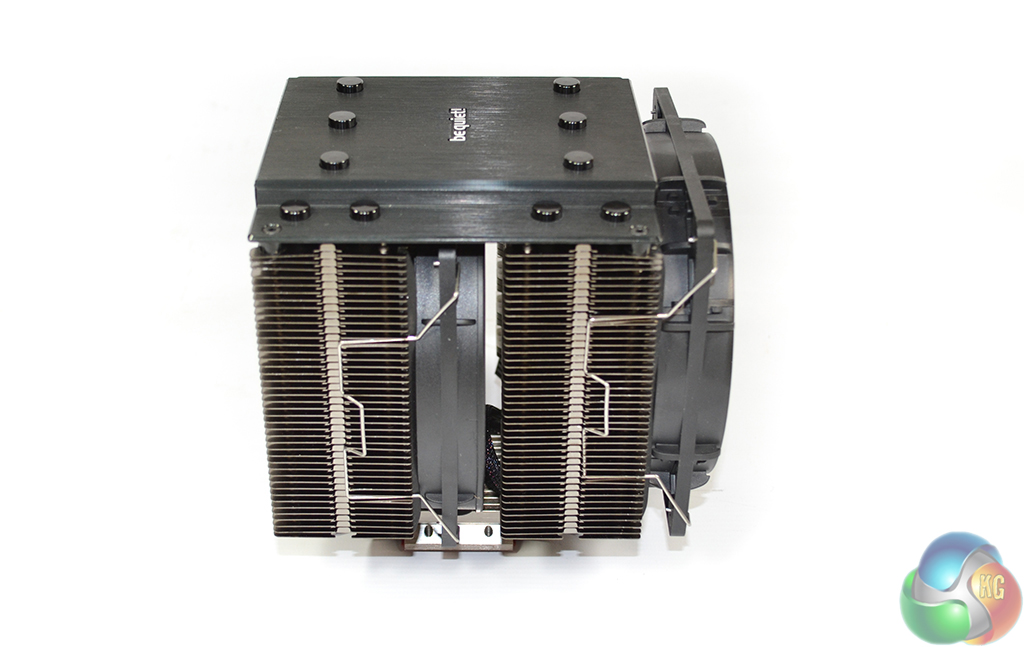
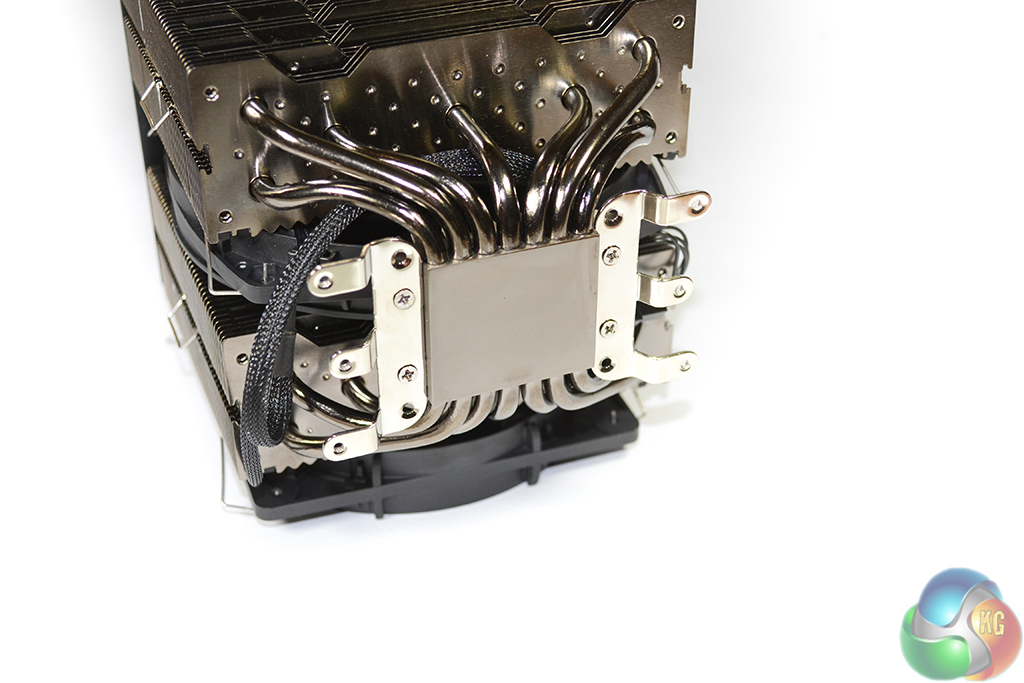
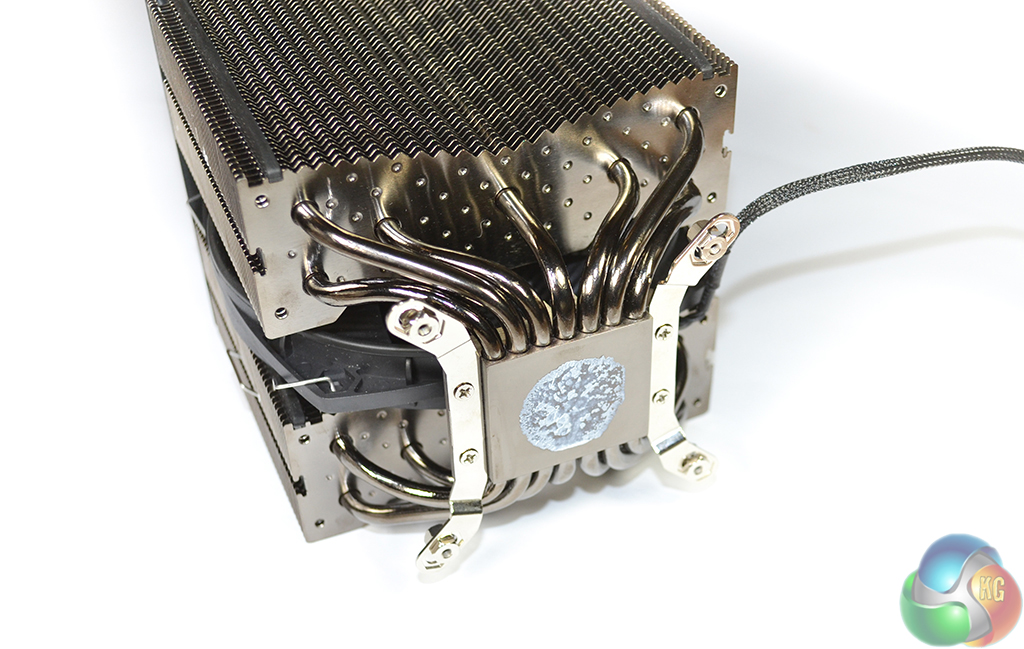
A base comprised of what appears to be nickel-plated copper brings together seven 6mm heatpipes. Provided the base can effectively spread the thermal load across its surface, the heatpipe layout appears to be very well-thought-out.
Three heatpipes are positioned at similar intervals throughout the fin arrays’ central regions, while be quiet! doubles up towards the heatsink’s edges. In theory this appears to be a good choice; the bulk of the thermal load is transferred to the fans’ most effective regions, with a lower proportion being conducted to their potential dead spots in the central areas.
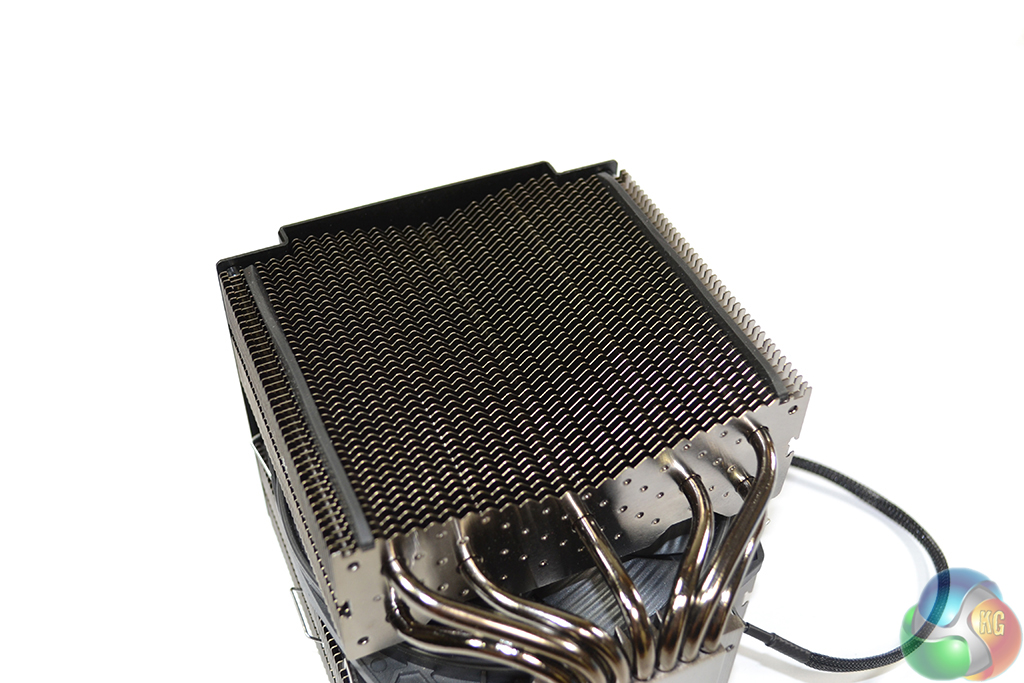
A number of unique optimisations of the fin array are incorporated by be quiet!. Coupled with a vacuum-inducing, inwards-sloping shape, the serrated fin design on each array's front end allows air to enter and pass through the structure even while the fans spin at lower speeds. An additional benefit of this design could be the potential to increase the turbulence of the air stream which enters the fin array.
The back end's design is a little more unusual. Alternating grooves and extrusions have the potential to act as flow adjustment surfaces which enhance the rate of heat removal. There is the likelihood that the design is relevant to make a third fan a worthwhile addition to the CPU cooler.
A number of small dots are present on each of the fin surfaces. Such additions help to increase convection heat transfer thanks to their ability to increase the airflow's turbulence. In theory, the dots should add little (if anything) in regard to noise output.
A pair of SilentWings fans from be quiet! accompanies the Dark Rock Pro 3 heatsink. Vibration-damping elements limit the amount of noise that is generated by each fan when it is connected to the heatsink. As noticed by its omission from the picture, removal of the interior – 135mm – fan requires the aluminium top plate to be separated.
The fan blades consist of a grooved structure which allows them to shift their relevant volumes of air with a reduced noise output. A copper-core Fluid Dynamic Bearing (FDB) is used for the 120mm unit, while the larger 135mm model relies upon an electromagnetic motor with six poles.
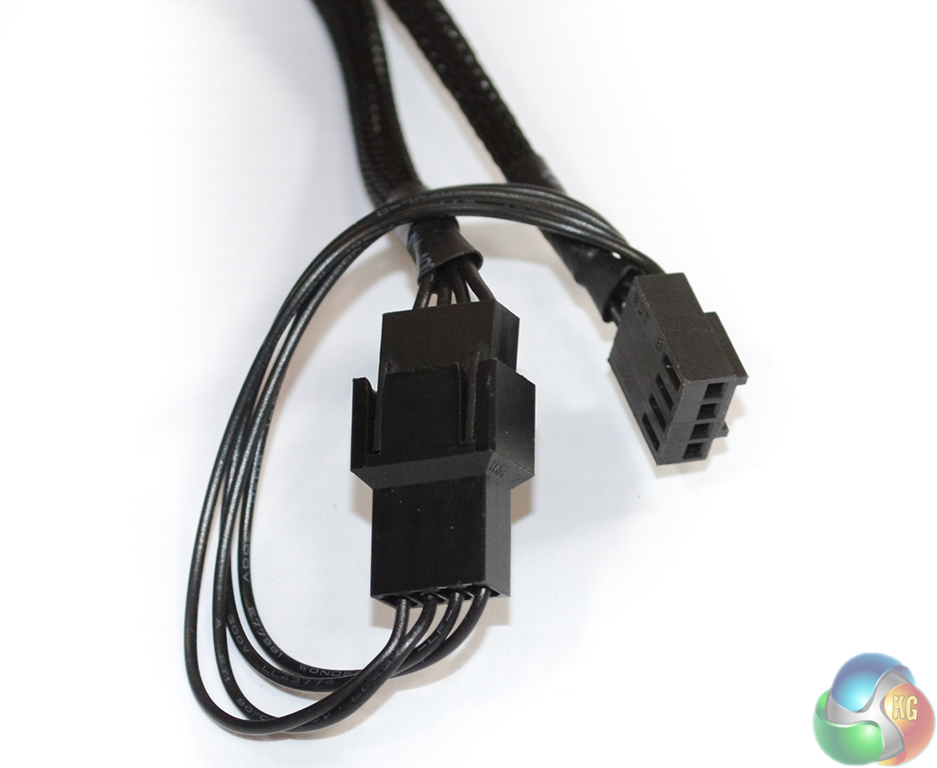
A single 4-pin PWM connector attaches to one's motherboard before converting into a splitter which powers both fans. Black braided fan cables are used to enhance the appearance of a system that makes use of the be quiet! Dark Rock Pro 3.
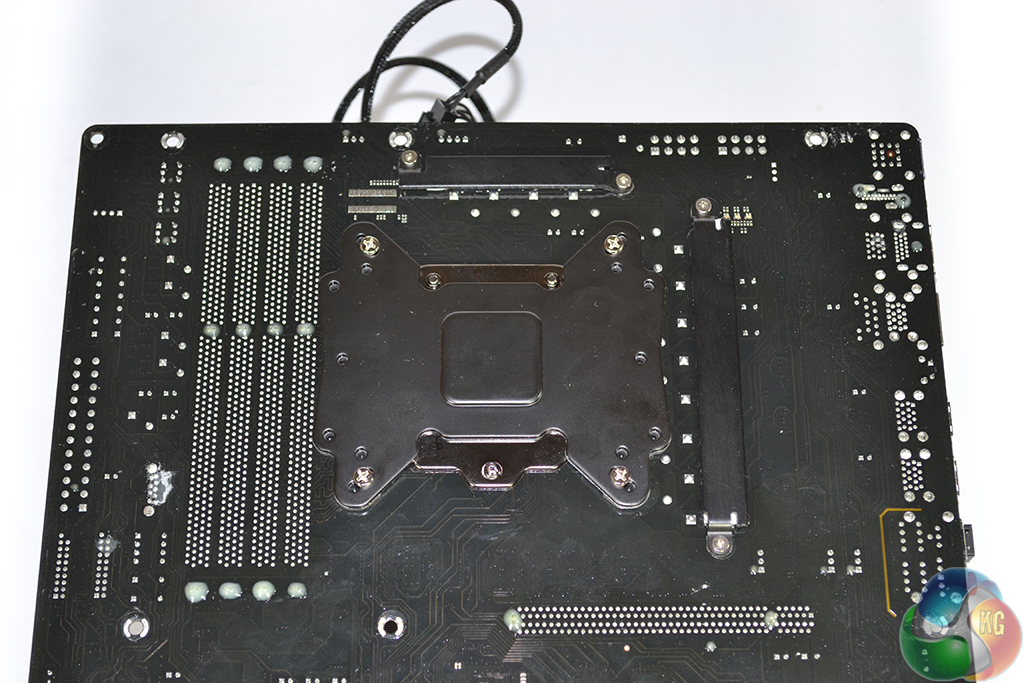
Four screws are pushed through the multi-socket backplate's relevant holes. Comprised of a sturdy metal and vibration-damping foam, the backplate should enforce adequate structural rigidity for the heavy CPU cooler while also minimising noise-causing vibrations.
A welcomed addition compared to be quiet!'s past designs, four plastic holders are used to fix the backplate in position. This is a critical addition for the mounting procedure because, as we will see later, holding the backplate securely in place is a contributing factor to the level of difficulty for the installation process.
be quiet! opts for the bracket-on-cooler approach to securing the heatsink in place. A pair of brackets is secured directly to the heatsink and then screwed onto the retention mounts. Shown above are the AMD brackets installed and ready to be set in position.
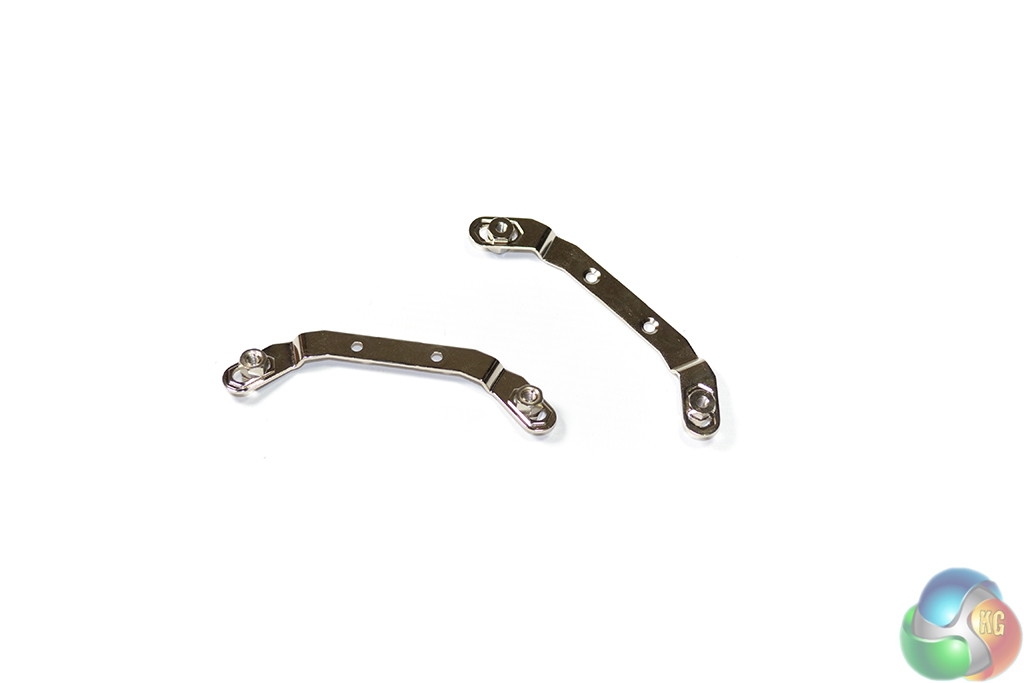
Attaching the securing nuts and bolts before screwing the brackets onto the heatsink is a crucial step in the installation procedure. The manual does point this out in a fairly clear manner. The reason it is so critical is because securing the nuts will be extremely difficult when the brackets are attached – heatpipes will obstruct the necessary turning radius of the tightening tool.
The final part of the procedure is physically attaching the CPU cooler to the motherboard. This is the point where difficulty starts to ramp up. Unlike the vast majority of high performance, dual tower heatsinks, be quiet! forces users to effectively mount the motherboard onto the cooler, not the other way round.
What I mean by this, is the cooler has to be placed on the relevant mounting holes and then the screws are tightened from the rear side. From what I experienced, this is easiest done by placing the cooler base-up on a flat surface and then aligning the mounting holes by trial and error. Thermal paste does get in places that one doesn't want it to, and the procedure requires balance and patience, but there doesn't seem to be an easier method.
be quiet!'s reasoning for such a difficult securing procedure is in the aluminium top plate. Securing the cooler from the front side (by placing it on top of an upwards-facing motherboard) would require removal of the top plate. be quiet! instead opts for the difficult securing approach, showing preference towards aesthetics over ease-of-installation.
Perhaps making use of long bolts which connect to the cooler's base brackets and then slip through the motherboard mounting holes would have been better. The bolts could have then been secured from the rear side which would make guiding the cooler into its correct position far less difficult.
As somebody who switches CPU coolers regularly, this is most certainly an inconvenience that I would rather not deal with. But to the vast majority of users (those who only remove the CPU cooler a handful of times per year), the tricky installation procedure will be far more bearable, and the added benefits of an attractive top plate will also be welcomed.
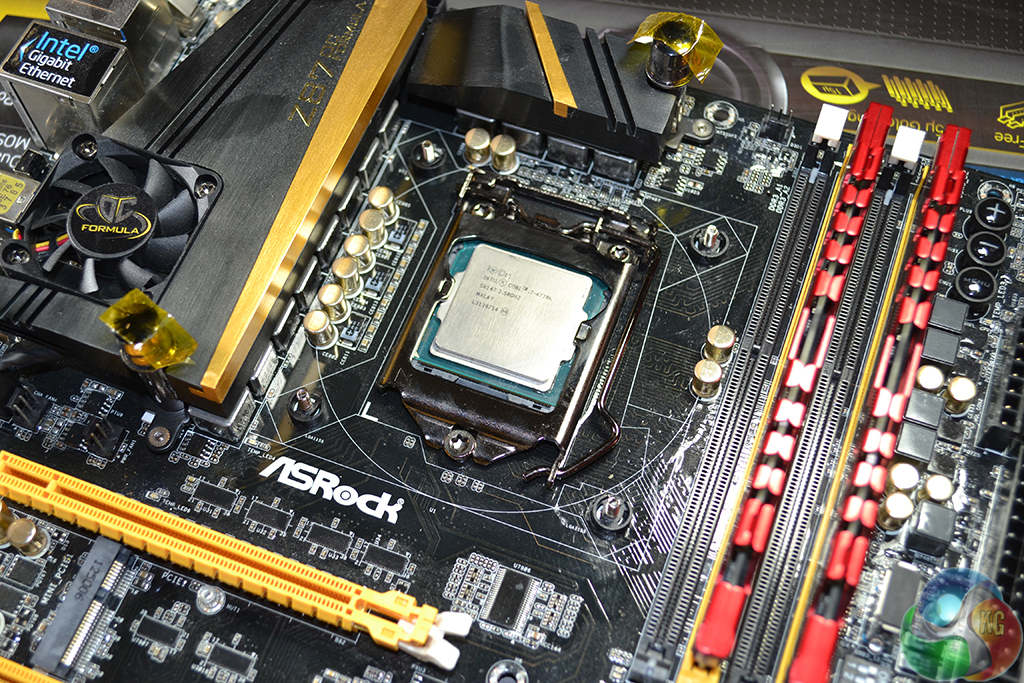
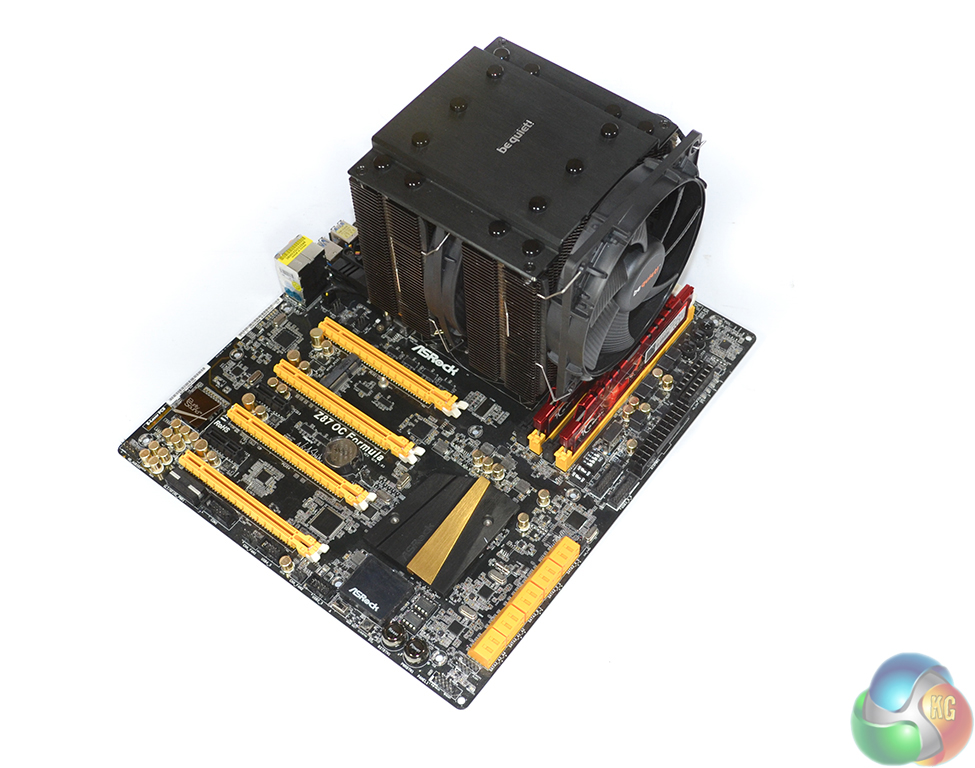
The VRM heatsink on our ASRock Z87 OC Formula motherboard very nearly interfered with a number of the cooler's 6mm heatpipes. Provided Intel's ‘stay-out' zone is respected, and VRM heatsinks aren't oversized, interference is unlikely to be an issue for many users.
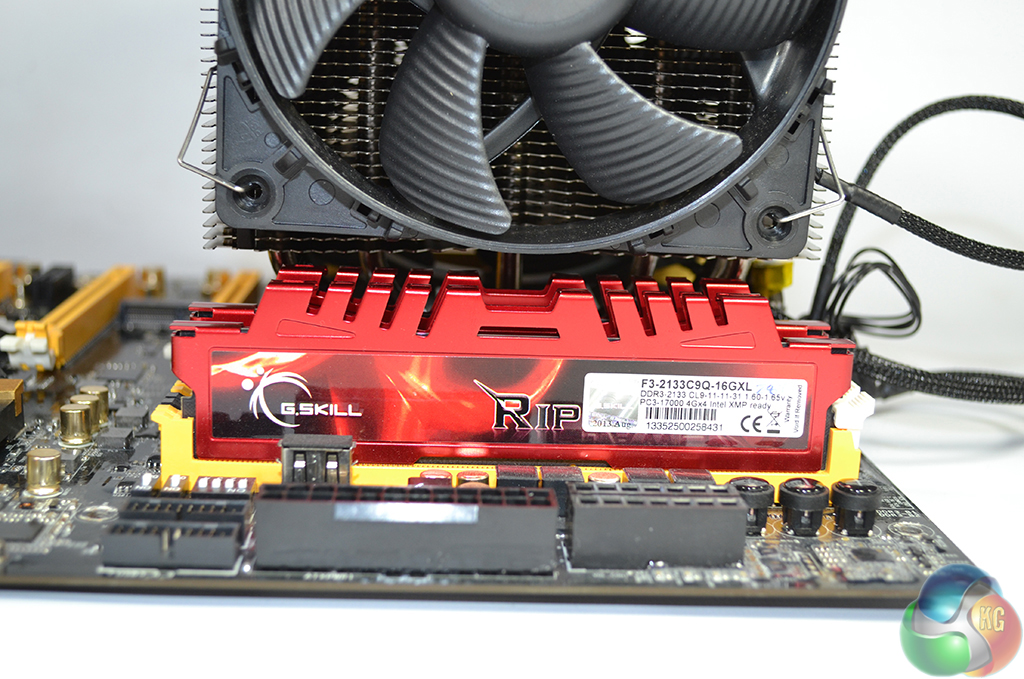
Thanks to the adjustable fan height, RAM clearance is unlikely to be a widespread issue. Even the fin array will not interfere with modules which are less than 43mm in height.
As we mentioned with the VRM heatsink, heatpipes exiting the base have the potential to cause interference. Upon closer examination, we could see that a number of heatpipes were overhanging the first DIMM slot on our motherboard, and therefore reduced the height of a module that could be installed.
Despite the tricky securing procedure, the sturdiness of be quiet!'s installation technique is excellent. The cooler does not move or rotate; I would have no concerns regarding the security of the Dark Rock Pro 3's mount.
As can be seen, the Dark Rock Pro 3 is a large CPU cooler. At 163mm tall, many mid tower cases may struggle to fit the unit in their belly and then close the side panel. One good point regarding interference is the cooler's 137mm width. Using our LGA 1150 motherboard, the Dark Rock Pro 3 did not extend past the board's upper edge, hence interference with roof fans is likely to be minimised.
Thermal Performance Test Procedures:
- Idle temperatures are obtained after sitting at the desktop for 15 minutes.
- Load temperatures are obtained after running Prime95 in the ‘Small FFTs' mode for 15 minutes.
- We tested with our CPU set at 3.9GHz (typical multi-core turbo speed of most motherboards) using a BIOS-set voltage of 1.200V (in the region of most common MCT voltages).
- We repeated testing with our CPU overclocked to 4.5GHz (45x multiplier, 100MHz base clock) using a BIOS-set voltage of 1.325V.
- The cooler's fans are set to 100% to eliminate inaccuracies due to dynamic PWM fan speed adjustments.
- The supplied thermal paste is used to provide an accurate interpretation of the cooler's out-of-the-box performance.
- We use HWMonitor to measure the CPU temperature.
- CPU temperature recording is precise to +/- 0.5°C. Ambient temperature recording is precise to +/- 0.05°C.
- Ambient temperature was maintained at 22°C.
Acoustic Performance Test Procedures:
- We measure the noise output of our entire system from a distance of 1m while the CPU cooler's fans operates at 100% (indicating the maximum noise output).
- We set the case and motherboard fans to minimum speed (hence noise) and avoid using a discrete GPU to isolate the CPU cooler's noise output.
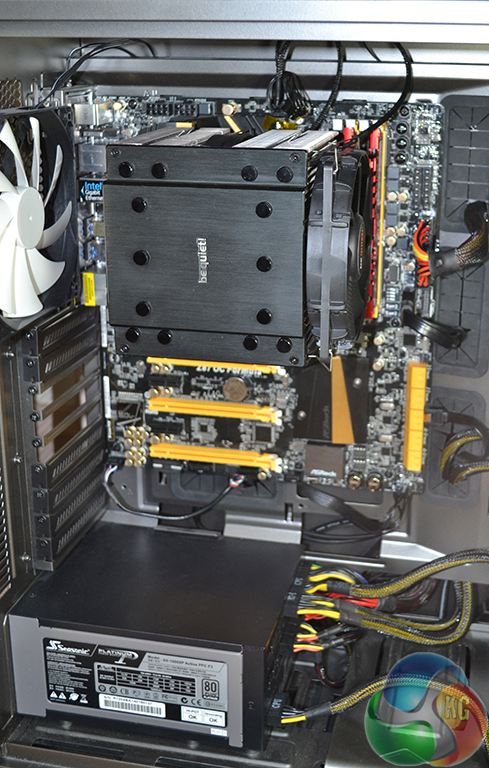
Test System:
- Processor: Intel Core i7 4770K Retail (3.9GHz forced turbo [manually set to 1.200V] and 4.5GHz OC [manually set to 1.325V]).
- Motherboard: ASRock Z87 OC Formula.
- Memory: 8GB (2x 4GB) G.Skill RipjawsX (F3-2133C9Q-16GXL) 2133MHz 9-11-11-31.
- Graphics Card: Asus R9 280X Matrix Platinum 3GB.
- System Drive: 500GB Samsung 840 Series SSD.
- Case: NZXT Phantom 630.
- Power Supply: Seasonic Platinum 1000W.
- Thermal Paste: Supplied Corning TC-5121 thermal paste.
Comparison Coolers:
- Noctua NH-D14 (100% fan speed).
- Corsair H100i (100% fan speed).
Software:
- CPUID HWMonitor.
- Prime95.
- Windows 7 Professional with SP1 64-bit.
We compared the be quiet! Dark Rock Pro 3 CPU cooler to two competing models – the Noctua NH-D14 and Corsair's All-in-One H100i.
It is worth noting that both the Noctua NH-D14 and Corsair H100i have received a large amount of usage over their lifetime. While we tried our best to clean the coolers and remove any dust, some dirt will inevitably remain and will have a small affect on the accuracy of our recorded performance (compared to a brand new unit).
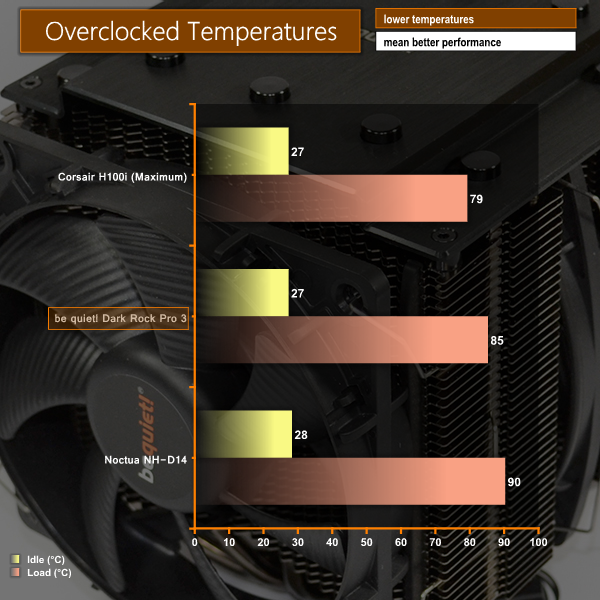
Our charts show actual temperatures of the CPU, not delta temperatures.
Ambient temperature was maintained at 22°C.
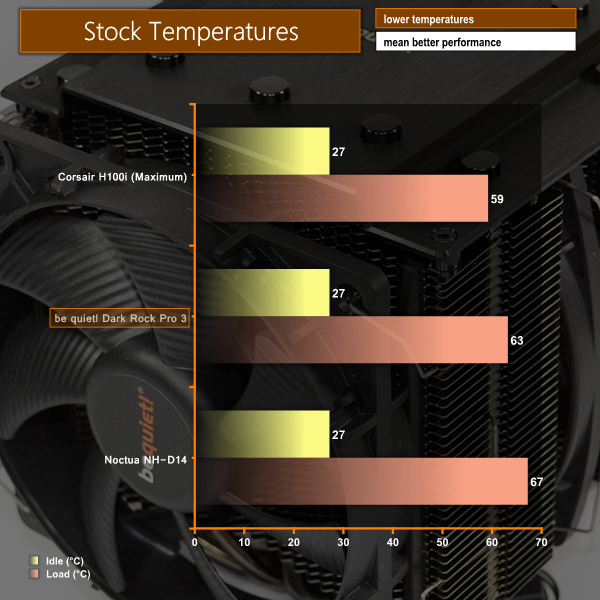
The Dark Rock Pro 3 manages a good start in stock speed cooling tests. be quiet!'s model outperforms its Noctua competitor by 4°C (6%) under a stock-clocked load. Neither of the dual tower air coolers can match the stock CPU thermal performance of Corsair's H100i closed-loop liquid cooler; the H100i outperforms the DRP 3 by 4°C (just over 6%).
With heat turned up via the application of a 4.5GHz overclock and 1.325V core voltage, the be quiet! Dark Rock Pro 3 still manages impressive numbers against Noctua's D14. Outperforming the former Austrian king by 5°C (5.5%), the Dark Rock Pro 3 has proven that it can handle the high thermal loads that Intel's 4770K can project. Corsair's H100i still manages a lead over both air coolers, though.
Higher fan speeds is the first reason that we will point towards for be quiet!'s DRP 3 outperforming the Noctua D14. The amount of thermal energy that can be removed from a heat exchanger is heavily reliant upon the speed of air flowing past the finned surfaces. Hence higher fan speeds are better, in simple theory (there are additional factors, of course).
An additional 6mm heatpipe for the Dark Rock Pro 3 also helps to increase the rate at which heat is transferred to the fin array via conduction. And, based on the cooling results, it would be fair to suggest that be quiet!'s clever heatpipe layout has worked positively for the heatsink's performance.
Although it is very difficult to point out how much effect each component has on cooling performance, I also want to mention the surface dots added by be quiet!. In theory, these dots help to increase the flow turbulence and therefore rate of heat removal. Our recorded results suggest that they could be doing just that, while combined with the other performance aspects.
While we cannot ignore the fact that extended usage (and henceforth small amounts of dust build-up) has affected our Noctua NH-D14's cooling performance, the margin at which be quiet!'s Dark Rock Pro 3 outperforms the Austrian beast is still impressive.
We measured the noise output of our entire system from a distance of 1m while the CPU cooler’s fans operated at 100% (indicating the maximum noise output).
Lower noise levels can be achieved by utilising the 4-pin PWM operation of the Dark Rock Pro 3 CPU cooler’s fans.
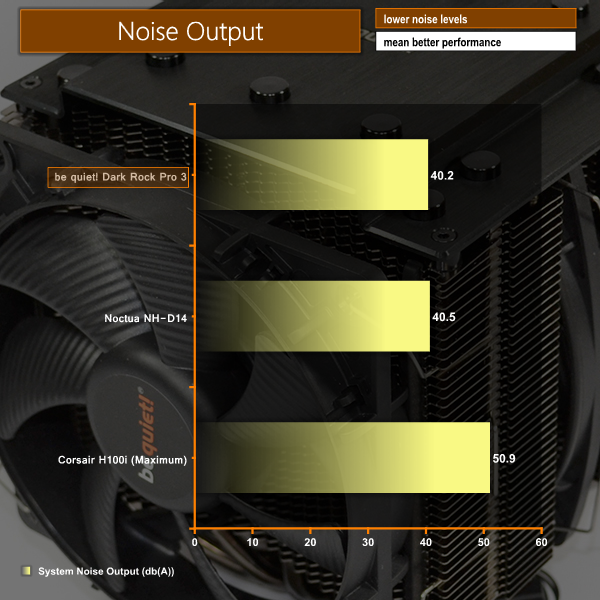
Noise output is where the be quiet! Dark Rock Pro 3 really shines. Noctua's NH-D14 was already regarded as one of the quietest high-performance, dual tower CPU coolers. And be quiet!'s latest Dark Rock Pro unit manages to match the Austrian sandwich's acoustic performance (the difference is too close to call a conclusive winner).
If there was a set of results that showed the benefits of an air cooler over an AIO liquid cooling unit, noise output would be it. Corsair's CLC unit is substantially louder than both dual tower air coolers. And while it does thermally outperform both models, that added cooling capacity comes at the price of noise, and lots of it.
According to the volume loudness (perceived sound level of human hearing) scale, the be quiet! Dark Rock Pro 3 is approximately half as loud as Corsair's H100i (- ~10dB). And if those noise levels aren't low enough, the PWM operation of the SilentWings fans can be utilised.
On a scale where noise is also considered alongside thermal performance (as is the case for most buyers today), be quiet!'s Dark Rock Pro 3 offers an excellent balance between the two most desirable parameters for a modern CPU cooler – cooling and noise output.
Mounted on our hot-running 4770K processor, be quiet!'s Dark Rock Pro 3 was able to offer impressive performance numbers which were able to cool the heavily overclocked chip. Our testing showed the Dark Rock Pro 3 to be outperforming Noctua's NH-D14 by 4-5°C (5-6%), although the latter is showing some signs of its heavy usage.
Low noise operation is arguably the biggest feature of be quiet!'s Dark Rock Pro 3. The unit has the ability to tame hot processors while operating at admirably low noise levels. And our recordings show maximum noise output; the PWM function of each SilentWings fan can help to reduce noise levels by a noticeable amount when low thermal loads are applied.
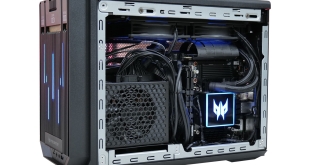
Another important factor for the Dark Rock Pro 3 is its appearance. be quiet! has made no attempts to hide the fact that aesthetics are important considerations for the company's design targets. An underlying dark appearance and the black aluminium top plate enhance the DRP 3's visual appeal and allow it to coincide with black-scheme systems.
Clearance is a difficult point to analyse with the Dark Rock Pro 3. In general, the majority of problems are caused by tall RAM modules, so be quiet!'s decision to make the front fan height-adjustable was a good one. But the cooler's sheer size and vast quantity of heatpipes create other possible areas of concern. This isn't strictly an issue for the Dark Rock Pro 3, though; all dual tower CPU coolers produce the same concerns.
Our biggest complaint for be quiet!'s newest flagship is the installation procedure. We understand that the aluminium top plate was deemed to be more important than a straightforward mounting process, but there are still adaptations that could reduce the installation complexity. We hope that be quiet! can adjust its mounting procedure on future models.
Priced at £69.95 from OverclockersUK, the be quiet! Dark Rock Pro 3 is situated in the same market as Noctua's NH-D14 and Phanteks's PH-TC14PE. A high performance AIO liquid cooling unit, such as Corsair's H100i, will cost around £20-30 more. We feel that just under £70 is a fair price to pay for the Dark Rock Pro 3.
The well-rounded performance and smart visuals of the be quiet! Dark Rock Pro 3 prove that the design of computer heat exchangers has, in fact, made progress over the past five years.
Discuss on our Facebook page, over HERE.
Pros:
- Good cooling performance.
- Excellent acoustic performance.
- Very attractive, all-black unit.
- PWM fans.
- Ability to house a third fan.
- Height-adjustable fan to avoid RAM clearance issues.
Cons:
- Difficult mounting procedure.
KitGuru says: be quiet! knows that gamers and enthusiasts of today want a quiet, well-cooled, good-looking system. With the company's Dark Rock Pro 3, users can satisfy all of those requirements in one well-priced CPU cooler.