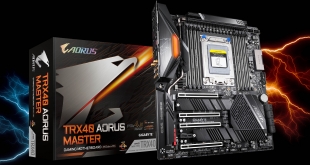
Gigabyte’s TRX40 Aorus Master is aiming to offer enthusiasts with a positive balance of features, high-performance cooling, and an eye-catching aesthetic design for their Threadripper system. Coming in at just below £500 in the UK, the TRX40 Aorus Master competes directly with ASUS’ TRX40-E Gaming but does many things in a very different manner.
Can Gigabyte’s offering prove itself as the ‘Master’ at this price point?

AMD’s TRX40 platform is unequivocally feature-rich when it comes to options for motherboard vendors. As such, Gigabyte has made the decision to deploy the TRX40 Aorus Master on an Extended-ATX PCB in order to squeeze in all the necessary features and cooling hardware.
With a 16+3 phase power delivery solution and active cooling for the finned VRM heatsink, it is clear to see that Gigabyte is not cutting corners with its power capabilities. The emphasis on cooling performance even continues to the back of the TRX40 Aorus Master with Gigabyte deploying a ‘NanoCarbon Coated’ backplate (which is marketing speak for a thermally enhanced sheet of aluminium).
Featuring 5 Gigabit Ethernet, triple M.2 slots, a right-angled 24-pin connector, and the promise of superb fan capabilities, let’s take a close look at the Gigabyte TRX40 Aorus Master.
Features (information taken from the Gigabyte webpage):
- Supports 3rd Gen AMD Ryzen™ Threadripper™ Processors
- Quad Channel ECC/ Non-ECC Unbuffered DDR4, 8 DIMMs
- 16+3 Phases Infineon Digital VRM Solution with 70A Power Stage
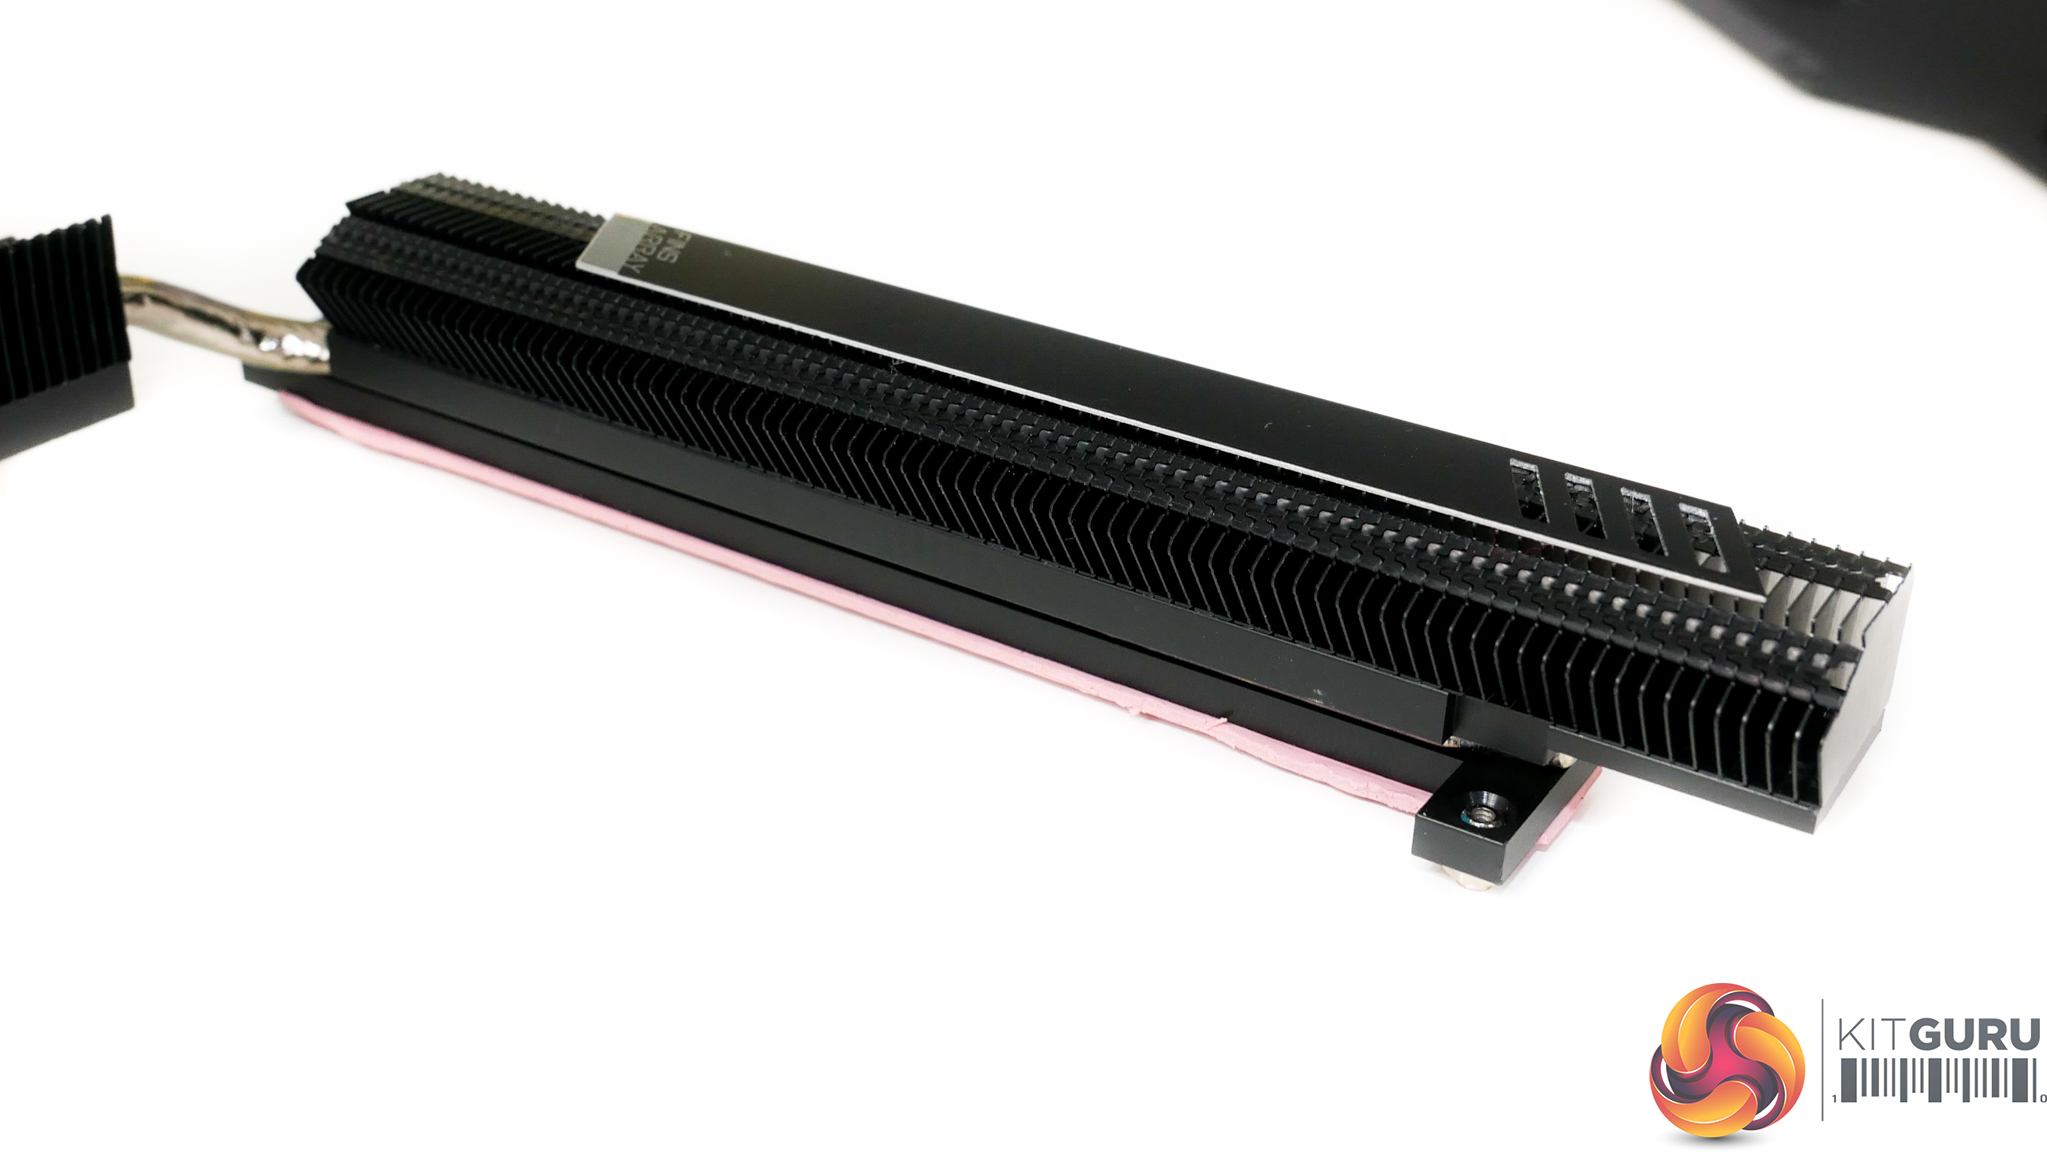
- Advanced Thermal Design with Fins-Array Heatsink, Heatpipe with Extended Heatsink and NanoCarbon Baseplate
- AQUANTIA® 5GbE LAN and Intel® GbE LAN with cFosSpeed
- 3 Ultra-Fast NVMe PCIe 4.0 x4 M.2 with Thermal Guards
- Onboard Intel® WiFi 6 802.11ax 2T2R & BT 5
- 130dB SNR AMP-UP Audio with High-End ESS SABRE 9218 DAC, ALC1220-VB and WIMA Audio Capacitors
- USB TurboCharger for Mobile Device Fast Charge Support
- RGB FUSION 2.0 with Multi-Zone Addressable LED Light Show Design, Support Addressable LED & RGB LED Strips
- Smart Fan 5 Features Multiple Temperature Sensors, Hybrid Fan Headers with FAN STOP and Noise Detection
- Front & Rear USB 3.2 Gen 2 Type-C™ Header
- Q-Flash Plus Update BIOS Without Installing CPU, Memory and Graphics Card
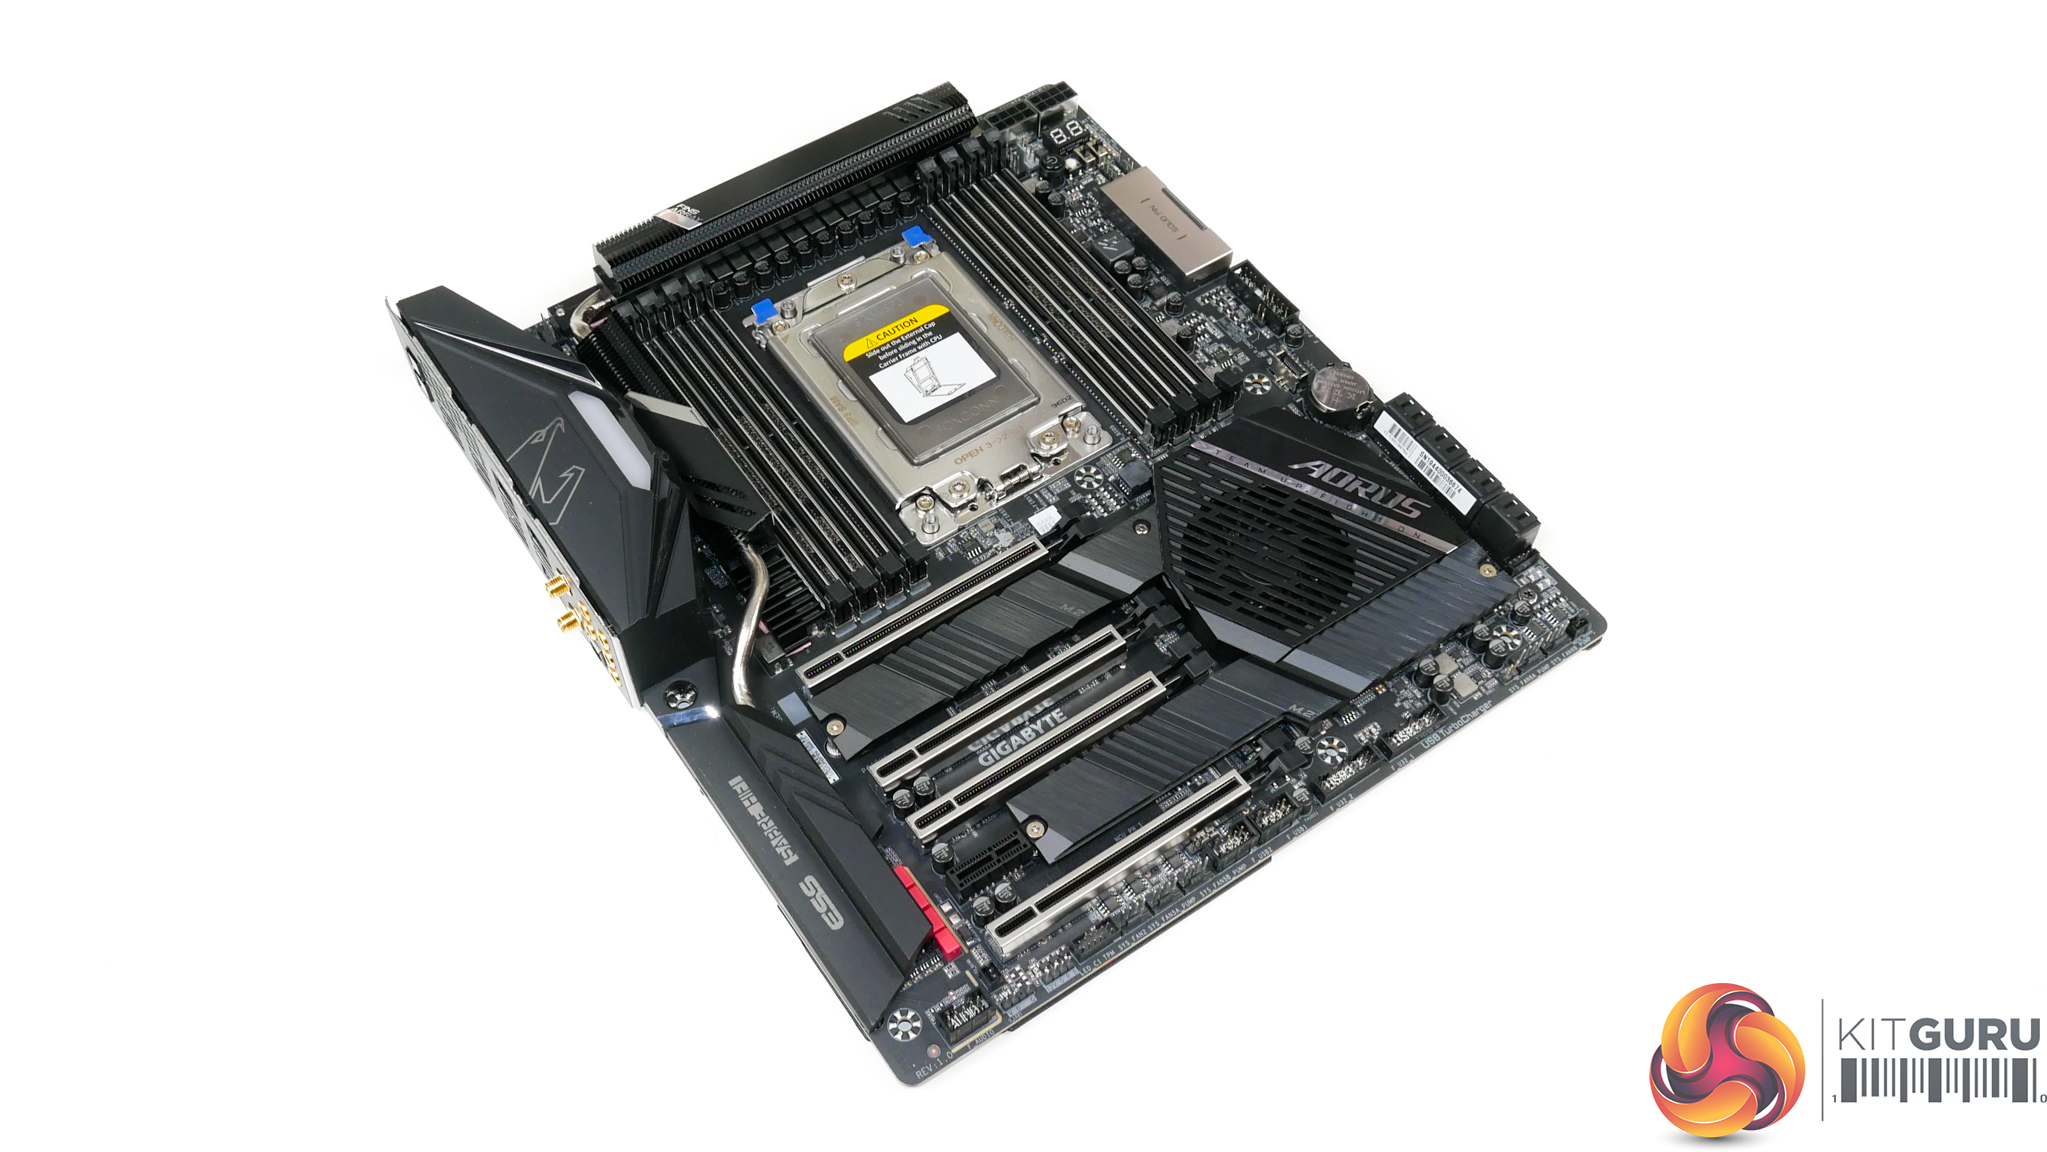
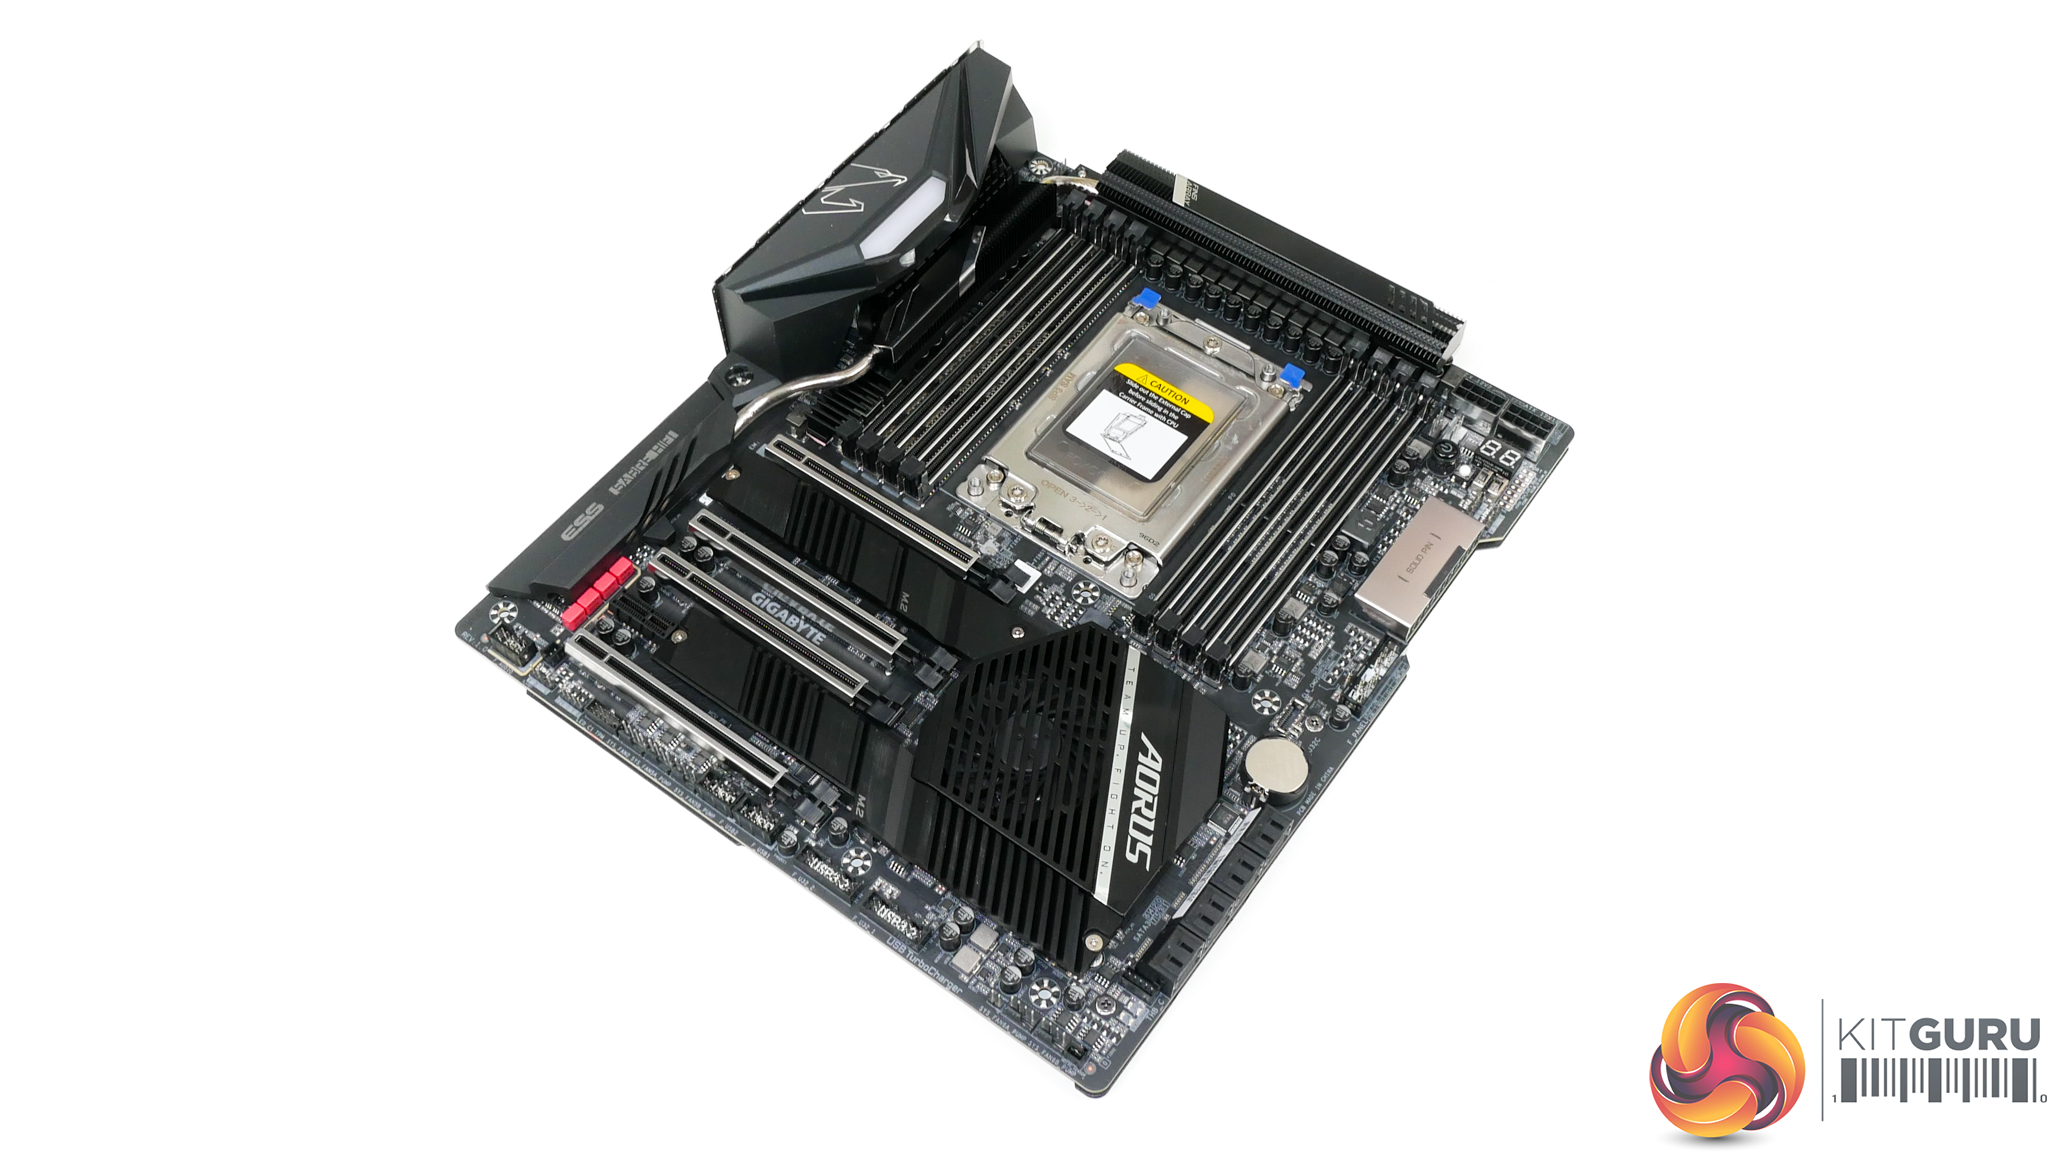
Gigabyte styles the TRX40 Aorus Master with a primarily black colour scheme that leaves a subtle zone of onboard RGB light to cater for added flair. There are areas of contrast with the silver slot covers and text, but the motherboard is primarily dark black and fairly neutral in its appearance.
The full-cover rear IO shroud is home to the single RGB lighting zone and the Aorus logo. Beneath this shroud lies the rear ports that see an integrated IO shield deployed. This is a premium touch that I am enjoying seeing on more motherboards in today’s market.
Evident is the TRX40 Aorus Master’s widened Extended-ATX sizing that makes chassis selection more challenging but certainly not as difficult as the longer XL-ATX form factor.
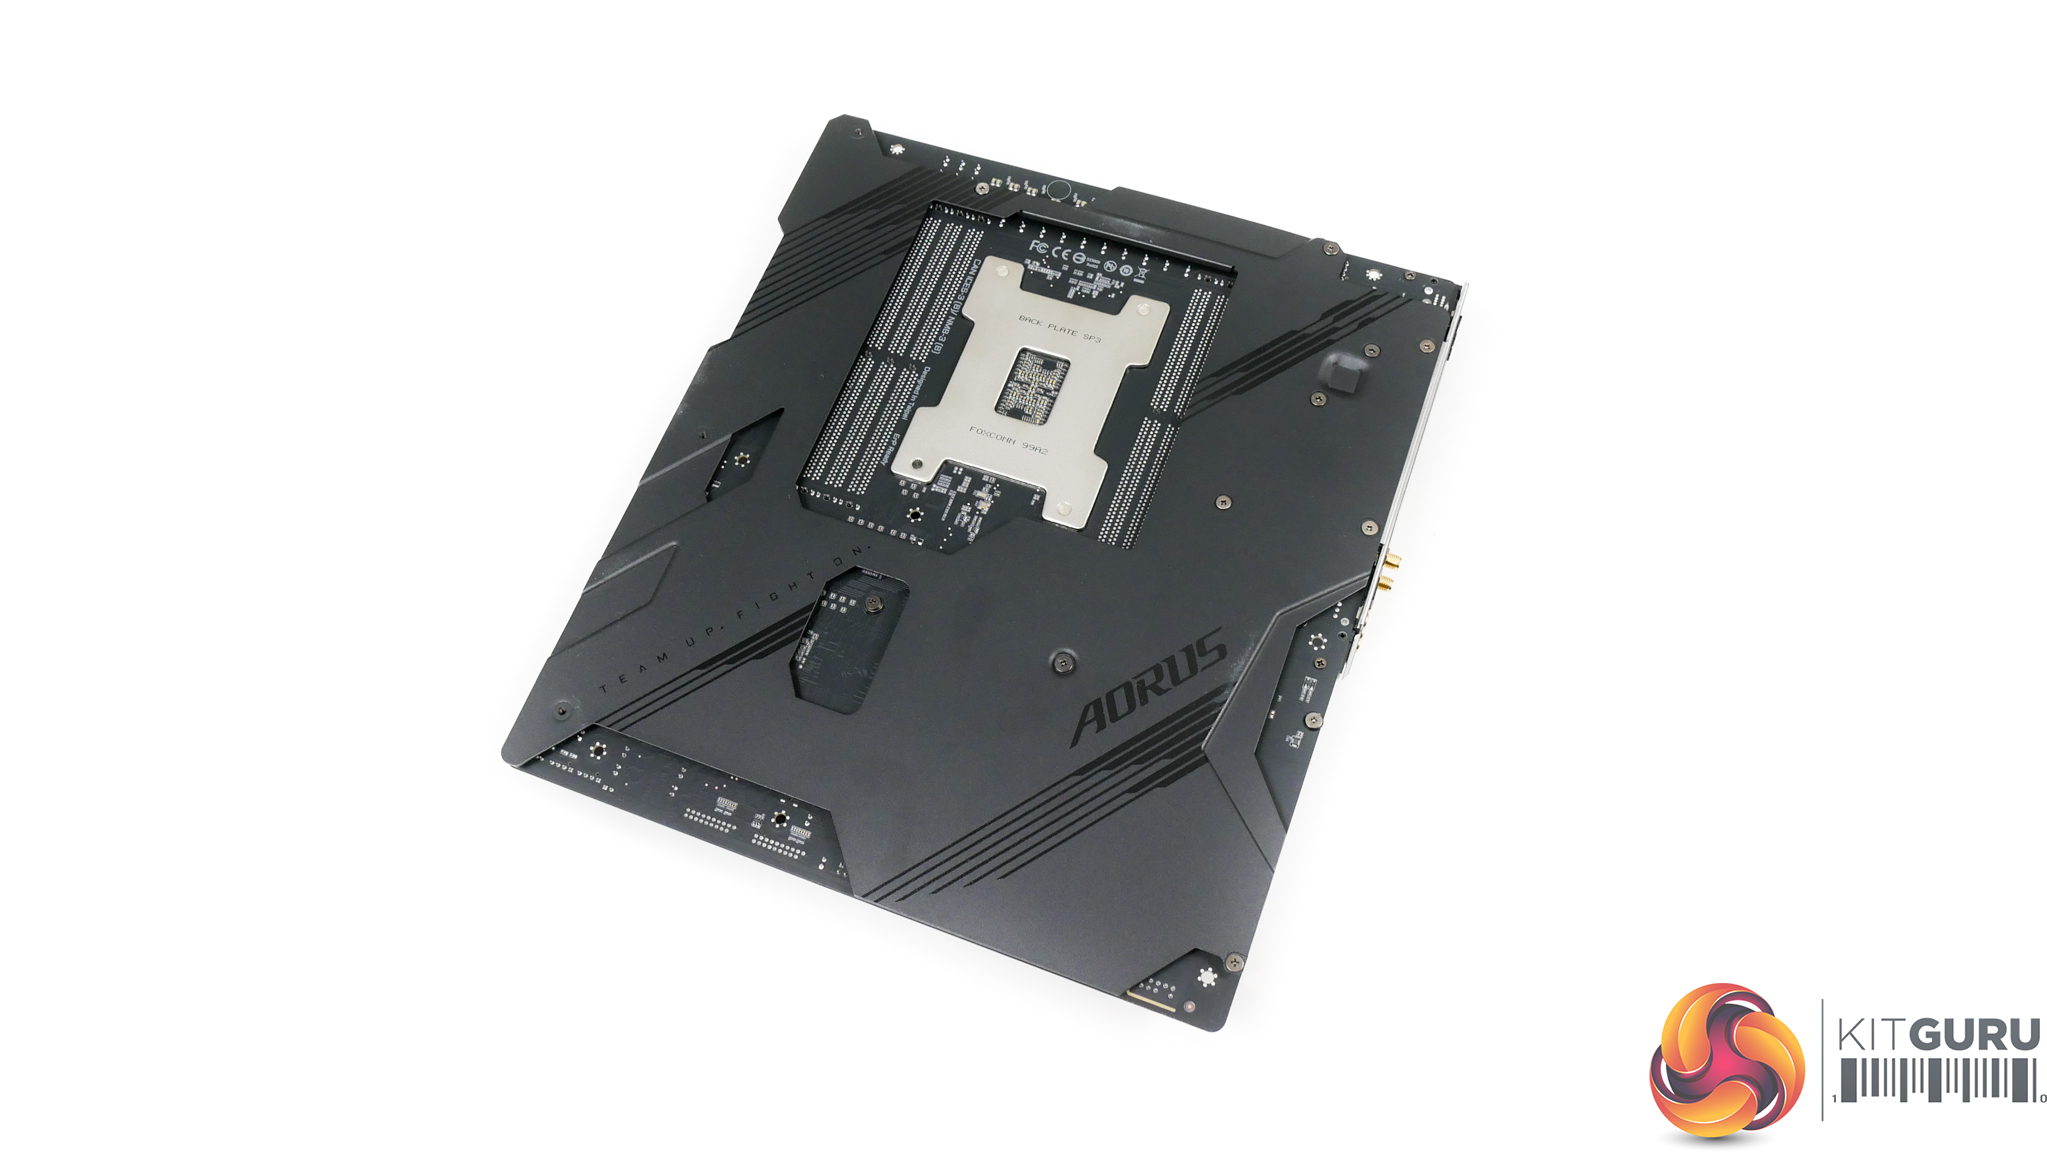
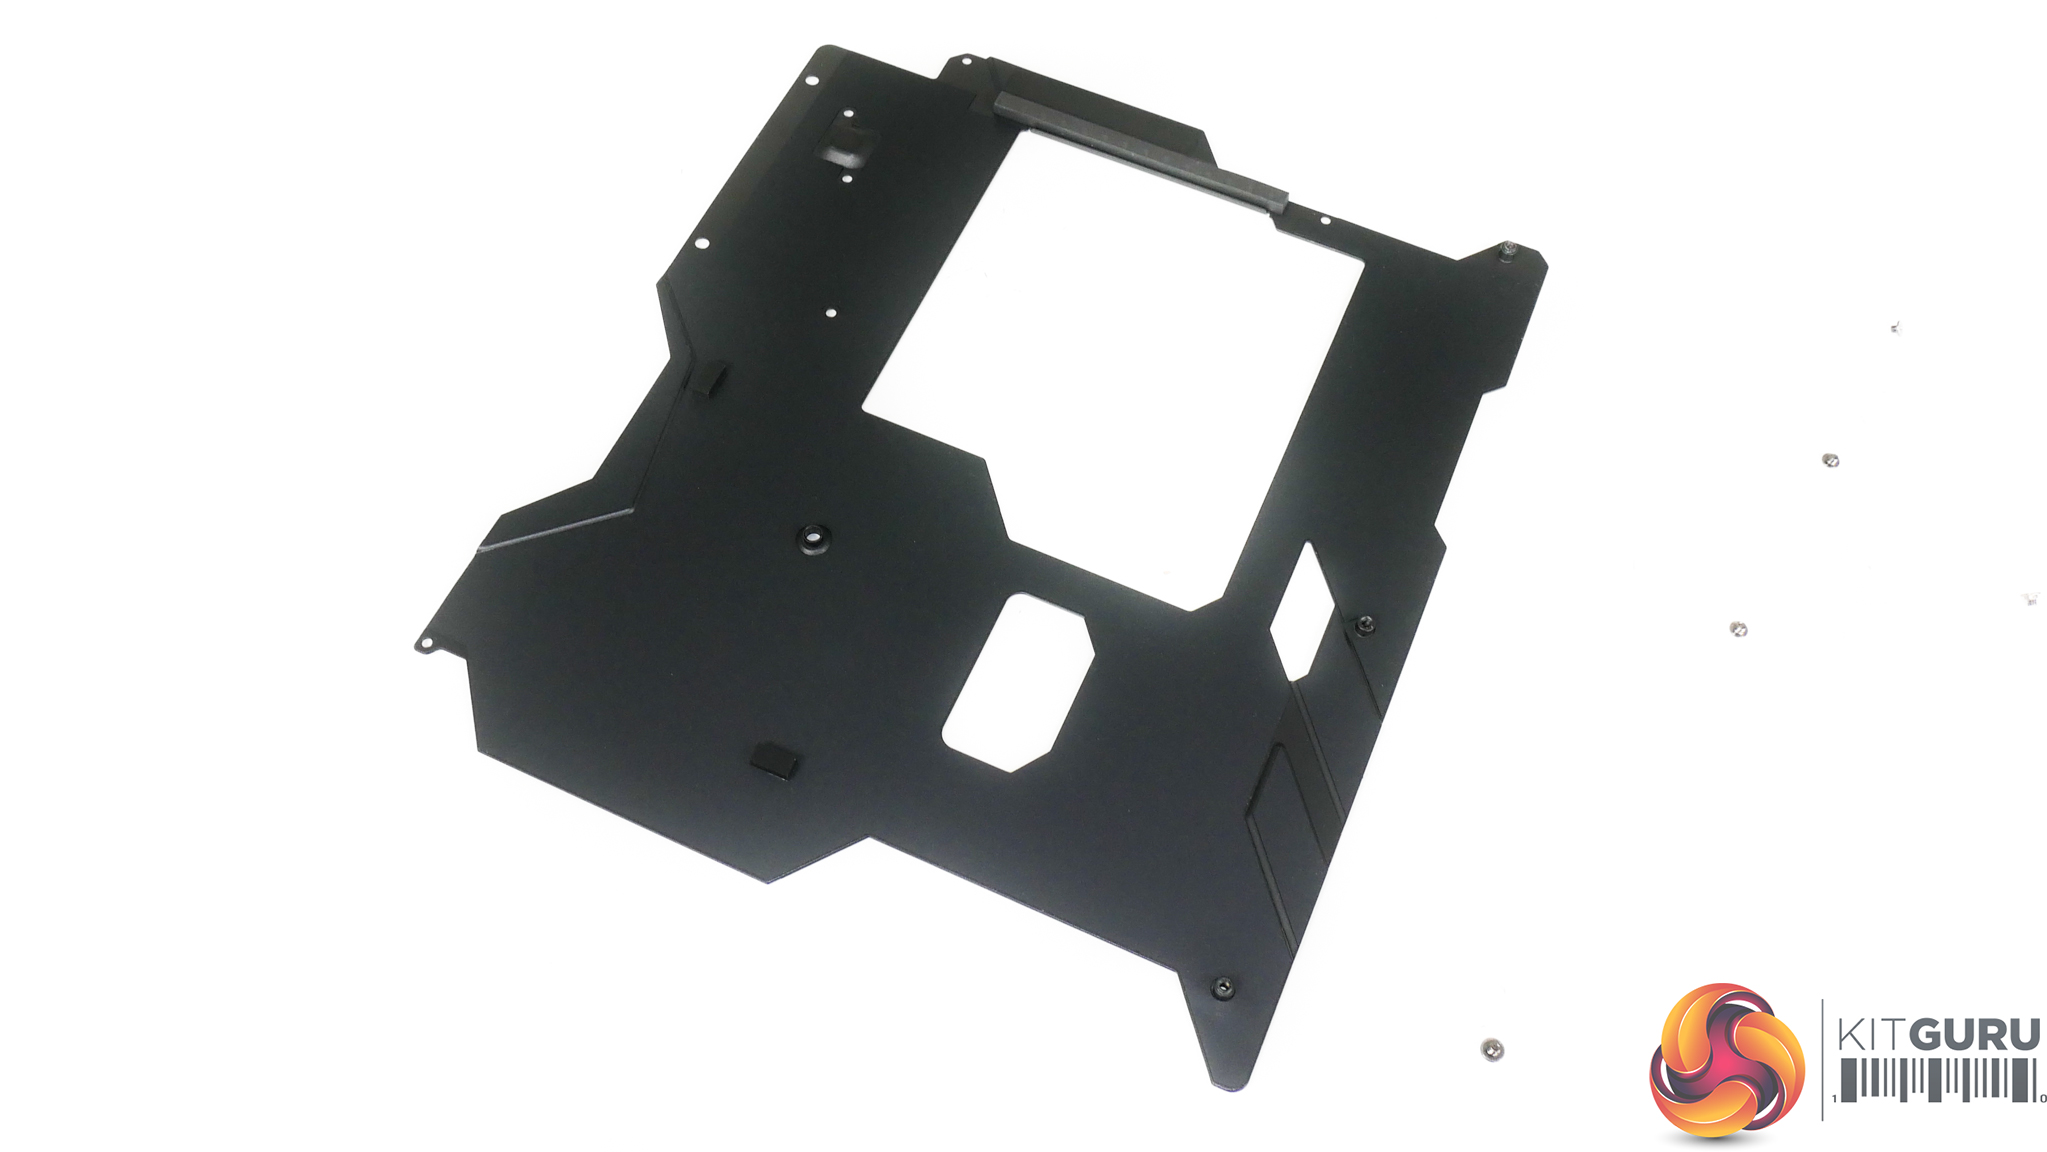
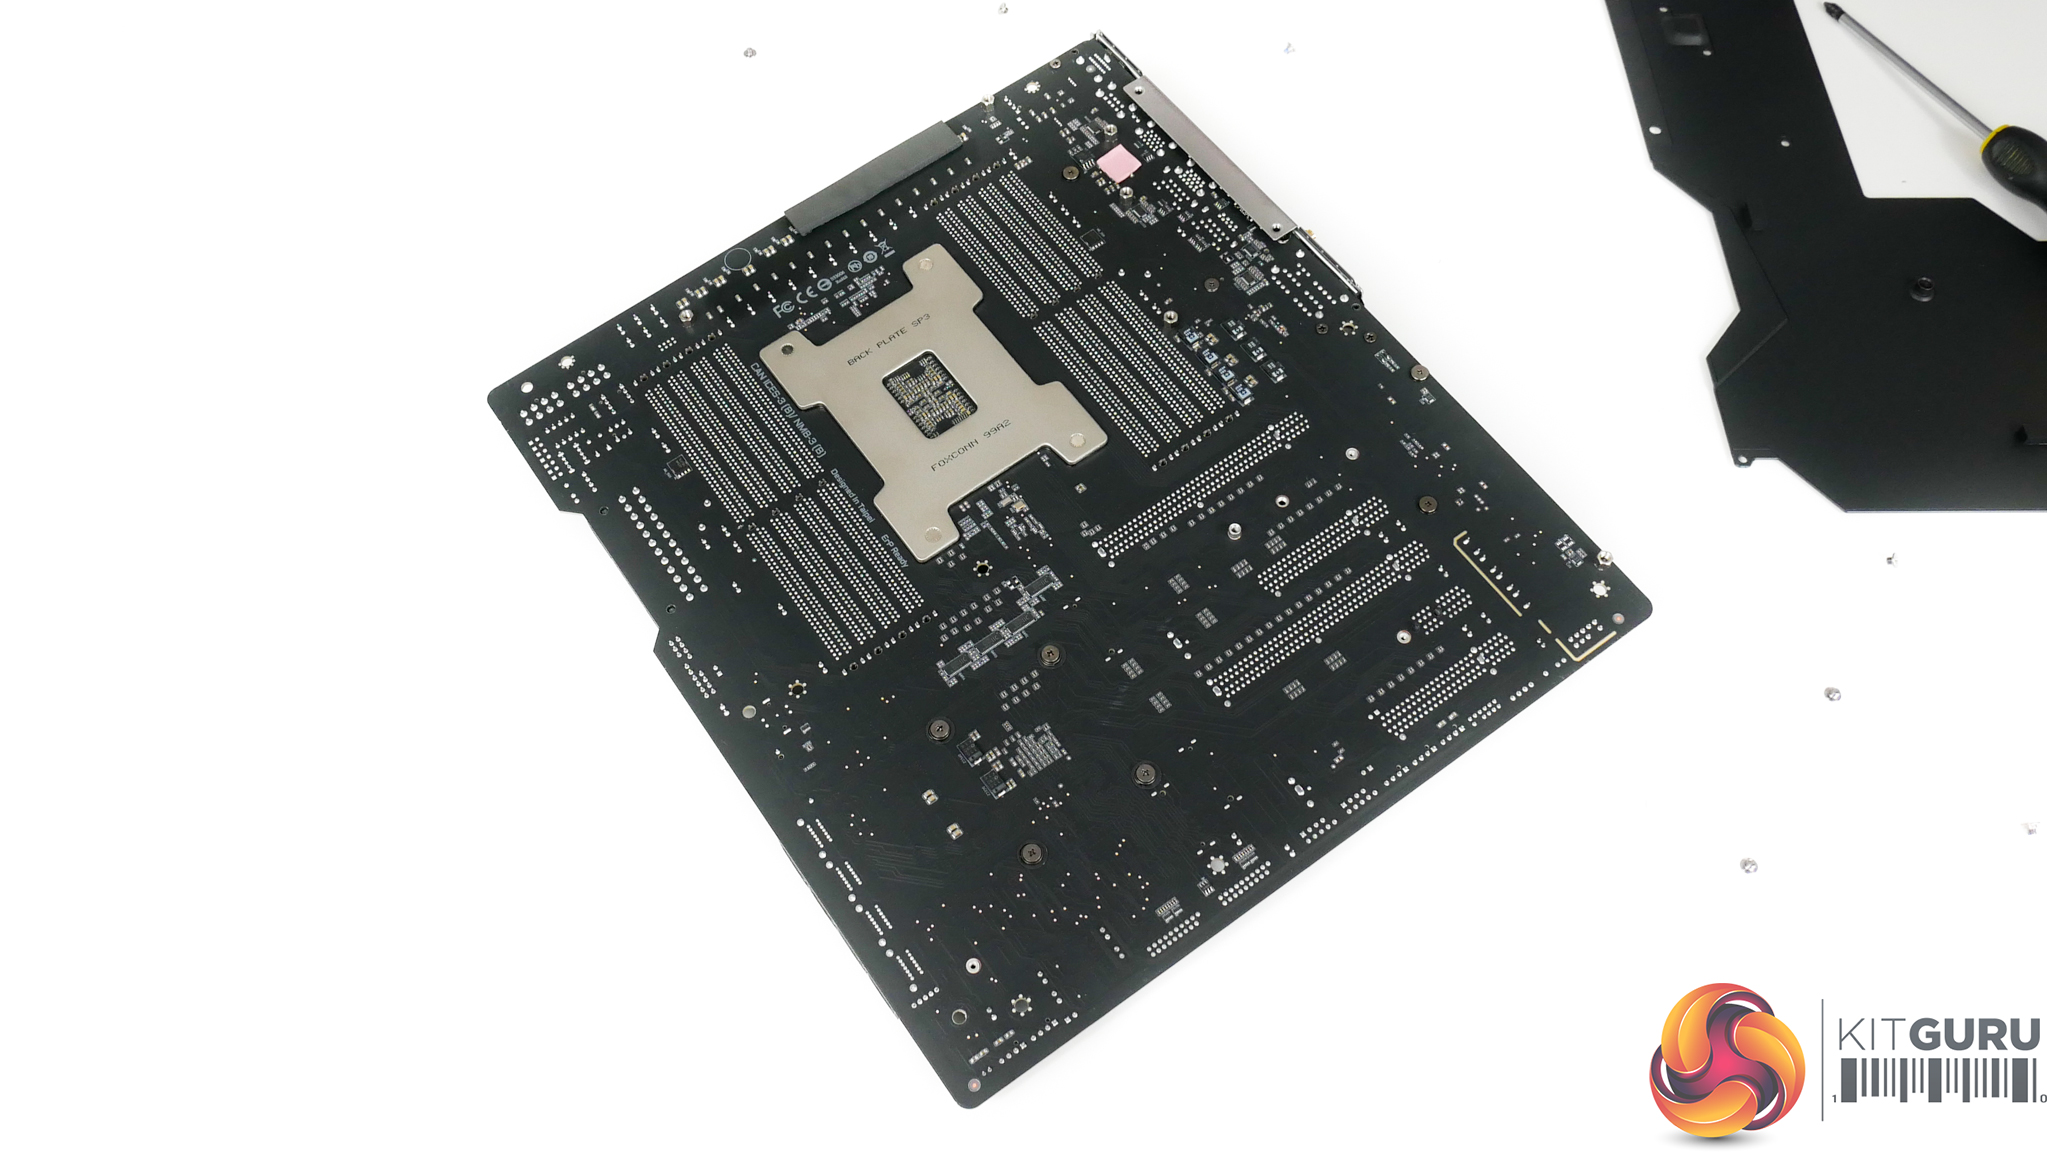
A dark black aluminium backplate encompasses most of the motherboard’s rear side. This rear brace certainly adds structural rigidity to the motherboard, and that is useful when installing a heavy CPU cooler and multiple graphics cards.
A ‘NanoCarbon Coating’ is applied to the rear of the backplate using an electrostatic adhesion technique, which sound fancy but is very common in industry. According to Gigabyte, the coating on the aluminium backplate helps to reduce backside PWM component temperatures by 10%. Realistically, a standard black aluminium backplate would have been adequately efficient in its heat transfer duties but credit to Gigabyte for trying out a relatively new process for enhancing thermal properties.
Worth noting is that users should watch out for interference with certain cases that struggle to deal with the added thickness.
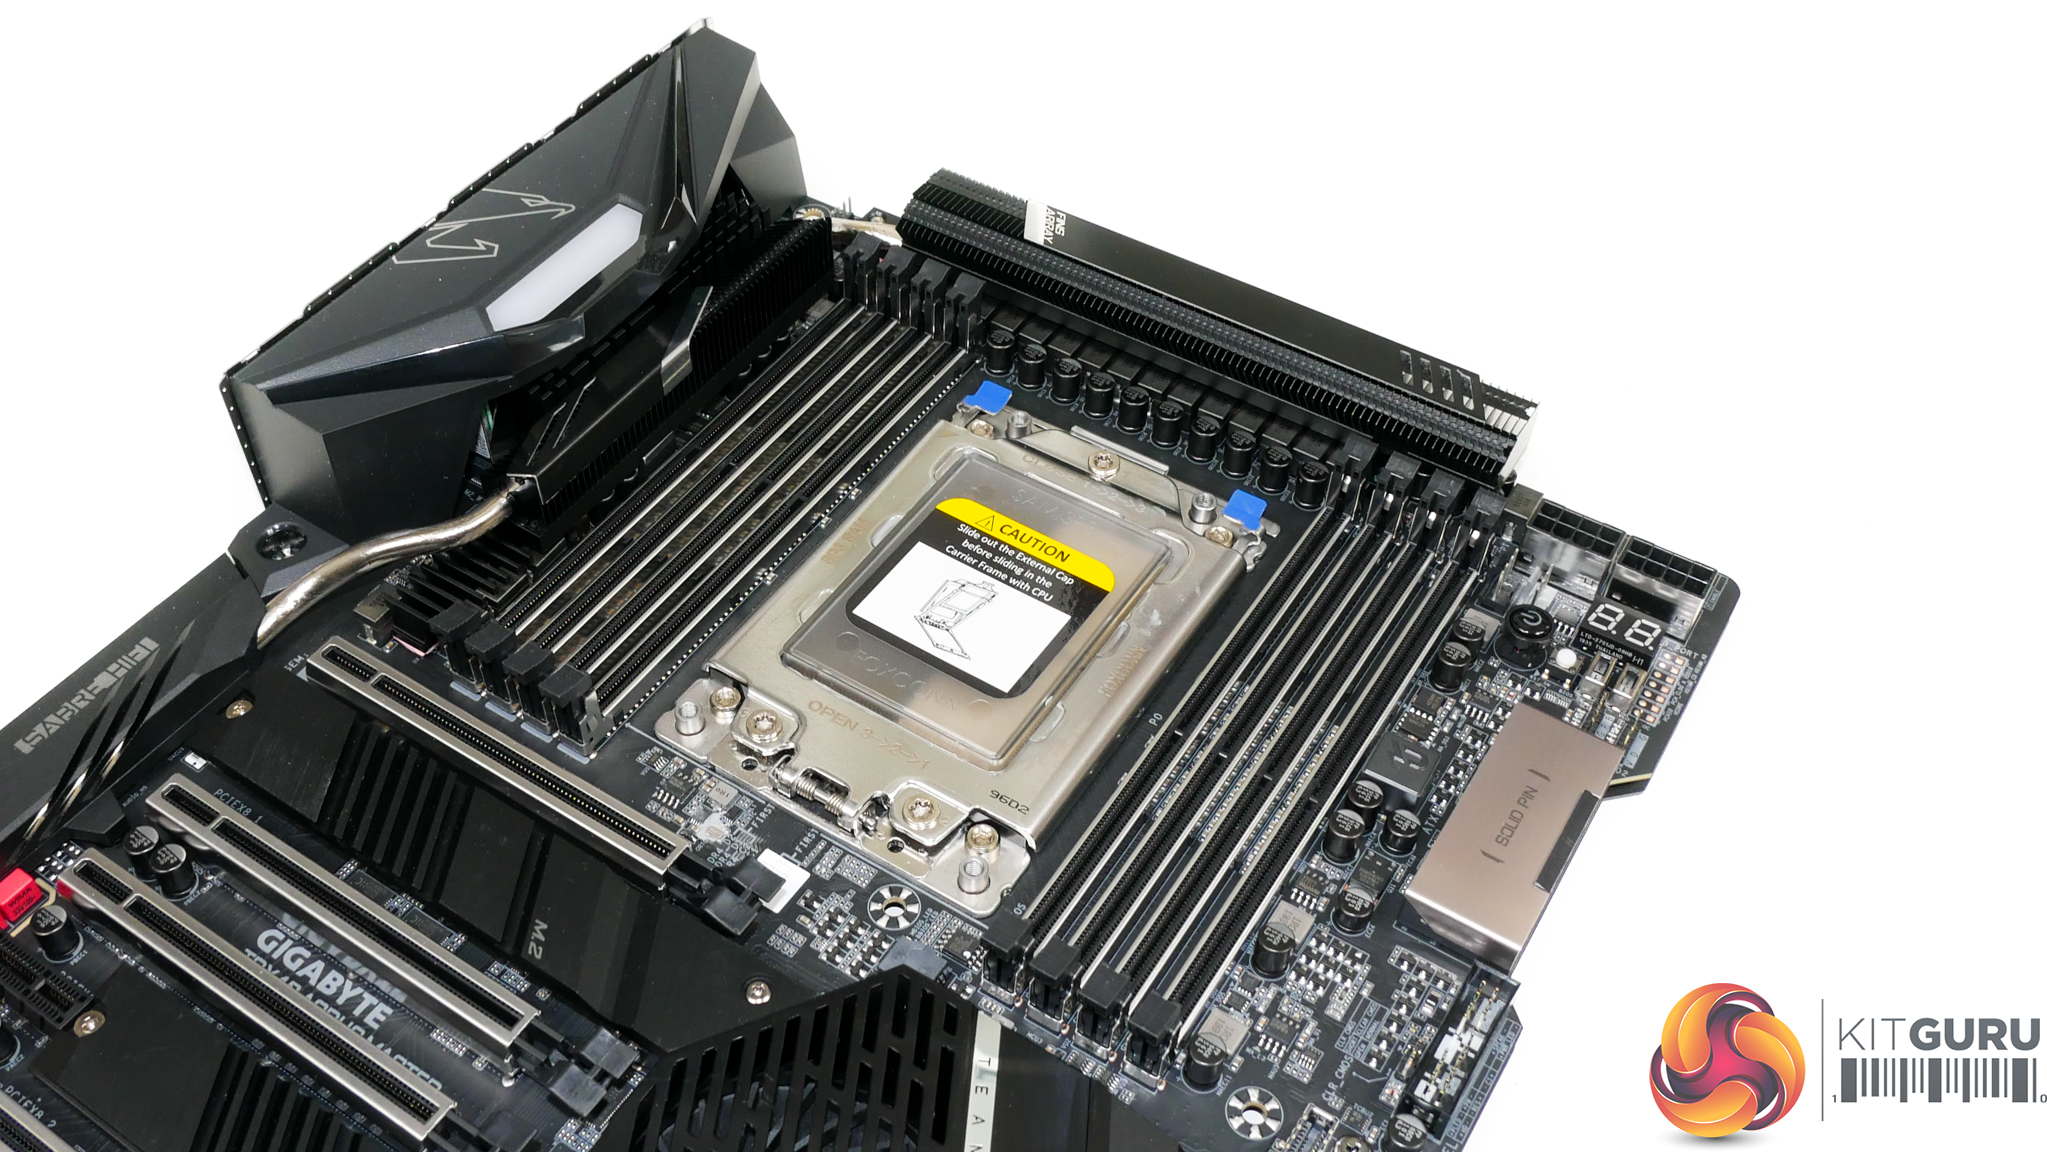
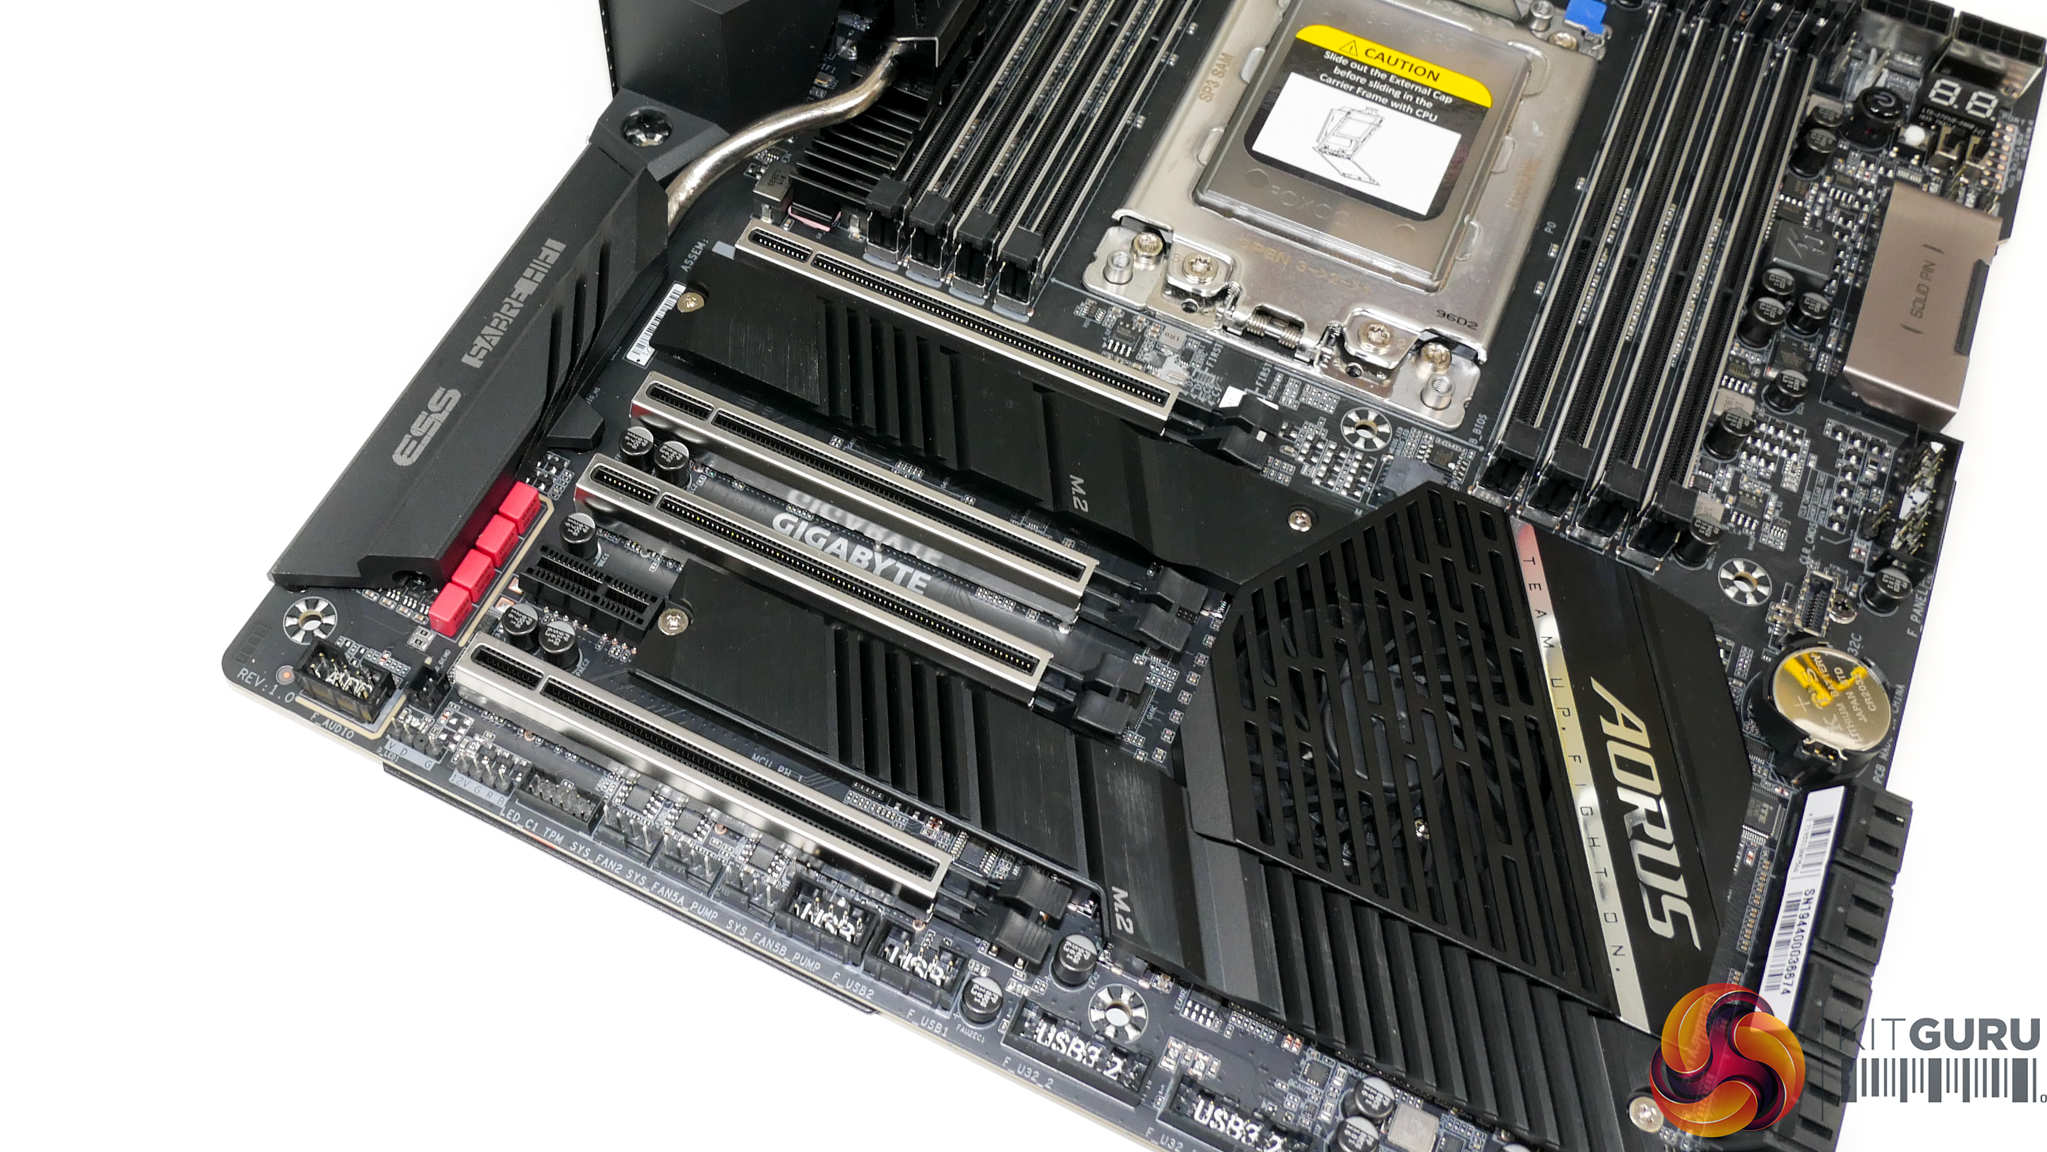
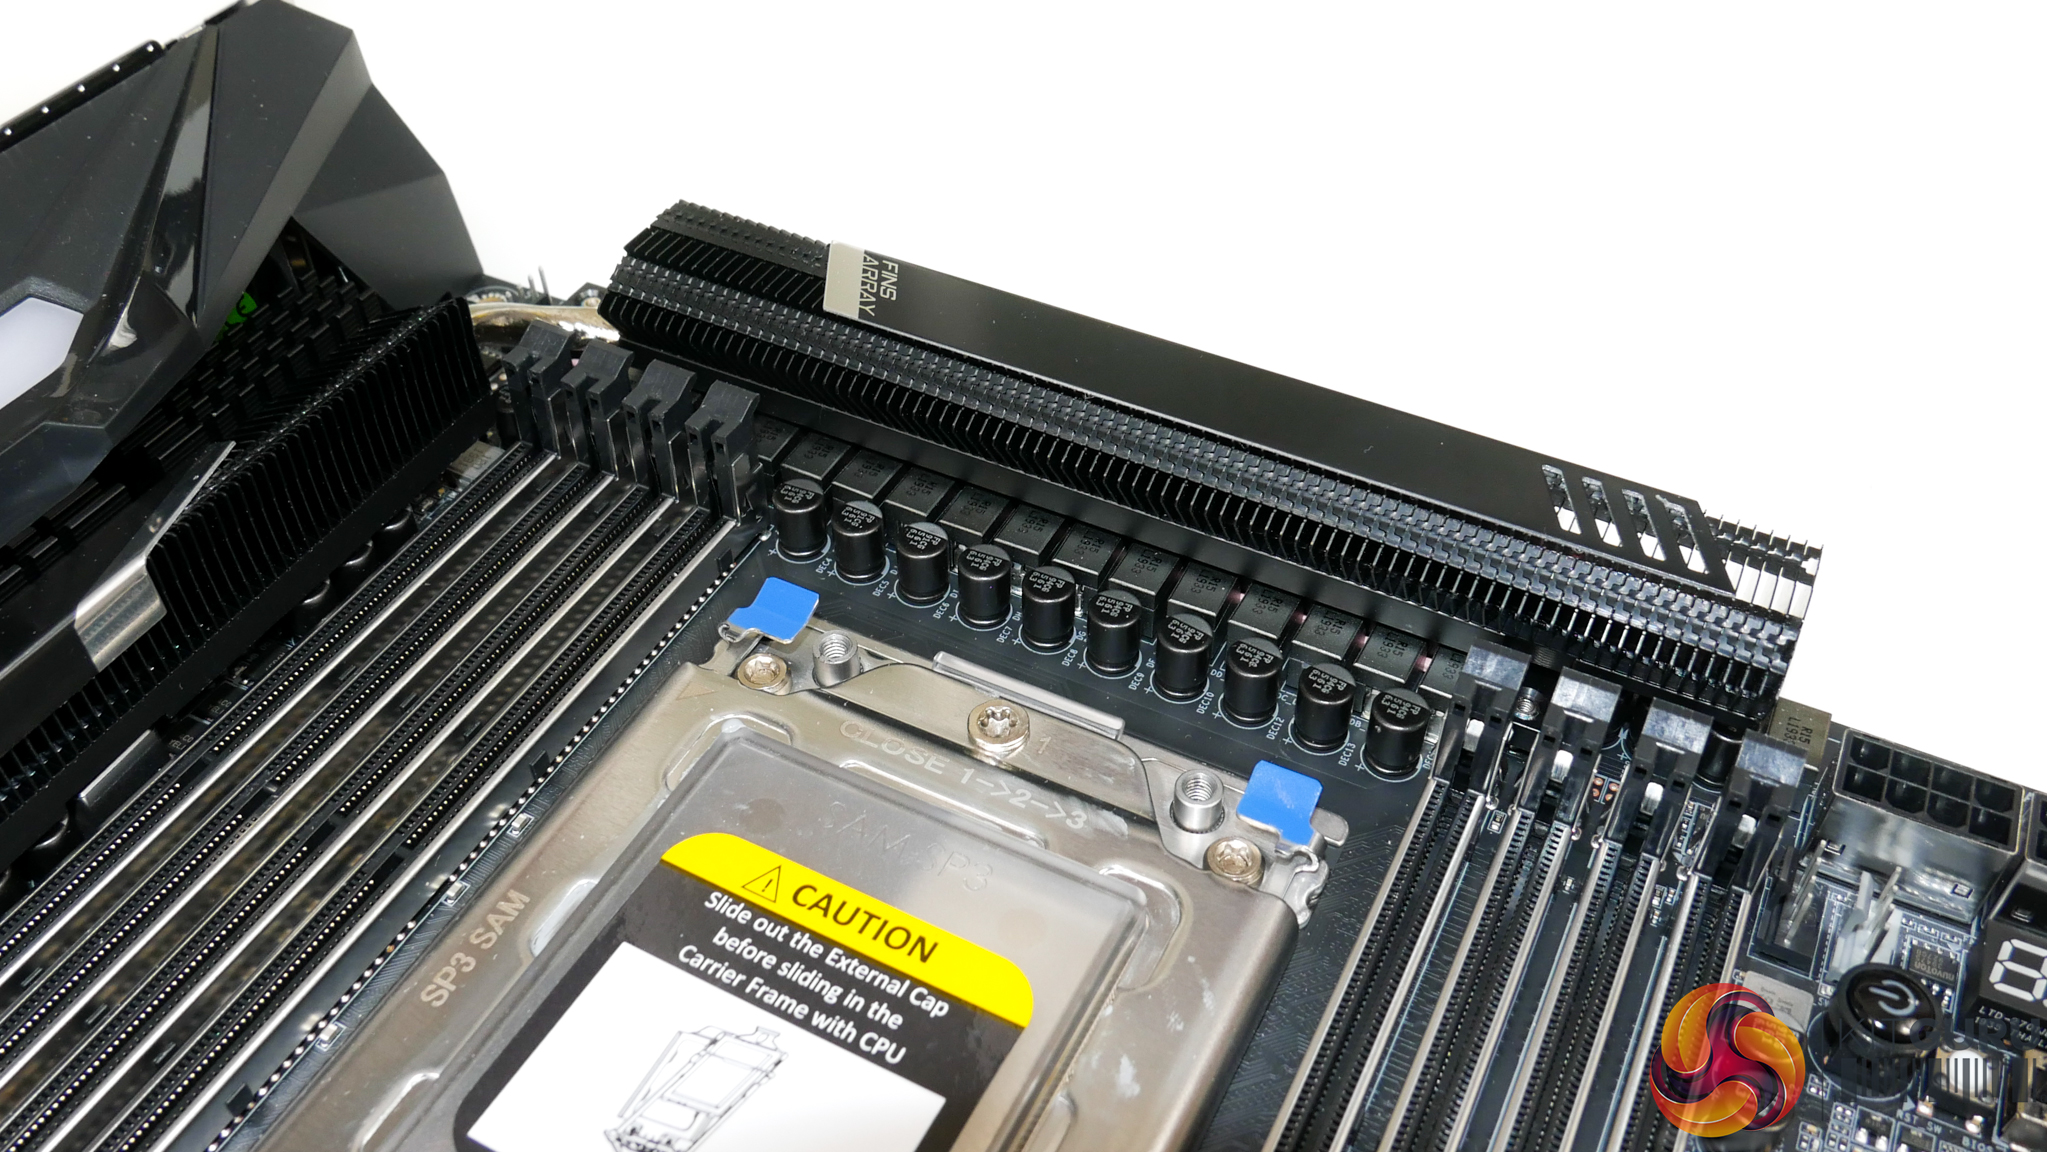
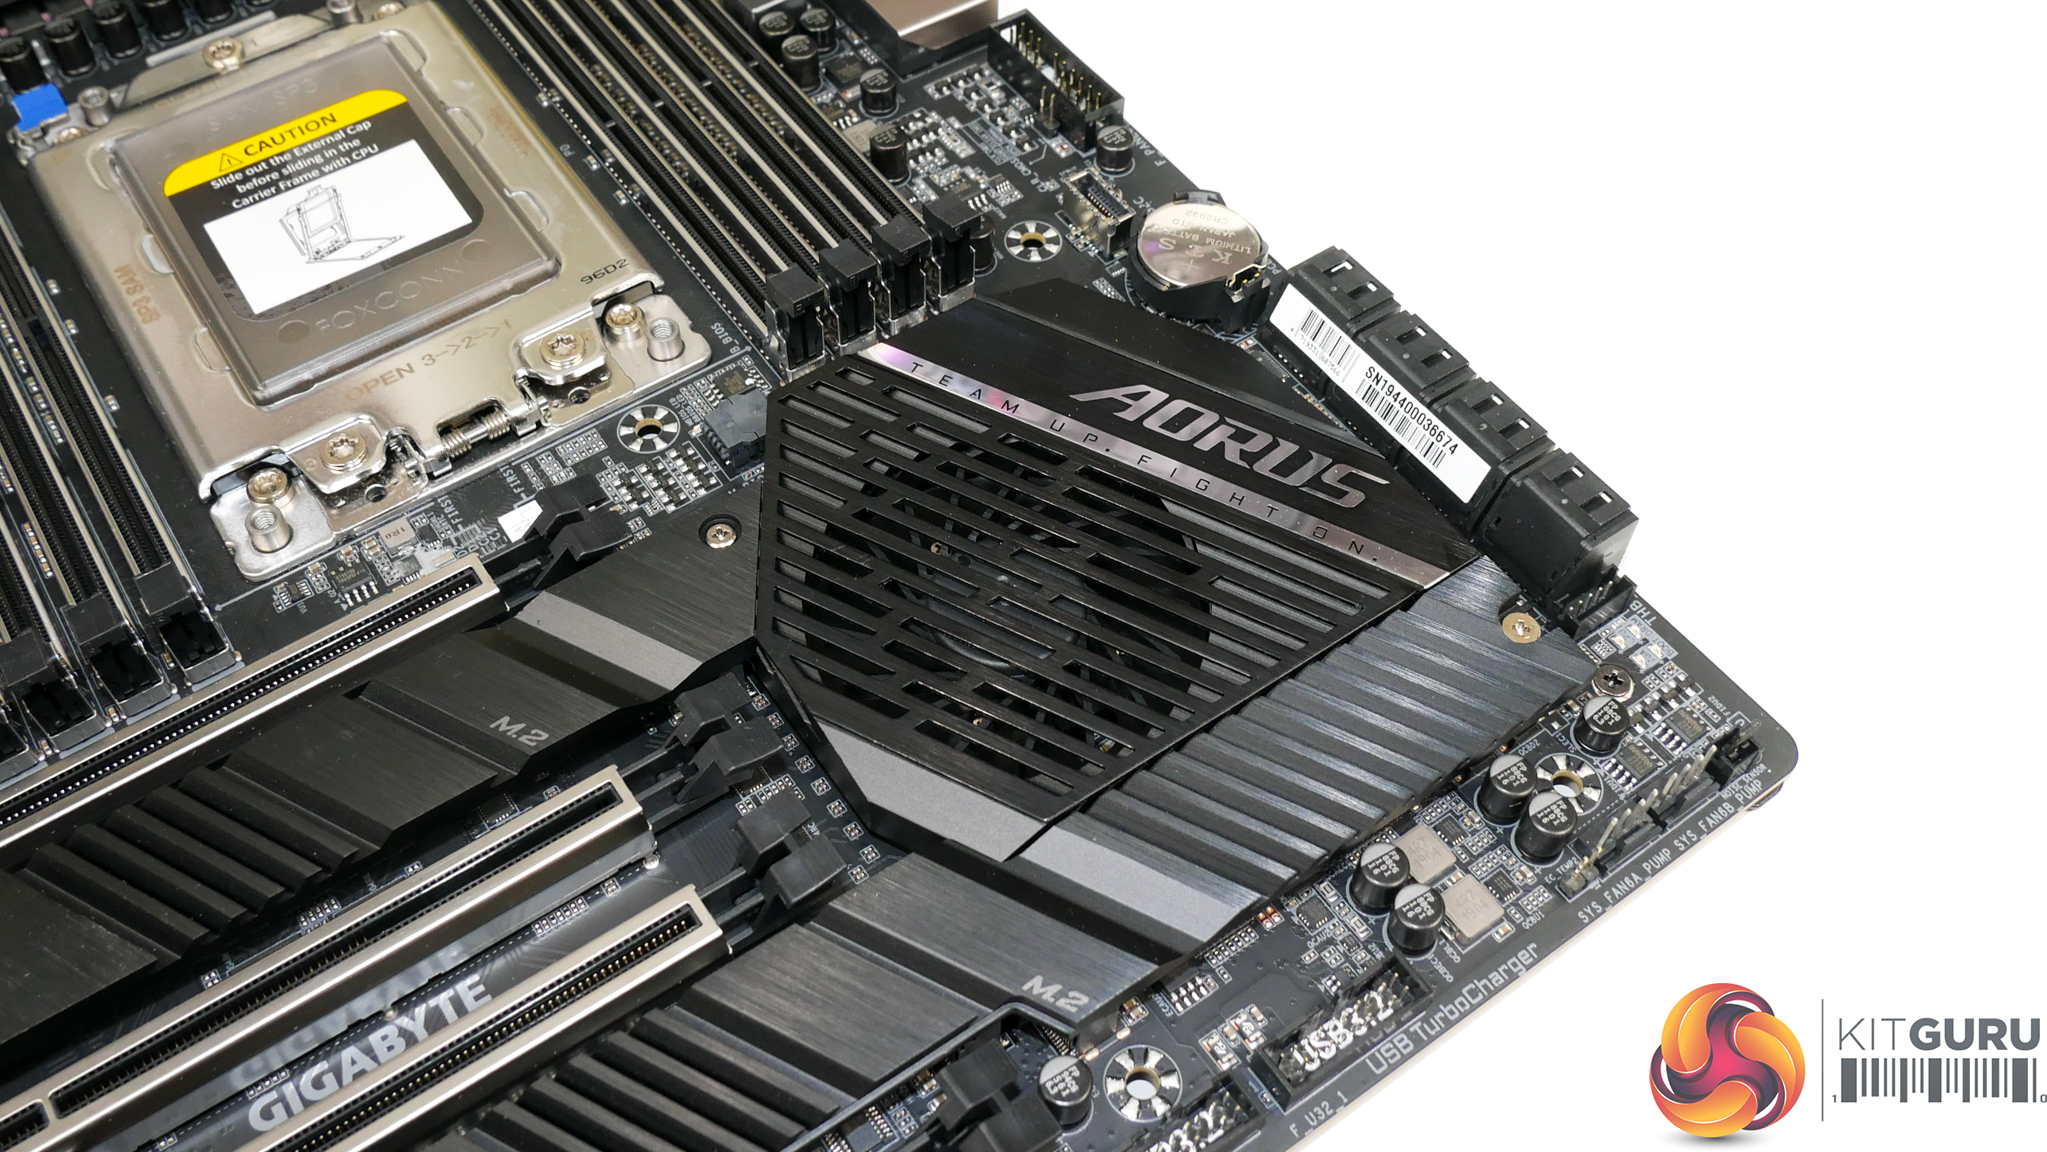
As is the norm for TRX40 motherboards, eight DDR4 DIMM slots are positioned either side of the giant sTRX4 CPU socket. Gigabyte quotes support for non-ECC memory up to 256GB using currently available 32GB DIMMs. ECC memory support is also stated, with Gigabyte’s QVL outlining compatibility with some Crucial (Micron) and V-Color (SK Hynix) modules.
While ECC memory support is arguably of little importance to buyers of Threadripper, rather than EPYC, it is good to see that Gigabyte has at least tested some ECC memory and put it on the support list. Users building a FreeNAS monster, for example, may appreciate the peace of mind that their Crucial ECC modules will work in this board.
Vertical positioning of the CPU socket and DIMM slots means that the first PCIe slot location is infringed upon. The benefit of this design decision is that it allows Gigabyte to provision more space above the CPU socket for the VRM components and cooling.
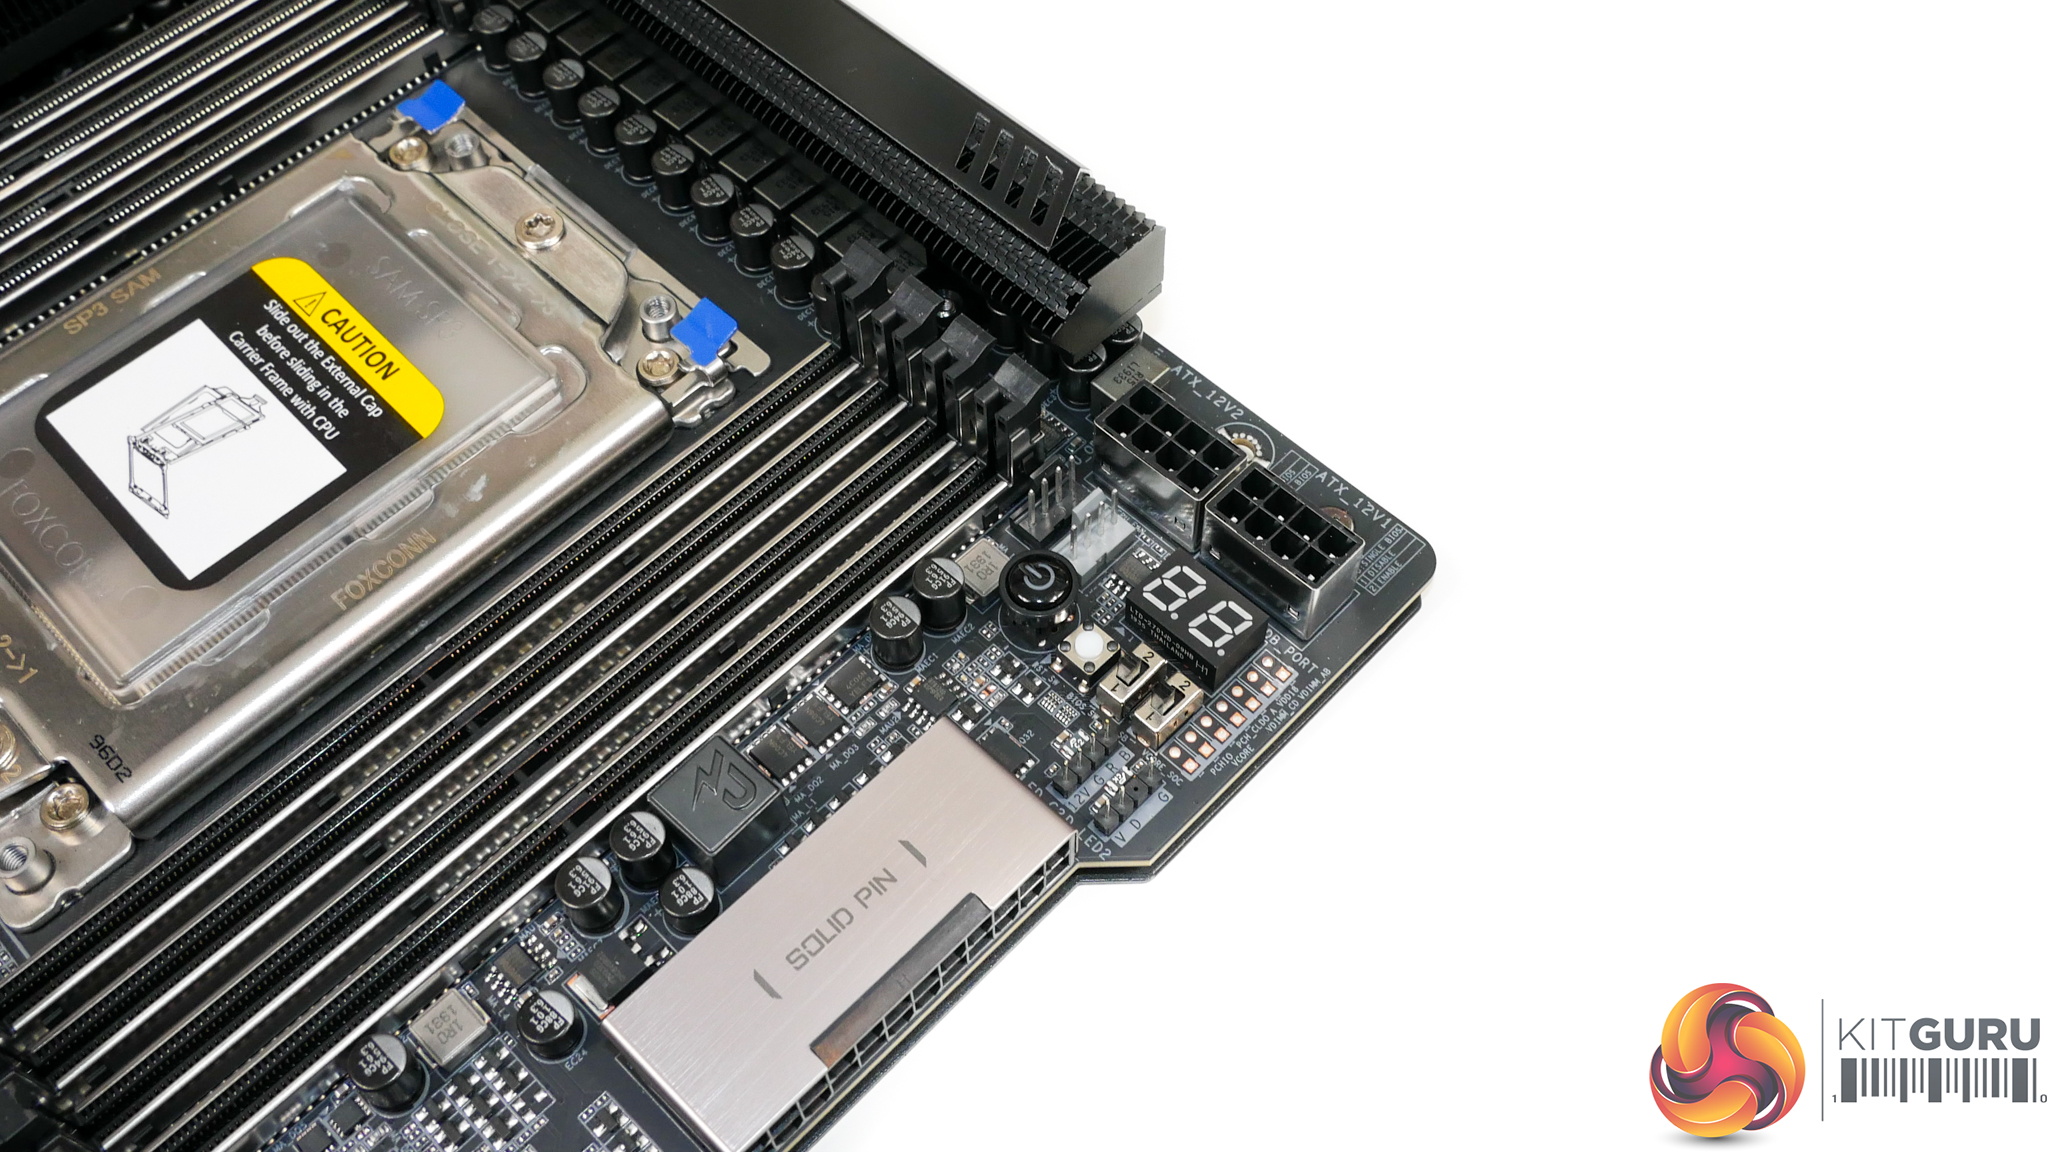
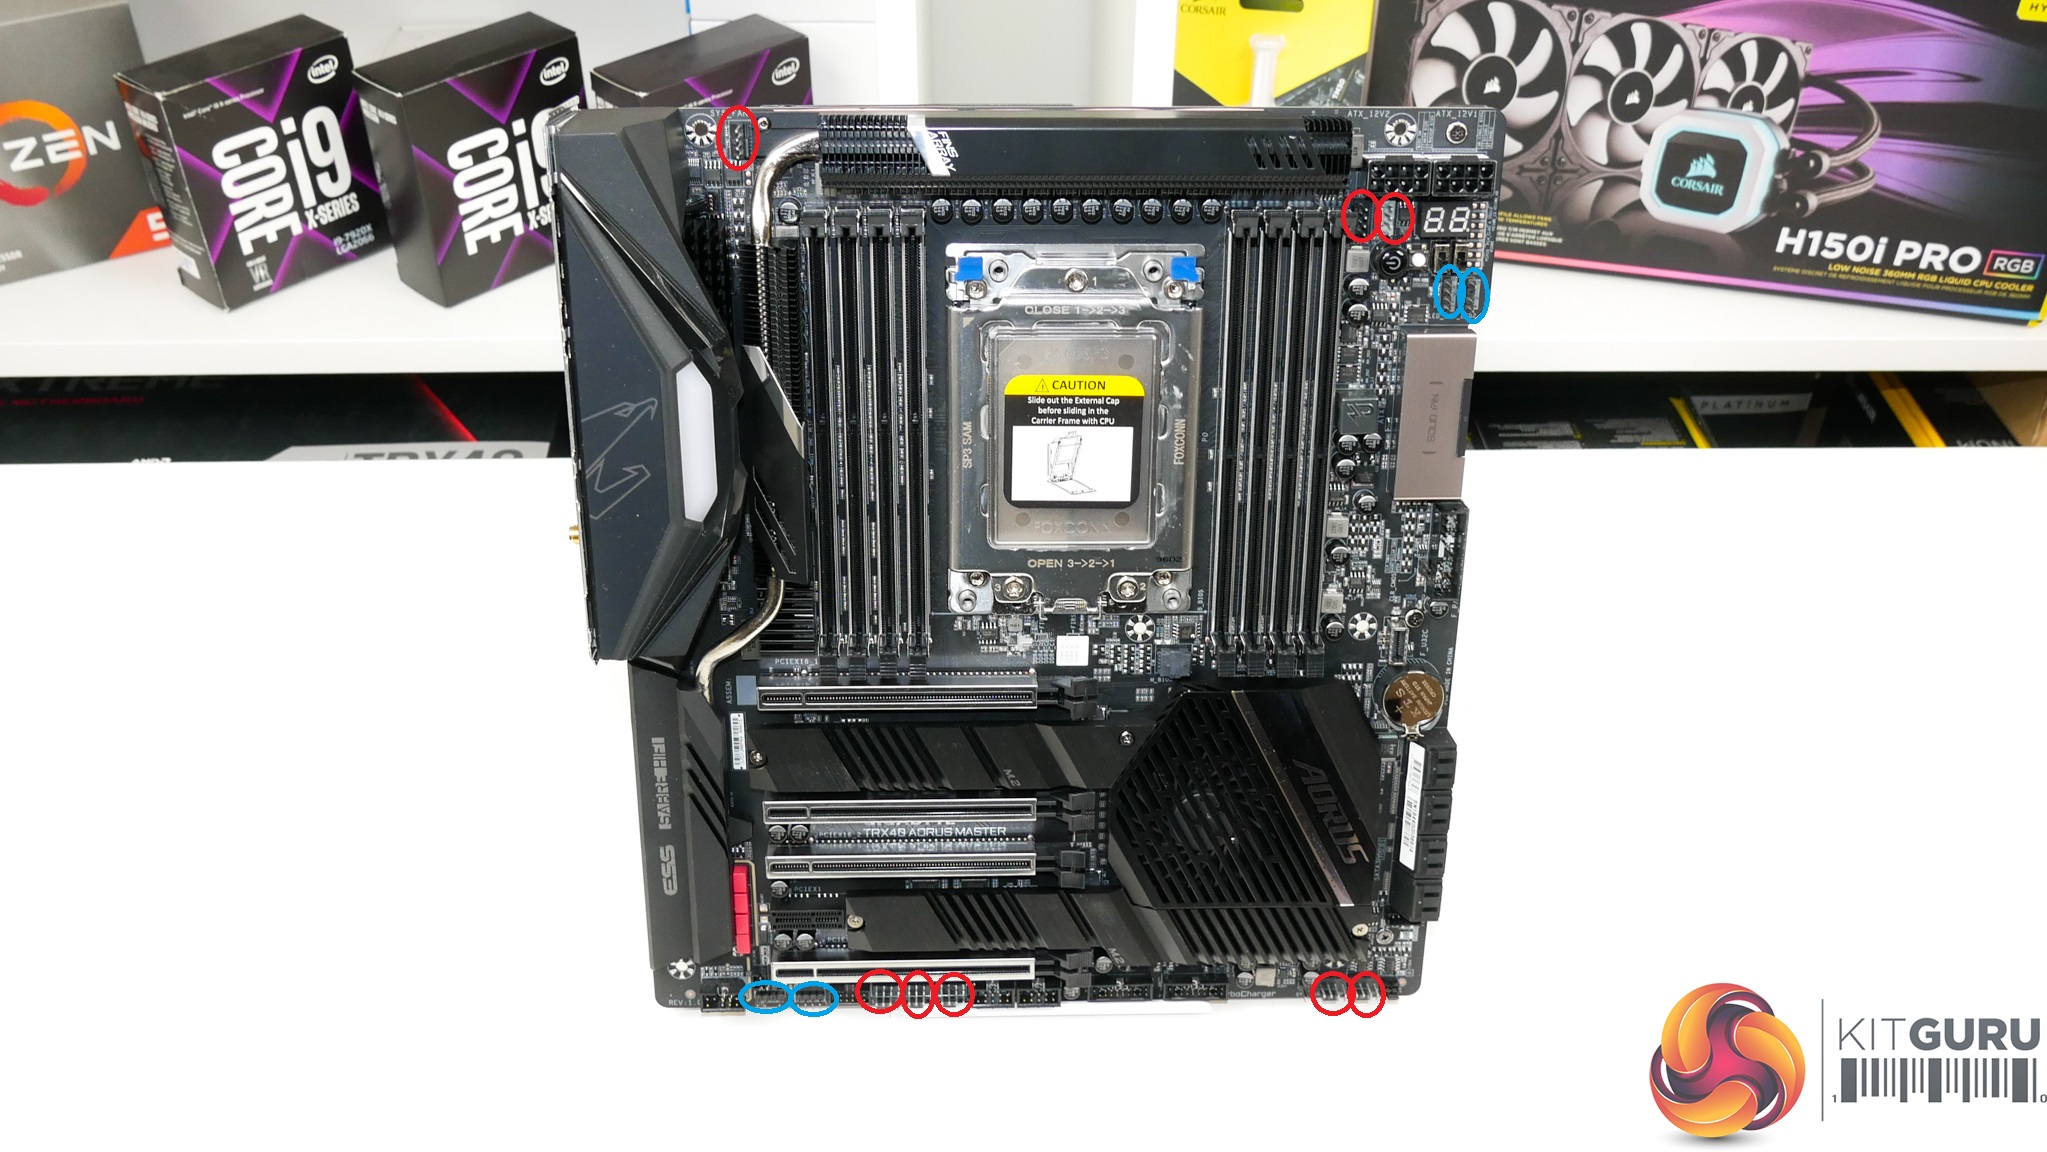
Close to the right-side bank of DIMM slots you will find an array of headers and switches. A two-digit debug LED display is included, which I love to see on a motherboard of this ilk. Onboard power and reset buttons, BIOS switches, and voltage monitoring points are some of the main attractions to enthusiasts and tinkerers.
On the topic of BIOS switches, Gigabyte continues its tradition by equipping this high-end offering with dual BIOS chips, one of which is in a socketed mount. This is ideal for redundancy and resiliency, especially as even a failure on both BIOSes may be rectifiable thanks to the socketed approach.
Given the sizeable VRM heatsink and its proximity to the motherboard’s top edge, Gigabyte positions both 8-pin CPU power connectors in the top-right area of the motherboard. This may cause some users a few cable management issues but it also makes them easily accessible even when the motherboard is sat inside a tight chassis.
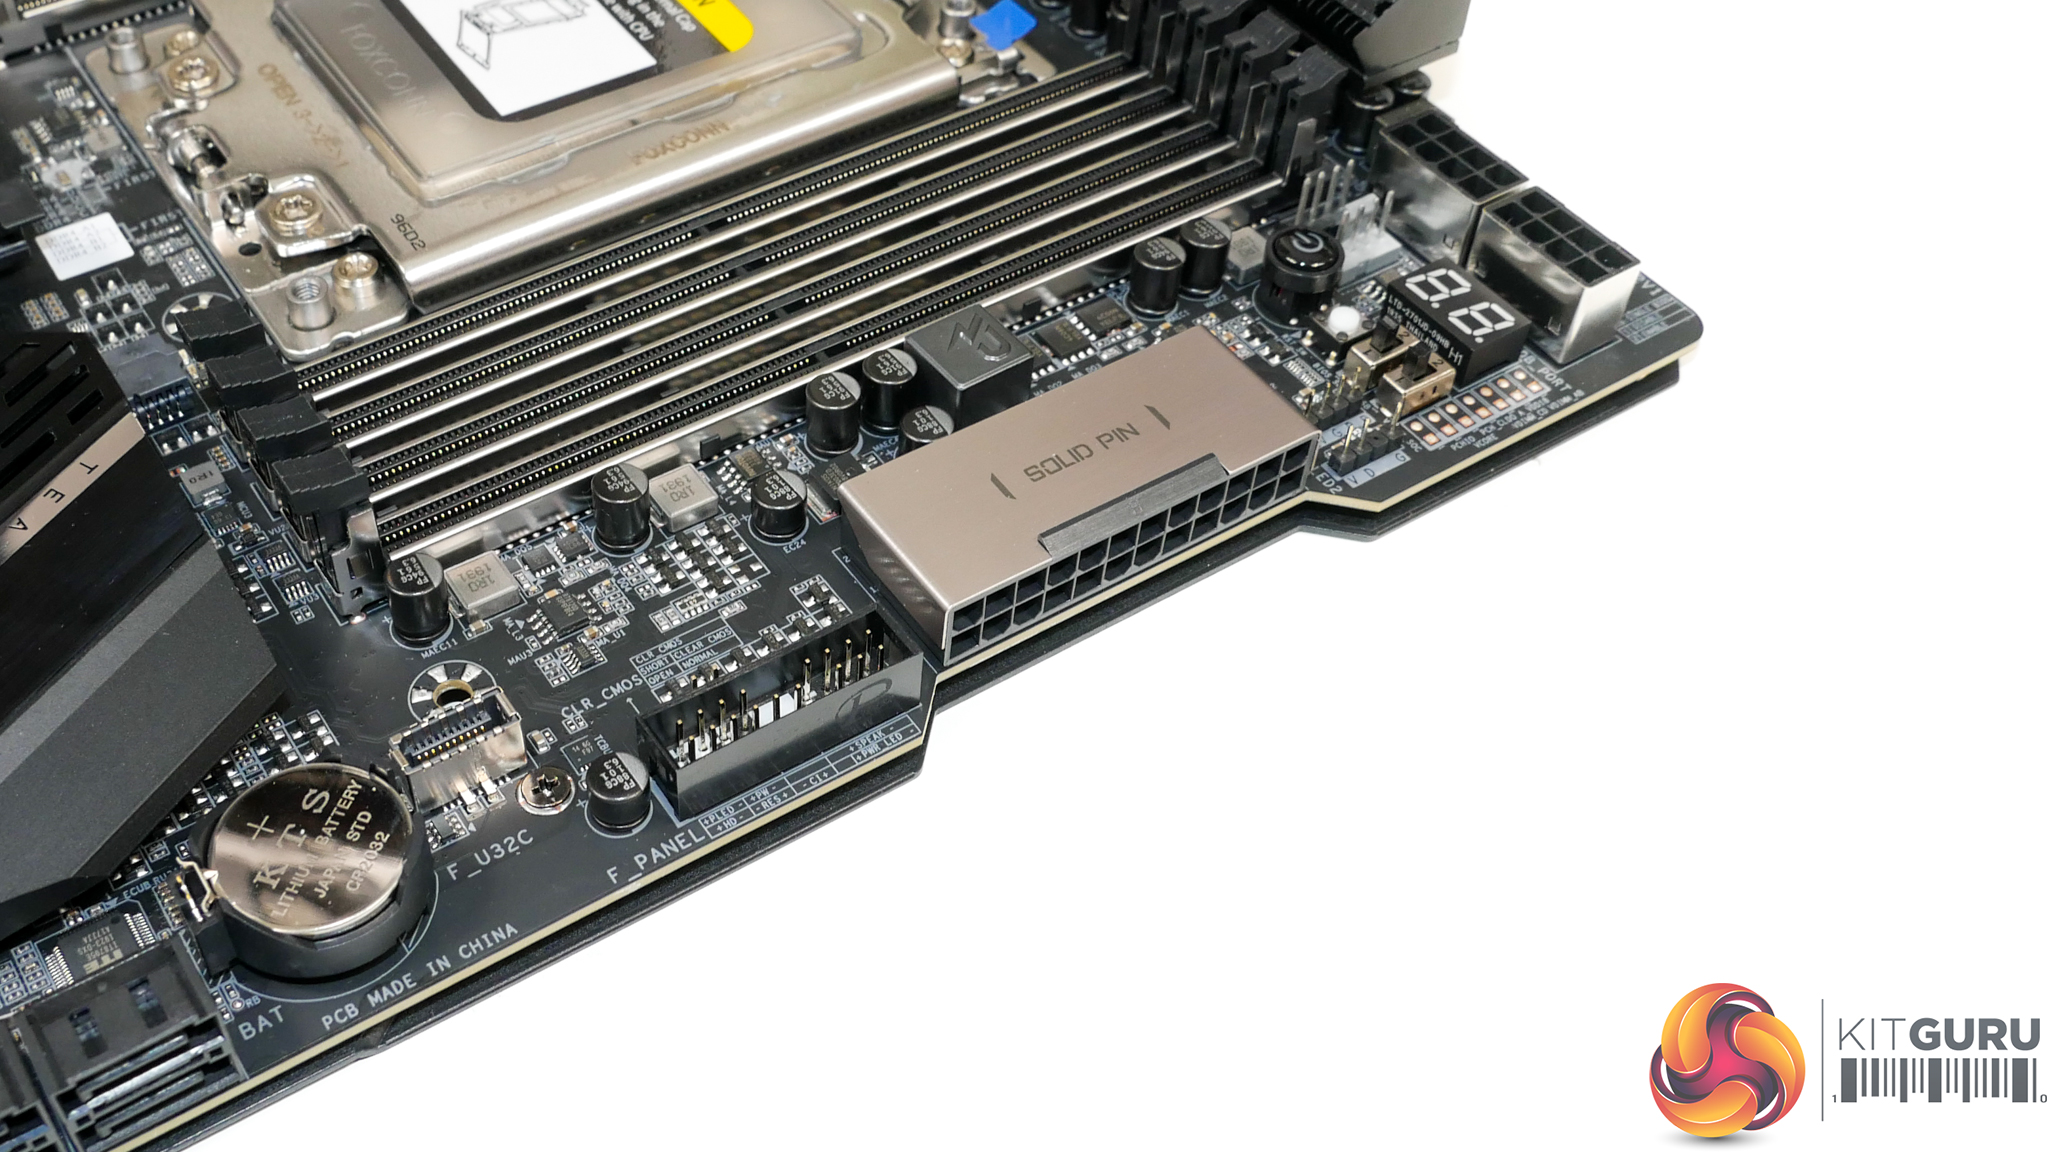
Moving further down the motherboard’s right edge, we come across the right-angled 24-pin connector. This 90-degree rotated orientation is undeniably clever when it comes to cable management benefits. But on an already-very-wide E-ATX motherboard, it will certainly increase the odds of installation woes in many mid-tower and even full-tower cases. This issue is somewhat alleviated by Gigabyte’s use of a small PCB cut-out to gives users a little extra space.
The vertical facing USB 3.2 Gen 2 internal Type-C header is found in its usual location, though Gigabyte could have made more effort to put this flush with the motherboard’s edge.
Interestingly, we also see the bank of front panel headers positioned up near the 24-pin connector rather than in their conventional bottom-right location. I do not see any problem with this installation location as cable management routing options are plentiful in this vicinity.
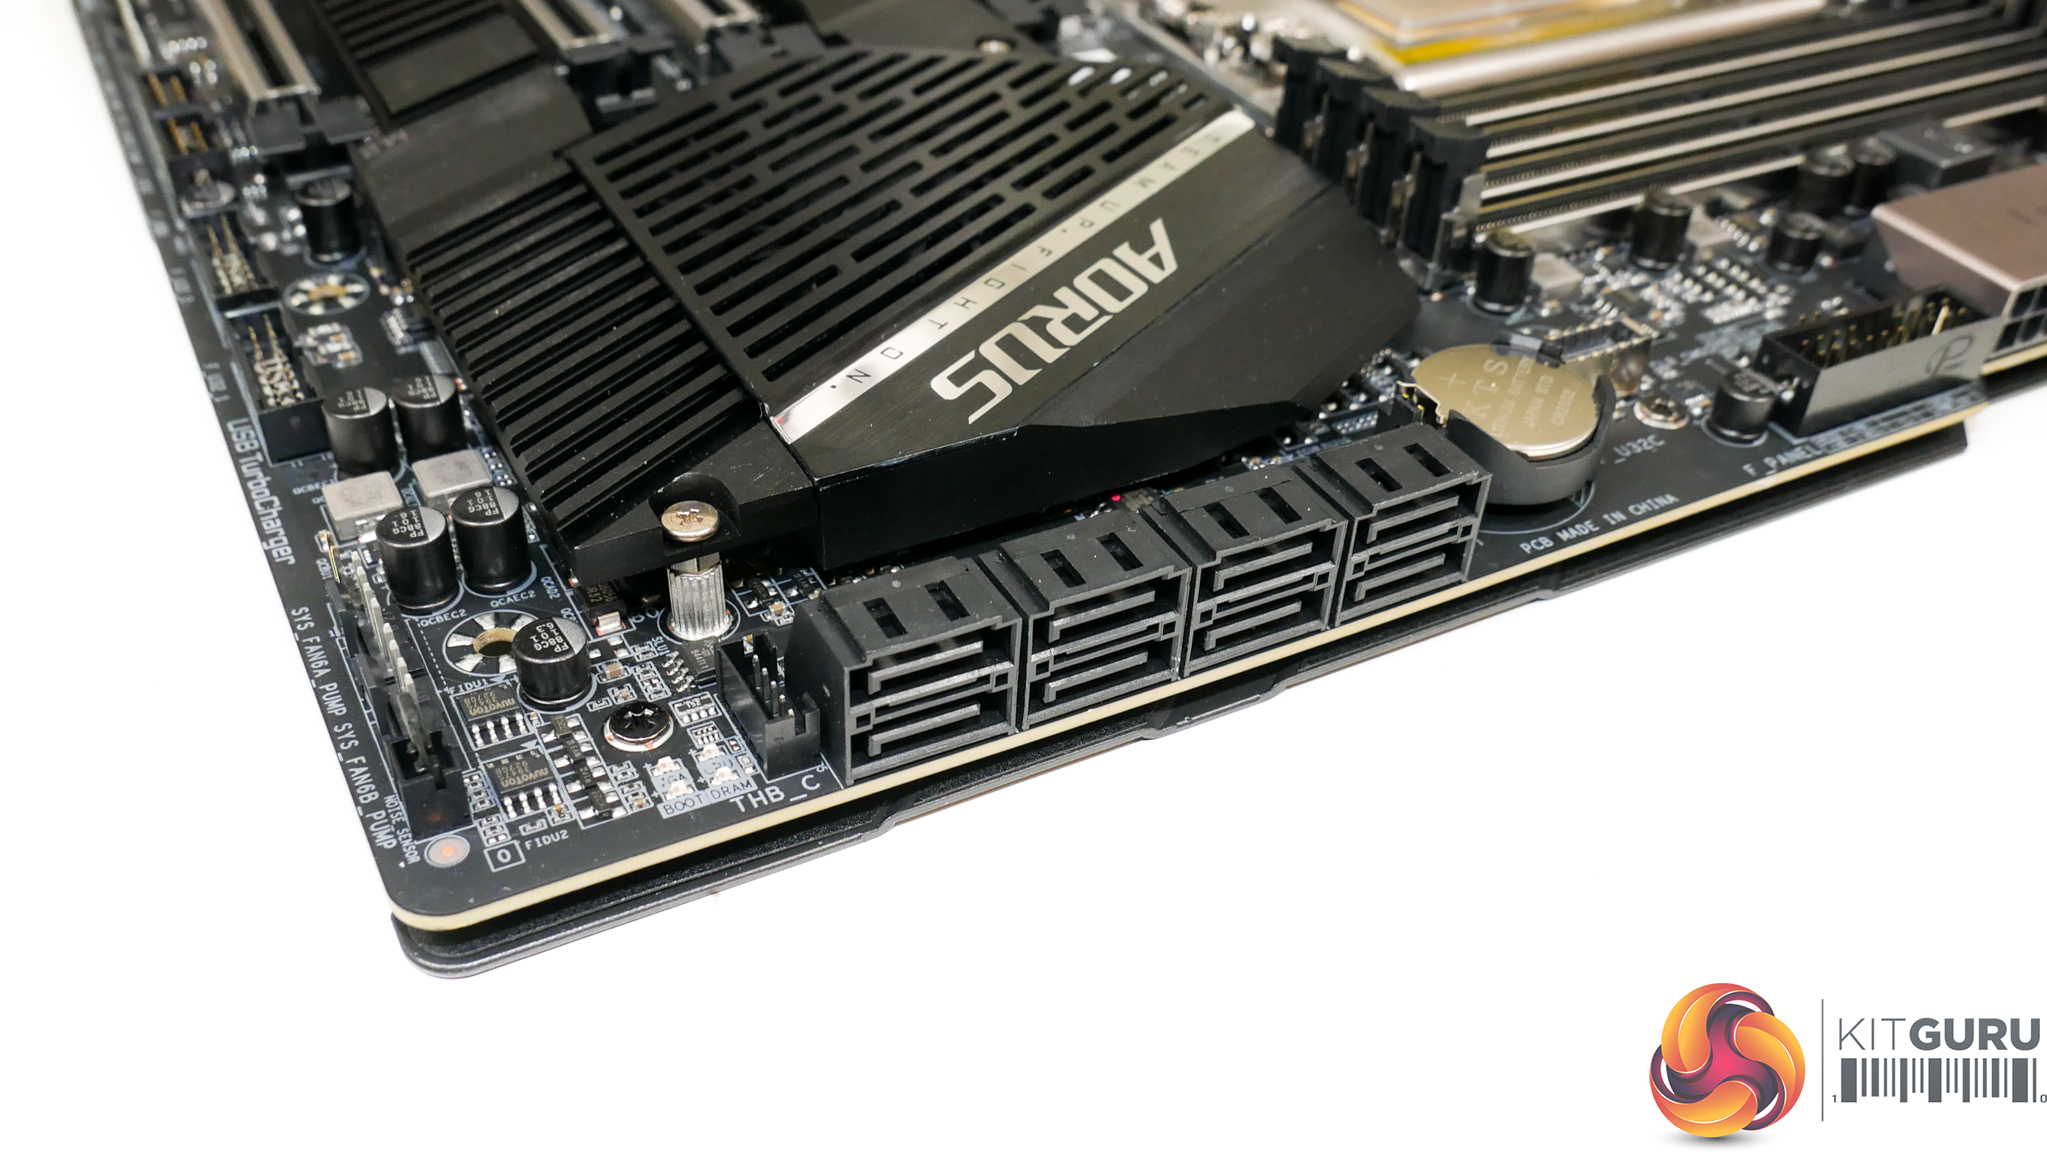
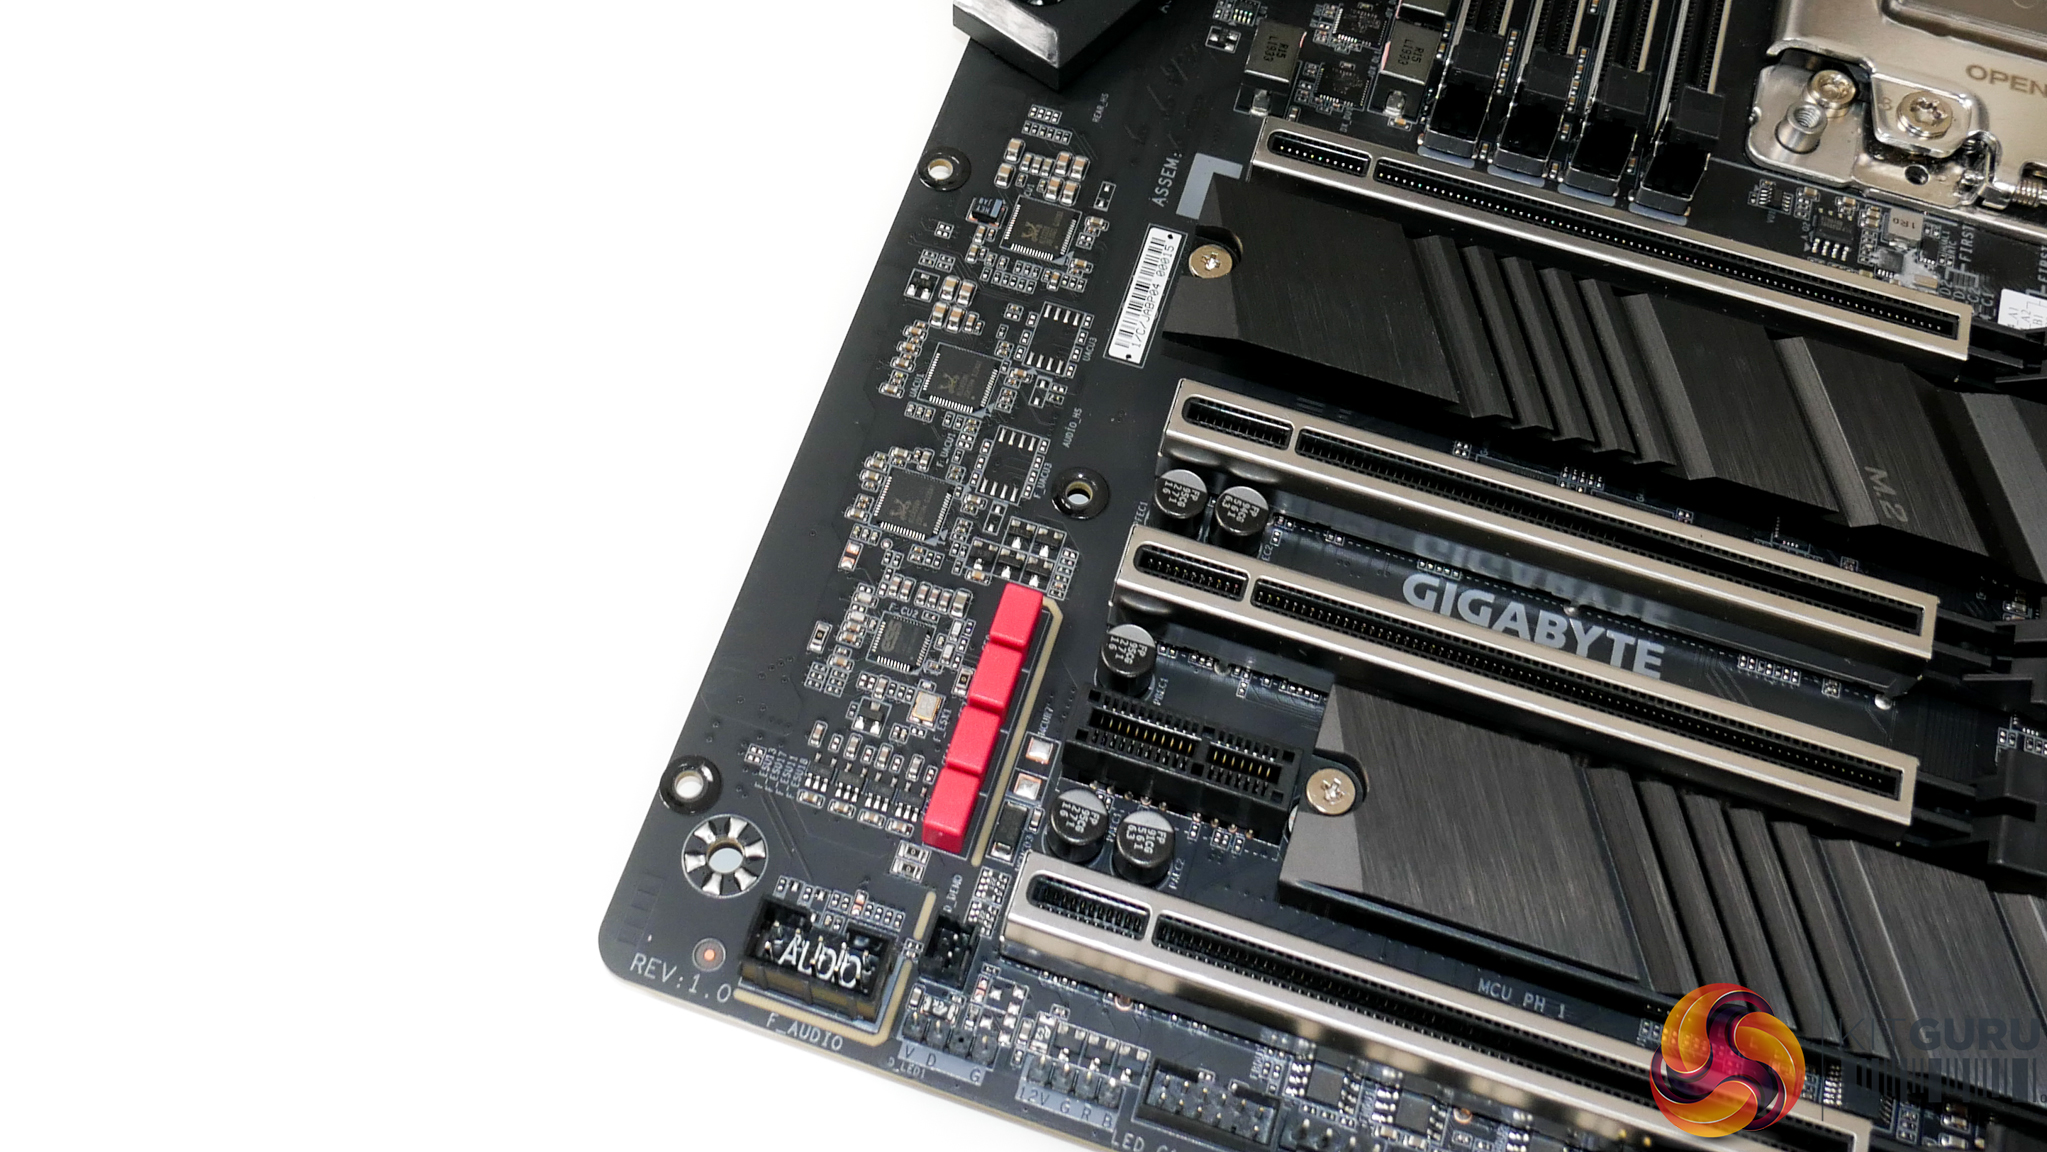
Eight SATA 6Gbps ports are provided, all of which are driven by the TRX40 chipset and do not share bandwidth with other devices. Adjacent to the bank of SATA ports is an internal Thunderbolt Add-in-Card header, though Thunderbolt is not provided on this motherboard out of the box.
You also get a set of four POST LEDs in this region, allowing users to quickly troubleshoot system boot problems tied to the CPU, DRAM, VGA, or BOOT device. A better position for these LEDs would have been in the top-right zone, but they are an undeniably valuable inclusion even in this slightly less visible location.
The bottom edge connectors are slightly different on the TRX40 Aorus Master thanks to Gigabyte’s adjusted layout decisions already highlighted.
Both internal USB 3.2 Gen 1 5Gbps internal headers are positioned in the bottom edge. If your chassis cable is short enough to not reach one, you can almost guarantee it will not reach both. That’s disappointing and would have been easy to avoid. Thankfully, Gigabyte includes a pair of standard USB 2.0 headers which repeatedly prove useful for RGB boxes and AIO controllers.
Gigabyte is clearly under no illusions of the cooling required with Threadripper builds. As such, we find five 4-pin fan headers mounted along the motherboard’s bottom edge. This is a superb move by Gigabyte as it gives plenty of connection option in a location that is simple to cable manage and easy to reach for most chassis fans.
Front panel audio, TPM, a couple of RGB headers, and two temperature sensor headers round out the main bottom edge connectors.

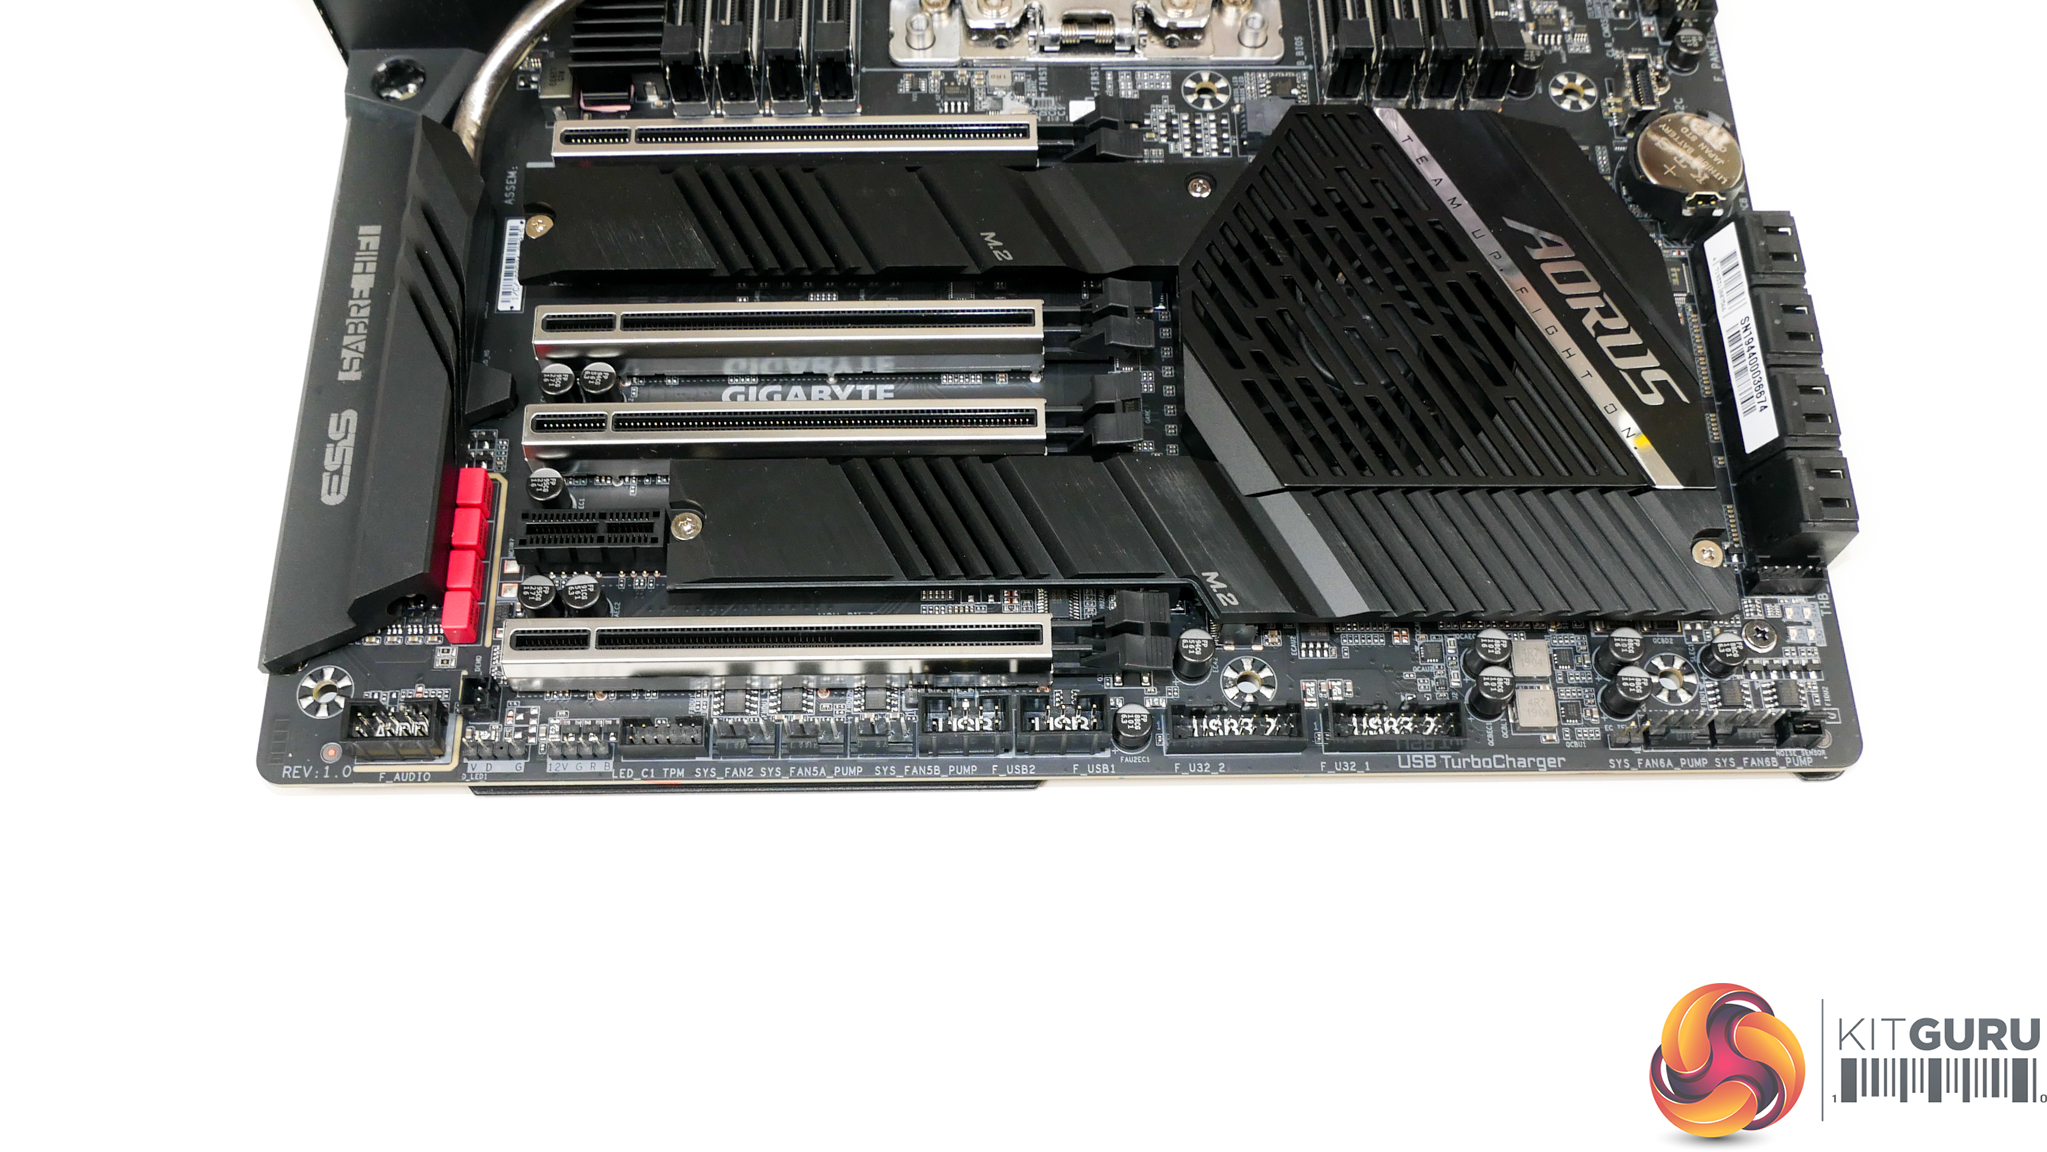
The steel reinforced, full-length PCIe slots can operate at PCIe 4.0 x16/x8/x16/x8 bandwidth directly from the CPU’s lanes. That single PCIe 4.0 x1 slot runs from the TRX40 chipset.
Gigabyte’s PCIe layout design is clearly targeted towards single- and dual-graphics card users, though there’s no reason why you couldn’t install three dual-slot cards in an eight-slot chassis. I can confidently say that Gigabyte’s slot spacing is ideal, given the constraints imposed by the CPU socket and DIMM slot positioning. It is superior to the layout decisions made by ASUS with the TRX40-E Gaming.
A pair of 2.5- or 3-slot graphics cards will gobble up all available connectors. But two dual-slot graphics cards can be used while maintaining access to a pair of full-length PCIe 4.0 x8 ports.
That last point is absolutely ideal for dual-purpose buyers of this motherboard. If you’re a gamer by night whose work commands a pair of dual-slot graphics cards by day, you’re likely to be smiling at the ability to install two additional high-bandwidth devices such as RAID controllers, video capture cards, accelerator devices, or fast NICs.
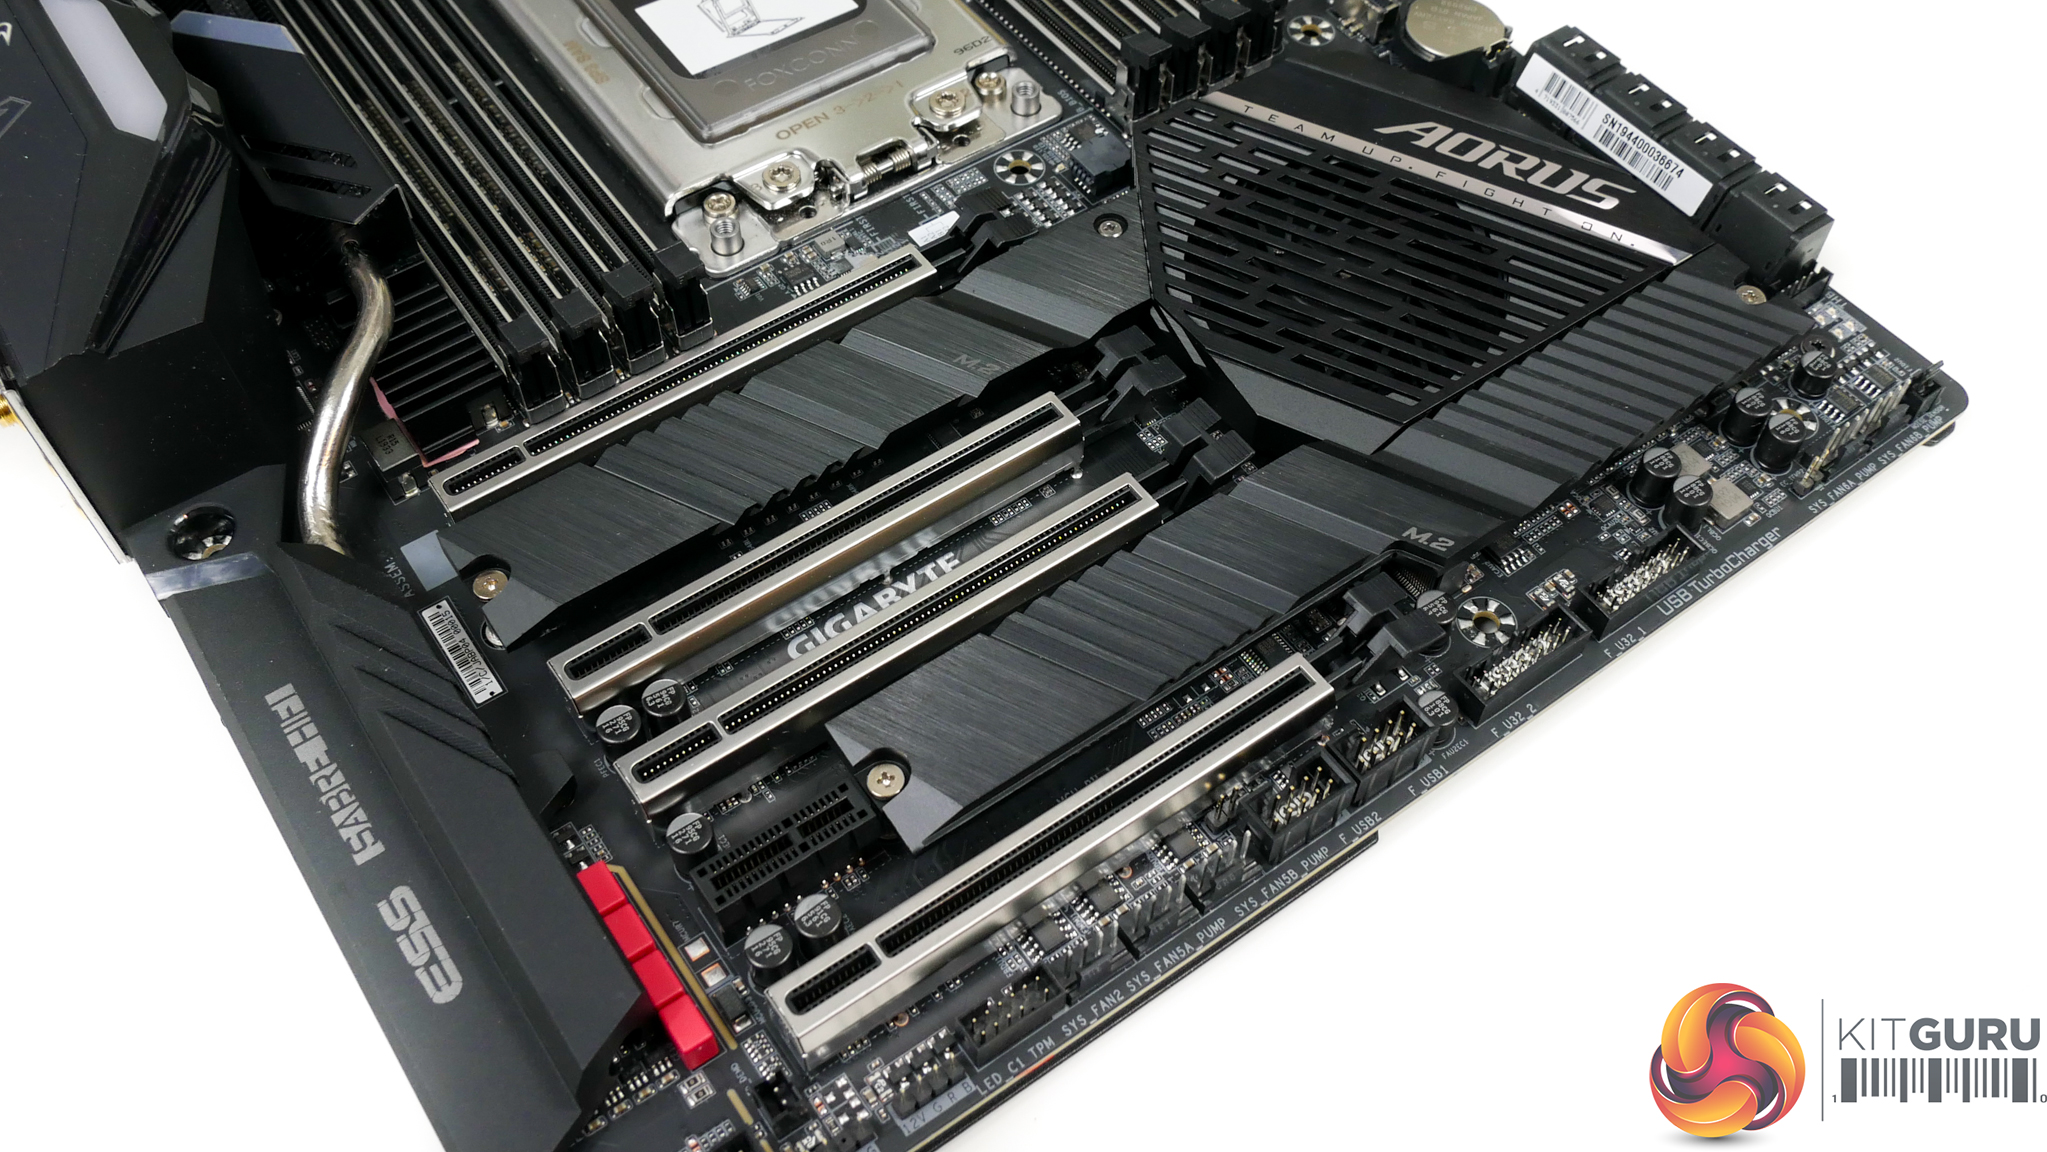
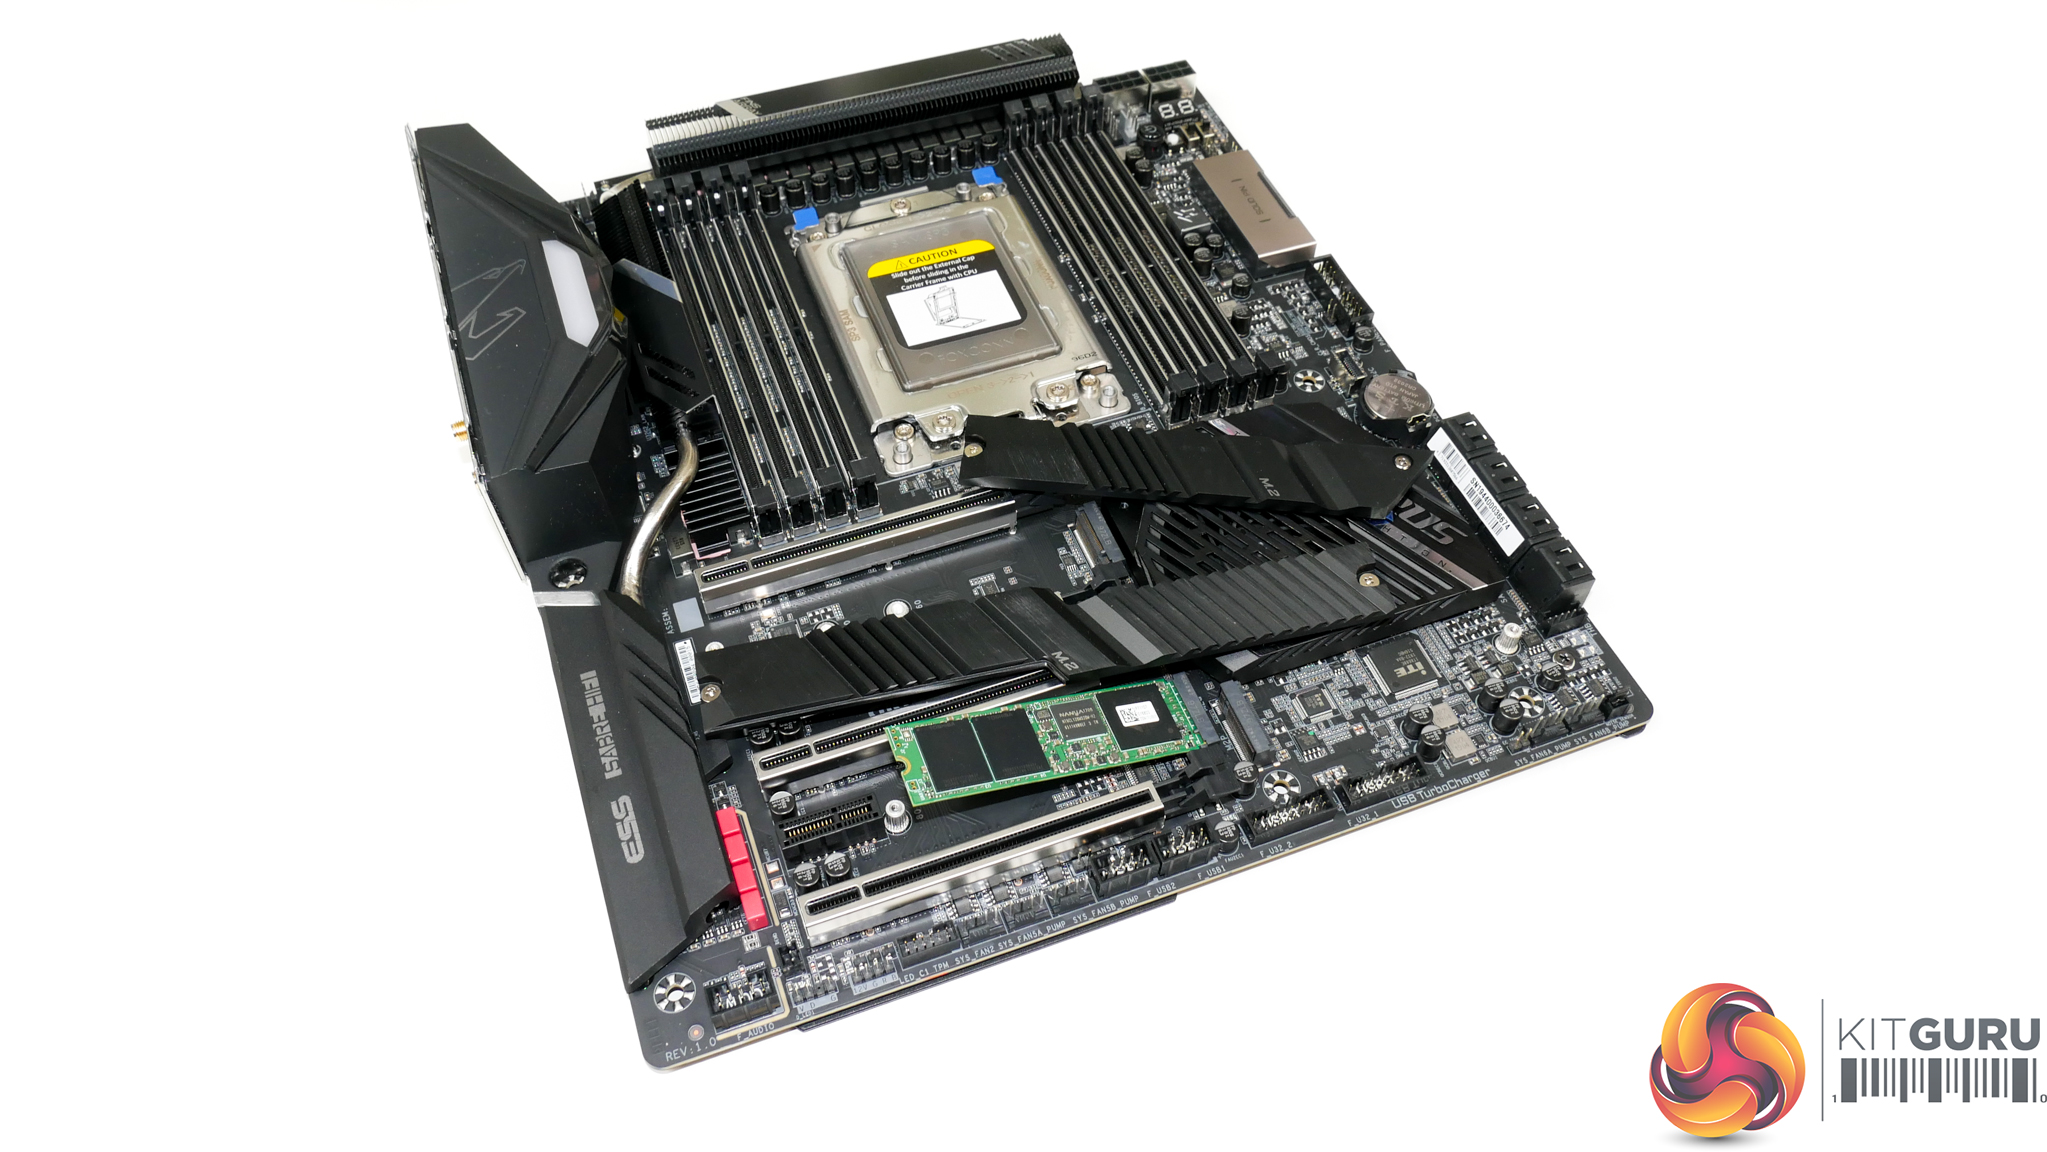
Three M.2 slots are spread across two primary installation zones on the TRX40 Master. Installation is simple and quick – you do not need to remove large motherboard shrouds or heatsinks integrated with the chipset cooler.
The top slot runs from the CPU and can take 60/80/110mm length drives with PCIe 4.0 x4 or SATA 6Gbps connections. The lower-left slot is exactly the same, other than its size limitation of 80mm drives only. The lower-right option can also take 80mm PCIe 4.0 x4 or SATA 6Gbps SSDs but this bandwidth is fed through the TRX40 chipset.
Gigabyte uses a rather chunky metal heatsink and thermal pad to cool the drives. The top M.2 slot gets its own dedicated heatsink while the bottom two slots share a larger block of metal. That latter point has cooling benefits when just one drive is installed in the location, as it is given complete usage of a metal heatsink designed for two toasty SSDs.
As is usually the case, though, an open-venting graphics card sat above the SSDs will raise their temperature considerably. ASUS’ vertically-orientated M.2 mount near the 24-pin connector is one of the best methods we have seen for avoiding this potential cooling headache.
Gigabyte’s AMP-UP audio system is based around the Realtek ALC1220-VB audio codec and an ESS SABRE 9218 DAC. As the TRX40 platform does not feature onboard audio support, Realtek ALC4050H controllers are used to power the audio chipsets by converting TRX40 USB connections.
WIMA audio capacitors are used for signal smoothing and gold-plated jacks are thrown in for good measure, and EMI reduction.
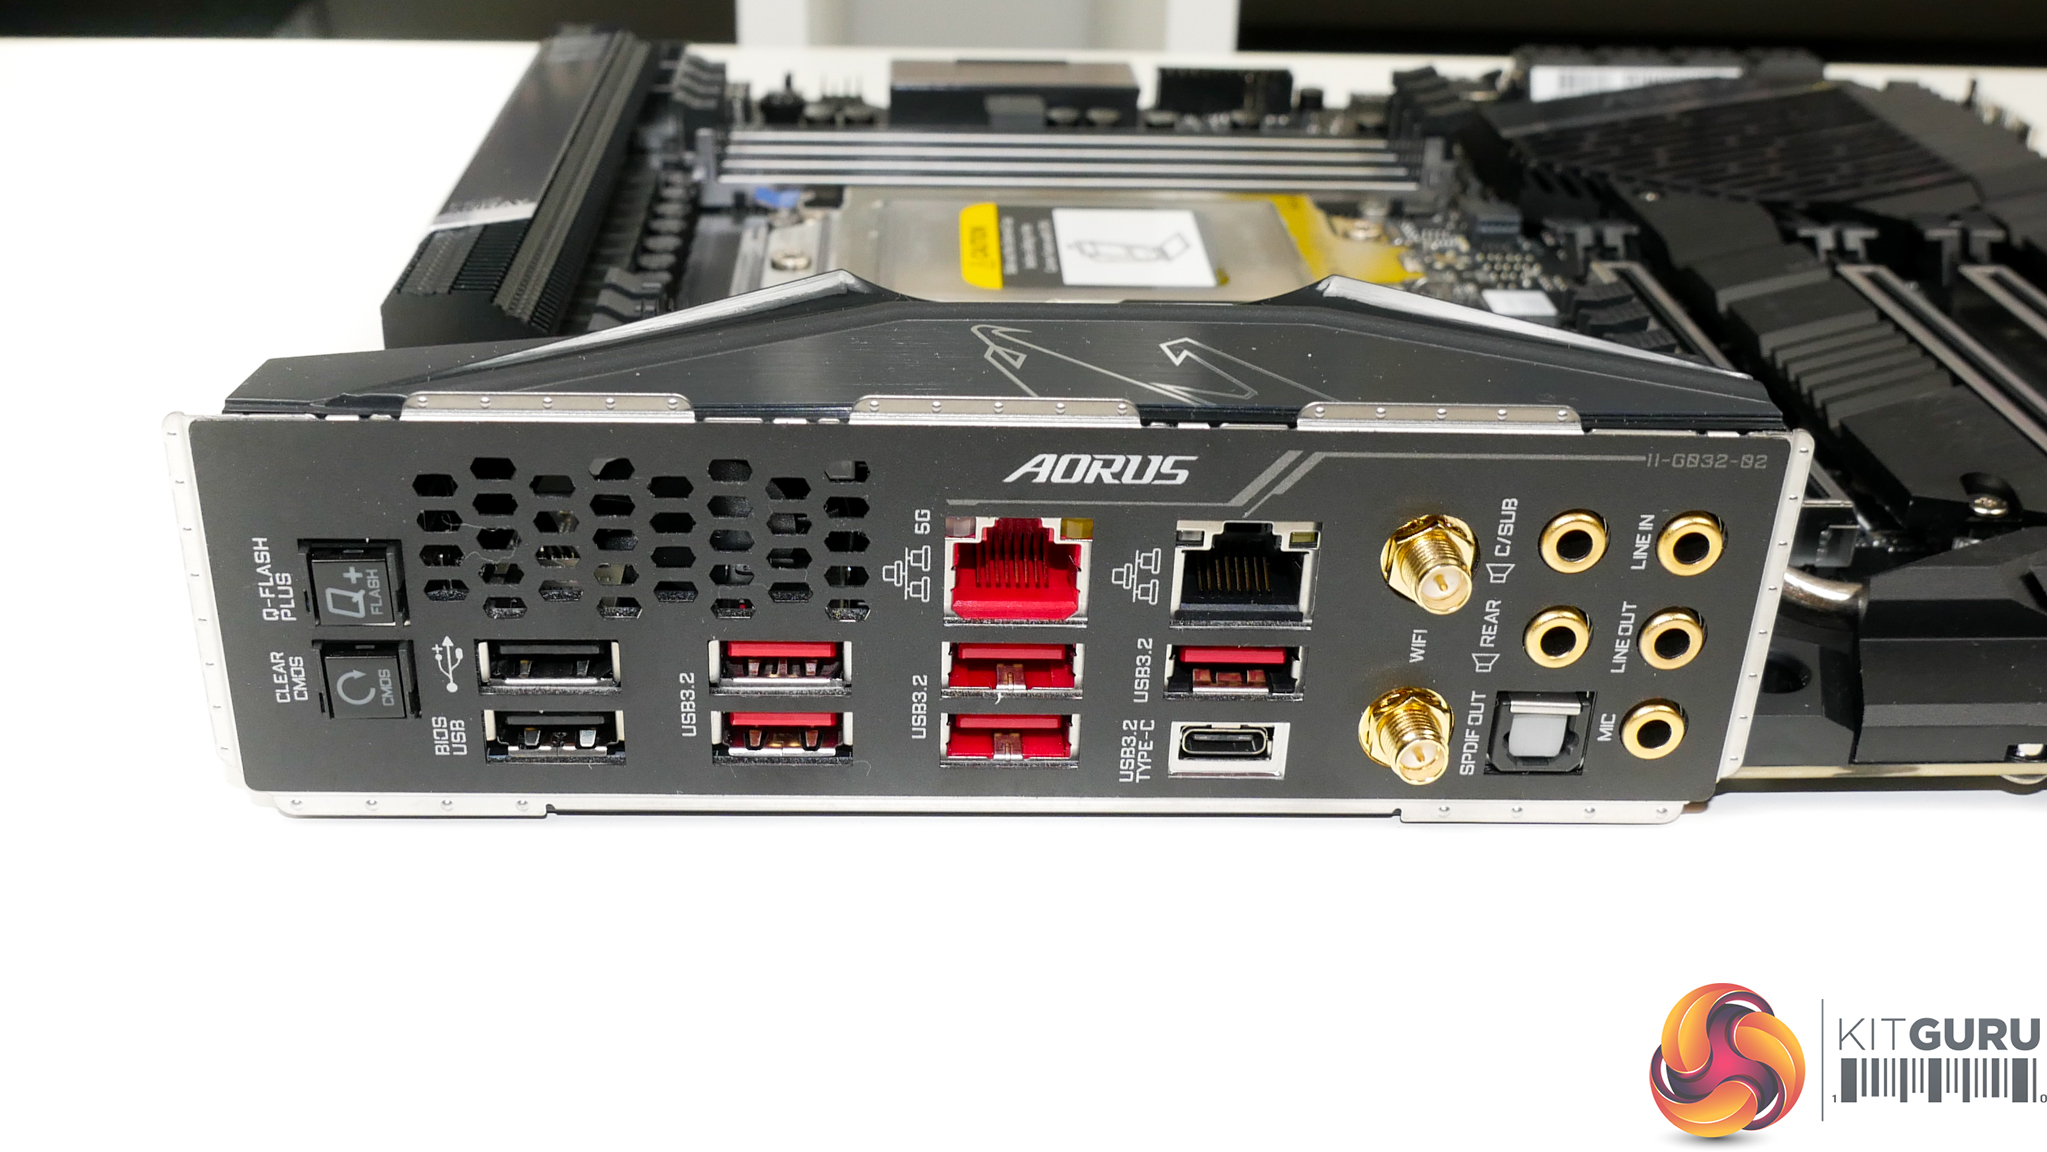
Clear CMOS and Q-Flash Plus buttons are found on the rear IO next to a pair of USB 2.0 ports, one of which is intended for BIOS flashing. You get another five 10Gbps USB 3.2 Gen 2 ports in Type-A form and one as Type-C.
Gigabit networking is handled by an Intel I211AT NIC while an Aquantia adapter is called upon for 5GbE duties. I am glad to see Gigabyte deploying 5 Gigabit Ethernet as I think it is a perfectly reasonable inclusion for mid-range motherboards on the high-end Threadripper platform.
Alongside the standard set of audio connectors are the two antenna ports that provide up to 2.4Gbps 802.11ax WiFi 6 capability. This is deployed by an onboard Intel WiFi 6 AX200 M.2 PCIe adapter.
A small area of perforation is maintained on the integrated rear IO shield to act as an airflow path for the VRM cooling fan.
Eight 4-pin fan headers are spread across the Gigabyte TRX40 Aorus Master, which is a superb number to include on this level of motherboard. Three of the headers are within easy reach of the CPU socket, and two of those are geared to CPU fan duties.
Gigabyte’s fan header positioning is smart and the abilities of the ‘Hybrid’ fan headers is excellent. Each 4-pin header supports up to 2A (24W) high current fans, making them also usable with liquid cooling pumps. Users are also given excellent control options within the UEFI Smart Fan 5 utility as to how quickly their fan speed curves will react and which temperature sensor data should be read.
Additionally, Gigabyte also includes two external temperature sensor cables that can be used to drive fan speed curves. And a unique inclusion is the noise detection cable that detects airflow/sound pressure to display an estimated noise output within OS software.
Two pairs of RGB headers are found on the motherboard with each pair featuring an old 12V header and one of the newer Addressable RGB alternatives.
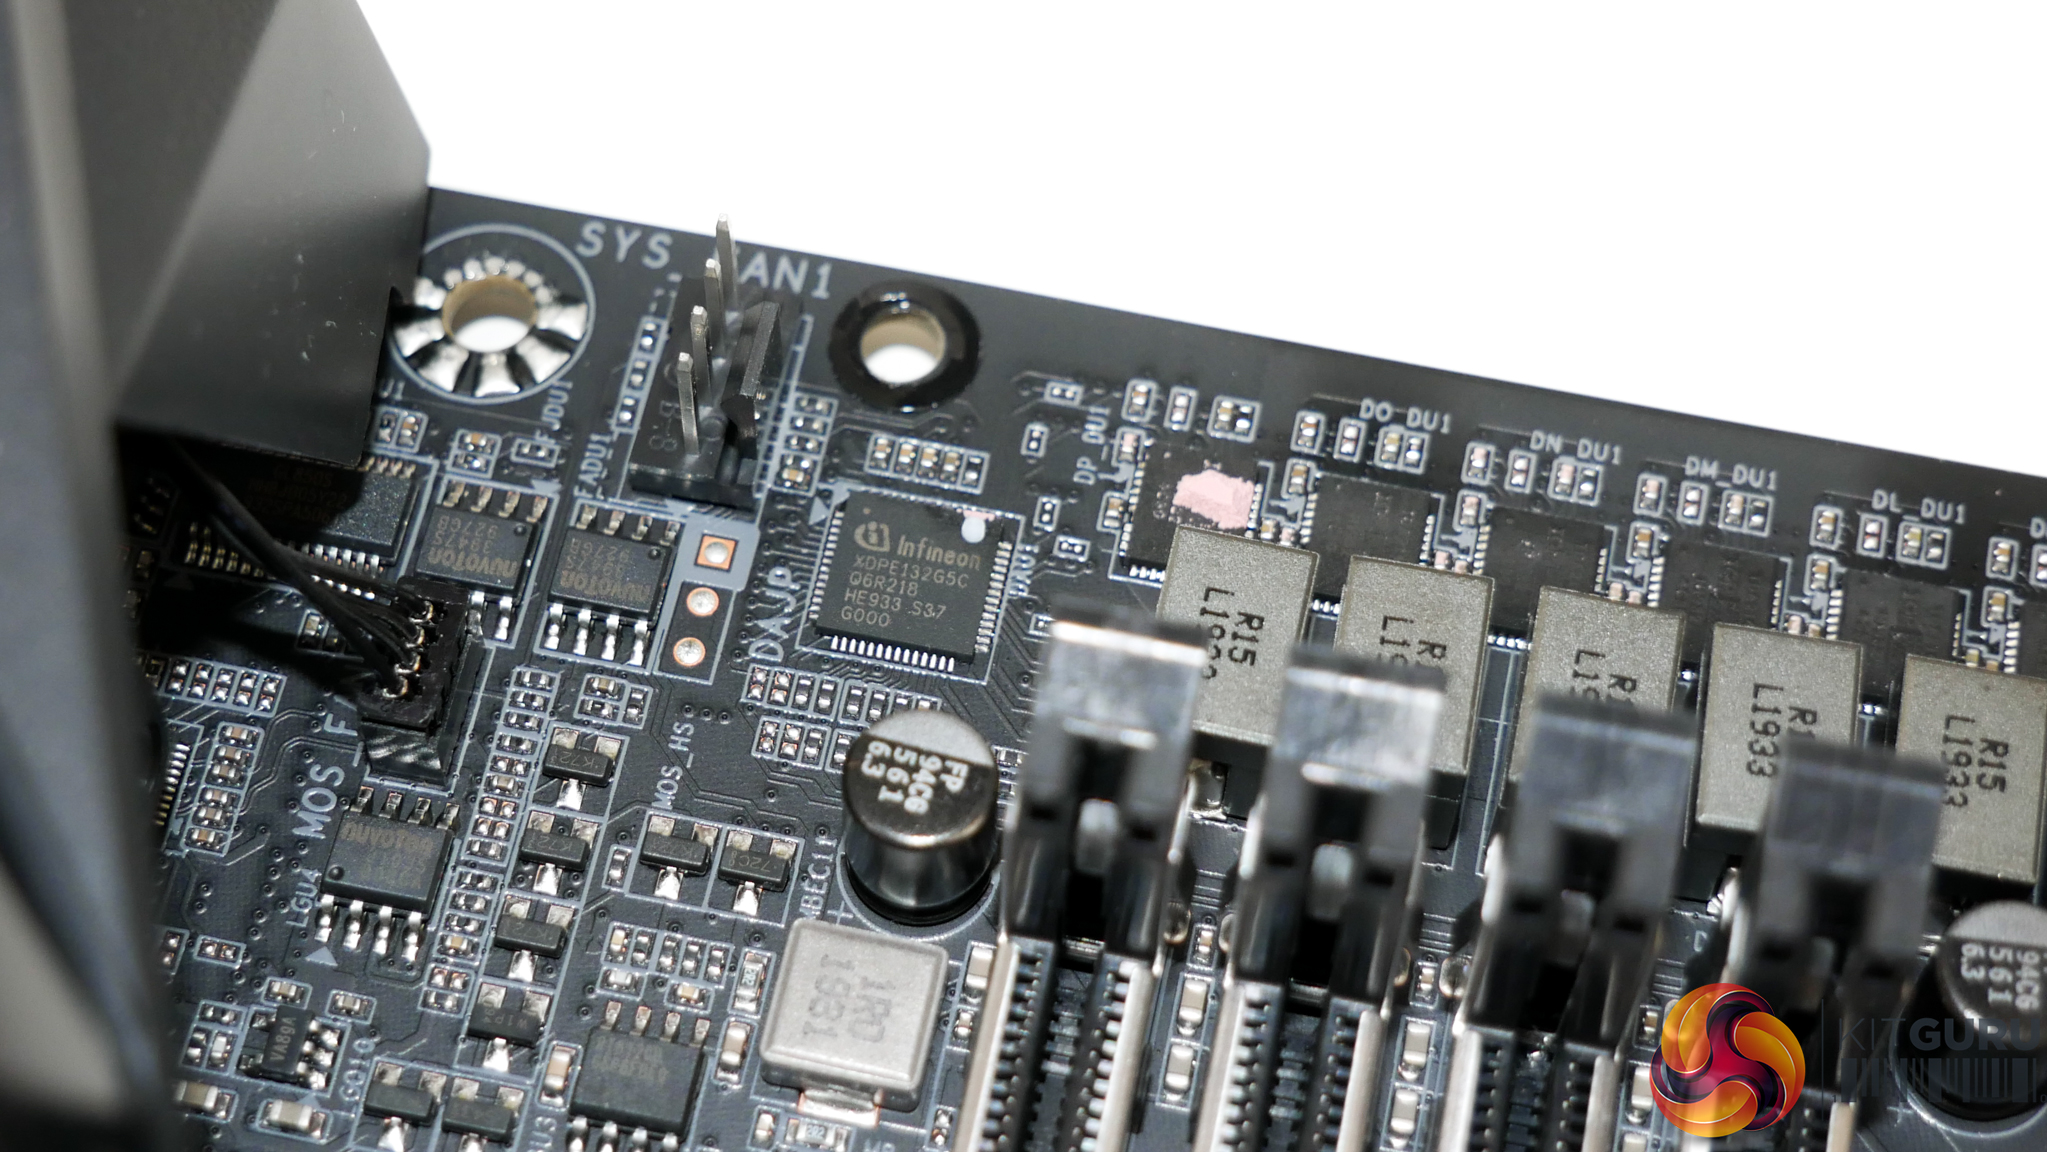
Gigabyte builds the TRX40 Aorus Master around a monster of a power delivery solution. Controlled by the Infineon XDPE132G5C PWM controller, this true sixteen phase VRM delivers power directly to the sTRX4 CPU socket.
Being designed as a true sixteen phase configuration without phase doubling or power stage teaming, Gigabyte’s VRM solution enjoys the speed and latency benefits of a non-doubled alternative approach, with the sheer control capability of a heavy multi-phase system.
1120A of theoretical maximum current delivery capability is a gargantuan level that even the 64-core Threadripper 3990X will not saturate.
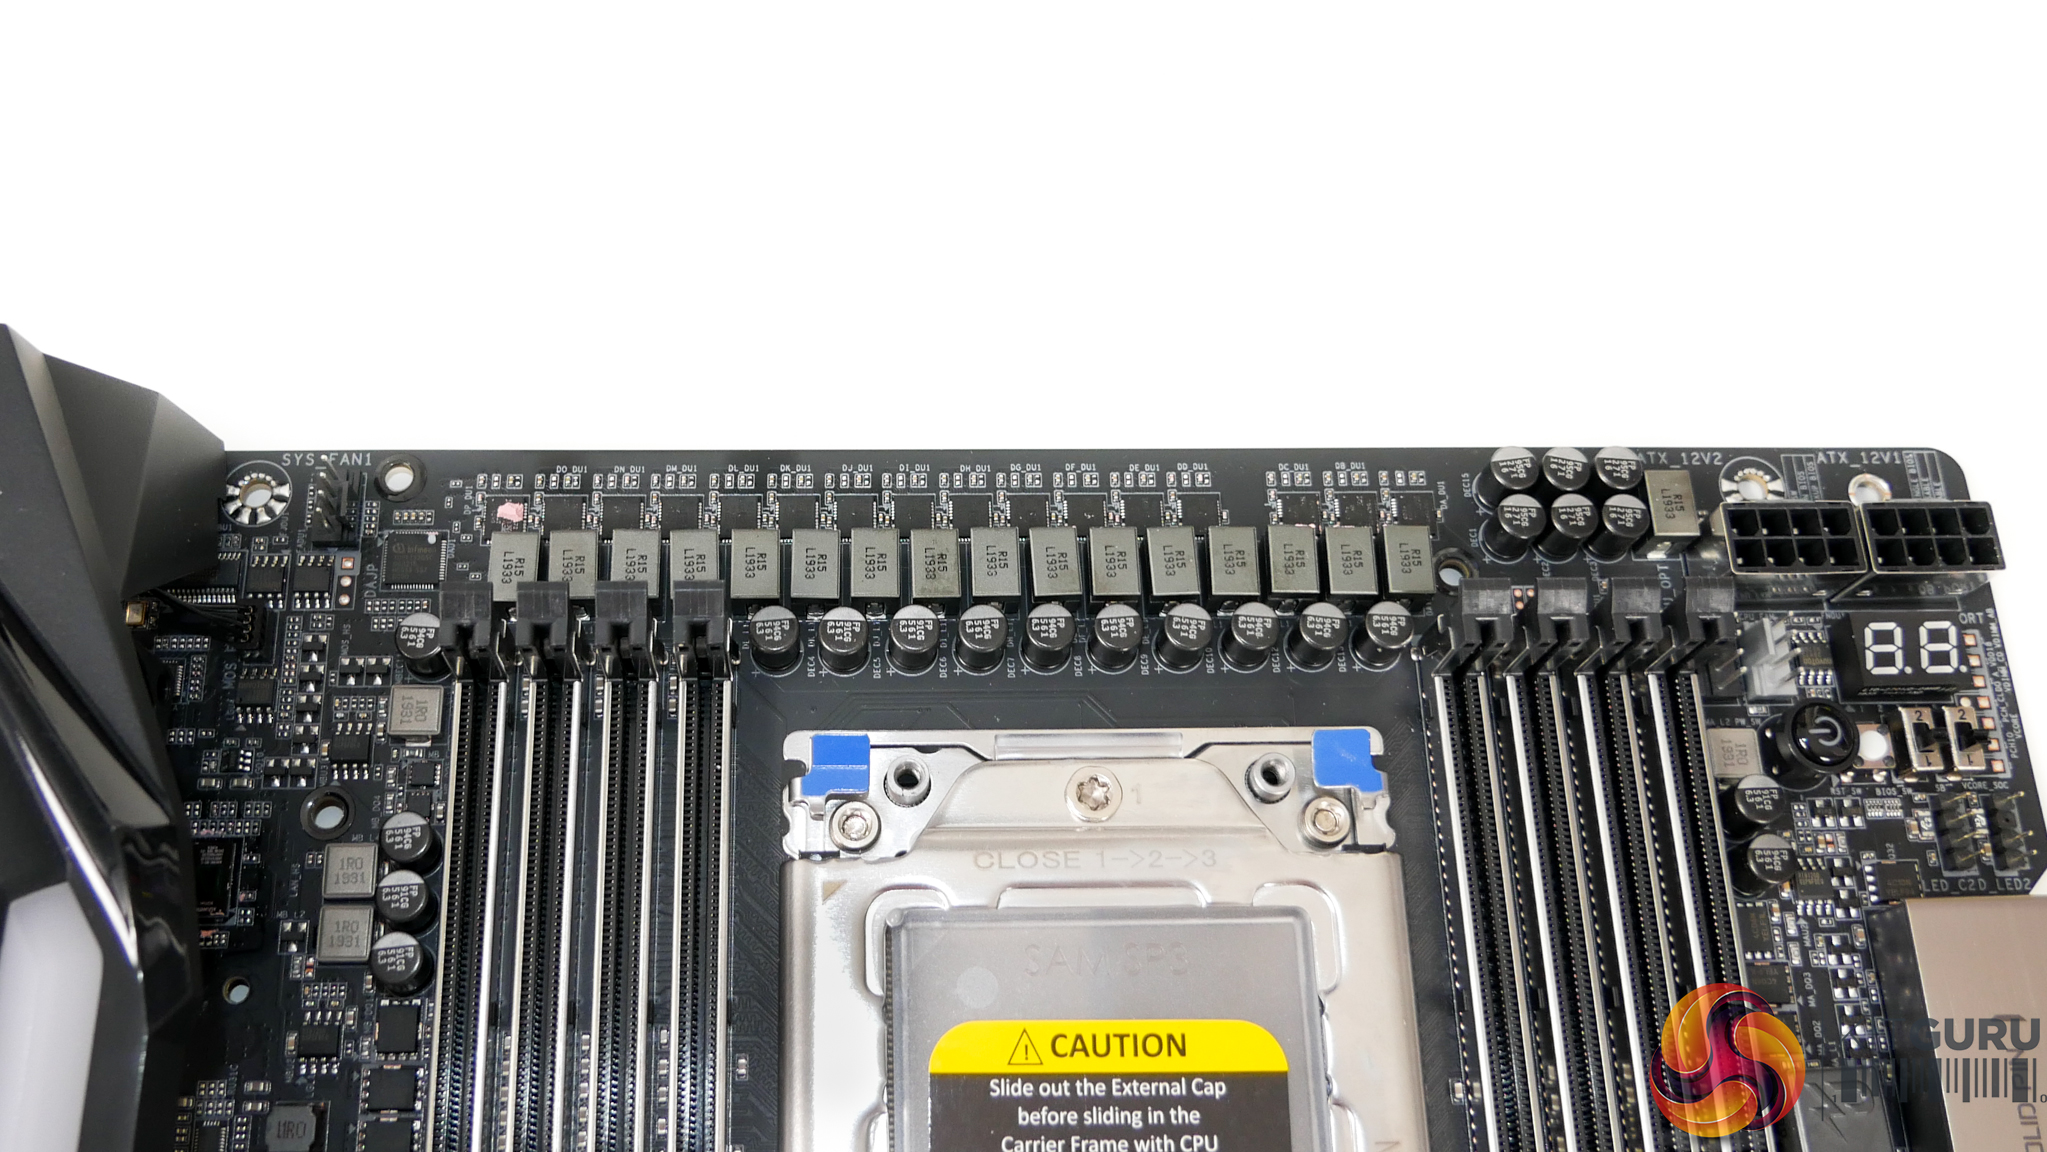
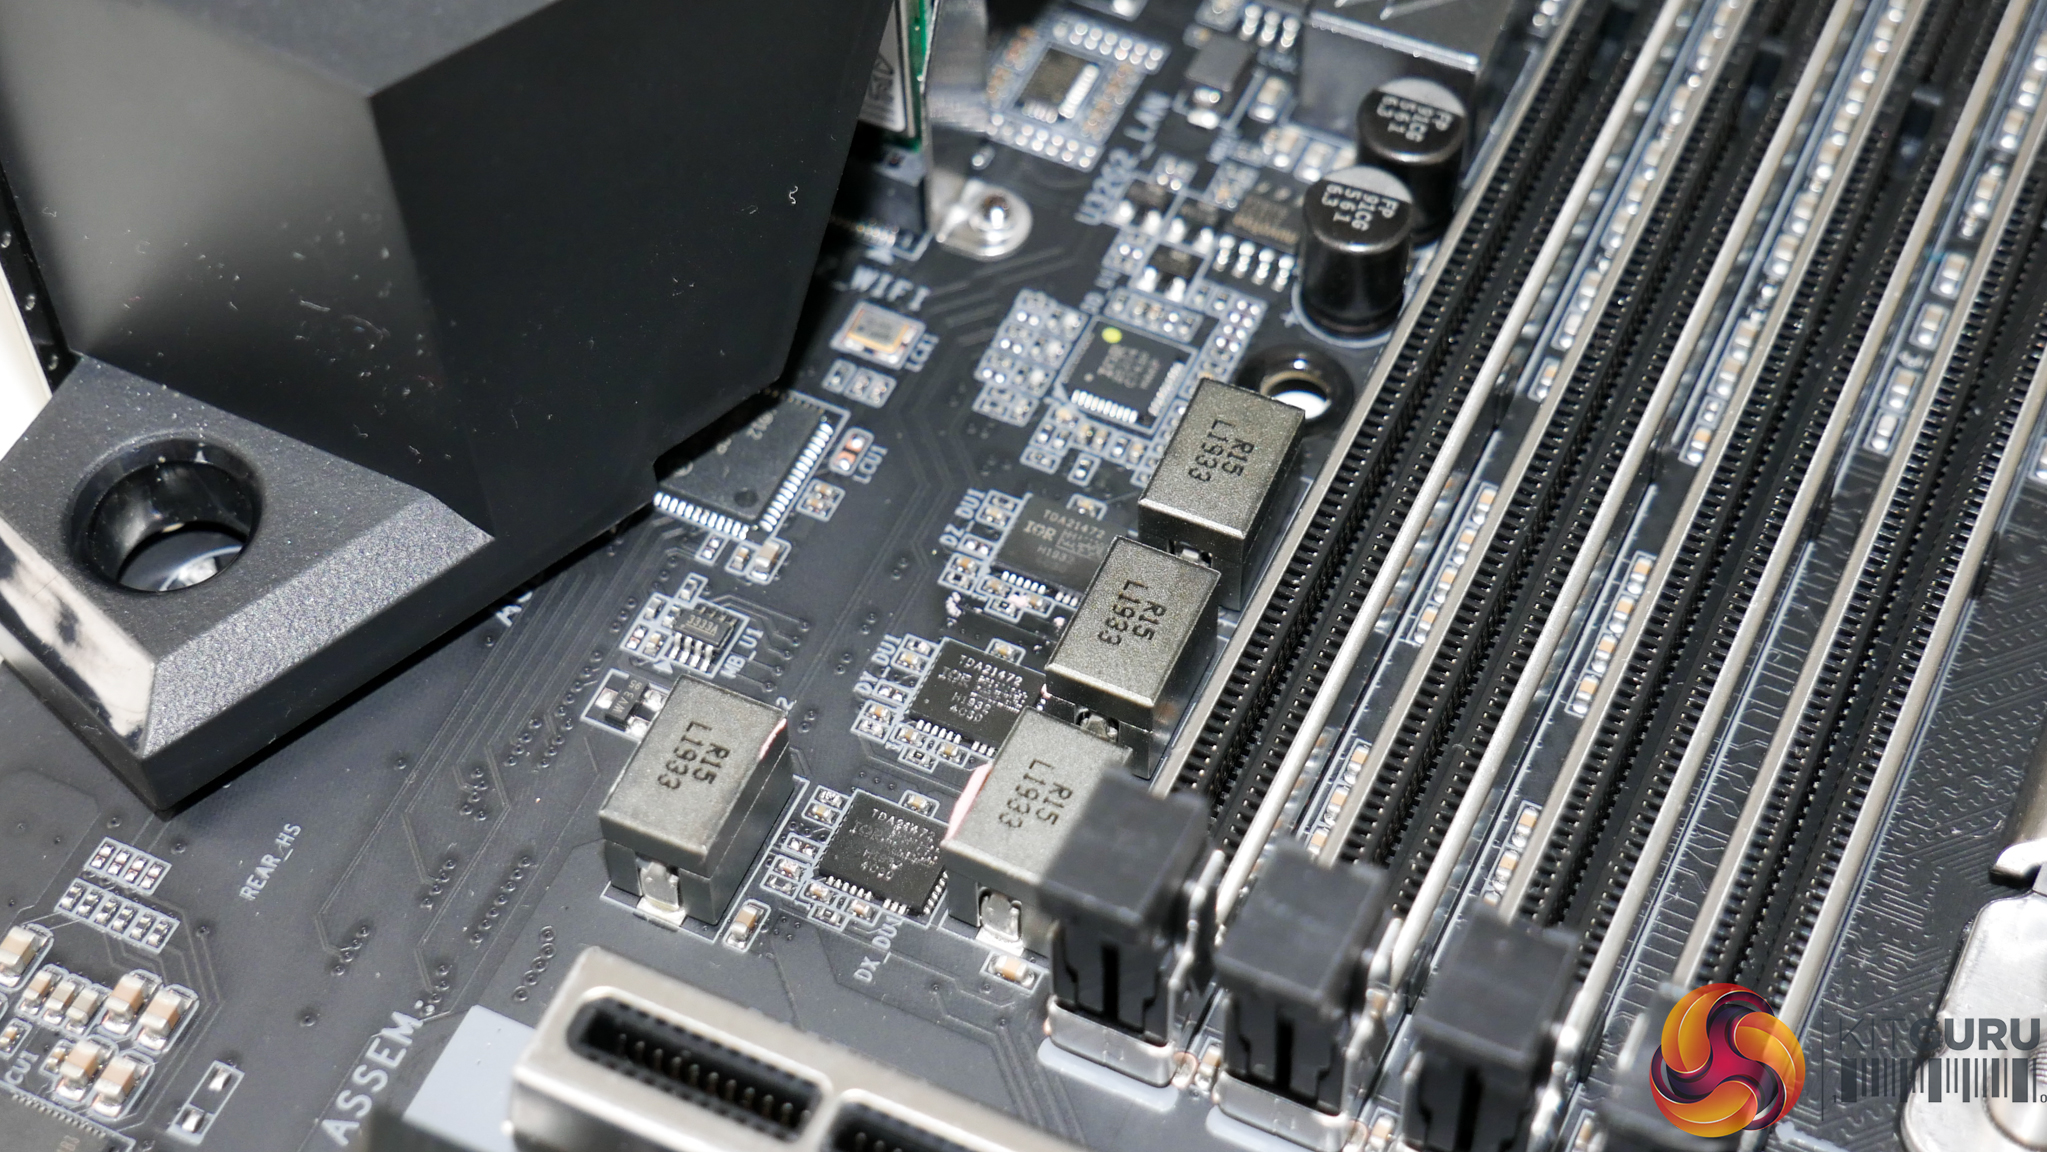
The sixteen power stages that feed a processor are International Rectifiers TDA21472 units. Rated at 70A each, these are up there with the absolute best co-packaged MOSFET solutions on the market.
For comparison, ASUS’ competing ROG STRIX TRX40-E Gaming motherboard uses sixteen of the de-rated TDA21462 60A power stages for its primary power delivery solution.
There are 90A alternative DrMOS or power stage solutions deployed on competing motherboards. But, with sixteen of the 70A International Rectifiers models deployed in a non-doubled control configuration, Gigabyte’s TRX40 Aorus Master is offering just about the best power delivery solution at this price point.
Three additional TDA21472 70A power stages are mounted with an International Rectifiers IR35204 PWM controller near to the left-side DIMM bank. These look to be in control of the SoC power delivery and are absolute overkill for such a task.
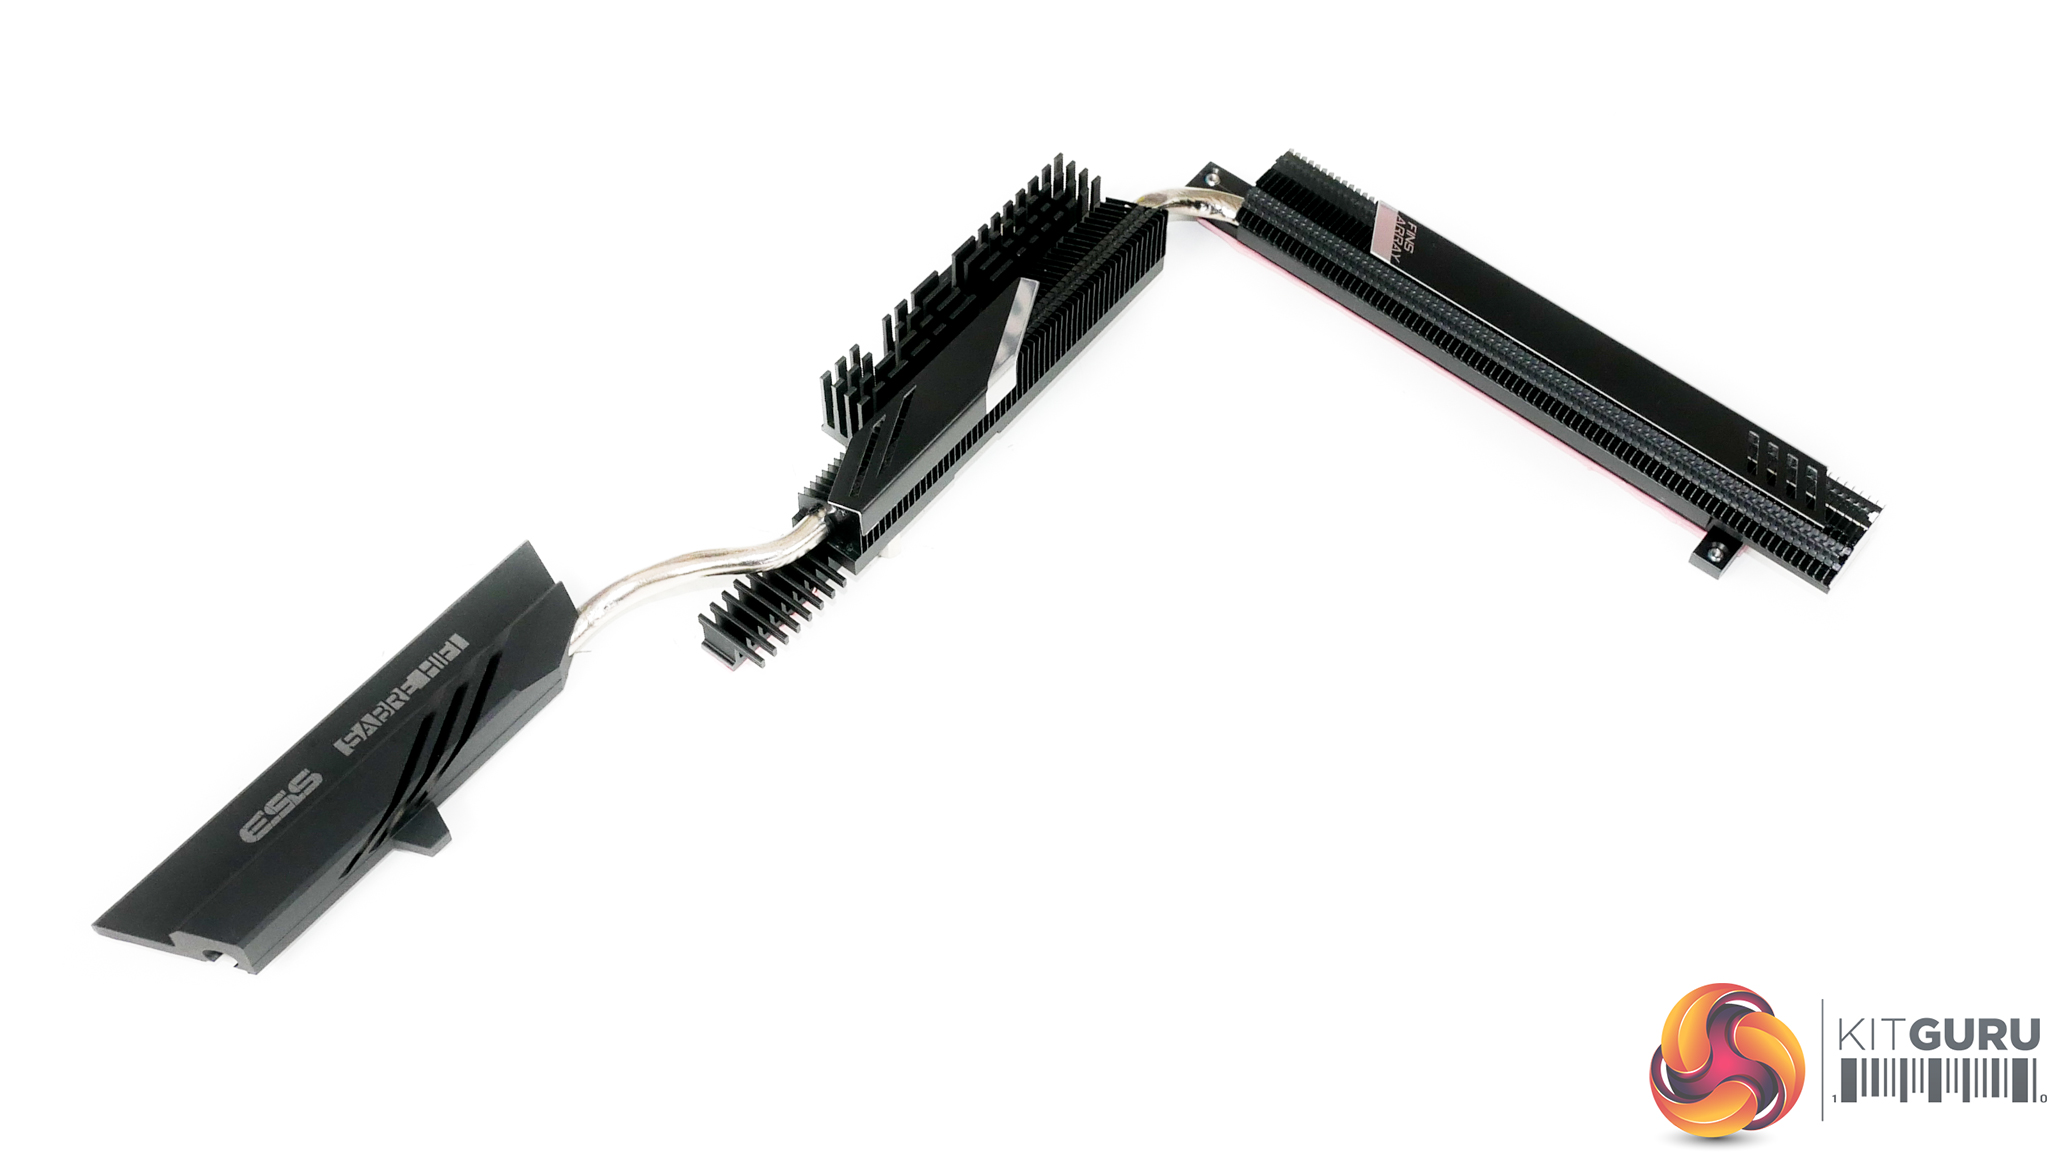
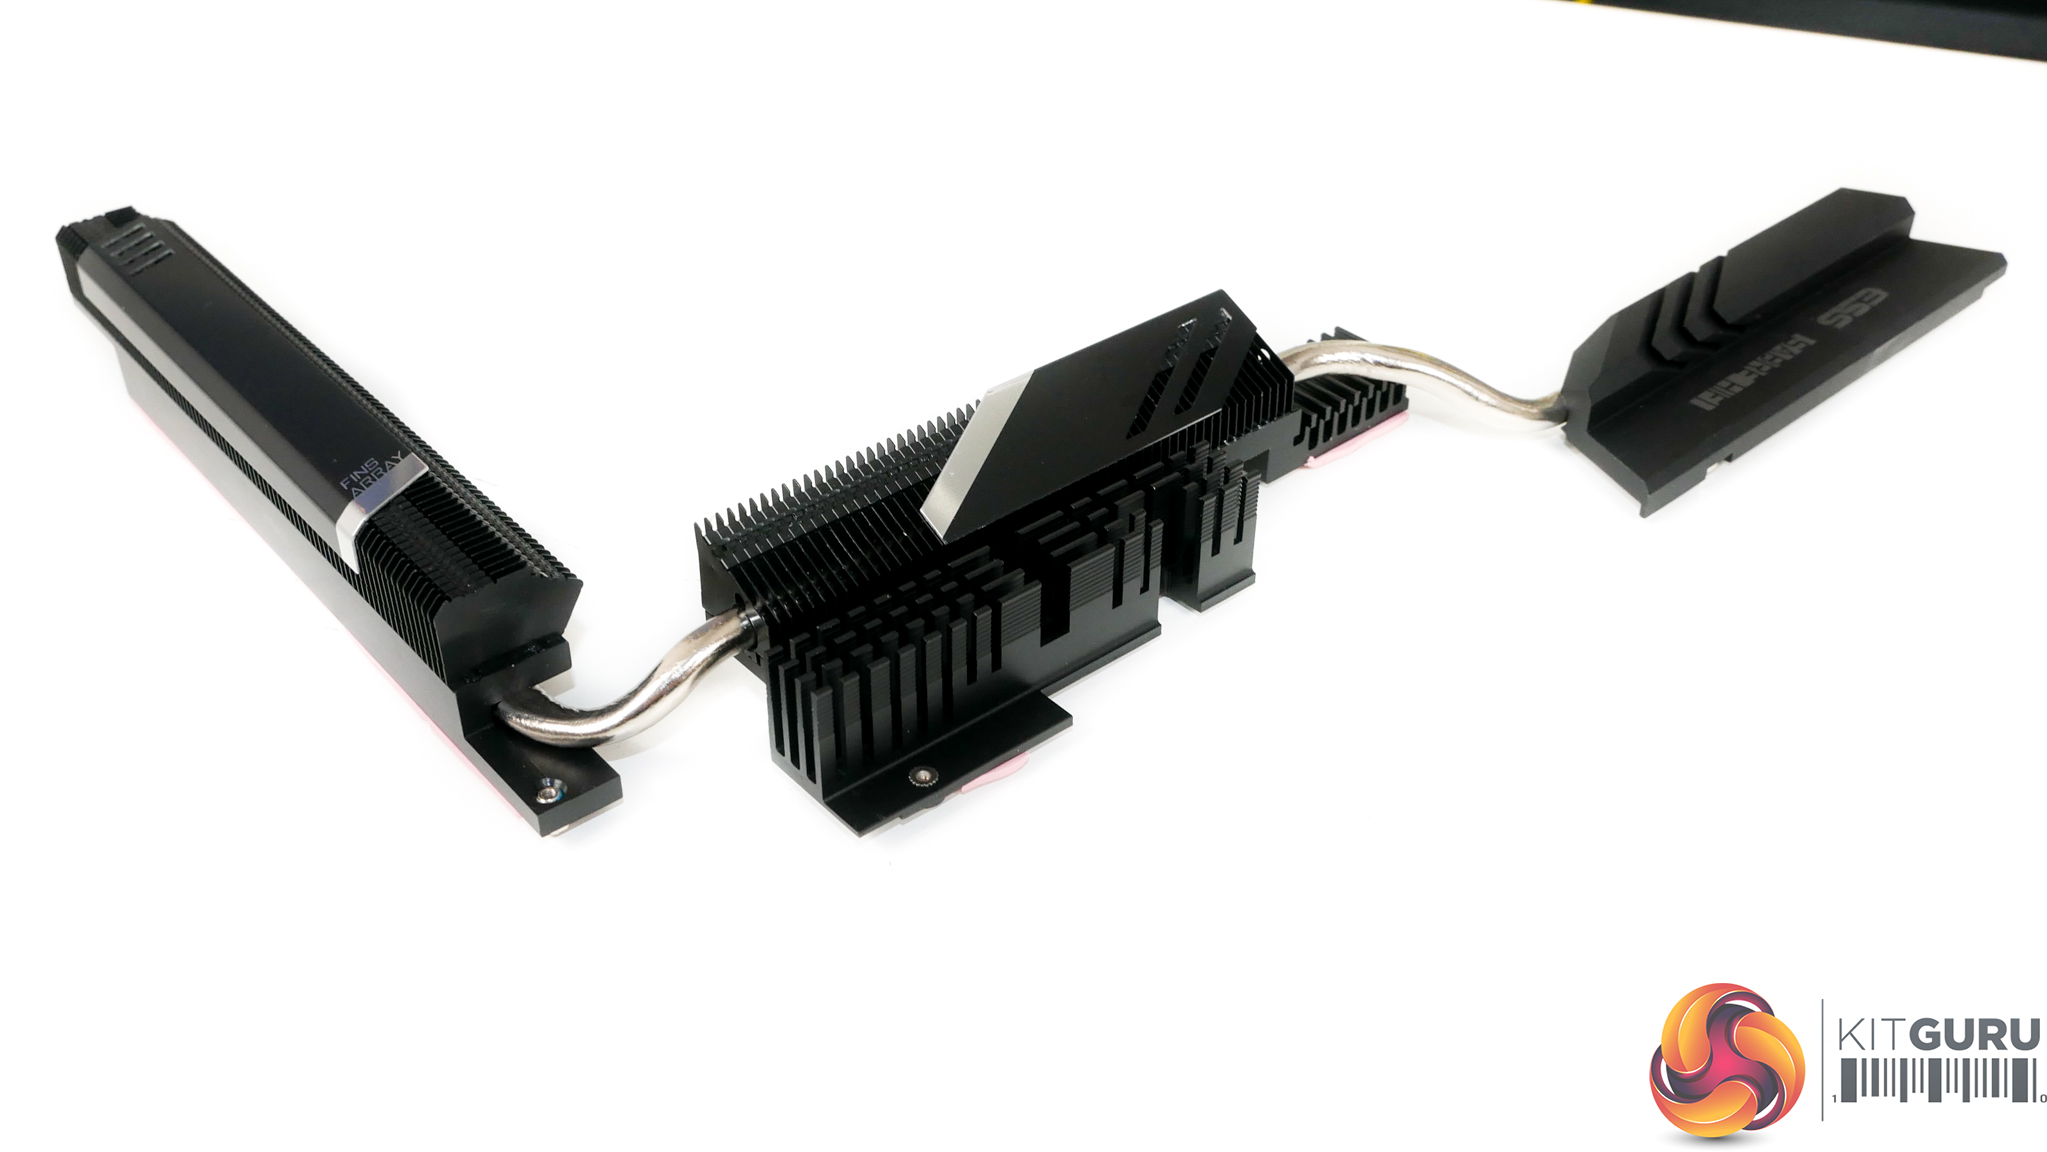
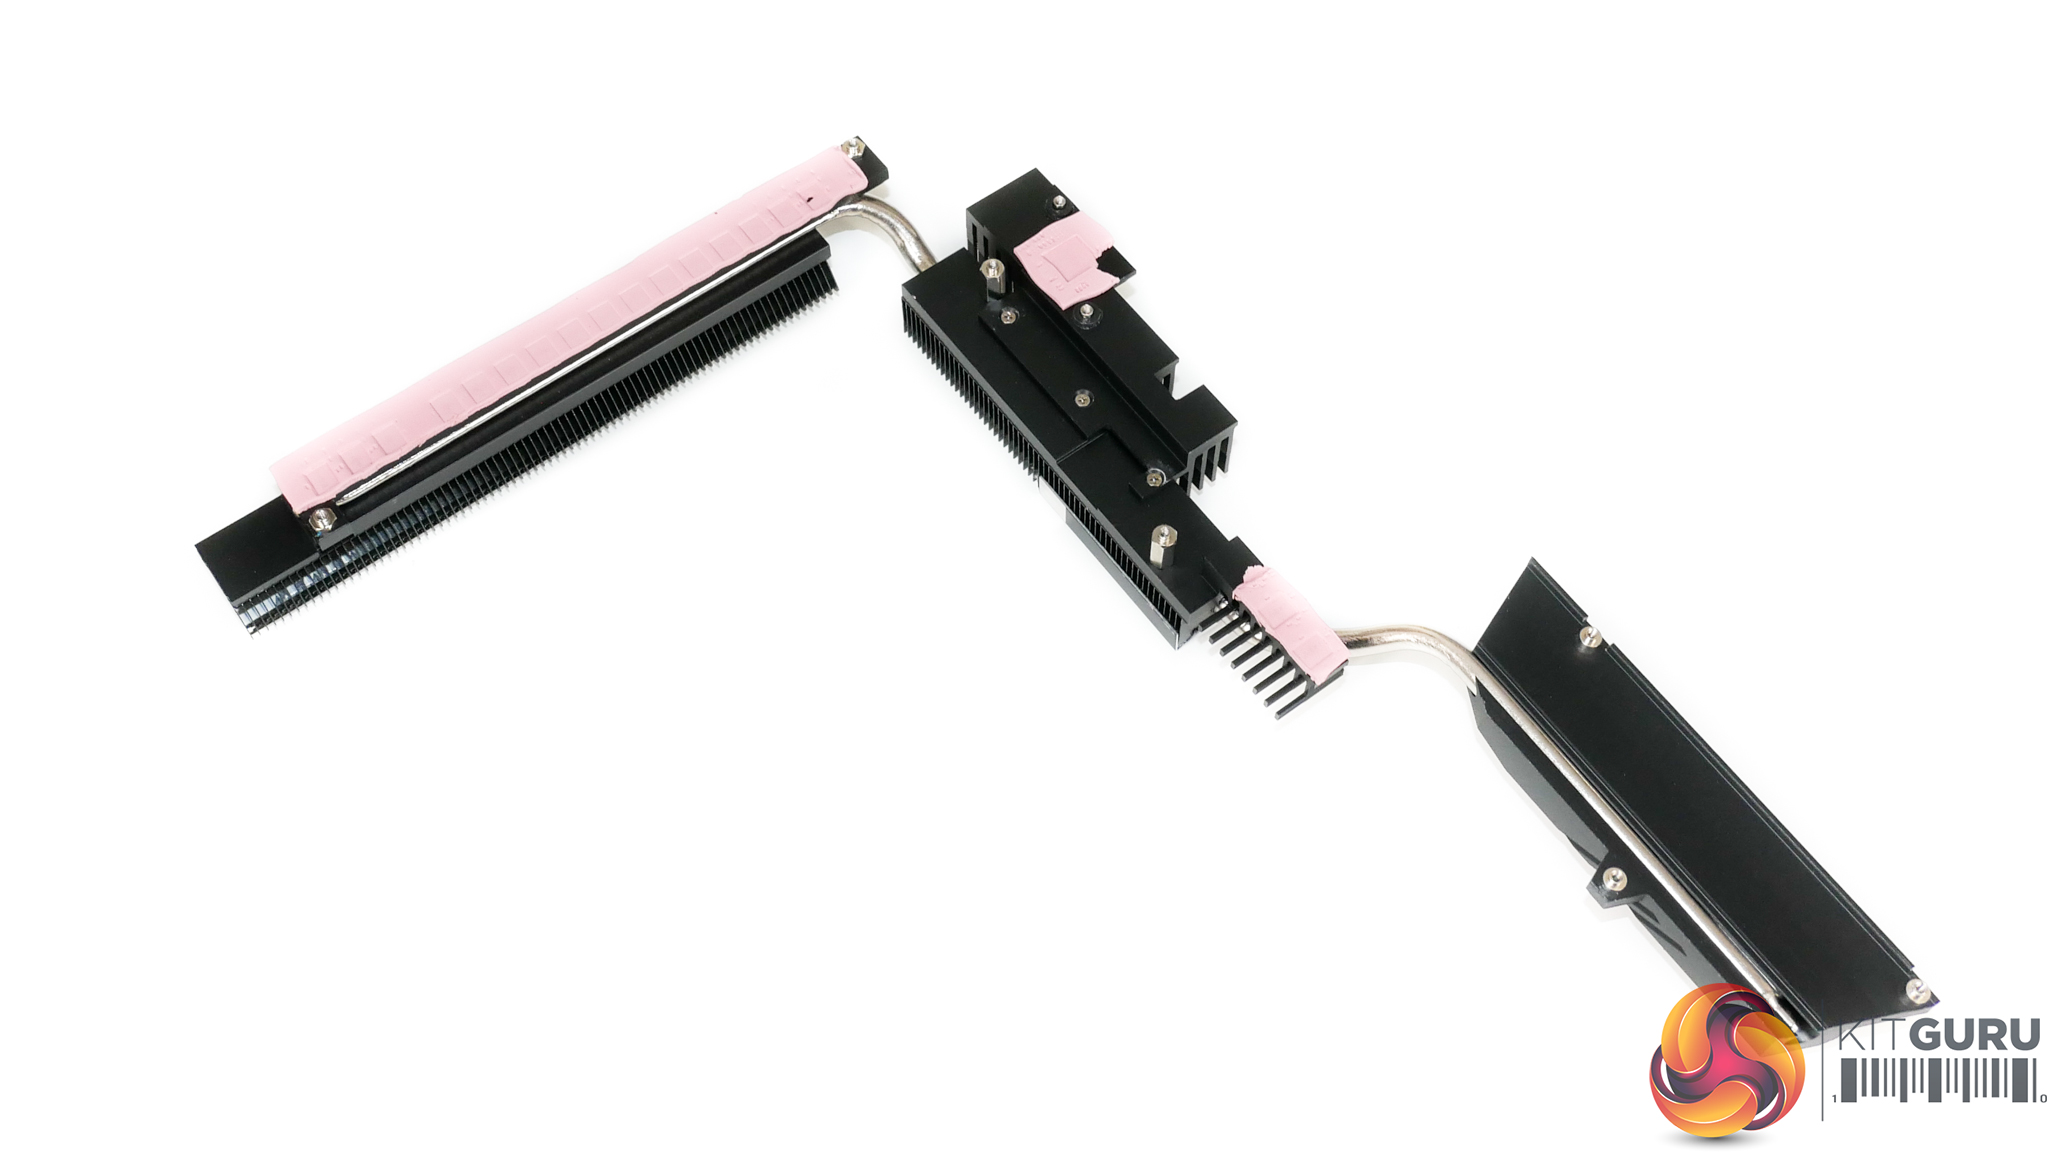
The primary MOSFET heatsink is mounted on the top side of the configuration and is connected via heatpipe to the secondary heatsink and the thermal block that stretches down to the motherboard’s bottom-left region.
Gigabyte deserves credit for making a smart, low-profile heatsink that uses fins well whilst also maintaining a good appearance. This is a well-designed heatsink for a motherboard of this calibre, given that Gigabyte has clearly gone for a short design that minimises clearance issues.
ASUS’ competing heatsink design for the TRX40-E Gaming is physically larger and will beat the short-duration performance of Gigabyte’s design. That point is thanks in large to the ROG STRIX motherboard’s use of a hybrid-type heatsink design that trades some area of the fin array for a sizable slab of metal that offers strong thermal capacitance capabilities in the cooling equation.
With that said, Gigabyte’s heavily finned design should be able to shed its heat load effectively at higher temperatures and longer stress durations. There’s also the benefit of Gigabyte’s design being far smaller in terms of height and physical footprint and therefore presenting fewer interference opportunities.
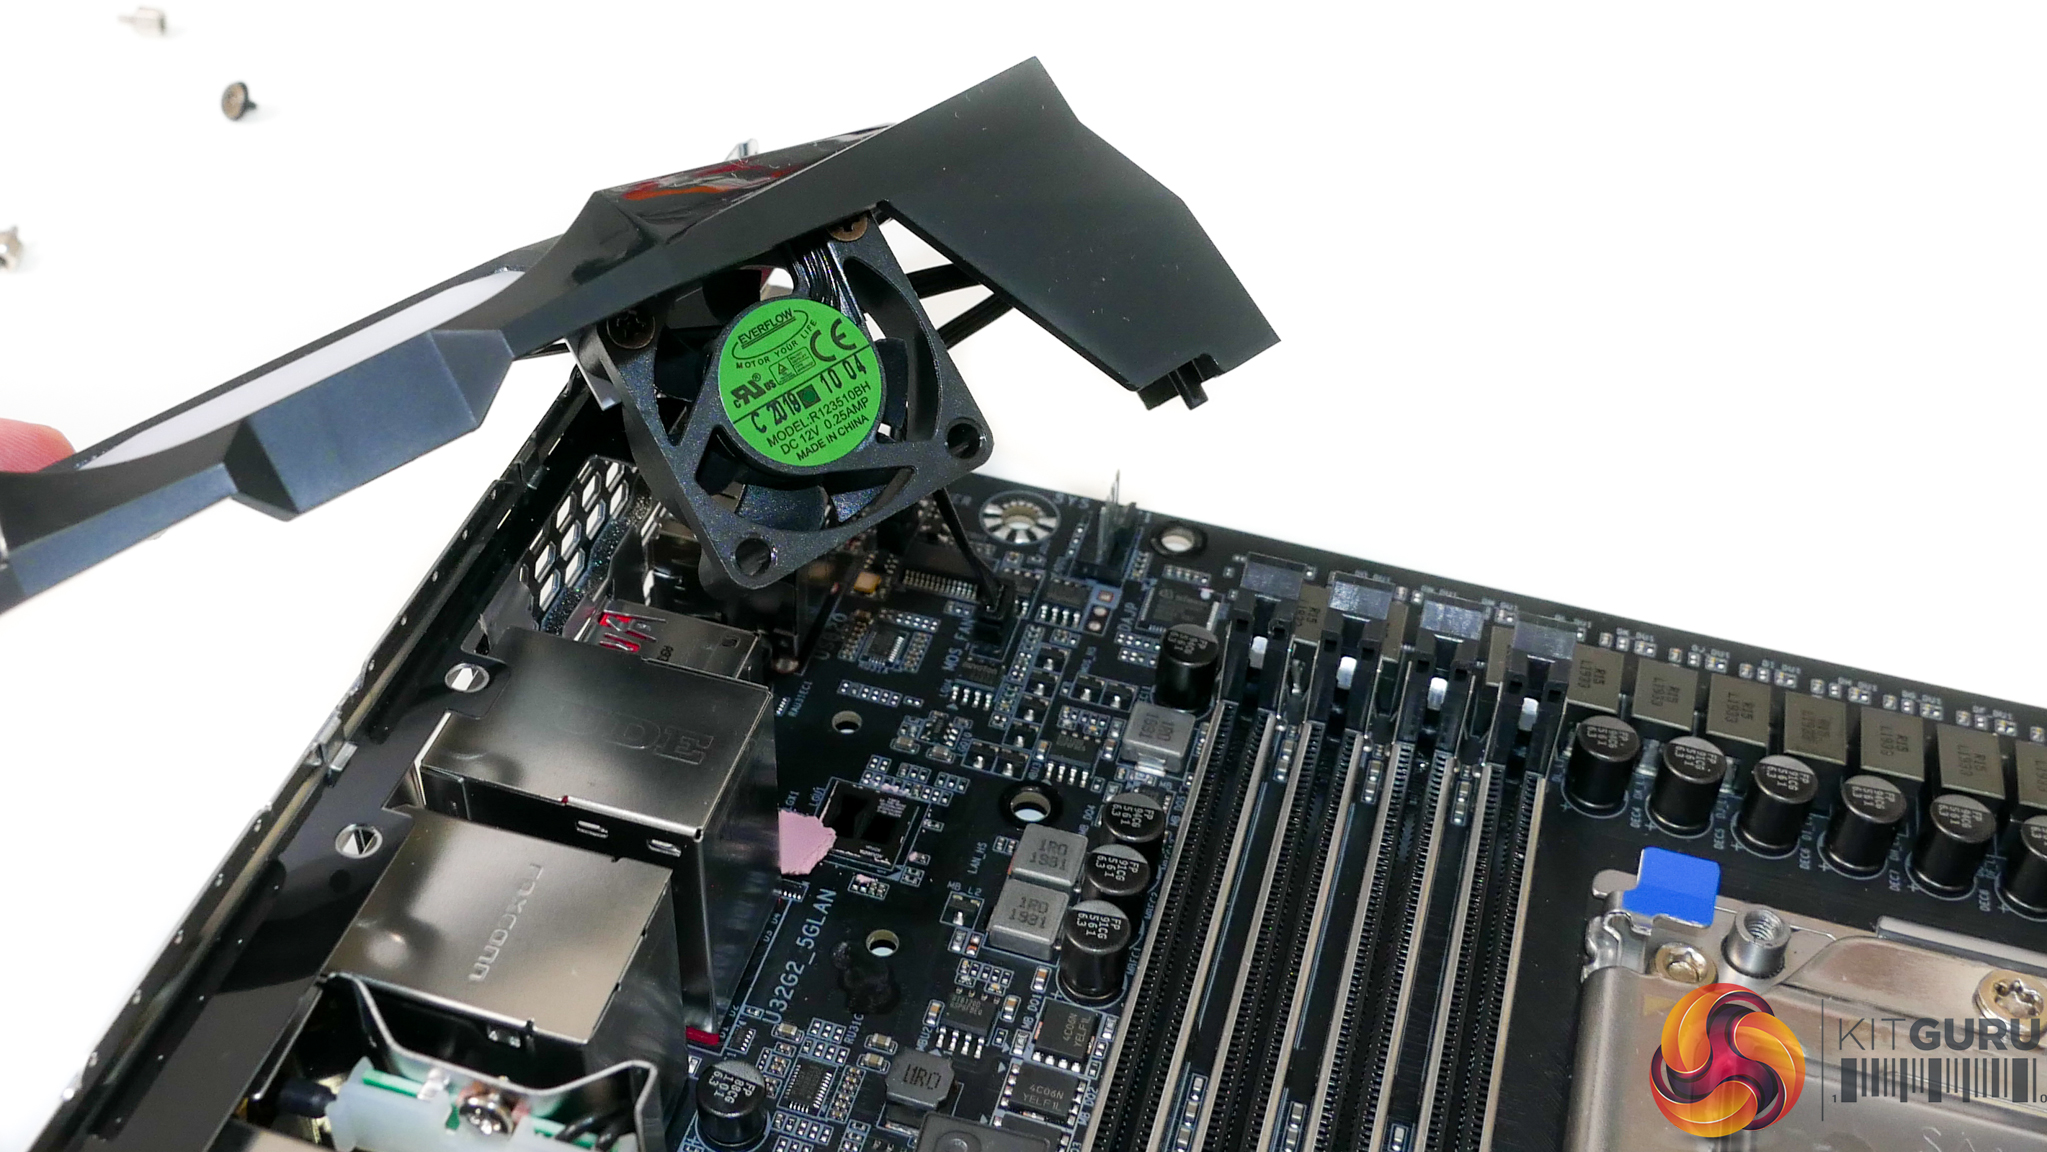
The 55mm diameter chipset fan sits beneath a metal grille and features vertical blades that aim to force airflow in a specific direction. According to our testing, the maximum speed of this fan is around 4200 RPM, at which point it becomes clearly audible and intrusive.
Out of the box, in Gigabyte’s ‘Balanced’ mode, the fan was audible over a quiet CPU cooler but did a superb job at keeping temperatures low when combined with the well-sized block of metal on top of the chipset. Using the ‘silent’ mode, or a manually tuned alternative, narrowly permitted zero RPM operation for spells of low system activity.
The 30mm MOSFET fan was not so good, however. This small unit draws fresh air in from a shrouded area in the rear IO shield and forces it over the left-side heatsink fin array. The problem there is that the top-side fin array directly interacts with the bulk of the thermal load but receives active cooling from the fan only via a conduction lag time through the heatpipe. This design approach is not ideal for minimising fan speed under high thermal loads.
Operating at its maximum speed of 10,500 RPM, the 30mm unit sounded like a dentist drill. Thankfully, the more common operating speed of around 5000-5500 RPM was tolerable, but by no means quiet.
We managed to manually tune a zero RPM operating mode using Gigabyte’s superb UEFI control abilities. This allowed the fan to remain off until the MOSFET sensor hit 60°C. The fan stayed at around 4200 RPM for the extended test run and this kept MOSFET temperatures below 70°C.
The ‘NanoCarbon-coated’ aluminium backplate makes clear contact with the underside of the power delivery area via thick thermal pads. This allows for heat soaking through the PCB to be transferred to the sizeable piece of metal and therefore dissipated over a greater surface area than the concentrated PCB hotspot.
It’s a smart design move by Gigabyte.
Gigabyte TRX40 UEFI
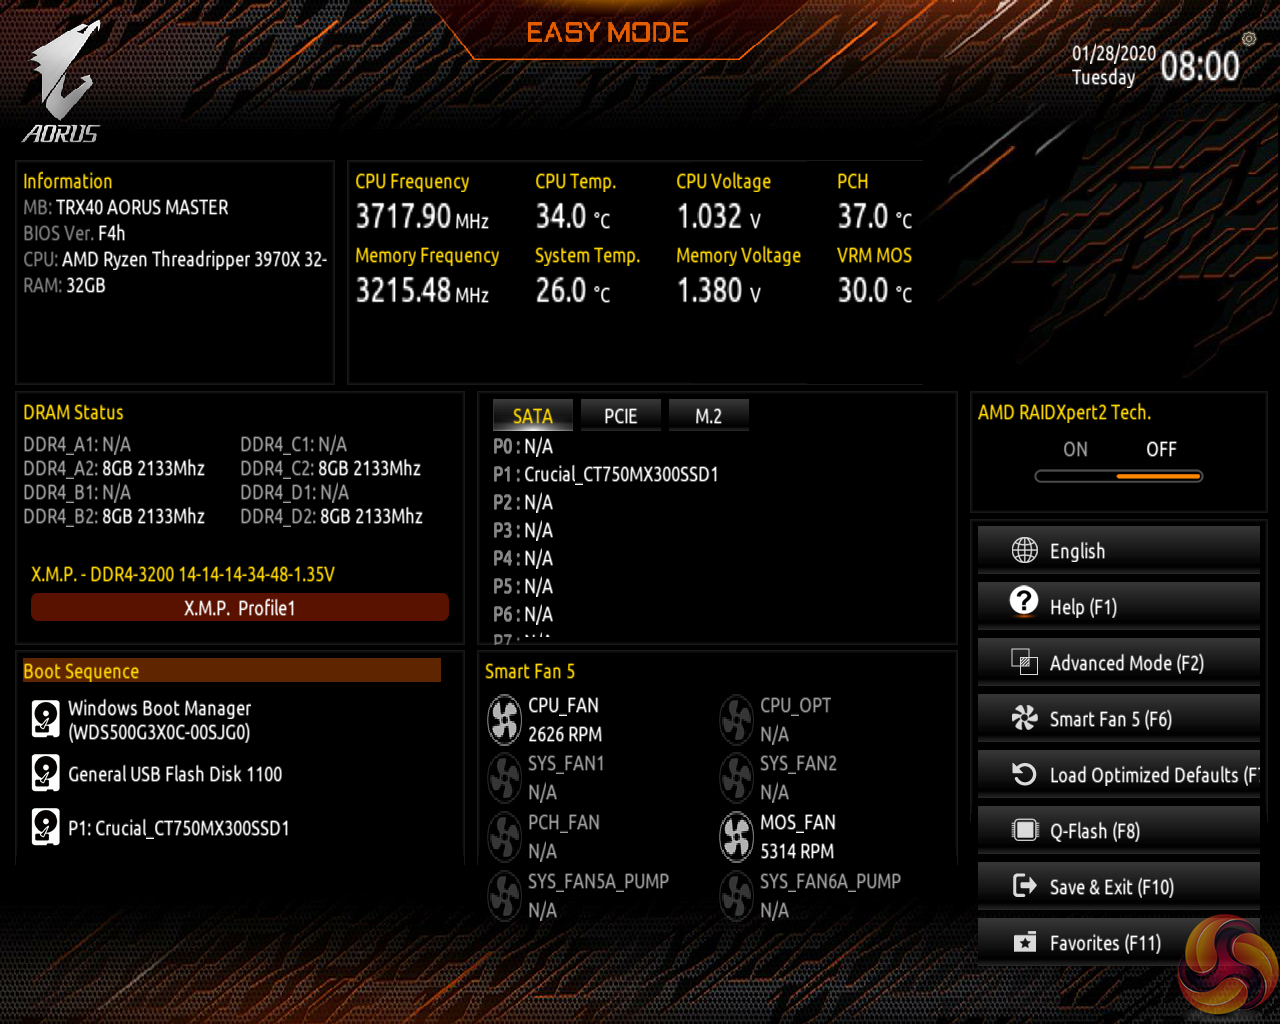
Gigabyte’s Easy Mode page is a quick-access area where users can alter the boot sequence, check fan speeds, monitor temperatures and voltages, enable XMP, and change the performance mode without jumping into the deeper (and scarier for less experienced users) UEFI sections.
Gigabyte’s Easy Mode implementation is as good as the versions used by competing vendors. I like that the fan icons rotate to show which headers are currently active.
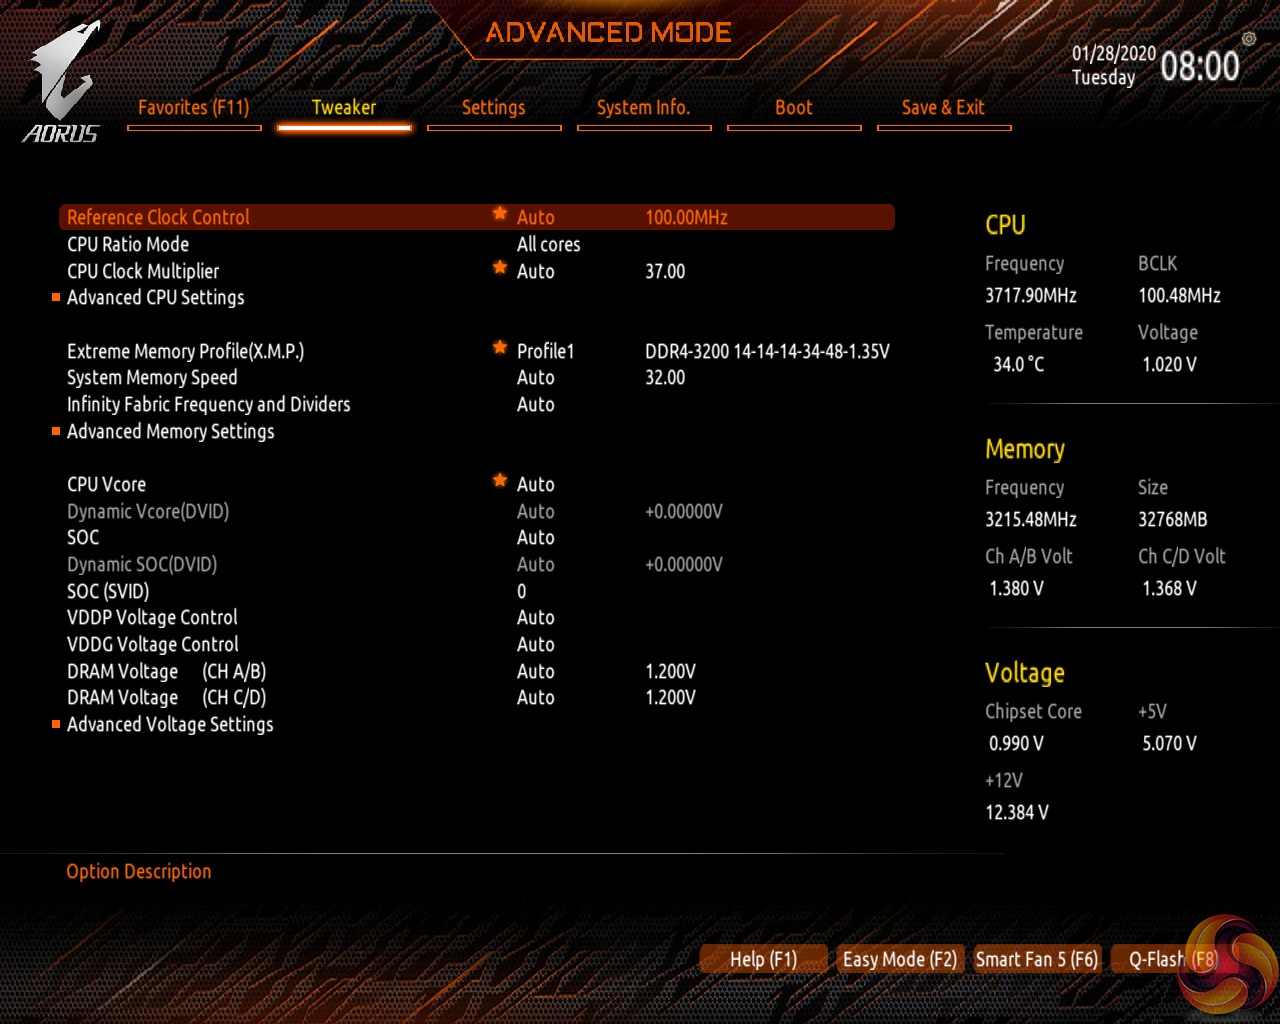

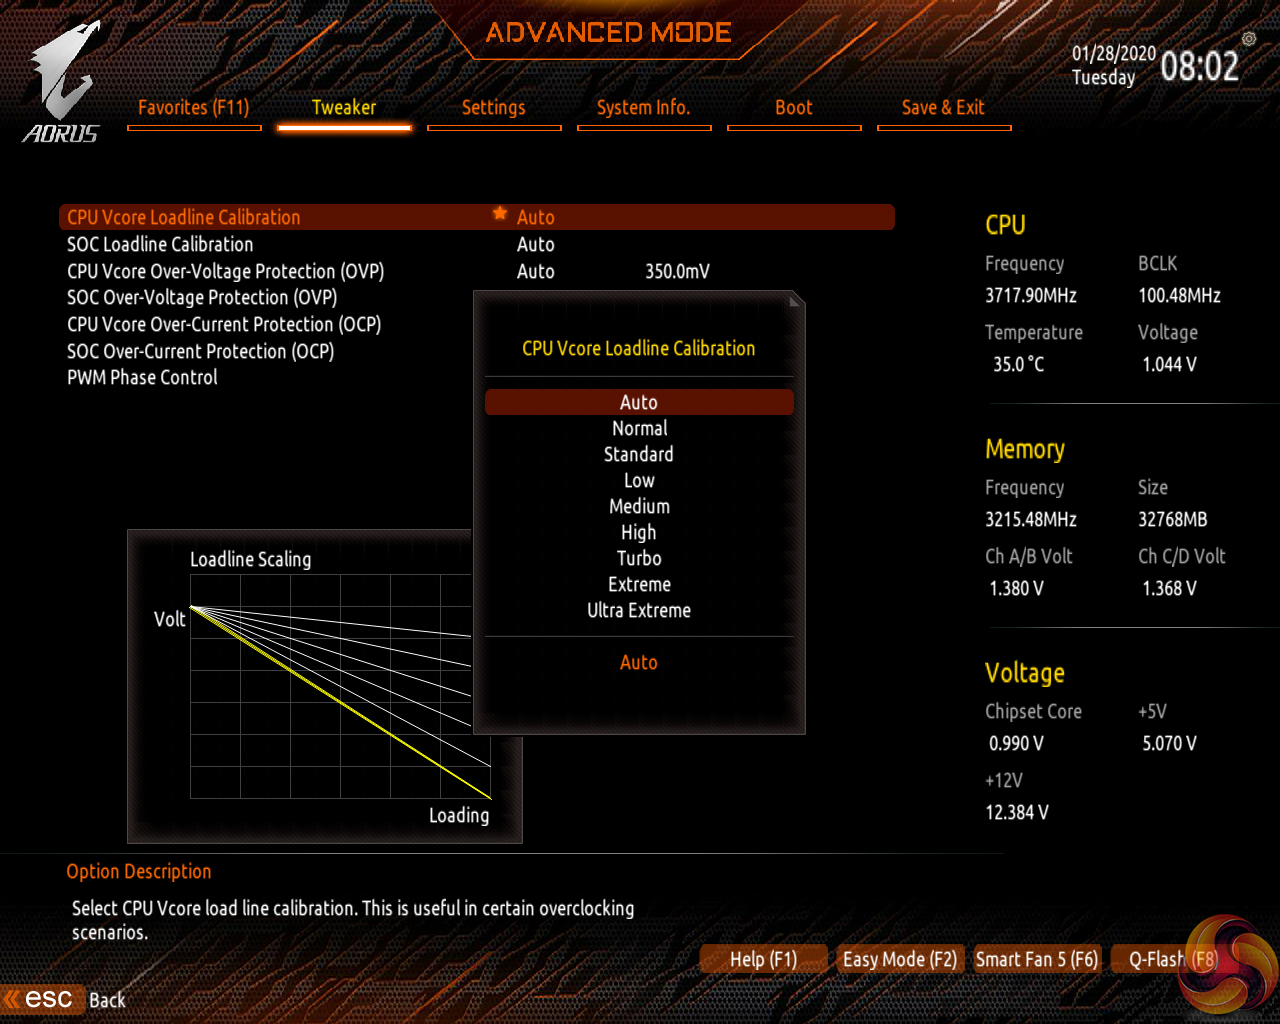
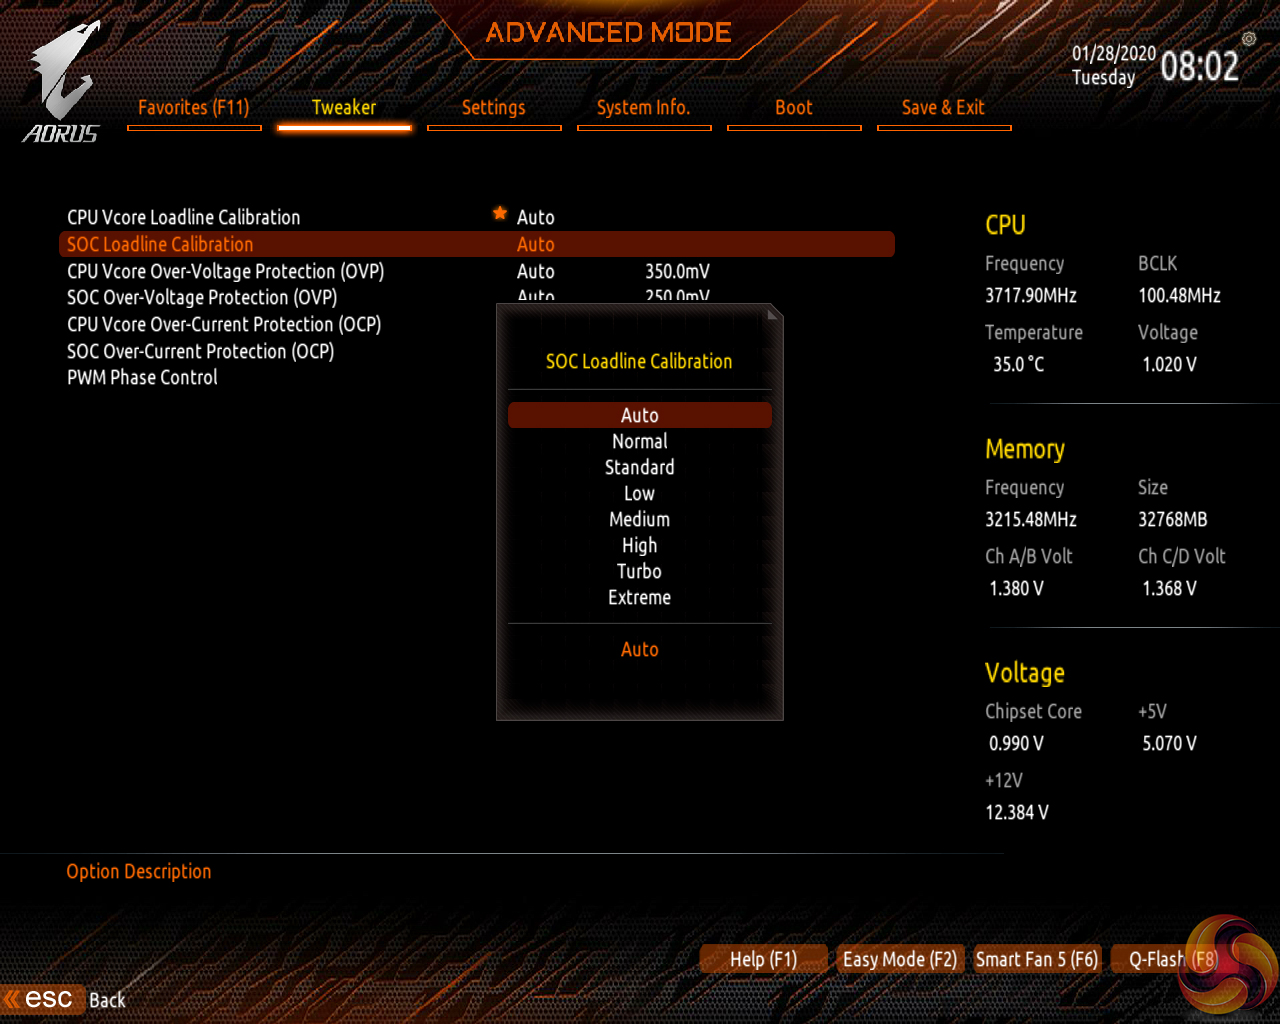
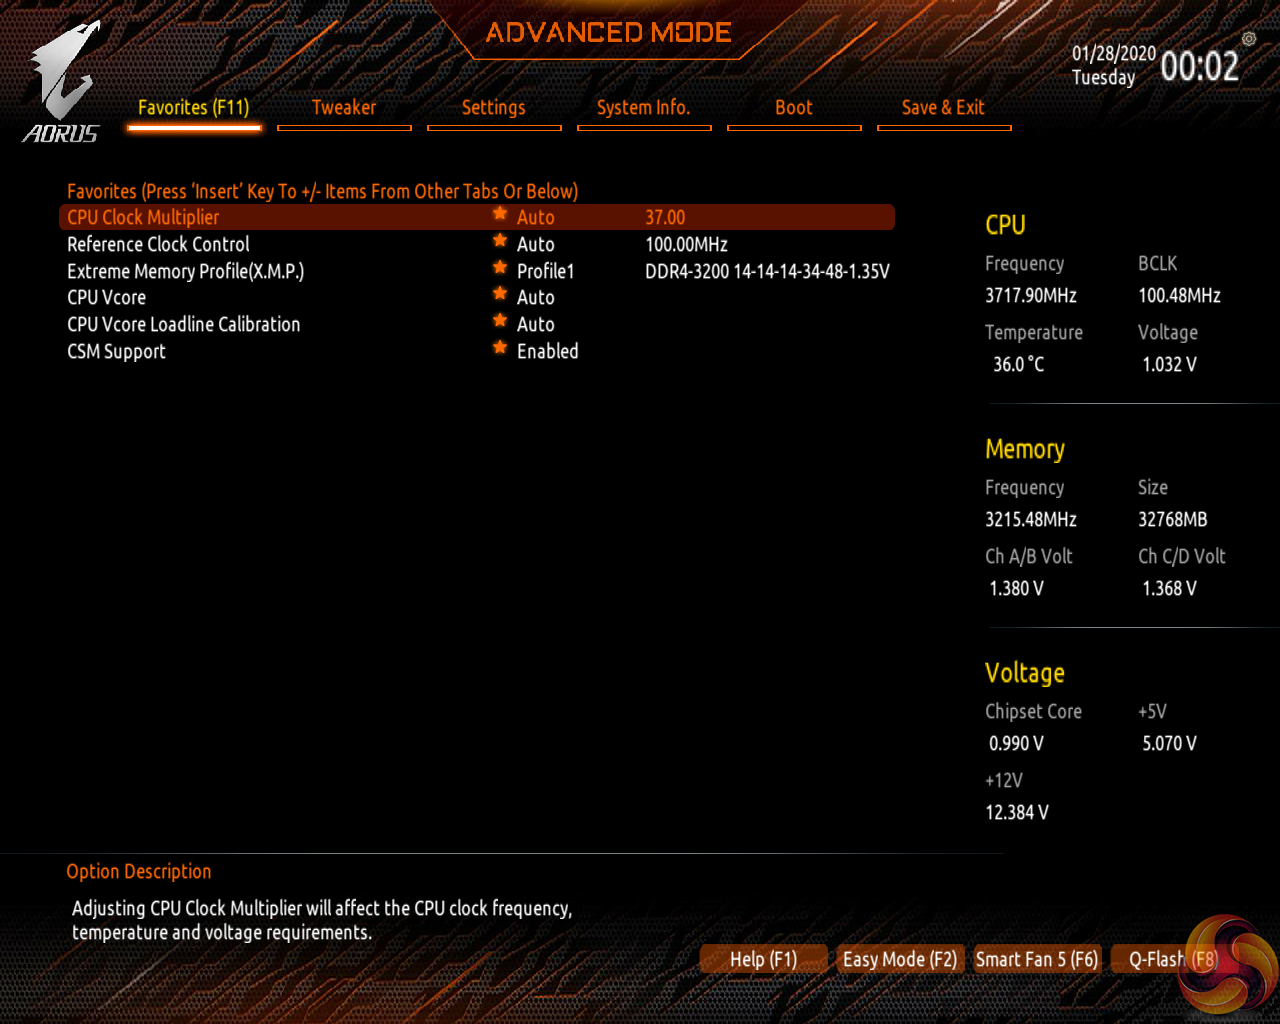
Tweaker is the main section where parameters relating to voltages, frequencies, and power settings for the system’s main components are found. All of the main sections are found on one page, with additional ‘Advanced’ subsections being accessible. The subsection splitting forces a user to jump back and forth between pages but it also helps to keep the individual subsections tidy and without an overwhelming amount of information on one page.
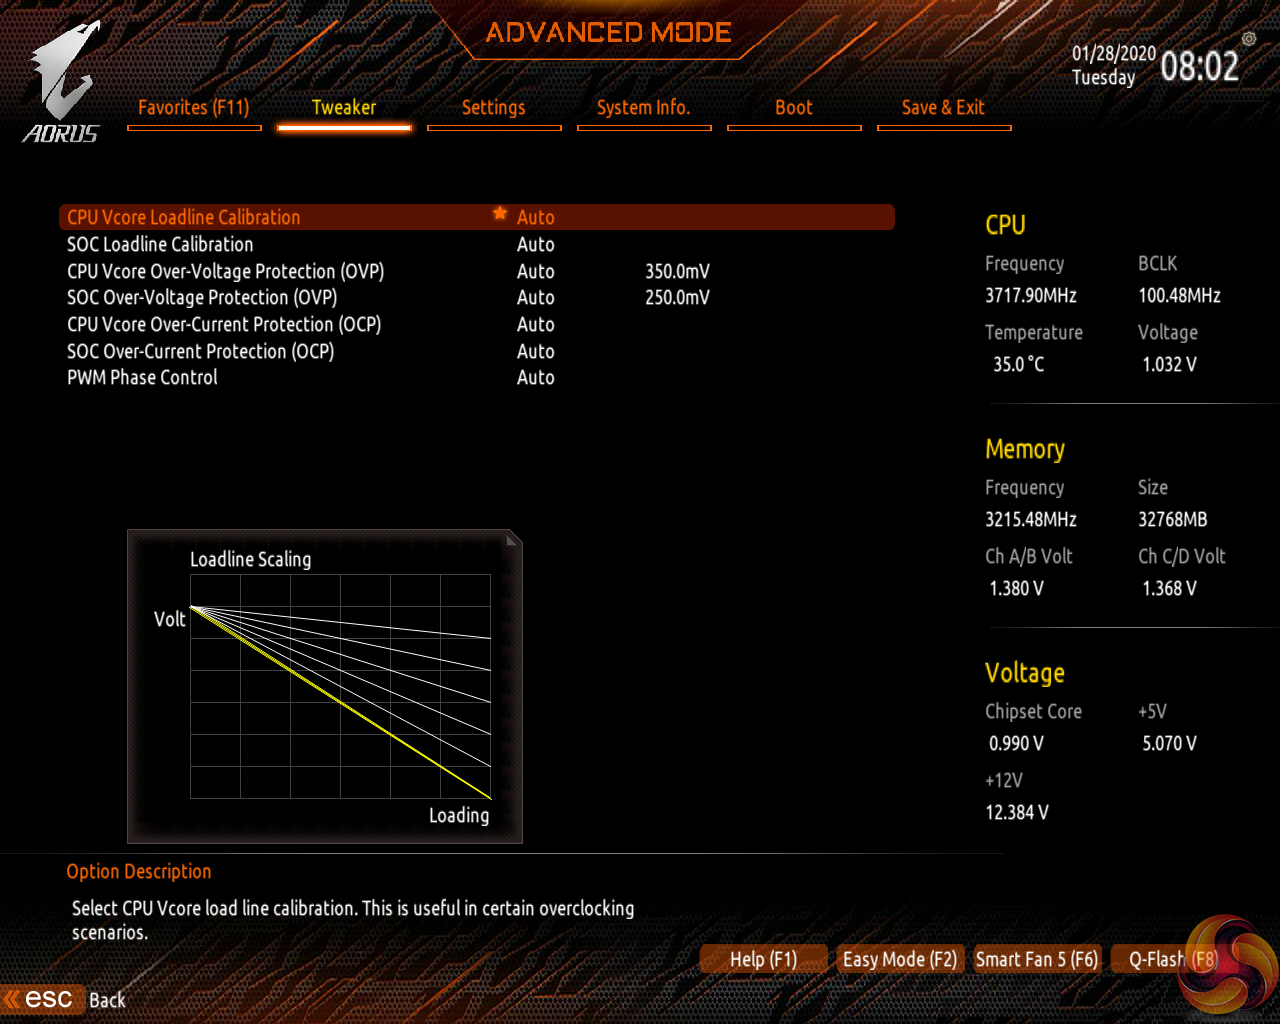
The selection of LLC names doesn’t really make sense. However, Gigabyte makes up for this by including the (critical in my opinion) visual graph that shows how some of the LLC settings operate. As it happens, our trial-and-error testing suggests that you should use the High LLC setting if you want CPU VCore to stay close to your applied numerical value without a significant overshoot or undershoot.
I would say that Gigabyte’s improvements to its overall UEFI – especially the critical voltage and frequency section – have been significant over the past couple of years. There are, however, still areas where improvement is required. There are generally no drop-down lists for selecting frequencies and no colour indication is given to highlight a high voltage level. I also found navigating to the power controls section for the CPU a little more long-winded than it needs to be, and the inability to increase and decrease this value with +/- keys was incredibly frustrating.
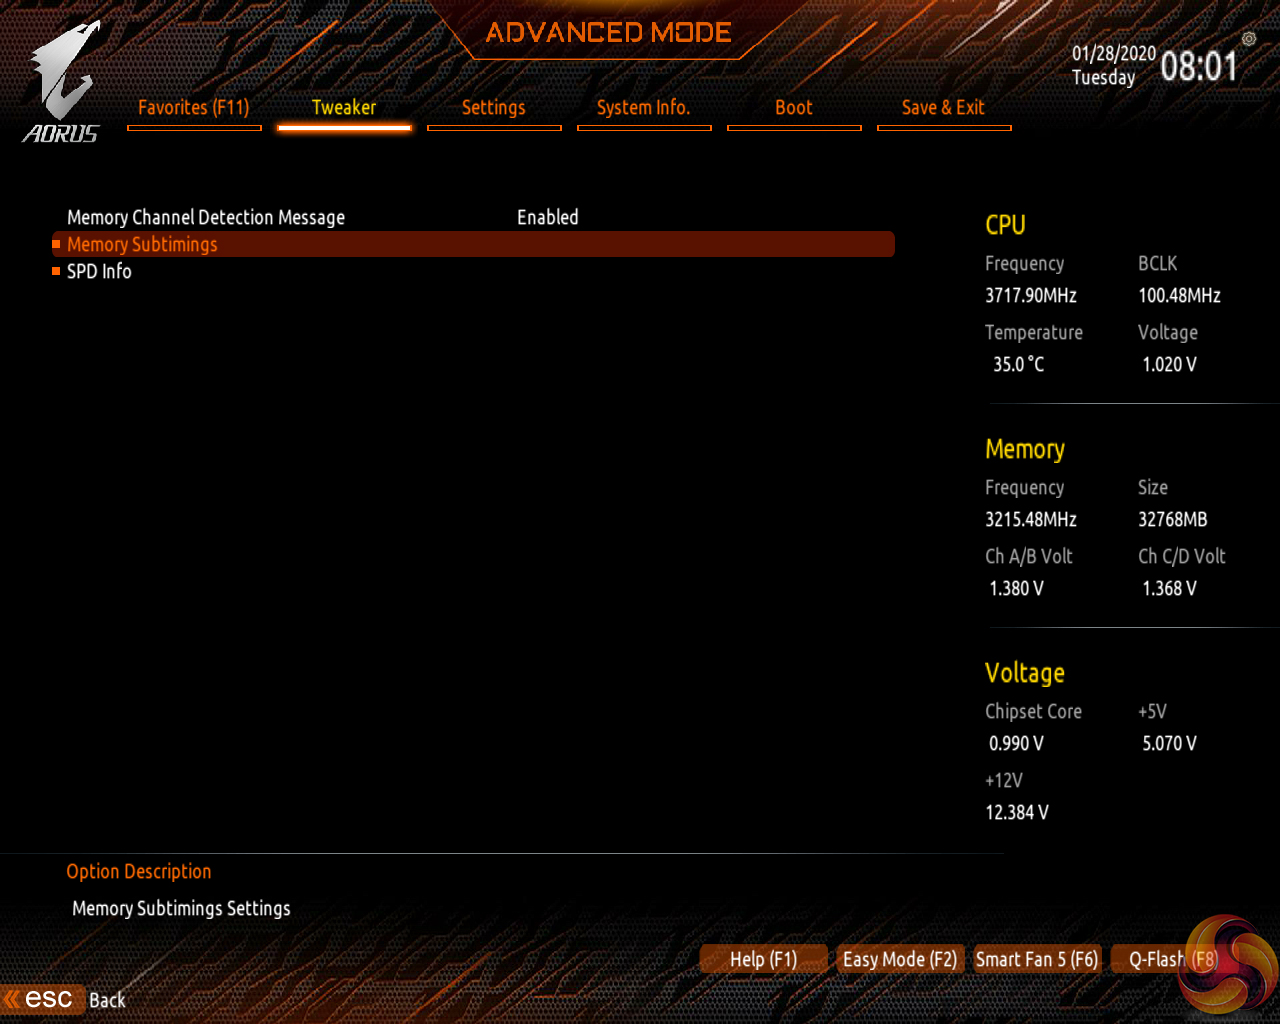
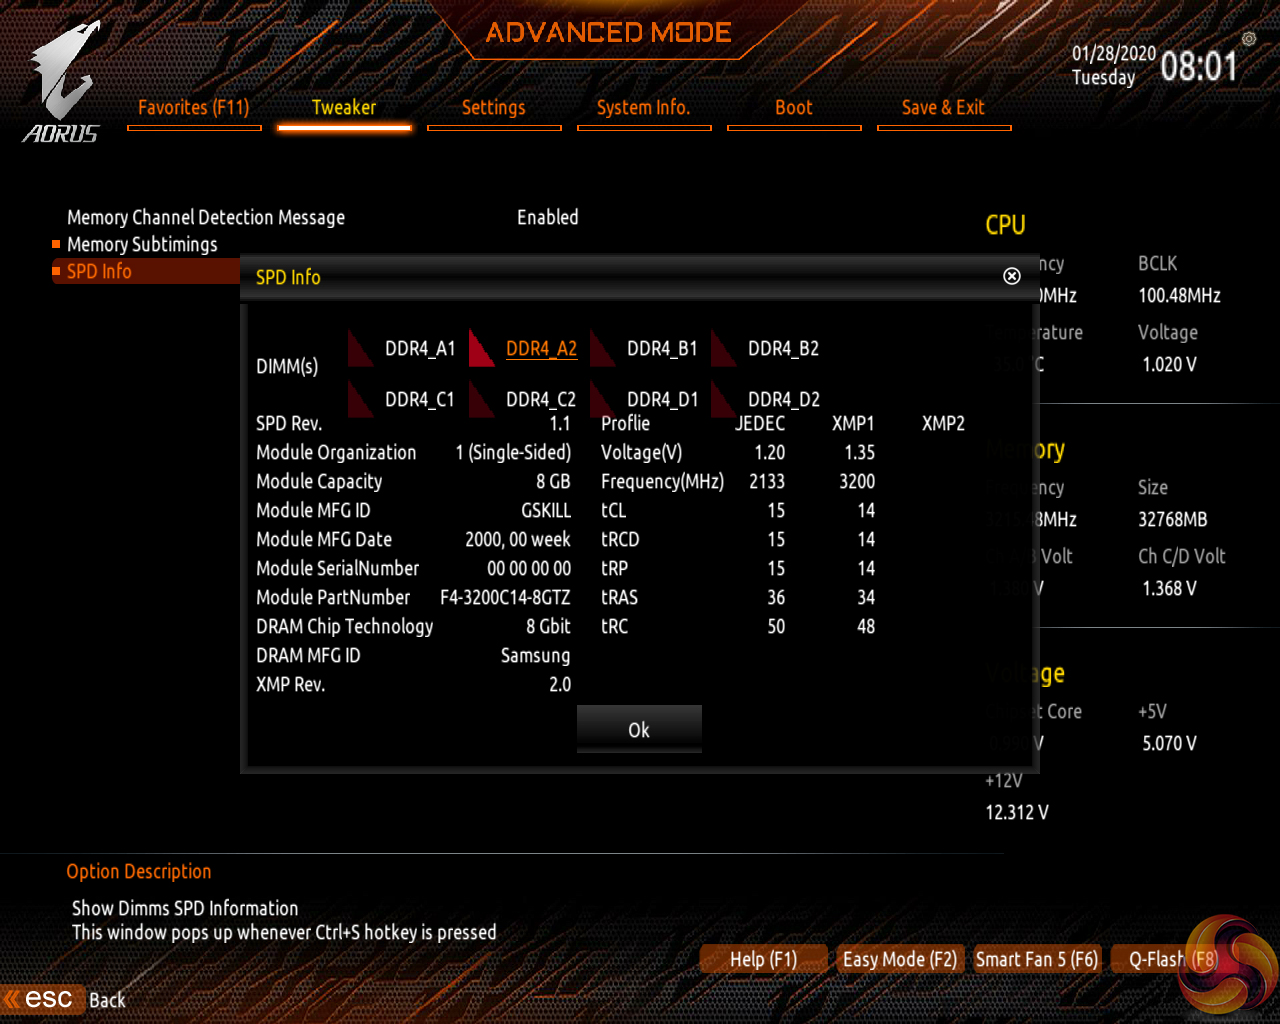
Control for memory subtimings and information relating the specific installed modules is broken out into a separate section.
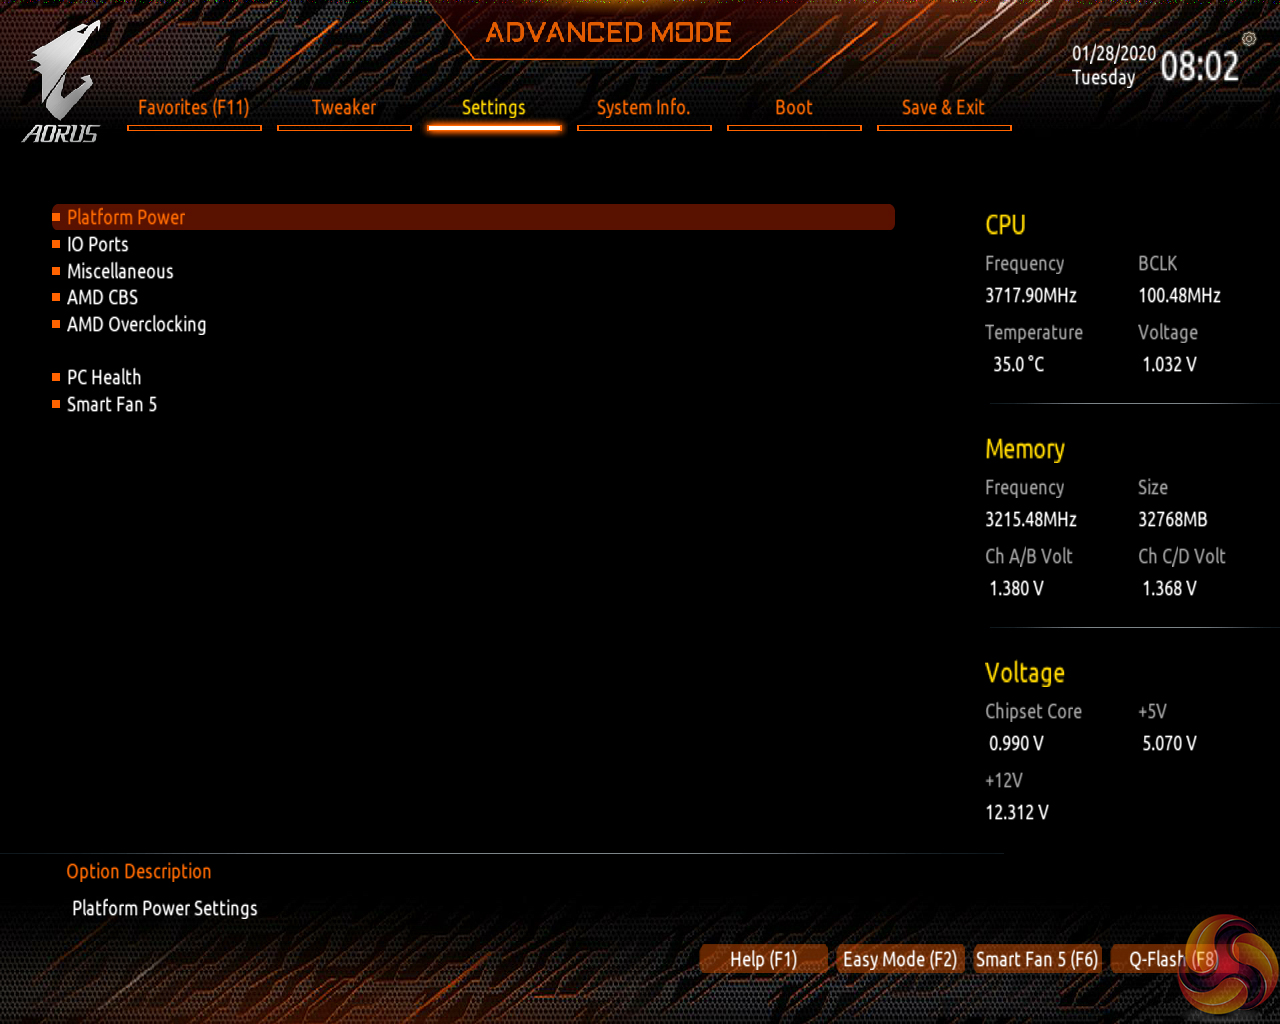
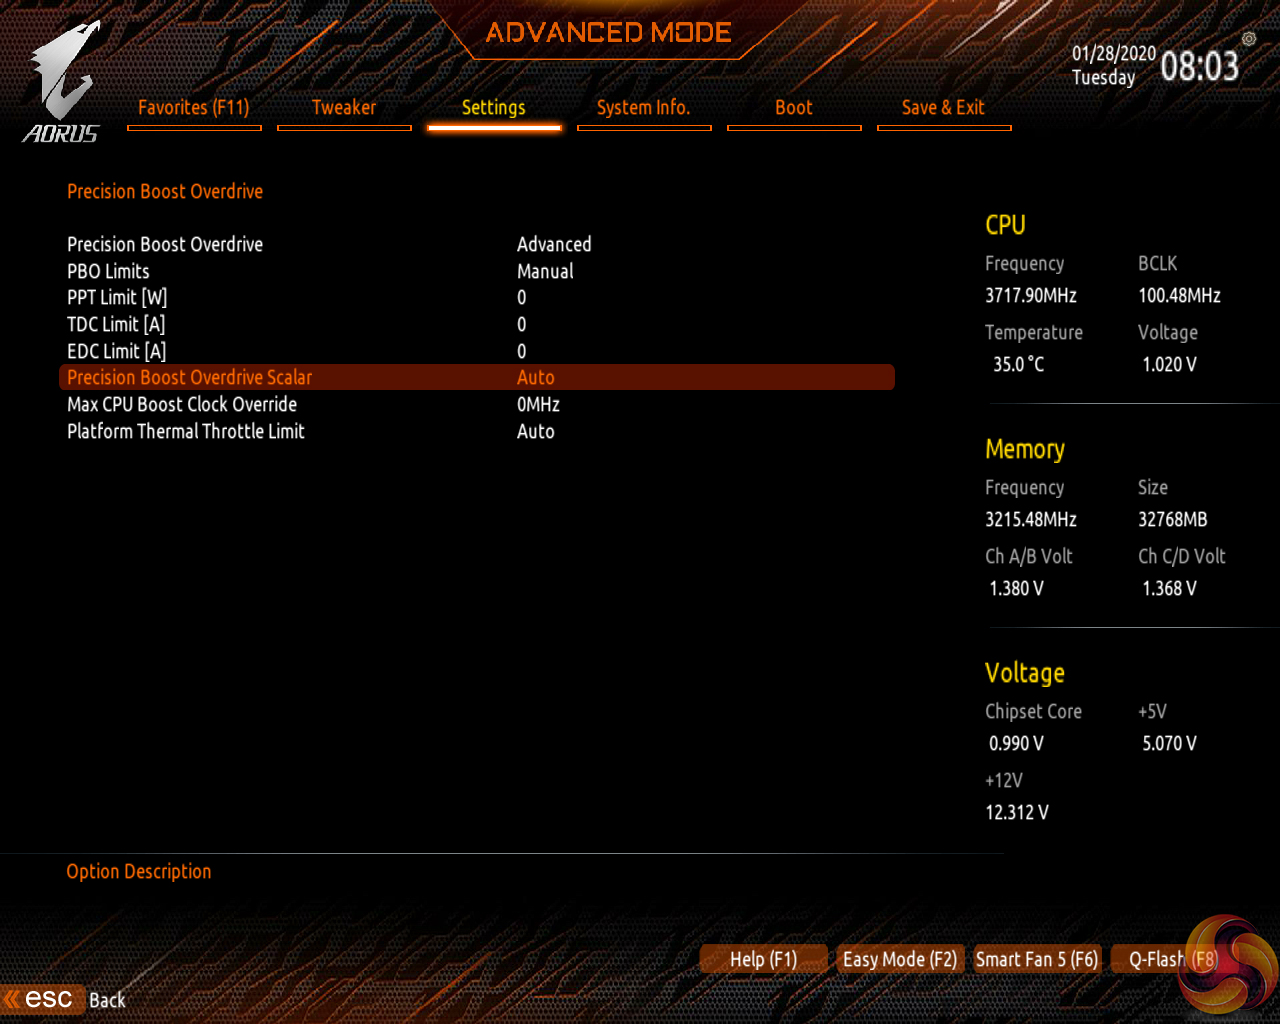
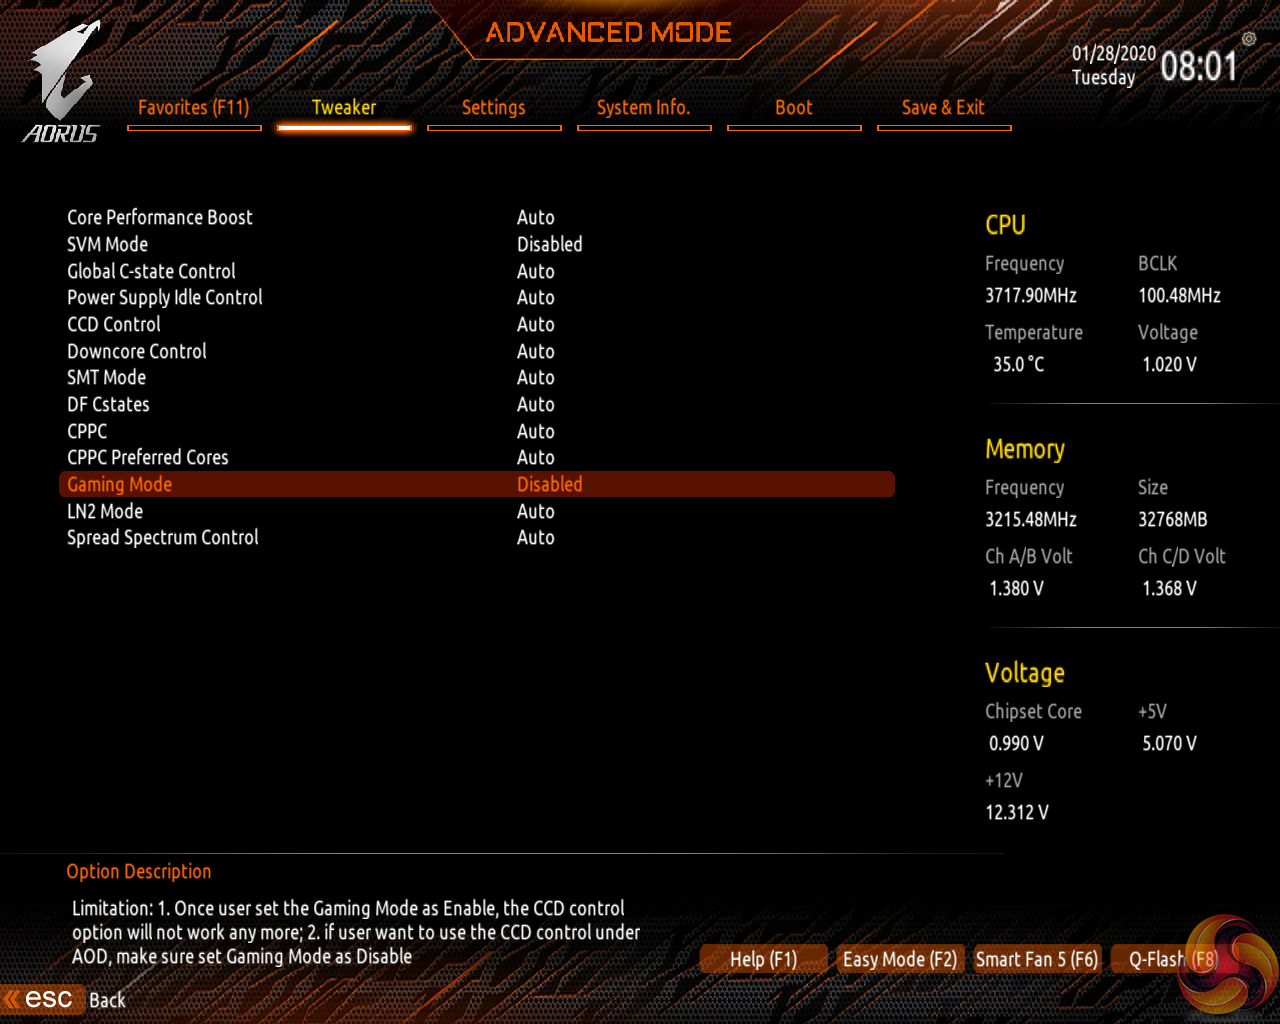
Plenty of settings relating to system operations are found within dedicated subsections. Users have the ability to control CCD operation, Infinity Fabric clocks, and Precision Boost Overdrive, for example.
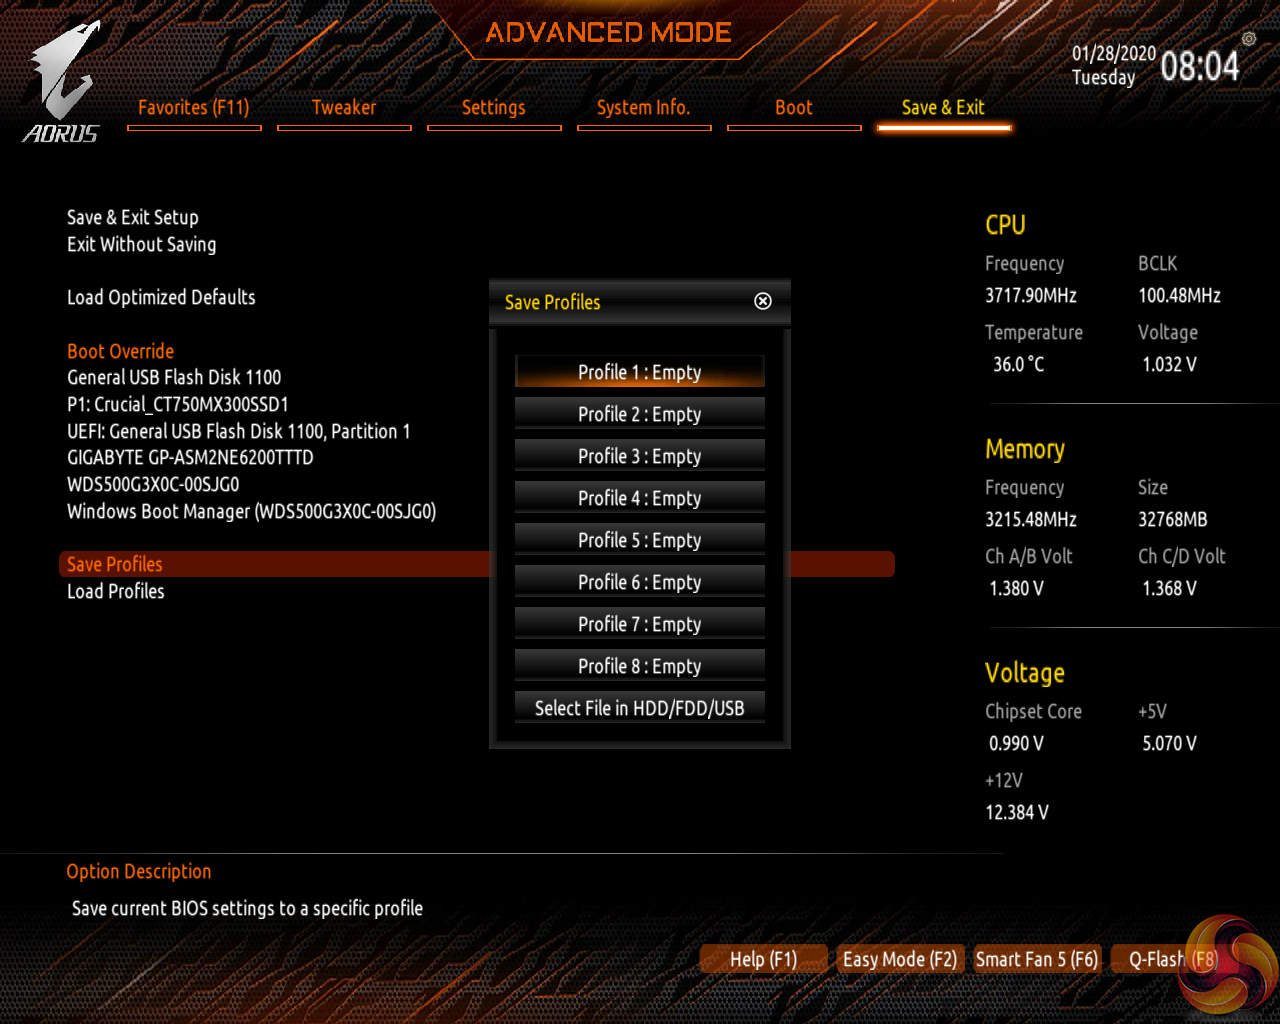
Up to eight user profiles can be saved on the board’s internal memory. Further profiles can be transferred via storage media such as a USB flash drive.
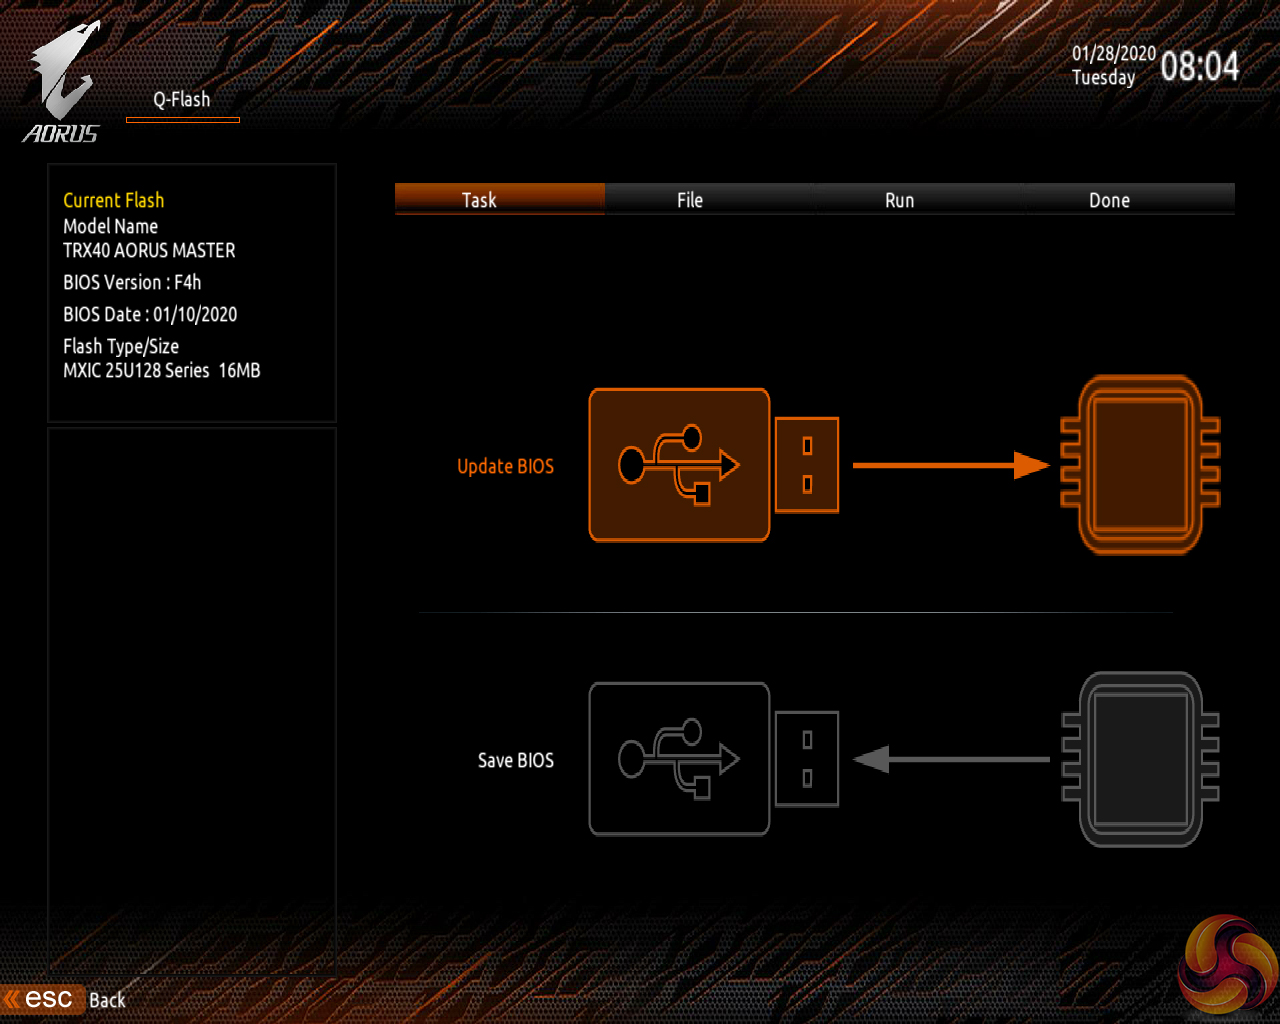
Q-Flash is accessed by hitting F8 on any main UEFI page. The tool is able to access folders within a USB flash drive so that one can locate the BIOS file and flash it.
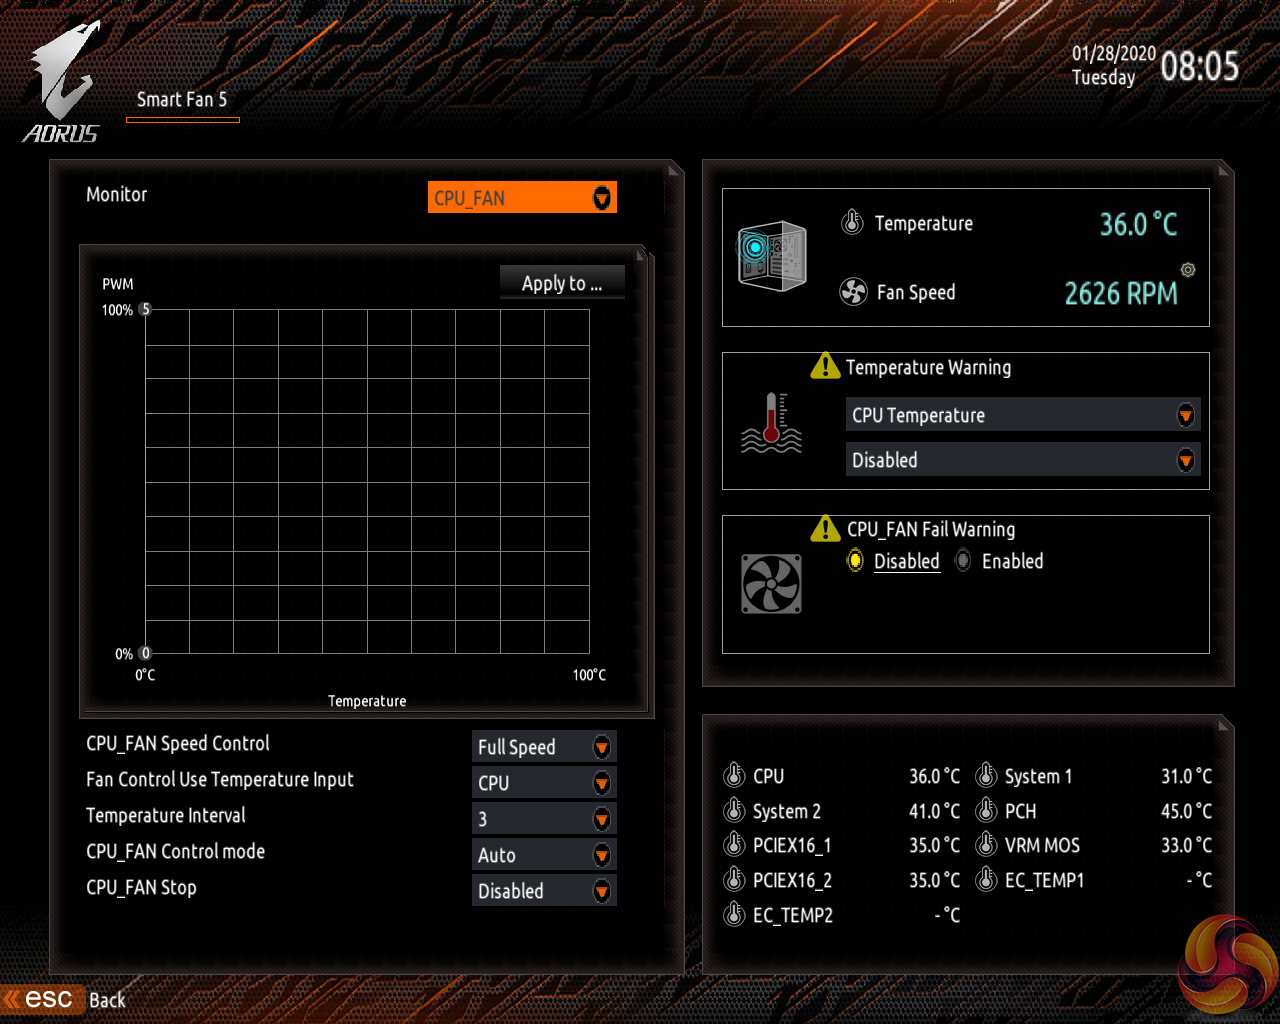
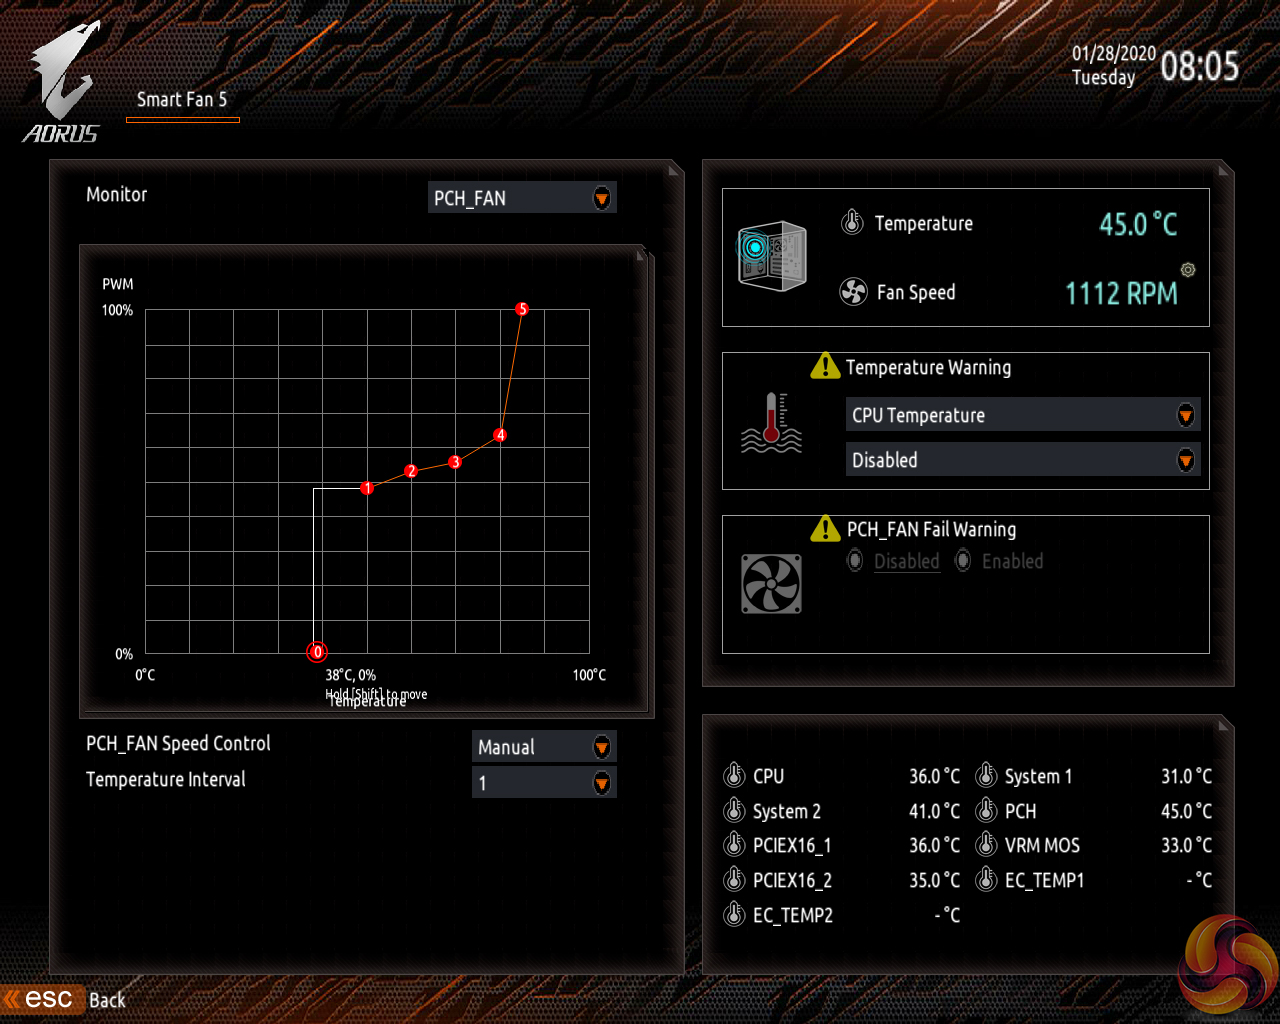
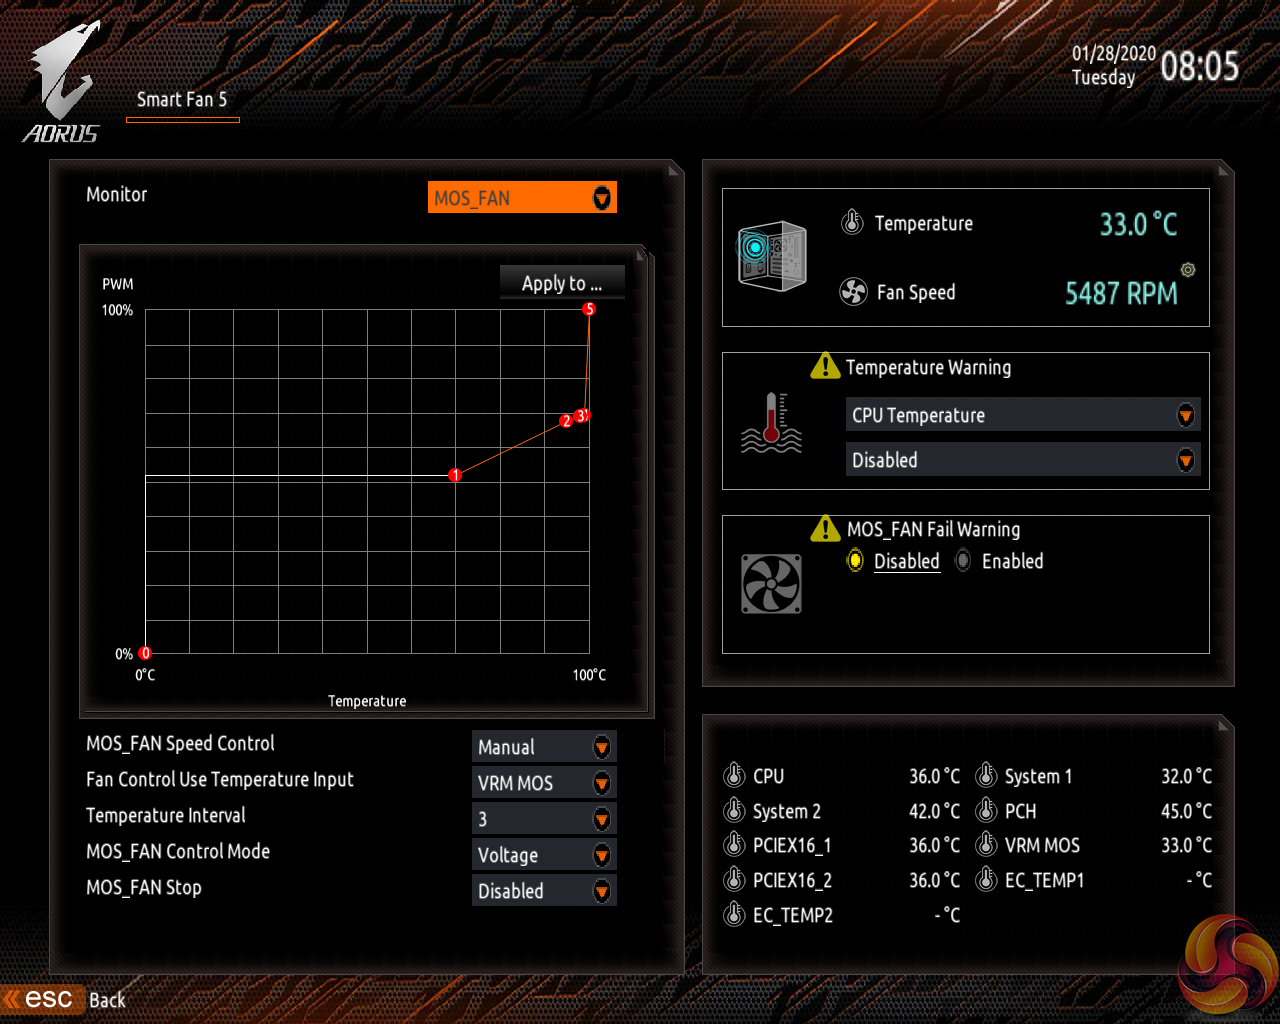
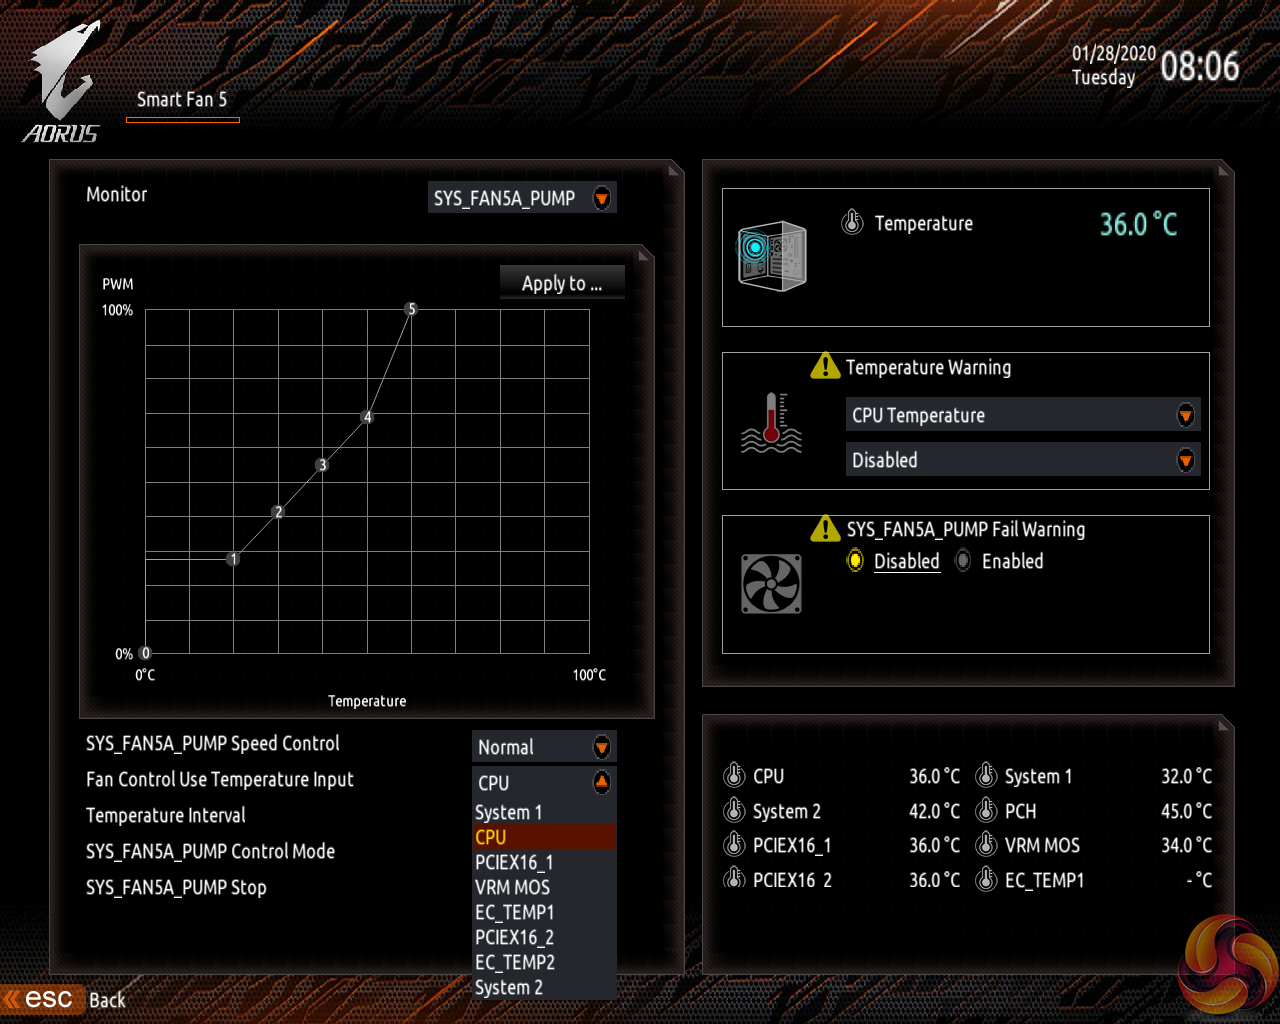
The Smart Fan 5 settings subsection can be accessed from any page by hitting the F5 key. This superb fan control system is the star of the show for Gigabyte’s UEFI.
All fan headers can be individually selected and their speed profiles can be tweaked. Gigabyte includes basic preset fan speed control settings and a choice of temperature monitoring points. The headers can also be set to PWM or Voltage (DC) mode at will, which is ideal for feeding continuous current to a watercooling pump or letting PWM fans adjust their own speed.
It’s the manual fan speed tweaking mode where Smart Fan 5 really shows its worth. Six points on a graph can be used to create the fan speed curve. A level as low as 0% PWM speed down to 0°C is also supported, meaning that you can set the fan to switch off if the system is operating at ambient, or elevated, temperature (provided the fan is able to stop itself spinning).
The temperature monitoring points for fan speed curves vary by motherboard but include: CPU, System 1, PCIe x16, VRM MOSFET, and External temperature sensor 1.
Not all the fan headers can interact with all monitoring points but this range of sensors is superb. A user should be able to comfortably set fan speed adjustments based on relevant data from the CPU, MOSFET, and PCIe slots.
The only noteworthy omission is a graphics card monitoring sensor. It would be good if Gigabyte fed data from its Aorus graphics cards, for example, through to the motherboard-controlled fan headers. PCIE readings in the UEFI relate to the actual slots, not the cards installed in them.
Gigabyte OS Software
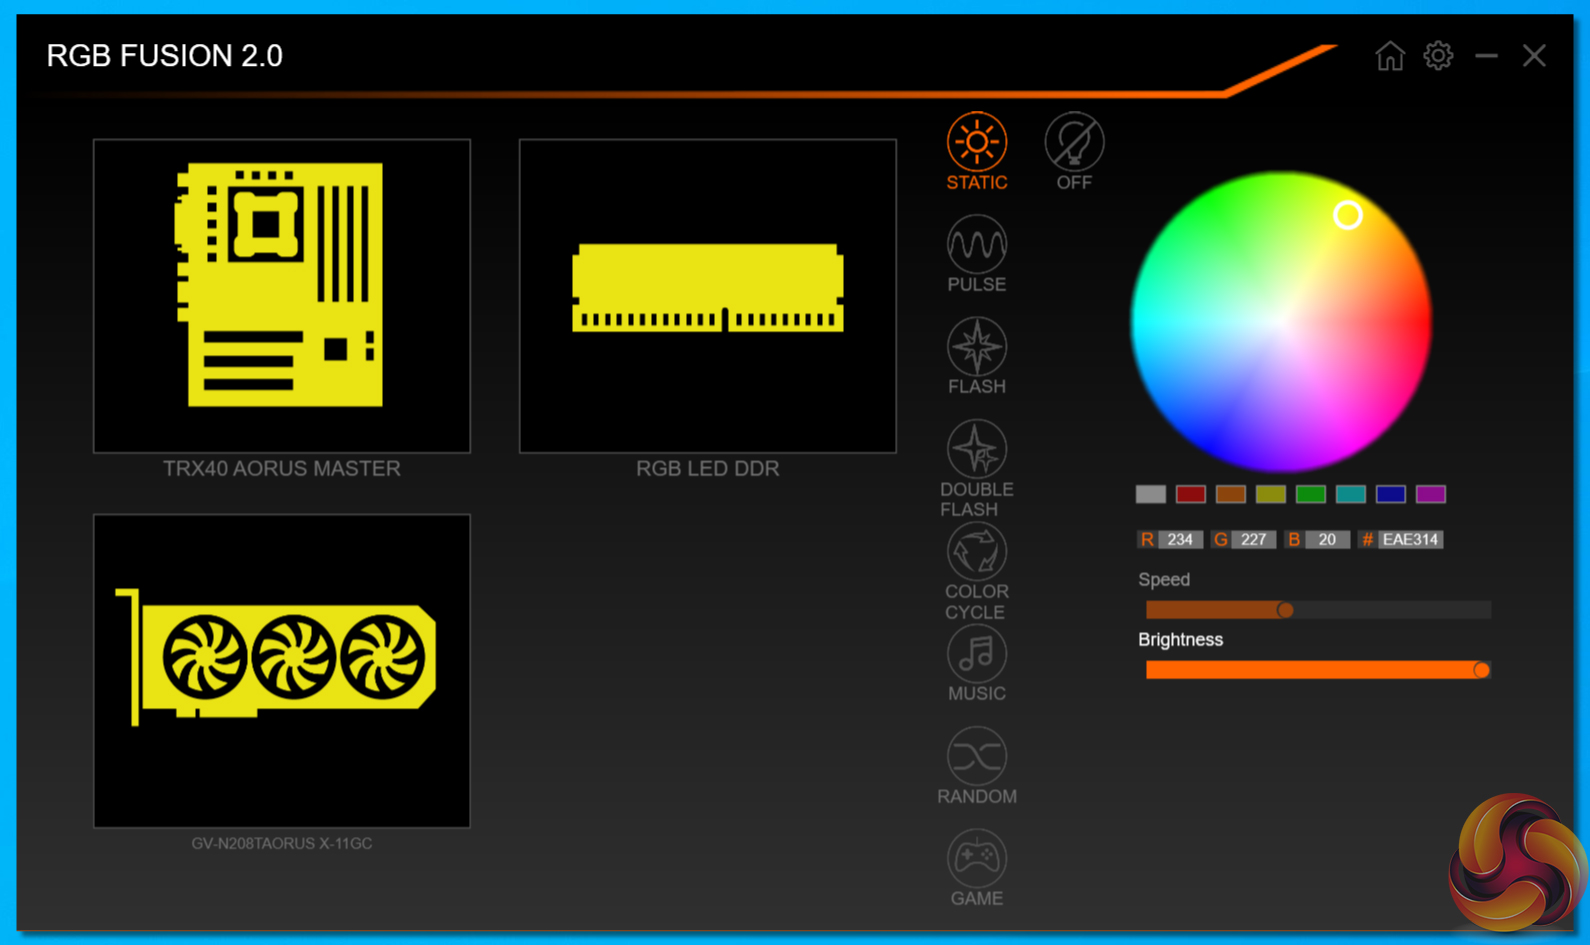
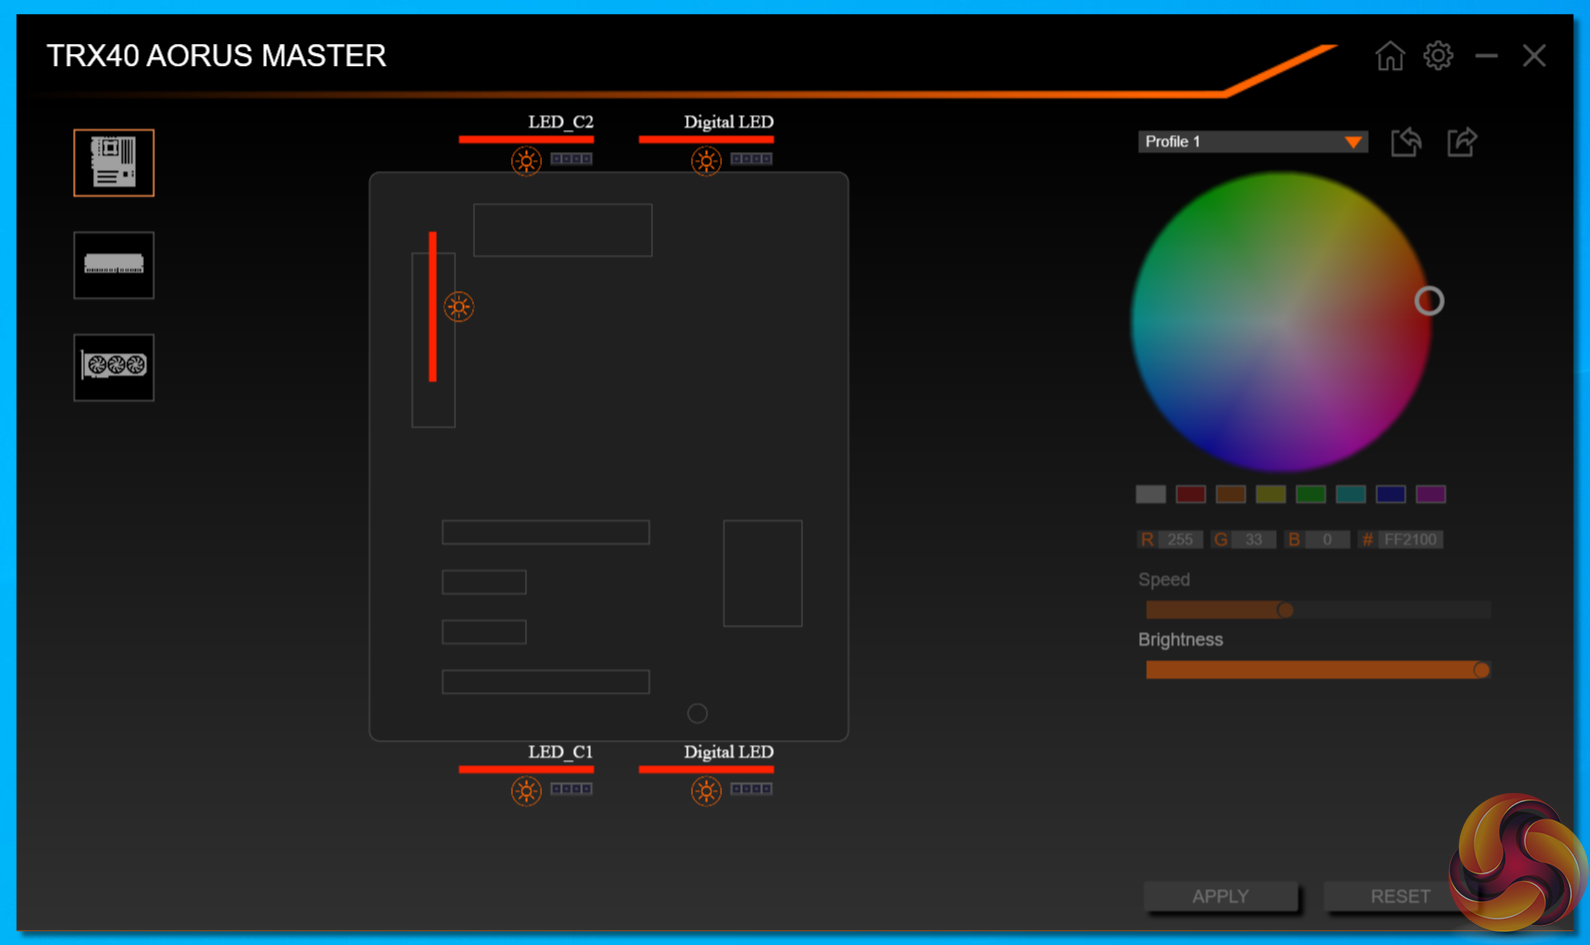
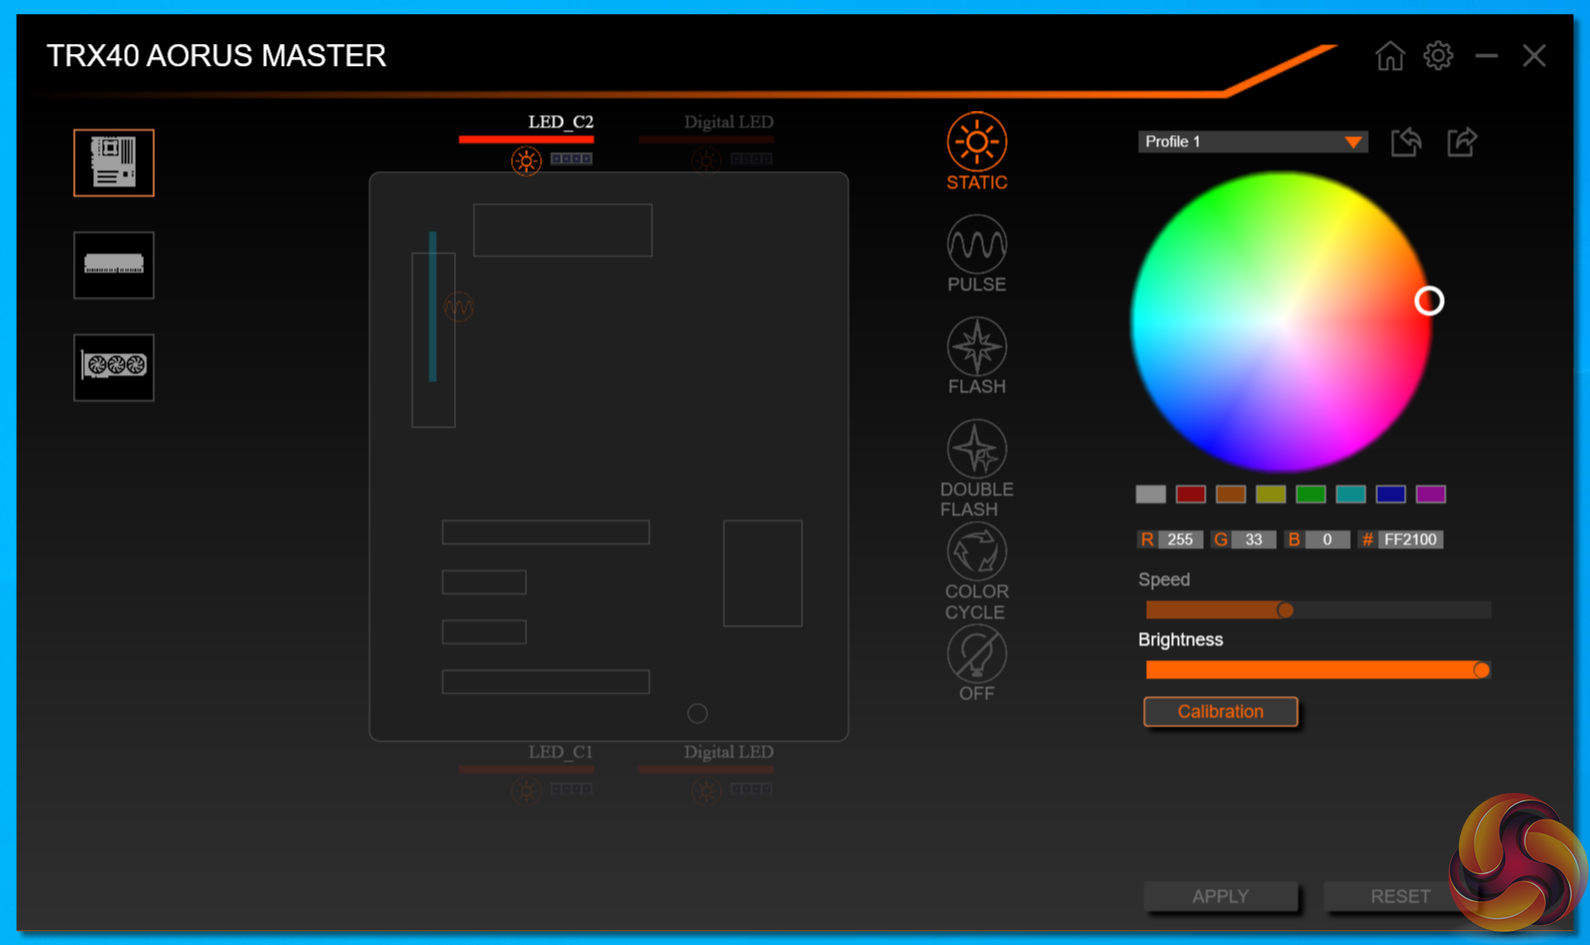
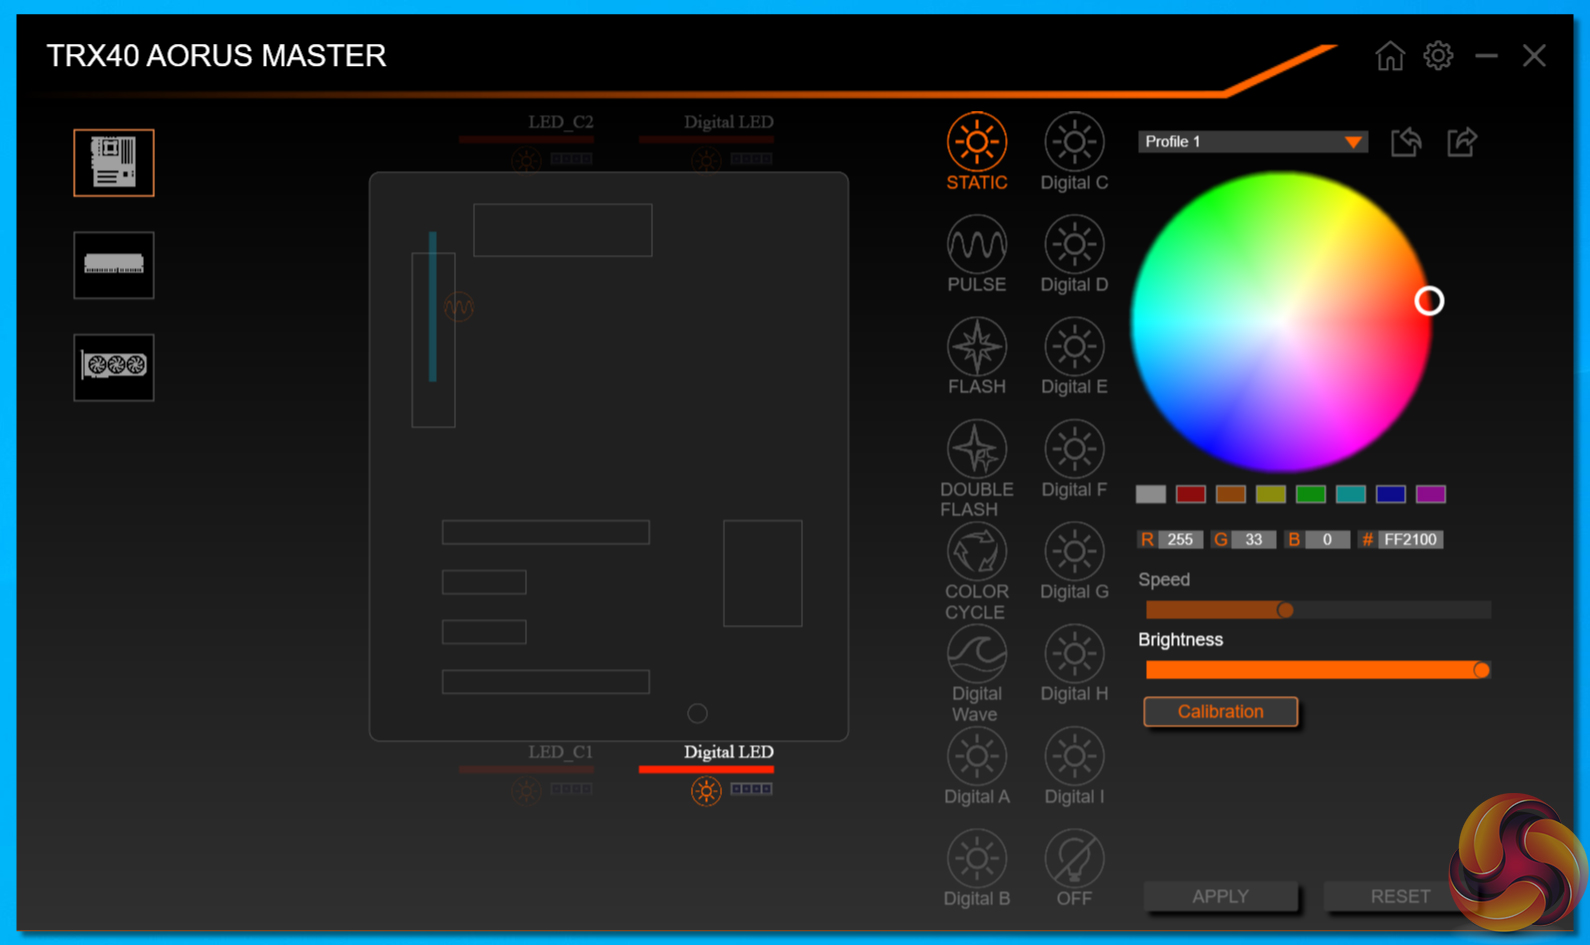
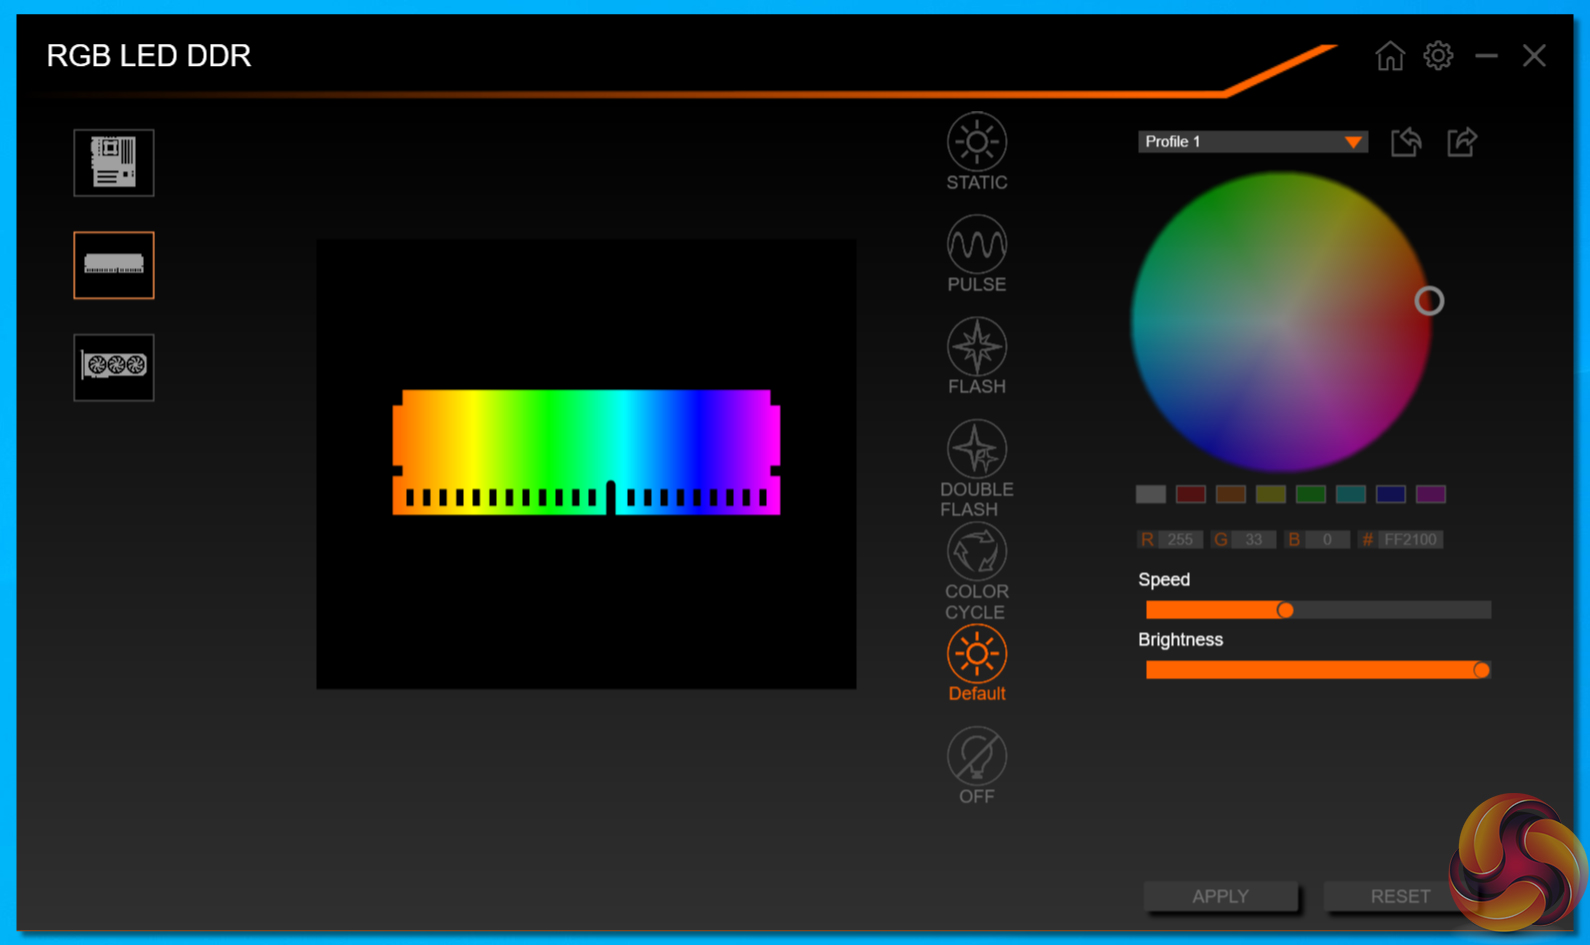
RGB Fusion 2.0 has a decent variety of LED operating modes and the colour wheel is incredibly simple to use. It is good to see that Gigabyte provides individual control to the separate lighting zones on the motherboard itself.
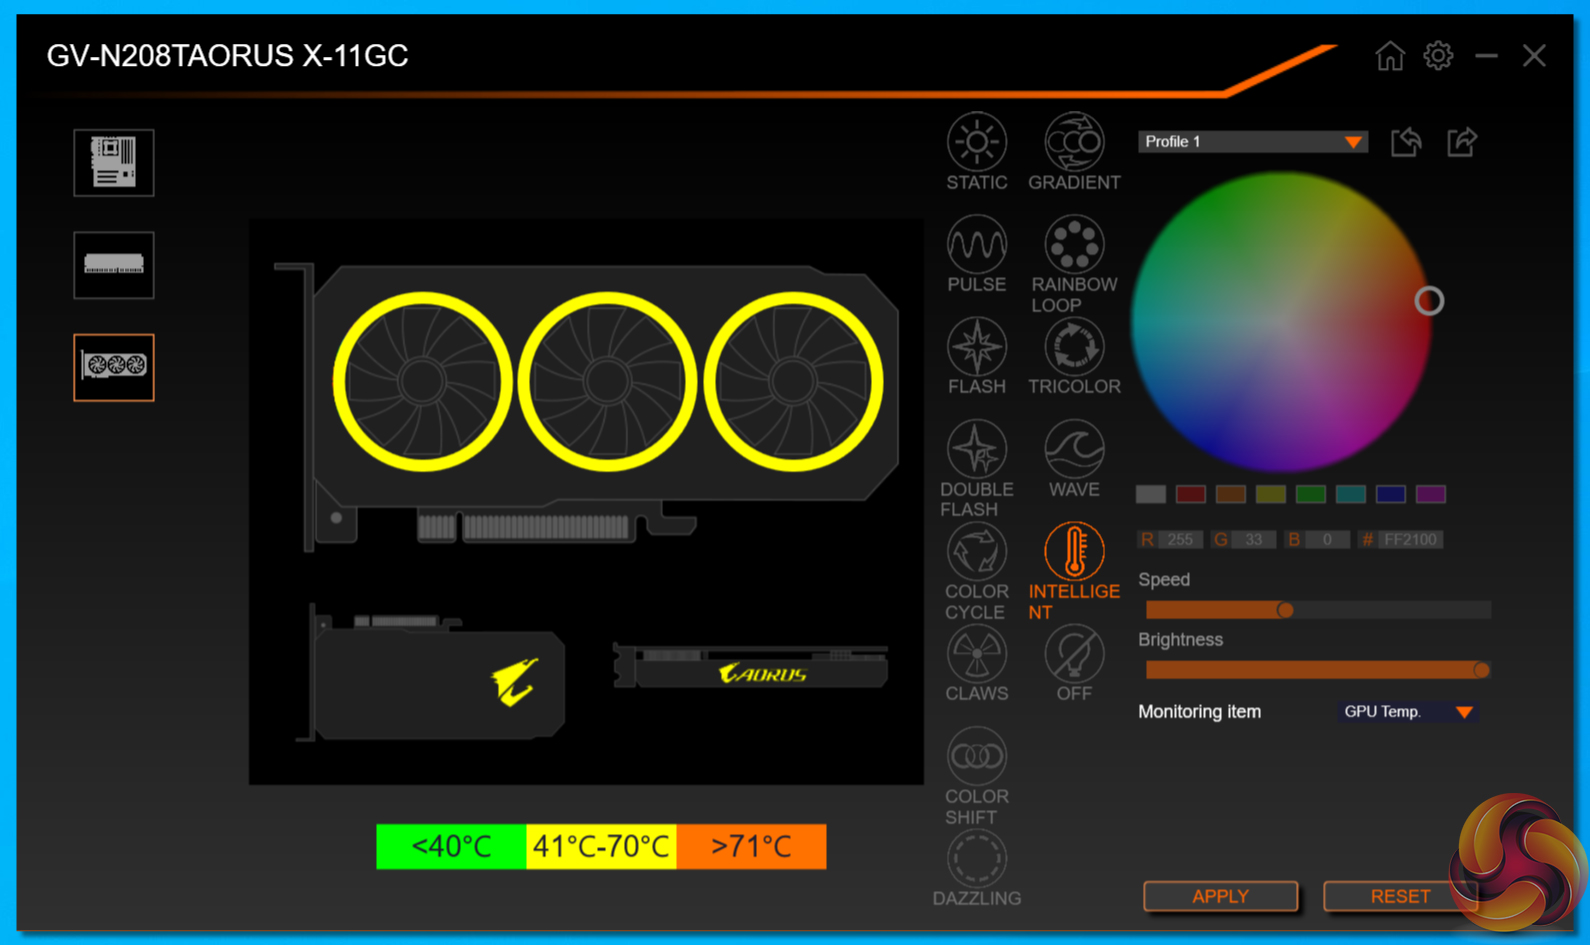
Another area where RGB Fusion 2.0 is particularly strong is its integration and control ability with other Gigabyte Aorus hardware. We were able to control our Aorus RTX 2080 Ti Xtreme graphics card with ease, allowing coherence between the lighting modes.
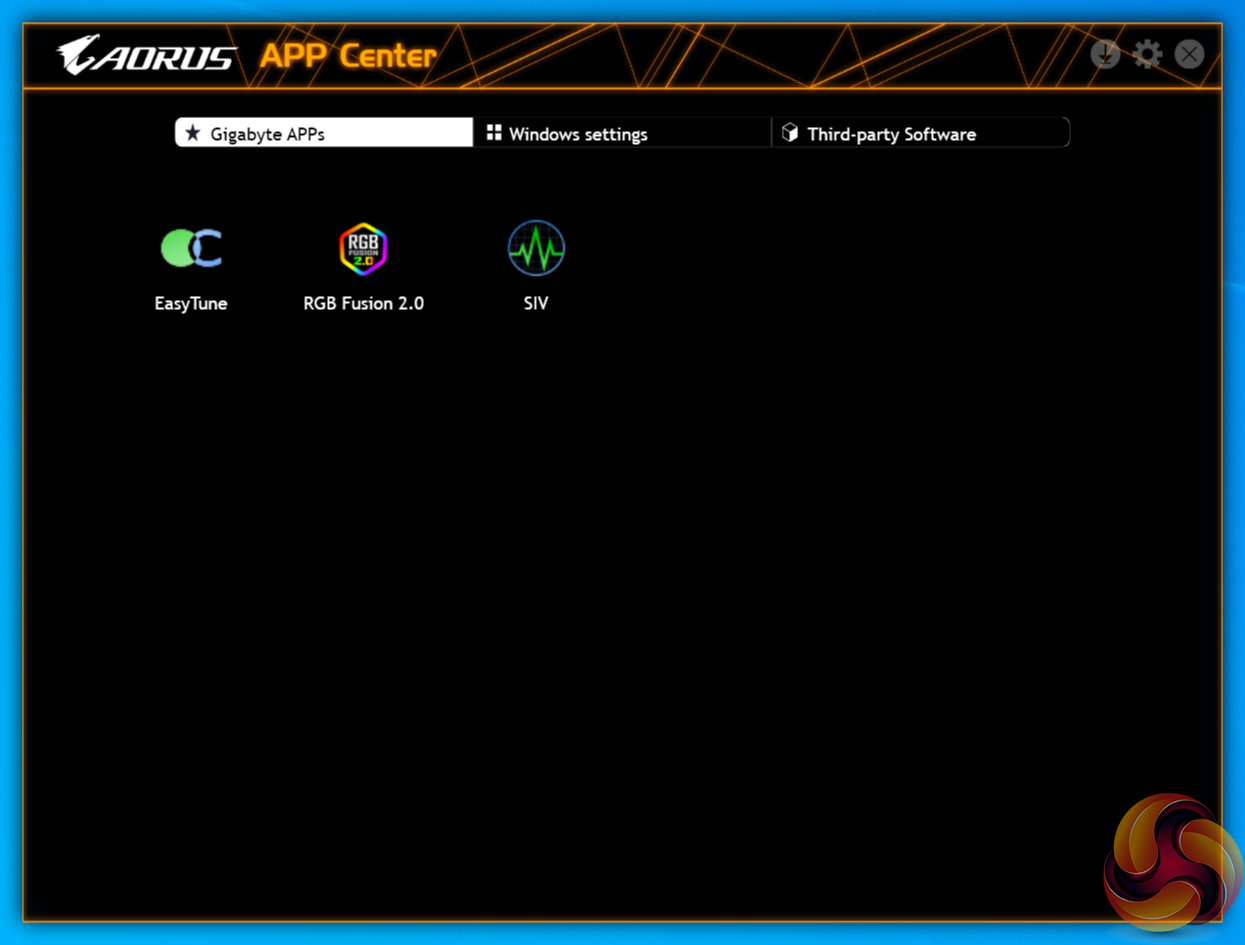
Gigabyte makes a vast number of software utilities available for installation with its motherboards. Thankfully, not all the tools have to be installed and APP Center is a very good method of managing the selected software, as well as third-party apps and Windows settings.
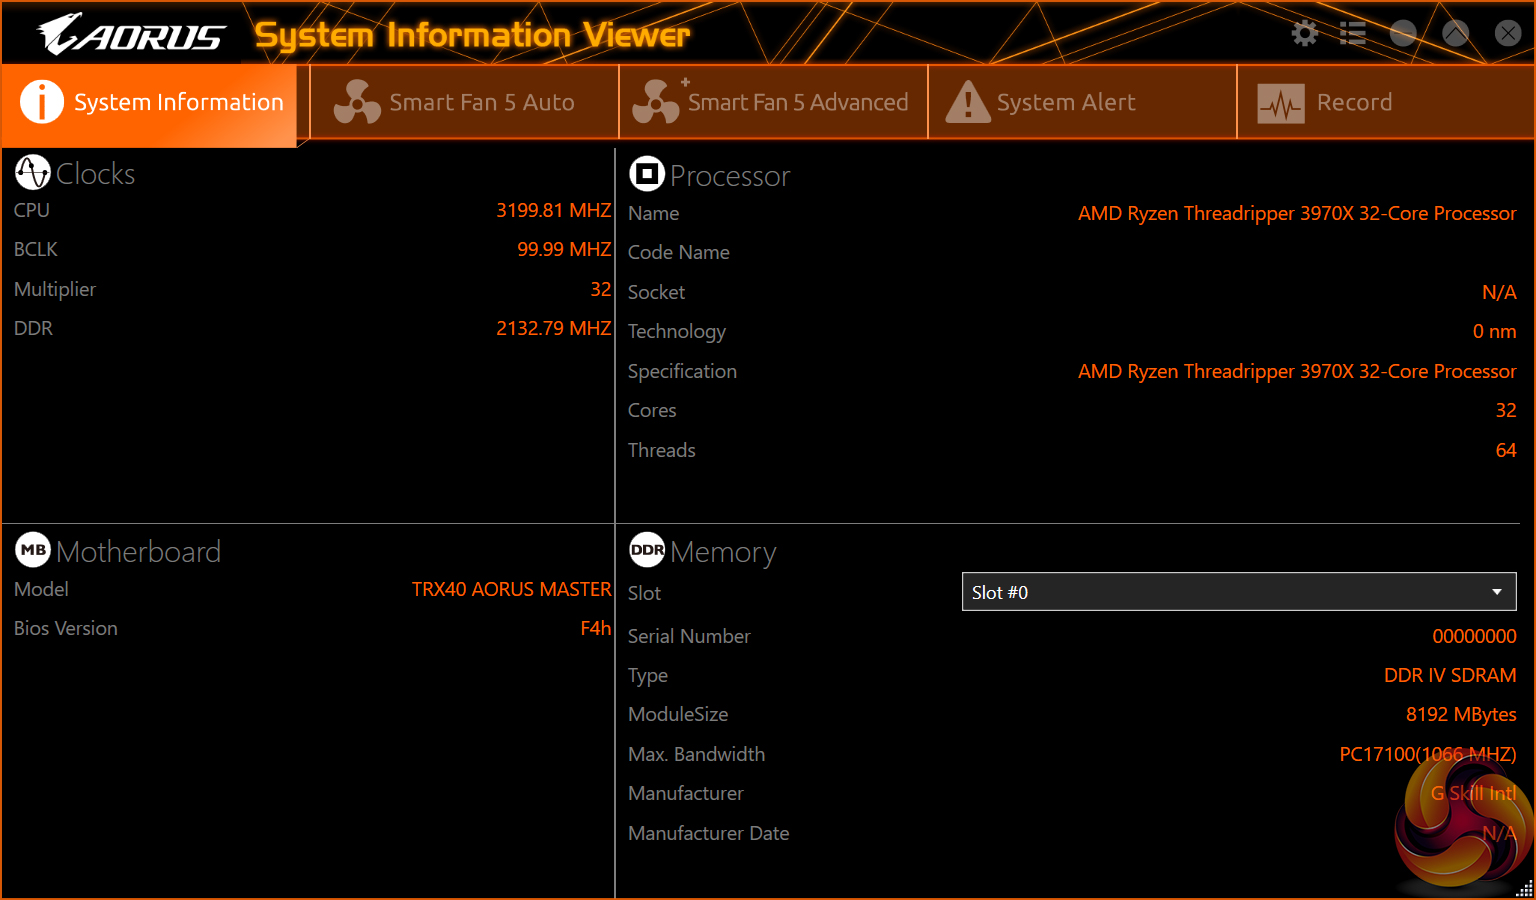
System Information Viewer (SIV) is a similar setup to EasyTune but it is geared towards fan control and system monitoring. System recordings relating to voltages, temperatures, and fan speeds can also be made.
This is particularly useful for analysing stability in the form of checking how your system behaves during an extended gaming or video rendering session, for example.
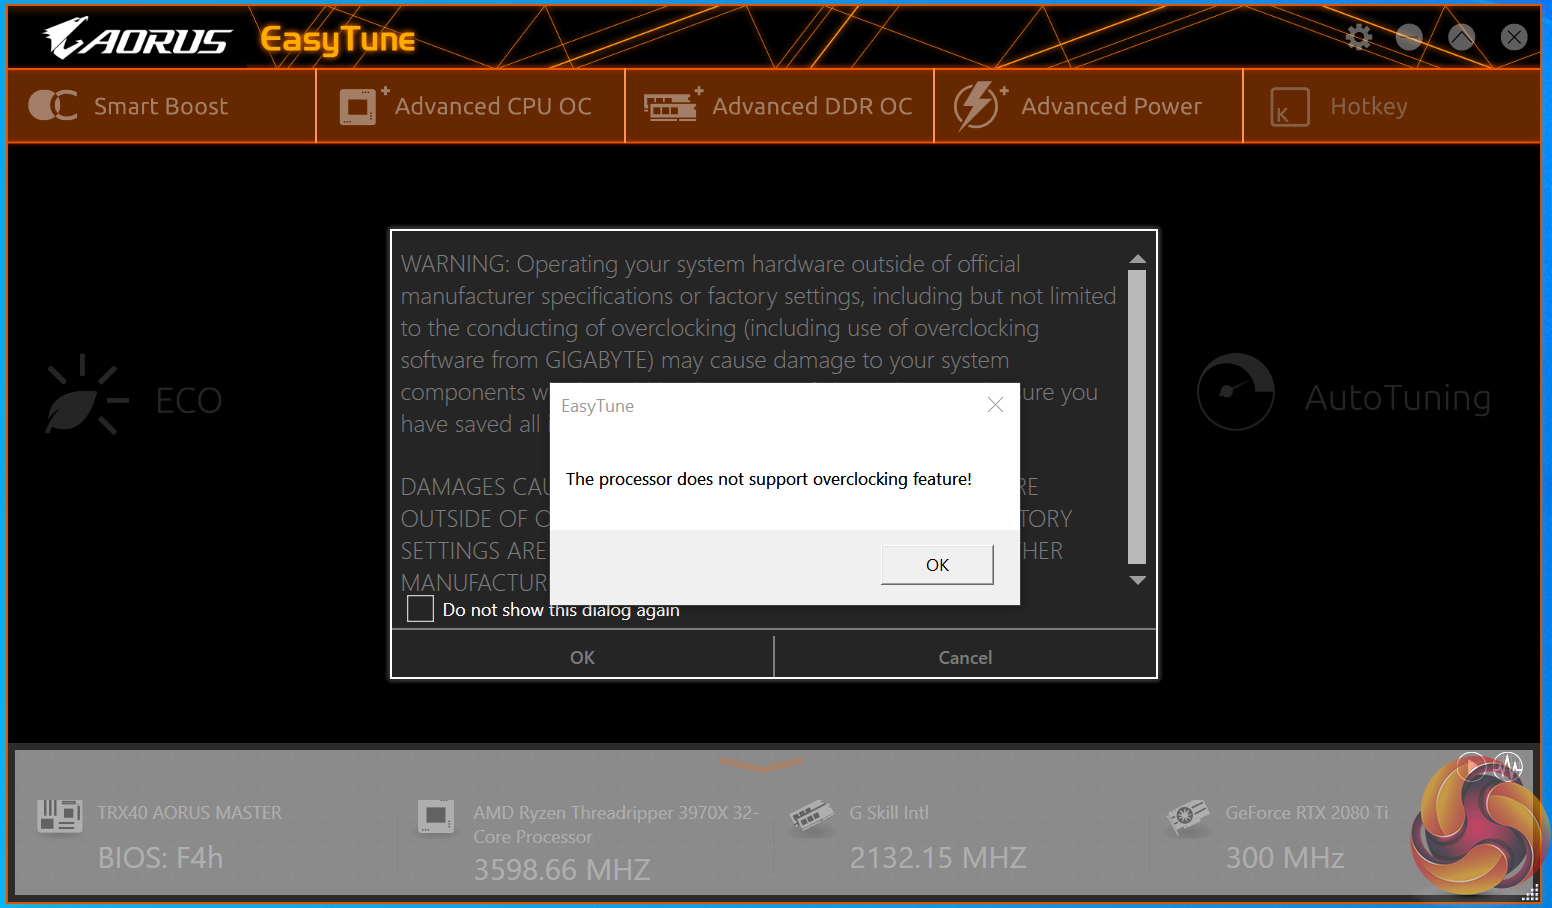
Unfortunately, EasyTune did not seem to work during our testing.
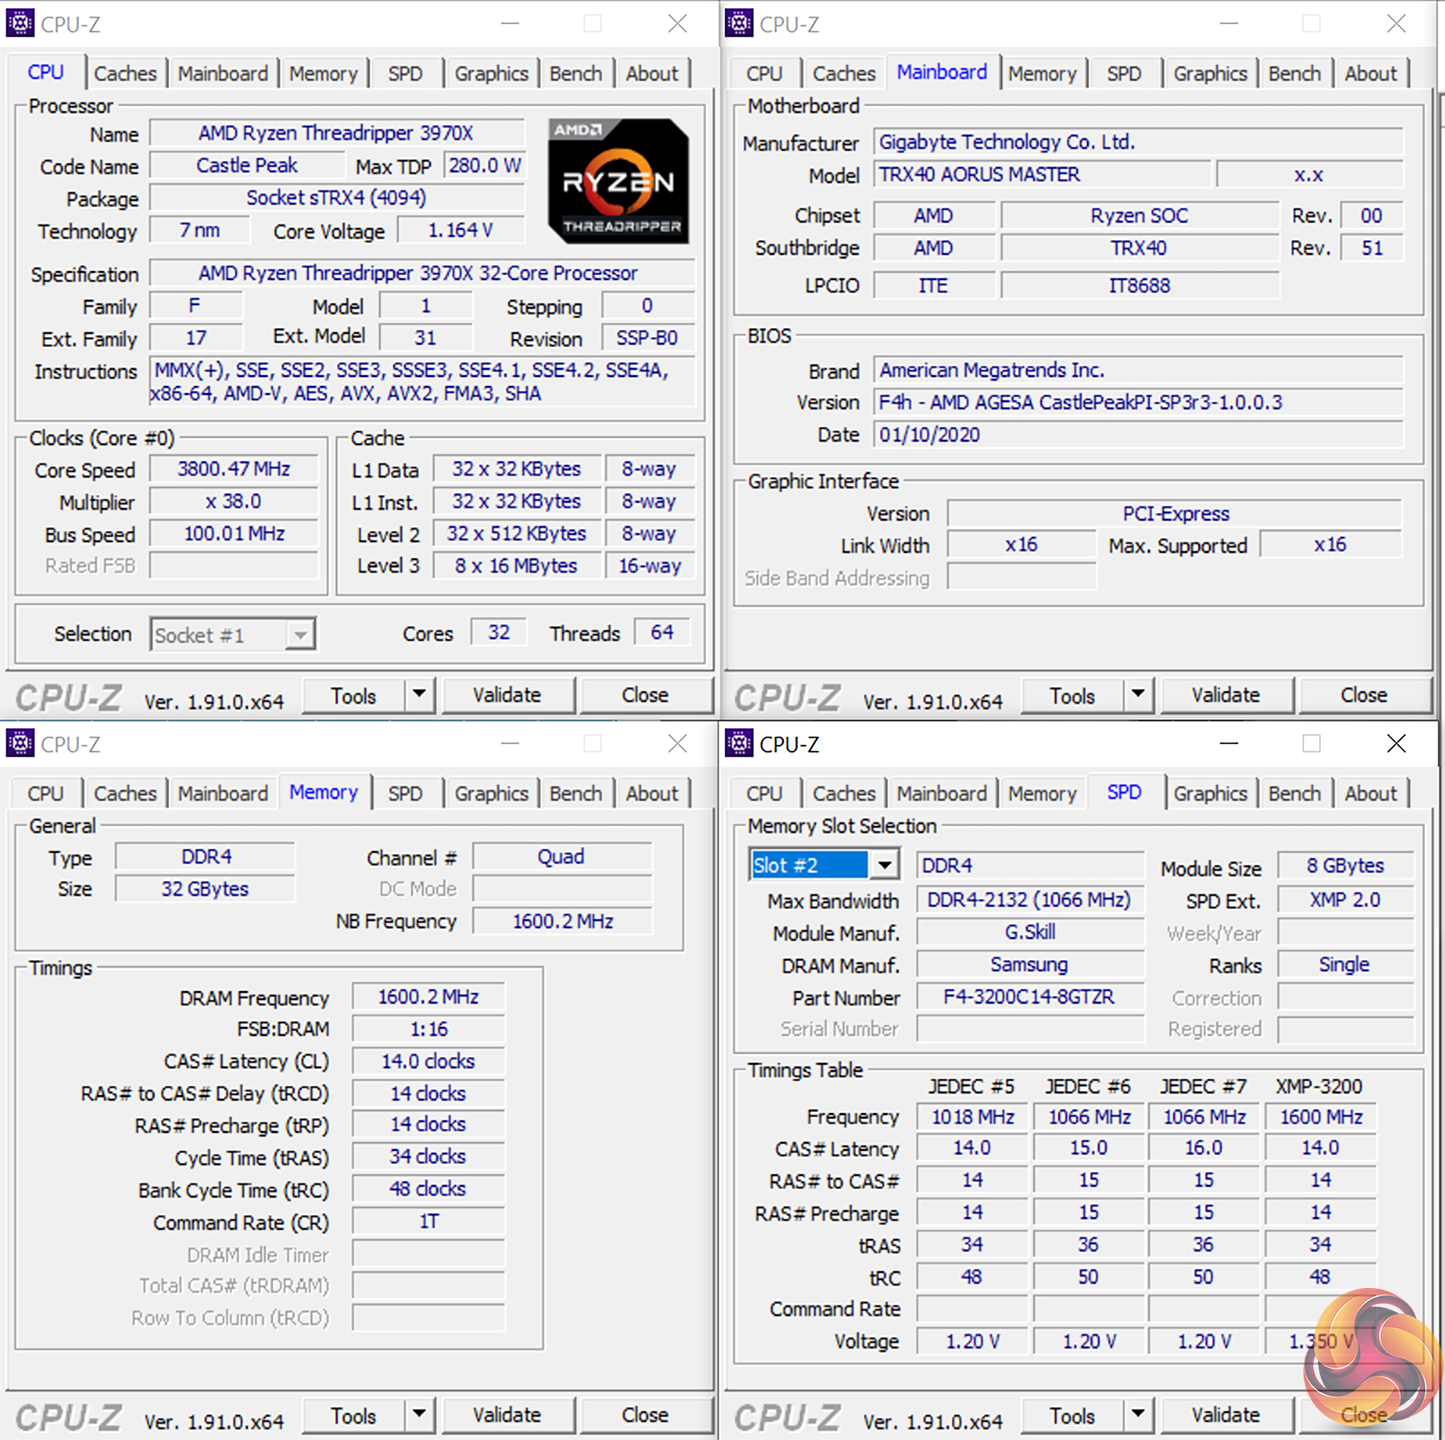
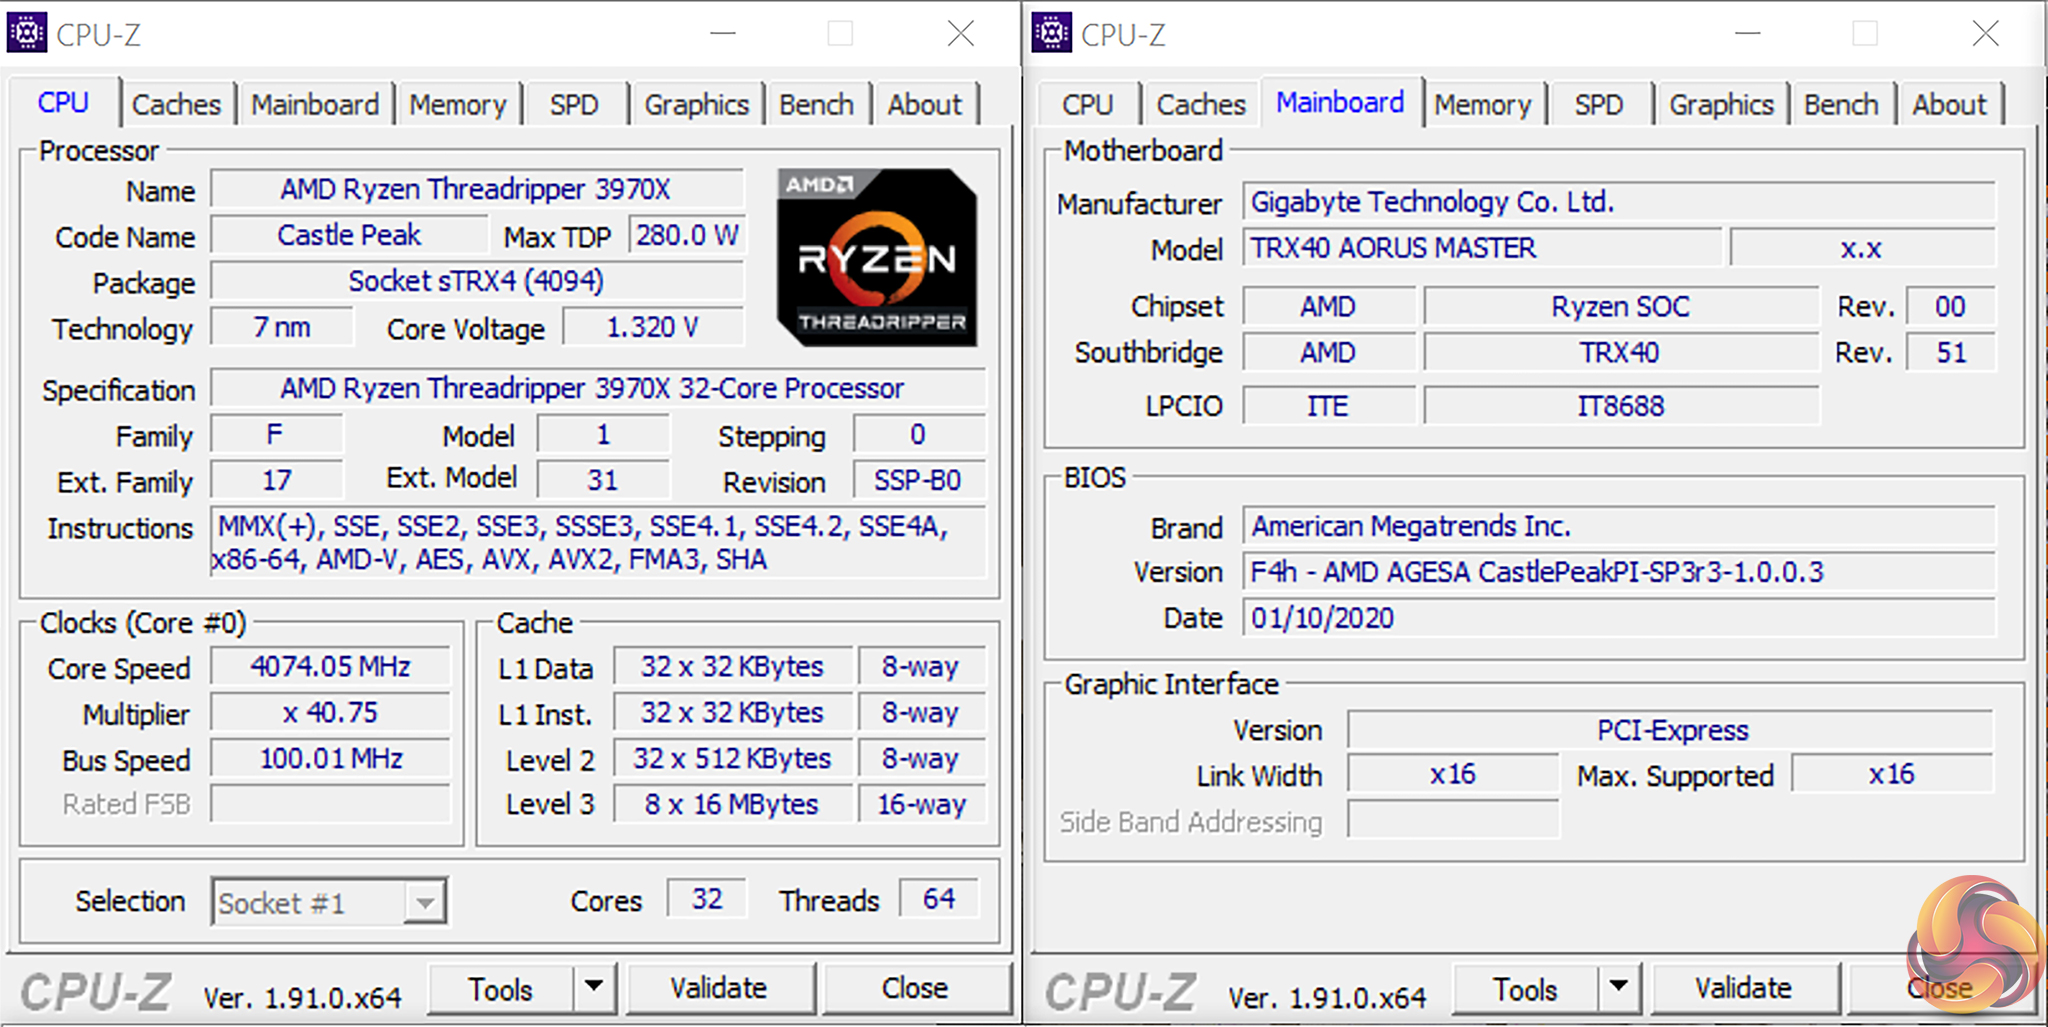
We will be outlining the Gigabyte TRX40 Aorus Master motherboard’s performance with the AMD Ryzen Threadripper 3970X CPU, 32GB of 3200MHz DDR4 memory, and an Aorus RTX 2080 Ti XTREME graphics card.
TRX40 Motherboard Test System:
- Processor: AMD Ryzen Threadripper 3970X.
- Memory: 32GB (4x8GB) G.SKILL 3200MHz CL14 DDR4 @ 1.35V.
- Graphics Card: Gigabyte Aorus RTX 2080 Ti XTREME 11G (custom fan curve to eliminate thermal throttling).
- System Drive: WD Black SN750 500GB.
- Test SSD: Gigabyte Aorus PCIe Gen 4 2TB.
- Games SSD: Crucial MX300 750GB.
- CPU Cooler: Cooler Master Wraith Ripper (full speed fans to eliminate thermal throttling).
- Power Supply: Seasonic Prime TX-1000 80Plus Titanium 1000W.
- Operating System: Windows 10 Pro 64-bit 1909 Update.
Drivers and UEFI:
- Gigabyte TRX40 Aorus Master BIOS F4h [AGESA 1.0.0.3] (latest at the time of testing).
Comparison Motherboards:
- ASRock TRX40 Creator (BIOS 1.10).
- ASUS ROG STRIX TRX40-E Gaming (BIOS 0602).
- ASUS ROG Zenith II Extreme (BIOS 0601).
Tests:
- Cinebench R20 – All-core & single-core CPU benchmark (CPU), Stress test (Temperatures & Power Consumption)
- Blender 2.81a – All-core rendering of the BMW and Classroom benchmark (CPU), Stress test (Temperatures & Power Consumption)
- 7-Zip v19 – Built-in 7-Zip benchmark test (CPU & Memory)
- SiSoft Sandra – Memory bandwidth (Memory)
- AIDA64 – Memory bandwidth, memory latency (Memory)
- 3DMark TimeSpy – Time Spy (1440p) test (Gaming)
- Deus Ex: Mankind Divided – Built-in benchmark tool, 1920 x 1080, Ultra quality preset, no AA, DX12 version (Gaming)
- Shadow of the Tomb Raider – Built-in benchmark tool, 1920 x 1080, Highest quality preset, no AA, DX12 version (Gaming)
- CrystalDiskMark– Storage transfer rates (Motherboard)
- Rightmark Audio Analyzer – Record and playback test using a line-in to line-out loopback with a 3.5mm audio cable (Motherboard)
- HWiNFO – System sensor monitoring during stress test (Temperatures & Power Consumption)
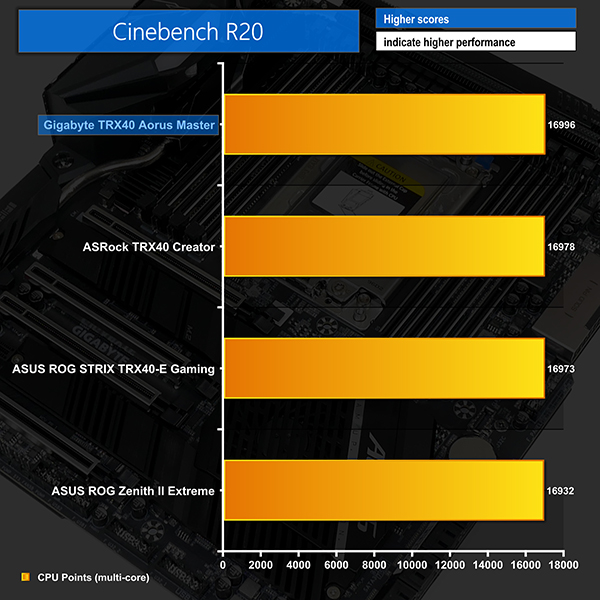
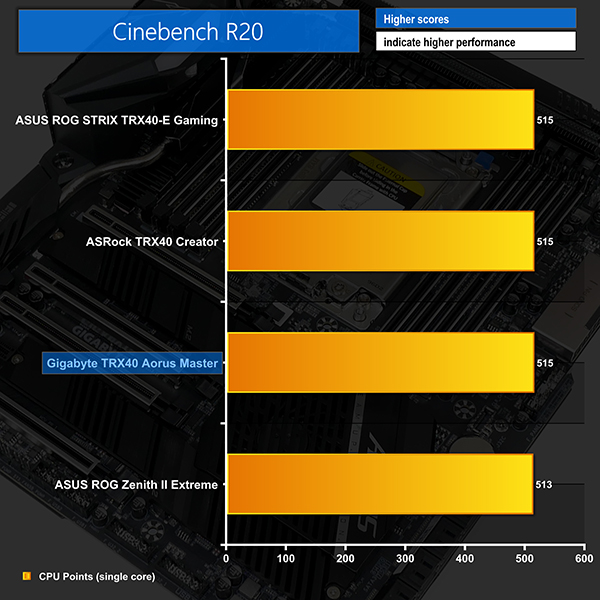
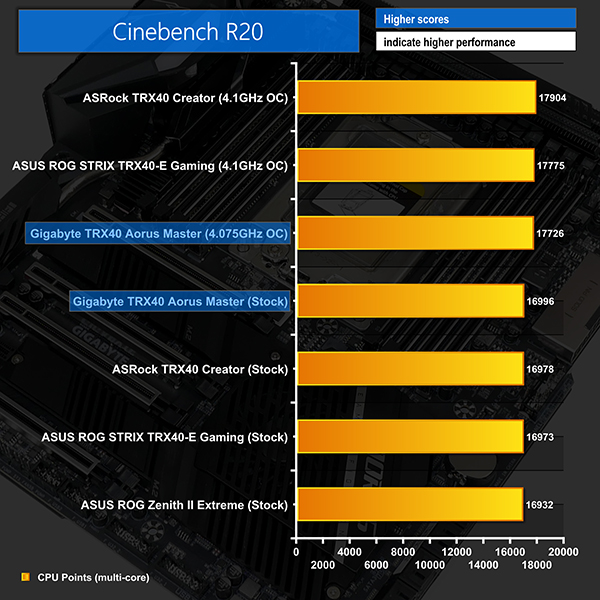
Cinebench R20
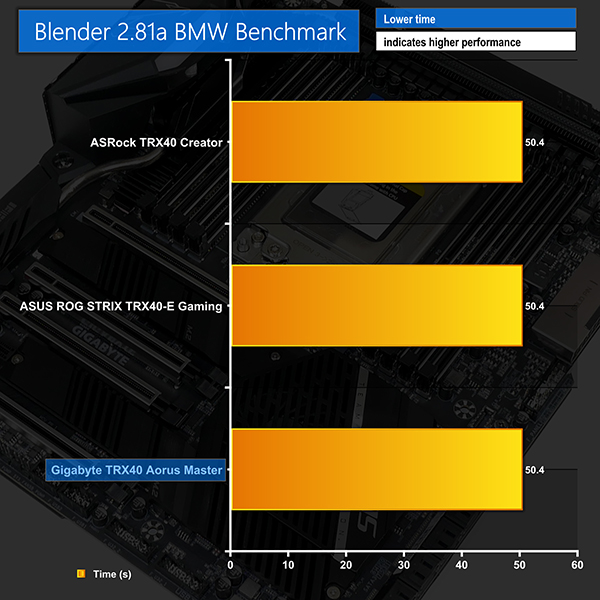
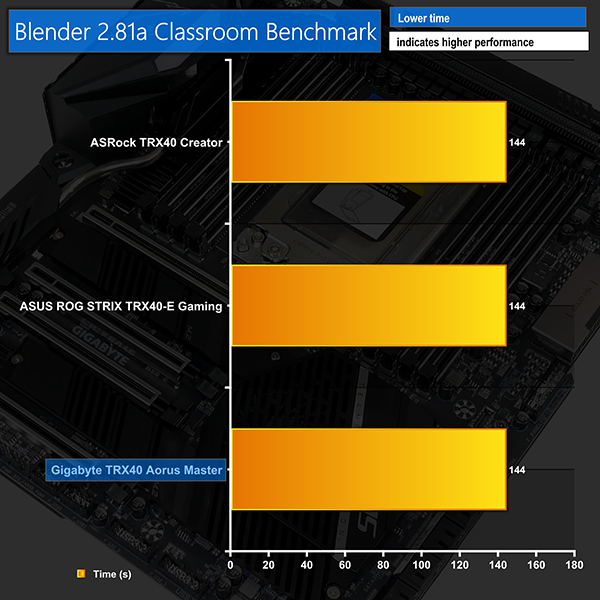
Blender BMW & Classroom Benchmarks
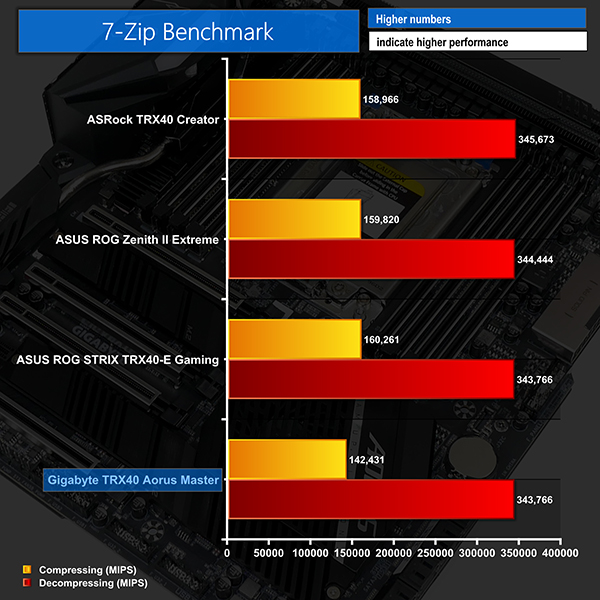
7-Zip
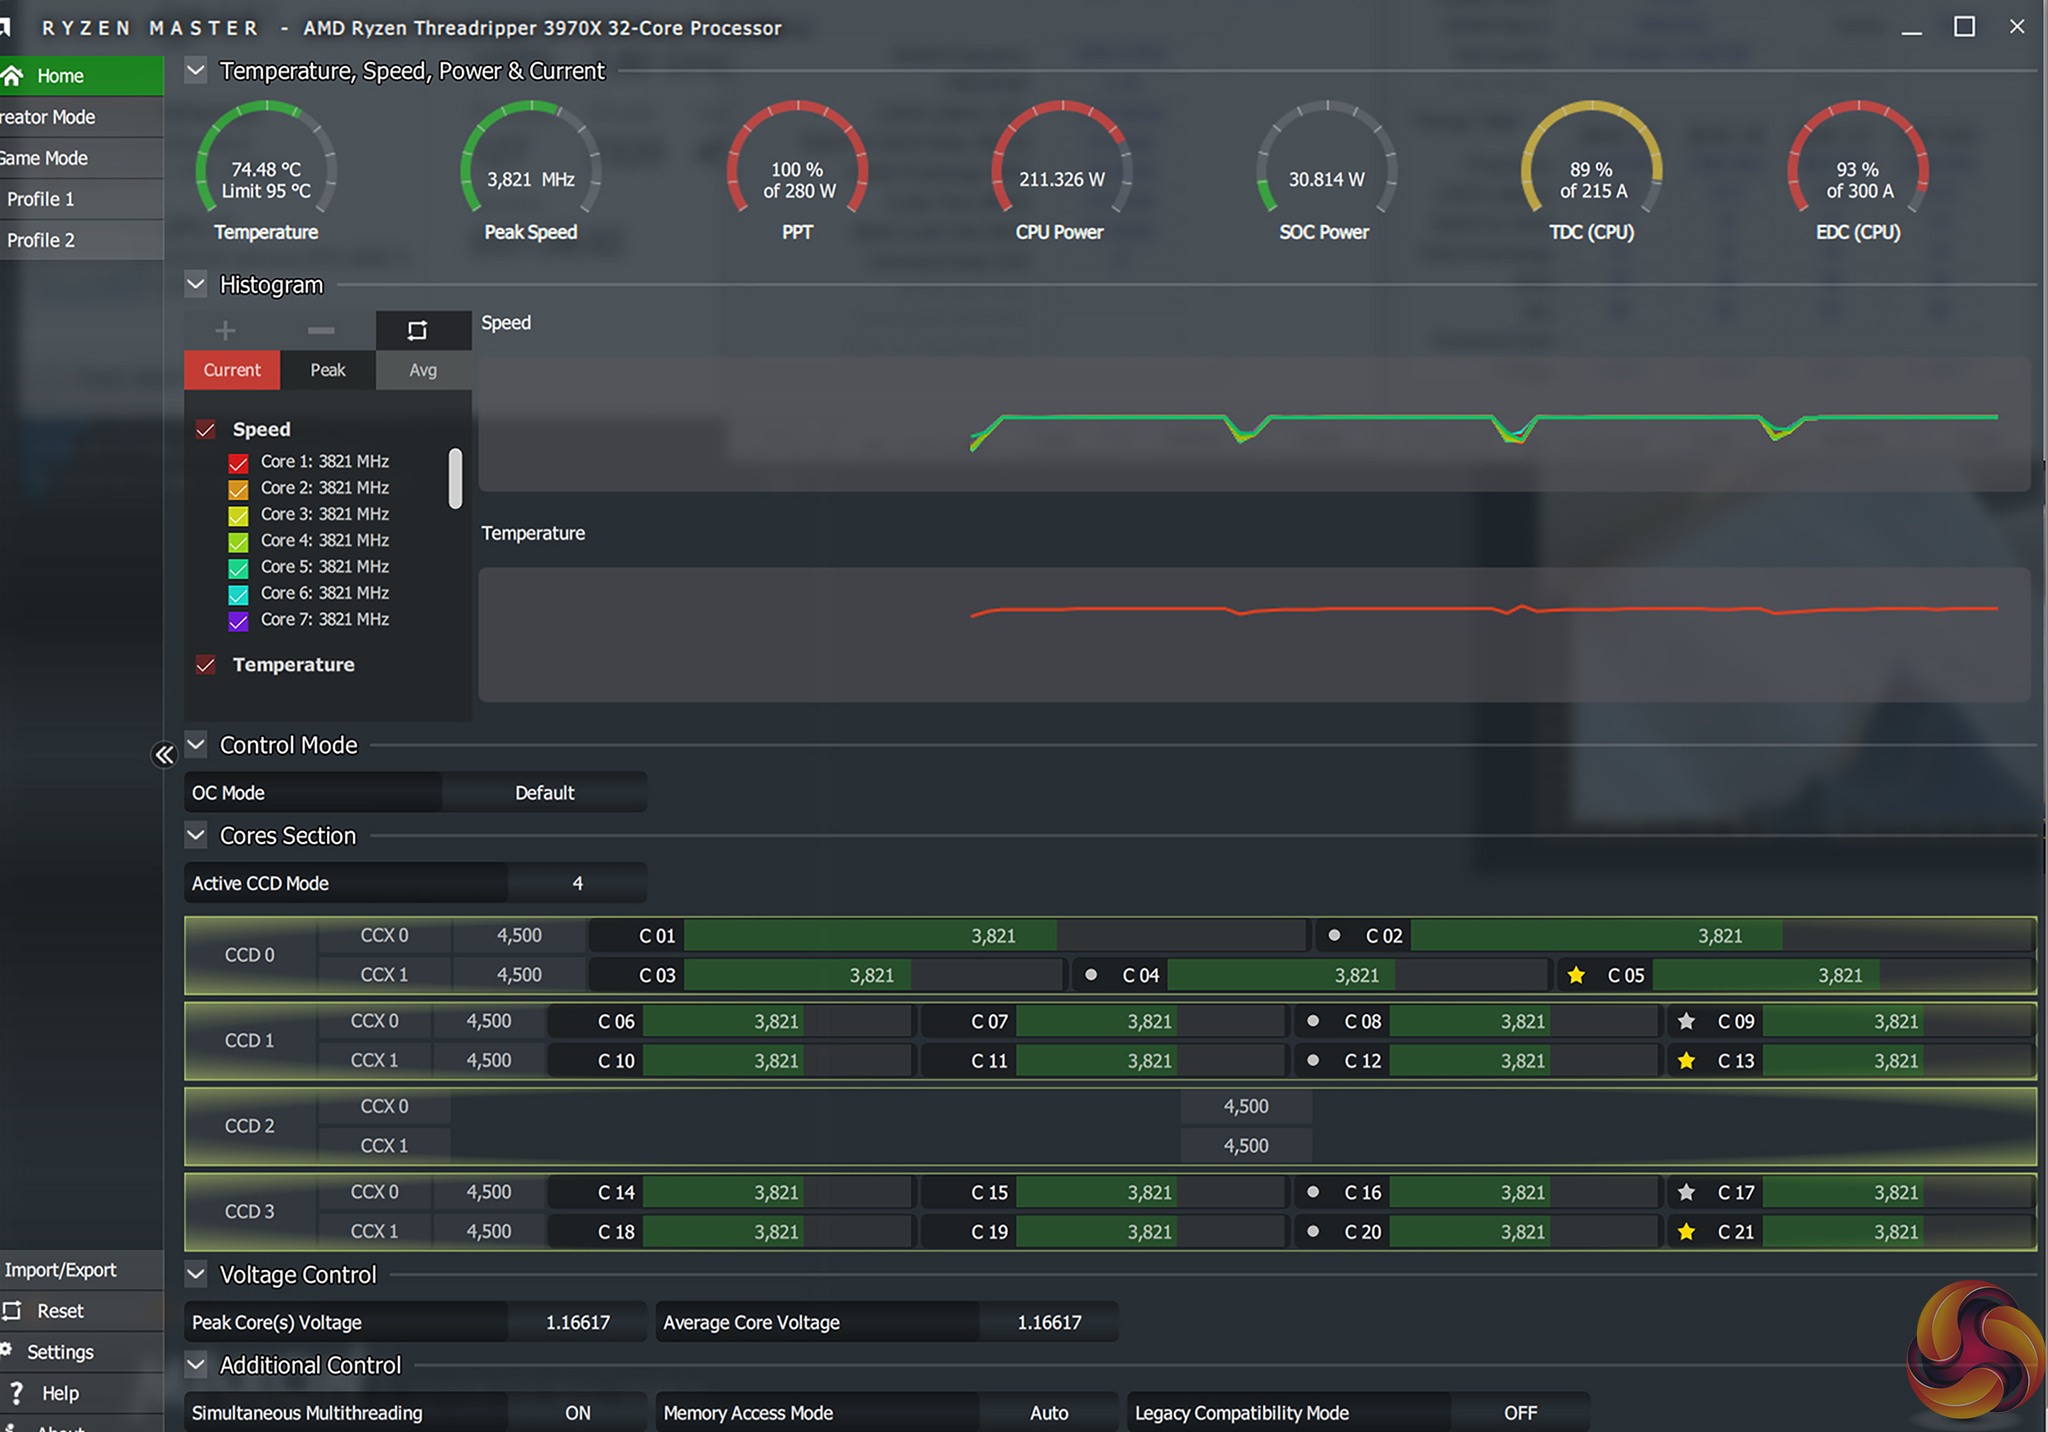
CPU performance from the Gigabyte TRX40 Aorus Master was as good as competing TRX40 motherboards, if not a little faster (albeit with very minor victories). All-core frequencies were around 3.875GHz in Cinebench R20 nT while the single-threaded test confirmed that the maximum boost clocks of 4.5GHz were being achieved.
Blender also showed perfectly competent performance from the Gigabyte motherboard with its results matching those of ASUS and ASRock competitors. All-core frequencies in Blender hovered around 3825MHz on average.
Gigabyte TRX40 Aorus Master is as fast as competitors in terms of 7-Zip’s decompressing numbers, but it is noticeably slower on the compressing front. This is an early indicator that system memory bandwidth is reduced versus that competing solutions as it is a critical factor in 7-Zip’s performance.
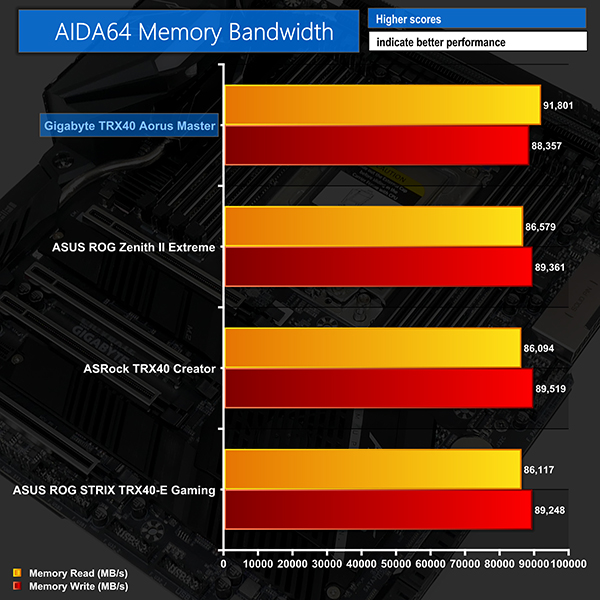
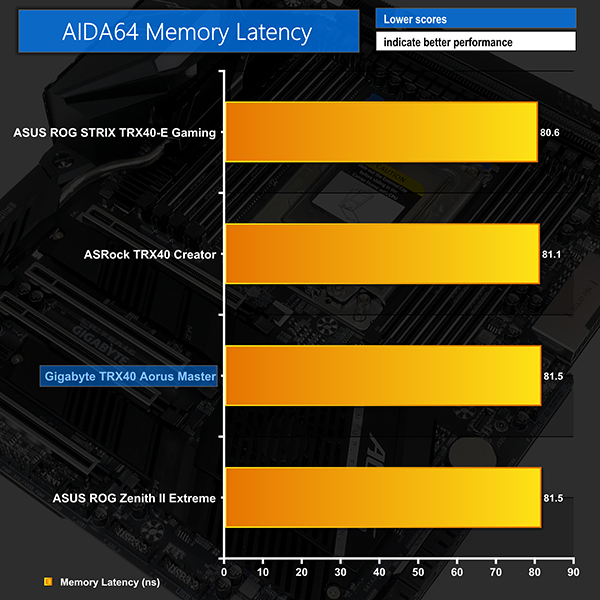
AIDA64 Engineer
Sandra Memory Bandwidth
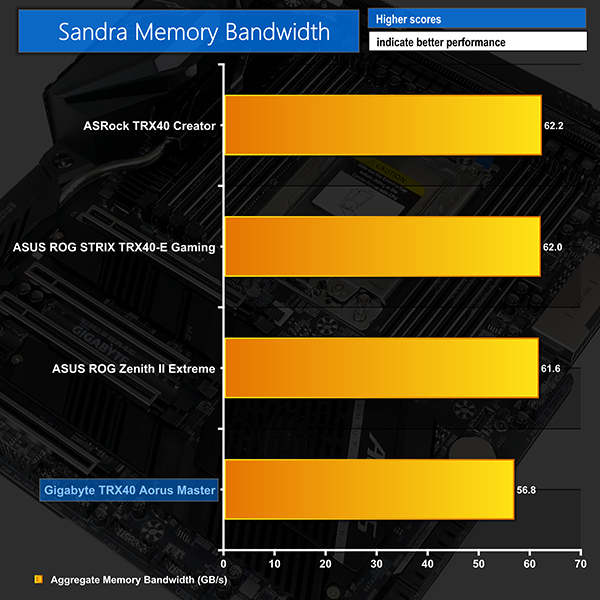
Gigabyte’s memory bandwidth scores register a little higher than the ASRock and ASUS competitors in AIDA64 especially when focusing on the read result. However, when we switch focus to SiSoft Sandra’s test, we see the Gigabyte board drop to the bottom of the chart. This looks to be a key explanation for the lacklustre 7-Zip compression performance result.
The AIDA64 memory latency test shows no real cause for concern from the TRX40 Aorus Master.
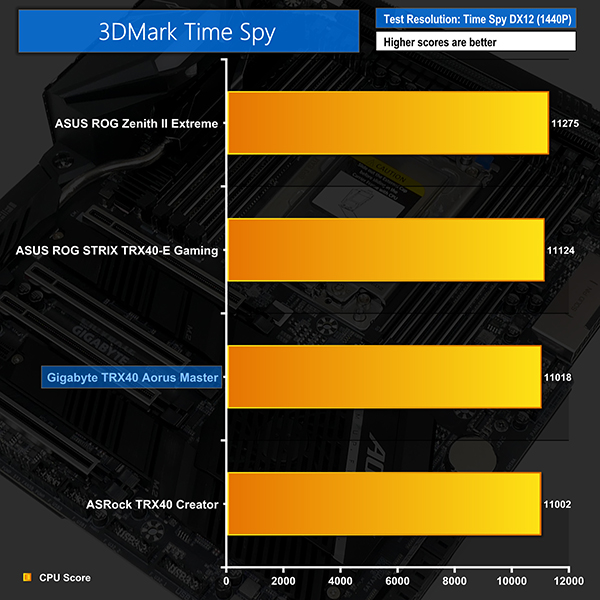
3DMark
3DMark is a multi-platform hardware benchmark designed to test varying resolutions and detail levels of 3D gaming performance. We run the Windows platform test and in particular the Time Spy benchmark, which is indicative of high-end 1440p PC Gaming.
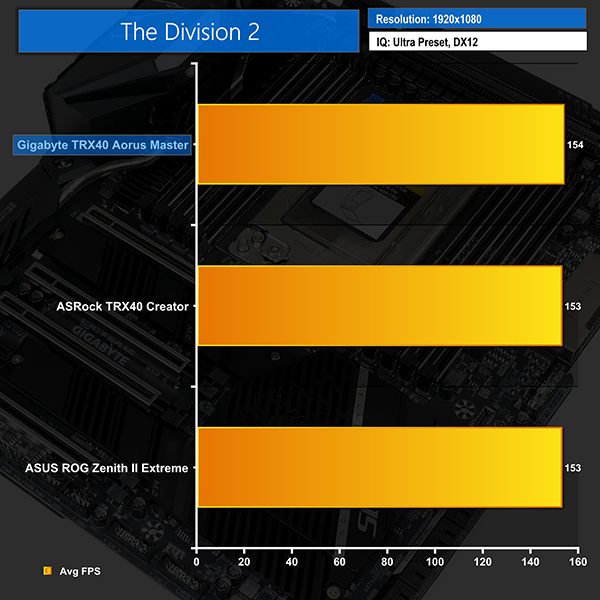
The Division 2
We use the game’s built-in benchmark with quality set to Ultra, VSync disabled, and DX12 mode.
Shadow of the Tomb Raider
We run the built-in benchmark using the DirectX 12 mode, anti-aliasing disabled, and the Highest quality preset.
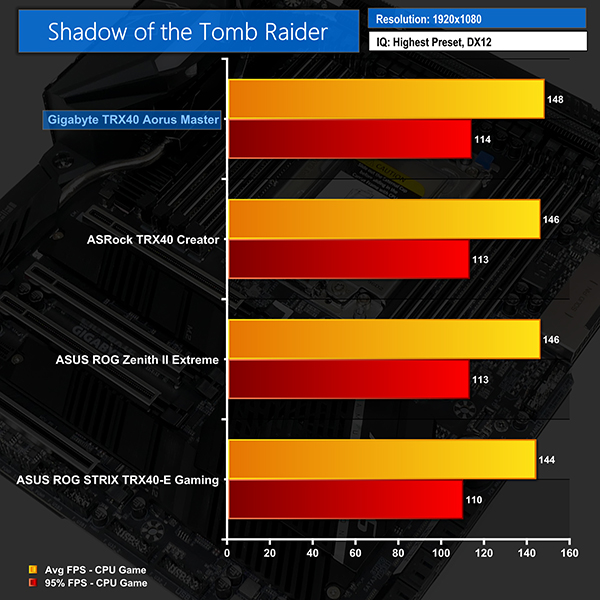
The margins in gaming performance between motherboards are slim, but Gigabyte does consistently outperform its competitors by small, repeatable amounts. This is most notable in Shadow of the Tomb Raider whereby the TRX40 Aorus Master’s average and 95% CPU FPS values are chart-topping.
You should not expect to put yourself in a new tier of gaming performance using the TRX40 Aorus Master. However, the gaming results we have seen are repeatably strong from Gigabyte’s offering.
M.2 PCIe Performance
We test M.2 PCIe performance using an Aorus PCIe Gen 4 2TB SSD. This SSD uses a Phison-based PCIe Gen 4 controller.
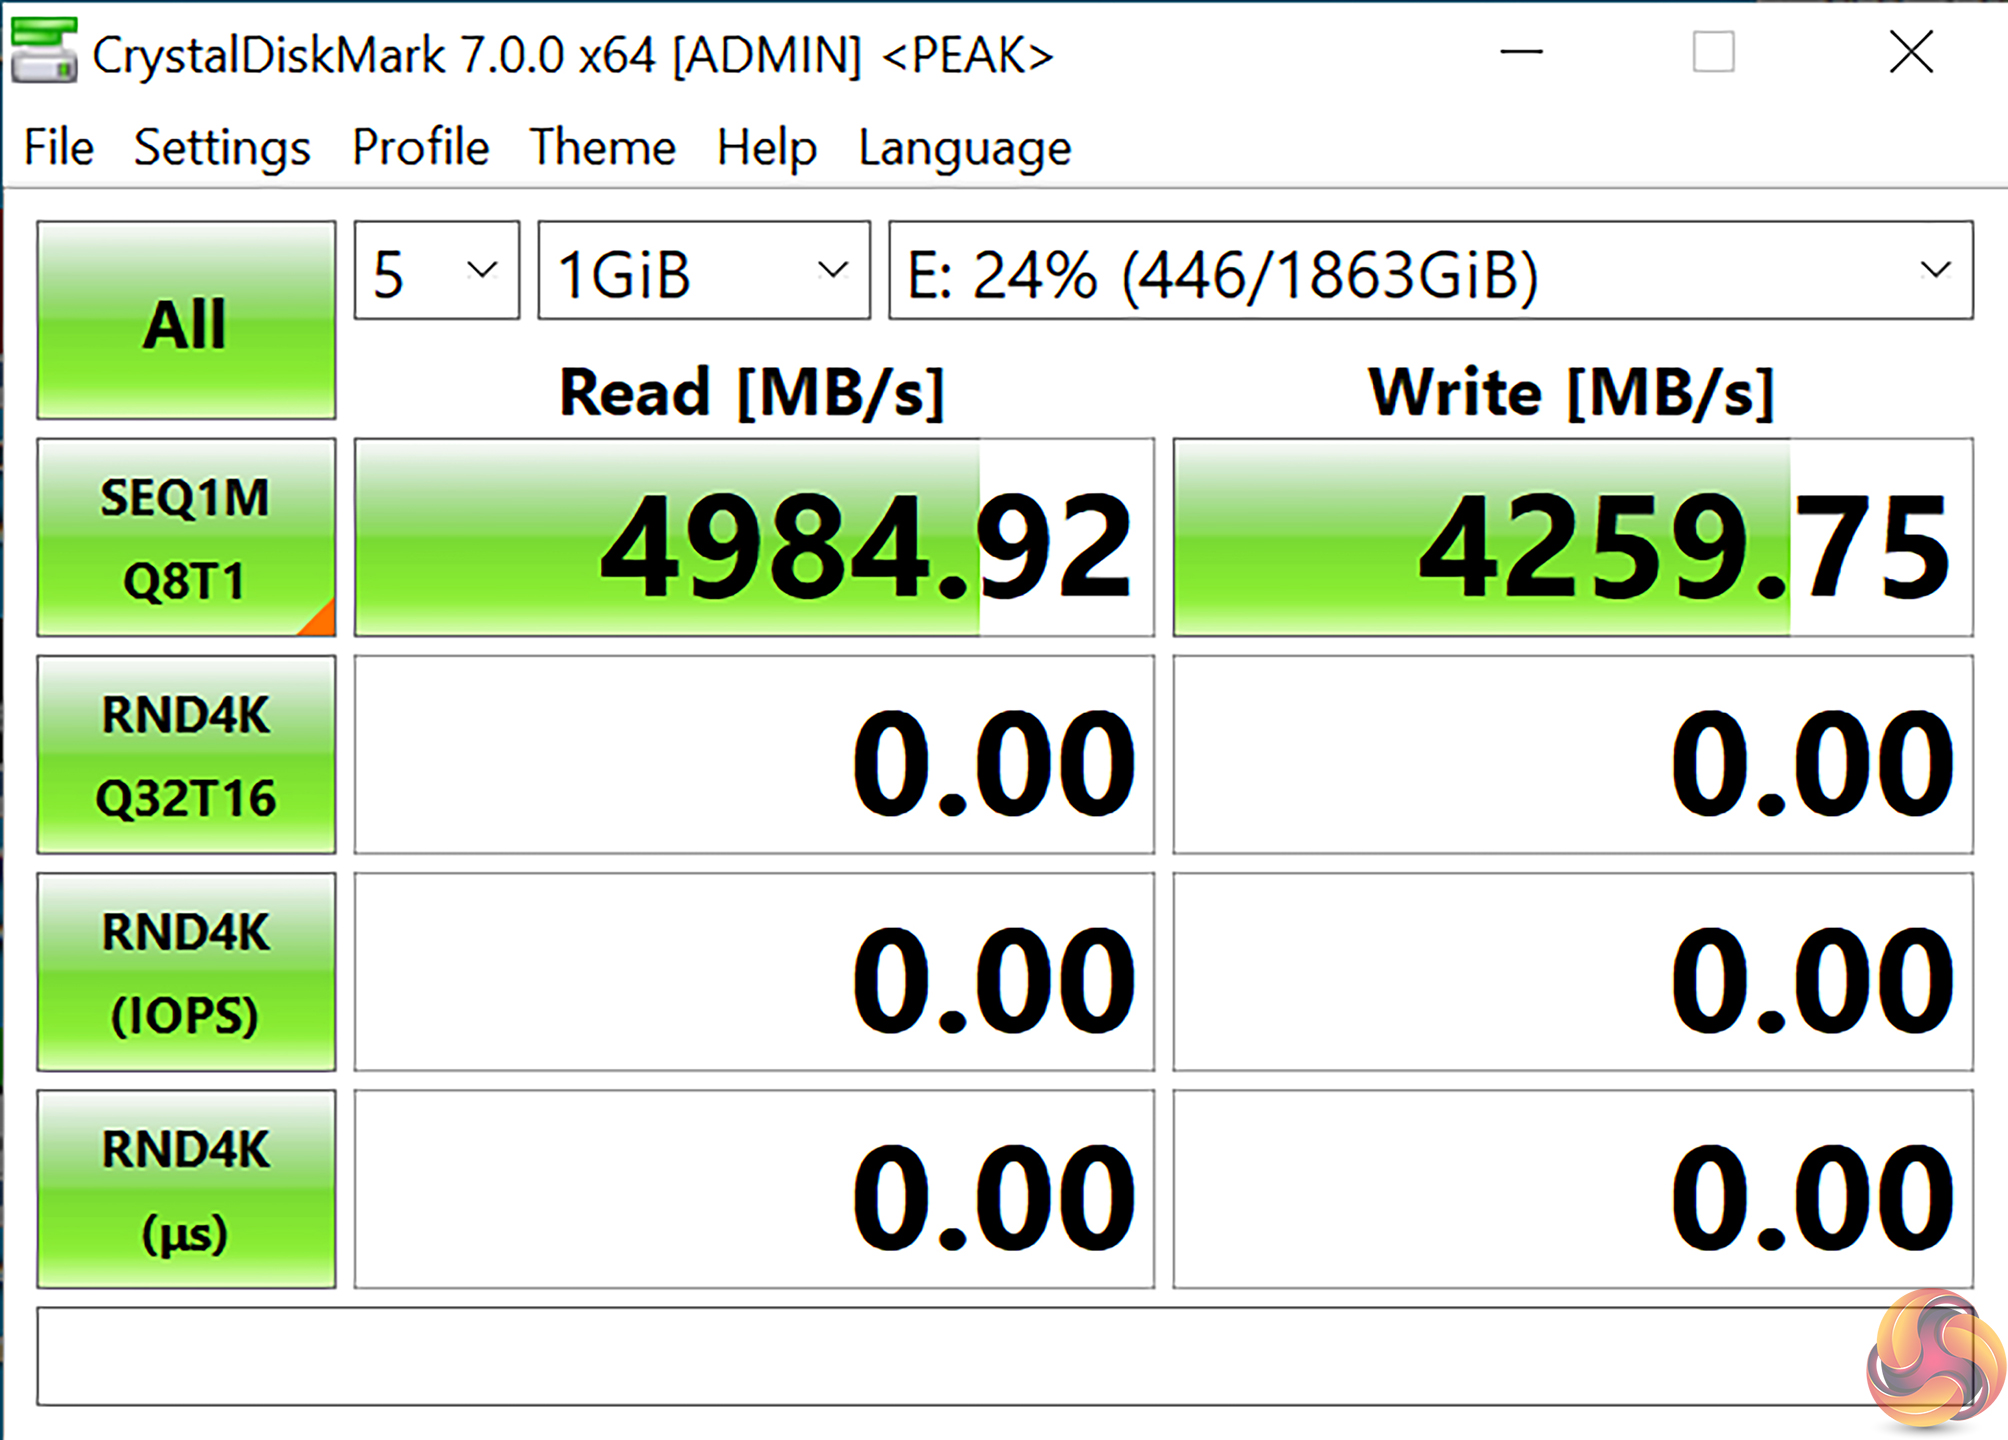
M.2 performance is close to where we would expect it, with the PCIe Gen 4 x4 SSD peaking at just below 5GBps.

Cooling performance from Gigabyte’s M.2 heatsink was reasonable. We observed the drive operating at 63°C in our CrystalDiskMark benchmark run, even when our OS SSD was installed under the same heatsink.
SATA 6Gbps Performance
For SATA 6Gbps testing we use a Crucial MX300 750GB SSD.
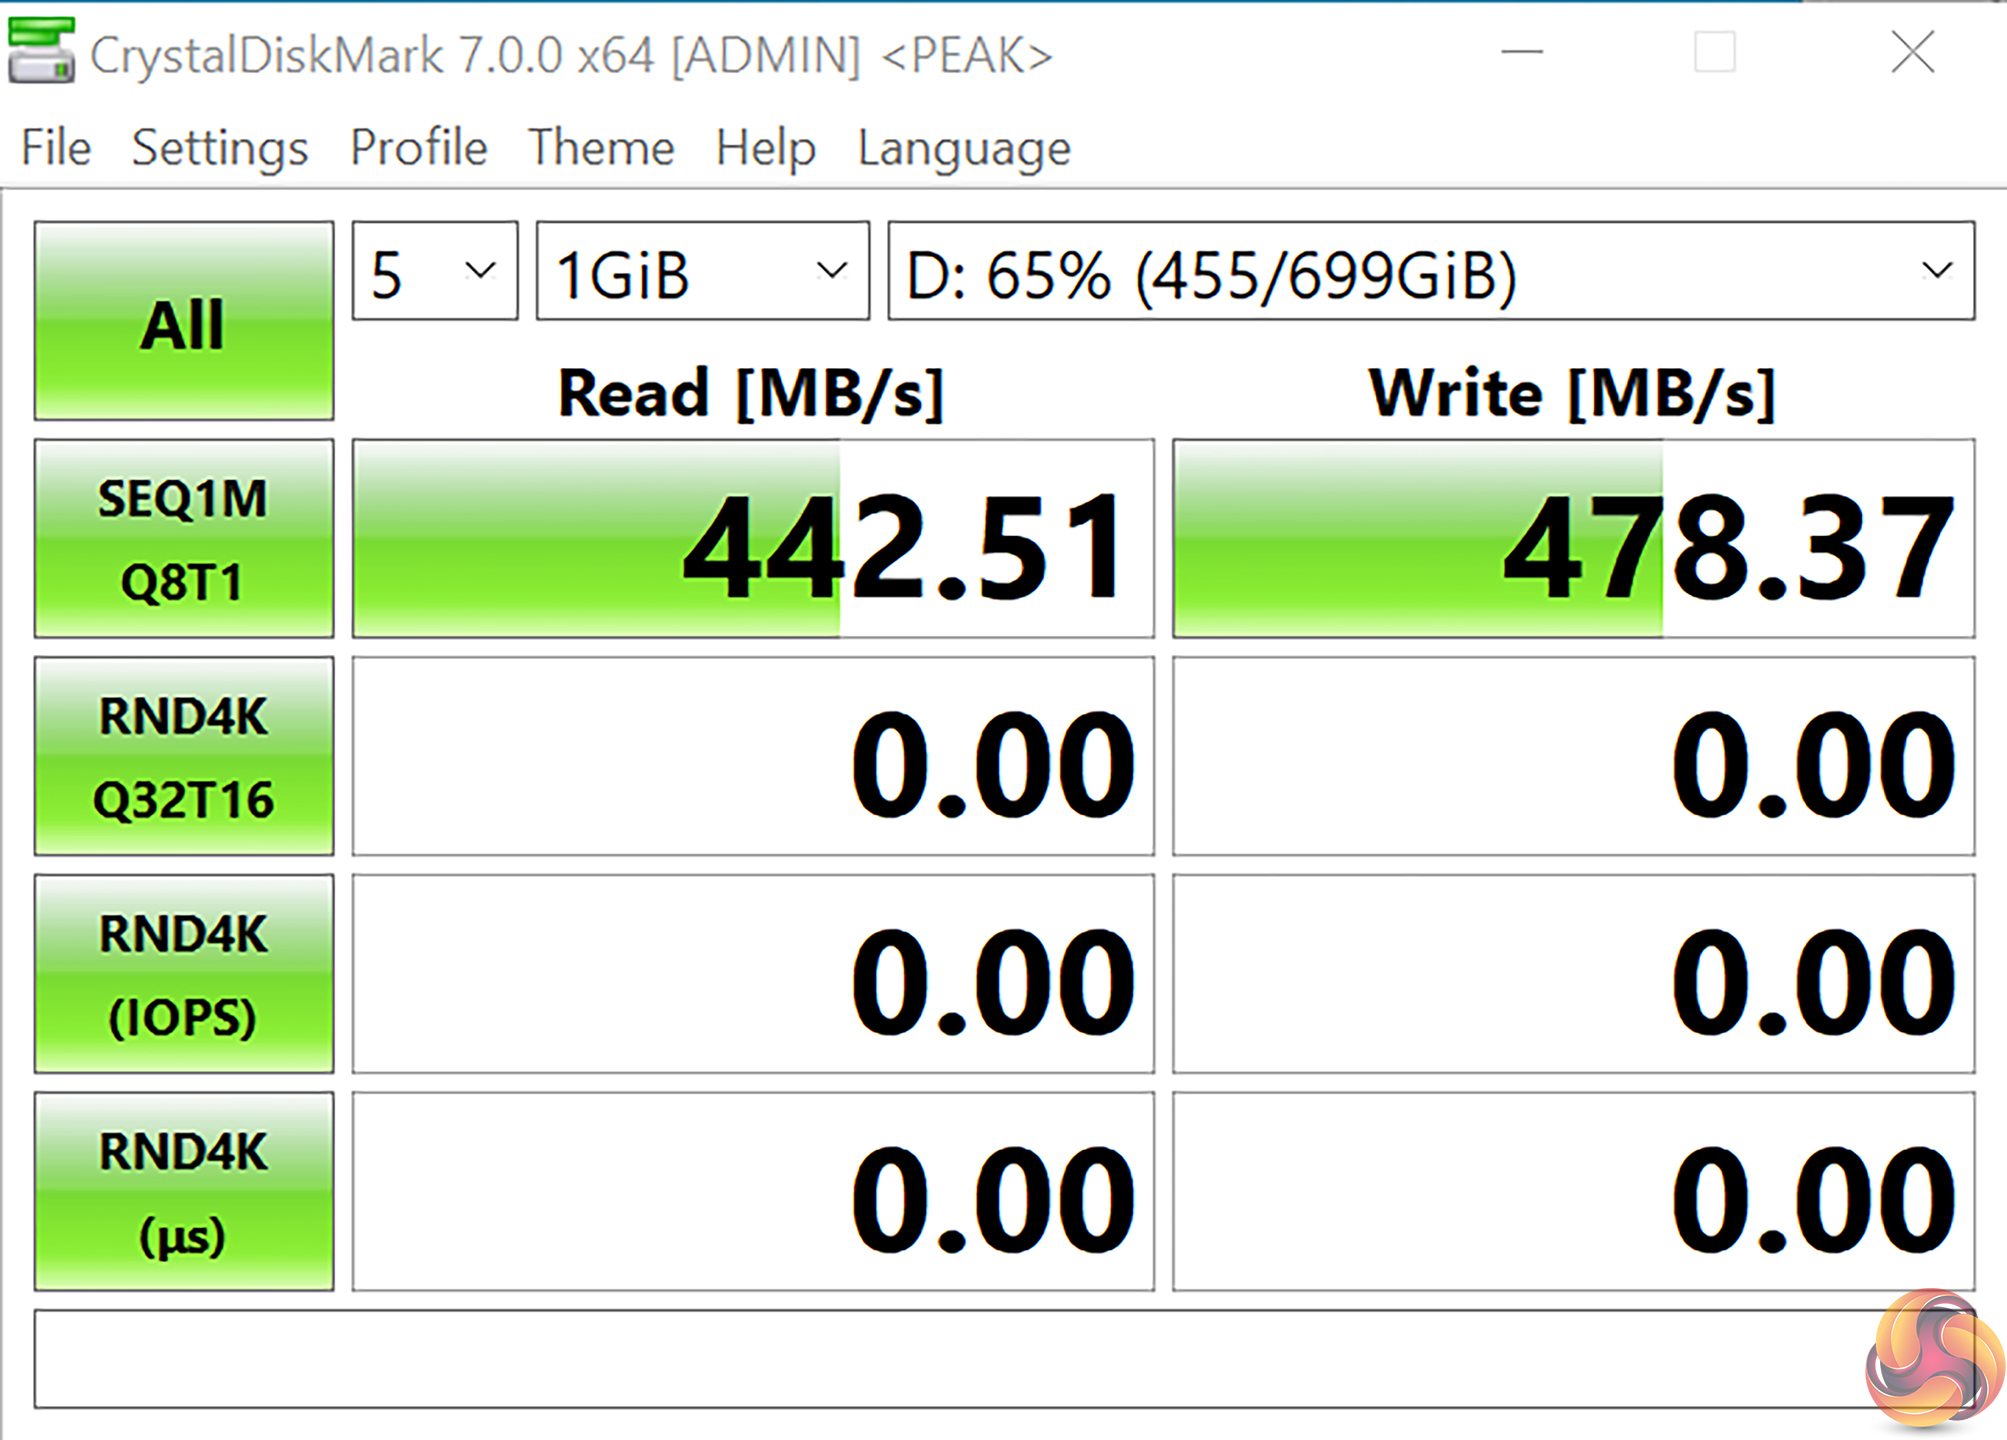
No problems to report with SATA performance. We do not see any reason why users should have concerns about deploying an army of SATA SSDs.
Audio
Rightmark Audio Analyser is a freeware benchmarking utility designed to objectively test the performance characteristics of audio solutions. We setup a line-in line-out loop and execute the record/playback test before generating the results report you see below. A sampling mode of 24-bit, 192 kHz was tested.
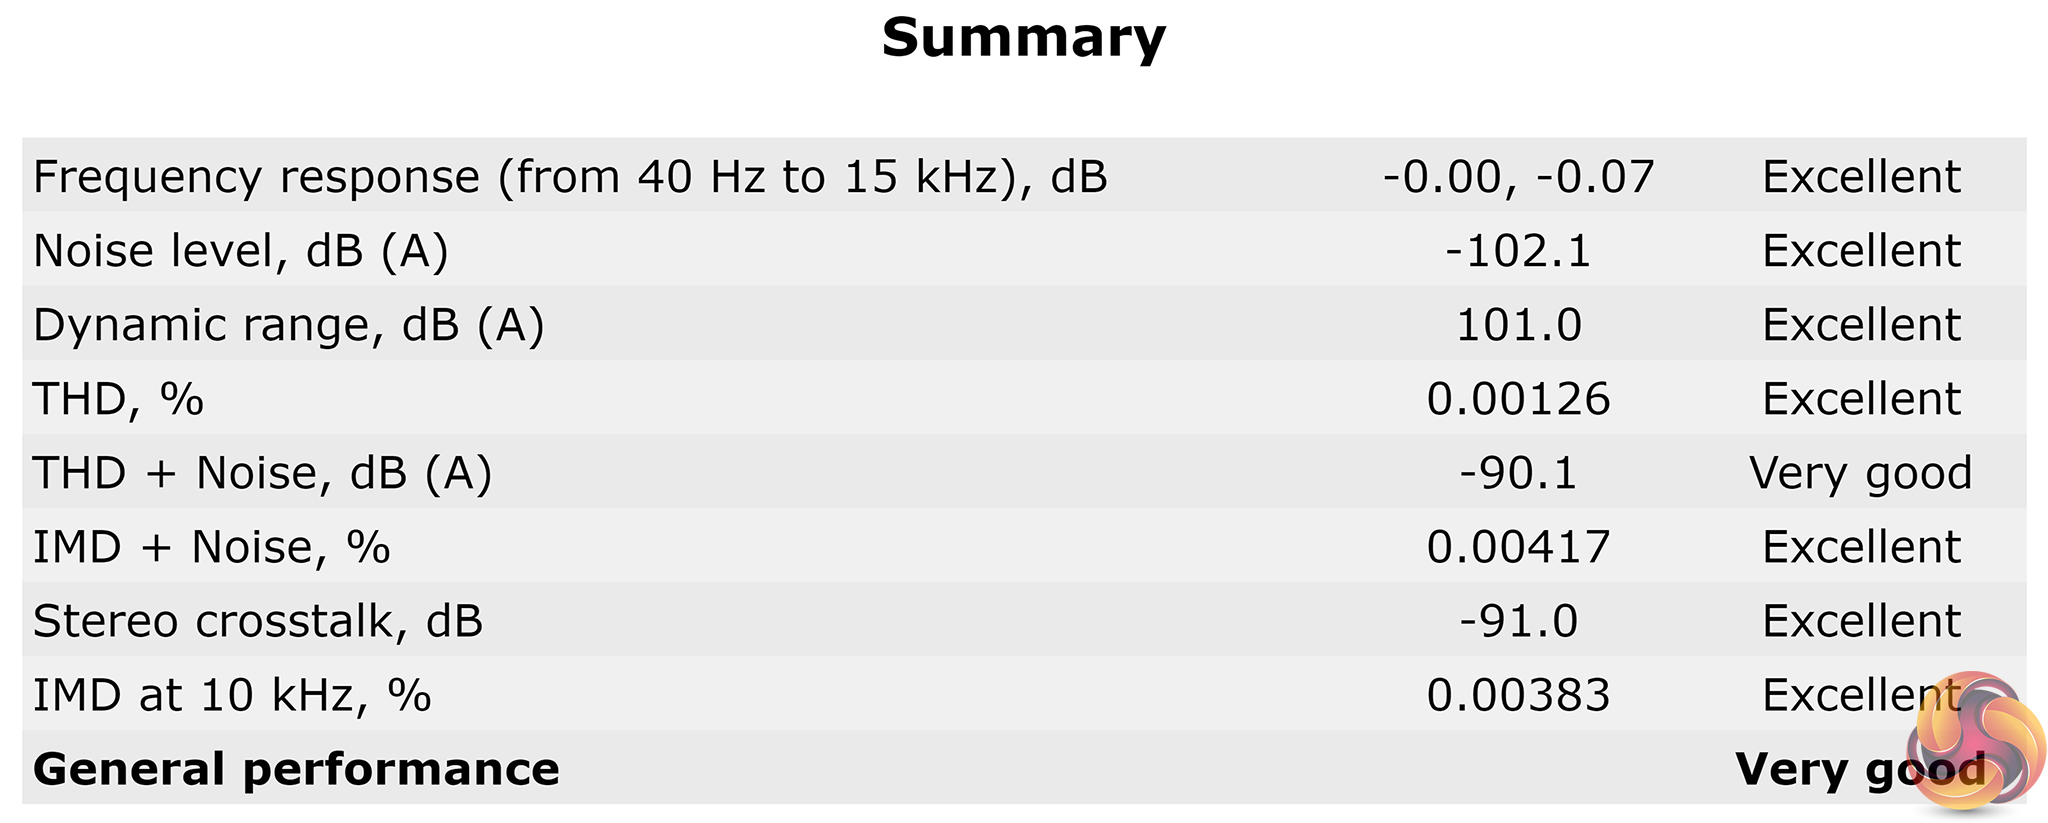
Rightmark Audio Analyser rates the Gigabyte TRX40 Aorus Master motherboard’s AMP-UP audio system as ‘Very Good’ overall, with most of the categories scoring ‘Excellent’.
Manual CPU Overclocking:
To test the Gigabyte TRX40 Aorus Master motherboard’s CPU overclocking potential, we set the CPU Core Voltage to 1.281V and applied the High LLC setting.
We managed to hit a stable frequency of our usual 4100MHz on the Threadripper 3970X CPU, but this result was far more difficult to achieve than with the ASRock and ASUS competitors.
Firstly, Gigabyte’s Loadline Calibration (LLC) settings in the UEFI are somewhat difficult to understand, though there is a useful graphical display highlighting what each level does. Unfortunately, this seemed to be inaccurate, as our target voltage was far away from the recorded load voltage using both the High and Medium LLC settings.

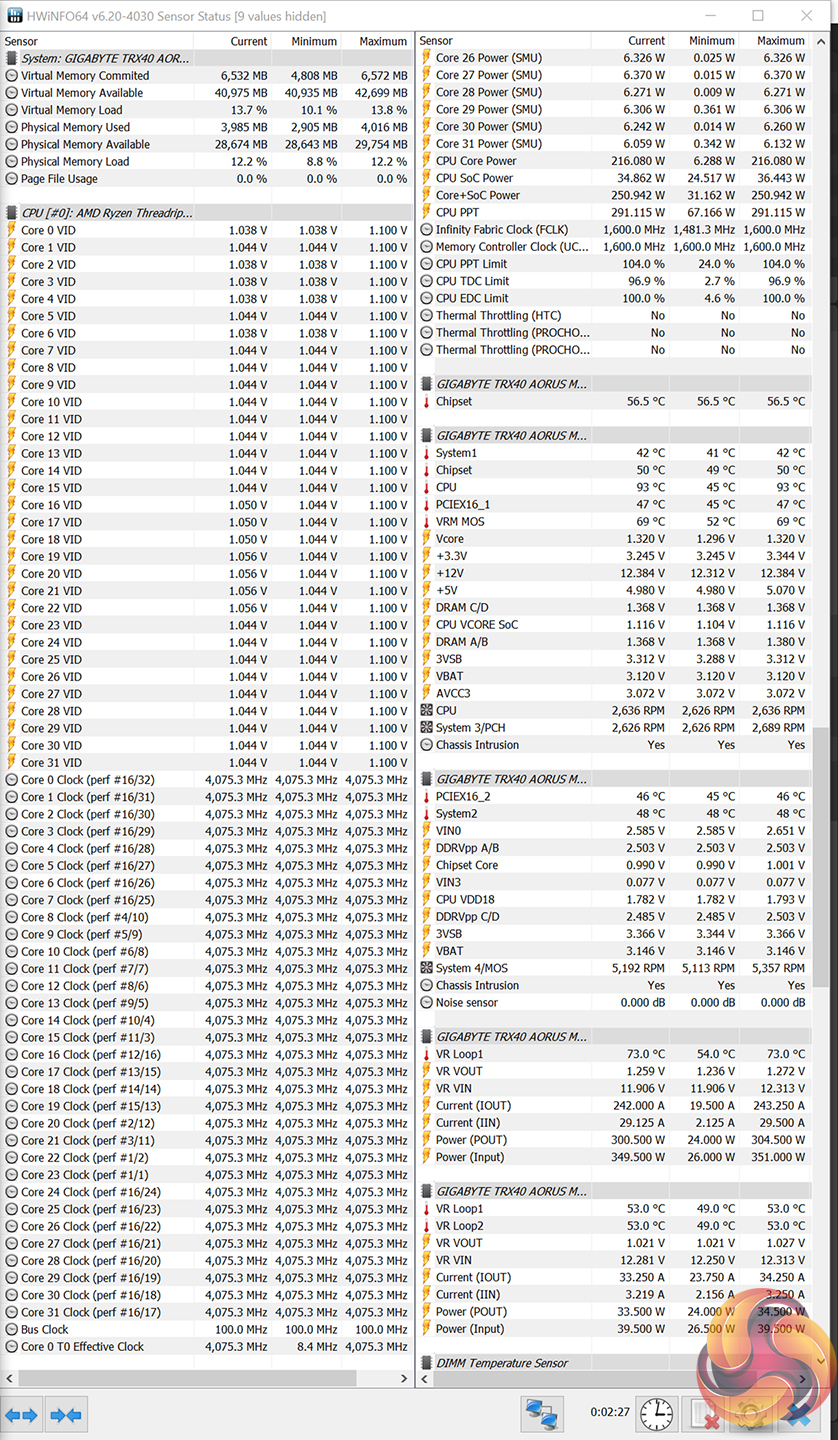
We had to increase the CPU Core Voltage in the UEFI to 1.281V (higher than our usual 1.25V) with High LLC in order to get delivered power that was comparable to other solutions we have tested. This resulted in a 1.320V load voltage according to CPU-Z, but power draw from the wall was comparable to competing solutions running at around 1.25-1.275V. The implication here is that either Gigabyte’s reading data is managed differently or the motherboard’s VRM is vastly more efficient.
4100MHz with 1.281V UEFI voltage, which resulted in 1.320V software-read voltage with High LLC was stable and delivered solid results. However, the motherboard regularly refused to retain these settings upon system restart or clear boot from the powered down state. The board would aim to POST or boot into Windows, but it would fail, reduce the applied core voltage, and continue to fail to boot. This was circumvented by going into the UEFI and re-applying the intended CPU core voltage frequently.

As such, we reduced the operating frequency to 4075MHz with the same voltage and LLC settings as the failed POSTs and boots during system start up were significantly reduced.
Having to reduce the CPU frequency versus competitors is disappointing, especially as Gigabyte’s power delivery solution looked to be well designed for the task. We are confident that these issues are fixable with a BIOS update, but as of now, they are annoyances that users will have to circumvent or deal with.
Motherboard Sensors
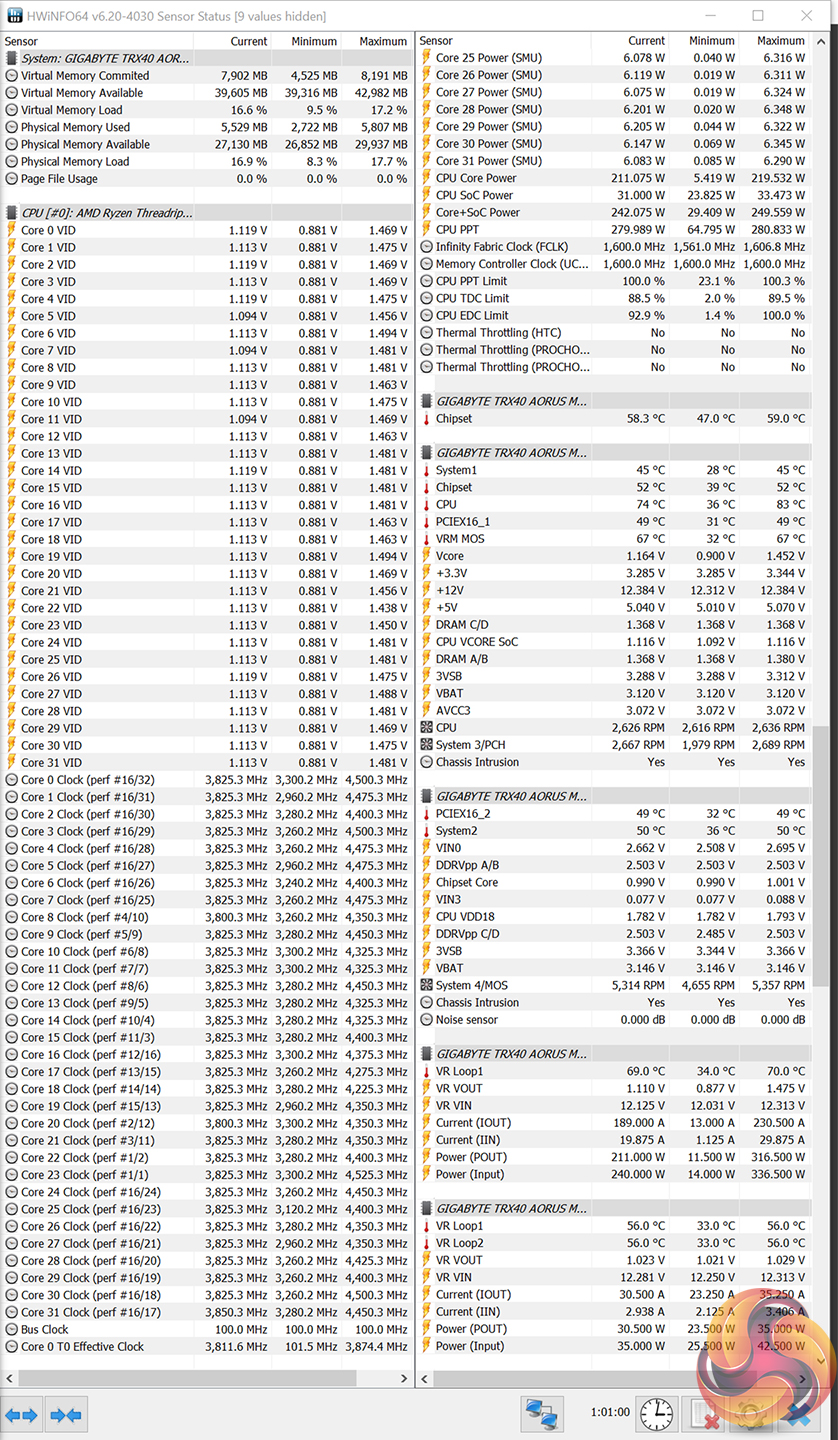
Gigabyte provides a good set of onboard monitoring data, including temperature sensors for the VRM, some PCIe slots, and the chipset. The VRM and chipset temperature sensors are important as they can be used to optimise the fan speed curves from Gigabyte’s onboard blowers.
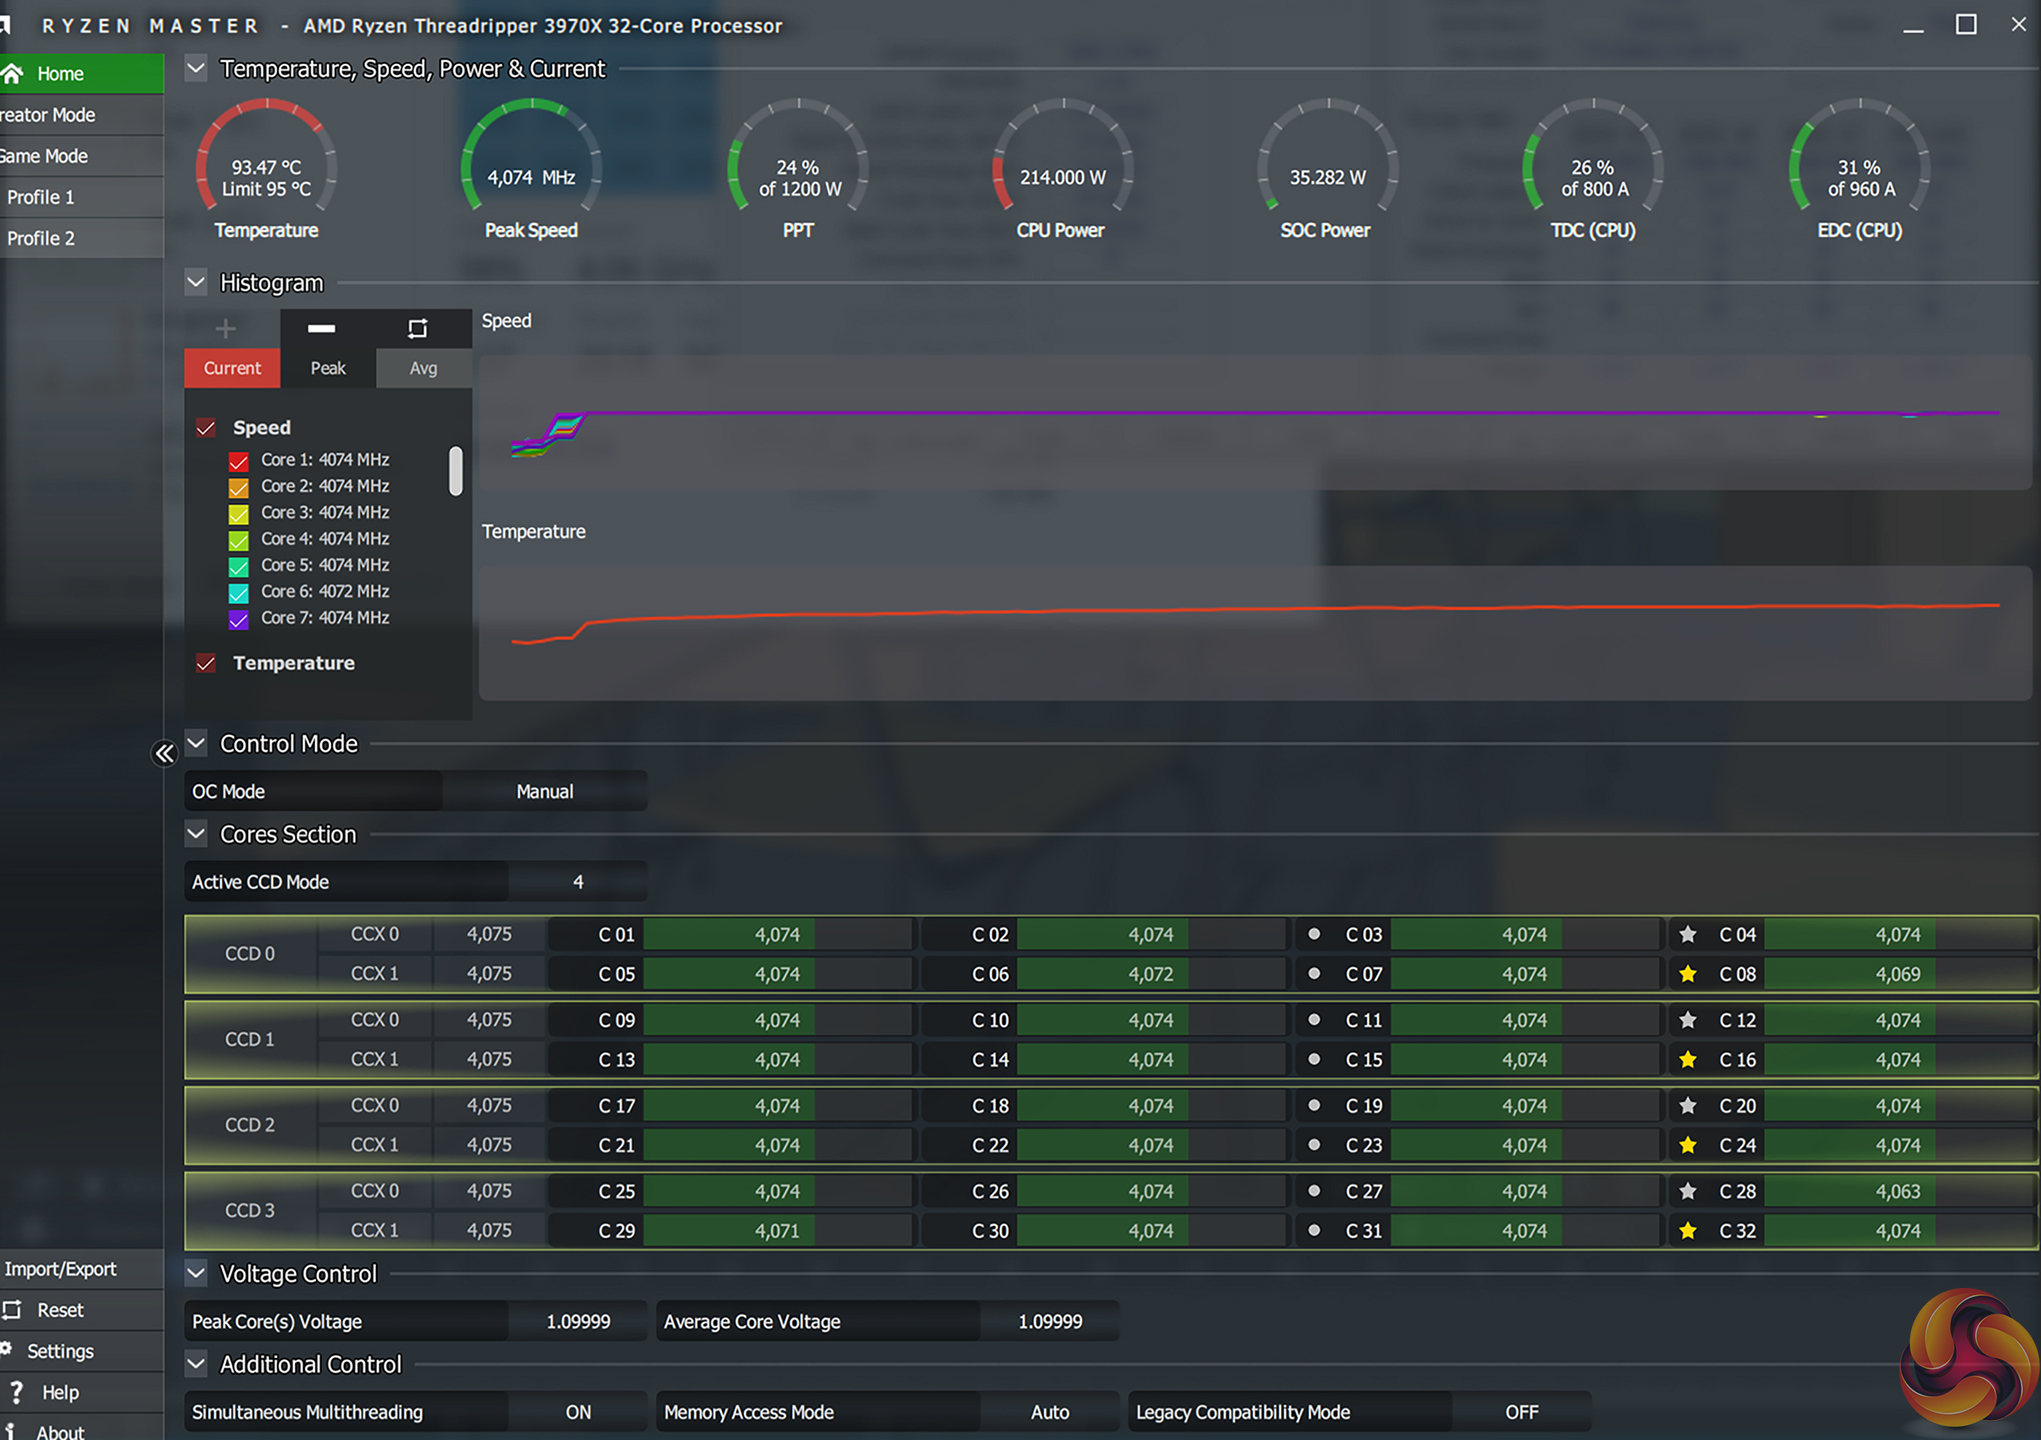
Data reported by HWiNFO and Hardware Monitor, such as CPU temperature and package power draw, tended to corroborate with the numbers displayed by Ryzen Master, which is good. We also checked the CPU core voltage using a multimeter connected to the onboard check points and found the software readings to be fit for purpose and close to the physical recordings.
Overclocked Performance
A performance boost of almost 750 points, or 4.4%, was obtained by overclocking the CPU to 4.075GHz. This is not quite as fast as the 4.1GHz overclocked competitors, but it is close enough that many users will not be overly disappointed.
Of course, Precision Boost Overdrive is still a smart choice if you want to keep your Threadripper 3000 CPU’s maximum boost clocks of 4.5GHz whilst trading down some of the all-core load frequency.
System Power Consumption
We leave the system to idle on the Windows 10 desktop for 10 minutes before taking a reading. For CPU load results we run Cinebench R20 nT and Blender Classroom stress tests and take a reading. The power consumption of our entire test system (at the wall) is shown in the chart.

Gigabyte’s stock voltage levels are sensible and the VRM solution is clearly efficient, so stock-clocked numbers are as reasonable as we would expect. Overclocking increases the load power draw significantly and our settings also pushed up the idle number by around 10%. In our testing, the 16+3-phase power delivery solution had no problems dealing with this level of load.
As we always suggest, a strong power supply like the Seasonic Prime TX-1000 unit that we used is an absolute requirement for a Threadripper system, especially with a power-hungry graphics card thrown into the mix.
System Temperatures
We run the Cinebench R20 nT test on loop for 1 hour while recording the system data using HWInfo. This data is then analysed to show the CPU temperatures and also the VRM MOSFET temperatures, when the sensor data is available.
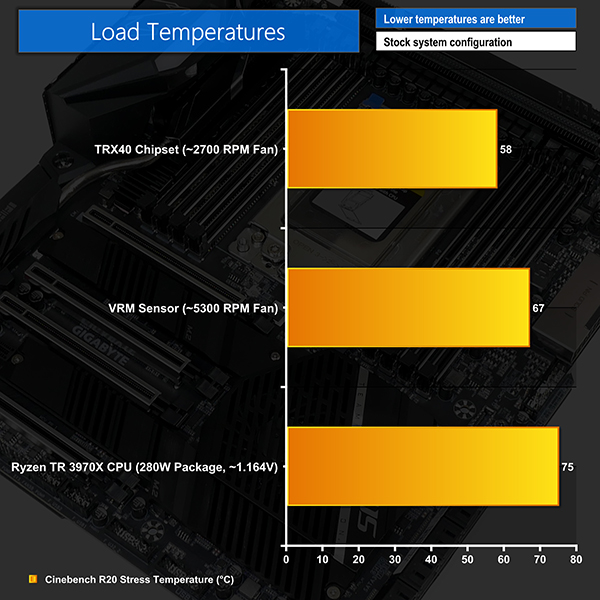
Gigabyte’s VRM cooling solution does a stellar job at keeping the recorded temperatures in check. We saw the VRM sensor reading stay comfortably below 70°C at stock but Gigabyte achieves this by using a relatively high fan speed of around 5300 RPM. By comparison, the ASUS TRX40-E Gaming was able to stay at around 60°C MOSFET temperature without having to spin up its VRM cooling fans.
We were able to reduce the fan speed to 4200 RPM whilst still getting a 68°C VRM temperature reading. This was done by using a custom fan speed curve that set the blower to 0 RPM until 60°C was hit. Gigabyte’s superb UEFI fan control is to thank for this level of adjustment granularity.
Overclocking did not add significant additional temperature or fan speed to the VRM cooling solution for short, bursty workloads. This implies that Gigabyte’s heavily finned cooling design is efficient at shedding high heat loads, even if it does benefit from a decent amount of fan airflow at lower thermal loads.
Chipset cooling was very good, and this is thanks in large to Gigabyte’s robust chipset heatsink and the sizable fan. The 2700 RPM fan speed that we recorded under this load condition was not audible over the higher speed VRM heatsink fan. If you are happy with chipset temperatures around the 70°C level, our test setup managed this with the fan operating primarily under its zero RPM mode and complete silence.
The Gigabyte TRX40 Aorus Master is a rather straightforward motherboard to analyse as obvious weaknesses are so rare yet the unique strengths are consistent. The key focus point, in our opinion, is how the motherboard compares to its similarly-priced competitor in ASUS’ TRX40-E Gaming.
Performance of the TRX40 Aorus Master was as good as we would expect from a £500 TRX40 offering and we had no issues with out-of-the-box boost frequencies. Our overclocking efforts could have certainly been made easier by loadline calibration settings that do not force a guessing game for targeting specific voltages. Thankfully, performance when overclocked was fine, aside from the BIOS bug that sometimes hit during system boot.
Gigabyte’s layout decisions are generally smart and work well, provided your chassis can take an Extended-ATX motherboard. The right-angled 24-pin connector eases cable management burdens in some cases, and that theme is consistent for fan header positioning. PCIe slot layout is superior to that of ASUS’ TRX40-E Gaming, with users able to install triple dual-slot graphics cards on the Gigabyte board, or two graphics cards and two high-bandwidth devices.
The 16+3-phase power delivery solution is undeniably powerful. I am absolutely confident that this solution will have no problems pushing the upcoming 64-core 3990X Threadripper. And the low-profile VRM cooling solution minimises potential CPU cooler interference better than many competing motherboards.
With that said, Gigabyte’s VRM cooling solution is not as efficient as ASUS’ alternative on the TRX40-E Gaming. The TRX40 Aorus Master required higher fan speed to maintain similar (or sometimes slightly higher) MOSFET temperatures to that of the ASUS competitor in our extended Cinebench R20 test. This is disappointing, especially as Gigabyte’s E-ATX form factor provided more room to fit a beefier heatsink.
Sticking with the topic of cooling, Gigabyte’s approach to system fans is superb. The TRX40 Aorus Master is equipped with a total of eight headers, all of which support high current fans. Additionally, the system fan headers can be controlled via temperature data from several onboard reading points and two external sensors. That’s in addition to the functional zero RPM mode for the small MOSFET blower.
Excellent fan control is an area of usability that can easily go under the radar but makes a noteworthy difference in day-to-day system usage.
While just under £500 is certainly expensive for a motherboard, the Gigabyte TRX40 Aorus Master does a good job at showing its competitiveness in this tough market segment. Triple M.2 slots, onboard diagnostic features, and 5 Gigabit networking are some of the value-added features that work well alongside the extremely powerful VRM solution and excellent fan operation capabilities.
![]()
The Gigabyte TRX40 Aorus Master is available for £489.95(at the time of writing). Buy from OCUK HERE.
Discuss on our Facebook page, over HERE.
Pros:
- Smart expansion slot layout.
- Low profile VRM heatsink minimises CPU cooler interference.
- Onboard voltage read points, power buttons, and debug LED are welcomed.
- Dual BIOS chips give peace of mind.
- Strong out of the box performance.
- Excellent fan operation capabilities.
- Premium design – integrated rear IO shield, thermal backplate, right-angled 24-pin.
- 5GbE networking and triple M.2 slots with cooling.
Cons:
- Some BIOS bugs in keeping overclocked settings on POST/Boot.
- VRM heatsink cooling performance is not as strong as ASUS’ larger design.
- E-ATX form factor is more difficult to deal with than ATX, especially with a right-angled 24-pin.
KitGuru says: Plenty of appealing features, class-leading fan control, and a monster of a power delivery solution, Gigabyte's TRX40 Aorus Master has a lot to offer.