

MSI is giving the X370 chipset its Titanium treatment with the vendor's flagship AM4 motherboard. Sporting the unique style that has become representative of MSI's range, the X370 XPower Gaming Titanium is targeting enthusiasts who want a stack of features and strong overclocking potential from their motherboard. Priced at £300, this is the most expensive X370 offering currently on the UK market. Does it live up to its billing?
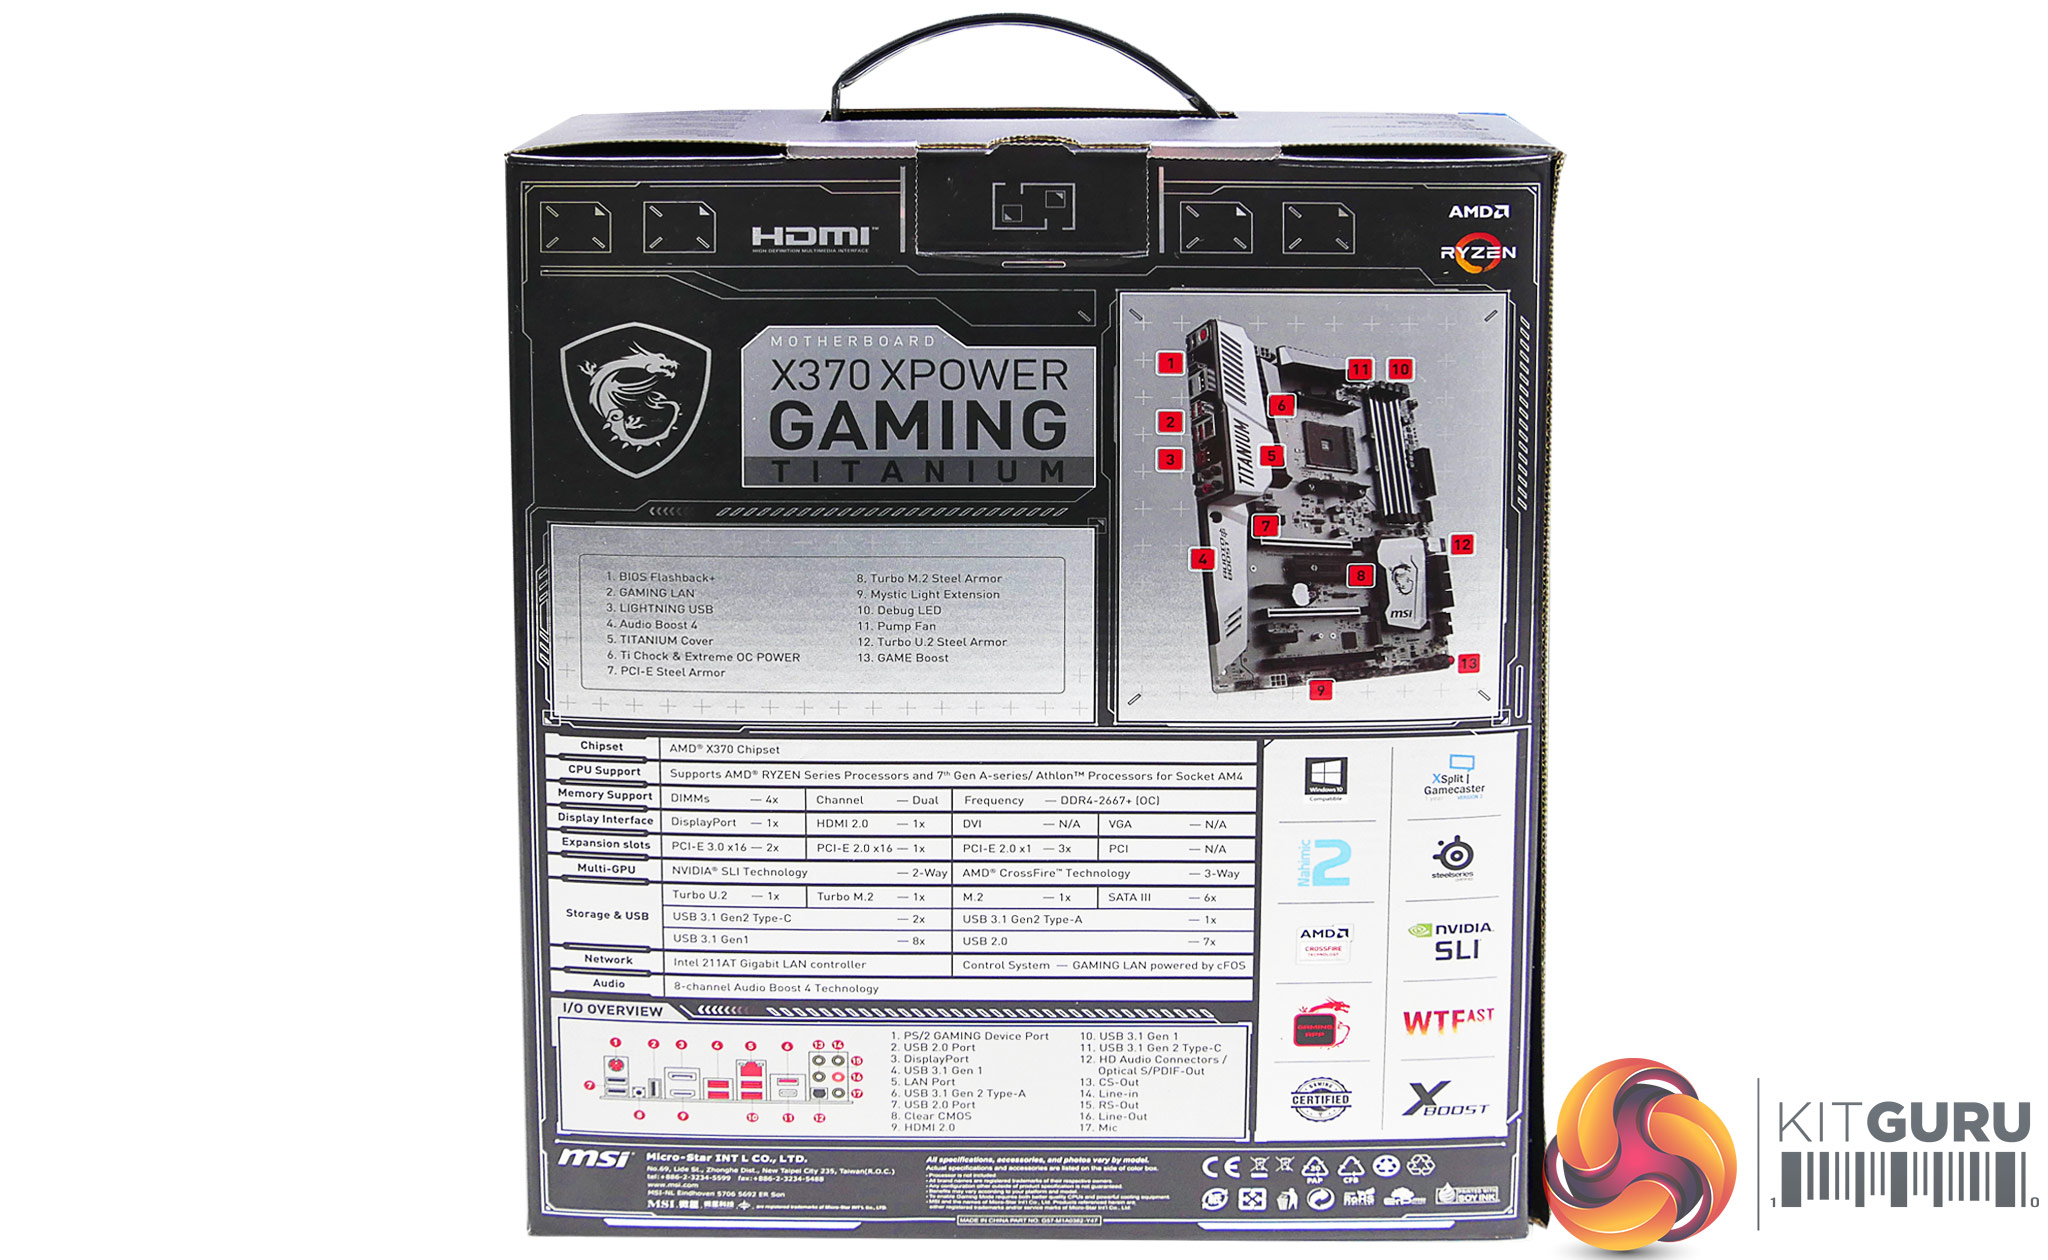
Features galore is the trend for the MSI X370 XPower Gaming Titanium motherboard. Alongside the usual batch of 5Gbps USB 3.0 ports and SATA 6Gbps links are 32Gbps PCIe 3.0 x4 U.2 and M.2 connectors, an added M.2 slot running at 20Gbps PCIe 2.0 x4 bandwidth, and internal 10Gbps USB 3.1 Gen 2. That high-speed PCIe 3.0 x4 M.2 slot is also given access to MSI's M.2 Shield that has some strong claims (both good and bad) tied to its name.
Overclocking users will notice the 6+4-phase power delivery system sat beneath sizeable MOSFET heatsinks. The addition of a 4-pin CPU power connector, alongside the usual 8-pin, is another aspect that may appeal to those interested in pushing frequencies hard. Other features such as steel-plated PCIe and DIMM slots are becoming more commonplace on today's market. However, the same cannot be said about the X370 XPower Gaming Titanium's unique colour scheme. No onboard RGB lighting with this one, though colour can be added through the onboard 4-pin RGB strip header.
With a lofty price tag of £300 but a feature set that could back up such a cost, how will MSI's X370 XPower Gaming Titanium AM4 flagship perform in our testing?
Features (taken from the MSI product page):
- Supports DDR4-3200+(OC) Memory
- DDR4 Boost with Steel Armor: Give your DDR4 memory a performance boost
- VR Ready and VR Boost: Best virtual reality game experience without latency, reduces motion sickness
- Mystic Light Extension and Mystic Light Sync: Control all LEDs in system with one click by GAMING APP or mobile devices
- Turbo M.2 with M.2 Shield. Turbo U.2 with Steel Armor, Lightning USB 3.1 Gen2
- Audio Boost 4 with Nahimic 2: Reward your ears with studio grade sound quality for the most immersive gaming experience
- GAMING LAN with LAN Protect, powered by Intel® : The best online gaming experience with lowest latency and bandwidth management
- BIOS Flashback+: Easy BIOS recovery without the need of a CPU, memory and VGA card
- Military Class 5, Guard-Pro: Latest evolution in high quality components for best protection and efficiency
- MULTI-GPU: With Steel Armor PCI-E slots. Supports NVIDIA SLI™ & AMD Crossfire™
- In-Game Weapons: Game Boost, GAMING Hotkey, X-Boost, Xsplit Gamecaster
- EZ Debug LED: Easiest way to troubleshoot
- Click BIOS 5: Award-winning BIOS with high resolution scalable font, favorites and search function
- GAMING CERTIFIED: 24-hour on and offline game and motherboard testing by eSports players
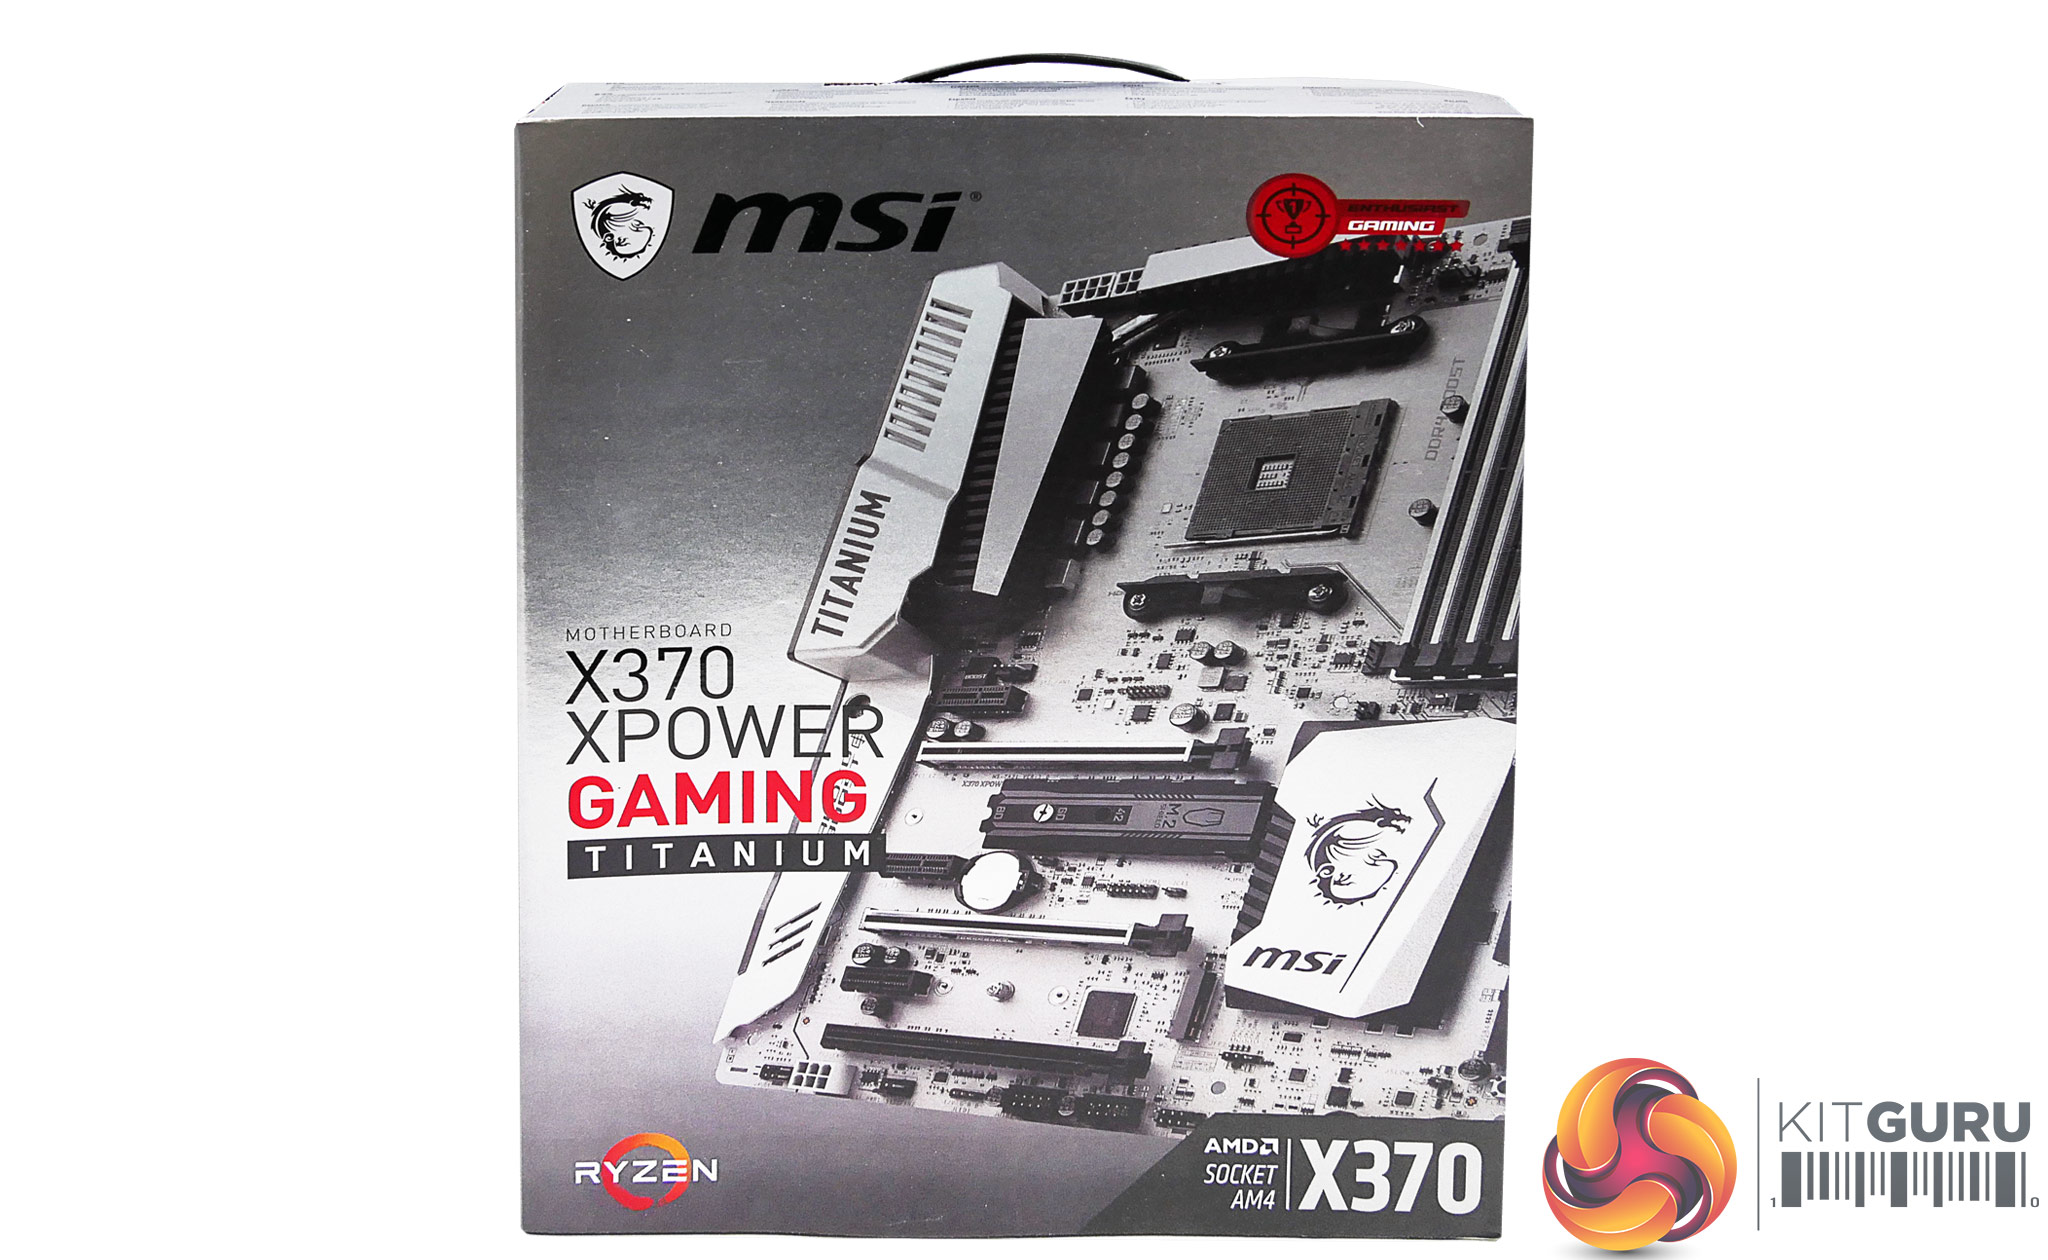
The MSI X370 XPower Gaming Titanium ships in shiny silver packaging that fits in with its overall styling.

Opening the front flap gives a glimpse of the motherboard.
Our sample shipped as a plain motherboard from AMD. We understand that a 4-pin splitter and extension cable will be provided for connecting additional RGB LED strips. Other accessories will likely include SATA cables and a HB SLI bridge.
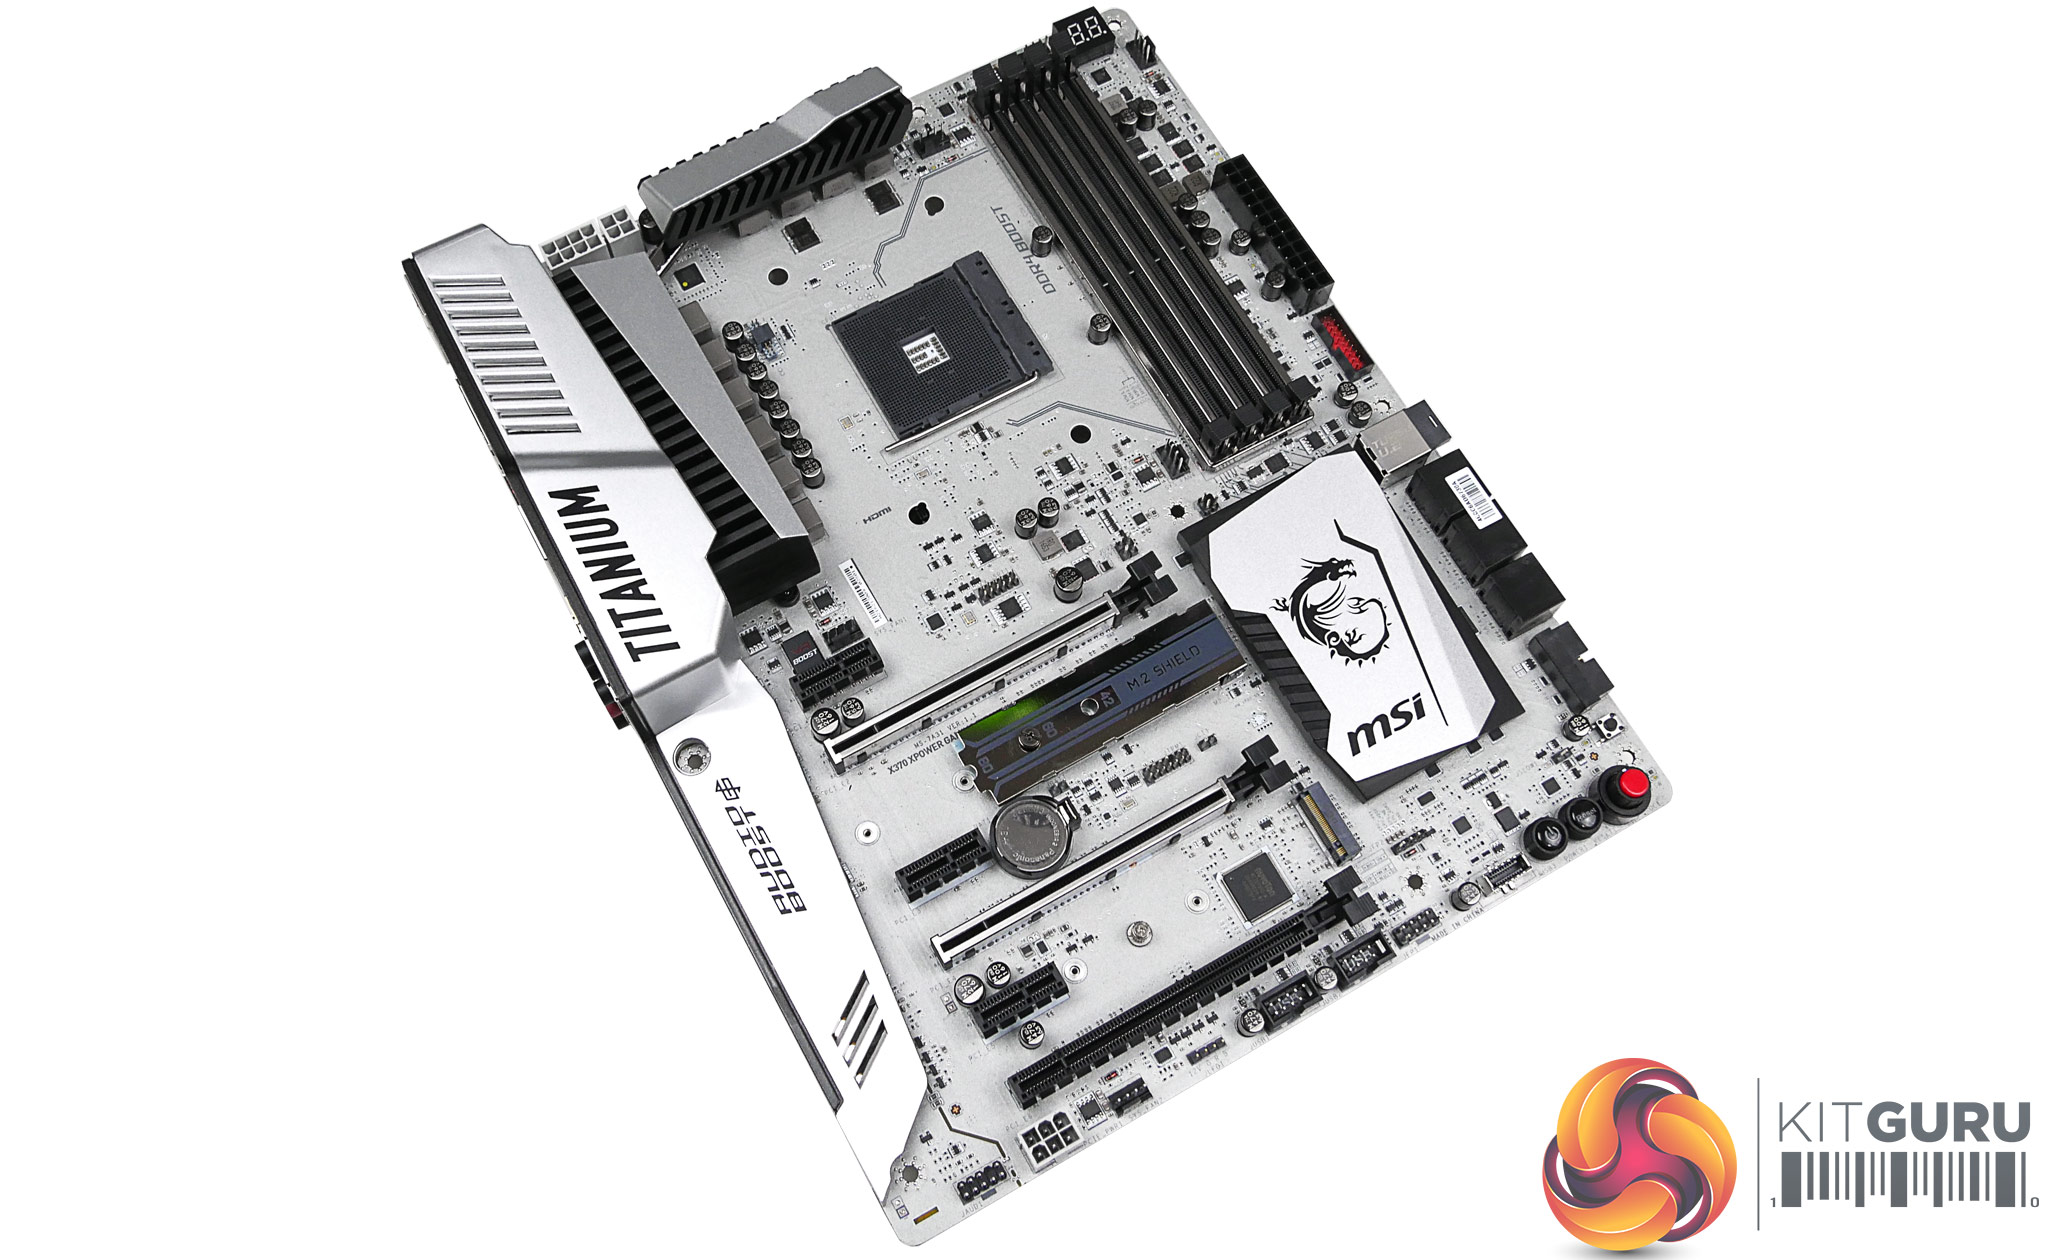
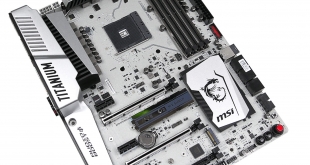
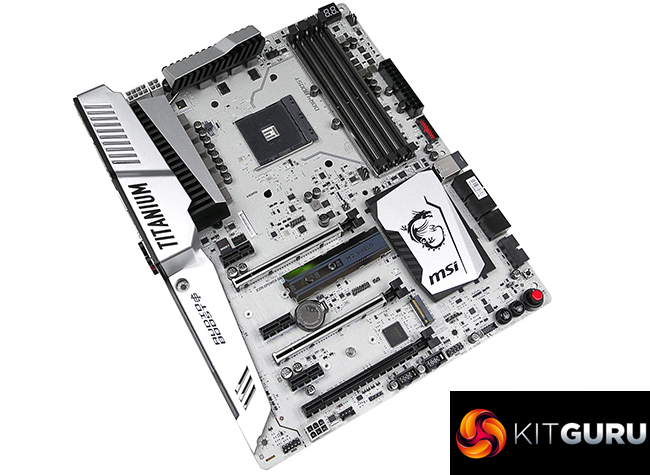
To say that the styling of MSI's X370 XPower Gaming Titanium is unique would be an understatement. The motherboard features a metallic-like finish that we have come to expect from the vendor's ‘Titanium' boards. Silvery-white heatsinks and a rear IO cover add to the effect to create what is, in my opinion, a unique and desirable style.
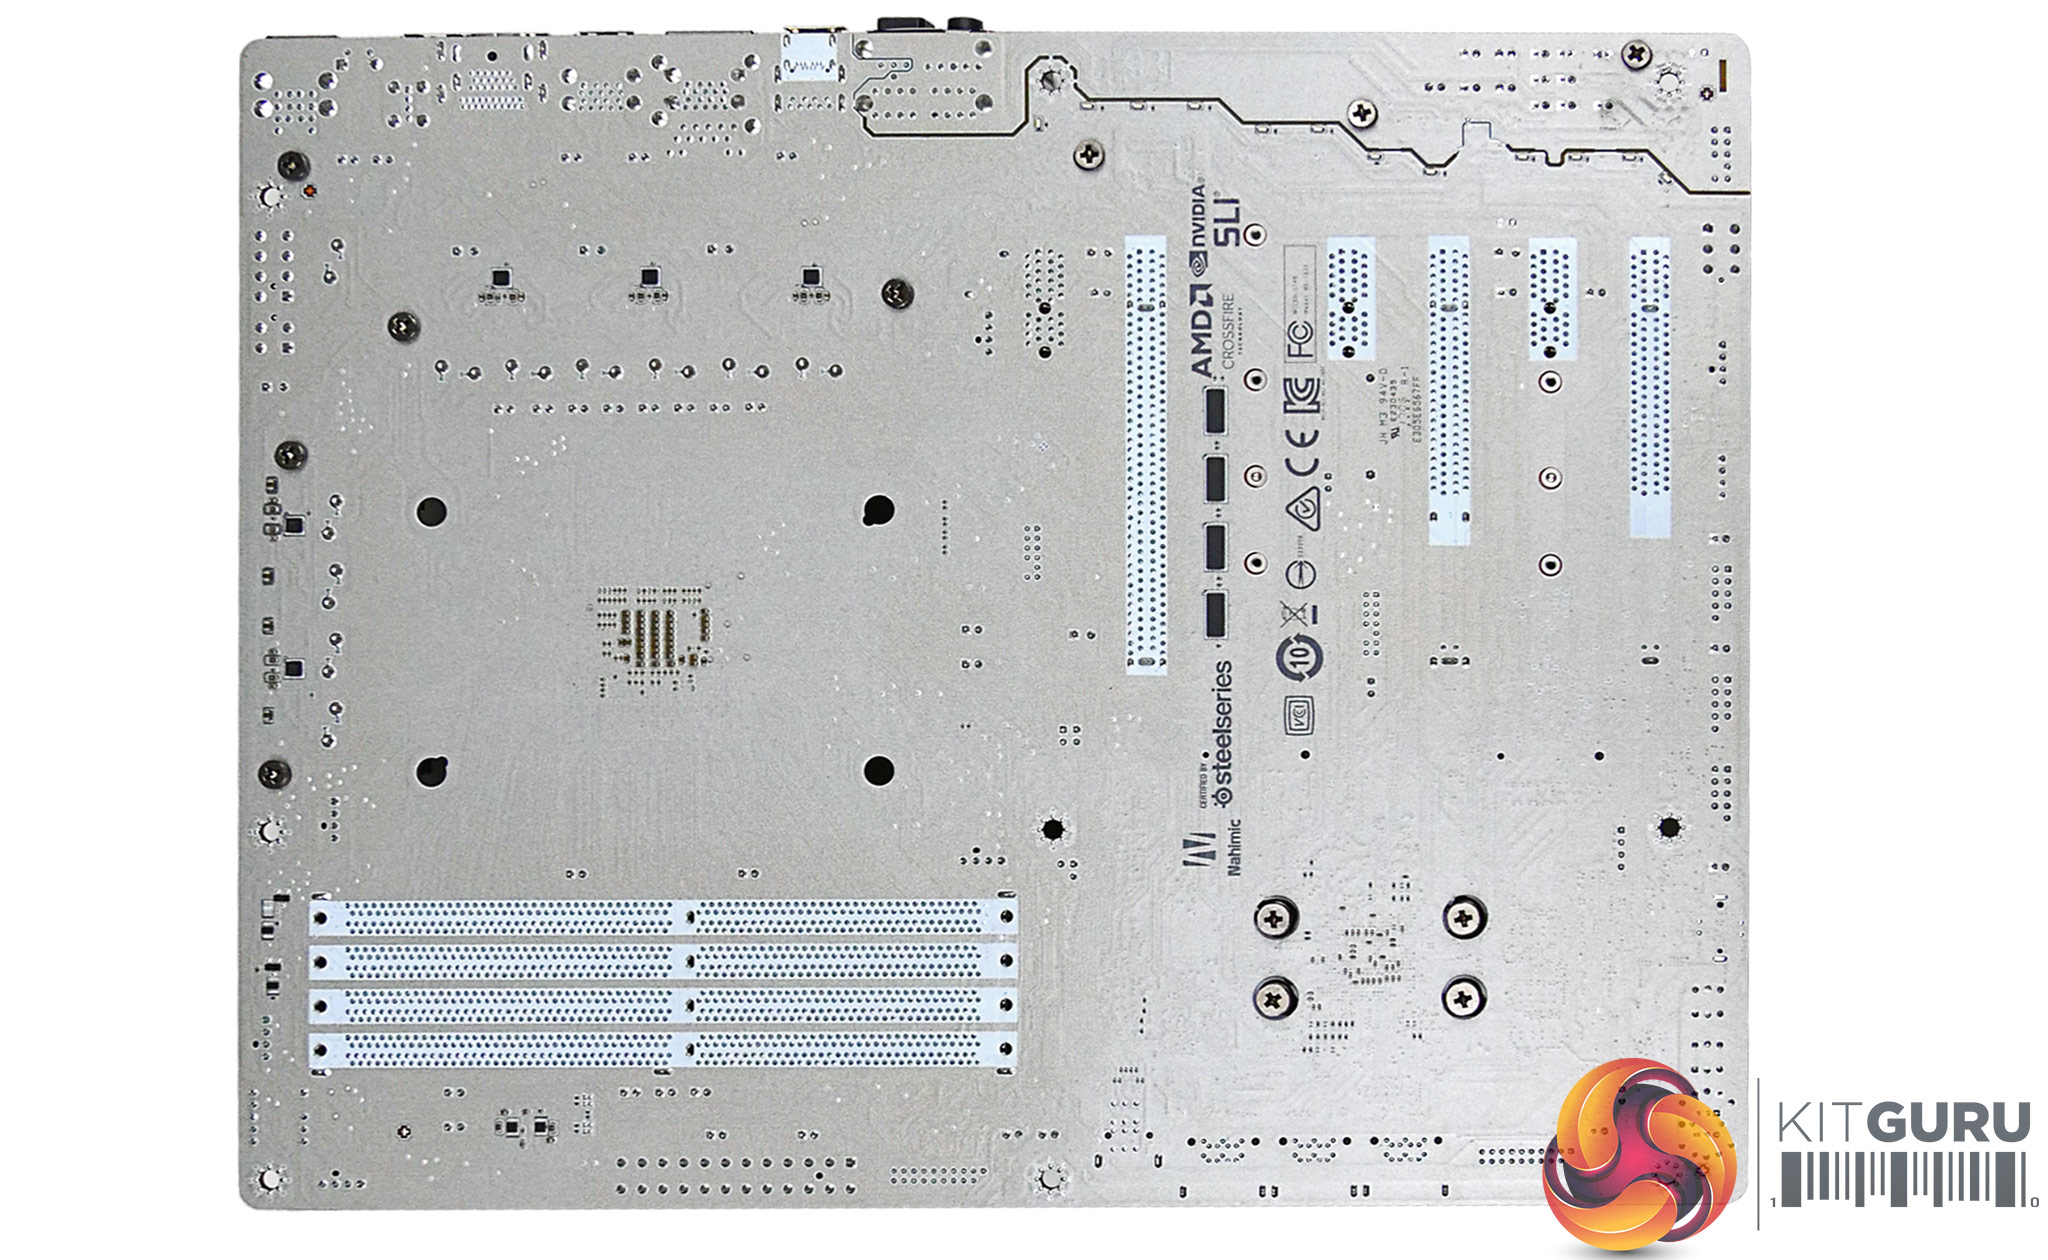
A look at the rear of the PCB shows that its colour is present throughout. MOSFET drivers for the VRM are found on the rear and the physical PCIe lane layout can be interpreted (though that bottom slot actually runs at x4 bandwidth).
MSI has a small number of LEDs mounted on the X370 XPower Gaming Titanium. They are designed to shine white in order to follow the motherboard's overall style.
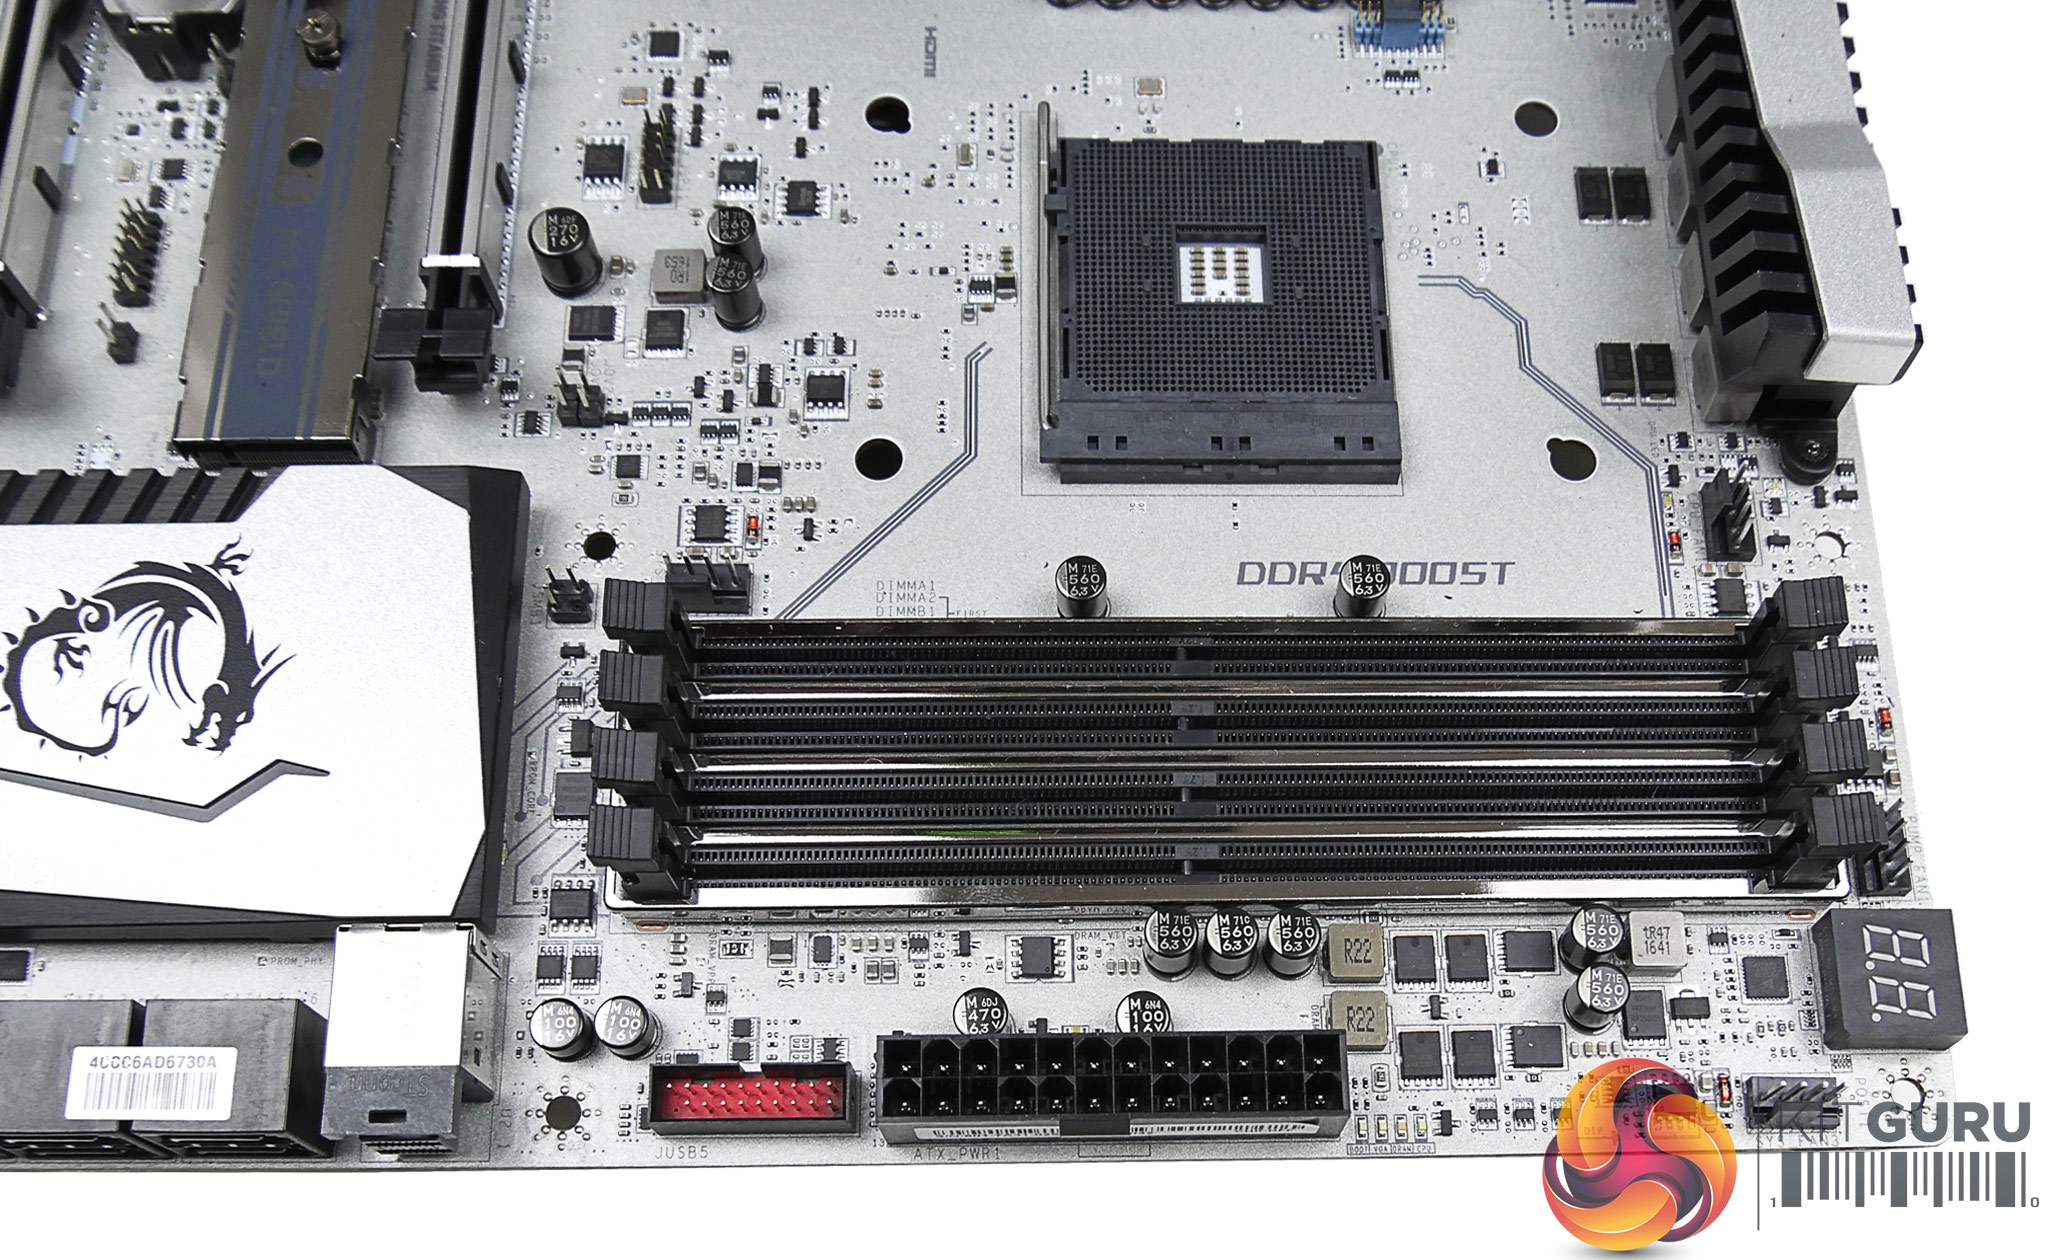
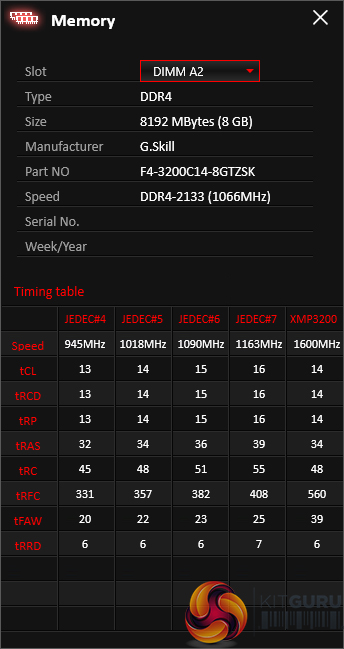
All four of the DDR4-capable DIMM slots feature steel plating to improve their strength. This is not important in daily usage but it does help to mitigate PCB flex encountered when installing memory modules during the build phase. It also adds an element to the motherboard styling. MSI quotes support for memory frequencies of 3200MHz+ by overclocking and includes an XMP option in the UEFI.
Sat next to the 24-pin connector is one of the board's two internal 5Gbps USB 3.0 headers. Both headers are delivered through the X370 chipset lanes. Electronic components in this area imply that the DRAM power delivery system is likely to be a 2-phase design managed by the Powervation PV3205 controller. The onboard 2-digit debug LED is good to see and I like MSI programming it to display the CPU temperature when the system is inside a Windows OS.
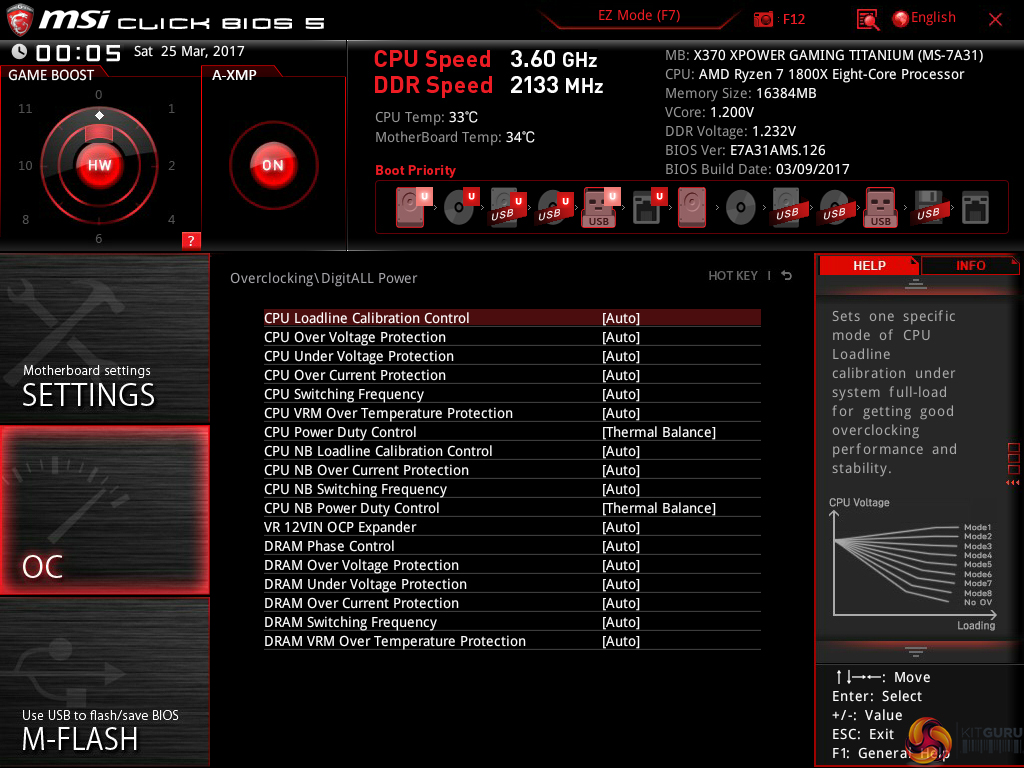
The lack of voltage monitoring points is not a smart move by MSI.
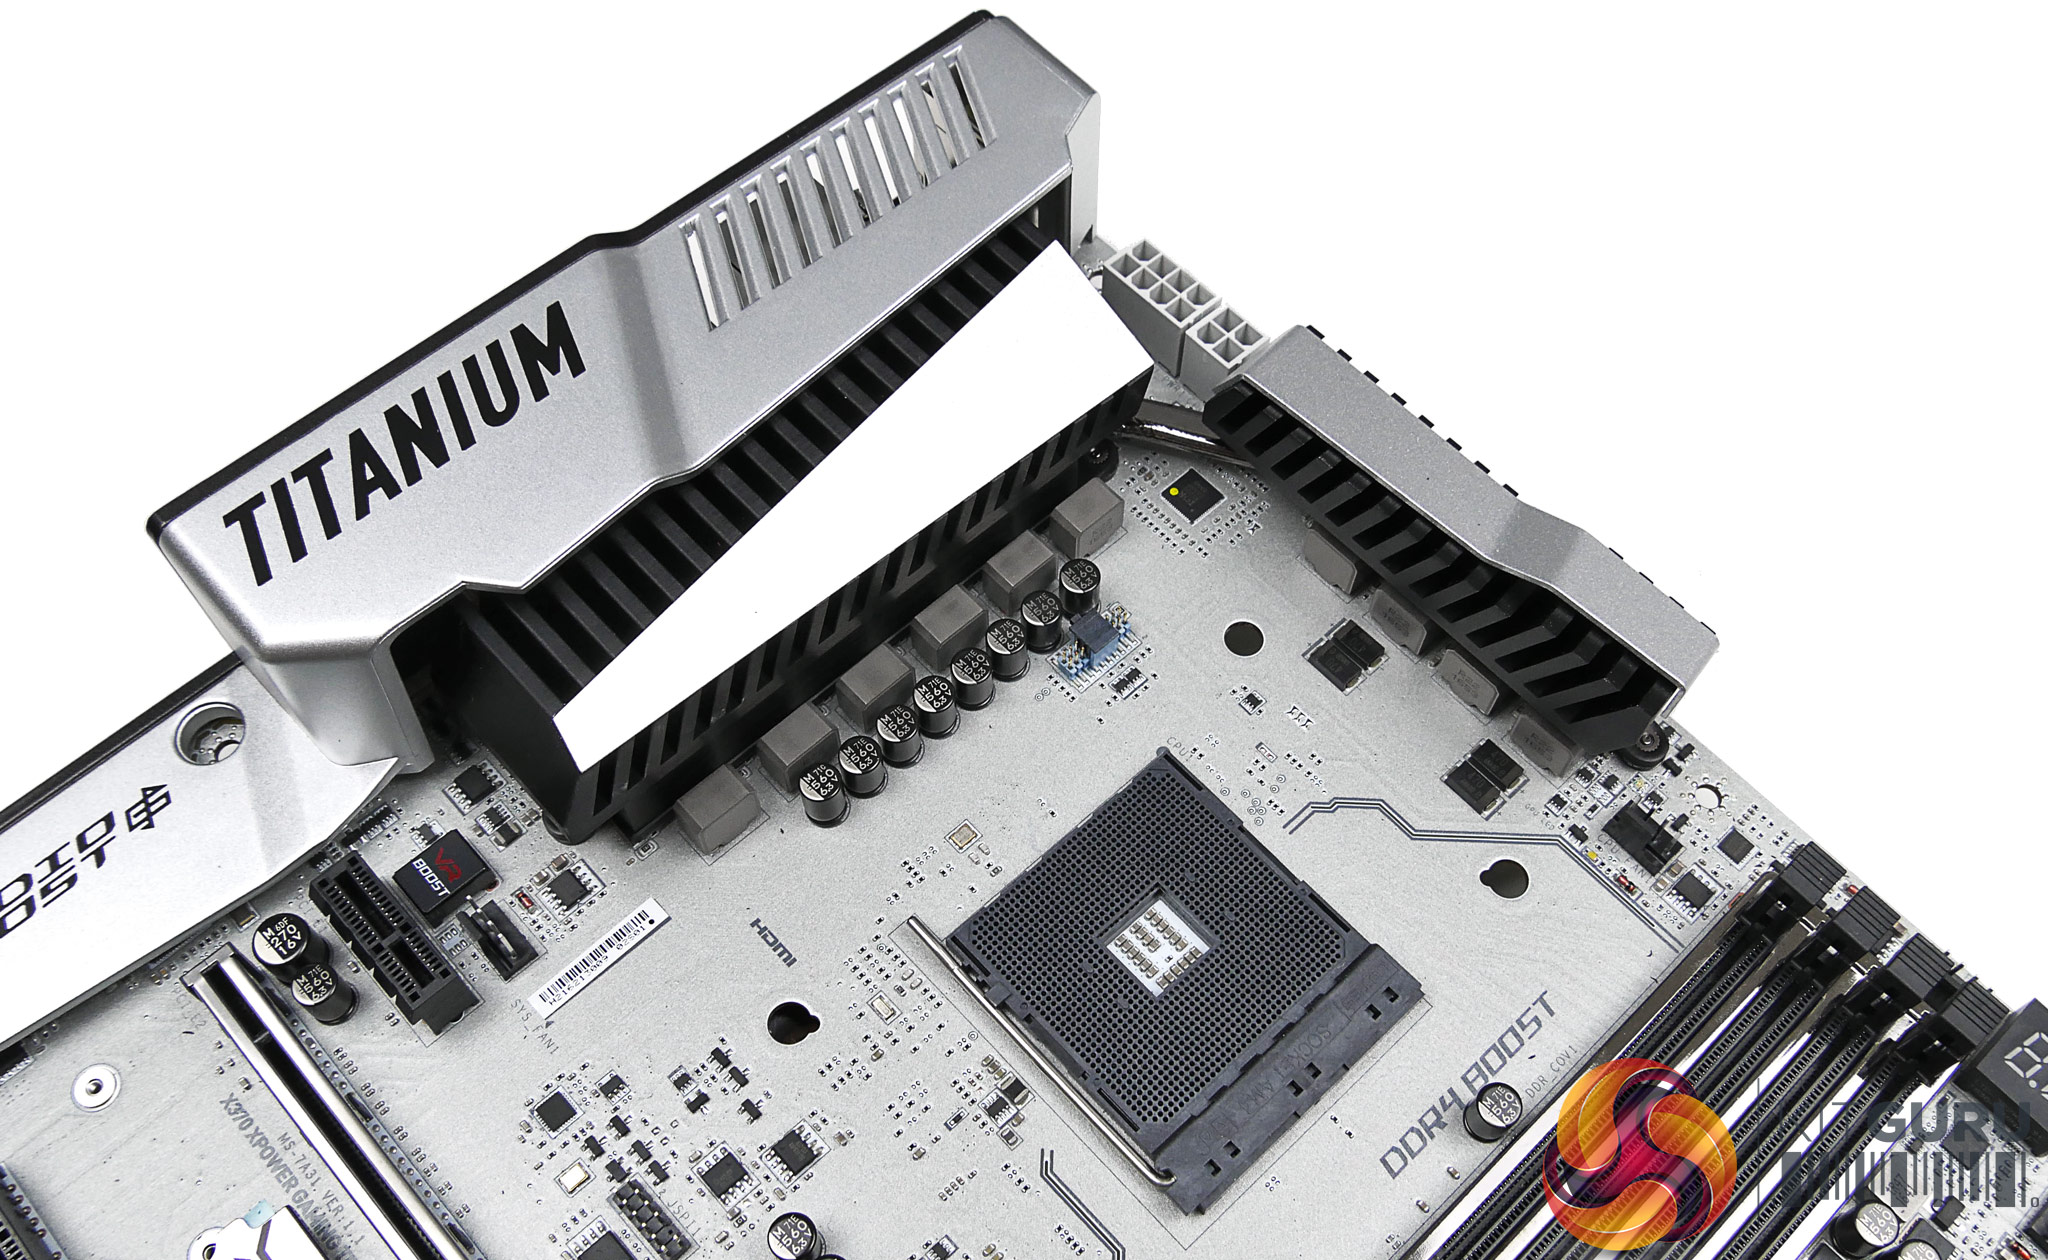
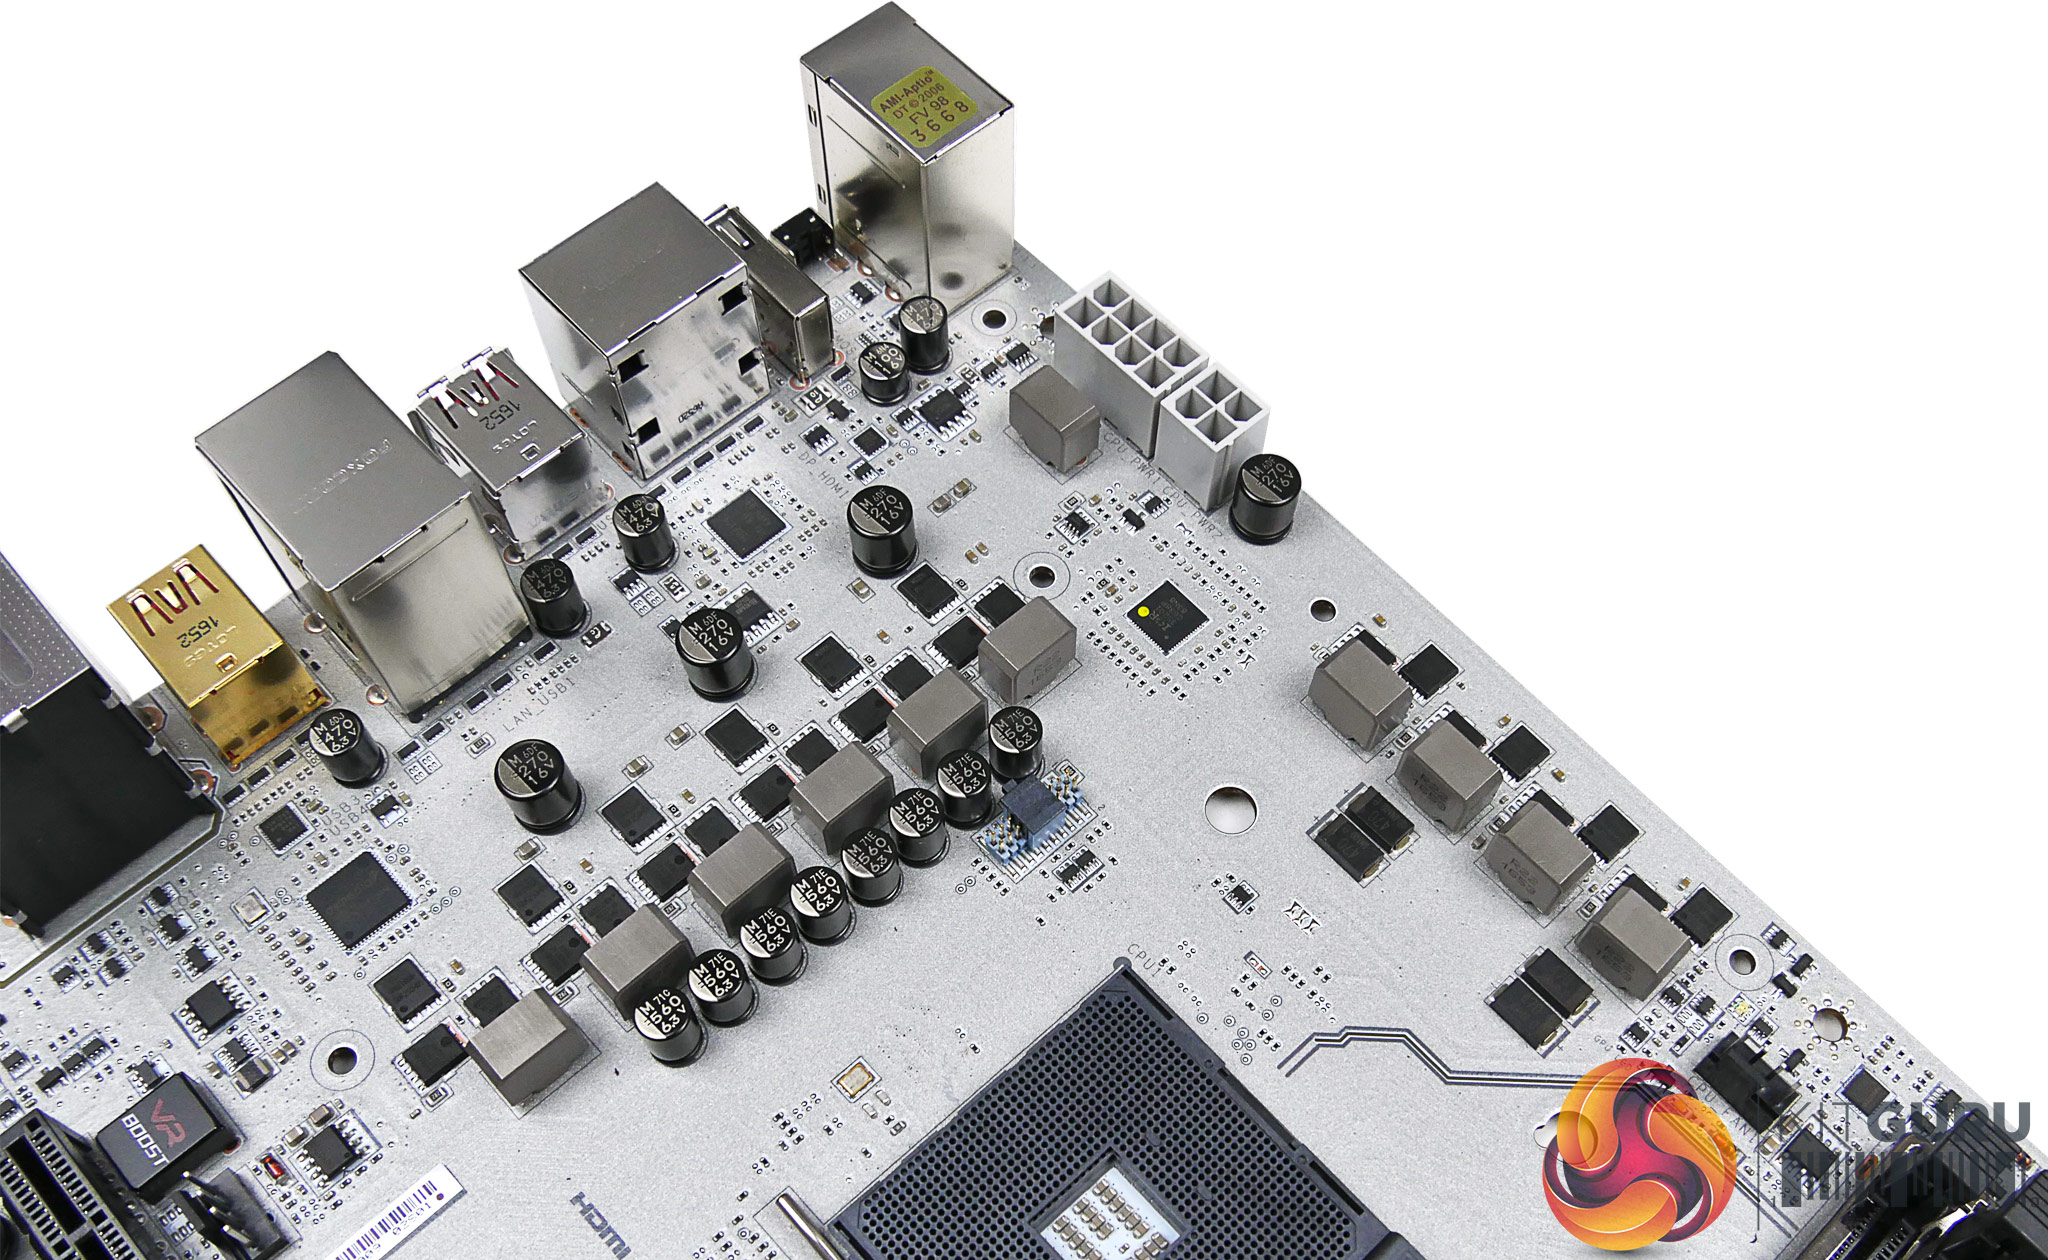
The 6+4-phase power delivery system will be split as six phases for the CPU and four for the SOC voltage rail. MSI uses an International Rectifiers IR35201 PWM controller which can manage up to eight phases. The presence of 3+2 (CPU+SOC) International Rectifiers IR3598 dual/doubler MOSFET drivers shows that MSI is leveraging phase doubling to drive the MOSFETs.
For the CPU power delivery section, six NIKOS PowerPAK PK616BA and twelve NIKOS PowerPAK PK632BA are combined. The SOC section gets four PK616BA MOSFETs and four PK632BA.
MSI's power delivery system seems a little light for a flagship, overclocking-geared design. ASRock and ASUS offer higher total phase counts on their competitors while also using efficient Texas Instrument NexFET power blocks (MOSFETs).
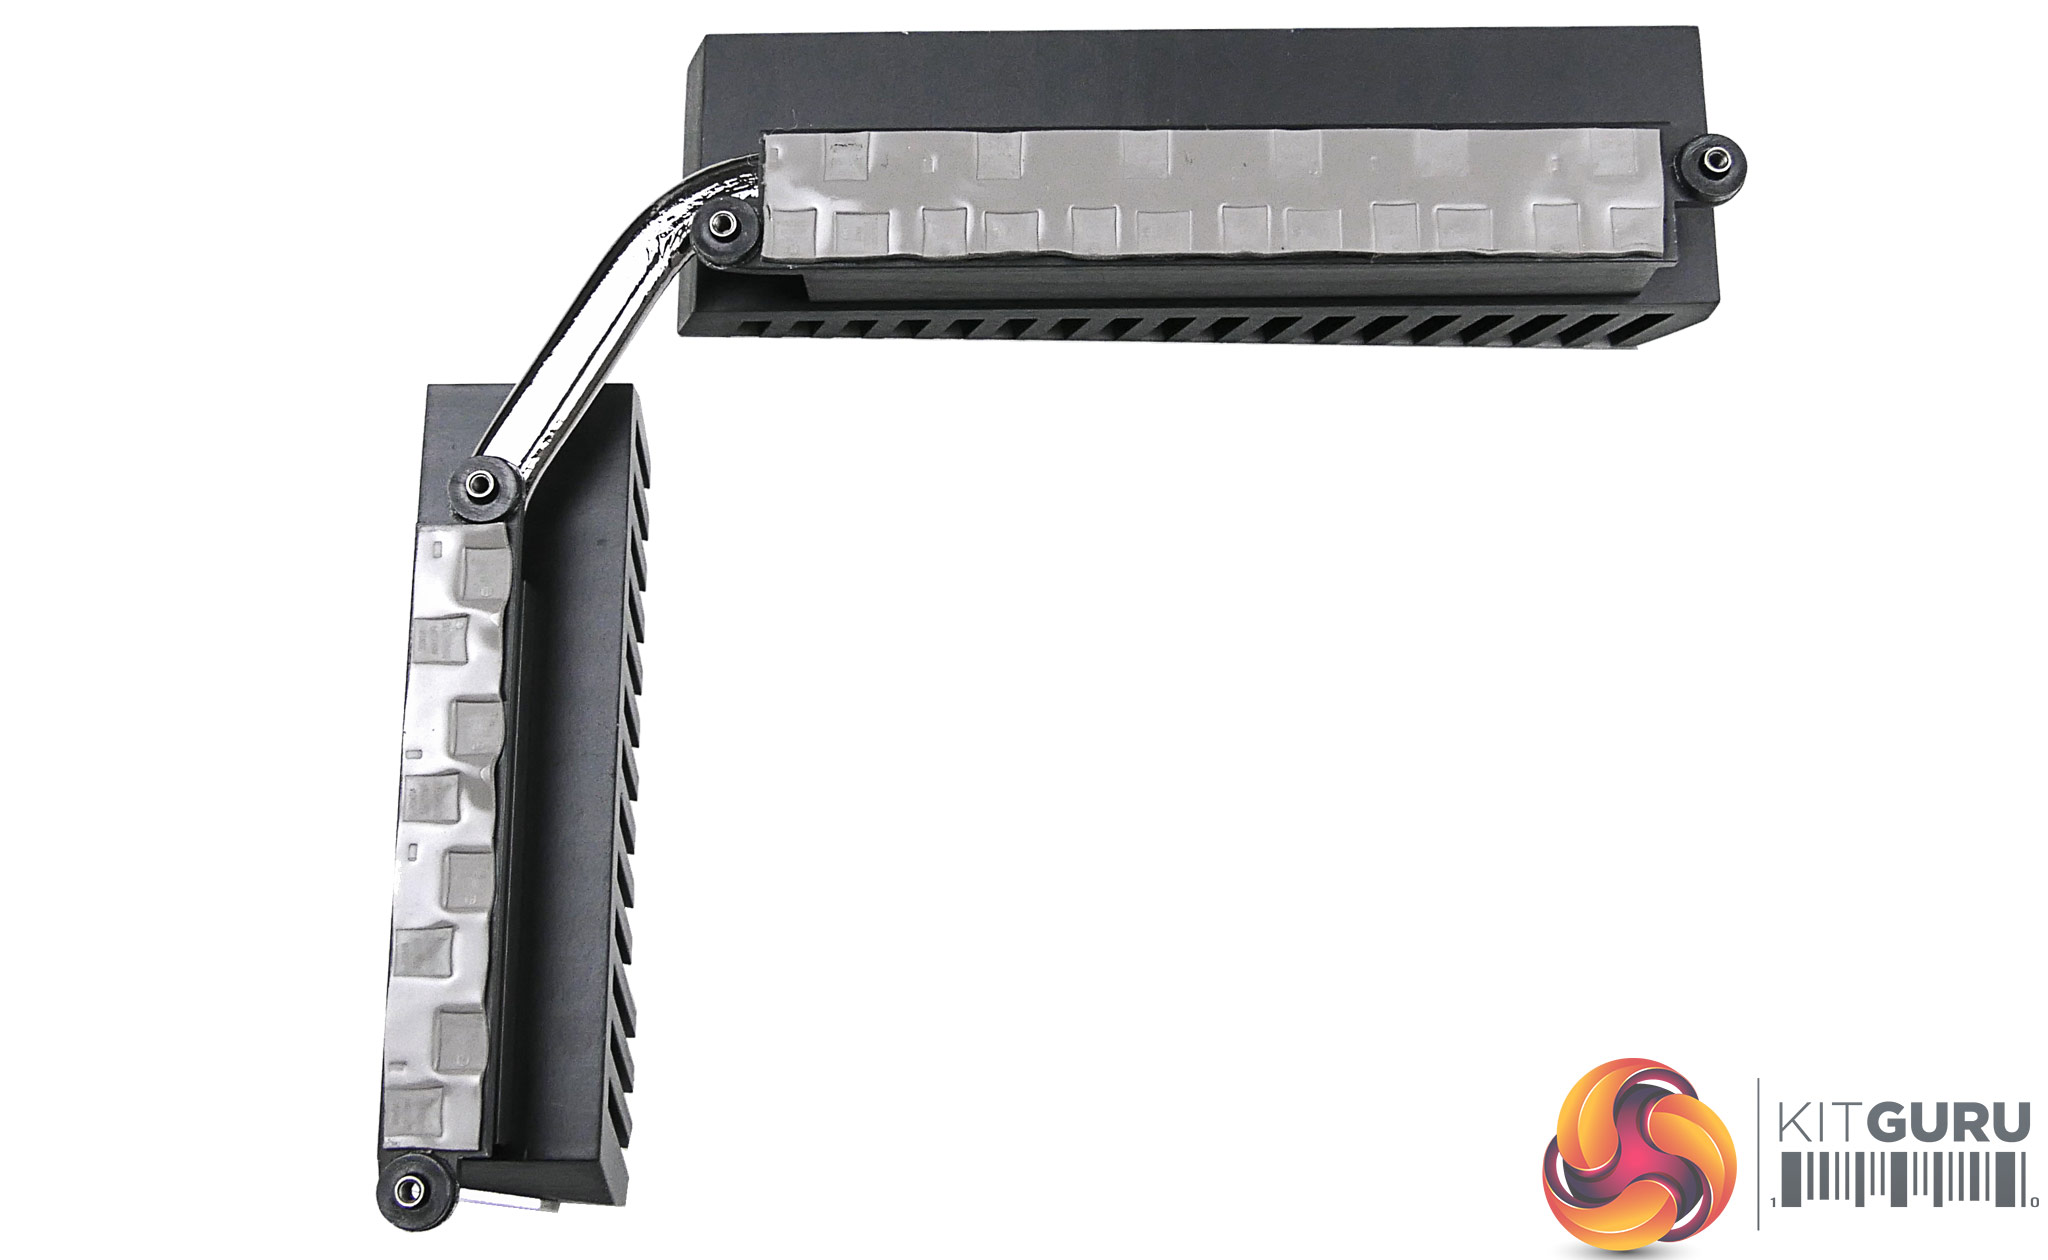
MSI uses a well-built heatsink for the MOSFETs. Two metal blocks are connected via a heatpipe and use a design that has fin structures, of sorts, to enhance heat dissipation potential versus a basic slab of aluminium. MSI's marketing material eludes to ‘Heavy Plated Titanium heatsinks‘.
I sincerely hope that is a simple case of marketing nonsense rather than actual engineering as Titanium is a poor thermal conductor compared to aluminium or copper (which are typically used for heatsinks).
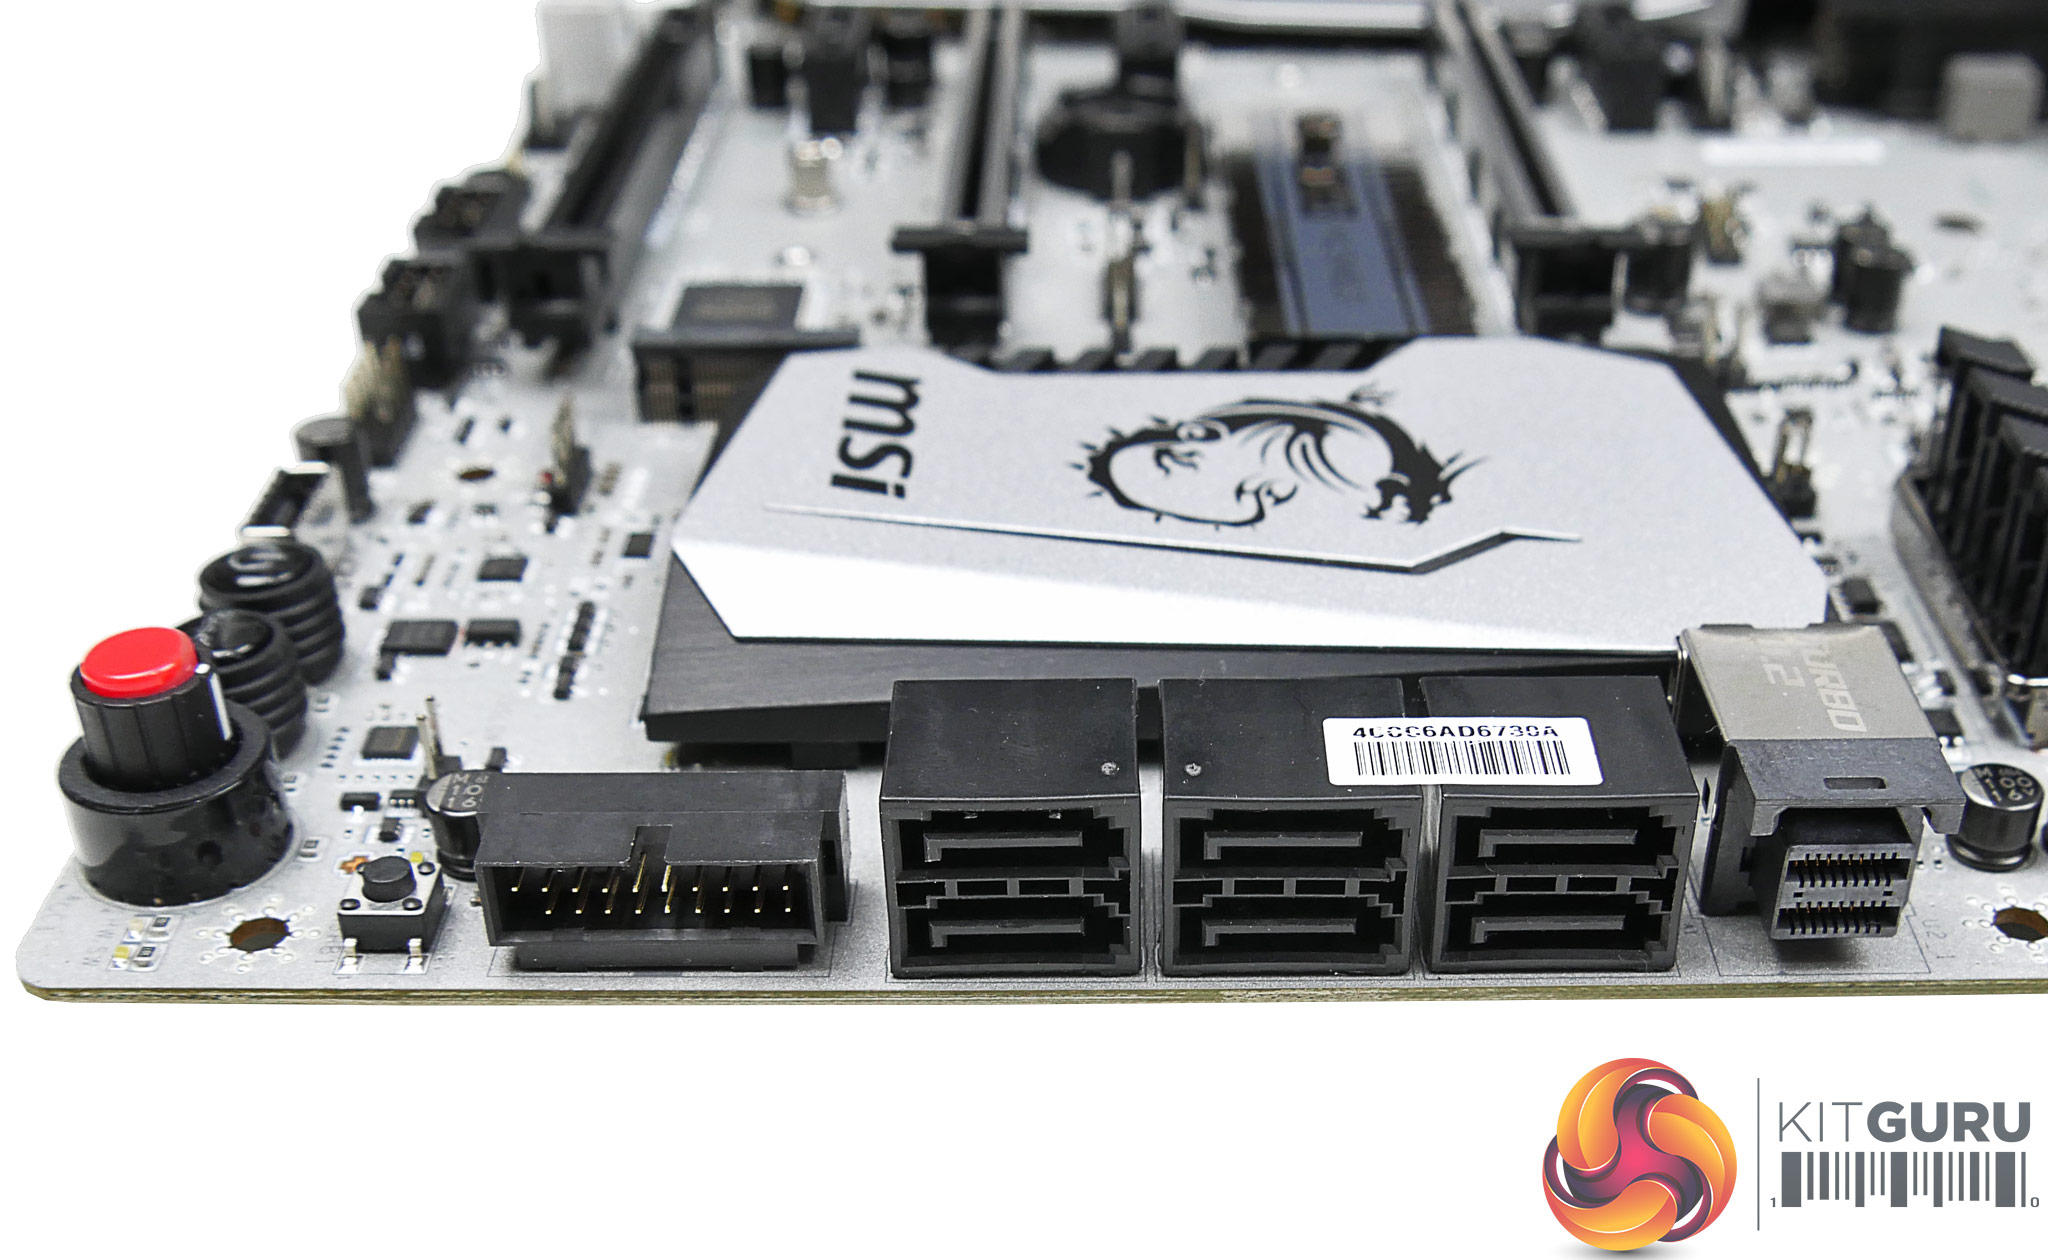
Six SATA 6Gbps ports are used, rather than the full allocation of eight made available by the AM4 platform. MSI mounts its second internal 5Gbps USB 3.0 header in this area in a right-angled orientation that can aid cable management duties.
I am glad to see the inclusion of a 32Gbps PCIe 3.0 x4 NVMe-capable U.2 connector given the strength of Ryzen 7 and AM4 as a workstation platform. Bandwidth for this port is shared with the M.2 connector, meaning that only one of them can be used at a given time.
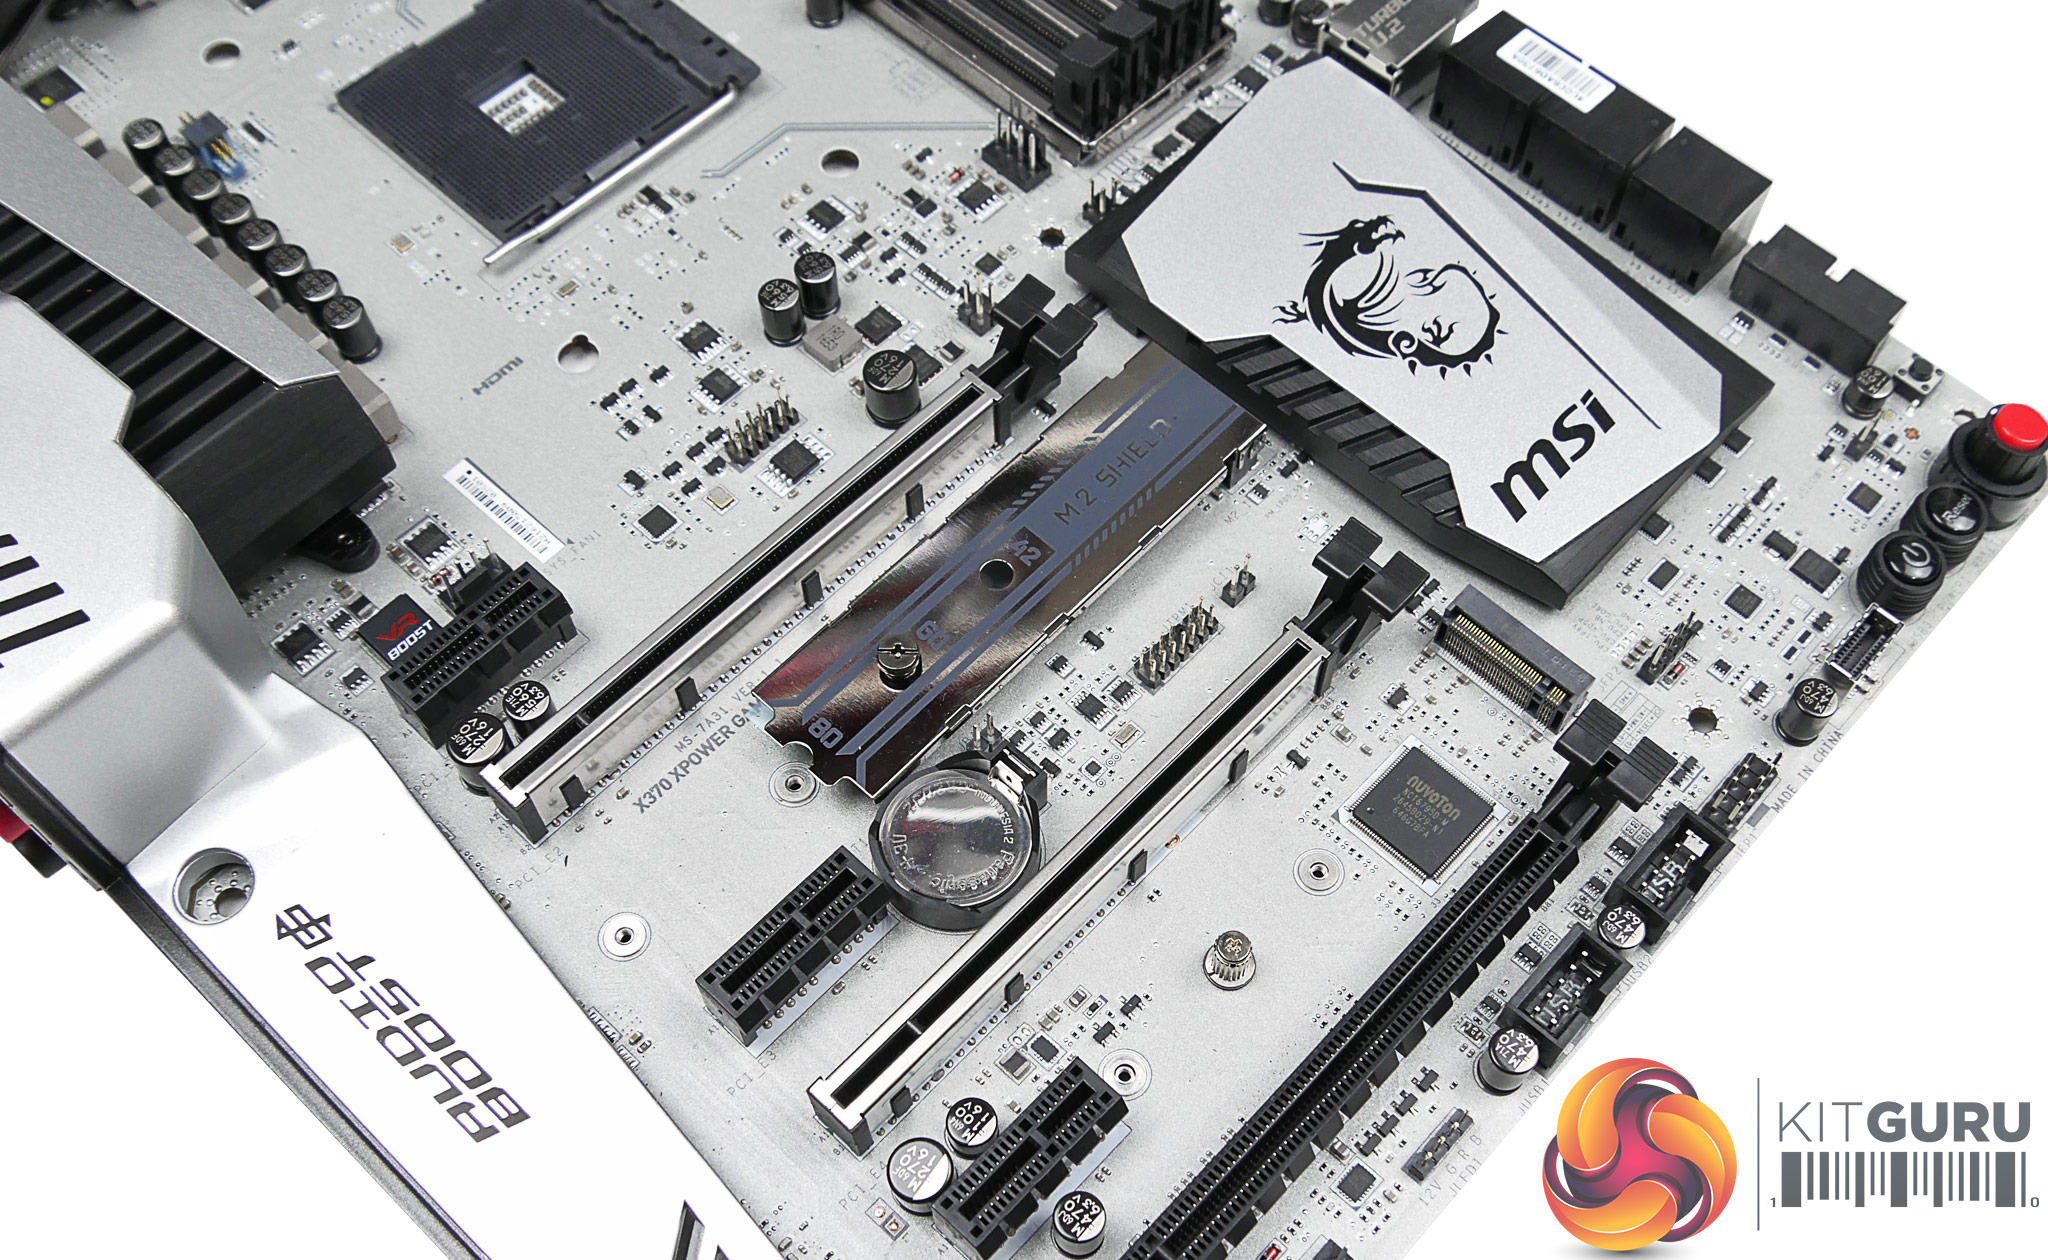
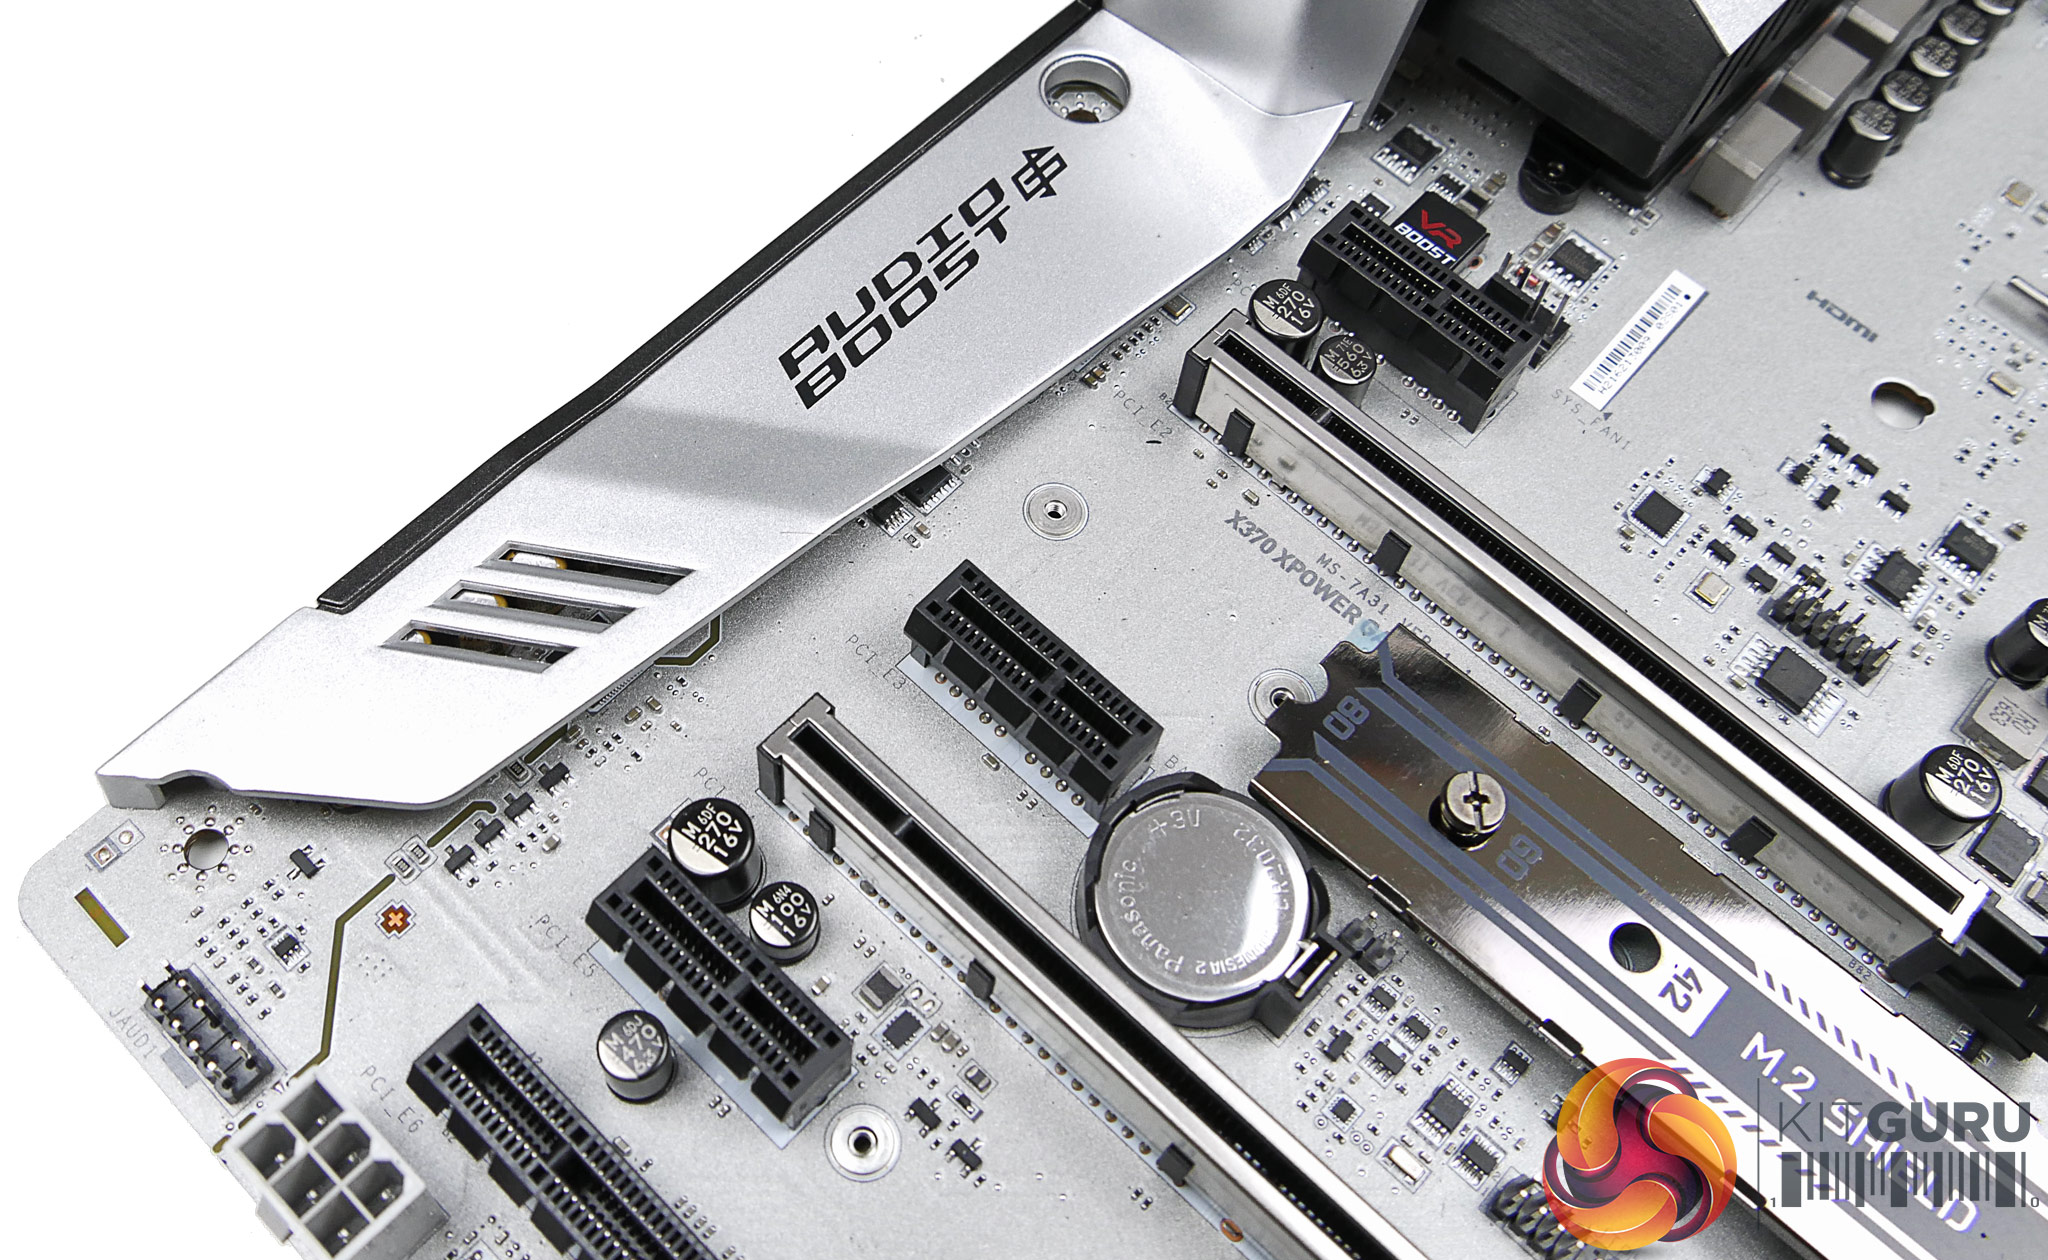
The CPU-fed PCIe 3.0 x4 NVMe-capable M.2 slot is given protection using MSI's M.2 Shield. There are contradictory reports on the relevance and usefulness of M.2 Shield as a cooling mechanism for SSDs. Thermals aside, it can mask an ugly green PCB on an M.2 SSD, which may be useful to some buyers.
That secondary M.2 slot is fed four PCIe 2.0 lanes from the X370 chipset, making its maximum transfer rate less than 2GBps. M.2 Shield cannot be used on the bottom slot instead of the top one. Both connectors also provide connectivity for M.2 SATA 6Gbps devices by stealing links from the onboard SATA ports.
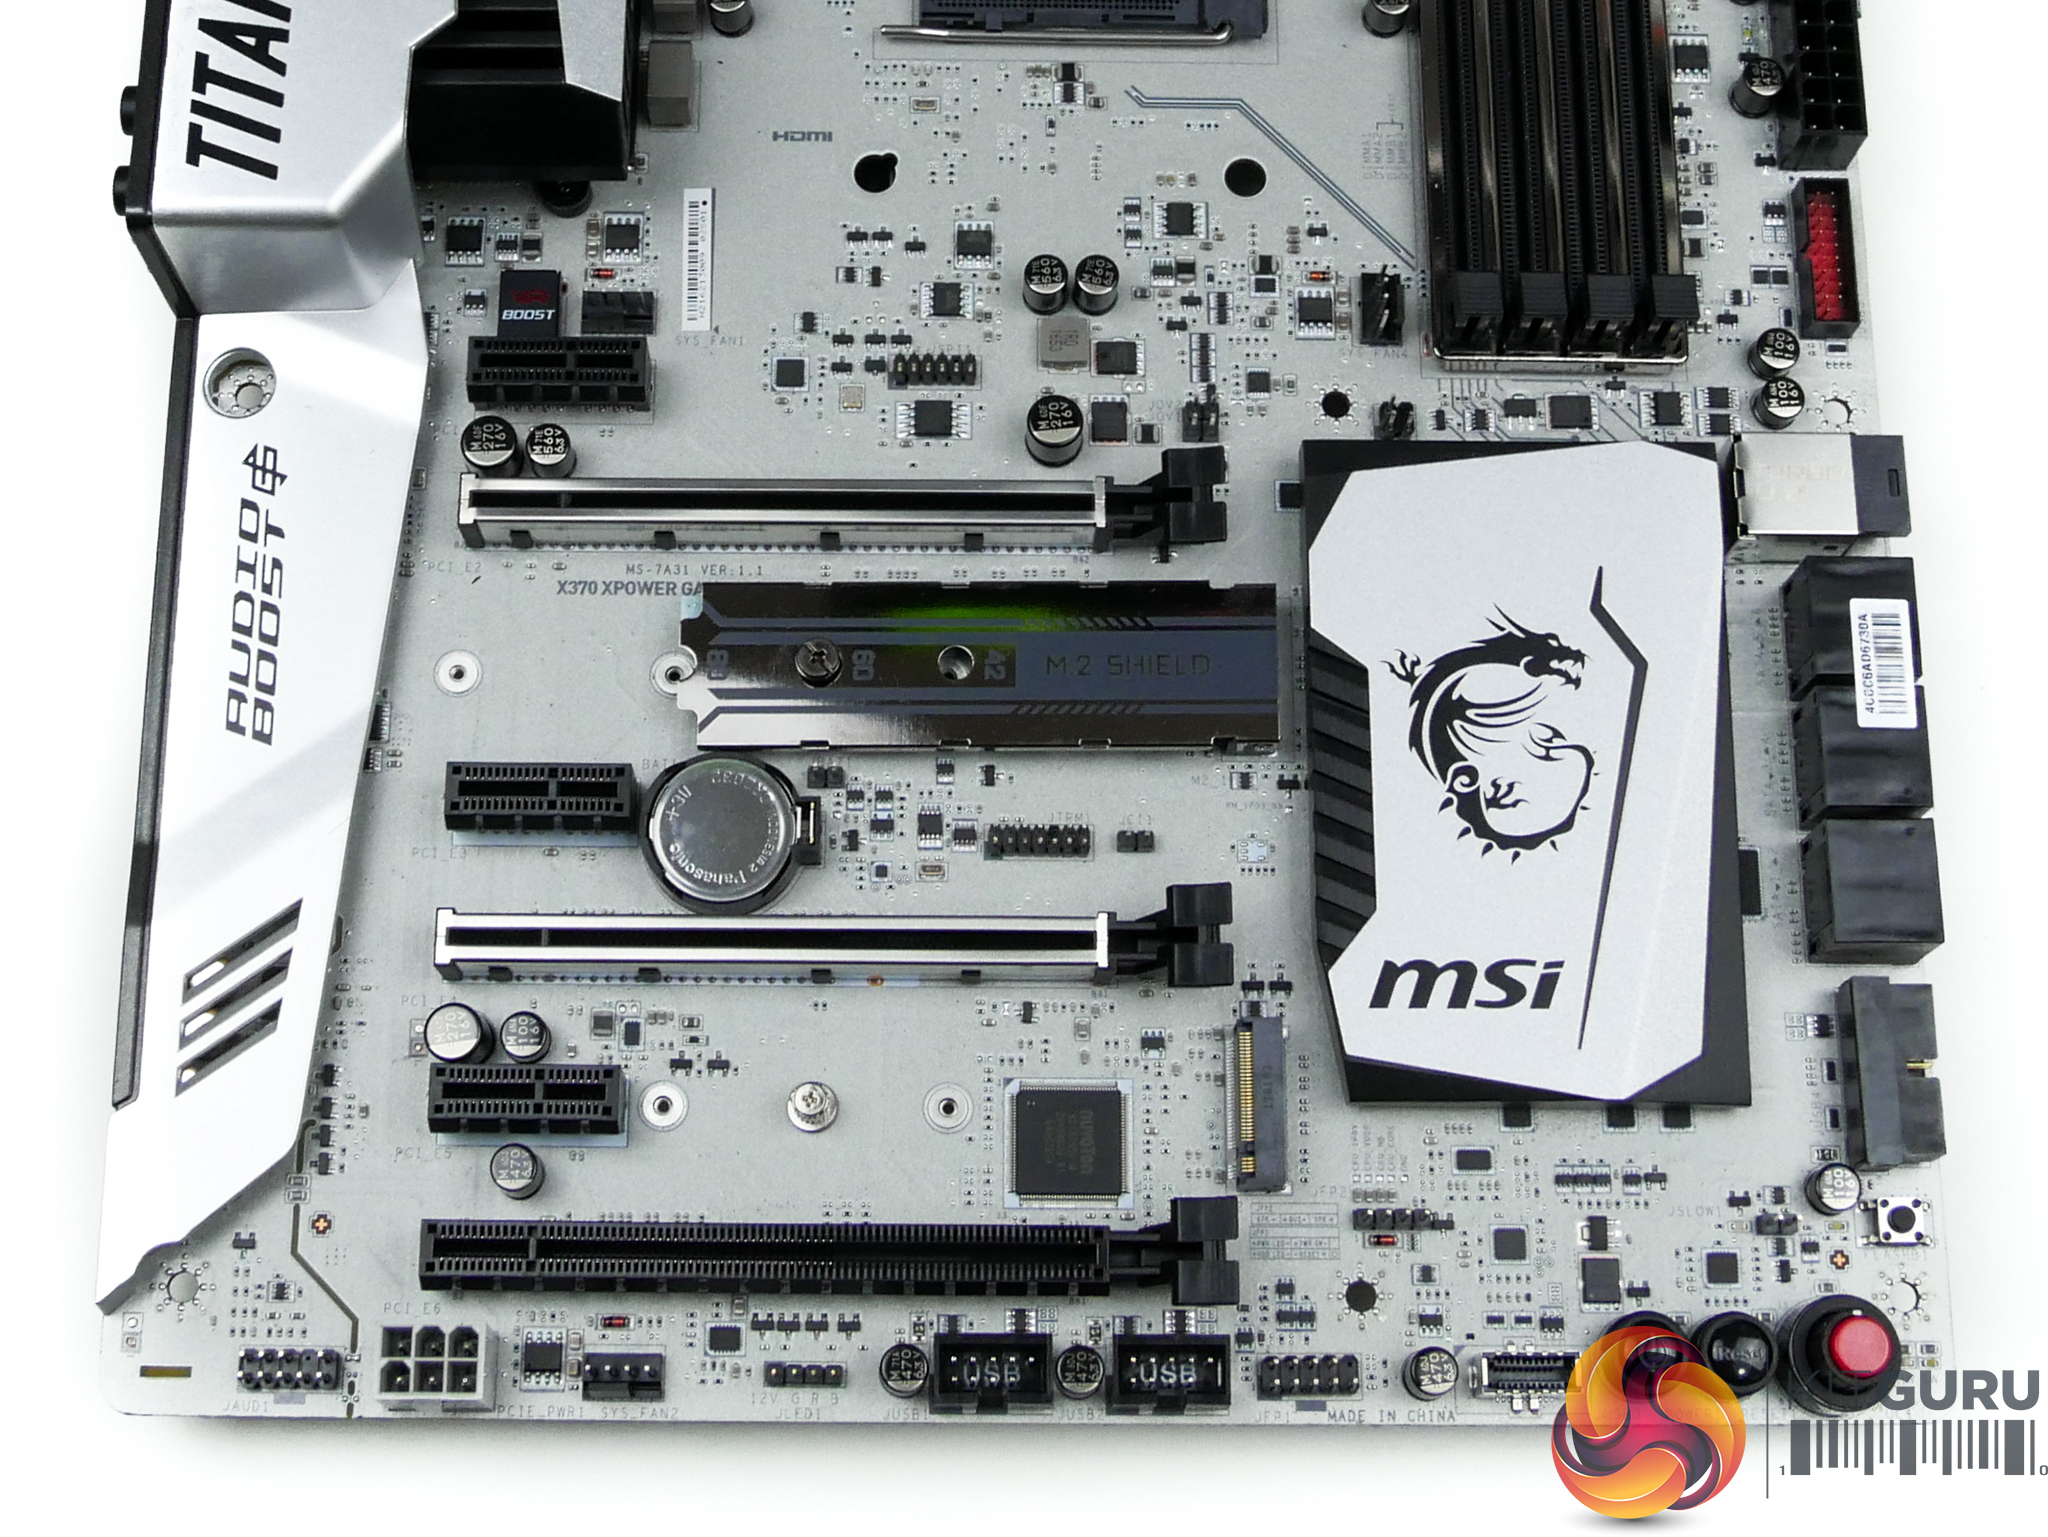
The two steel-reinforced PCIe x16 slots can be used for graphics cards. A single card runs at PCIe 3.0 x16 bandwidth from a Ryzen CPU while PCIe bifurcation allows x8/x8 which can support 2-card CrossFire and SLI. Slot spacing is the standard for today's market, with room being given between the coolers of 2- or 2.5-slot video cards.
That lower full-length PCIe slot runs with four Gen 2 lanes from the X370 chipset. Its bandwidth is switched from the lower M.2 slot meaning that only one of those connectors can be used at a given time. This highlights the somewhat limited PCIe expansion capabilities of AMD's AM4 platform in its current guise.
Three PCIe 2.0 x1 connectors are provided, all of which are given dedicated lanes from the X370 chipset and can be used without interference.
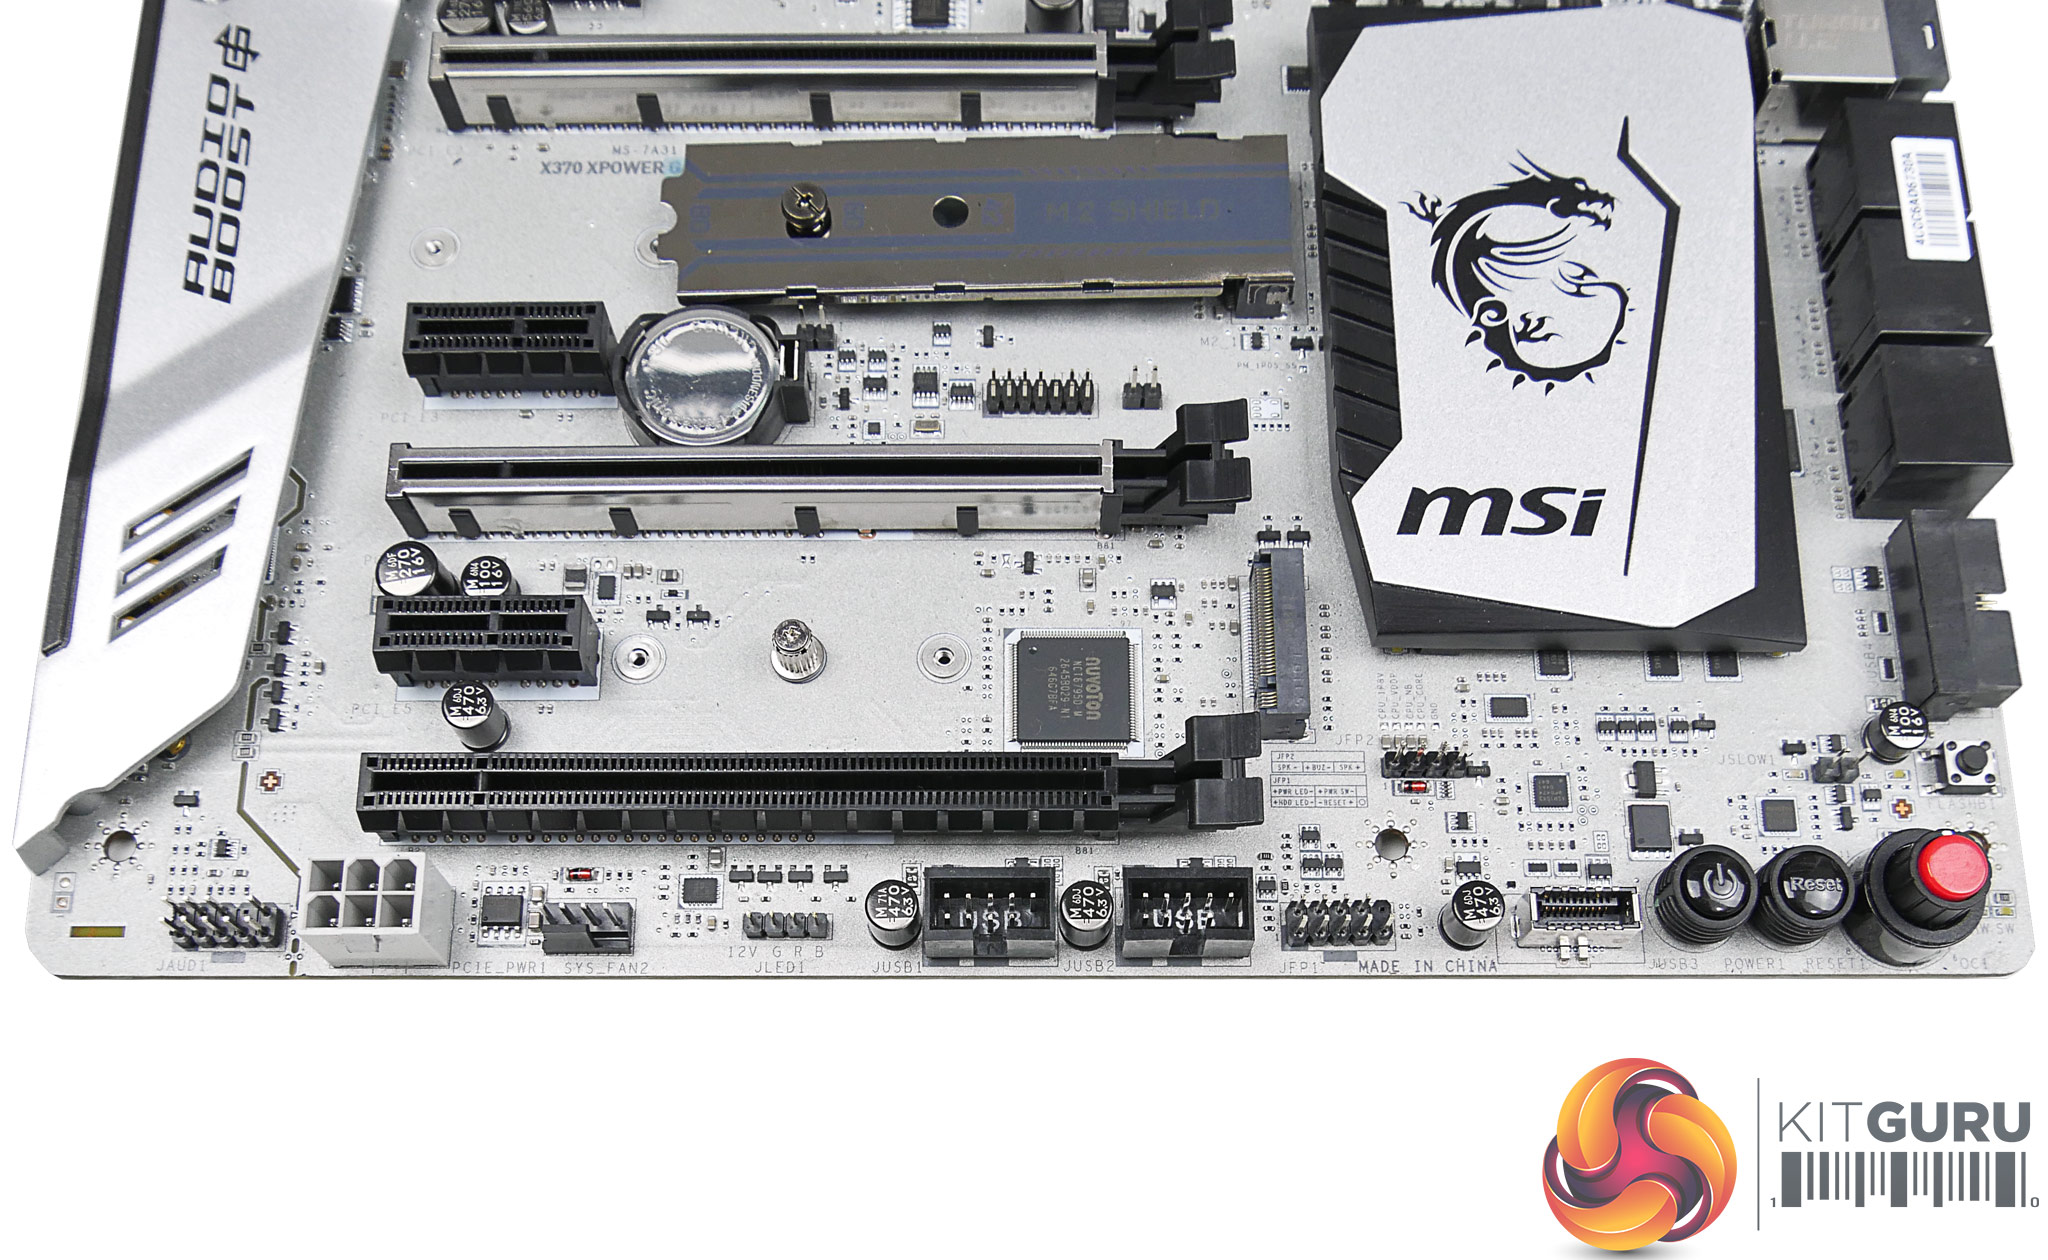
The usual set of headers is found on the bottom edge. Notable additions include a 4-pin RGB connector, an internal 10Gbps USB 3.1 Gen 2 header (delivered from the X370 chipset and aided by ASMedia ASM1543 logic), and onboard buttons for power and preset overclocking. No +/- overclocking-geared adjustment buttons are available, which is disappointing.
MSI adds a supplementary 6-pin PCIe power connector in case of stability issues when running two high-powered graphics cards that work the PCIe slots hard (I'm looking at you, RX 480).
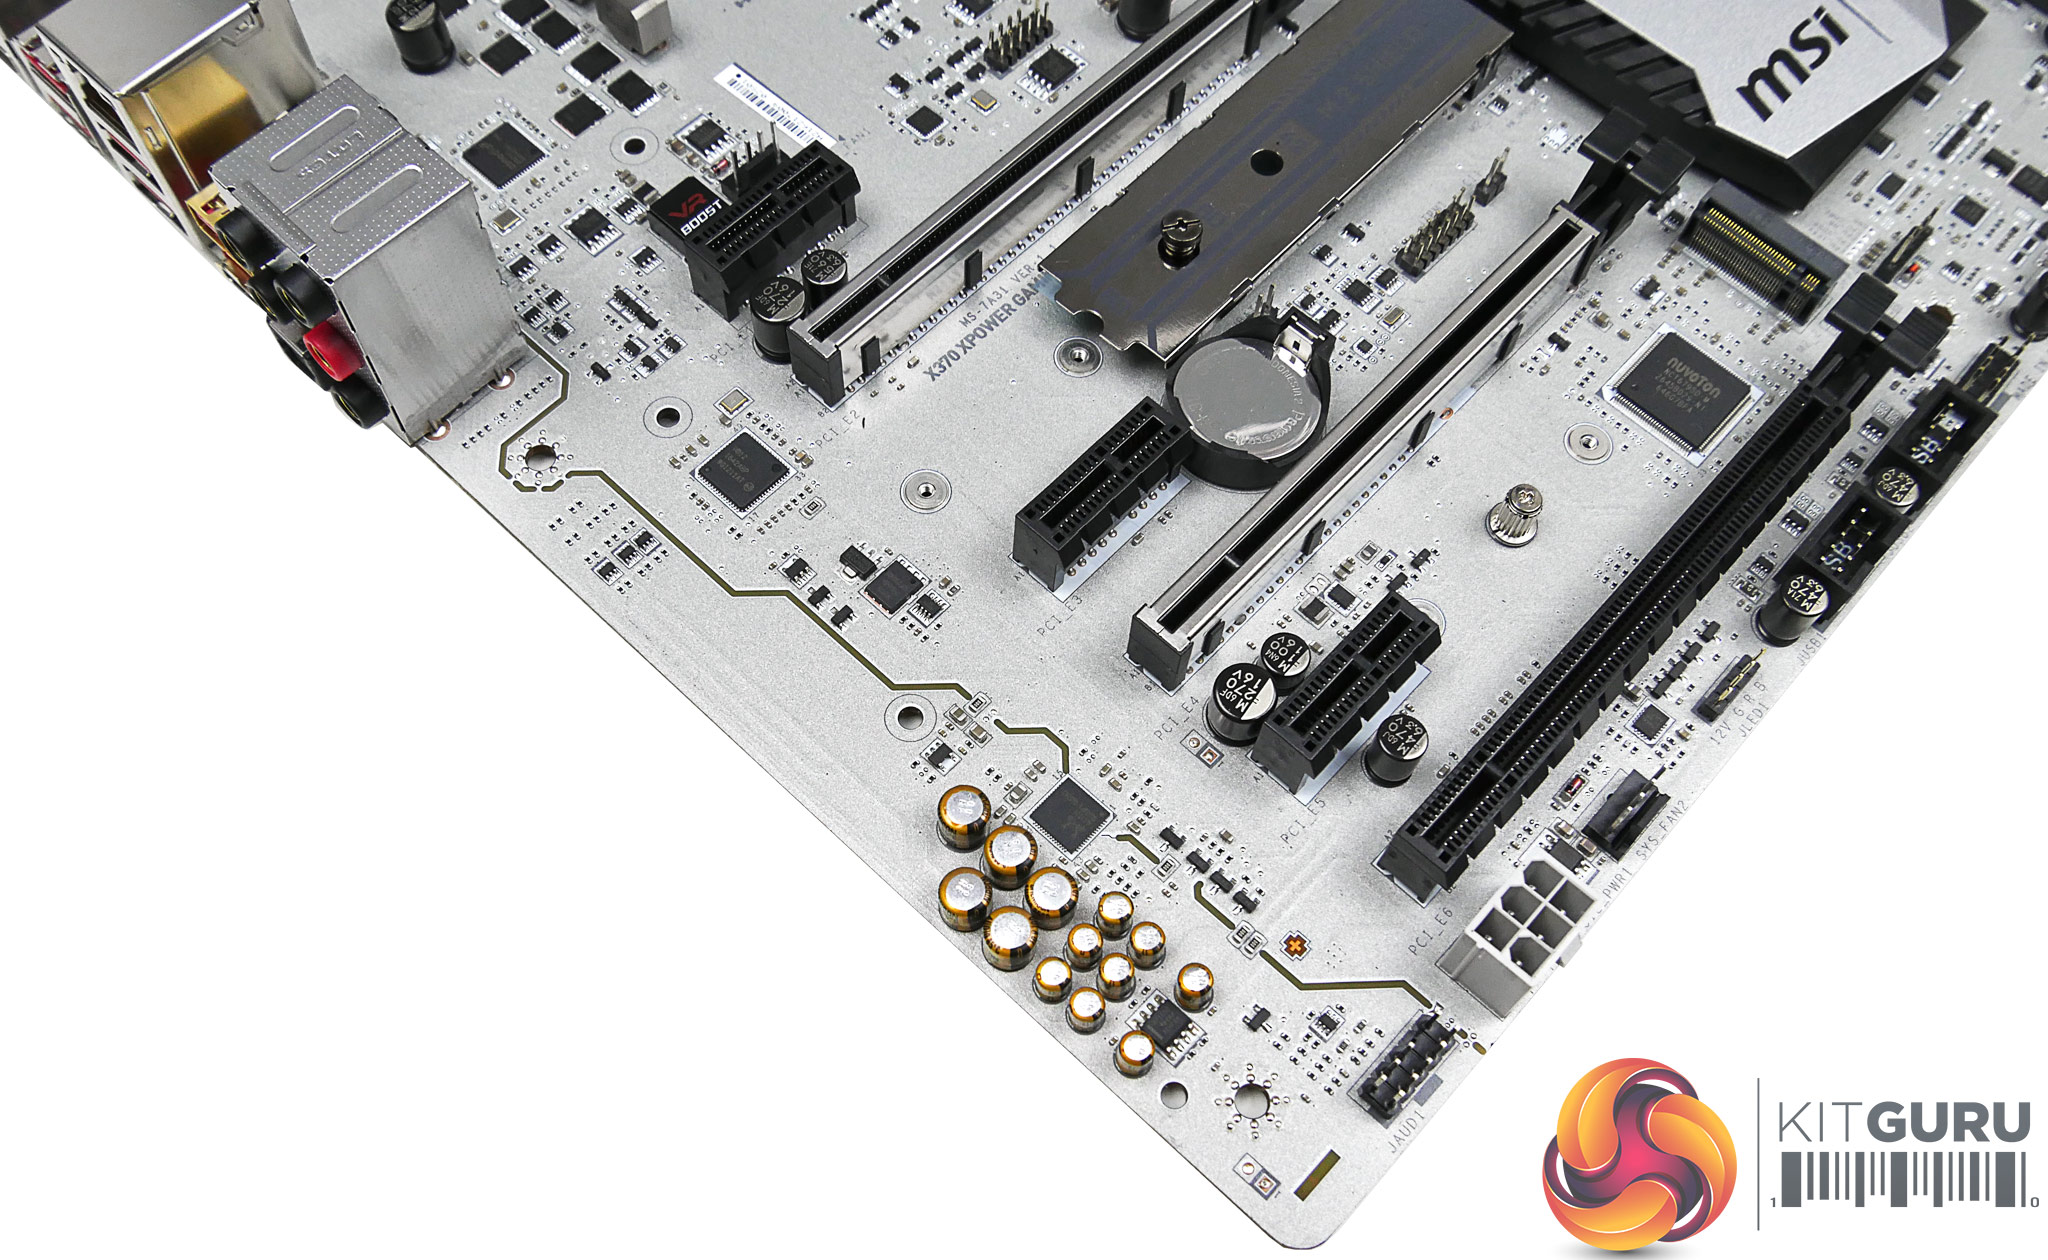
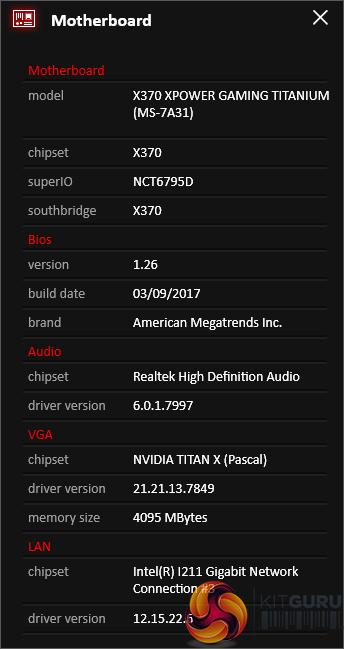
Audio Boost 4, as MSI names it, is built around the popular Realtek ALC1220 codec found on most high-end motherboards in today's market. A Texas Instruments OPA1652 op-amp and Nippon Chemicon capacitors are added.
Video outputs in the form of DisplayPort and HDMI 2.0 are a questionable inclusion on the rear IO, especially when there's a BOM cost to the Texas Instruments SN75DP159 chip used. We would be astonished to see APU users partnering their chip with this motherboard.
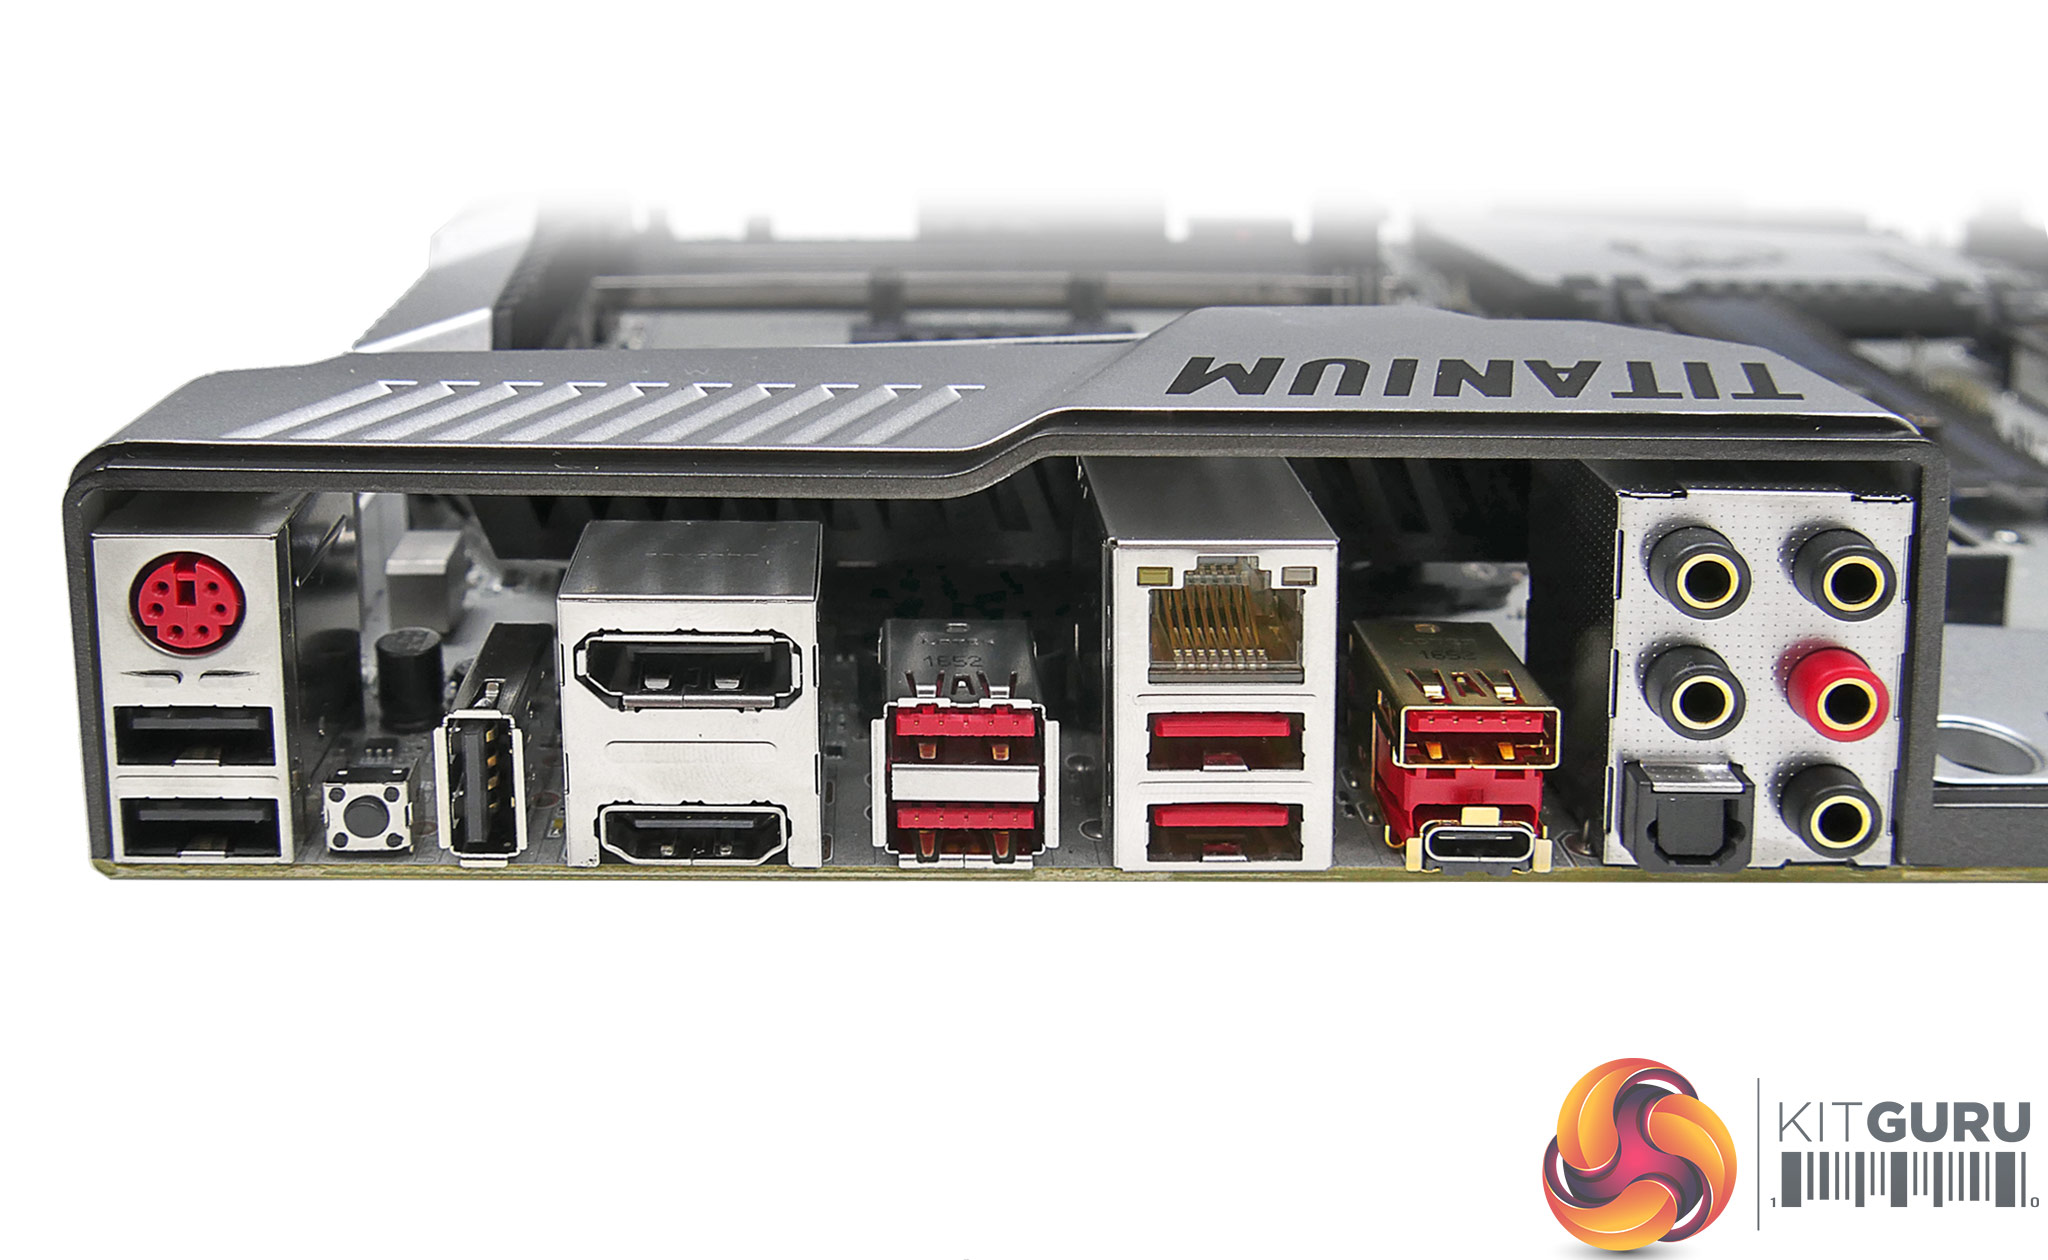
A PS/2 combo port is sat next to three USB 2.0 Type-A connectors. The right-angled Type-A port is allocated BIOS Flashback+ duties and sits next to the clear CMOS button. Four more Type-A ports, this time coloured in red to signal 5Gbps USB 3.0 operation, are provided. The two sat beneath Intel's I211AT-based GbE are ‘VR Ready‘ which basically means that they should deliver a clean voltage level thanks to an add-on ‘VR Boost‘ chip.
10Gbps USB 3.1 Gen 2 is provided in Type-A and Type-C form on the rear panel. I am pleased to see that MSI has chosen to use the ASMedia ASM2142 chipset that is superior to the ASM1143 alternative seen on ASUS' ROG Crosshair VI Hero and Gigabyte's Aorus AX370-Gaming 5. Gold-plated audio jacks and an optical output finish up the rear IO group.
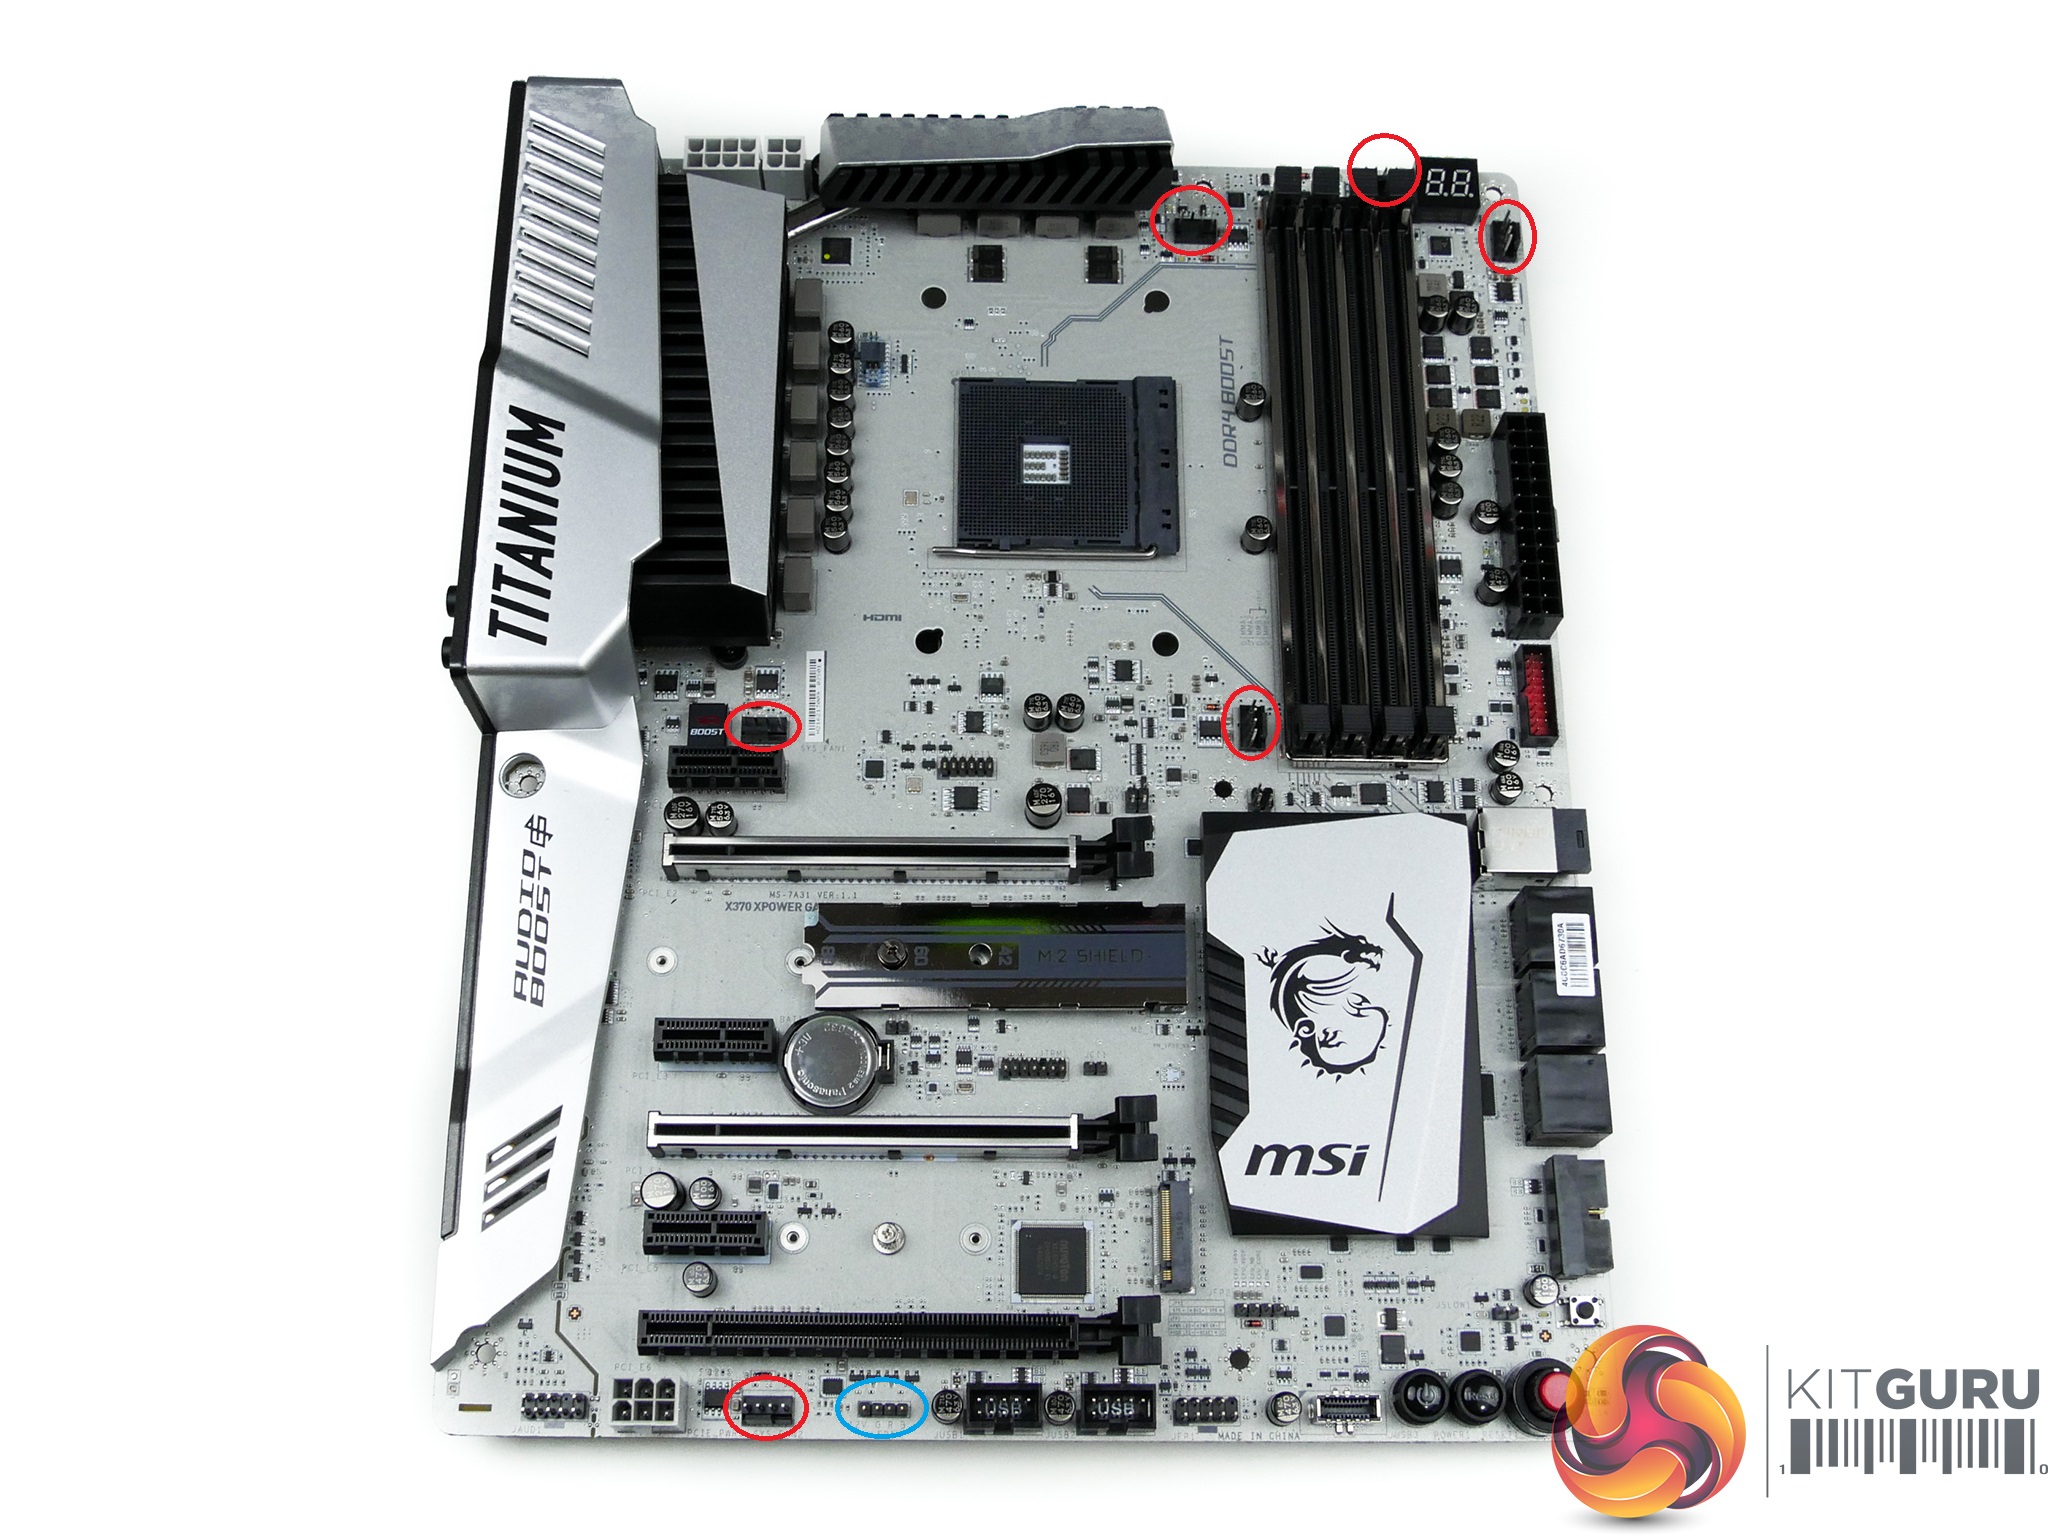
Six 4-pin fan headers are spread across the motherboard. Five of these headers are close to the CPU socket, which is a positive. PWM- and DC-control ability is given to the headers meaning that they can be switched to CPU fan, chassis fan, or water pump operation as desired. Nuvoton's NCT6795D-M is deployed for monitoring duties.
MSI includes just the one 4-pin RGB header at the very bottom of the motherboard. This is disappointing given that the market has shifted to providing at least two headers in this segment, for added flexibility. With that said, the accessory bundle that we did not receive should include an RGB LED splitter and extension cable.
MSI X370 UEFI
The UEFI used for X370 is almost identical to that found on the Z270 offerings. As such, we have re-used the bulk of our analysis from those reviews and updated the text where there are subtle differences.
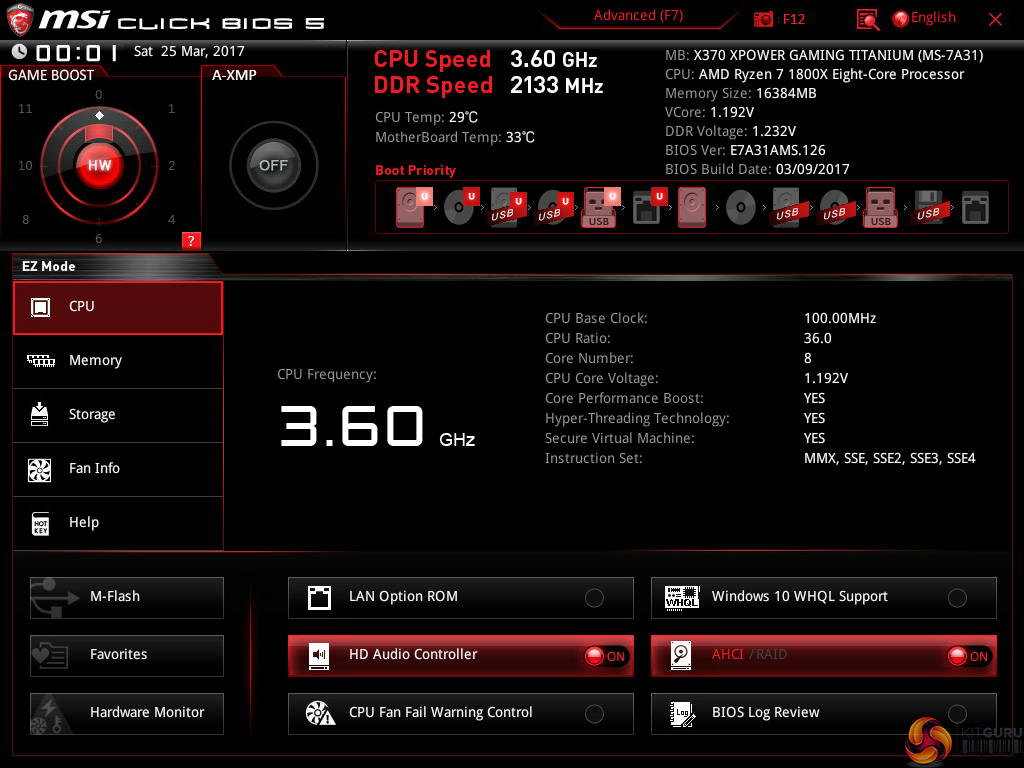
Entry into MSI’s Click BIOS 5 UEFI is started on the EZ Mode page.
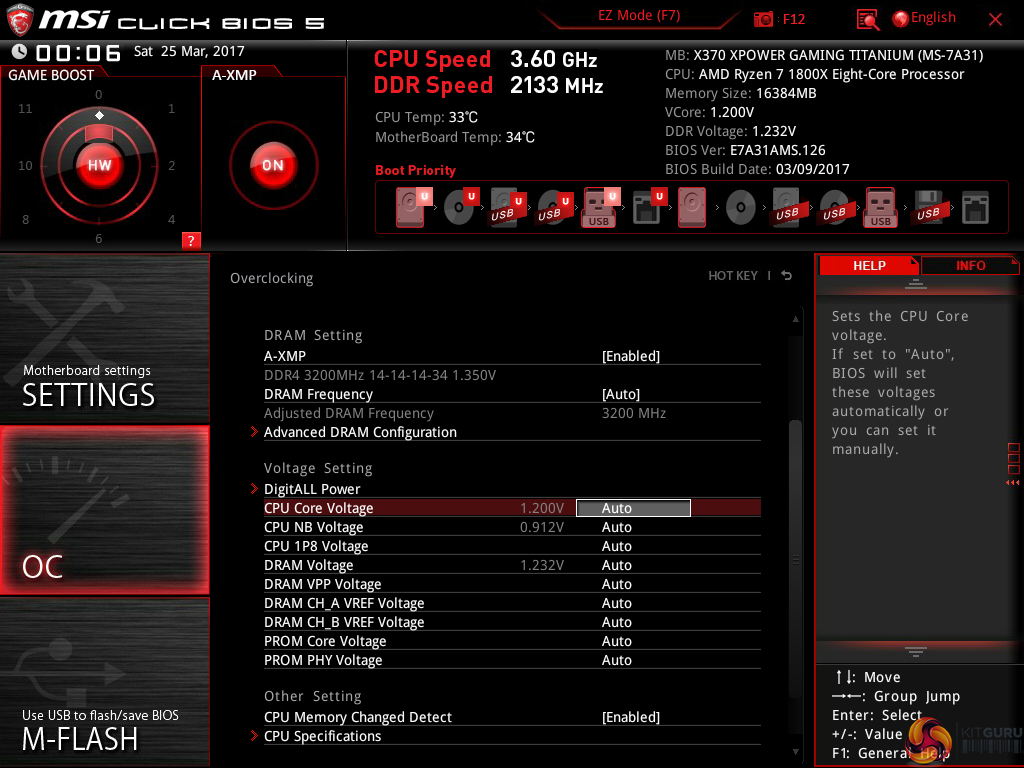
MSI’s version of EZ Mode is the best of all motherboard vendors as it features the most options but does not overcrowd the screen and remove the ease-of-use aspect. Buttons for simple A-XMP and Game Boost overclocking activation are smart moves.
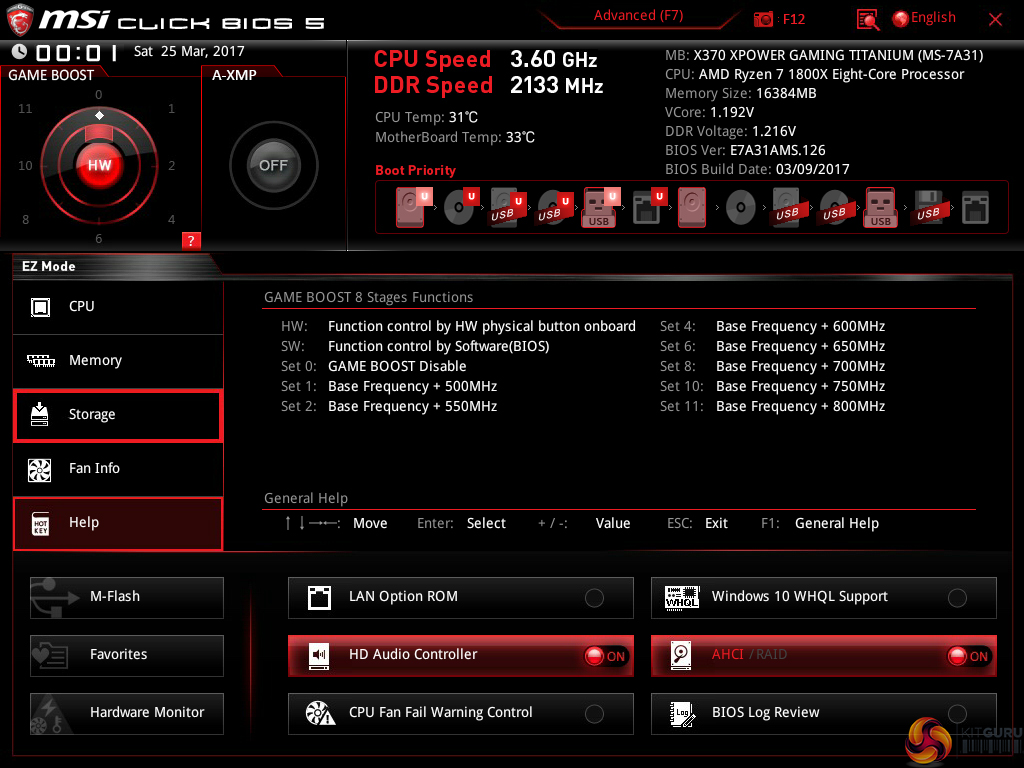
Game Boost is MSI’s pre-determined overclocking mode which offers frequency adjustments for Ryzen CPUs. These are far less fine-tuned than manual overclocking, though, as they are designed to work with a variety of chips rather than your own specific silicon.
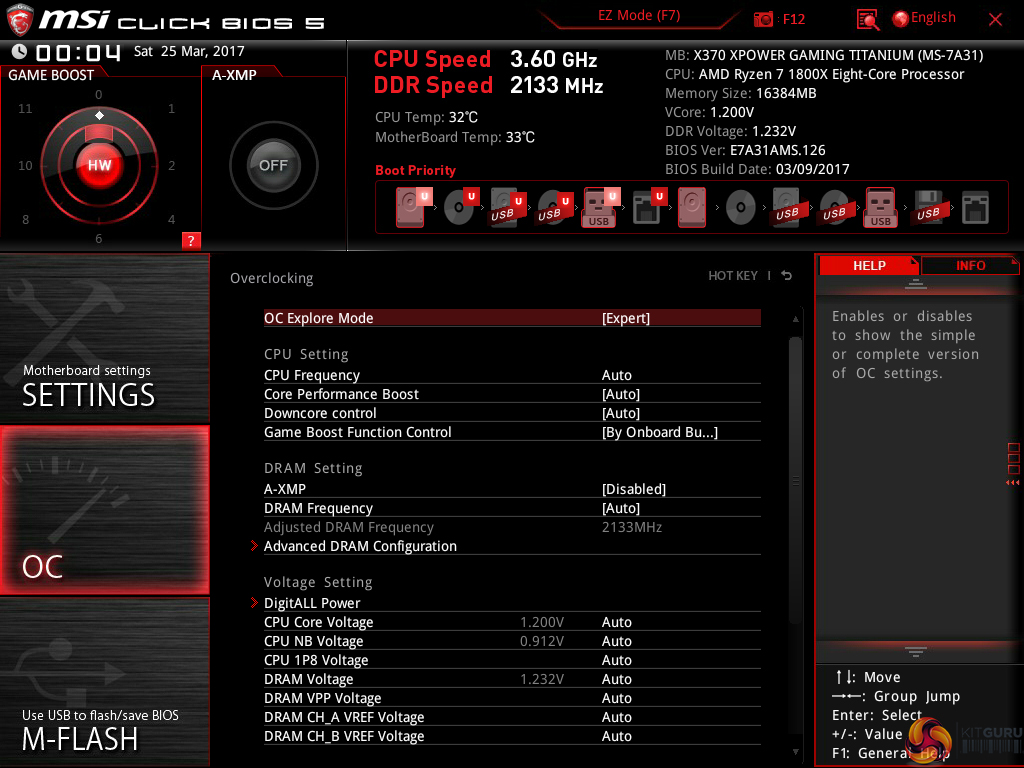
Hitting F7 takes a user into the Advanced section. The general layout is well-described and easy to follow. Six tabs house all of the adjustable settings, with information and boot device adjustment being held at the top of the page.
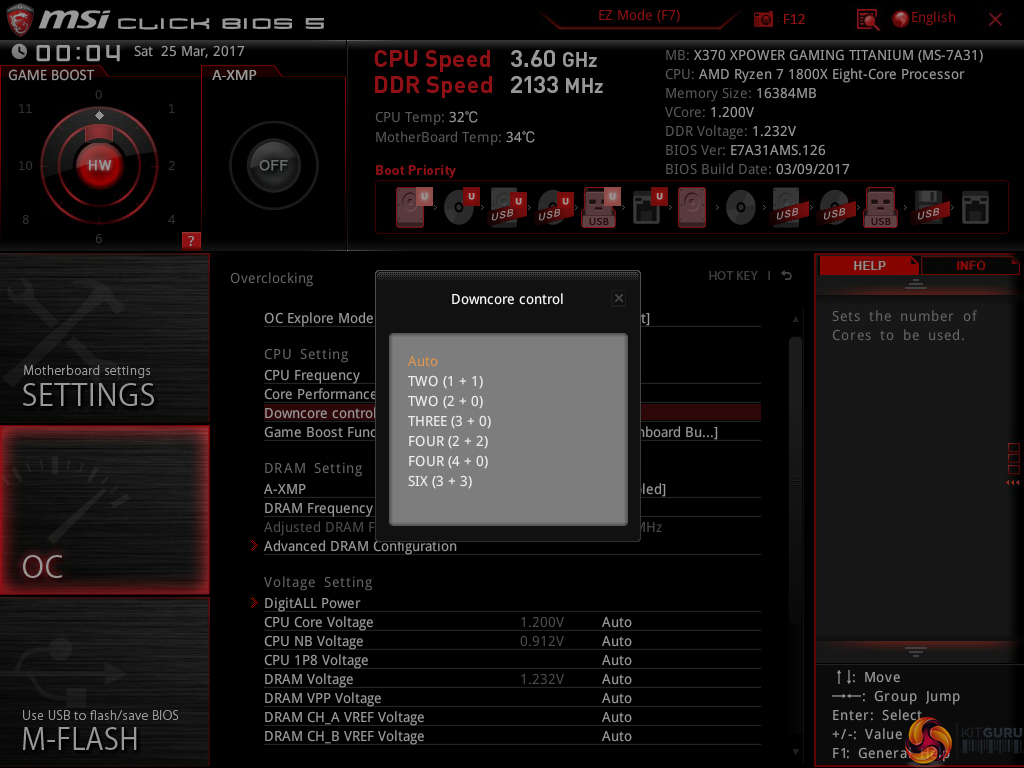
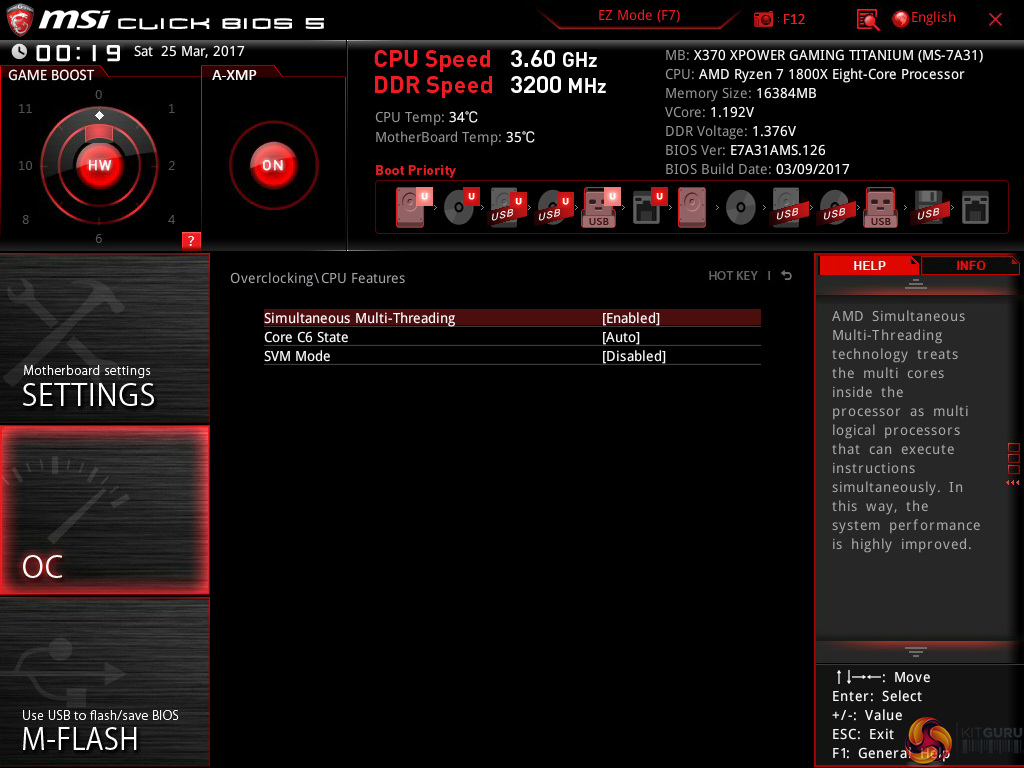
The OC section is, as expected full of settings relating to overclocking. MSI smartly includes a Normal or Expert selection mode that is useful for those trying to learn about overclocking who do not want to risk adjusting irrelevant settings.
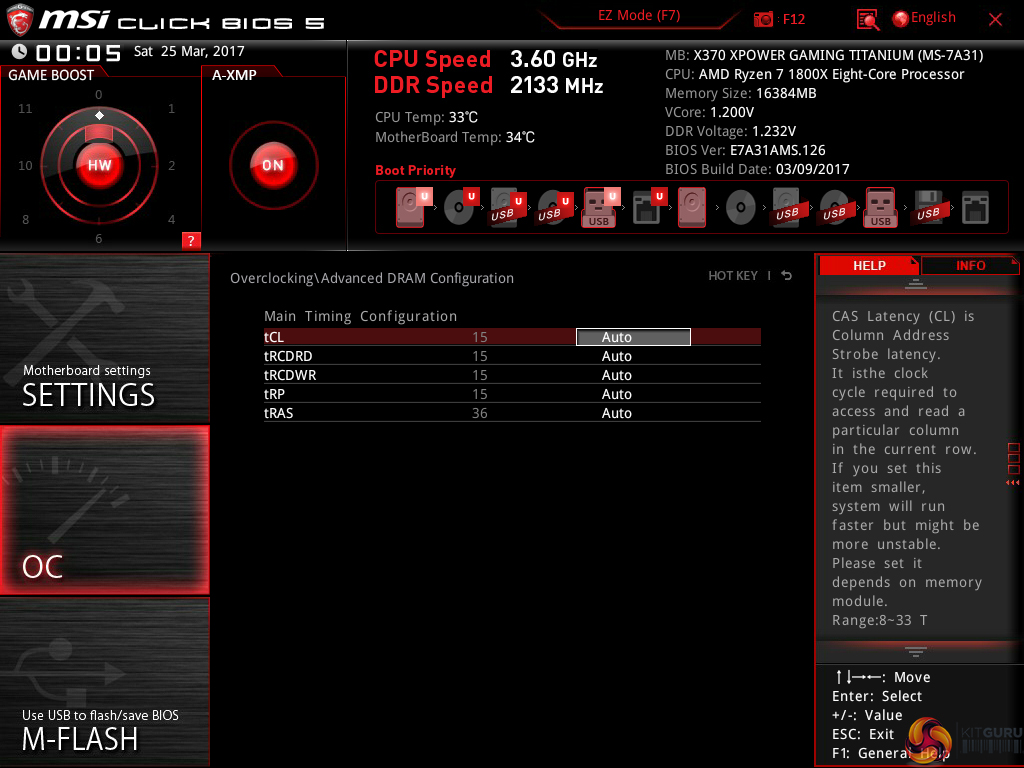
There are plenty of options relating to voltage, frequency, and settings adjustments and all are generally easy to find. Being critical, the layout could be a little more segregated to reduce the amount of information on the single primary page.
MSI's load-line calibration (LLC) settings are clear and functional, which cannot be said for the system deployed by Gigabyte and ASUS. Nine different options can be selected and MSI smartly uses a simple graph to show how the voltage changes based on load. Simple, yet functional. It certainly aided the simplicity of our overclocking attempts.
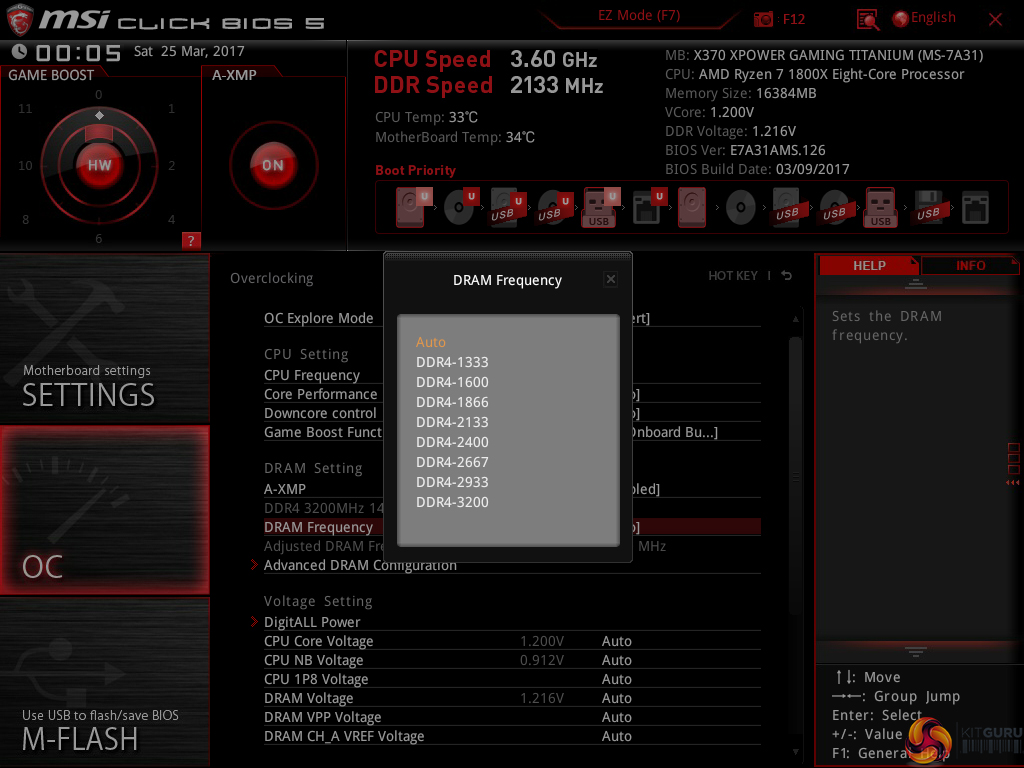
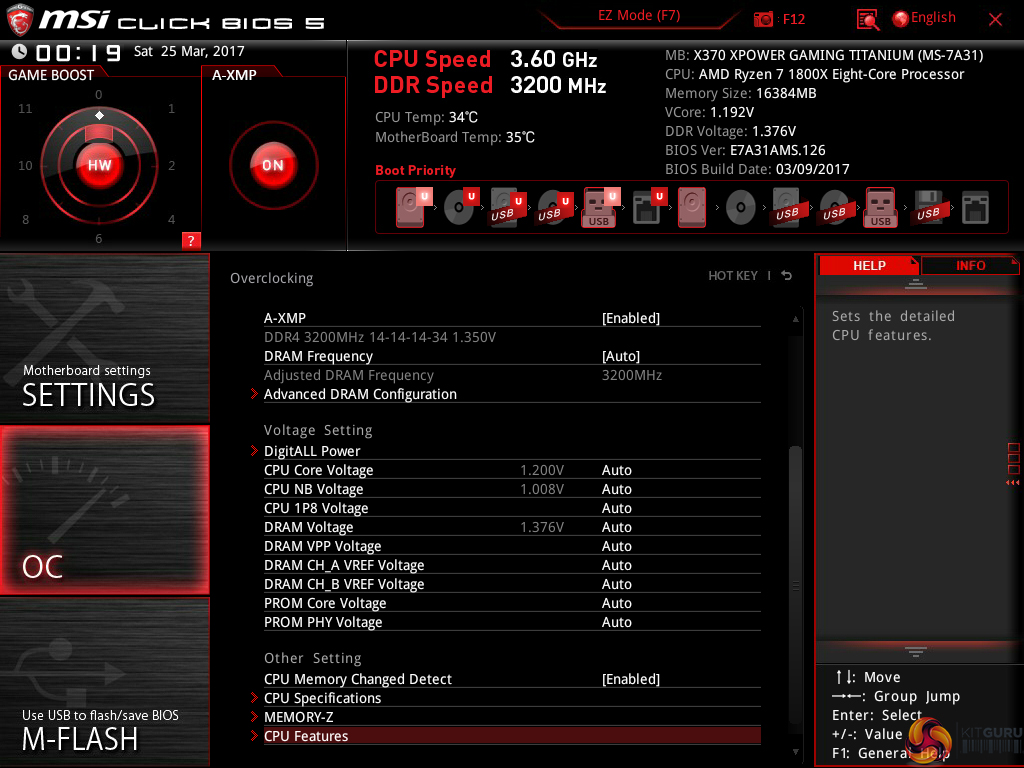
Options are also allocated for memory. Dividers up to 32x for 3200MHz can be selected, which is ideal for aiding flexibility to overclockers who are pushing their system with high-speed RAM. A-XMP is basically MSI's way of loading up an XMP configuration on its AMD motherboards. This was a hassle-free, stable process using our 3200MHz G.SKILL Trident Z memory modules.
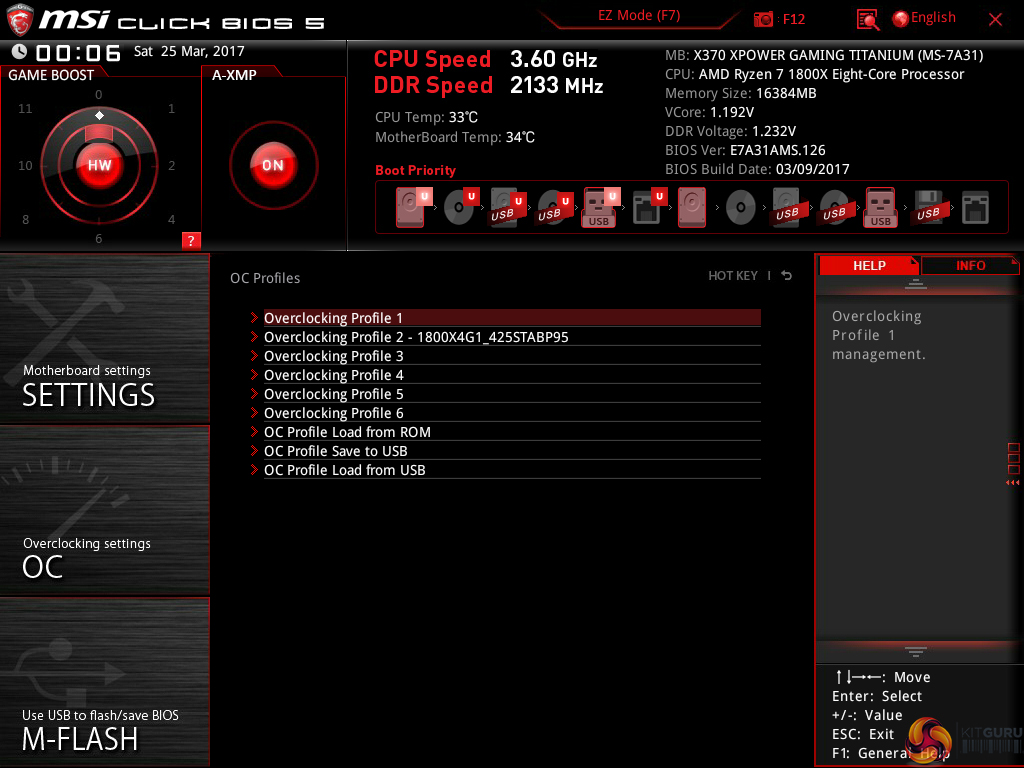
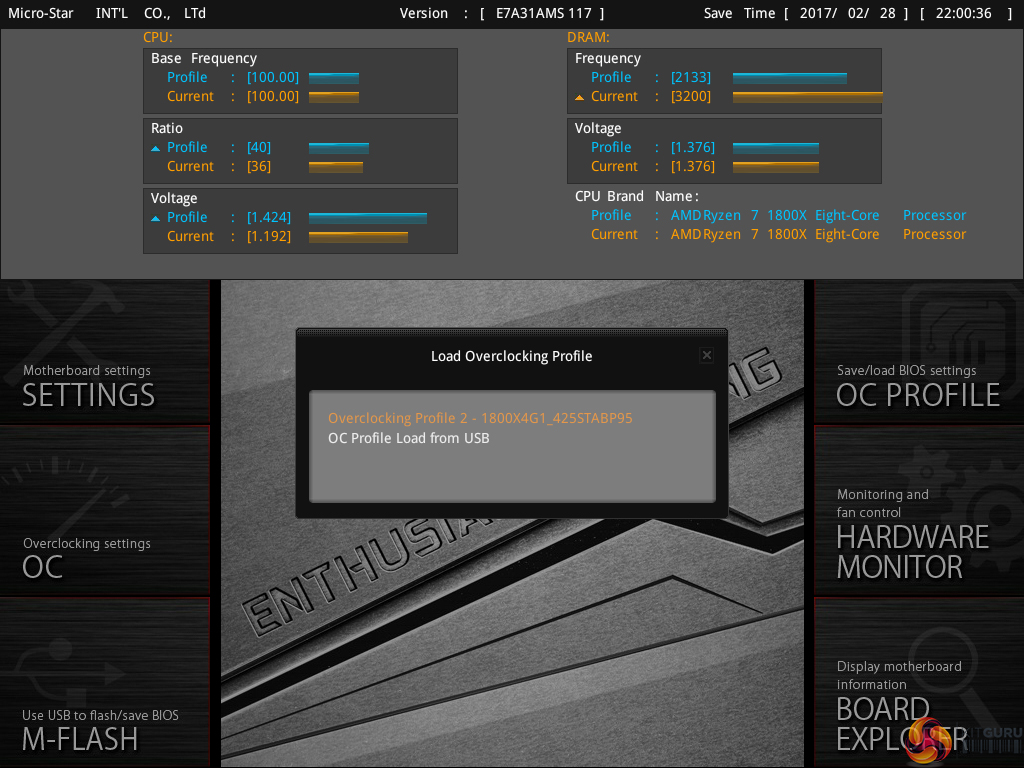
Up to six individual settings profiles can be saved to the board and more can be transferred using storage mediums. Pressing F8 and F9 on a main page of the UEFI draws down an overclocking profile tool which allows for saving and loading.
This tool is a superb graphical method of displaying how the system will change compared to its current state. It would be great to see MSI also roll this out to the more mundane OC Profile section. Either way, the graphical display is certainly a positive for MSI’s UEFI over its competitors’.
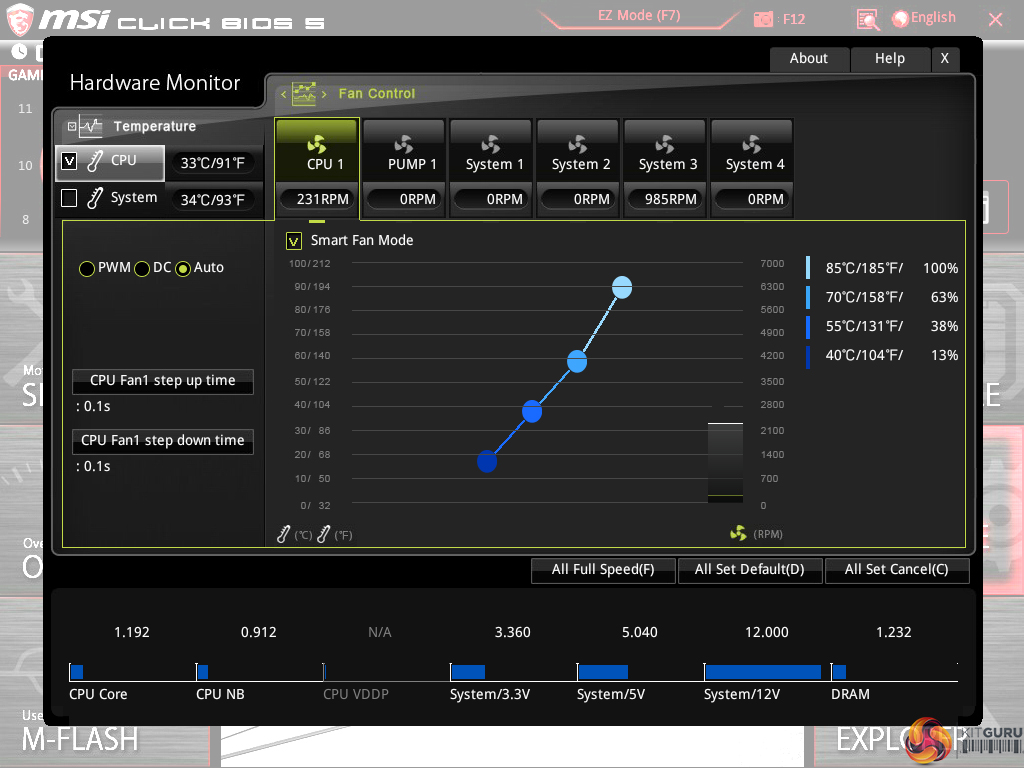
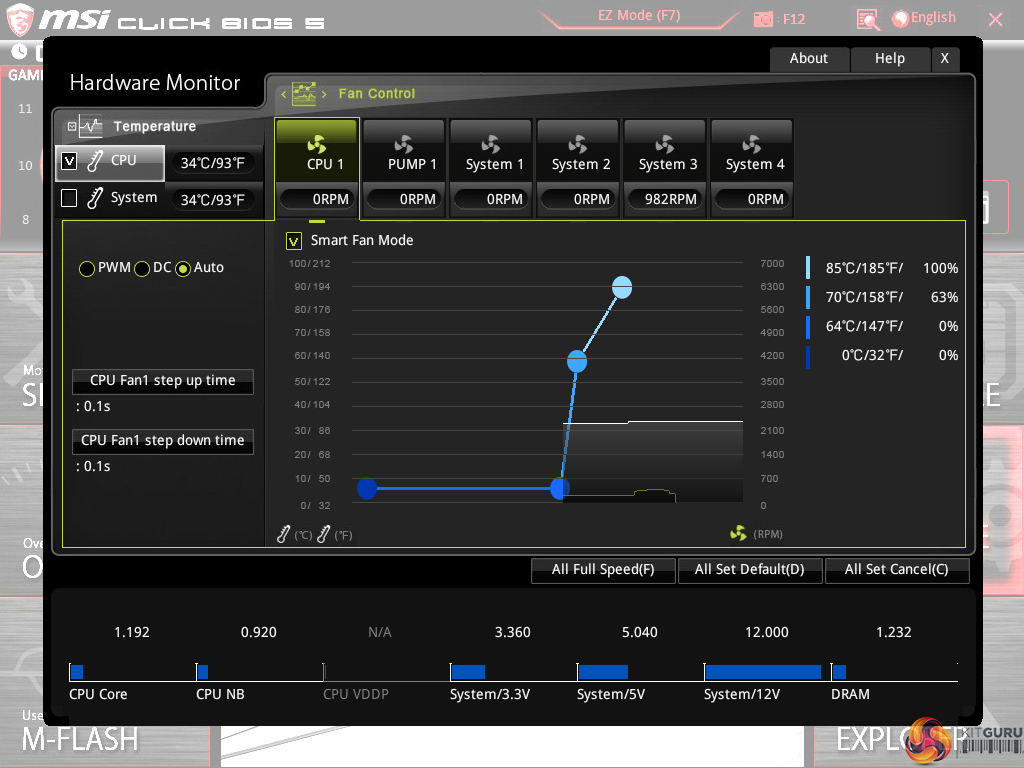
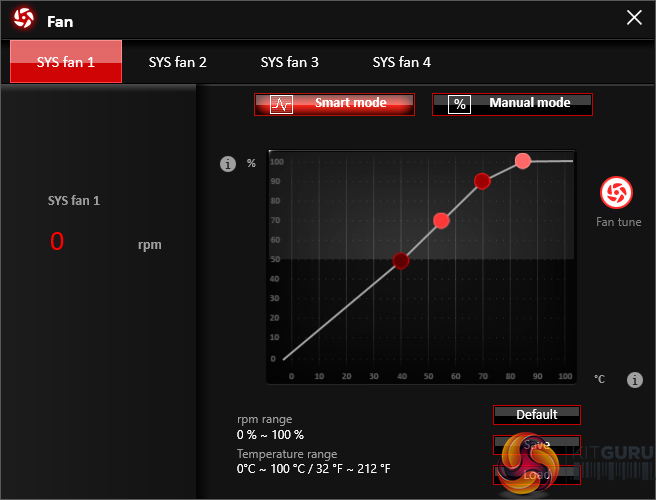
Hardware Monitor is where the primary fan control actions take place. PWM and DC control modes are selectable. MSI keeps in-built fan speed presets to a bare minimum and instead relies on its good graphical control method.
A 4-point curve can be used to adjust the fan speed profile based on temperature readings from the CPU or system. Fan speed adjustments take place in real time which is ideal for tuning the system noise output more efficiently.
The ability to run fans at 0% up to a user-defined temperature level is a strength for MSI and speed hysteresis control is good to have. However, the fact that only CPU and System temperature sensor data can be read is disappointing. ASUS, with its ROG Crosshair VI Hero, and Gigabyte's Aorus AX370-Gaming 5 provide more control in this aspect.
I like the written information that MSI displays alongside the graph, such as exact fan speed percentages and temperatures for each marker.
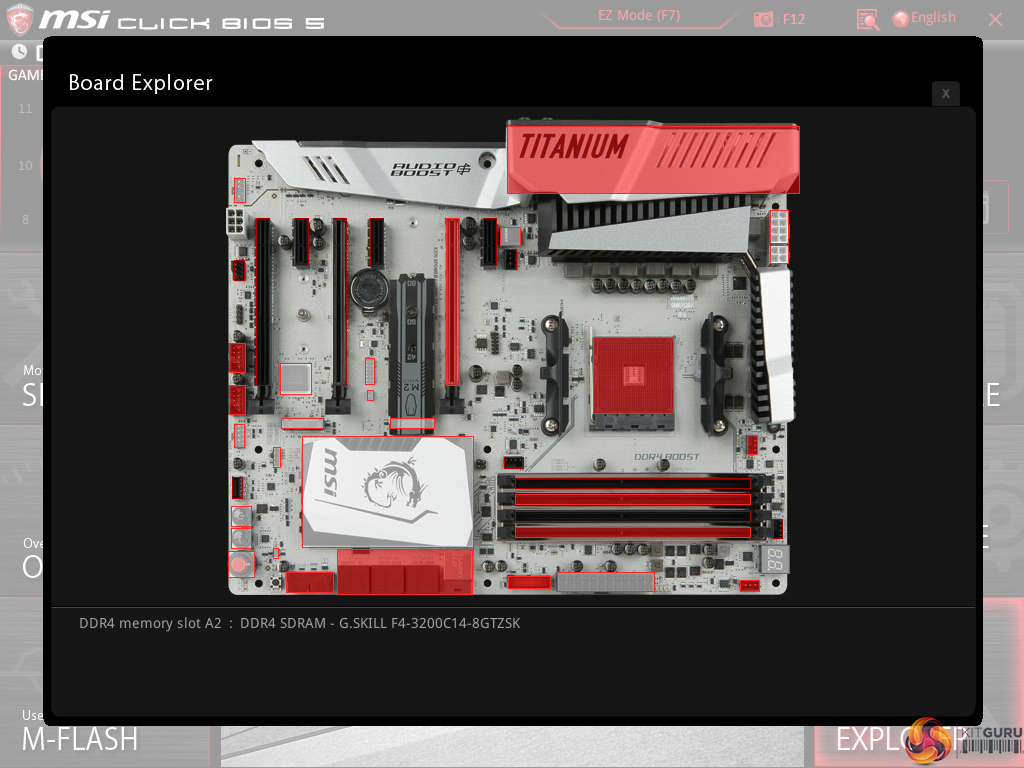
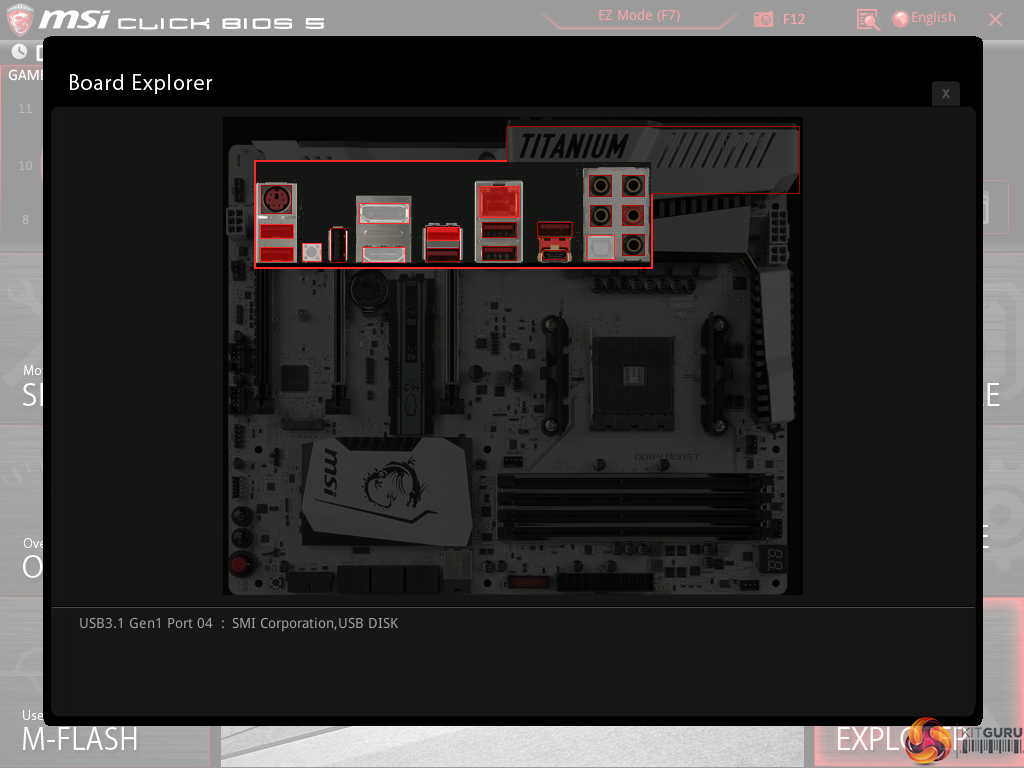
Board Explorer is a visual interpretation of the motherboard and its connected devices. This is a valuable tool to use for troubleshooting or ensuring that components are connected to the correct port at the correct speed. This is like ASRock’s System Browser tool.
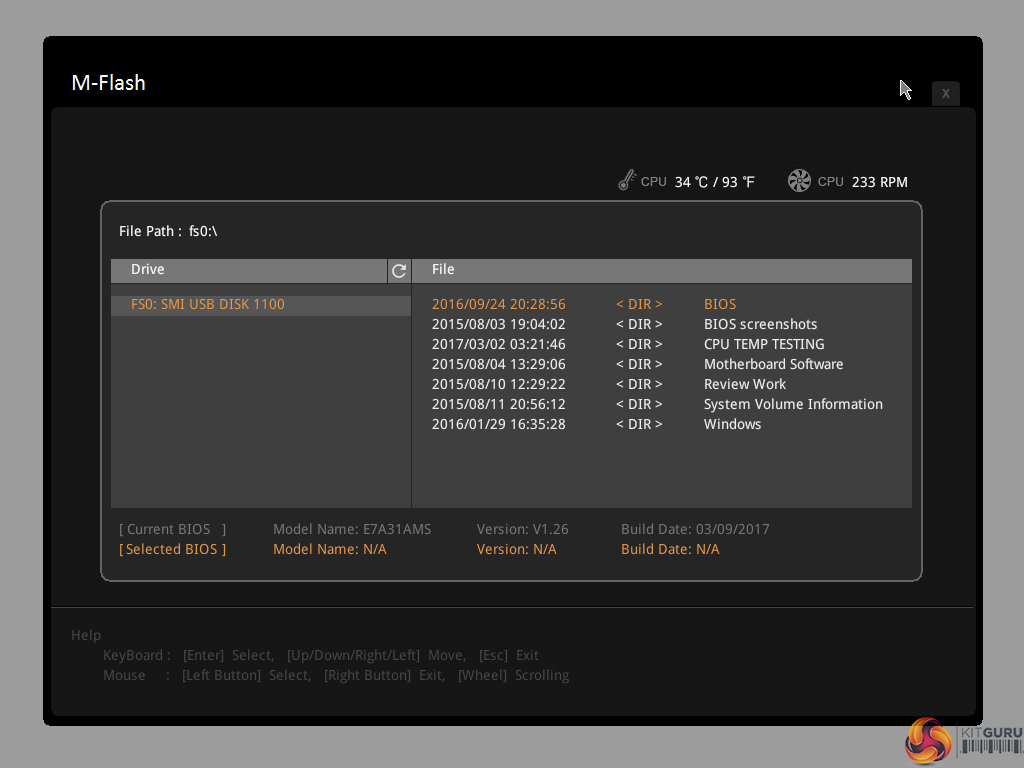
M-Flash has an ability to select BIOS profiles in USB drive folders, which is good. The tool works without hassle.
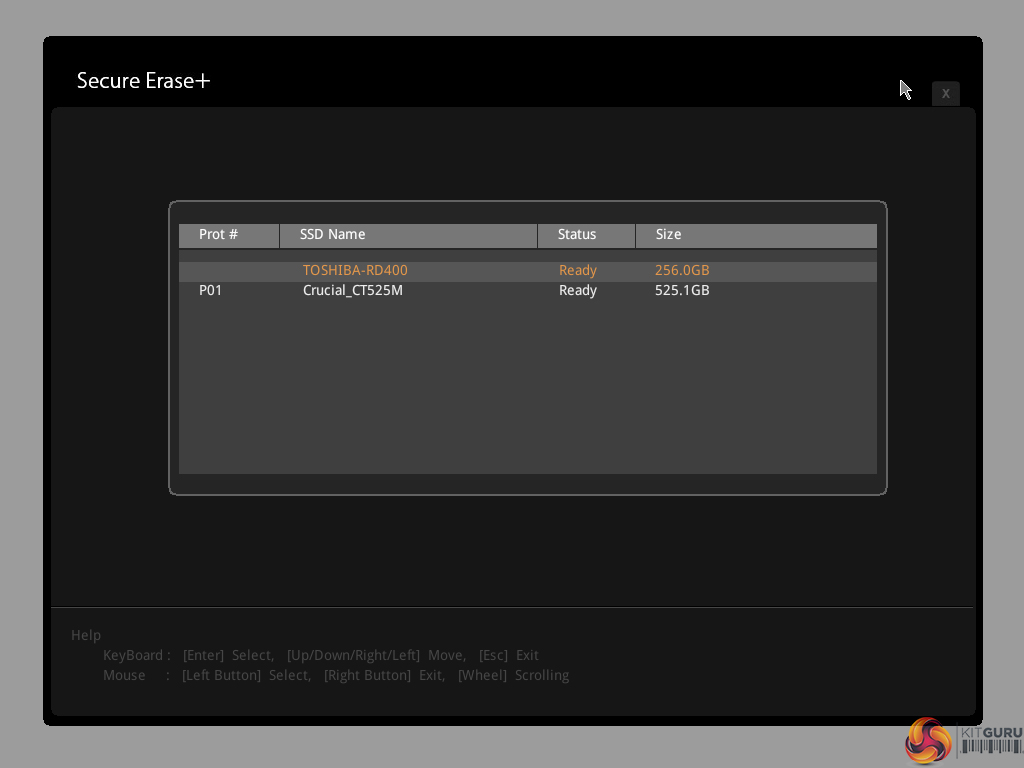
Secure Erase is a relatively new addition to MSI’s UEFI. The tool can be used to securely wipe (not just format) an SSD with great ease which can be good if selling it on or aiming to restore performance from a ‘dirty’ drive. I used this tool successfully with a SanDisk SSD on one of MSI's Z270 offerings.
UEFI Summary:
MSI’s Click BIOS 5 UEFI is a great offering without any glaring weaknesses. The EZ Mode page is market-leading, ease of navigation is high despite the crowded OC page, and tools such as Secure Erase and Board Explorer sweeten the deal. I found mouse support to be stronger than ASUS' and Gigabyte's and visual interpretation of the LLC settings aided overclocking simplicity.
Manual fan control is good but the lack of preset profiles and fewer temperature sensors leaves MSI behind its competitors in this department. Save slots for six system profiles is sufficient and the alternative mode by which these profiles can be selected is extremely intuitive.
The lack of RGB LED control options through the UEFI is disappointing. UEFI settings for LEDs can be retained in the event of an OS crash or reinstall. Despite this, MSI’s UEFI is a strong offering that should serve the clear majority of users well.
Software
The software used for MSI's X370 motherboard is almost identical to that available for the Z270 offerings. As such, we have re-used the bulk of our analysis from those reviews and updated the text where there are subtle differences.
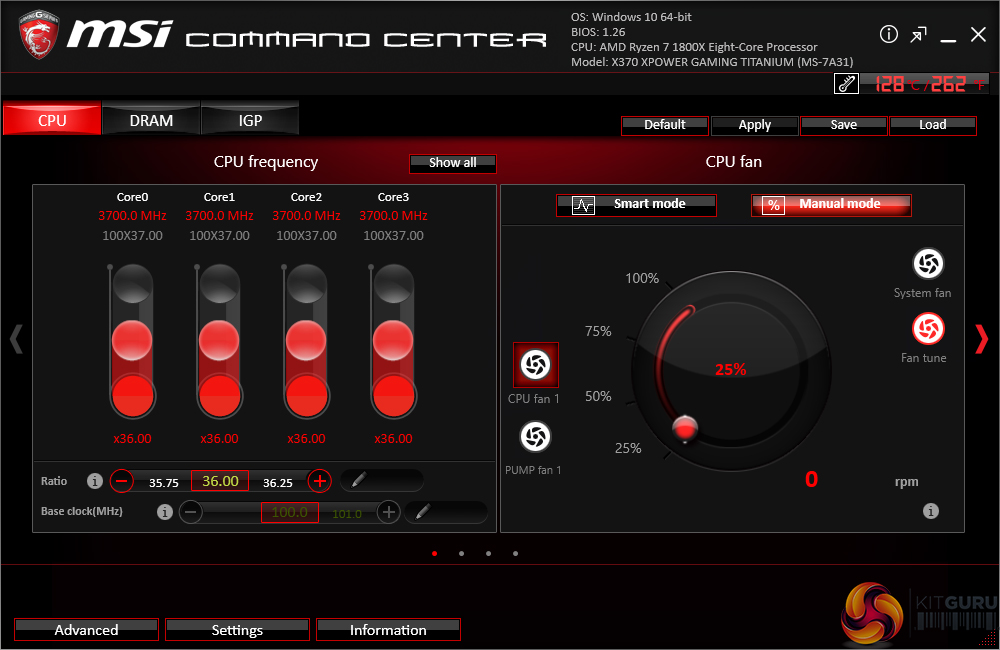
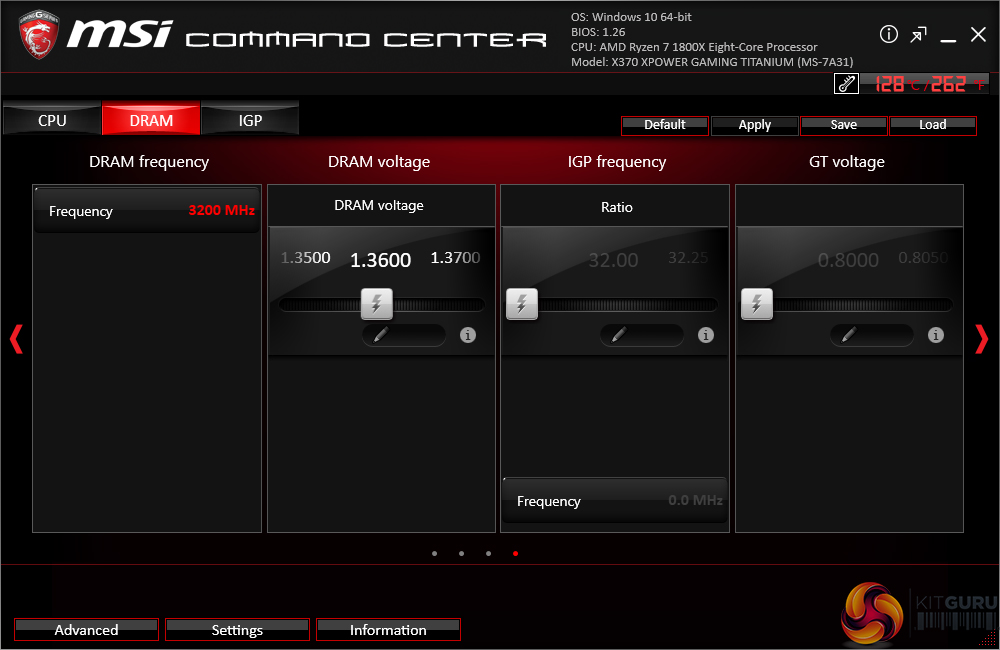
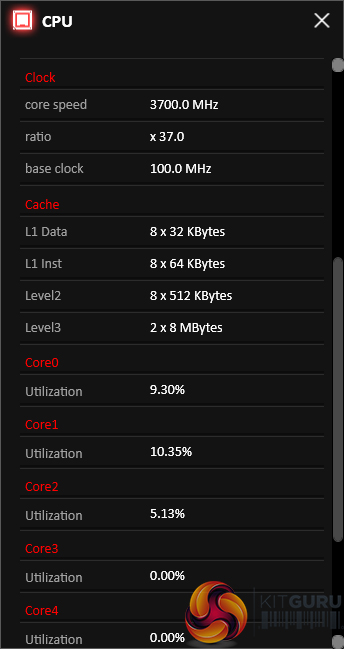
Command Center is the bread-and-butter of MSI’s OS-based software tools. Primary functionality of the system can be controlled here, including adjustment of multiplier ratios, clocks and voltages, and MSI’s Game Boost overclocking preset.
Break-out tabs display information and adjustment options for voltages, ratios, and fan speeds. DRAM timings also get their own break-out page.
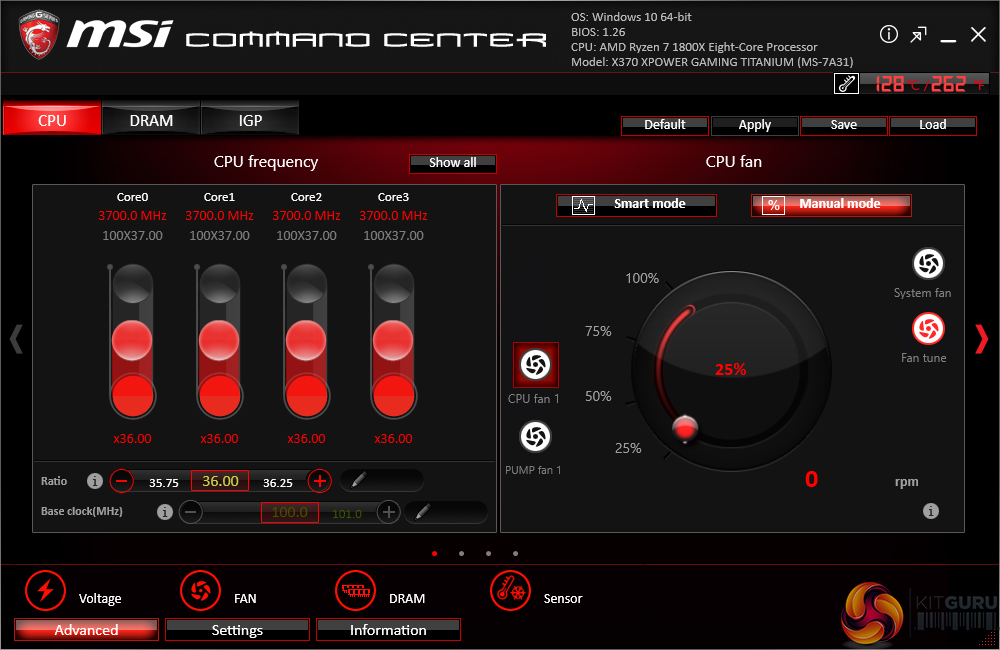
Fan tuning options in Command Center are good. There is an auto fan tuning mode which allows the system to adjust the fan speed curve to its perceived optimal design. User adjustment of the fan speed curves is also possible using a 4-point graph.
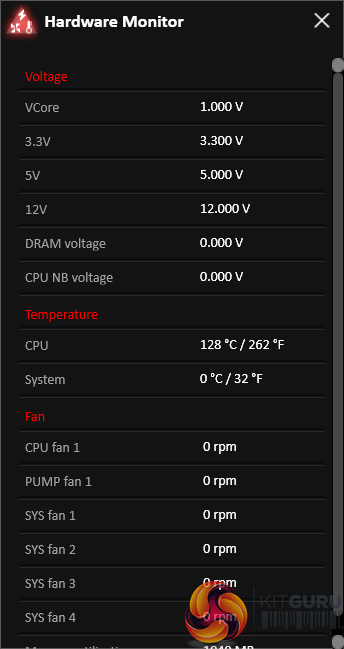
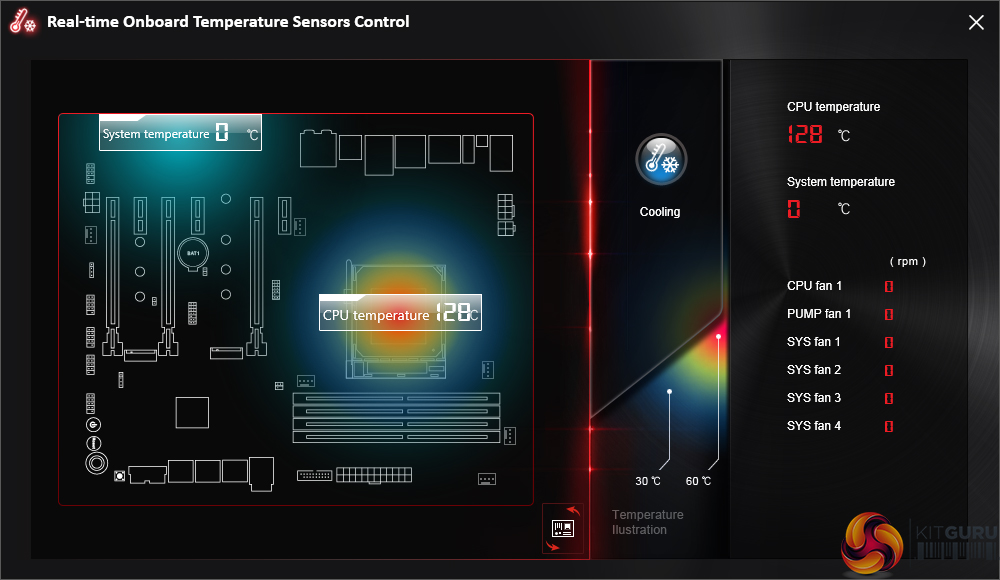
MSI’s temperature sensor page is good although the number of reading points is limited to just two – the CPU and system. This page also shows which fans are connected and a temperature illustration can be set to give visual interpretation of system behaviour.
There still seems to be a bug-or-two present in this aspect as our CPU was not operating at 128°C and the system was not running at sub-ambient temperatures.
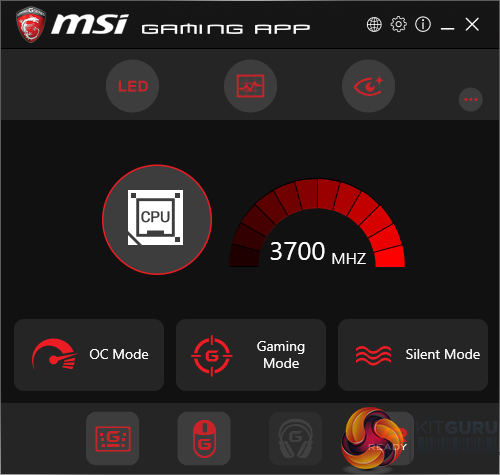

Gaming App is used to control several different operating modes for the system. Three pre-set modes are available – Gaming, OC, and Silent. The OC mode applies Game Boost, as it is called in the UEFI.
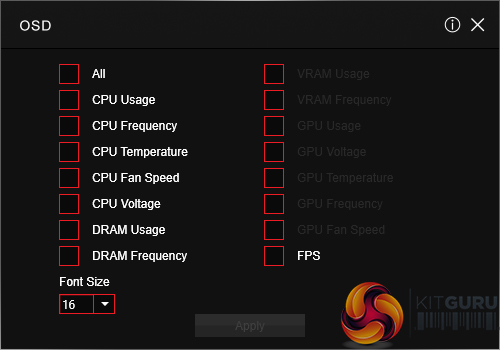
There’s an OSD to display system information but it is far less in-depth than RivaTuner that is supplied with MSI Afterburner. A monitor’s colour profile can be adjusted to reduce eye-strain or blue light. There’s also an option for remote control of the system settings.
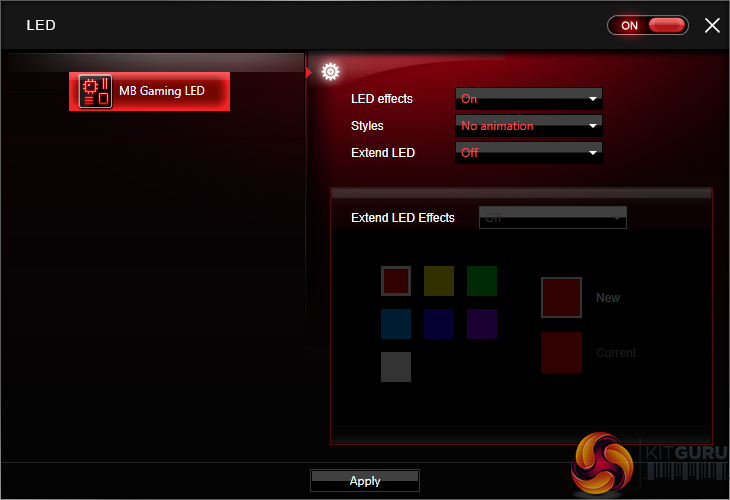
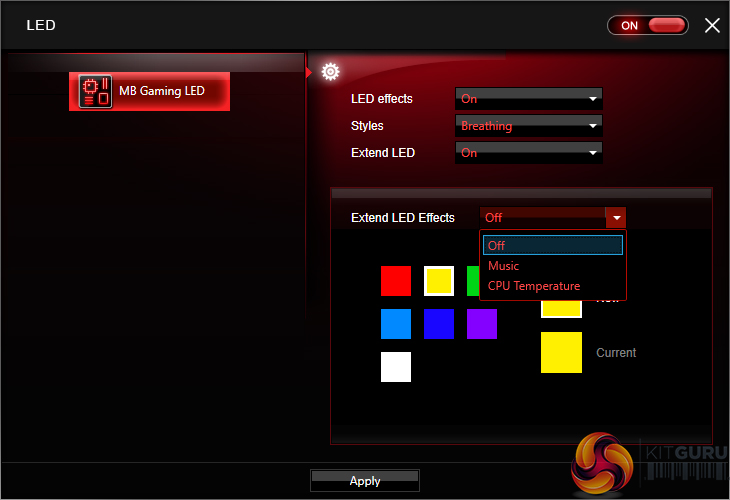
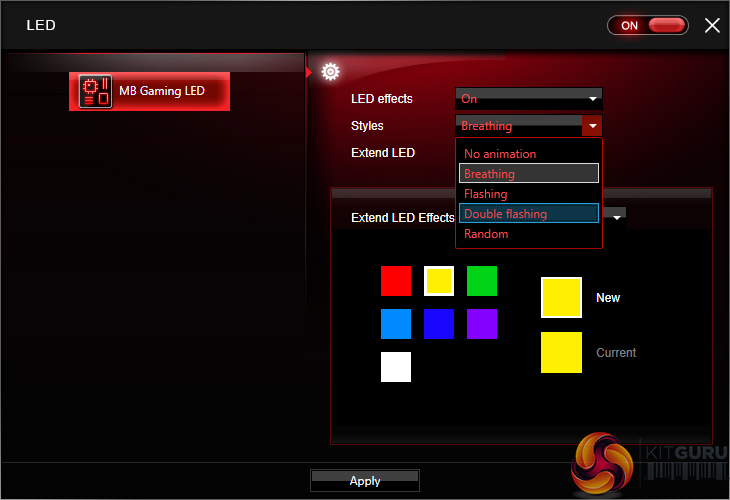
The RGB section of MSI’s Gaming App is where most users are likely to be spending their time. Individual control is given to the lighting section of the motherboard and the 4-pin RGB header.
Different lighting modes can be activated, including breathing, flashing, and random behaviour. The lights can also be set to behave in a manner that is associated with different styles of music – for example, the rap mode flashed as if it was following the repetitive backing tune of a rap song.
There is also an option to completely switch off all LED lighting.
MSI’s lighting options in the OS software are decent. They aren’t as good as Gigabyte’s alternatives which offer intelligent operation modes for the LED colours to react to system behaviour such as LAN speed and CPU loading. We suspect that the X370 Gaming Pro Carbon will have a stronger RGB LED system on offer as fancy lighting is not one of the primary goals for the X370 XPower Gaming Titanium. With that said, the market of 2016 and 2017 has dictated the RGB lighting is important.
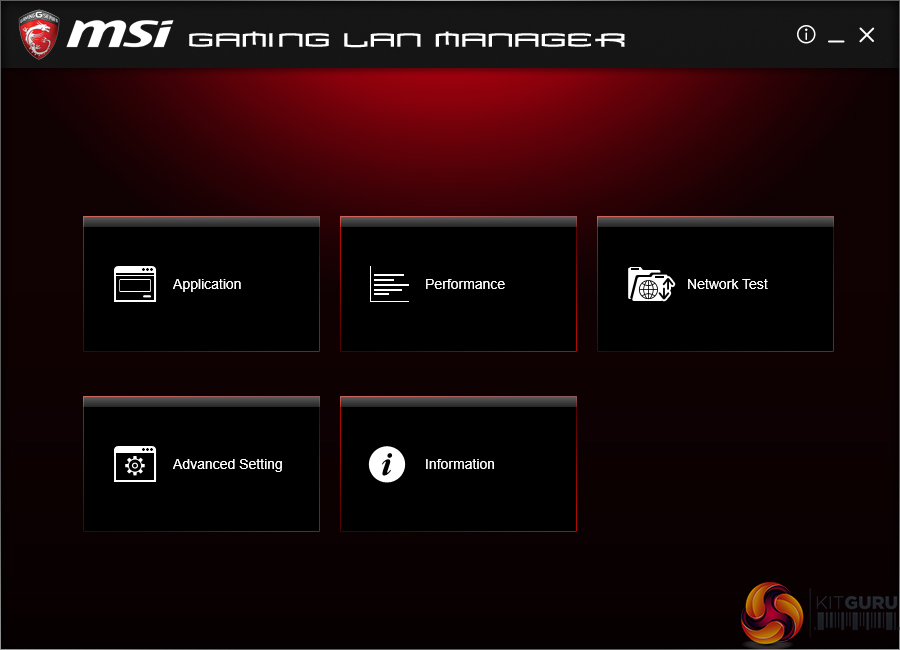
Gaming LAN Manager is essentially MSI’s in-house software that allows the vendor to use an Intel NIC while also retaining some of the control features typically associated with Killer-based offerings. The main benefit is enhanced information delivery so that a user can understand how their system’s network-interacting software is behaving. There’s also an ability to prioritise applications such as games.
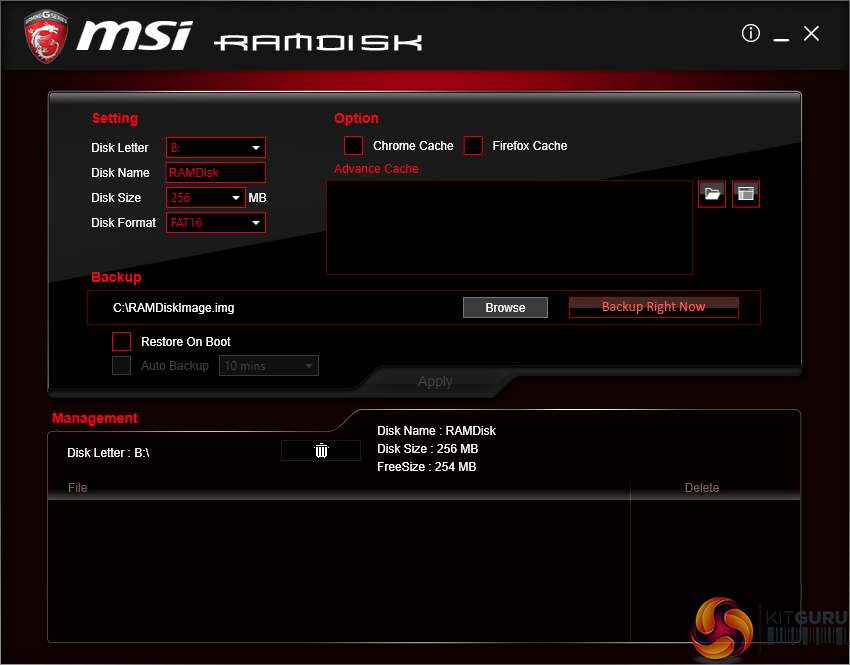
MSI’s RAMdisk does what the title says. The RAM disk size can be set up to a high percentage of system memory. The tool also includes options to restore the RAM disk upon boot, back it up to a non-volatile storage device, and set advanced cache for certain options.
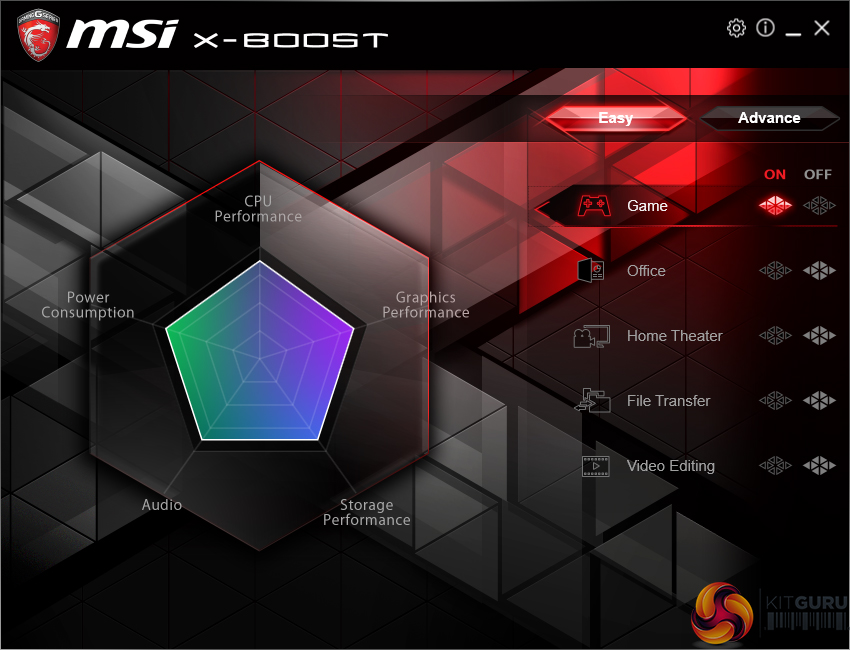
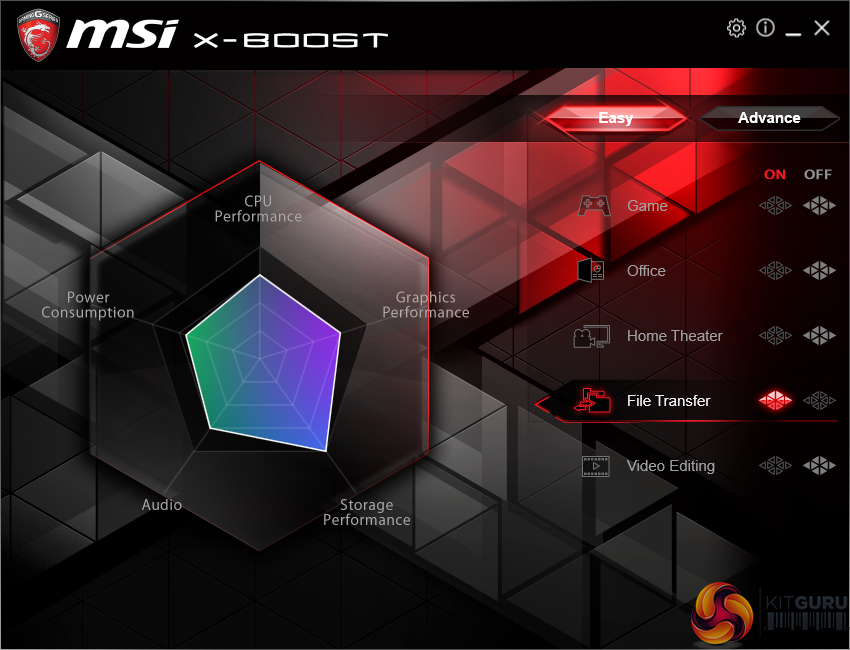
X-Boost features several system operation modes that use tweaked settings. There are presets for operations such as gaming and video editing. The game mode sets all performance metrics to a high importance while the video editing mode emphasises parameters important to such a task.
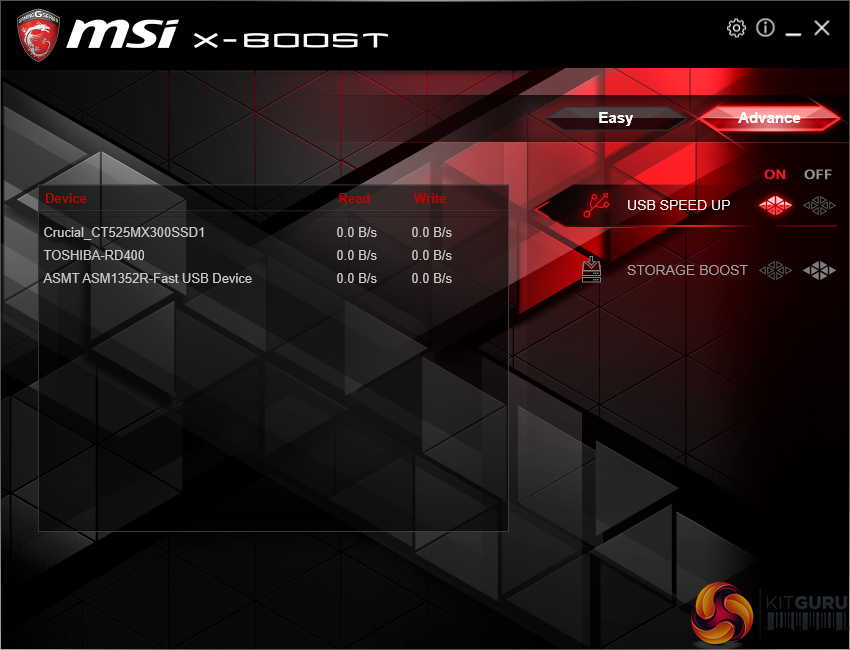
There is also the ability to speed up USB and storage devices. We tested X-Boost and found it to offer little benefit to storage devices other than those based on USB 3.1 Gen 2. Using our USB 3.1 Gen 2 test device with RAID 0 SSDs, X-Boost helped to deliver higher and more consistent transfer rates in our ATTO test.
OS Software Summary:
It would be a significant understatement to say that MSI includes a sizeable number of in-depth software tools. The separate software pages are vast and options are plentiful. I particularly like X-Boost and the extremely in-depth Command Center.
MSI’s RGB lighting control tool is decent. However, it could be better given that Gigabyte offers intelligent operation modes that can adjust colour based on CPU usage and LAN speed, for example. I would have also liked to see a software manager app like App Center by Gigabyte and AI Suite by ASUS. A lot of software means a lot of shortcuts or location to manage – one umbrella utility would aid ease of navigation to different software offerings.
Overall, MSI’s variety and quality of OS-based software apps is very good.
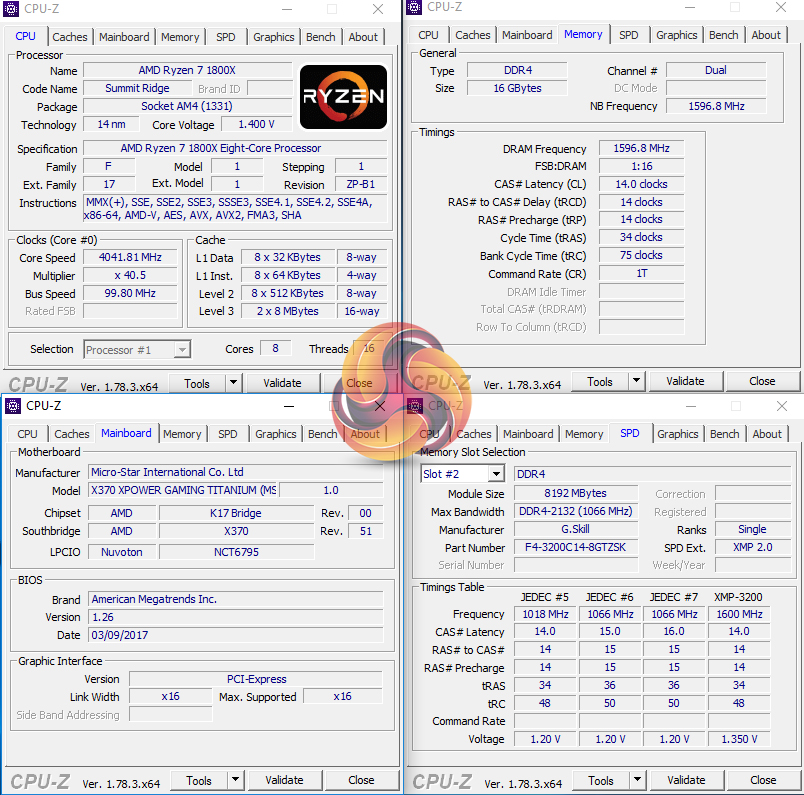
We will be outlining the MSI X370 XPower Gaming Titanium motherboard’s performance with the Ryzen 7 1800X CPU and 16GB of 3200MHz G.Skill TridentZ DDR4 memory.
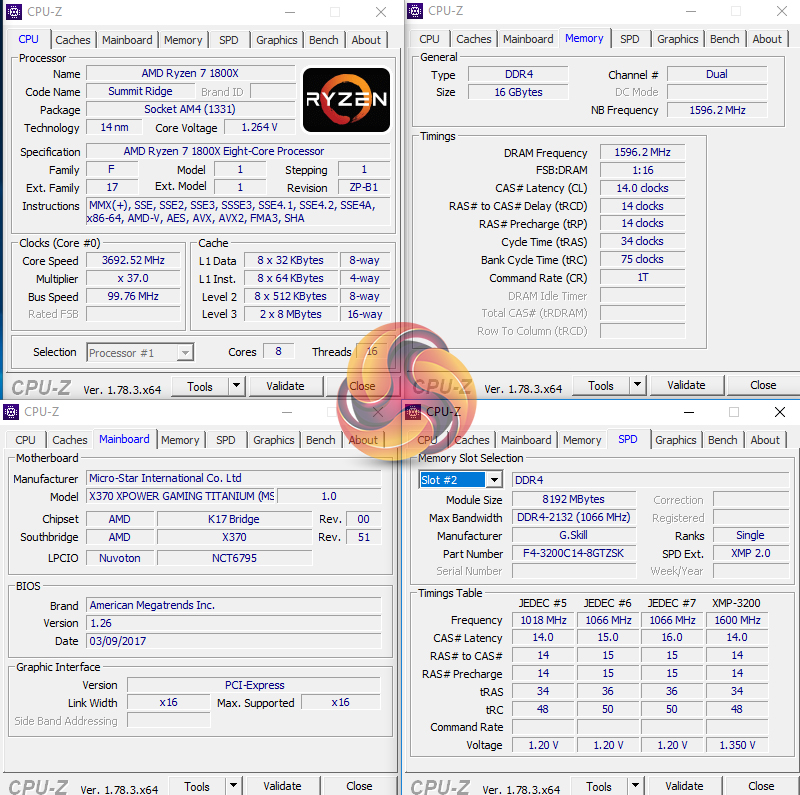
Stock voltage hovered around 1.264V under Cinebench load. MSI's level is around 20mV lower than we observed on ASUS' ROG Crosshair VI Hero and Gigabyte's Aorus AX370-Gaming 5. This was using the latest 1.26 BIOS.
AM4 Motherboard Test System:
- Processor: AMD Ryzen 7 1800X (3.6-4.0GHz + 4.1GHz XFR).
- Memory: 16GB (2x8GB) G.Skill TridentZ 3200MHz 14-14-14-34 DDR4 @ 1.35V.
- Graphics Card: Nvidia GTX Titan X Pascal (custom fan curve to eliminate thermal throttling).
- System Drive: 525GB Crucial MX300 SATA 6Gbps SSD.
- Games Drive: 960GB SK Hynix SE3010 SATA 6Gbps SSD.
- CPU Cooler: Noctua NH-D15.
- Power Supply: Seasonic Platinum 1000W.
- Operating System: Windows 10 Pro 64-bit (Anniversary Update).
Comparison AM4 Motherboards:
- ASUS ROG Crosshair VI Hero.
- Gigabyte Aorus AX370-Gaming 5.
Software:
- MSI X370 XPower Gaming Titanium BIOS 1.26 (latest).
- GeForce 378.49 VGA drivers.
Tests:
- Cinebench R15 – All-core CPU benchmark (CPU)
- HandBrake 0.10.5 – Convert 6.27GB 4K video recording using the Normal Profile setting and MP4 container (CPU)
- SiSoft Sandra 2016 SP1 – Processor Arithmetic Test (CPU) and Memory Bandwidth Test (Memory)
- 7-Zip 16.04 – Built-in 7-Zip benchmark test (CPU & Memory)
- 3DMark Fire Strike v1.1 – Fire Strike (1080p) test (Gaming)
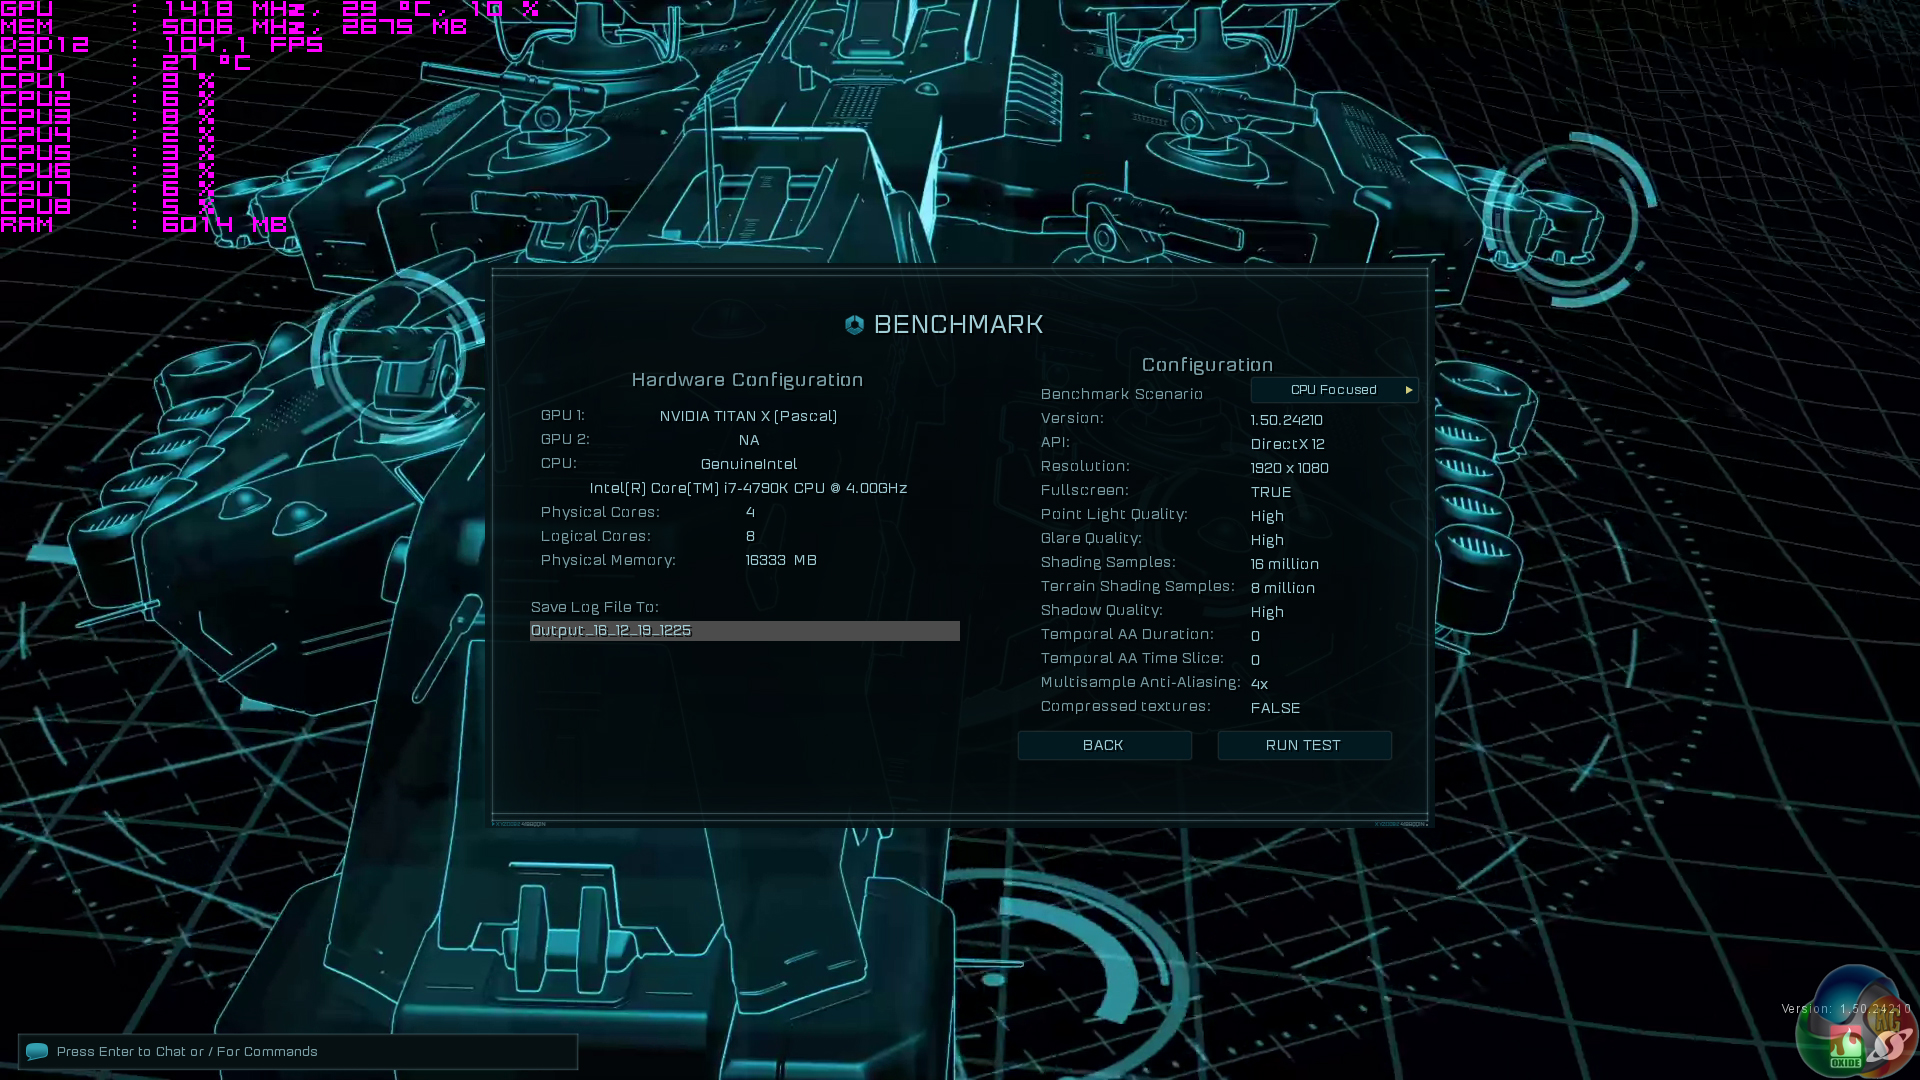
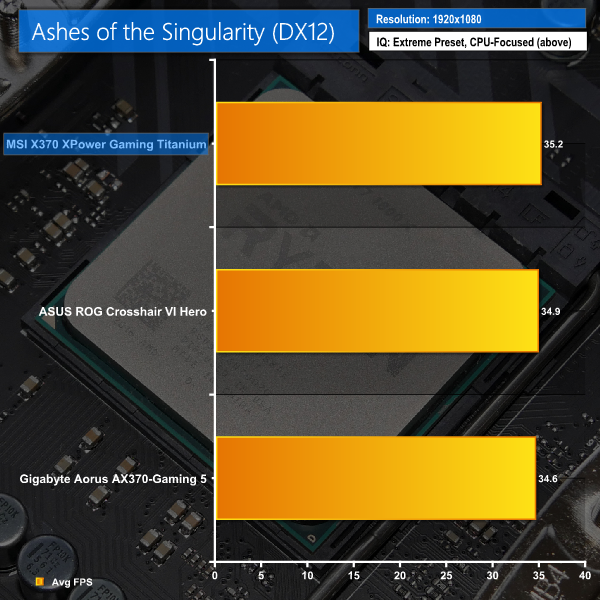
- Ashes of the Singularity – Built-in benchmark tool CPU-Focused test, 1920 x 1080, Extreme quality preset, DX12 version (Gaming)
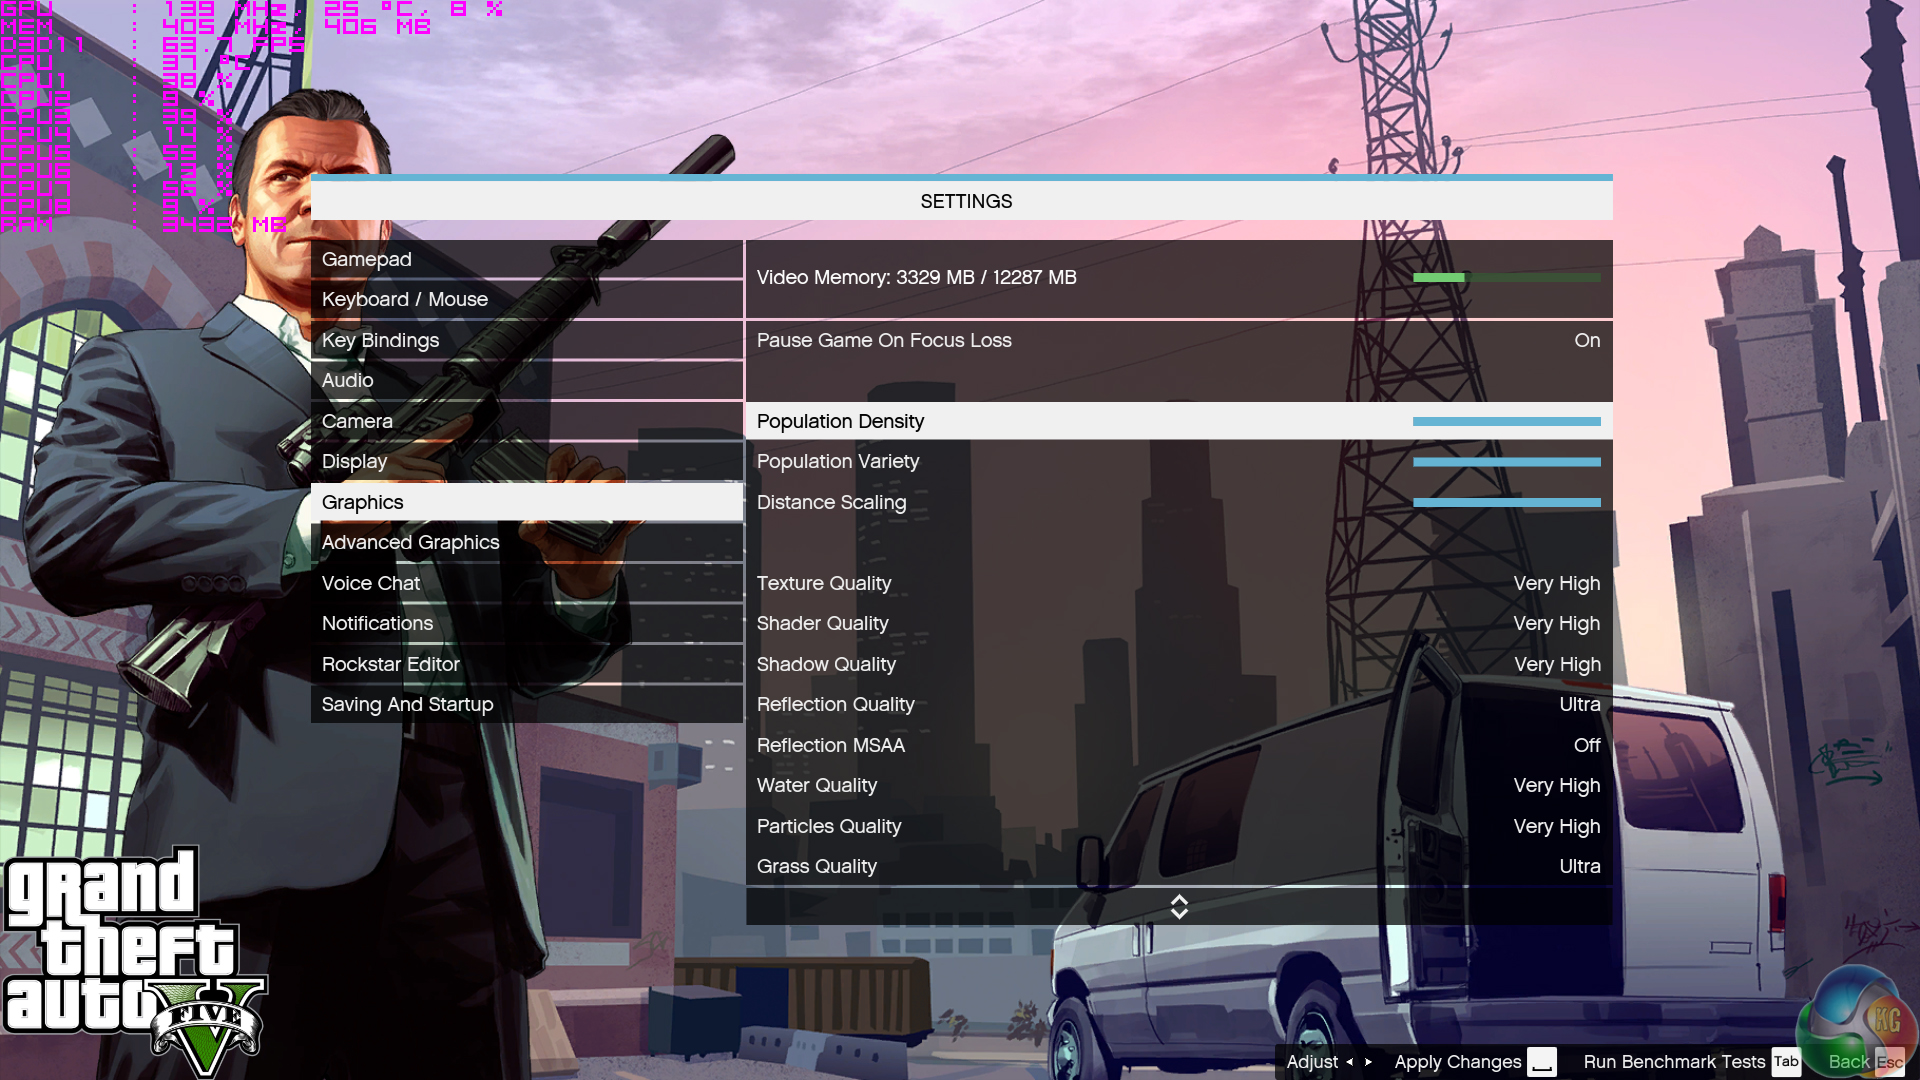
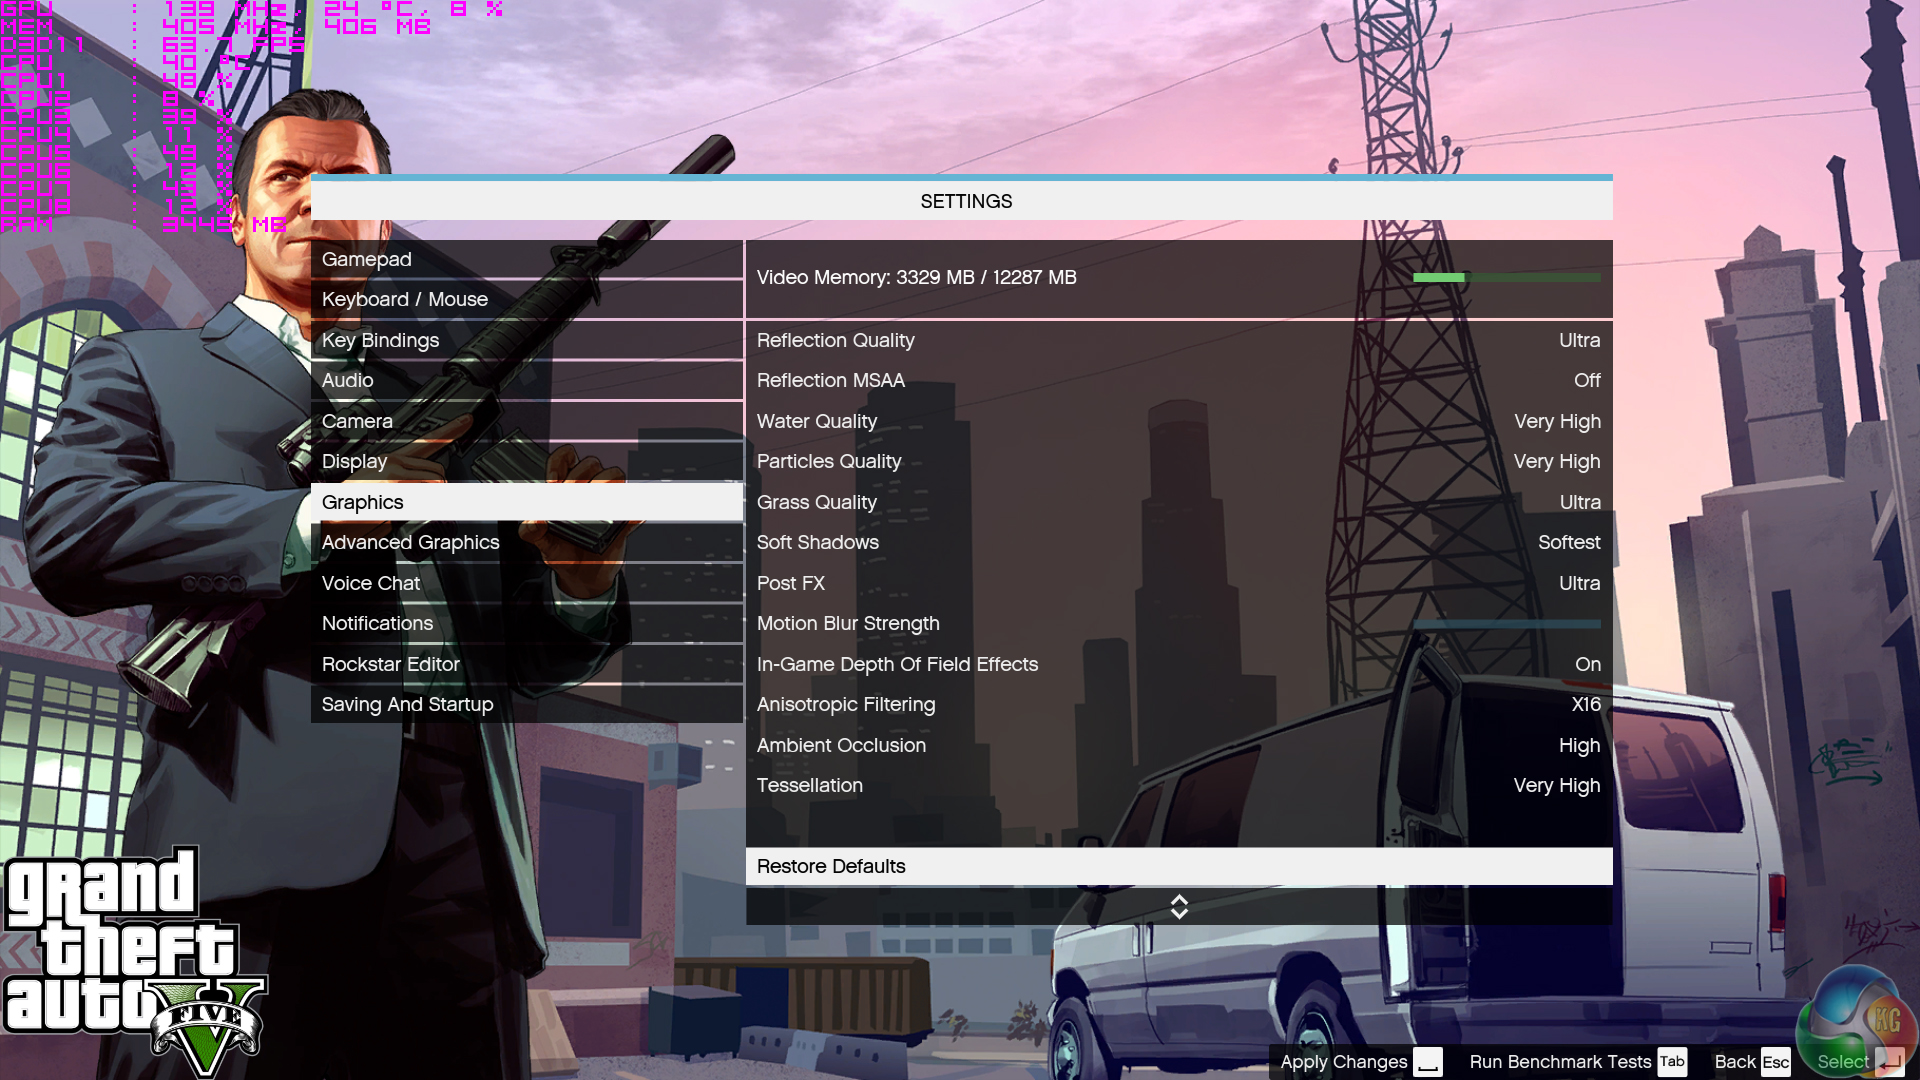
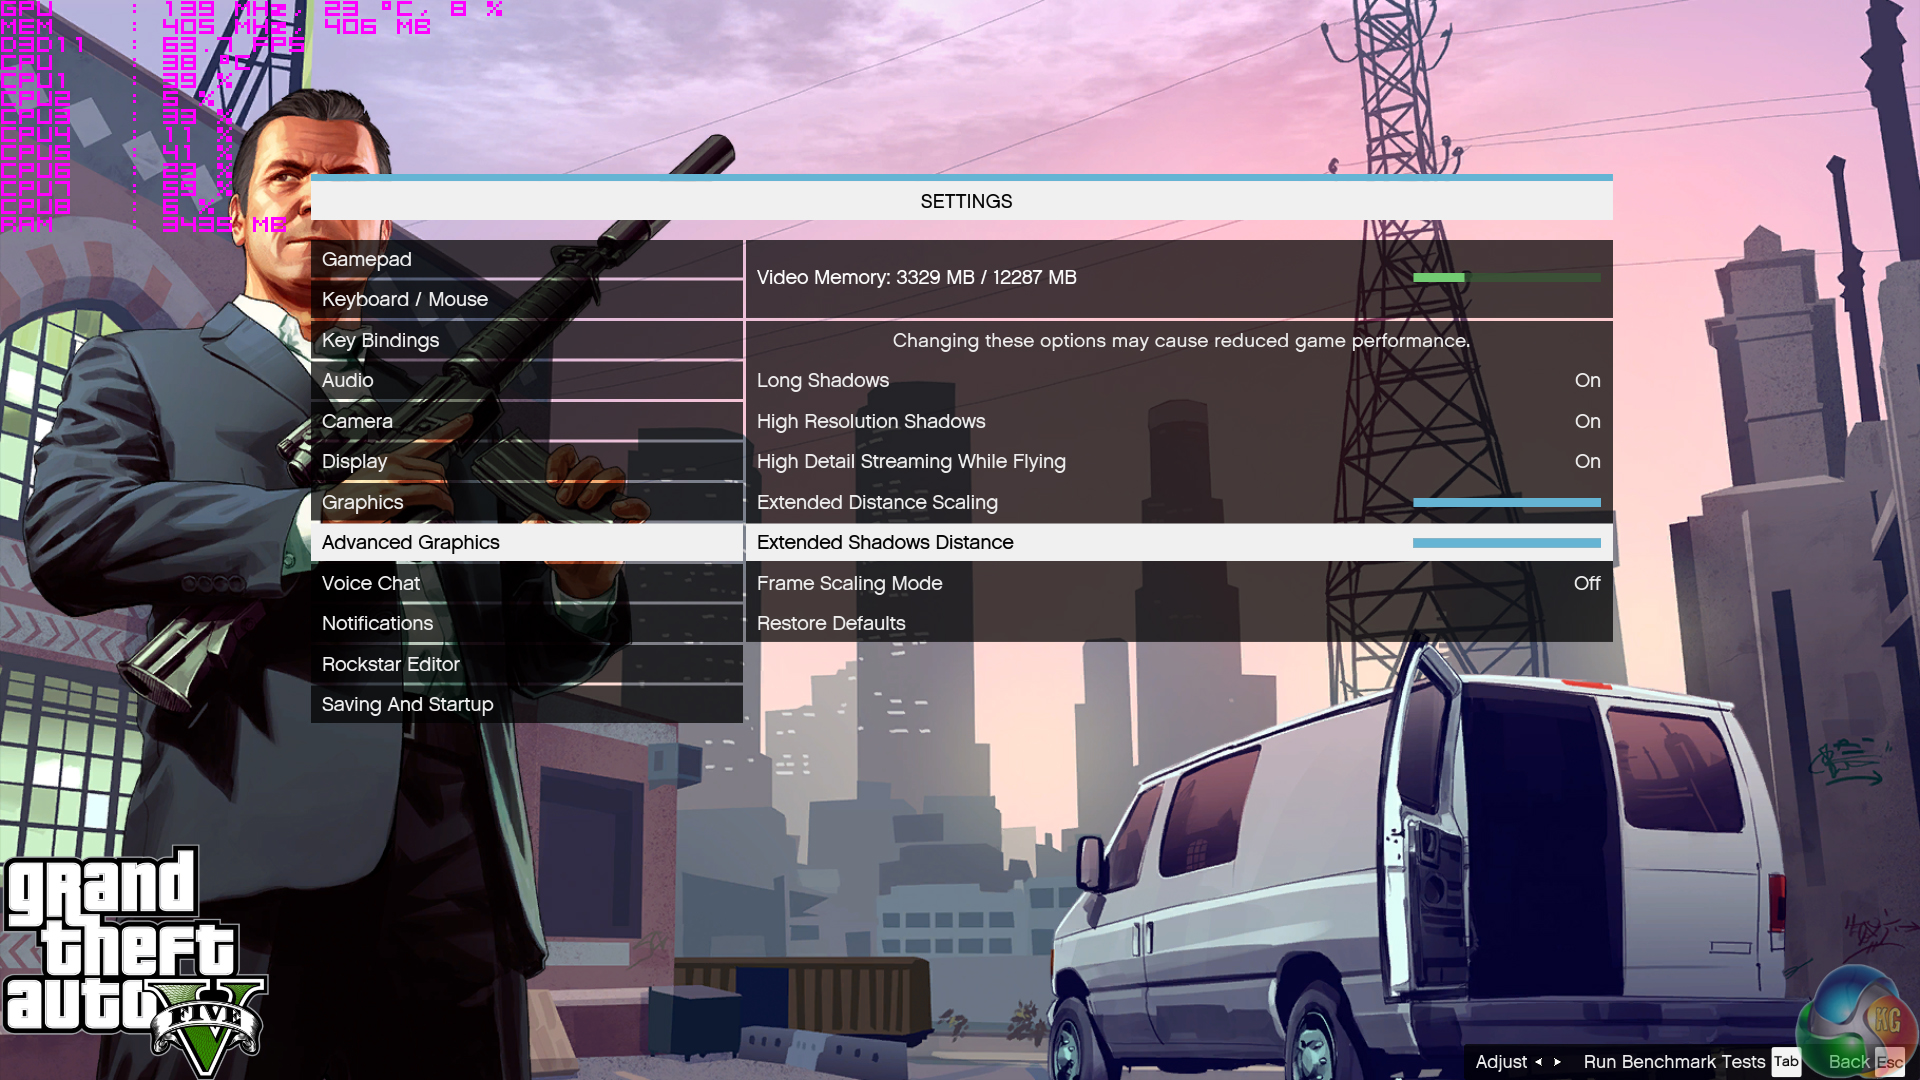
- Grand Theft Auto V – Built-in benchmark tool, 1920 x 1080, Maximum quality settings, Maximum Advanced Graphics (Gaming)
- Metro: Last Light Redux – Built-in benchmark tool, 1920 x 1080, Very High quality, SSAA, AF 16X, Tessellation: High (Gaming)
- ATTO – M.2, USB 3.1, and SATA 6Gbps transfer rates (Motherboard)
- RightMark Audio Analyzer – Record and playback test using a line-in to line-out loopback with a 3.5mm audio cable (Motherboard)
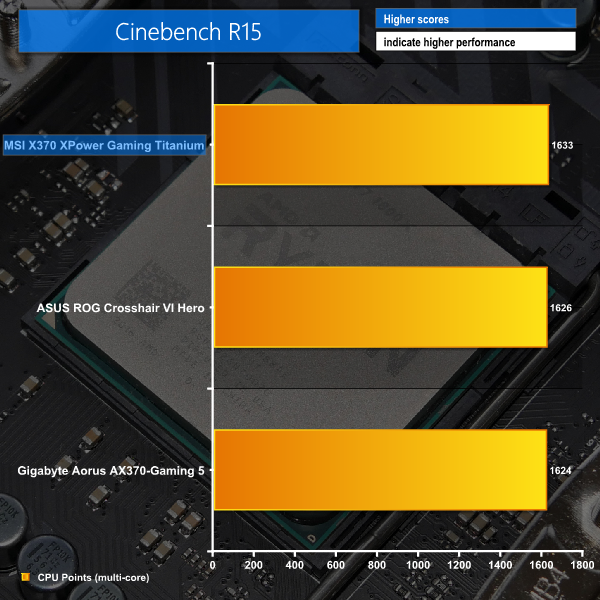
Cinebench R15
Cinebench is an application which renders a photorealistic 3D scene to benchmark a computer’s rendering performance, on one CPU core, all CPU cores or using the GPU. We run the test using the all core CPU mode.
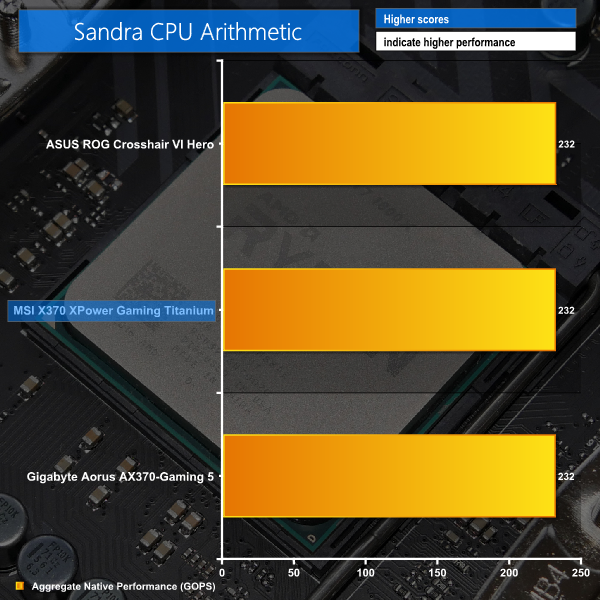
Sandra Processor Arithmetic
SiSoft Sandra 2016 is a multi-function utility program that supports remote analysis, benchmarking and diagnostic features for PCs, servers, mobile devices and networks. We run the application’s processor arithmetic test to gauge the CPU performance on each tested motherboard.
Handbrake Conversion
Handbrake is a free and open-source video transcoding tool that can be used to convert video files between different codecs, formats and resolutions. We measured the average frame rate achieved for a task of converting a 6.27GB 4K video using the Normal Profile setting and MP4 container. The test stresses all CPU cores to 100% and shows an affinity for memory bandwidth.
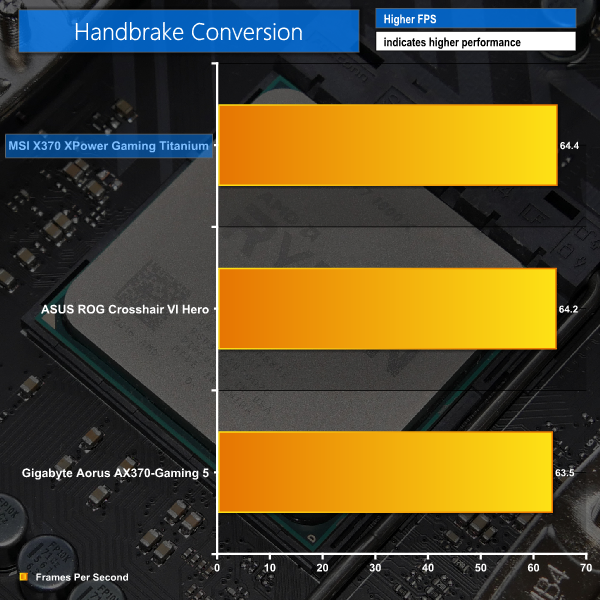
A good set of CPU-related results from MSI. Clearly the vendor's engineers are doing a respectable job with the BIOS performance.
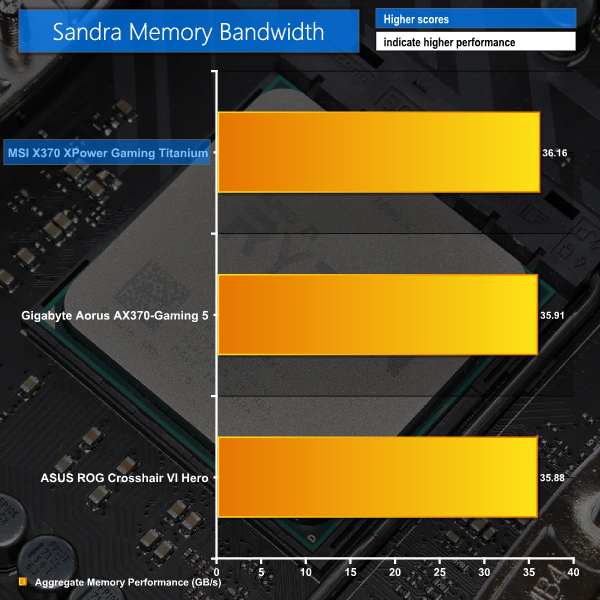
Sandra Memory Bandwidth
SiSoft Sandra 2016 is a multi-function utility program that supports remote analysis, benchmarking and diagnostic features for PCs, servers, mobile devices and networks. We use the SiSoft Sandra memory bandwidth test to provide a set of memory bandwidth results.
7-Zip
7-Zip is an open source Windows utility for manipulating archives. We measure the Total Rating performance using the built-in benchmark tool. The test stresses all CPU cores to 100% and shows an affinity for memory bandwidth.
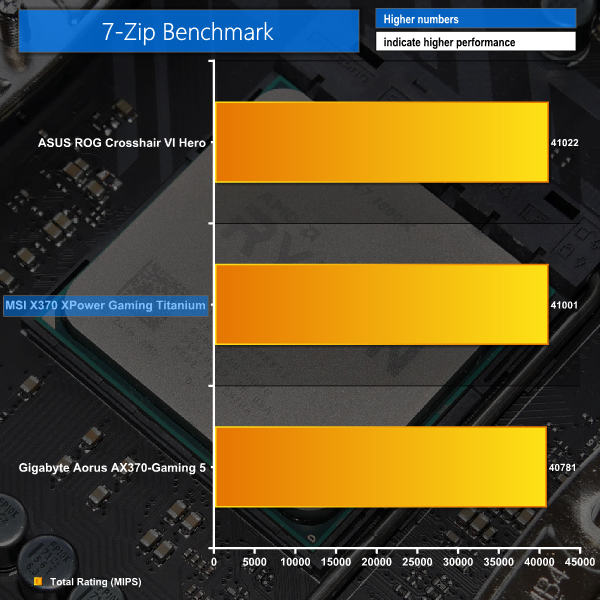
Memory performance was also strong, aided by the ability to set correct timings thanks to the A-XMP setting. 7-Zip hits a 41,000 MIPS rating, which is positive.
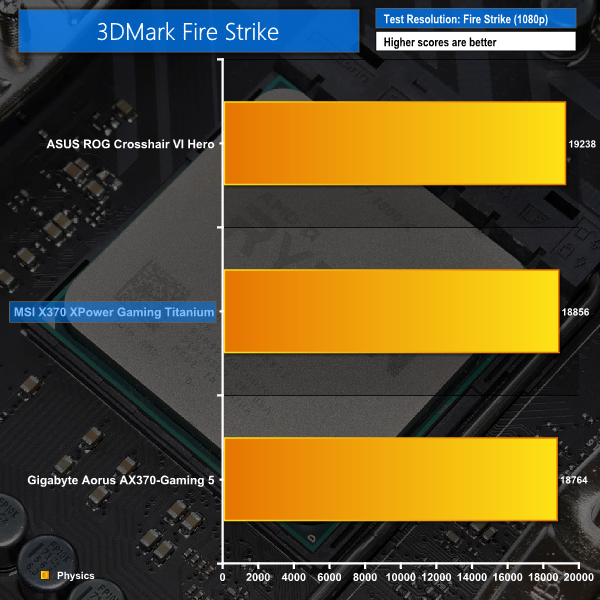
3DMark
3DMark is a multi-platform hardware benchmark designed to test varying resolutions and detail levels of 3D gaming performance. We run the Windows platform test and in particular the Fire Strike benchmark, which is indicative of high-end 1080p PC Gaming.
Ashes of the Singularity
Ashes of the Singularity is a Sci-Fi real-time strategy game built for the PC platform. The game includes a built-in benchmark tool and was one of the first available DirectX 12 benchmarks. We run the CPU-focused benchmark using DirectX 12, a 1080p resolution and the Extreme quality preset.
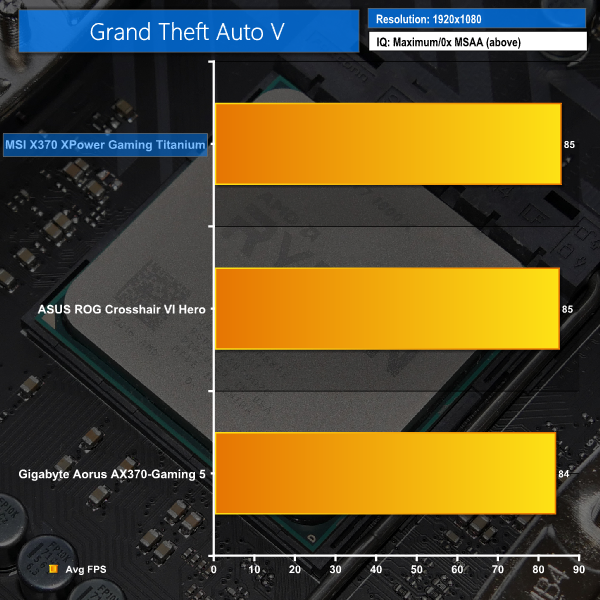
Grand Theft Auto V
Grand Theft Auto V remains an immensely popular game for PC gamers and as such retains its place in our test suite. The well-designed game engine is capable of providing heavy stress to a number of system components, including the GPU, CPU, and Memory, and can highlight performance differences between motherboards. We run the built-in benchmark using a 1080p resolution and generally Maximum quality settings (including Advanced Graphics).

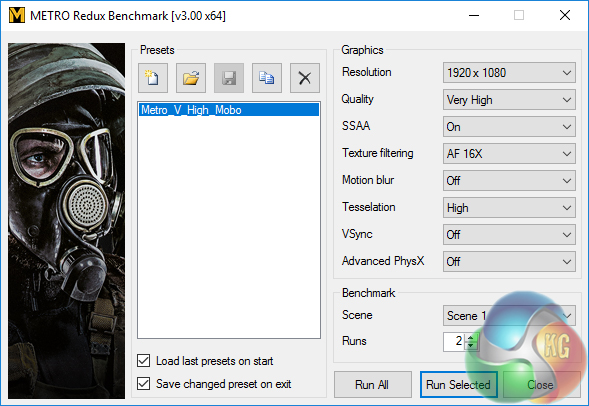
Metro: Last Light Redux
Despite its age, Metro: Last Light Redux remains a punishing title for modern computer hardware. We use the game's built-in benchmark with quality set to Very High, SSAA enabled, AF 16X, and High tessellation.
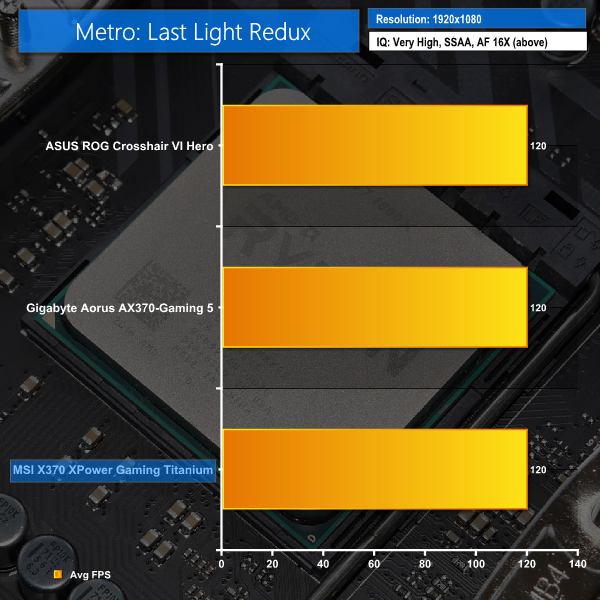
Another strong set of results from MSI's X370 XPower Gaming Titanium, this time in gaming-related tests. MSI takes a narrow lead in half the tests and runs at the same 120 FPS as the other two boards in Metro: Last Light.
Manual CPU Overclocking:
To test the MSI X370 XPower Gaming Titanium motherboard’s CPU overclocking potential, we aim to set the CPU voltage close to 1.40V. CPU VCore is set to 1.40V, NB voltage is set to 1.15V, and we applied the Mode 4 LLC setting.
We maintained the DRAM frequency at 3200MHz to take its stability out of the overclocking equation.
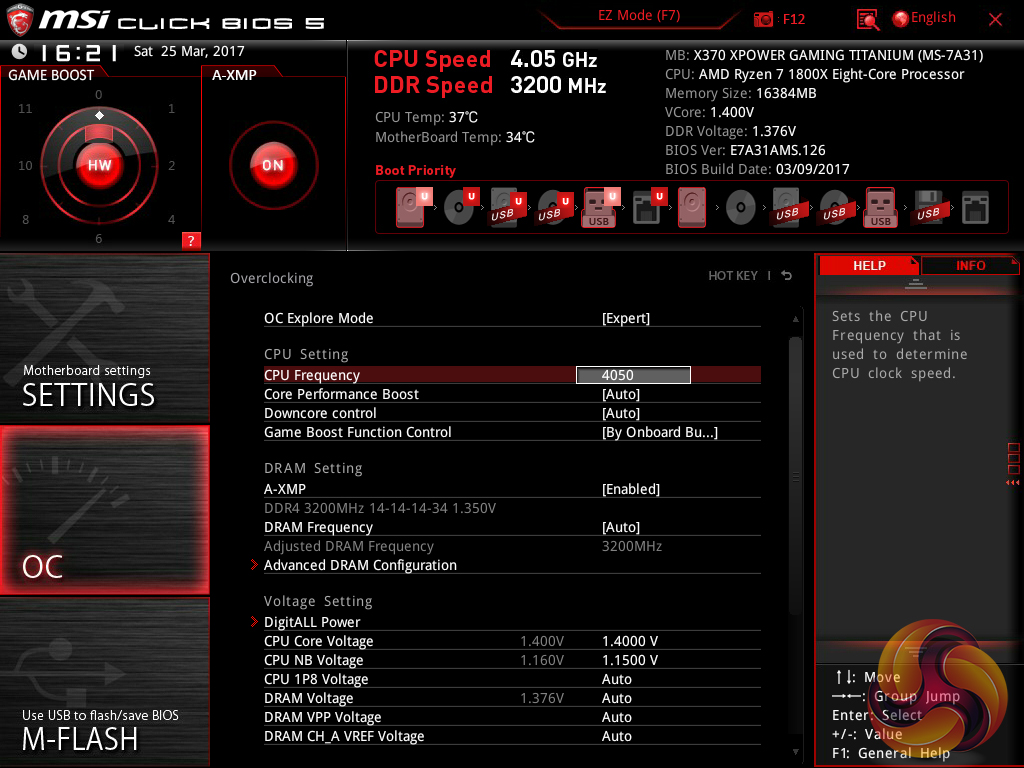
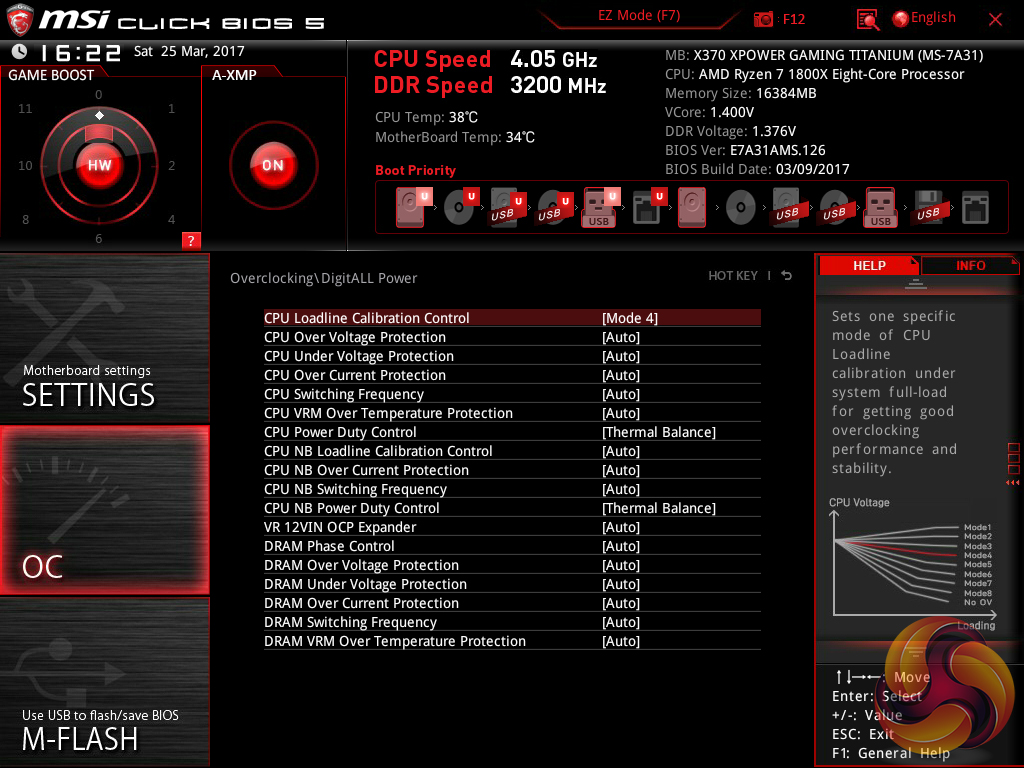
Keying in the overclocked settings is straightforward in MSI's UEFI thanks to its layout. Despite the LLC graph indicating that Mode 3 would give a stable voltage, we found it to overshoot our selected 1.4V level by around 16-24mV under Cinebench loading. Switching to Mode 4 LLC adjusted this and saw the chip operating at 1.40V under Cinebench load.
Voltage accuracy is a positive for MSI. With the Mode 3 LLC setting, idle voltage ran at 1.408V and load was 1.40V. These are pretty much perfect given that we wanted 1.4V going to the CPU.
Pushing up from 4.05GHz to 4.1GHz resulted in instability. Cinebench would complete a single run if we were lucky but would inevitably crash on the second run.
Overclocked Performance
As a performance comparison, we have included the results from two other AM4 motherboards. The maximum overclocked configuration achieved with each board was a 4050MHz (40.5 x 100MHz) processor frequency whilst using 3200MHz CL14 memory.
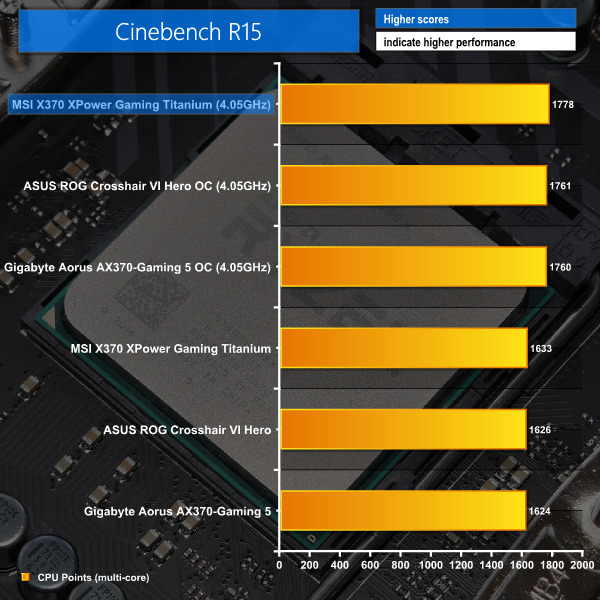
Impressive performance observed throughout stock testing is maintained with the MSI board overclocked. The X370 XPower Gaming Titanium edged out Gigabyte and ASUS competitors in terms of performance, despite operating at the same core and memory speed. Well done to MSI's BIOS team.
Power
We leave the system to idle on the Windows 10 desktop for 5 minutes before taking a reading. For CPU load results we run Cinebench multi-core and take a reading. The power consumption of our entire test system (at the wall) is shown in the chart.
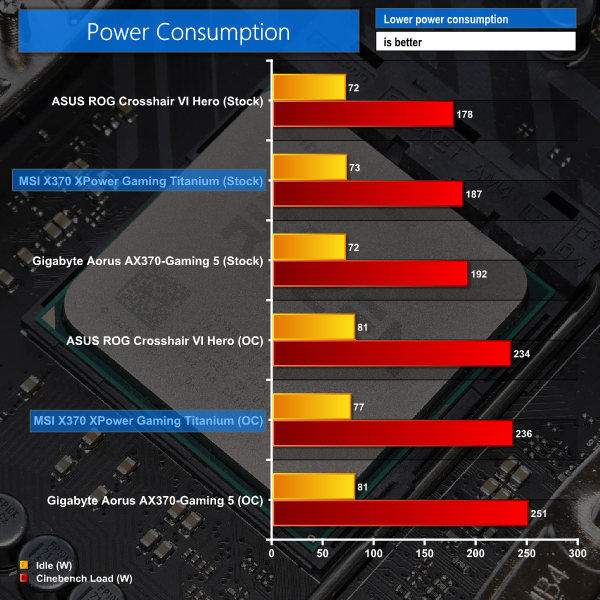
Power consumption from the MSI board sits somewhere between ASUS' and Gigabyte's. 187W system-wide power draw is seen under stock-clocked load with the 1800X. This increases to 236W when overclocked, which is practically the same as the power draw level from ASUS' ROG Crosshair VI Hero.
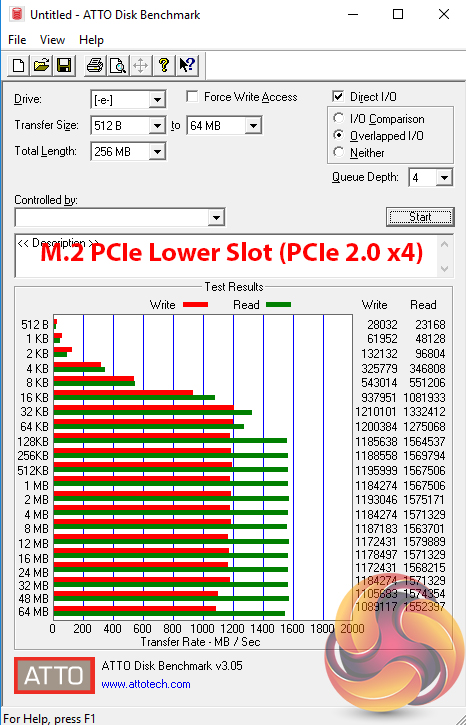
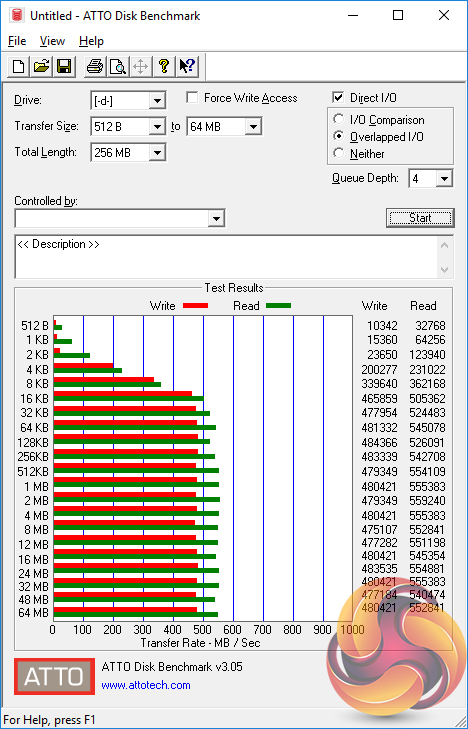
ATTO Disk Benchmark
The ATTO disk benchmark is a Windows-based utility for testing storage performance of any storage drive or controller. We use the default benchmark setup.
M.2 PCIe Performance
For M.2 testing we use a Toshiba OCZ RD400 256GB M.2 PCIe NVMe SSD.
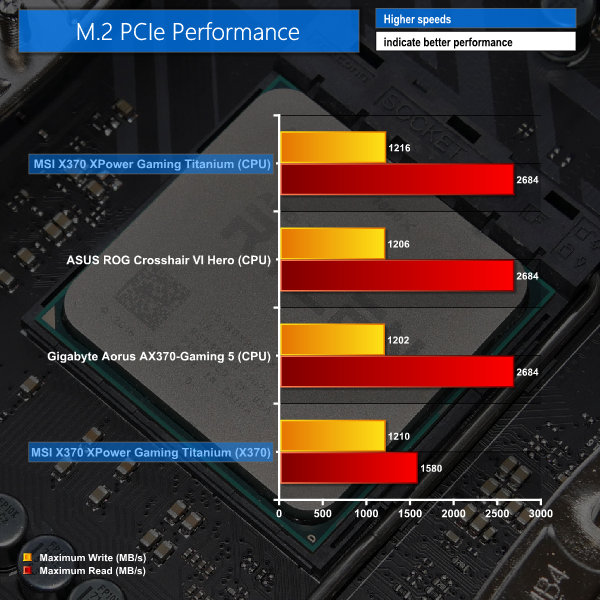
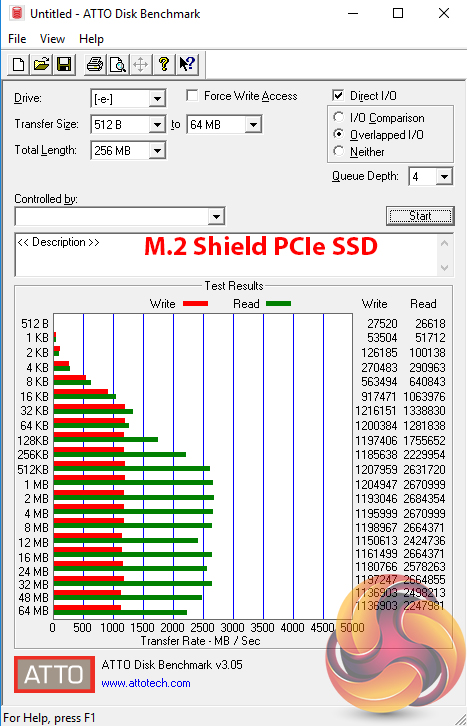
M.2 PCIe performance was slightly faster on MSI's board than on the competitors. The write speed is improved by a small amount over the competitors and this result is repeatable. MSI's M.2 Shield may be having an influence here, as it managed to keep our Toshiba OCZ RD400 SSD at a maximum of 69°C during the ATTO test, which is a few degrees cooler than on ASUS and Gigabyte competitors (and beyond margin of error).
The lower M.2 slot uses a PCIe 2.0 x4 link from the X370 chipset and therefore tops out at around 1.6GBps. If you have a drive like our 256GB Toshiba OCZ RD400 and only use heavy write operations, this level may be fine for saturating the drive's rated 1.2GBps write speed. However, for something faster, like a Samsung 960 PRO, the connector will act as a bottleneck to performance.
Perhaps a more reasonable use for the dual M.2 slots would be a configuration like the one that I operate in my own workstation. That is, an older PCIe 2.0 AHCI SSD as the Windows and programs drive alongside a fast PCIe 3.0 x4 NVMe Samsung PM961 for projects requiring high-speed storage (such as video work). Put simply, I like MSI's inclusion of dual M.2 connectors even if the second one isn't blazingly fast. I'd rather have one fast and one slow than only one fast, like ASUS and Gigabyte provide.
USB 3.0 5Gbps Performance
We test USB 3.0 performance using a pair of Corsair Force LE 120GB SSDs in RAID 0 connected to an Icy Box RD2253-U31 2-bay USB 3.1 enclosure powered by an ASMedia ASM1352R controller.
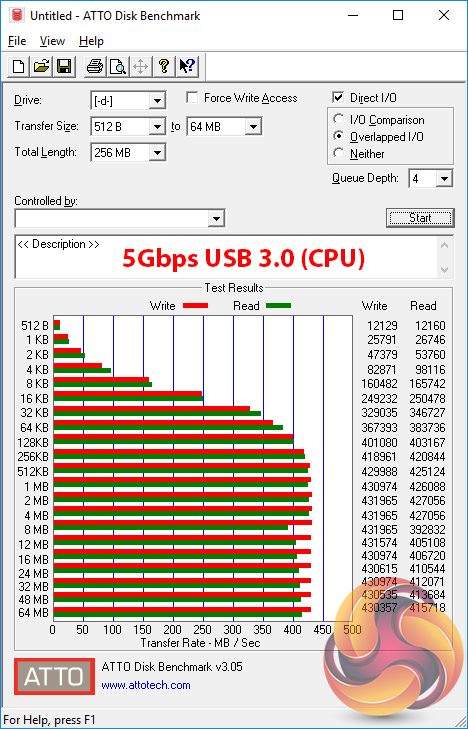
USB 3.0 5Gbps performance tops out at close to 450MBps, as we would expect. This was using the CPU-fed ports.
USB 3.1 10Gbps Performance
We test USB 3.1 performance using a pair of Corsair Force LE 120GB SSDs in RAID 0 connected to an Icy Box RD2253-U31 2-bay USB 3.1 enclosure powered by an ASMedia ASM1352R controller.
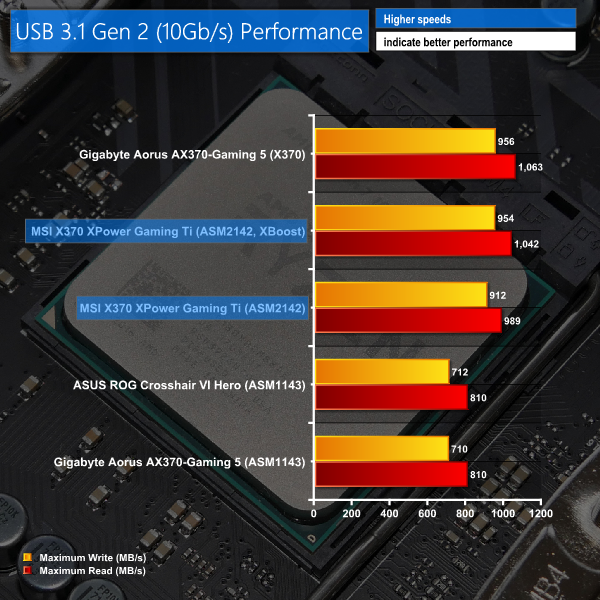
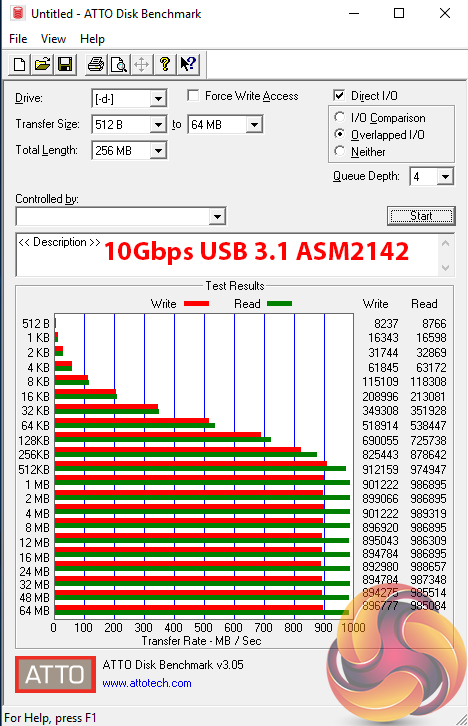
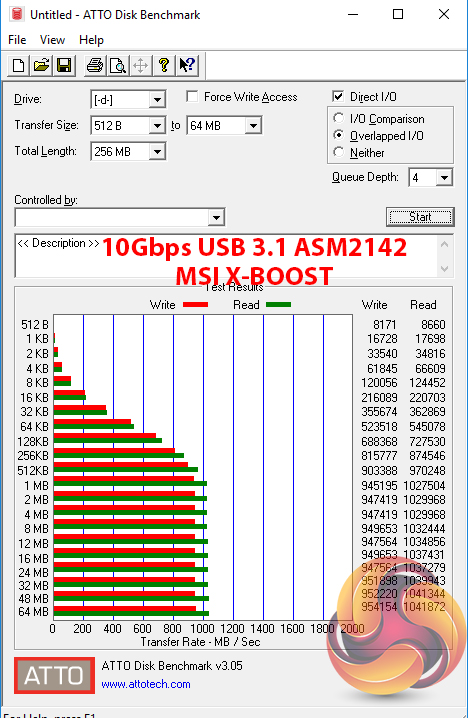
ASMedia's newer ASM2142 USB 3.1 Gen 2 controller used by MSI puts the ASM1143 opted for by Gigabyte and ASUS to shame. Without any software optimisation, MSI's solution is more than 20% faster than the chipset opted for by the two charted competitors. It is, however, slower than the 10Gbps USB 3.1 Gen 2 ports natively offered by the X370 chipset. Excellent job, AMD.
MSI's X-Boost software provided a boost to top-end USB 3.1 transfer rates. The software tool unlocked an additional 40-50MBps on transfer rates, which is a reasonable amount to content creators who push files back and forth for much of their working day.
SATA 6Gbps Performance
For SATA 6Gbps testing we use a SK Hynix SE3010 960GB SSD.
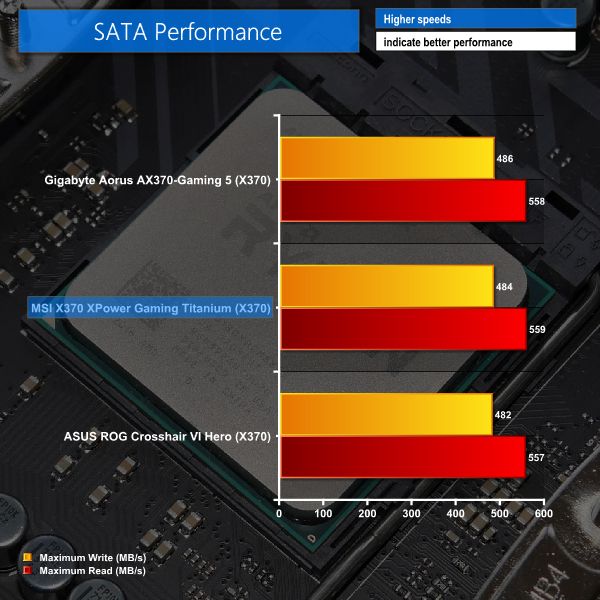
Performance from the AMD-based SATA 6Gbps ports is without issue.
Audio
Rightmark Audio Analyser is a freeware benchmarking utility designed to objectively test the performance characteristics of audio solutions. We setup a line-in line-out loop and execute the record/playback test before generating the results report you see below. A sampling mode of 24-bit, 192 kHz was tested.
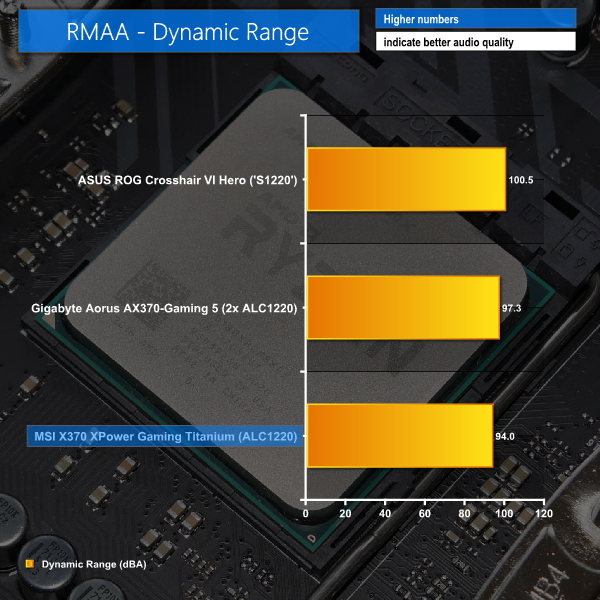
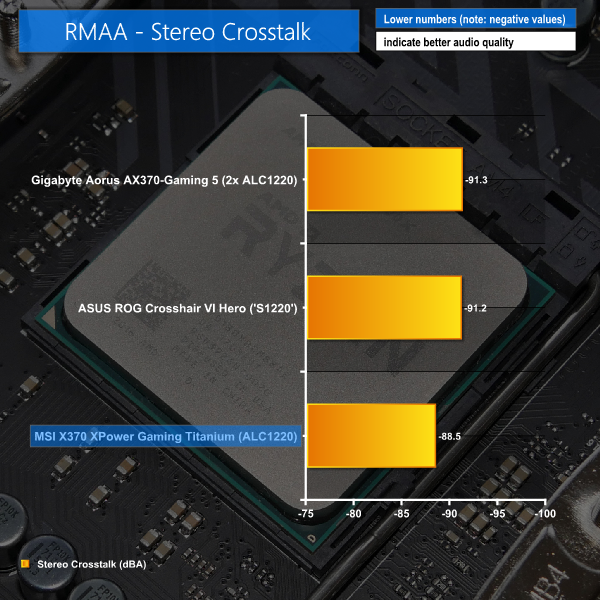
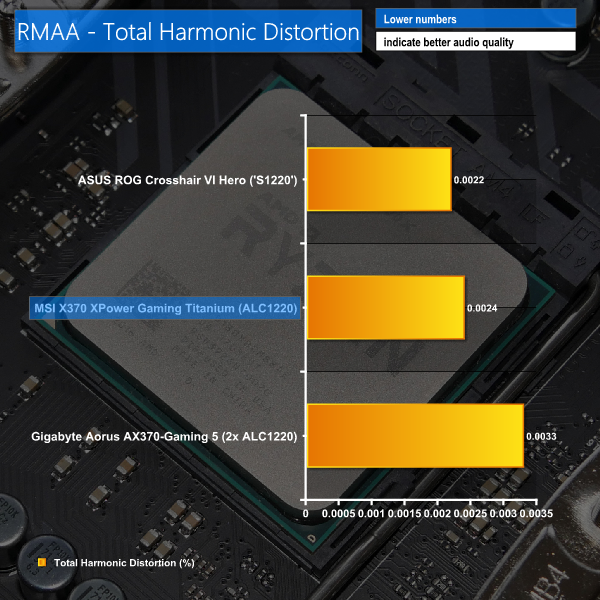
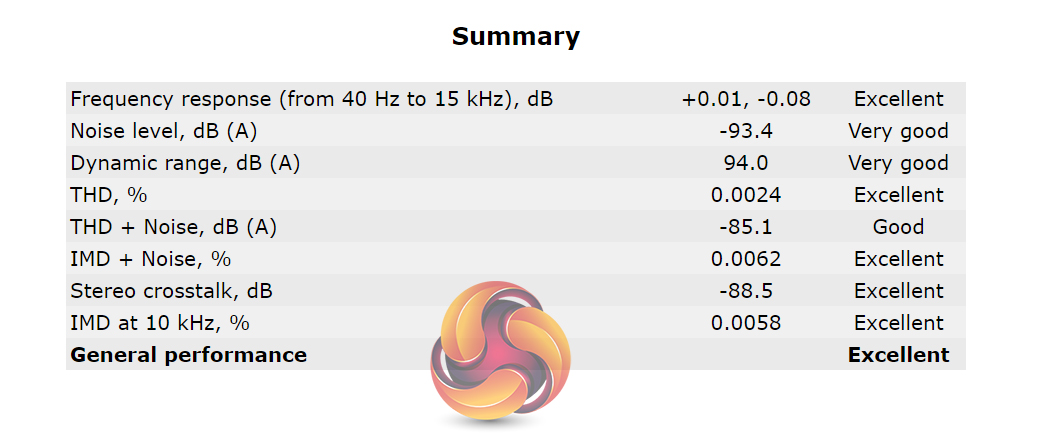
Audio performance for MSI's board is rated as ‘Excellent' by RMAA. In some of the key metrics, MSI's motherboard wasn't quite as strong as the performance offered by Gigabyte and ASUS competitors. However, the balance and retention of impressive performance throughout RMAA's test lead to a positive scoring.
Given its flagship status and XPower branding, performance is arguably the most important metric for MSI's X370 XPower Gaming Titanium. It's performance where the MSI offering is strong.
Out of the box, A-XMP was set to run our 3200MHz modules without hassle and the motherboard's stock-clocked performance was consistently competitive. Overclocked performance showed gains slightly larger than we expected that saw the XPower outperforming ASUS and Gigabyte competitors. The process of getting to that enhanced CPU frequency was straightforward thanks to MSI's explanation of LLC options and the accurate voltage levels.
Features are a strength for MSI. Dual M.2 ports is good to see, even if one is forced to run at reduced speeds using a PCIe 2.0 x4 link from the X370 chipset. The inclusion of U.2 is another strength as it doesn't take anything away from the board with its presence and bandwidth sharing. A reduction from eight to six in the board's SATA count is a minor negative that is unlikely to dissuade many potential buyers.
MSI's decision to use the ASMedia ASM2142 USB 3.1 Gen 2 chipset was a good one as it is more than 20% faster than lower-cost ASMedia offerings deployed by ASUS and Gigabyte. It also means that a user can get roughly 1GBps USB 3.1 Gen 2 transfer rates through the rear IO ports as well as front panel connections fed by the X370 chipset. That is something that cannot be said for the ASUS ROG Crosshair VI Hero, Gigabyte Aorus AX370-Gaming 5, or ASRock X370 Taichi. MSI clearly has an advantage in this aspect.

MSI's X370 XPower Gaming Titanium seems a little slim in the power delivery department compared to competing flagships. Despite a mixture of quantity and quality being important for VRM designs, both ASUS and ASRock provide solutions that look to be stronger on their flagships. This is not a strict negative for the MSI offering as its overclocking results were good in our testing. However, it is something worth pointing out as this is a £300 motherboard targeting power users.
ASUS and ASRock also deploy clock generators to aid BCLK adjustment potential but MSI does not, which is odd for an overclocking motherboard. The omission of some overclocking-geared tools, such as voltage monitoring points and onboard adjustment buttons, is an oversight by MSI.
Styling is one of the clear strengths for the X370 XPower Gaming Titanium. Its unique design and colour scheme will appeal to many buyers who want their hardware to stand out. However, the fixed onboard LED lighting colour will mean that users hoping for a rainbow on their motherboard should look elsewhere. A lack of customisation is a little disappointing in the age of RGB-everything.
I would have also liked to see better lighting modes made available for an attached RGB LED strip. Gigabyte offers ‘intelligent' modes and other options that are superior to what MSI provides. While ASUS provides multiple RGB headers that can be controlled individually. Some form of LED control through the UEFI would also be welcomed.
The MSI X370 XPower Gaming Titanium is a strong, feature-filled motherboard that delivers performance worthy of its flagship status. There are some areas where the overall package could better compete with the alternatives but the unique colour scheme and straightforward overclocking are worthy points to consider alongside the healthy set of features.
![]()
The MSI X370 XPower Gaming Titanium is available at Overclockers UK for £299.99 (at the time of writing).
Discuss on our Facebook page, over HERE.
Pros:
- Two M.2 ports for PCIe and SATA SSDs.
- Fast USB 3.1 Gen 2 through the rear IO and internal header.
- Fan control is generally good (but should read from more temperature sensors).
- UEFI is easy to work with.
- Voltage accuracy when overclocked was a strength.
- A-XMP setting worked well with our 3200MHz G.SKILL Trident Z DDR4.
- Debug LED displays CPU temperature.
- Unique styling is a change from black and RGB.
Cons:
- Lacks some overclocking-geared tools such as onboard voltage monitoring points and adjustment buttons.
- No RGB lighting onboard.
- Limited control over external RGB LED strips and no UEFI-based tool.
- Fewer SATA ports than competing solutions.
KitGuru says: A good all-rounder that offers plenty of flexibility in the storage and interface department. A solid choice if you don't care for onboard RGB lighting.

You should test usb lag for mouse input. I hear fps gamers saying Ryzen is smoother because the usb is on cpu, vs Intel where it has to bounce between chips across the board. It’s more relevant at high refresh rates.
I would still go for the Taichi X370, has better power…
Hi I’m thinking of getting this motherboard but want to replace the m.2 shield with this (https://www.scan.co.uk/products/ekwb-ek-m2-nvme-heatsink-black-ribbed-aluminium-design-provides-passive-cooling-to-m2-2280-pcie-sata) DO you think I would have clearance issues with a gpu installed(I have the aorus 1080)?