Intel platforms typically offer an excellent foundation for small form factor builds and Intel's Z390 continues that trend unabated. ASUS has curated Intel's latest chipset with ample features and a high-end specification, making it the ideal candidate for a miniature performance powerhouse.
It isn't quite as exciting or innovative as the renowned Republic of Gamers “Maximus Impact” motherboards, last seen on the Intel Z170 platform, but ASUS continues to target development effort at the mini-ITX form factor with the ROG Strix Z390-I Gaming.
There are no signs of any outlandish daughterboards or otherwise astounding innovations, typically associated with the Republic of Gamers brand, instead a sensible mini-ITX solution that most consumers and system builders could make good use of.
Some of the neat features of the ROG Strix Z390-I Gaming include dual M.2, plentiful USB connectivity of all generations, onboard WiFi/Bluetooth, ample RGB options and a “beefy looking” VRM that makes use of the ASUS “Twin phase” CPU VRM, also seen on the ROG Strix Z390-E Gaming.
That VRM solution continues to be a “hot topic”, excuse the pun, among enthusiasts with ASUS effectively offering, on this motherboard, 6 CPU VRM phases worth of components but with only three PWM signals and no doublers. Improved transient response and less voltage droop between load switching have both been reported by ASUS as benefits, compared to doubler-based solutions, but it remains to be seen whether most consumers can look past the long-standing concept that “more phases is better”.
Let's see how the ASUS ROG Strix Z390-I Gaming handles itself under testing.
| ASUS ROG Strix Z390-I Gaming | |
| Form Factor | mini-ITX, 17cm x 17cm |
| CPU Socket | LGA 1151 v2 |
| CPU VRM PWM |
ASUS ASP1401CTB PWM controller |
| CPU VRM MOSFETs |
8 x On Semiconductor NCP302045, 1 x On Semiconductor NTMFS4C10N & 1 x NTMFS4C06N |
| Chipset | Intel Z390 |
| Memory | DDR4, 2 DIMMs, up to 32GB, up to 4500MHz+ with OC |
| On-board Graphics | Intel UHD Graphics (on supported CPUs) |
| Discrete Graphics | Single Graphics Card Configurations Only |
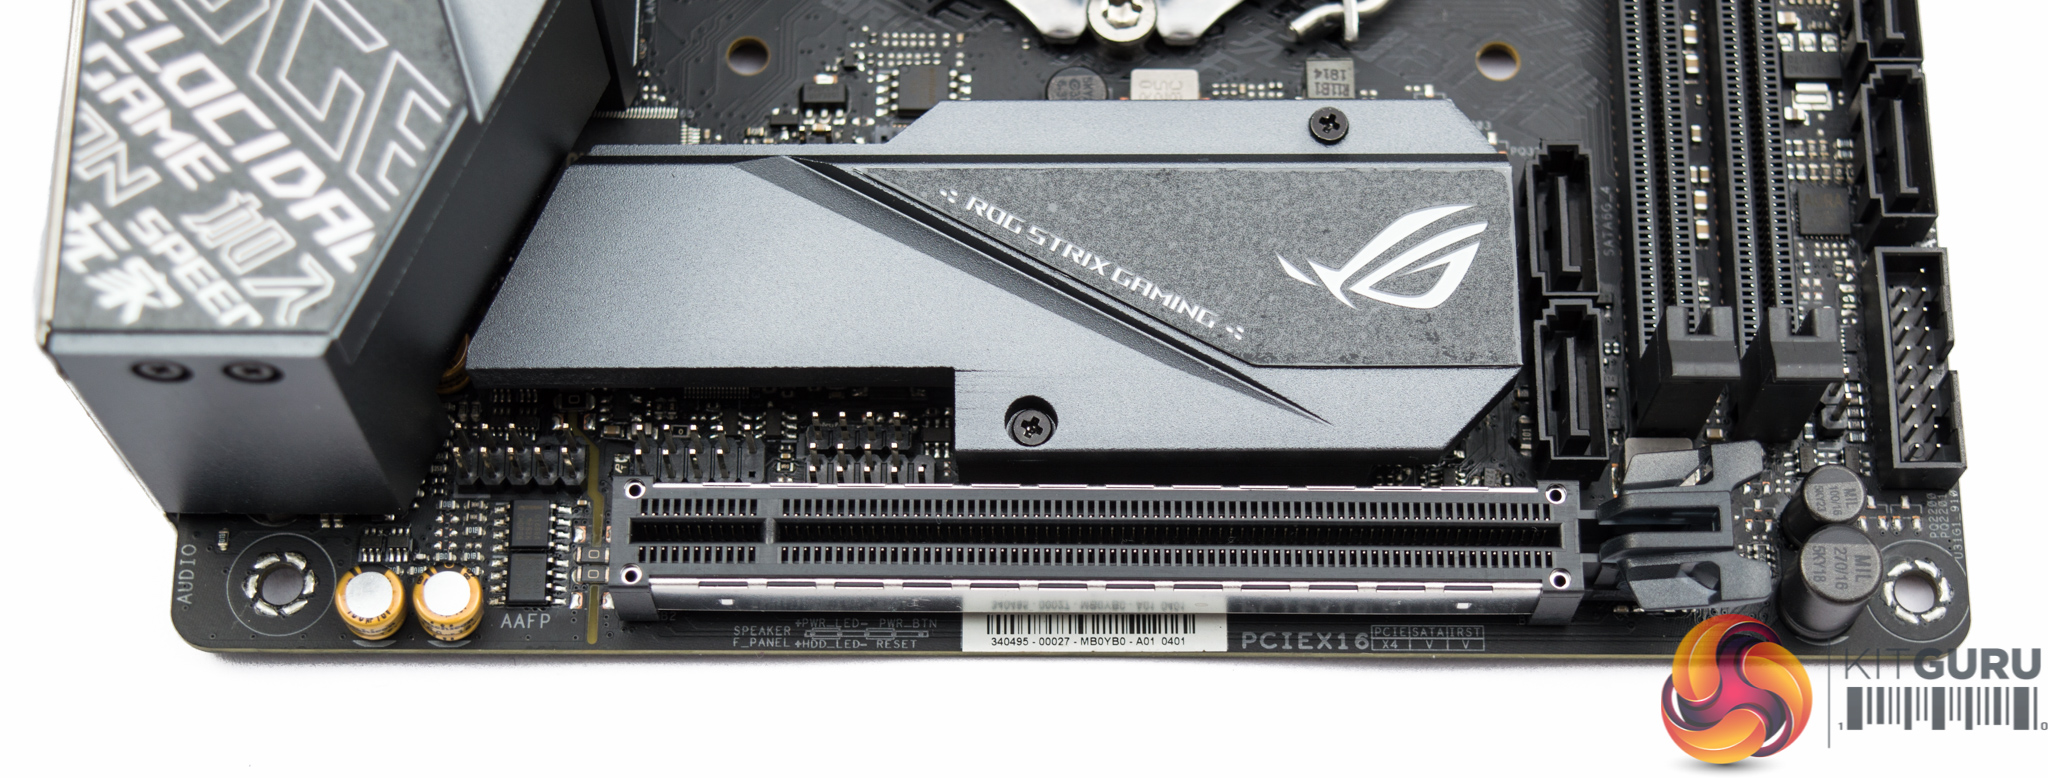
| Expansion Slots | 1 x PCIe 3.0 X16 |
| Storage | 2 x M.2 (Support PCIe 3.0 X4 or SATA III, both up to 2280) 4 x SATA III* *SATA Port 2 disabled when M2_1 operating in SATA mode |
| USB | 4 x USB 2.0 (2 Front, 2 Rear, via Intel Z390) 5 x USB 3.0 (2 Front, 3 Rear [One Type-C], via Intel Z390) 3 x USB 3.1 (2 Rear, 1 Front, via Intel Z390) |
| Networking | 1 x Intel I219-V Gigabit LAN Intel Wireless-AC 9560NGW with Bluetooth 5.0 |
| Audio | Realtek ALC1220 7.1 Channel HD Audio with Texas Instruments OPA1688 and R4580I operational amplifiers |
| RGB | 1 x 12v G R B 1 x 5v Digital addressable 1 onboard RGB lighting zone (underside strip, MB 24 pin) |
| Fan Headers | 3, all support 3/4pin fans (1 x CPU, 1 x CHA, 1 x W_PUMP) |
| Rear I/O | 1 x DisplayPort 1 x HDMI 1 x LAN (RJ45) port(s) 2 x USB 3.1 Gen 2 Type-A, 2 x USB 3.1 Gen 1 (blue) Type-A, 1 x USB 3.1 Gen 1 (black) Type-C, 2 x USB 2.0 1 x Optical S/PDIF out 5 x Audio jack(s) 1 x ASUS Wi-Fi GO! module (Wi-Fi 802.11 a/b/g/n/ac and Bluetooth v4.2) |
| UEFI | 1 x 128Mb UEFI AMI |
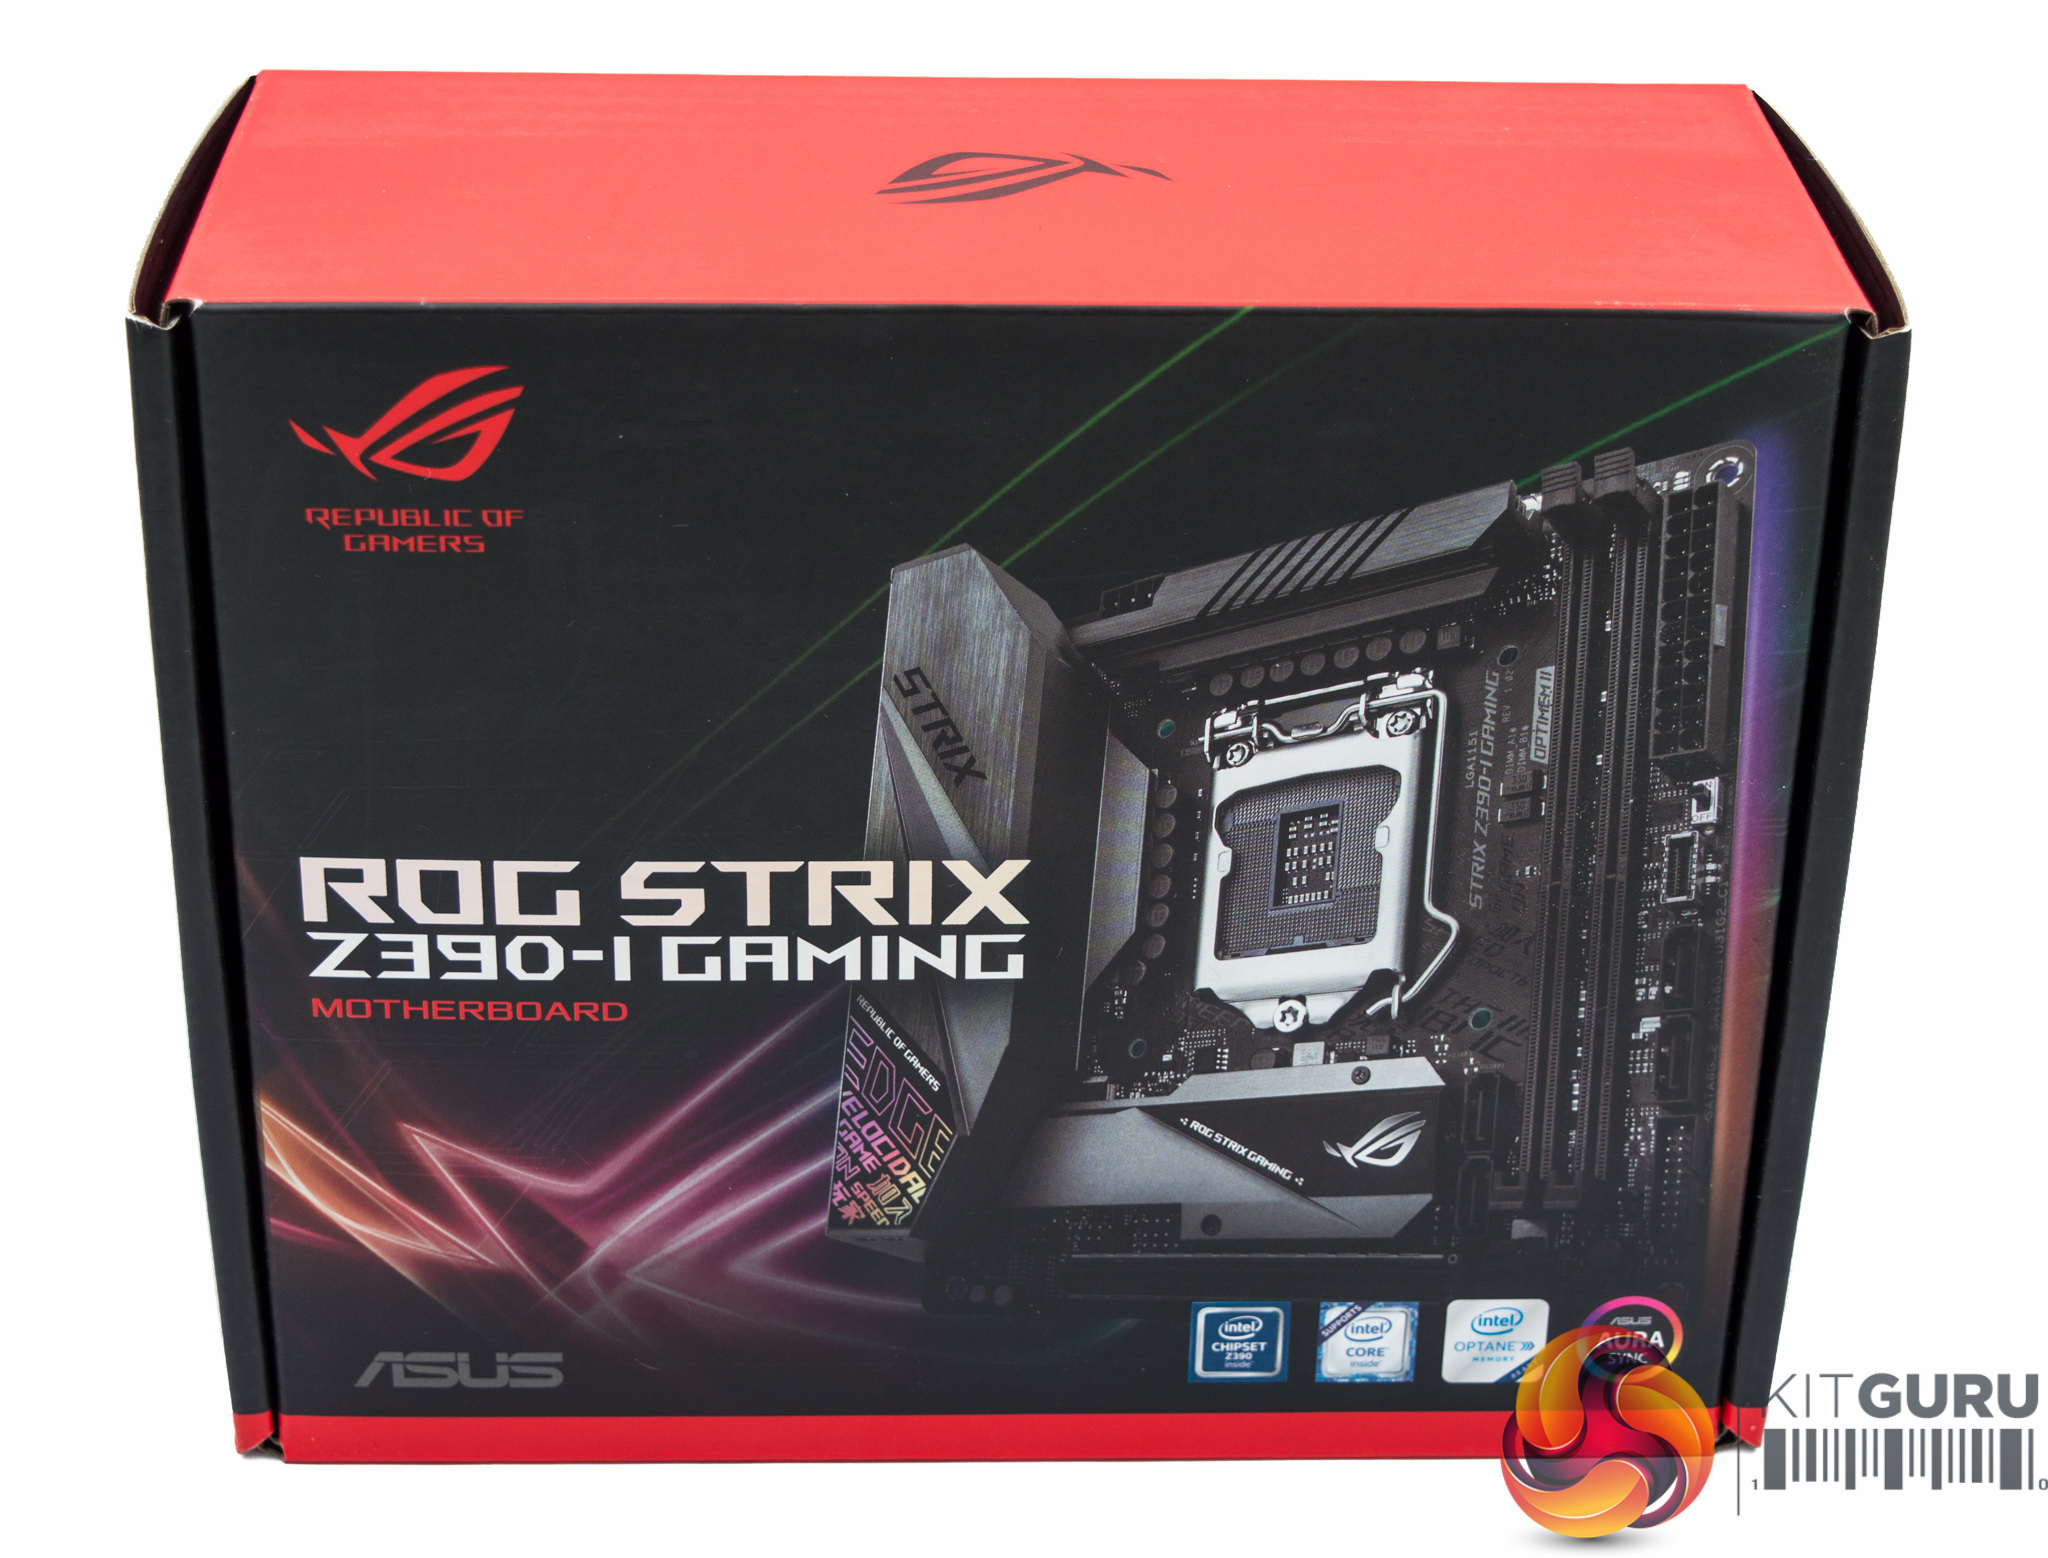
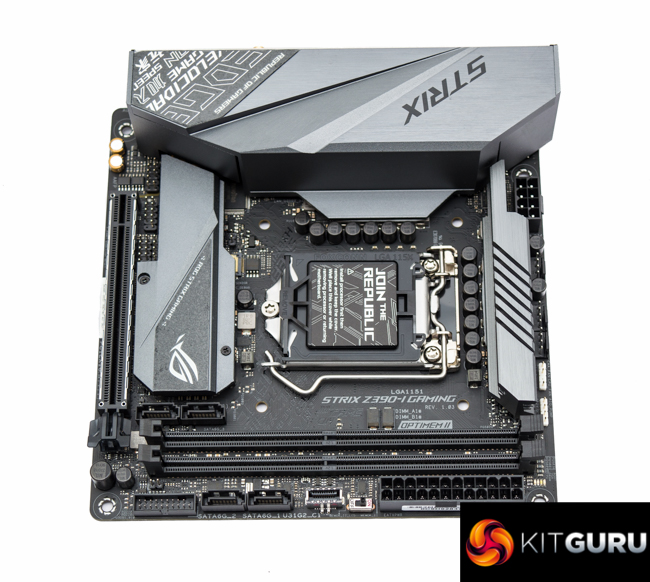
Compact packaging for a compact product, the box highlights the “doubler decker” chipset and M.2 heatsink, as well as the integrated I/O cover and VRM heatsink design. To finish off the design elements ASUS offers “AURA Sync” with onboard lighting and both 12v G R B and 5v Digital addressable headers.
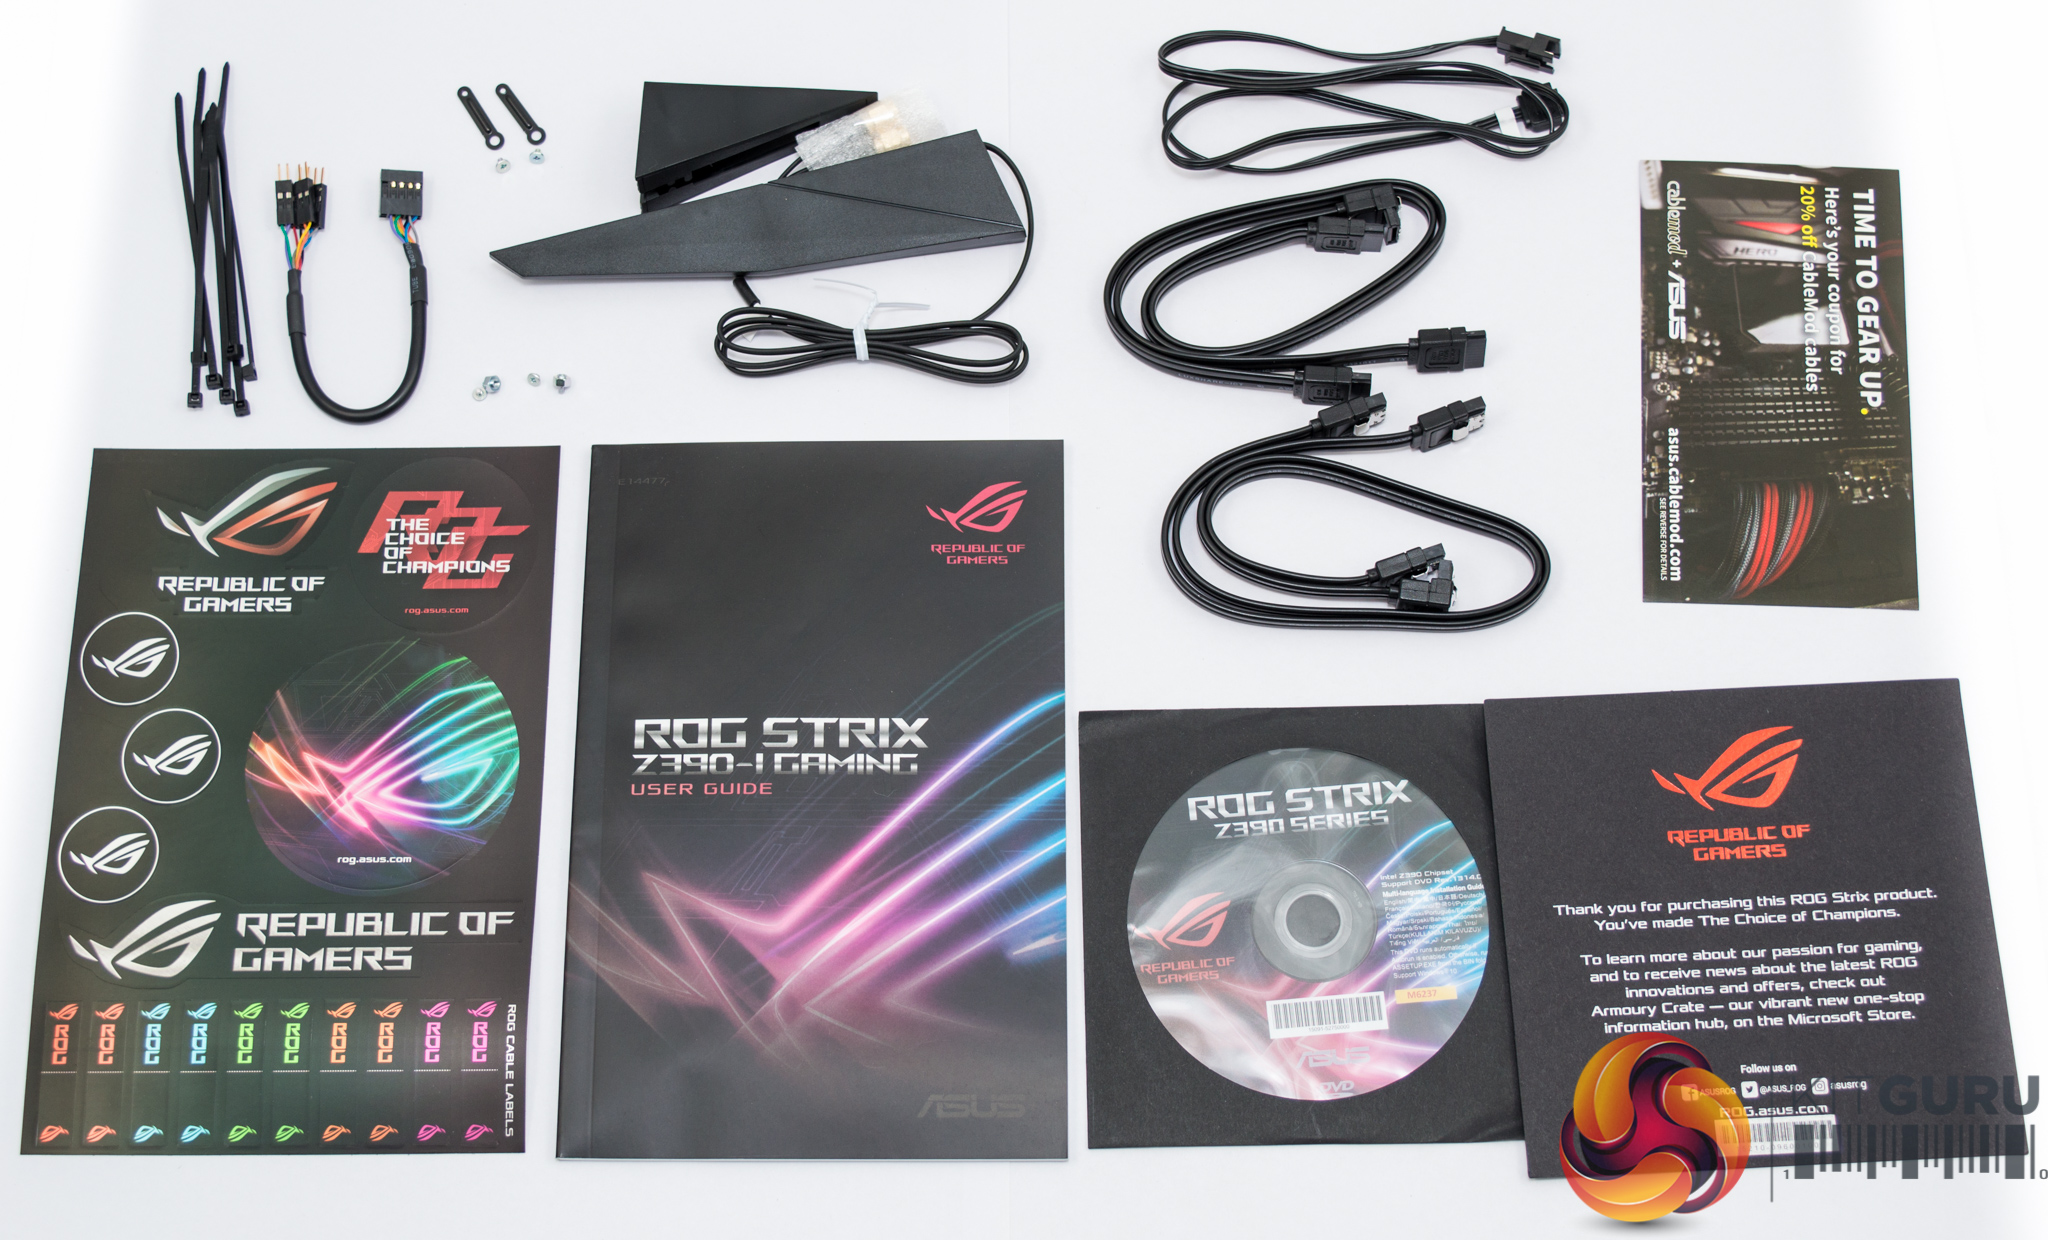
The accessory bundle includes documentation, the driver/utility DVD, some cable labels, a WiFi antennae, zip ties, SATA cables, an RGB extension cable, a front panel header cable and various mounting hardware.

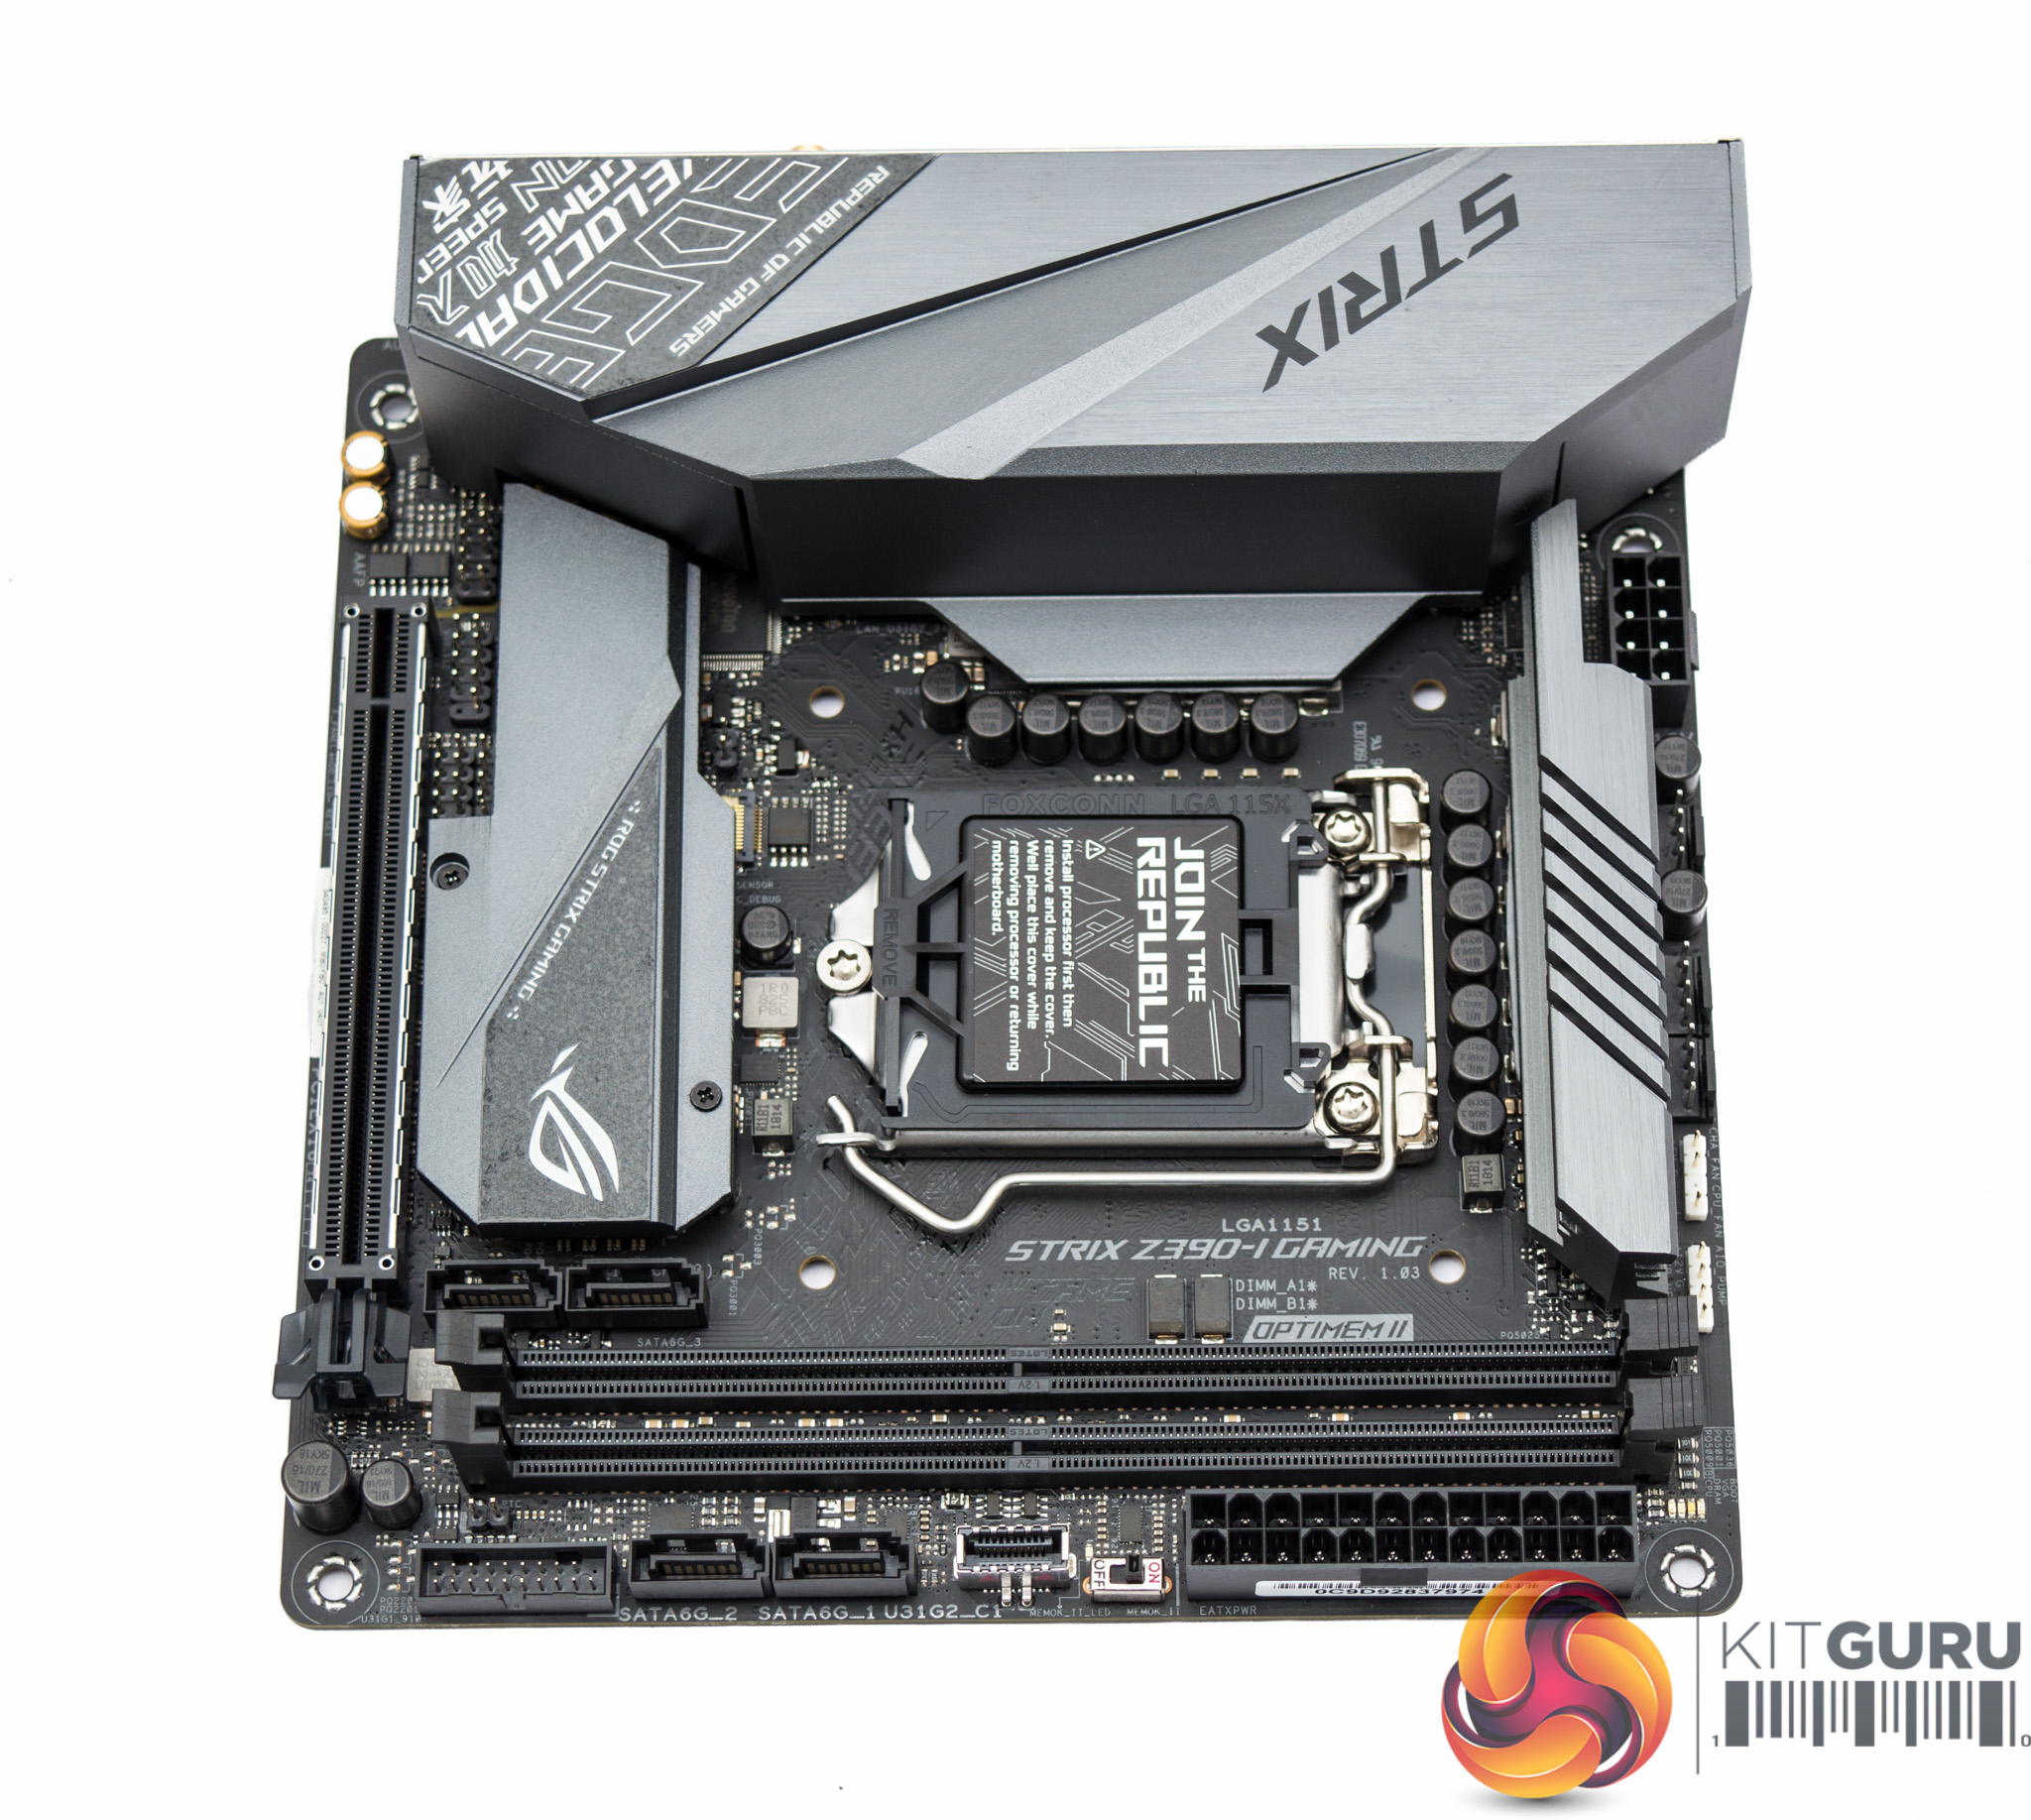
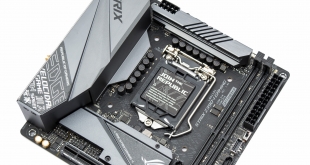
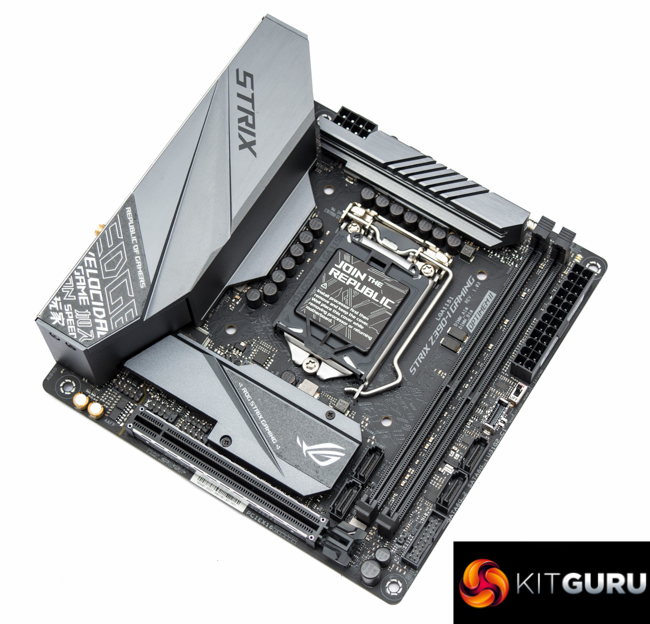
The aesthetics of the ASUS ROG Strix Z390-I Gaming have distinctively evolved from the Z370-I and Z270i predecessors. The overall look is smart, with a neutral colour palette, and makes good use of heatsinks and an I/O cover to deliver visual appeal that is typically difficult to achieve on such a small motherboard.
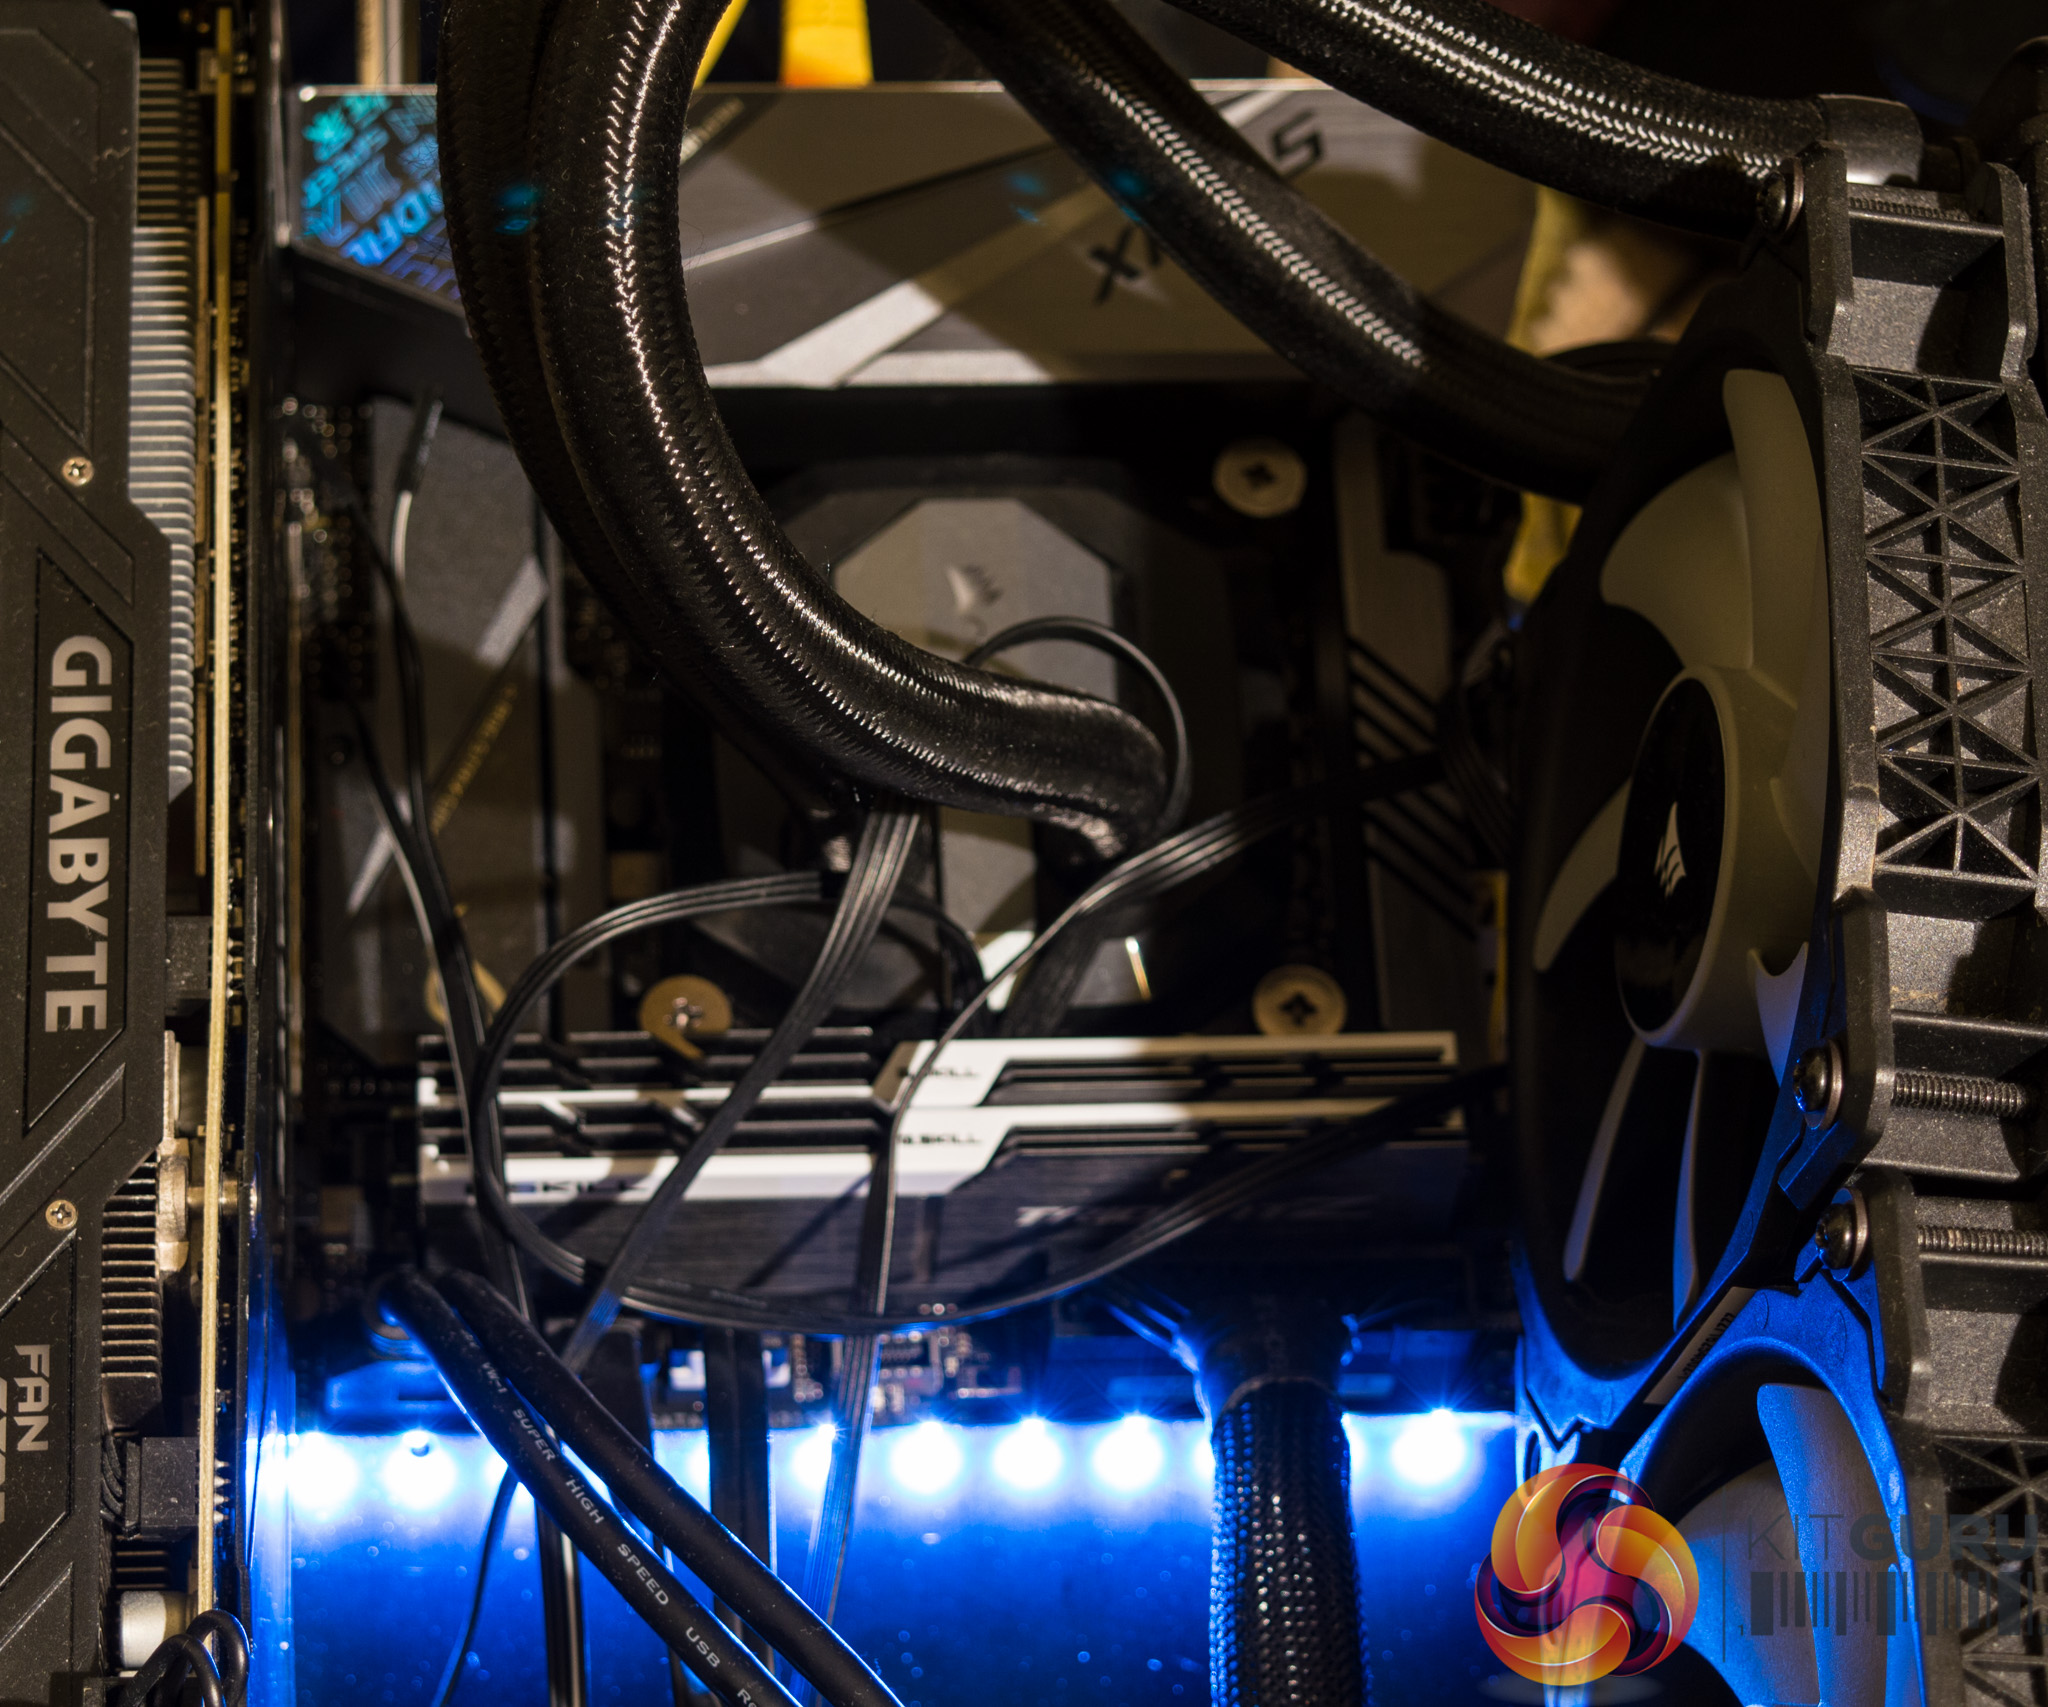
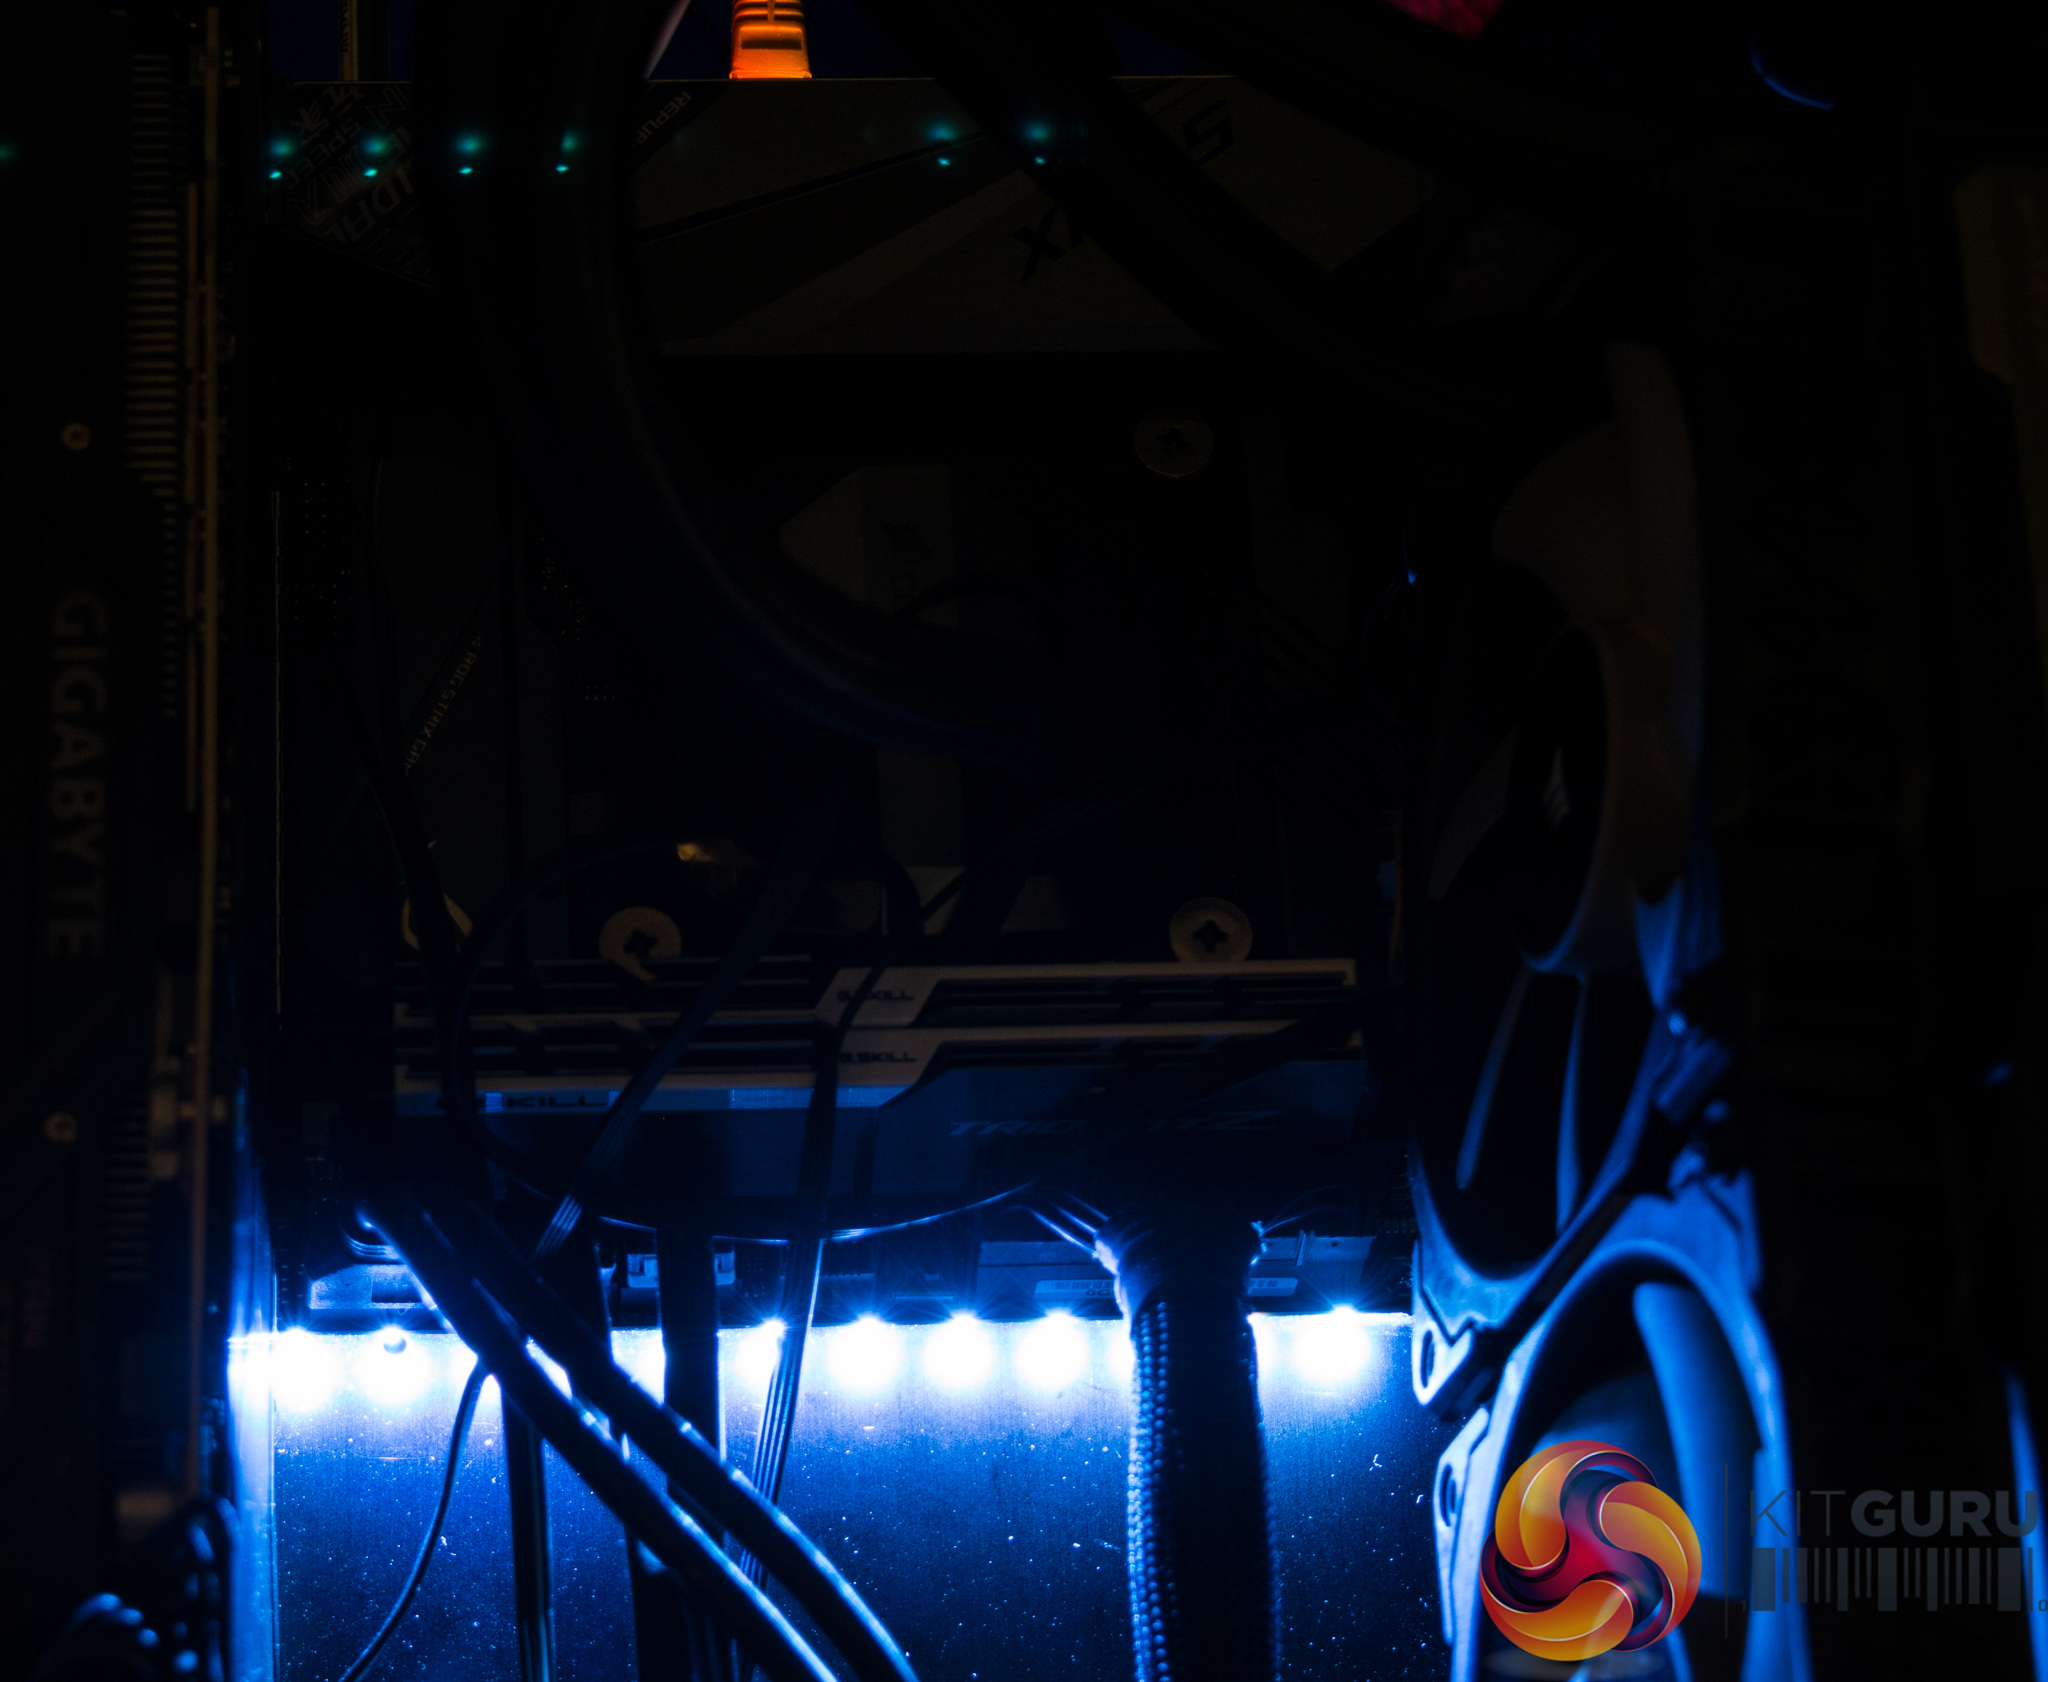
The primary onboard RGB lighting zone runs underneath the motherboard 24pin and is fully customisable using the ASUS AURA software. Up to two more RGB strips can be added, through 5v Digital Addressable and 12v headers respectively, for those system builders with a taste for customisation.
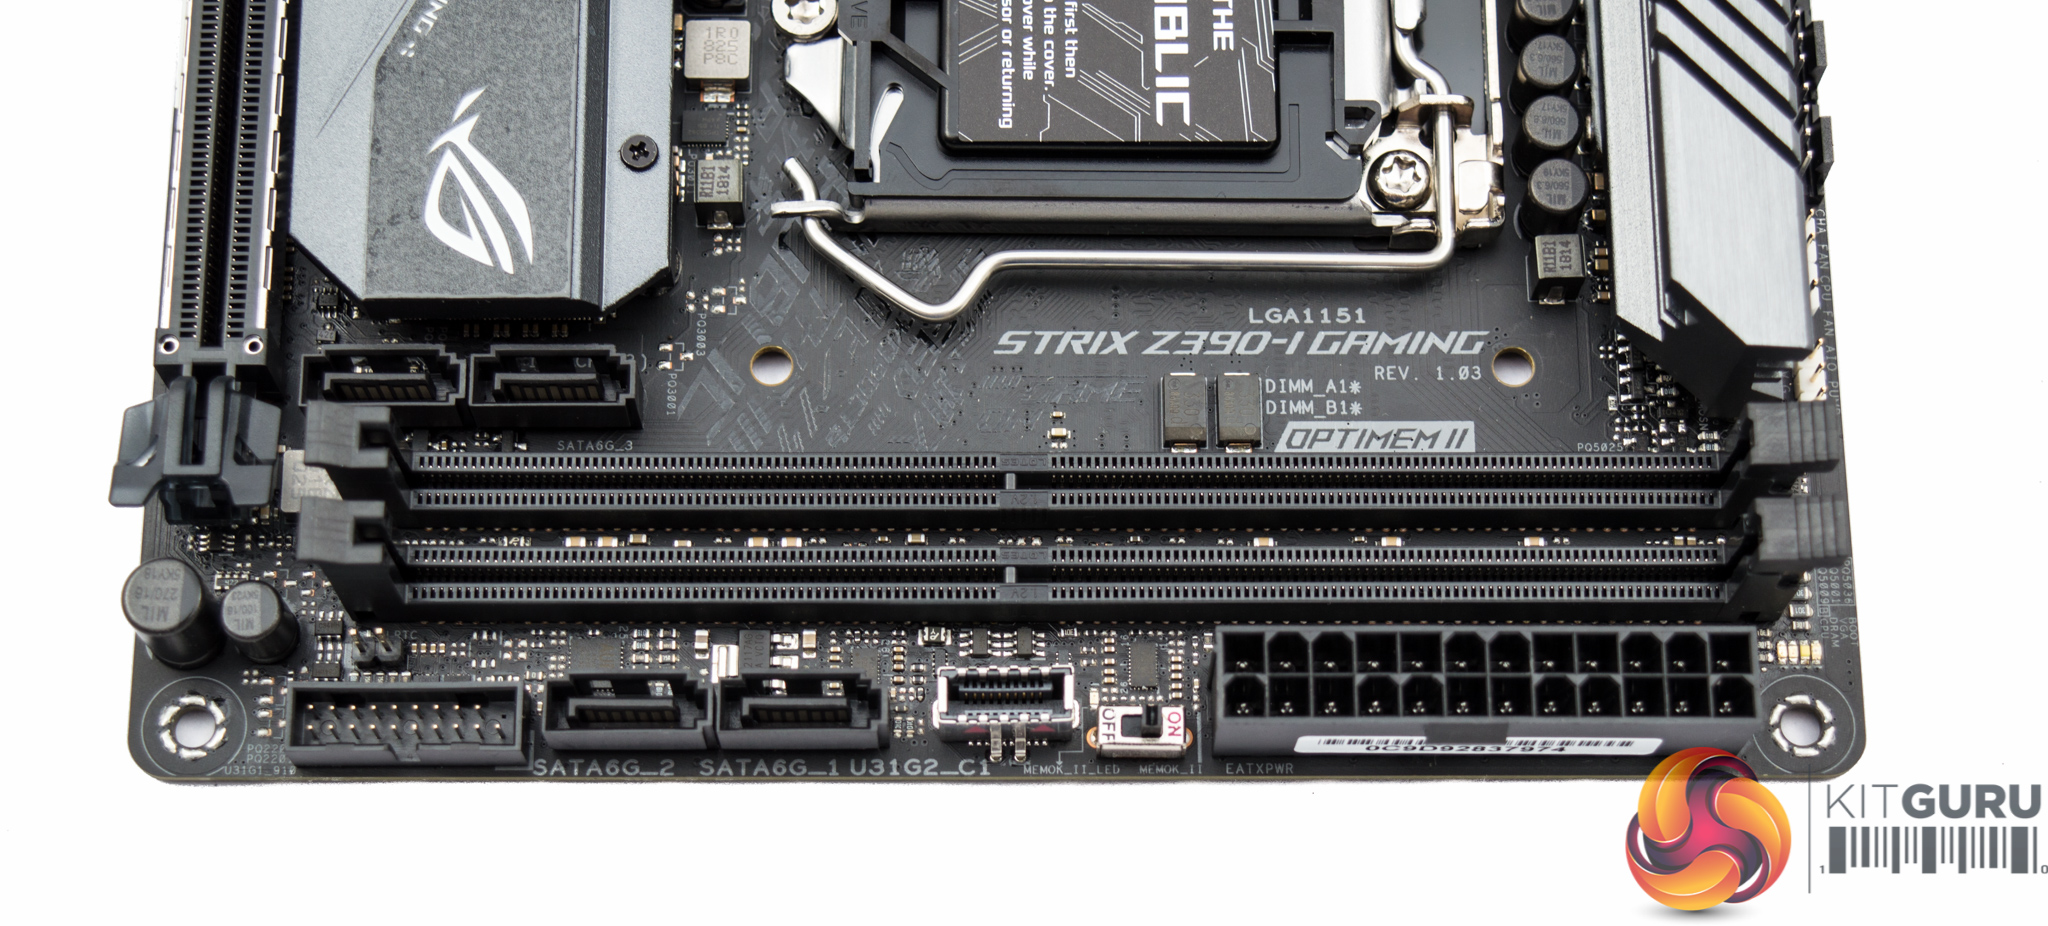
ASUS packs in a MemOK! switch, MemOK! LED and full debug LEDs to assist with the building and troubleshooting process. A front panel USB 3.1 header and a cooled M.2 slot are also welcomed additions.
The location of the front panel, USB 2.0 and HD audio connections is somewhat awkward, sandwiched right in between the PCIe lane and the M.2 heatsink. That said, ASUS does provide a front panel extension cable to make the installation of those front panel connections a little easier.
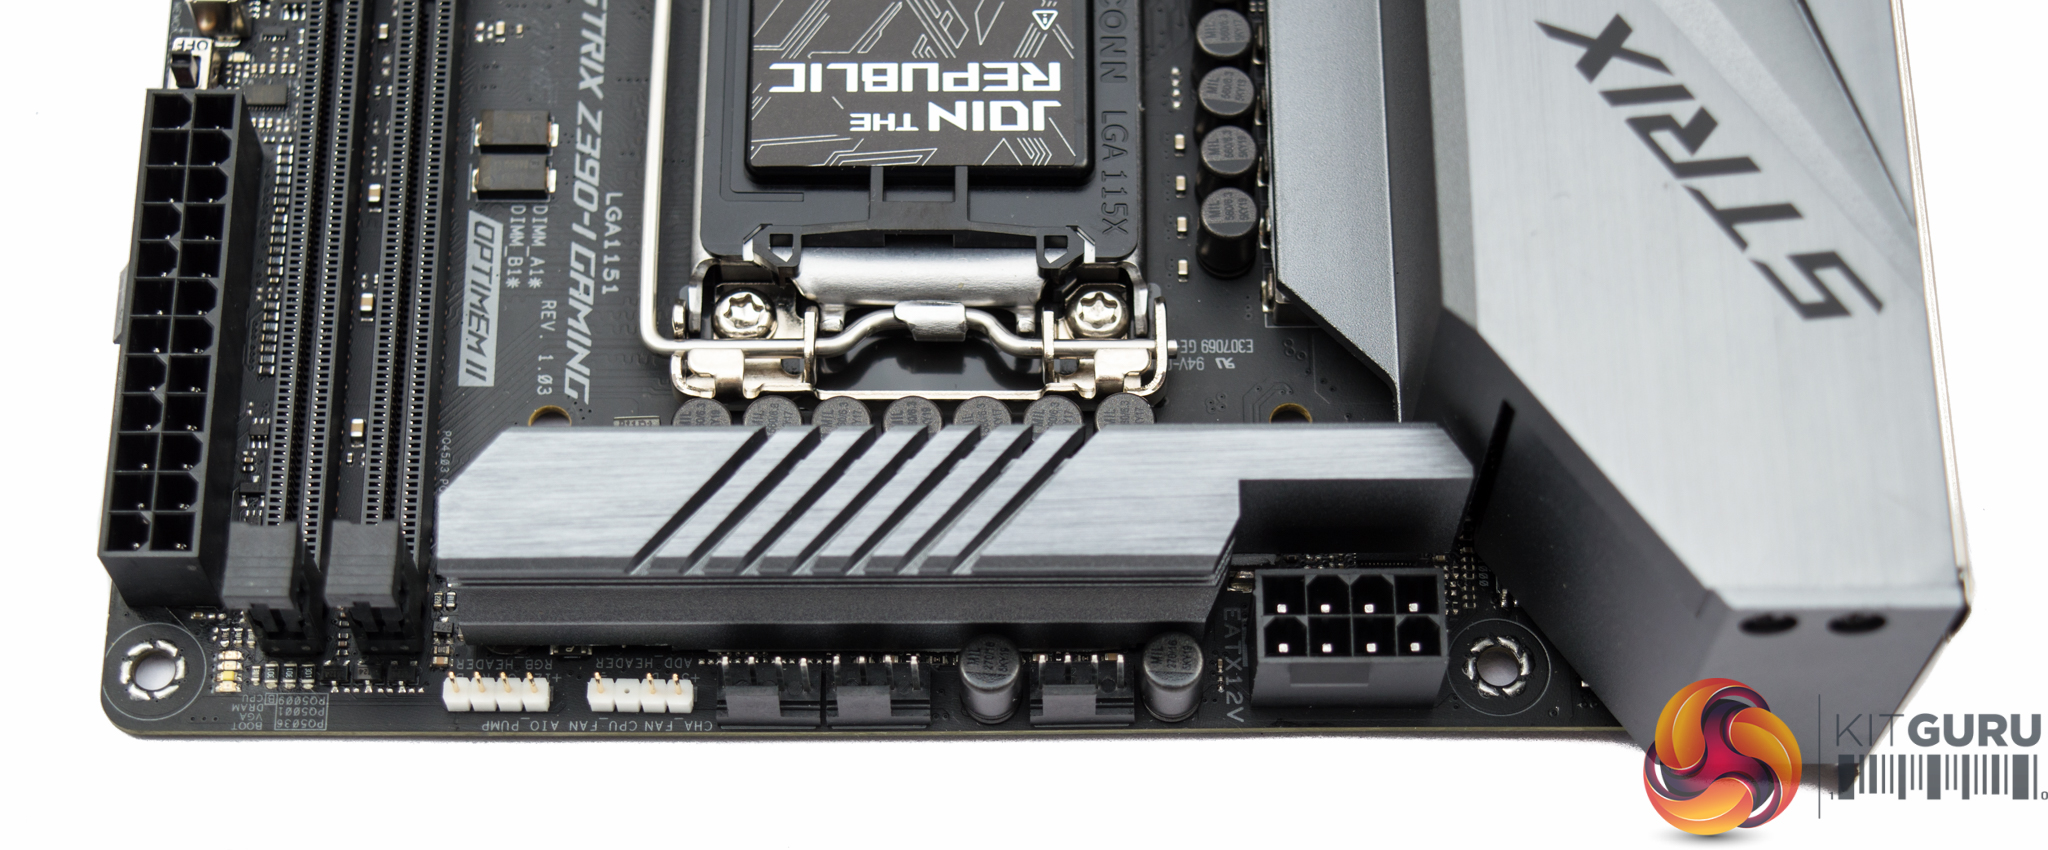
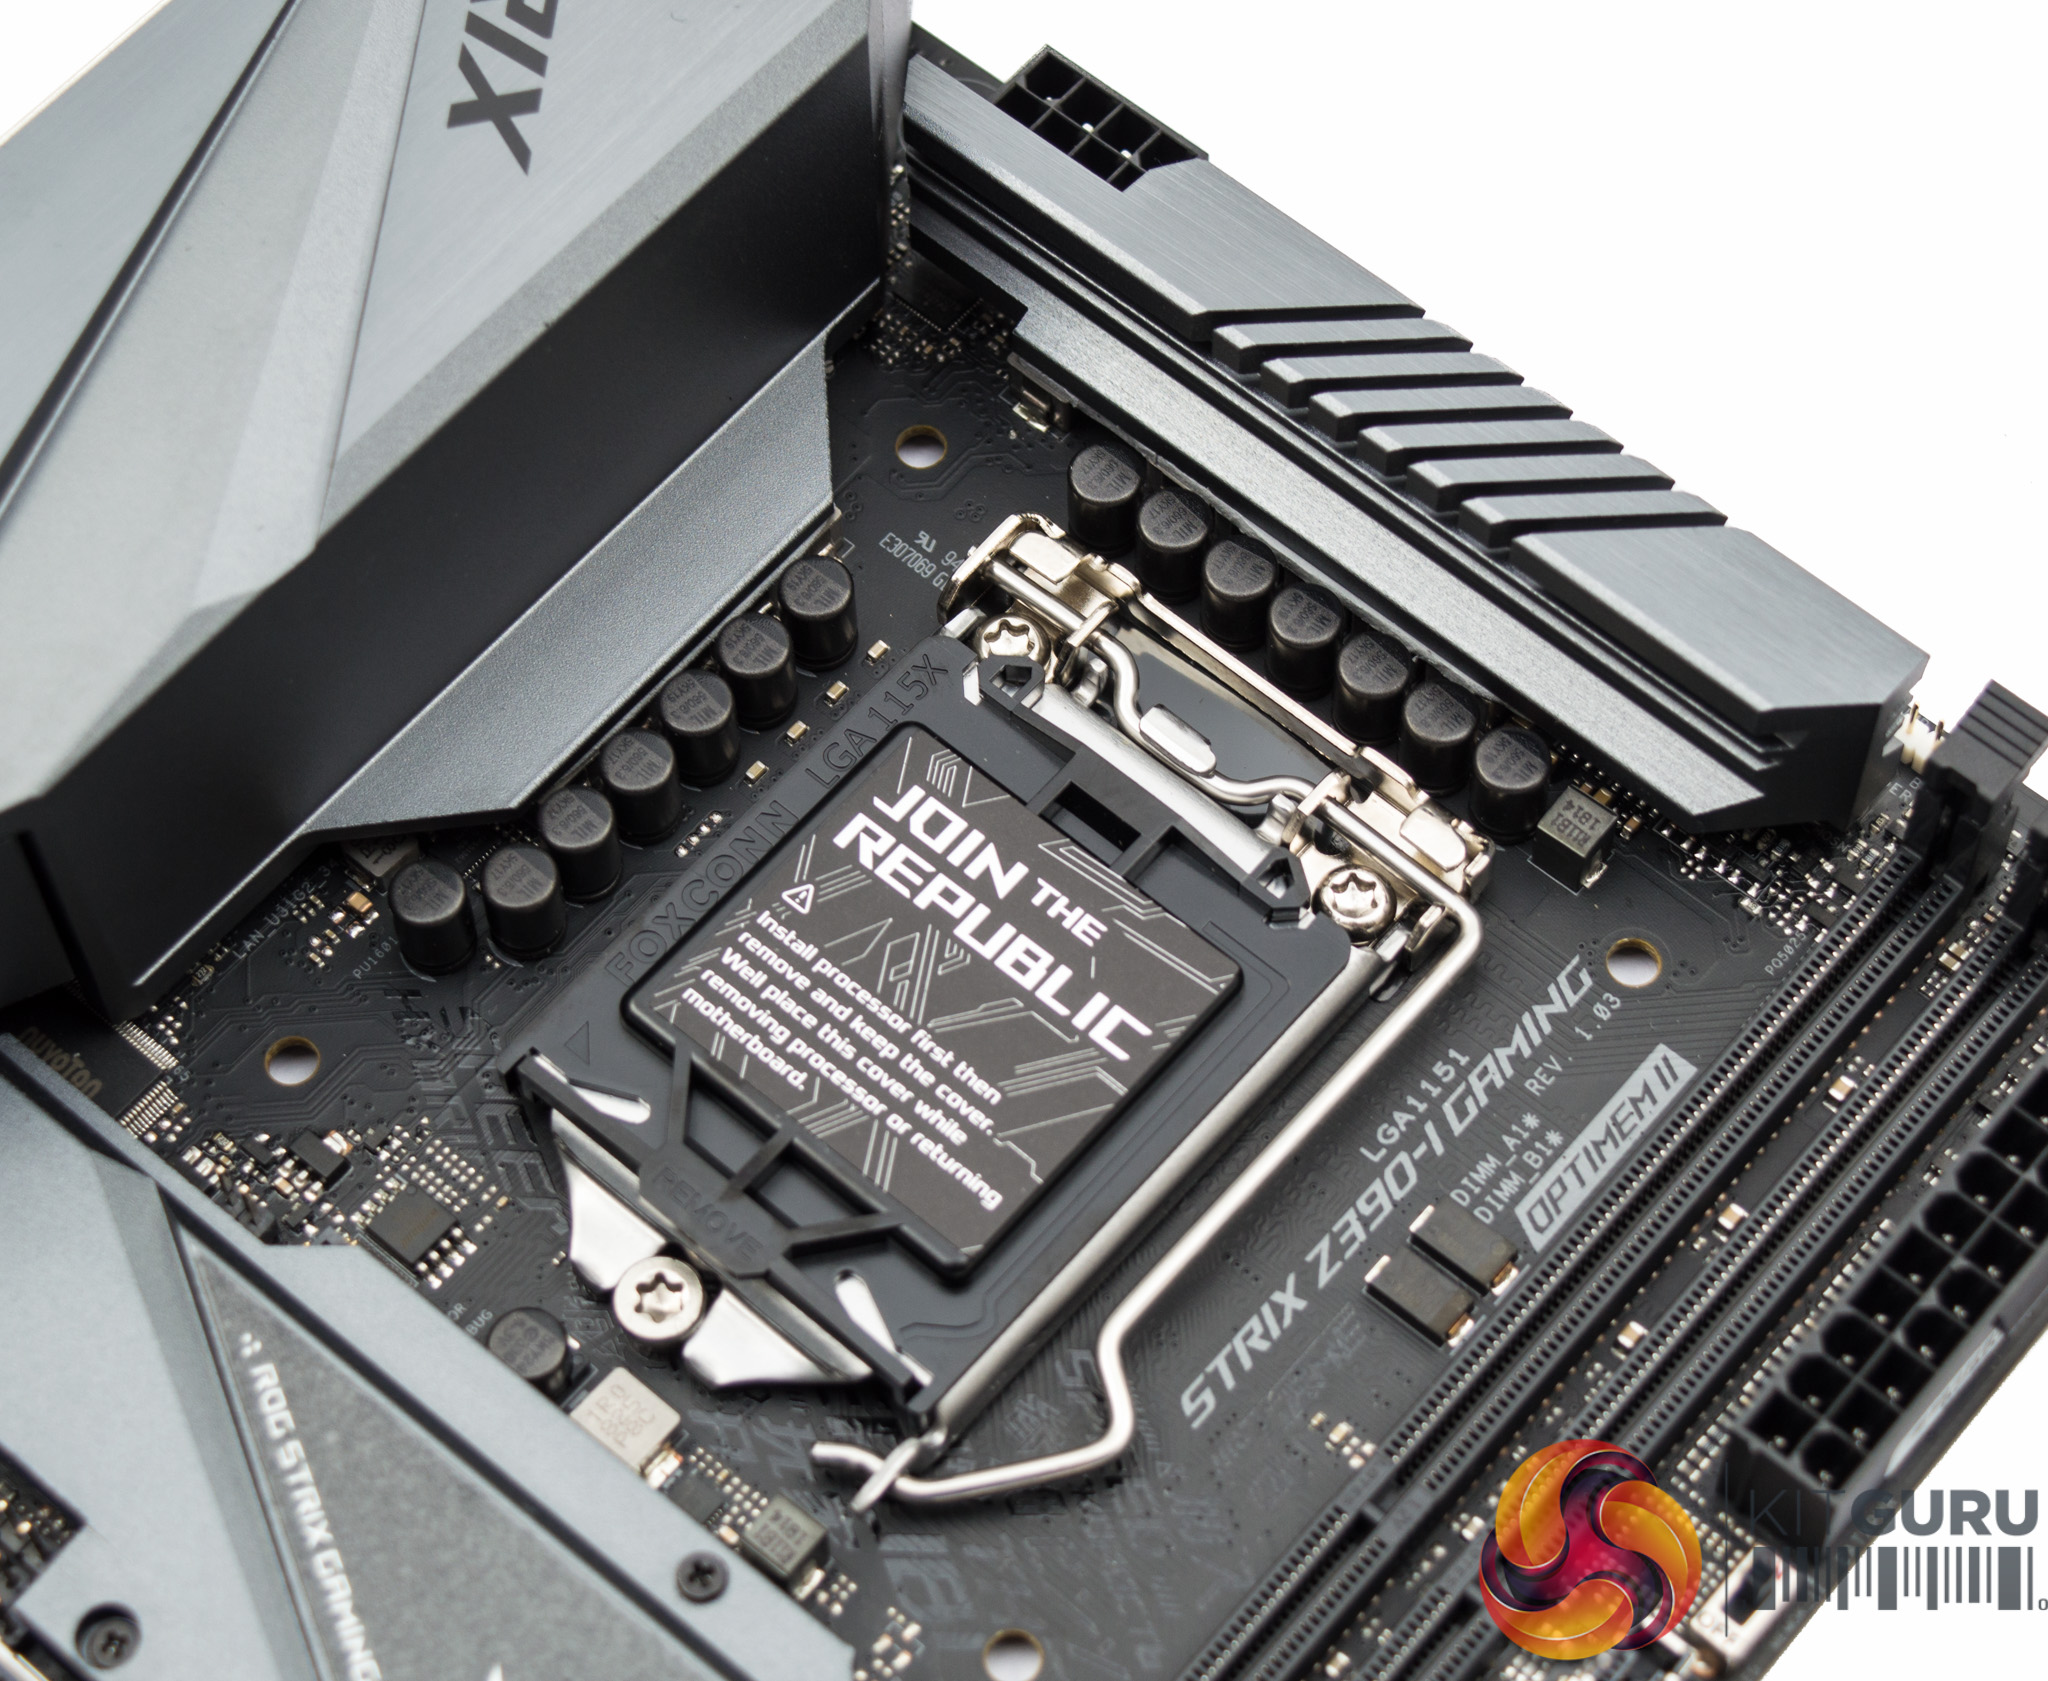
A pair of heatsinks for the CPU VRM should keep thermals under control, many motherboards vendors have been known to sacrifice one of these heatsinks when space or cost limitations become tricky.
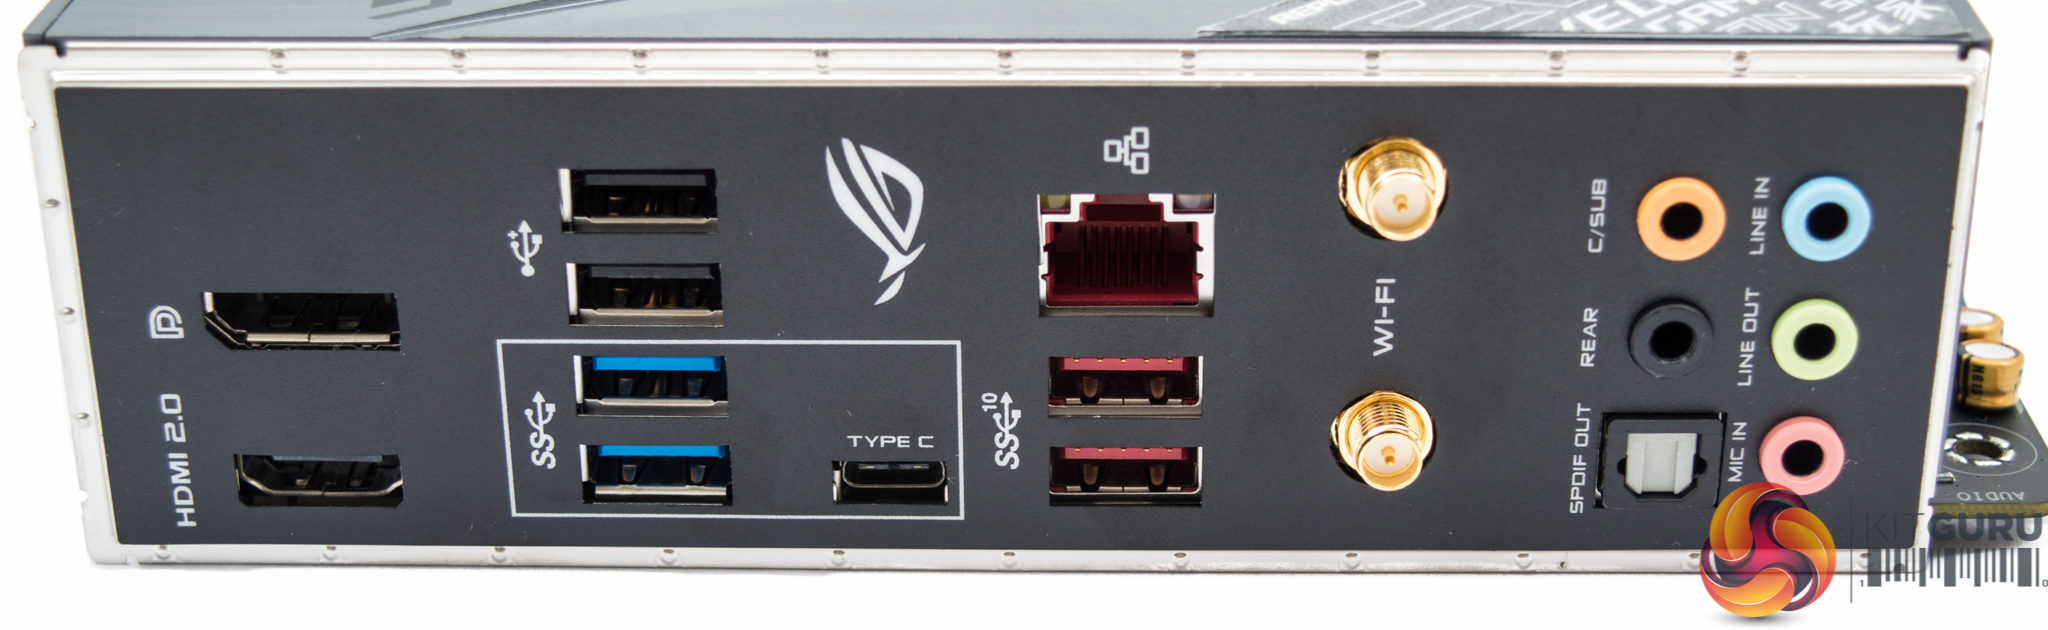
The I/O shield is fully integrated into the motherboard design, simplifying the building experience. Overall connectivity is impressive with two 4K-capable display outputs and 7 USB ports spanning Type-C and all USB generations of recent times. The integrated WiFi, now a default part of the Z390 chipset, is a nice addition for those who are unable to make use of wired networking connectivity.
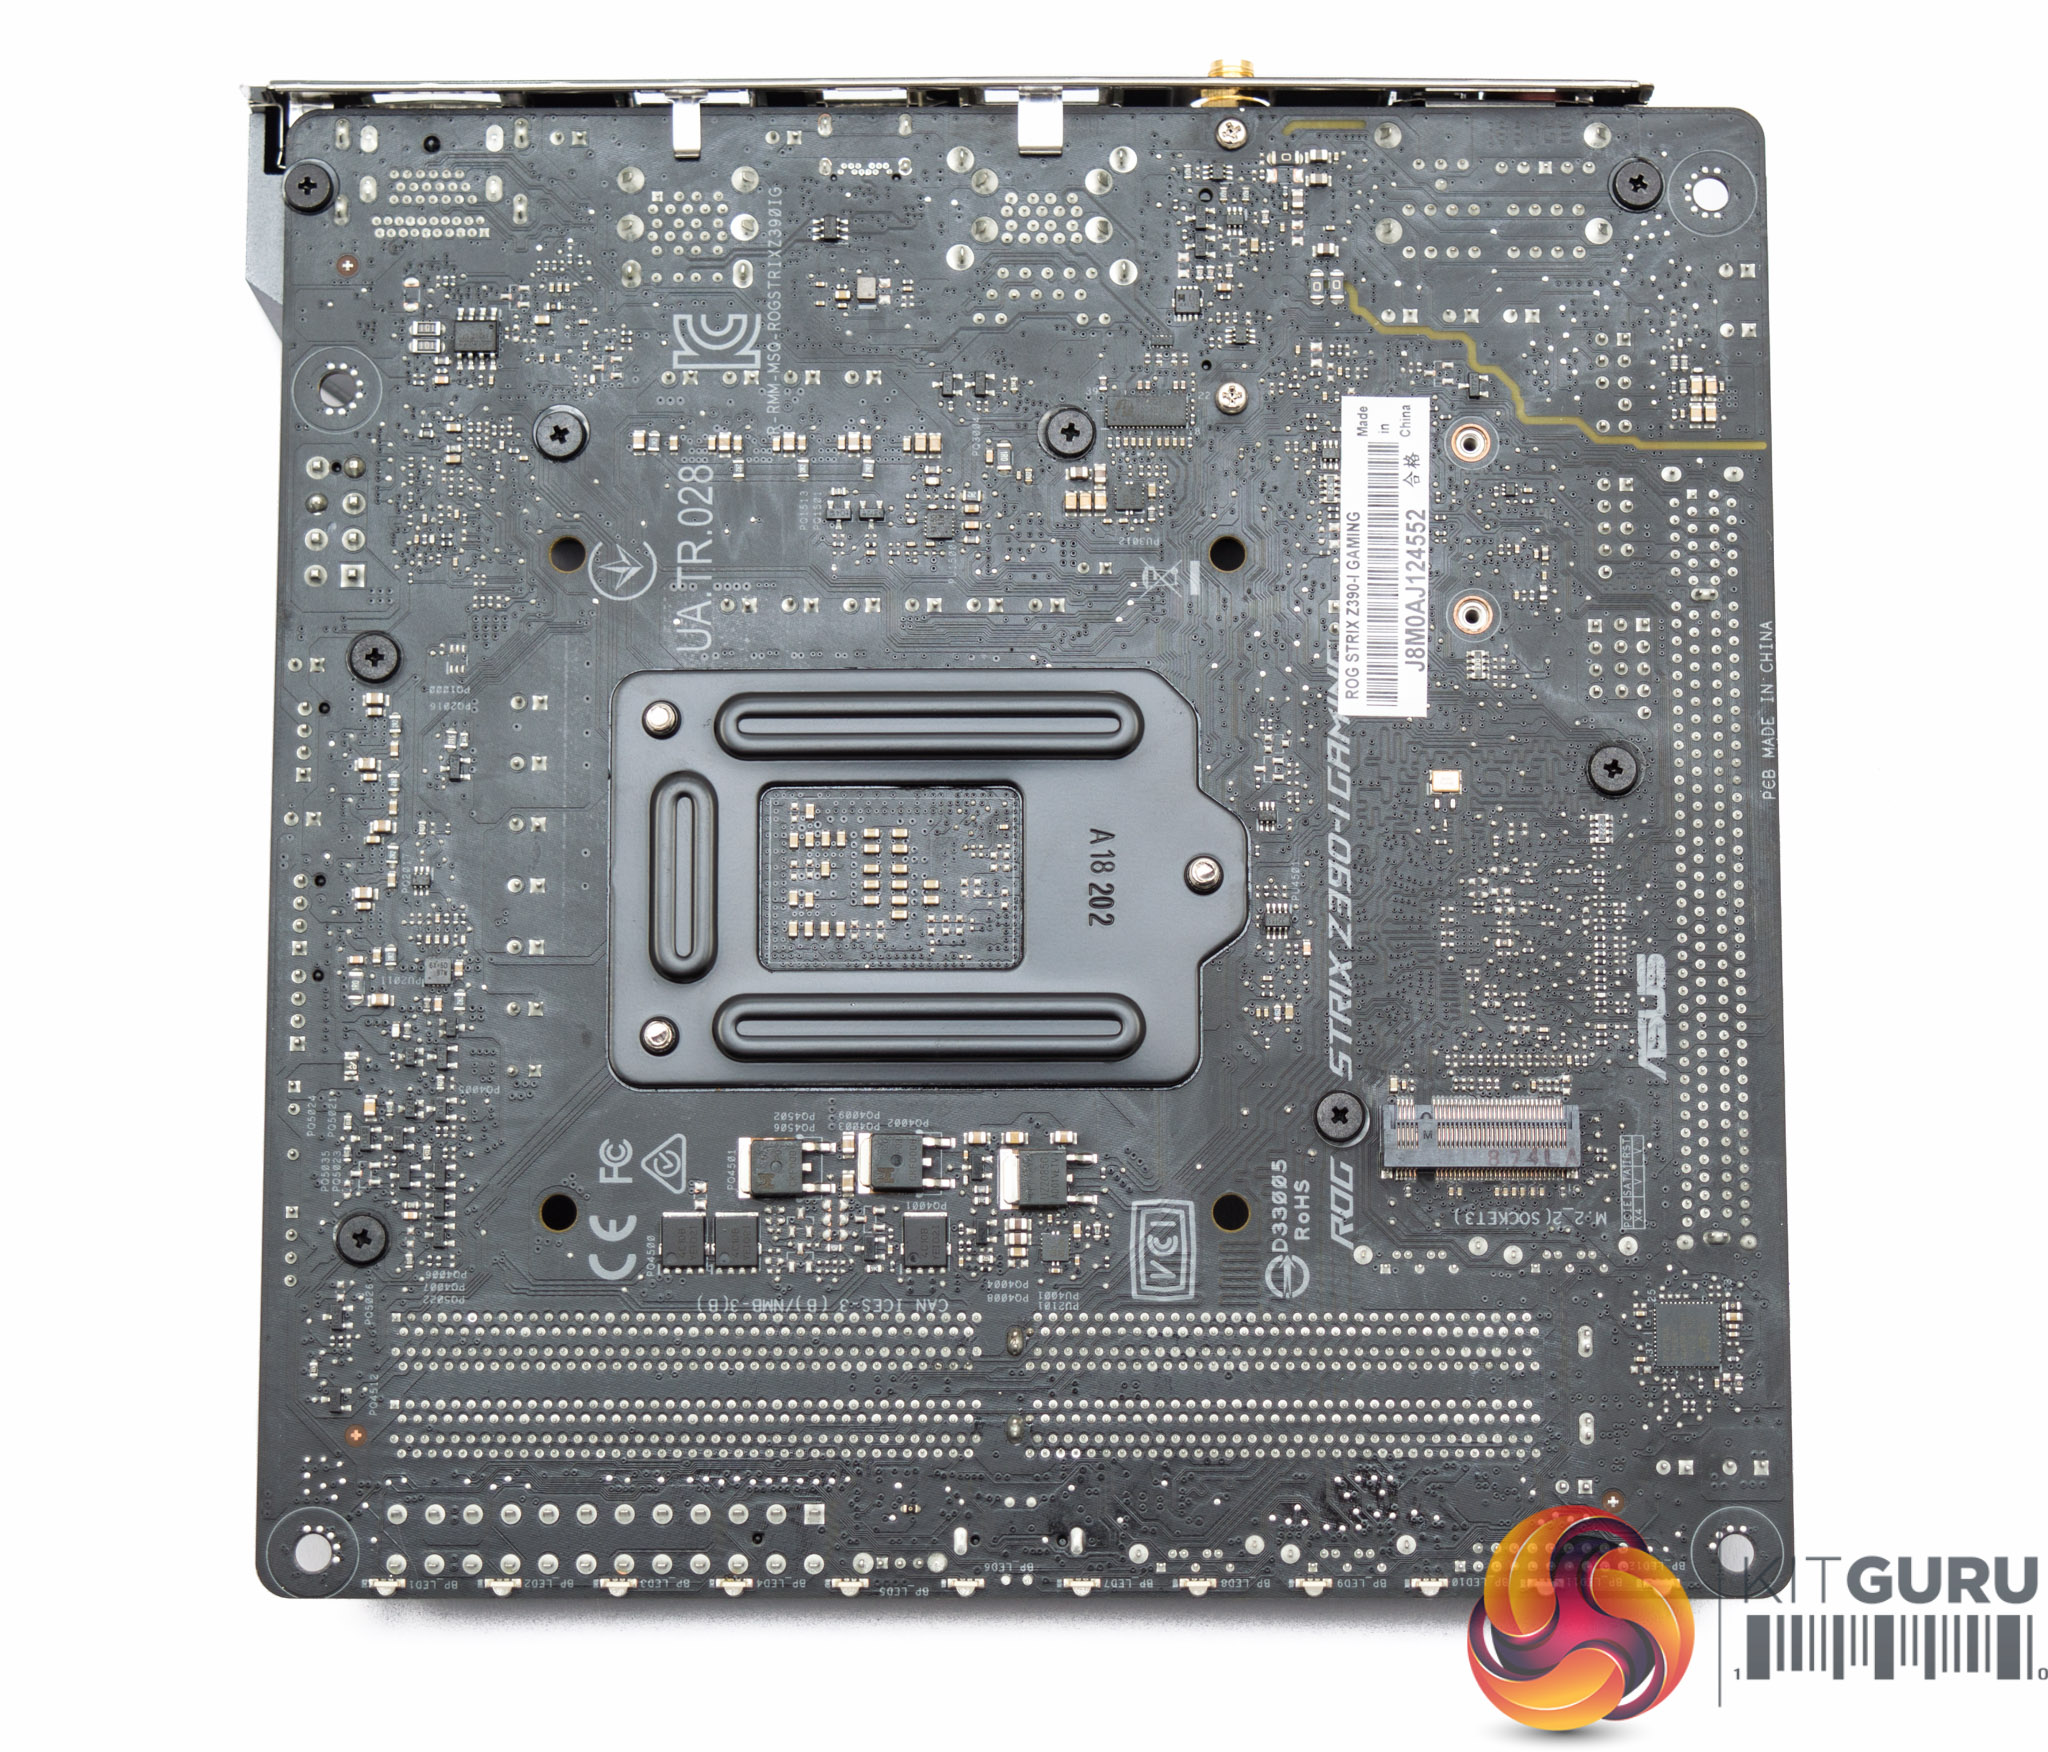
Underneath the motherboard is a second M.2 slot, without any cooling.
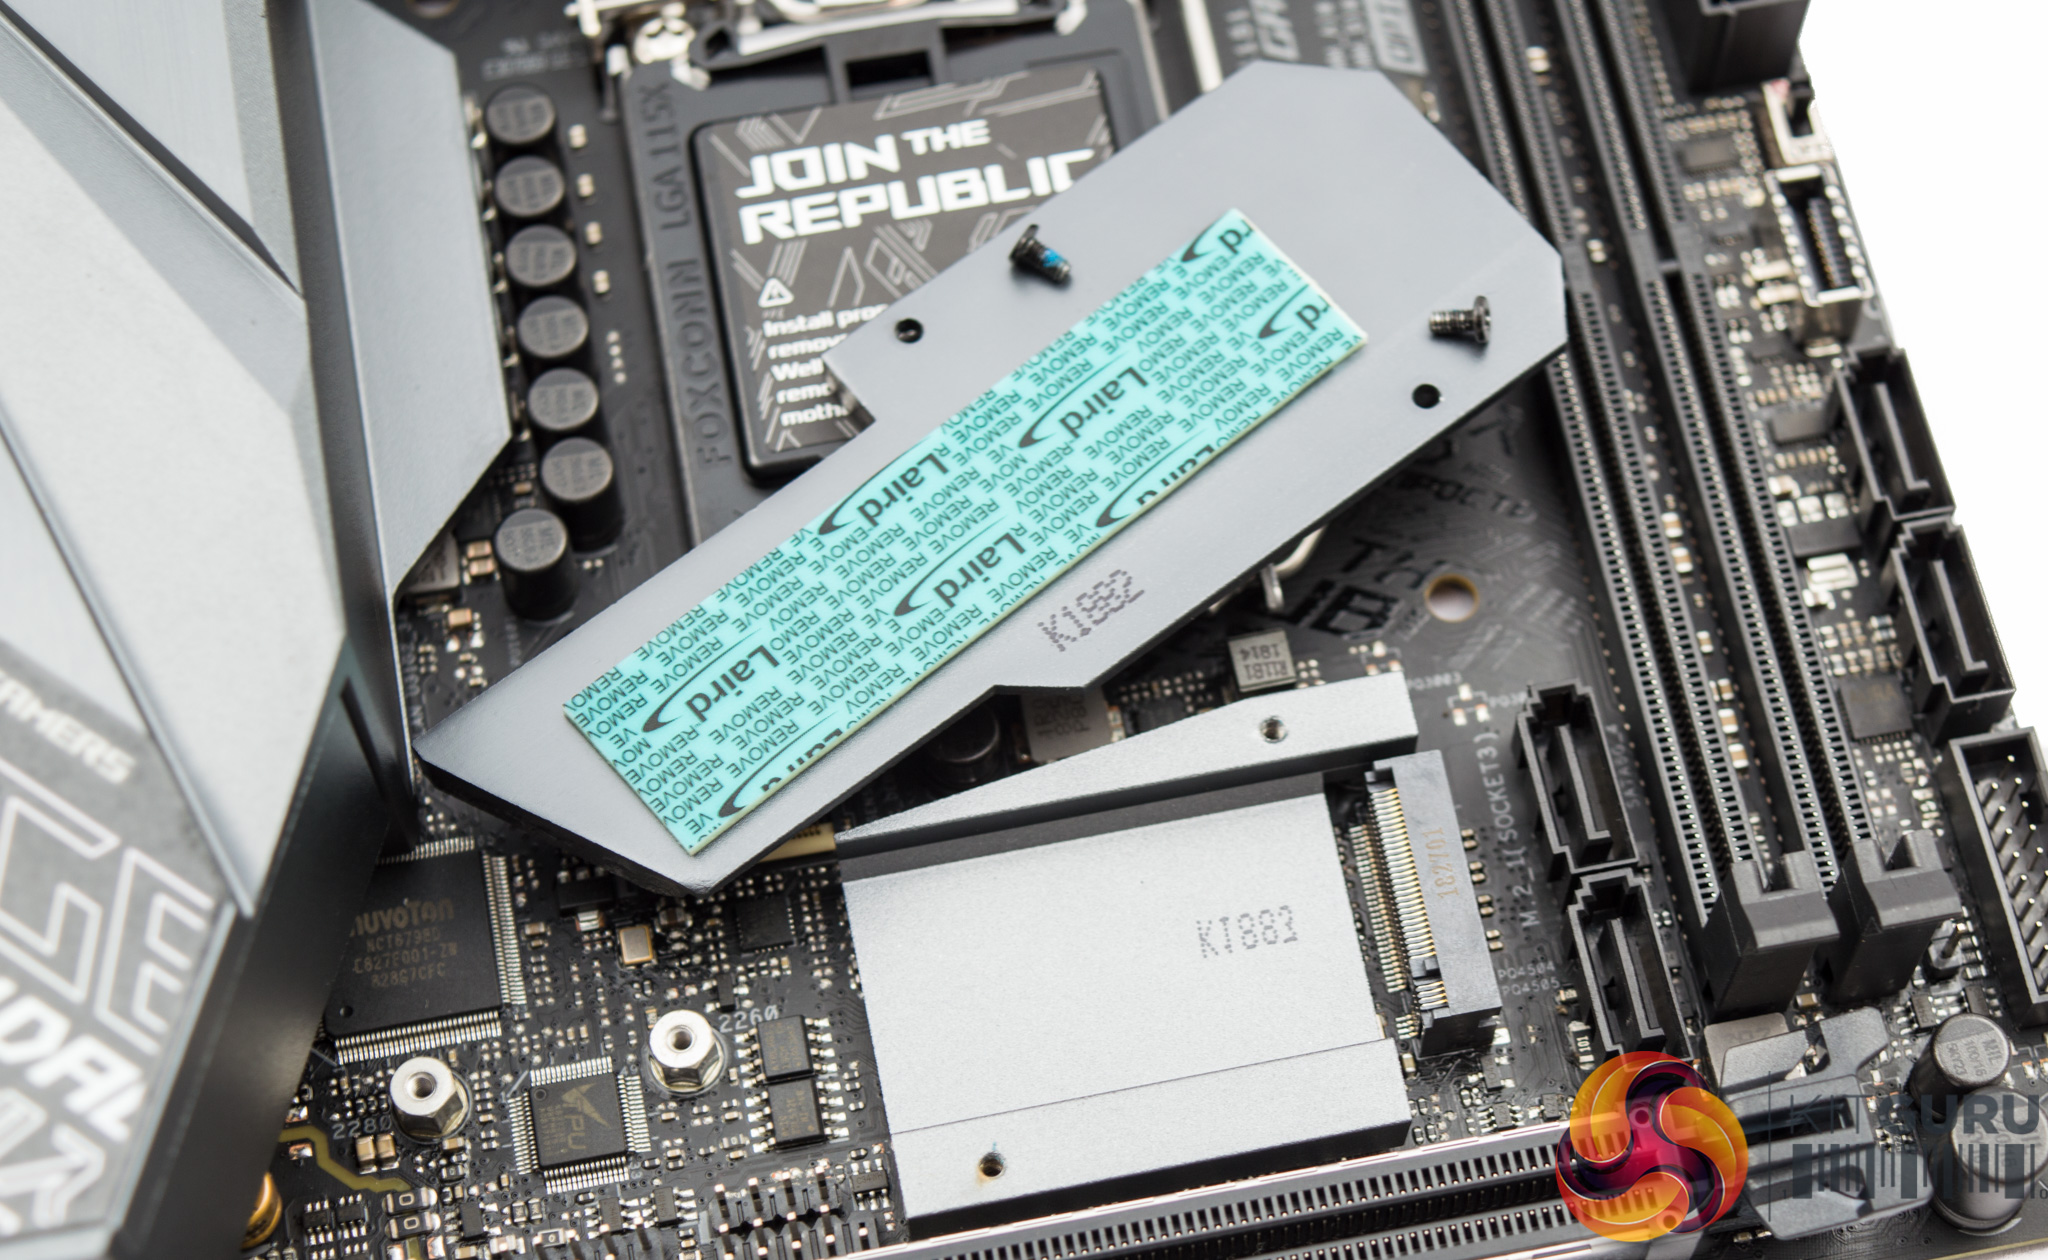
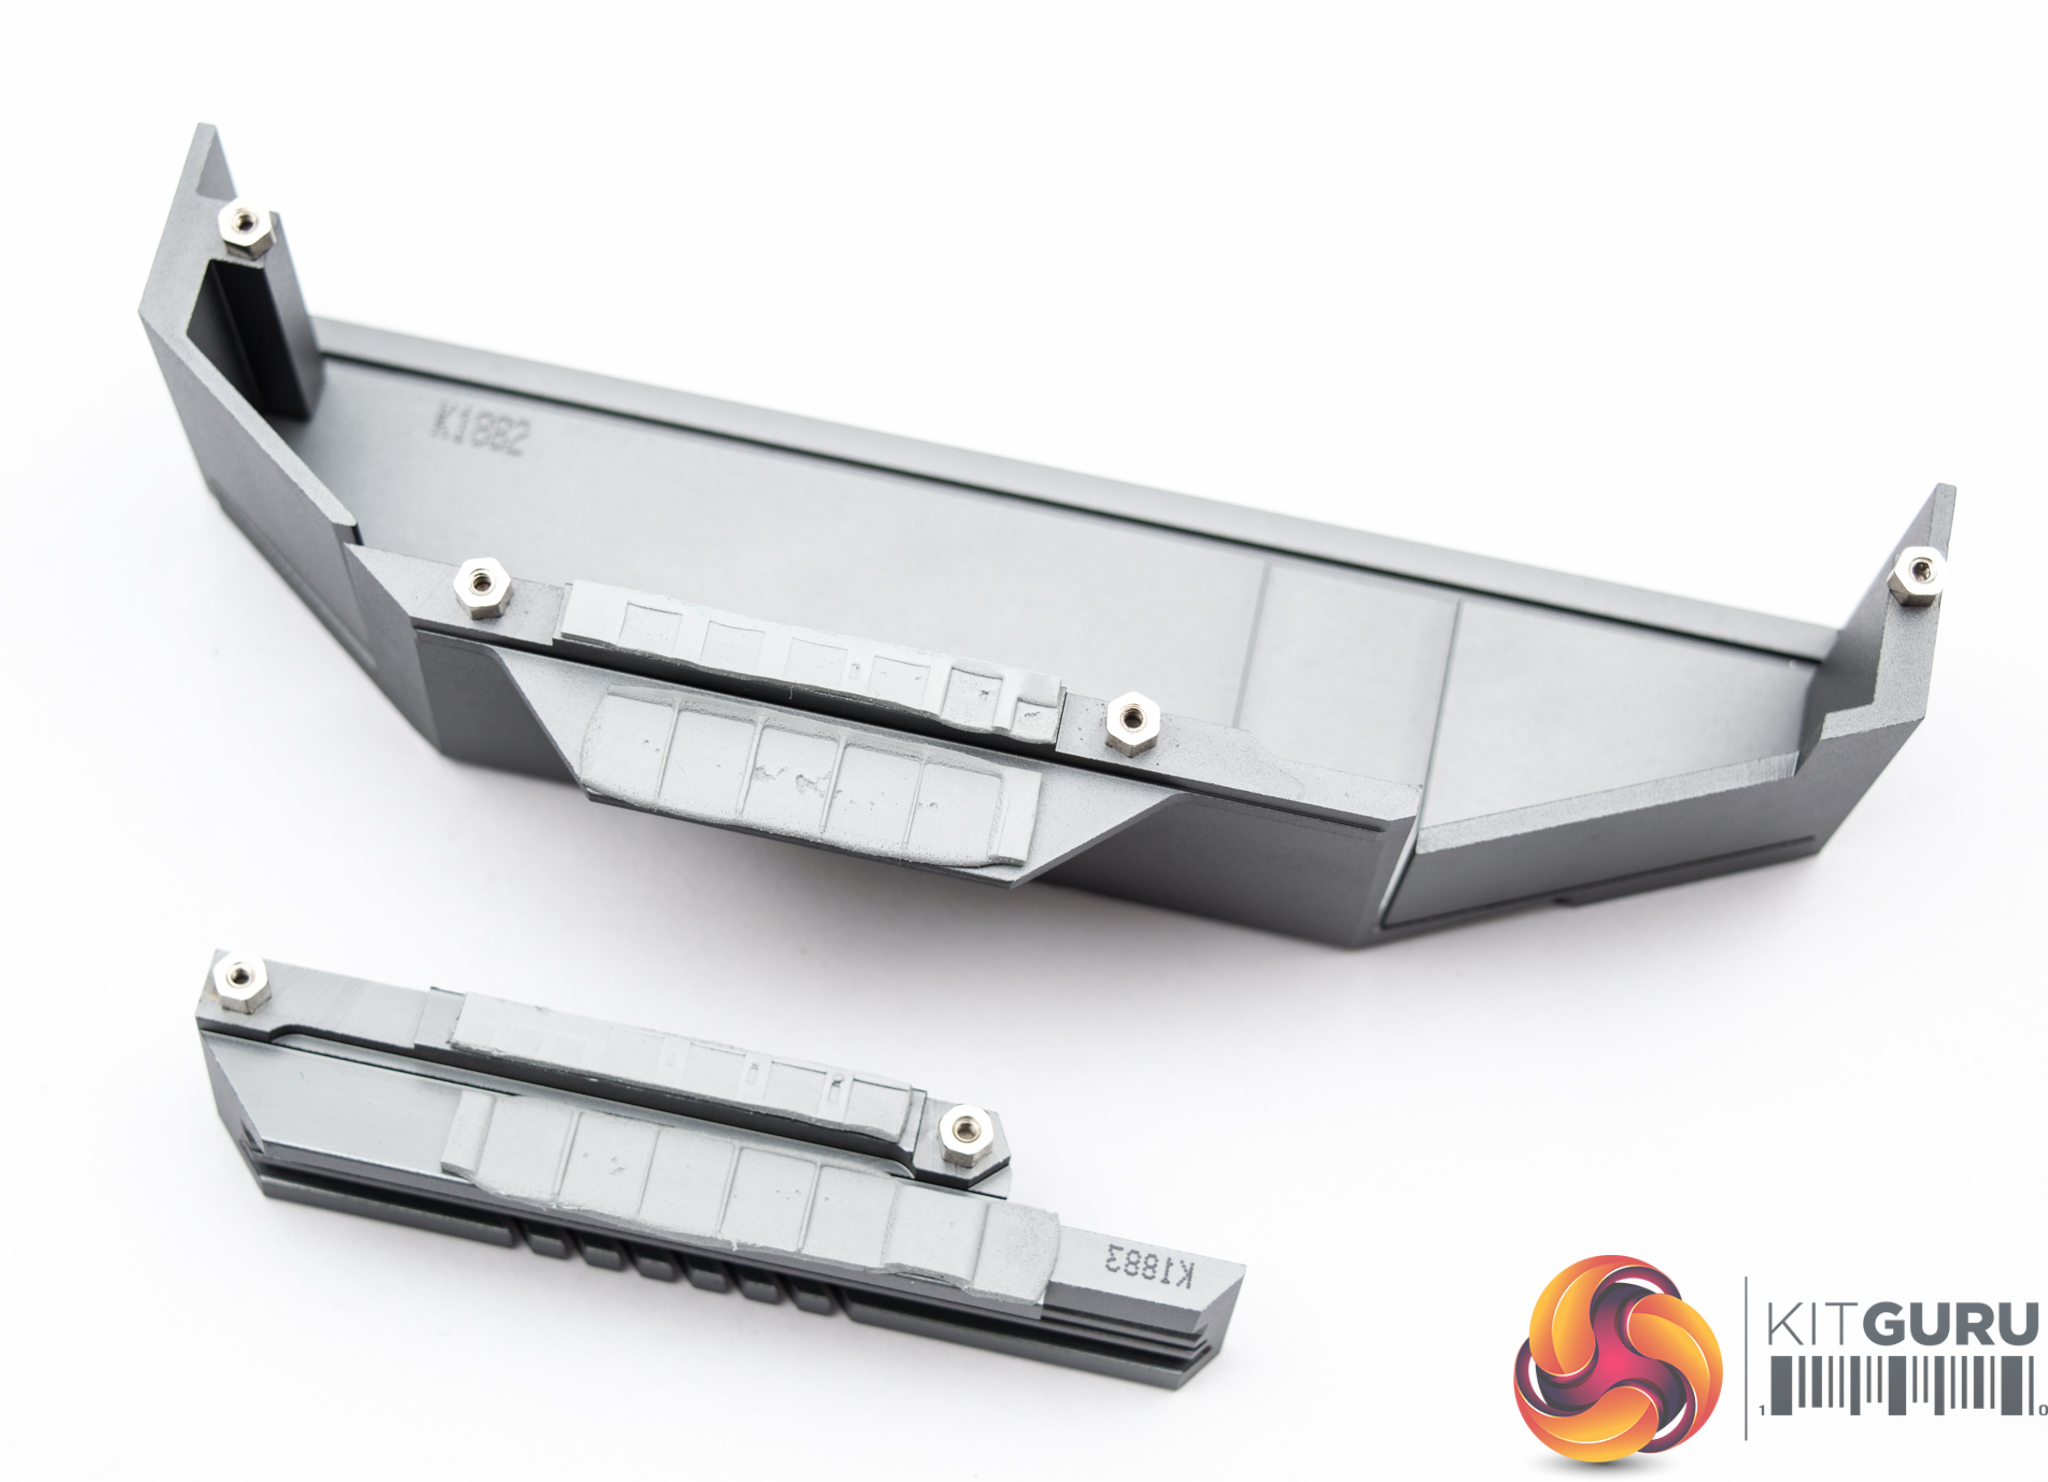
The primary M.2 slot features some cooling but that heatsink assembly is shared with the chipset so it remains to be seen how effective the cooling might be.
The rear I/O cover, impressively, is metal in its entirety so all of it represents cooling surface area for the VRMs. The VRM heatsink and I/O cover merge into a single piece.
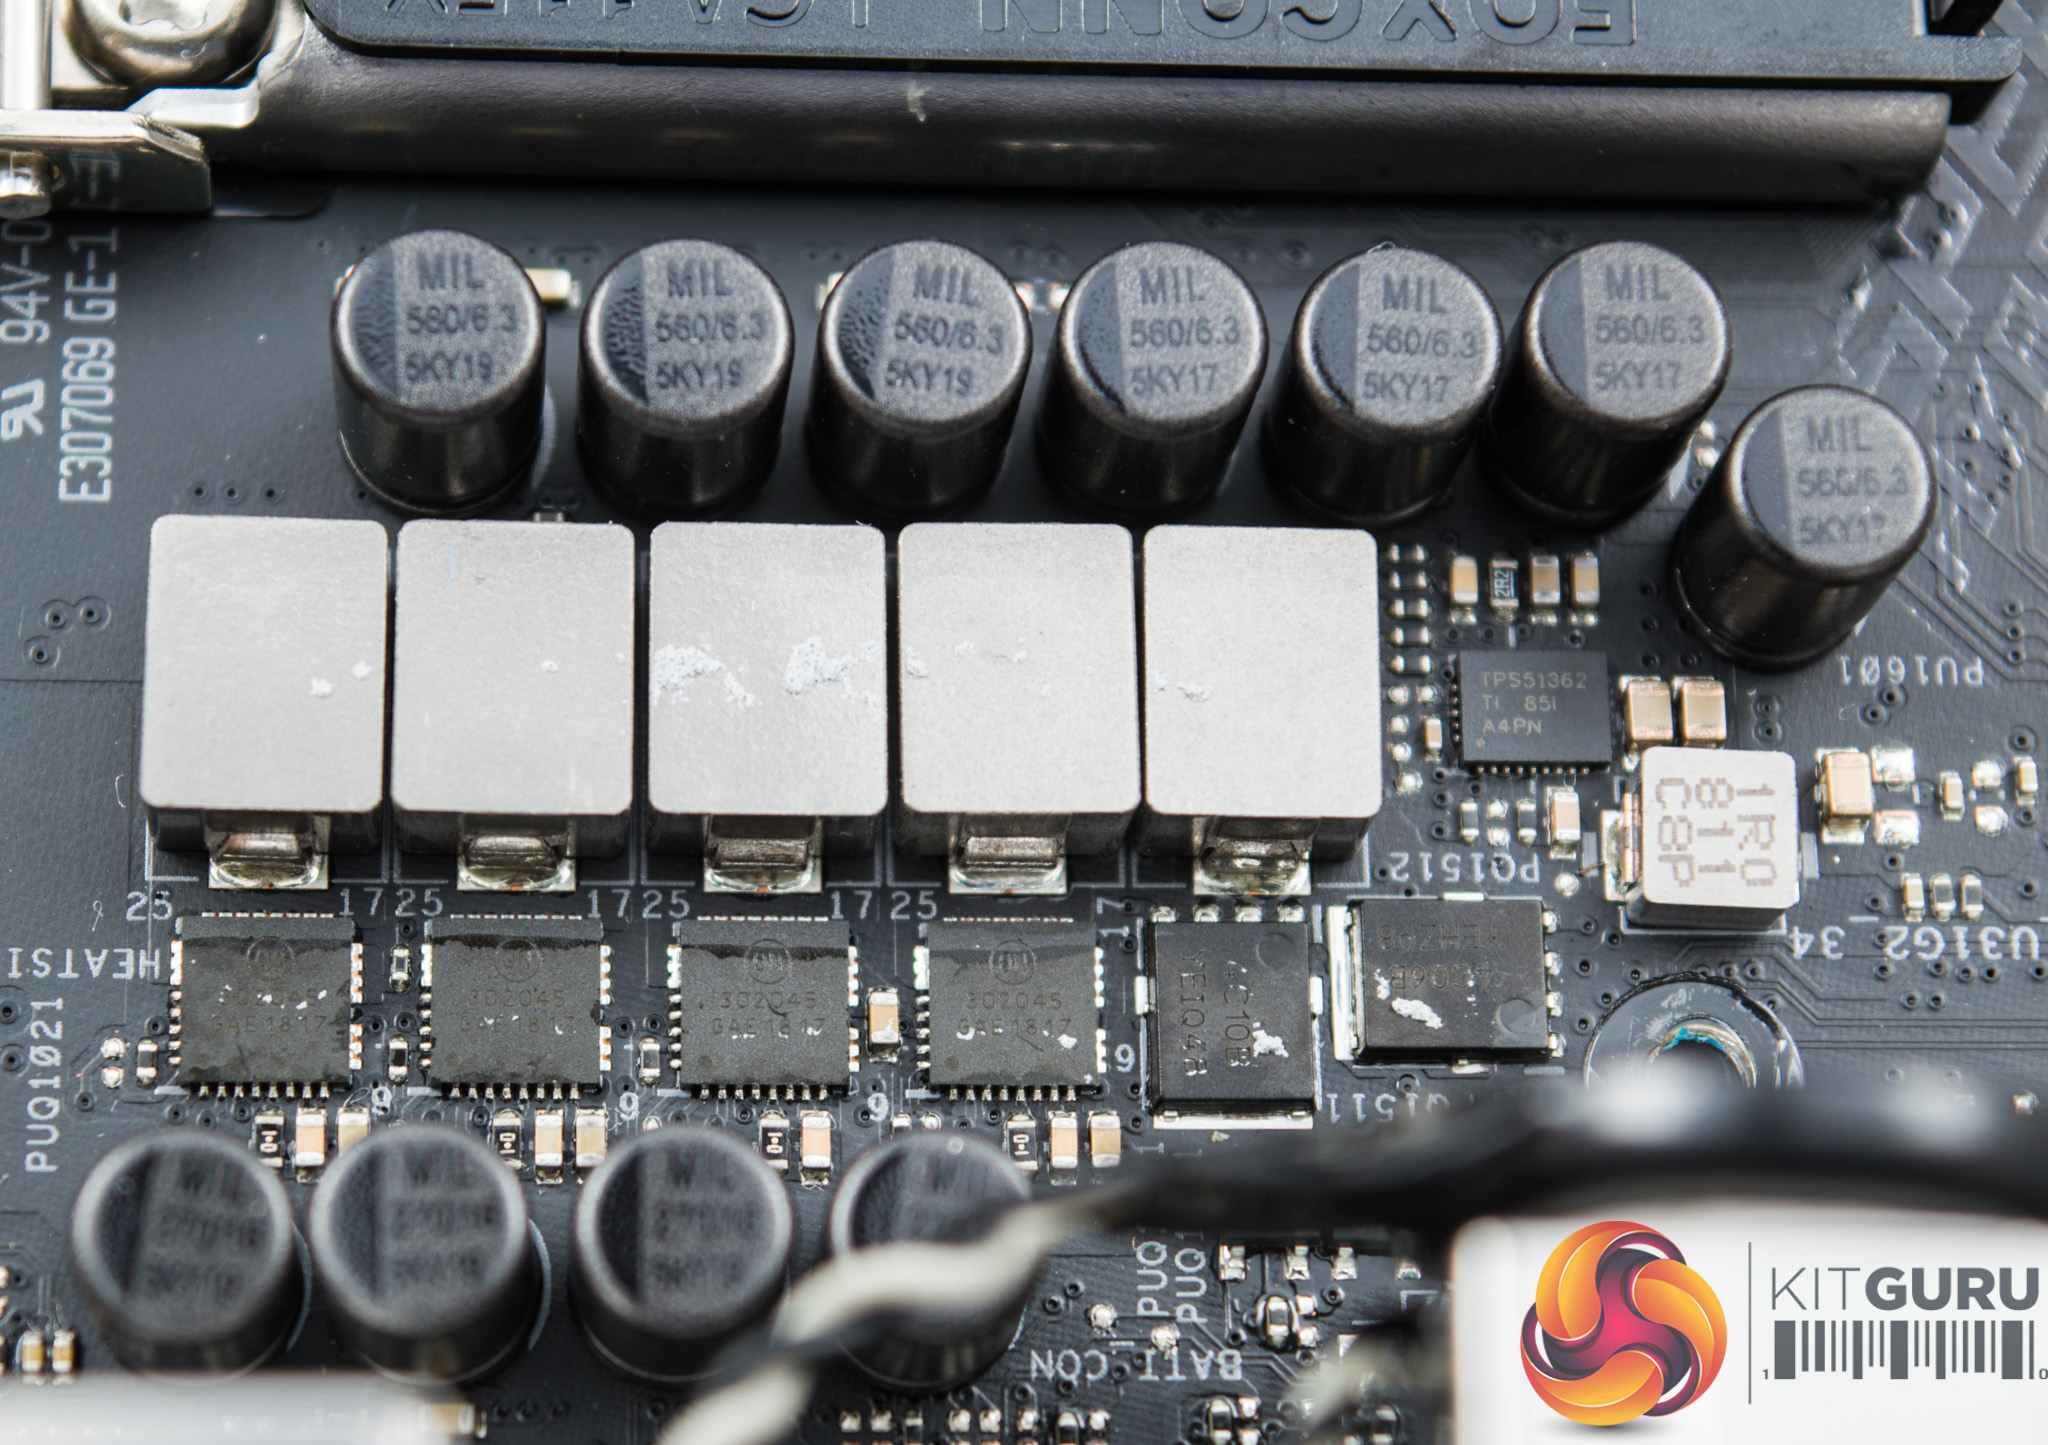
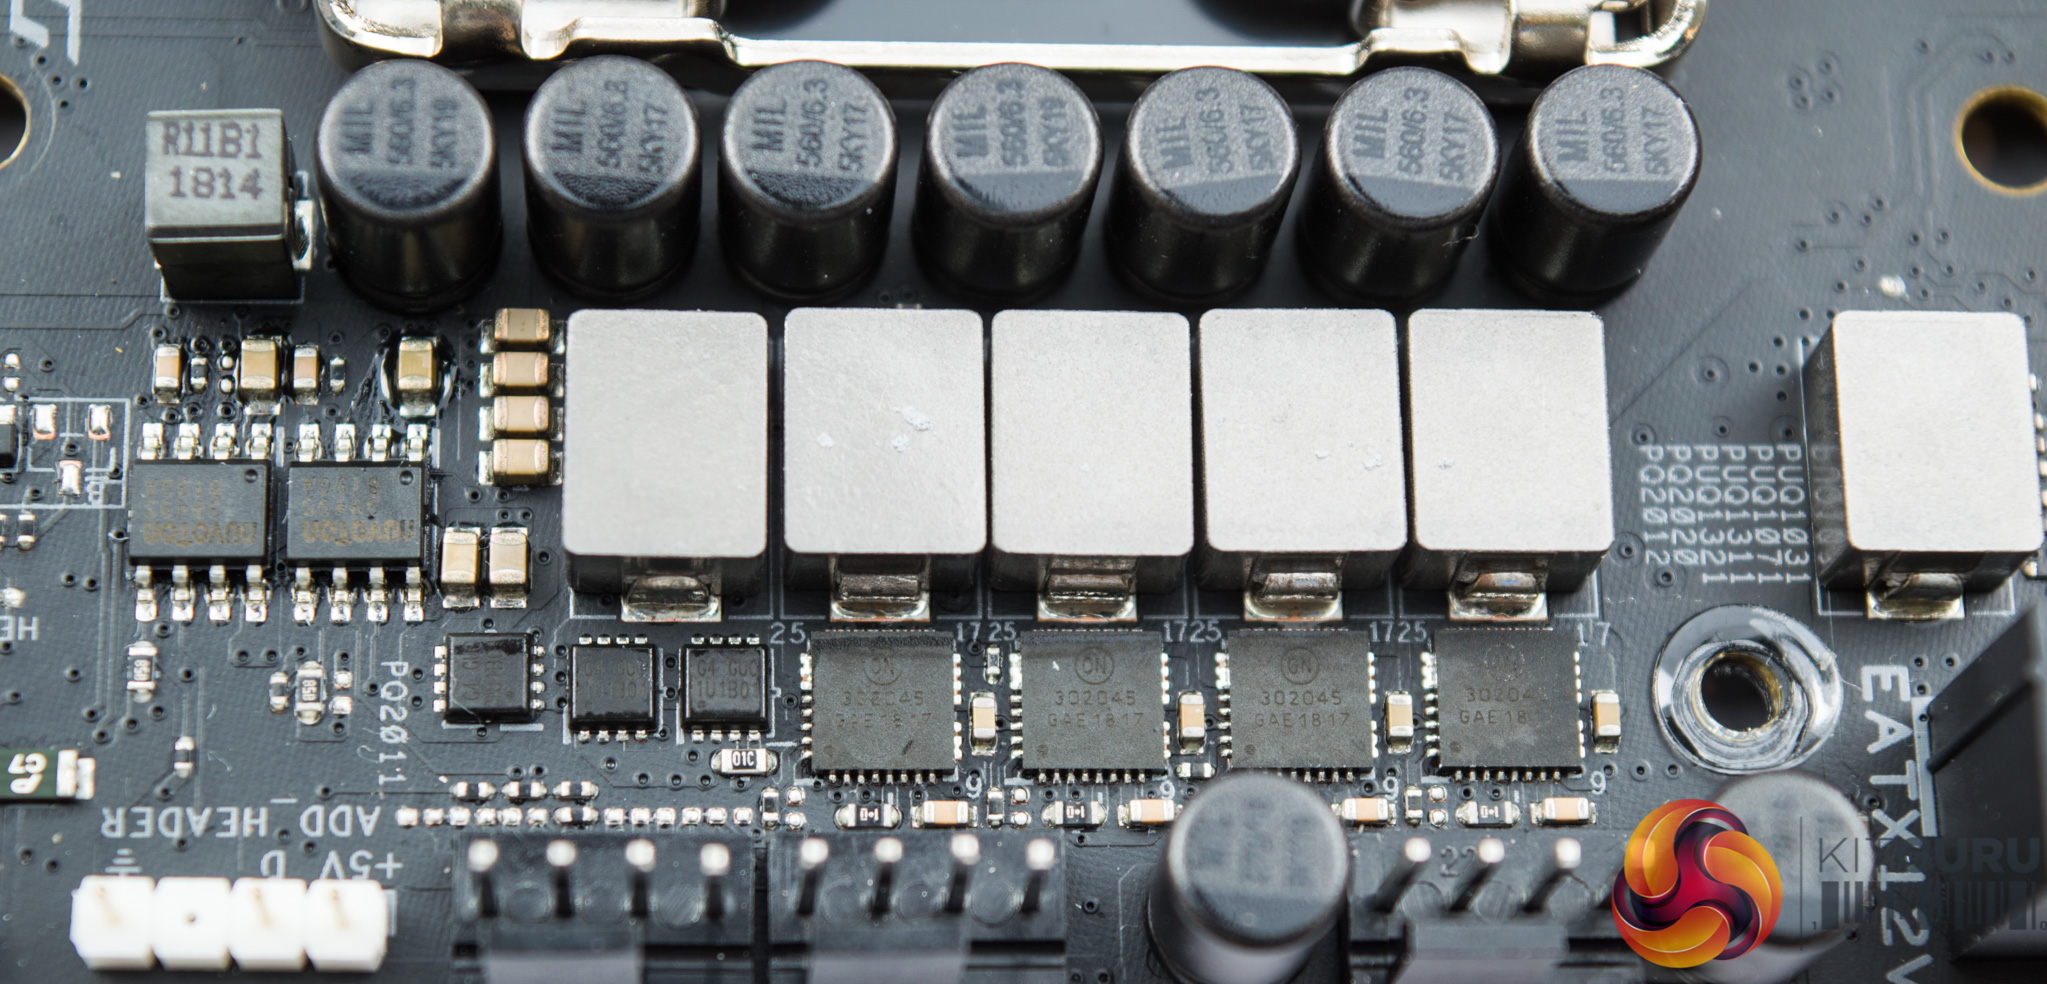
The configuration of the VRM is not immediately clear from the pictures but there are a significant number of components on show. There are 11 full-sized inductors, 8 ON Semiconductor 302045 integrated MOSFET and driver packages (i.e. include the high- and low-sides, and driver in the same chip), a further two ON Semiconductor MOSFETs (NTMFS4C10N, NTMFS4C06N) and a custom ASUS VRM controller (ASP1401CTB).
The exact configuration is not specified but ASUS does provide 6 phases worth of CPU VRM components, using 3 PWM signals which is a technique it calls “twin phases”, and then a further 2 phases worth iGPU VRM components, likely with 2 PWM signals. Then there are a few other ancillary phases around the CPU VRM for things like the VCCSA and VCCIO which give the illusion of a greater number of phases.
The summary is that it is most likely a 6+2+1+1 “virtual” configuration of VCore + VCCGT (iGPU) + VCCSA + VCCIO, 3+2+1+1 “actual”.
To even call it “6 phases” at all for the VCore is slightly misleading given there are no doublers at play but it really depends on how flexible the definition of a phase is.
ASUS claims improved transient response and less voltage droop between load switching, compared to doubler based solutions.
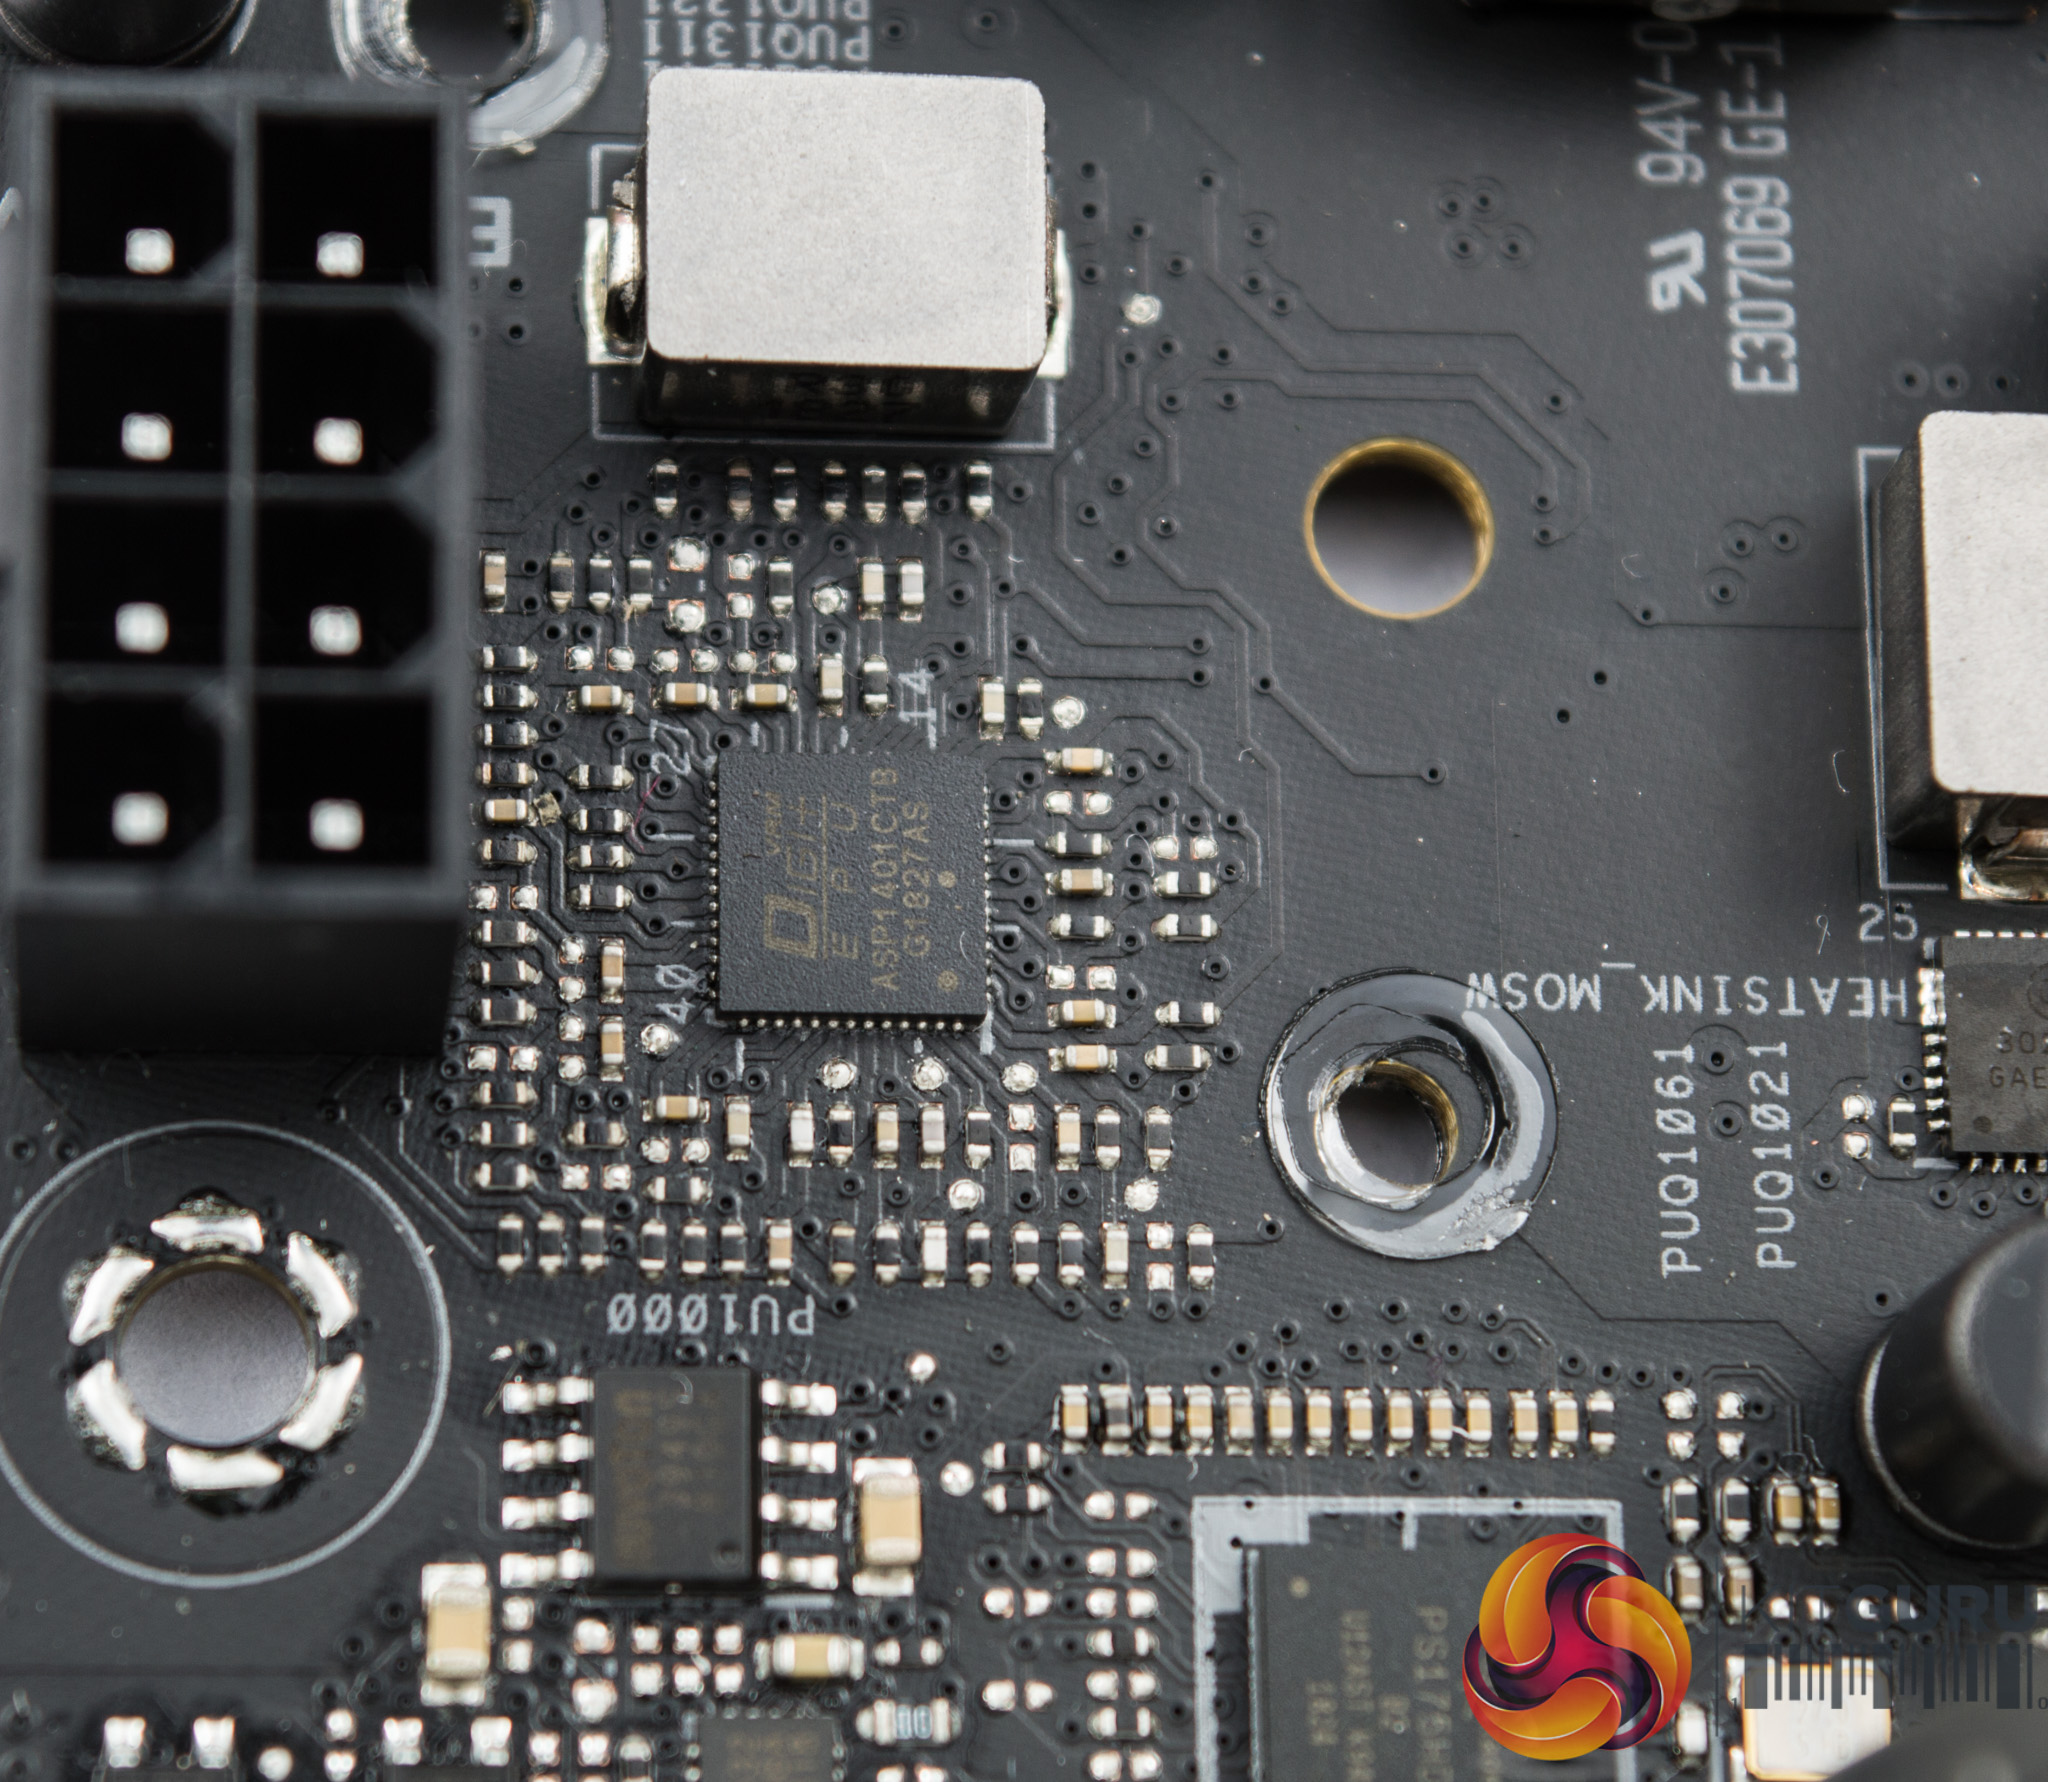
The PWM controller is marked ASP1401CTB and is thought to be a unit capable of up to 4+2 phases, but in this configuration it is likely operating as 3+2 phase.
All the inductors/chokes used are solid units and the capacitors are 5,000 (5K) hours rated units, marked “MIL 560/6.3 5KY17 or 5KY19”.
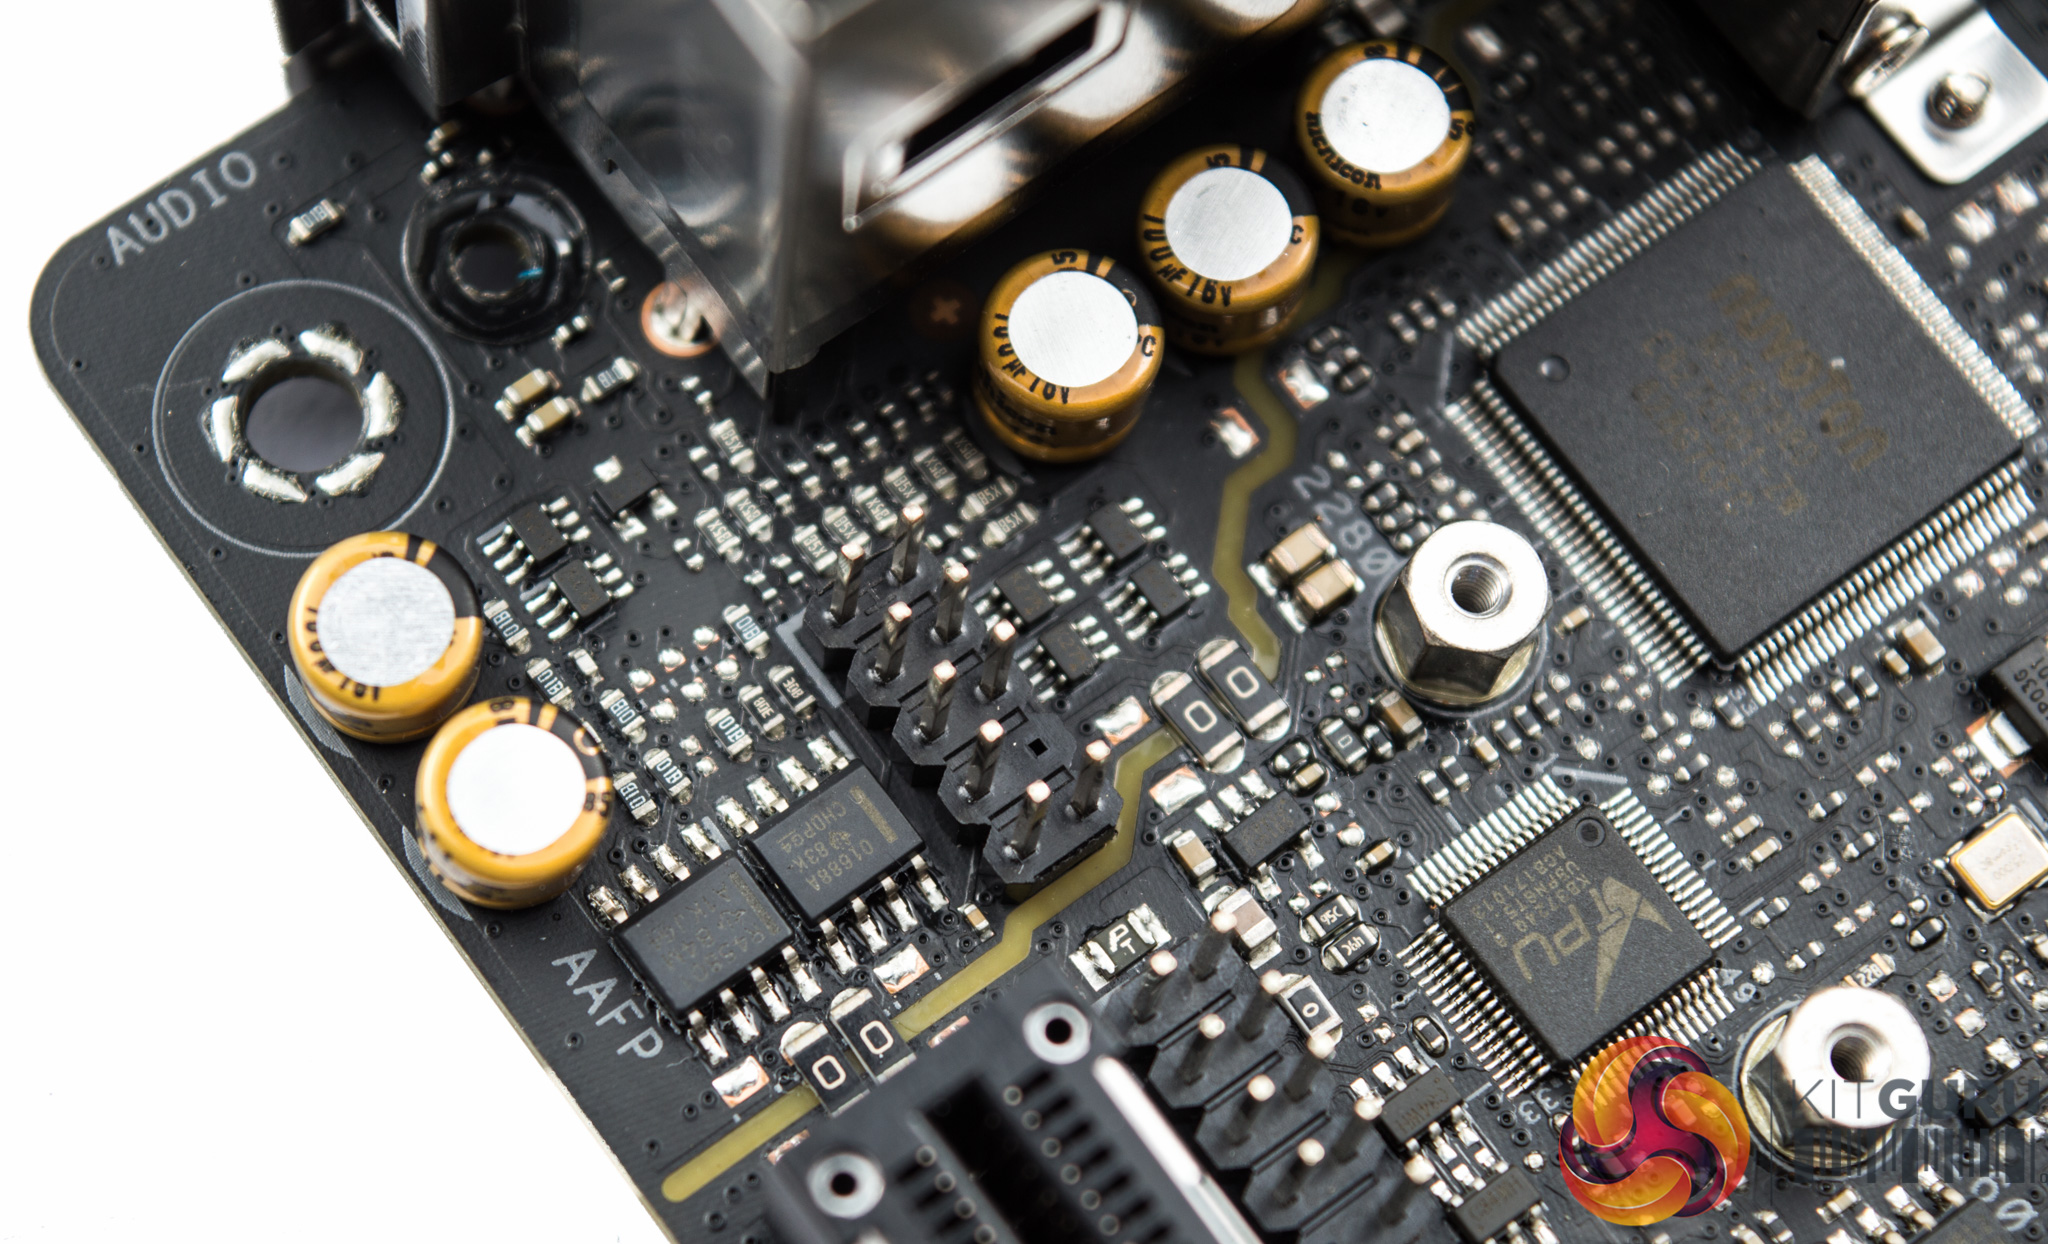
The audio section features PCB isolation with the codec hiding in between the rear I/O items. There are gold audio series capacitors as well as two operational amplifiers, both by Texas Instruments – OPA1688 and R4580I.

There are some more VRM components underneath the motherboard, potentially supporting the memory VRMs.
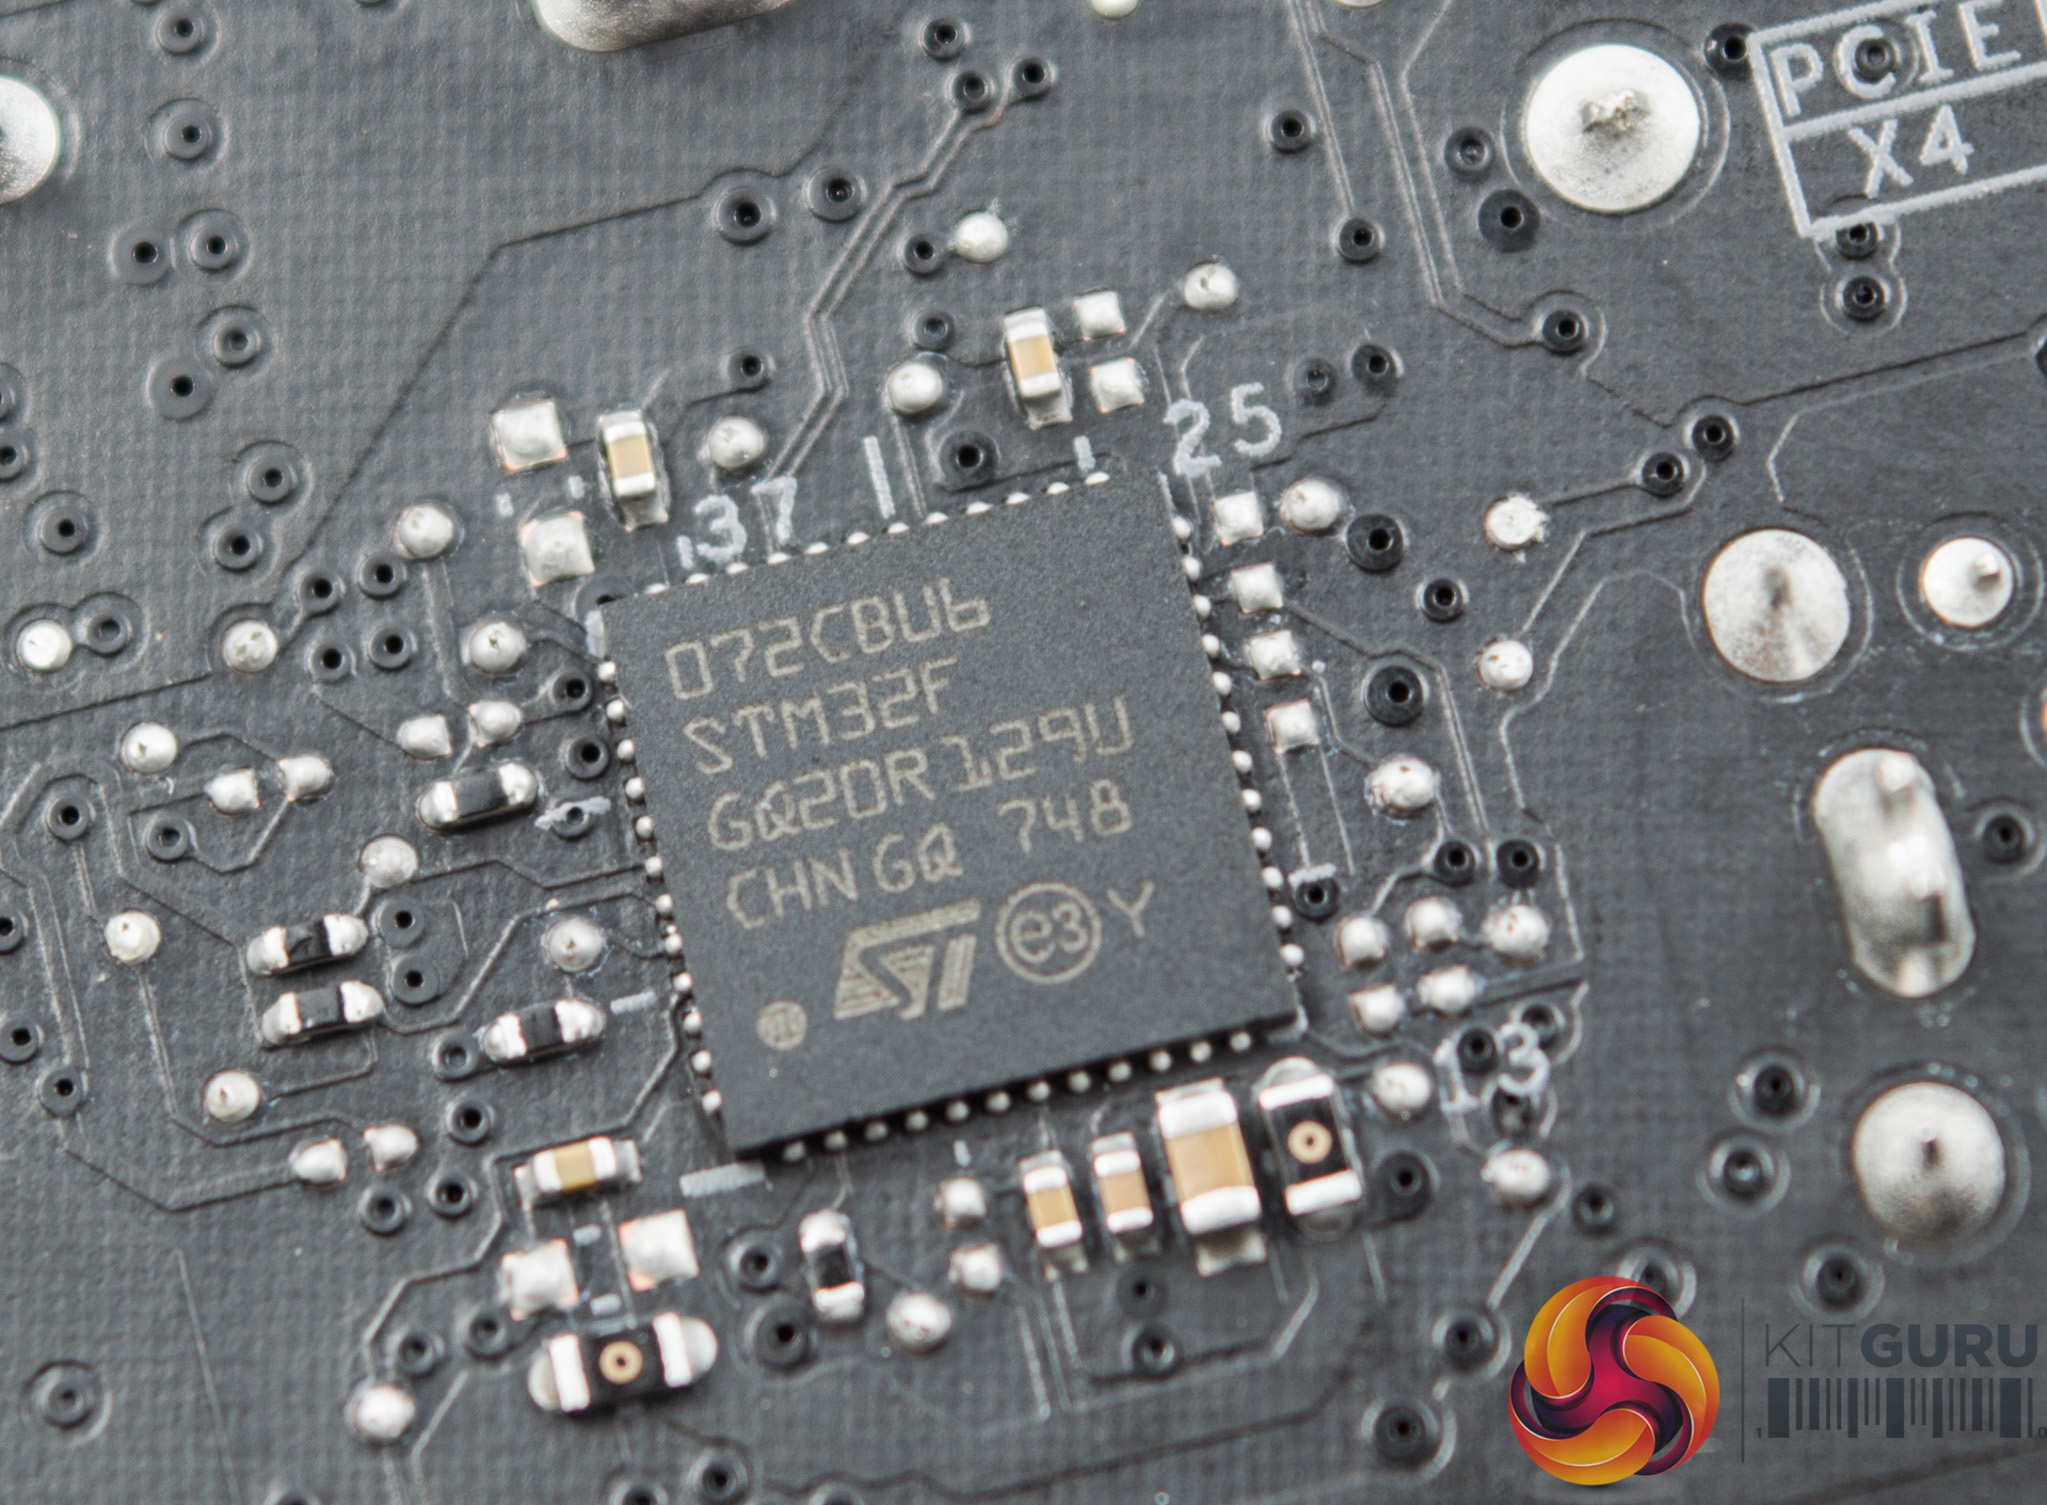
An STMicroelectronics STM32F 072CBU6 ARM microcontroller is located on the back, though we're not sure what it is in charge of controlling.
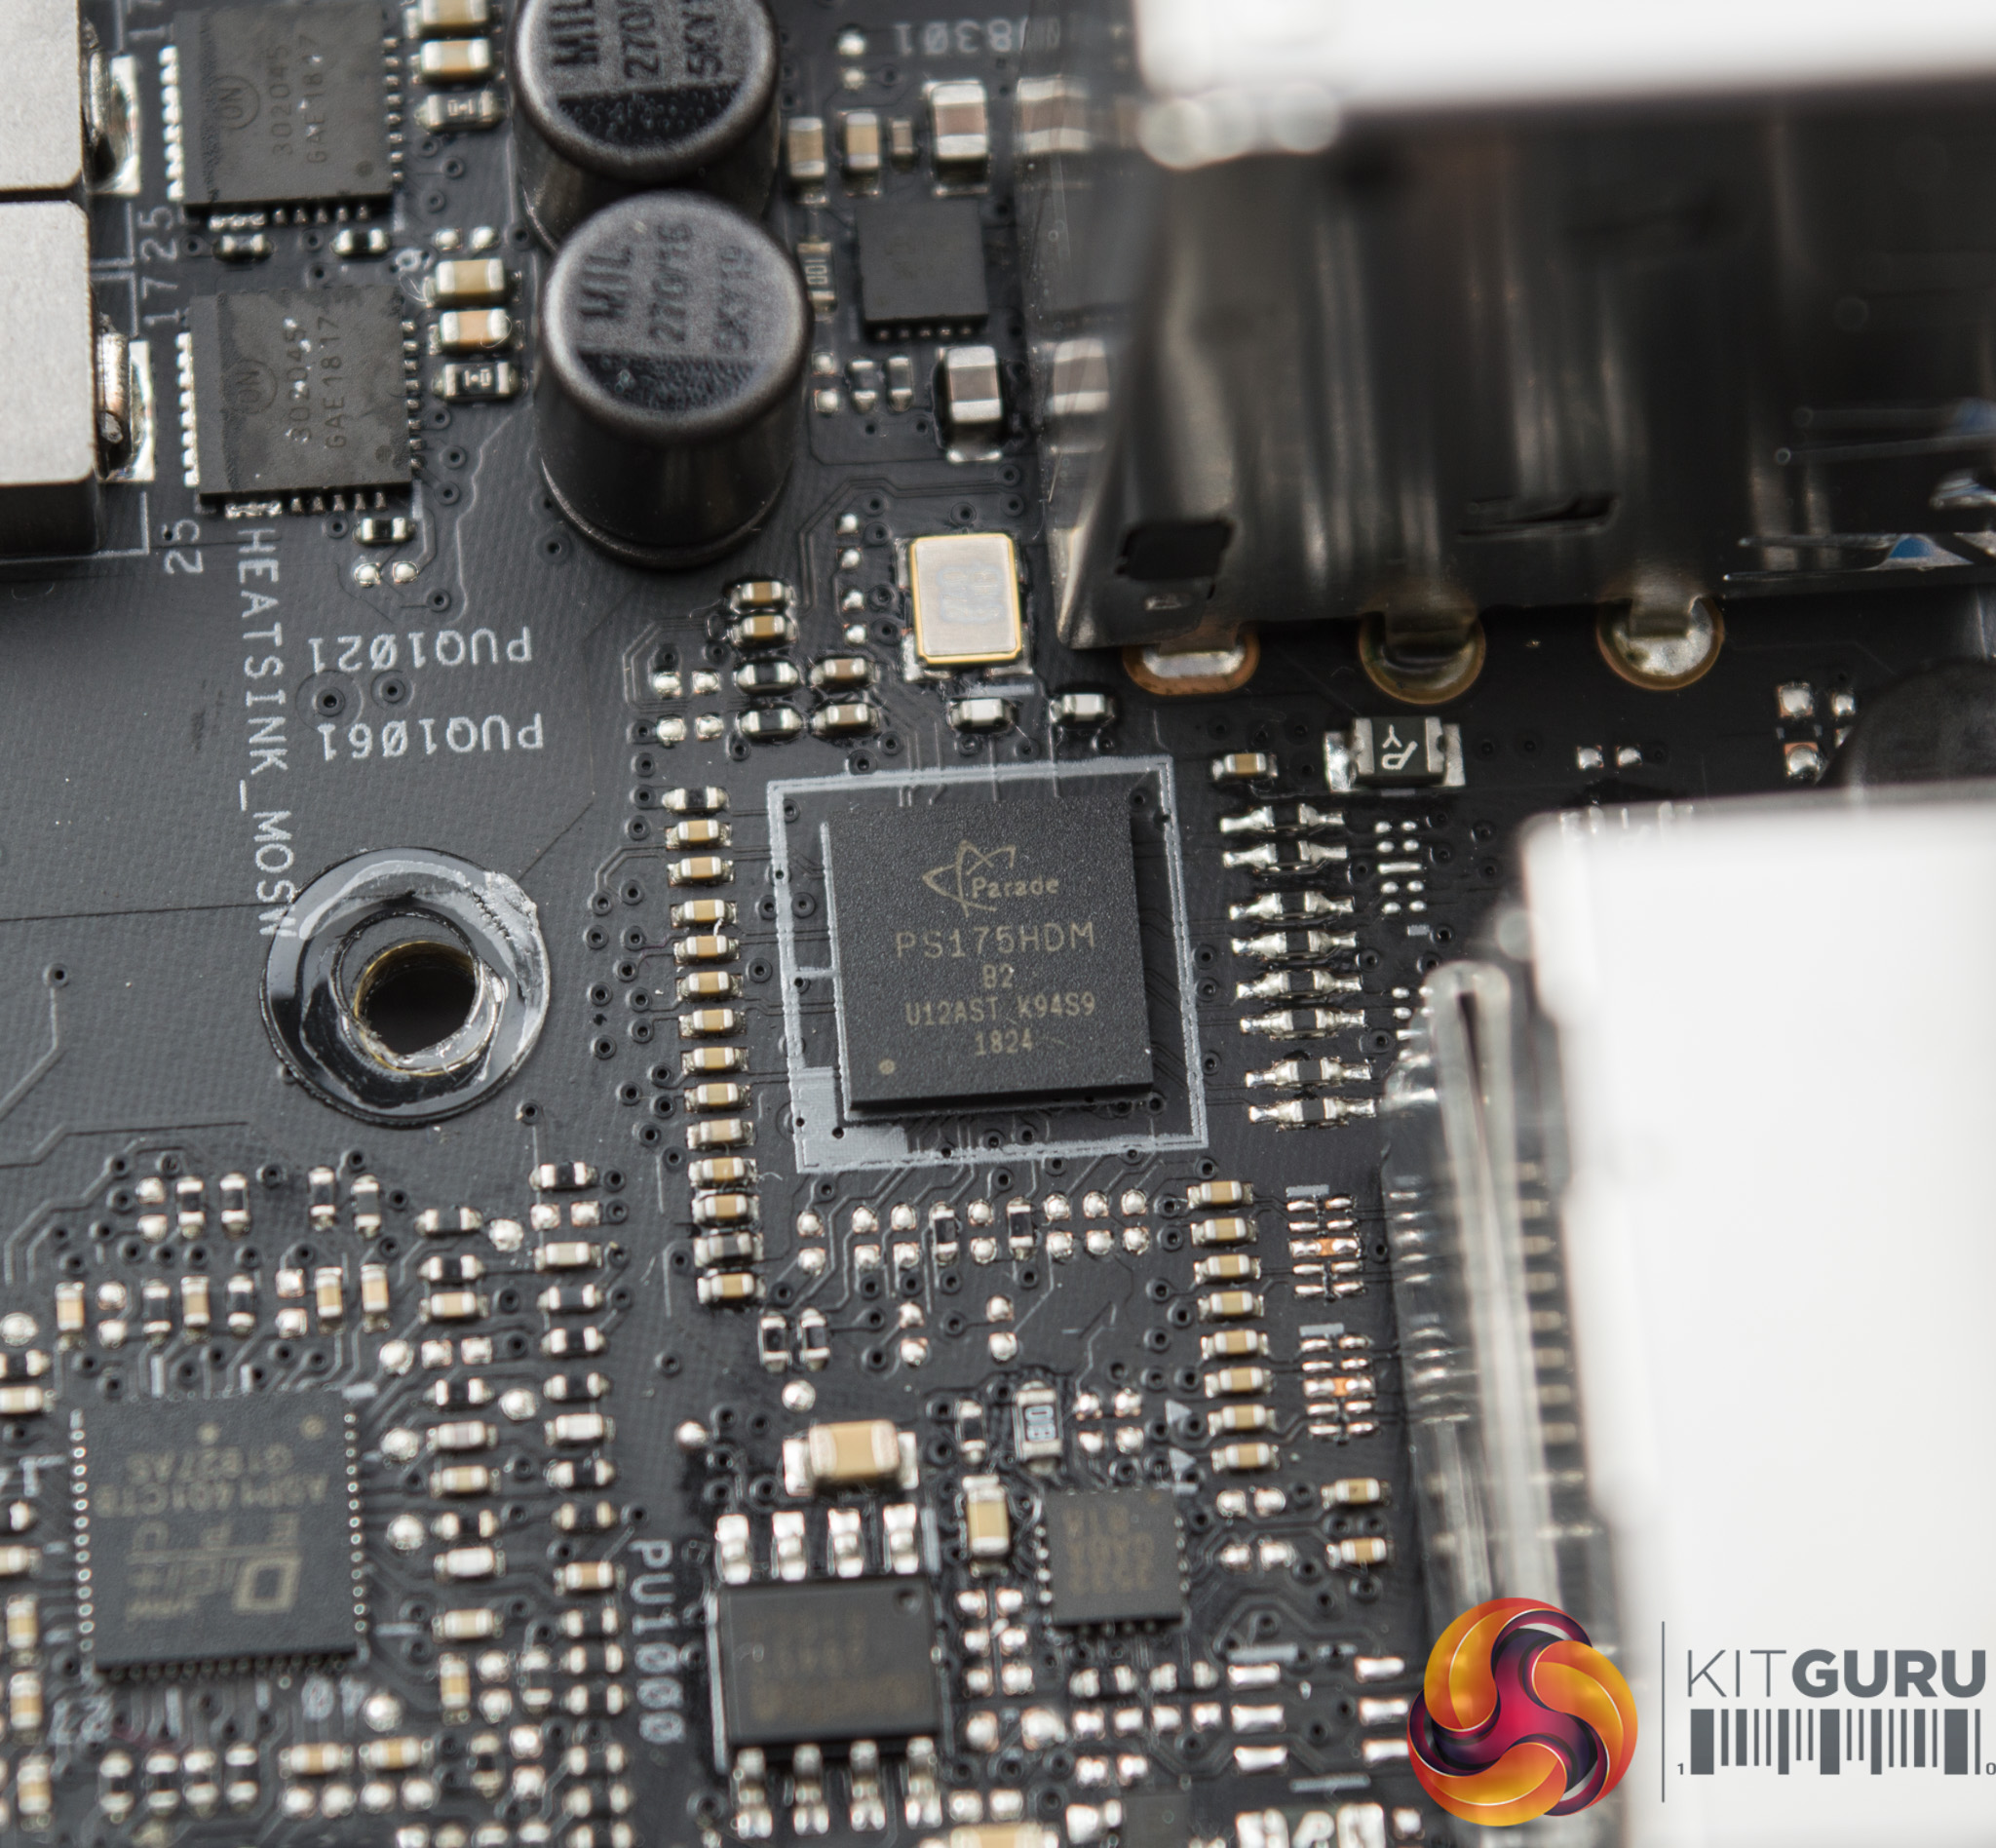
A Parade PS175HDM chip is in charge of providing the HDMI 2.0 connectivity at the rear I/O.
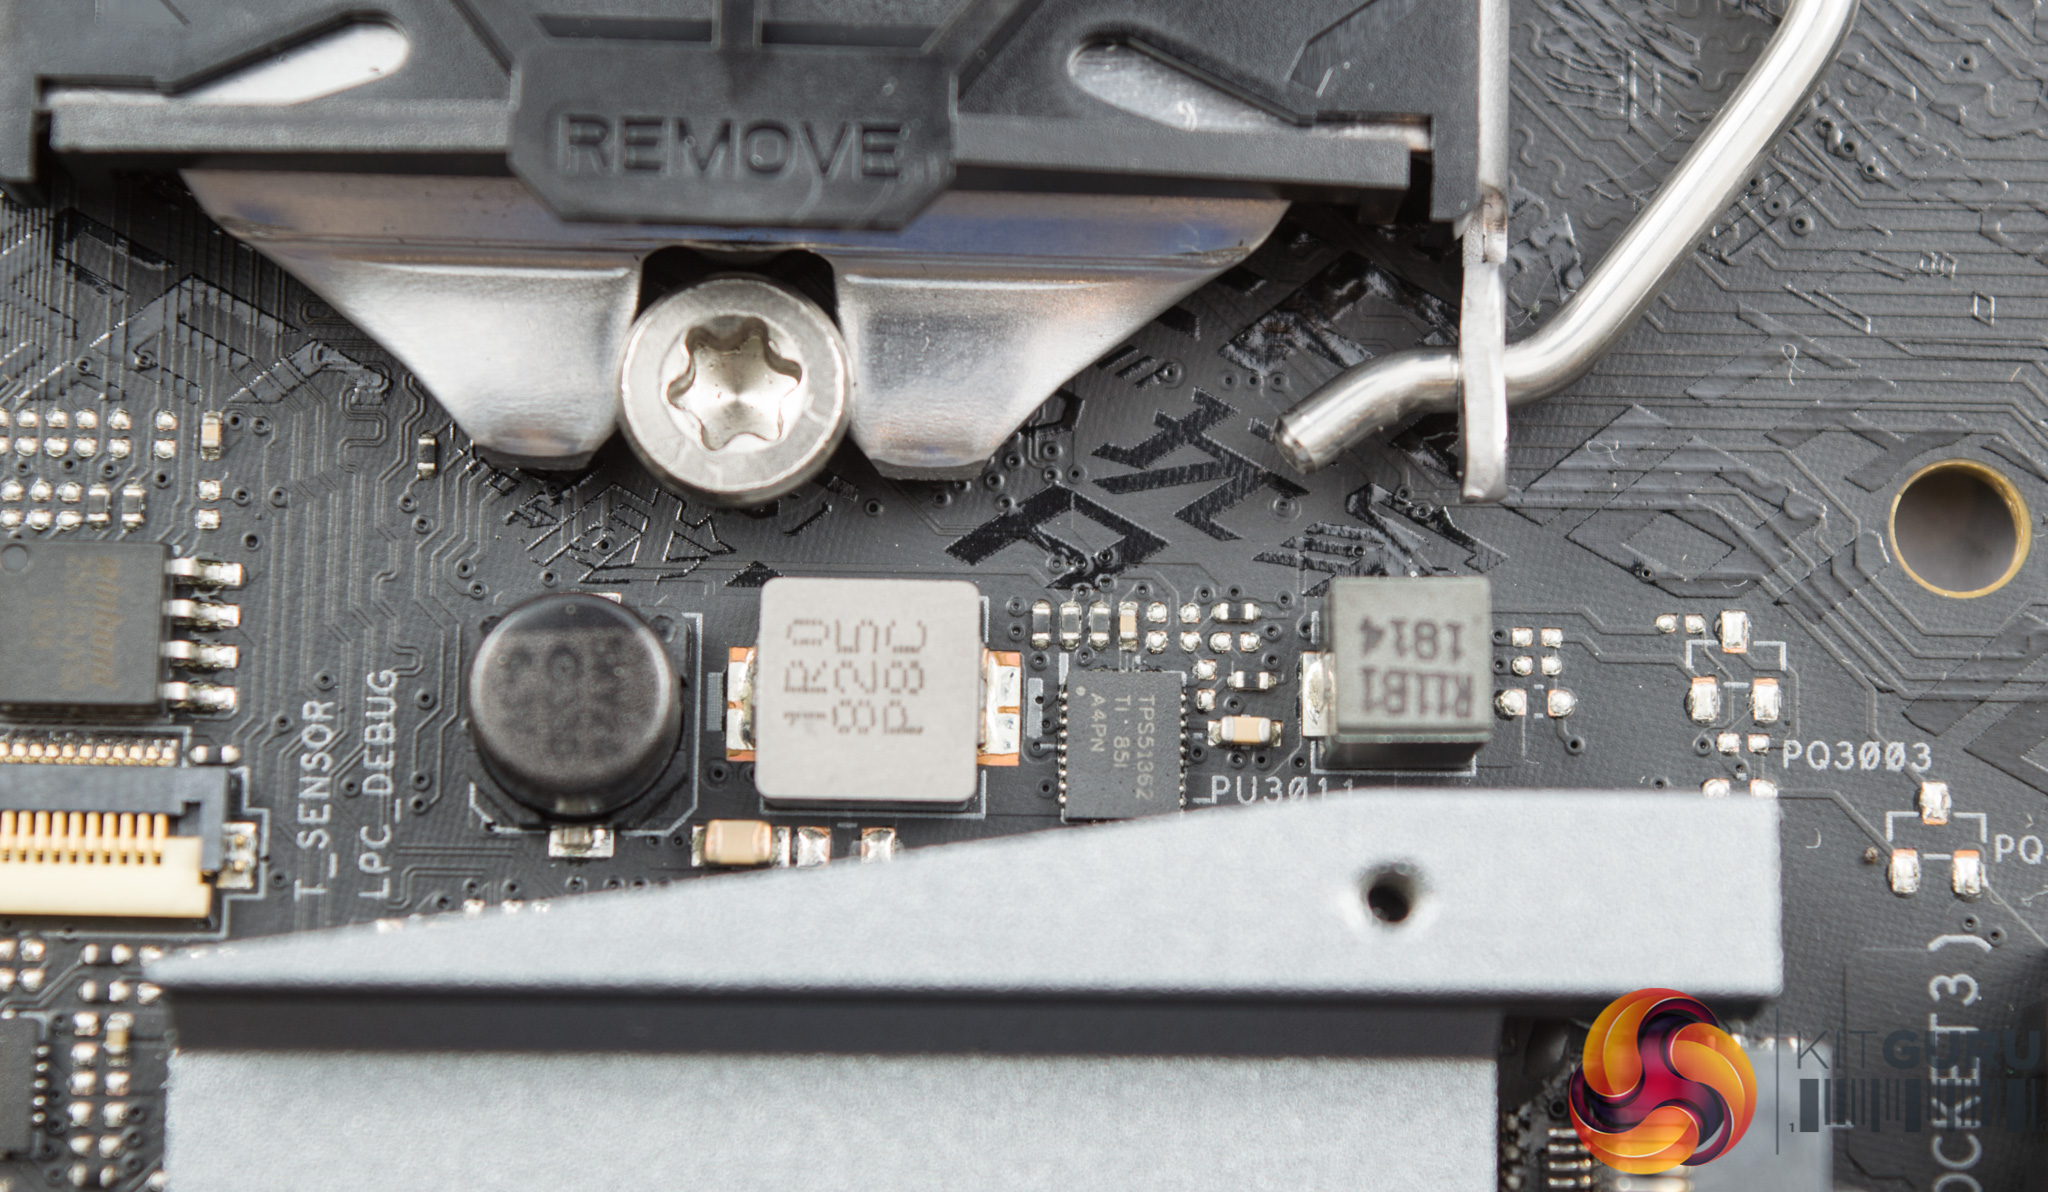
Two Texas Instruments TPS51362 Synchronous converters are used. The vendor says they are designed for VCCIO and DDR voltage applications.
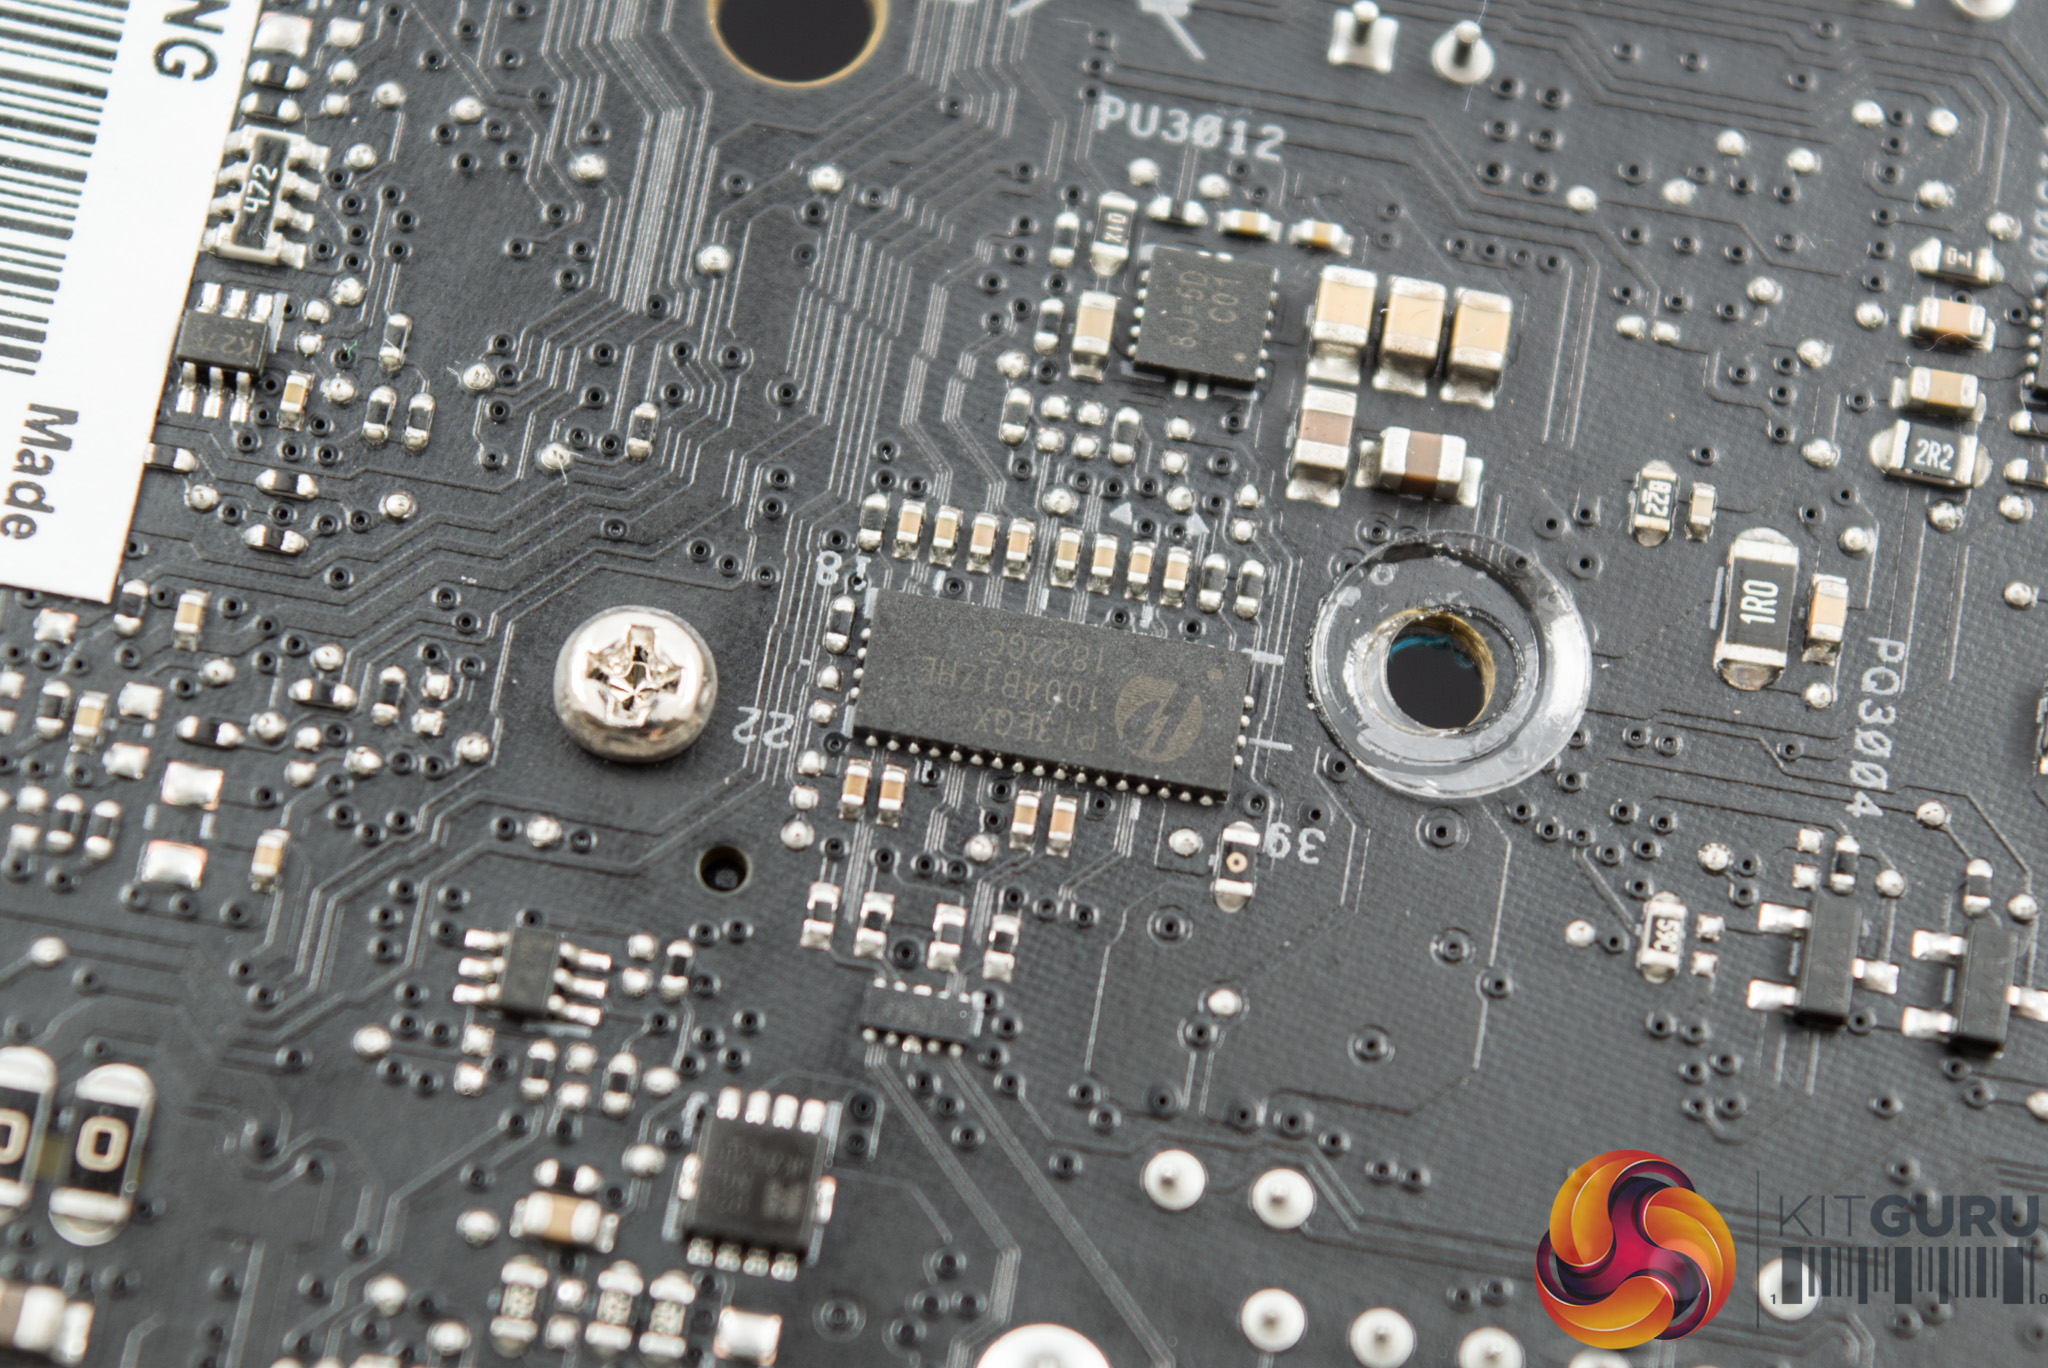
The Pericom P13EQX chip is used as a redriver for the USB 3.1 (10Gbps) signal available on the rear I/O.
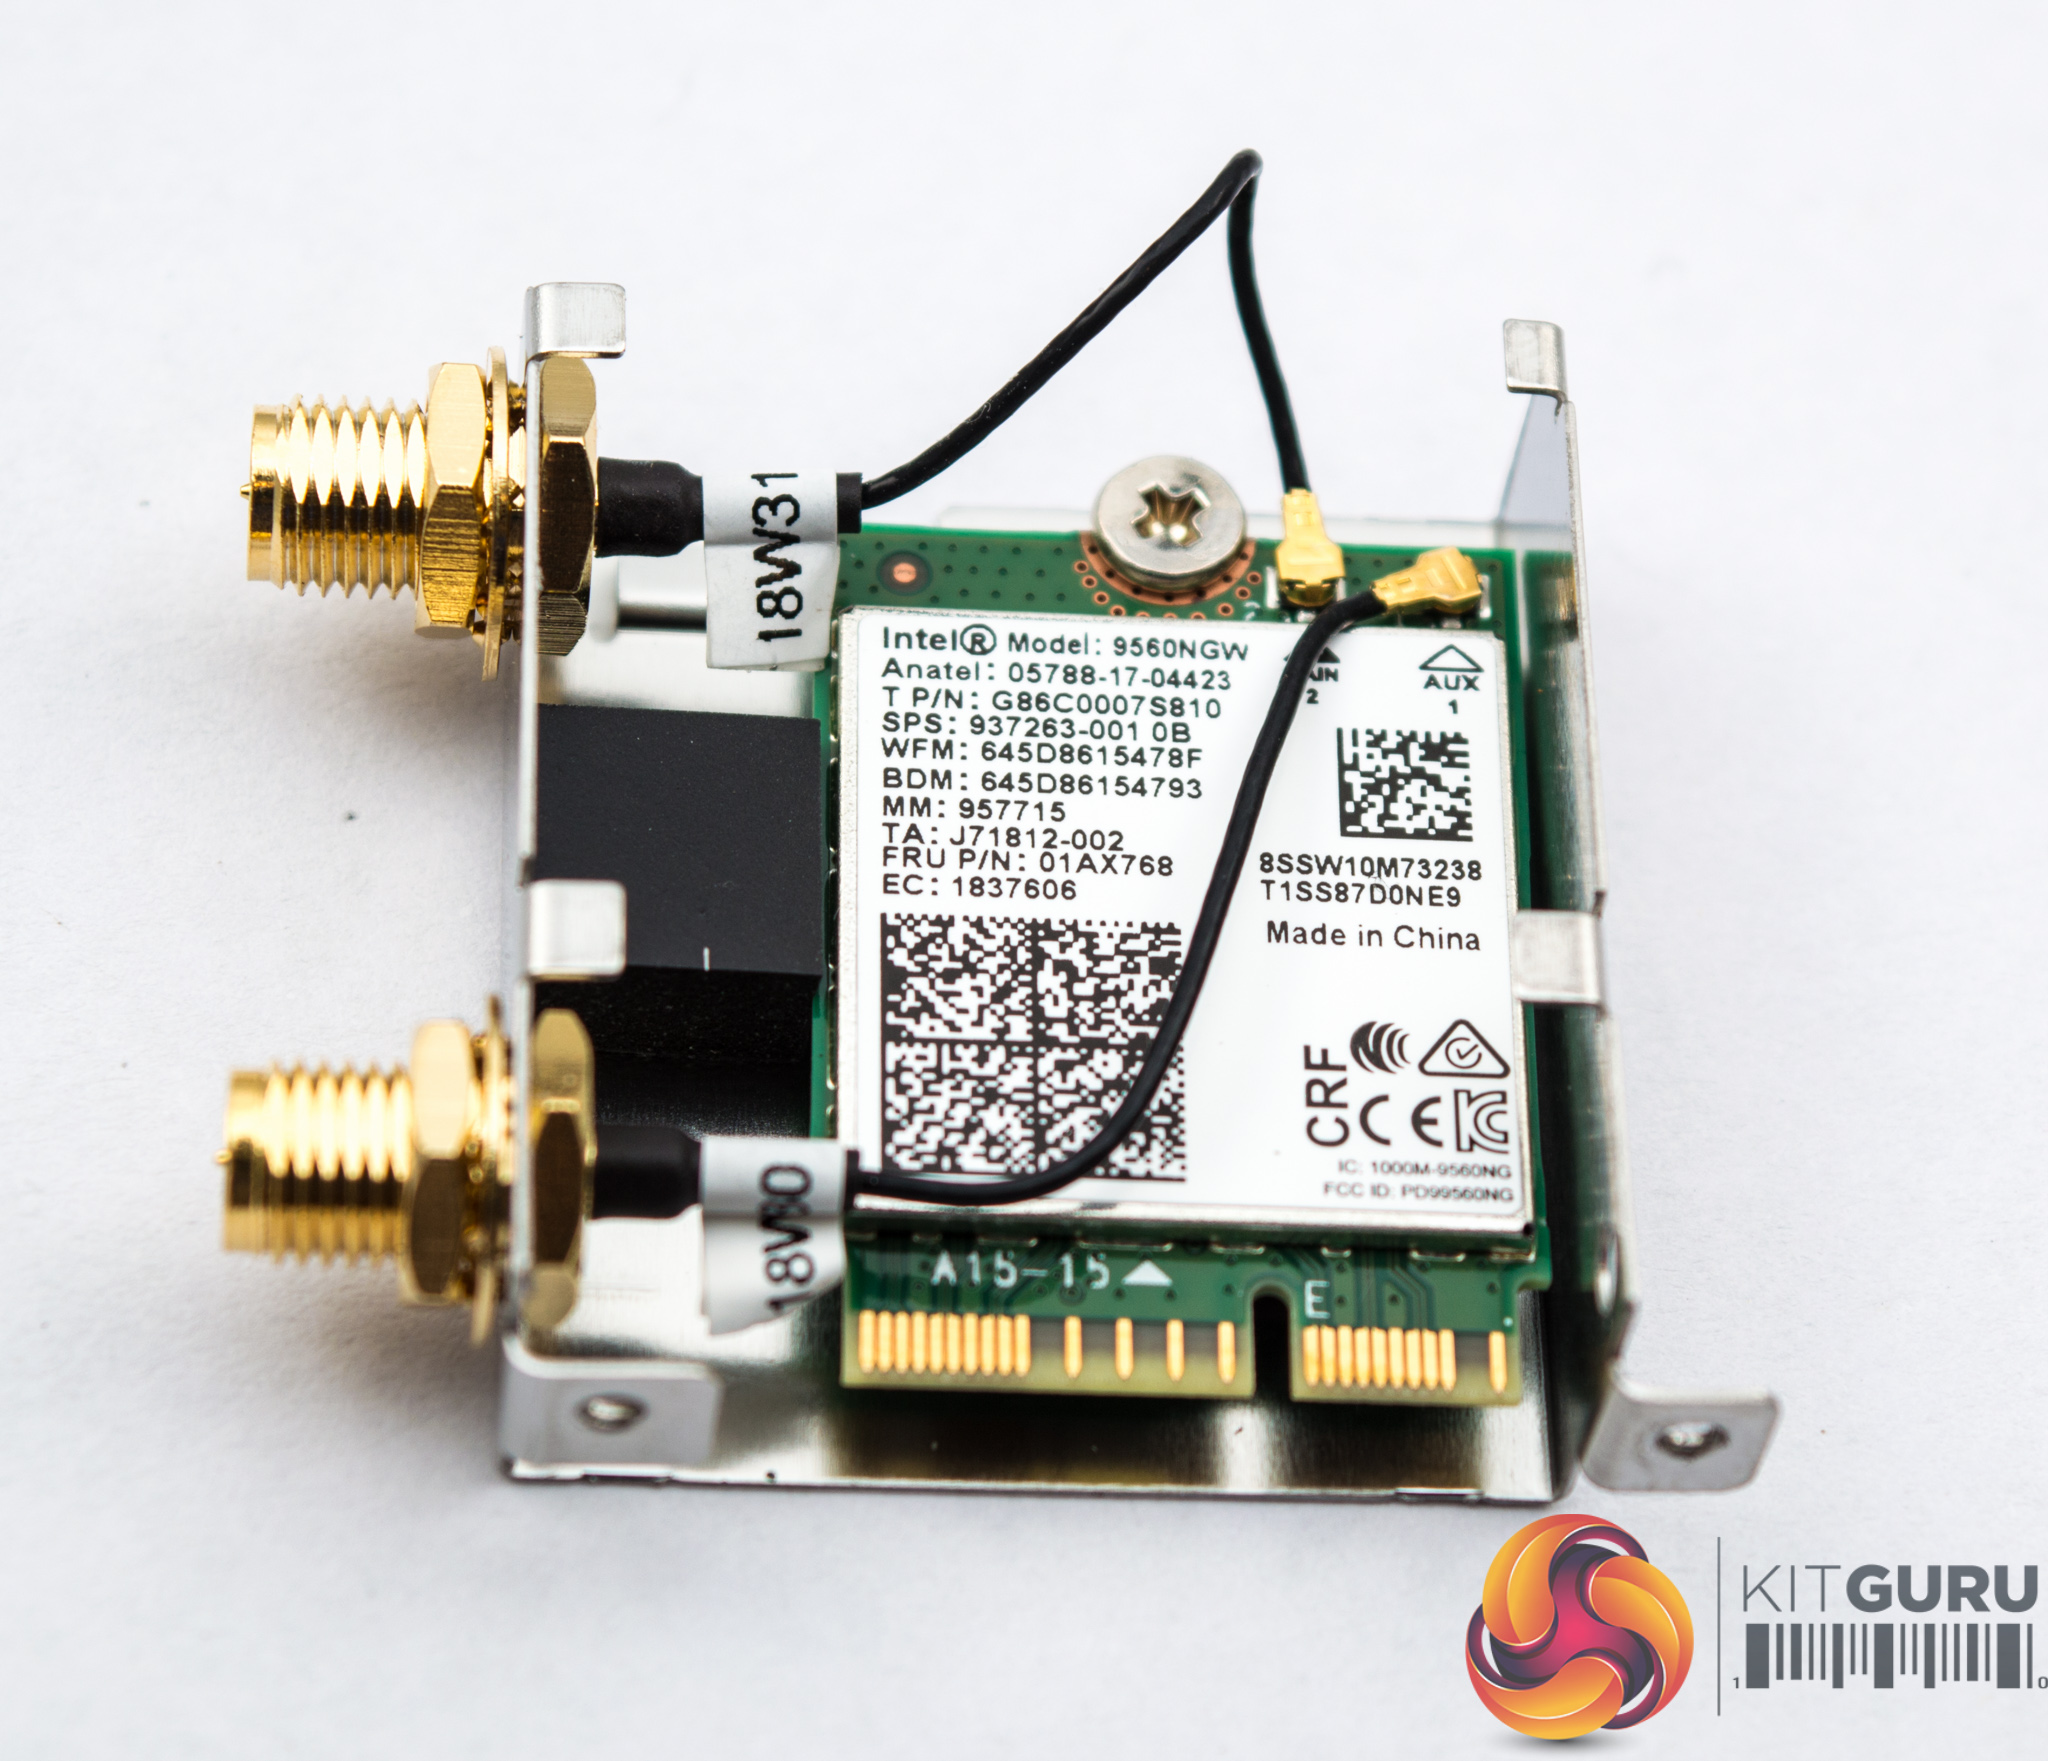
The WiFi module is provide by Intel's Wireless-AC 9560NGW chipset, which combines Bluetooth 5.0, and sits on the Intel integrated connectivity (CNVi) interface.
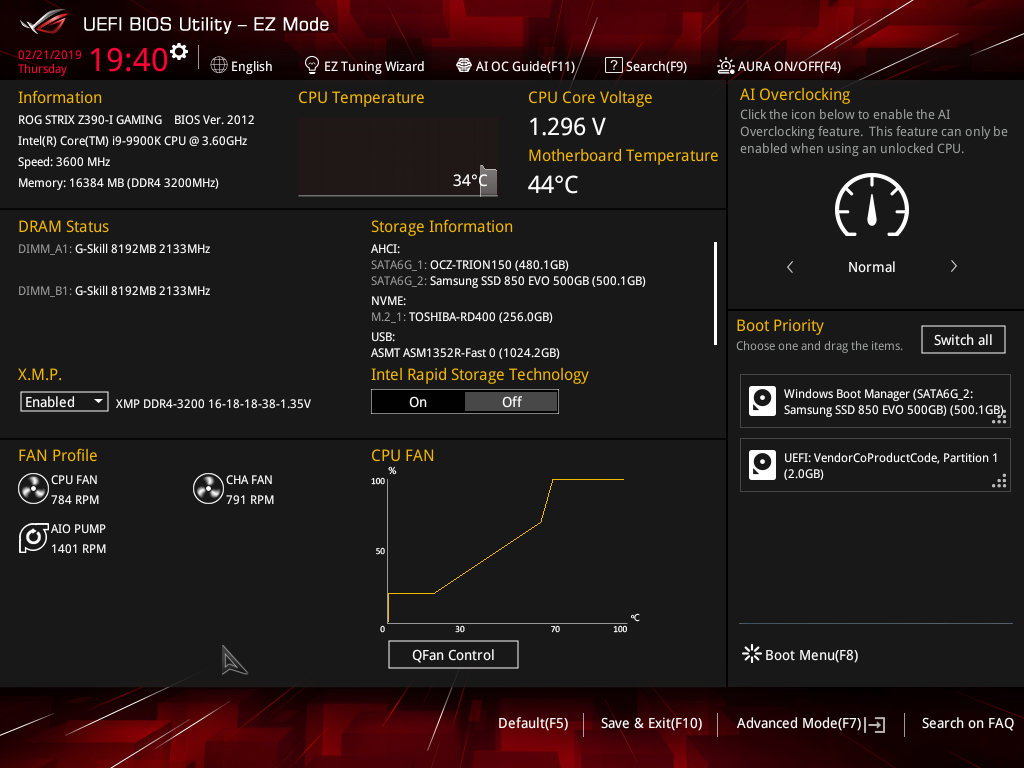
The ASUS UEFI enters straight into the EZ Mode splash screen which has a selection of frequently used settings including XMP profiles, boot device order and fan speeds. Pressing F7 takes the user into the advanced section of the UEFI but there are some additional tools that can be accessed from the splash screen such as Q-Fan Control, EZ System Tuning and AI Overclocking.
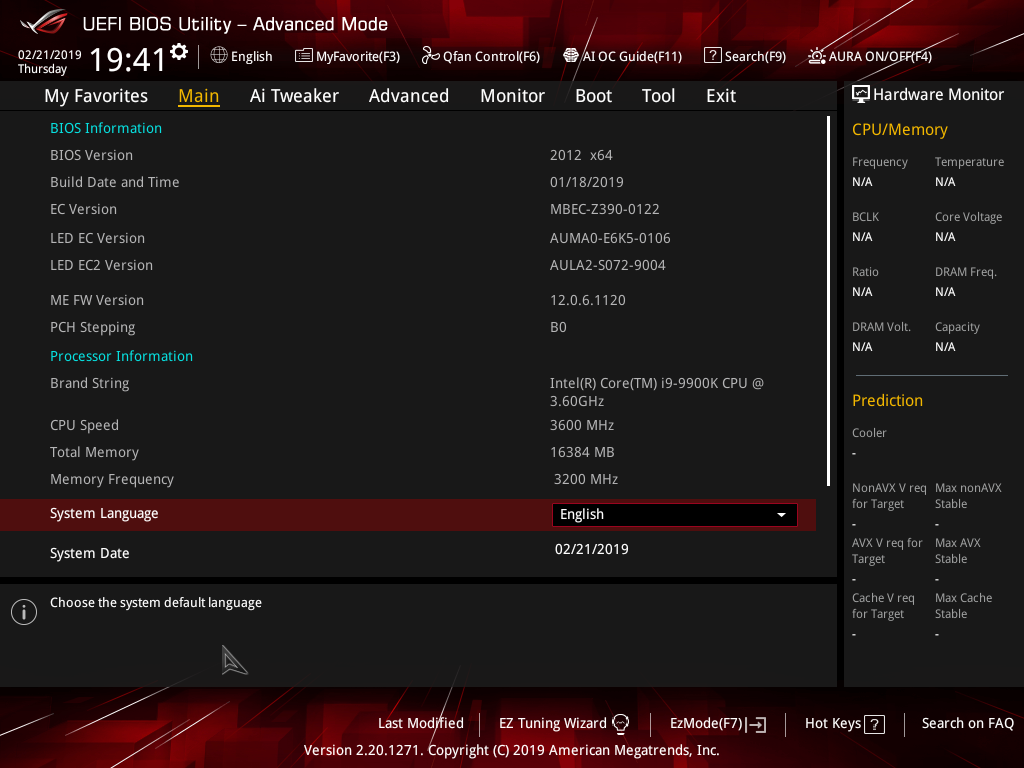
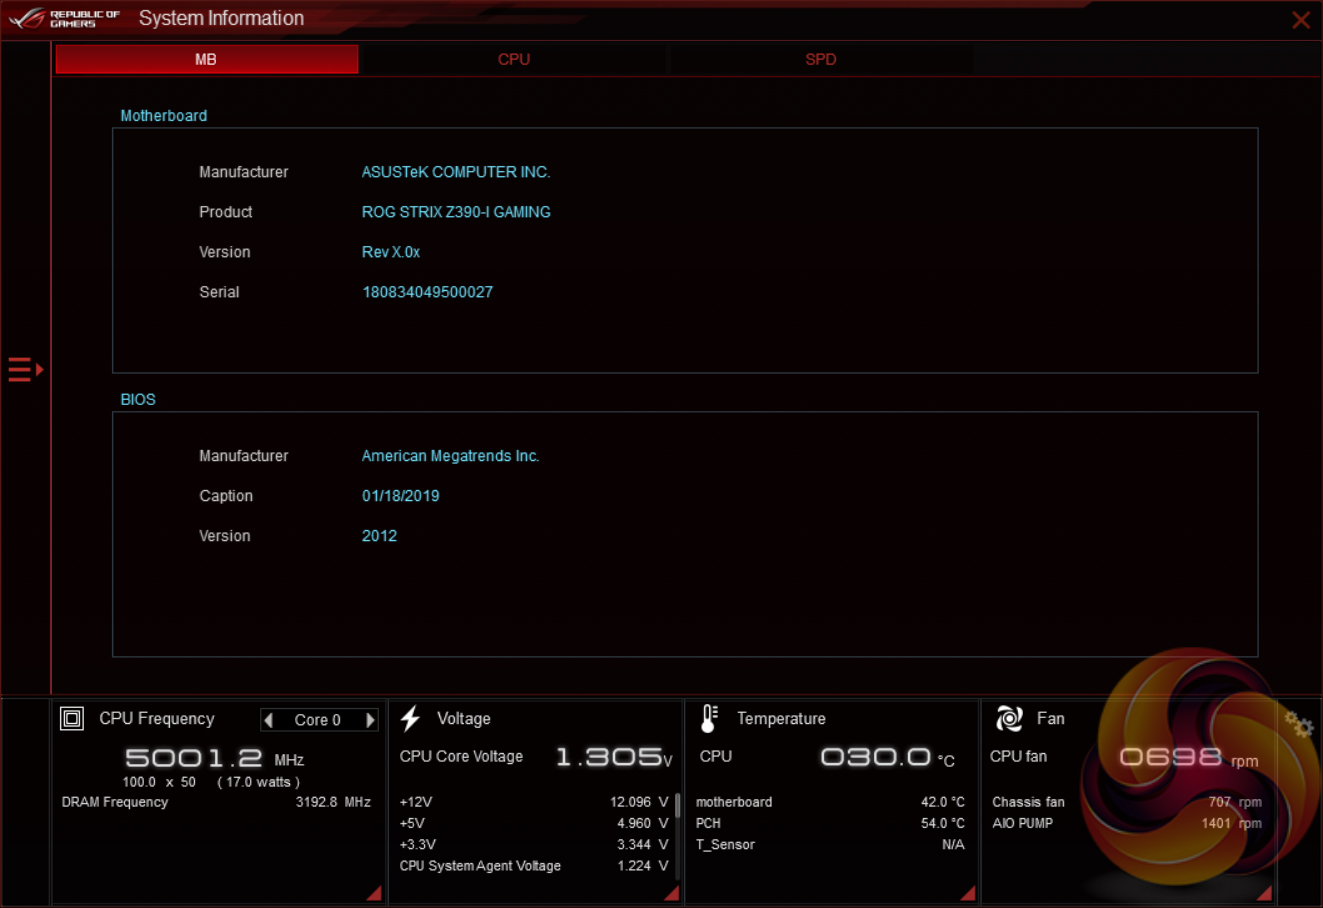
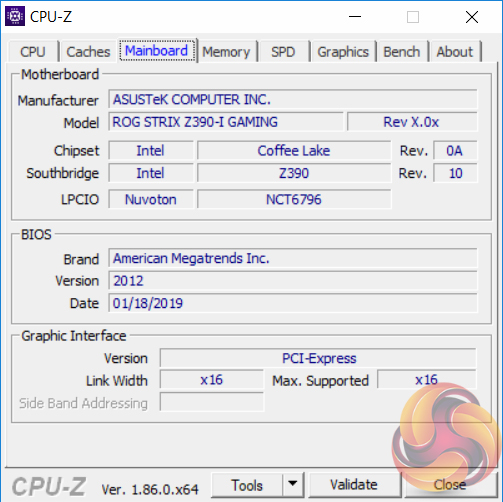
The first tab is MyFavorites which stores the most frequently accessed UEFI settings. The next tab, Main, contains detailed processor and BIOS version information.
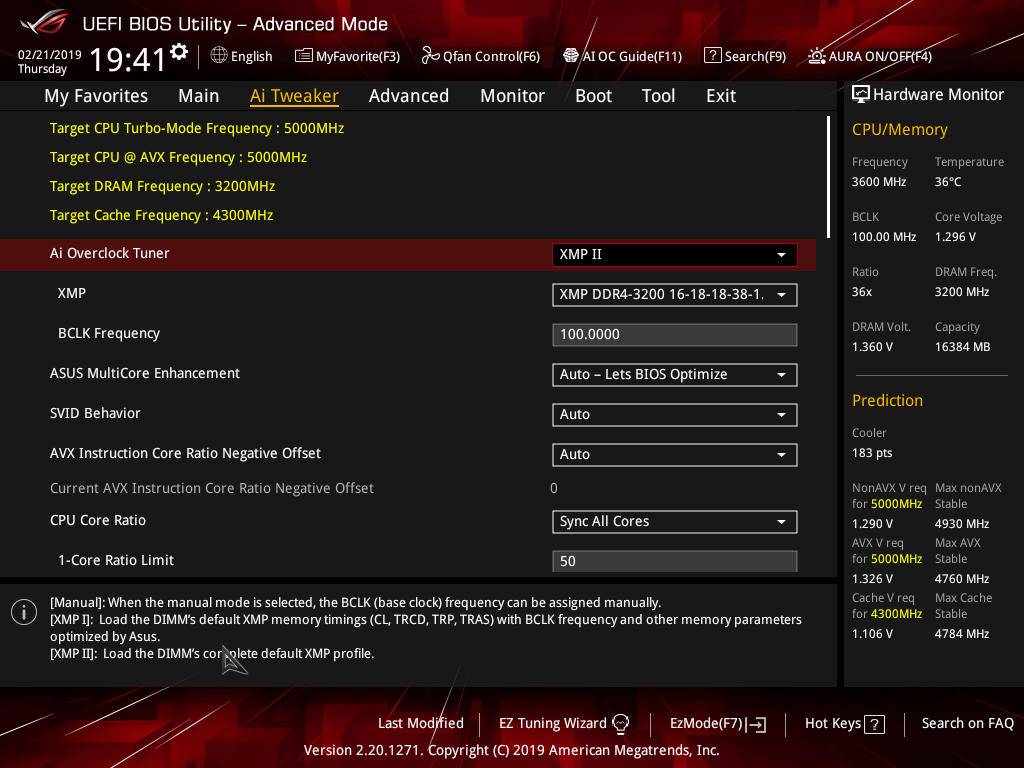
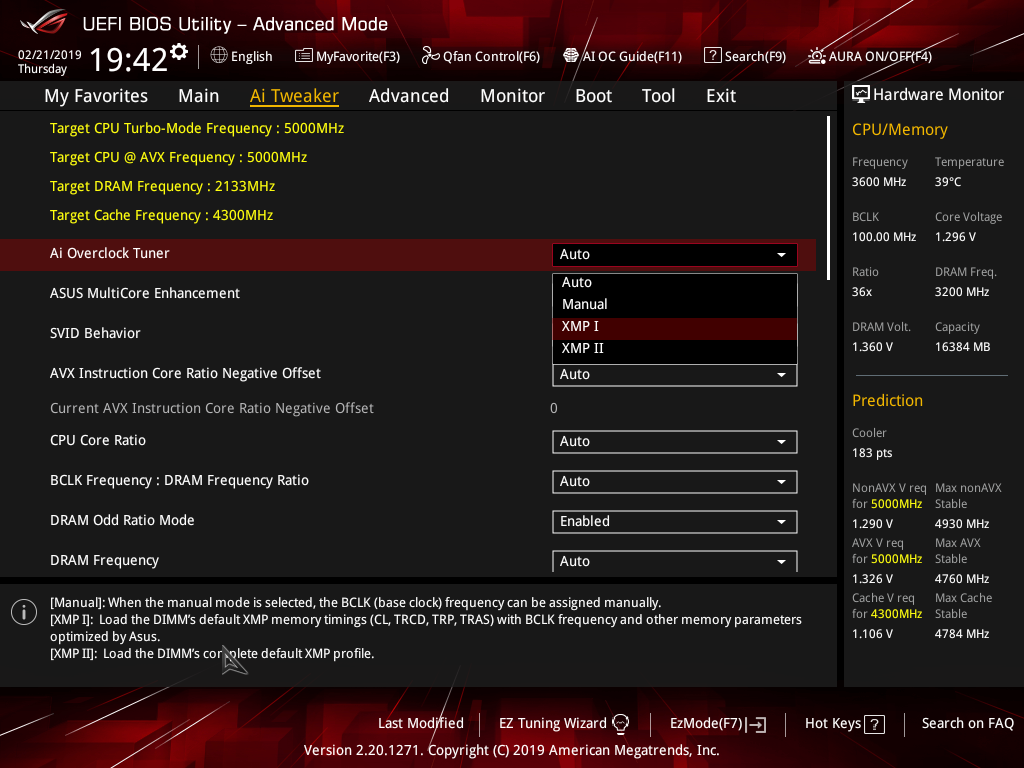
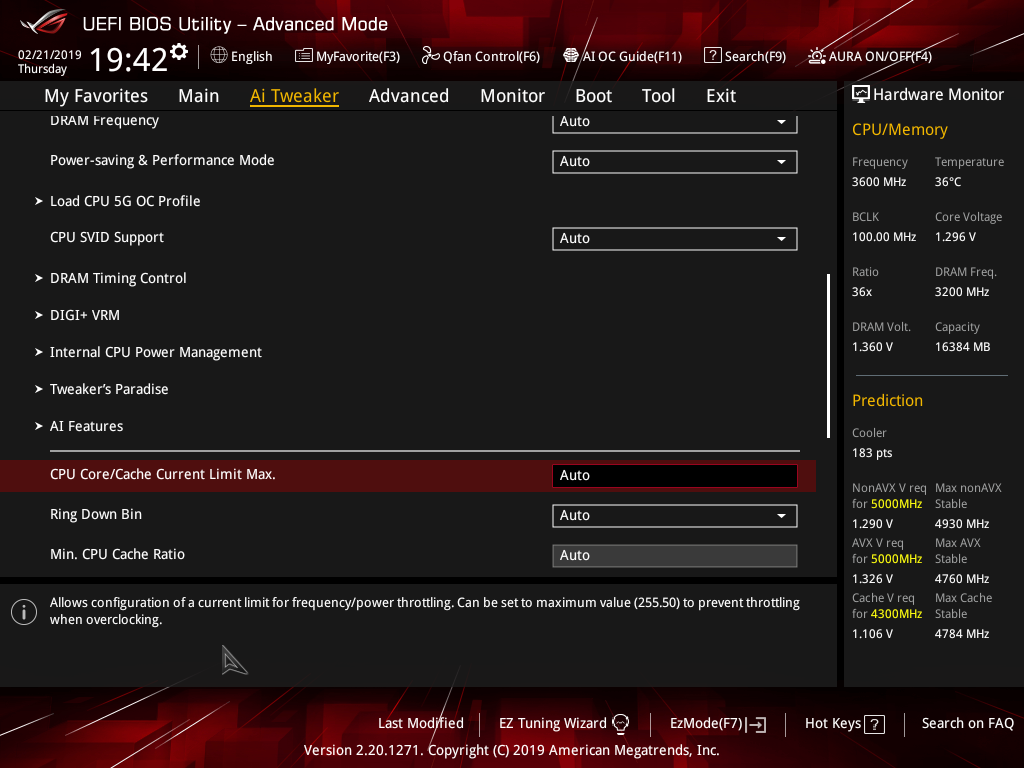
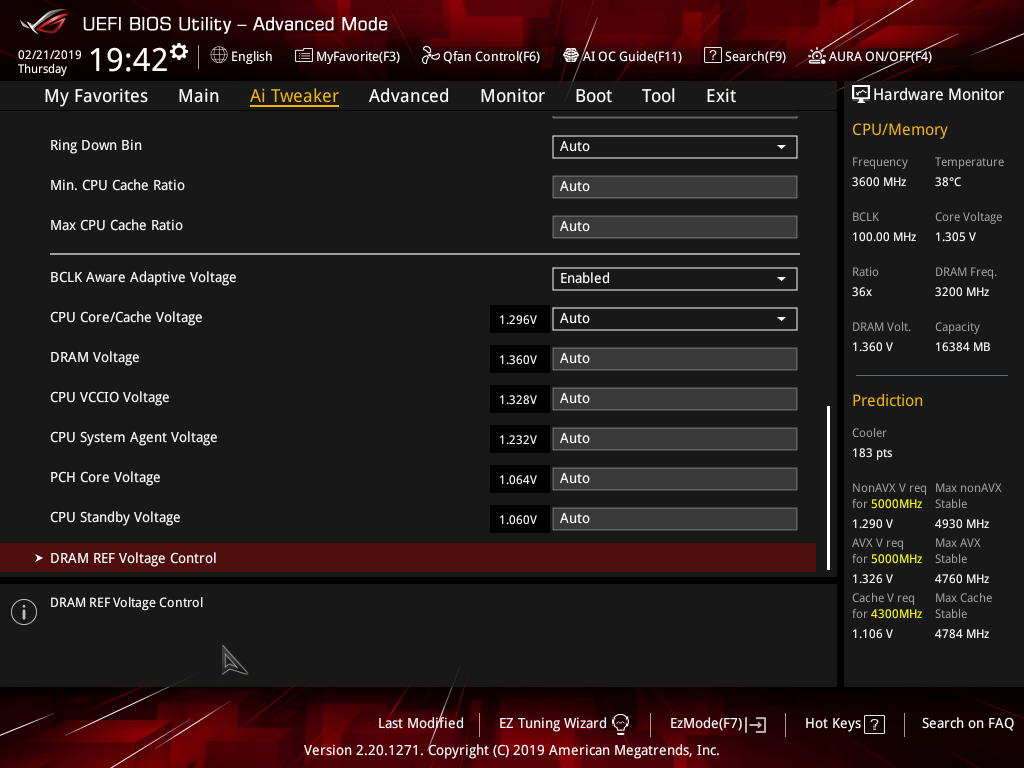
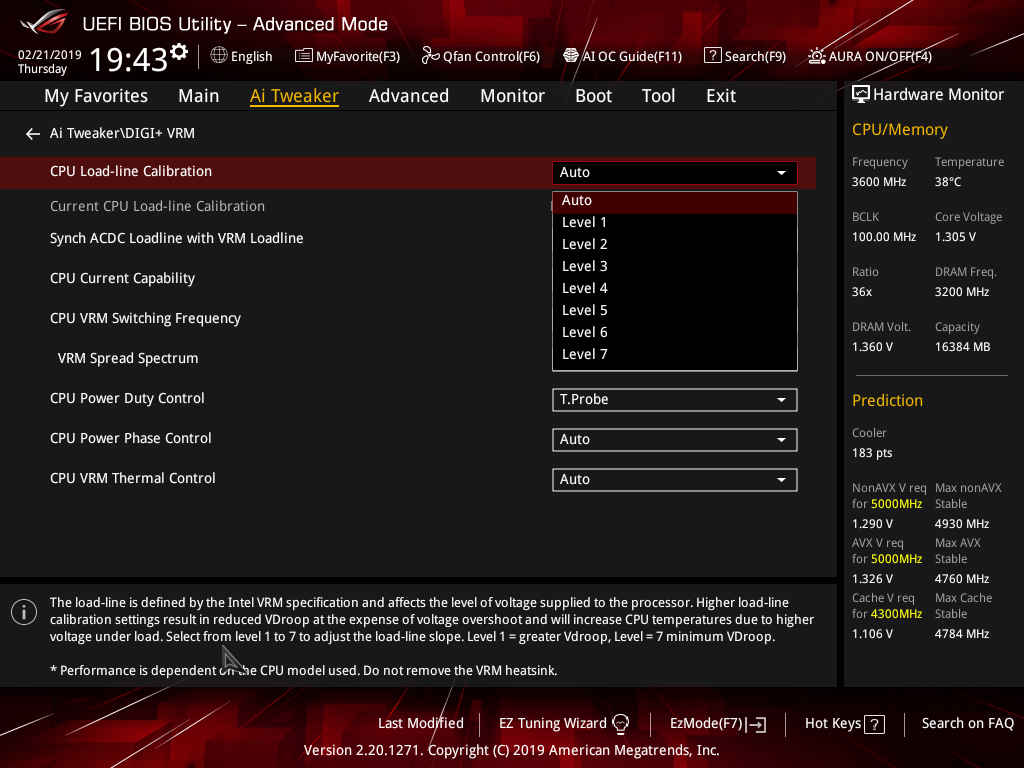
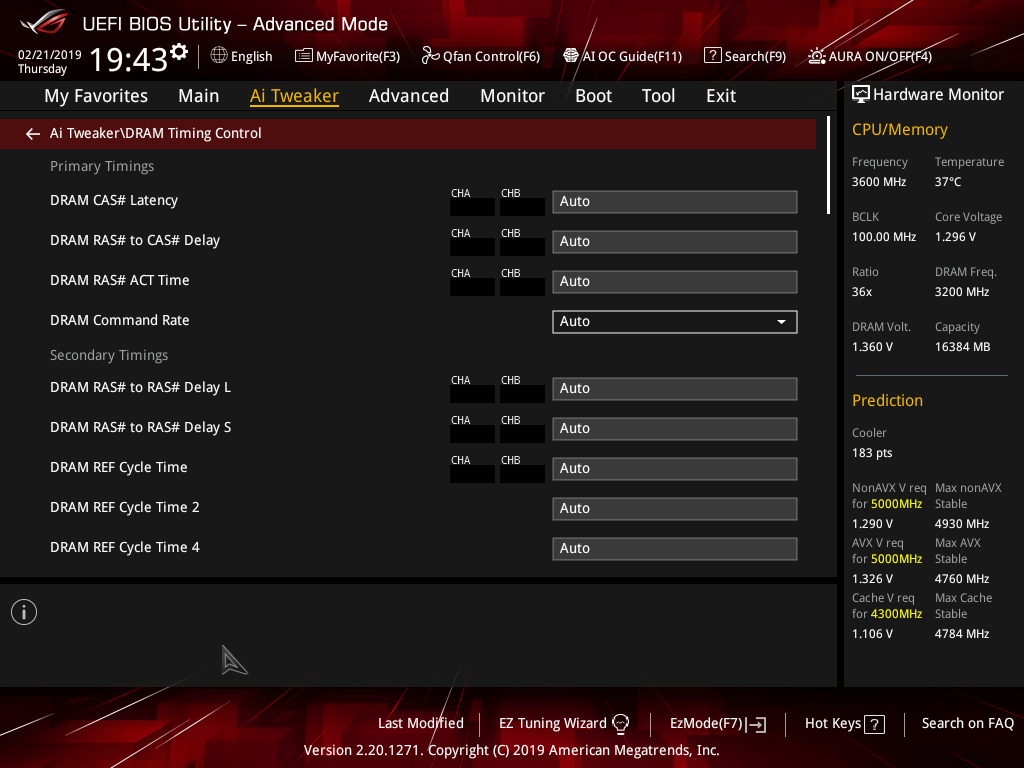
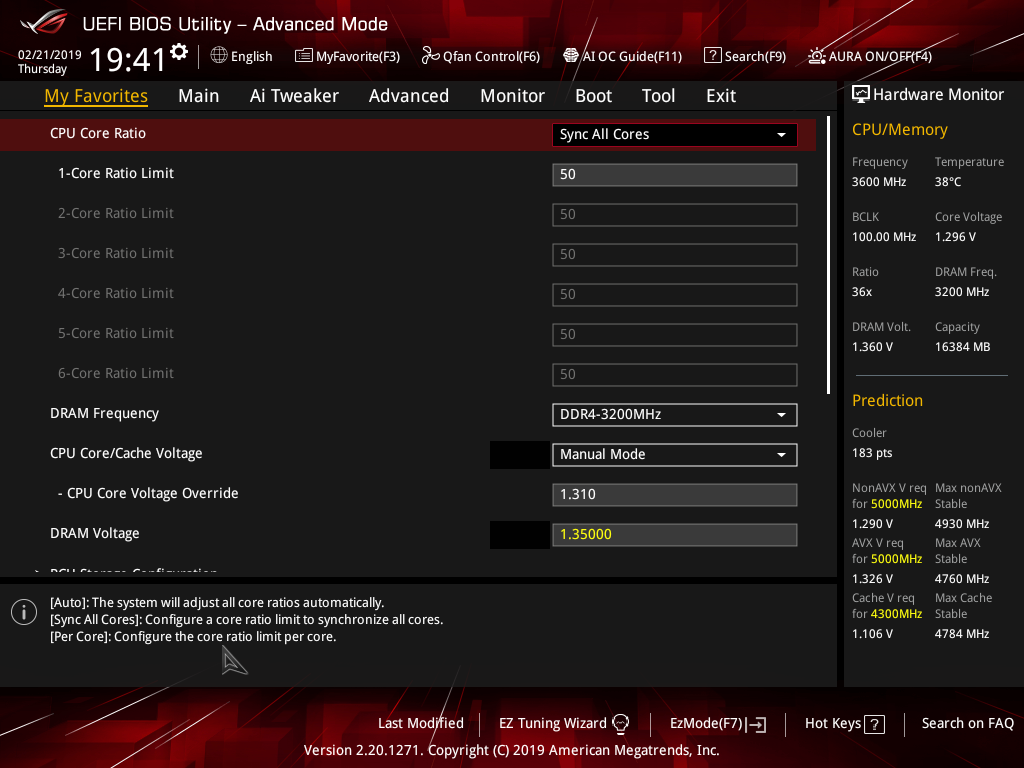
AI Tweaker is the UEFI tab which contains the vast majority of performance tuning settings pertaining to the CPU and DRAM. From here you can set XMP profiles, overclock the CPU, set all the various voltages and voltage operation modes, change the Load Line Calibration (LLC) and considerably more.
LLC has 8 levels, using a 0-based index, with 0 being the least aggressive and 7 the most. The voltage modes include manual, adaptive and offset. Unlike MSI, ASUS does not offer combined voltage modes such as override + offset.
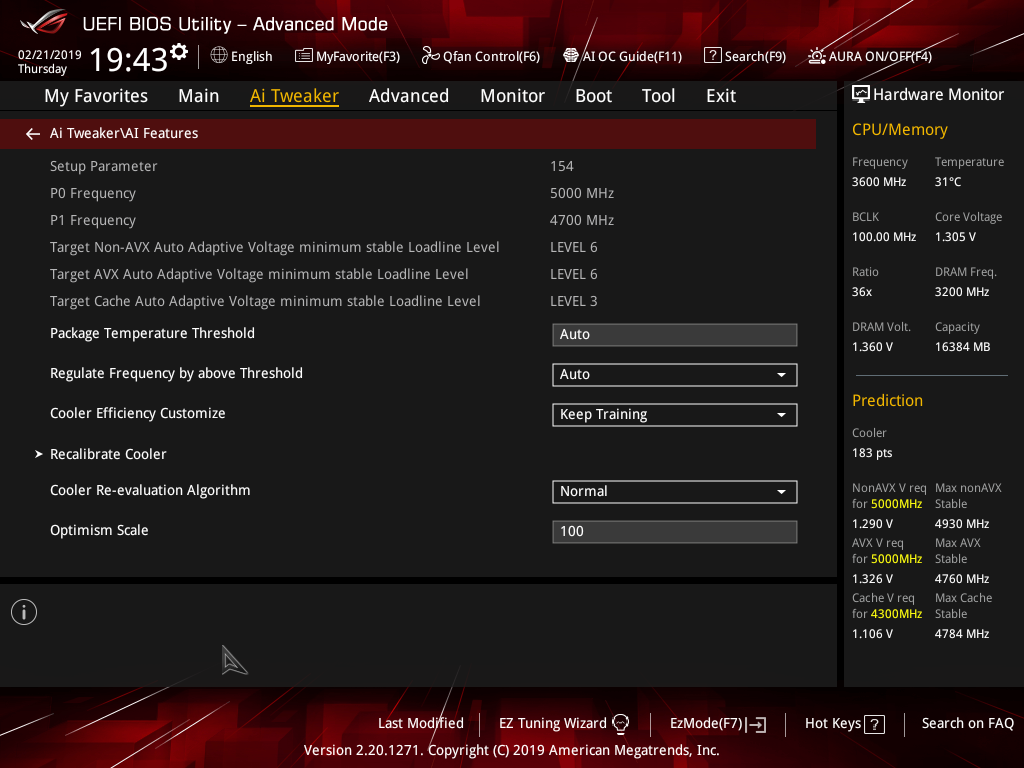
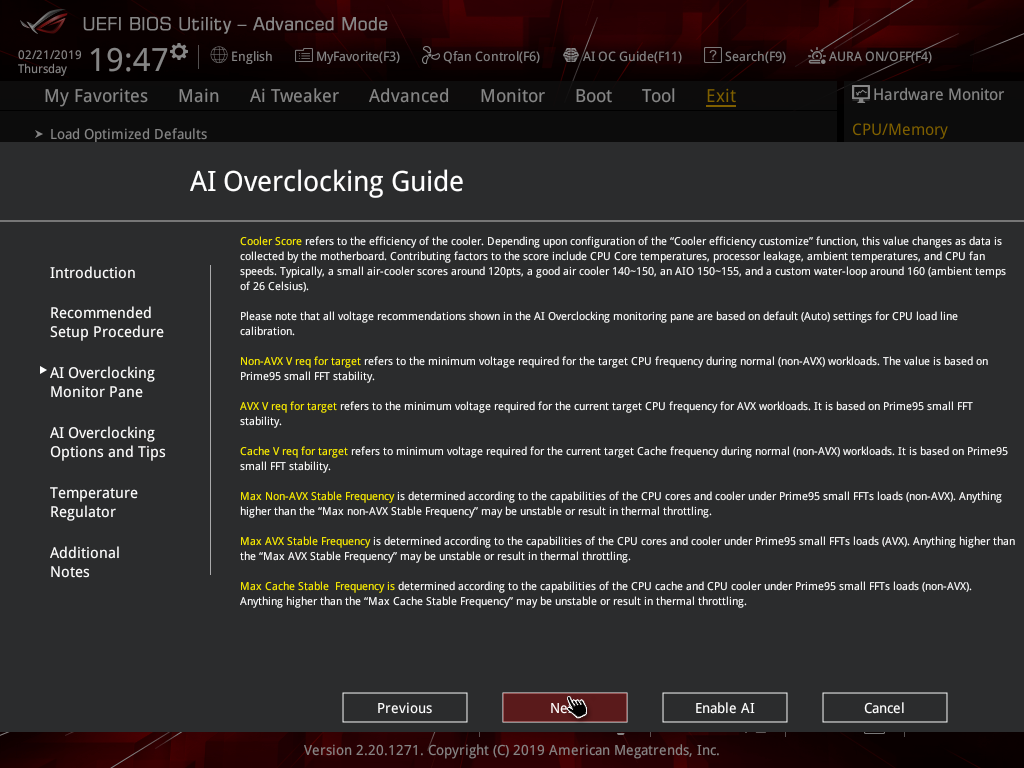
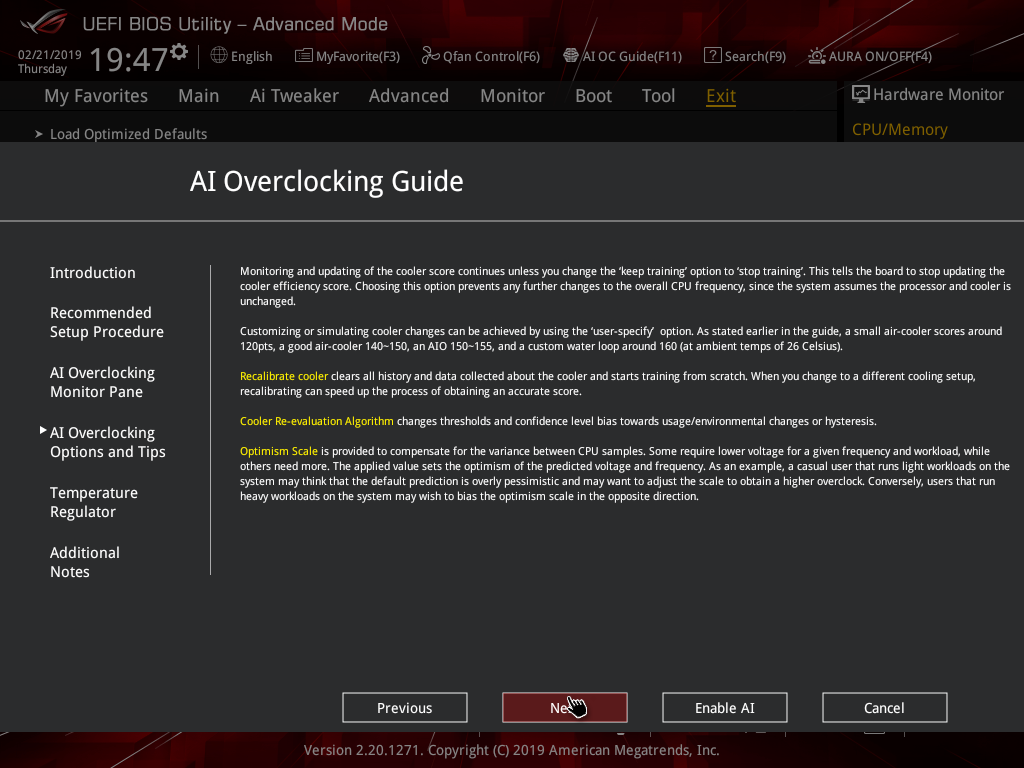
ASUS has implemented a new “AI” overclocking feature which can be enabled through the “AI OC Guide” window (F11). This has an “optimism scale” associated with it which will determine how adventurous the target overclock will be, there’s also a cooler calibration test which effectively tests “how good” your CPU cooler is before attempting higher voltages. The scale ranges from 50, least optimistic, to 150, most optimistic, with 100 being the default.
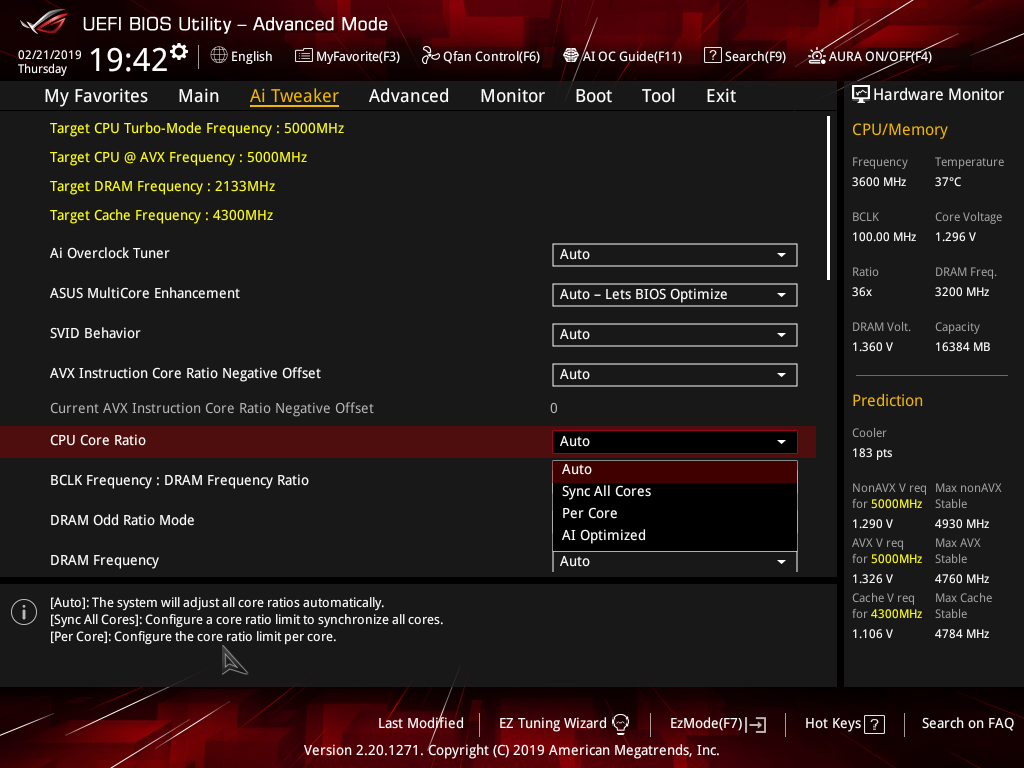
There’s also a feature called “SVID behaviour” which affects the level of input voltage the CPU will use at a given voltage. There’s an option to run this as “best-case”, “typical”, “worst case” or “Intel’s Fail Safe” scenarios but effectively what it means is that, in that order, power consumption goes from lowest to highest. A best-case scenario assumes a high-quality chip that requires less power to operate, and Intel’s fail safe is the opposite.
In practice, manually setting the CPU VCore overrides the SVID behaviour but anyone who just dials in a 50x multiplier for 5GHz and leaves the voltage to auto, would be affected by the SVID behaviour. This is also relevant when using Adaptive and Offset VCore modes since those modes will add or subtract voltage from the VCore based on the SVID set voltage, so a higher or lower the baseline level set by the SVID behaviour will affect the final VCore under load.
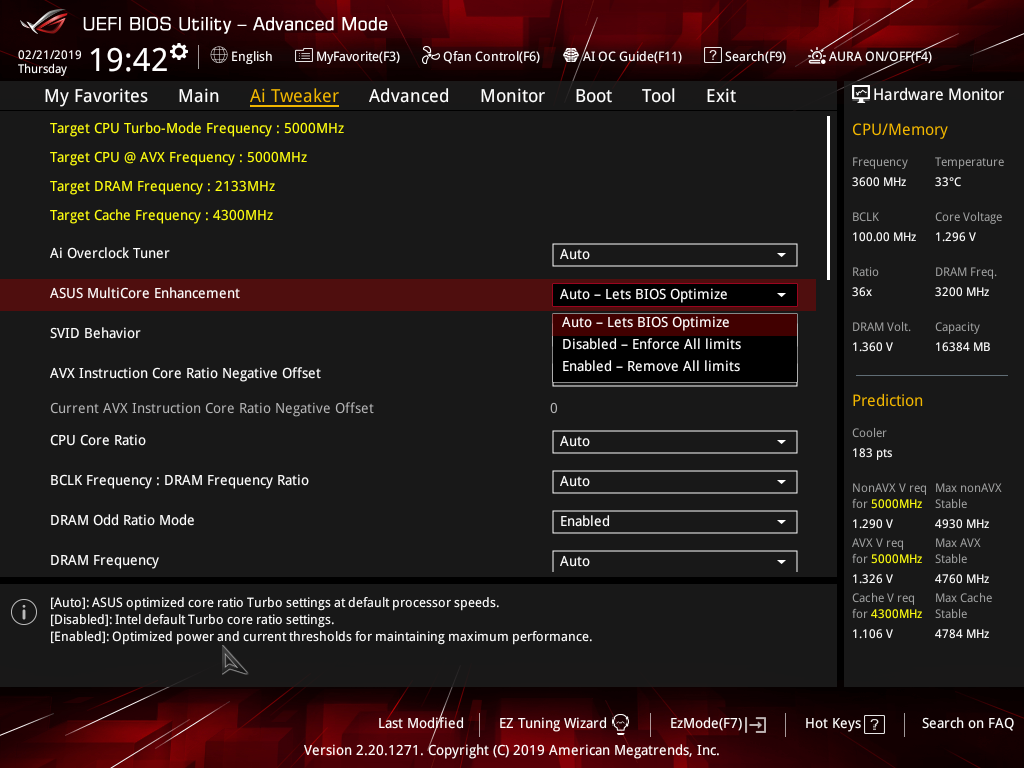
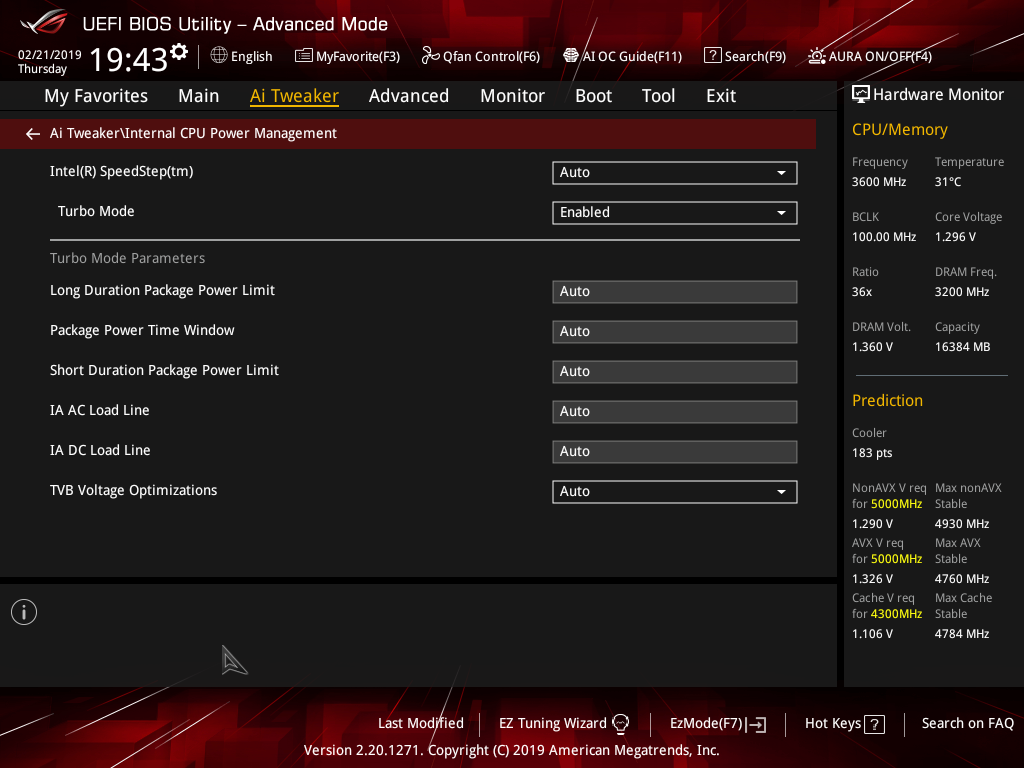
The ASUS UEFI no longer provides a warning about opting out of an “enhanced turbo” when setting an XMP profile. The default setting for the ASUS Multicore Enhancement is now “Auto – Lets BIOS Optimize” which effectively enables an enhanced turbo scenario that consumes considerably more power than stock Intel operation.
To run at default Intel specification, the user must select “Disabled” for ASUS Multicore Enhancement.
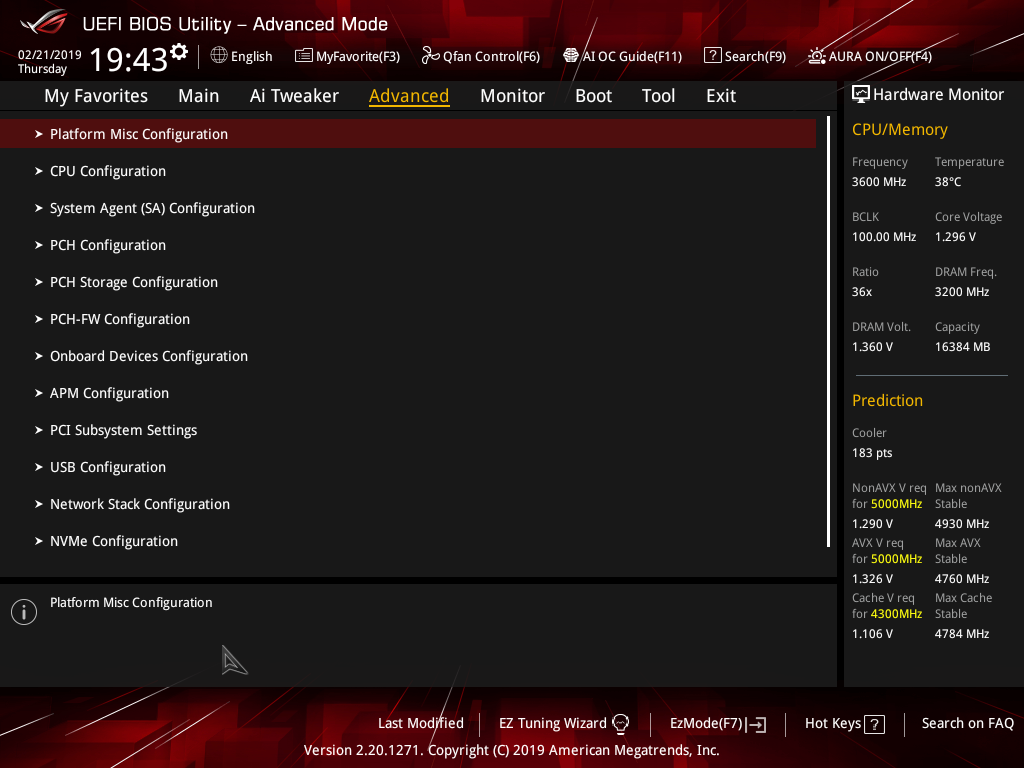
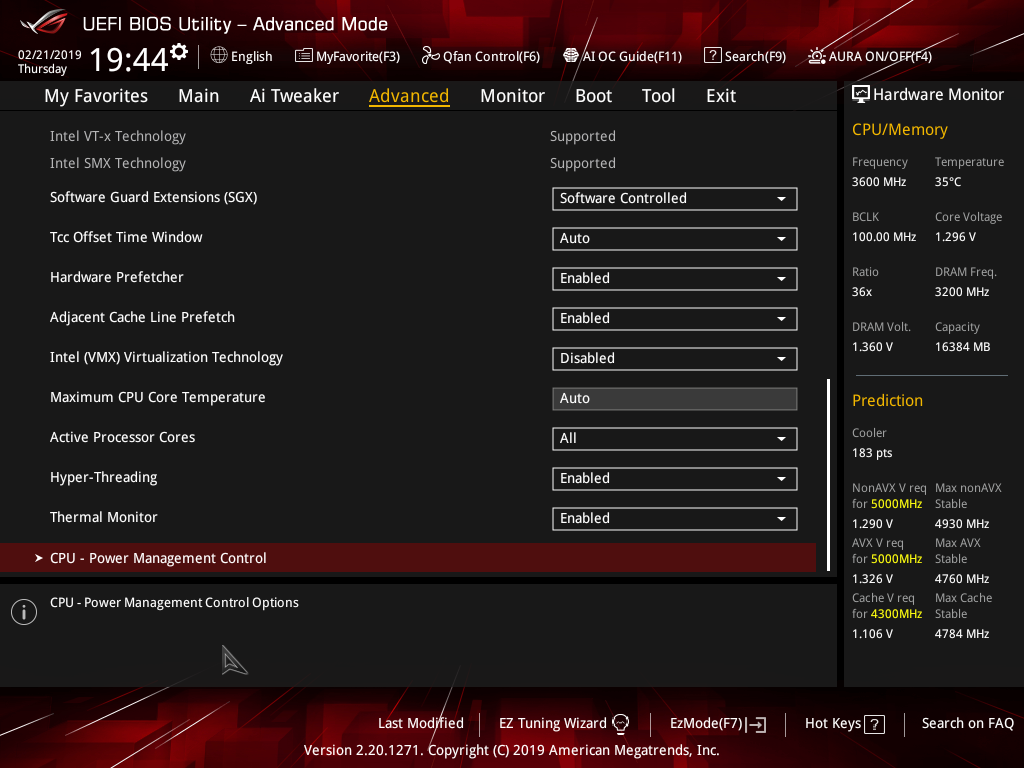
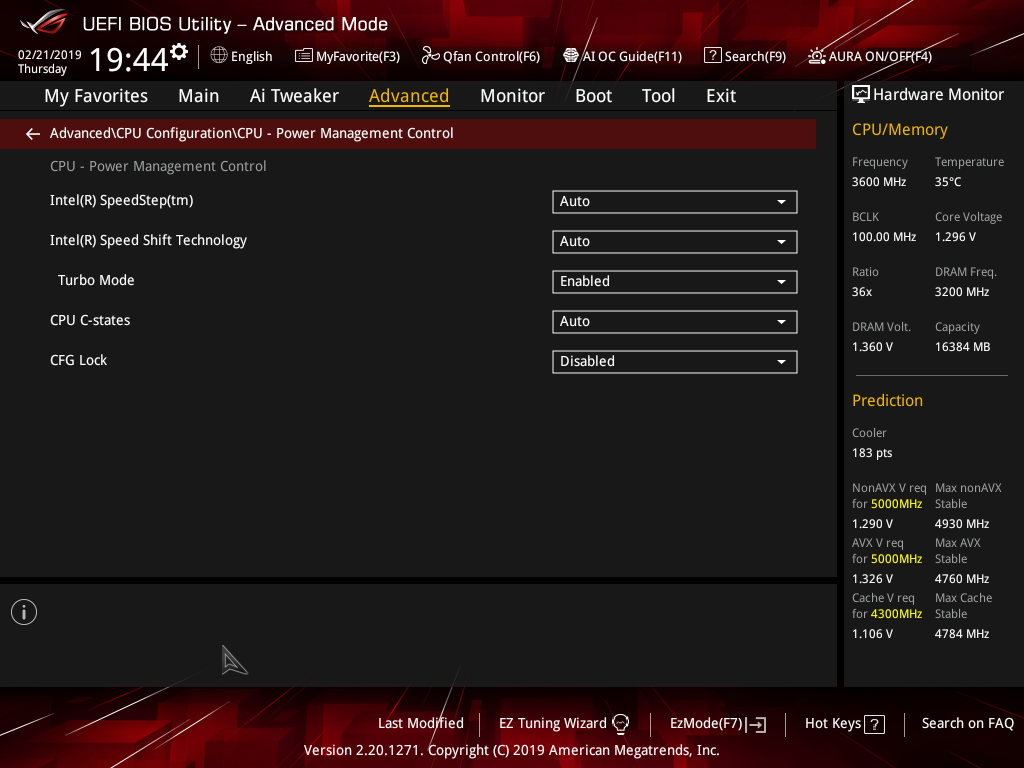
There is a significant selection of performance and compatibility parameters to be found under the Advanced section should the need arise. As well as a number of other peculiar settings related to the functions of onboard devices, LEDs, USB and storage controllers and more.
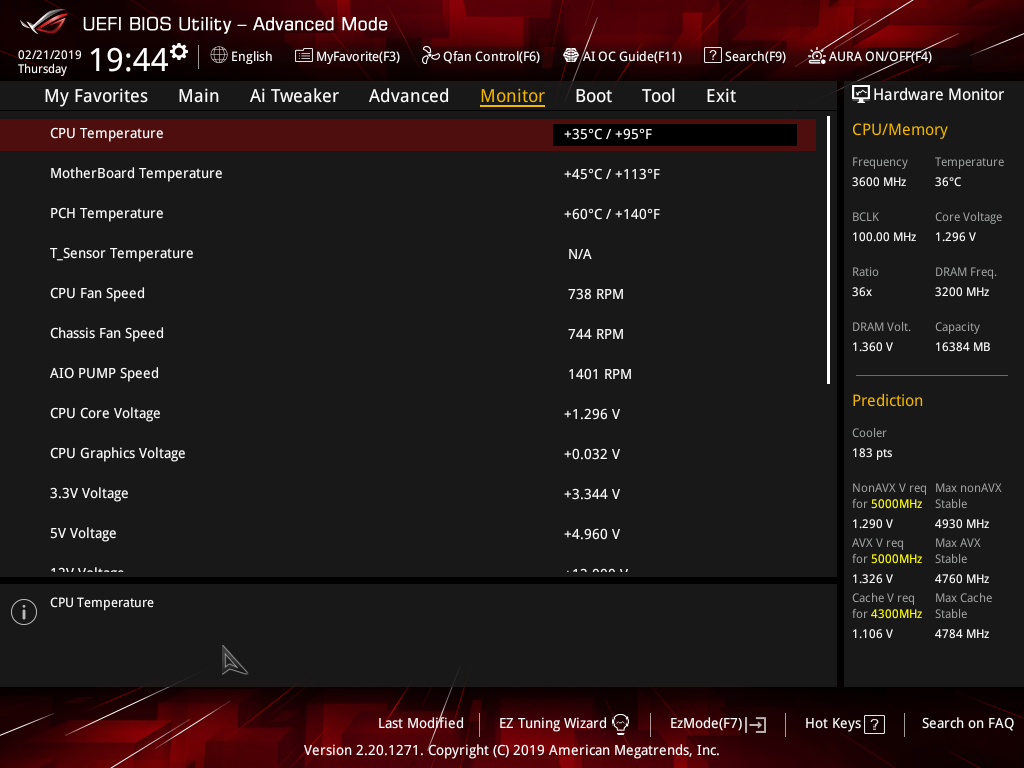

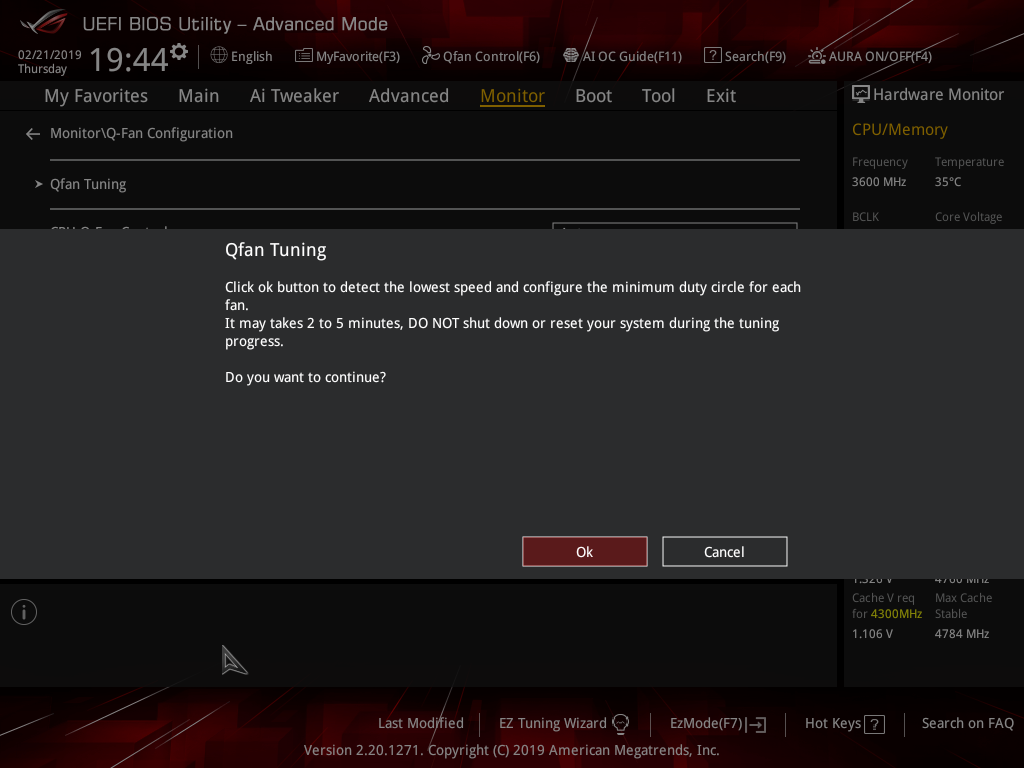

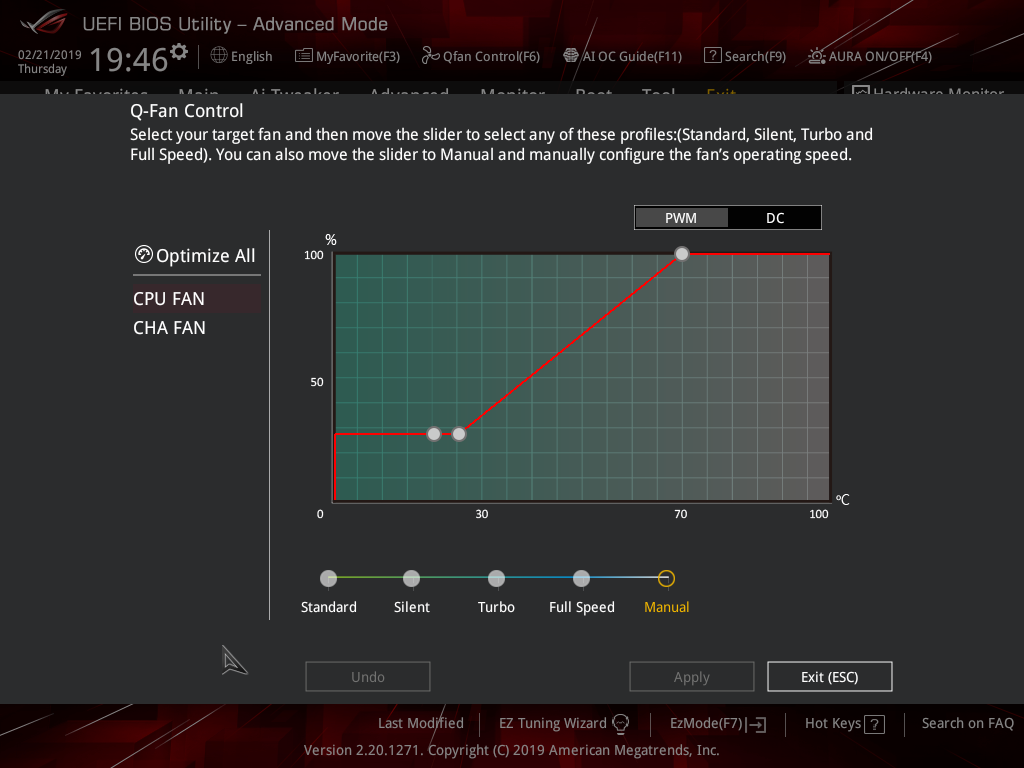
The Monitor tab will allow you to instruct the UEFI how to handle temperature data from the various sensors as well as what to do with fan speed profiles. For example where a fan speed profile is temperature dependent you can choose which temperature sensor to use. Q-Fan Control provides the visual interface for doing the same thing, while Q-Fan Tuning will calculate the full RPM range for each connected fan.
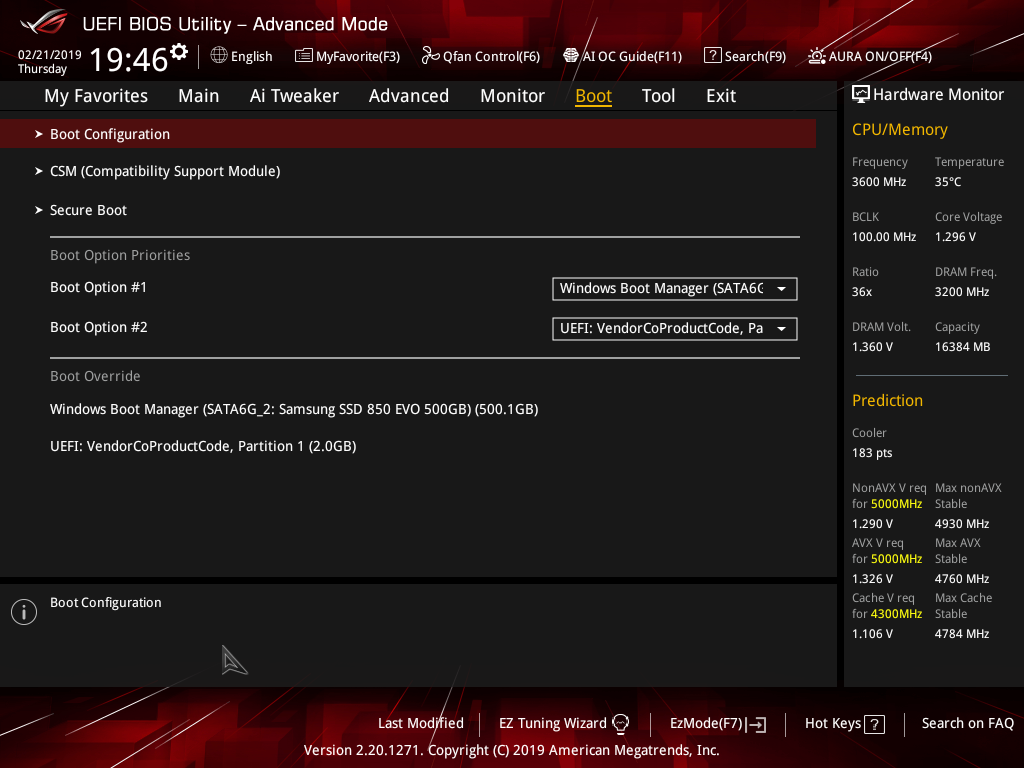
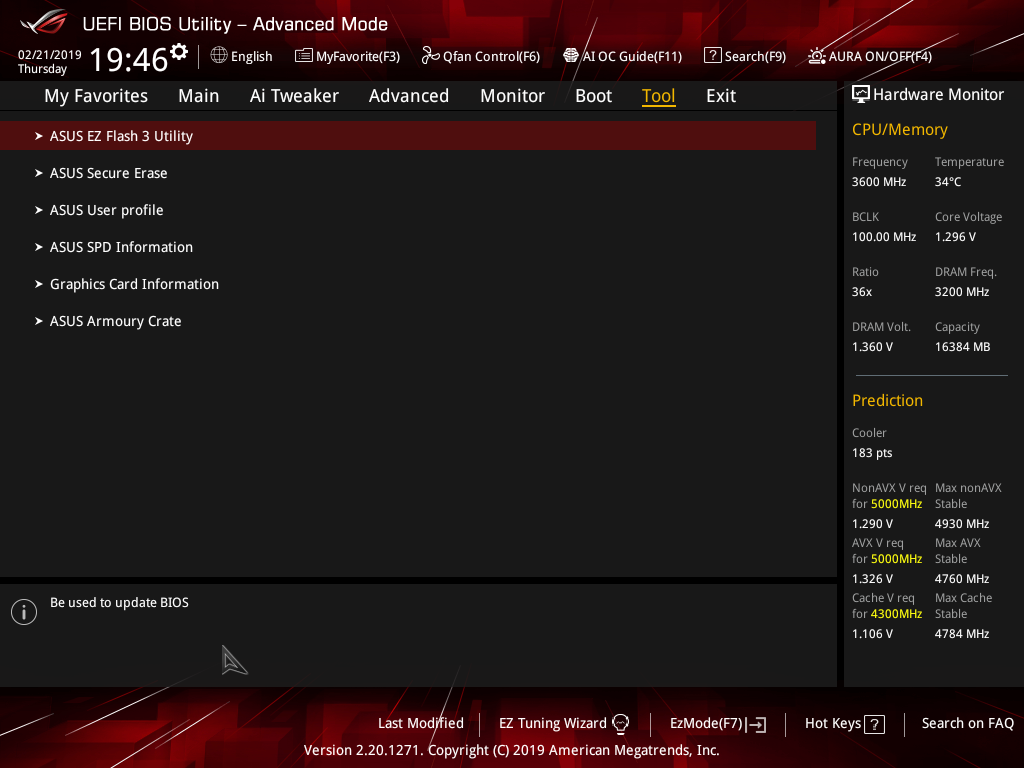
The Boot tab is as expected in delivering the key boot options such as secure boot, boot priority and boot compatibility options. Users needing to update the UEFI (via the EZ Flash Utility), save, import or export BIOS settings, or secure erase a storage drive should refer to the Tool tab.
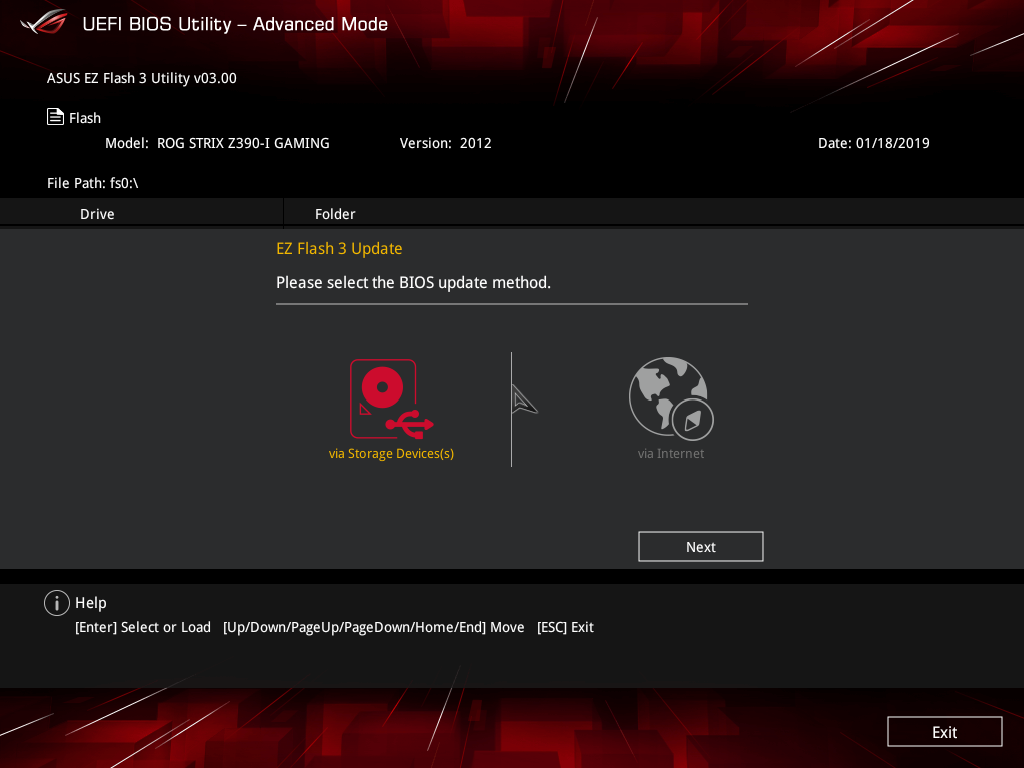
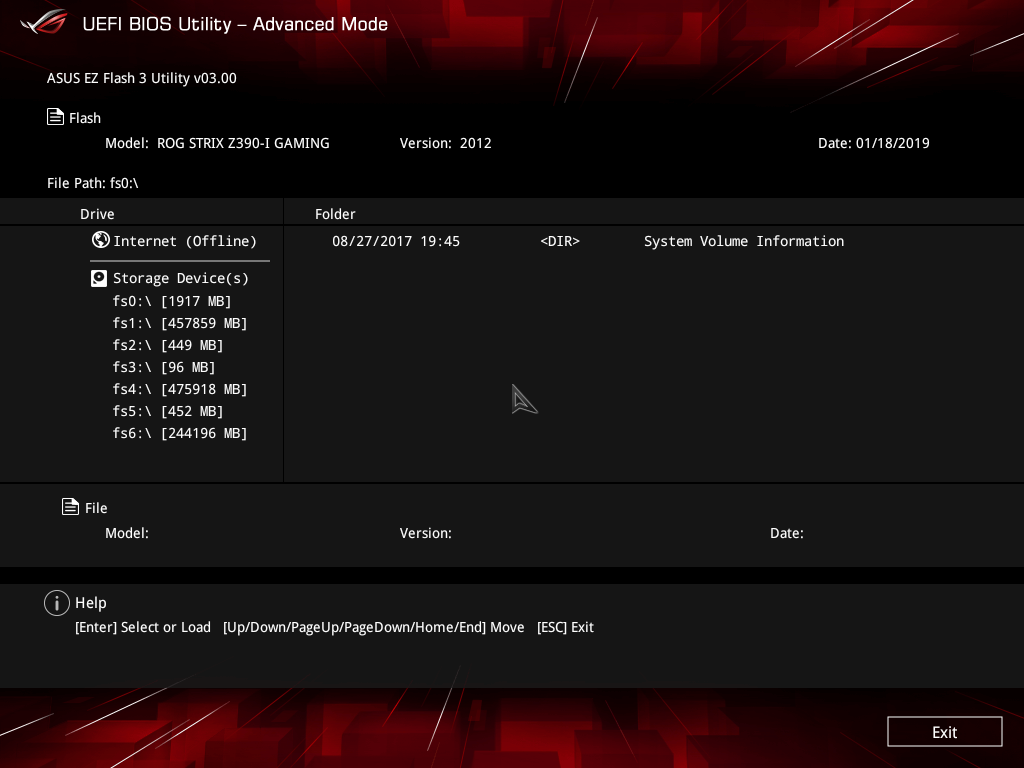
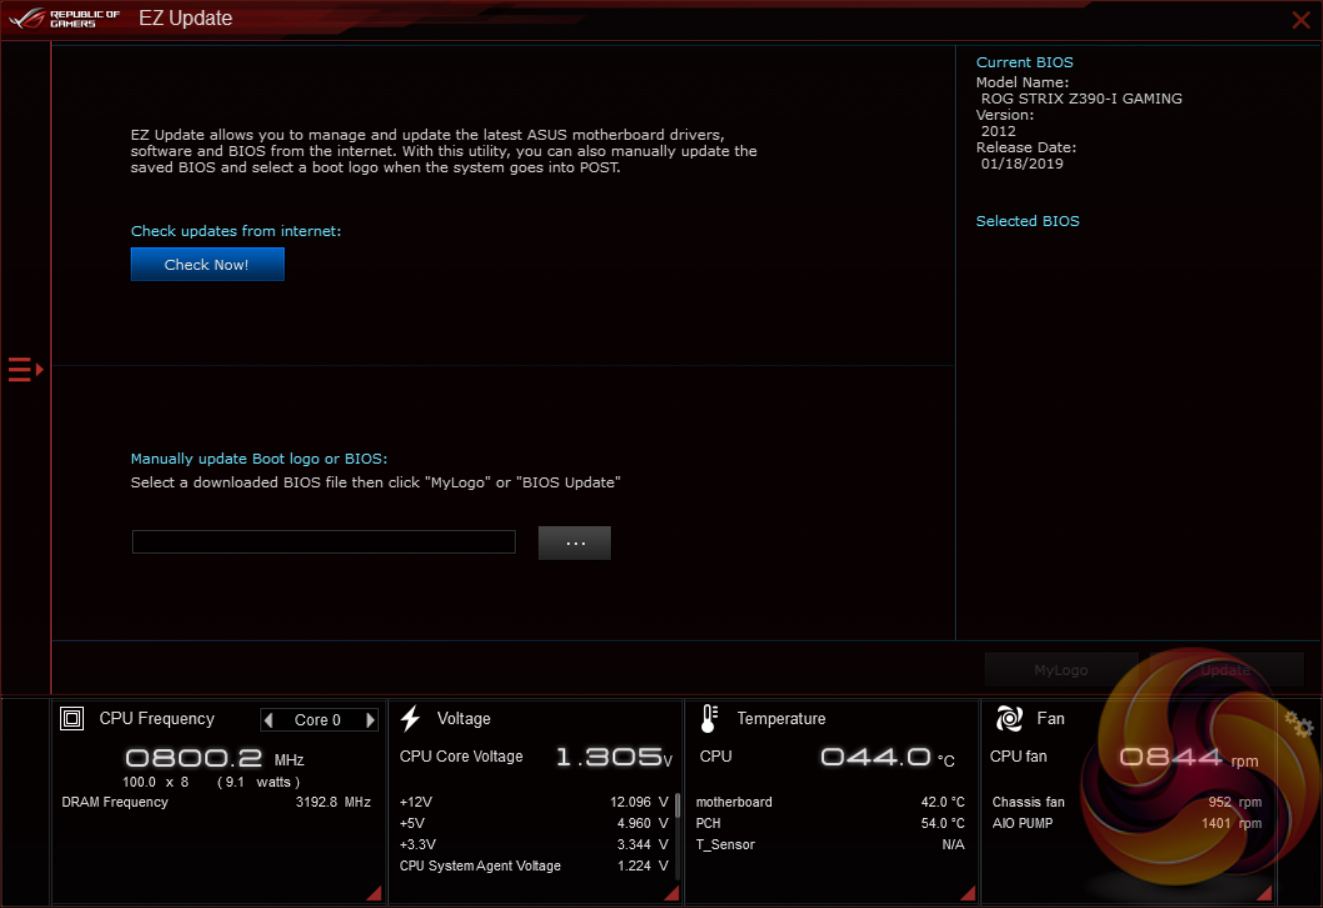
The EZ Flash utility is very simple to use and allows the UEFI to be updated from either a local disk or the internet over the Intel I219V Gigabit Ethernet adapter.
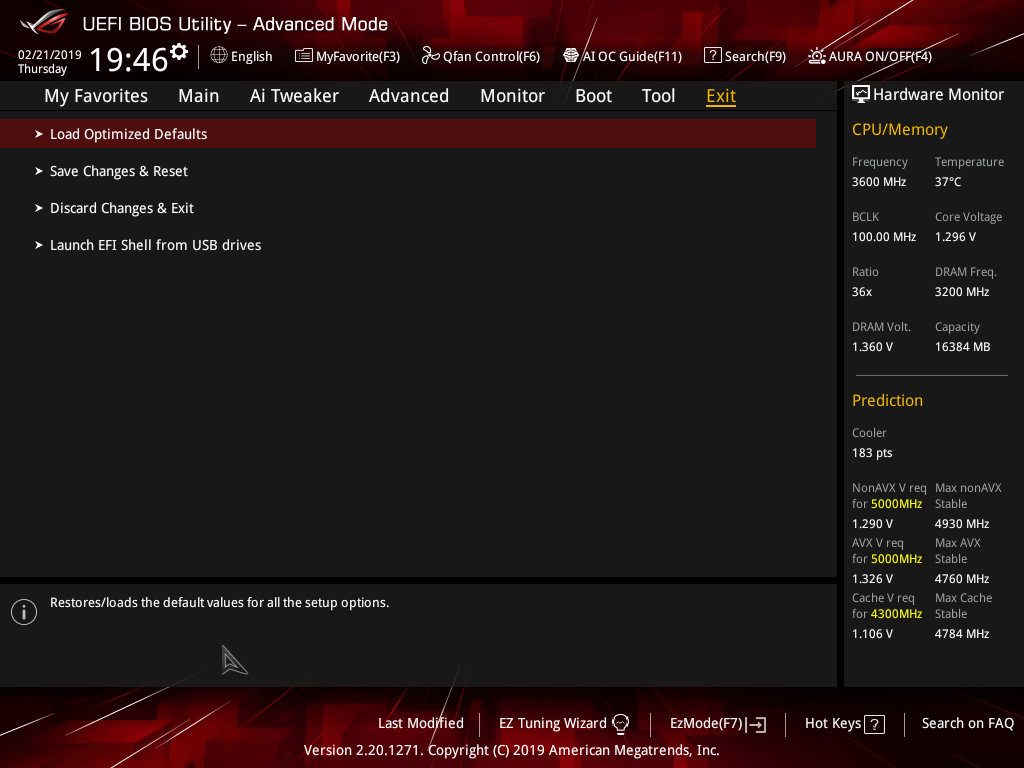
The Exit tab is fairly self-explanatory and helpfully provides a summary of changes upon exit.
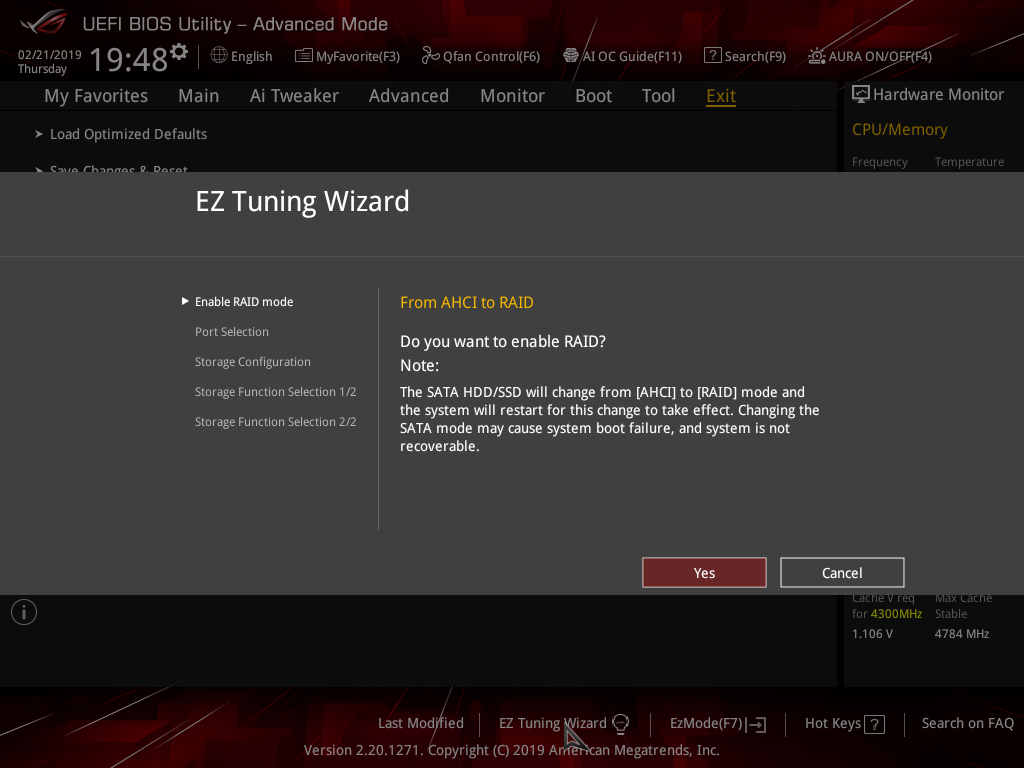
The EZ Tuning Wizard has been relegated to just being for RAID setup and configuration, like on the H370 platform where overclocking isn’t supported. This used to be the “automated overclocking” utility until ASUS replaced it with the “AI Overclocking” guide.
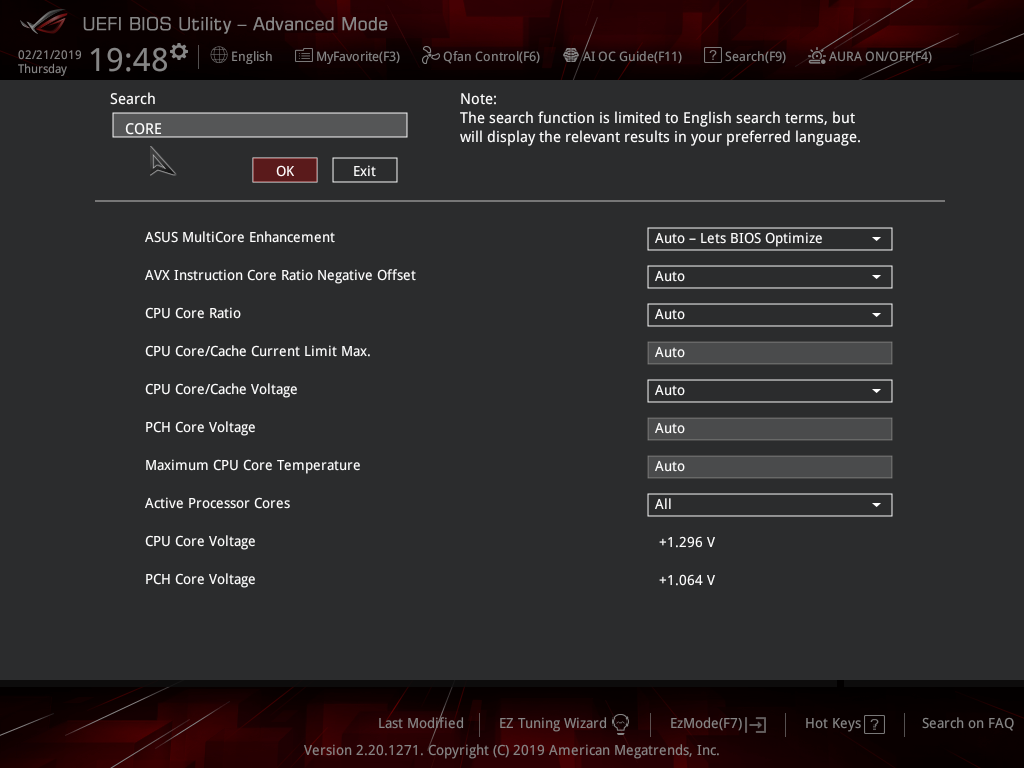
The search function allows a text string to be searched against all the UEFI parameters. It isn’t a smart search so doesn’t have an auto-fill function and will not find similar items to your search string i.e. M.2 when M2 is searched.
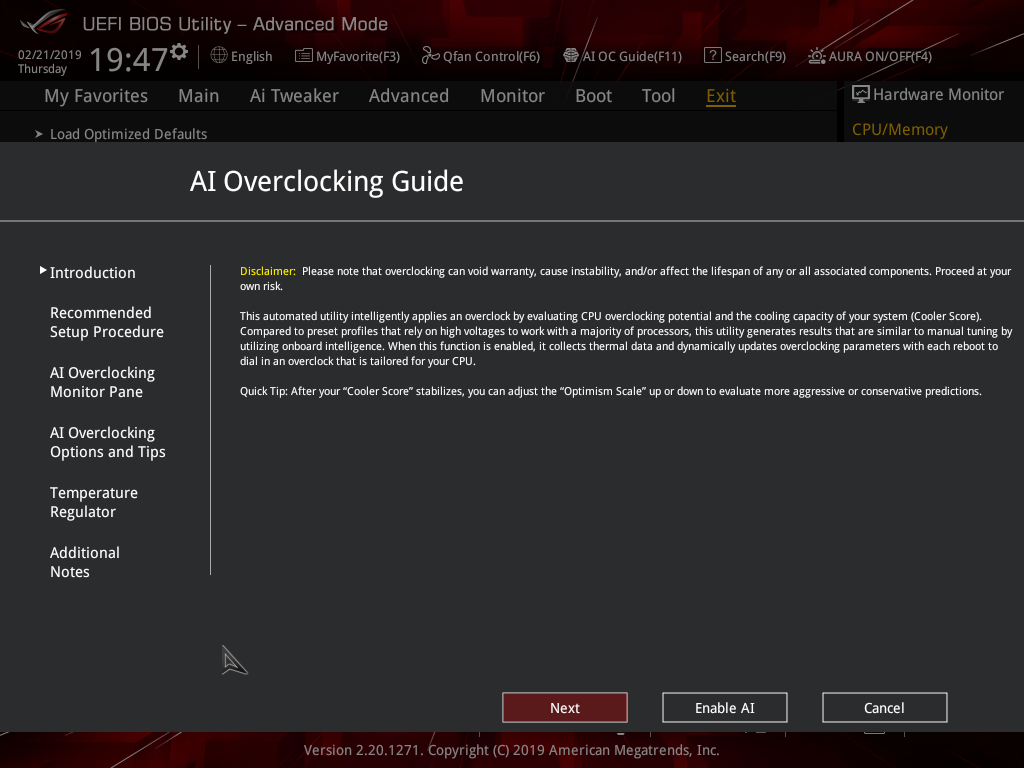
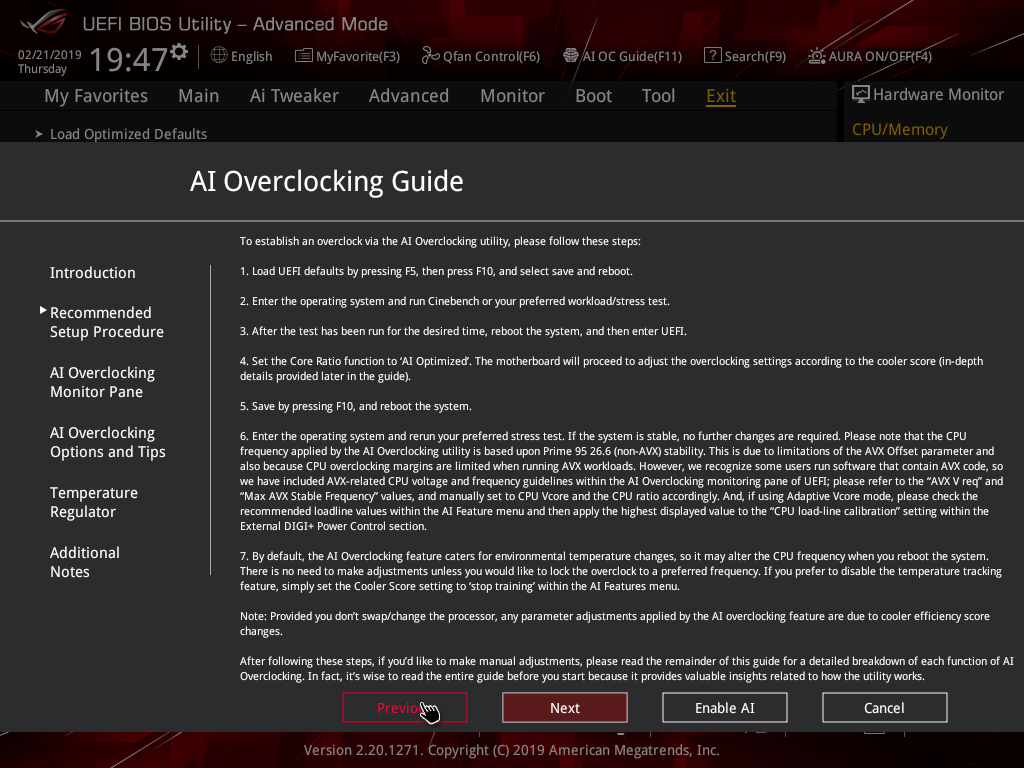
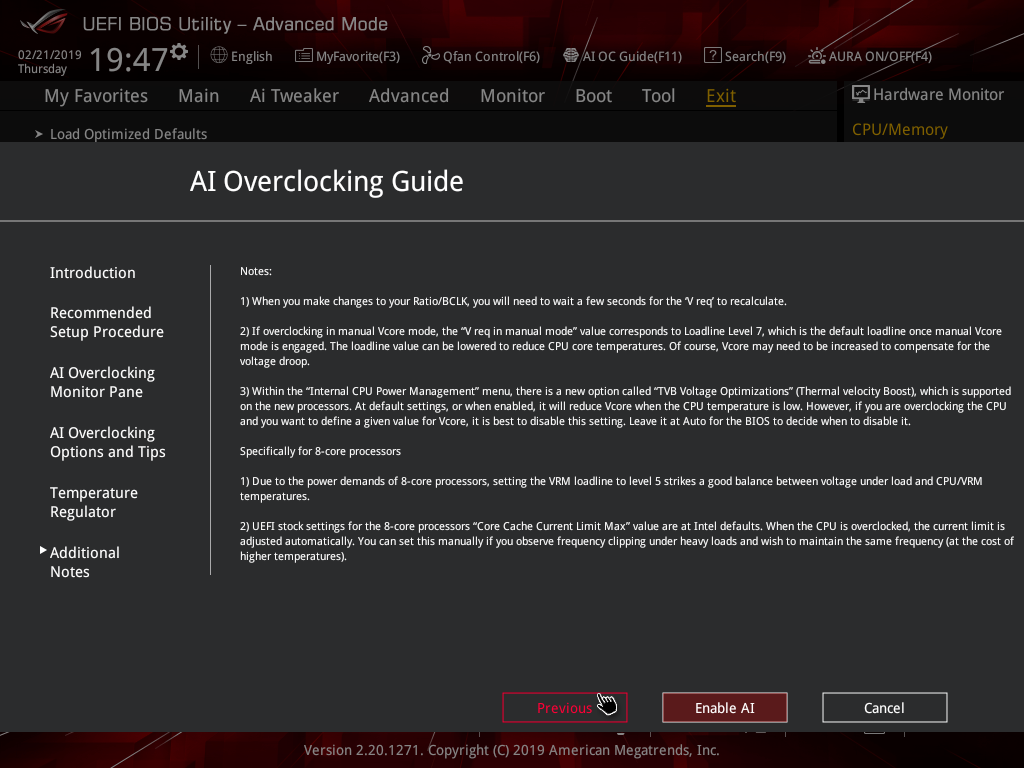
The ASUS AI Overclocking replaces the previous EZ Tuning Wizard for automated overclocking, and also takes its F11 hotkey in the UEFI environment. This is an improved version of EZ Tuning Wizard that takes into account thermal data, i.e. the effectiveness of the CPU cooler, when overclocking.
ASUS claims they have developed a “proprietary algorithm” which tests the quality of the CPU and mixes that with the capability of the CPU cooler to give a better result. When we enabled this using “100” optimism after calibrating our CPU cooler we got a 166 points score for the CPU cooler, with a “4.8GHz” turbo mode for non-AVX workloads and 4.6GHz with AVX and 4.65GHz cache. The light load result was 5GHz while the heavy load result was 4.8GHz, all using 1.204~1.257v (non-AVX/AVX) for the CPU and 1.1v for the Cache.
Changing optimism to the max, 150, scored us a result of 5.5GHz non-AVX, 5.4GHz AVX, 5.4GHz cache and 5.5/5.5 GHz light/heavy with 1.436~1.438v (non-AVX/AVX) and 1.041v (cache). (un)surprisingly enough, this didn’t boot!
In most cases the result will be “improved” over the peculiar results EZ Tuning Wizard used to deliver – with painfully high voltages for relatively low clocks – but taking the time to tune the overclock yourself based on some research for your circumstances would still be the better way.
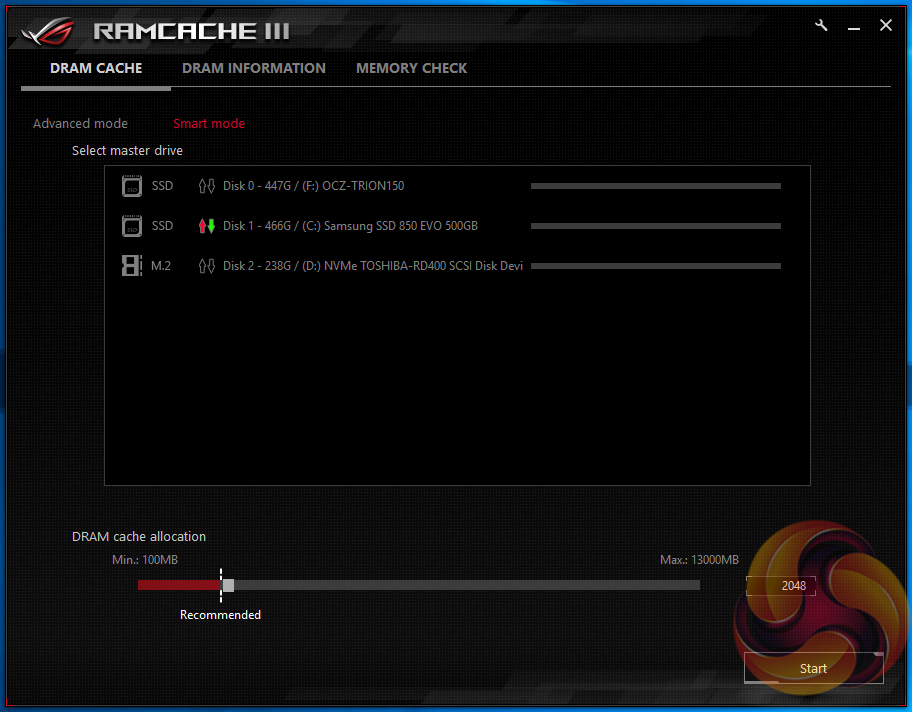
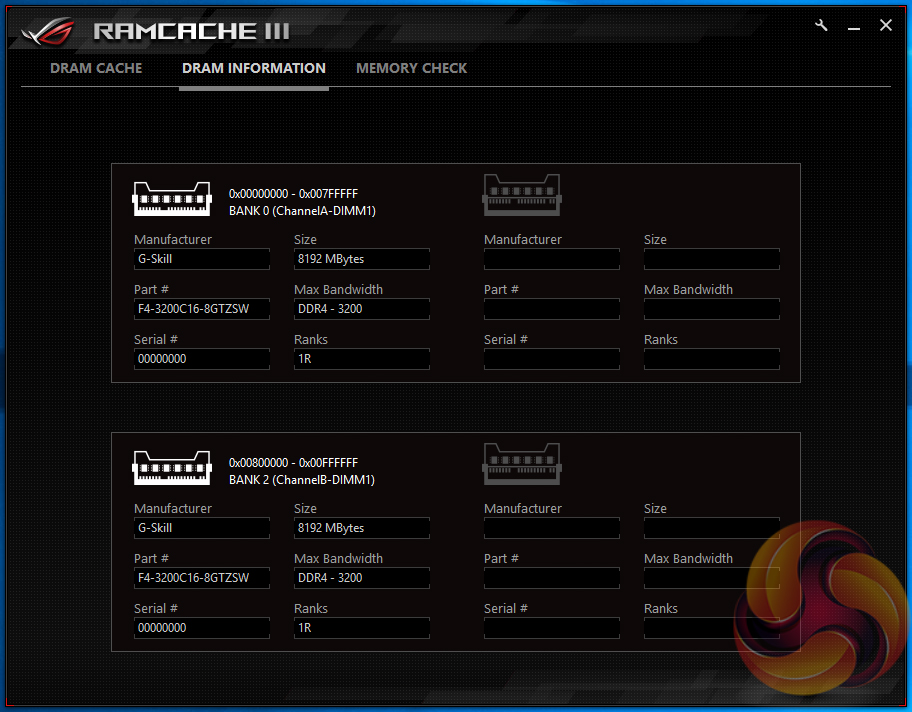
ROG RamCache III has also moved on to a new generation with Z390, up from version II prior. Not much appears to have changed aside from the addition of a memory testing application and a different graphical user interface. The ROG RAMCache III software aims to help with program loading and file transfers of regularly accessed data.
Users simply need to set aside the amount of RAM they would like for caching and the RAM Cache III software handles everything else behind the scenes when in Smart mode. There is an advanced mode that gives some additional parameters for user-control of the software’s behaviour if smart mode doesn’t suffice.
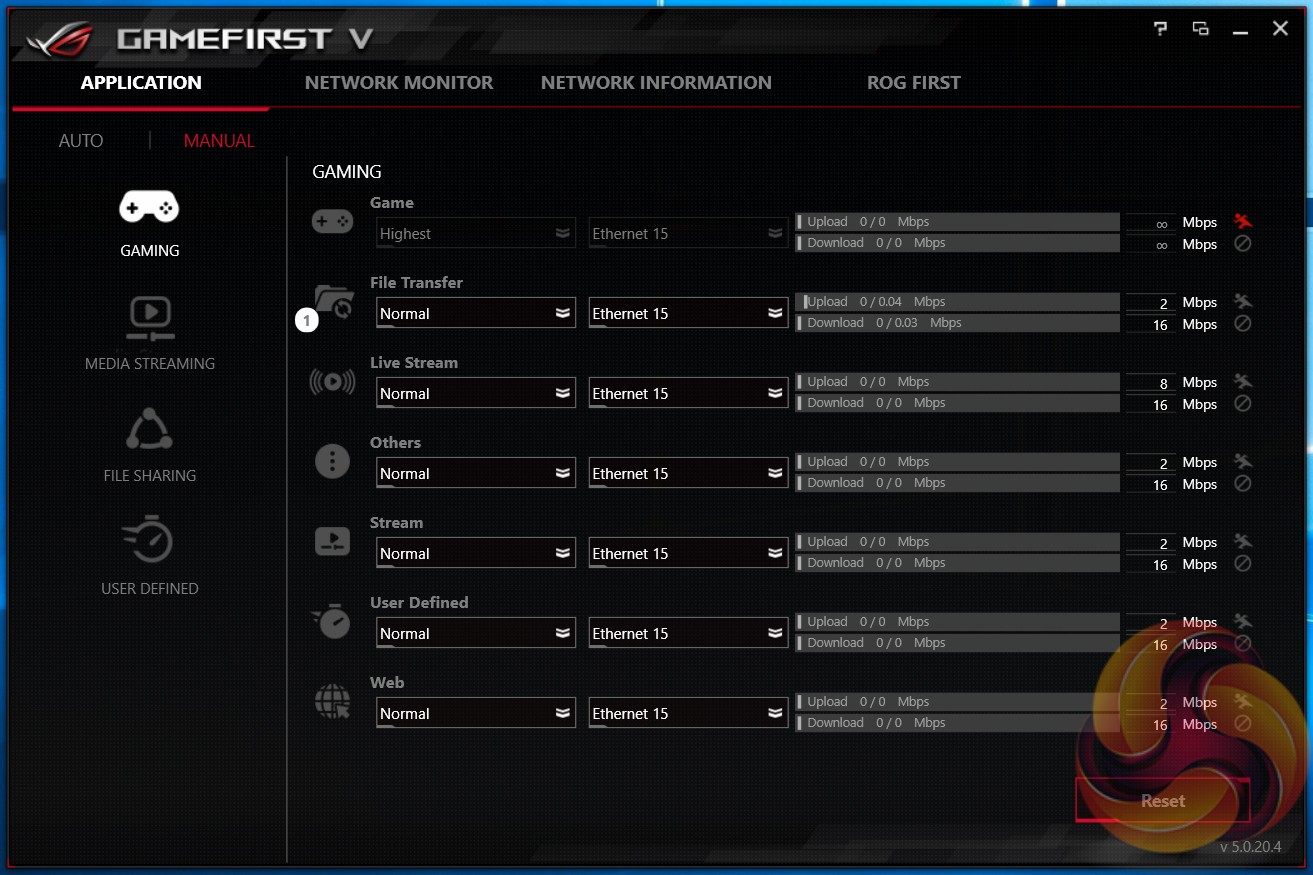
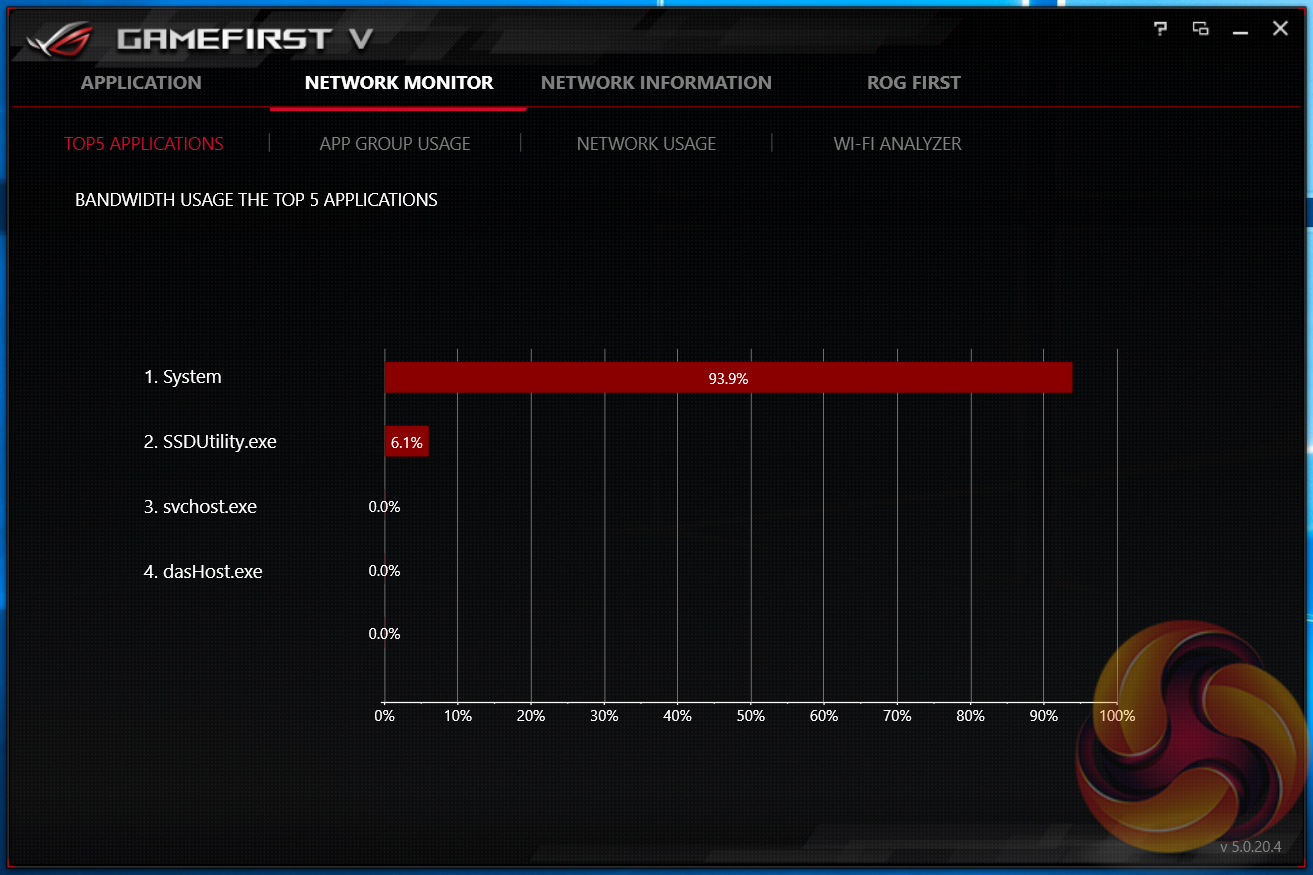
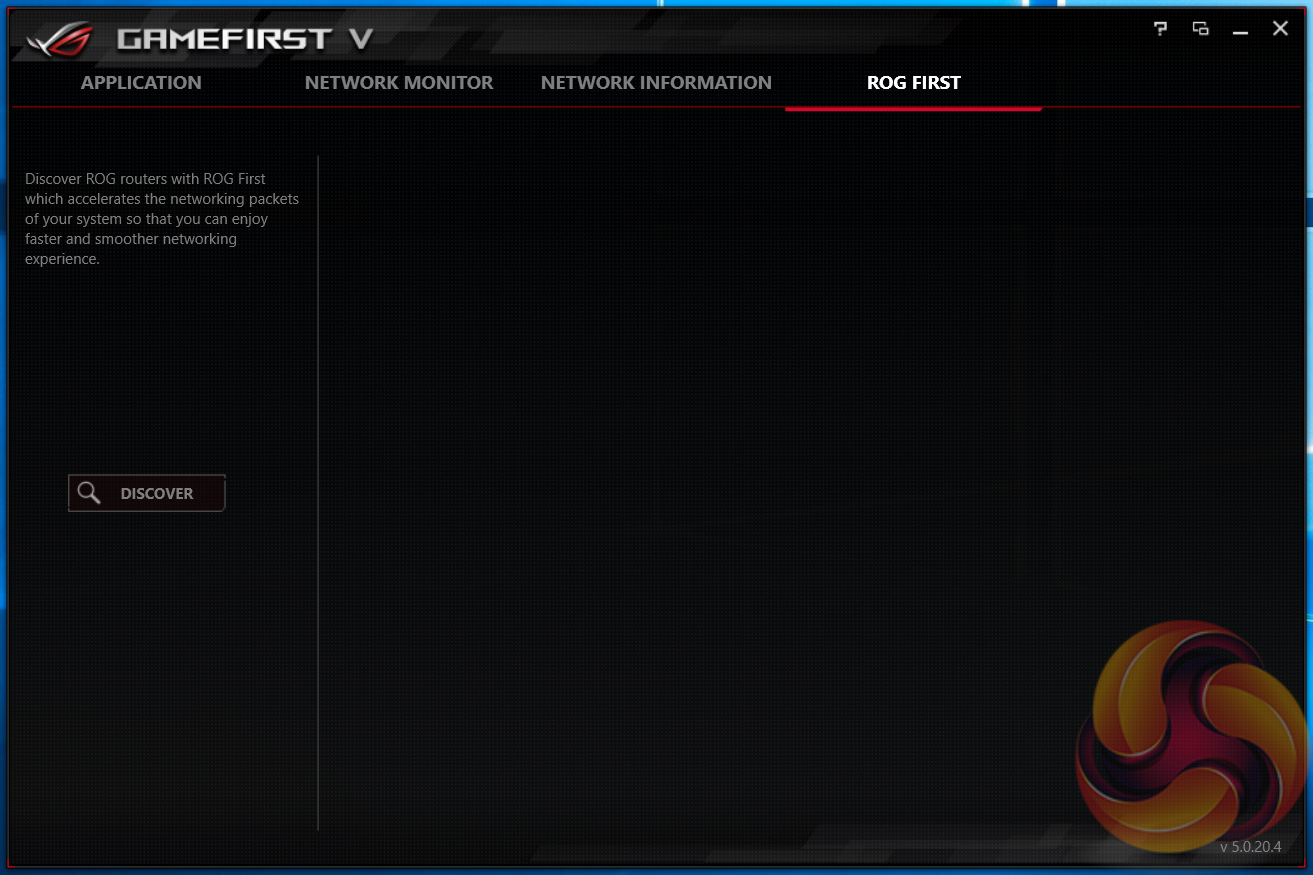
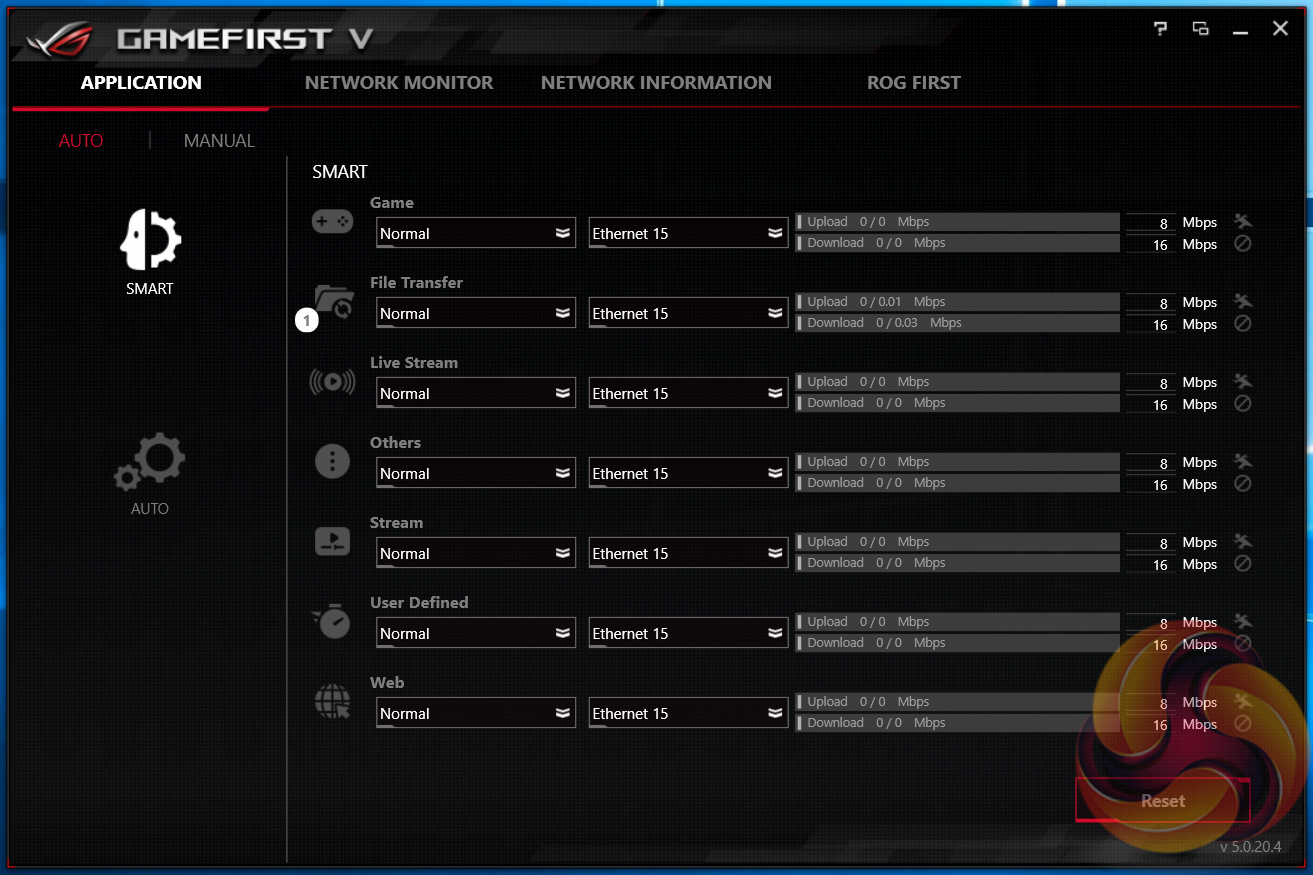
GameFirst V is the latest iteration of the ASUS network management software, launched alongside Z390. It’s functionality hasn’t changed a great deal since iteration 4 – it’s still packet prioritisation and traffic shaping software. It supports Multi-Gate teaming which allows the WiFi and wired connections to be used at the same time, and to prioritise different applications to use each for different things. It sounds novel but most people are hampered by the speed of their internet connection before the way their PC manages network traffic.
This is how ASUS describe the latest iteration: “GameFirst V is the ROG-exclusive tool that optimizes network traffic for faster, lag-free online gaming. Team your gateways, keeps tabs on bandwidth-hogging apps and make adjustments on the fly.”
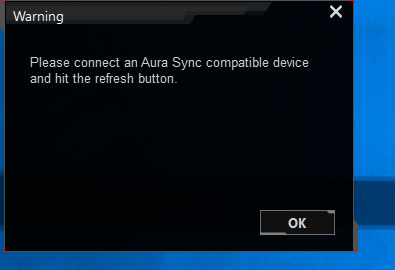

The ASUS AURA RGB software provided on the product page just didn’t work during our testing, we tried all versions available on the ASUS product page (1.06.91, 1.07.35, 1.07.36), the version on the ASUS utility DVD and tried each of those in combination with all the UEFI versions available on the product page. The error message we recorded each time was “Warning, Please connect an Aura Sync compatible device and hit the refresh button.” – clicking the refresh button made no difference.
We experienced a similar problem with the ASUS ROG Strix Z390-E Gaming but found that rolling back to version 1.06.17 fixed it. In the case of the ASUS ROG Strix Z390-I Gaming, version 1.06.17 didn't work either. During our testing we were not able to get the Windows ASUS AURA software working at all, even after using a new blank copy of Windows 10 1809.
While ASUS UK remains confident there are no issues with the compatibility of the AURA software, our testing continues to turn up issues. Given we've not been able to get to the root cause of the issue, it's difficult to know how widespread the issue is, or whether it's isolated to some configuration quirk of the KitGuru test bench.
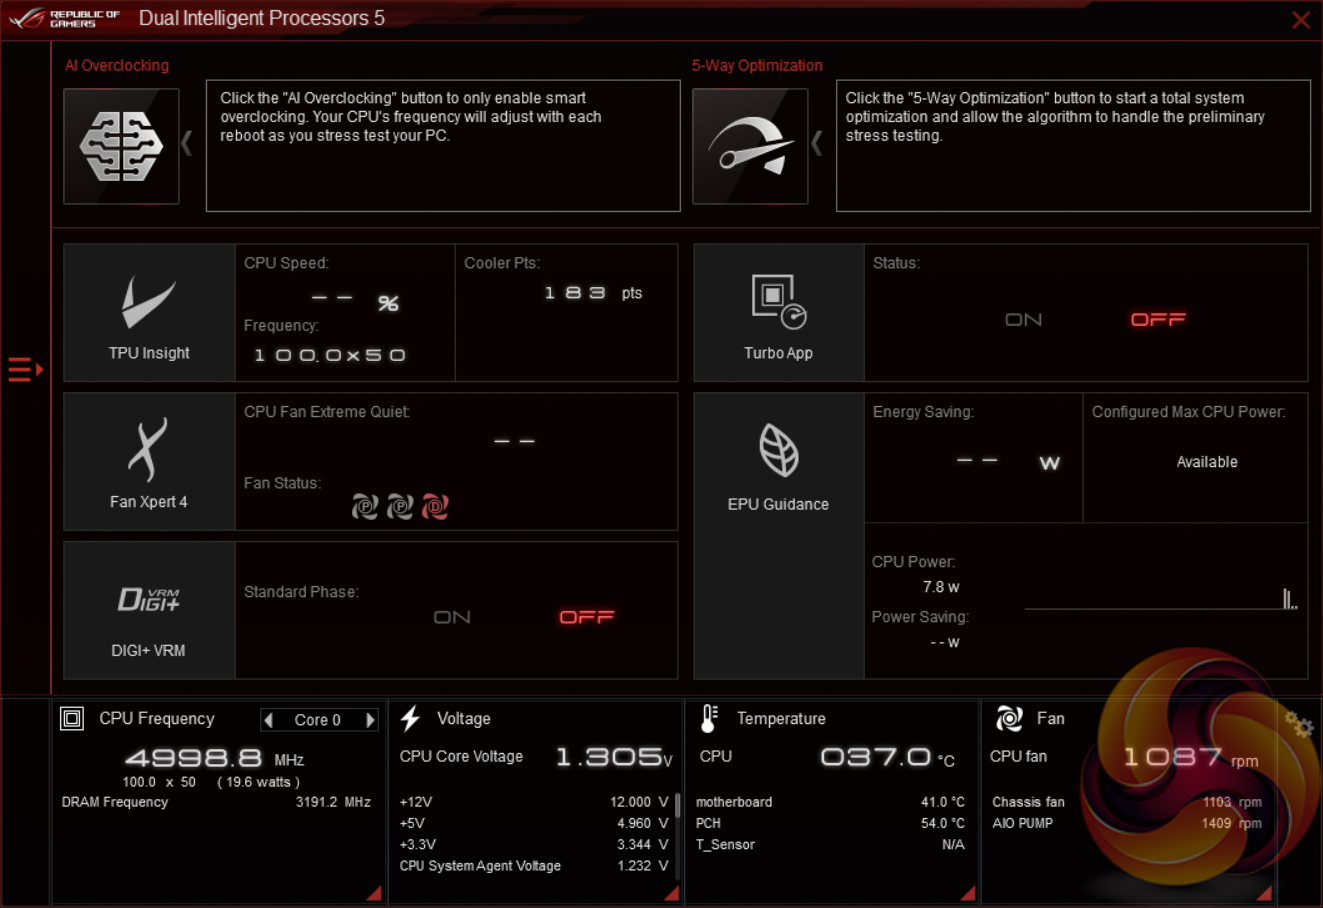
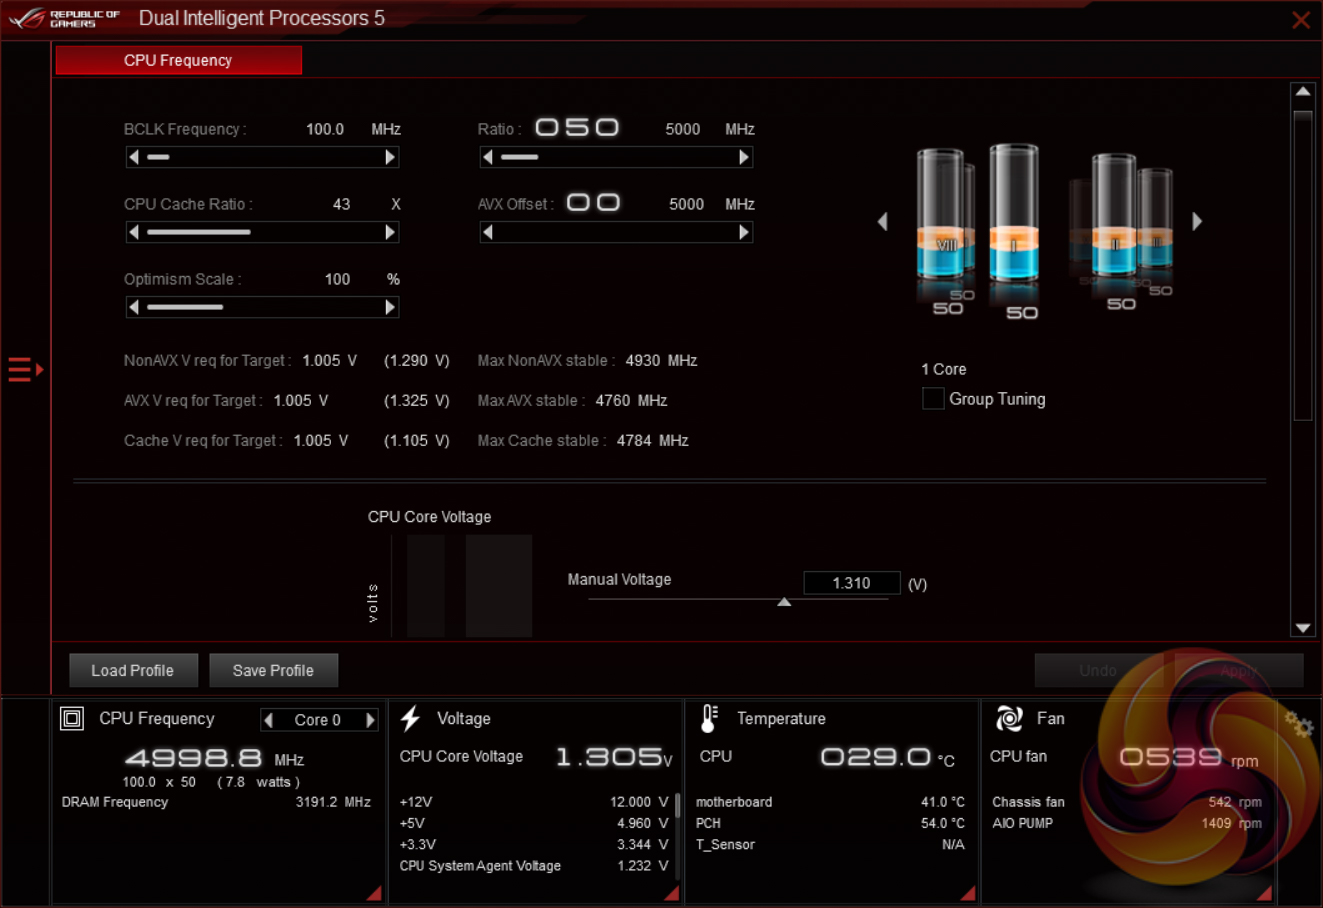
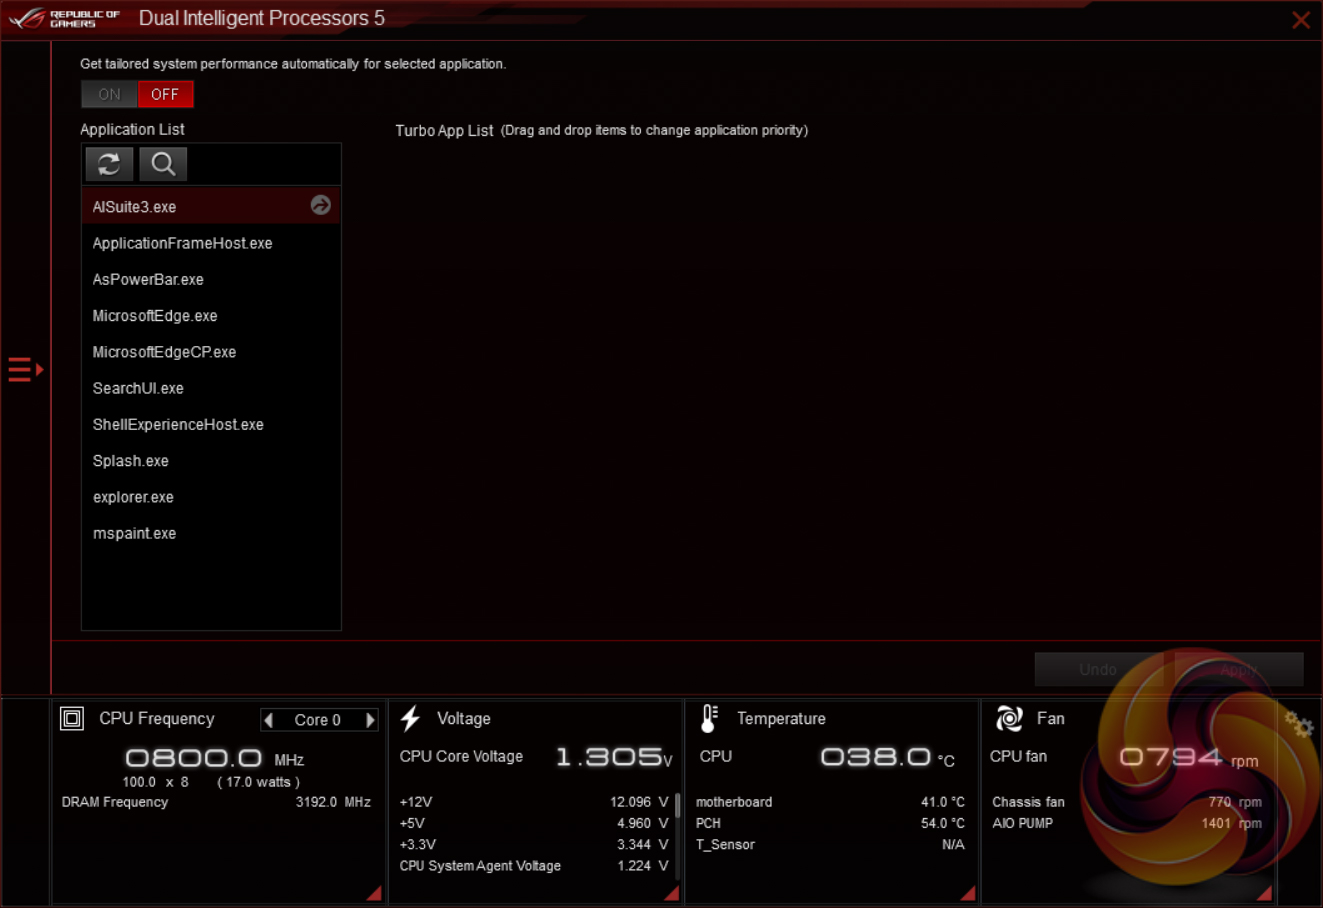
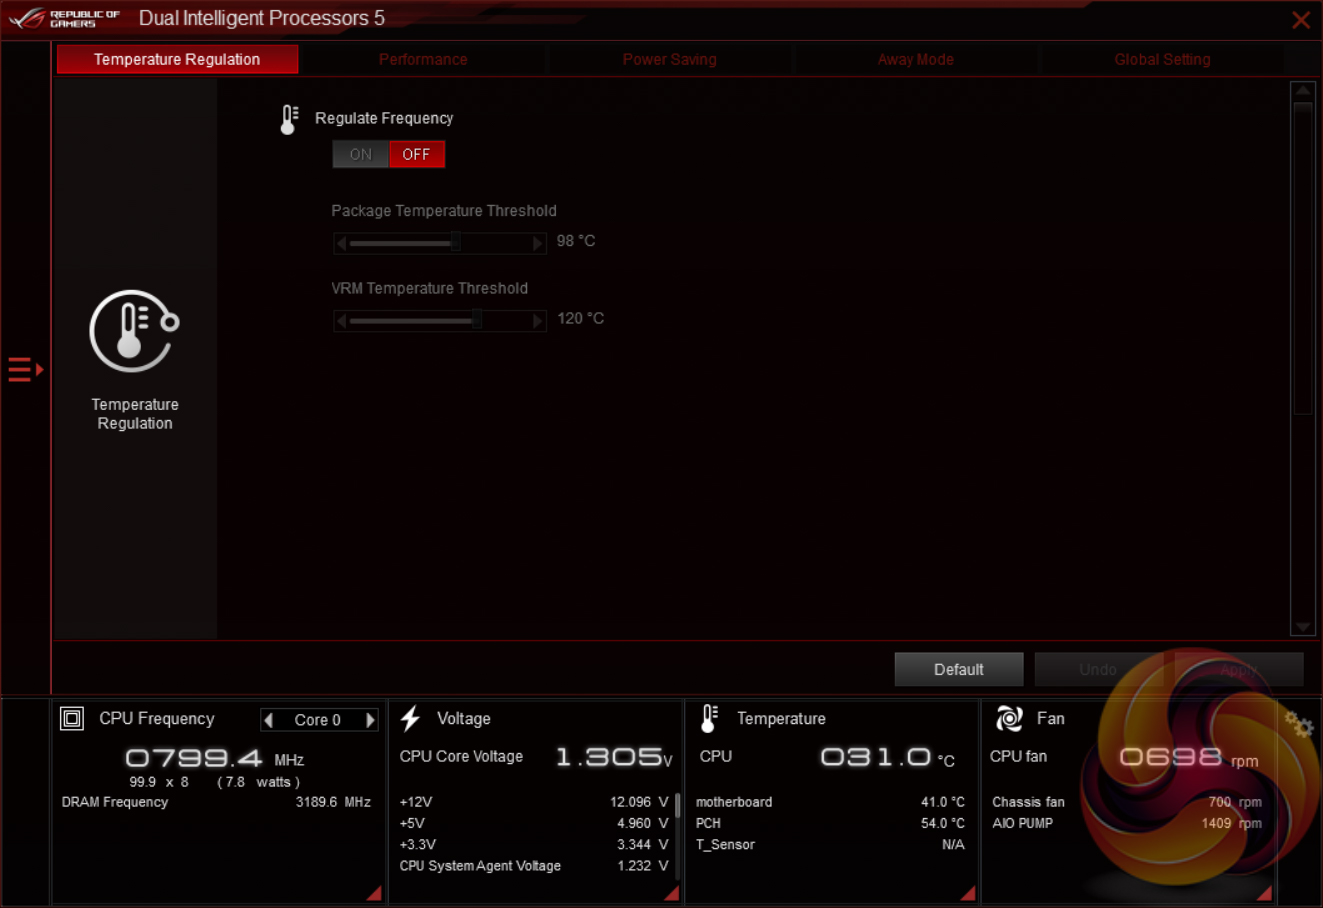
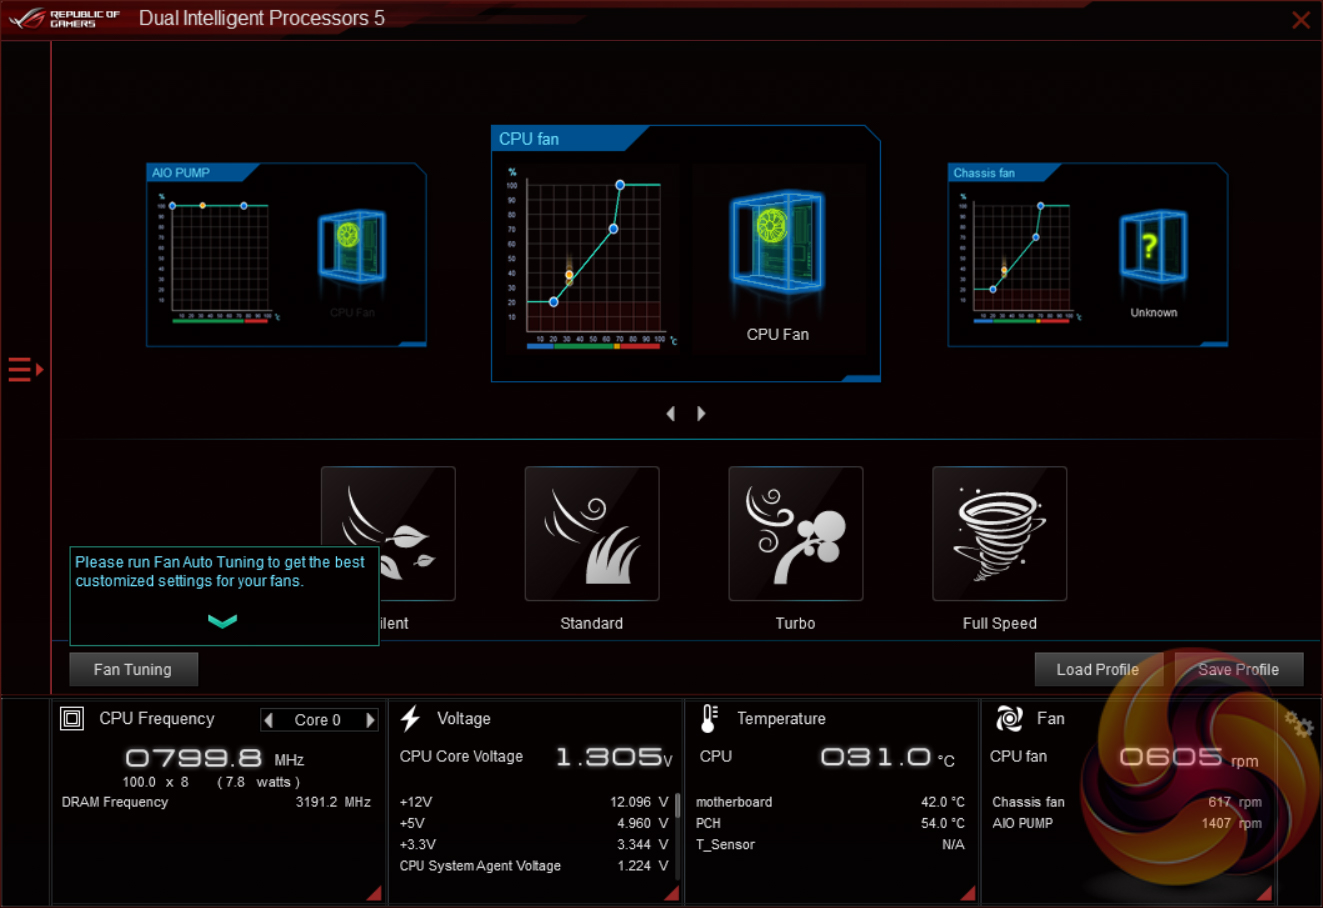
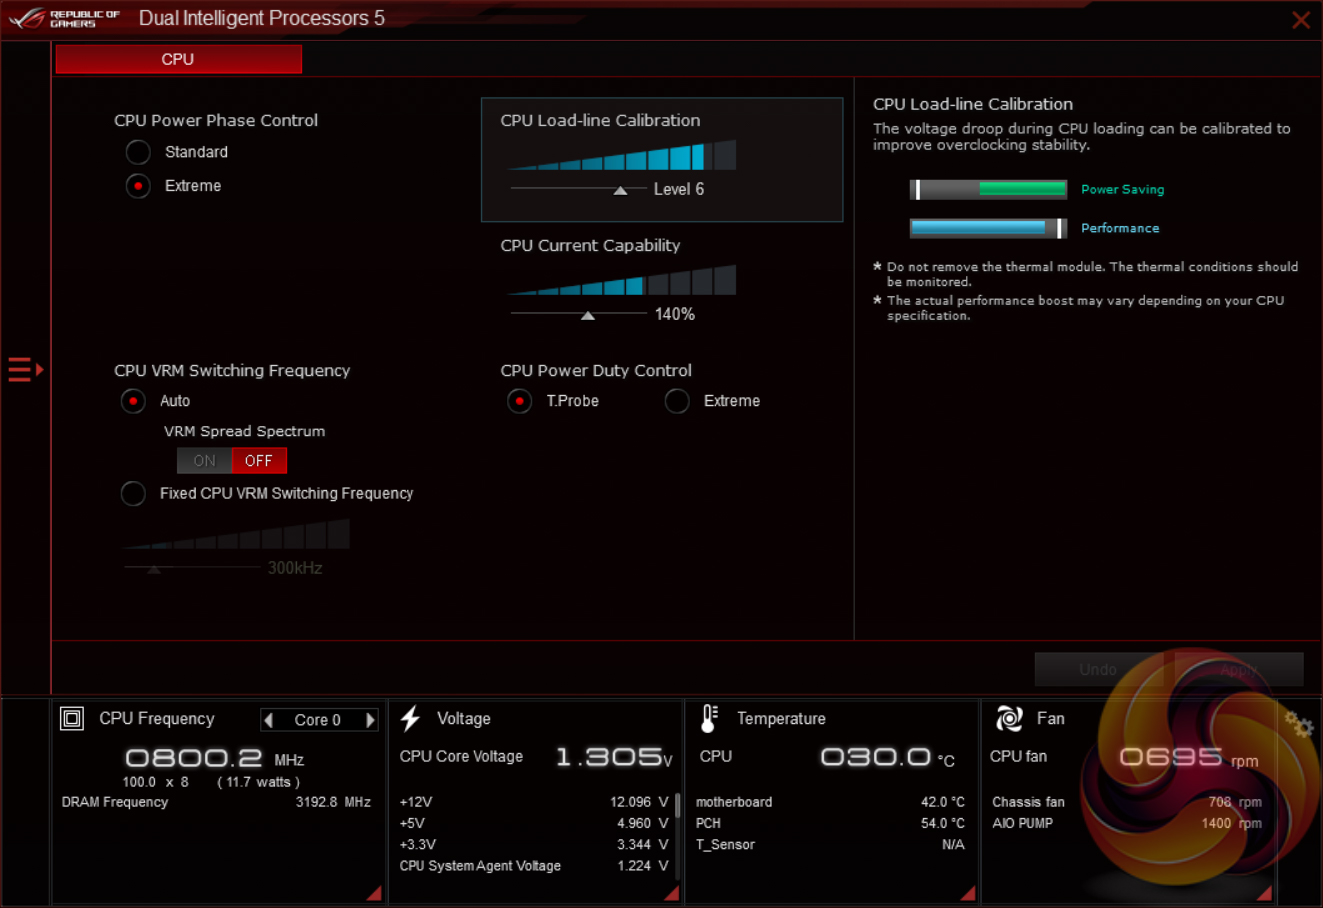
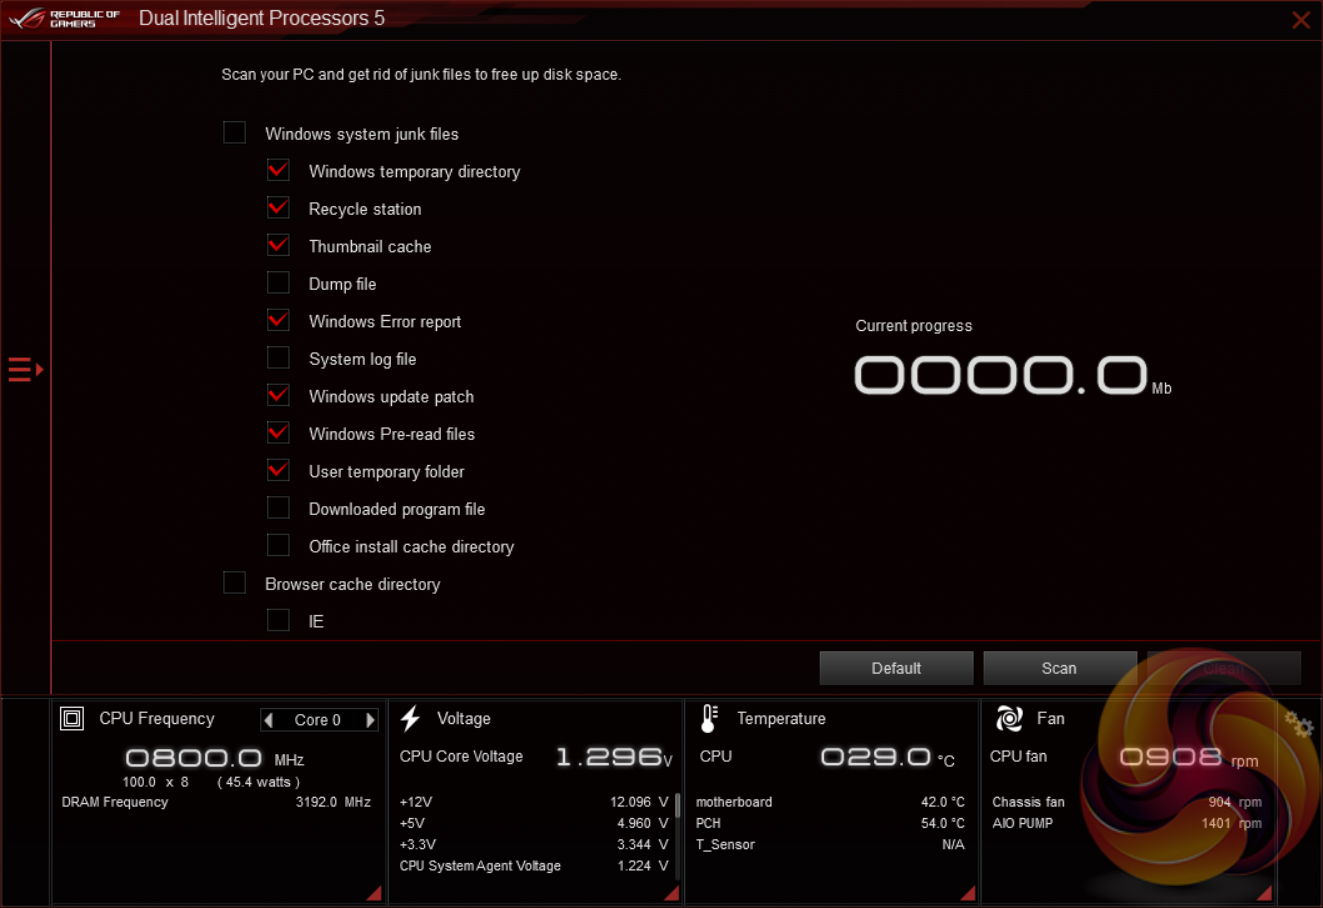
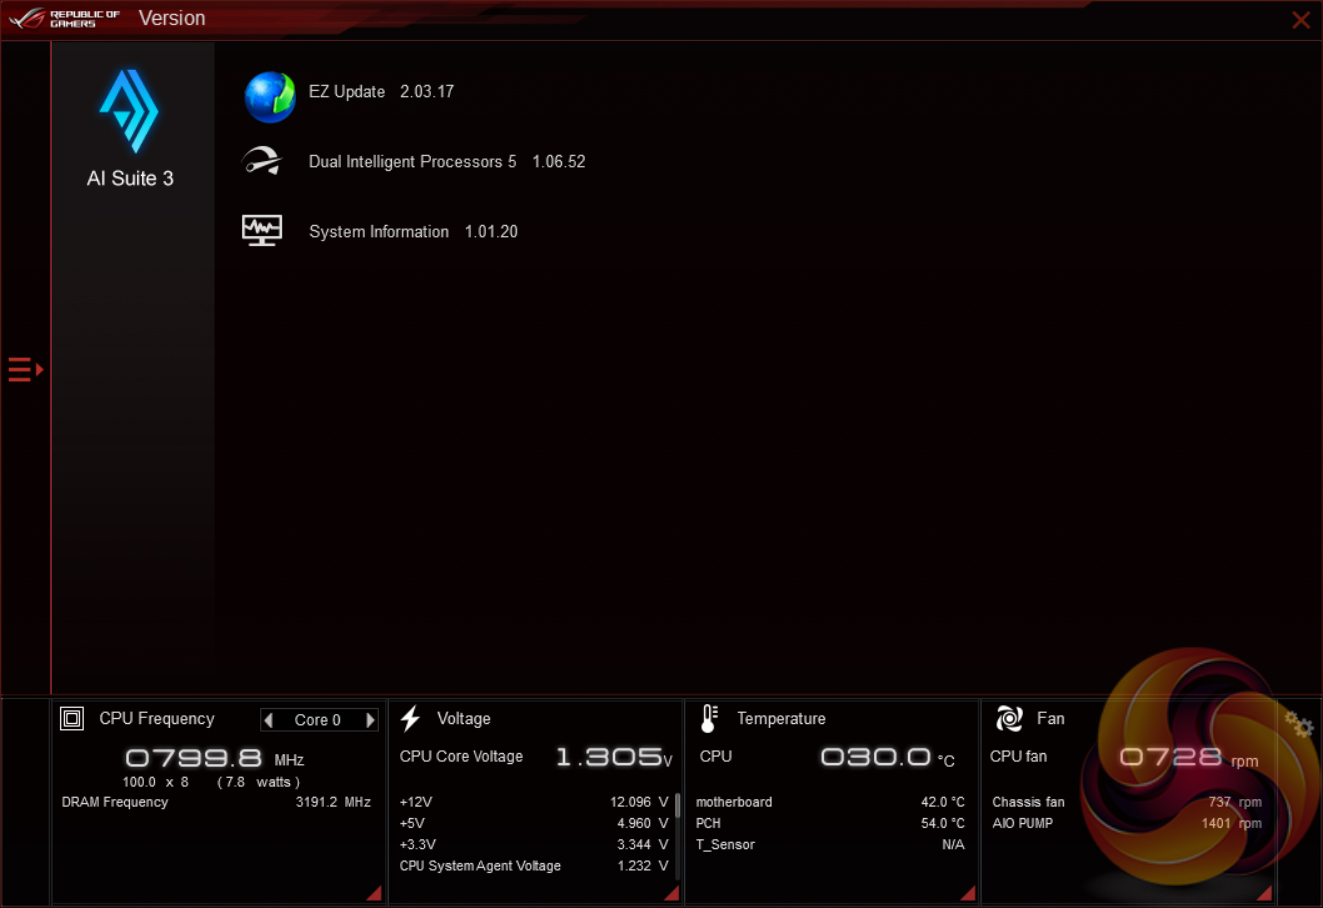
The main software utility for the ASUS motherboard range is the multi-function AI Suite III or Dual Intelligent Processors 5. It contains within it a significant number of utilities including the EPU and TPU, the Turbo App for core and application-specific turbo behaviour, Fan Xpert 4, on-the-fly overclocking support, a cleaning utility and an ASUS software updating tool.
Users seeking to download the software from the ASUS website might notice that not every downloadable version includes all the relevant utilities, you may need to download several recent files marked AI Suite III to ensure you get all the individual utilities. Alternatively, the version on the disc can be used to get all the base utilities and then these can be updated from within the application.
The functionality of the new ASUS automated overclocking utility is also built into this ASUS application, for those with a desire to make use of it.
We will be outlining the ASUS ROG Strix Z390-I Gaming motherboard's performance with the Intel Core i9 9900K CPU, 16GB* of 3,200MHz G.Skill Trident Z DDR4 memory and a Gigabyte GTX 1080 G1 Gaming.
*16GB for mini-ITX motherboards, 32GB for all other motherboards.
Z390 Motherboard Test System:
- Processor: Intel Core i9 9900K with Default Intel Turbo Behaviour where supported (varies depending on thermal and power conditions)
- Memory: 32GB (4x8GB*) G.Skill Trident Z XMP/DOCP/AMP (3,200MHz** 16-18-18-38 @ 1.35V), *2x8GB for mini-ITX motherboards
- Graphics Card: Gigabyte GeForce GTX 1080 G1 Gaming.
- System Drive: Samsung 850 EVO 500GB SSD
- CPU Cooler: Corsair H100i V2 with Two ML120 Pro Fans.
- Power Supply: Seasonic Platinum 760W SS-760XP.
- Operating System: Windows 10 Pro 64-bit
Comparison Z390 Motherboards:
- ASRock Z390 Phantom Gaming 9
- ASUS ROG Strix Z390-E Gaming
- ASUS ROG Strix Z390-I Gaming
- Supermicro SuperO C9Z390-CG-IW
Drivers and UEFI:
- Intel 10.1.17695.8086 chipset drivers
- Nvidia GeForce 416.34 VGA drivers
- ASUS UEFI 2012 (18th January 2019)
Tests:
- Cinebench R15 – All-core CPU benchmark (CPU)
- SiSoft Sandra 2018.9.28.28 – Processor Arithmetic Test (CPU) and Memory Bandwidth Test (Memory)
- 7-Zip 18.05 x64 – Built-in 7-Zip benchmark test (CPU)
- AIDA64 Engineer 5.98.4800 – System cache & memory benchmark and stress test (Memory and Power Consumption)
- 3DMark v2.5.5029 64 & TimeSpy v1.1 – Time Spy (1440p) test (Gaming)
- Ashes of the Singularity: Escalation – Built-in benchmark tool CPU-Focused test, 1920 x 1080, Extreme quality preset, DX12 mode (Gaming)
- Deus Ex: Mankind Divided – Built-in benchmark tool, 1920 x 1080, Ultra quality preset, DX12 mode (Gaming)
- ATTO 3.05 – M.2, USB 3.0, USB 3.1, and SATA 6Gbps transfer rates (Motherboard)
- Rightmark Audio Analyzer 6.4.5 – Record and playback test using a line-in to line-out loopback with a 3.5mm audio cable (Motherboard)
- HWiNFO 5.91.3560 – System sensor monitoring during stress test (Power Consumption)
- Cybenetics Powenetics v2.2.0.0 – 12v EPS monitoring during stress test (Power Consumption)
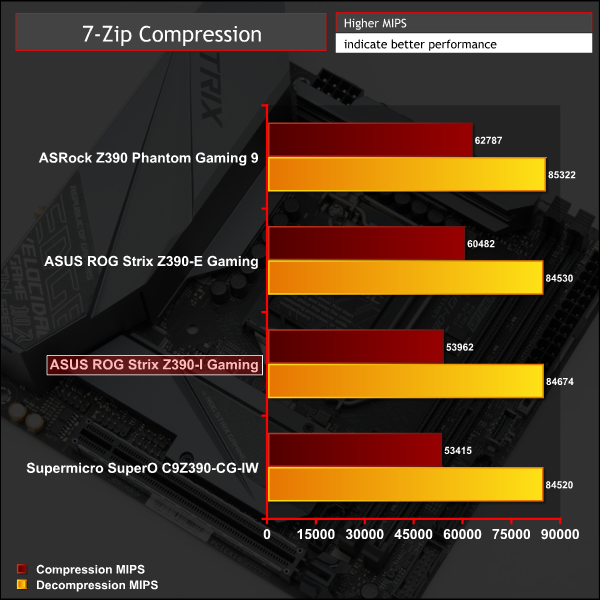
7-Zip
7-Zip is an open source Windows utility for manipulating archives. We measure the Total Rating performance using the built-in benchmark tool. The test stresses all CPU cores to 100% and shows an affinity for memory bandwidth.
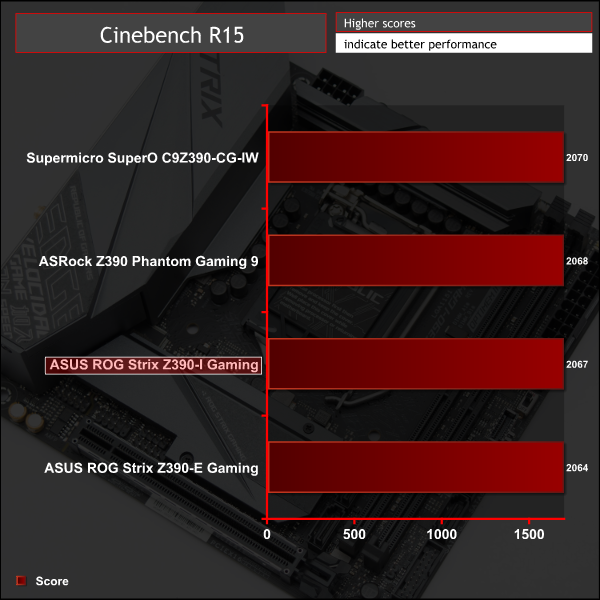
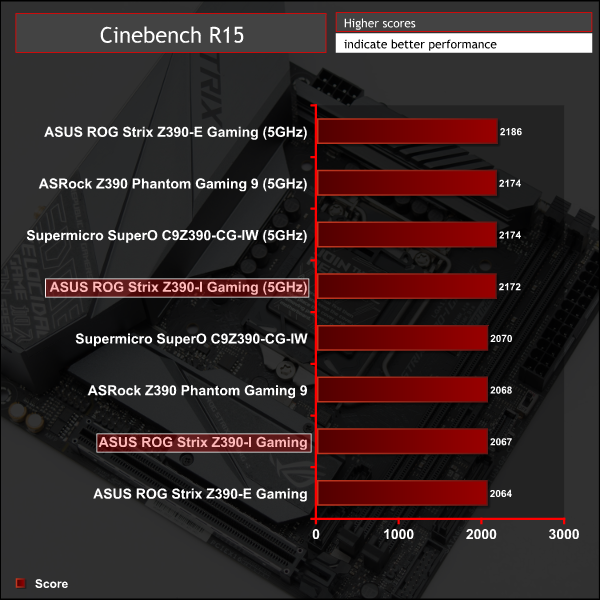
Cinebench R15
Cinebench is an application which renders a photorealistic 3D scene to benchmark a computer’s rendering performance, on one CPU core, all CPU cores or using the GPU. We run the test using the all core CPU mode.
Sandra Processor Arithmetic
SiSoft Sandra 2018 is a multi-function utility program that supports remote analysis, benchmarking and diagnostic features for PCs, servers, mobile devices and networks. We run the application’s processor arithmetic test to gauge the CPU performance on each tested motherboard.
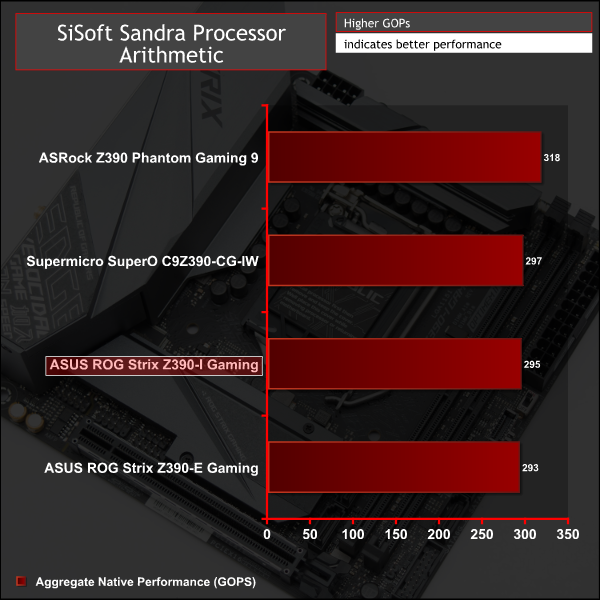
CPU performance is as expected for the ASUS mini-ITX board and reflects the fact we test with Intel stock turbo limits, where this option is available. The fact there are only two memory modules available has some impact on the 7Zip test where both mini-ITX motherboards score slightly lower in the compression test.
For a rough guide of how CPU performance compares to other platforms please see our most recent reviews for the following platforms:
B450/X470 (Ryzen 7 2700)
Z370 (Intel Core i7 8700K)
X299 (Intel Core i9 7900X)
Please note software and driver versions have changed hence why we caution that results are not directly comparable.
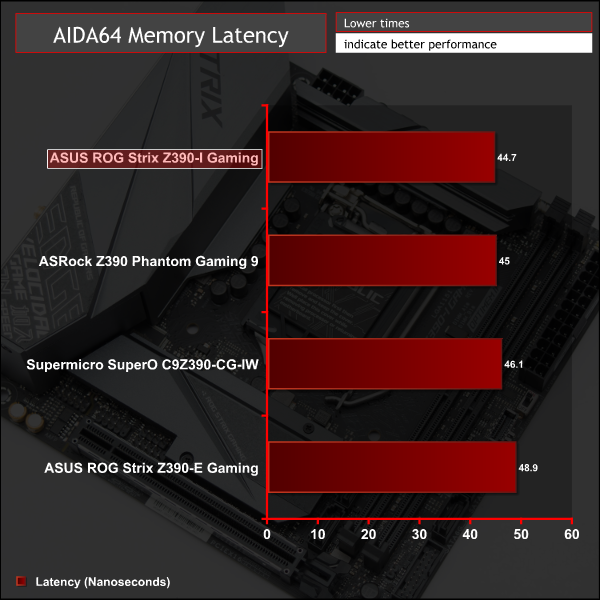
AIDA64 Engineer
AIDA64 Engineer is a multi-featured software suite for diagnostics, stress testing, benchmarking, software auditing and various other measurement parameters. We use AIDA64 Engineer to benchmark memory throughput and latency.
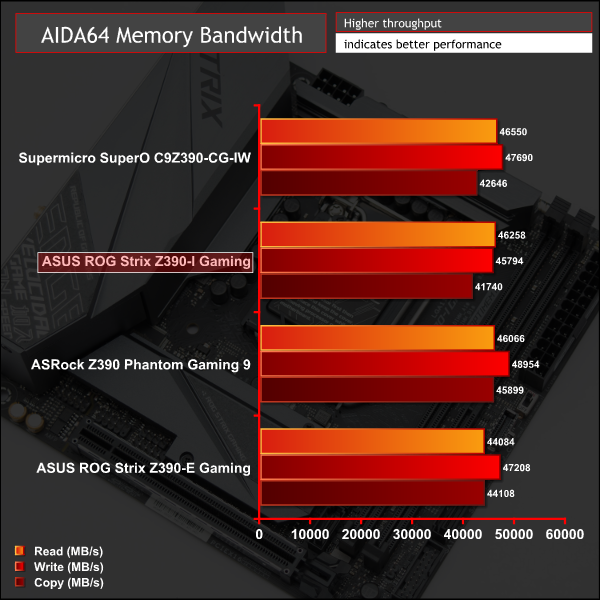
Sandra Memory Bandwidth
SiSoft Sandra 2018 is a multi-function utility program that supports remote analysis, benchmarking and diagnostic features for PCs, servers, mobile devices and networks. We use the SiSoft Sandra memory bandwidth test to provide a set of memory bandwidth results.
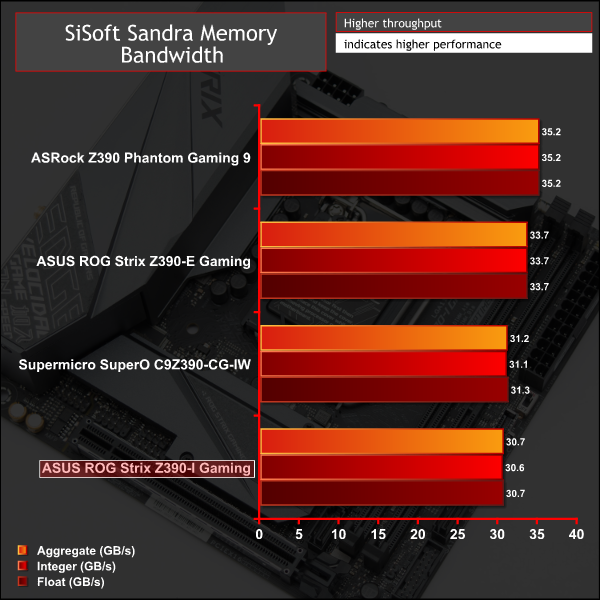
Memory performance was a little bit lower than some ATX motherboards we've tested, but again the fact mini-ITX motherboards are limited to two modules rather than four probably explains most of the variance.
For a rough guide of how memory performance compares to other platforms please see our most recent reviews for the following platforms:
B450/X470 (Ryzen 7 2700)
Z370 (Intel Core i7 8700K)
X299 (Intel Core i9 7900X)
Please note software and driver versions have changed hence why we caution that results are not directly comparable.
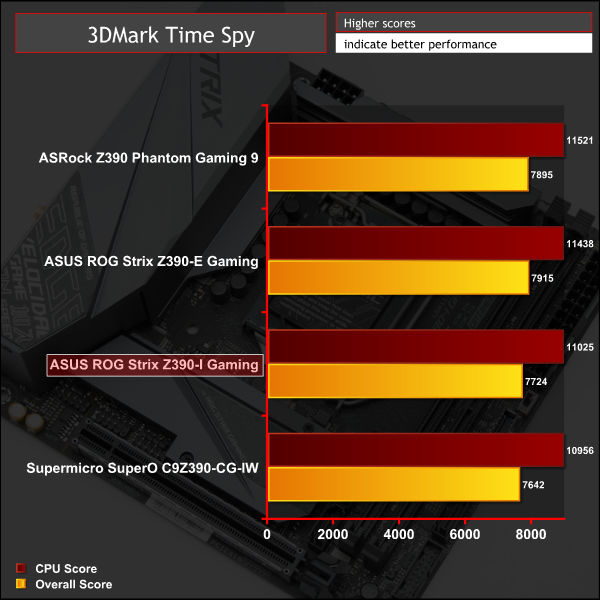
3DMark
3DMark is a multi-platform hardware benchmark designed to test varying resolutions and detail levels of 3D gaming performance. We run the Windows platform test and in particular the Time Spy benchmark, which is indicative of high-end 1440p PC Gaming.
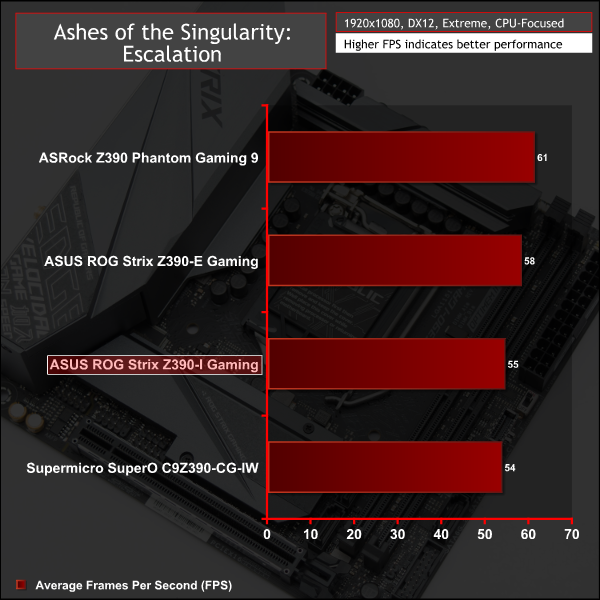
Ashes of the Singularity: Escalation
Ashes of the Singularity: Escalation is a Sci-Fi real-time strategy game built for the PC platform. The game includes a built-in benchmark tool and was one of the first available DirectX 12 benchmarks. We run the CPU-focused benchmark using DirectX 12, a 1080p resolution and the Extreme quality preset.
Deus Ex: Mankind Divided
Deus Ex: Mankind Divided is an action role-playing stealth video game released in August 2016. A built-in benchmark utility is included and we test using the Ultra quality preset and the DirectX 12 API at a 1080p resolution.
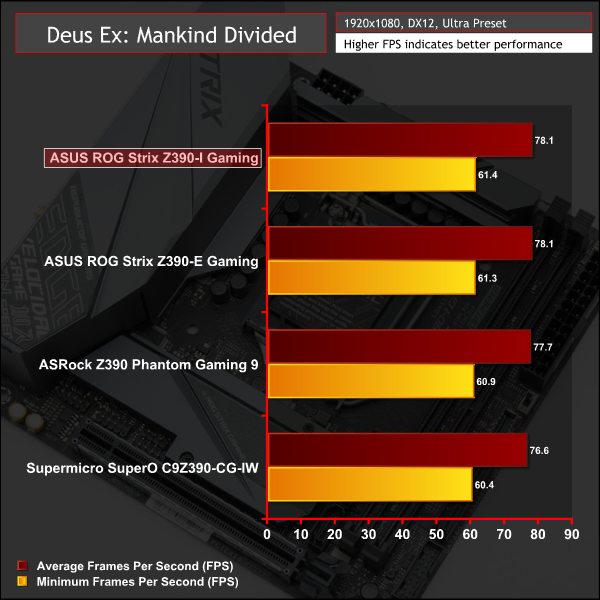
GPU and gaming performance was standard fare for a mini-ITX motherboard.
For a rough guide of how gaming performance compares to other platforms please see our most recent reviews for the following platforms:
B450/X470 (Ryzen 7 2700)
Z370 (Intel Core i7 8700K)
X299 (Intel Core i9 7900X)
Please note software and driver versions have changed hence why we caution that results are not directly comparable.
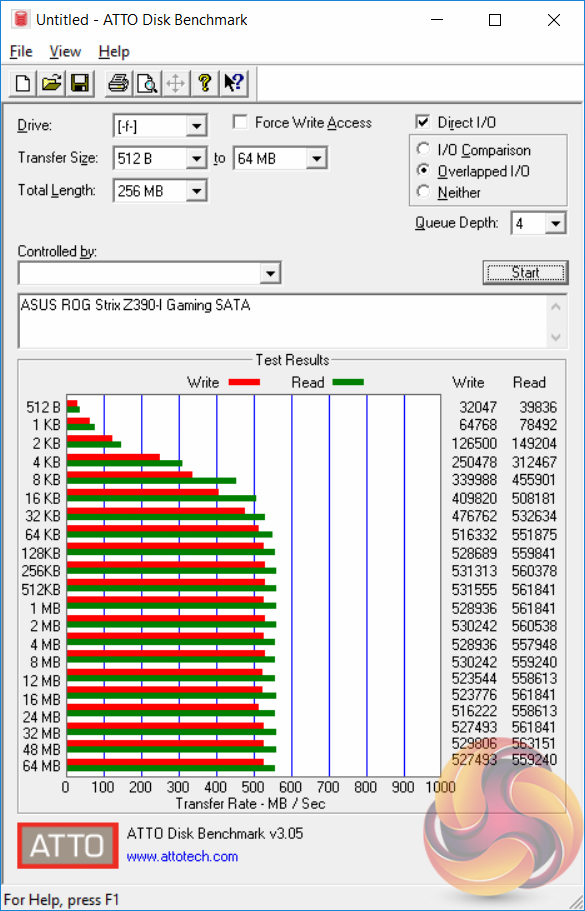
ATTO Disk Benchmark
The ATTO disk benchmark is a Windows-based utility for testing storage performance of any storage drive or controller. We use the default benchmark setup.
M.2 PCIe Performance
For M.2 testing we use a Toshiba OCZ RD400 256GB M.2 PCIe NVMe SSD.
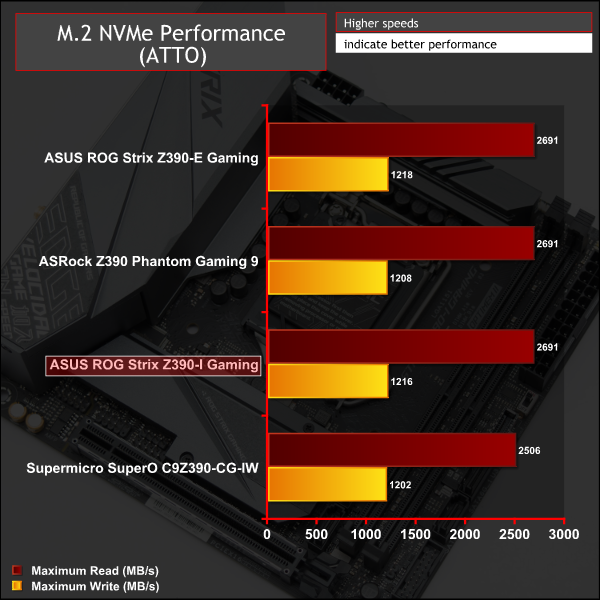
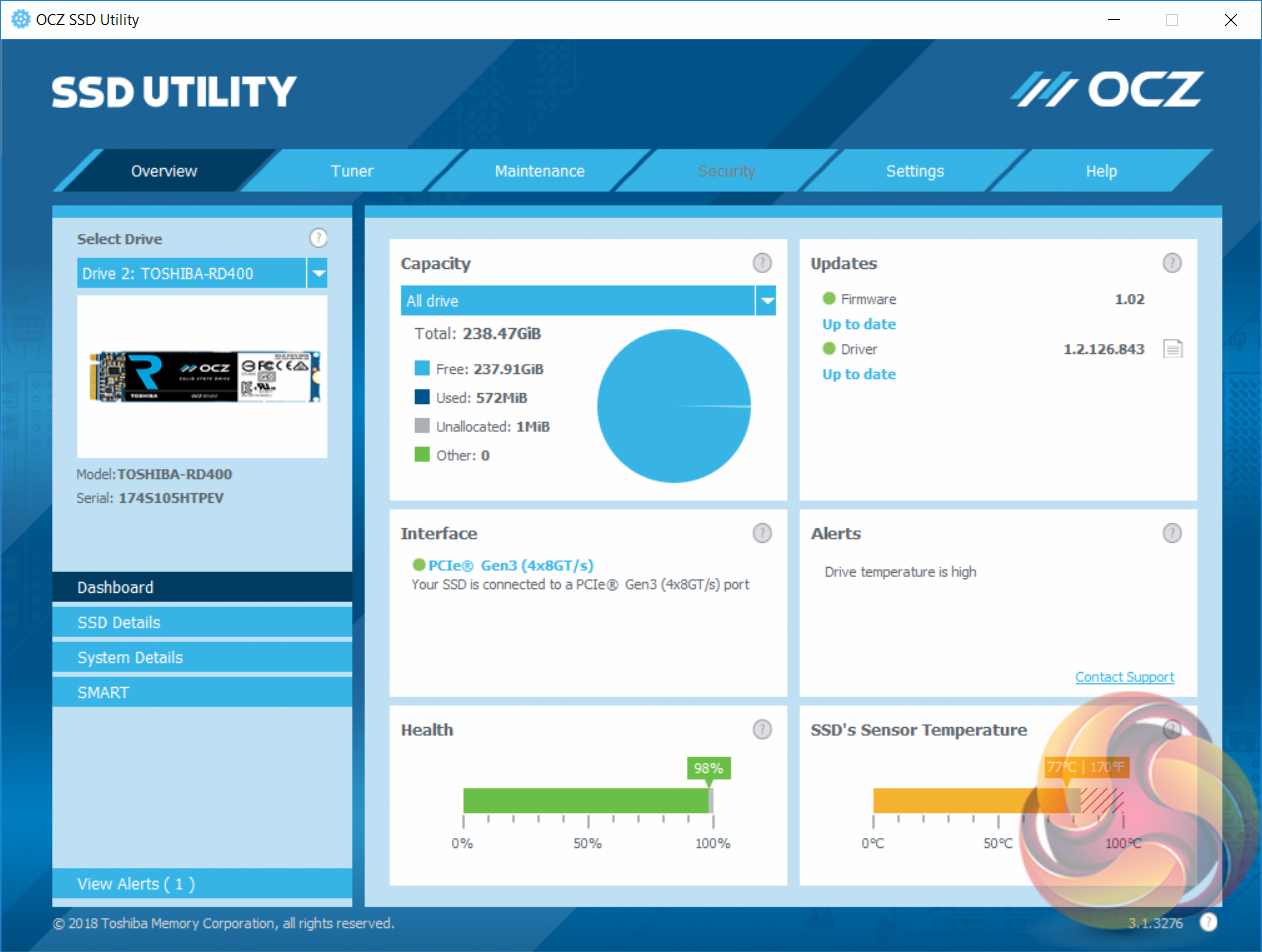
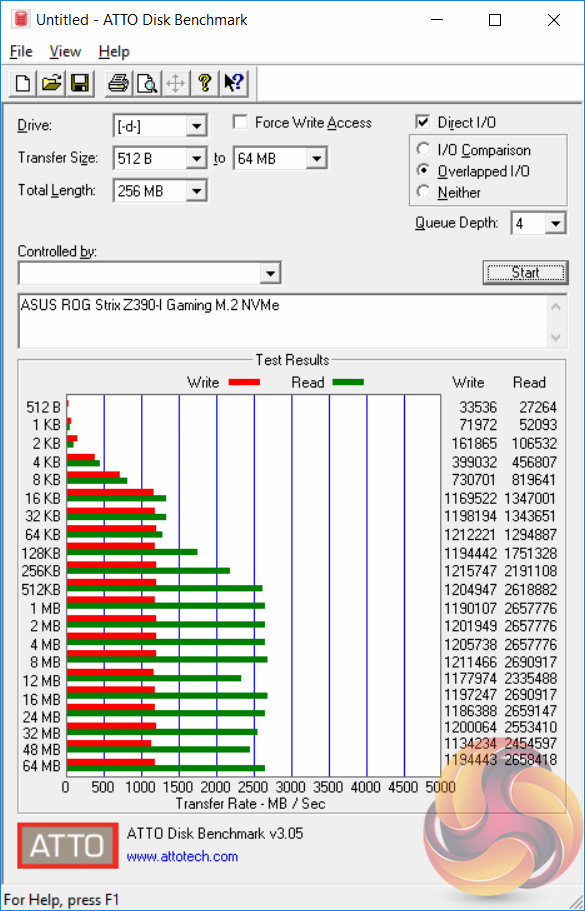
M.2 performance is as expected for the 32Gbps PCIe 3.0 X4 link and the M.2 heatsink does an adequate job of keeping thermals out of the throttling zone, even under prolonged (10 minutes +) stress testing.
It's not the most effective M.2 cooling solution as we often see temperatures in the low-60s, not high-70s, but it should prevent the worst of any thermal throttling.
USB Performance
We test USB 3.0 and 3.1 performance using a pair of Transcend SSD370S 512GB SSDs in RAID 0 connected to an RaidSonic Icy Box RD2253-U31 2-bay USB 3.1 enclosure powered by an ASMedia ASM1352R controller.
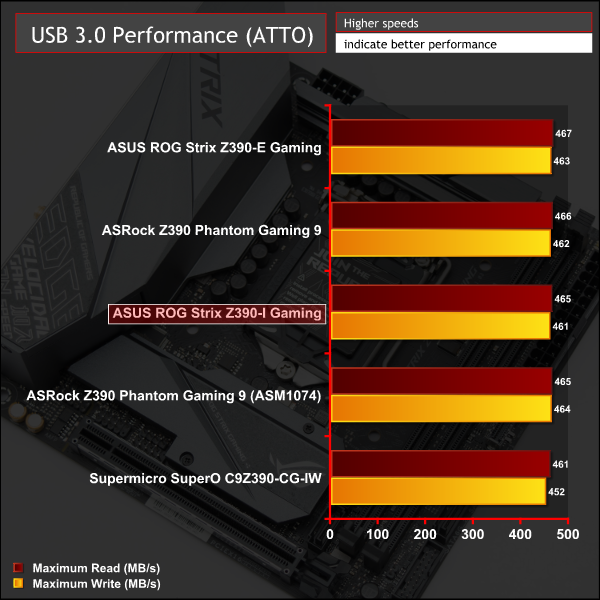
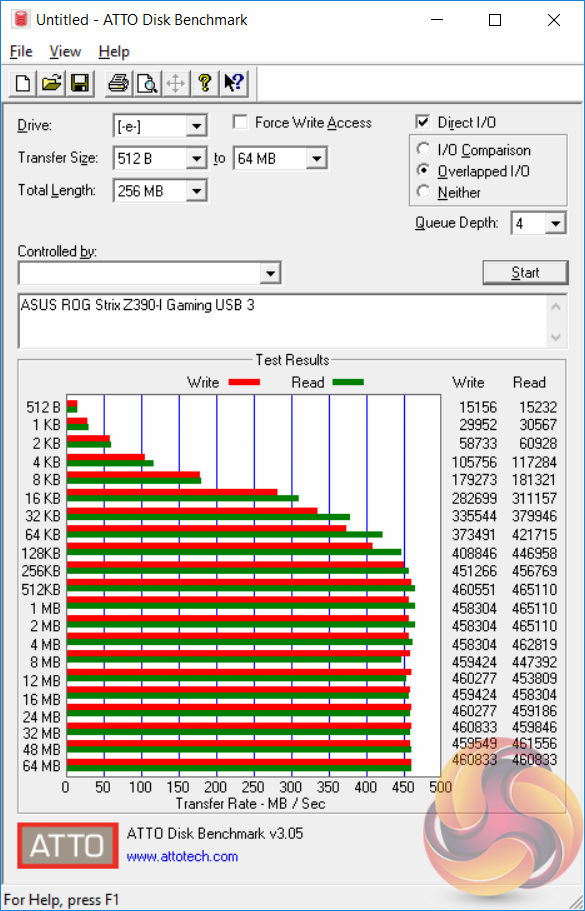
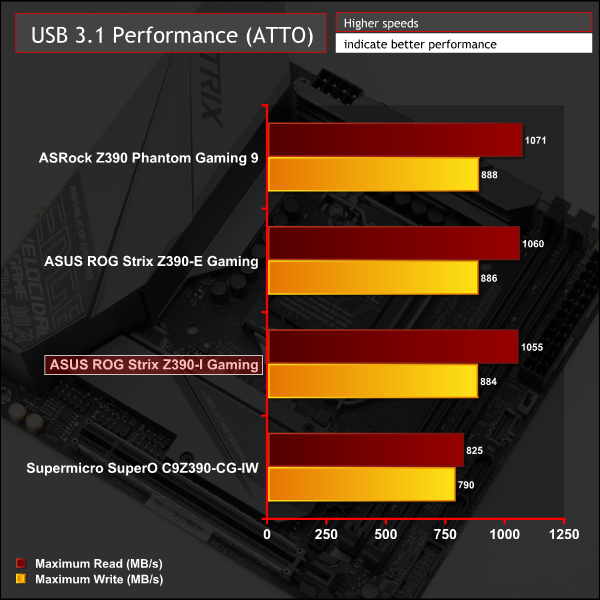
USB performance was standard fare for both USB 3.0 and 3.1
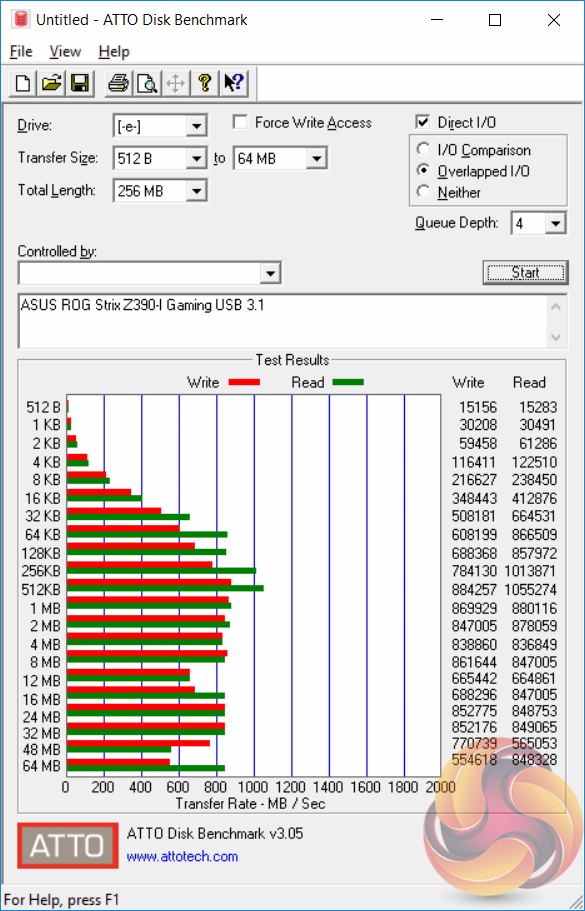
SATA III 6Gbps Performance
For SATA 6Gbps testing we use an OCZ Trion 150 480GB SSD.
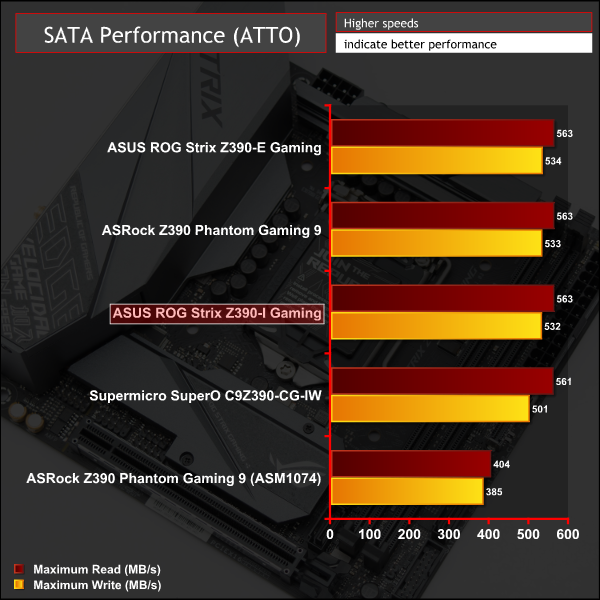
SATA performance was equally typical.
Audio
Rightmark Audio Analyser is a freeware benchmarking utility designed to objectively test the performance characteristics of audio solutions. We setup a line-in line-out loop and execute the record/playback test before generating the results report you see below. A sampling mode of 24-bit, 192 kHz is tested where available. If unavailable the closest alternative operating mode available is used and clearly marked.
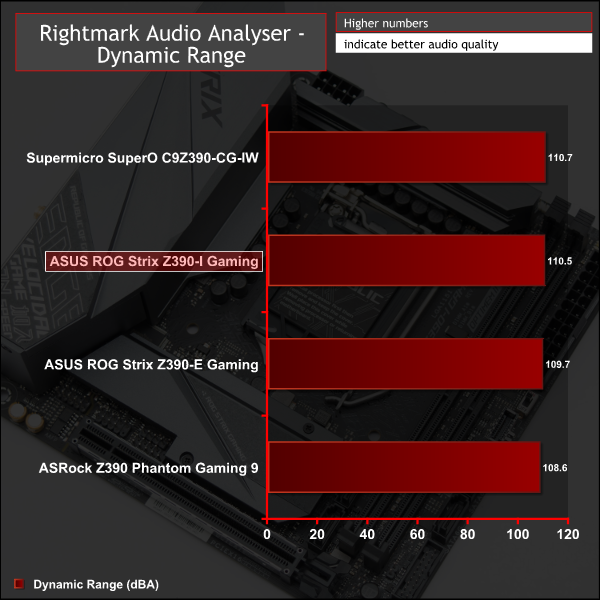
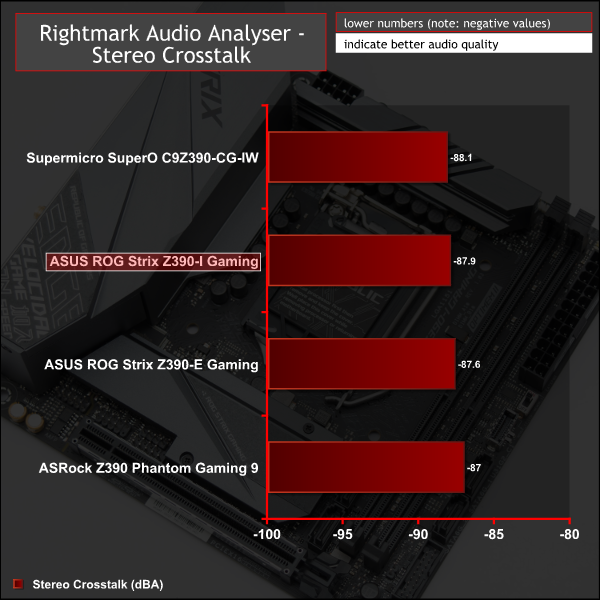
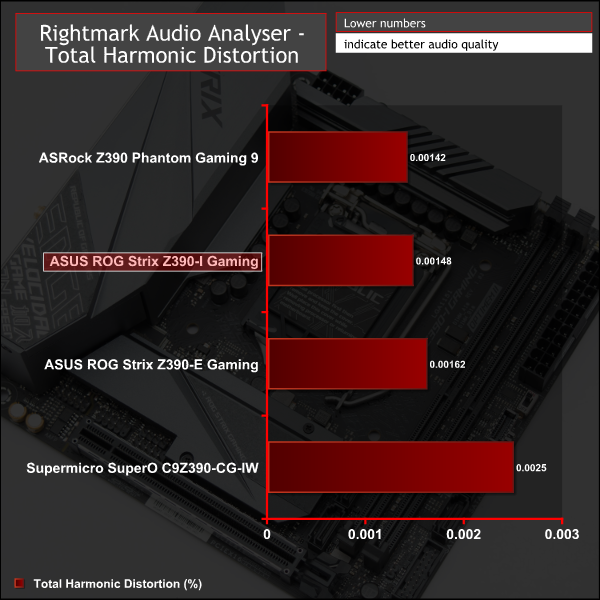
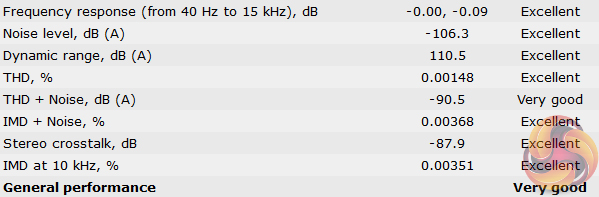
Audio performance was very good across the range of tests and reflects the quality of the ALC1220 codec. ASUS has implemented the codec well and the dual operational amplifiers is a nice touch for headphone users too.
Manual CPU Overclocking:
To test the ASUS ROG Strix Z390-I Gaming motherboard’s CPU overclocking potential, we set the CPU core voltage no higher than 1.3V and push for the highest stable clock speed. We maintain the DRAM frequency at 3200MHz to take memory stability out of the overclocking equation.
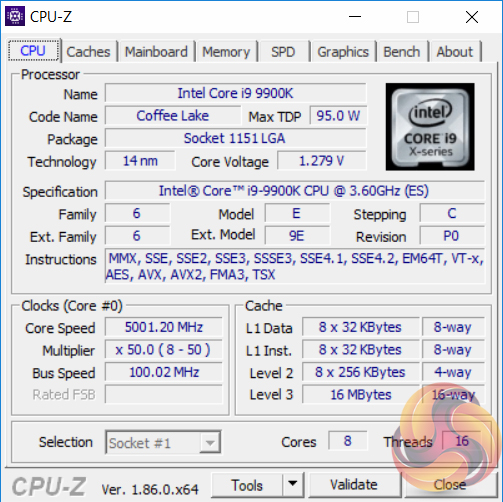
Our particular CPU is not stable at 5.1GHz even with 1.45v. The final stable overclock for almost all Z390 motherboards we may test should be 5GHz, unless there is something particularly wrong with the VRM that limits the voltage or power it can supply. In the case of the ASUS ROG Strix Z390-I Gaming it achieved 5GHz at 1.28 volts with no significant issues.
Motherboard Sensors

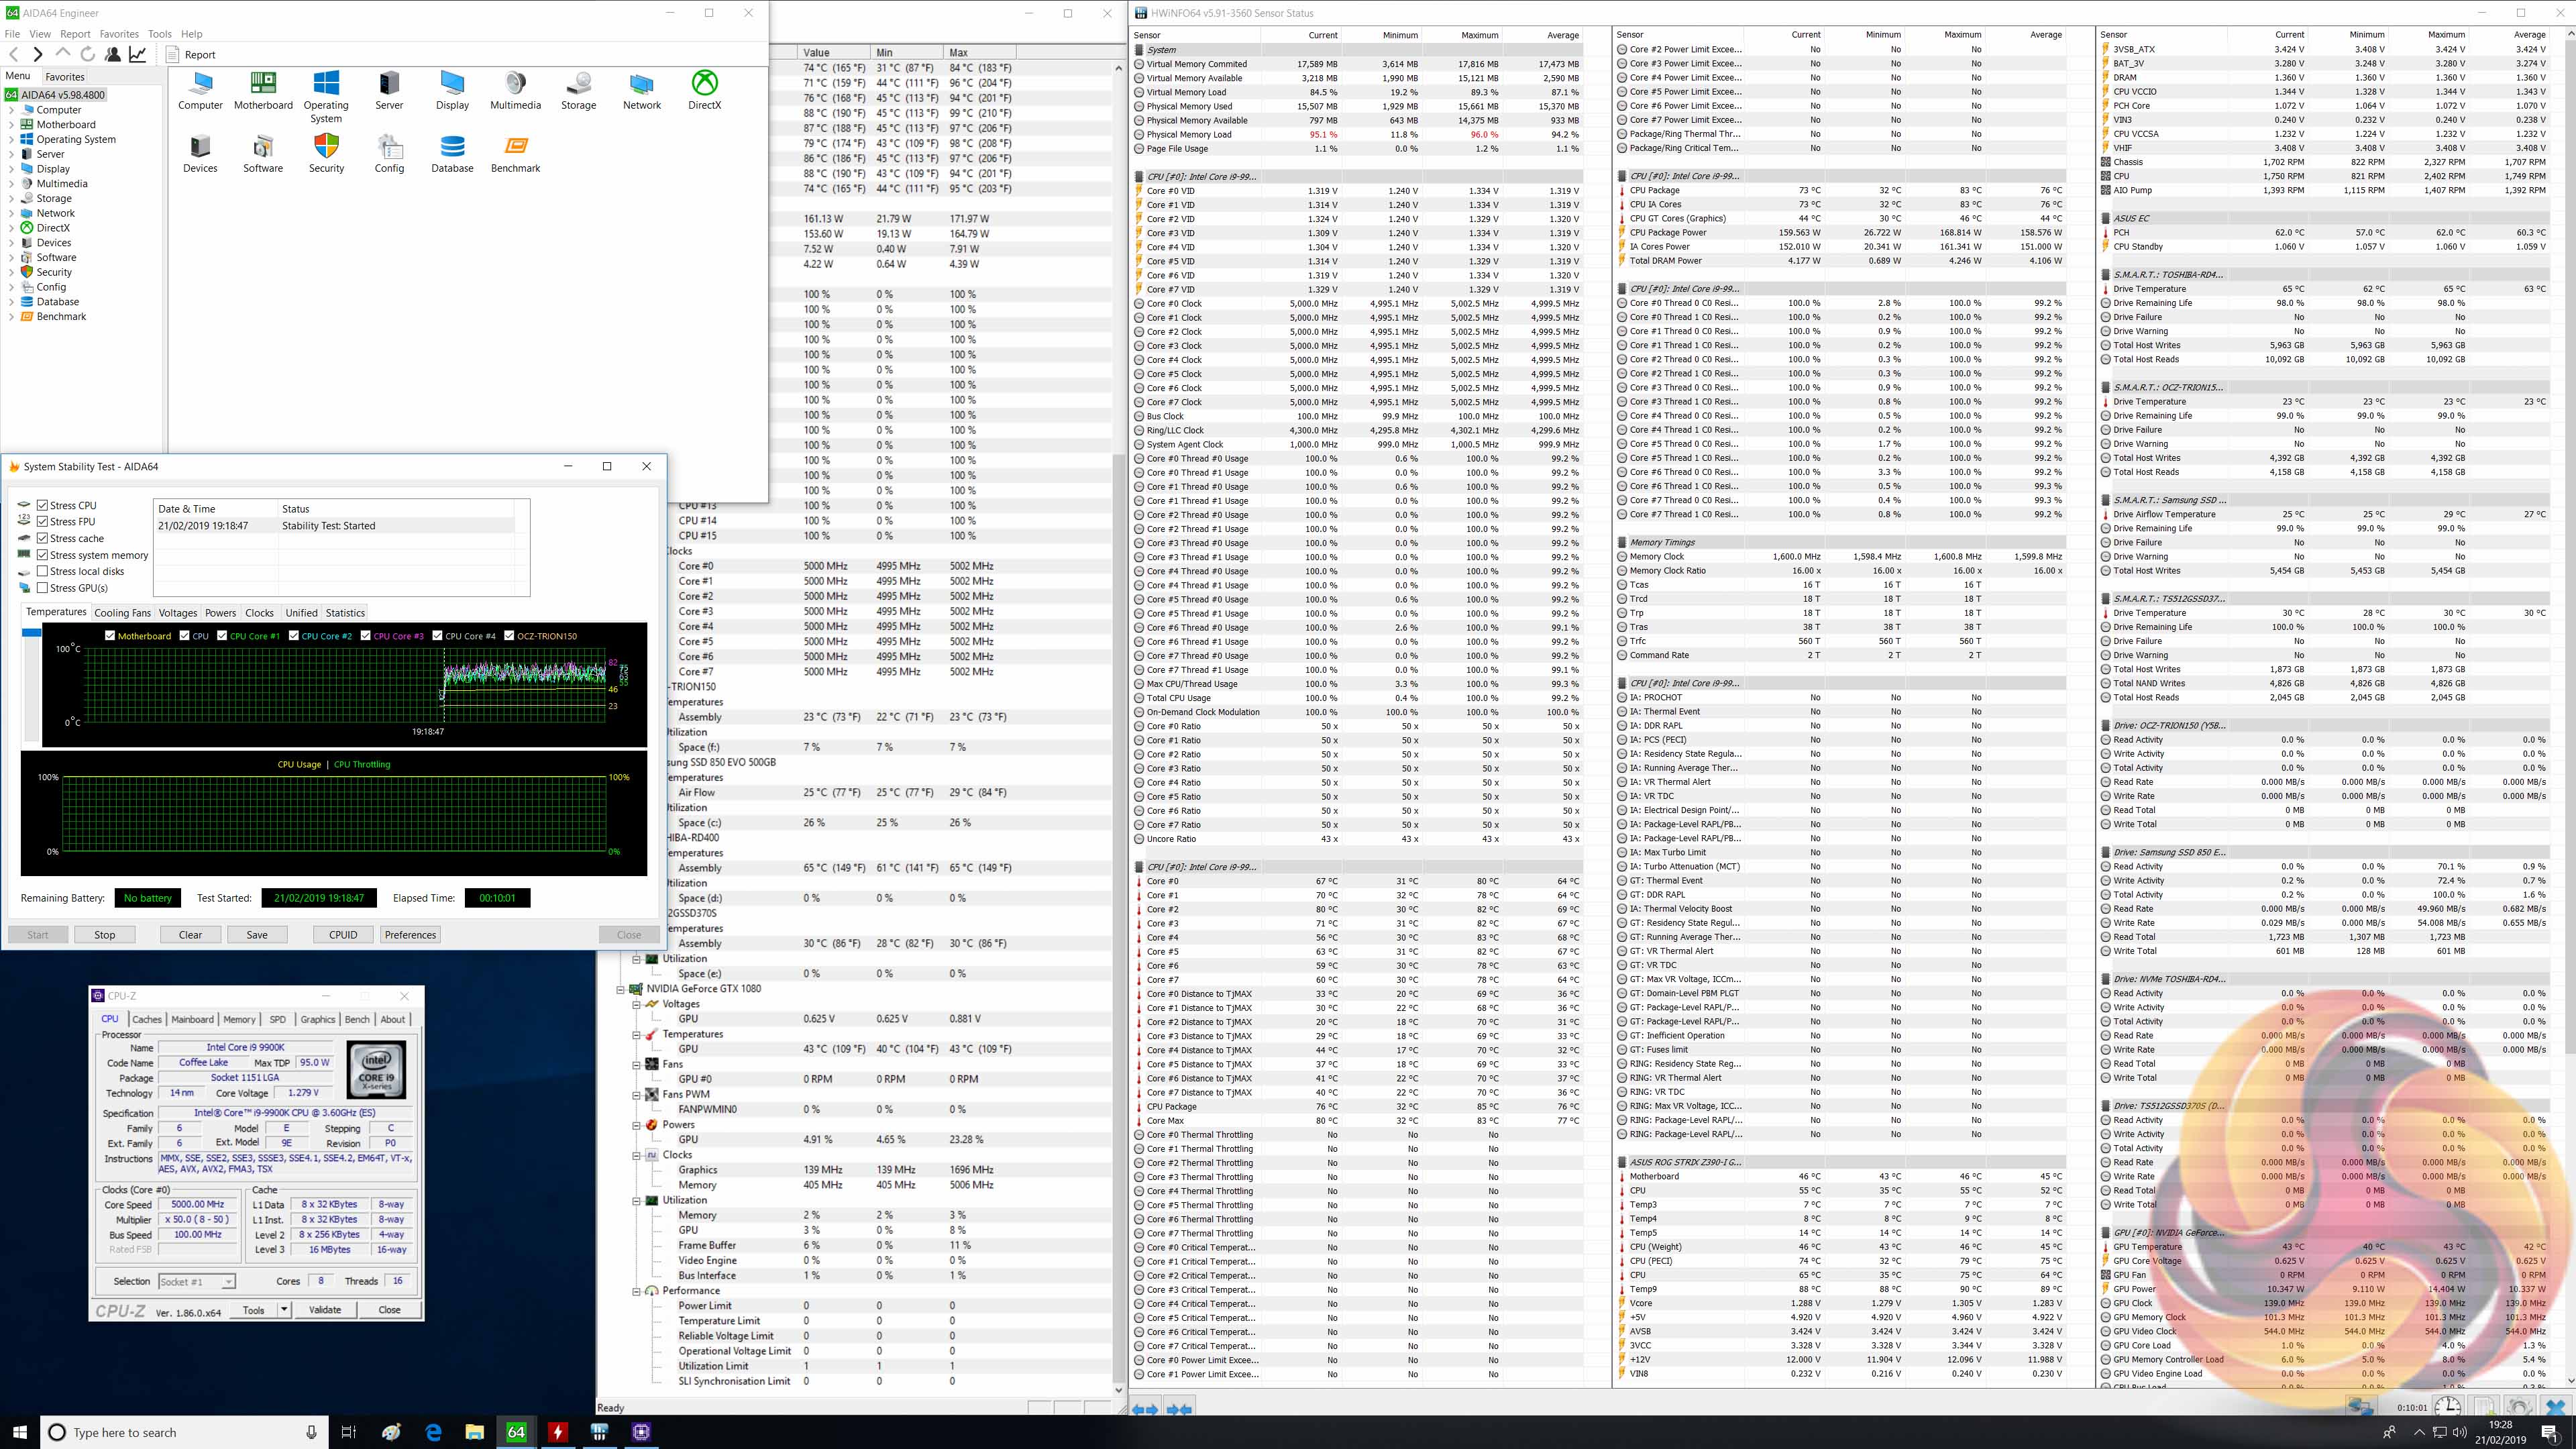
There are no temperatures sensors which indicate the VRM temperatures so it is unfortunately a guessing game as to how hot the VRMs were operating during testing.
Overclocked Performance
Performance scaled with frequency. On this motherboard where the CPU can follow Intel Turbo guidance the gains from overclocking in longer benchmarks would be more noticeable (effectively going from 4.2GHz all core turbo to 5GHz), since overclocking takes the CPU beyond Intel’s specification. However, if you’d been using the enhanced Turbo mode before overclocking, the jump to a 5GHz all-core frequency, from 4.7GHz all-core, would be less noticeable.
System Power Consumption
We leave the system to idle on the Windows 10 desktop for 10 minutes before taking a reading. For CPU load results we run AIDA64 CPU, FPU, Cache and Memory stress tests and take a reading after 10 minutes. The power consumption of our entire test system (at the wall) is shown in the chart.
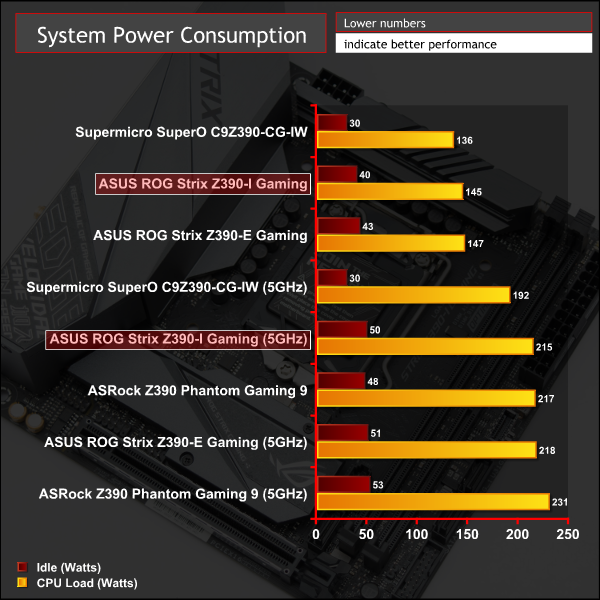
Power consumption was as expected, and largely aligns with the ROG Strix Z390-E Gaming.
12-volt EPS Power Consumption
During the 10-minute stress test as specified above, we record the direct CPU power consumption drawn through the EPS 8-pin socket using modified EPS 8-pin cables that have a Tinkerforge Voltage/Current 1.0 bricklet intercepting and monitoring the power flow from the power supply. That bricklet then reports its data to a Tinkerforge Master Brick. All the data collected by the Tinkerforge Master Brick is passed into an external laptop over a USB connection and analysed in the Cybenetics Powenetics Project software.
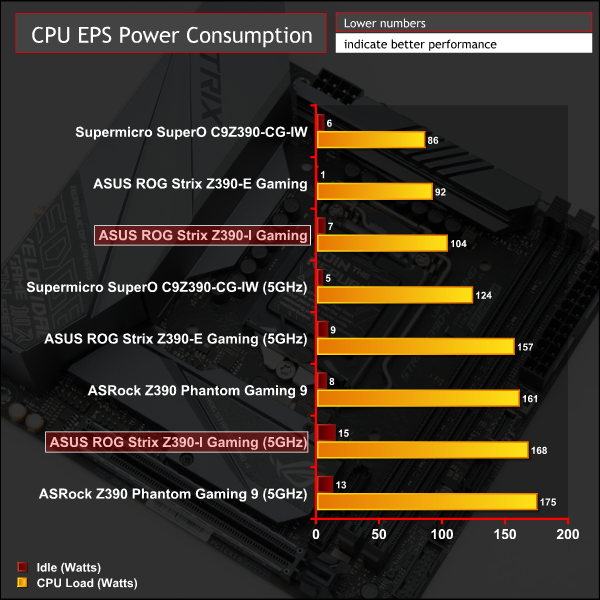
Power consumption as measured at the CPU 8-pin socket is about right – 104-watts at stock operation and 168-watts under overclocked load. We'd expect to see more like 95-watts for stock operation, but 104-watts is within acceptable margin.
It's hard to find anything significant to say about the ASUS ROG Strix Z390-I Gaming, which is mostly a good thing. The design is well-thought out and it is a sensible motherboard choice for anyone looking to build around the mini-ITX platform using Intel's latest Coffee Lake CPUs.
At the price point and given the form factor it has everything that a consumer might reasonably expect including ample RGB lighting options, suitable diagnostics and debug tools and all-round excellent connectivity in terms of storage, USB and networking. As is always the case with high-end mini-ITX options “less costs more” and consumers simply looking for a good value proposition would do well to consider more affordable ATX or micro-ATX alternatives.
While it's a well equipped motherboard it feels like it has lost that certain ROG charm and wow-factor that we last saw with the Maximus VIII (Z170) Impact. Perhaps the market has moved on and consumers are now looking for something different, or maybe it's now possible to achieve the same or better performance without the quirky daughterboards and separated PCBs.
In any case a consumer seeking to build a compact mini-ITX system using Intel's latest CPUs can do so with the confidence that the ASUS ROG Strix Z390-I Gaming is a well-built and full-featured choice. It's fairly expensive, but mini-ITX solutions always have been because of the increased design effort required to shoehorn so many features into such a small footprint. In this case, the expense is well-justified.
The performance is all there, including when overclocking, despite the debate around the new ASUS approach to VRM design. Consumers will be limited by their CPU before they are limited by the capability of the motherboard.
![]()
The ASUS ROG Strix Z390-I Gaming has a retail price of £214.99 in the UK at Overclockers UK and is usually sold with a 3 year warranty.
In the USA it can be had for $193.52 at Amazon and usually has a 3 year warranty.
Pros:
- Debug/Diagnostic LEDs
- Ample RGB lighting options (12v/5v/onboard)
- USB 3.1 and Type-C
- Dual M.2 with M.2 cooling
- Integrated I/O shield
- Large VRM heatsinks
- Good quality VRM components
- High-quality audio
- Neutral styling
Cons:
- AURA RGB software compatibility issues (again)
- M.2 cooling runs on the warm-side
- “only” 3 phase VCore VRM (albeit with 6 phases worth of components)
- Enhanced turbo is now “on by default”, with no warnings
- Awkward to access front panel headers
KitGuru says: Well-built and fully-featured, the ASUS ROG Strix Z390-I Gaming is a sensible choice for an Intel-based mini-ITX build.