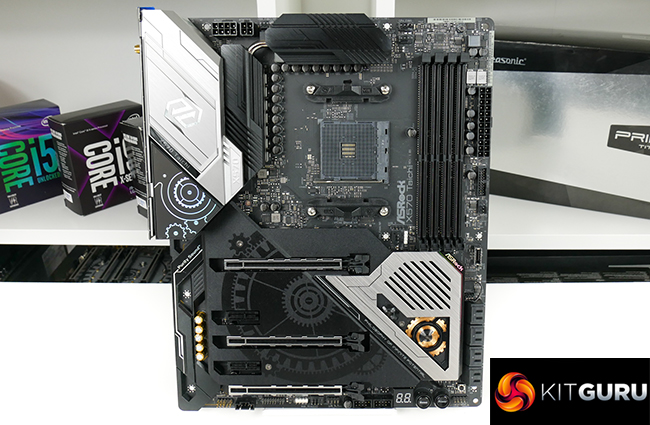
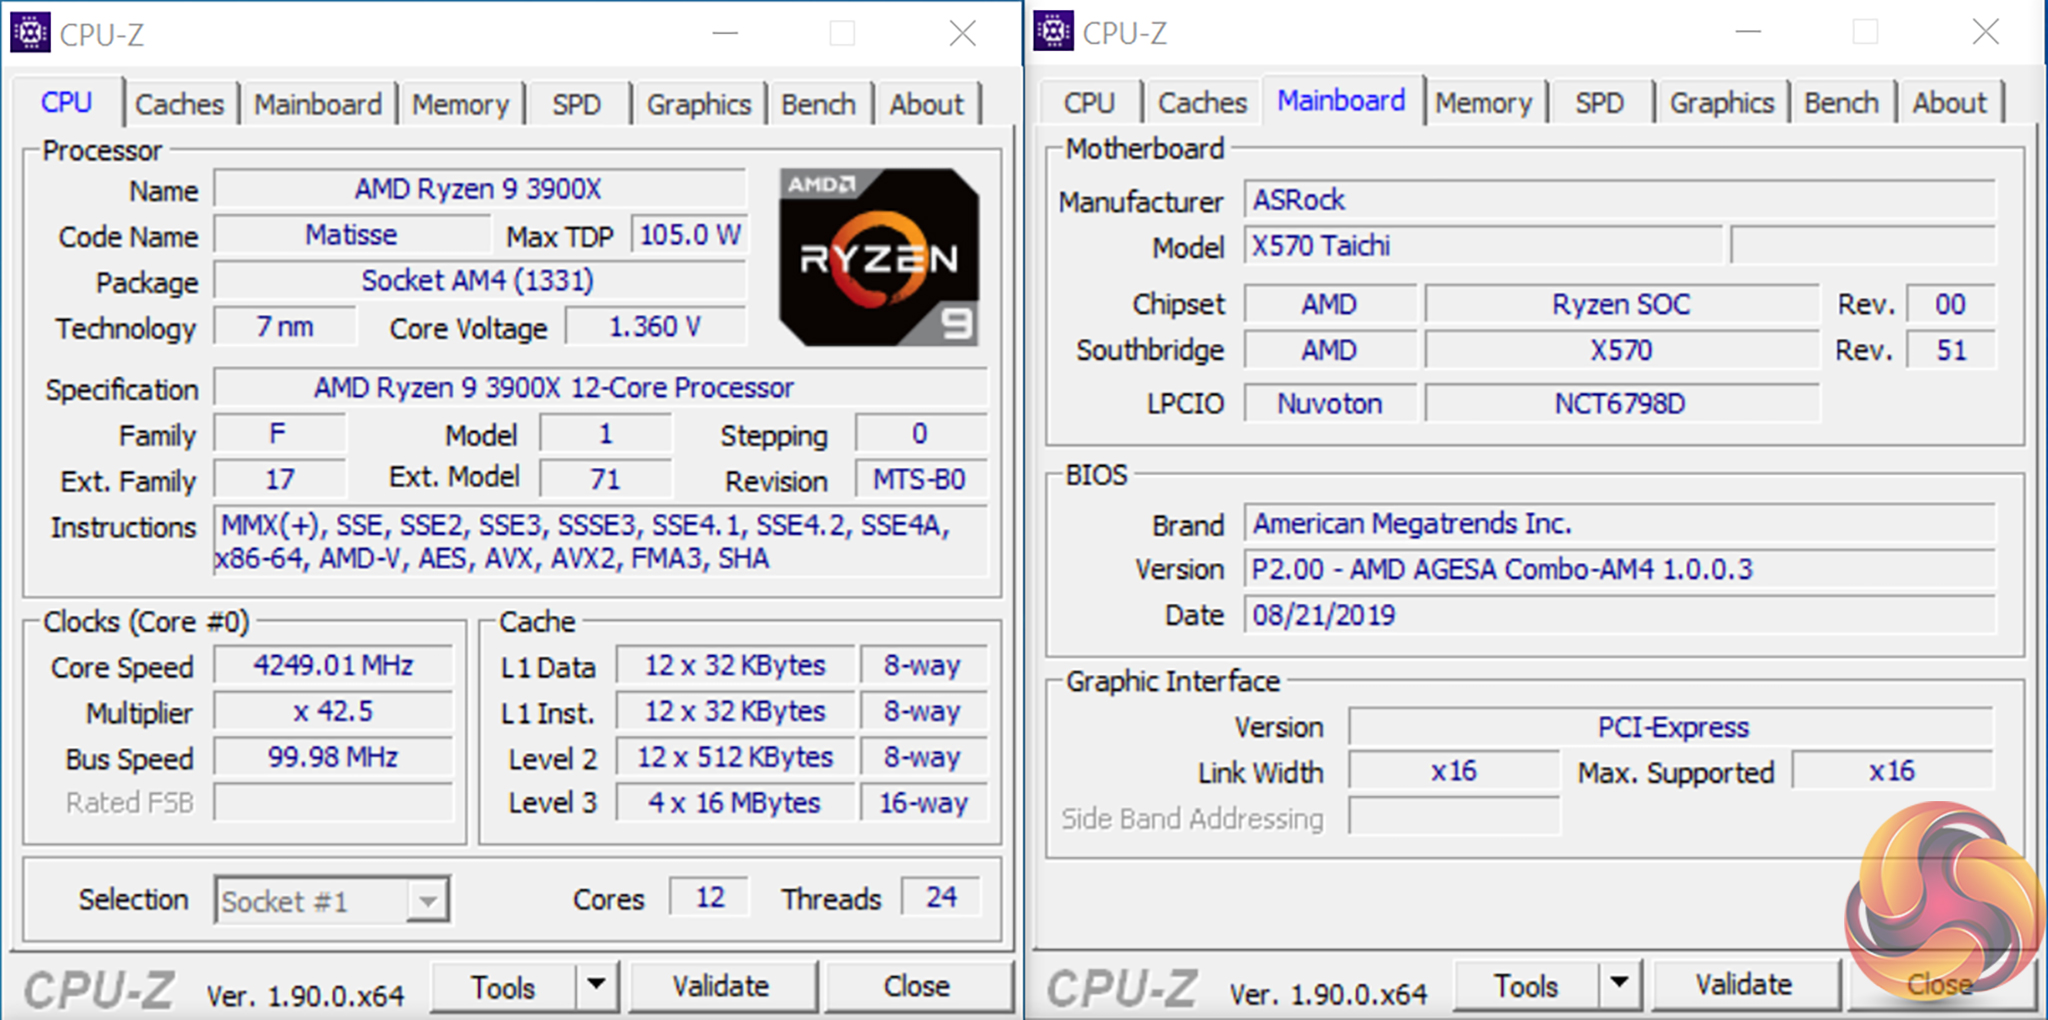
Aiming to prove that a £300 spend still nets you a premium X570 motherboard, the ASRock X570 Taichi features a 14-phase power delivery solution, triple M.2 connectors, and 802.11ax WiFi 6.
Fans of RGB should be impressed, too, as there’s little skimping on ASRock’s part when it comes to onboard lighting. You get three onboard lighting zones – the rear IO and chipset areas – in addition to ASRock’s edge LED lighting down the right side of the motherboard. I must say, the glowing edge lighting zone looks superb. That could be an important factor to styling-conscious users who see competing options as frugal when it comes to onboard lighting.
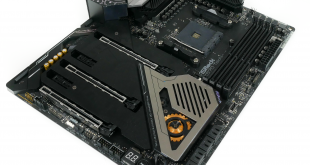
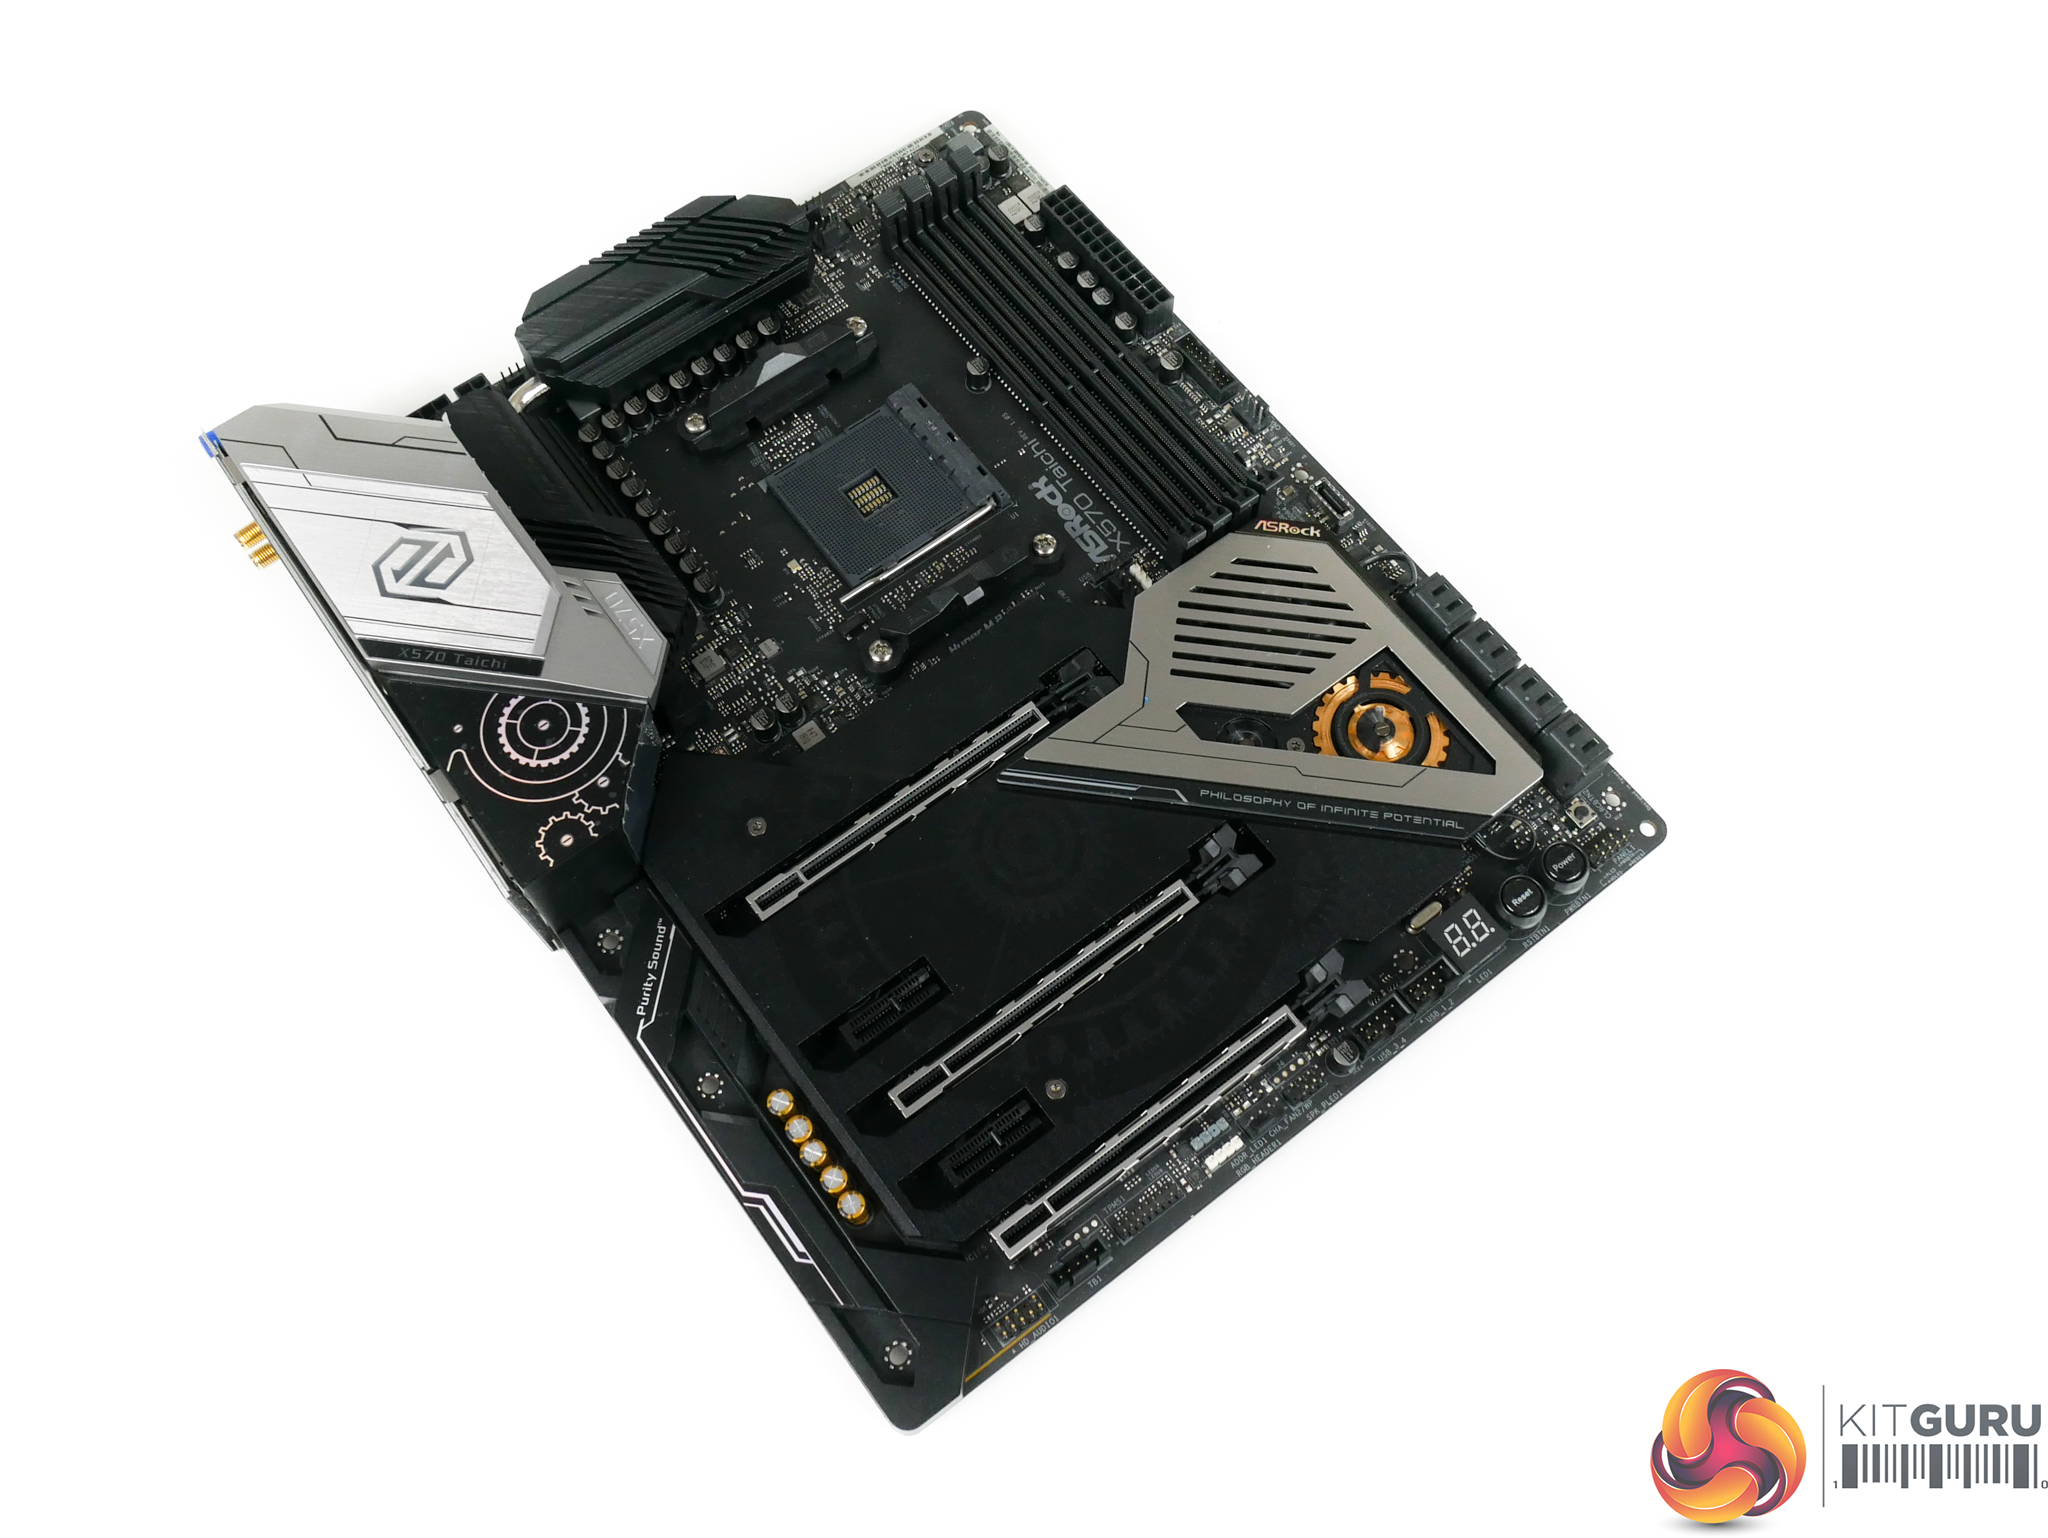
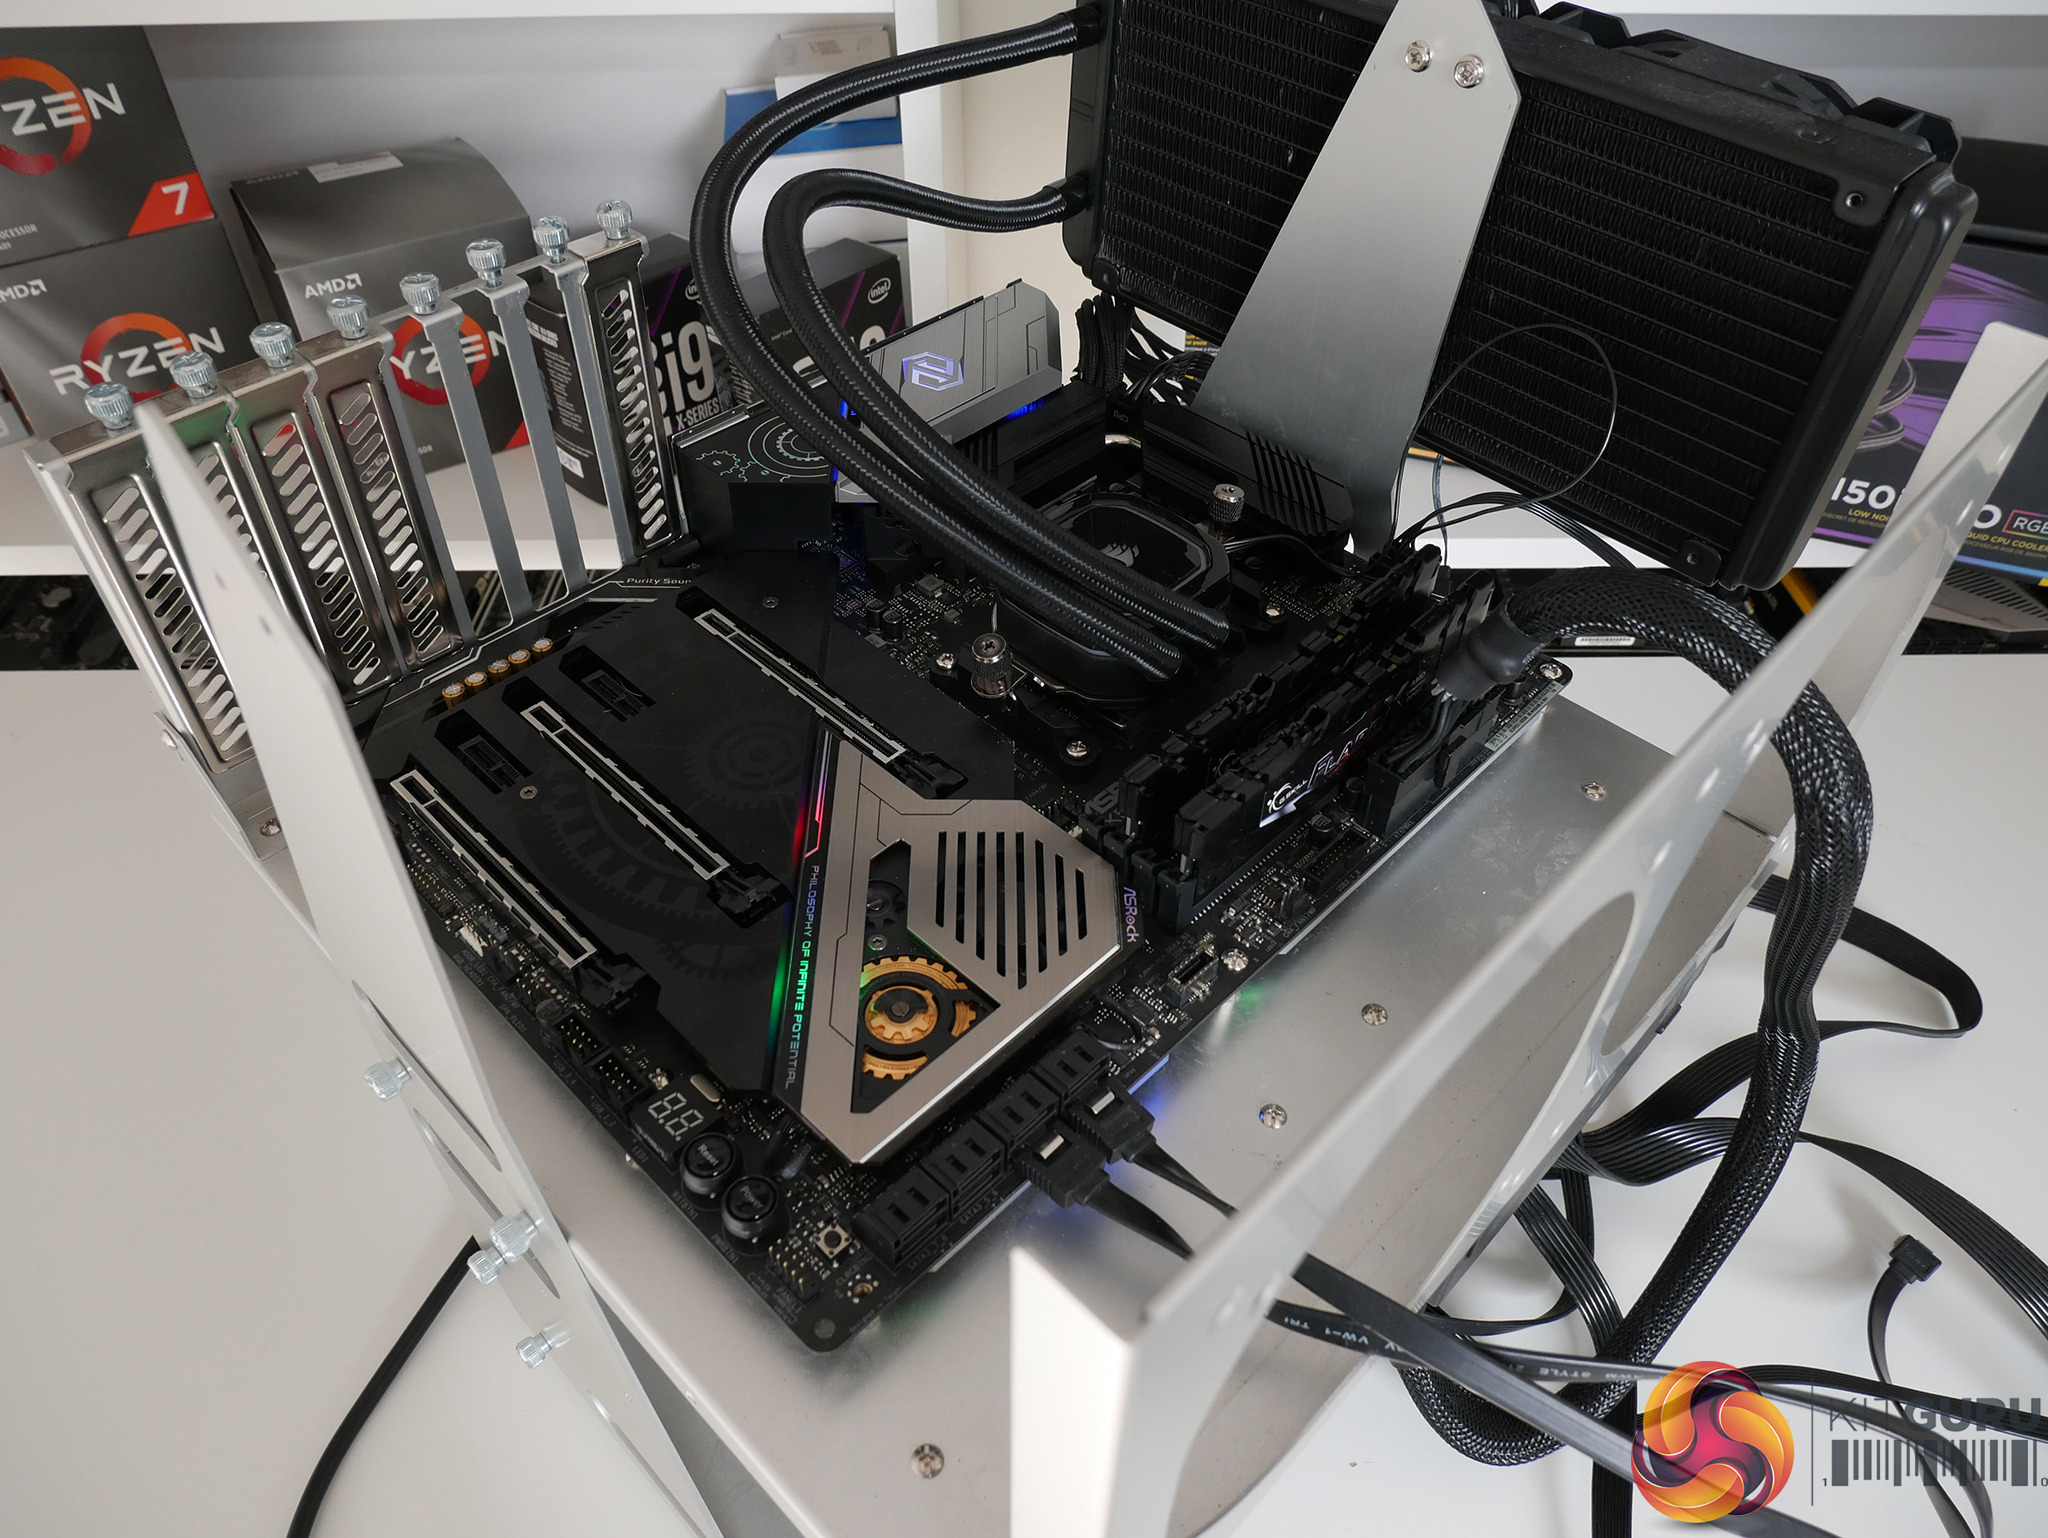
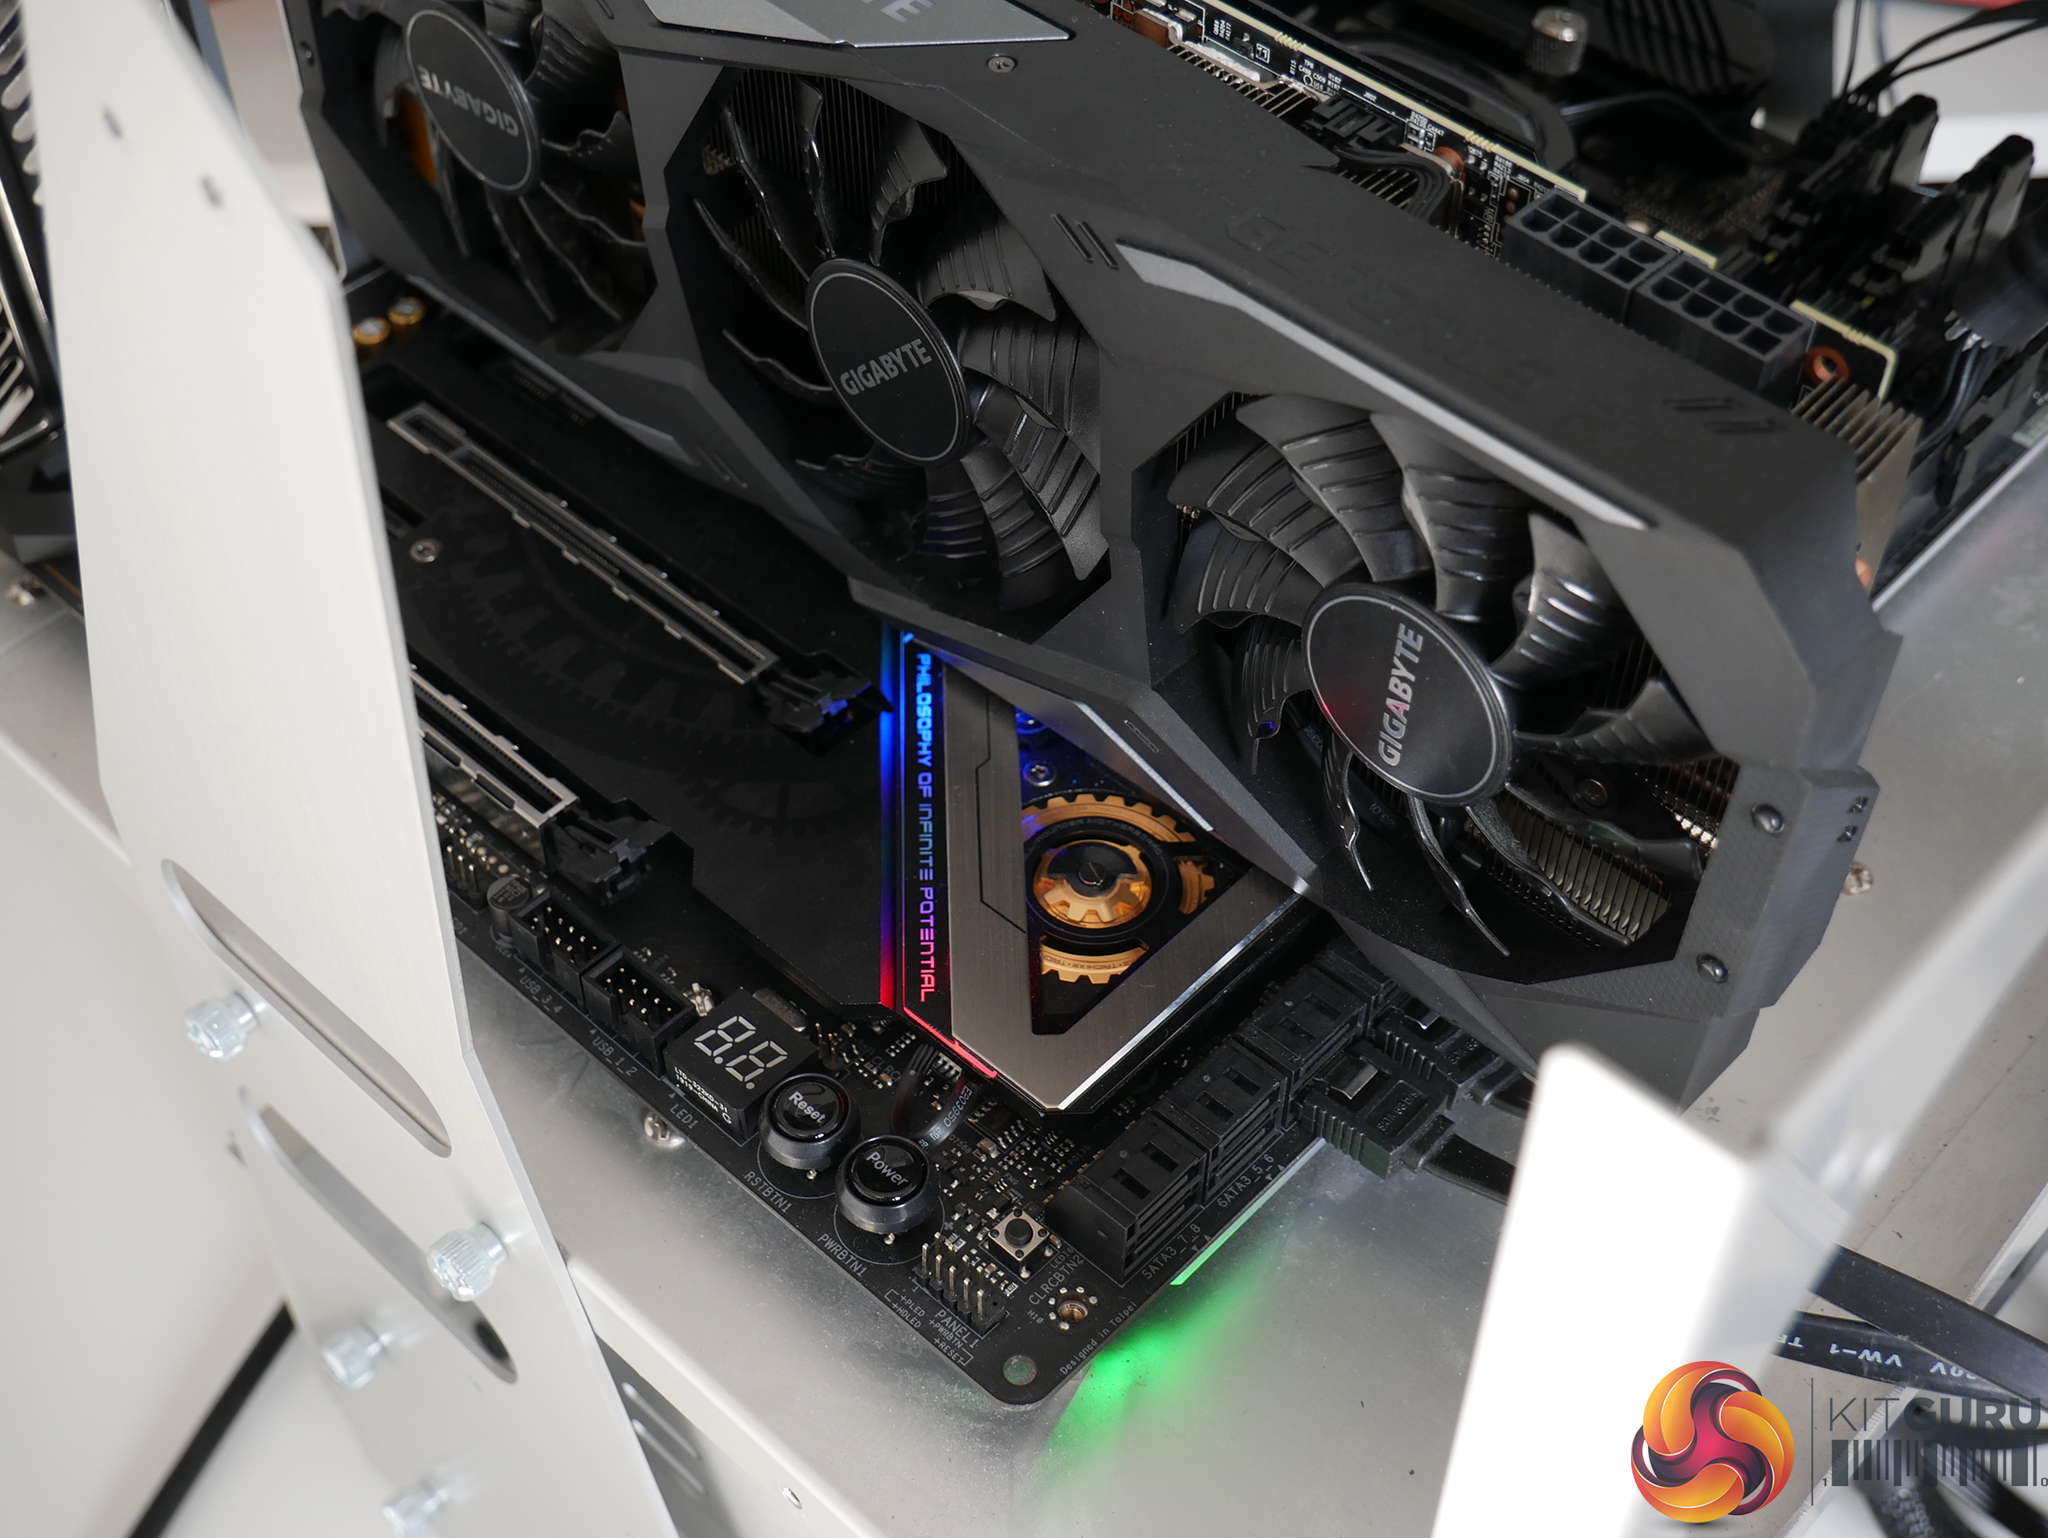
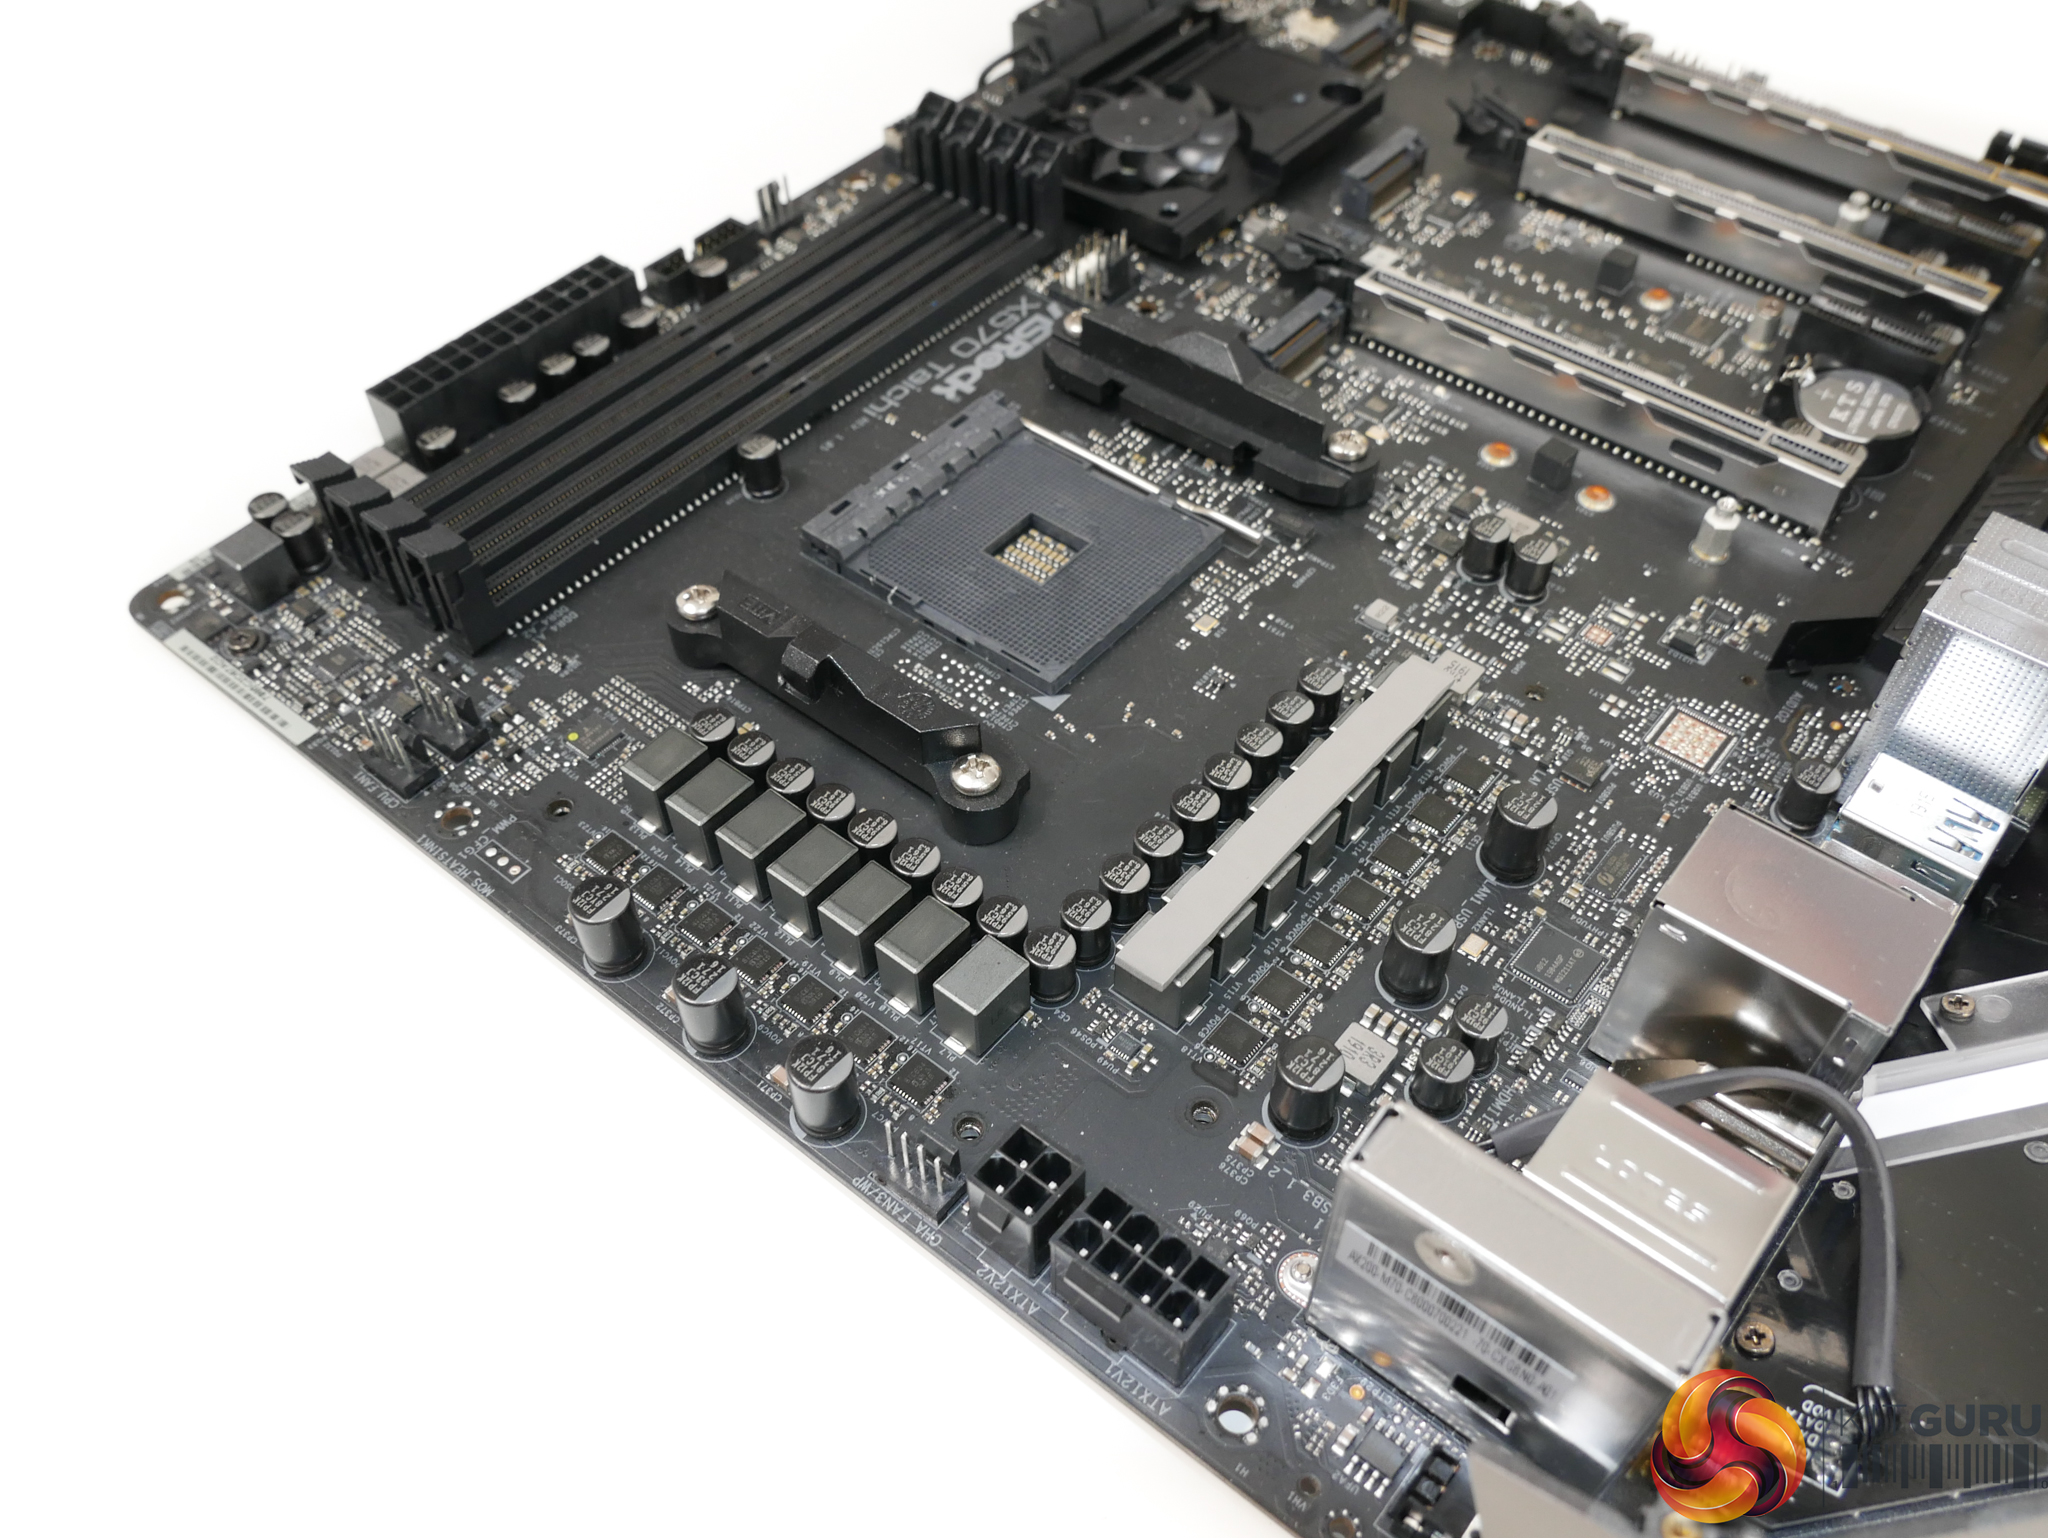
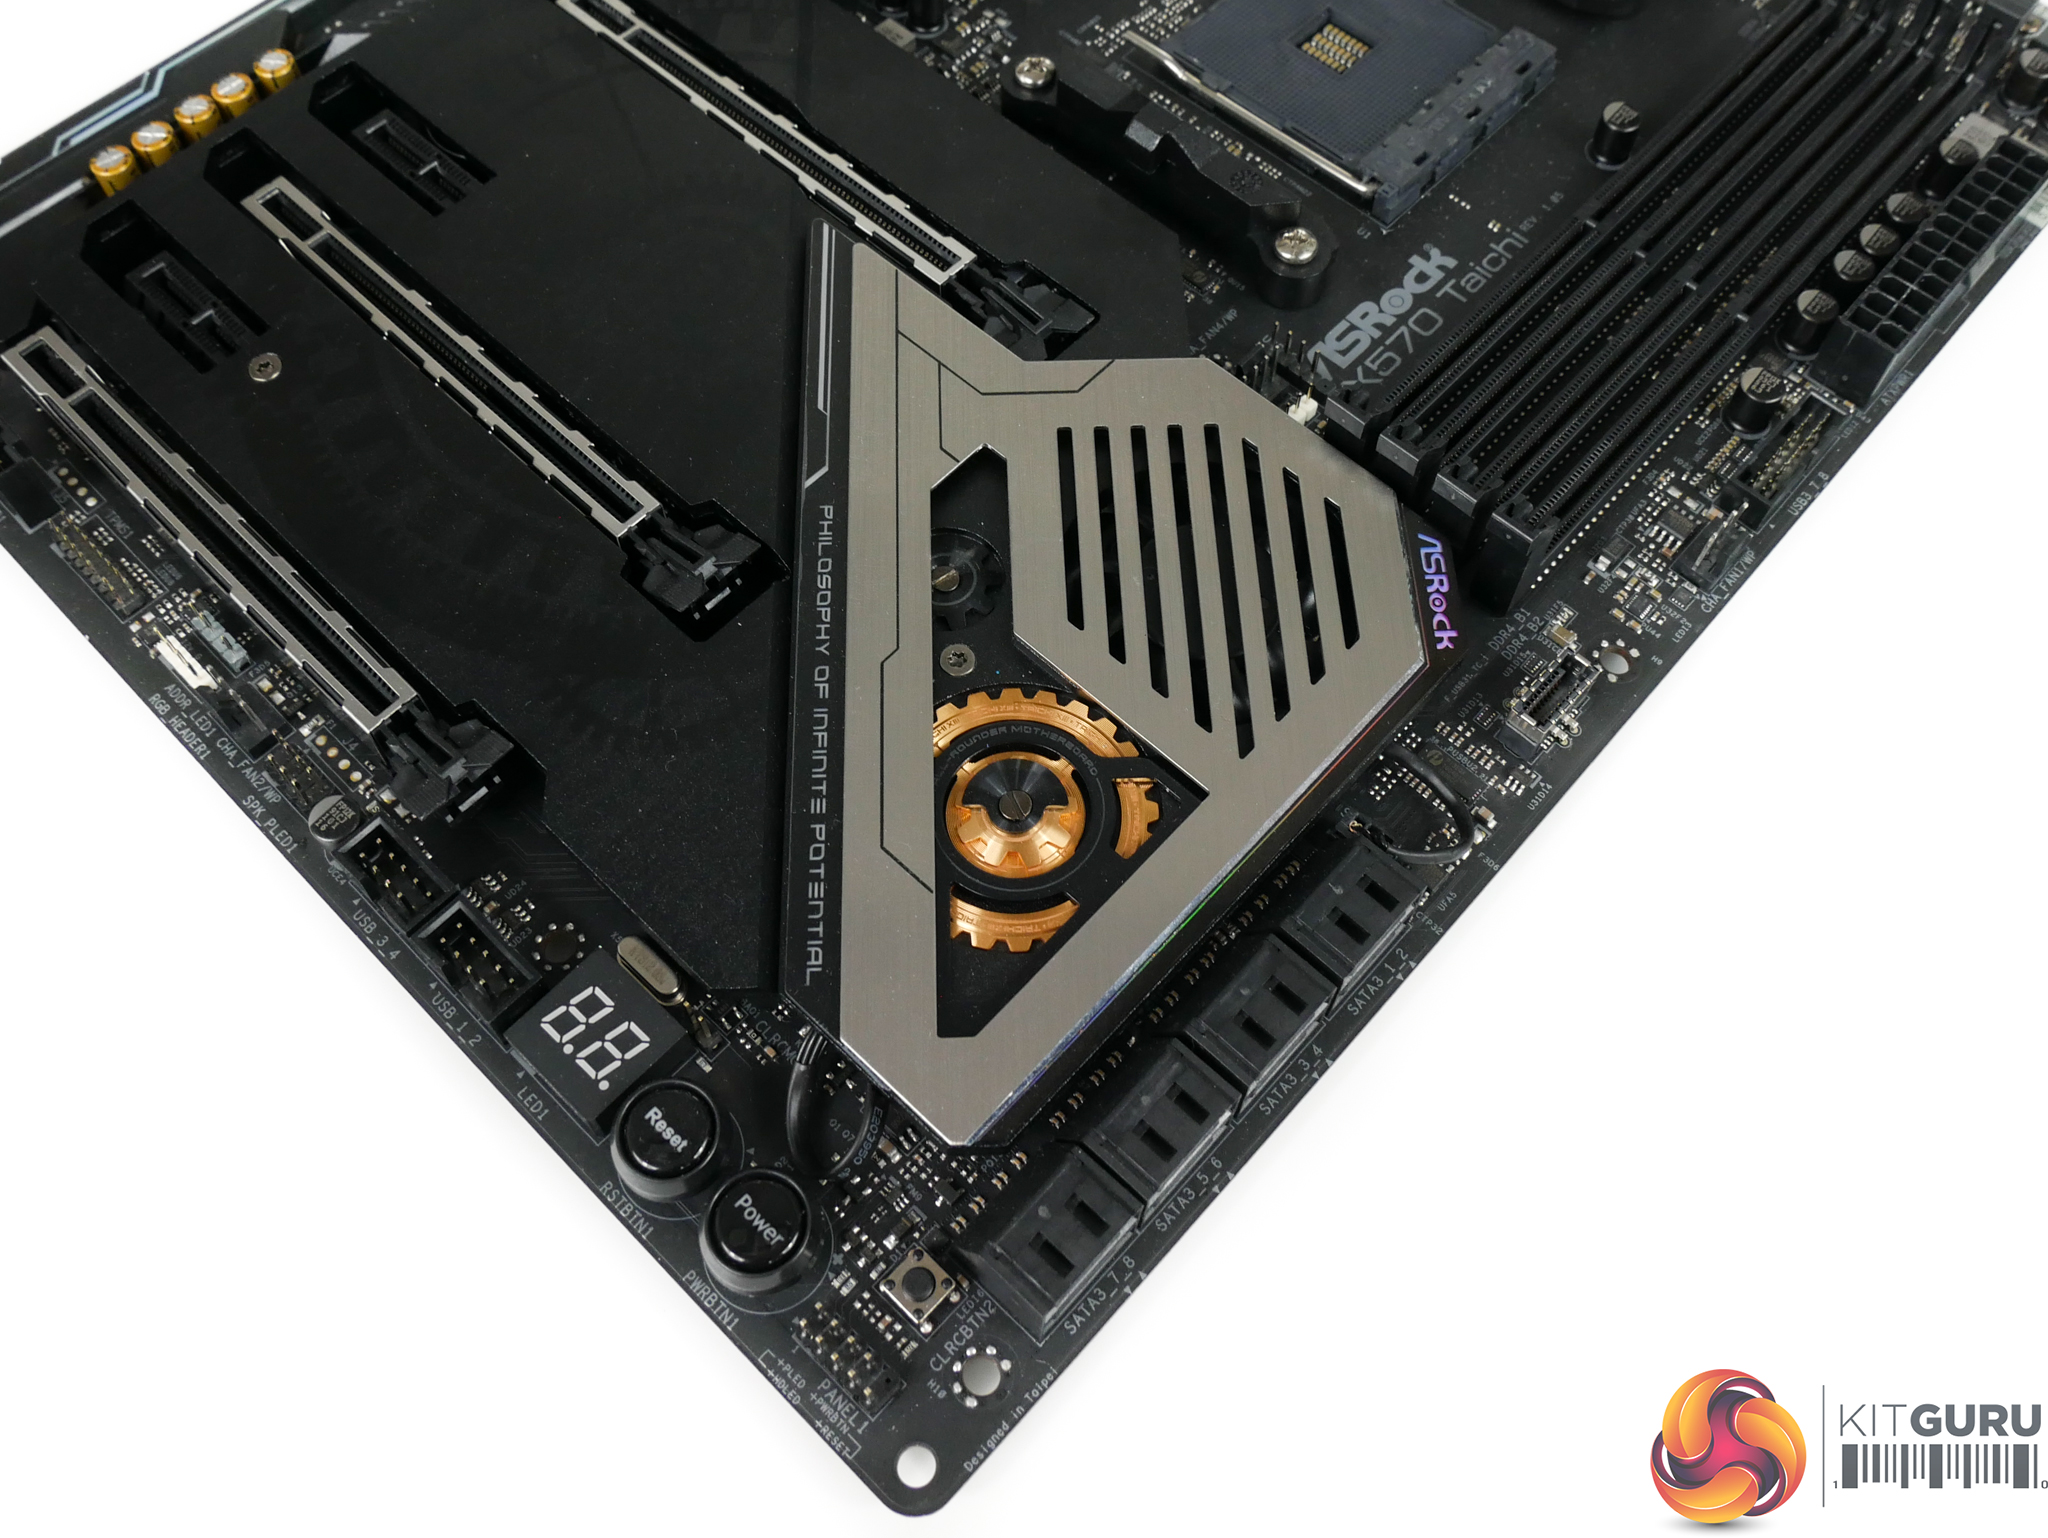
One rather unique factor for the ASRock X570 Taichi is the shroud that covers a large proportion of the motherboard’s expansion slot area. This aluminium piece is held in position with three screws and uses thermal pads to make direct contact with all three M.2 SSDs and the X570 chipset heatsink.
In theory, a big lump of metal for the SSDs to dump their heat onto should be better than the small metal strips that we’re used to seeing. Further testing will indicate whether that’s the case.
Features (information taken from the ASRock webpage):
- Supports AMD AM4 Socket Ryzen™ 2000 and 3000 Series processors
- Intel® Wi-Fi 6 802.11ax (2.4Gbps) + BT 5.0
- Supports DDR4 4666+ (OC)
- 3 PCIe 4.0 x16, 2 PCIe 4.0 x1
- NVIDIA® NVLink™, Quad SLI™, AMD 3-Way CrossFireX™
- 7.1 CH HD Audio (Realtek ALC1220 Audio Codec), Supports Purity Sound™ 4 & DTS Connect
- 8 SATA3, 2 Hyper M.2 (PCIe Gen4 x4 & SATA3), 1 Hyper M.2 (PCIe Gen4 x4)
- 3 USB 3.2 Gen2 (Rear Type A+C, Front Type-C), 8 USB 3.2 Gen1 (2 Front, 6 Rear)
- Intel® Gigabit LAN
- ASRock Polychrome SYNC
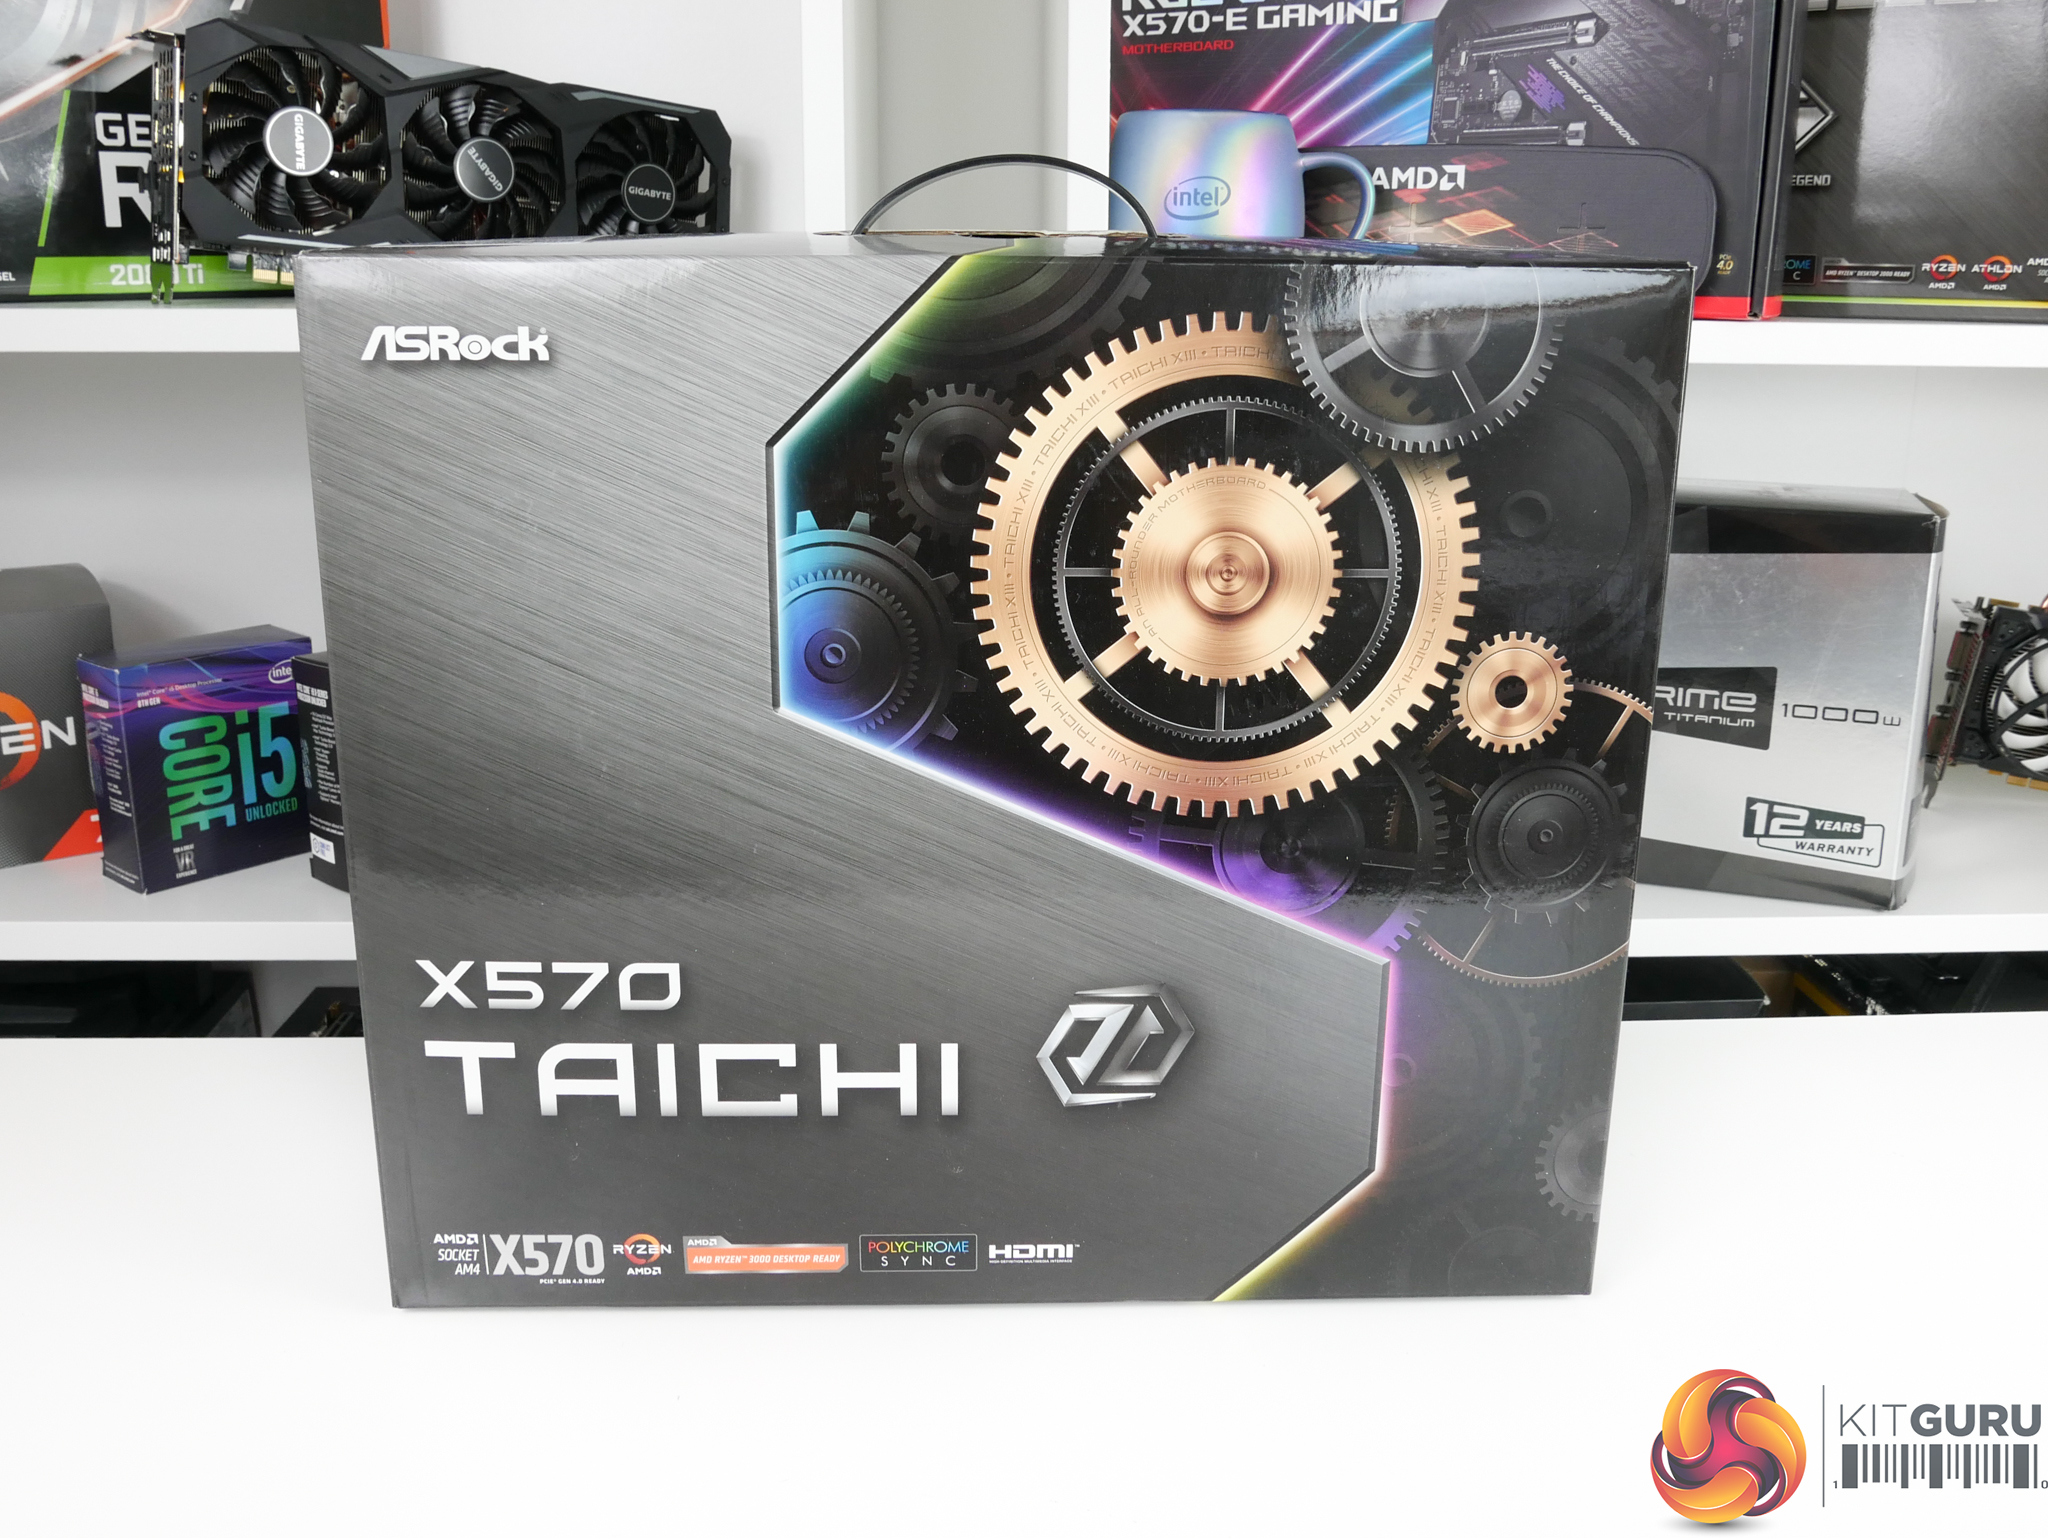
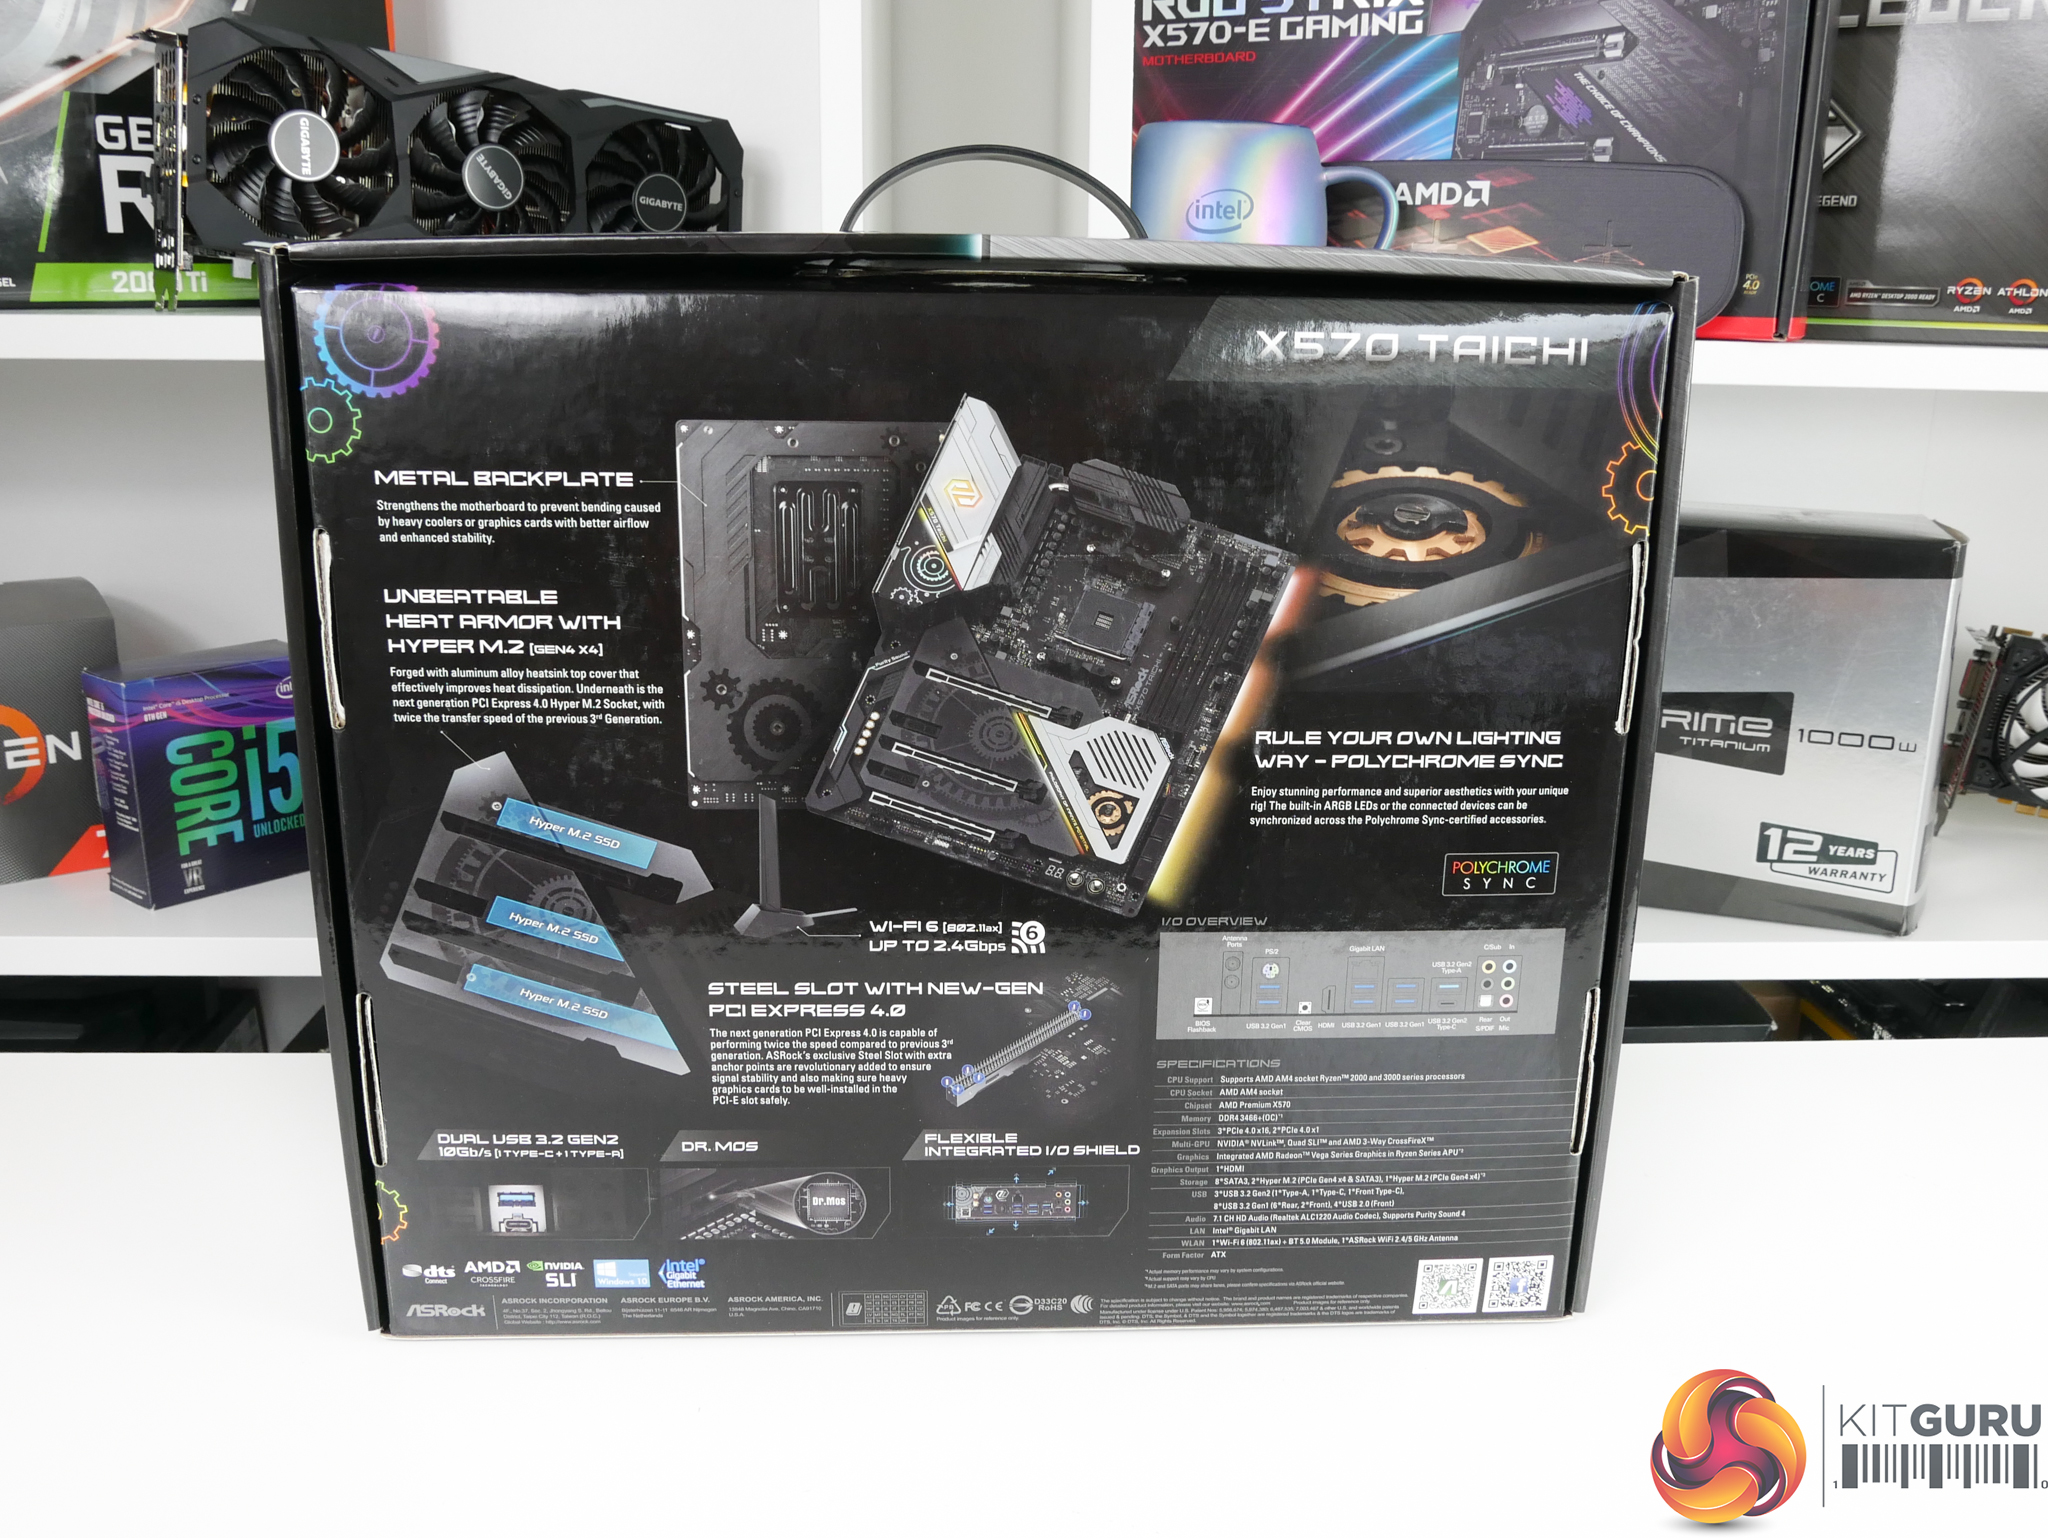
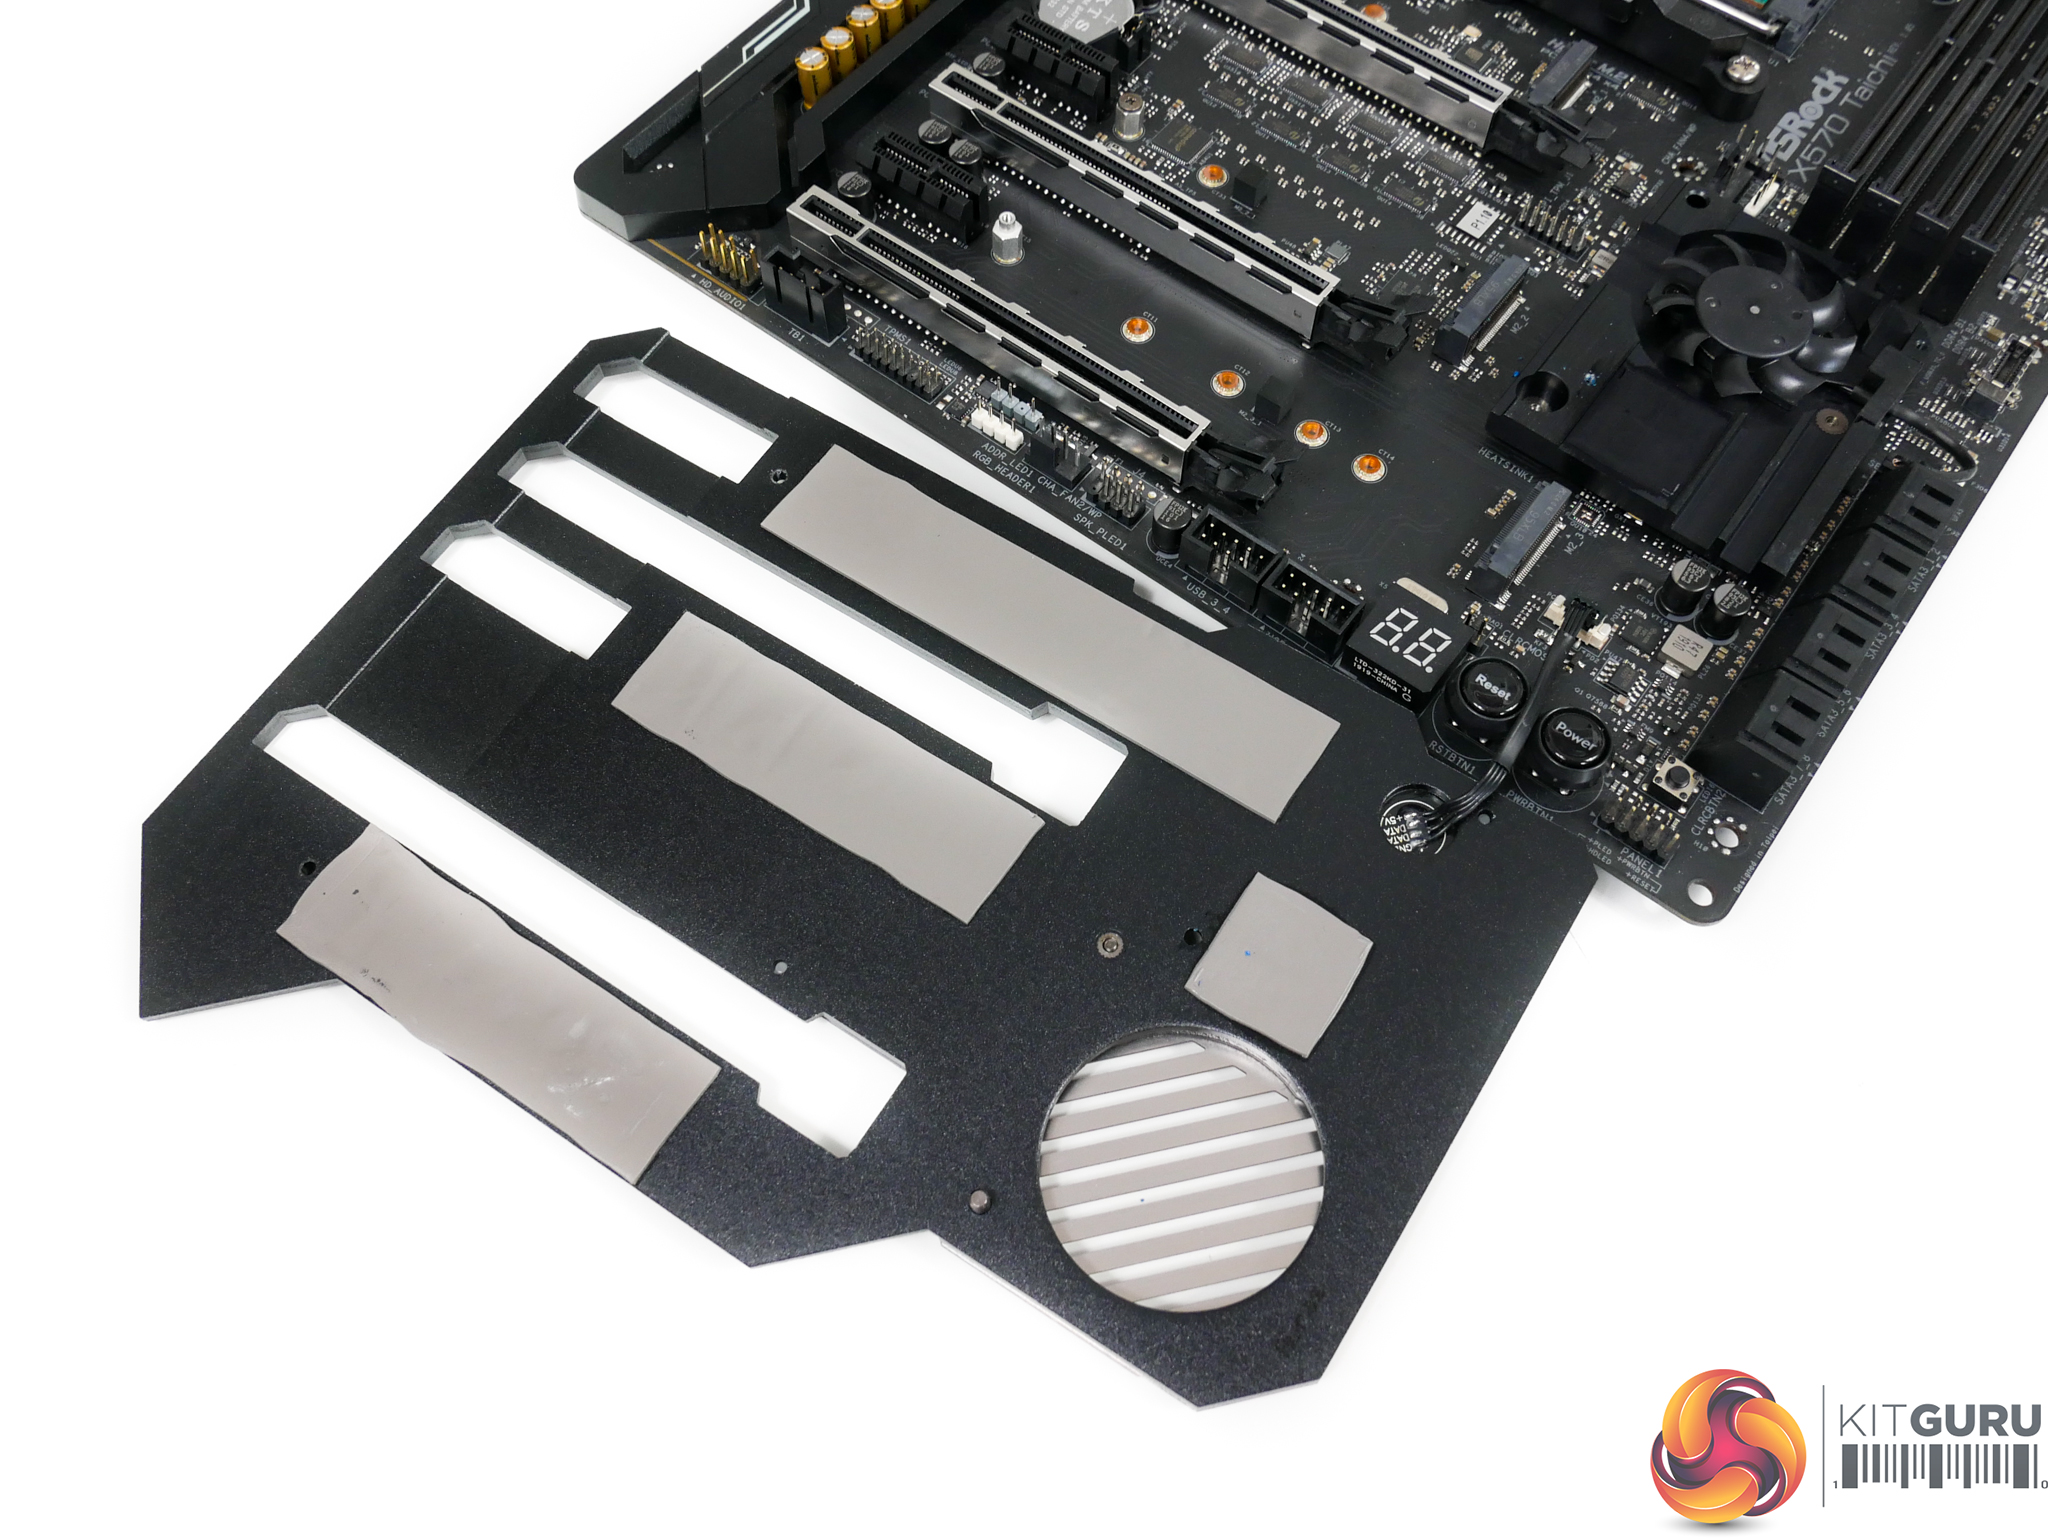
The ASRock X570 Taichi motherboard ships in a large box that features branding and product information. M.2 mounting standoffs and screws, SATA cables, the dual-band WiFi antenna, a high-bandwidth SLI bridge, and a T8 Torx tool make up the supplied bundle.

ASRock uses a dark black and grey colour scheme with touches of gold dotted via the heatsink and audio capacitors. I personally like the balance of ASRock’s styling as the board’s look is consistent.
Noteworthy is the large shroud that ASRock uses to cover most of the lower portion of the motherboard. This shroud integrates with the chipset heatsink cover and is also used to cool M.2 SSDs.
The way that ASRock hides some of the T8 mounting screws for the shroud is smart – they’re integrated into the centre of the cog and gear styling printed throughout the motherboard.

ASRock includes RGB lighting in three discrete zones – the rear IO shroud, the chipset heatsink, and the right edge. I particularly like the right edge under glow as this area features top-to-bottom lighting and will look good in a chassis.

Four single-latch DIMMs support up to 128GB of DDR4 memory. I like that ASRock ensures all DIMM slots are the same colour; users buying this calibre of board will know how to install memory to operate correctly in dual channel mode.
ASRock quotes DDR4 memory support of more than 4666MHz via overclocking, though this is heavily dependent upon CPU IMC strength. The fastest frequency shown on the QVL is 4600MHz via overclocking a G.SKILL 3600MHz kit. And then there's the 4400MHz Patriot kit that's supported at 4000MHz. ASRock's memory QVL makes little sense.
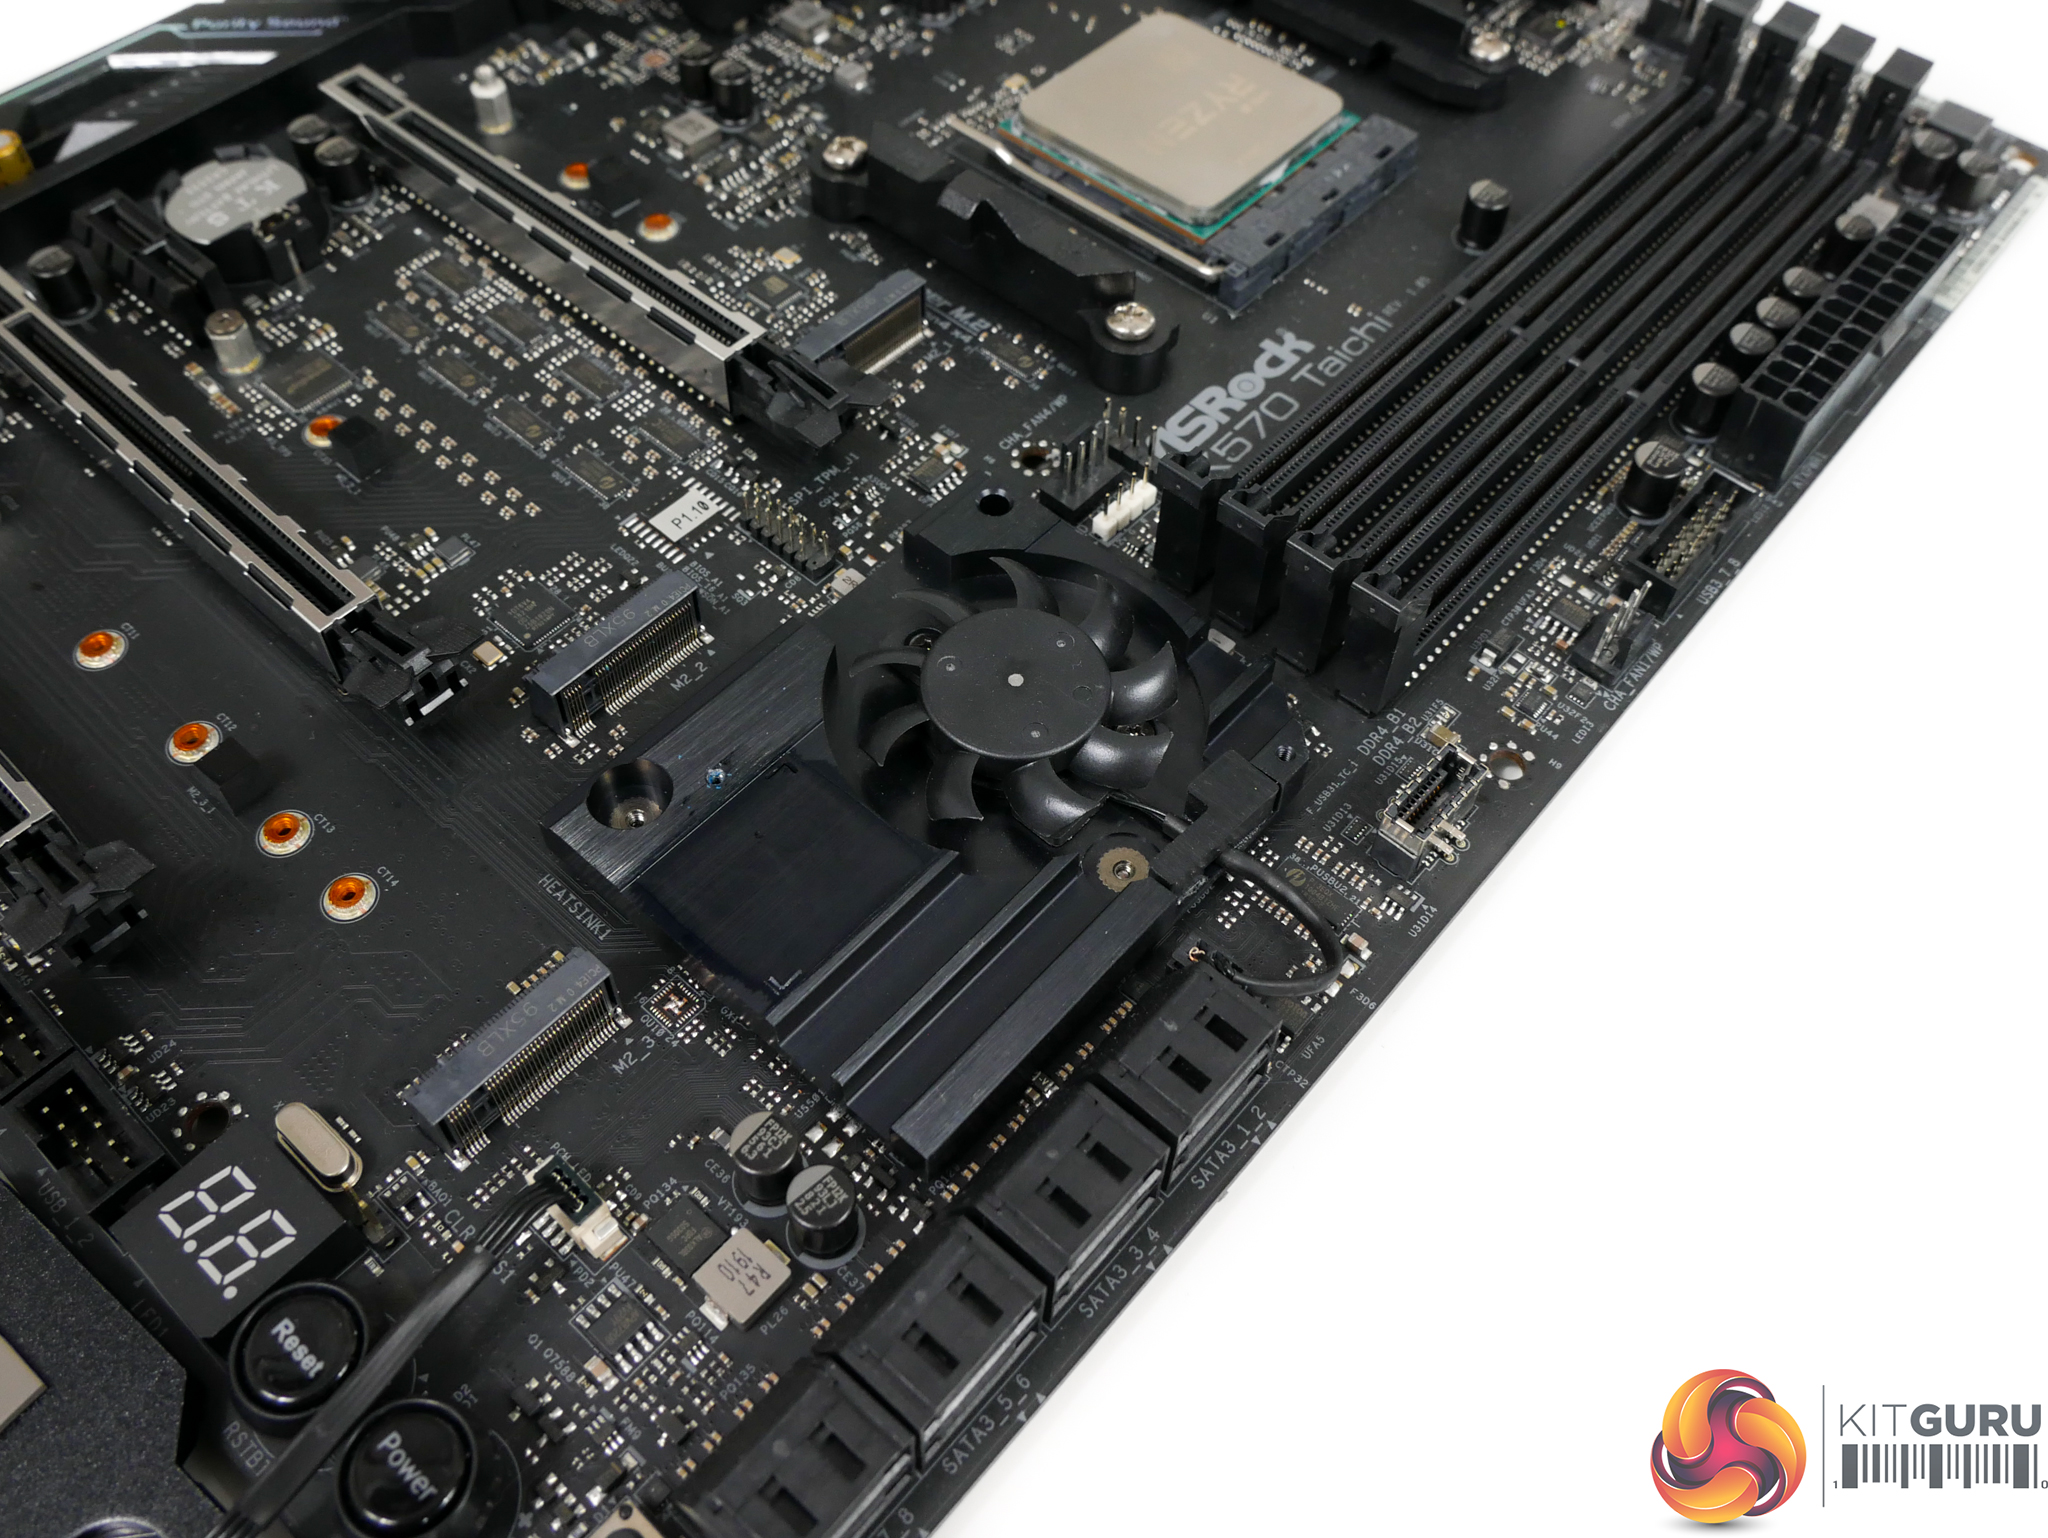
Close to the DIMM slots is the board’s only 5Gbps internal USB 3.0 header. This is mounted in a vertical orientation and the positioning close to the motherboard’s edge should help with cable management duties.
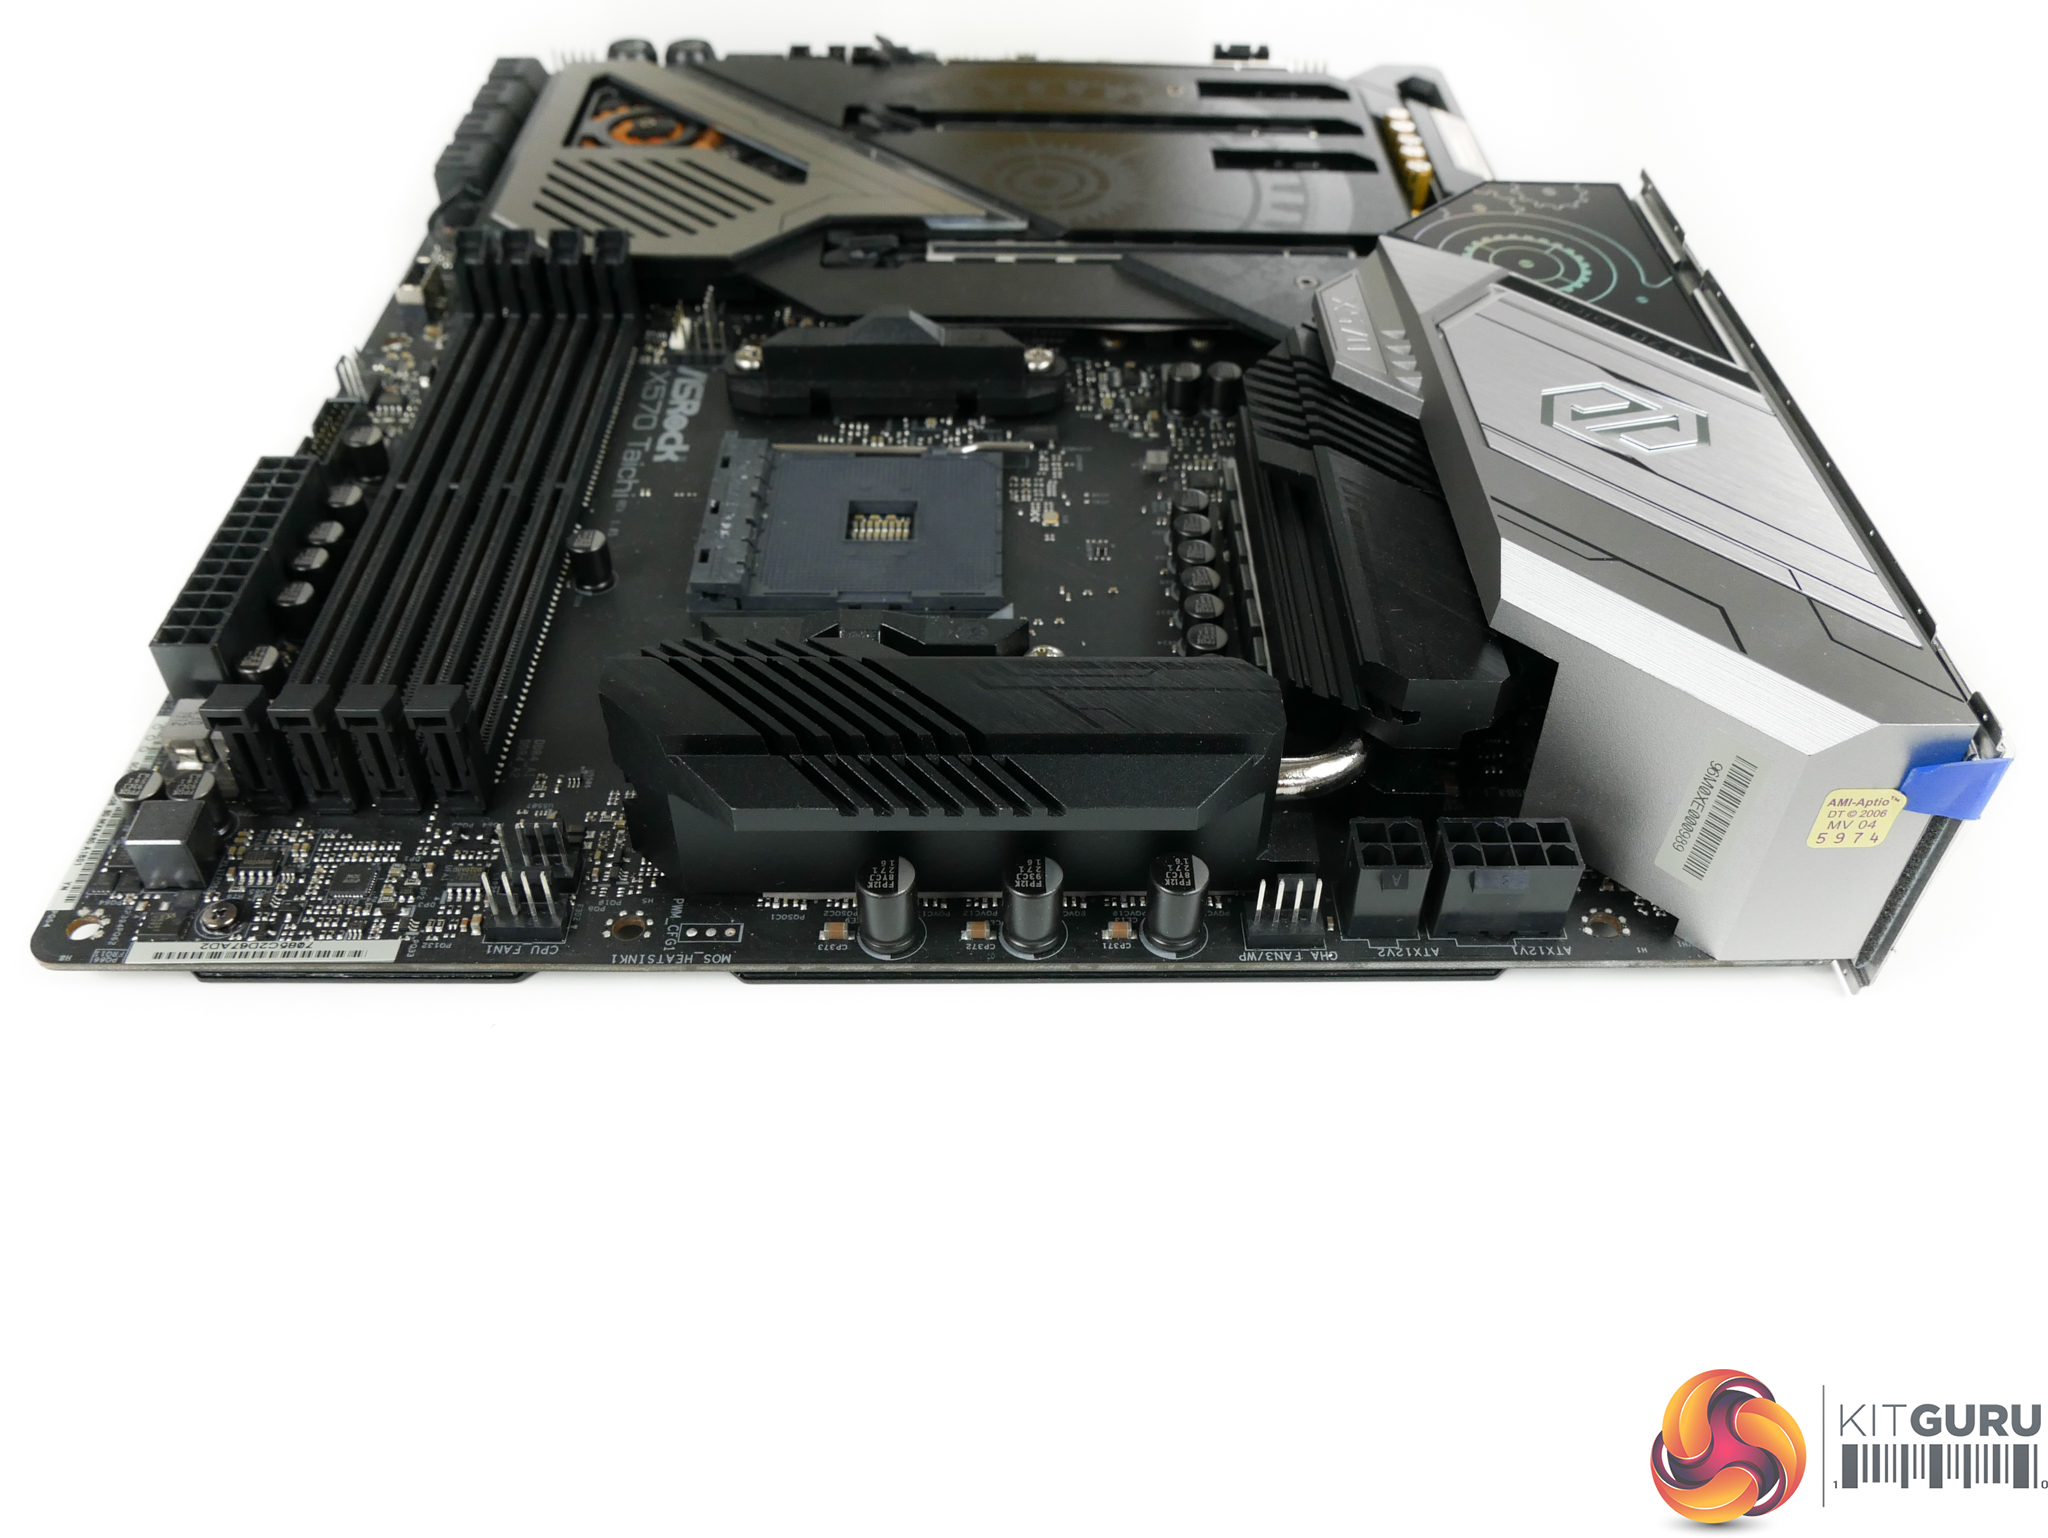
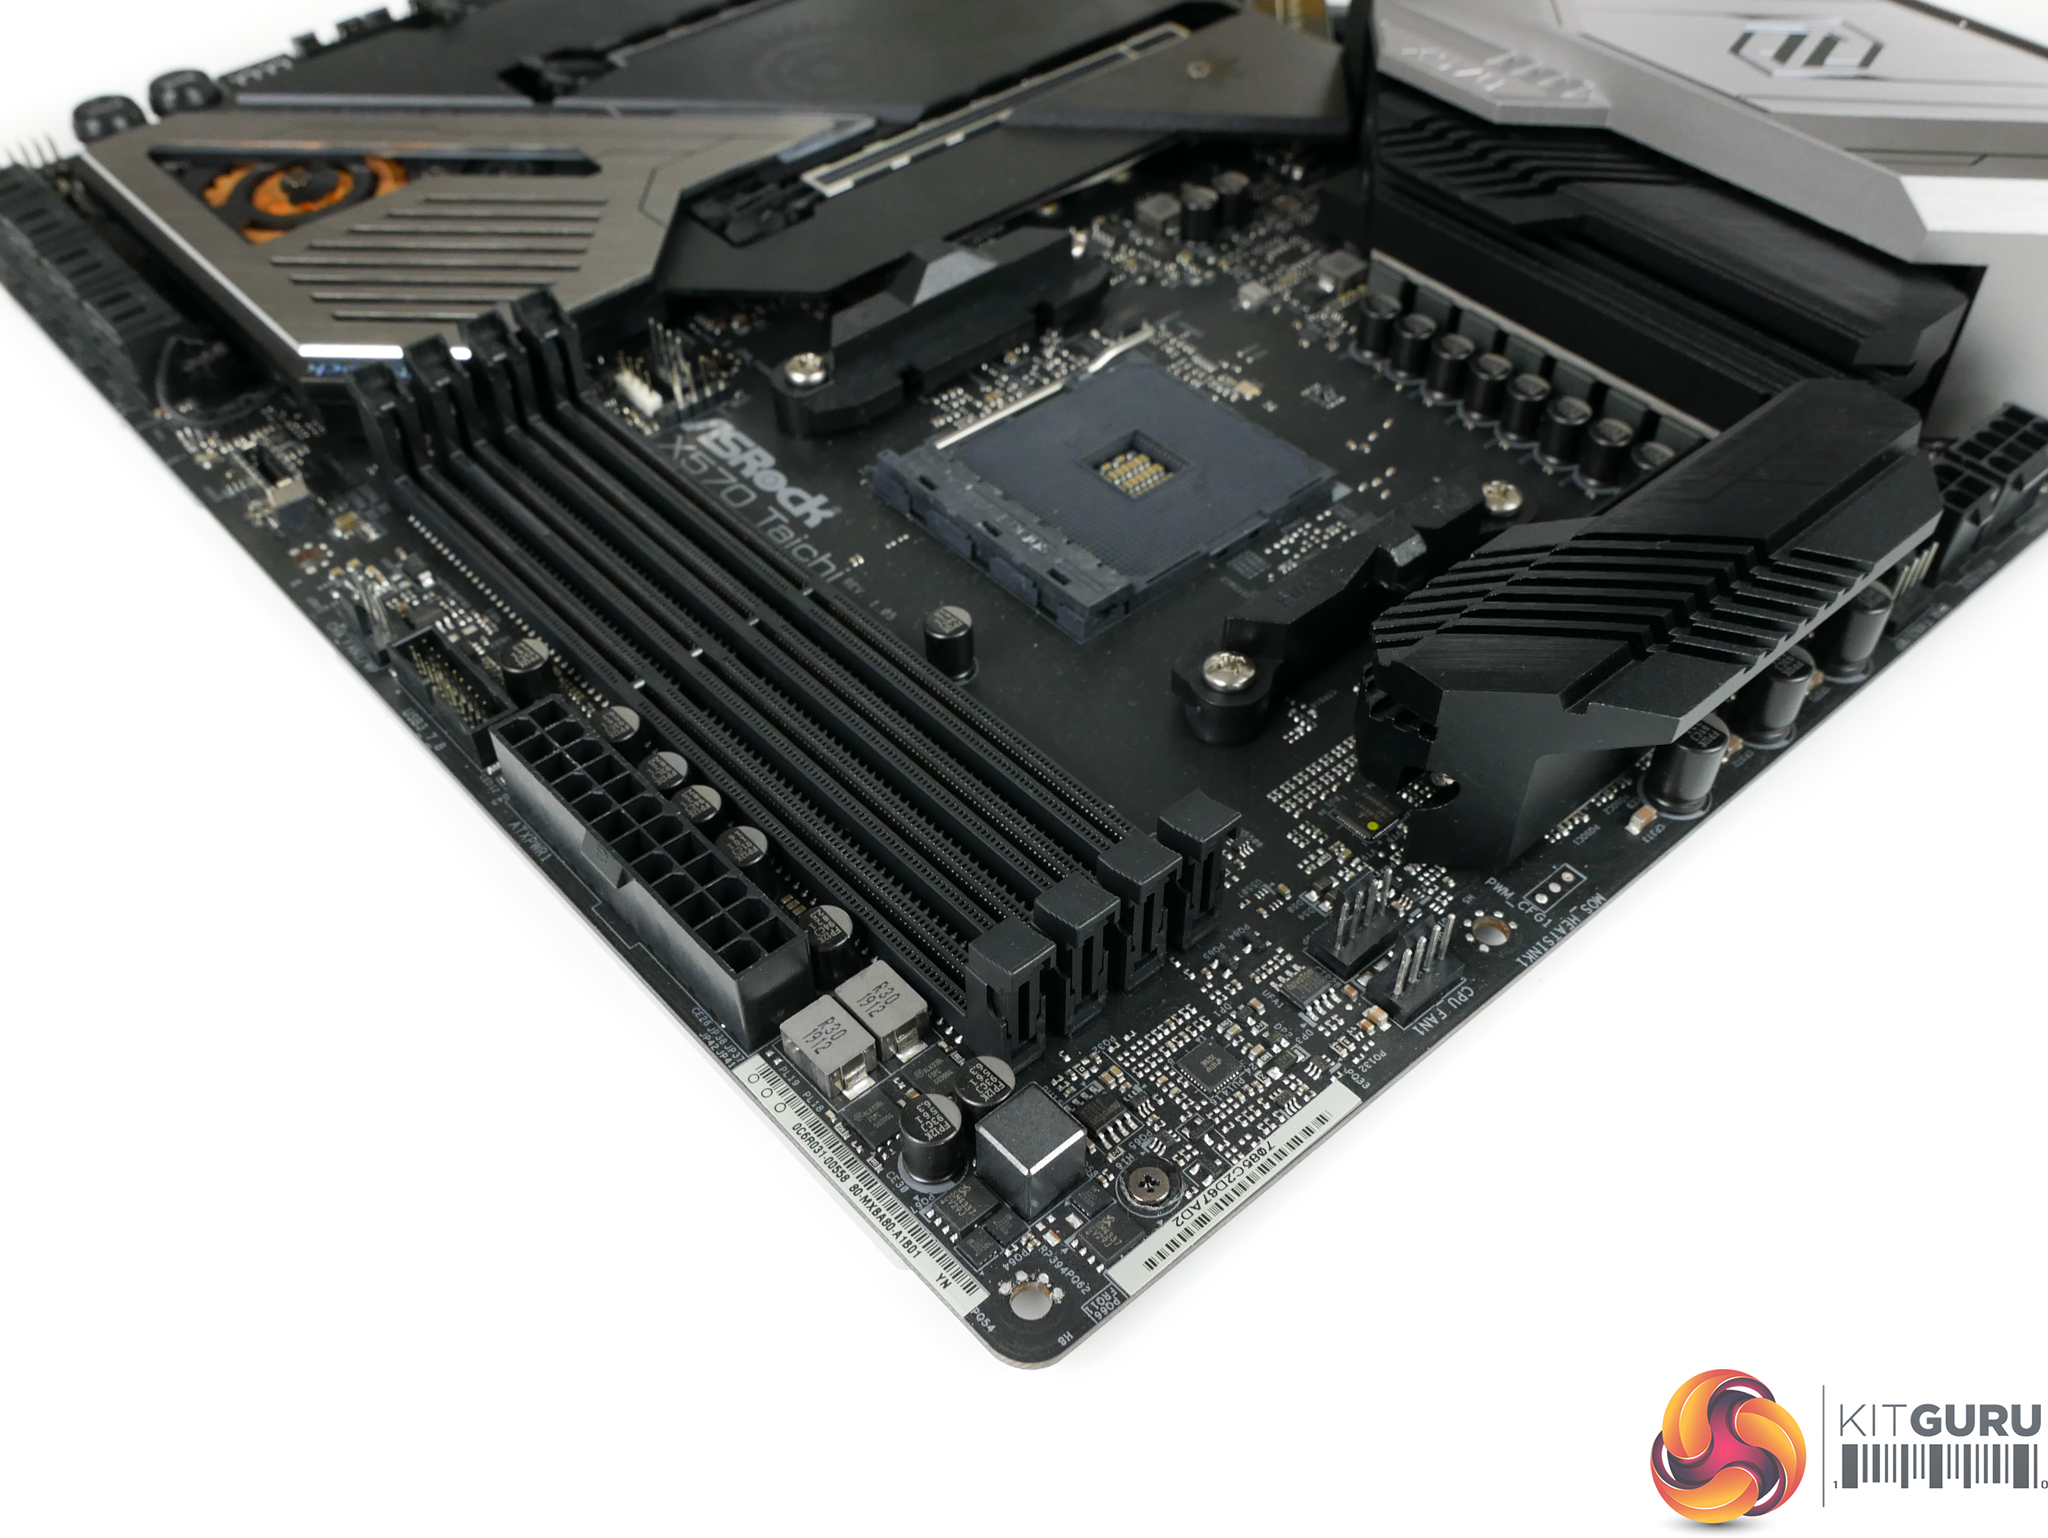
8-pin plus 4-pin CPU power connectors are found in their usual location along the motherboard’s top edge. Nearby you’ll also find three 4-pin fan headers that are ideally situated for CPU cooler and rear chassis fan duties.
It’s slightly disappointing to see no onboard voltage monitoring points being provided. However, that’s perhaps more understandable on a £300 X570 motherboard than on some of the more expensive offerings.
No RGB headers up on this top edge, either, so you’ll have to trail cables across the motherboard or buy an extension if you have roof-mounted LED strips. Not ideal.
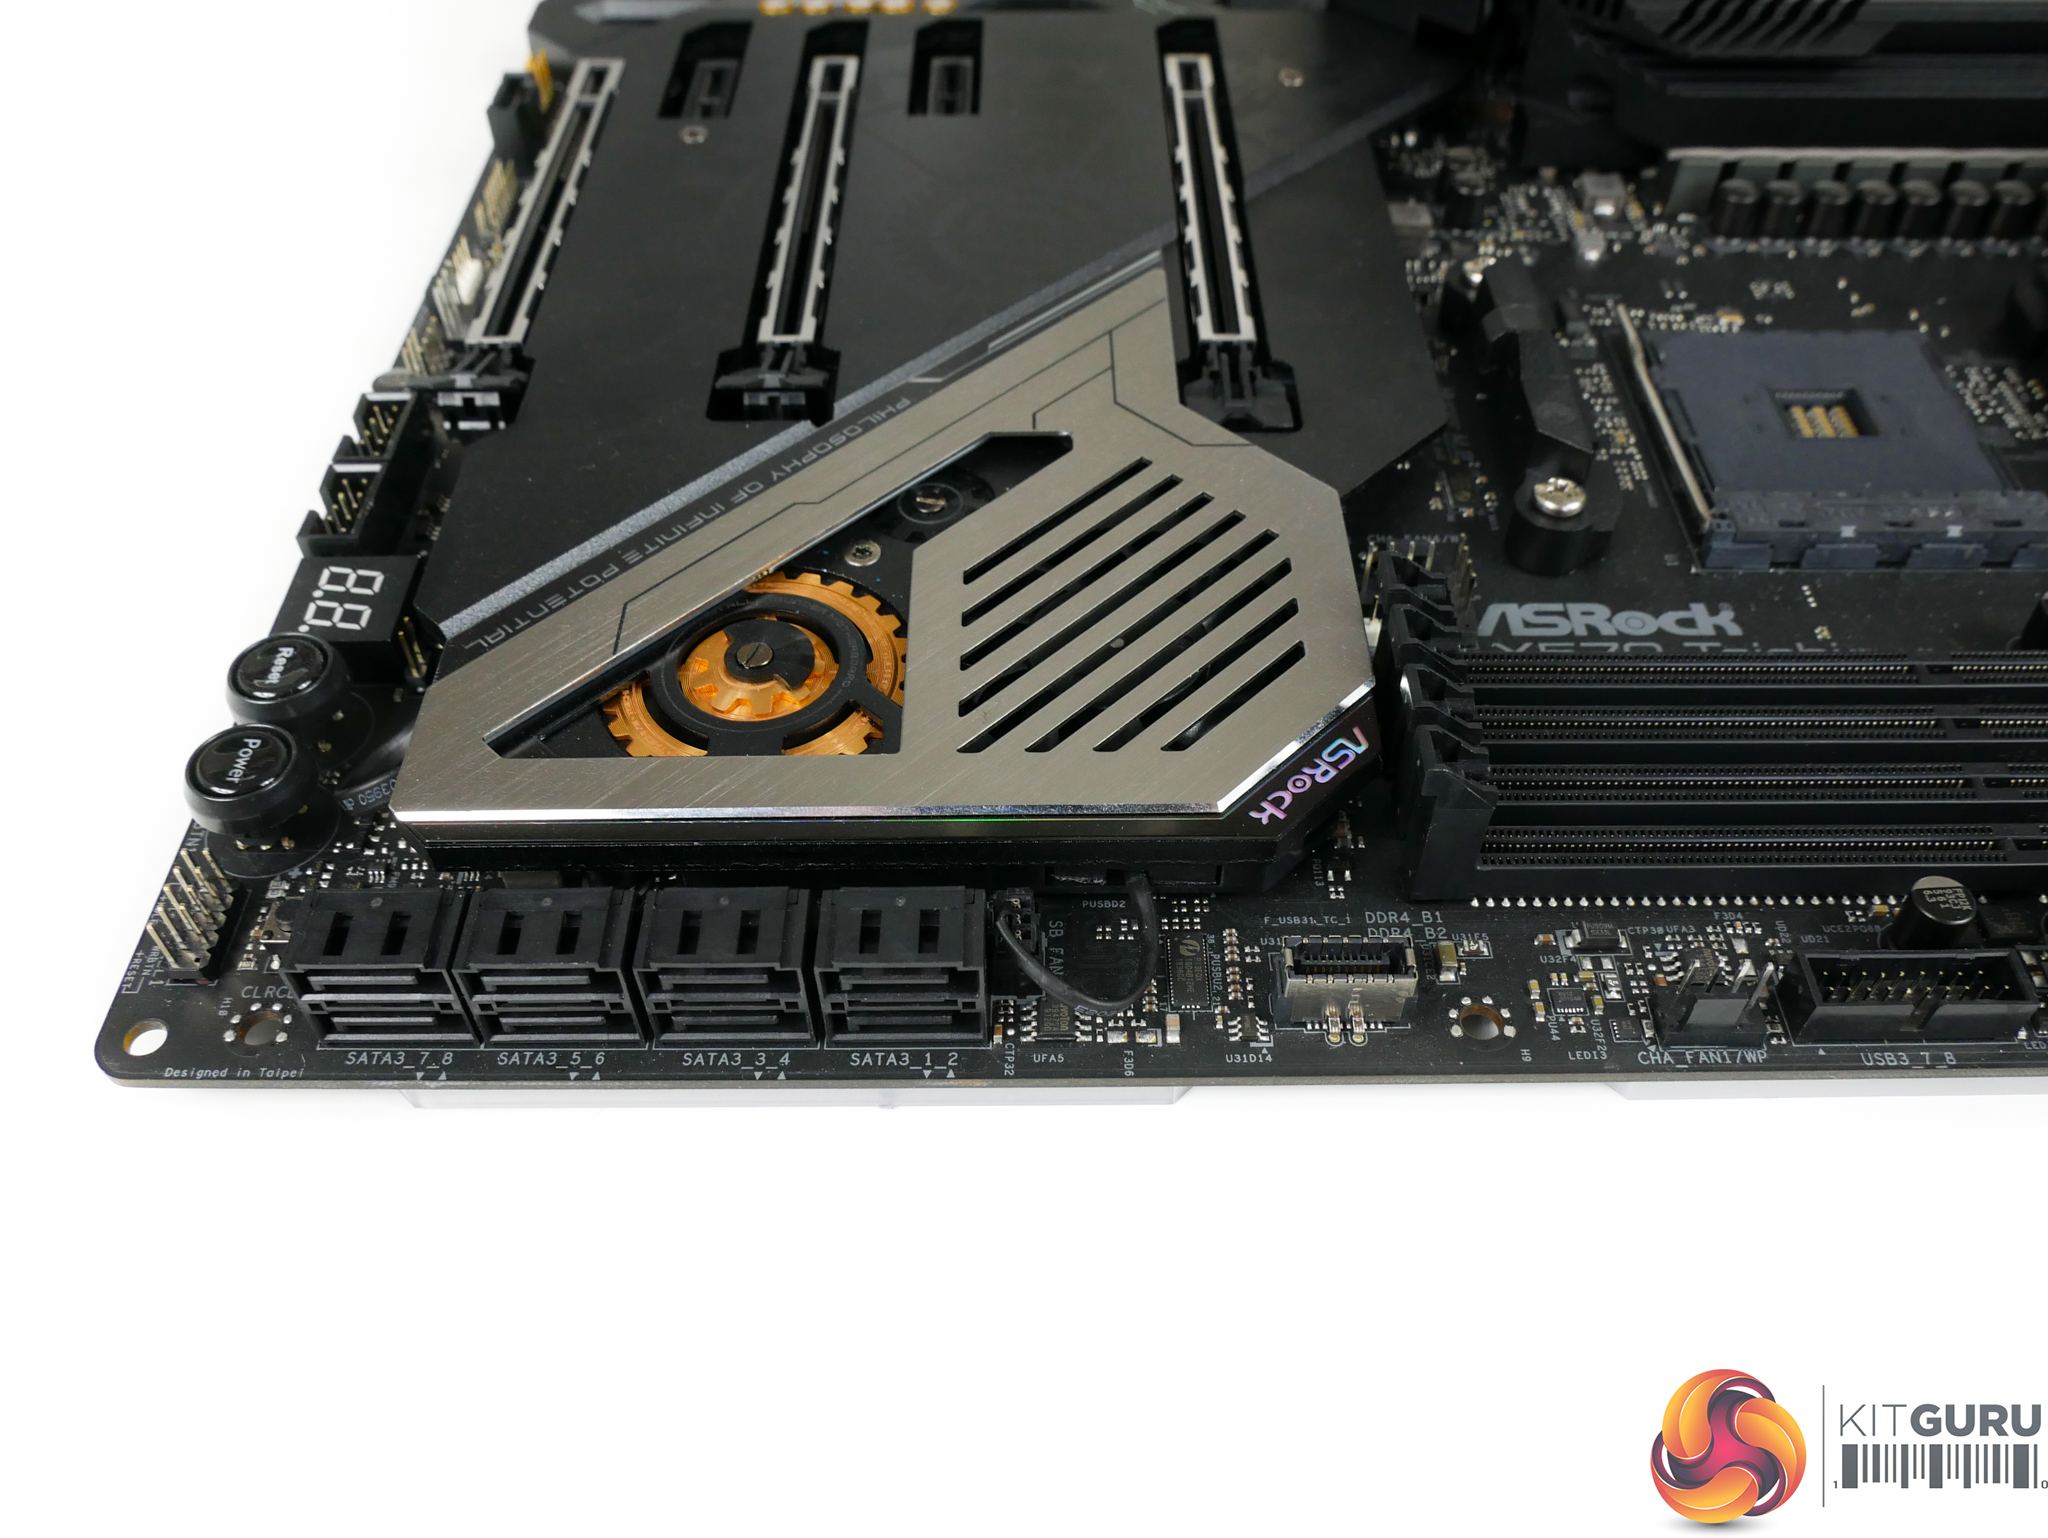
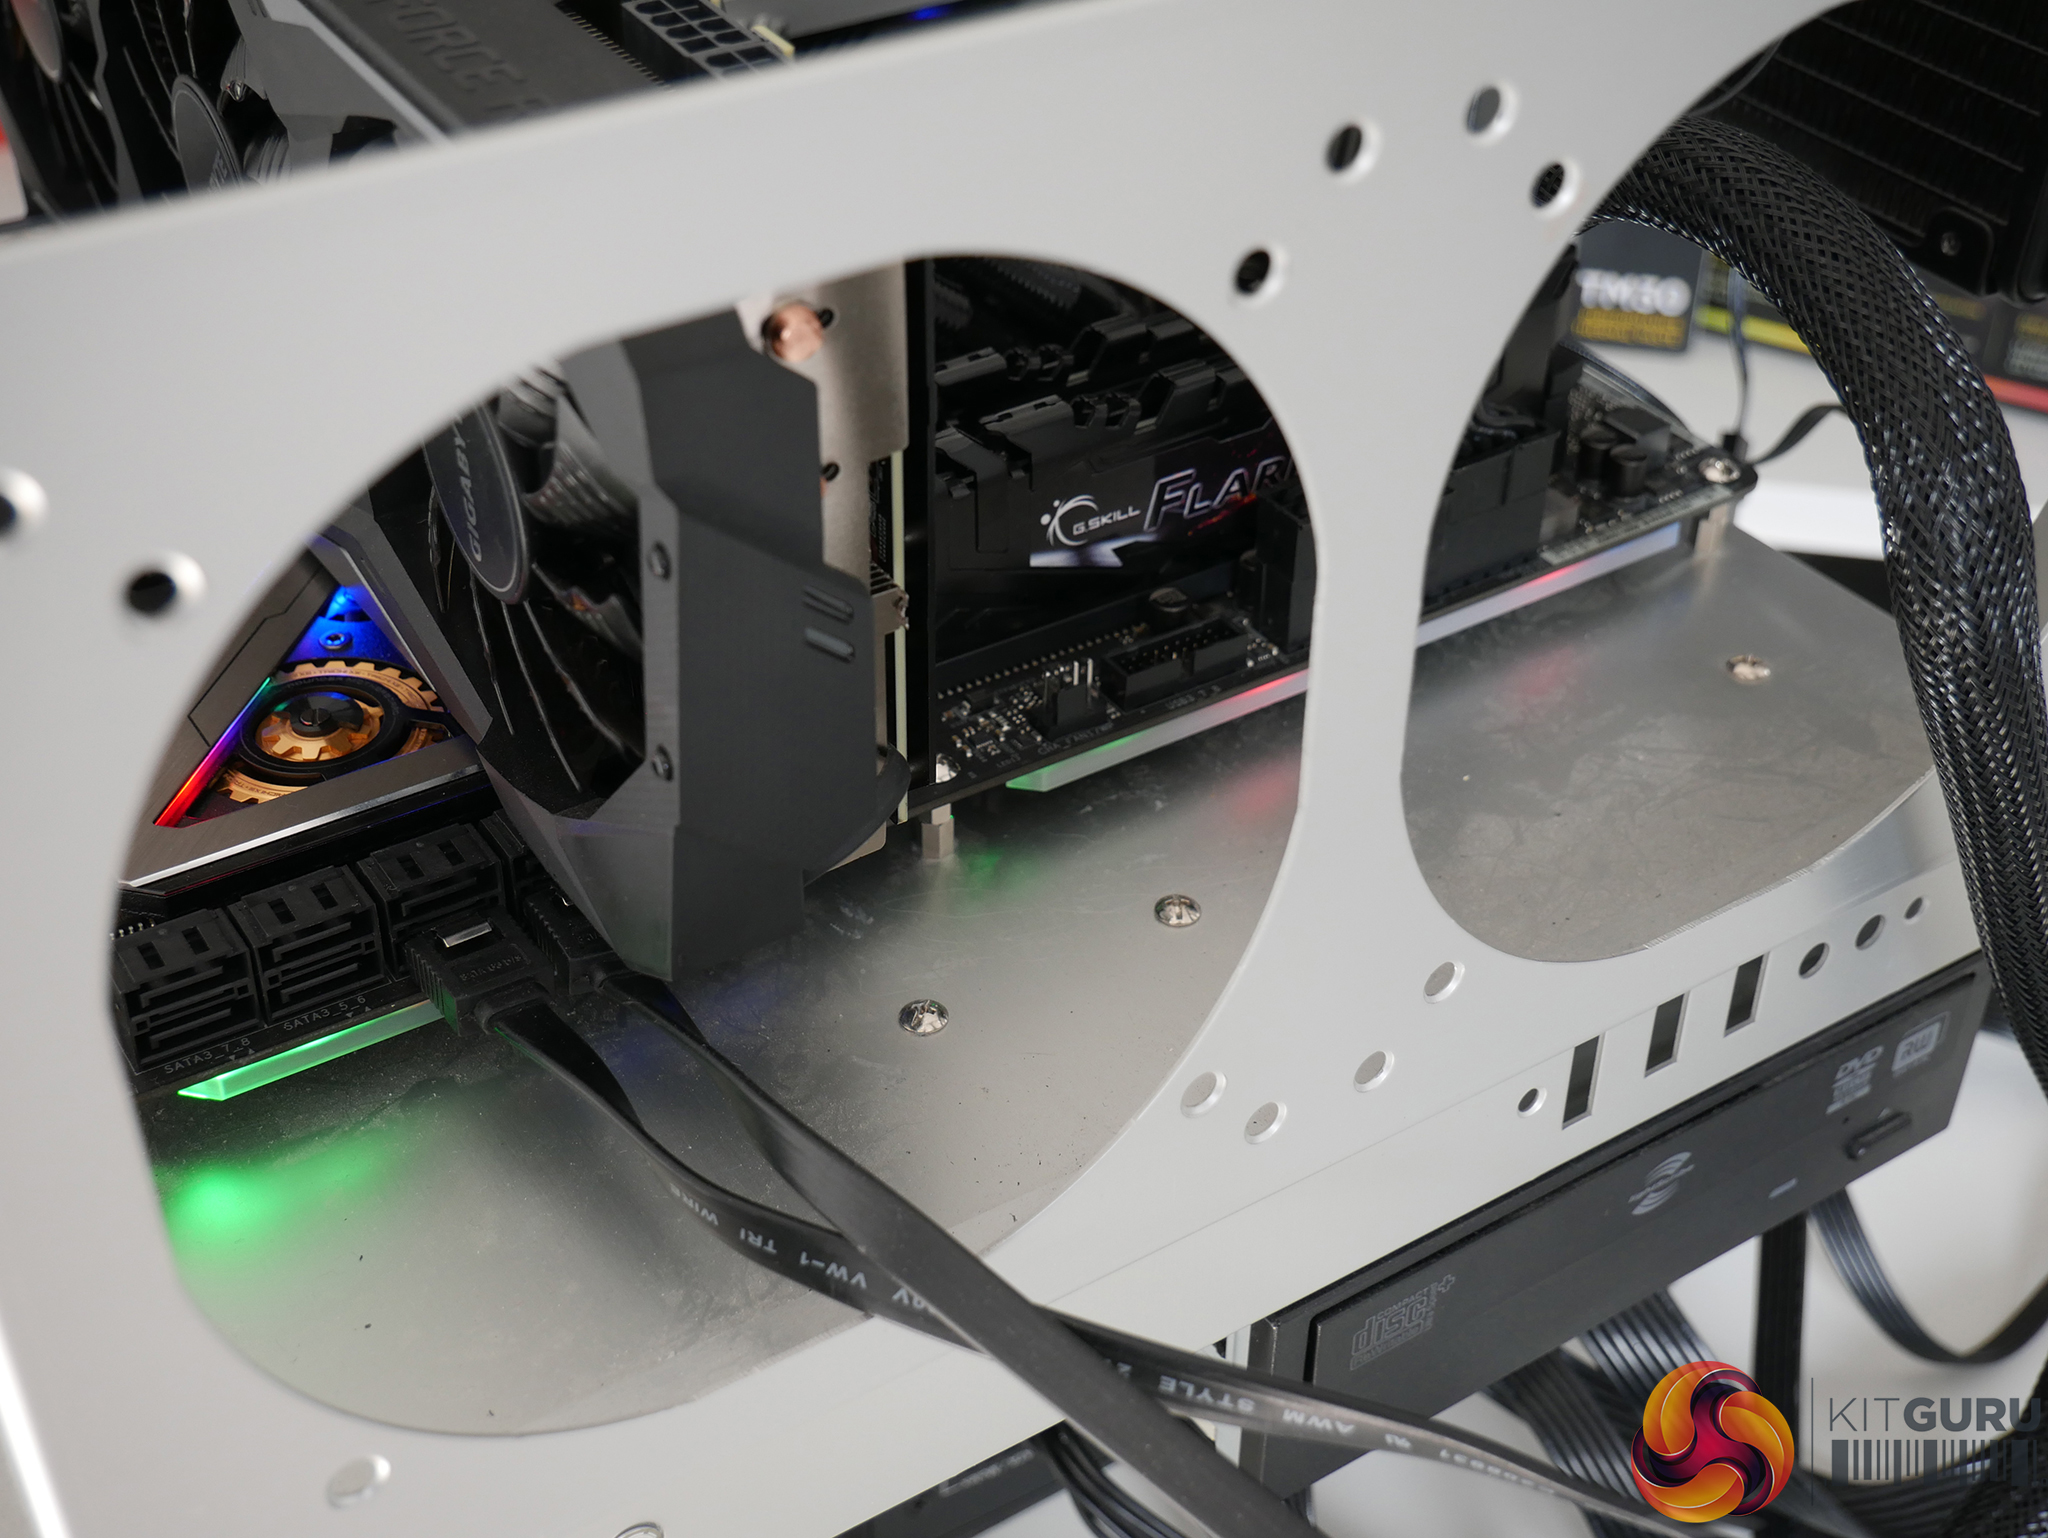
ASRock deploys eight SATA 6Gbps ports on the X570 Taichi. None of these ports share bandwidth with any other connectors, so all eight can be used at any time.
Next to the SATA ports is the single, vertically facing internal front panel 10Gbps USB 3.2 Gen 2 Type-C header. The positioning of this header is dreadful and a complete oversight on ASRock’s part.
Installing a graphics card in the primary slot, as you should to get full x16 bandwidth, will completely cover the header and render it unusable. That’s unless you have a graphics card shorter than around 9 inches, which is unlikely if you’re building an X570 system with a motherboard of this calibre.
We wouldn’t expect to see this level of oversight on an entry-level, bargain-basement motherboard, never mind a premium X570 offering. How this placement decision passed engineer/designer sign-off, I do not know.
There have been suggestions on Reddit of people contacting ASRock support for a right-angled cable and receiving one depending on stock levels. We checked with ASRock and the company is aware of the issue and later manufactured batches of the motherboard will have the connector rotated by 90 degrees.
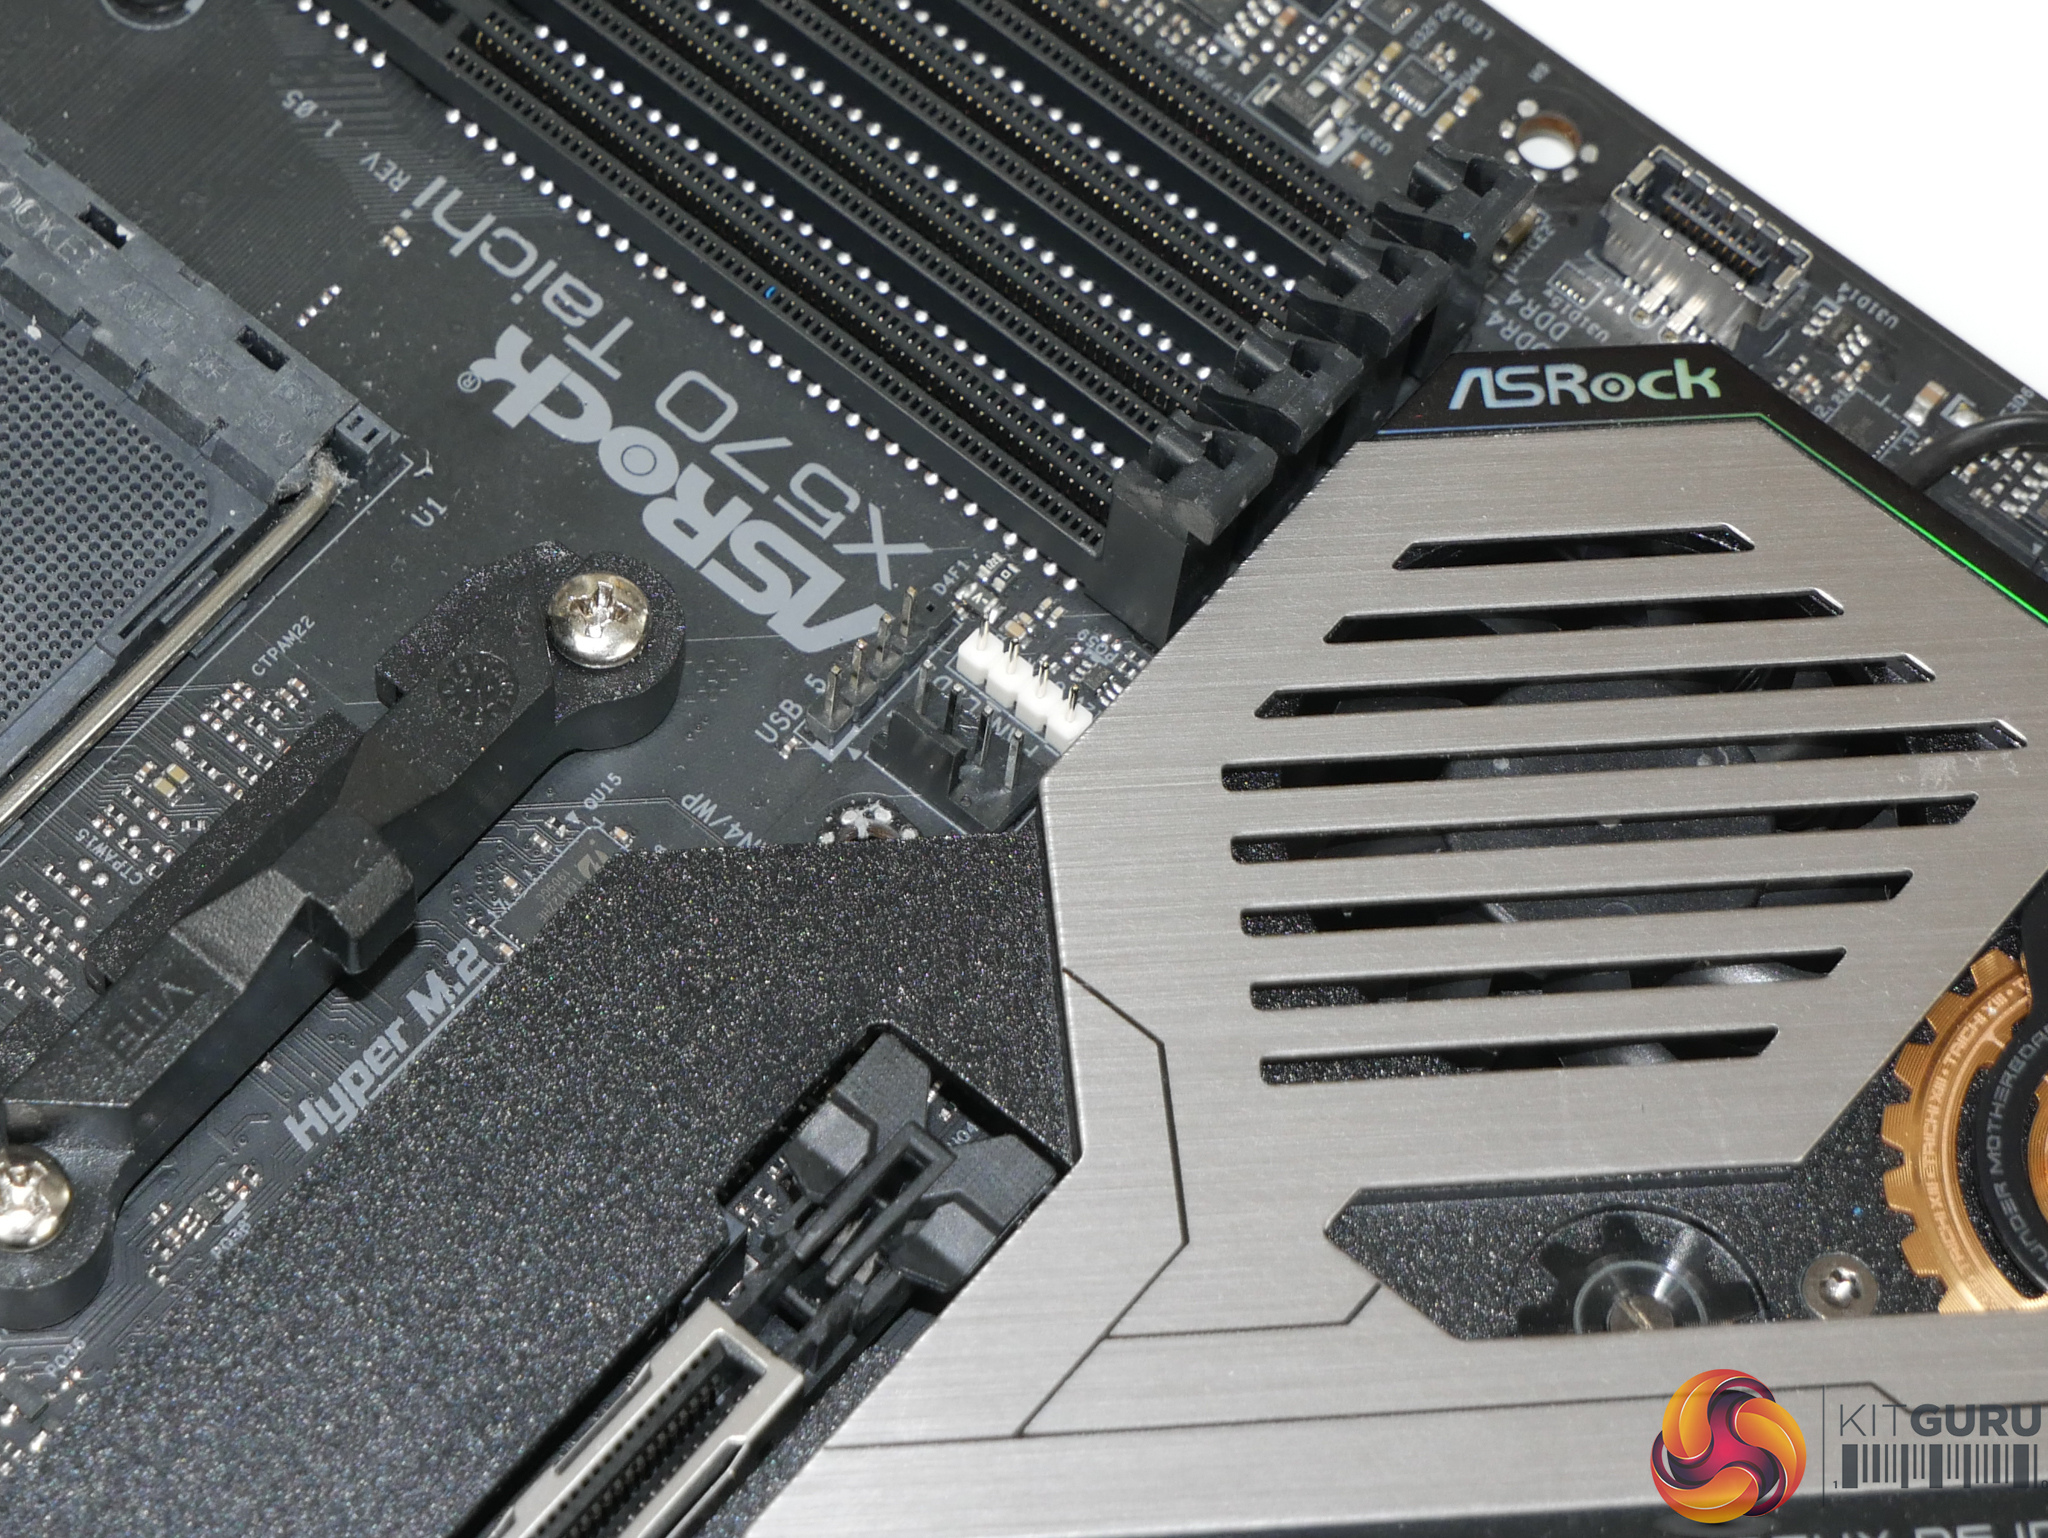
One of ASRock’s smartest design moves is the inclusion of headers located near to the CPU socket. ASRock breaks the norm by mounting 4-pin fan, RGB, and half-height USB 2.0 headers close to the CPU socket and DIMM slots. This positioning makes them ideally located for usage with AMD’s Wraith Prism RGB cooler that is provided with the Ryzen 7 and Ryzen 9 processors. Smart move, ASRock.
There is no dual BIOS switch on the motherboard as ASRock only includes a single chip. Thankfully, the chip’s 256Mb capacity should make it capable for future AM4 CPUs but the lack of dual-BIOS resiliency and redundancy is a little disappointing.
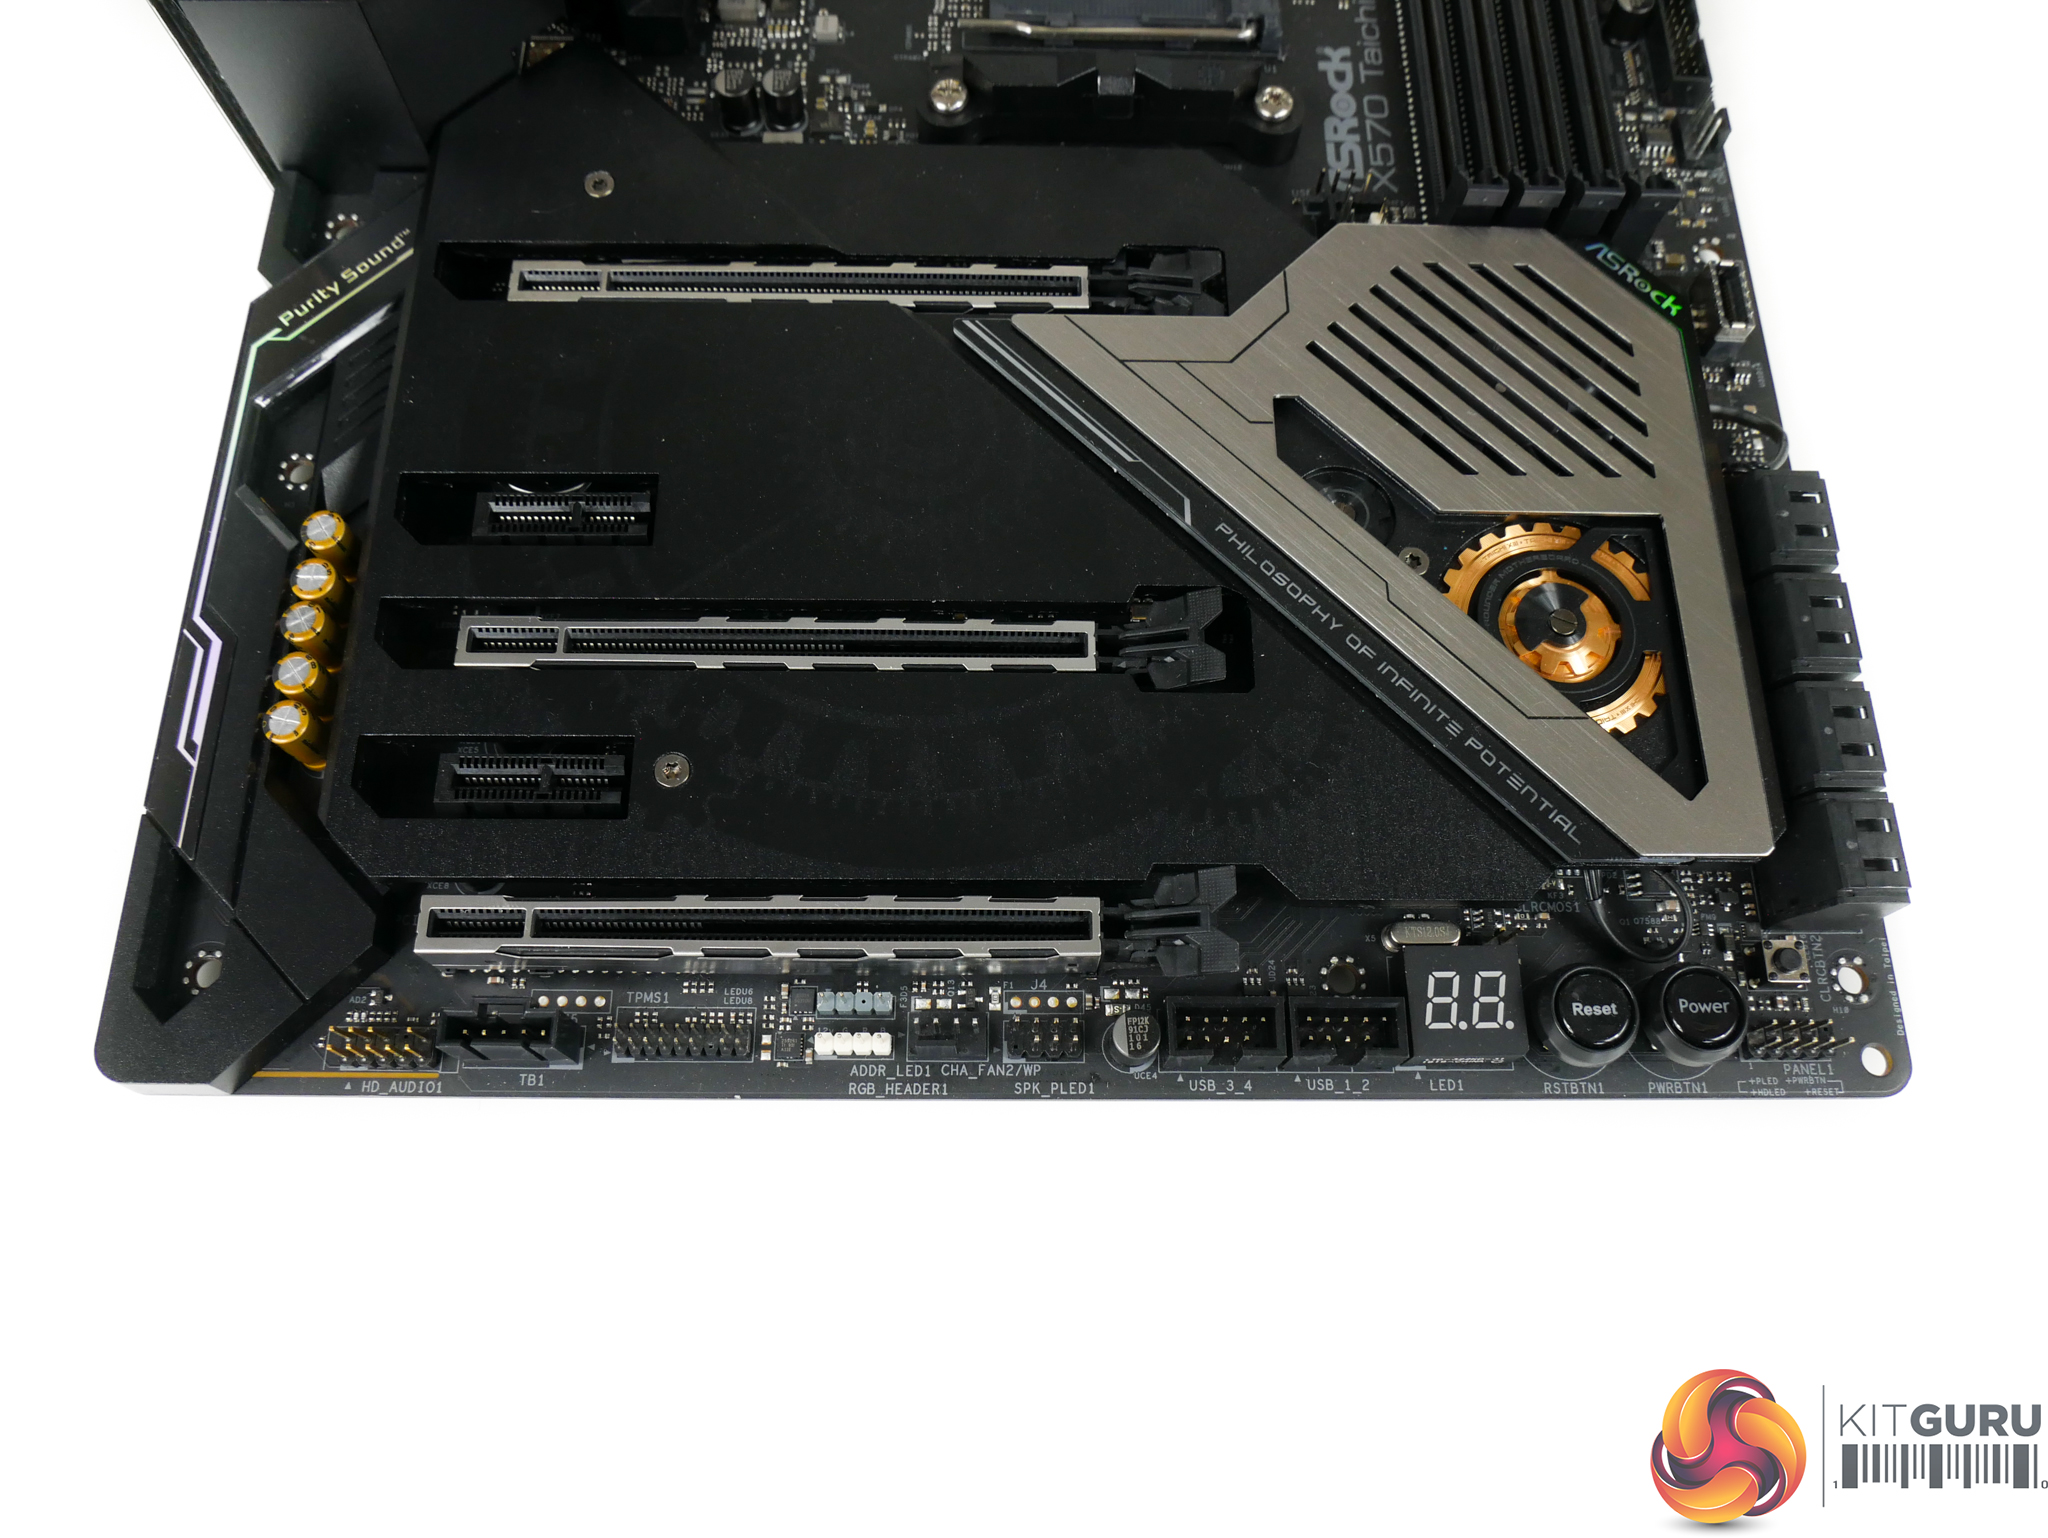
Along the bottom edge, ASRock provides a further two USB 2.0 headers, this time in full-height form. These are ideal for use with an AIO CPU cooler and the likes. Also found along the bottom edge are a further two LED headers, one of which uses the 3-pin addressable format.
Power, reset, and clear CMOS buttons are included on the X570 Taichi. I like to see these features as they’re always useful for troubleshooting. Next to the buttons is a 2-digit debug LED that’s equally useful.
ASRock’s positioning of these buttons and the Dr. Debug LED display is good. The display should be visible even when a graphics card is installed, and most users shouldn’t have issues accessing the buttons when the system is fully built.
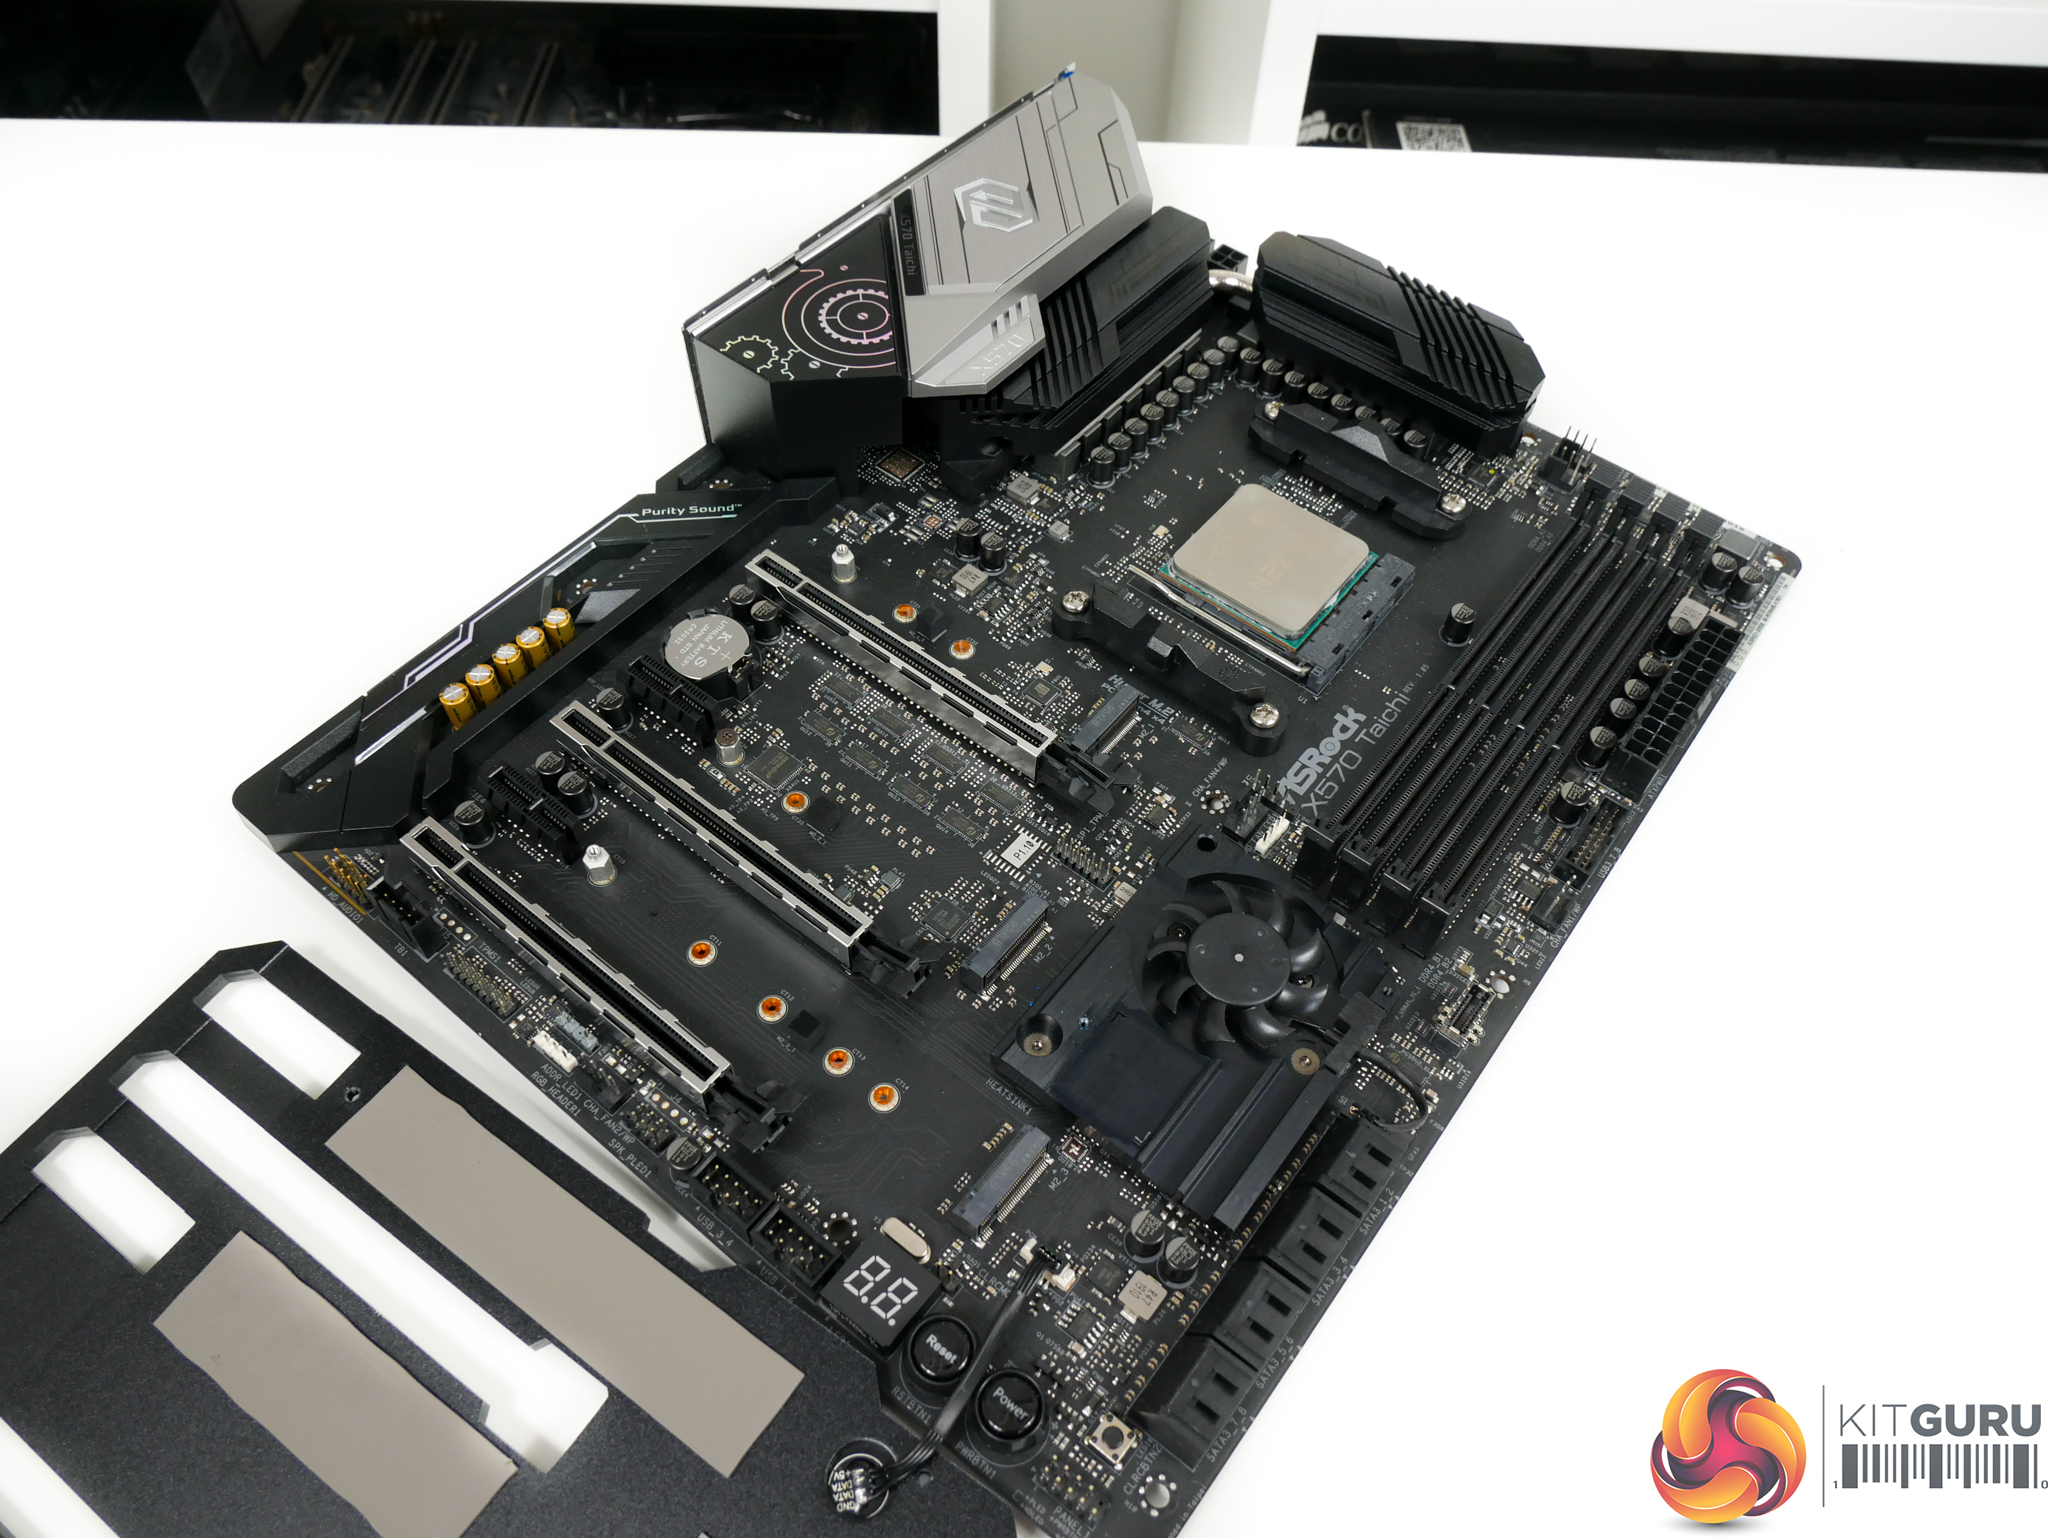
Beneath the dark shroud (which feels like aluminium), ASRock hides three M.2 connectors with one of them supporting drives up to 110mm in length. The top and bottom connectors support PCIe 4.0 x4 and SATA 6Gbps drives. However, the middle connector (M2_2) only supports PCIe devices with up to Gen 4 x4 bandwidth.
X570 chipset lanes are used to drive the lower two slots, while the uppermost is linked to a Ryzen CPU. Bandwidth sharing is minimal, with only the bottom M.2 connector sharing its link with lowermost PCIe expansion slot. Three M.2 devices can be used simultaneously, provided you’re happy to forgo the lowest full-length PCIe slot.
The large shroud features thermal pads positioned to cool M.2 SSDs. This is good to see, as each SSD is given far greater surface area to dissipate its thermal energy onto than competing M.2 heatsinks from the likes of MSI and Gigabyte.
There is a major drawback, however. Fancy new SSDs with their own well-built heatsinks, such as the Corsair MP600 and Aorus PCIe Gen 4 SSD, cannot be installed on the ASRock X570 Taichi with their heatsinks equipped. Thankfully, M.2 devices can generally have their heatsink removed so that just the thin PCB is exposed.
Another annoyance of the shroud is the needless difficulty, or perhaps consumption of time, required for a simple M.2 SSD install or upgrade. On competing solutions, you simply unscrew the M.2 heatsink, screw down the drive, replace the heatsink, and you’re good to go. No system disassembly is required and the whole task takes maybe five minutes.
With ASRock’s X570 Taichi shroud, though, you’d have to remove a graphics card and any other expansion devices, remove the shroud’s three T8 Torx screws using ASRock’s included tool, hope that there’s wiggle-room in your chassis so that the entire motherboard doesn’t need to come out, slot the new M.2 SSD in, remount the cover, and reinstall expansion devices.
So, your five-minute task just became a twenty-minute one. What if that graphics card you’re forced to remove is water-cooled in a custom loop? You’re going to have a *cough* fun *cough* few hours doing your supposed five-minute M.2 SSD install.
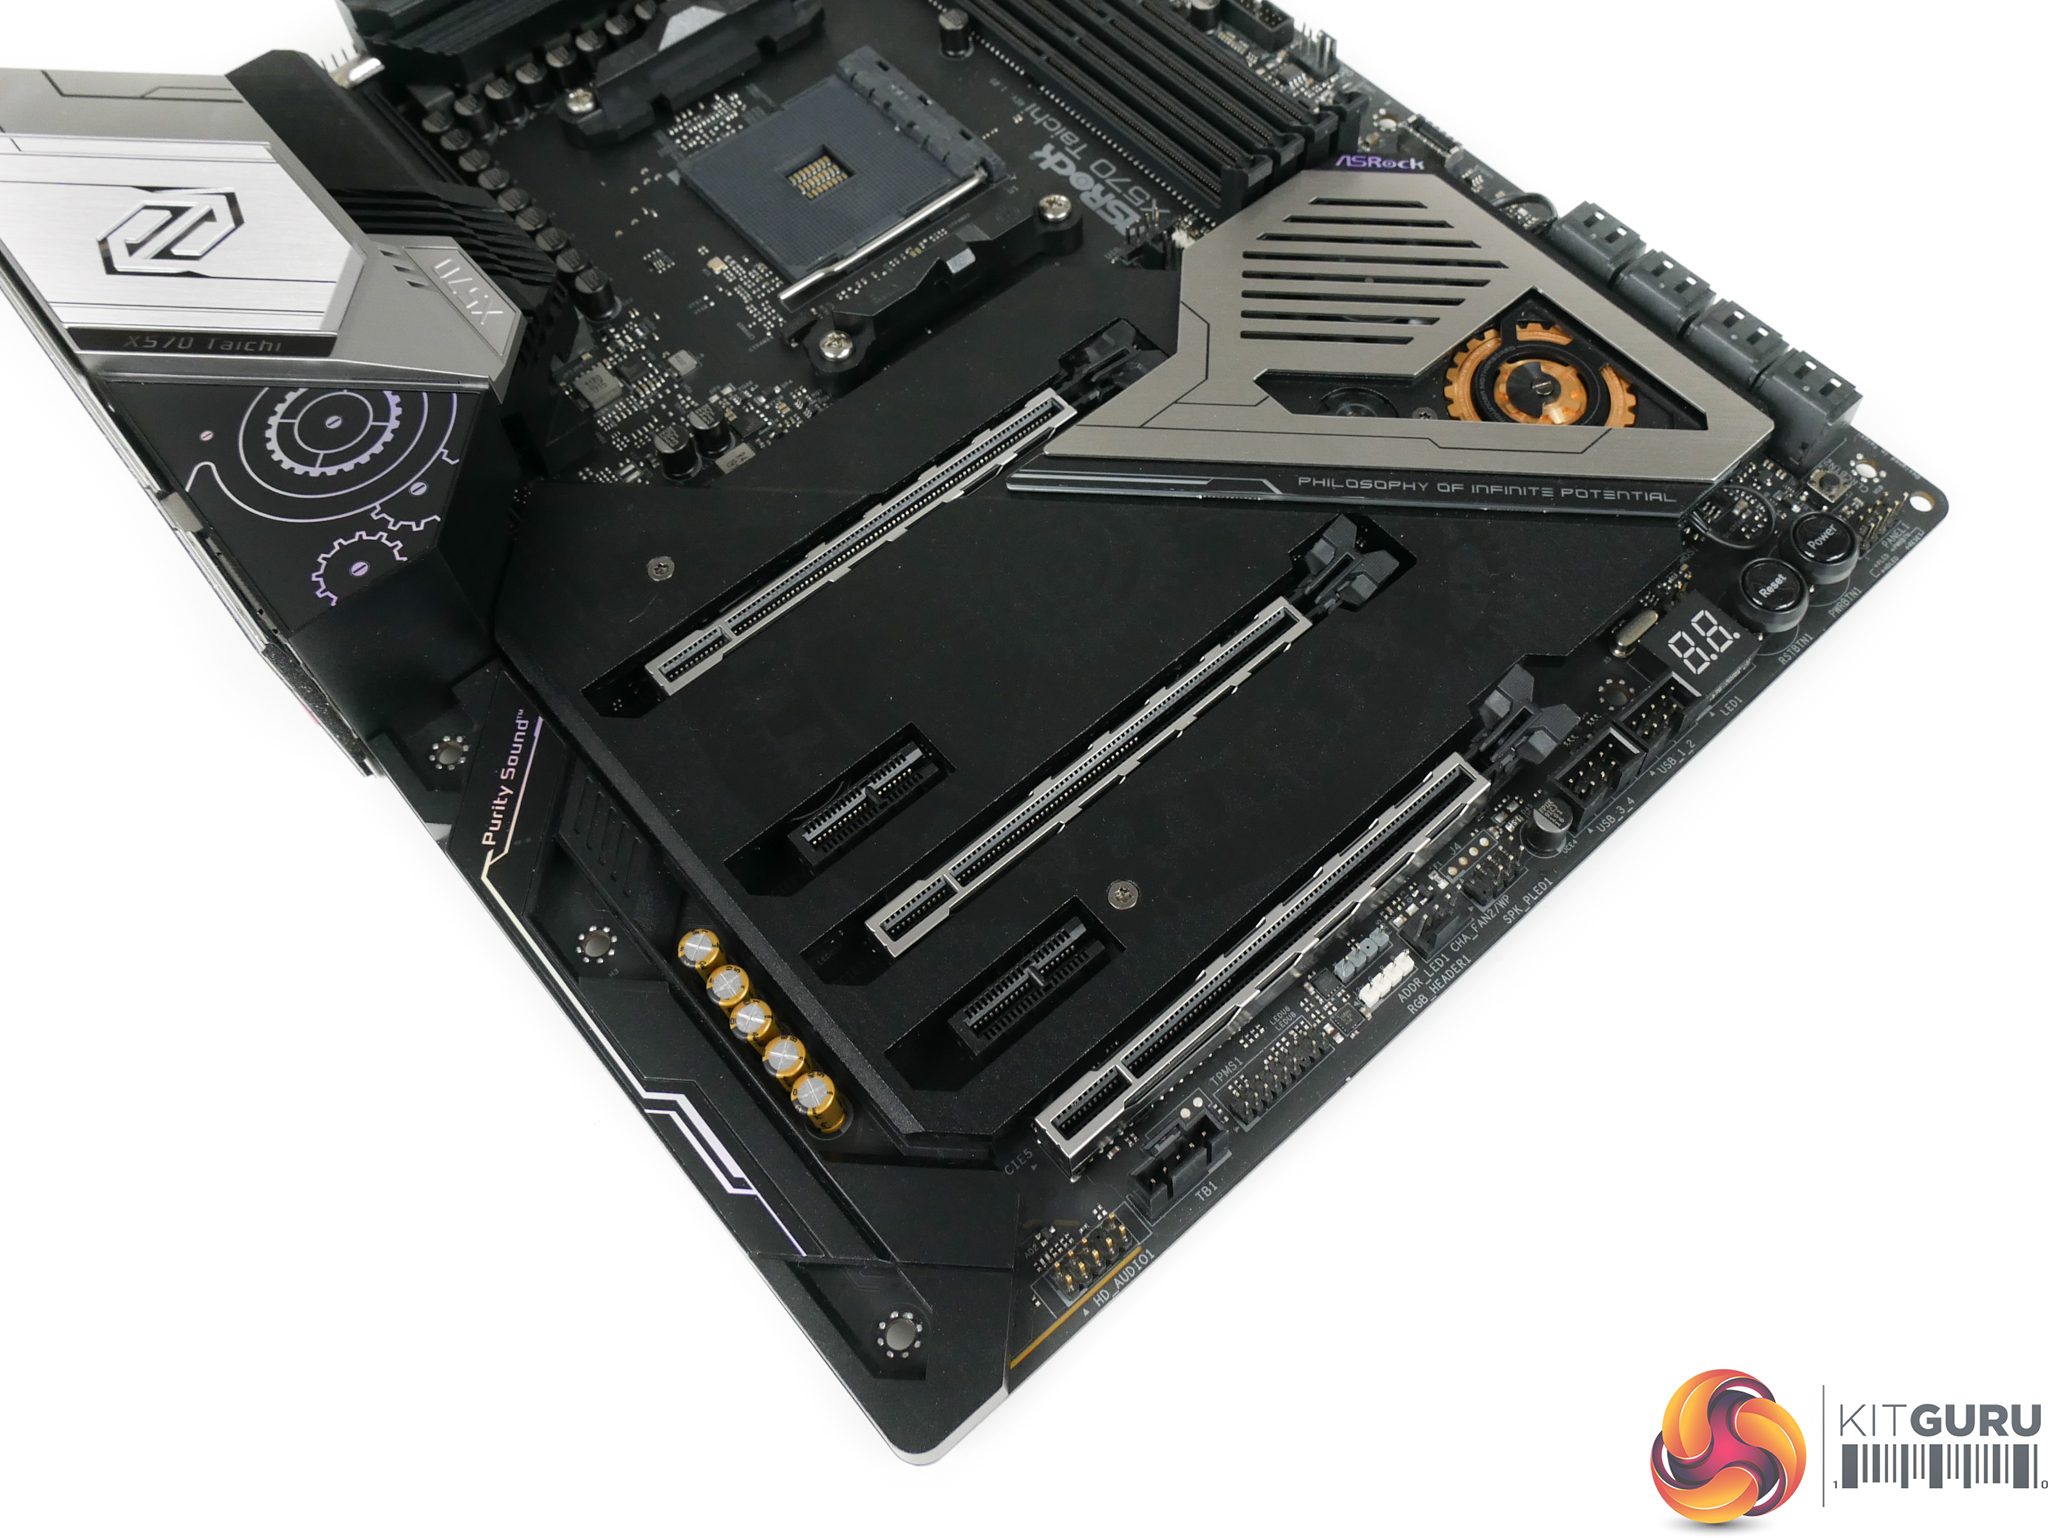
The X570 Taichi comes with the expected set of expansion slots for a premium X570 offering. All three of the full-length slots feature steel reinforcement which helps to minimise GPU sag. I like ASRock’s decision to make the two x1 connectors open-ended so that cards with physically larger PCIe connectors can be installed if desired. Oh wait, that would cause interference with the shroud so it’s not possible unless you get your Dremel out. The shroud is clearly starting to look like more of a hindrance than a benefit.
Ryzen CPU lanes are used to feed the top two full-length expansion slots in the usual x16/x0 or x8/x8 format. As such, Crossfire and SLI is supported. The bottom full-length connector gets its PCIe 4.0 x4 connection from the X570 chipset and shares that link with the lowest M.2 connector. Both PCIe 4.0 x1 slots are also fed by the X570 chipset.
Expansion slot spacing is ideal for X570. The main graphics card slot is far enough away from the CPU socket to avoid interference with large air coolers. And there’s a three-slot gap to allow for cooling space in multi-GPU setups.
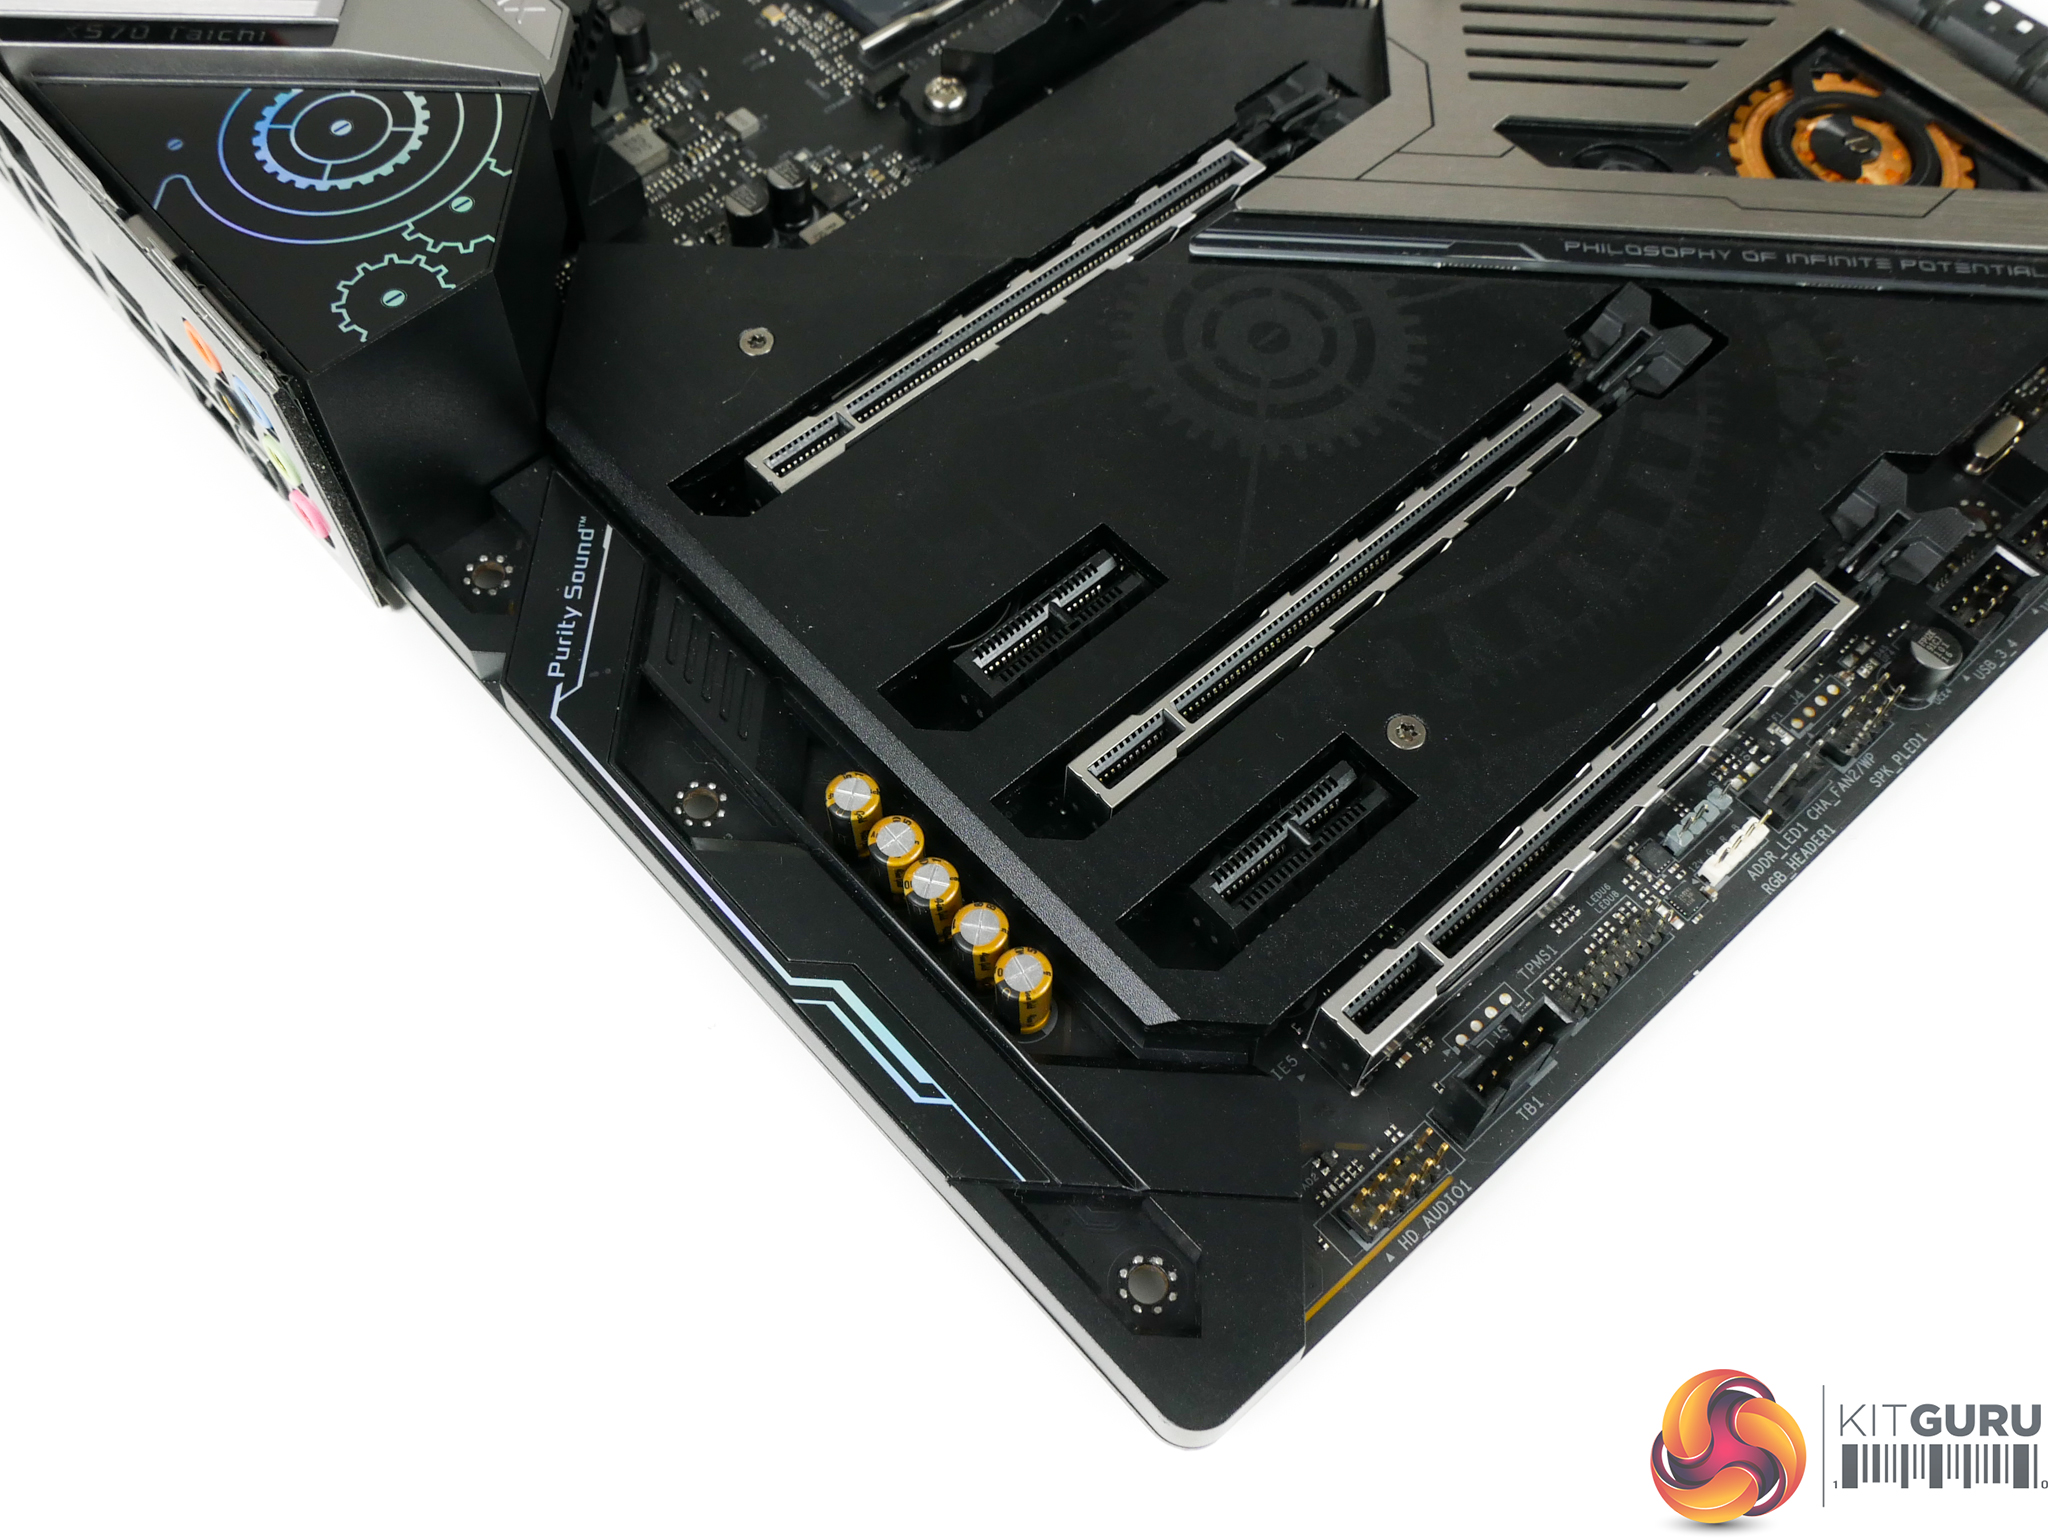
ASRock's Purity Sound audio system is built around the Realtek ALC1220 audio codec. A Texas Instruments NE5532 op-amp is provided in addition to Nichicon Fine Gold audio capacitors.
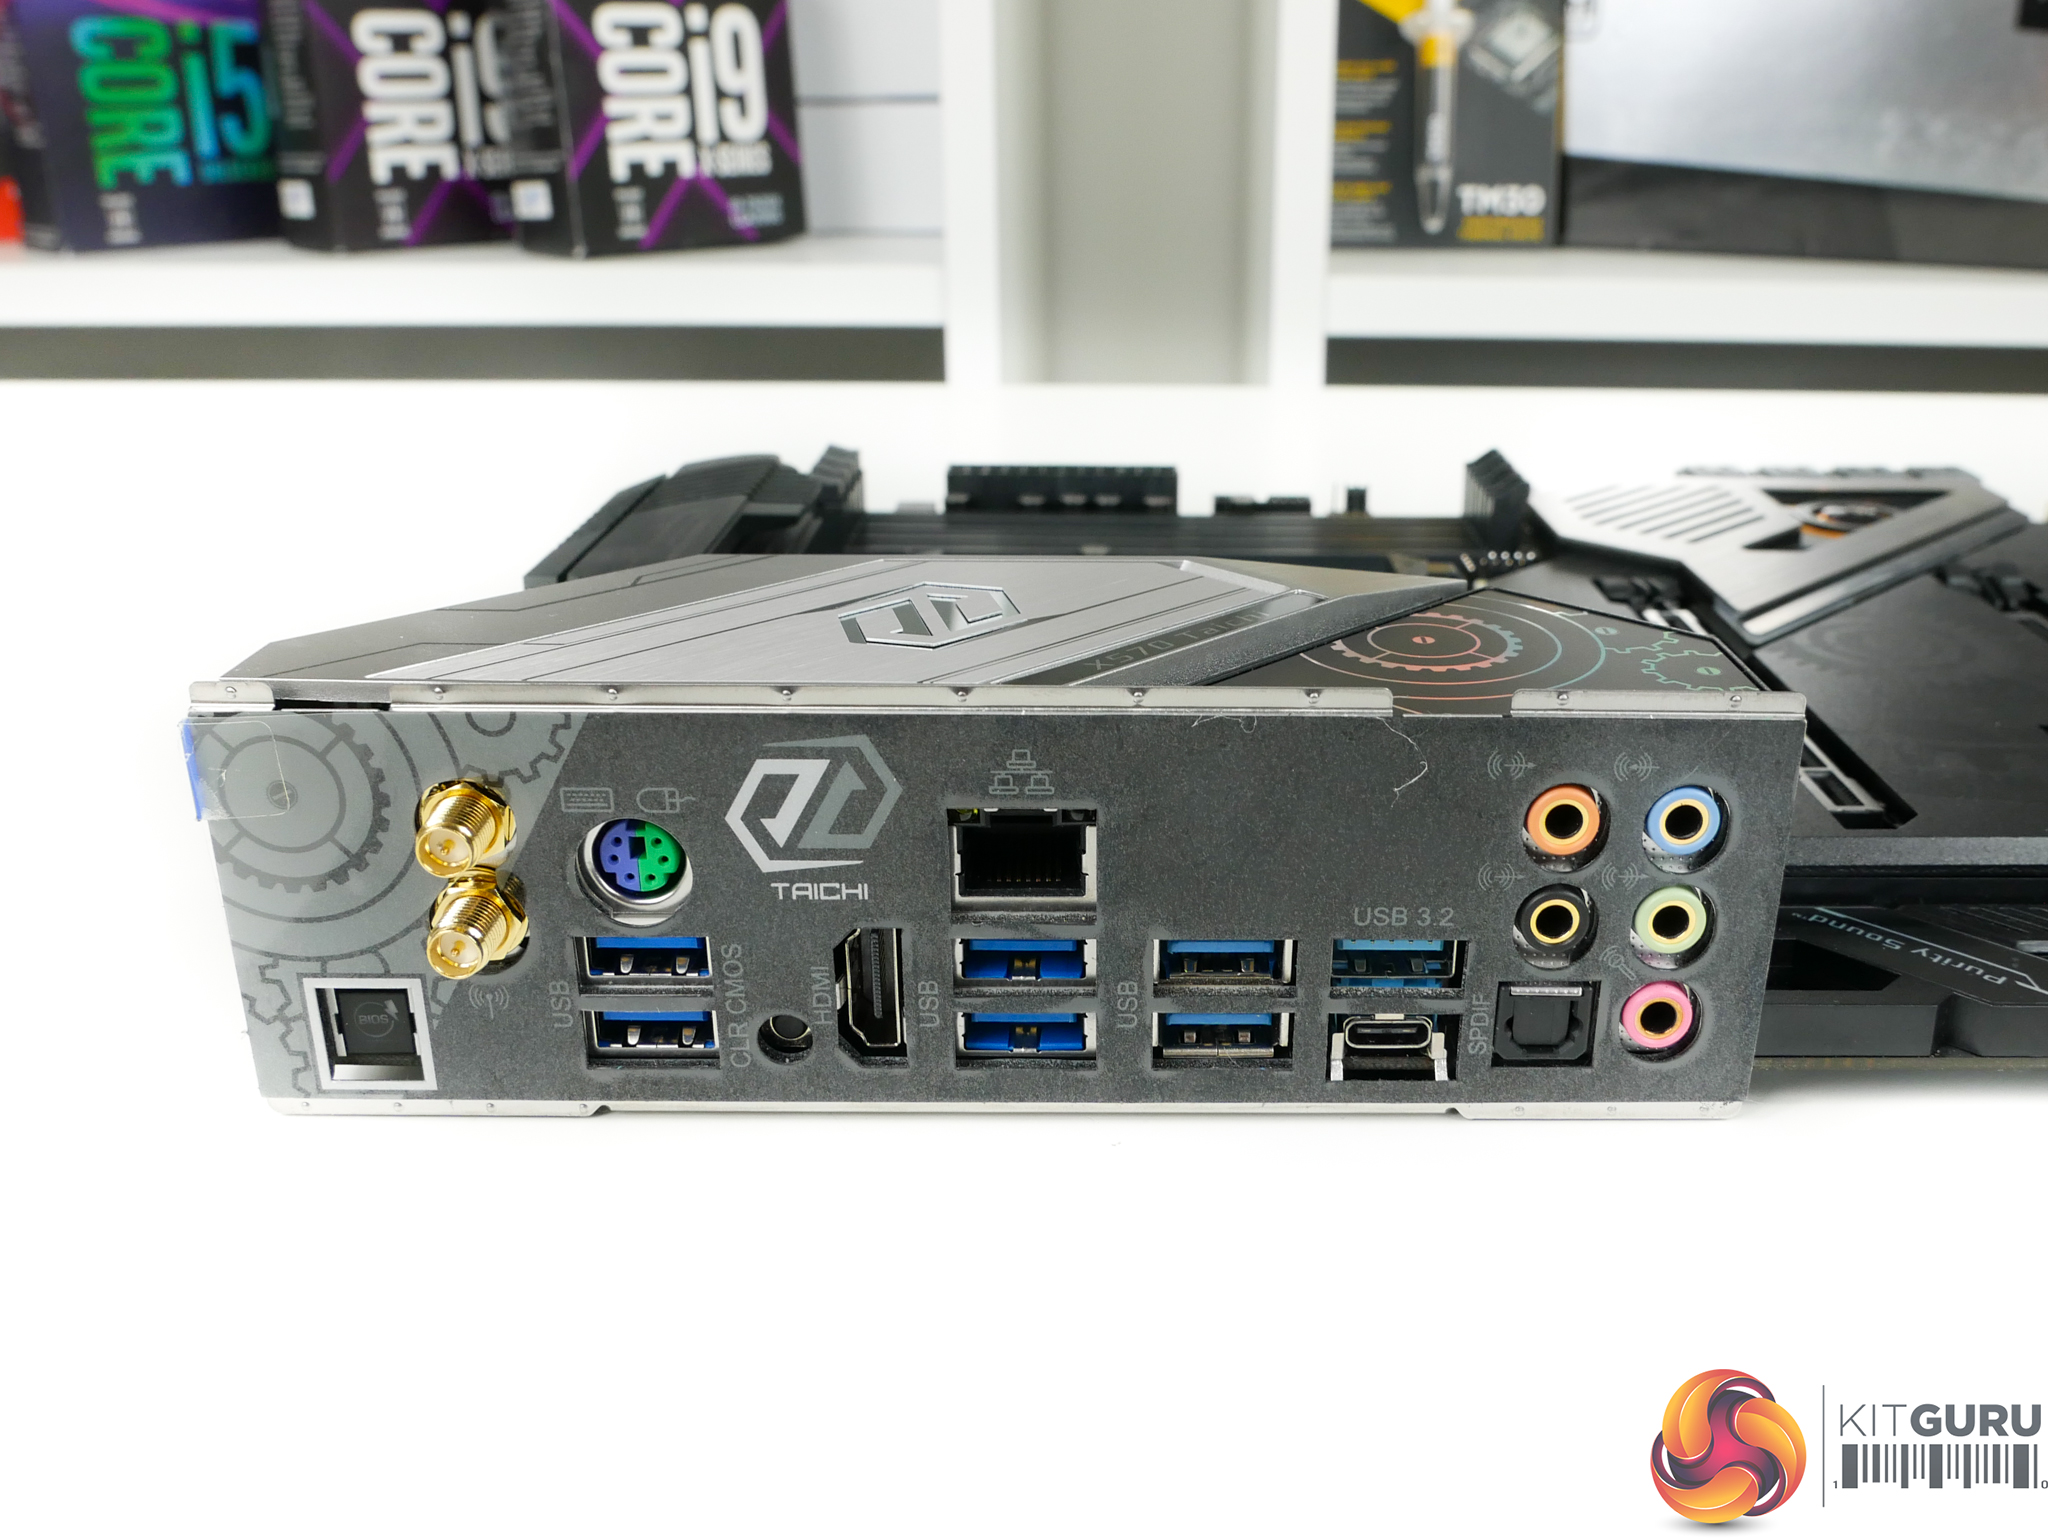
It is good to see ASRock using an integrated IO shield that has a far more premium feel than the fiddly, cheap metal alternative. It is worth noting that the included HDMI 2.0 port with HDCP 2.2 makes the X570 Taichi properly compatible with AM4-based APUs.
Six 5Gbps USB 3.0 (or 3.2 Gen 1 if you prefer) ports are provided on the rear IO. The two lighter-blue coloured ports feature support for ASRock’s Ultra USB Power. PS/2 is also provided, though I feel that it is pointless these days. Two 10Gbps USB 3.2 Gen 2 ports are available, with one in Type-A form and one as Type-C.
Intel’s I211AT chipset is used to provide the single Gigabit Ethernet port. 2.4Gbps-capable 802.11ax WiFi 6 is also provided by an Intel chipset. ASUS’ similarly-priced ROG STRIX X570-E Gaming adds a 2.5Gb Ethernet port at this price point, so it’s a little disappointing to see ASRock out-gunned on the networking front.
Audio connectors are the usual affair and the highly useful clear CMOS button is unlikely to be accidentally pressed. It is good to see ASRock supporting BIOS flash without a CPU installed.
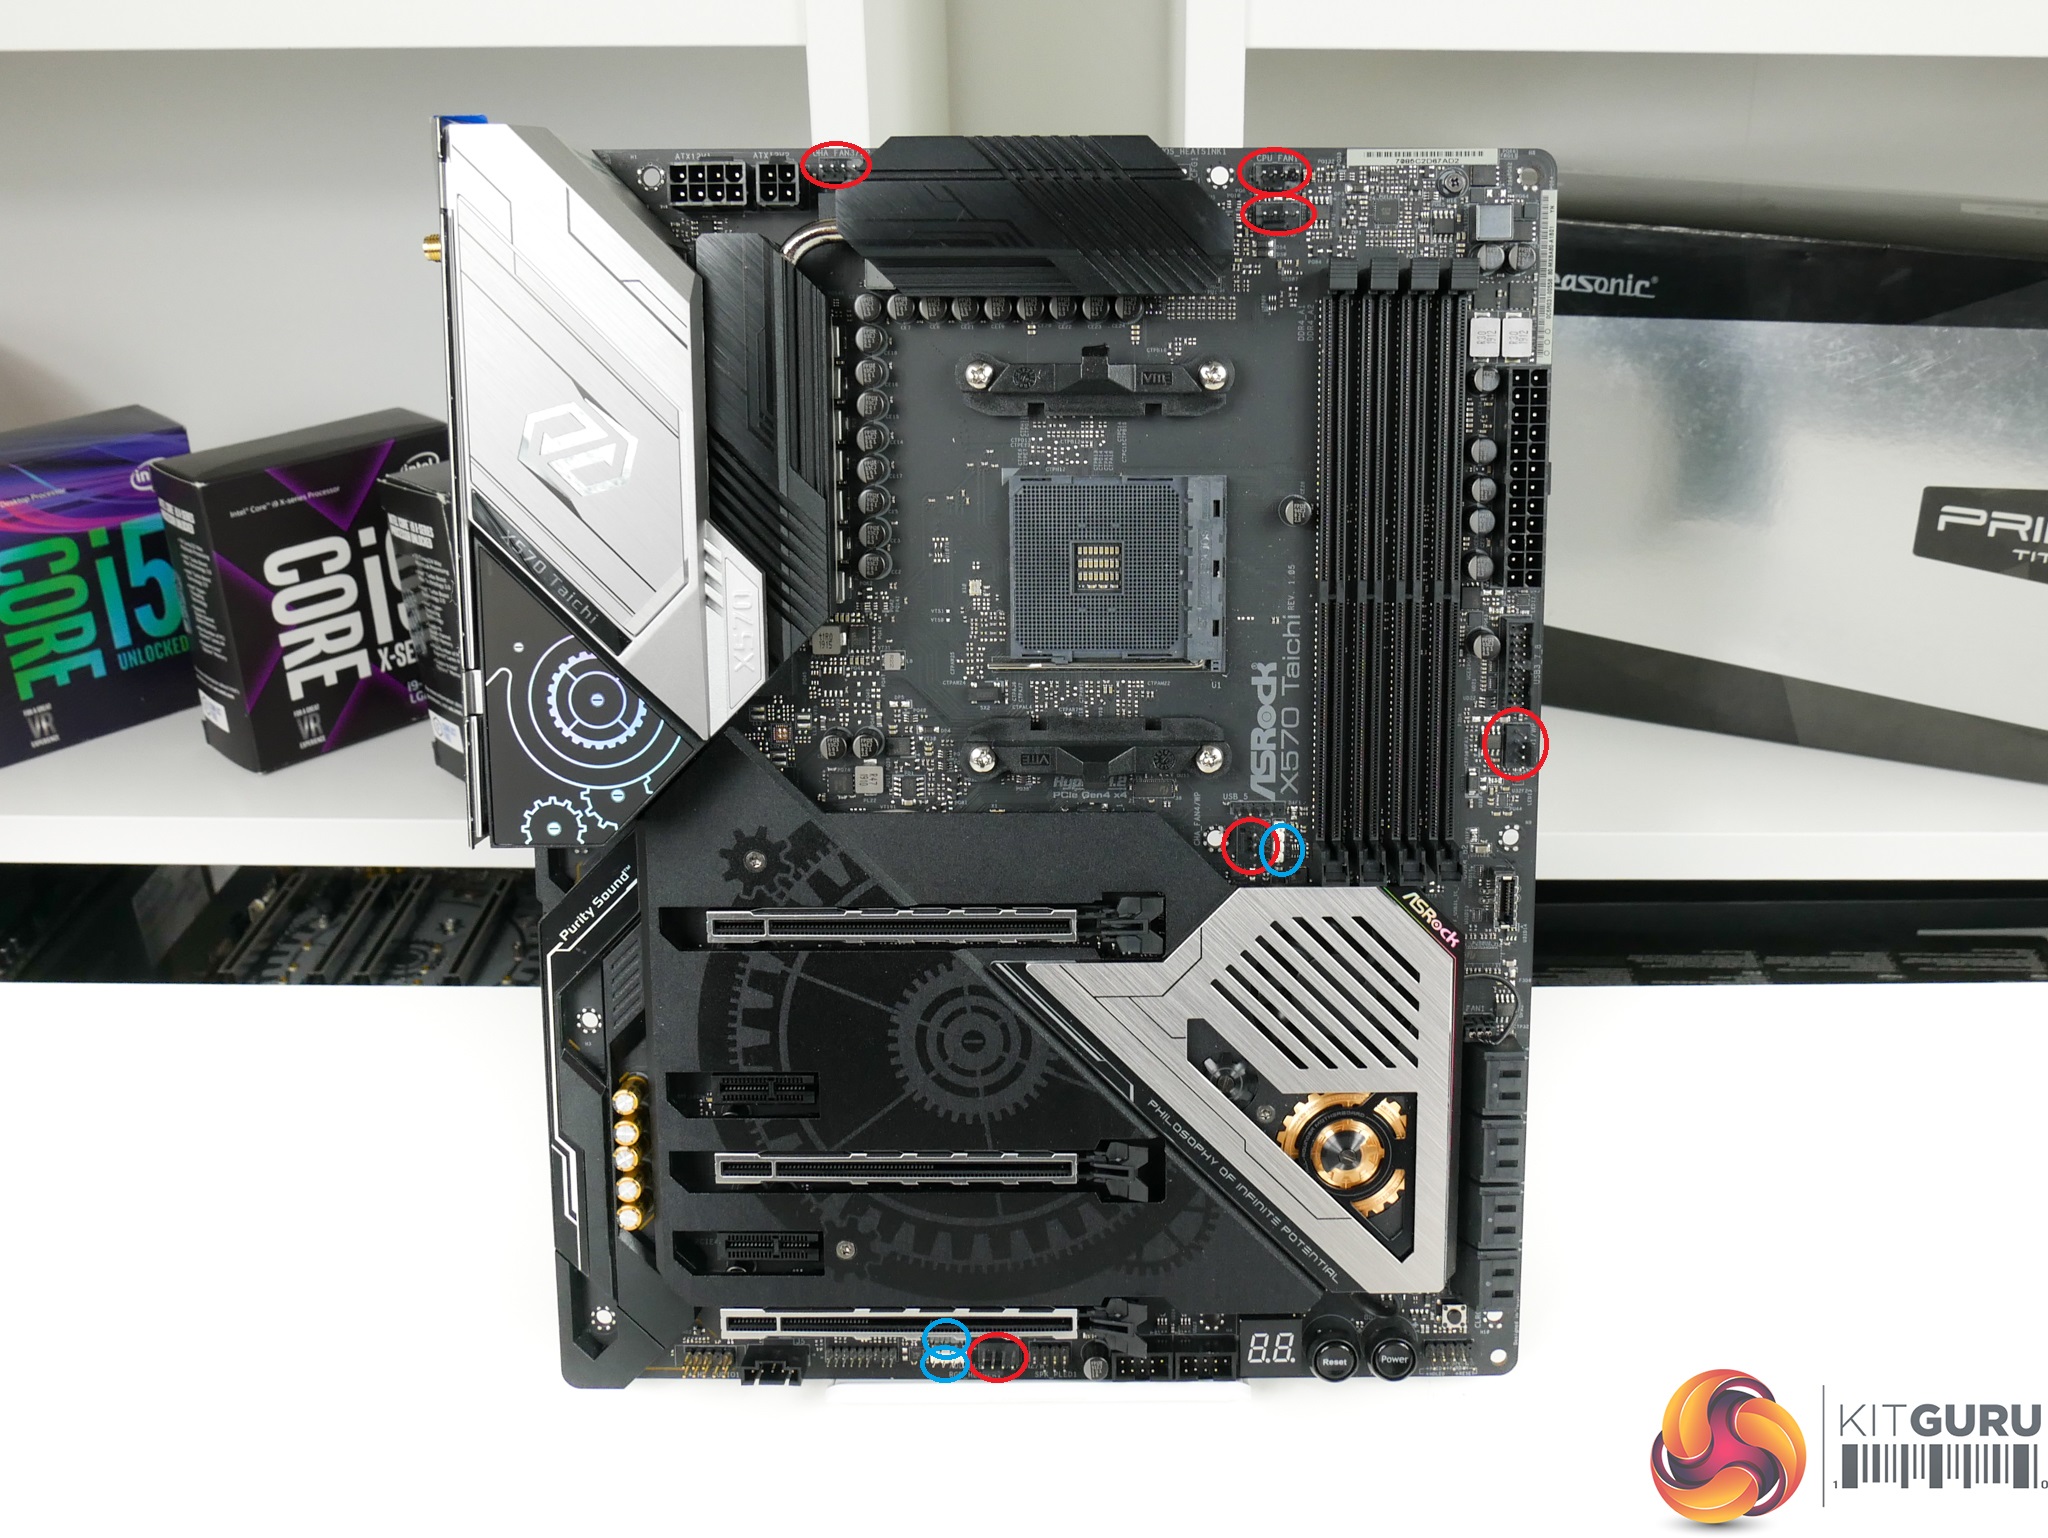
Six 4-pin fan headers are provided, five of which are reachable from the AM4 CPU socket. The middle-of-the-board 4-pin header allocated for a Wraith CPU cooler is smartly positioned.
Three LED headers are provided, with the one addressable version sitting along the board’s bottom edge.
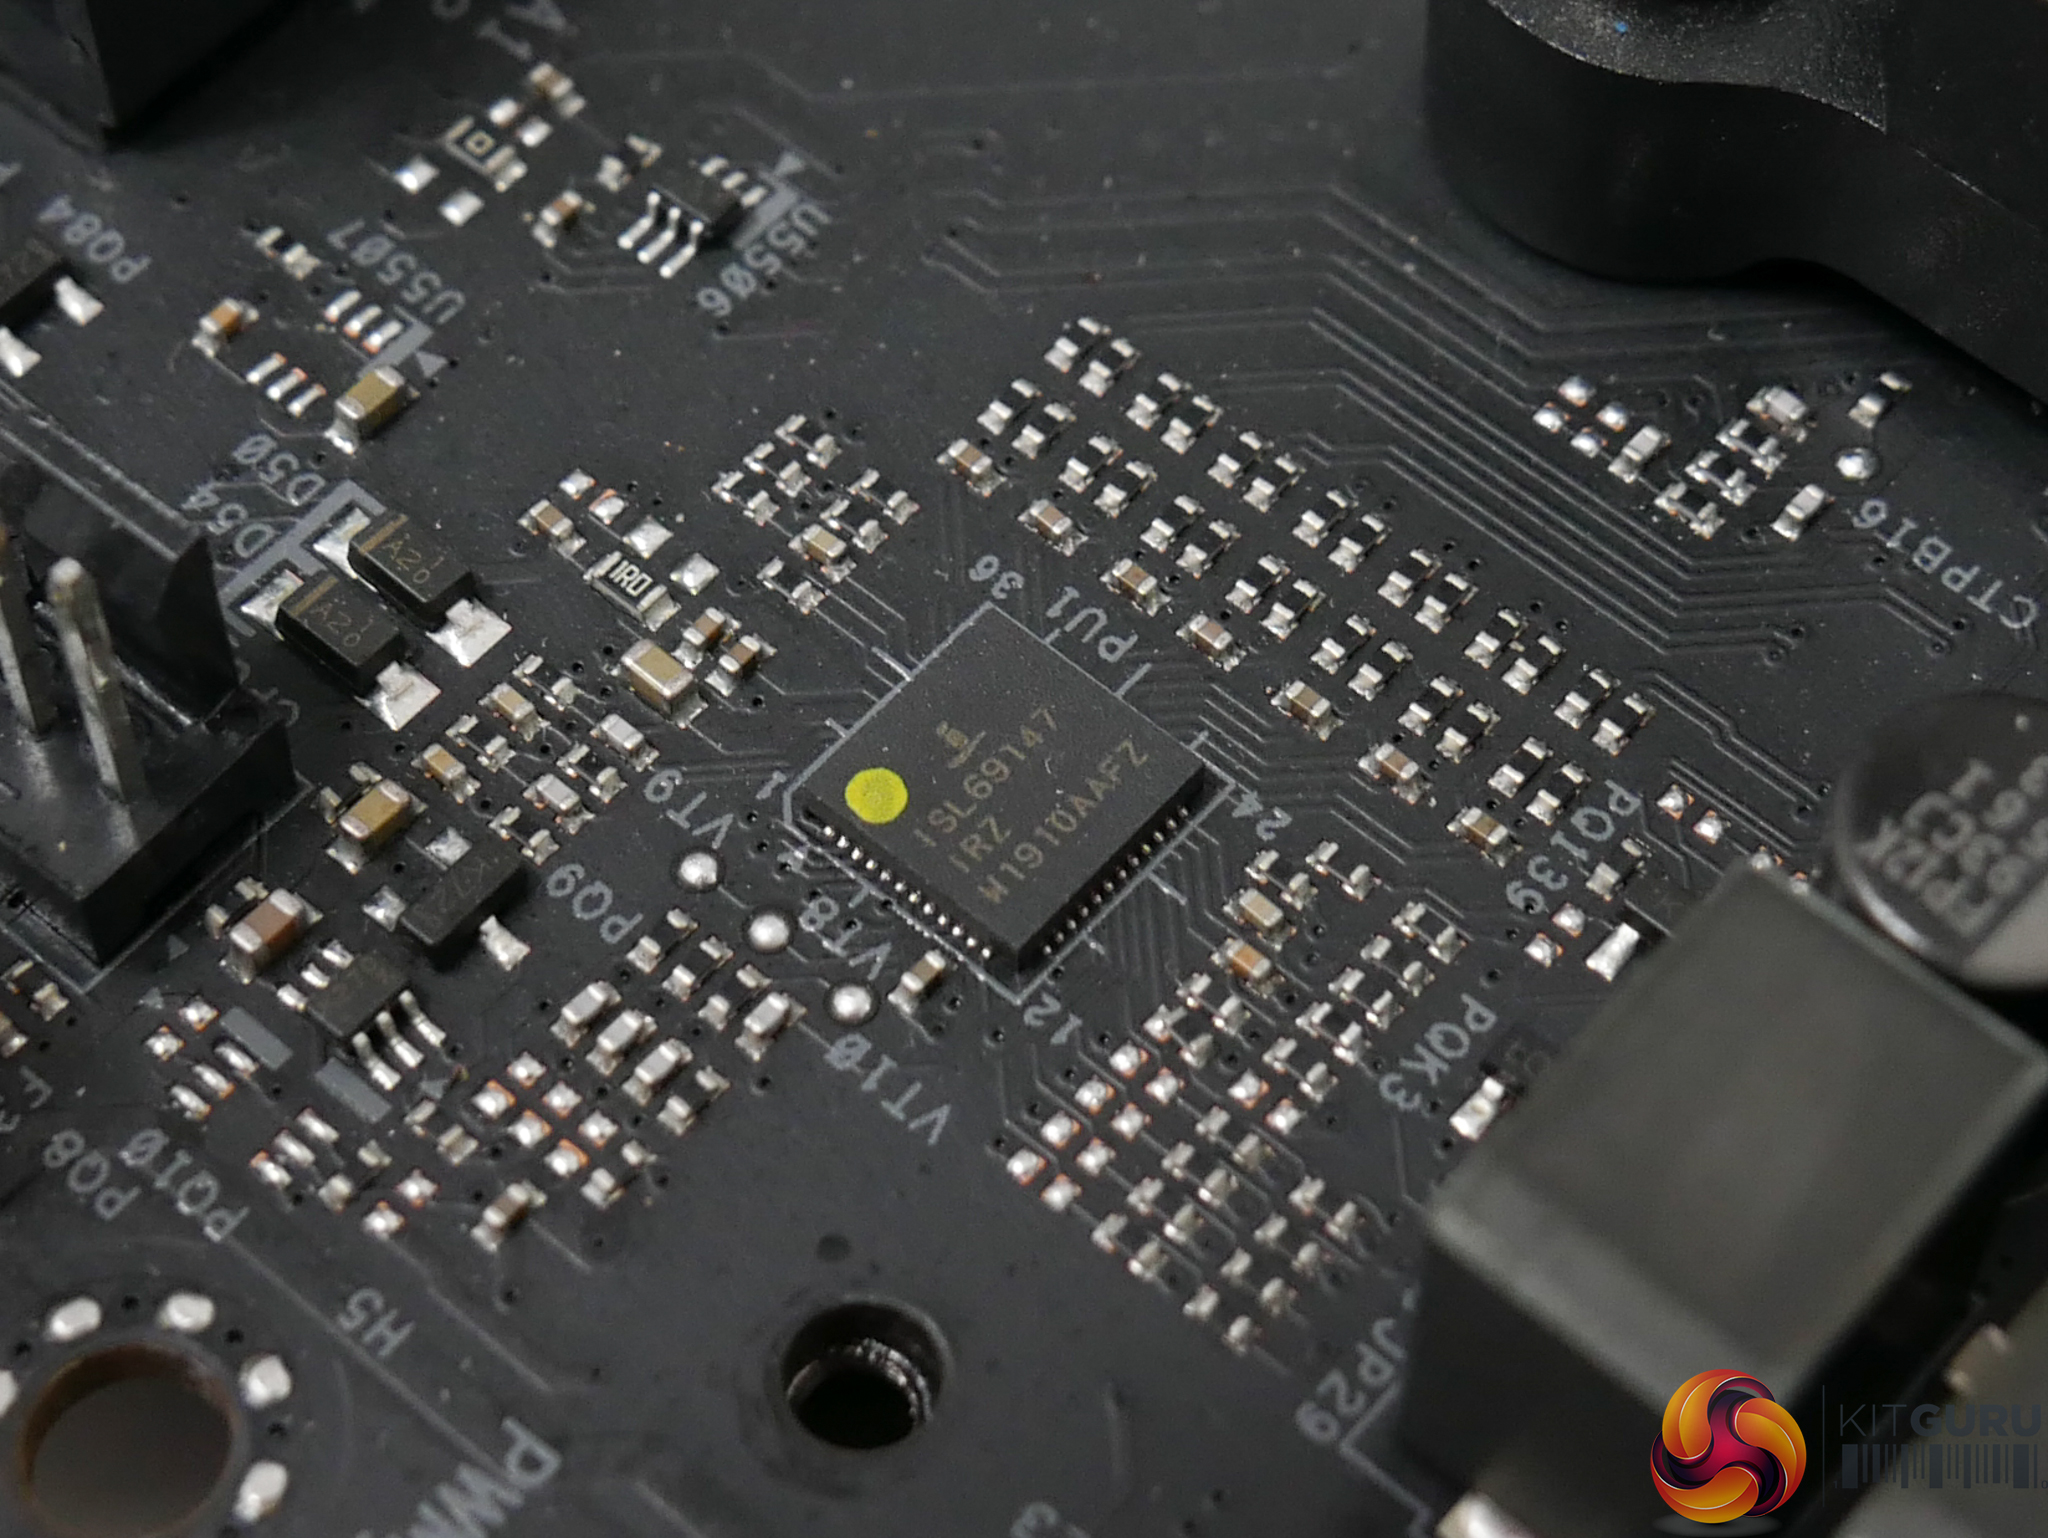
ASRock’s 12+2-phase VRM is deployed in a (6×2) + (1×2) configuration due to the seven-phase capacity of the PWM controller. The chip controlling all of this is the Intersil ISL69147, aided by seven ISL6617A phase doublers mounted on the rear.
Vishay SiC634 50A power stages are used for each of the VRM phases. A dozen of these driving the CPU alone gives a theoretical current capacity of 600A for a Ryzen processor. However, that raw current number does not factor in response times, efficiency, and accuracy factors when using the PWM phase doubling.
While the Vishay components aren’t typically regarded as highly as the (more expensive) International Rectifiers alternatives, the overall current capacity looks to be more than adequate for the upcoming 16-core Ryzen 9 3950X. Additionally, the 50A power stage rating is for continuous current delivery and the power stages are able to deliver 10% more load for 10ms periods, not accounting for thermal limitations.
A quick look at the data sheet highlights Vishay’s claims of safe operation and 50A continuous output at up to 120°C operating temperature when using a 12.6V input voltage. One could perceive that result as putting less emphasis on all-out cooling performance from the MOSFET heatsink.
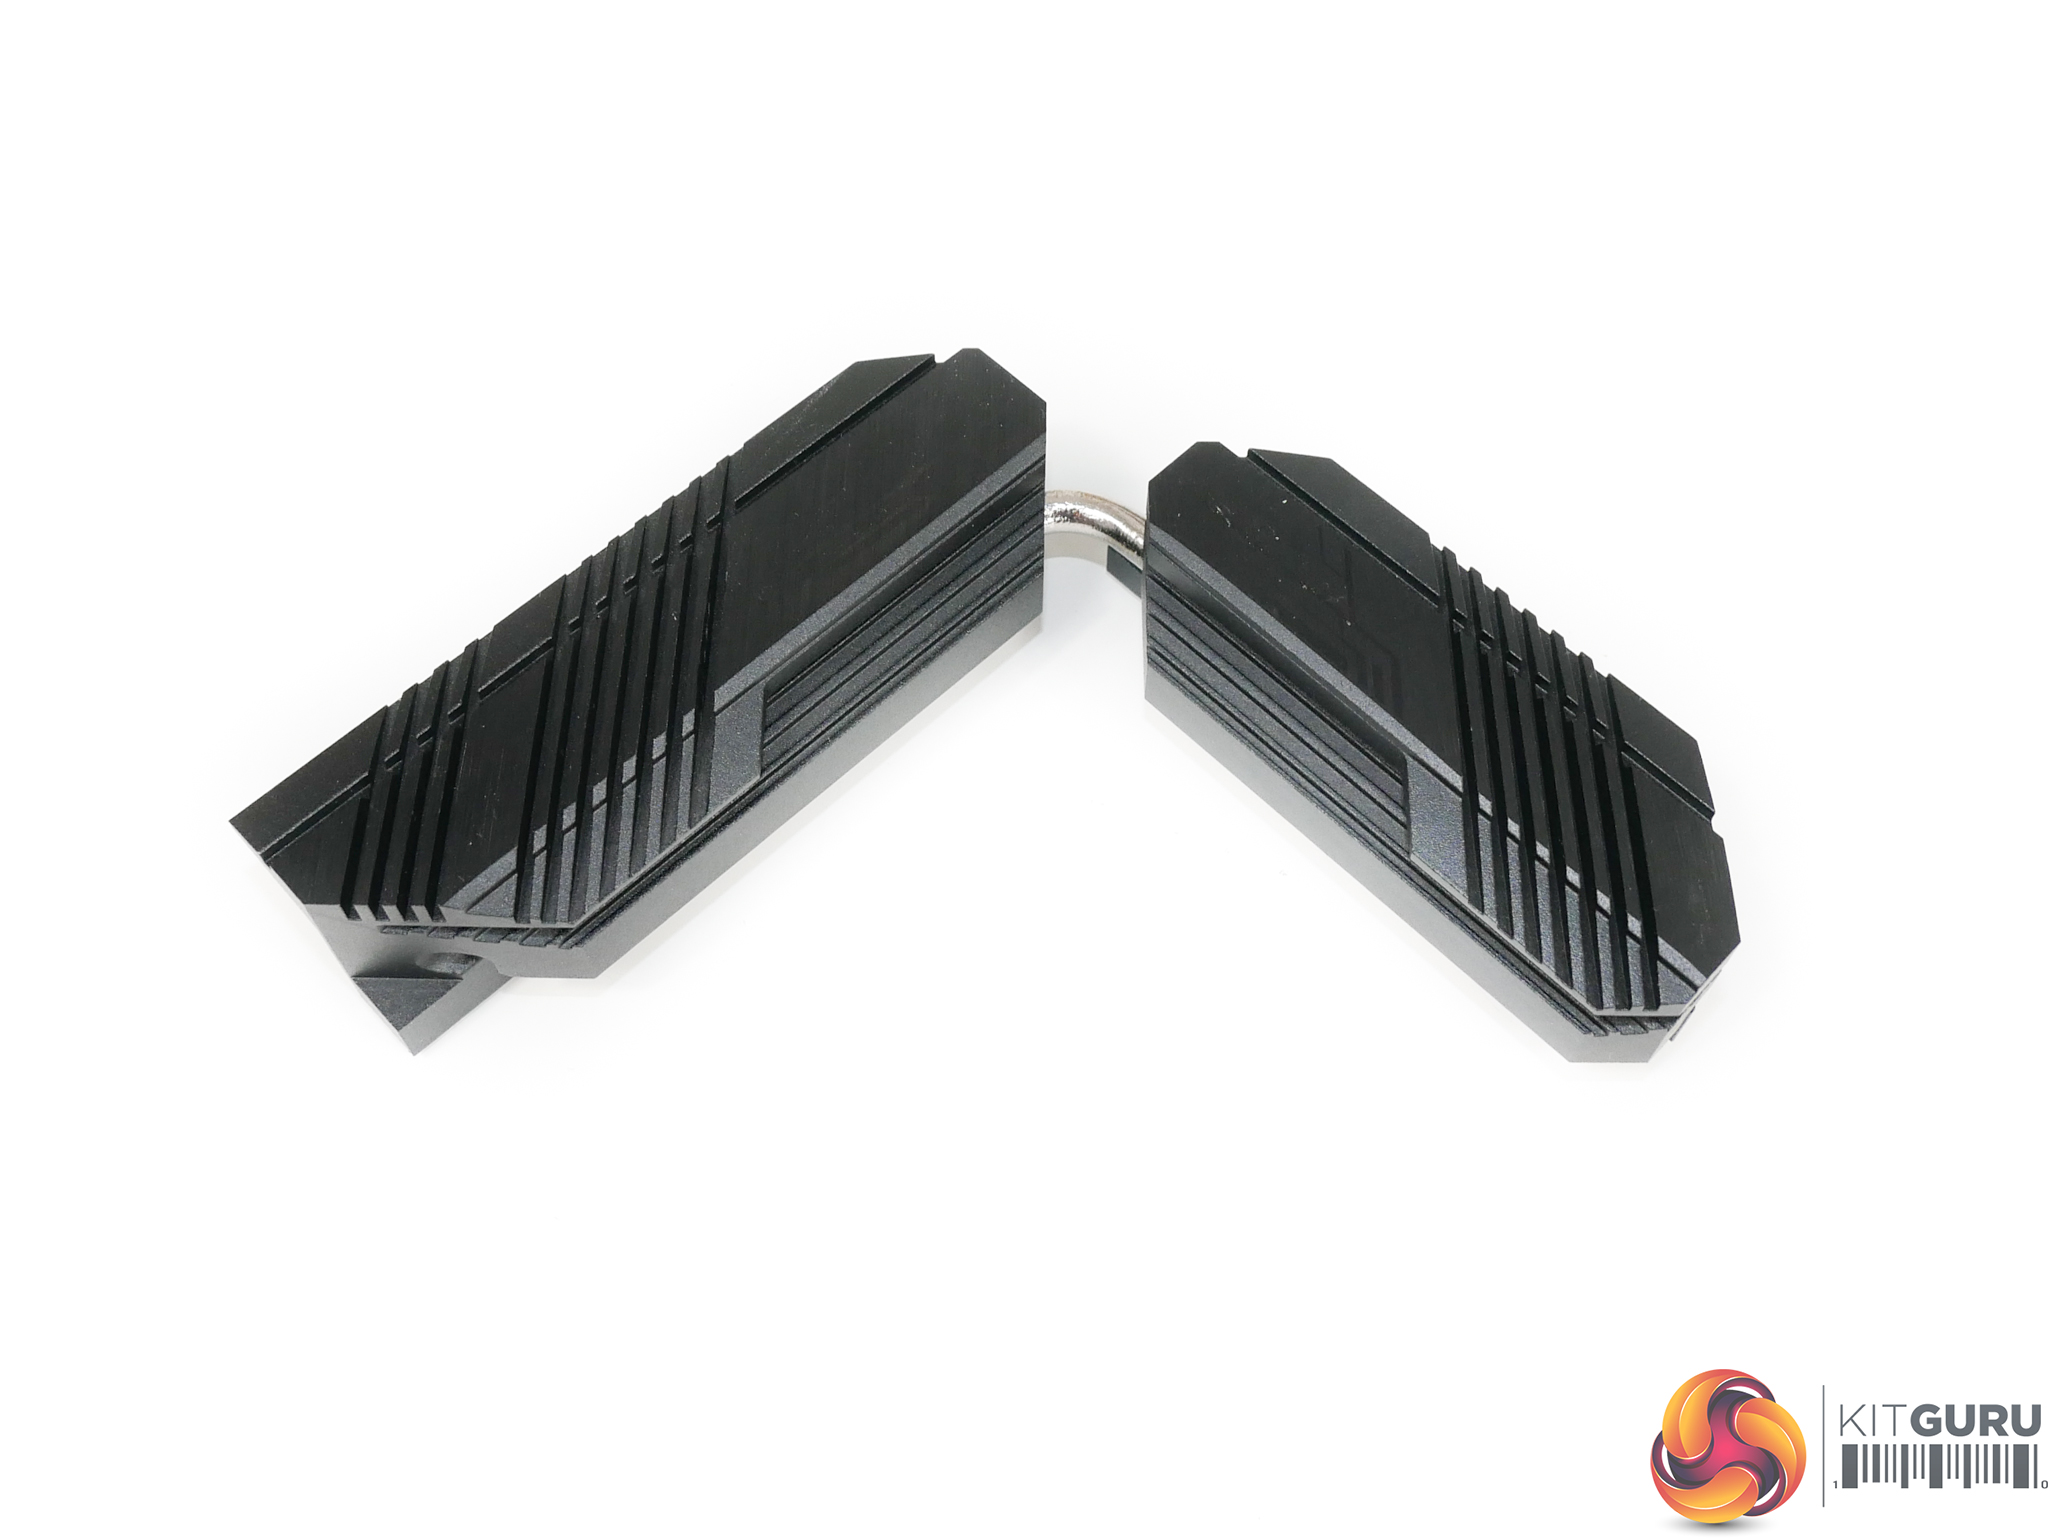
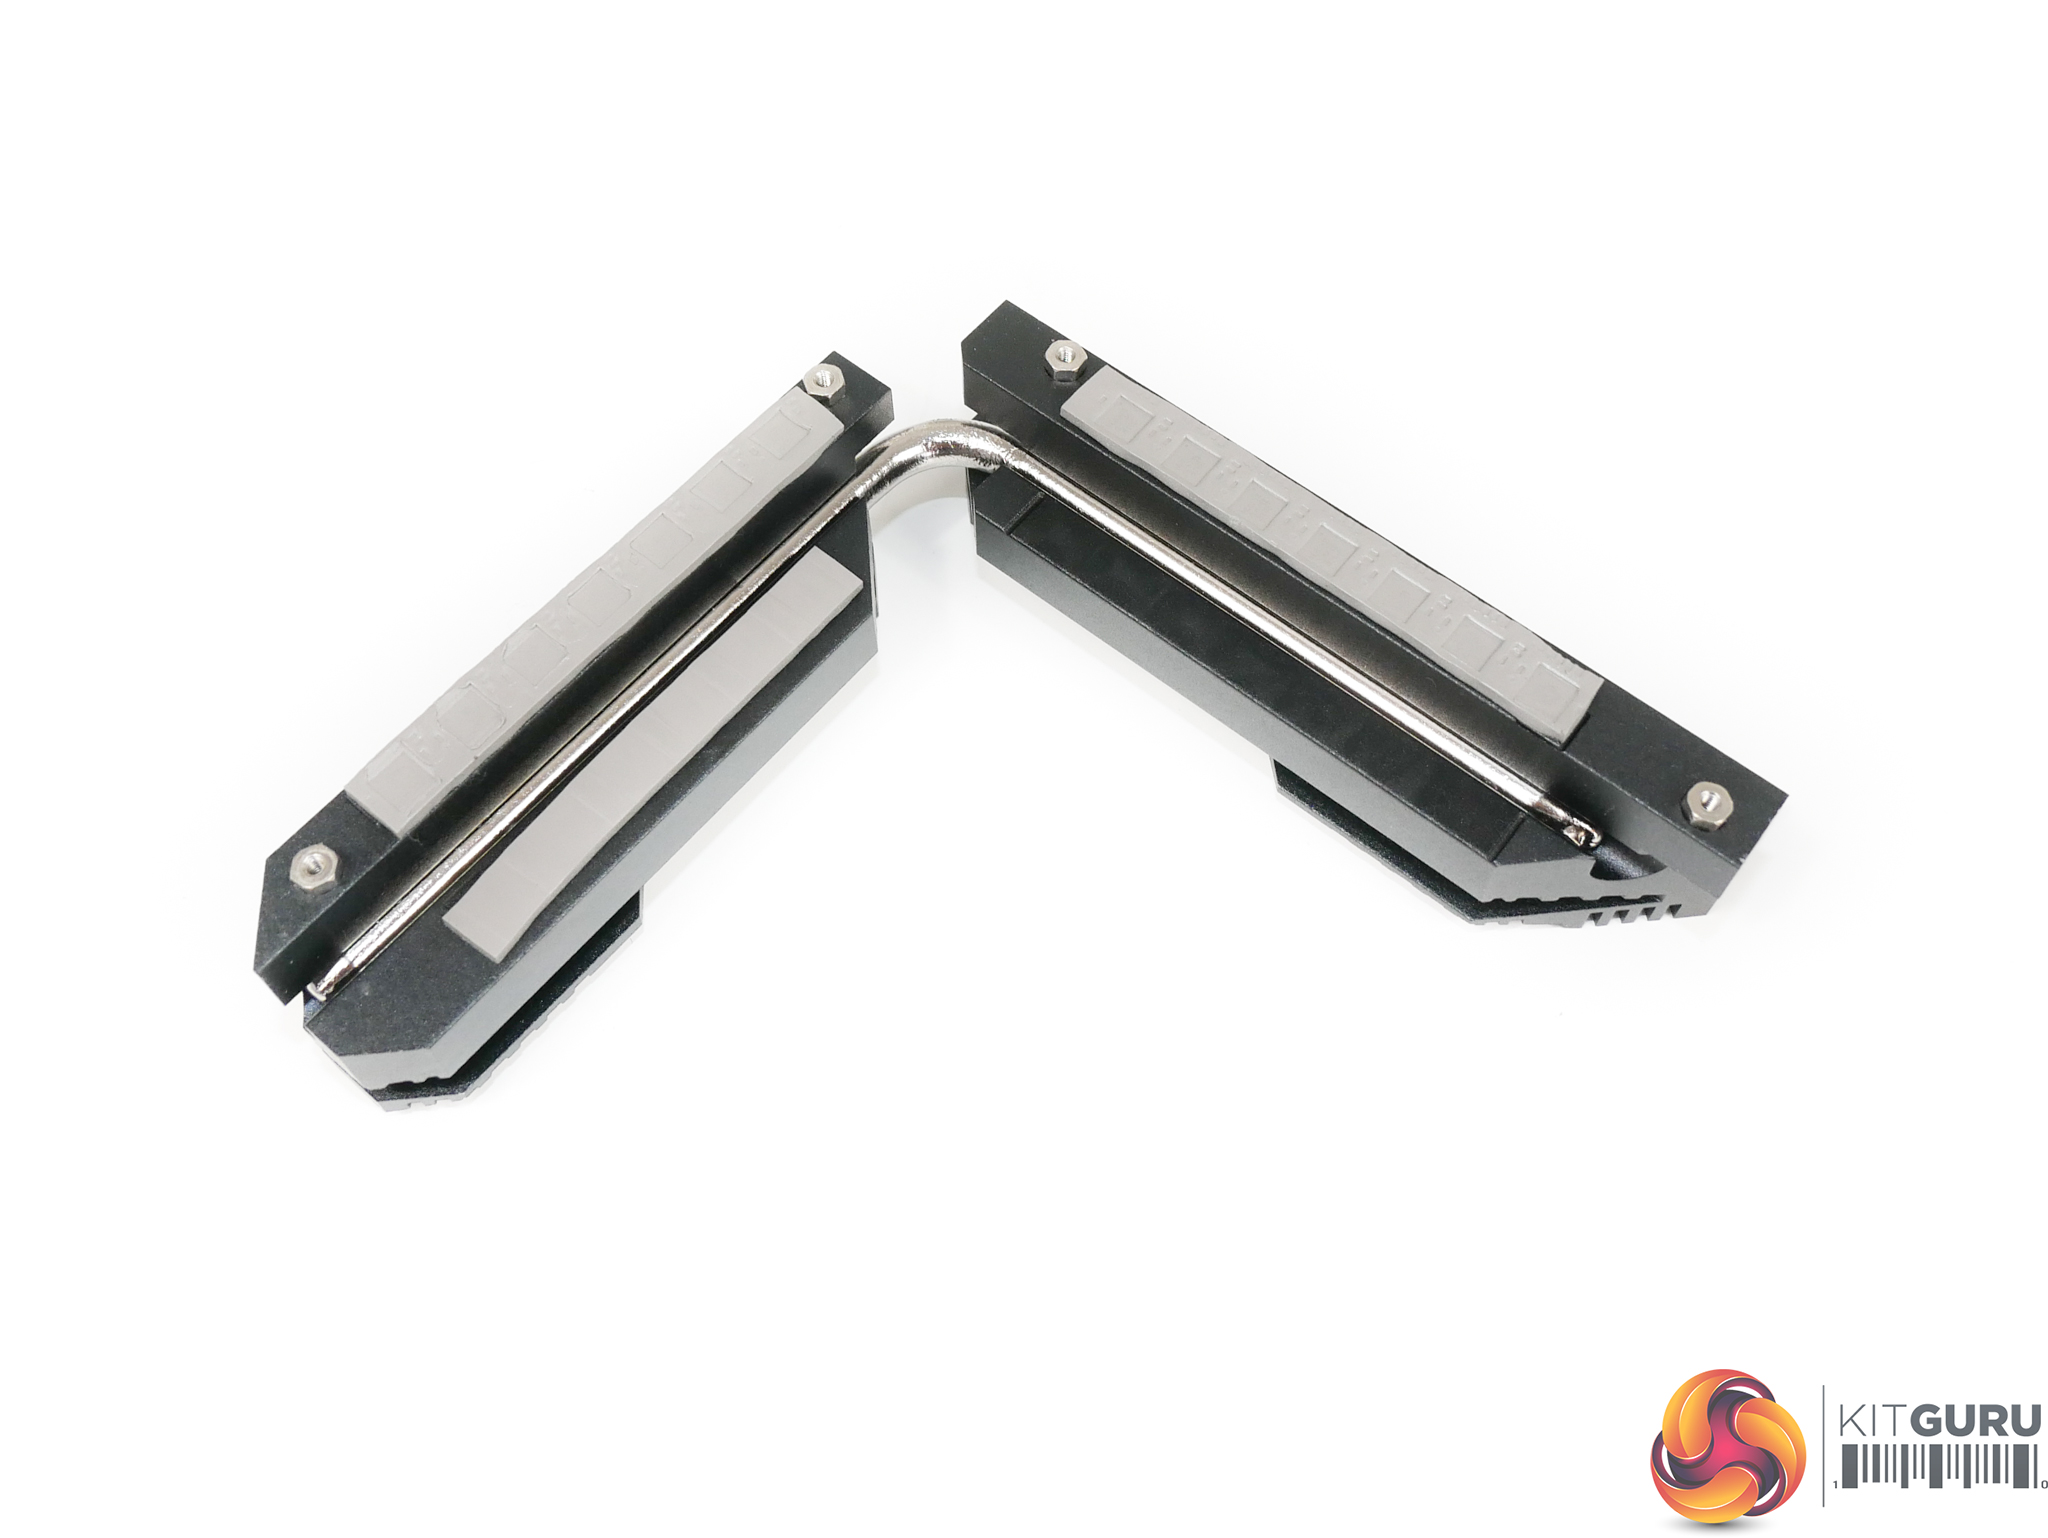
The sturdy VRM heatsink is well-built and both metal blocks are connected via heatpipe. Design wise, the heatsink is clearly focussed on aesthetics more than performance, and that's disappointing to see. There is no fin stack and no real effort to optimise surface area. With that said, the bulk of metal in the heatsink combined with the high phase count VRM, should provide adequate cooling performance.
ASRock adds a thermal strip to contact both sets of inductors. That's unique, even on premium motherboards, and is good to see even if the inductors don't necessitate additional cooling.
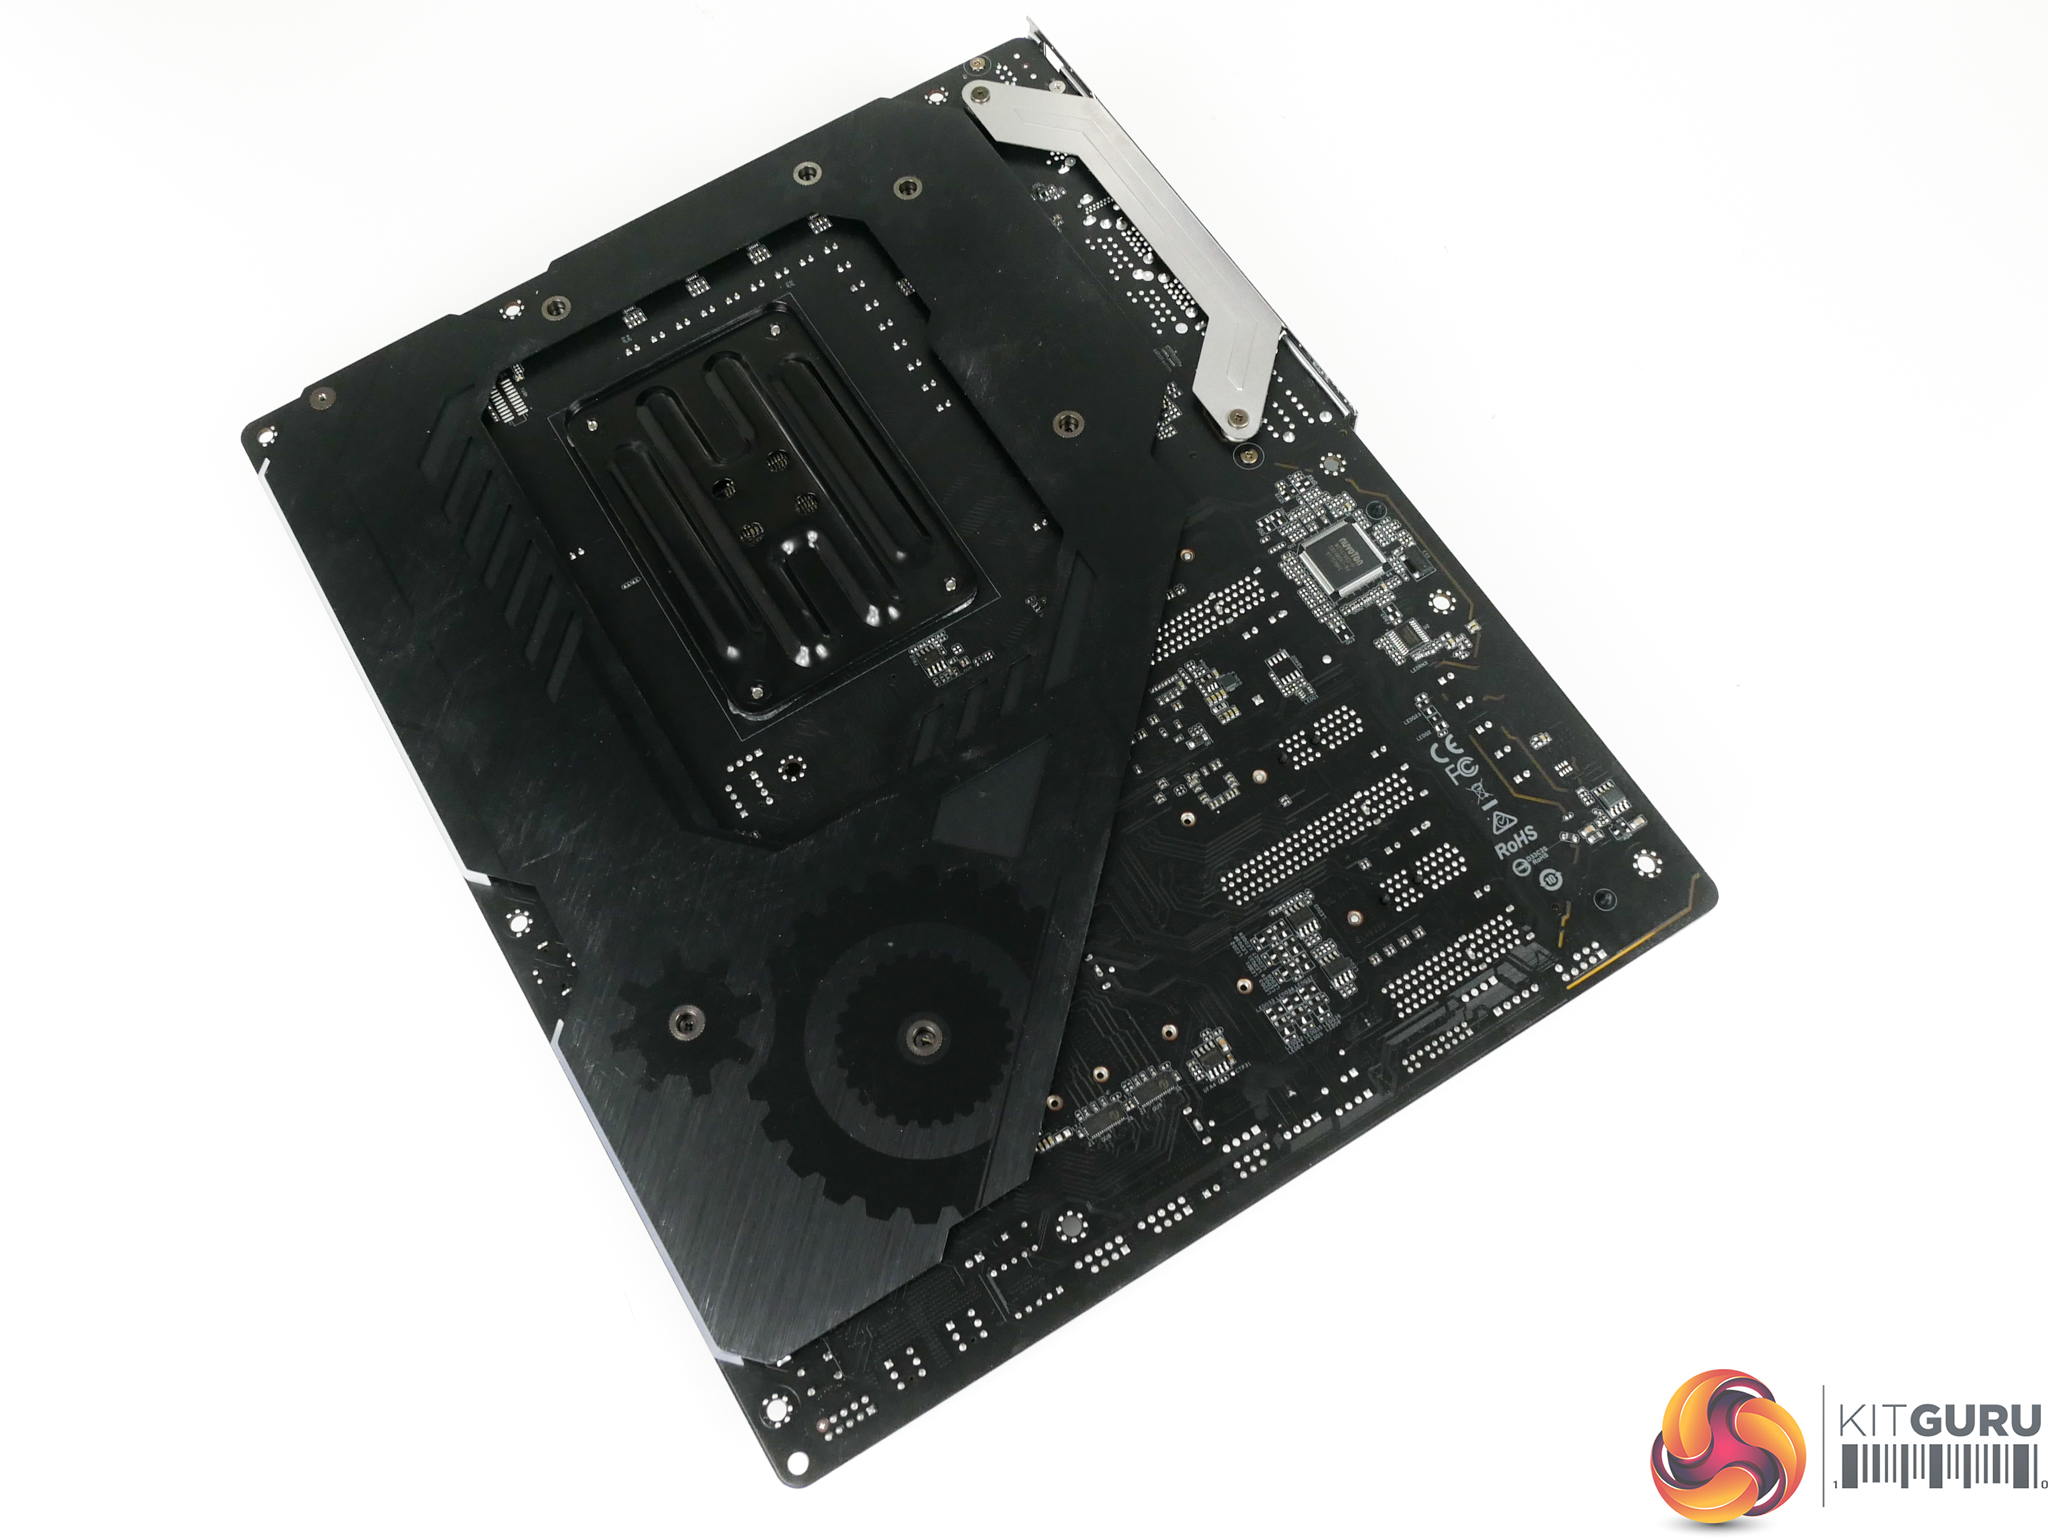
No thermal contact is made between the metal backplate and the motherboard PCB. So, there are no cooling benefits from the backplate. Structural rigidity, however, is improved by the metal piece and that's especially useful when mounting heavy CPU coolers or graphics cards.
The backplate is also used to cover the edge lighting zone that is provided by a thick strip of plastic.
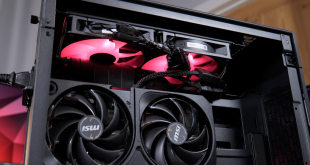
The chipset heatsink and its small 40mm, 6000 RPM-rated fan are both undeniably basic. ASRock makes an effort to uses blades with a decent airflow design but the sheer proportion of fan area taken up by the hub is very limiting. As such, higher operating speed is necessitated to achieve adequate cooling performance. And ASRock certainly doesn’t shy away from running this fan at high speeds.
There is speed control capability within the UEFI for the chipset fan. However, each of the preset profiles sees the unit staying above 3000 RPM just when messing around with UEFI settings. With our H100X fans operating below 1000 RPM, we could clearly hear the X570 Taichi’s chipset fan on our test bench. We could also notice the blower ramping its speed level up and down as the temperature changed. With the AIO CPU cooler running at 1700 RPM, however, the chipset fan could not be heard above Corsair’s loud fans.
The cooling performance isn’t great, either, with temperatures over 60°C seen almost constantly. It looks as if ASRock’s heatsink design for the chipset is less than ideal. The block of metal used to house the fan and conduct heat away from the X570 silicon is small. And the fan itself is not positioned directly above the point of contact with the heat producing X570 chipset, thus limiting the effectiveness of its coolant air.
Making matters worse, the positioning of the fan and the intake grille in ASRock’s shroud is directly beneath the heatsink of a graphics card. Stick a card in there that has a cooler designed to vent air out to the side (as most non-blower coolers do in today’s market) and you have an extra serving of thermal energy pumped directly into the ‘coolant’ air that’s then pushed onto the chipset heatsink.
We’ll have to keep an eye on chipset temperatures throughout testing.
ASRock maintains the same UEFI design that we have seen from its motherboards dating back to X370 and older. This is not a bad thing as ASRock's implementation is clear, well laid out, and has enough features for most users.
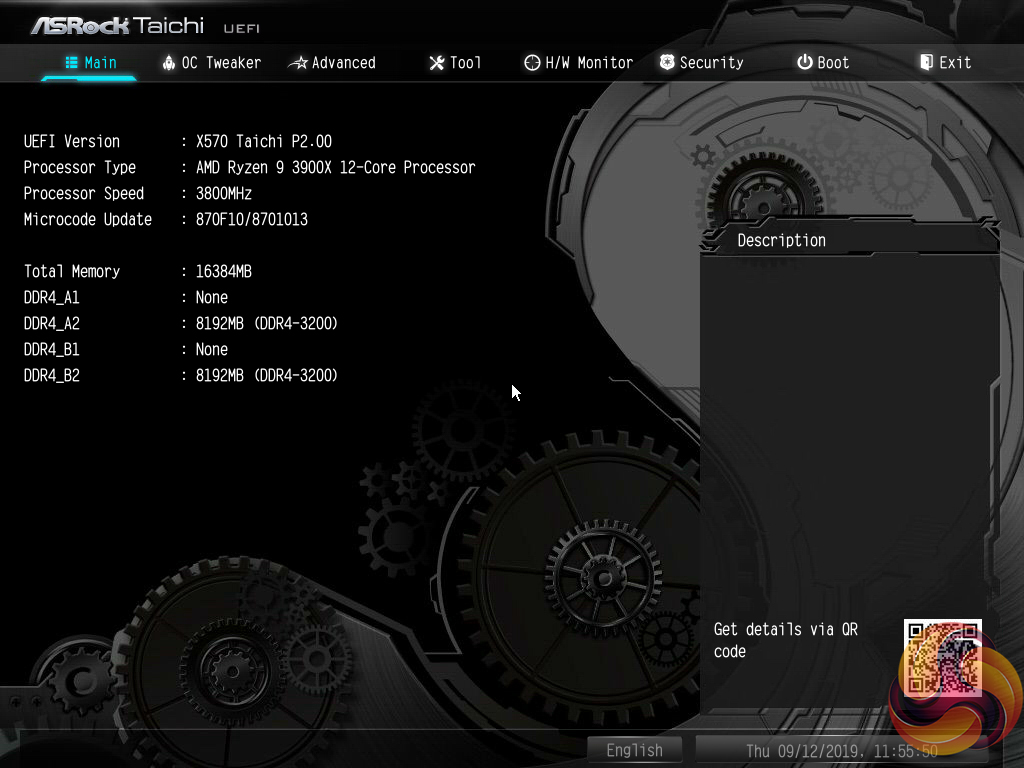
The Main page for ASRock’s UEFI outlines primary information relating to the system and motherboard. We noticed that ASRock does not include an Easy Mode section on the BIOS version that we tested with. This is disappointing given the separate section’s ability to present less-experienced BIOS-dwellers with simple options that are unlikely to cause instability.
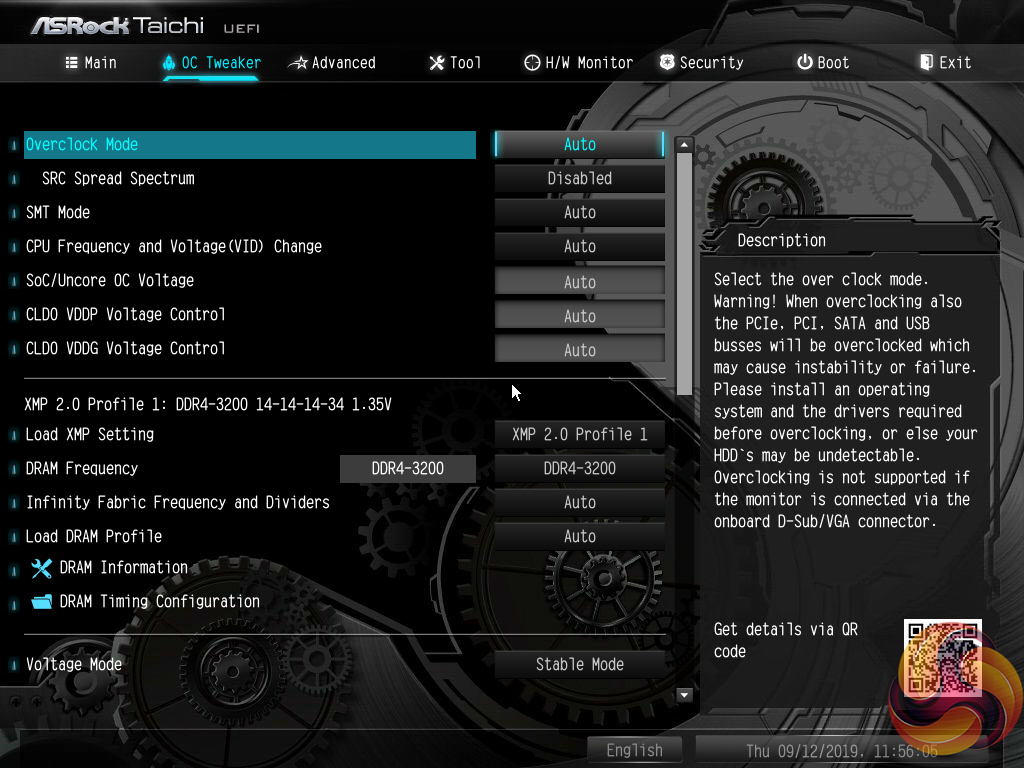

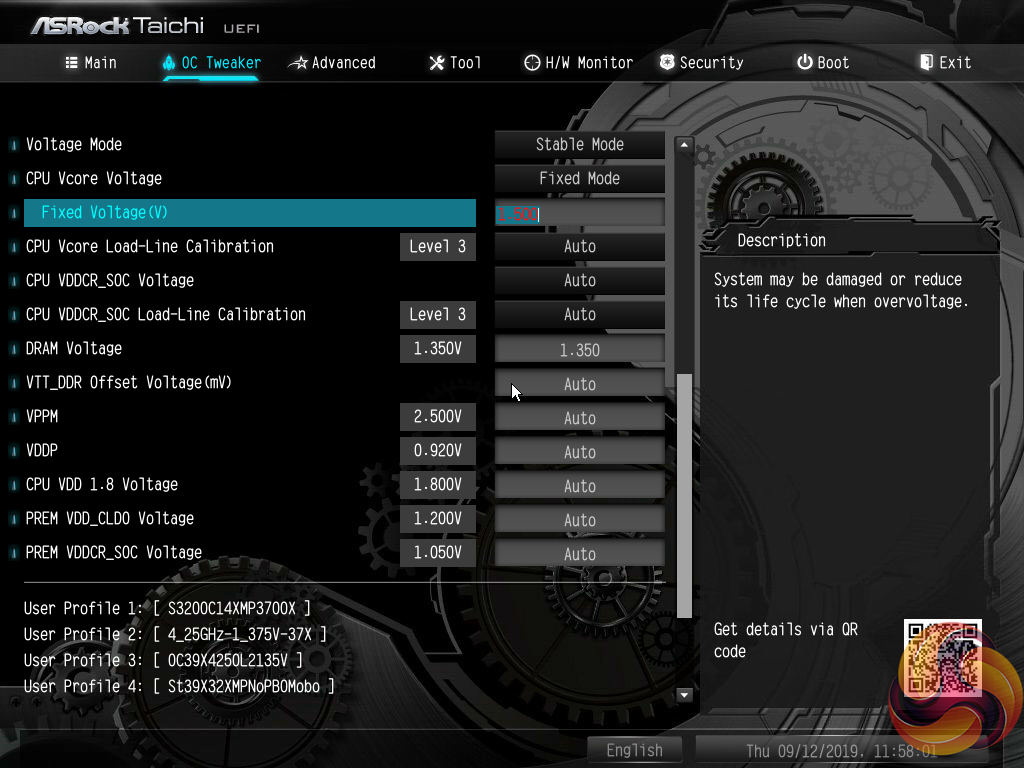
The heart of the performance tuning is the OC Tweaker section within which ASRock splits off the adjustment options into CPU, DRAM, and Voltage to aid ease of navigation.
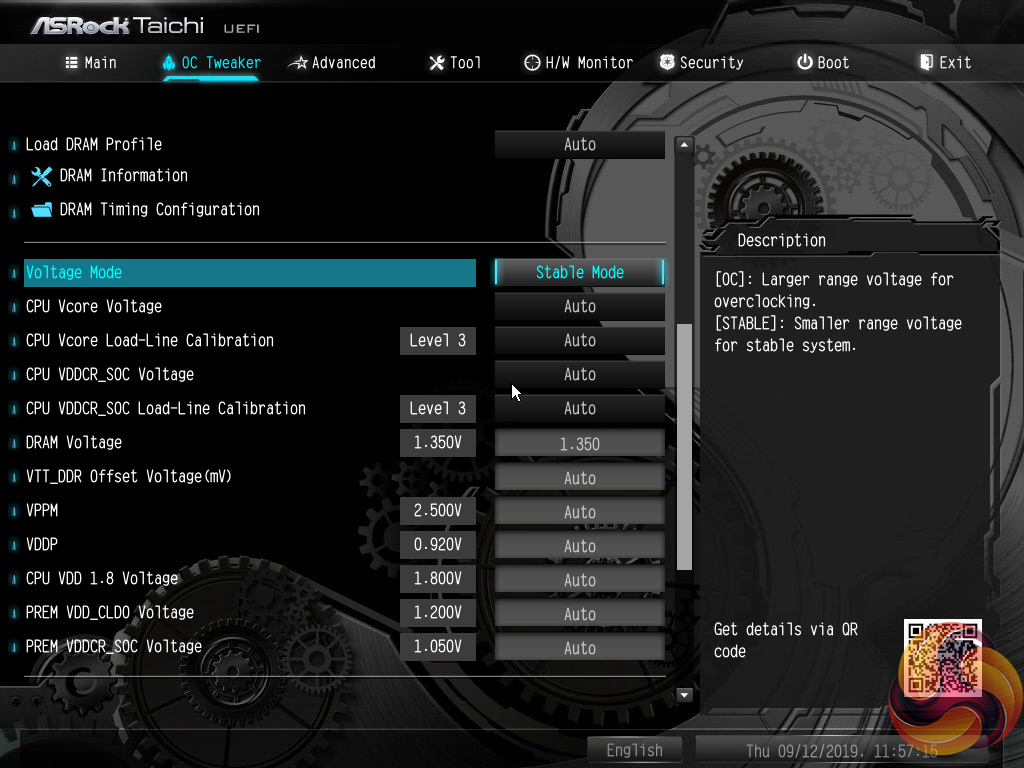
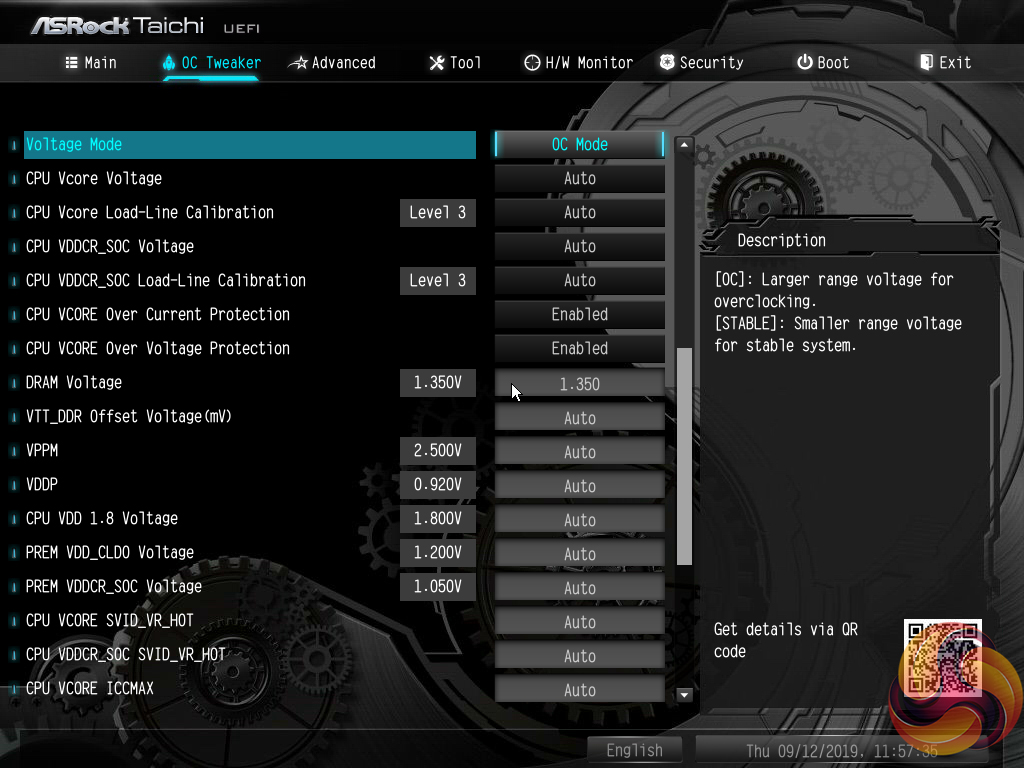
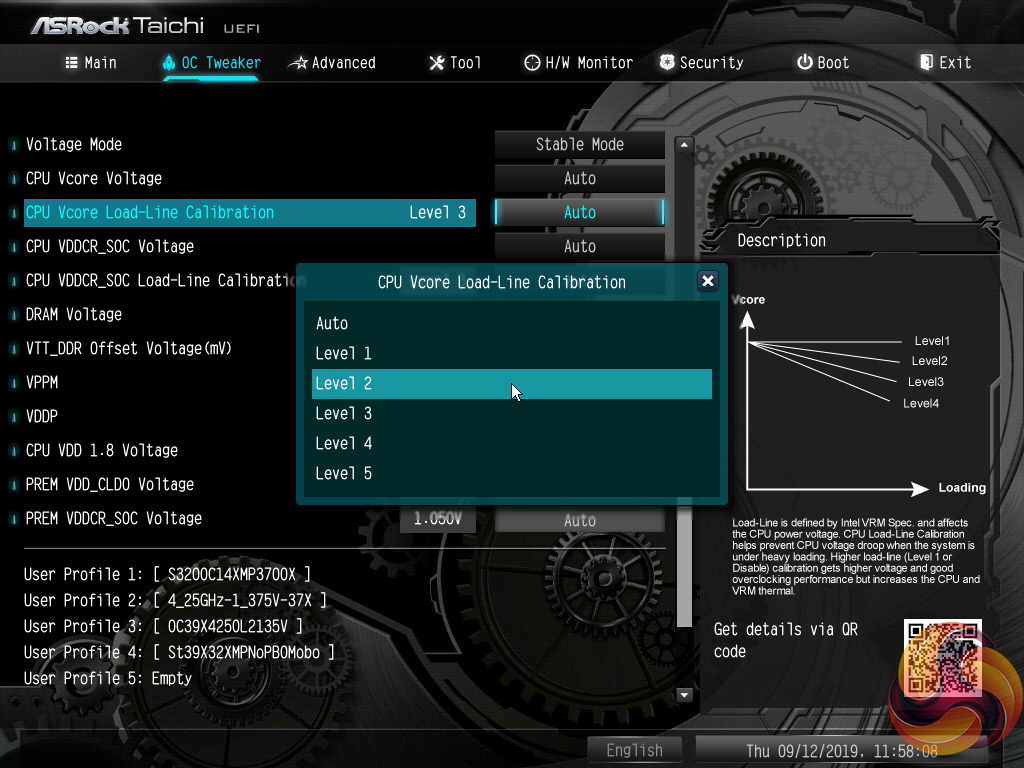
The OC Tweaker section is good in terms of the options and granularity the user has to tune their hardware. The voltage number input seems to be uses a switch to red text when voltage levels that are high and risky have been entered. ASRock’s system for allowing a user to manage loadline calibration is very good as the options are clearly displayed using a graph.
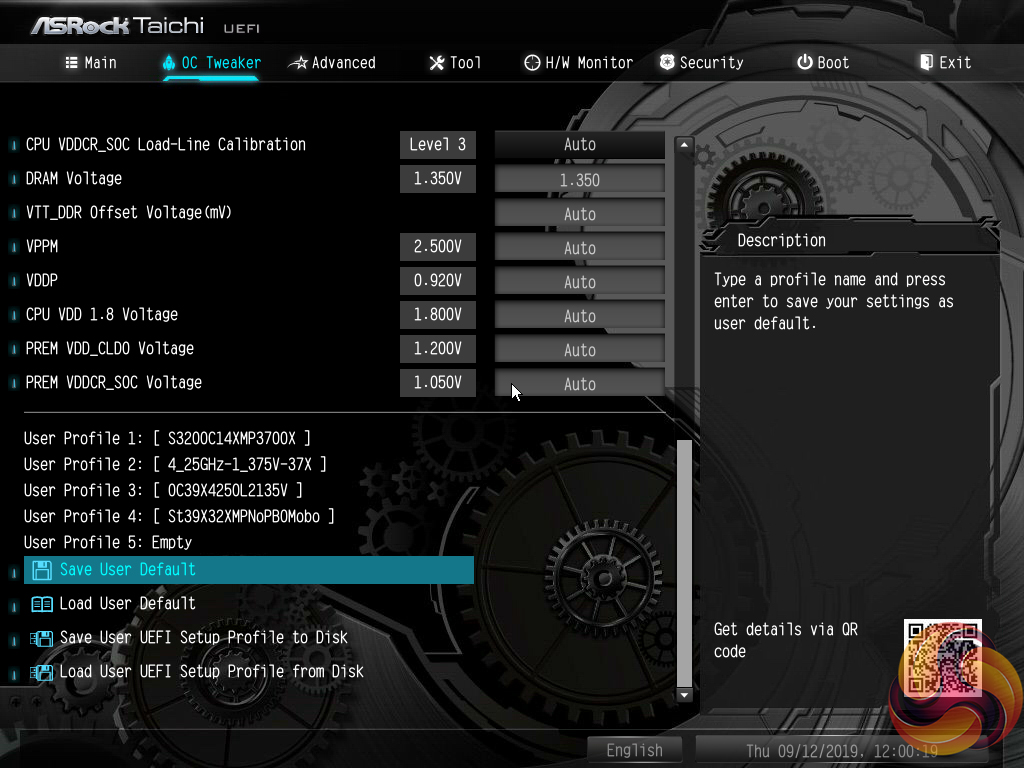
Five save profiles is perhaps cutting it a little fine for enthusiasts. However, there is the ability to transfer the profiles via USB. We also noticed that the saved settings stayed in place following a BIOS update, which is handy.
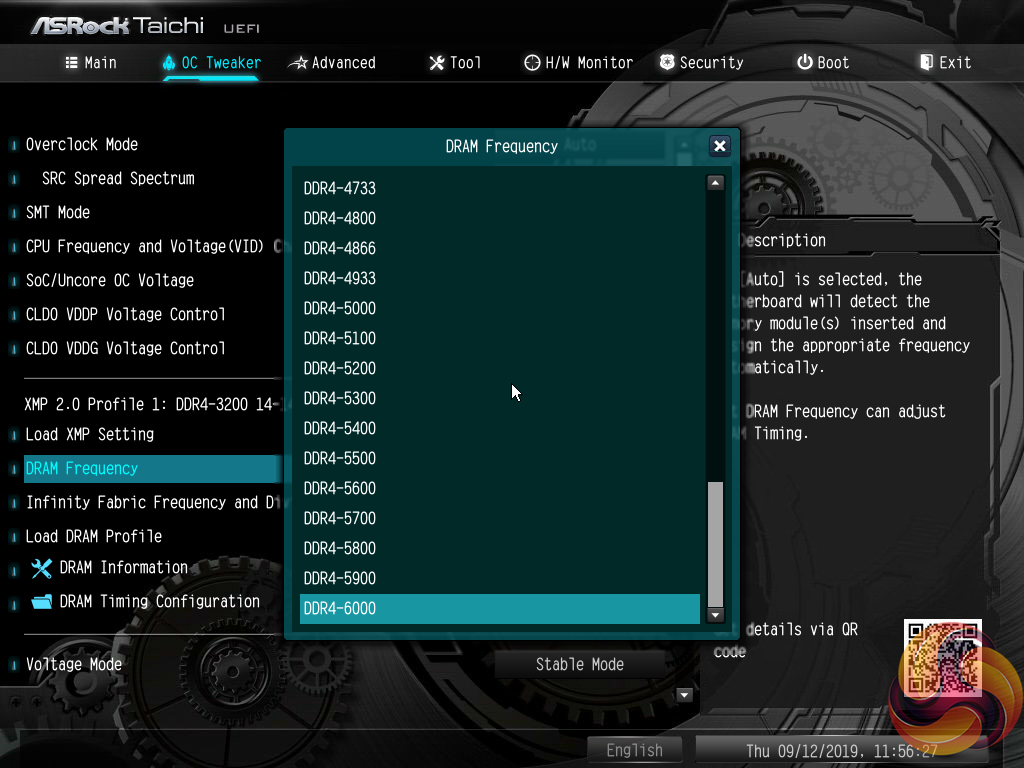
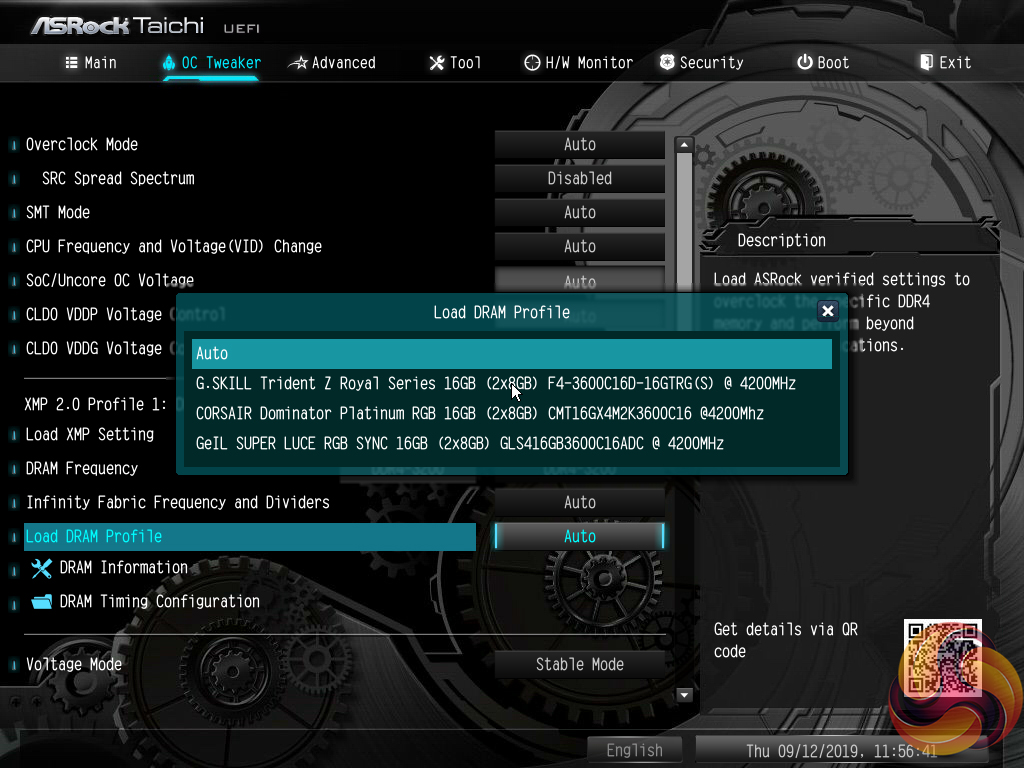
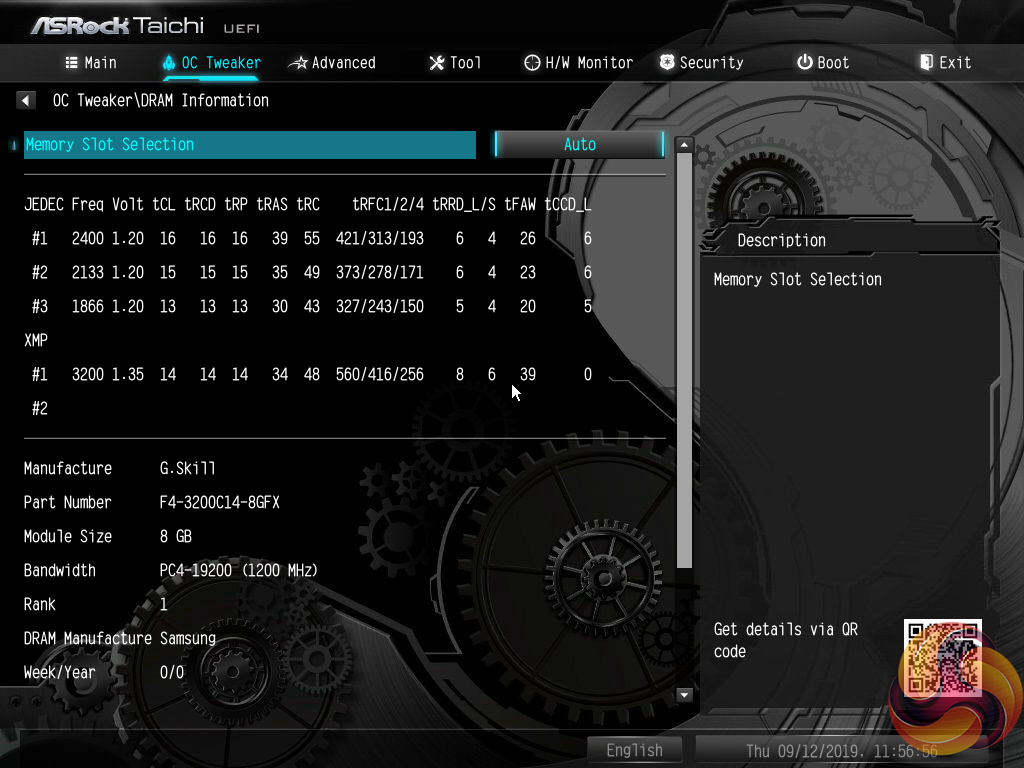
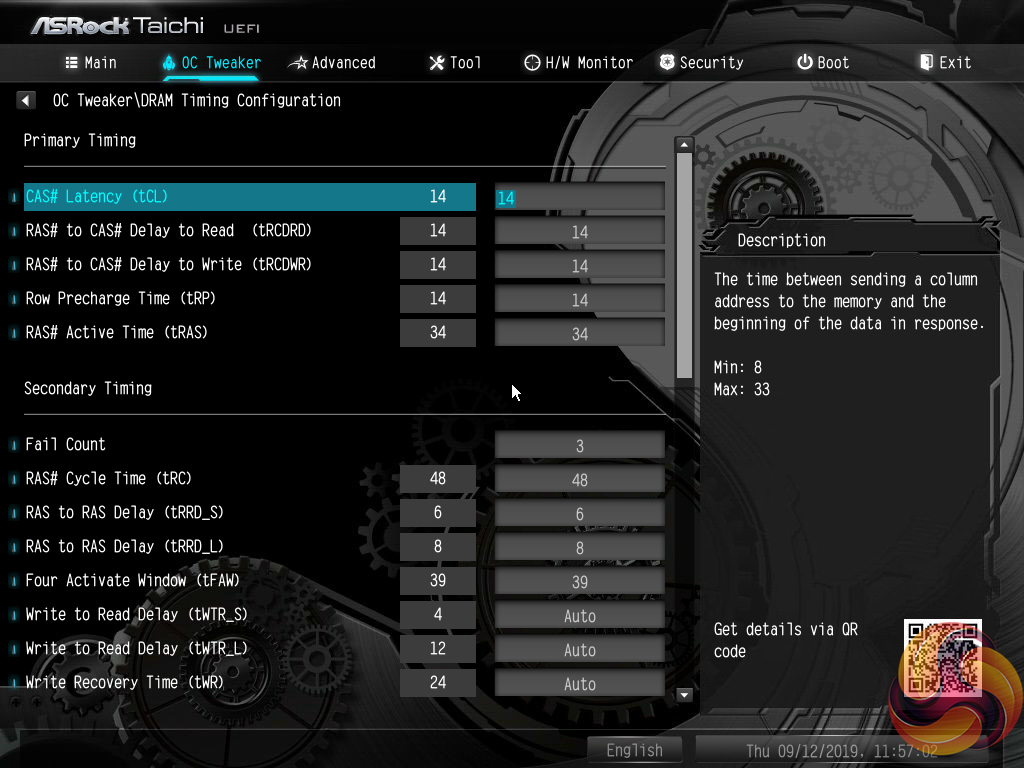
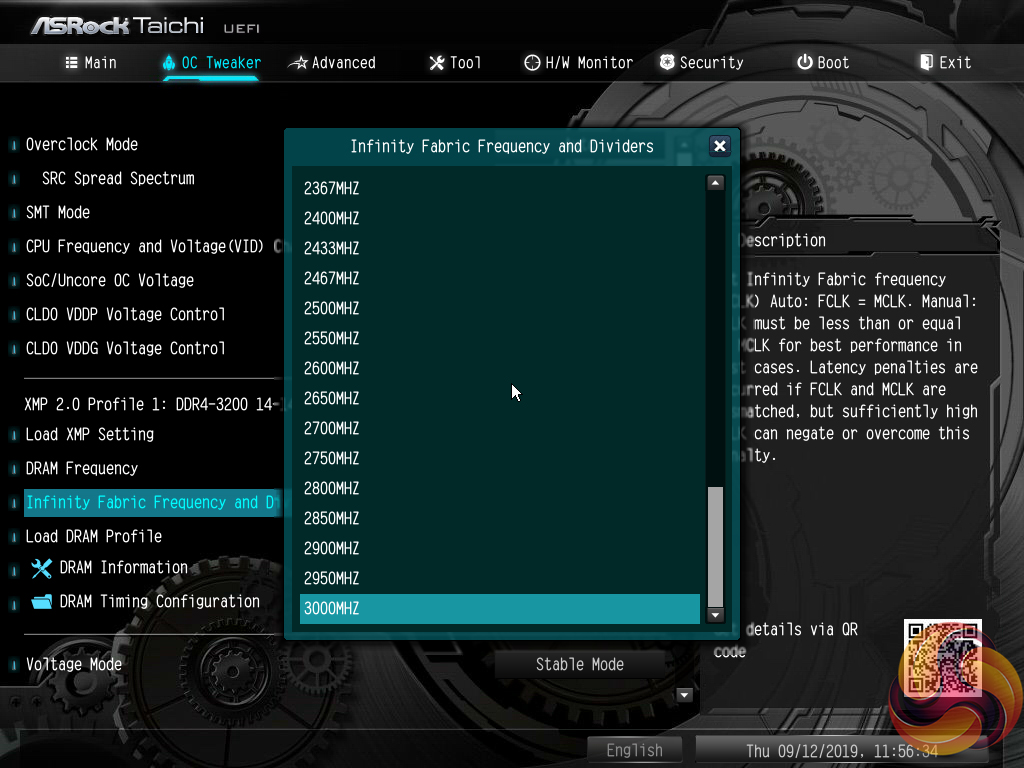
Plenty of memory-related settings are available, including dividers for extremely high frequencies and overclocked presets for specific kits.
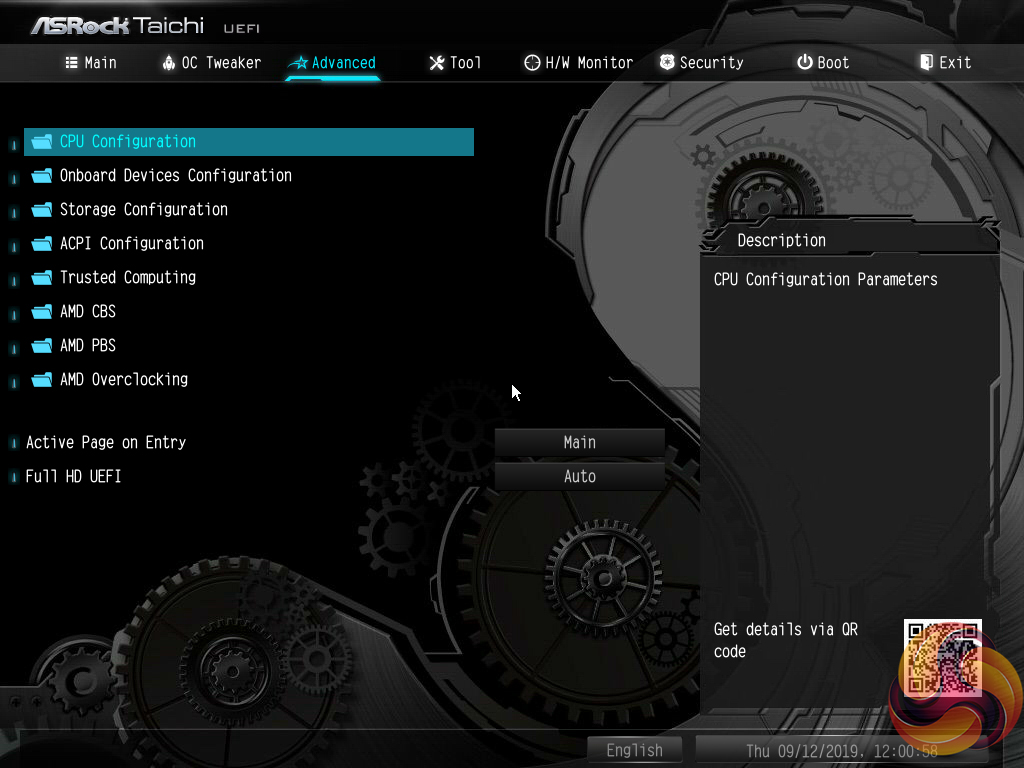
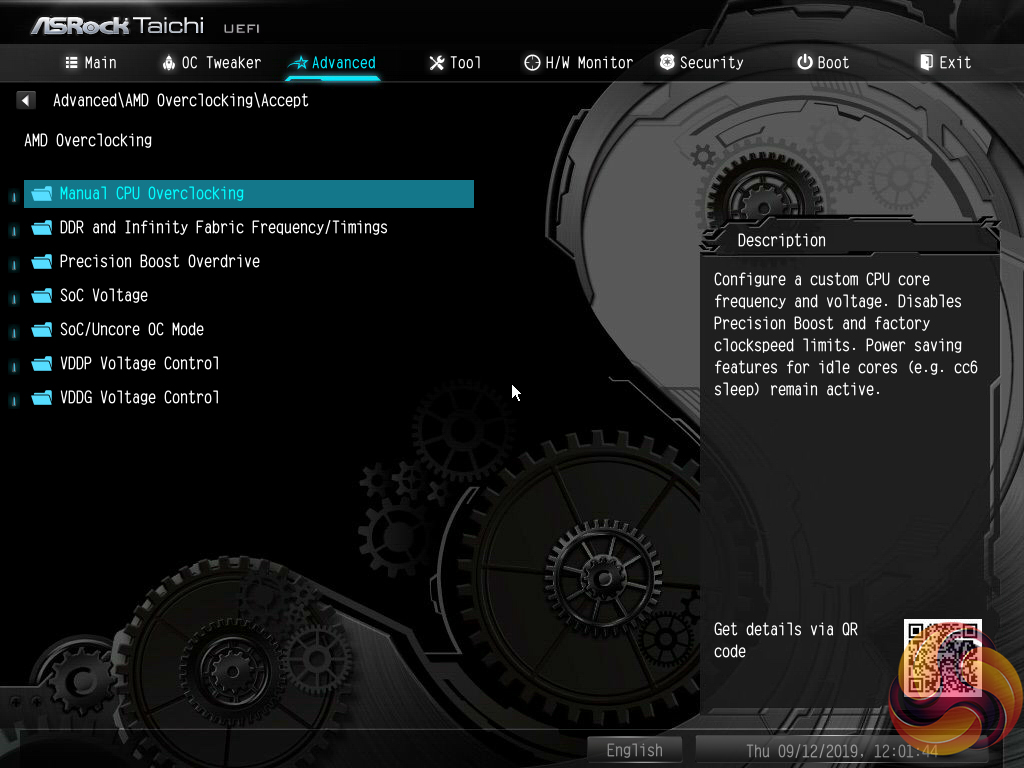

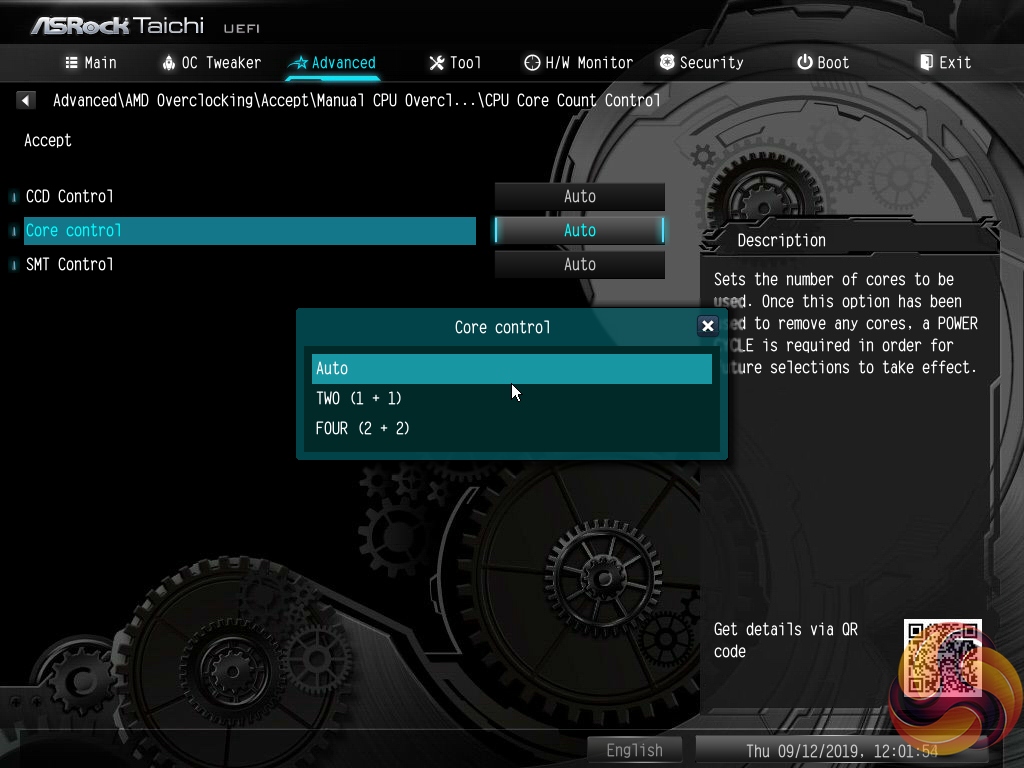
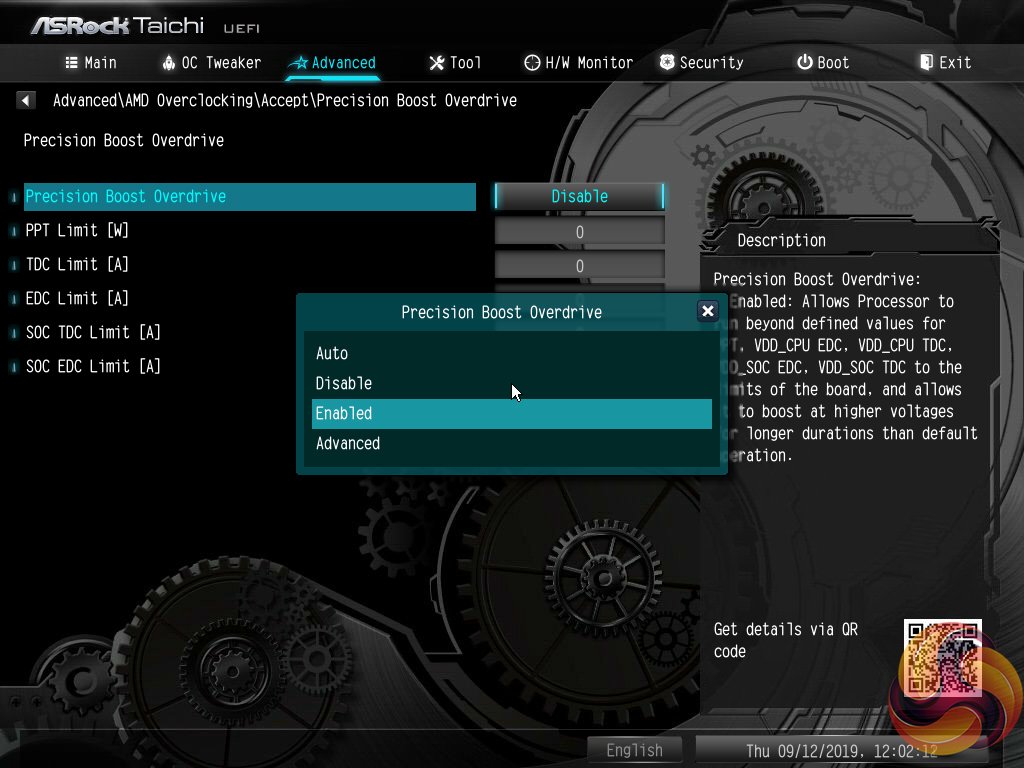

Settings more closely tied to the AMD CPU operation are found within the Advanced section. Settings such as CCD and core operations can be adjusted. There is also access to the Precision Boost Overdrive settings.
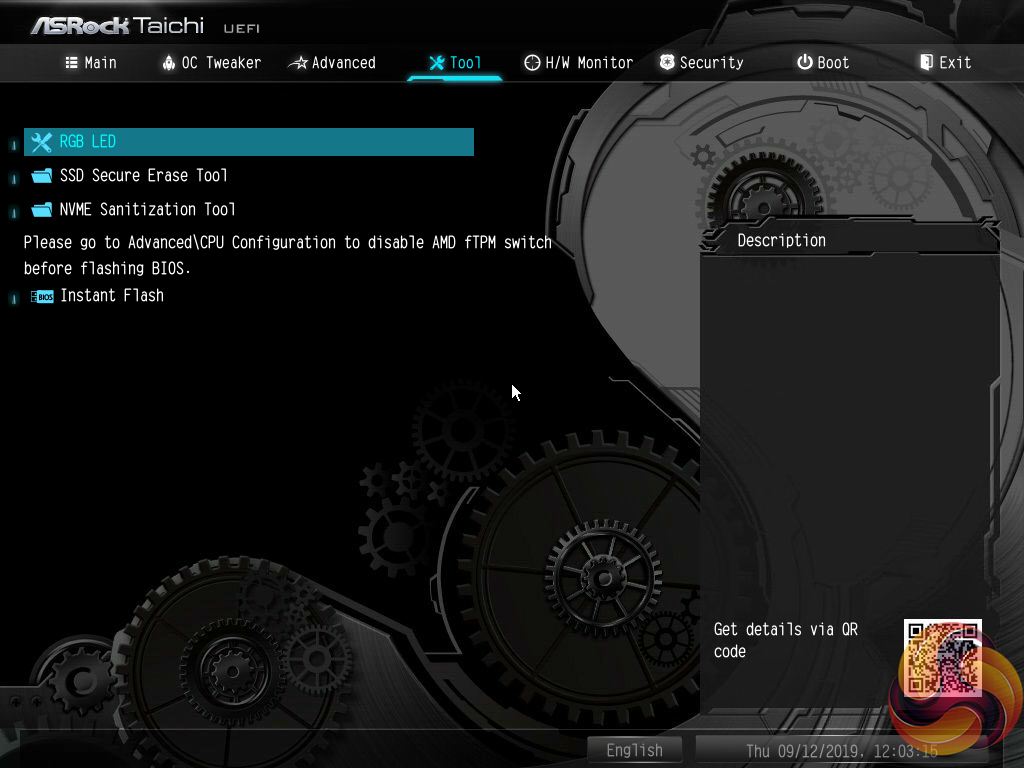
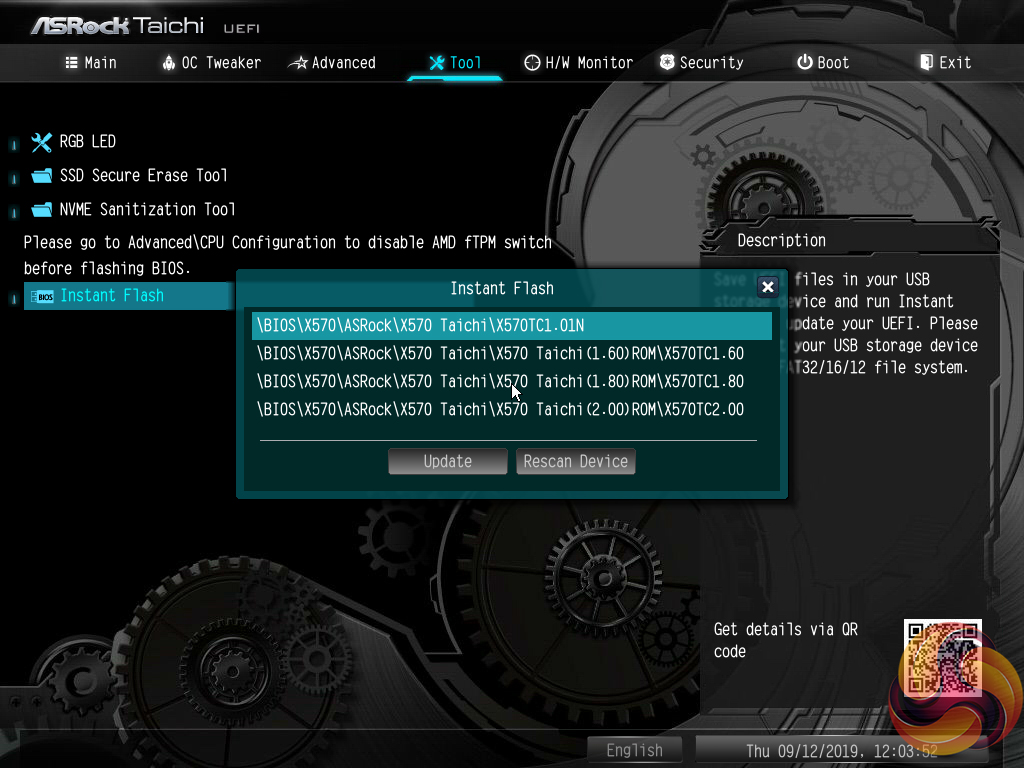
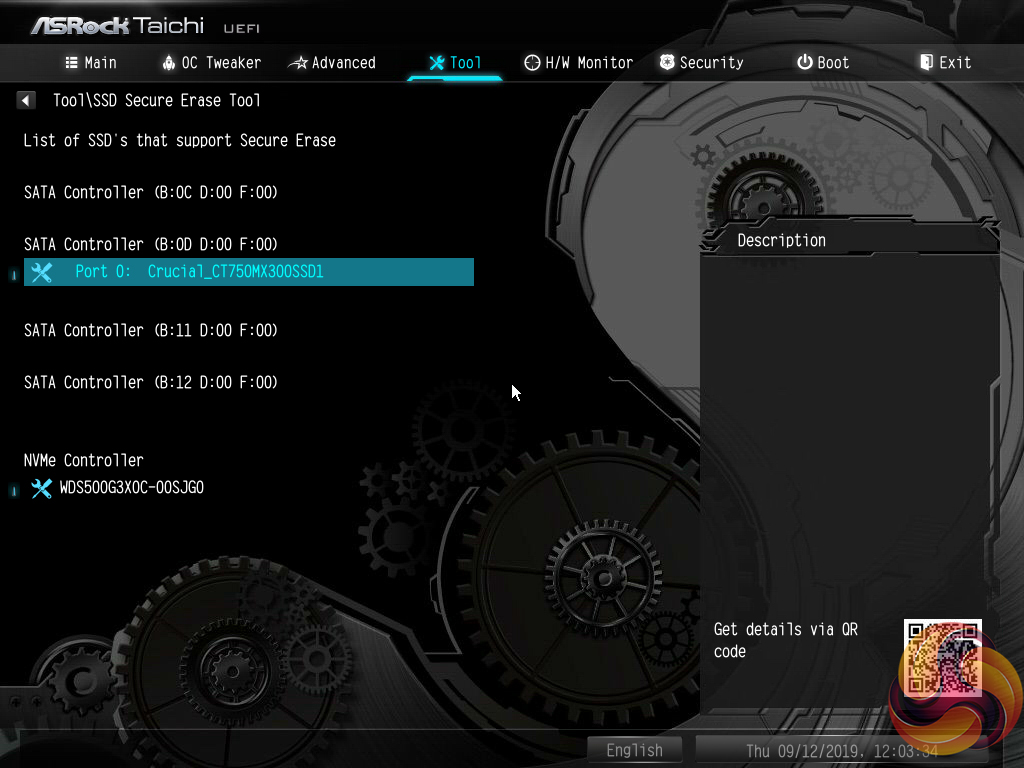
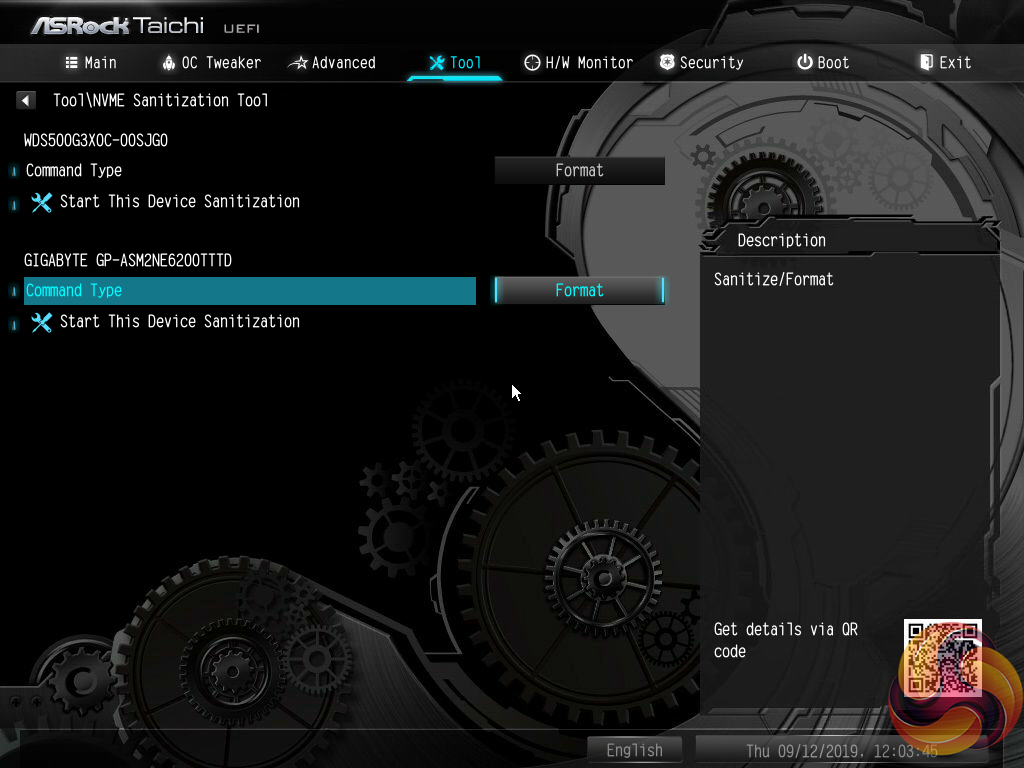
The Tools section holds a number of handy utilities such as Instant Flash for updating the UEFI (including via the internet), a driver installer, and an option for managing the RGB LEDs.
Instant Flash automatically scans a connected USB flash drive, rather than prompting a user to navigate through the folders to a BIOS file. There’s nothing wrong with this approach as the motherboard is able to find the BIOS update file itself. However, if your USB drive contains a large amount of data, the time taken to find the relevant BIOS file will be long.
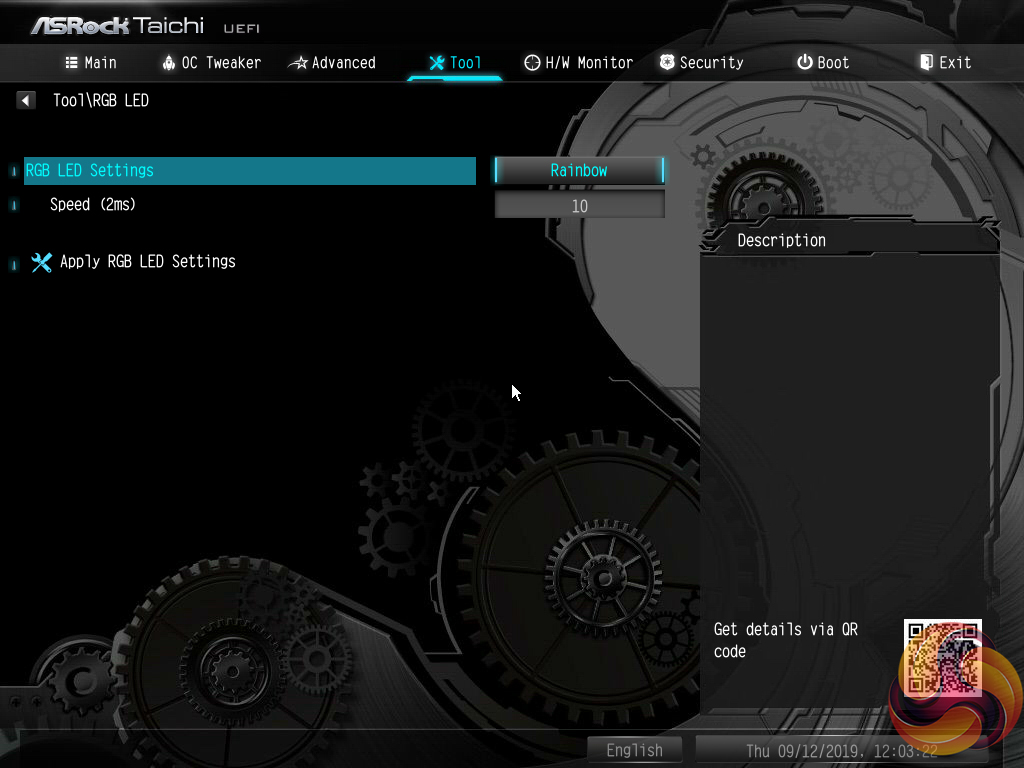
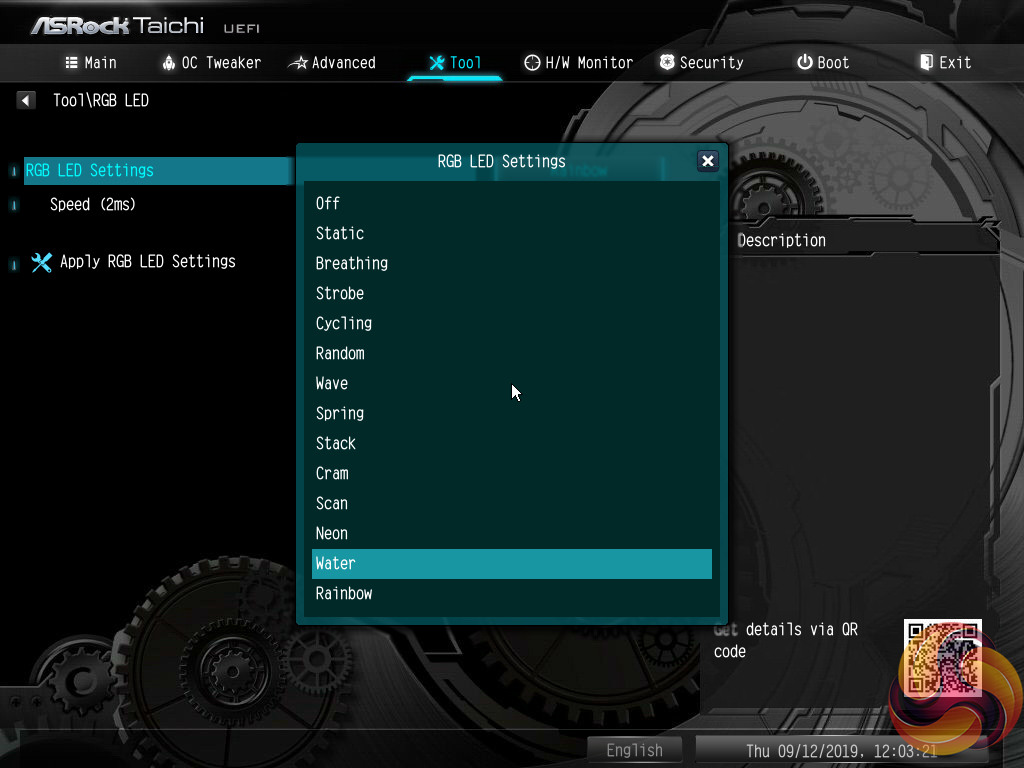
I particularly like ASRock's inclusion of a UEFI-based RGB LED control tool, especially when competing vendors do not provide such an offering. The ability to control one's LEDs within the UEFI is useful as it removes the necessity to install OS-based software that can sometime be badly optimised and hog system resources. Additionally, the UEFI-based control protects settings against Windows crashes or fresh OS installs.
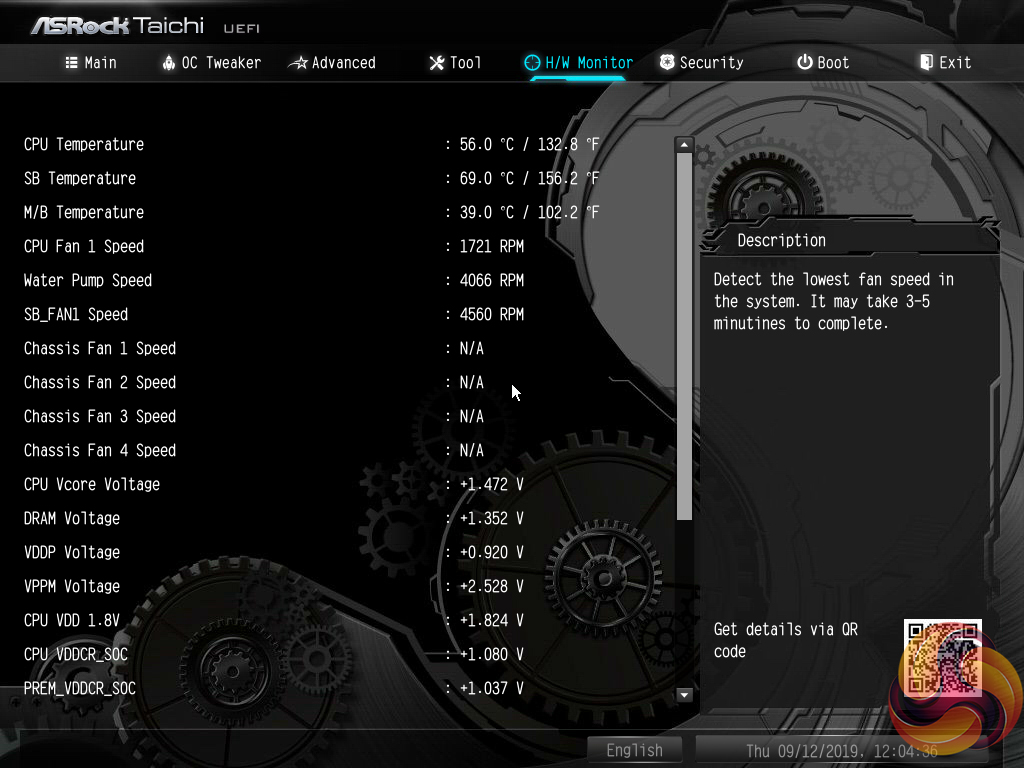


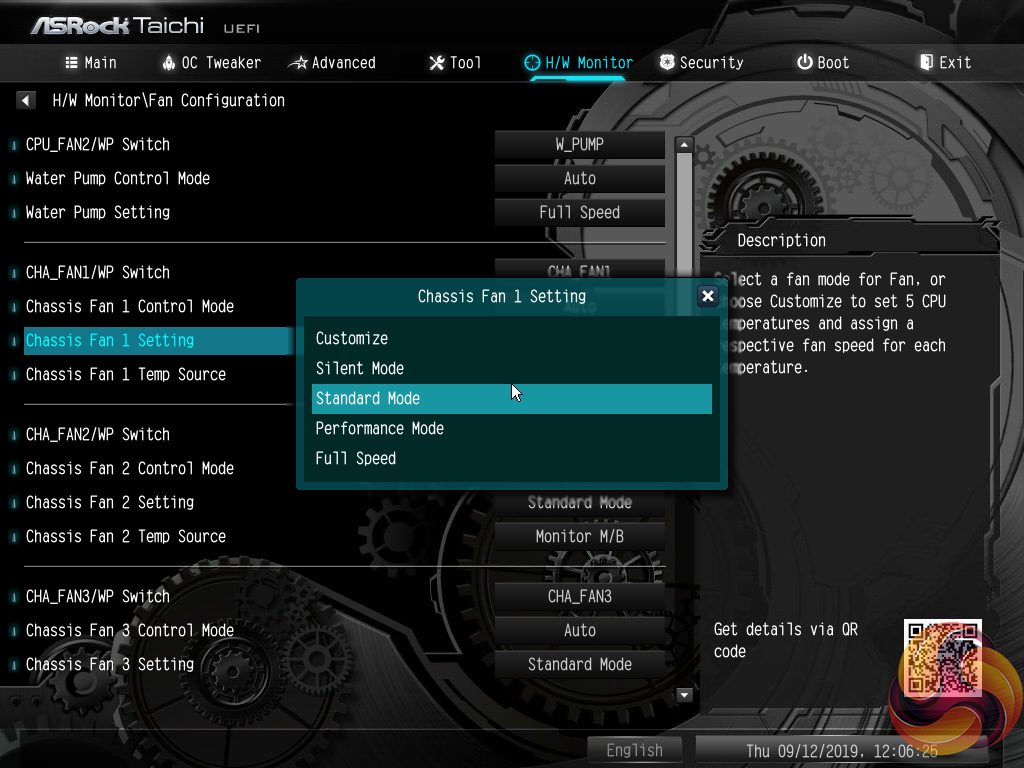
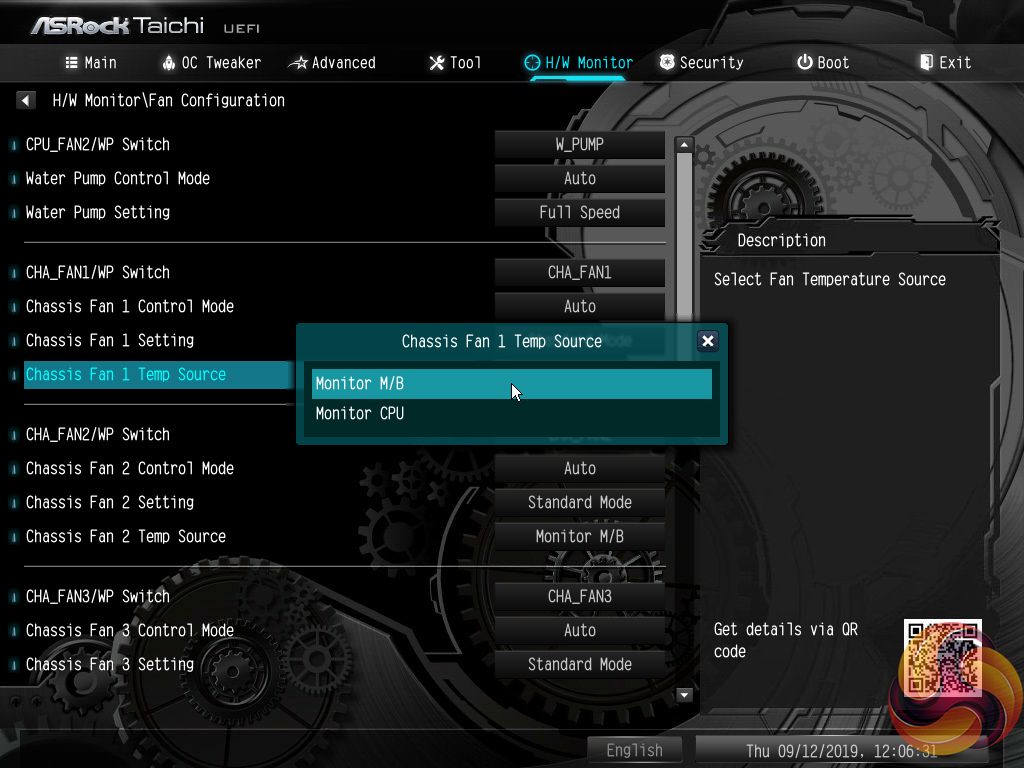
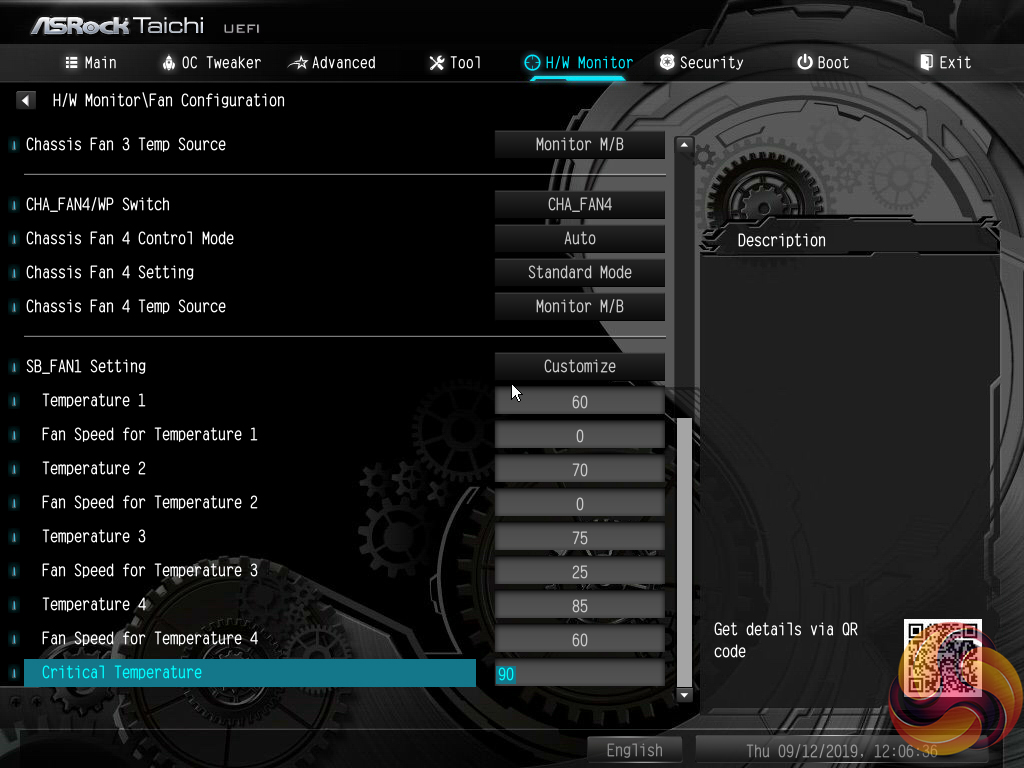
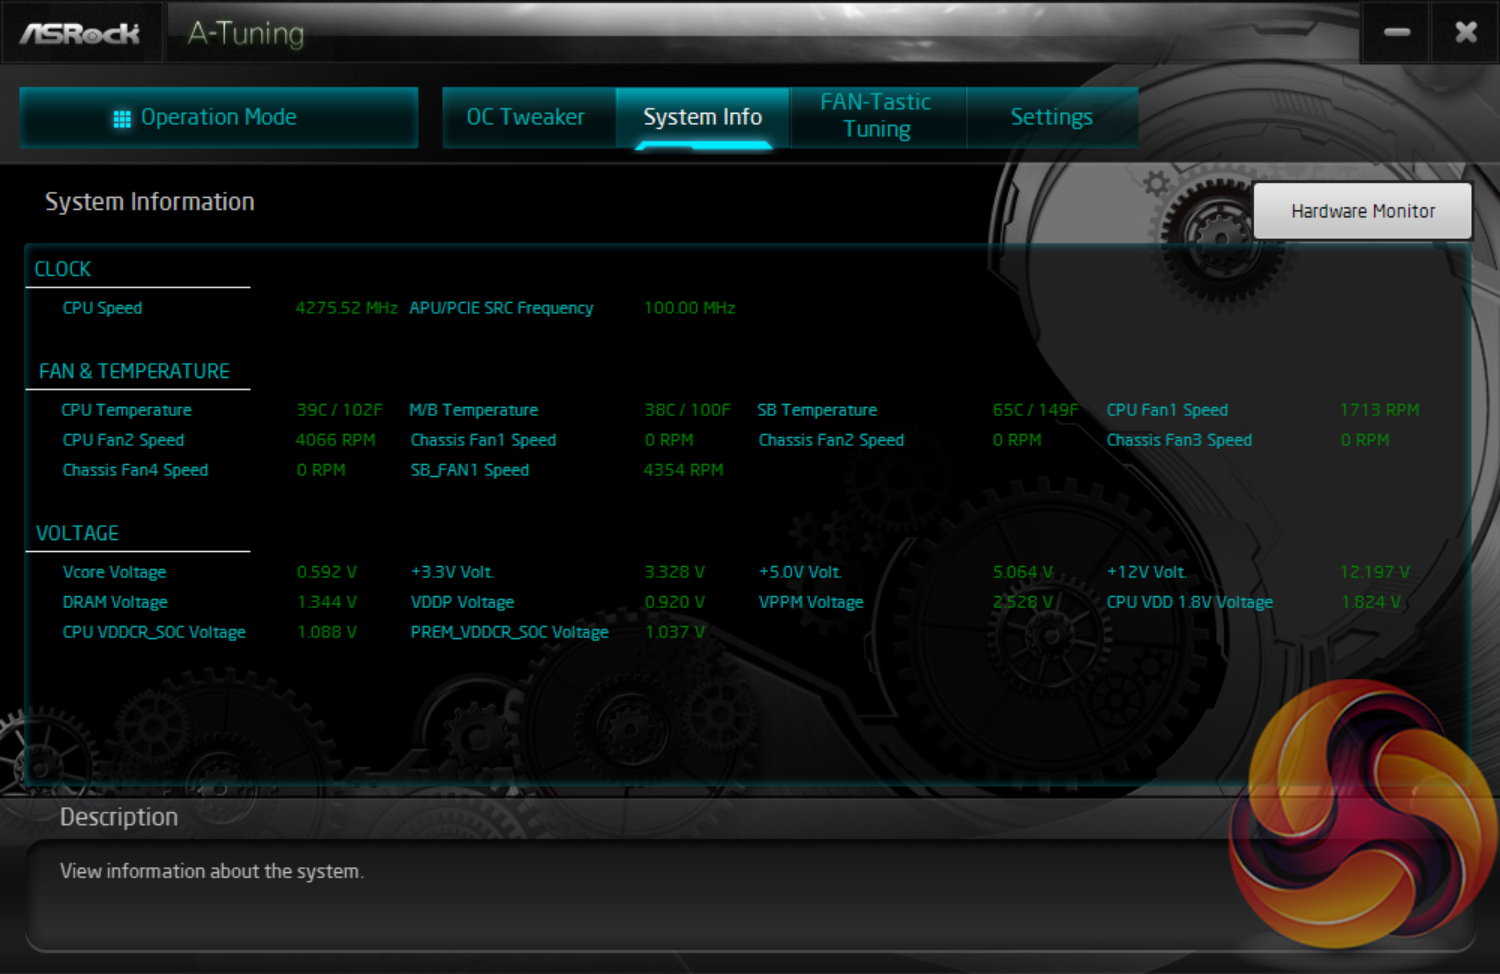
H/W Monitor contains fan controls and a number of temperature and voltage readouts for monitoring. The fan options are plentiful with a variety of fan speed profiles but only CPU and motherboard temperature reading options. A user can set a well-tuned fan speed curve simply by opting for numerical inputs.
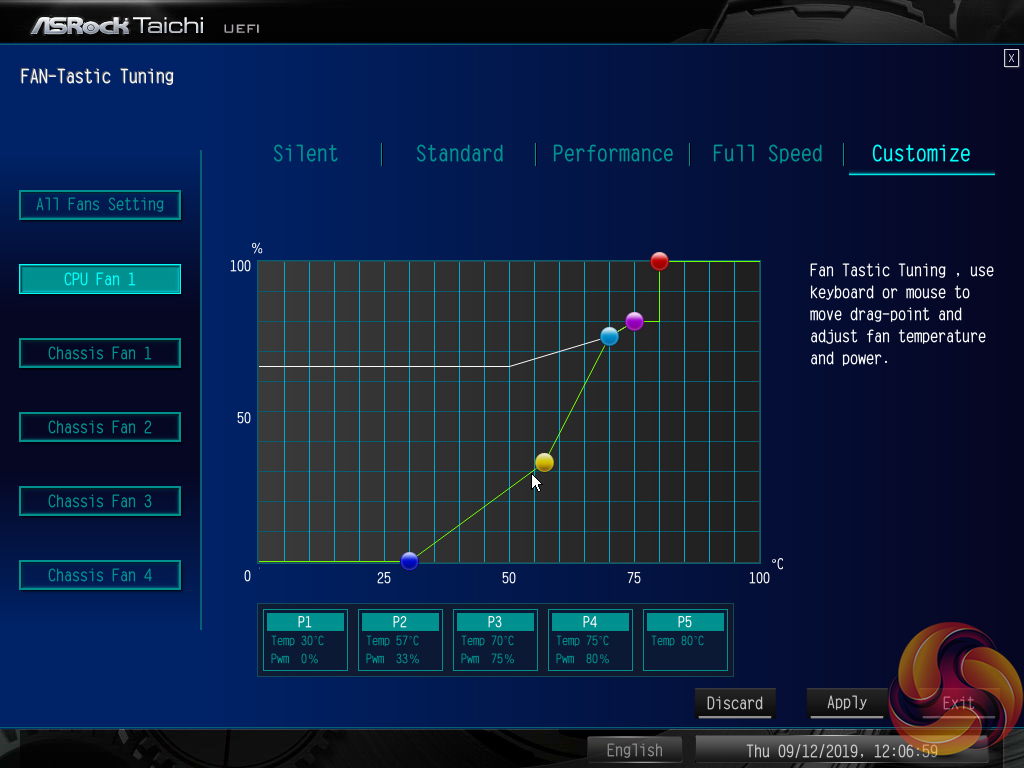
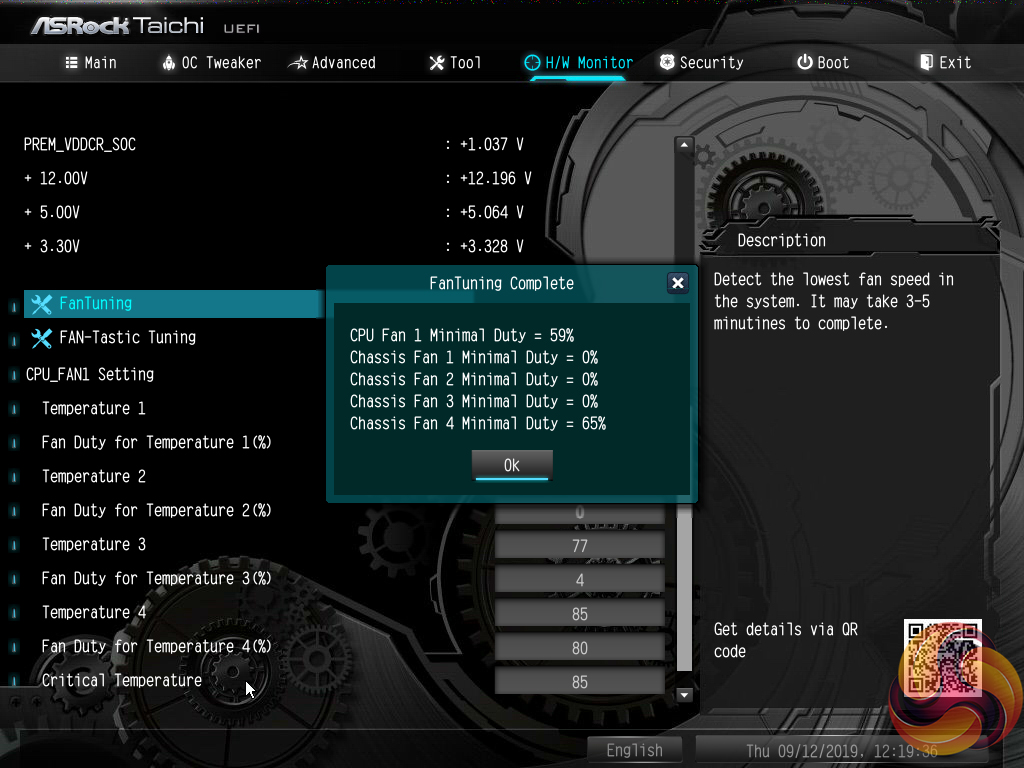
ASRock’s FanTuning utility automatically detects a number of minimum fan speed levels for the connected units. This can be useful when optimising fan speed curves to output as little noise as possible, while ensuring that the fans still rotate. The FAN-Tastic Tuning utility provides a graphical approach for managing fan speeds that is well built. The 5-point curve can be set to run fan speed levels as low as 0% at 30°C and the adjusted parameters update on connected fans in real time, which is ideal for tuning the system to one’s own preference.
There are no hysteresis options (time delays between fan speed changes) that are available on some competing motherboards, which is disappointing.
It is good to see included presets for the chipset fan and the same granular level of controllability. However, the presets did not force the fan speed below 3000 RPM in our testing. Setting a manual curve showed that the chipset fan likes to spin at around 1000 RPM at the minimum range. Temperatures at a rotational speed this low, however, are sub-par.
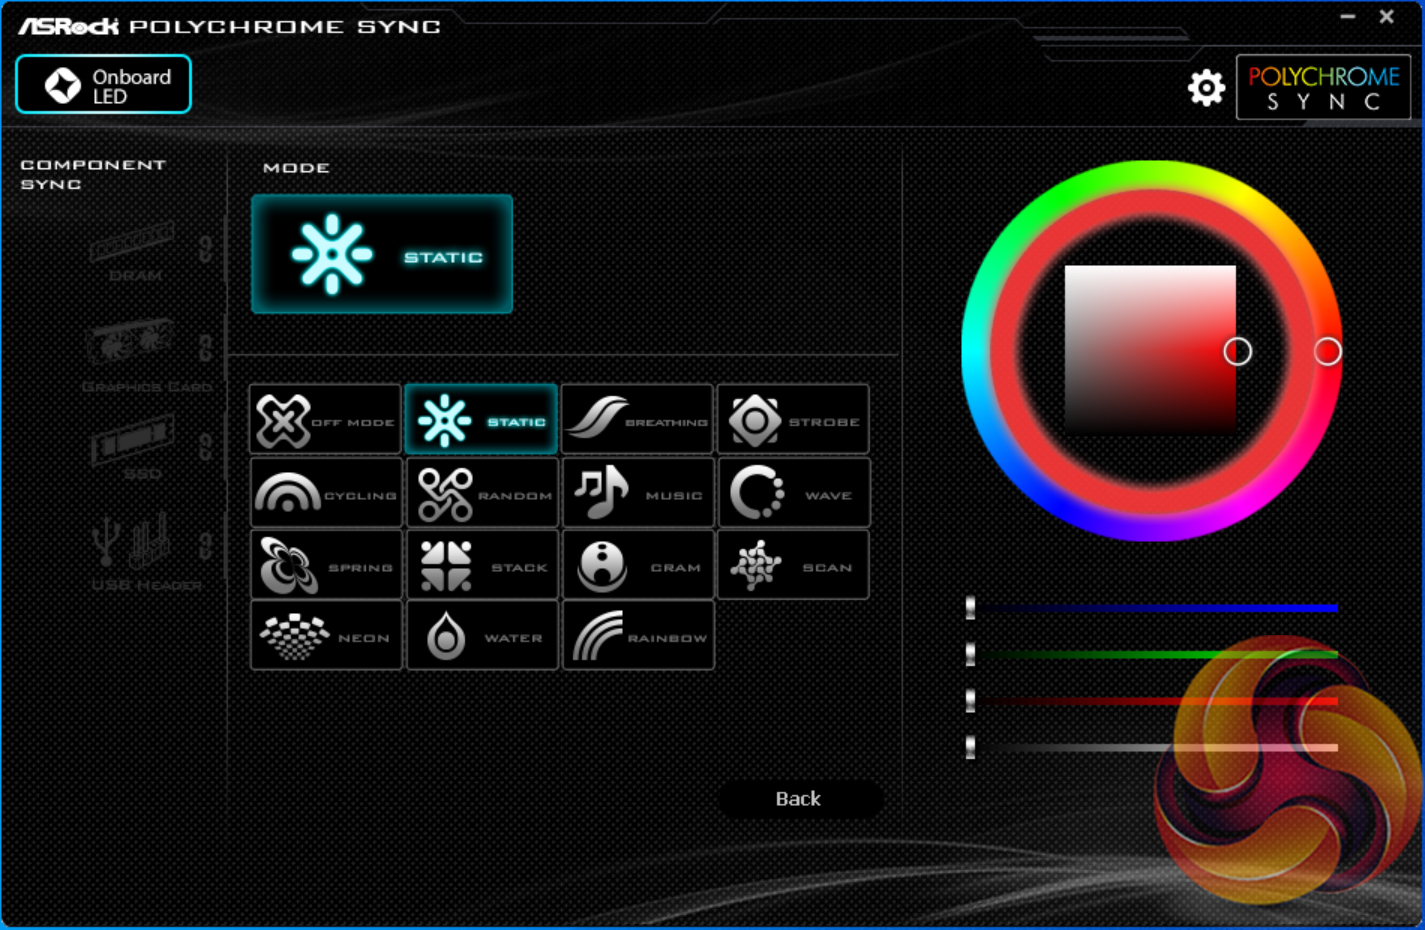
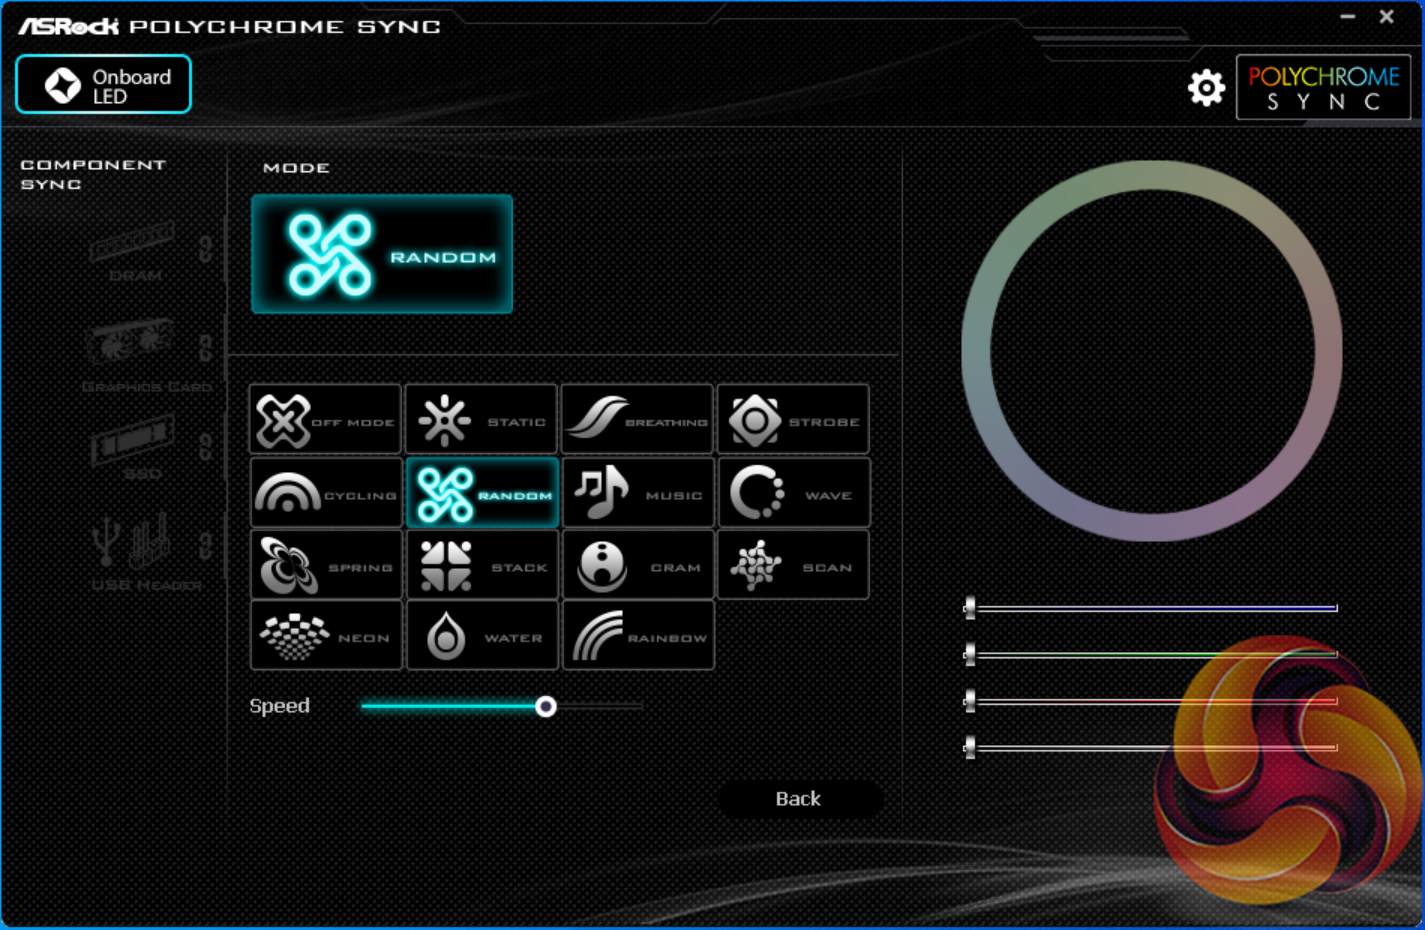
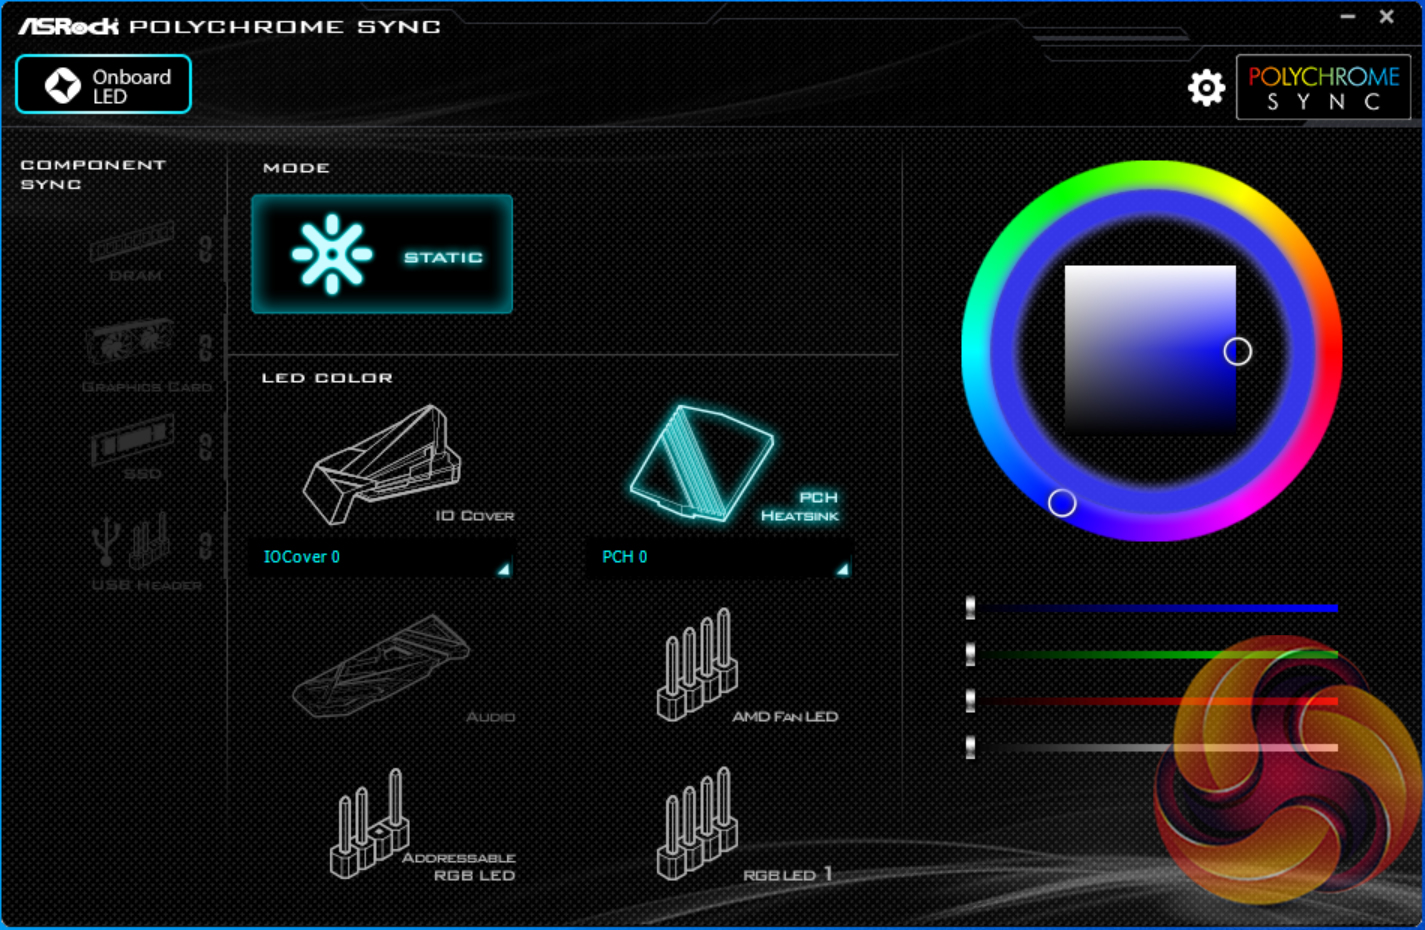

Users wanting to adjust colours of LEDs on the motherboard and those connected via the sync interface will need to install ASRock RGB LED. The software tool provides colour control in a wheel and square mechanism that is a little more complicated than colour blocks but gives superior granularity.
The RGB lighting colours can be controlled individually. There are a few basic lighting modes but nothing that I would consider to be out-of-the-ordinary. There are no ‘intelligent’ control modes as we would find on competing offerings, so don’t expect to set your LED colours to switch when your CPU temperature increases.
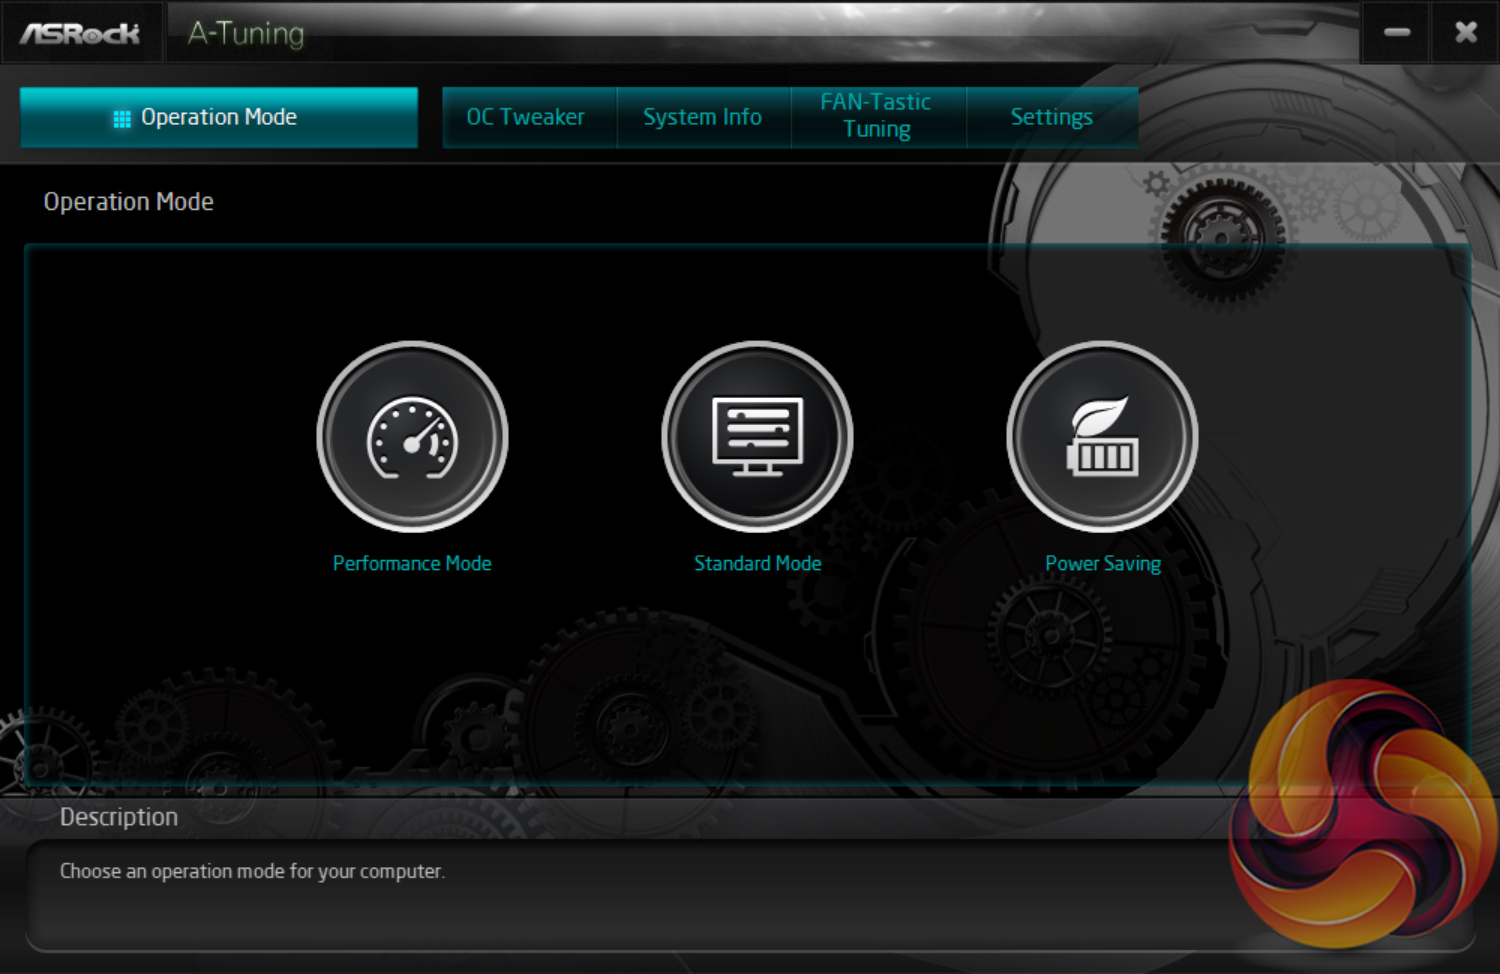
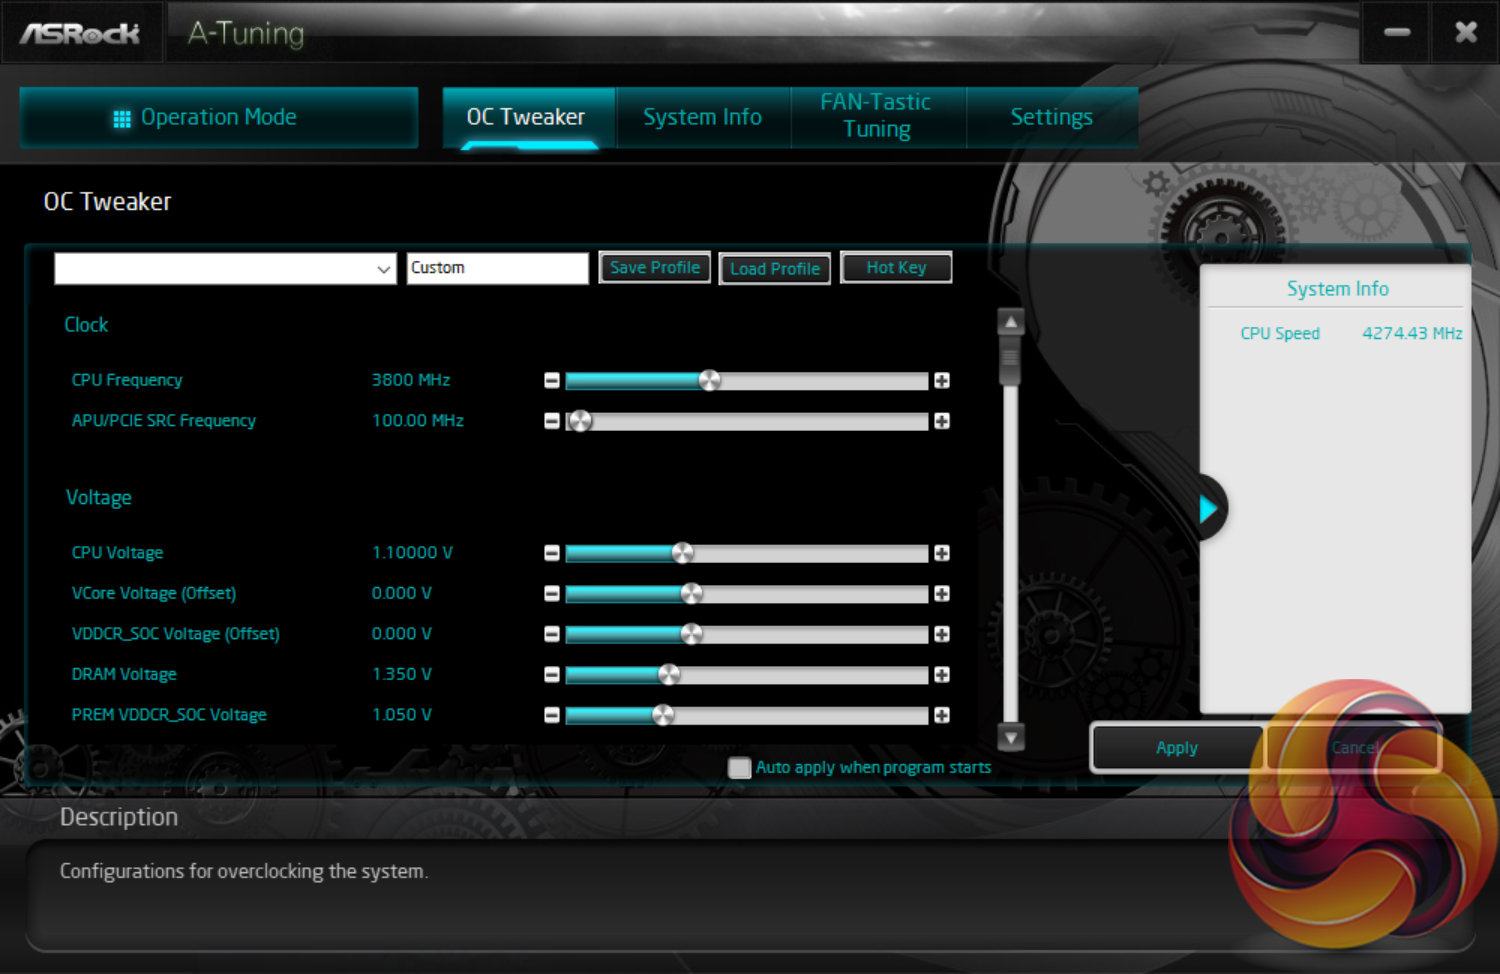
A-Tuning is ASRock’s equivalent to ASUS AI Suite, Gigabyte EasyTune, and MSI Dragon Center. This software allows you to overclock on the fly (OTF) and tune the fan speeds with the ASRock Fan-Tastic tuning utility. It’s a reasonably well-polished piece of software, is light on system resources, and not very intrusive. A-Tuning is decent enough and the data that was pulled through from system sensors seemed to align well with more established monitoring tools such as HWinfo64.
In our experience, overclocking is still better off carried out within the UEFI environment as it has more options and is more granular, but there’s no harm in ASRock offering the software equivalent.


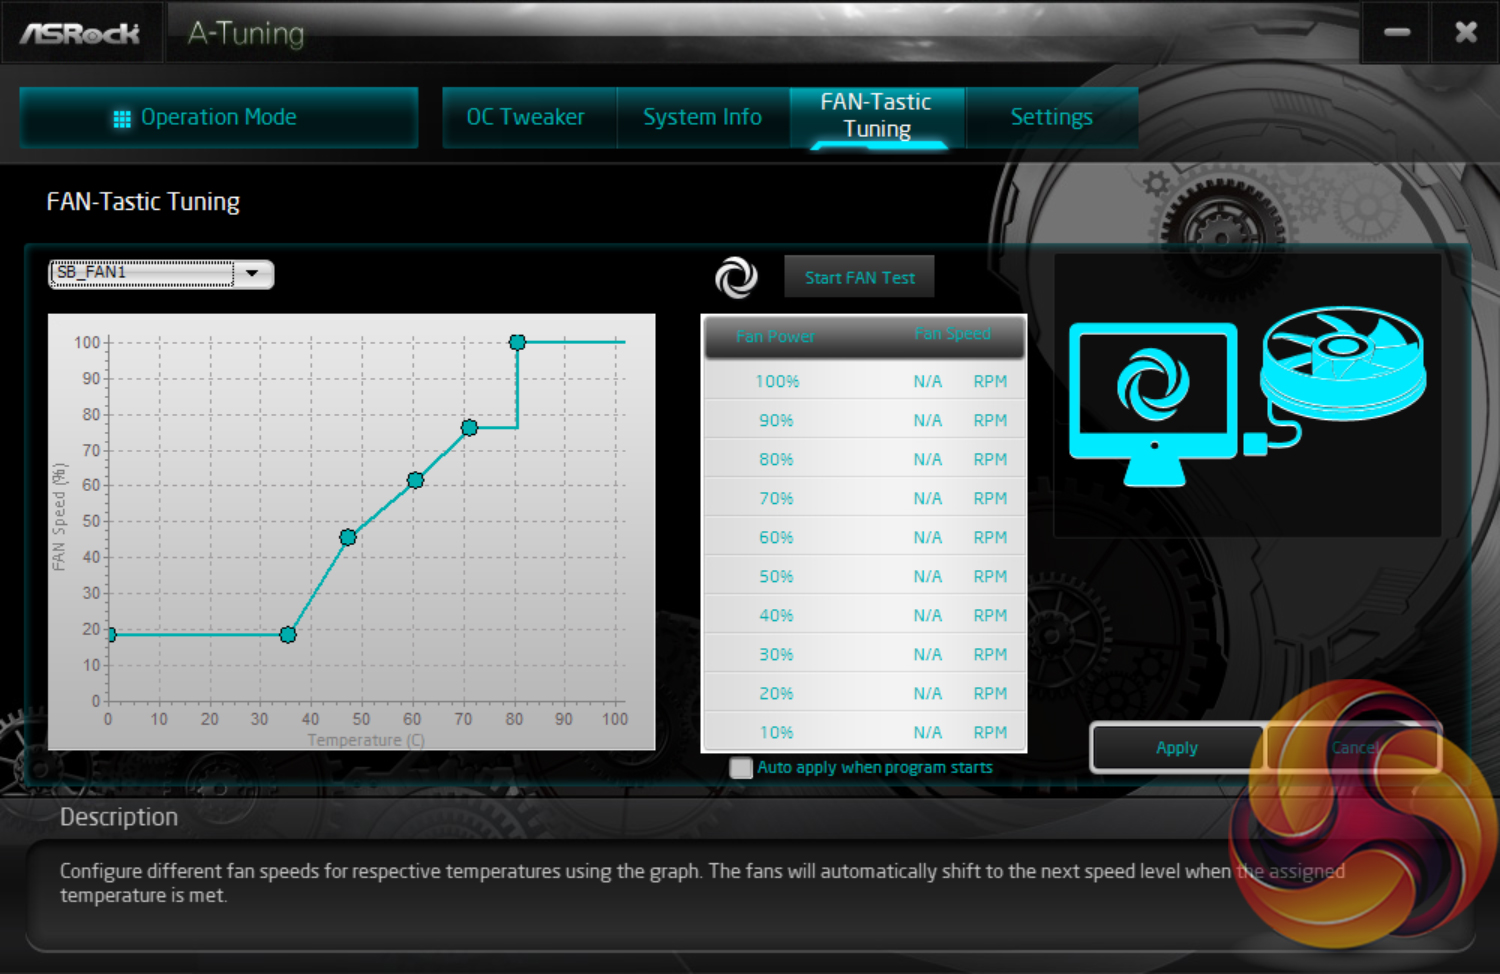

Fan control within ASRock's OS software is good. You get the same 5-point curve capability as is found within the UEFI. And there's the option to apply the fan settings at system start up – ideal if you want to make permanent changes or just temporary ones. The chipset fan featured one additional point on its speed curve.
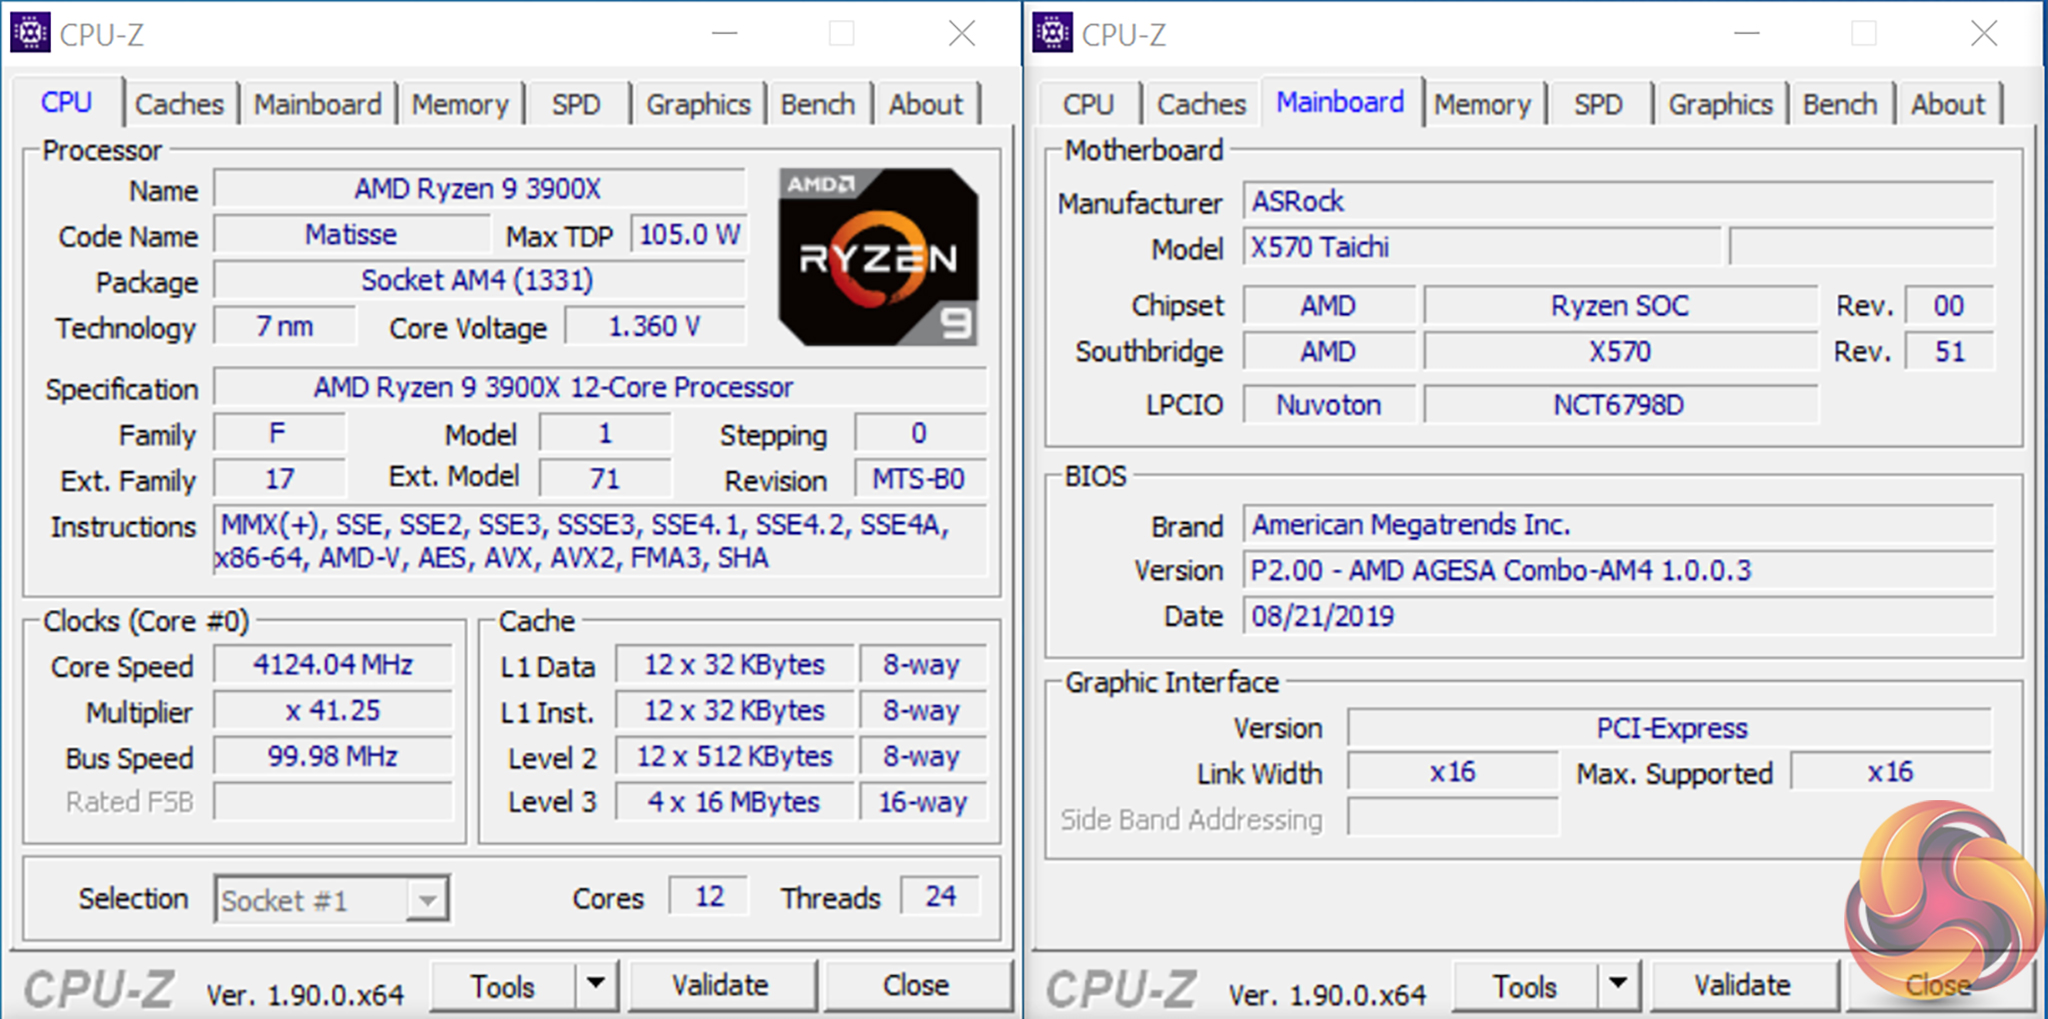
We will be outlining the ASRock X570 Taichi motherboard’s performance with the AMD Ryzen 9 3900X CPU, 16GB of 3200MHz DDR4 memory, and an Aorus RTX 2080 Ti graphics card.
X570 Motherboard Test System:
- Processor: AMD Ryzen 9 3900X.
- Memory: 16GB (2x8GB) G.SKILL 3200MHz CL14 DDR4 @ 1.35V.
- Graphics Card: Gigabyte Aorus RTX 2080 Ti Gaming OC 11G (custom fan curve to eliminate thermal throttling).
- System Drive: WD Black SN750 500GB.
- Games SSD: Crucial MX300 750GB.
- CPU Cooler: Corsair H100X (full speed fans to eliminate thermal throttling).
- Power Supply: Seasonic Prime Titanium 1000W.
- Operating System: Windows 10 Pro 64-bit 1903 Update.
Drivers and UEFI:
- ASRock X570 Taichi UEFI P2.00 [AMD AGESA Combo-AM4 1.0.0.3 ABB] (latest at the time of testing).
Comparison Motherboards:
Tests:
- Cinebench R20 – All-core & single-core CPU benchmark (CPU)
- Blender 2.79b – All-core rendering of the BMW benchmark (CPU)
- SiSoft Sandra – Memory bandwidth (Memory)
- AIDA64 – Memory bandwidth, memory latency (Memory)
- 3DMark TimeSpy – Time Spy (1440p) test (Gaming)
- Deus Ex: Mankind Divided – Built-in benchmark tool, 1920 x 1080, Ultra quality preset, no AA, DX12 version (Gaming)
- Shadow of the Tomb Raider – Built-in benchmark tool, 1920 x 1080, Highest quality preset, no AA, DX12 version (Gaming)
- CrystalDiskMark– Storage transfer rates (Motherboard)
- Rightmark Audio Analyzer 6.4.5 – Record and playback test using a line-in to line-out loopback with a 3.5mm audio cable (Motherboard)
- AIDA64 – Stress test (Temperatures & Power Consumption)
- HWiNFO – System sensor monitoring during stress test (Temperatures & Power Consumption)
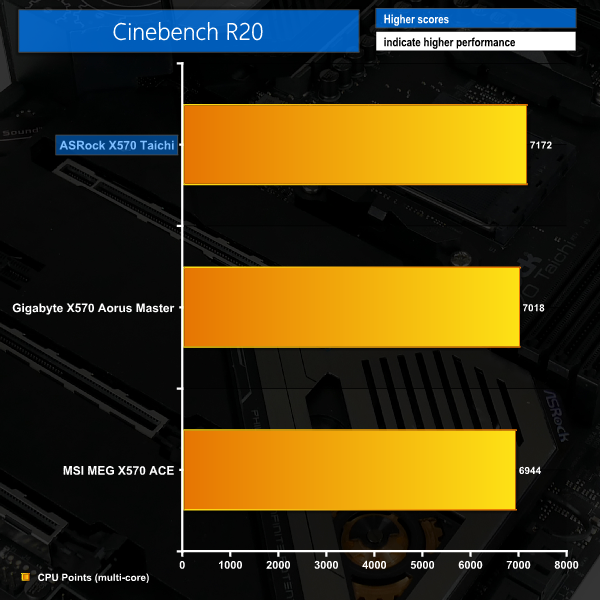
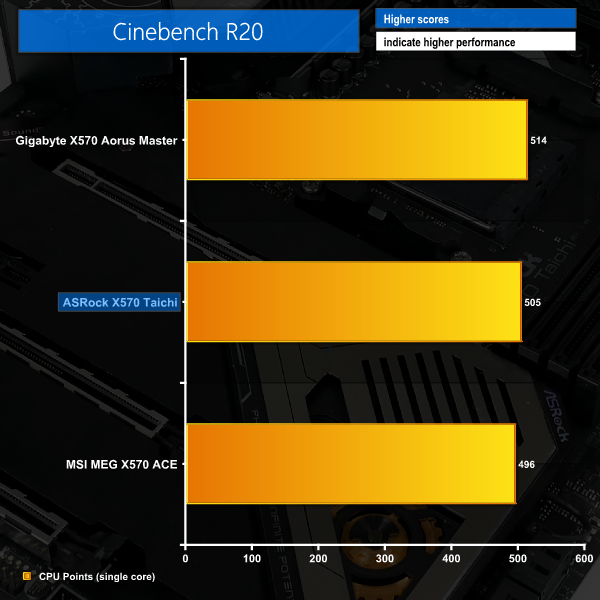
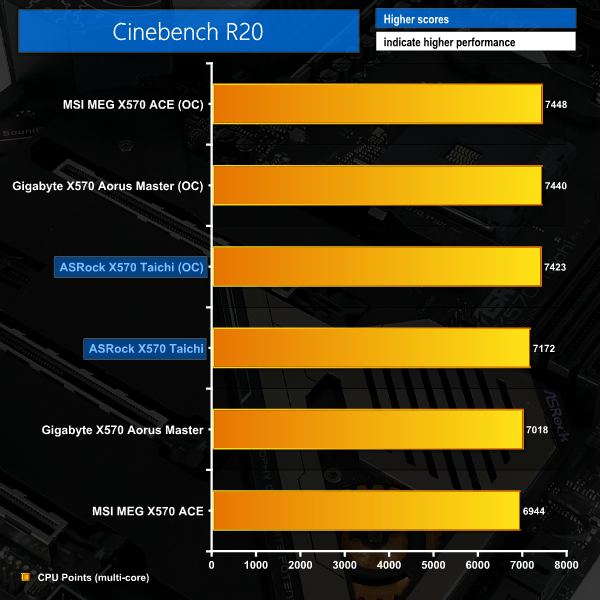
Cinebench R20
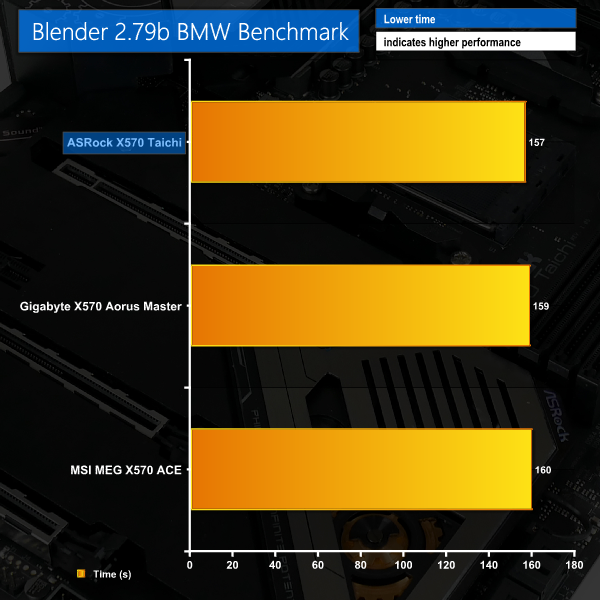
Blender BMW Benchmark
Cinebench R20 shows ASRock’s X570 Taichi topping the multicore chart thanks to its higher clock speed via more aggressive voltages. The performance increase over the next fastest X570 board we have tested is a solid 2%. According to our logs, the Ryzen 9 3900X sat nicely at 4125MHz throughout this test, with ASRock’s board pumping over 1.35V through the chip.
Single-threaded performance isn’t as fast as Gigabyte’s X570 Aorus Master but is still solid at just over 500 points. Our logs showed a maximum single-core boost of 4575MHz for a single two second data point. 4425-4475MHz seemed to be the more consistently achieved single-core boost clock.
Blender completes a couple of seconds quicker on the ASRock board thanks to its more aggressive voltage setting and CPU clock speed. This run also demands more power from the system than MSI and Gigabyte competitors.
AIDA64 Engineer
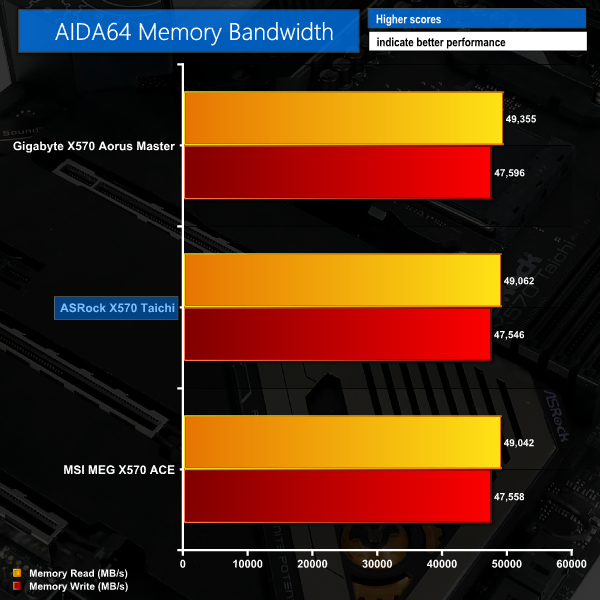

Sandra Memory Bandwidth
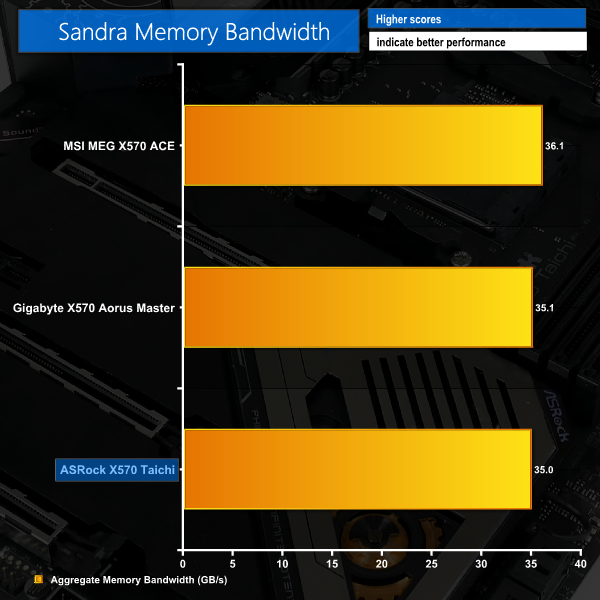
Memory bandwidth is where we’d expect it for 3200MHz CL14 DDR4 in dual channel configuration. The same can be said for latency performance which came in a touch slower than our X570 leader.
ASRock continues to show memory performance similar to Gigabyte with the 35GBps result in SiSoft Sandra.
3DMark
3DMark is a multi-platform hardware benchmark designed to test varying resolutions and detail levels of 3D gaming performance. We run the Windows platform test and in particular the Time Spy benchmark, which is indicative of high-end 1440p PC Gaming.

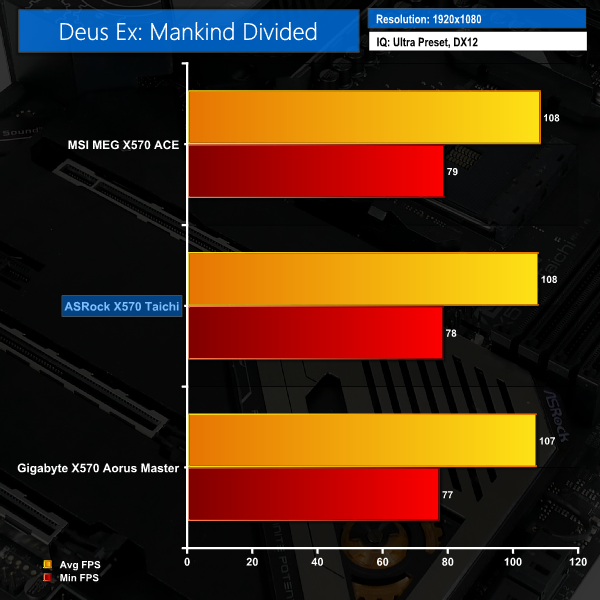
Deus Ex: Mankind Divided
Despite its age, Deus Ex: Mankind Divided remains a demanding title even for modern hardware. We use the game’s built-in benchmark with quality set to Ultra, MSAA disabled, and DX12 mode.
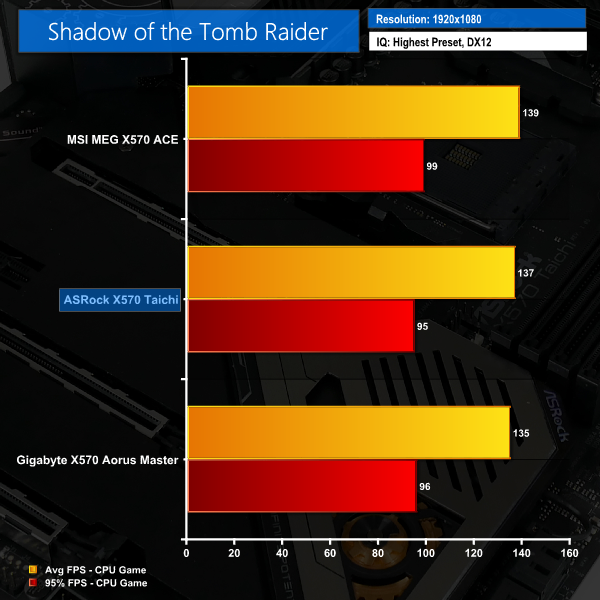
Shadow of the Tomb Raider
We run the built-in benchmark using the DirectX 12 mode, anti-aliasing disabled, and the Highest quality preset.
Surprisingly, given its higher boost clock frequencies through more aggressive CPU voltage, the X570 Taichi was a little slower than the rest in 3DMark Time Spy. The defeat is very narrow, however.
Clearly the 3DMark hiccup does not transfer into real world gaming performance, with ASRock’s X570 solution sitting close to the performance from MSI’s alternative in Deus Ex.
Shadow of the Tomb Raider shows another solid gaming result for the X570 Taichi with its average performance sitting between Gigabyte and MSI. With that said, frame consistency wasn’t quite as good as the two competitors, with the 95% FPS number from ASRock’s board scoring a little lower throughout our testing. The difference is minuscule, however.
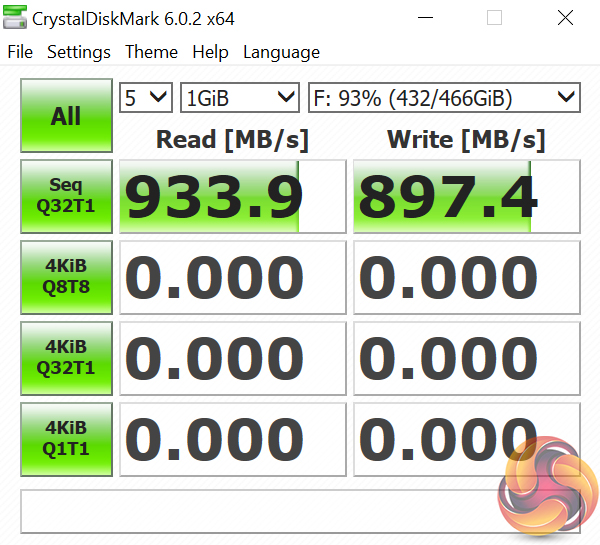
M.2 PCIe Performance
We test M.2 PCIe performance using an Aorus PCIe Gen 4 2TB SSD. This SSD uses a Phison-based PCIe Gen 4 controller.
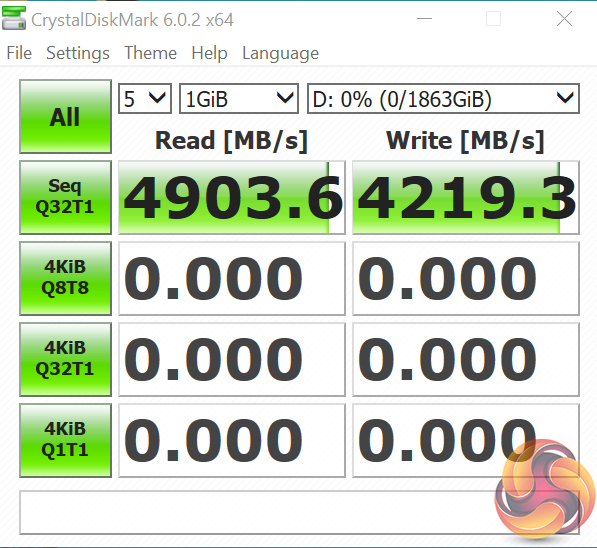
No cause for concerns from the X570 Taichi’s M.2 speed with our Aorus PCIe Gen SSD closing in on 5GBps.
Cooling performance from ASRock’s metal shroud proved adequate, with the Aorus SSD sitting comfortably around 60°C for our short duration write load.
USB Performance
We test USB 3.2 performance using a PCIe NVMe SSD connected to a Sabrent USB 3.2 Gen 2 (10Gbps) Type-C M.2 enclosure.
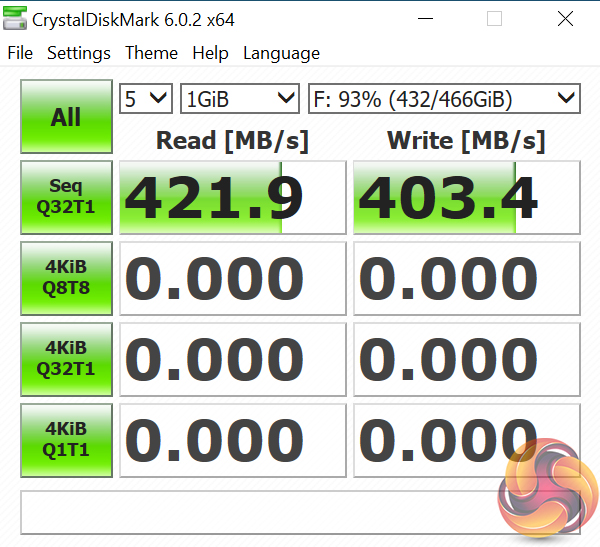
Read and write speeds in the 900MBps range shows that ASRock’s USB 3.2 Gen 2 10Gbps deployment is working as intended. The same goes for 5Gbps USB 3.0 transfer rates.
SATA 6Gbps Performance
For SATA 6Gbps testing we use a Crucial MX300 750GB SSD.
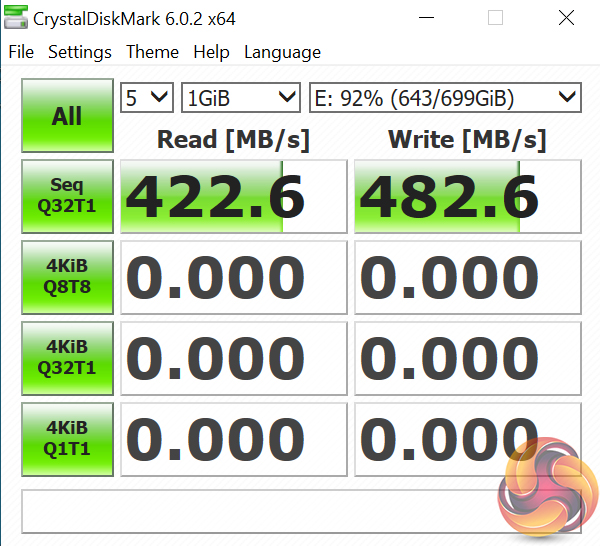
SATA 6Gbps performance is right where we'd expect it on our well-used Crucial SSD.
Audio
Rightmark Audio Analyser is a freeware benchmarking utility designed to objectively test the performance characteristics of audio solutions. We setup a line-in line-out loop and execute the record/playback test before generating the results report you see below. A sampling mode of 24-bit, 192 kHz was tested.
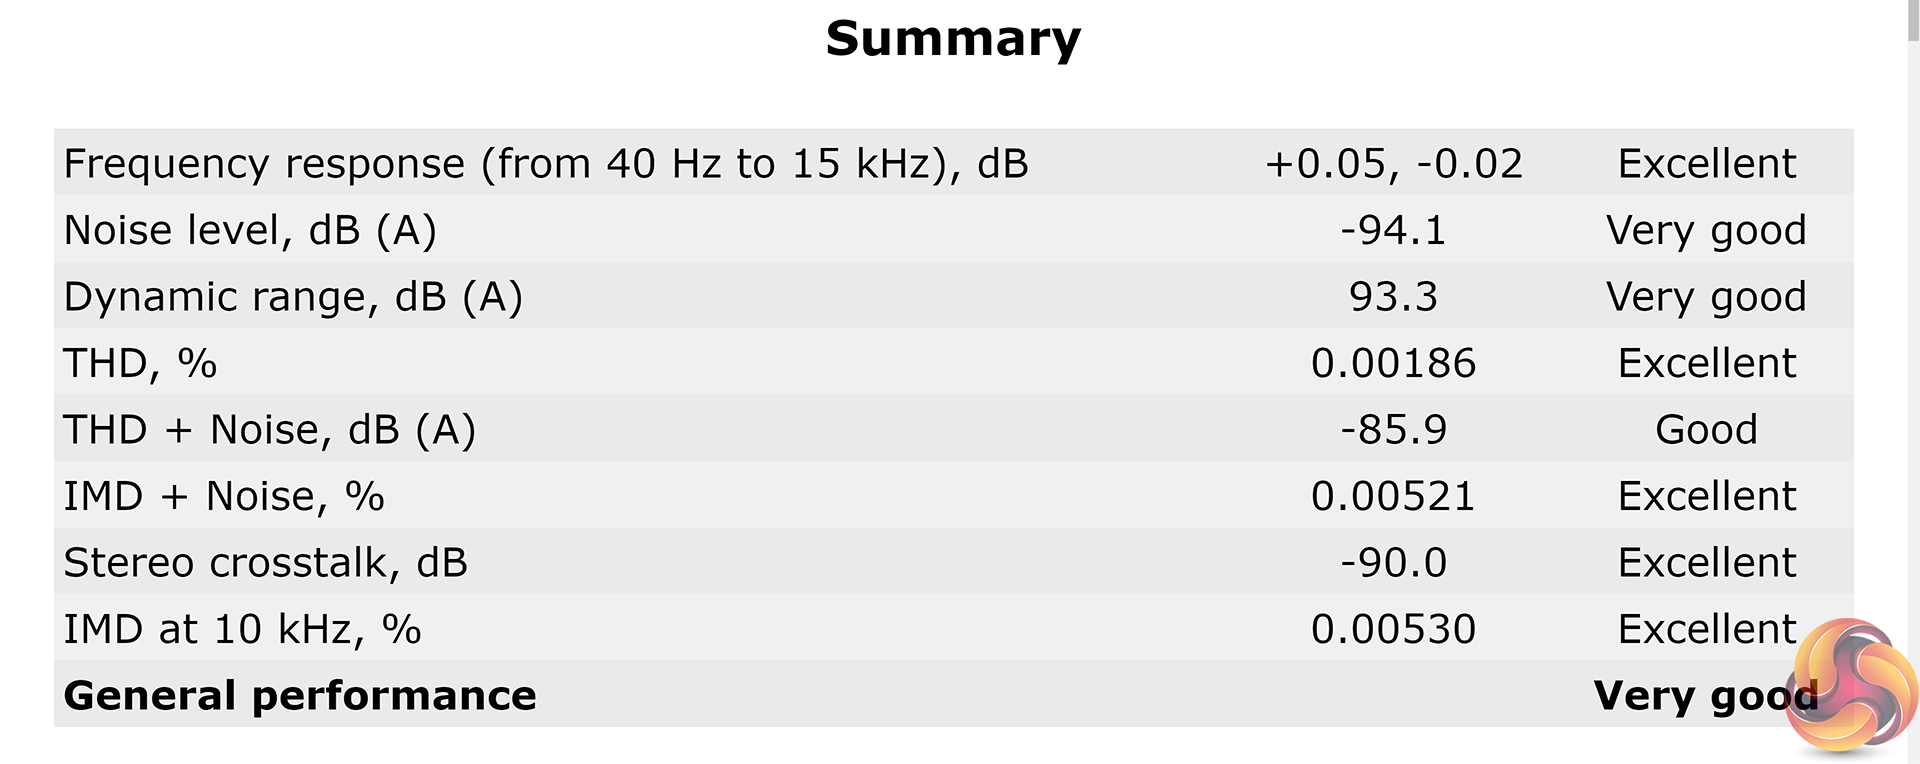
Rightmark Audio Analyser rates ASRock’s ALC1220-based Purity Sound system as Very Good overall, with several of the categories rating Excellent. Manual CPU Overclocking:
To test the ASRock X570 Taichi motherboard’s CPU overclocking potential, we set the CPU Core Voltage to 1.35V and applied the Level 2 LLC setting.
Overclocking was particularly easy with the X570 Taichi, thanks in large to ASRock's well laid out UEFI, clear loadline calibration settings, and seemingly accurate software-based voltage readings.
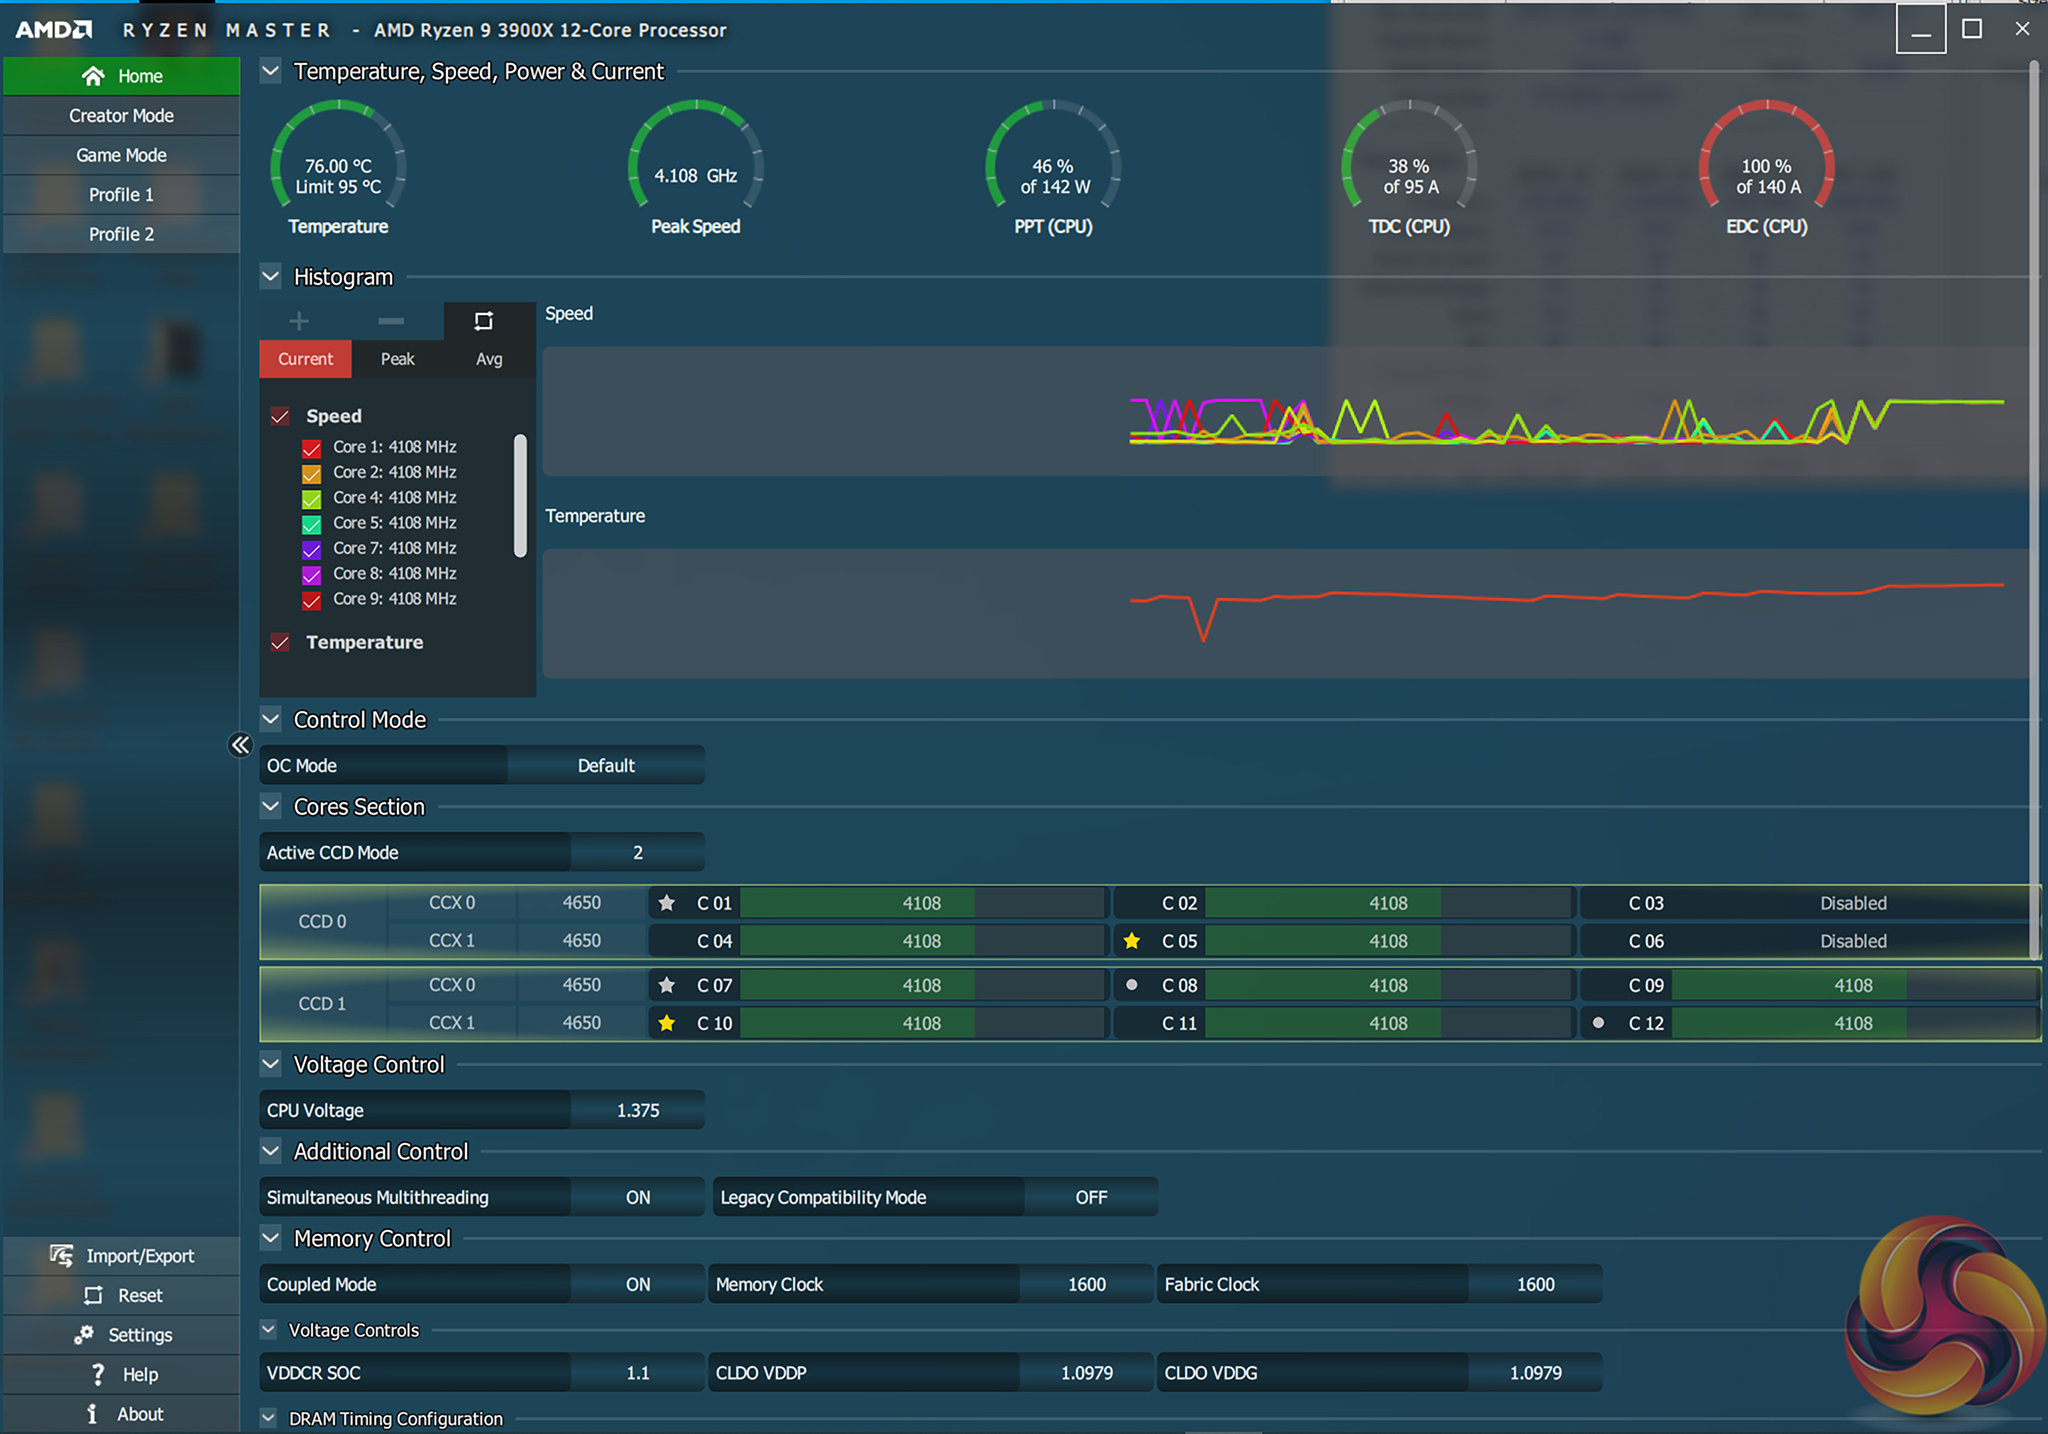
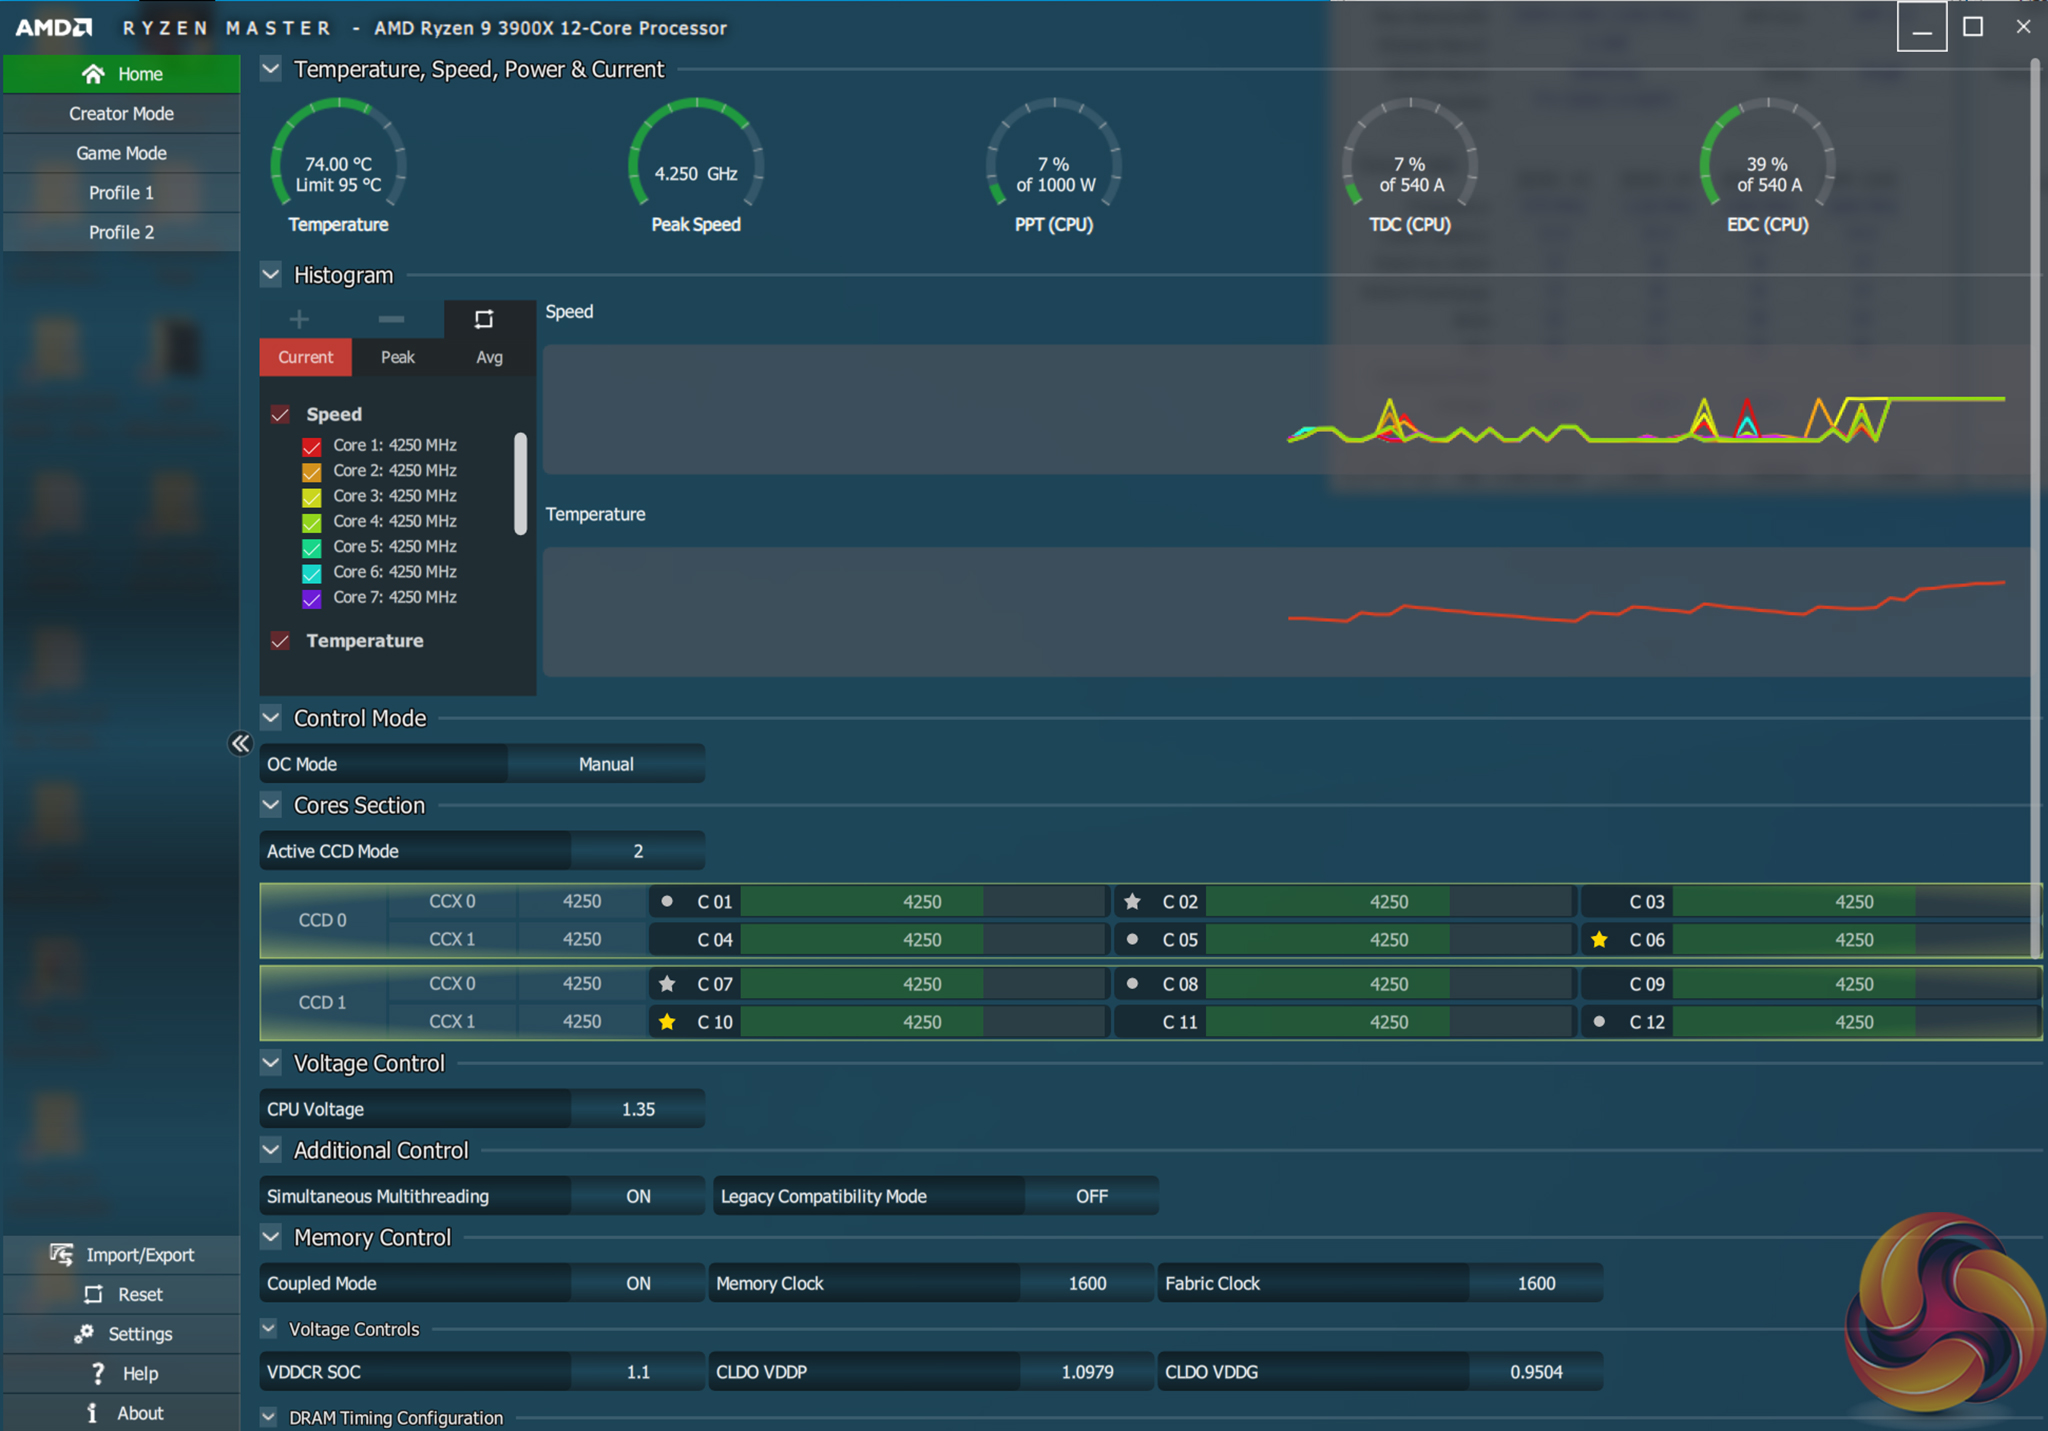
We were able to hit a stable frequency of 4250MHz using 1.35V as set in the UEFI. We applied the Level 2 load-line calibration setting as this resulted in a load voltage of 1.36V according to CPU-Z and 1.35V according to Ryzen Master. Level 1 LLC pushed voltage a little higher than we we’d have liked with its 26mV overshoot.
Motherboard Sensors
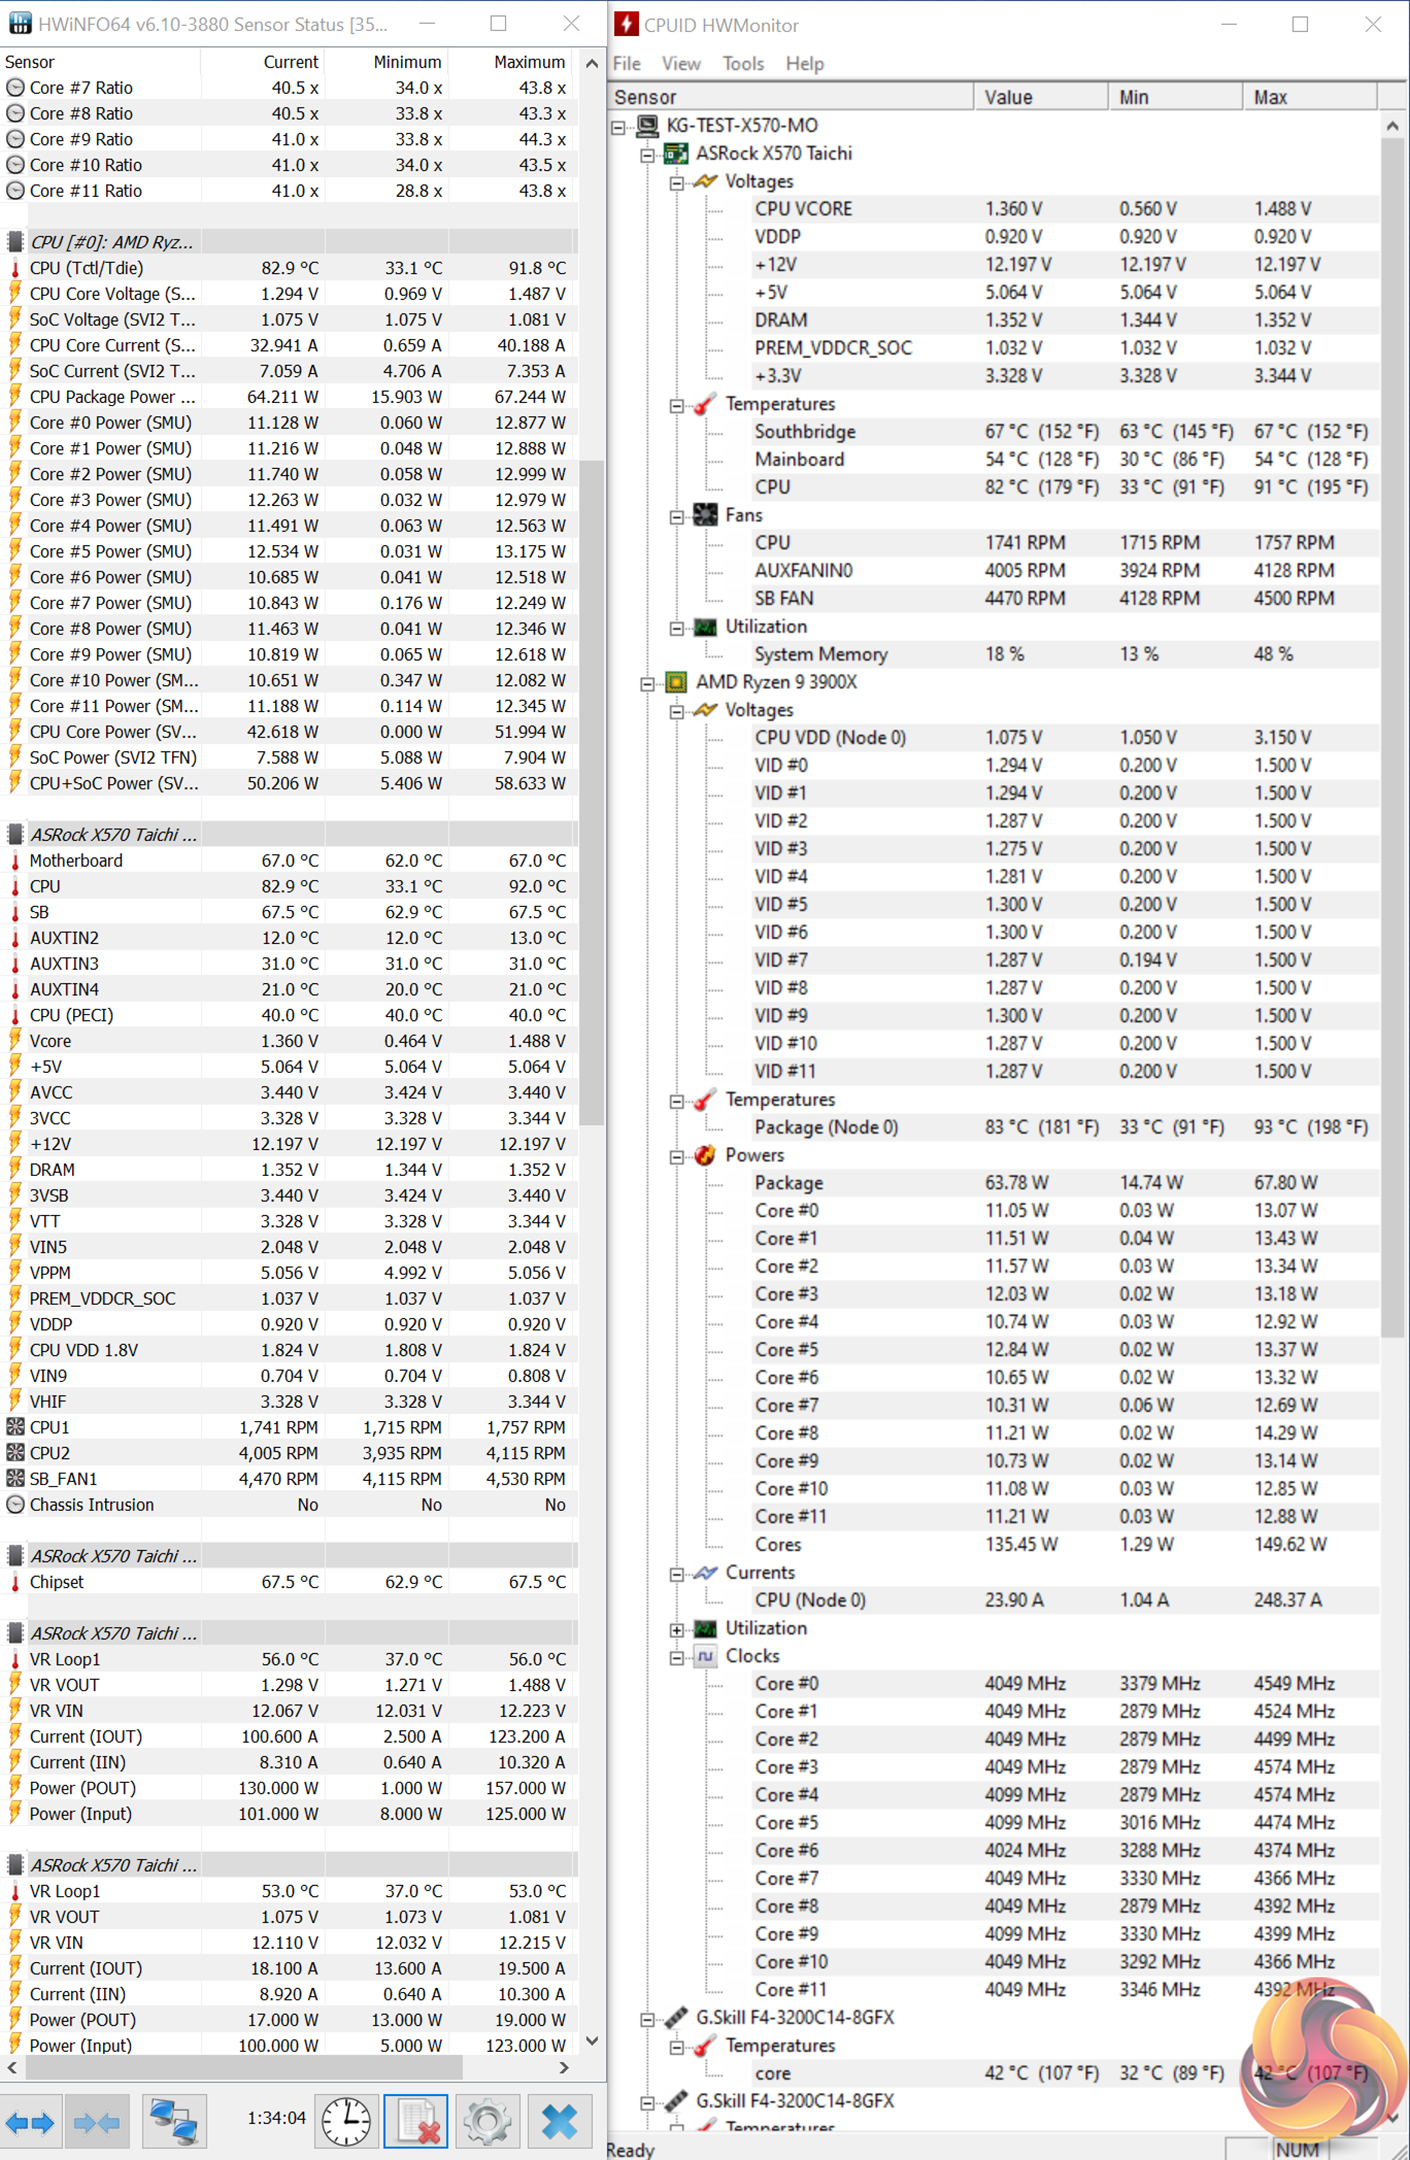
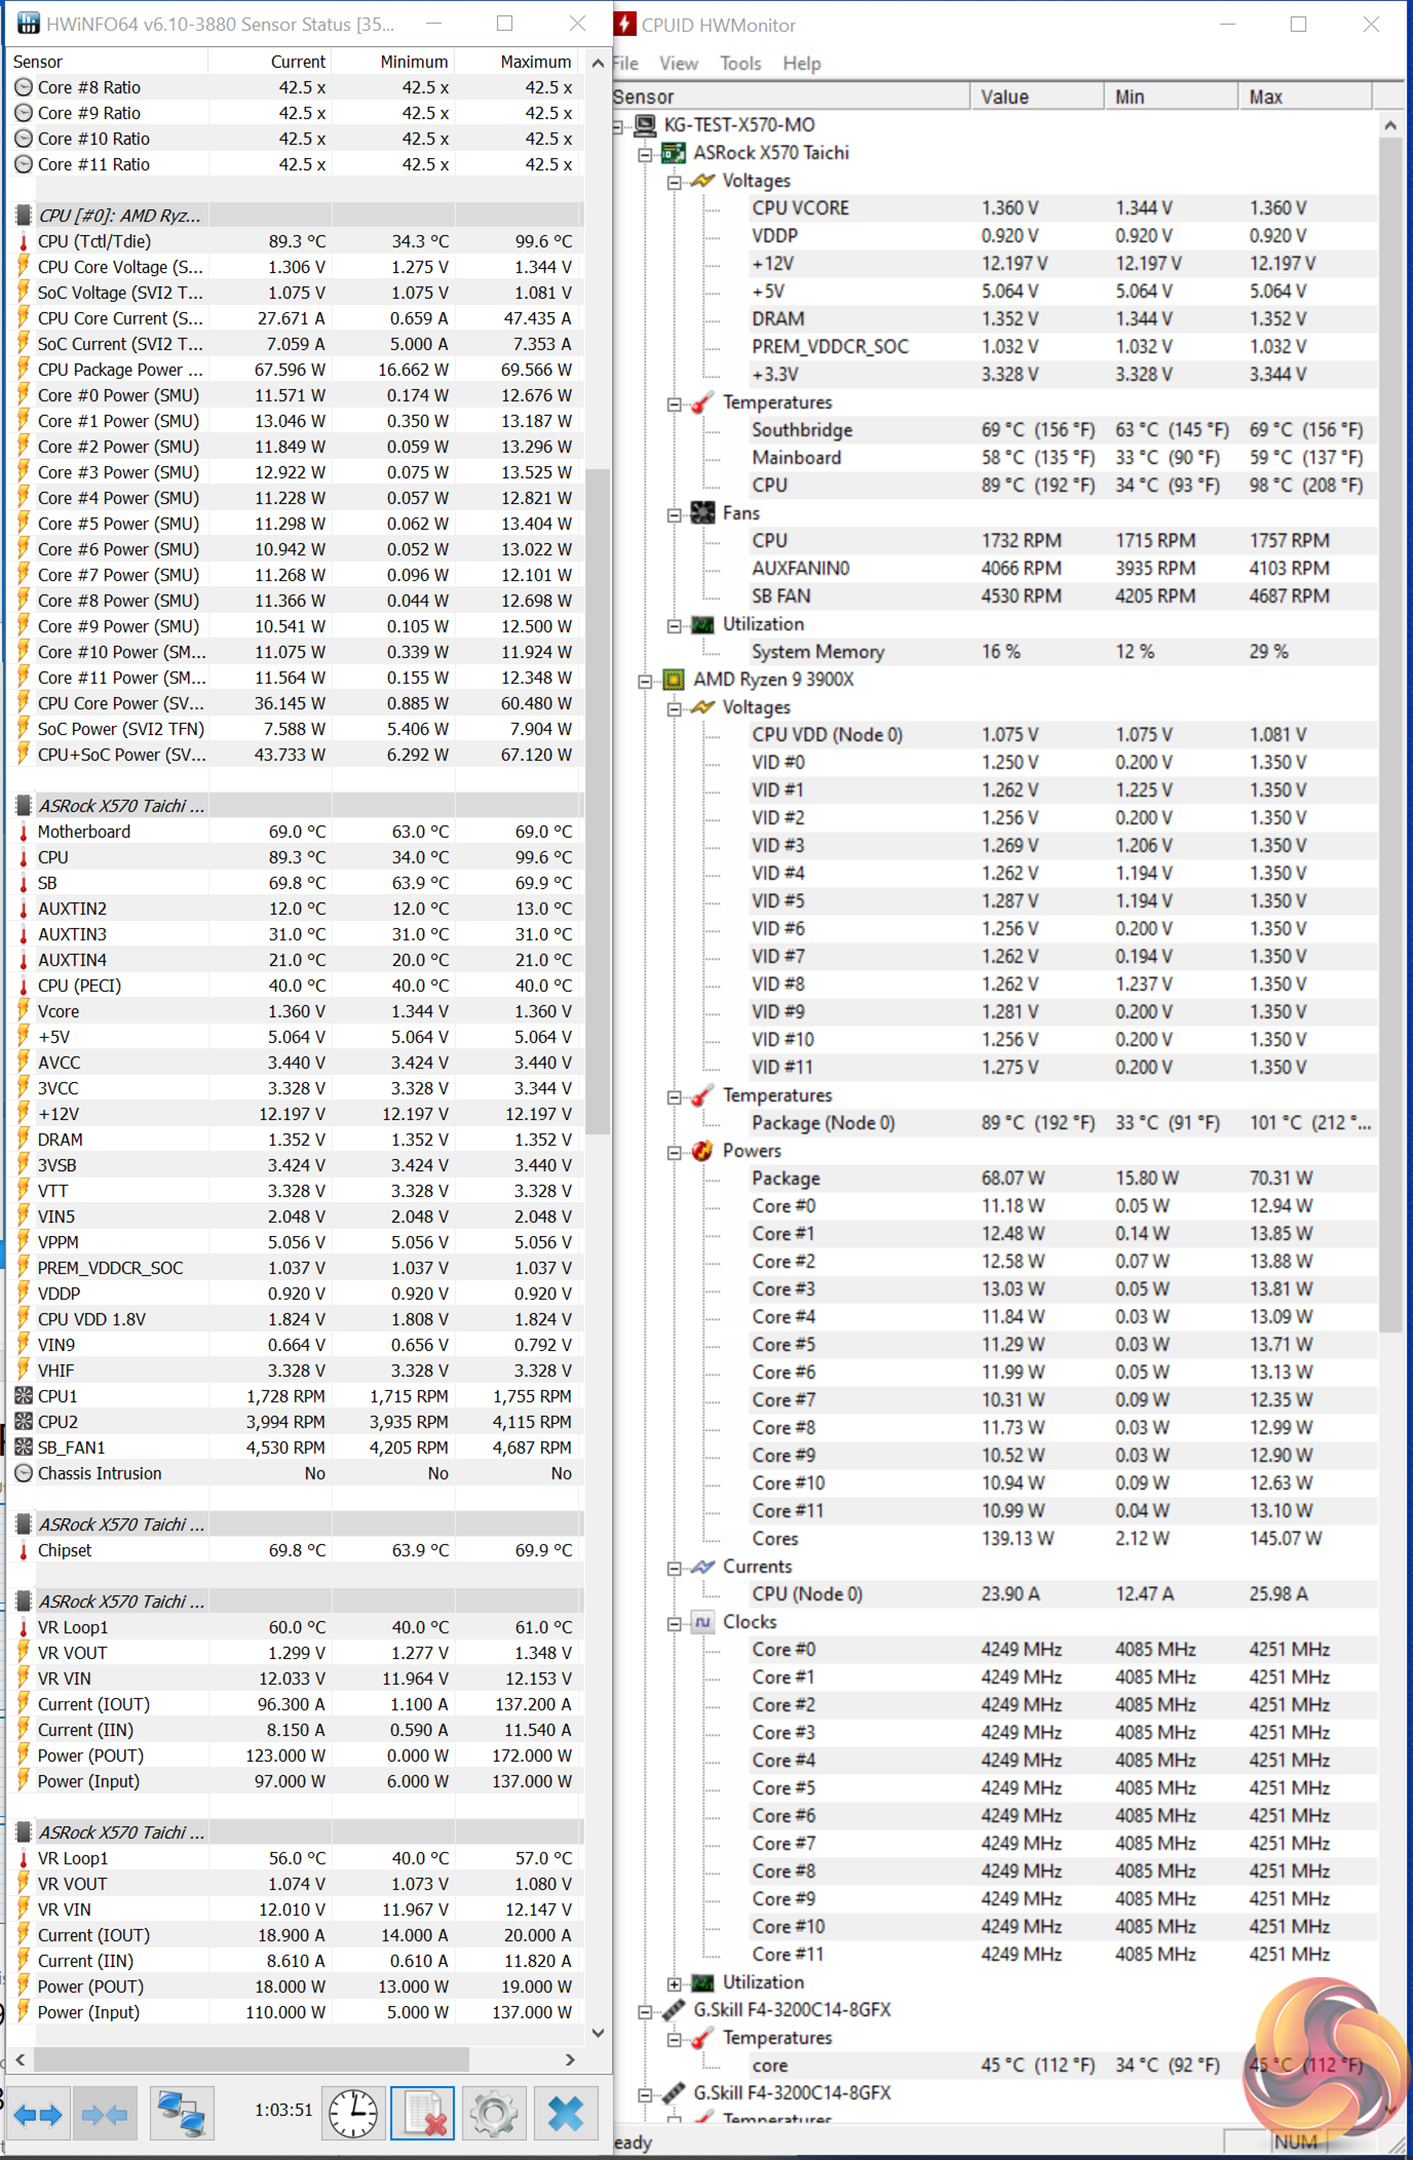
Much of ASRock’s power-related sensor data, as fed through to monitoring tools including Ryzen Master, is simply incorrect. As such, we used our power reading from the wall to interpret that the Ryzen 9 3900X was indeed being fed with the voltage of around 1.35V that we had requested.
Overclocked Performance
With the Ryzen 9 3900X CPU’s speed boosted to 4.25GHz by ASRock’s X570 Taichi motherboard, Cinebench R20 multi-core performance increased by 251 points. This 3.5% gain is quite slim for an overclocked result but that is due to the aggressive voltage and clock speeds that ASRock’s board permits at stock.
System Power Consumption
We leave the system to idle on the Windows 10 desktop for 10 minutes before taking a reading. For CPU load results we run AIDA64 CPU, FPU, and Cache stress tests and take a reading. The power consumption of our entire test system (at the wall) is shown in the chart.
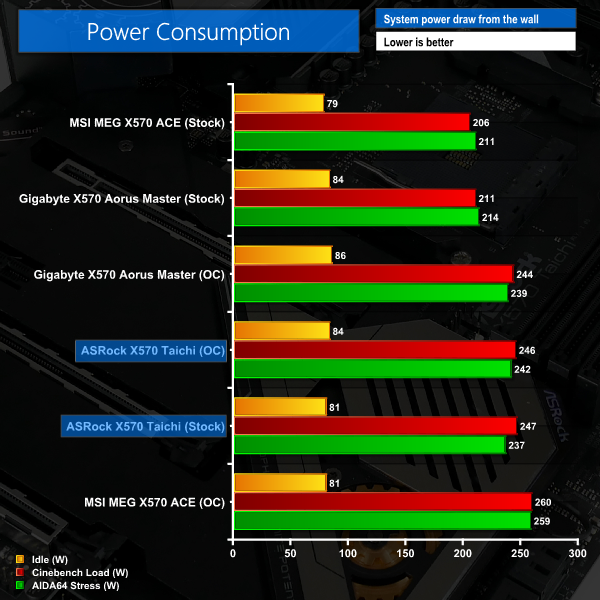
Unsurprisingly, given the aggressive voltages that ASRock applies to our Ryzen 9 3900X under stock conditions, power draw is around 30-40W higher than what we’d expect for the 12-core Ryzen. That’s not ideal as it translates into extra load on the VRM components and extra stress on the thermal solutions, though it does come with a performance boost in multi-threaded workloads.
This was not related to ASRock sneakily applying Precision Boost Overdrive as we disabled it manually within the UEFI. Incorrect power and TDC data were being fed through to Ryzen Master, and one would assume that this data is also being input to the Precision Boost 2 algorithm. In turn, there was no power or thermal current throttling, according to Ryzen Master, and the CPU was glued to 100% electrical current input of 140A. This looks to be the reason for ASRock’s more aggressive CPU voltage and higher clock speeds – questionable sensor data, as suggested by Ryzen Master and HWInfo readings.
Our 1.35V overclocked voltage actually managed to maintain roughly the same power consumption, despite running 125MHz higher under all-core conditions. Clearly, the stock settings are not ideal for users who care about how much power their system draws, especially if that heat is then dumped inside a non-air-conditioned room.
System Temperatures
We run the AIDA64 CPU stress test for 1 hour while recording the system data using HWInfo. This data is then analysed to show the CPU temperatures and also the VRM MOSFET temperatures, when the sensor data is available.
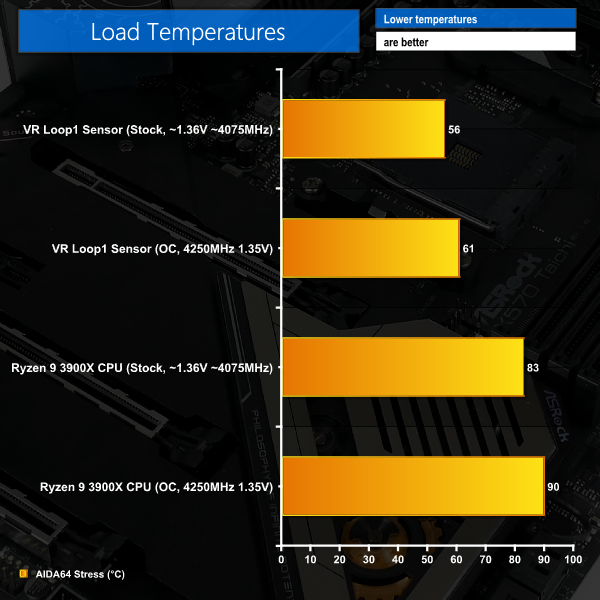
The Ryzen 9 3900X registered more than 80°C under our H100X at stock settings. Again, ASRock’s aggressive stock voltage and frequency is to thank for that. Despite ASRock’s MOSFET heatsink being more focused on looks than efficient cooling performance, the VRM temperatures were perfectly reasonable according to data from the VR Loop1 sensor.
Overclocking pushed temperatures higher as the frequency was increased but ASRock’s voltage accuracy helped to keep our Ryzen 9 part away from the 95°C limit. VRM temperatures were still perfectly good when the CPU was overclocked.
One temperature that isn’t plotted in the chart but is worthy of reference is that of the X570 chipset. ASRock’s cooling system for this piece of silicon is not particularly high performance. That showed throughout testing, with temperatures regularly drifting past 70°C despite the 40mm fan spinning at more than 4000 RPM on our open-air test bench. This is worth bearing in mind when you are plotting fan speed curves through ASRock’s excellent UEFI- and software-based tools.
The ASRock X570 Taichi is a premium motherboard that will keep many buyers happy without needing to spend £50 extra for the next tier of products. Priced at around £300, the X570 Taichi certainly isn’t cheap. However, the strong RGB system, triple M.2 connectors, and well-built power delivery system are all key benefits.
Performance from ASRock’s board was strong. This is primarily due to the highly aggressive voltage and power allocation settings that ASRock applies by default. These PBO-style allowances result in higher all-core frequency from our Ryzen 9 3900X CPU at the expense of higher thermals and power consumption.
Some users may prefer the ‘free’ performance offered by ASRock, while others will see the aggressive voltages as a negative. Personally, I would prefer Ryzen 9 3900X performance levels that fall more in line with what we expect and reduced power and thermal readings. Of course, overclocking allows adjustments to be applied to a user’s preference. And the 12+2-phase power delivery system held up well throughout testing.
ASRock has you covered in terms of core features with inclusions such as triple M.2 slots, 802.11ax WiFi 6, and a healthy serving of eight SATA ports. It is slightly disappointing to see 2.5Gb ethernet omitted when ASUS’ price competitor offers it. And the positioning error for the internal USB Type-C is a frustrating oversight, even if ASRock is providing support.
ASRock’s aluminium shroud that covers the M.2 slots and chipset heatsink is both good and bad. The sheer size of cooling mass presented to M.2 devices is the biggest strength of the metal shroud. However, the increased inconvenience of simply adding another M.2 SSD to your system is unwelcome. The same displeasure will be present for users who are forced to remove their M.2 SSD’s heatsink to make it fit in place.
Performance of the chipset cooling system is sub-par. Despite the small 40mm fan running at well over 4000 RPM for most of our testing, we still saw the chipset temperature climbing above 70°C even without heavy PCIe Gen 4 loading. In itself, 70°C is not a problem, even if we are using an open-air test bench. But when that temperature comes with the irritation of an audible fan that clearly isn’t performing very well, it does highlight disappointment. Thankfully, the VRM cooling solution performed well.
Despite its overall solid selection of core features, you may find that the ASRock X570 Taichi misses out with some premium items that competitors offer. Combined with the less-than-ideal chipset cooling performance and the silly internal Type-C header positioning, ASRock’s X570 Taichi loses some elements of its premium feel. With that said, out-of-the-box performance is strong due to aggressive voltages and the power delivery system and UEFI held up well in our overclocking tests.
![]()
The ASRock X570 Taichi is priced at £308.99 at Overclockers UK.
Pros:
- Strong out-of-the-box performance, thanks to high voltages and frequencies.
- Solid VRM solution with adequate cooling.
- Overclocked the Ryzen 9 3900X well.
- Easy-to-use UEFI.
- Good fan speed control in the UEFI and software.
- Plenty of RGB lighting in different zones.
- Fan, USB, and RGB headers near CPU socket is smart.
- RGB control within the UEFI.
Cons:
- High out-of-the-box power consumption and temperatures due to aggressive stock voltage.
- Internal USB Type-C header positioning is an unmissable error.
- Metal shroud adds inconvenience when adding/removing M.2 SSDs.
- Chipset cooling performance is not ideal.
- Misses some useful features from competitors – dual BIOS or 2.5GbE.
KitGuru says: If its feature set, RGB lighting zones, and strong stock performance tick your boxes, ASRock’s X570 Taichi is a good choice. Just make sure you’re happy to deal with the chipset fan noise and an internal Type-C header adapter.