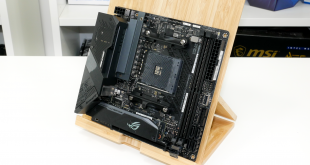
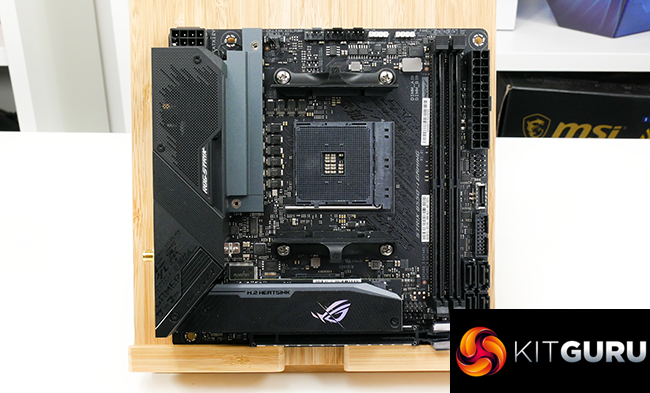
With AMD’s new Zen 3-based Ryzen 5000 processors offering new levels of compute, gaming, and power efficiency performance to mainstream desktop users, it is a great time to be a Mini-ITX fan. In this review, we examine the ASUS ROG STRIX B550-I Gaming Mini-ITX motherboard and see how it handles the AMD Zen 3 flagship CPU.
Video Timestamps:
Coming in at around the £200 mark, this high-end B550 offering features an actively cooled 8+2 power stage design, dual M.2 sockets, plentiful quantities of 10Gbps USB on the rear and internally, and high-speed wired and wireless networking connectivity. ASUS also included a unique feature in its USB Type-C audio connector.
£200 is steep for a B550 motherboard, even in the typically more expensive Mini-ITX form factor. And with tough competition from the similarly priced ASRock B550 Phantom Gaming-ITX/AX motherboard in particular, can ASUS’ ROG STRIX B550-I Gaming prove its worth? Let’s take a look.
Features (information taken from the ASUS webpage):
- AMD AM4 socket: Ready for Ryzen™ 5000 Series/ 4000 G-Series/ 3000 Series Desktop Processors
- Best gaming connectivity: PCIe® 4.0-ready, dual M.2, USB 3.2 Gen 2 Type-C® plus HDMI™ 2.1 and DisplayPort 1.4 output
- Smooth networking: Onboard WiFi 6 (802.11ax) and Intel® 2.5 Gb Ethernet with ASUS LANGuard
- Robust power solution: Teamed power stages with ProCool II power connector, high-quality alloy chokes and durable capacitors
- Renowned software: Intuitive dashboards for UEFI BIOS and ASUS AI Networking make it easy to configure gaming builds
- DIY-friendly design: Includes Q-connector, BIOS FlashBack™ and FlexKey
- Unmatched personalization: ASUS-exclusive Aura Sync RGB lighting, including Aura RGB header and addressable Gen 2 RGB header
- Industry-leading Gaming Audio: Audio USB Type-C®, AI Noise Canceling Microphone, SupremeFX S1220A codec, DTS® Sound Unbound™ and Sonic Studio III for immersive audio

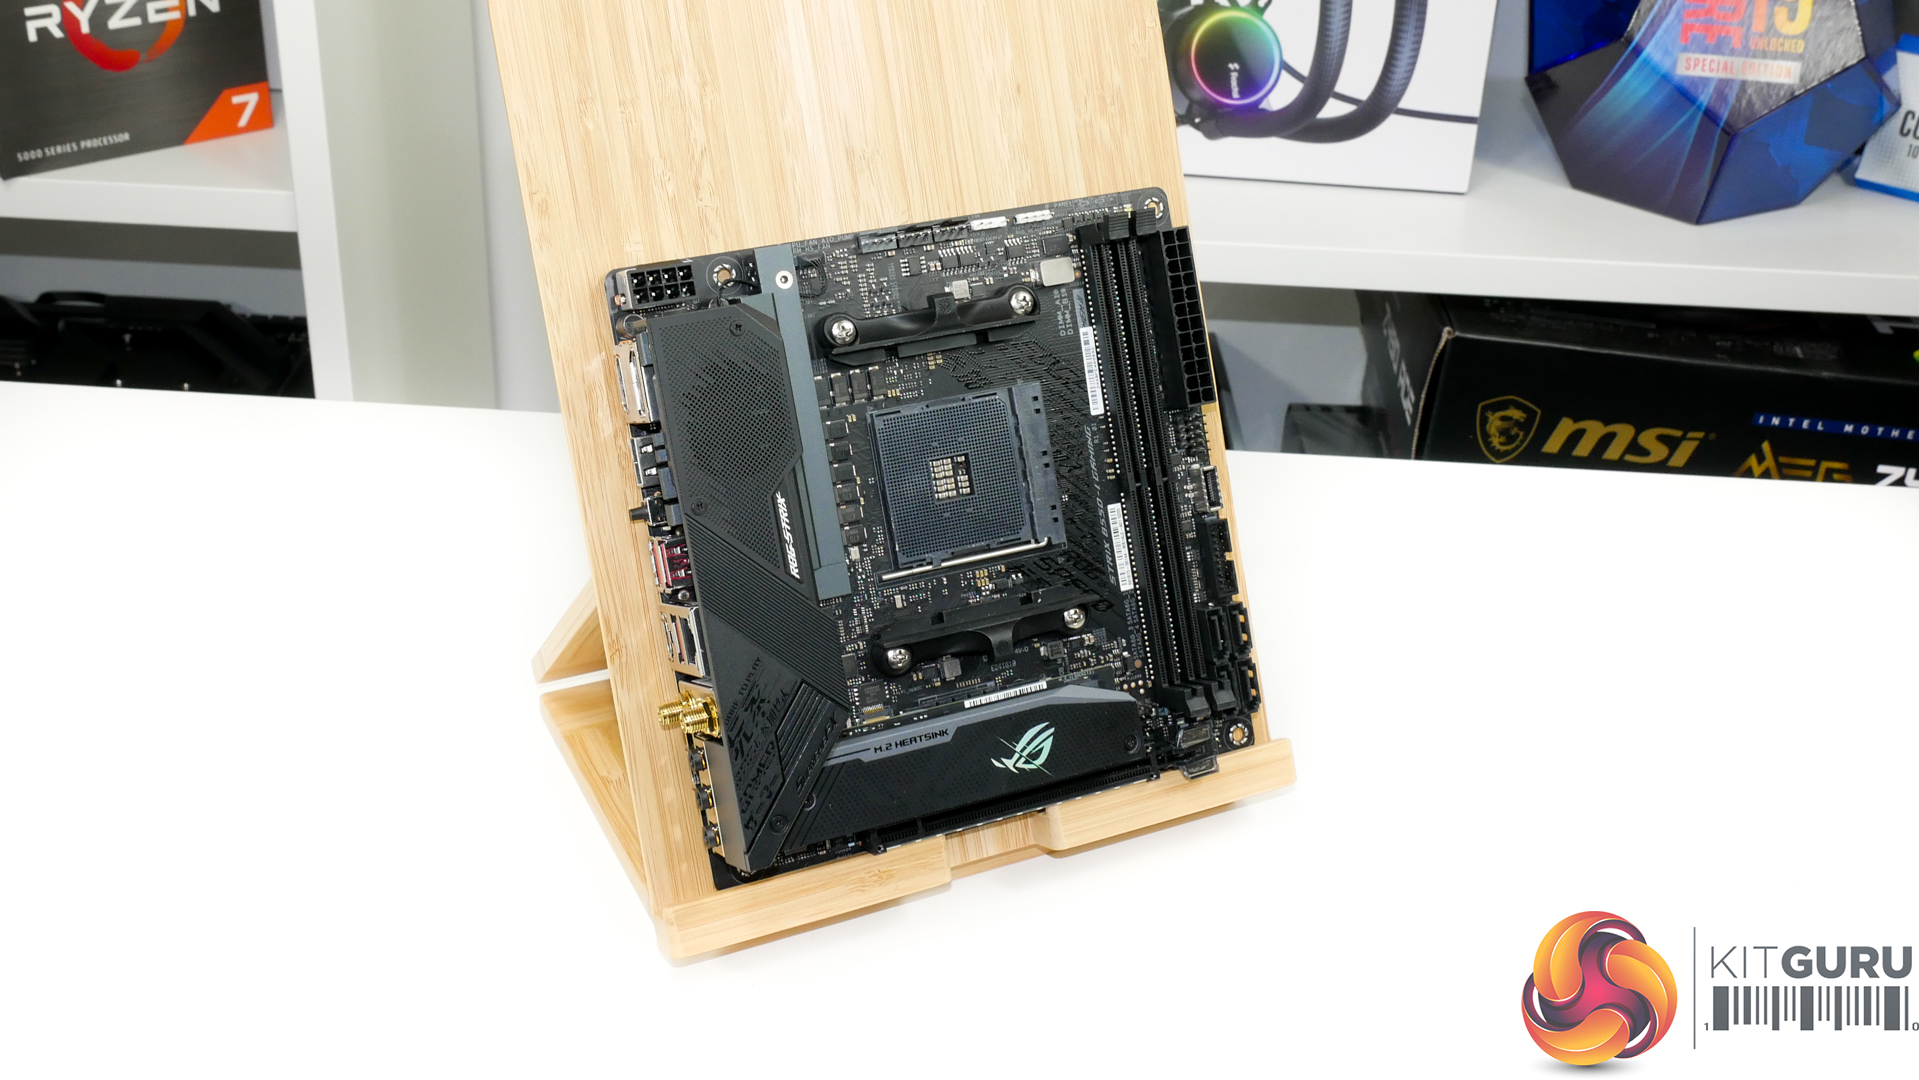
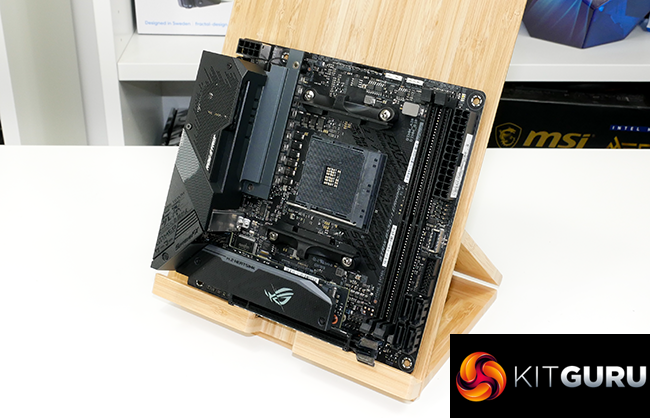
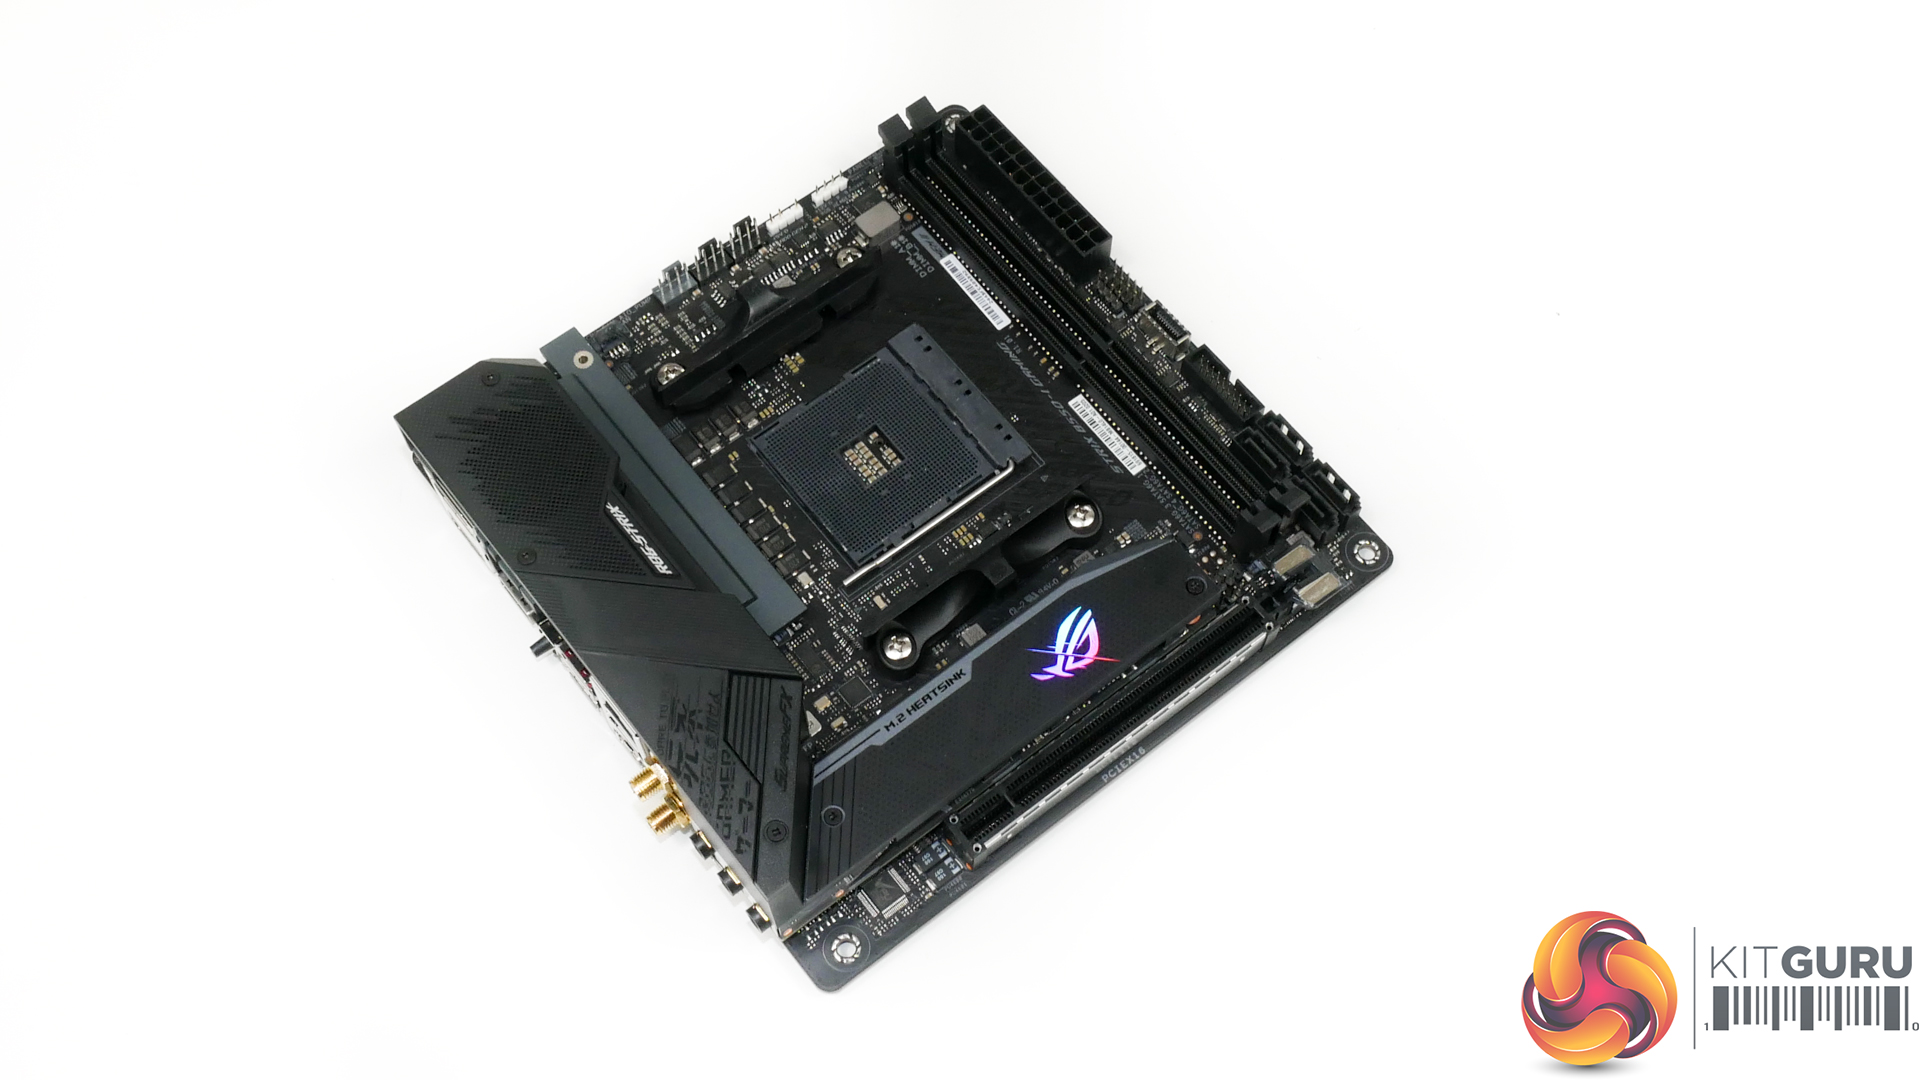
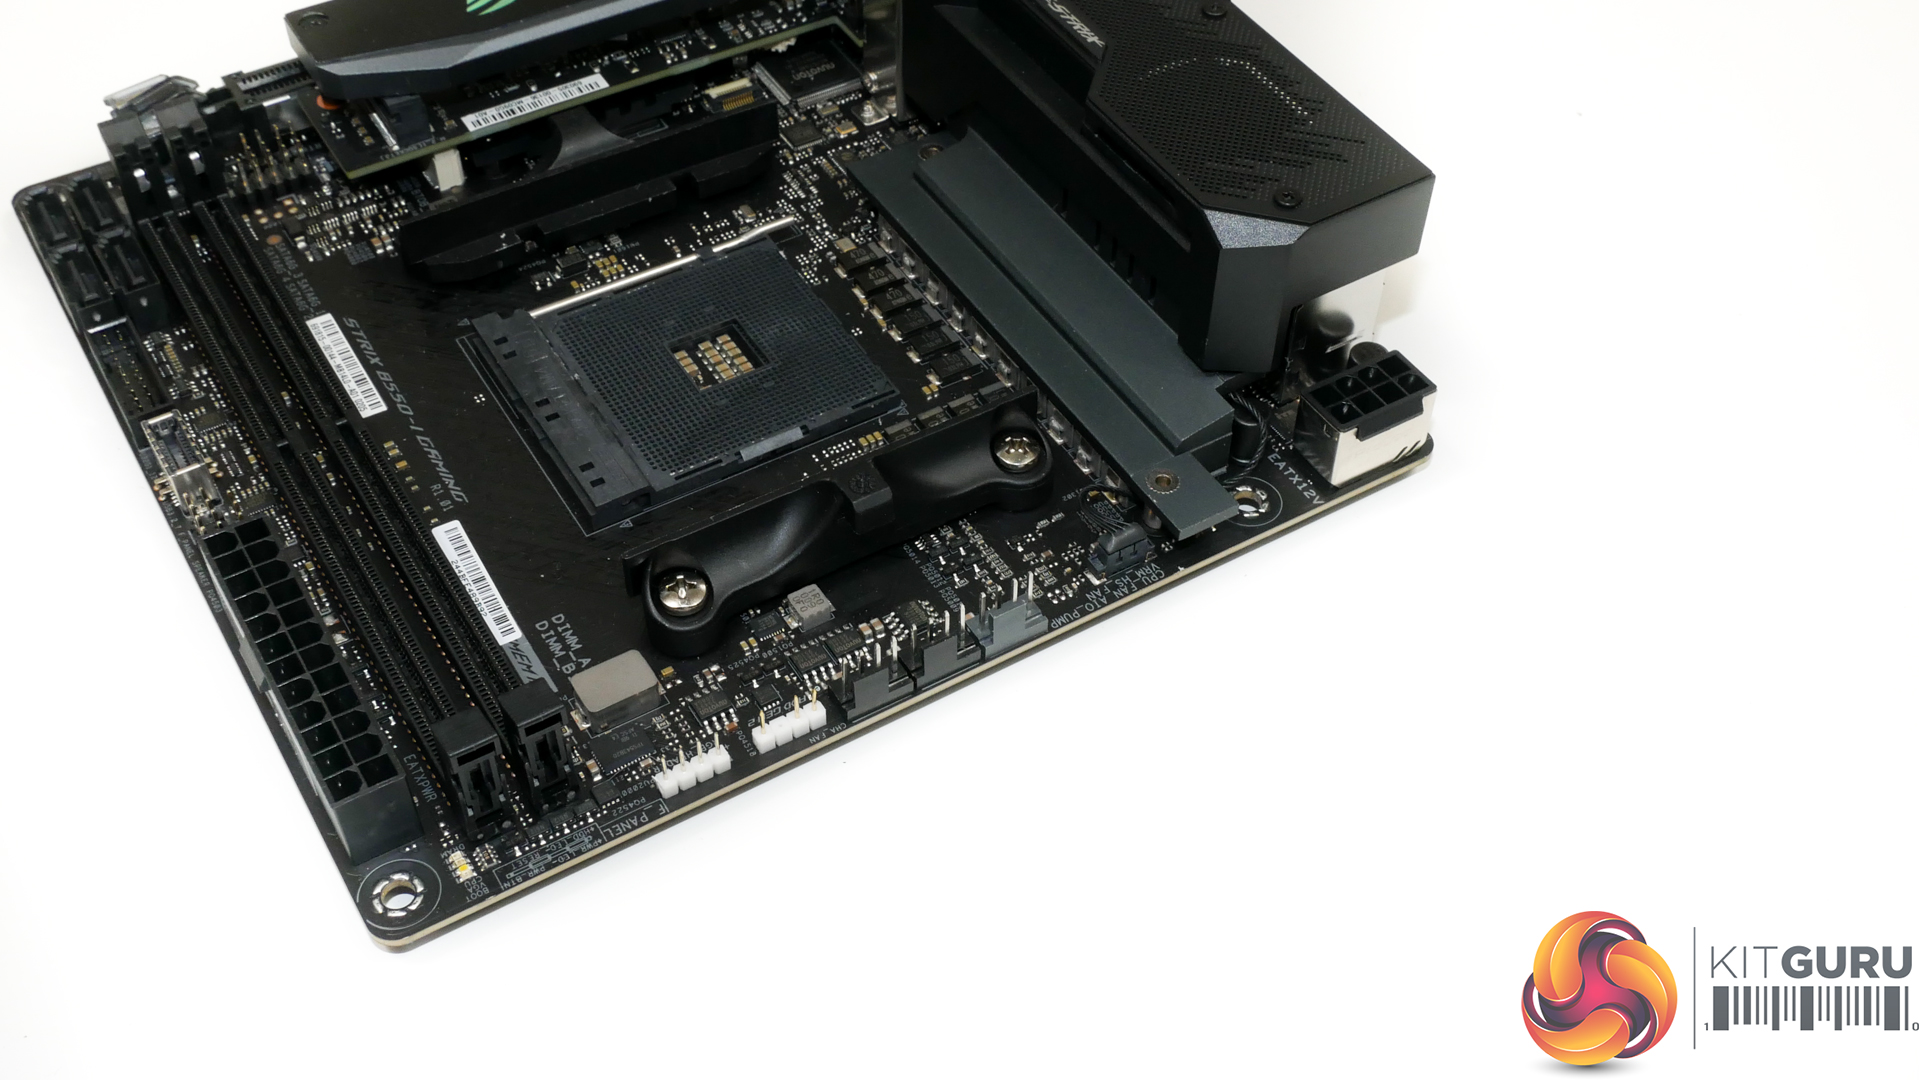
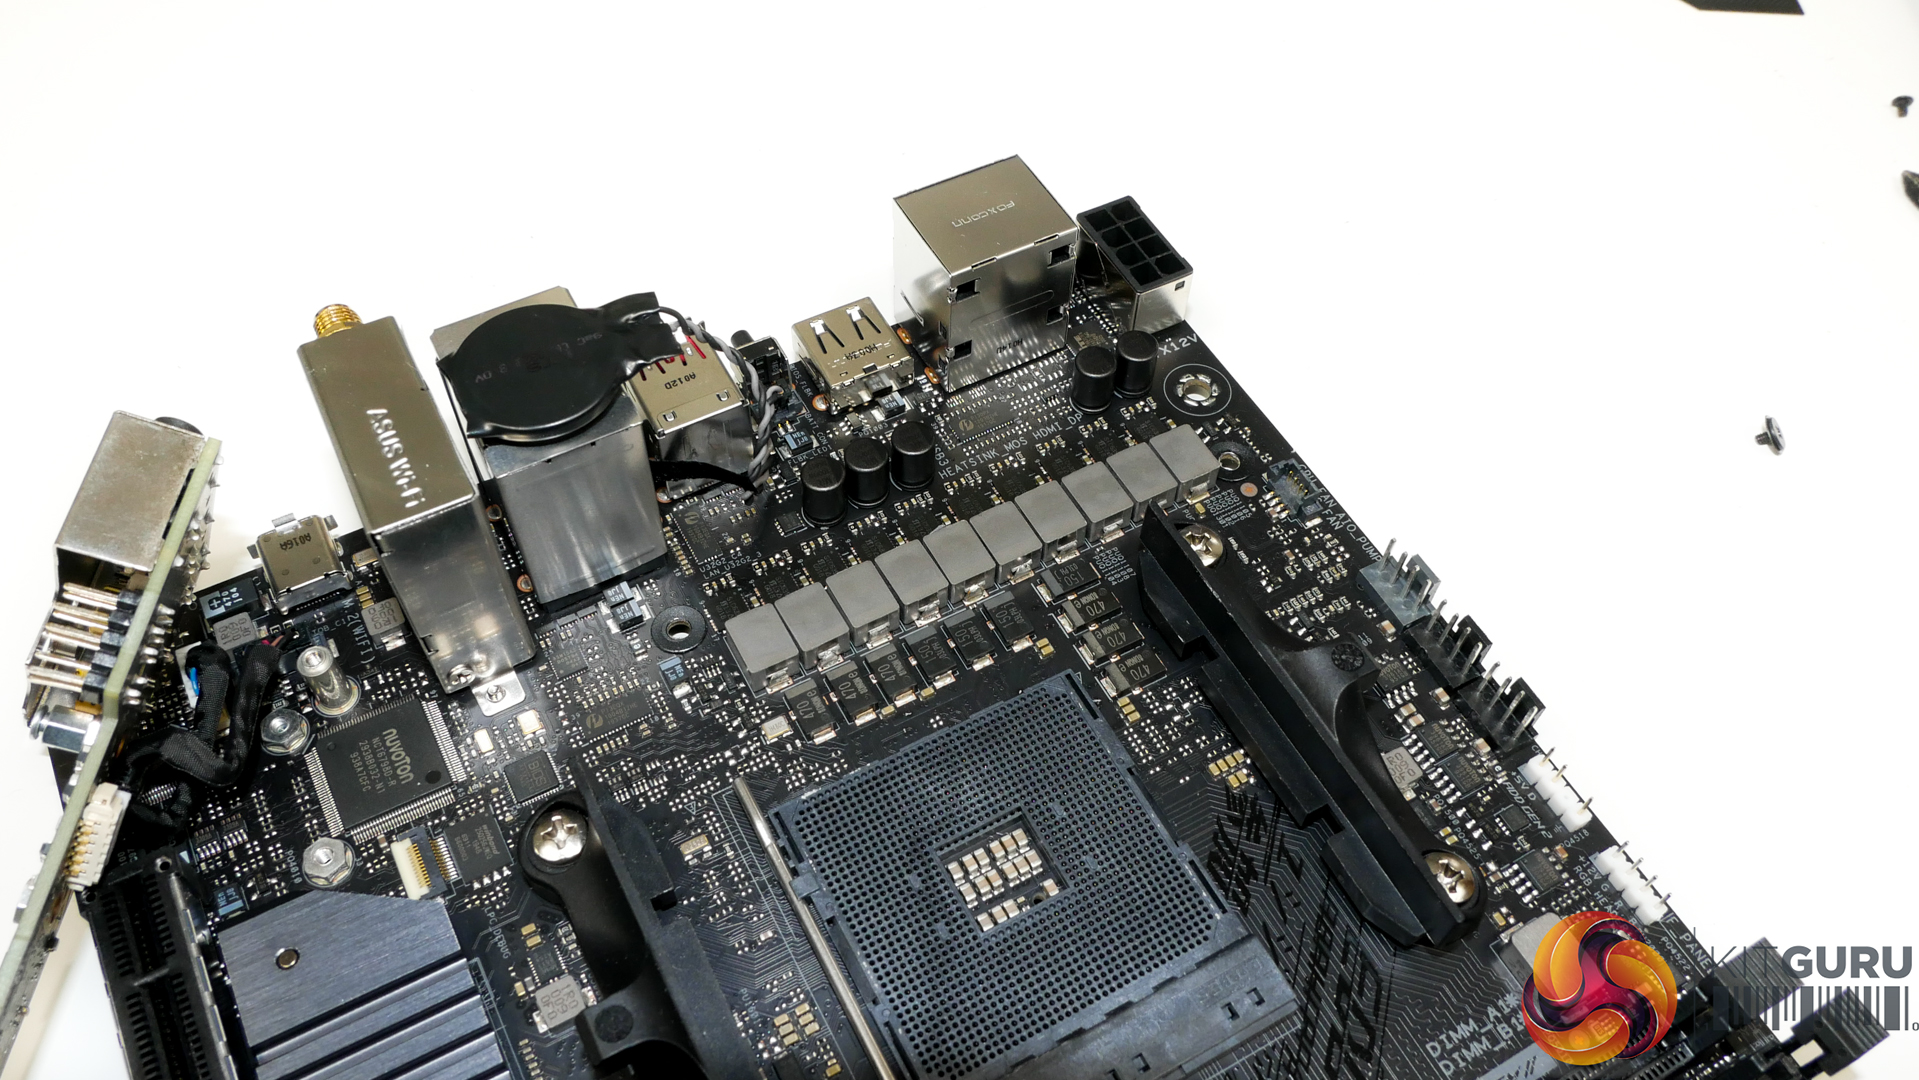
The B550-I Gaming sticks with ASUS’ consistent ROG STRIX styling; primarily dark black and grey colouring is used and should be easily matched with other components. ASUS uses an 8-layer PCB which is a positive sign for quality.
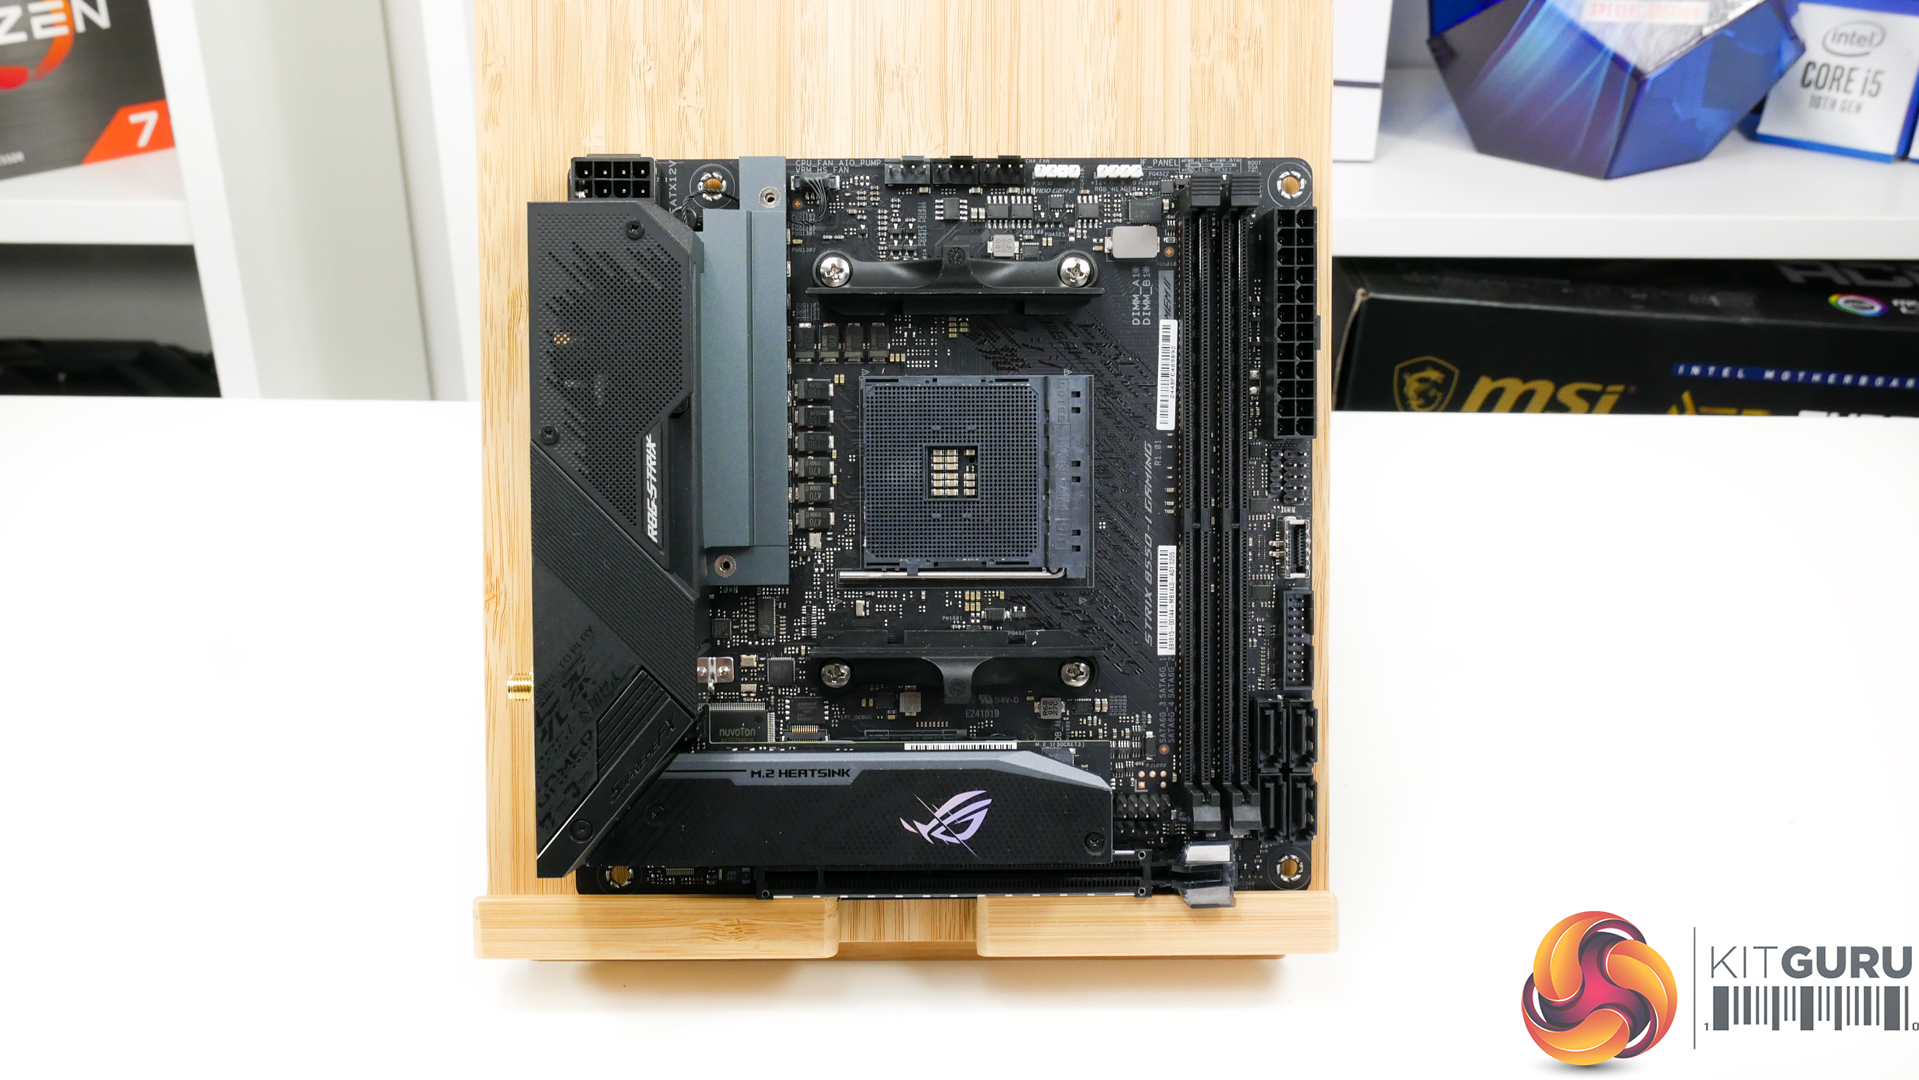
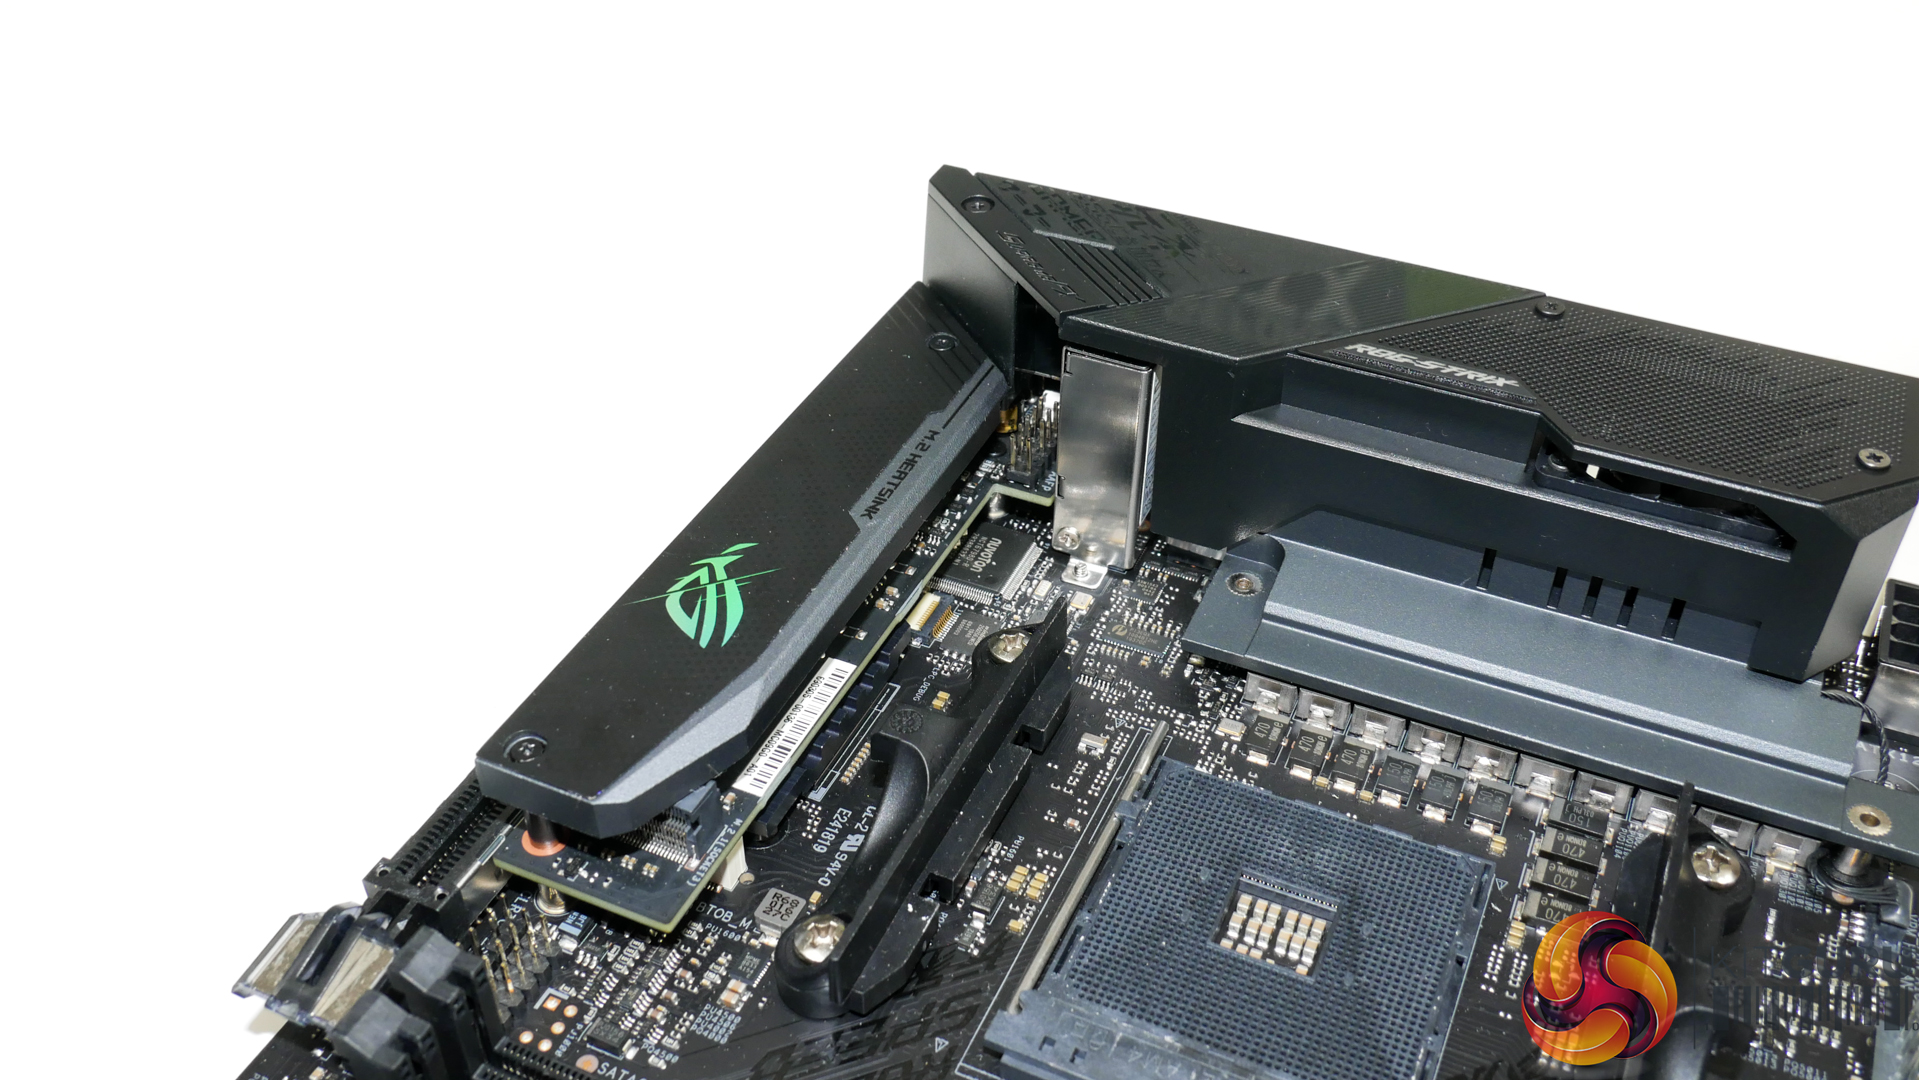
A combined rear IO shroud connects the motherboard’s VRM heatsink and integrates relatively seamlessly with the overall design. This shroud is not only used to cover the rear IO ports but also to sit atop the VRM cooling fan.
Another smart mounting location is the clear CMOS jumper above the PCIe slot meaning that it is accessible even with a graphics card installed.
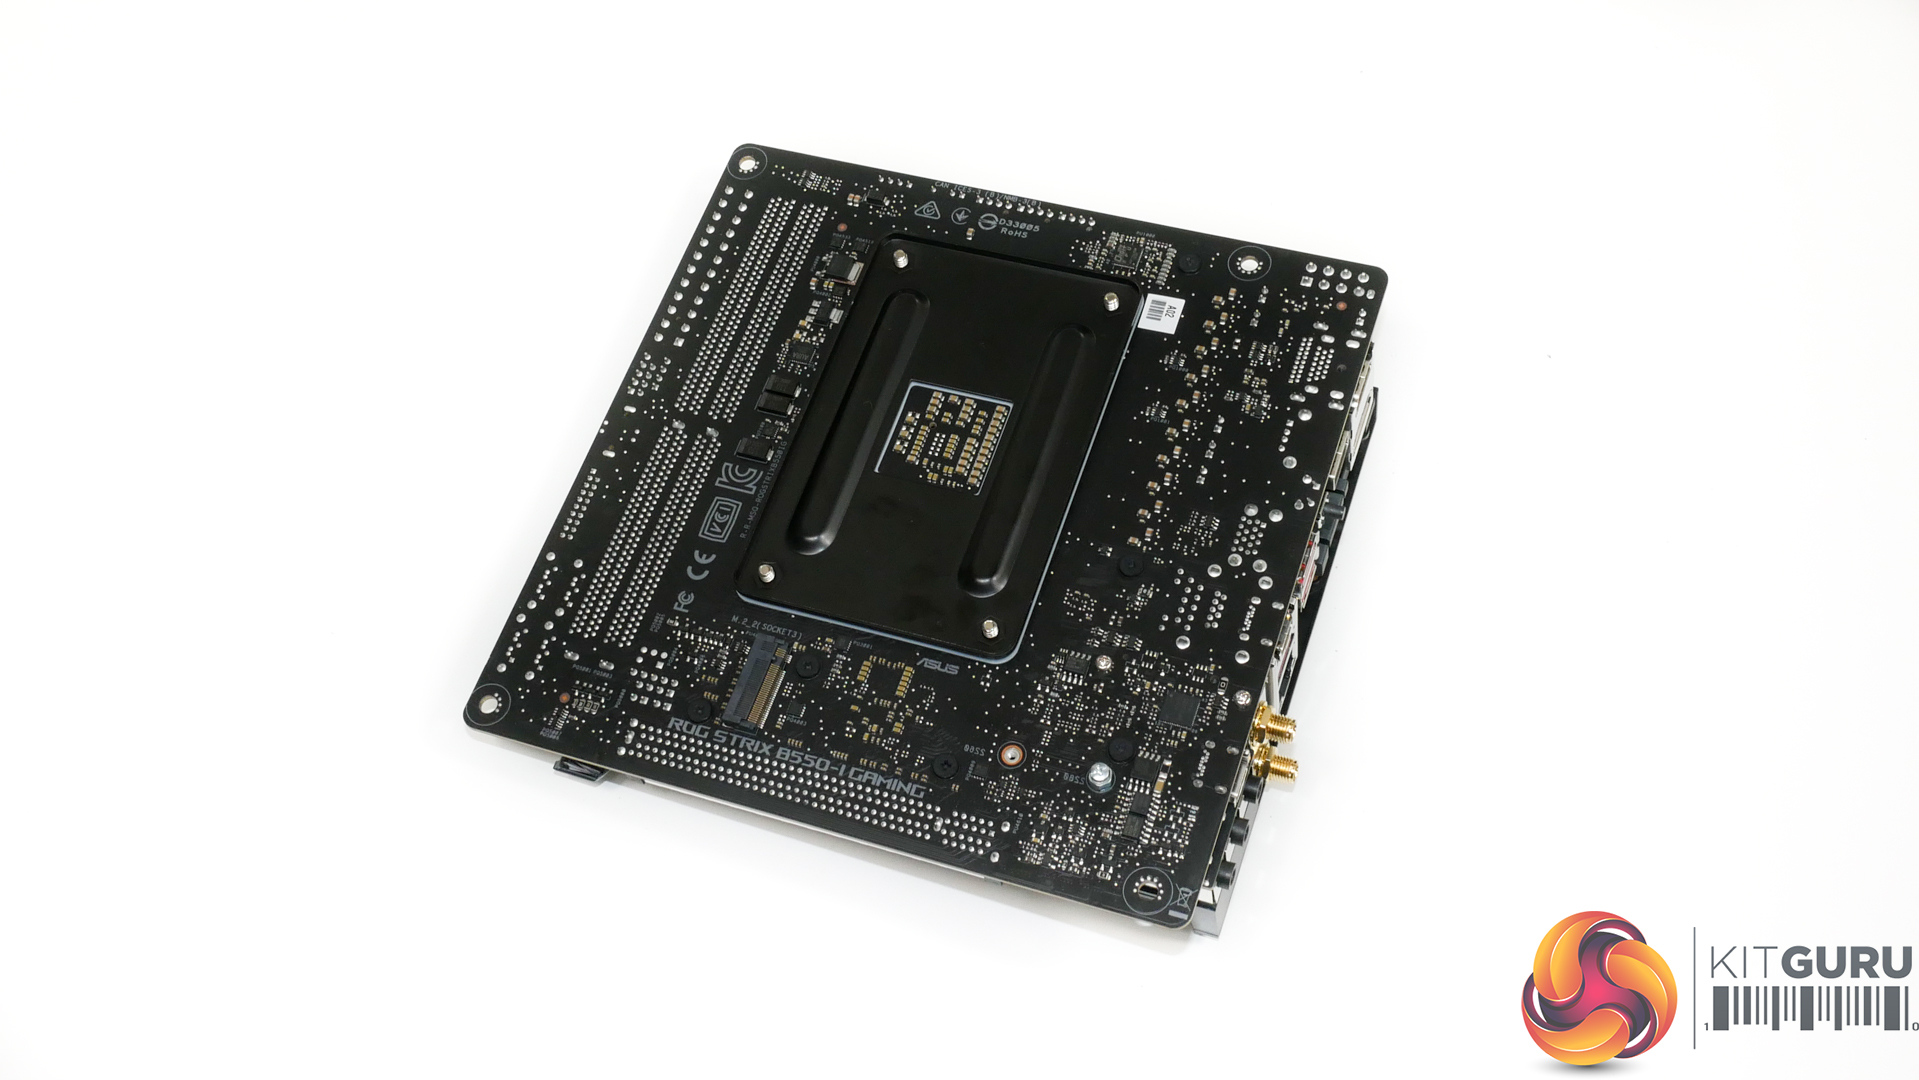
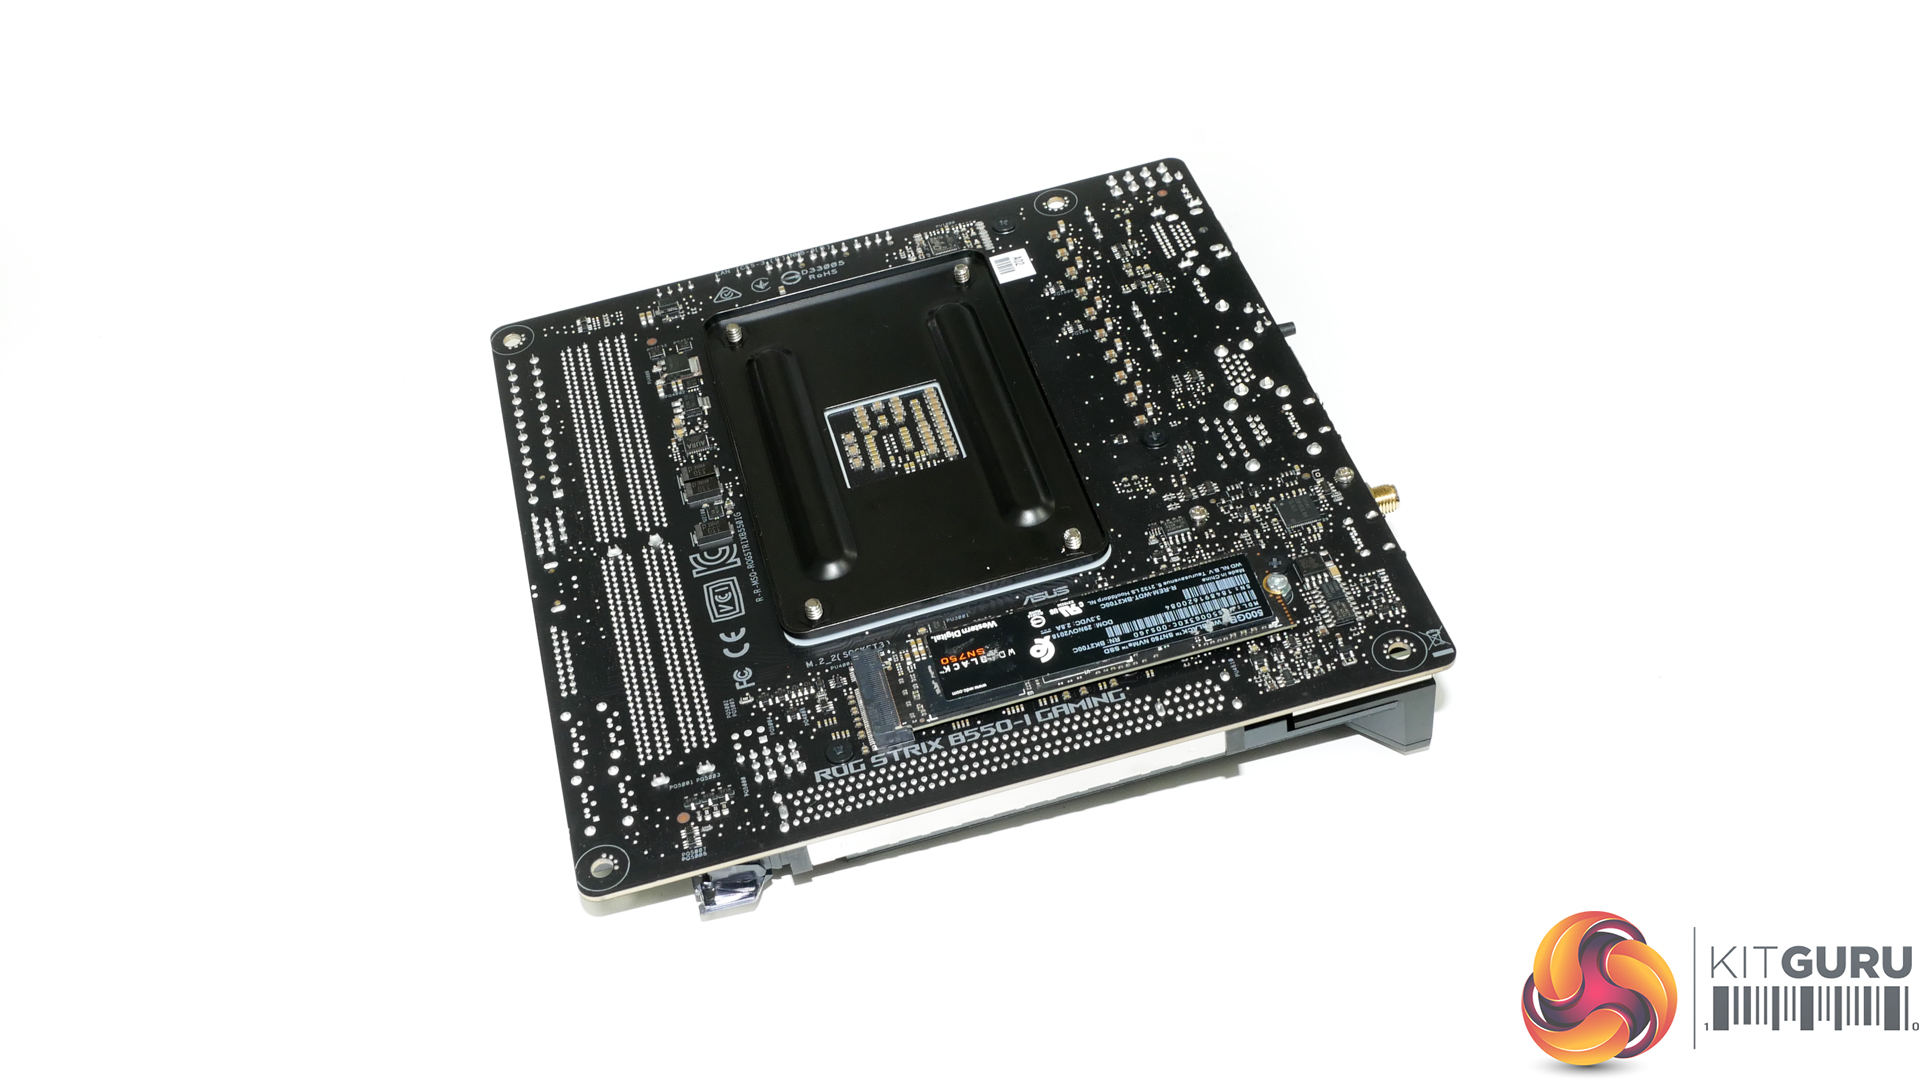
On the rear side, we have nothing of note other than the M.2 SSD connector. This rear-side connector supports PCIe 3.0 x4 or SATA 6Gbps M.2 SSDs up to 80mm in length and is driven by lanes from the B550 chipset.
There is clearly no room for large M.2 heatsinks, depending on spacing in your chassis. But some of our smart audience members have pointed out the ability to perhaps use some thermal pads to bridge the gap between a hot SSD and the chassis’ metal motherboard tray. Alternatively, cases like the Silverstone SUGO 14 that we recently examined have a backplate cut-out that may permit for some SSD heatsinks to be installed.
Two DDR4 modules can be installed in ASUS’ single-latch DIMM slots. Positioning of these slots is ideal for modern Mini-ITX motherboards. ASUS’ QVL highlights support for Crucial 5.1GHz memory modules at the top end.
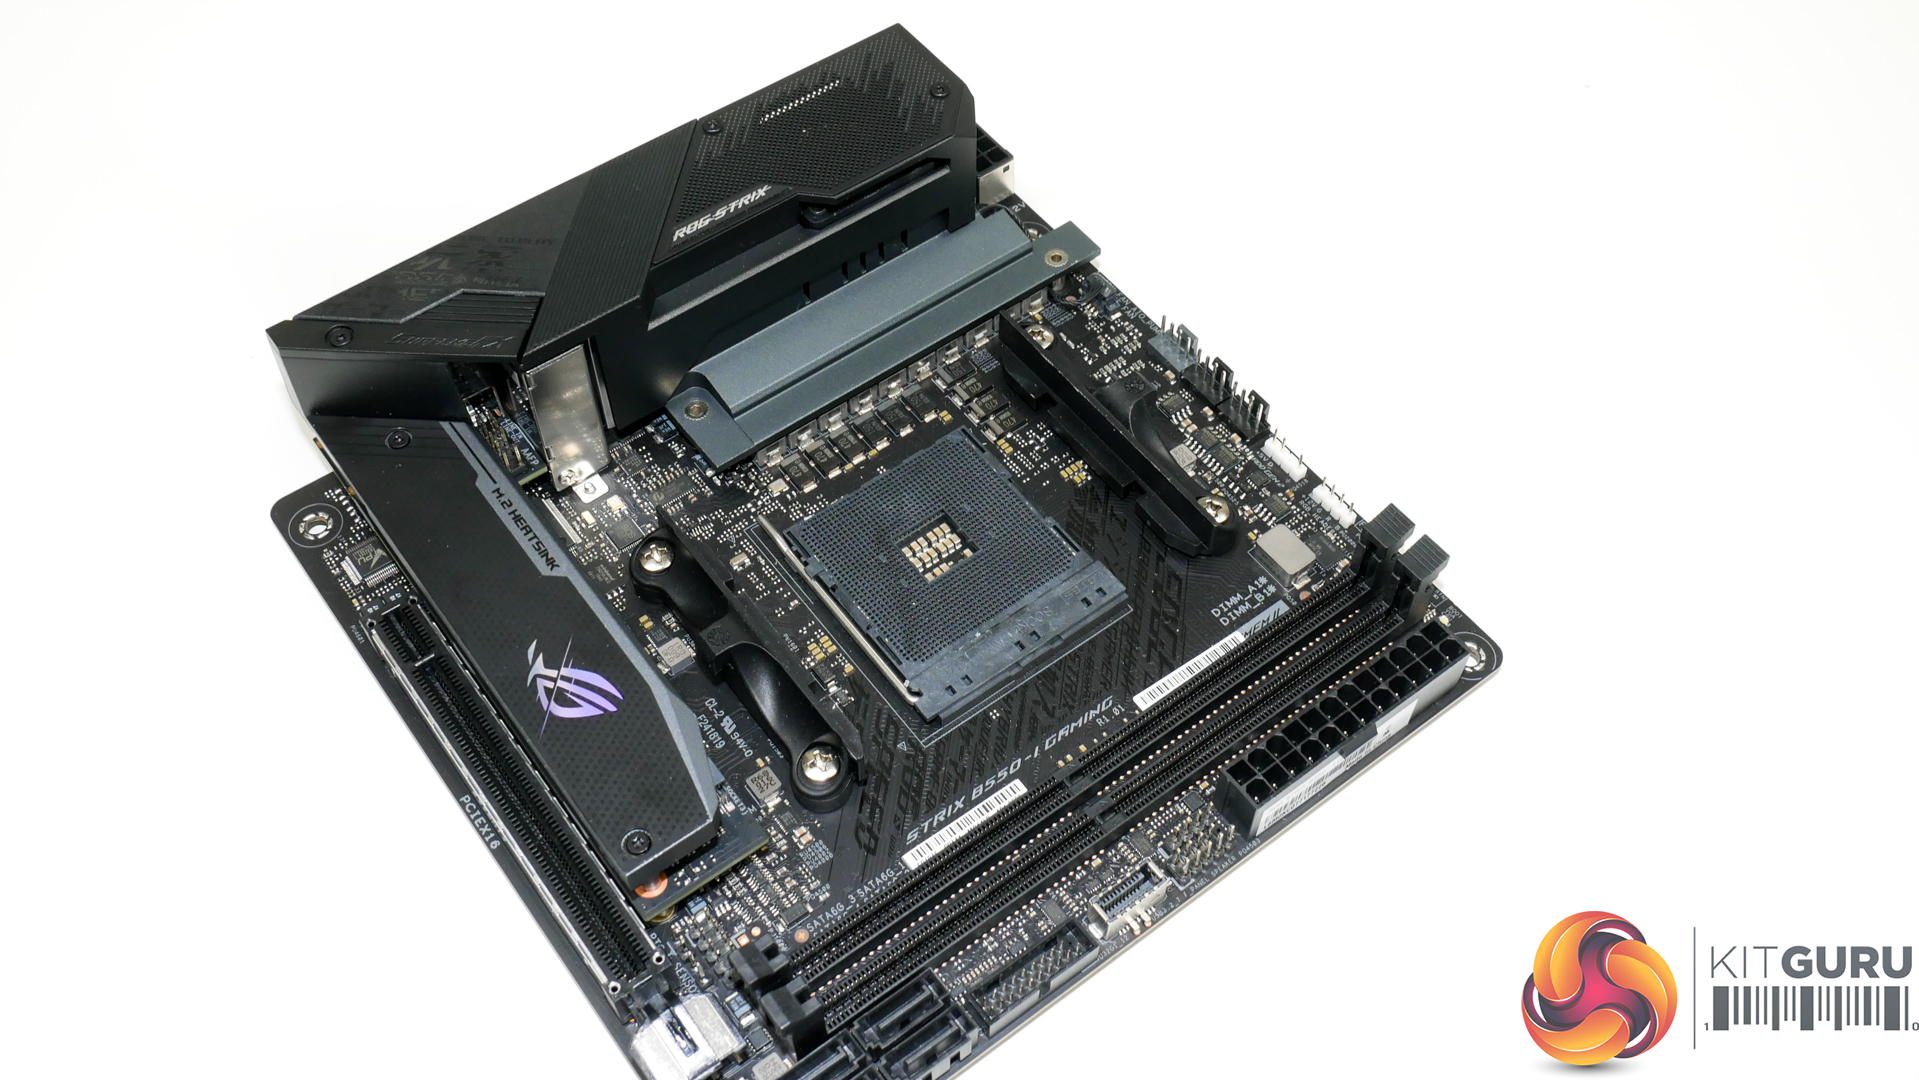
The CPU socket area is clear and void of any major vertical interference worries, especially from a CPU cooler perspective. This is because ASUS shifts the power delivery components to the motherboard’s left side and biases the heatsink over there.
One slight area for concern is the Z-height positioning of the flat VRM heatsink being slightly above the Z-height of a Ryzen CPU. This could cause interference for CPU coolers with large contact plates, though it is highly unlikely.

Focusing on the top edge connectors, we have:
- Aa single 8-pin CPU power connector nestled in the corner; this is likely to be sufficient for power, even for sensible Ryzen 9 5950X overclocks without extreme cooling
- The board’s two RGB headers – one ARGB and one 12V RGB
- 3x 4-pin fan headers – CPU, AIO pump, and Chassis control curves
The fan headers are all 1A rated for current output, which is highly disappointing and seems needless given that ASRock’s competitor offers 2x2A headers and 1x1A header. Higher current output capacity is important for builders wanting to run multiple fans from a splitter, which is very common for Mini-ITX usage.
I am personally not a fan (pun intended) of having all the fan headers in one location on the motherboard. However, this may suit the requirements for other Mini-ITX builders.
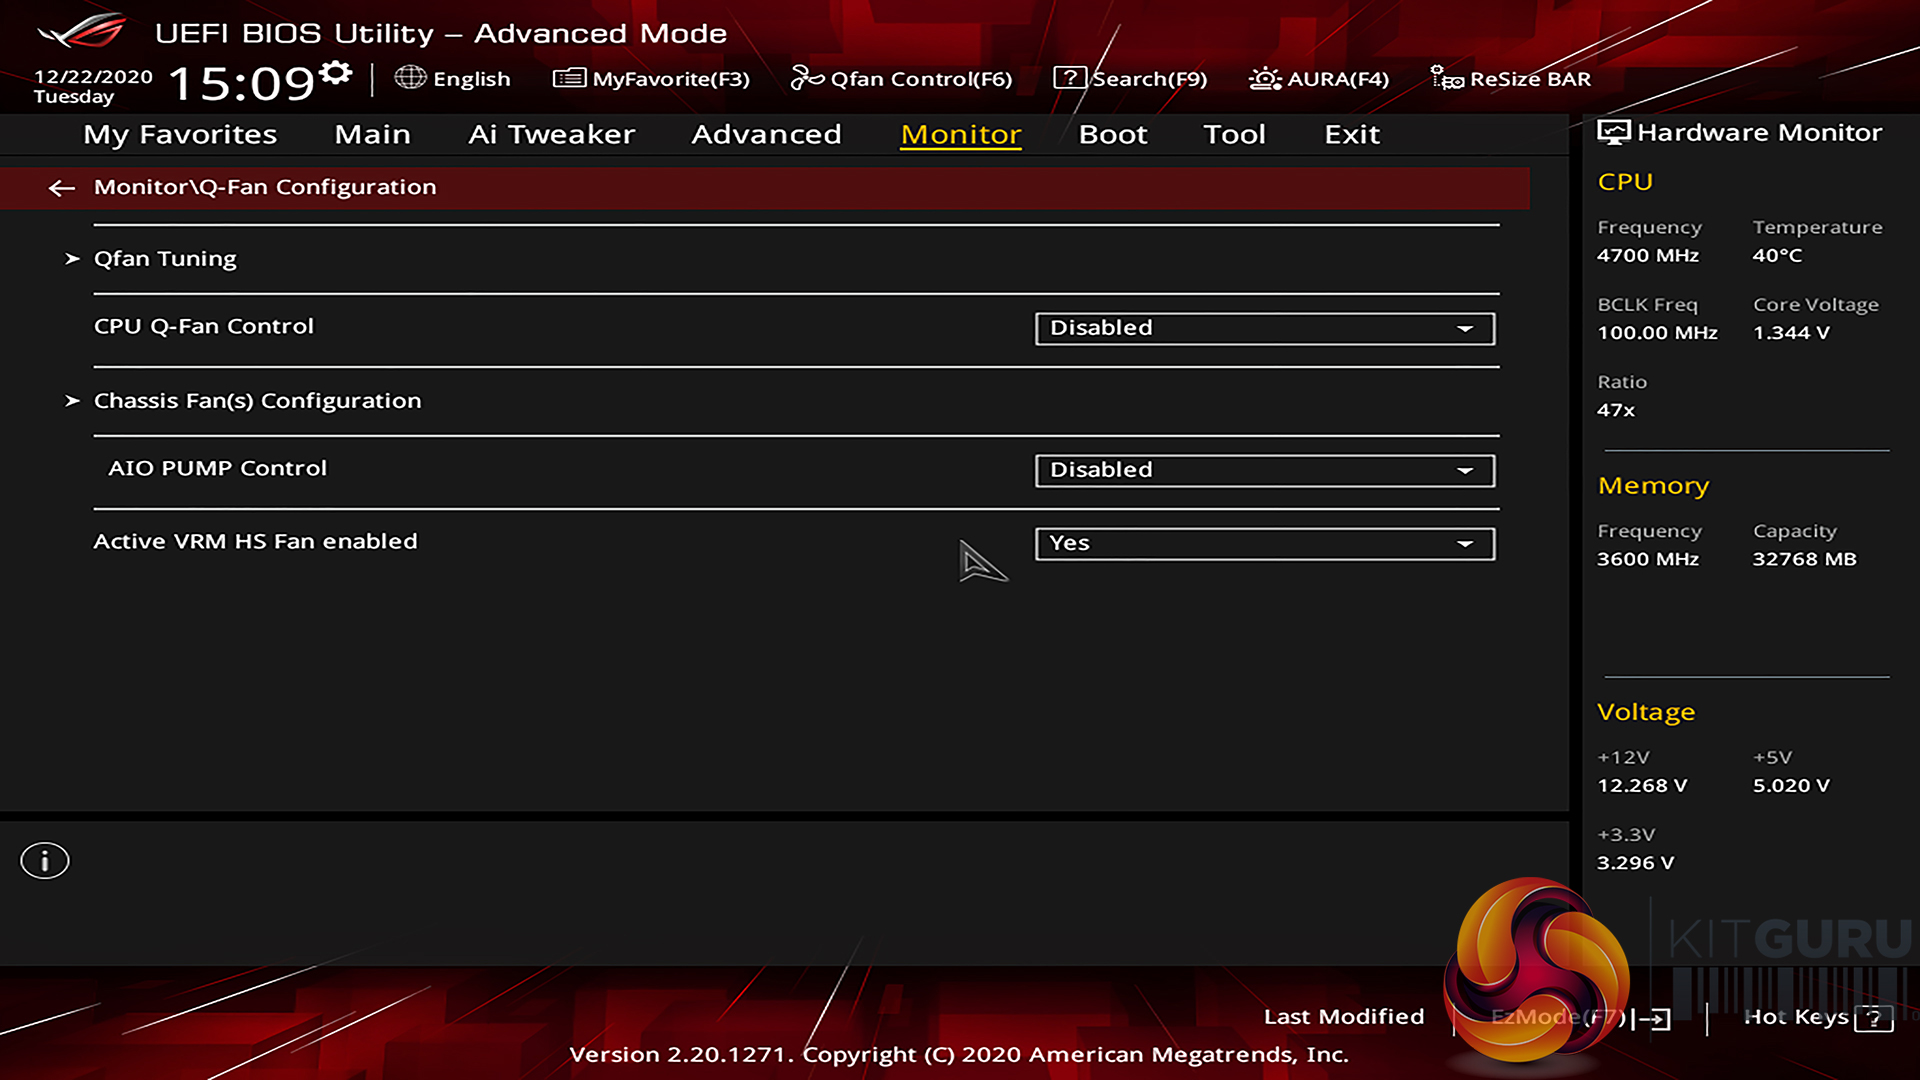
The VRM cooling fan has its own dedicated header and is pre-connected.
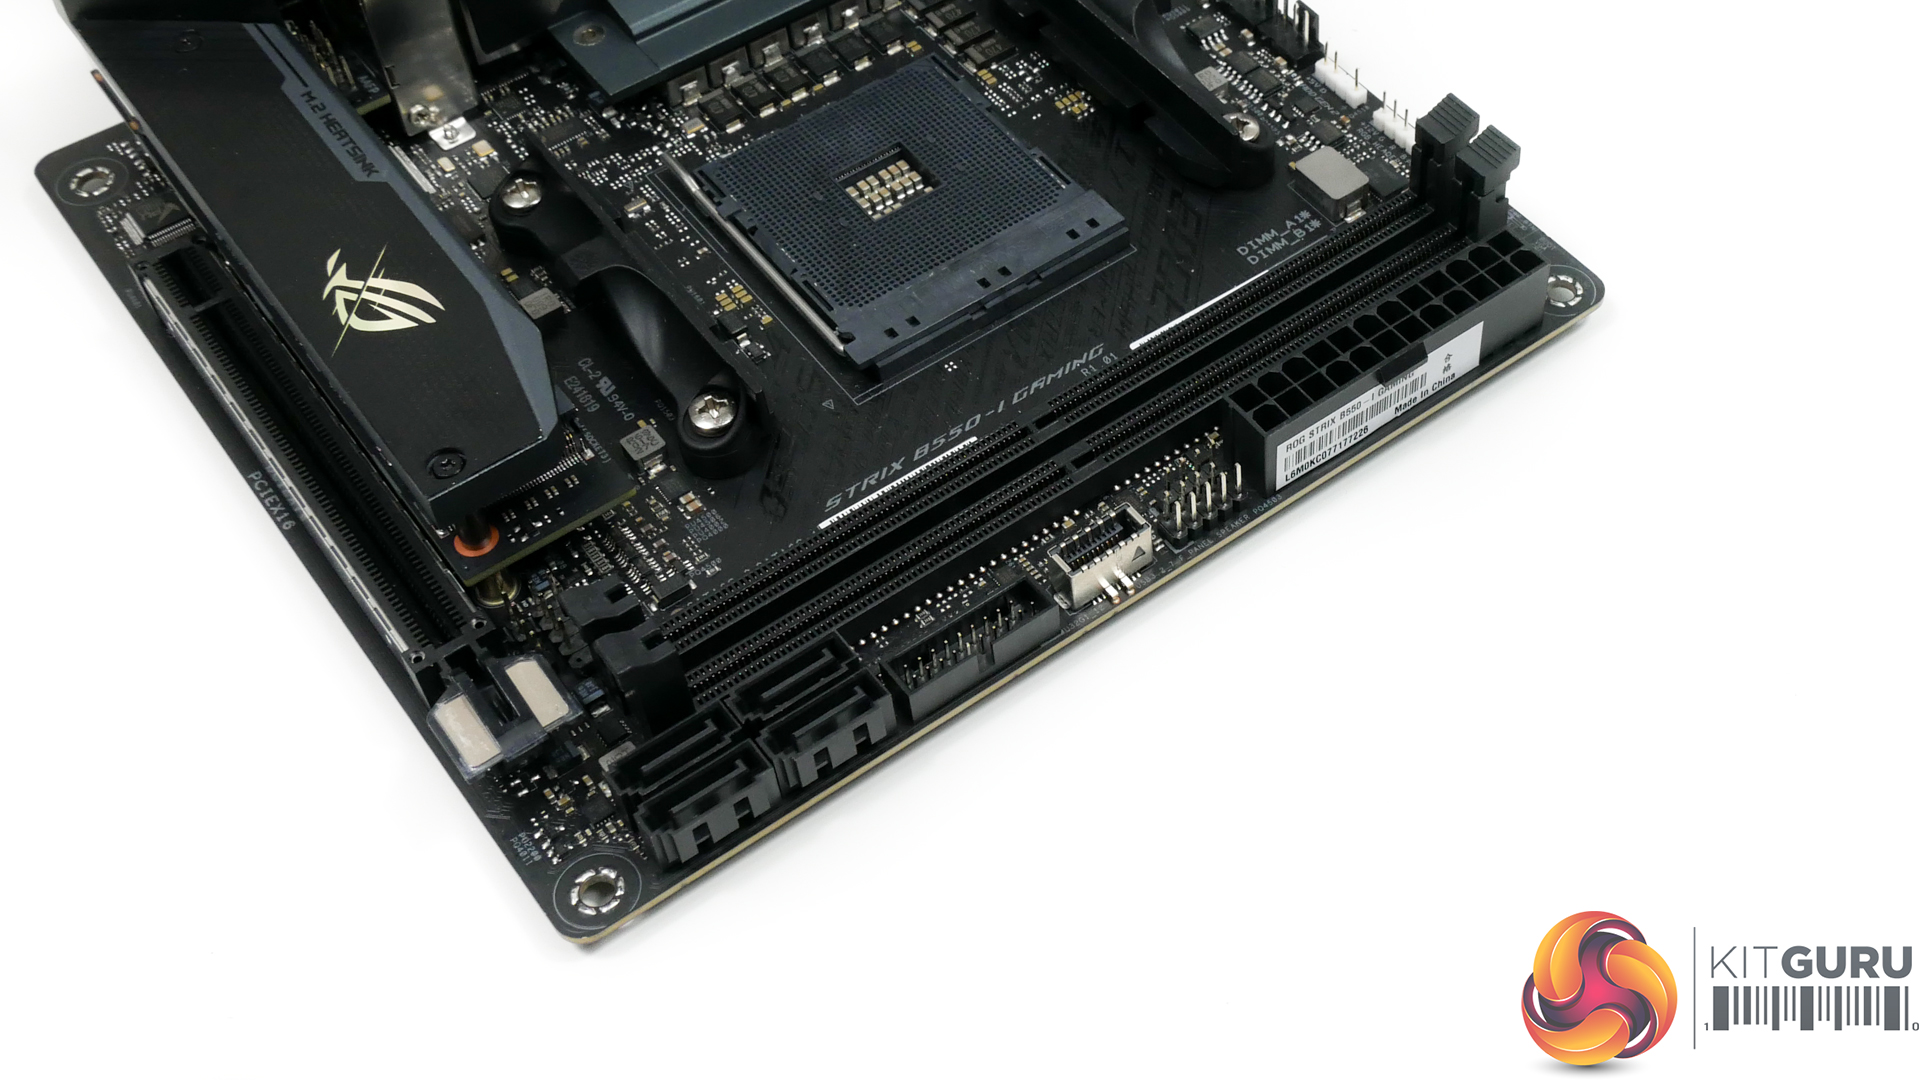
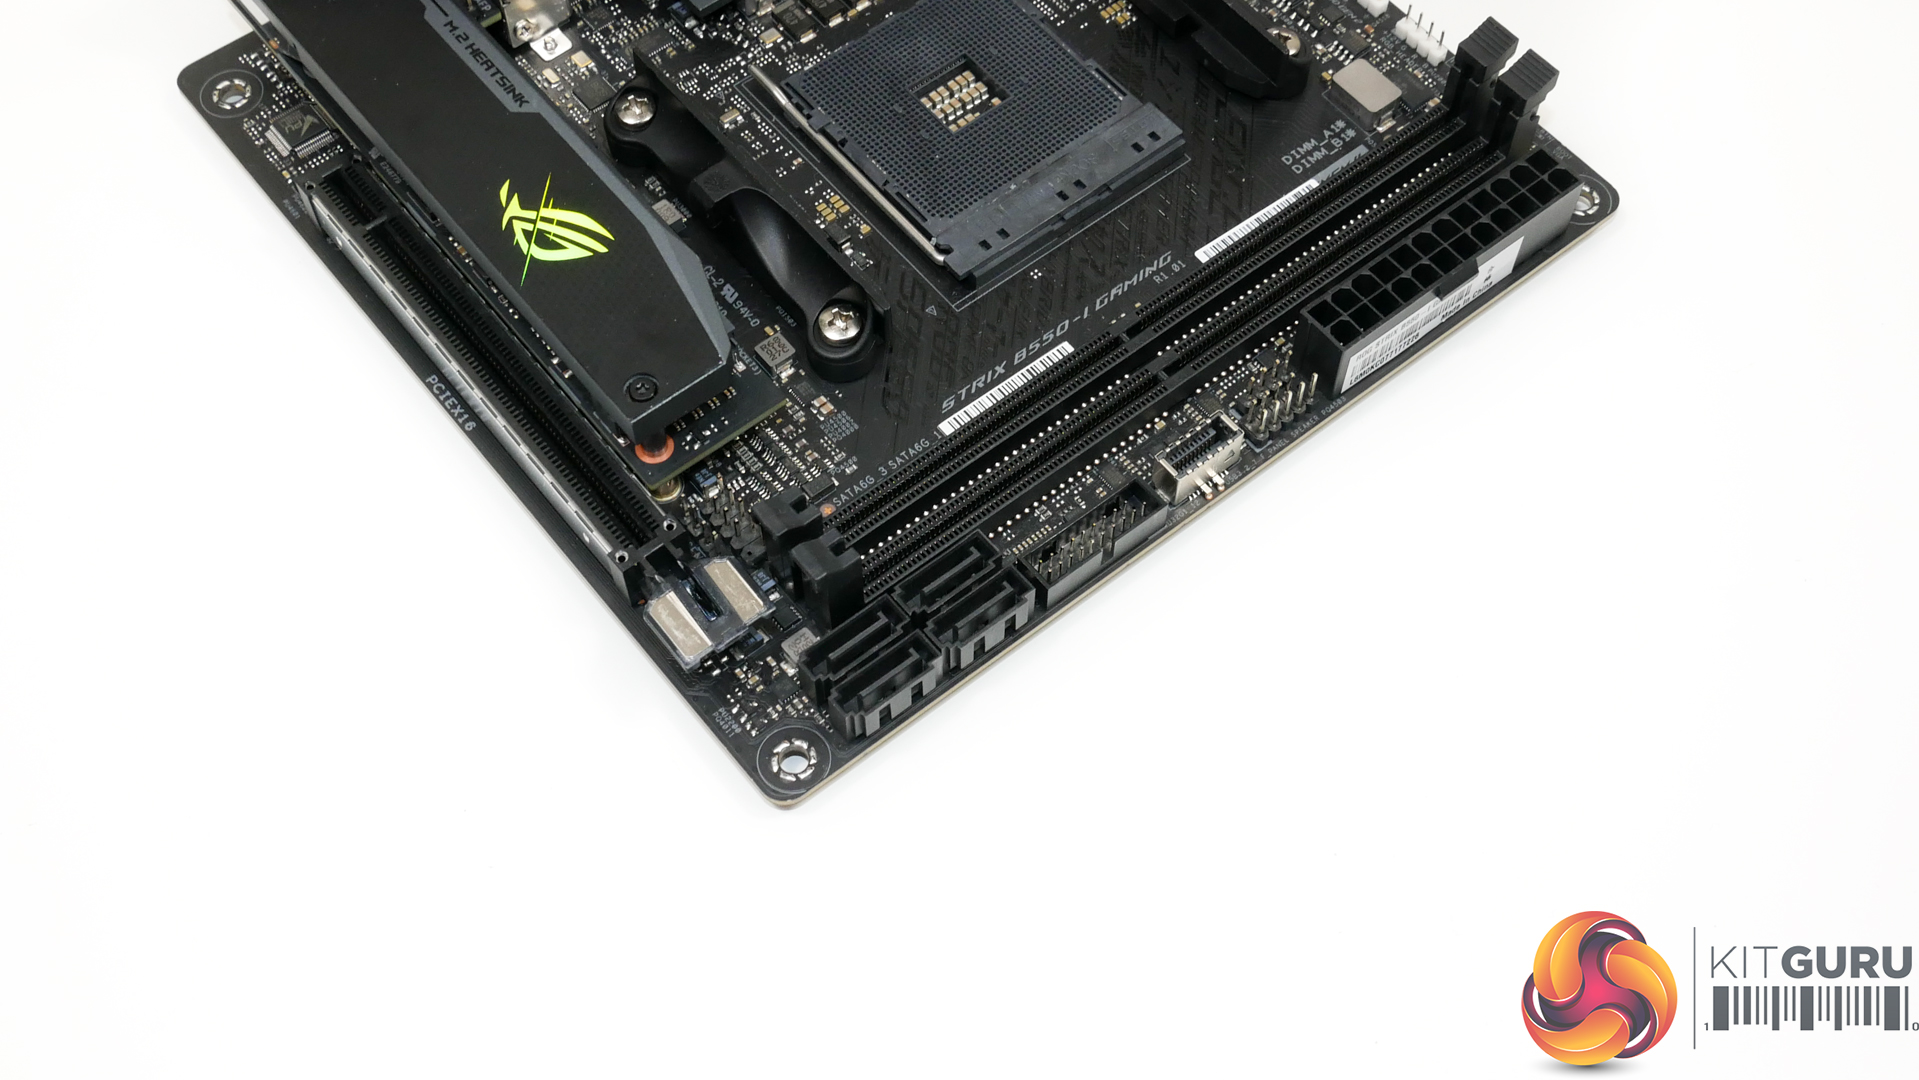
The 24-pin connector is in a good and easy to access location. Four SATA 6Gbps ports run from the B550 chipset. ASUS’ use of an outwards-facing orientation is very good as it eliminates potential interference headaches in cramped Mini-ITX cases, albeit at the expense of neater cable management versus right-angled alternatives.
In lieu of onboard power and reset buttons or a debug LED, ASUS mounts four diagnostic LEDs in the board’s top-right corner. These serve Boot, VGA, CPU, and DRAM functions.
Also mounted on the motherboard’s right edge is the internal USB 10Gbps Type-C front panel header. This is a good location, and it is positive to see the 10Gbps connection included when some cheaper B550 options omit the header or use 5Gbps instead.
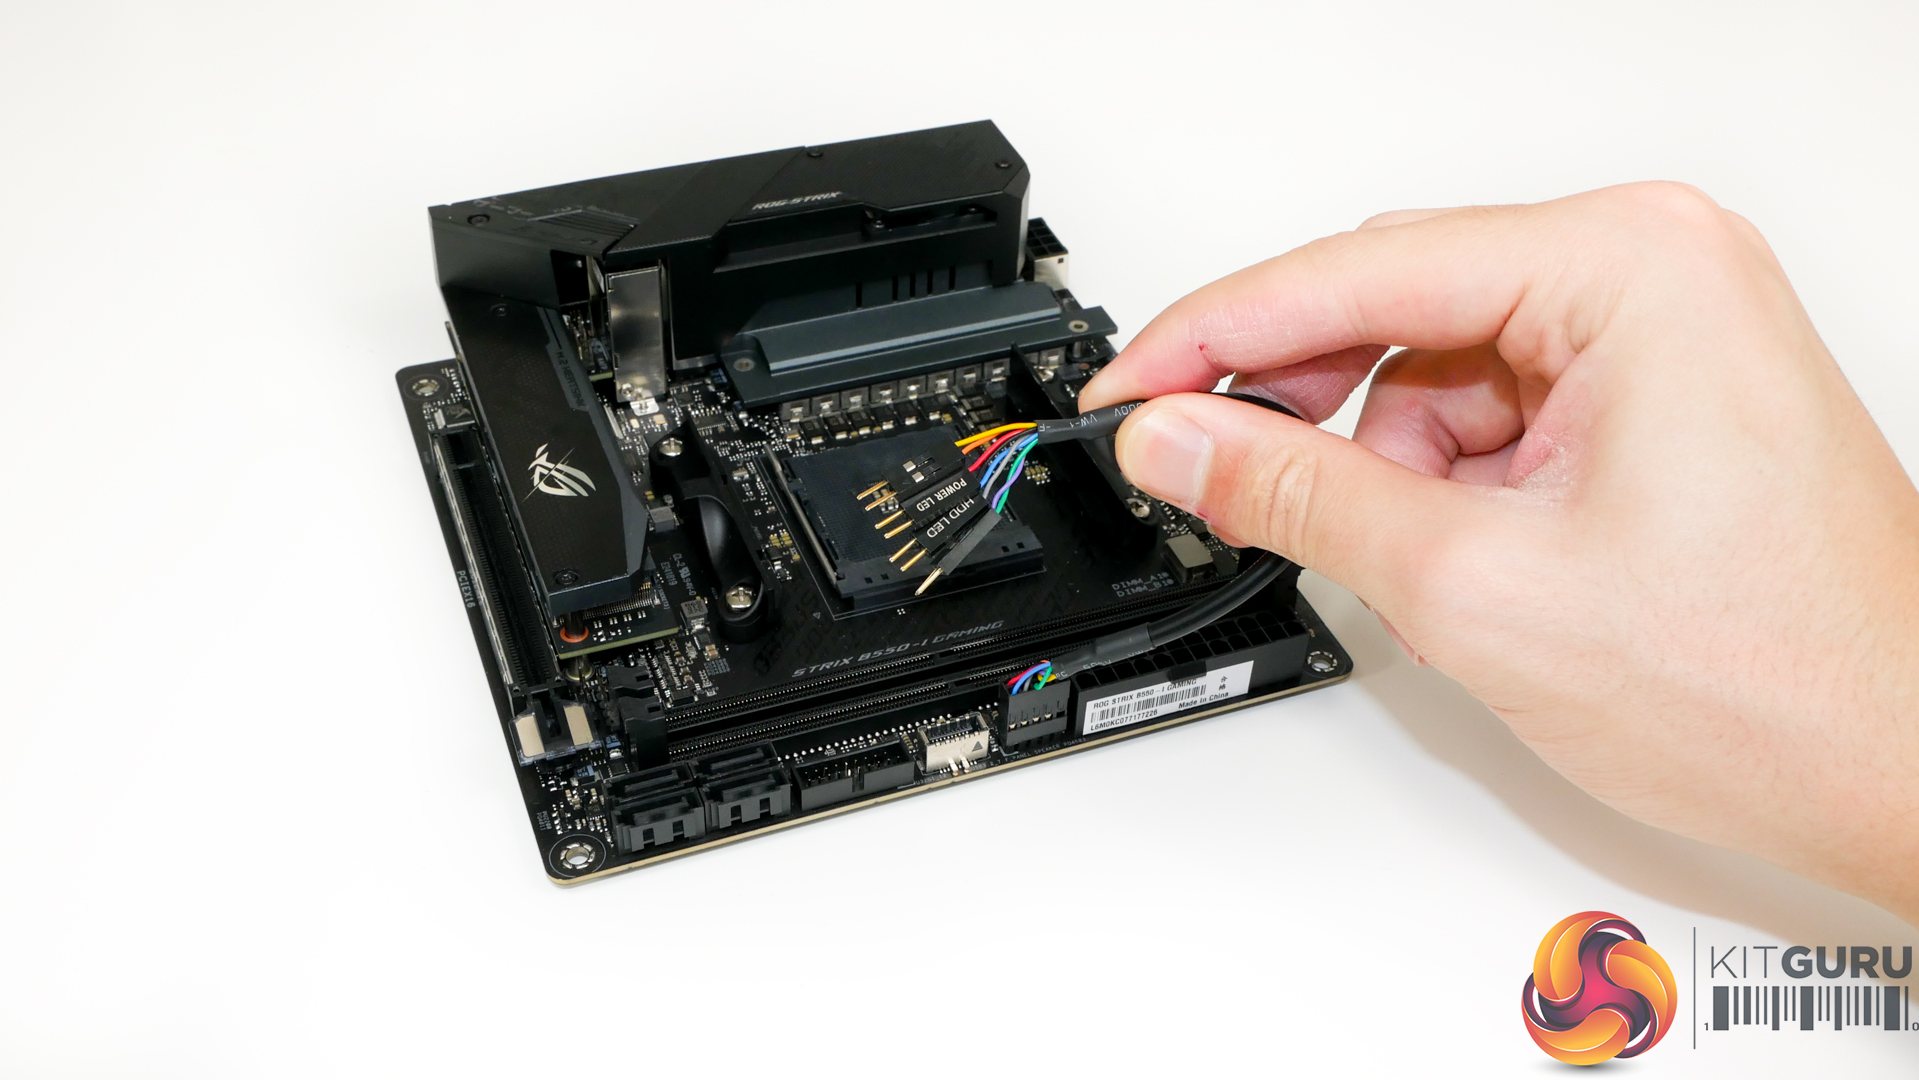
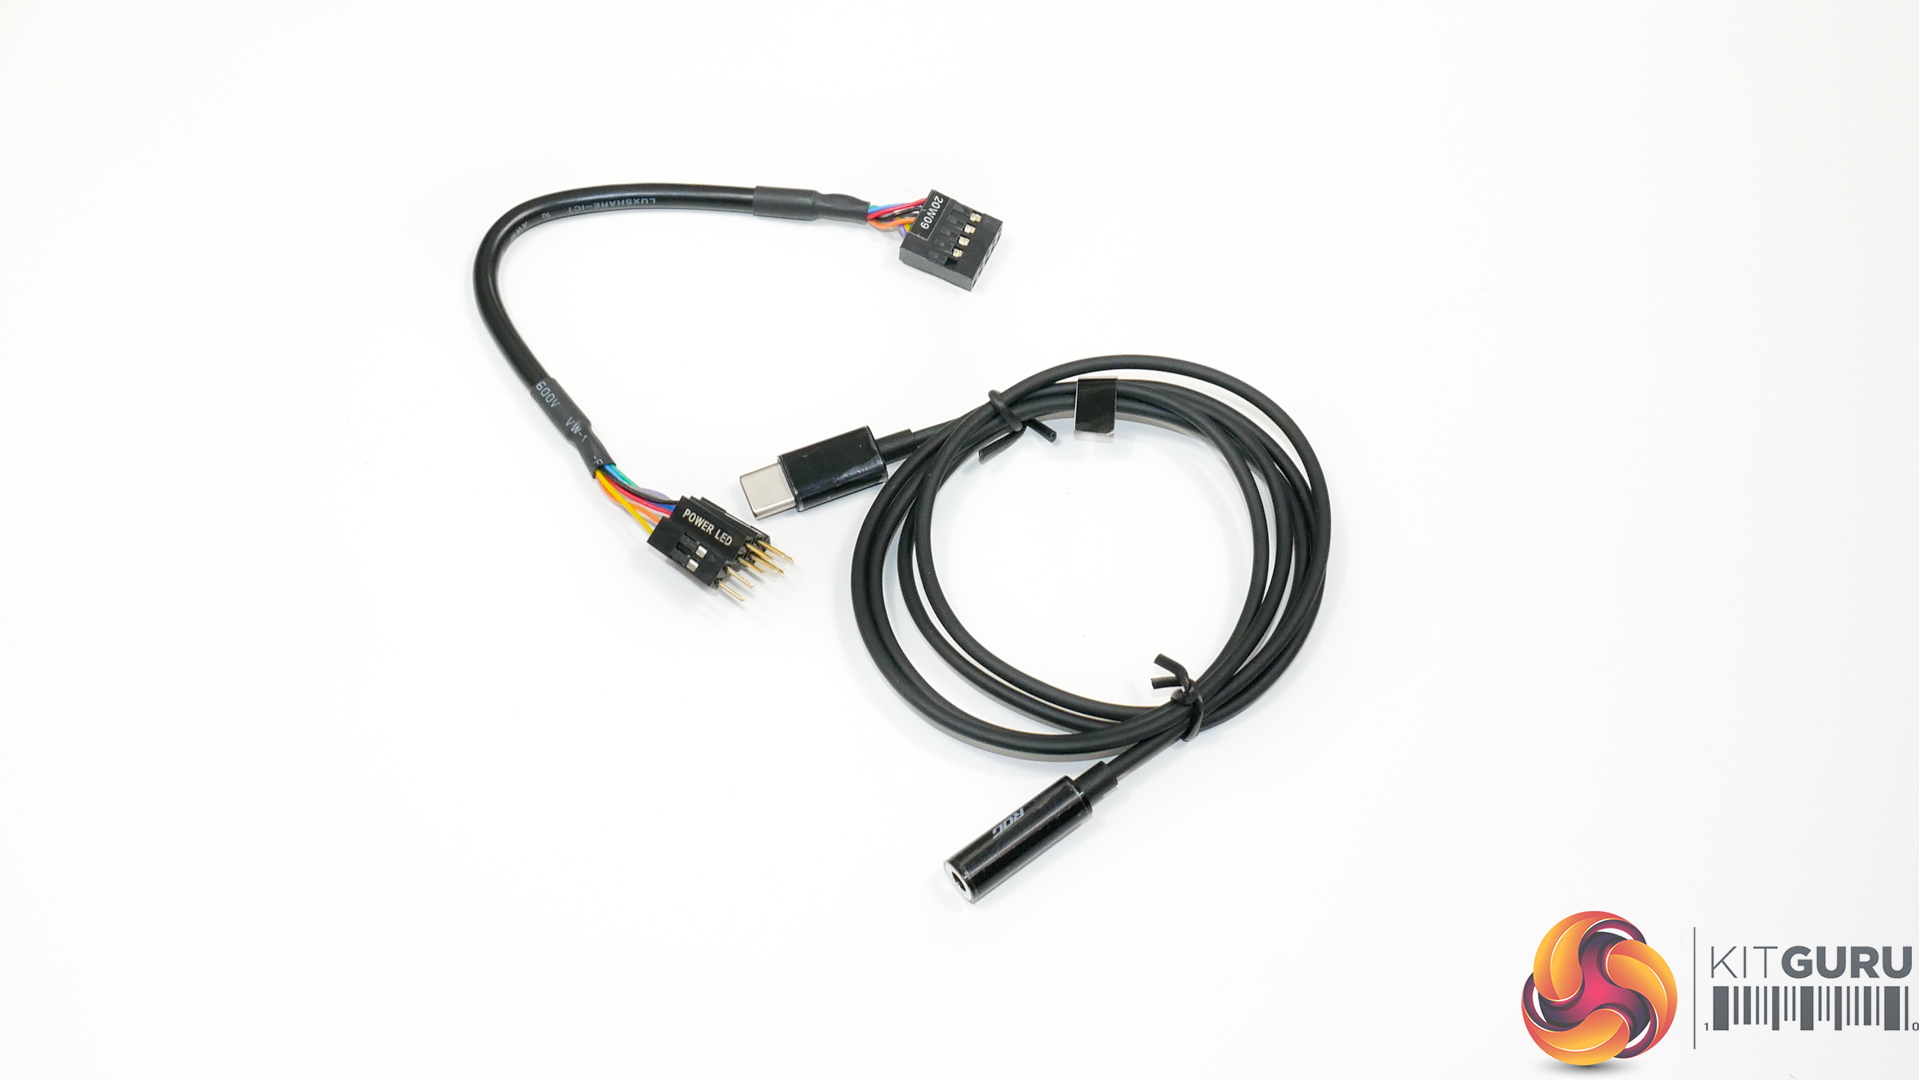
Front panel headers are easy enough to access as a CPU cooler does not overhang their zone. ASUS includes a break-out cable for easier connection of the cables in a tight chassis environment. This served us well when working with the B550-I Gaming inside the SilverStone SUGO 14 chassis recently.
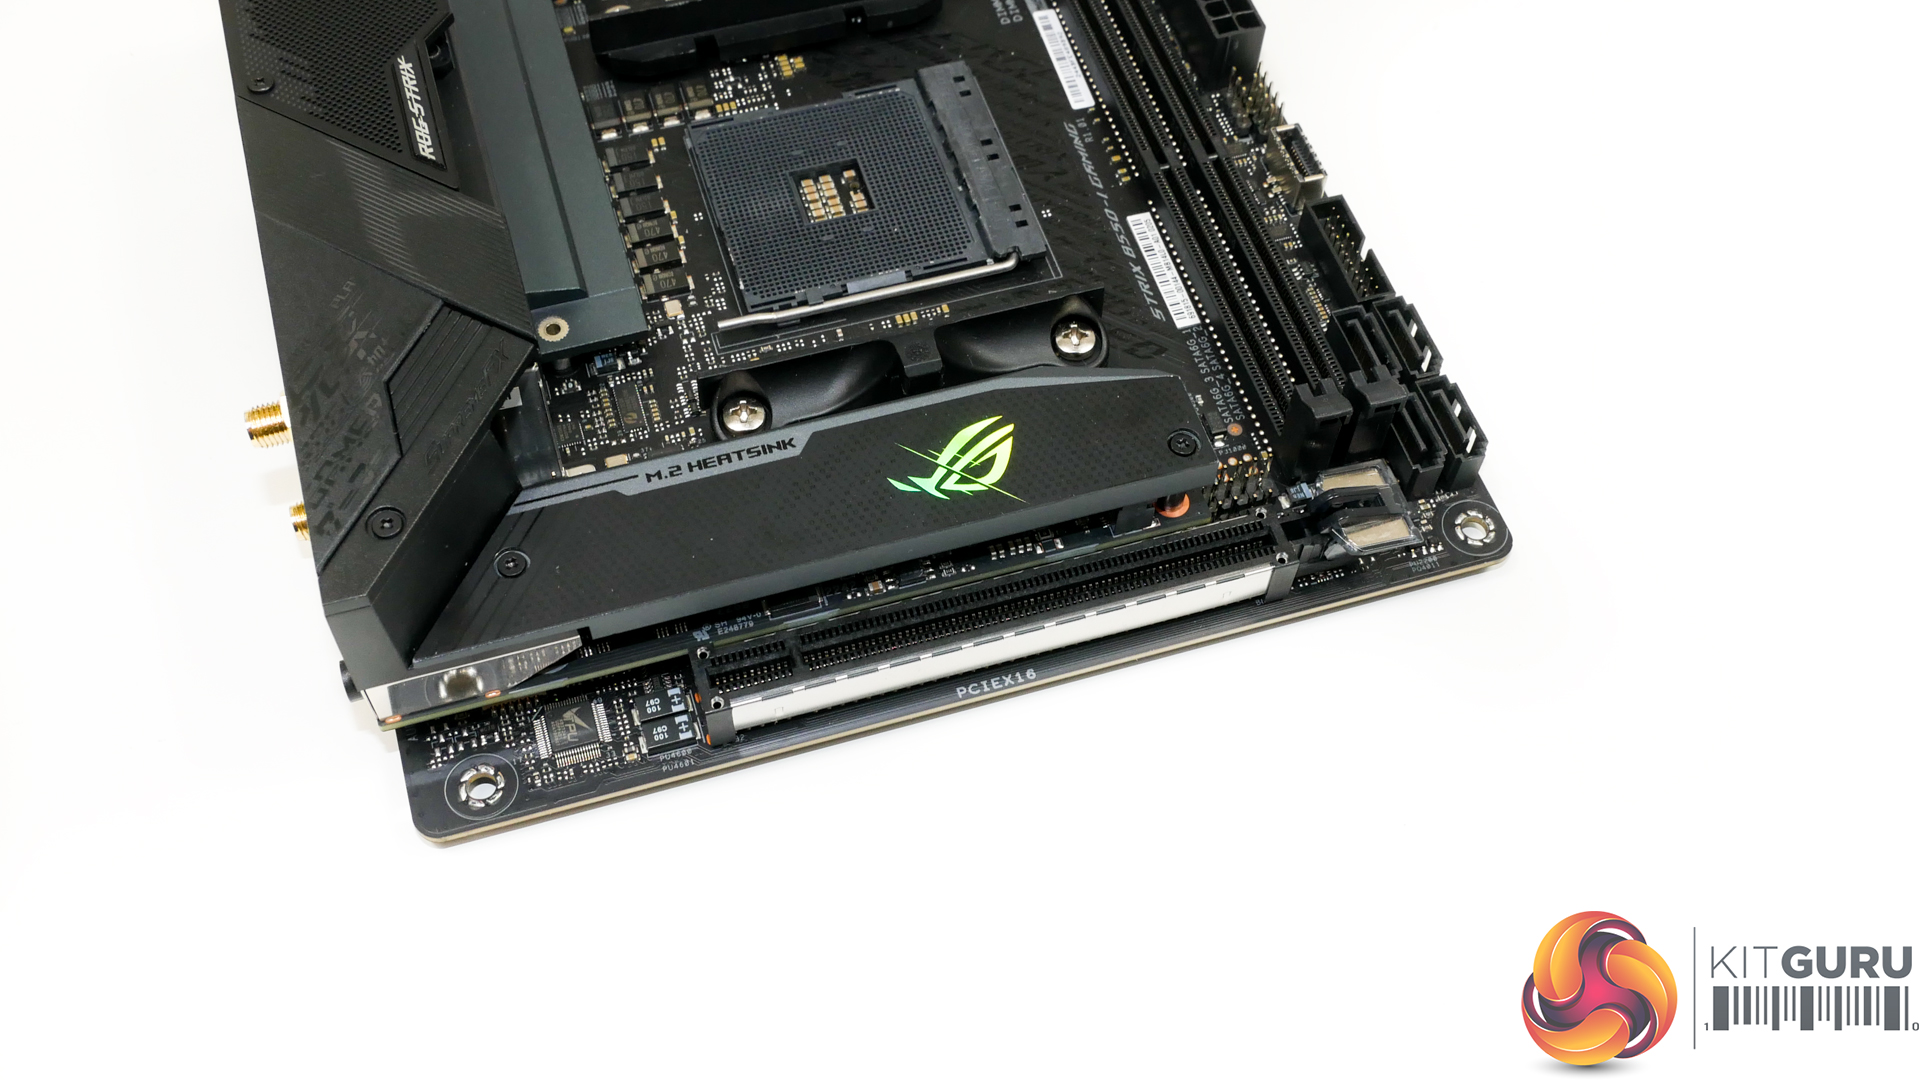
A single PCIe Gen 4 x16 connector runs with lanes from the CPU. This port uses ASUS’ Q-Slot design and is thicker and stronger than usual to help prevent graphics card sag.
The vertical height of the M.2 daughterboard is positioned such that it will cause interference with some particularly thick GPU backplates. This is not ideal, but it did not prove a problem when we used the large Gigabyte RTX 3080 Eagle OC graphics card.
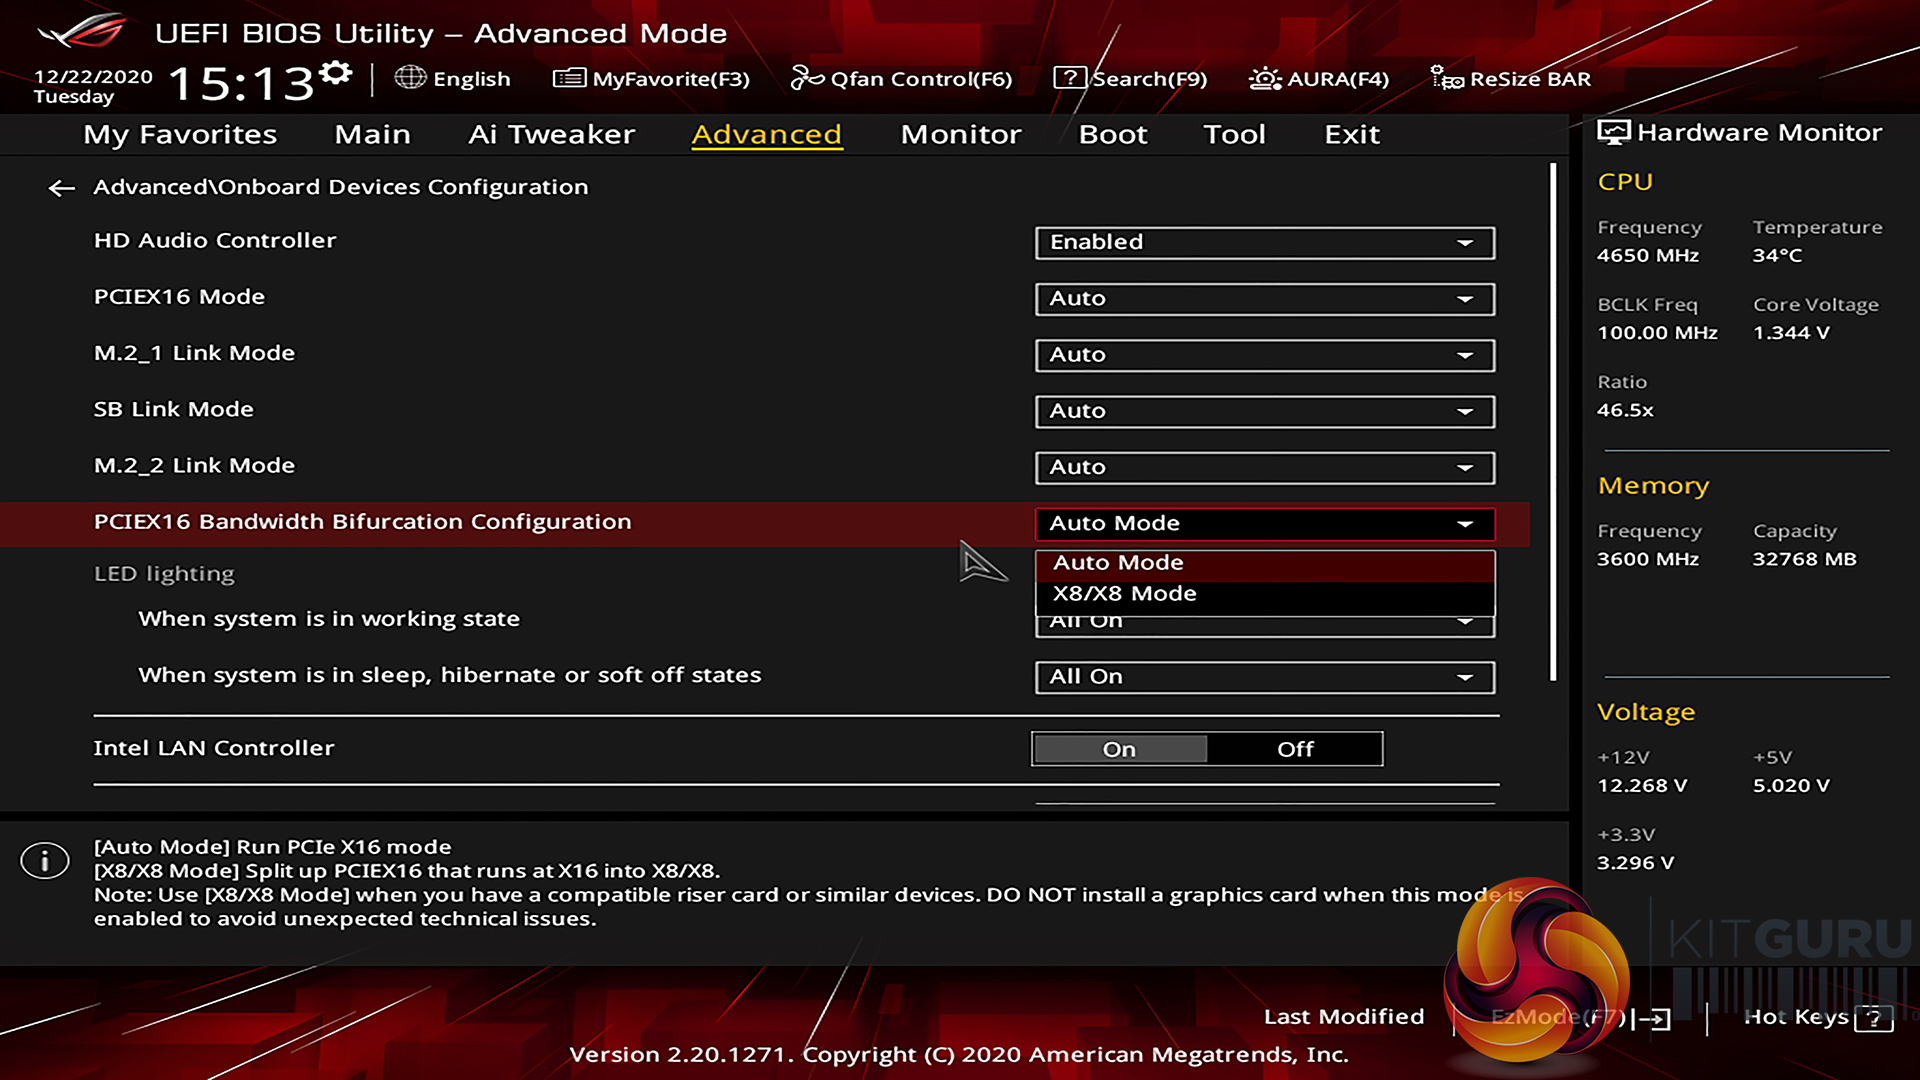
For those who need some degree of PCIe lane bifurcation, ASUS allows x8/x8 in the UEFI which is good but not as flexible as ASRock’s competing approach.
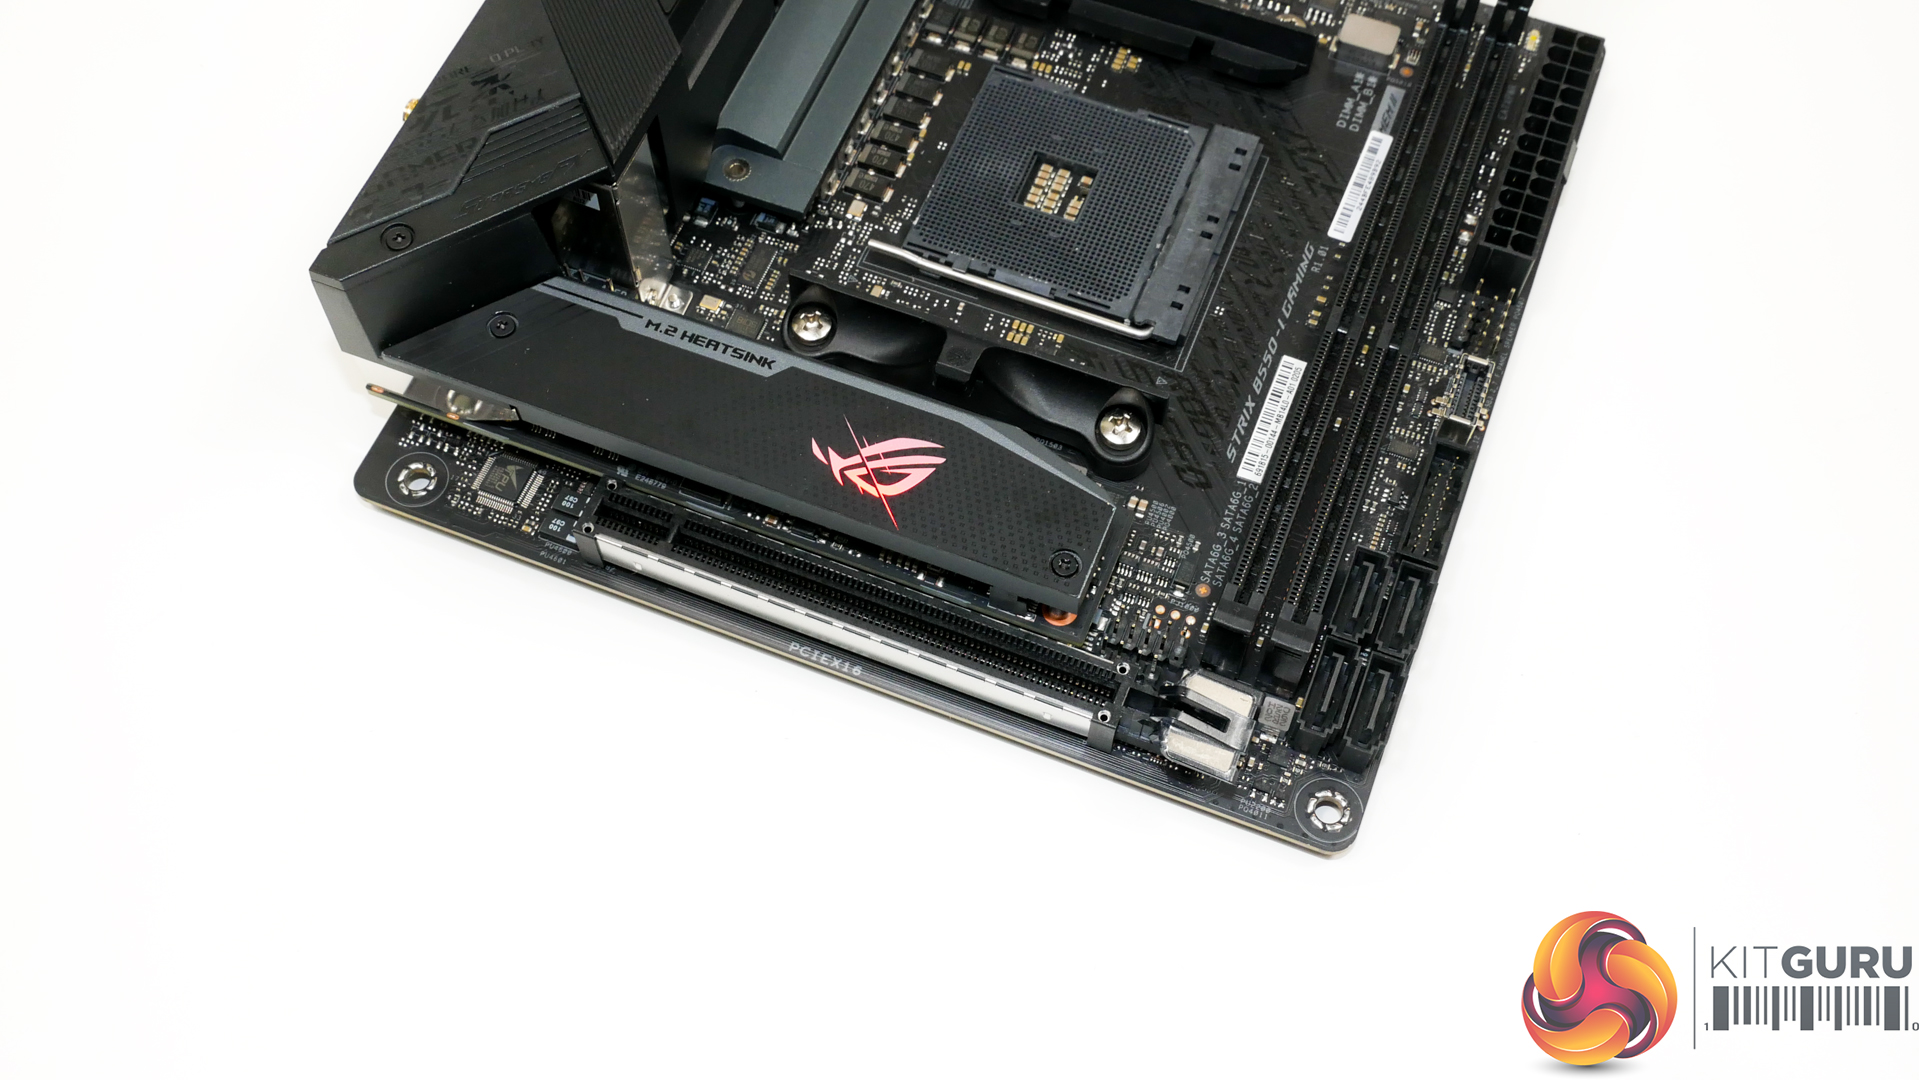
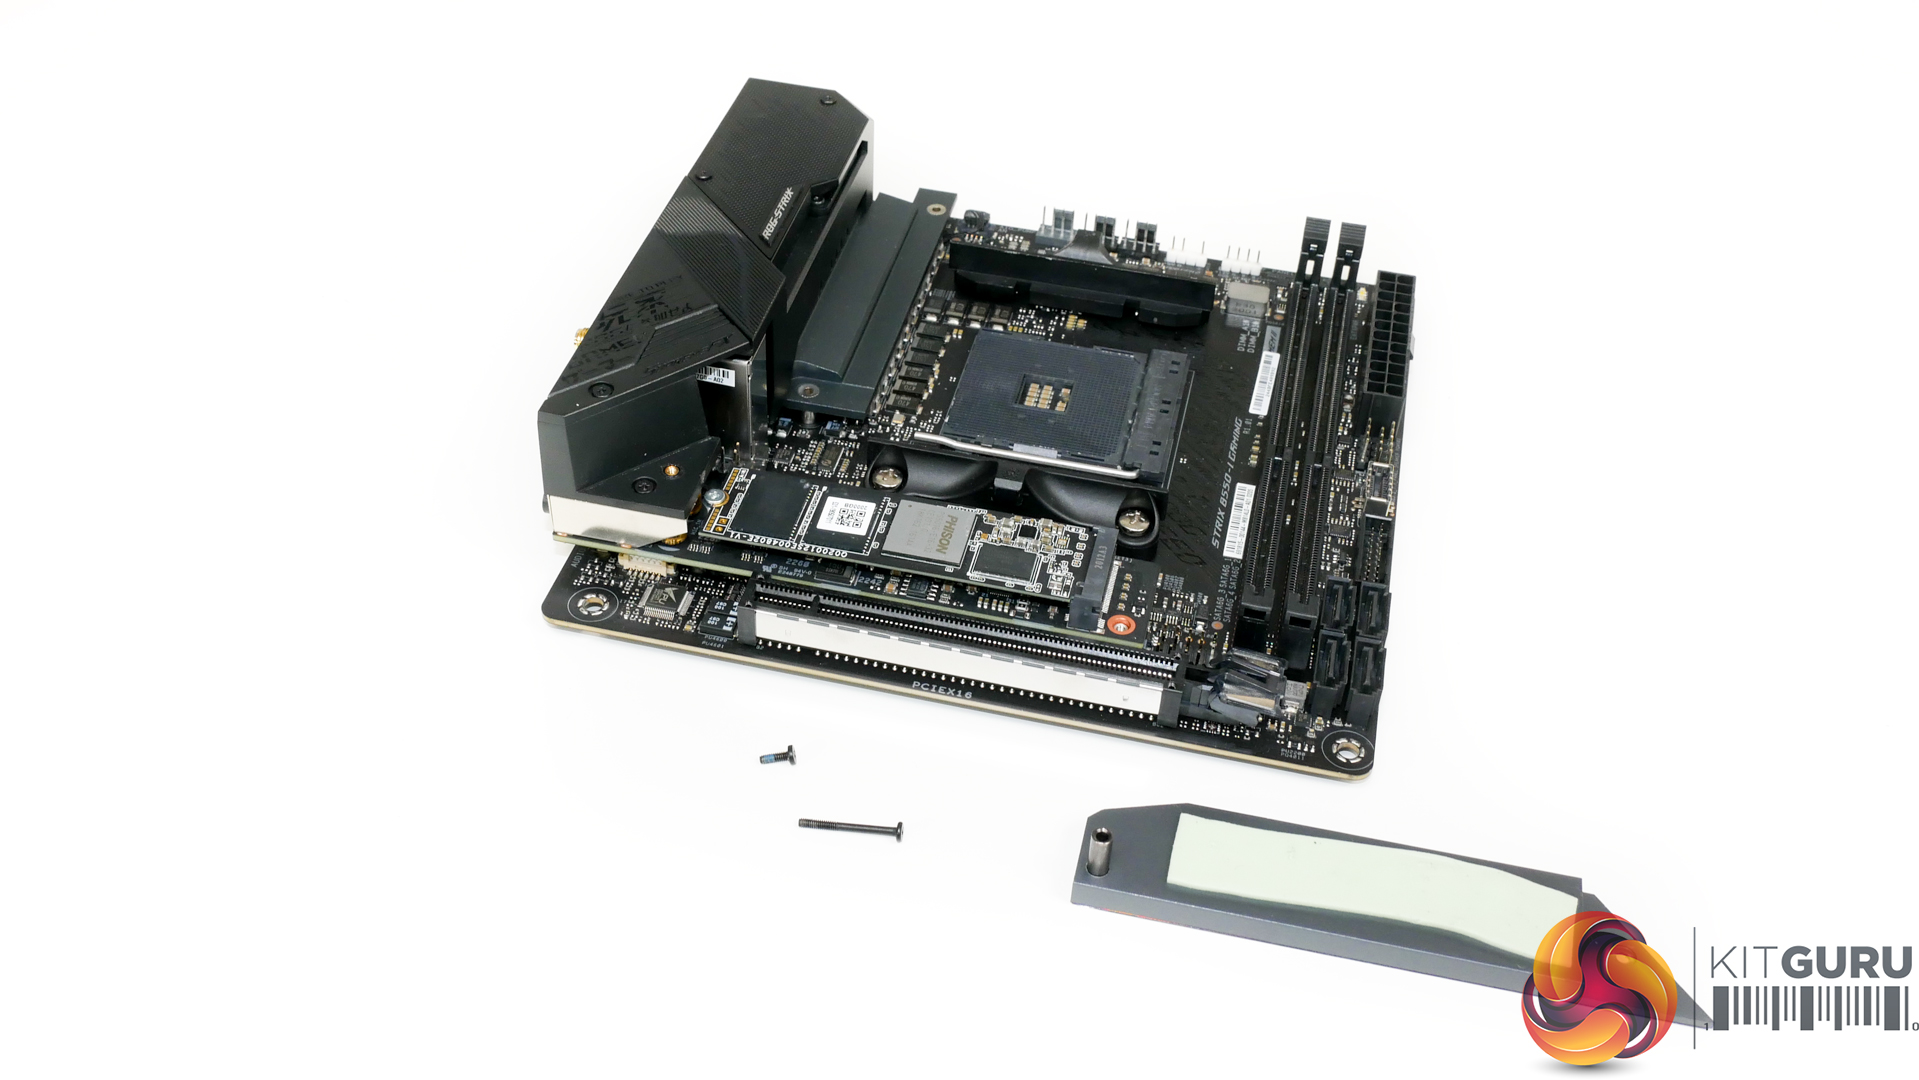
The front-side M.2 connector sits atop ASUS’ daughterboard and supports PCIe Gen 4 x4 or SATA 6Gbps SSDs using lanes direct from the Ryzen CPU. This daughterboard installation approach is used to avoid interference with the B550 chipset and heatsink sat below.
A reasonably sized metal block is used to cool the installed M.2 SSD.
Sat to the right of the M.2 connection is the single USB 2.0 internal header. Just the single USB 2.0 header is annoying for users who have peripherals such as an AIO or AMD Wraith cooler with RGB hardware, as any chassis USB 2.0 connections will not be possible to connect. But the single USB 2.0 header is a common compromise for ITX boards given the space constraints.
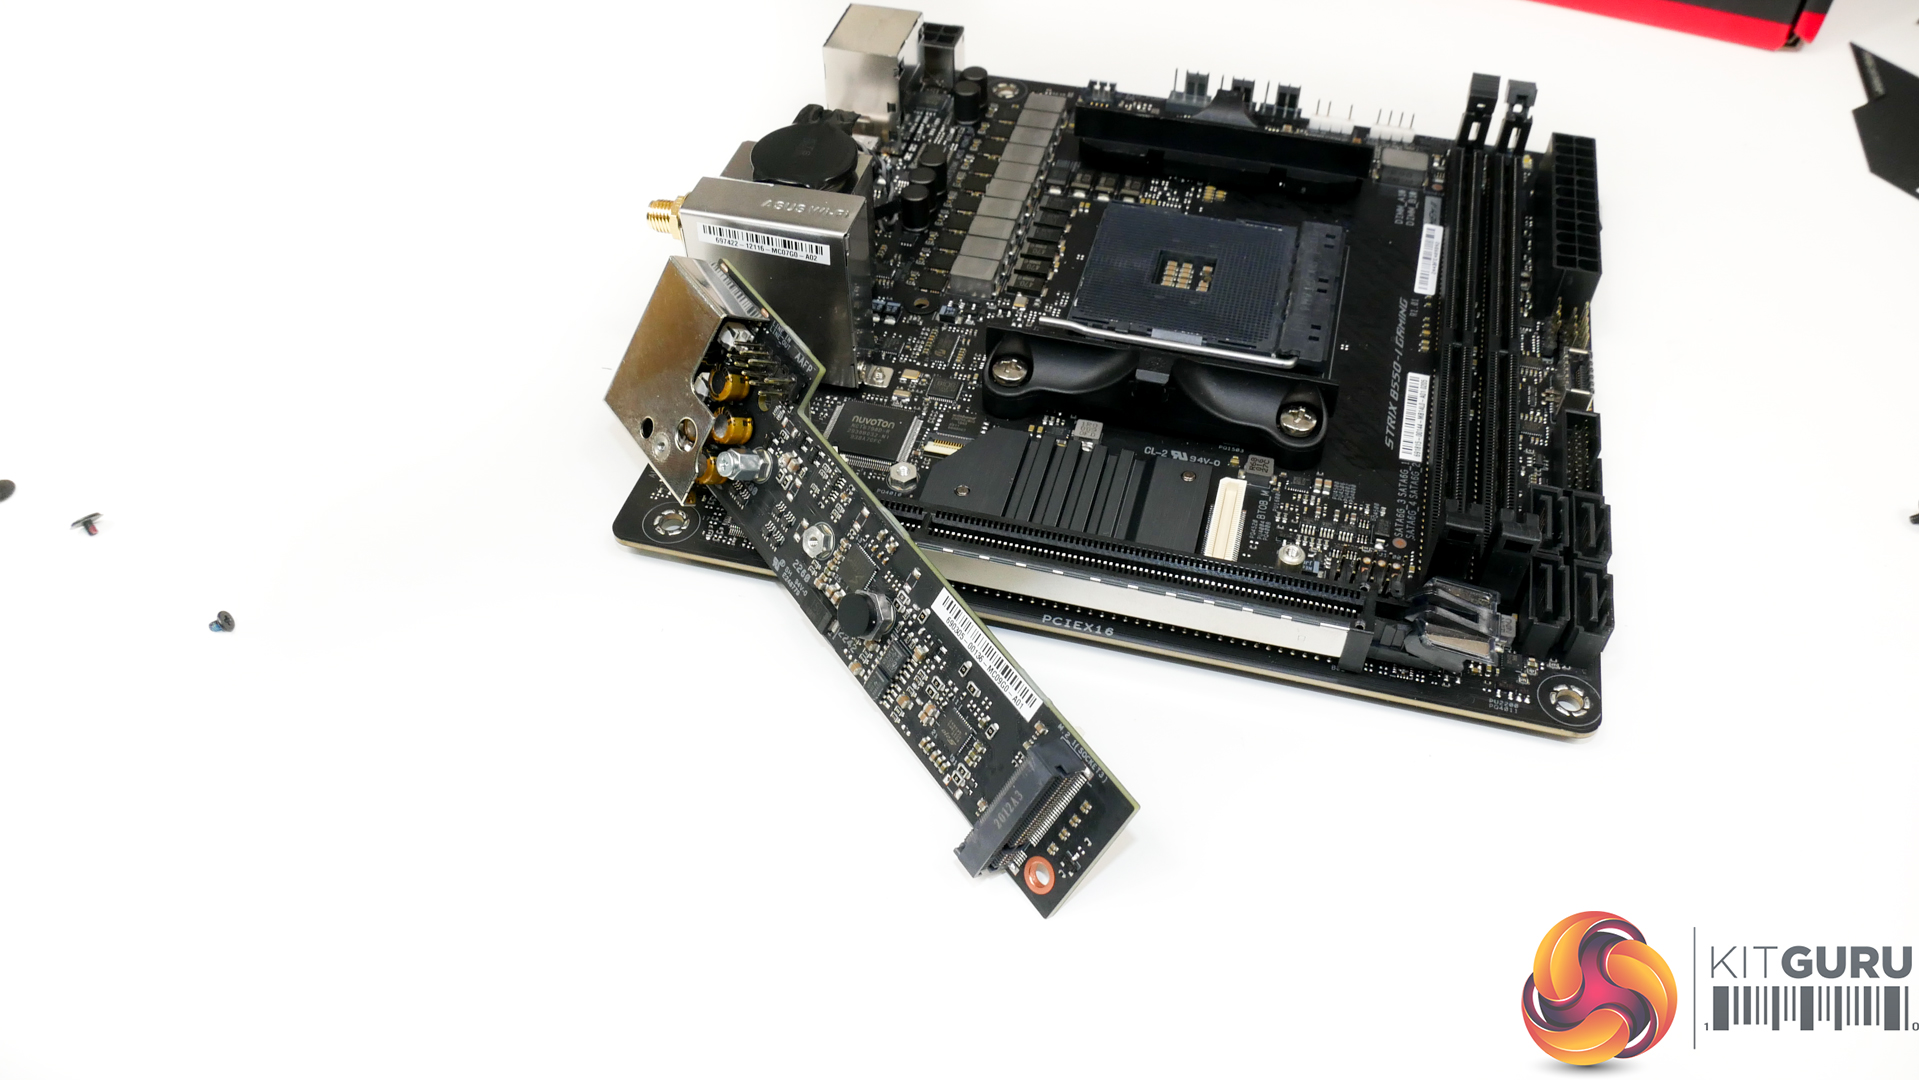
An additional function of ASUS’ M.2 daughterboard is to house the B550-I Gaming’s audio connectivity. Here, we see the front panel audio header mounted, as well as the SupremeFX audio chipset solution and associated rear IO ports.
ASUS’ SupremeFX audio solution is mounted on the daughterboard and consists of:
- The S1220A audio codec which is effectively a rebranded version of the popular Realtek ALC1220A
- Texas Instruments R4850I and OPA1688 operational amplifiers
- An S210 control chip to distinguish between standard USB connections on the Type-C port or audio hardware connections
- Nichicon audio capacitors
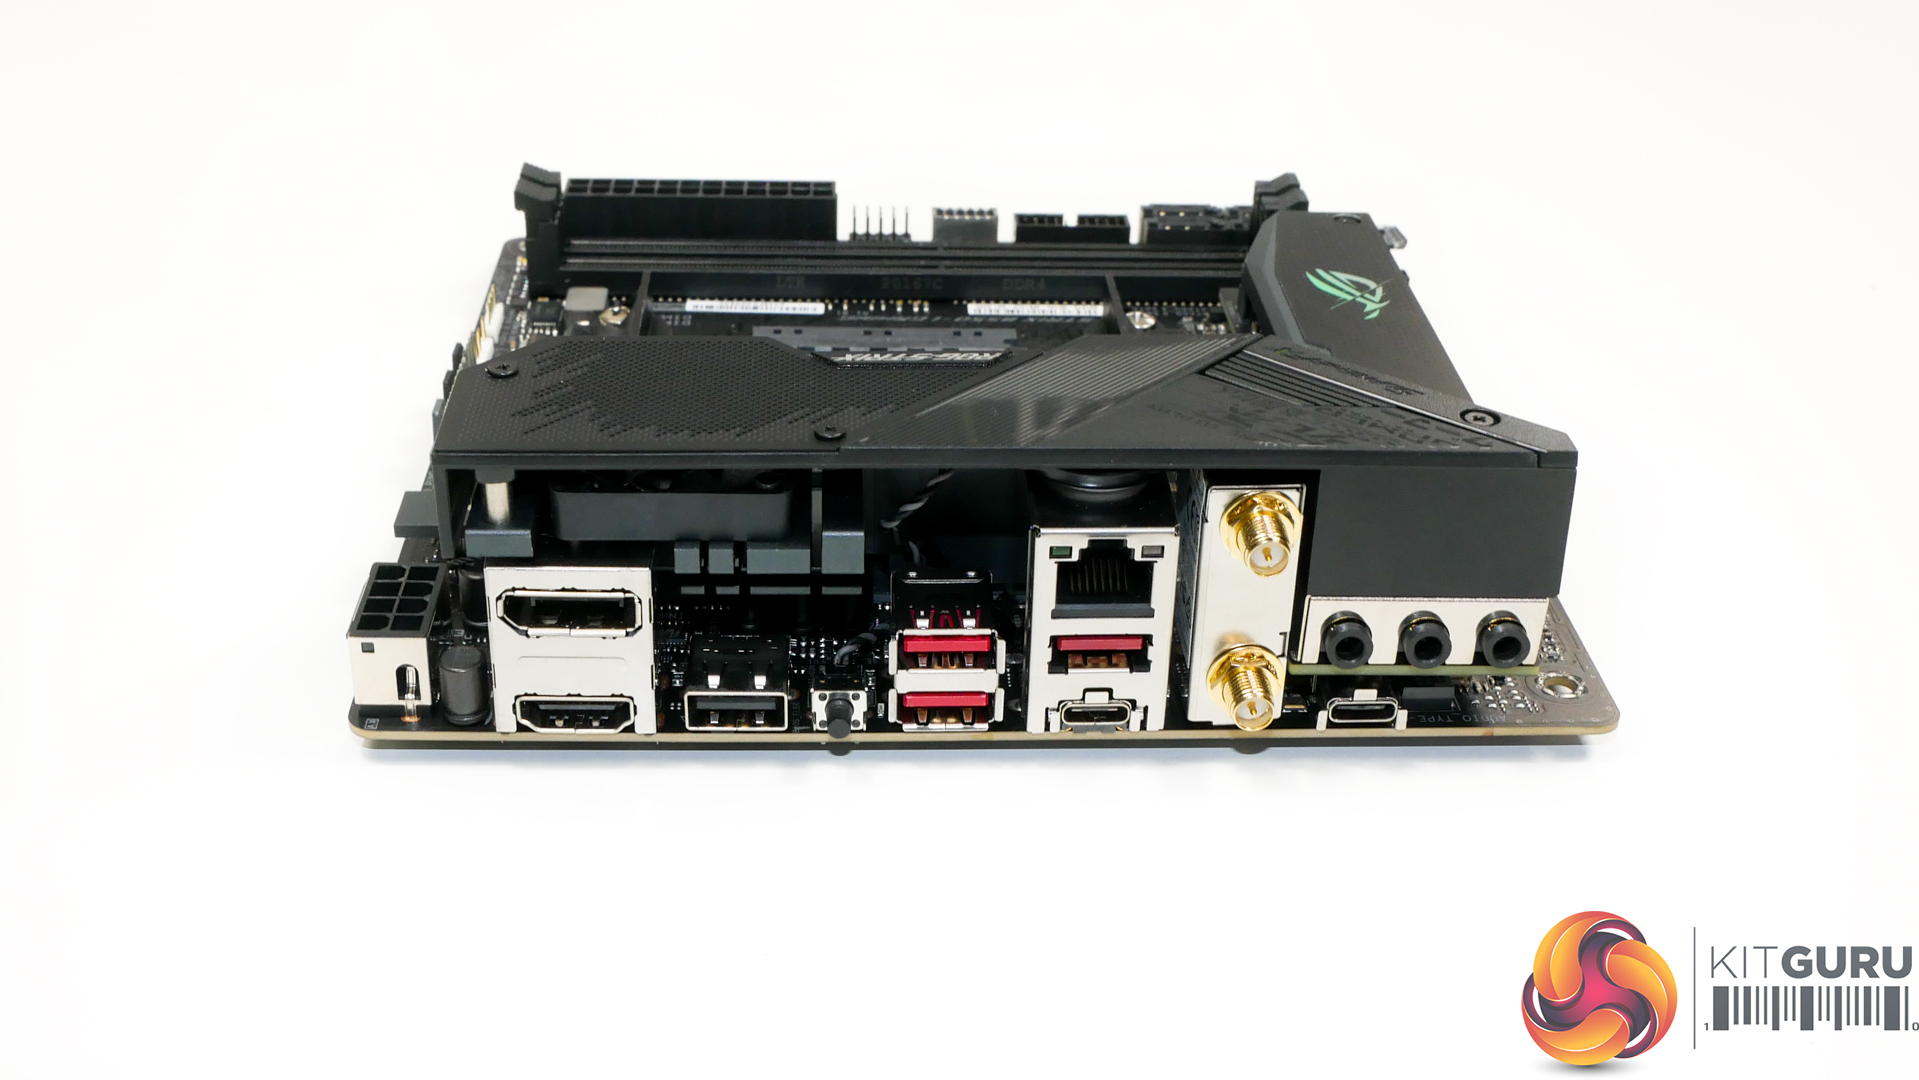
ASUS’ rear IO is reasonable by ITX standards and is very comparable to ASRock’s competing motherboard. You get four 10Gbps USB ports – one of which is Type-C – a USB 2.0 Type-C audio connector, and a USB 2.0 Type-A port for BIOS Flashback duties. That BIOS Flashback capability is a clear strength for ASUS as it is an important feature that ASRock’s competing model somehow managed to omit.
2.5Gb Ethernet is handled by the Intel I225-V adapter and 802.11AX WiFi and Bluetooth is from an Intel AX200 WiFi 6 adapter. The trio of 3.5mm audio jacks are LED illuminated, which is useful when fumbling around the back of your system. Both the DisplayPort 1.4 and HDMI 2.1 connectors support 4K60 outputs, which is positive to see.
I would have liked to see one or two USB Type-A ports (even in USB 2.0 or 5Gbps form), but the rear IO is reasonable overall.
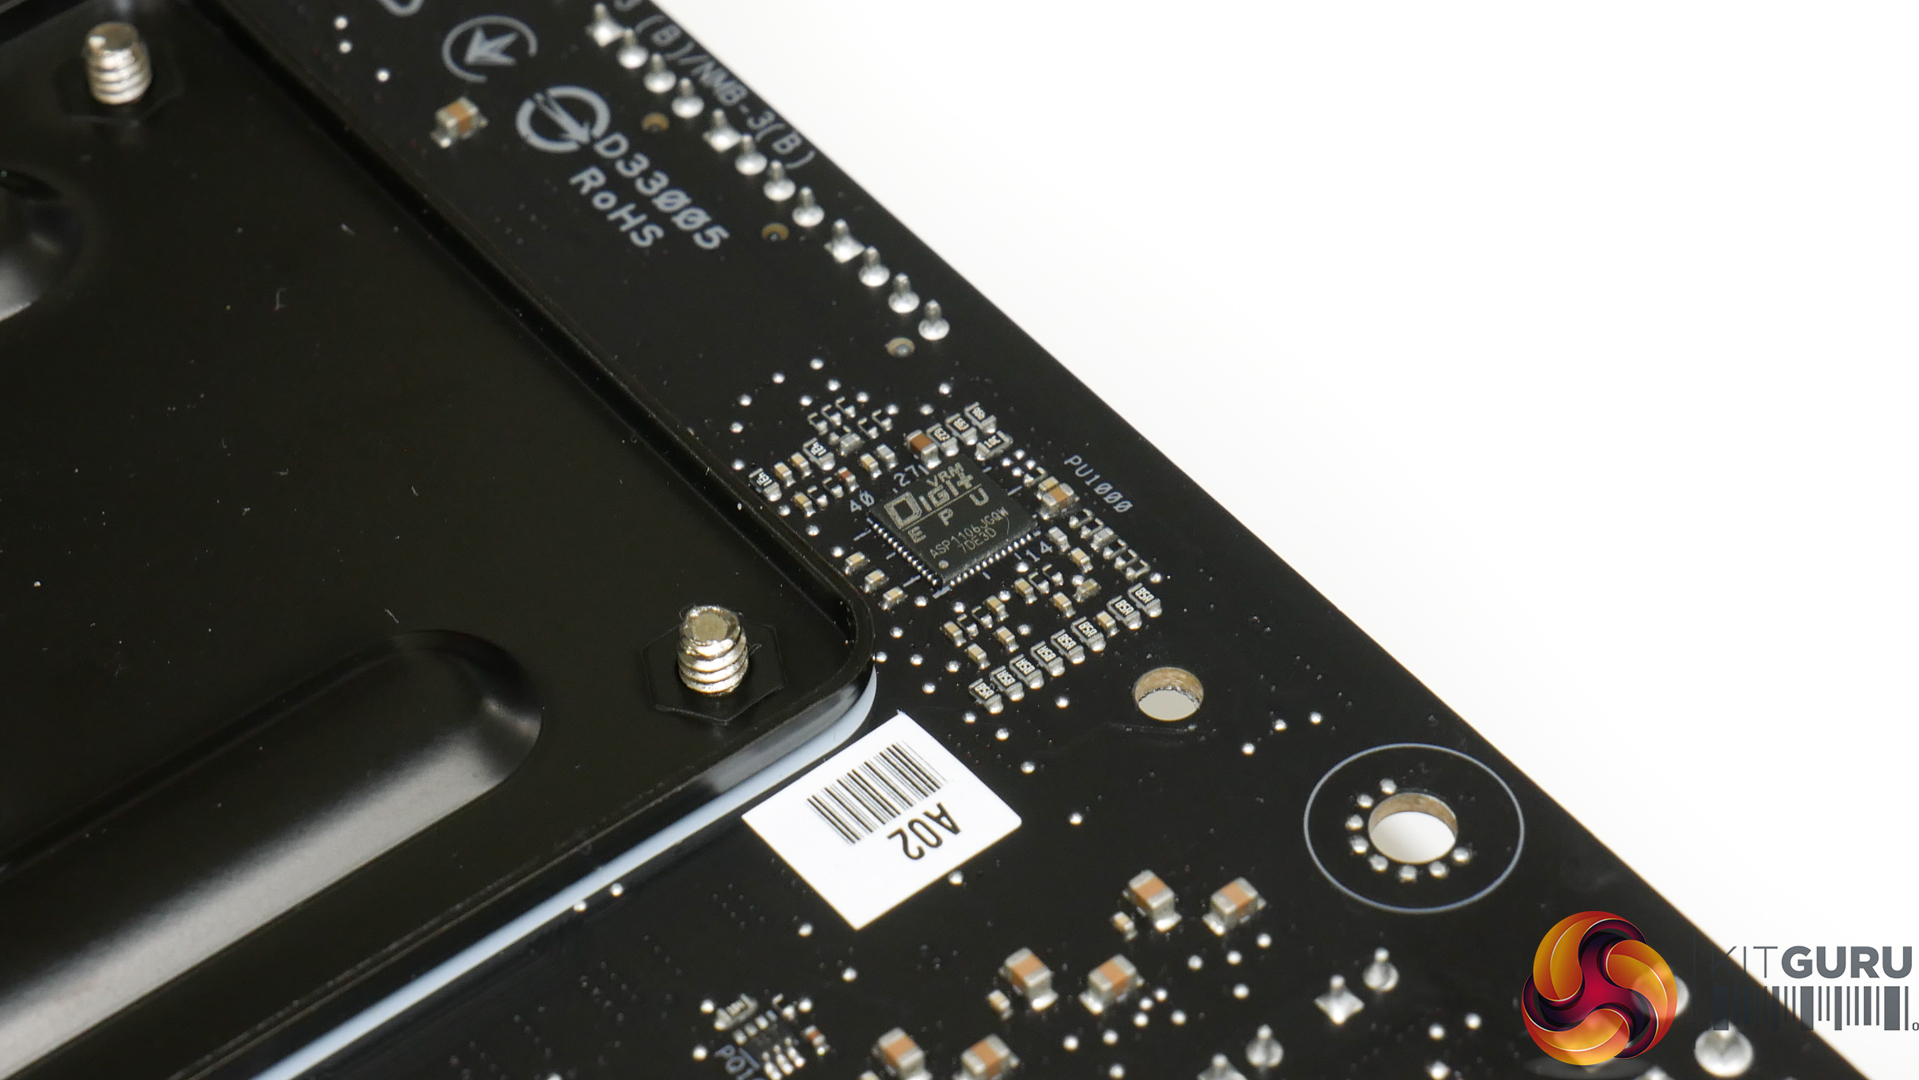
ASUS deploys an 8+2 stage power delivery solution that uses a teamed architecture. The rear-mounted Digi+ ASP1106 PWM controller runs the 8 physical phases for the CPU using 4 control lanes.
8+2 Vishay SiC639 50A-rated integrated power stages are used. These units have a 50A continuous current rating and up to 1.5MHz switching frequency. They are the same power stages used on the likes of ASUS’ TUF-Gaming X570 Plus motherboard, albeit in greater quantity on that X570 board, and have proven to be solid solutions.
With eight of the 50A-rated stages allocated for the CPU specifically, ASUS’ VRM is not as strong as the competing solution offered by ASRock’s B550 Phantom Gaming ITX/AX and that motherboard’s six 90A Intersil power stages. But with 400A theoretical continuous current capability and a VRM fan, the ASUS B550-I Gaming should be fine even with the power hungry Ryzen 9 5950X and sensible overclocks.
Ten chokes and ten total flat capacitors, six of which are 470uF rated with the other four 150uF rated, make up the rest of the primary VRM components. You also get MIL 5K-rated capacitors – four 270uF versions, a 100uF version near the VRM, and a 560uF unit nestled next to the 8-pin connector.
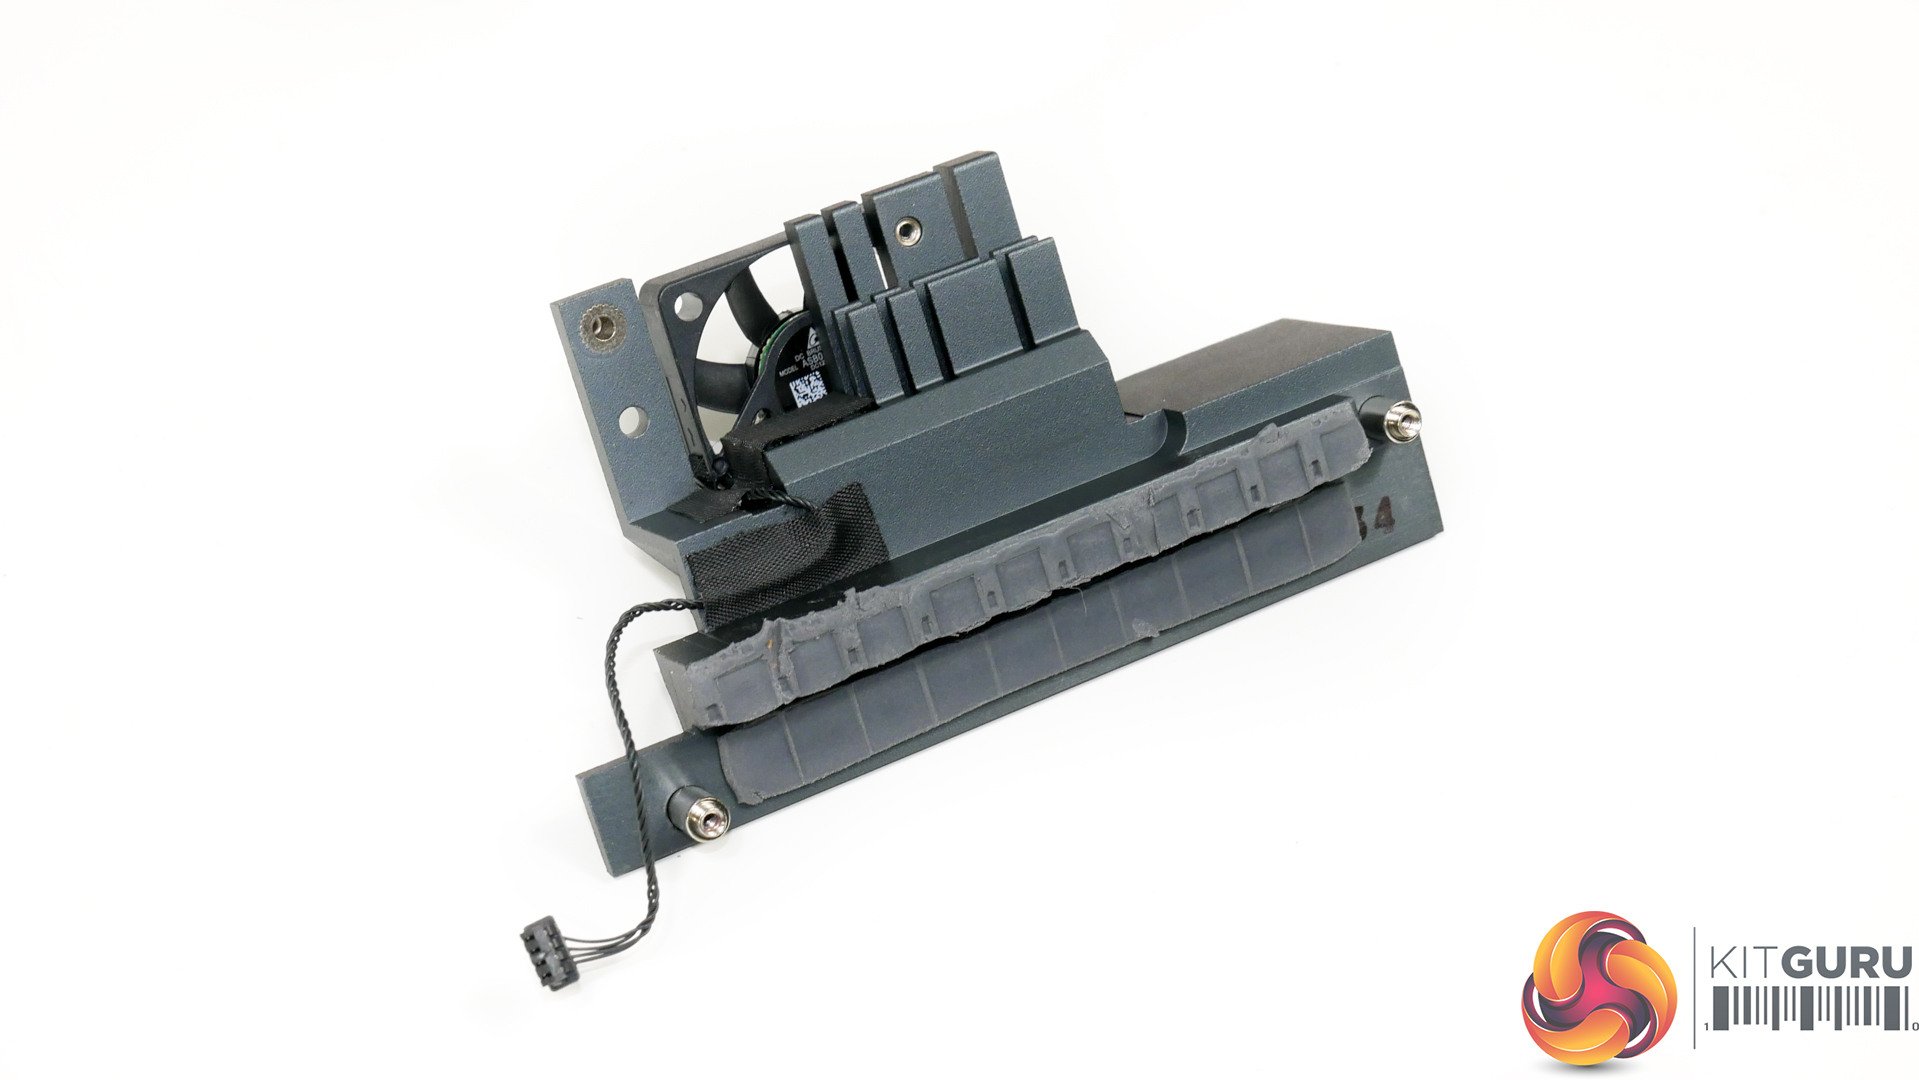
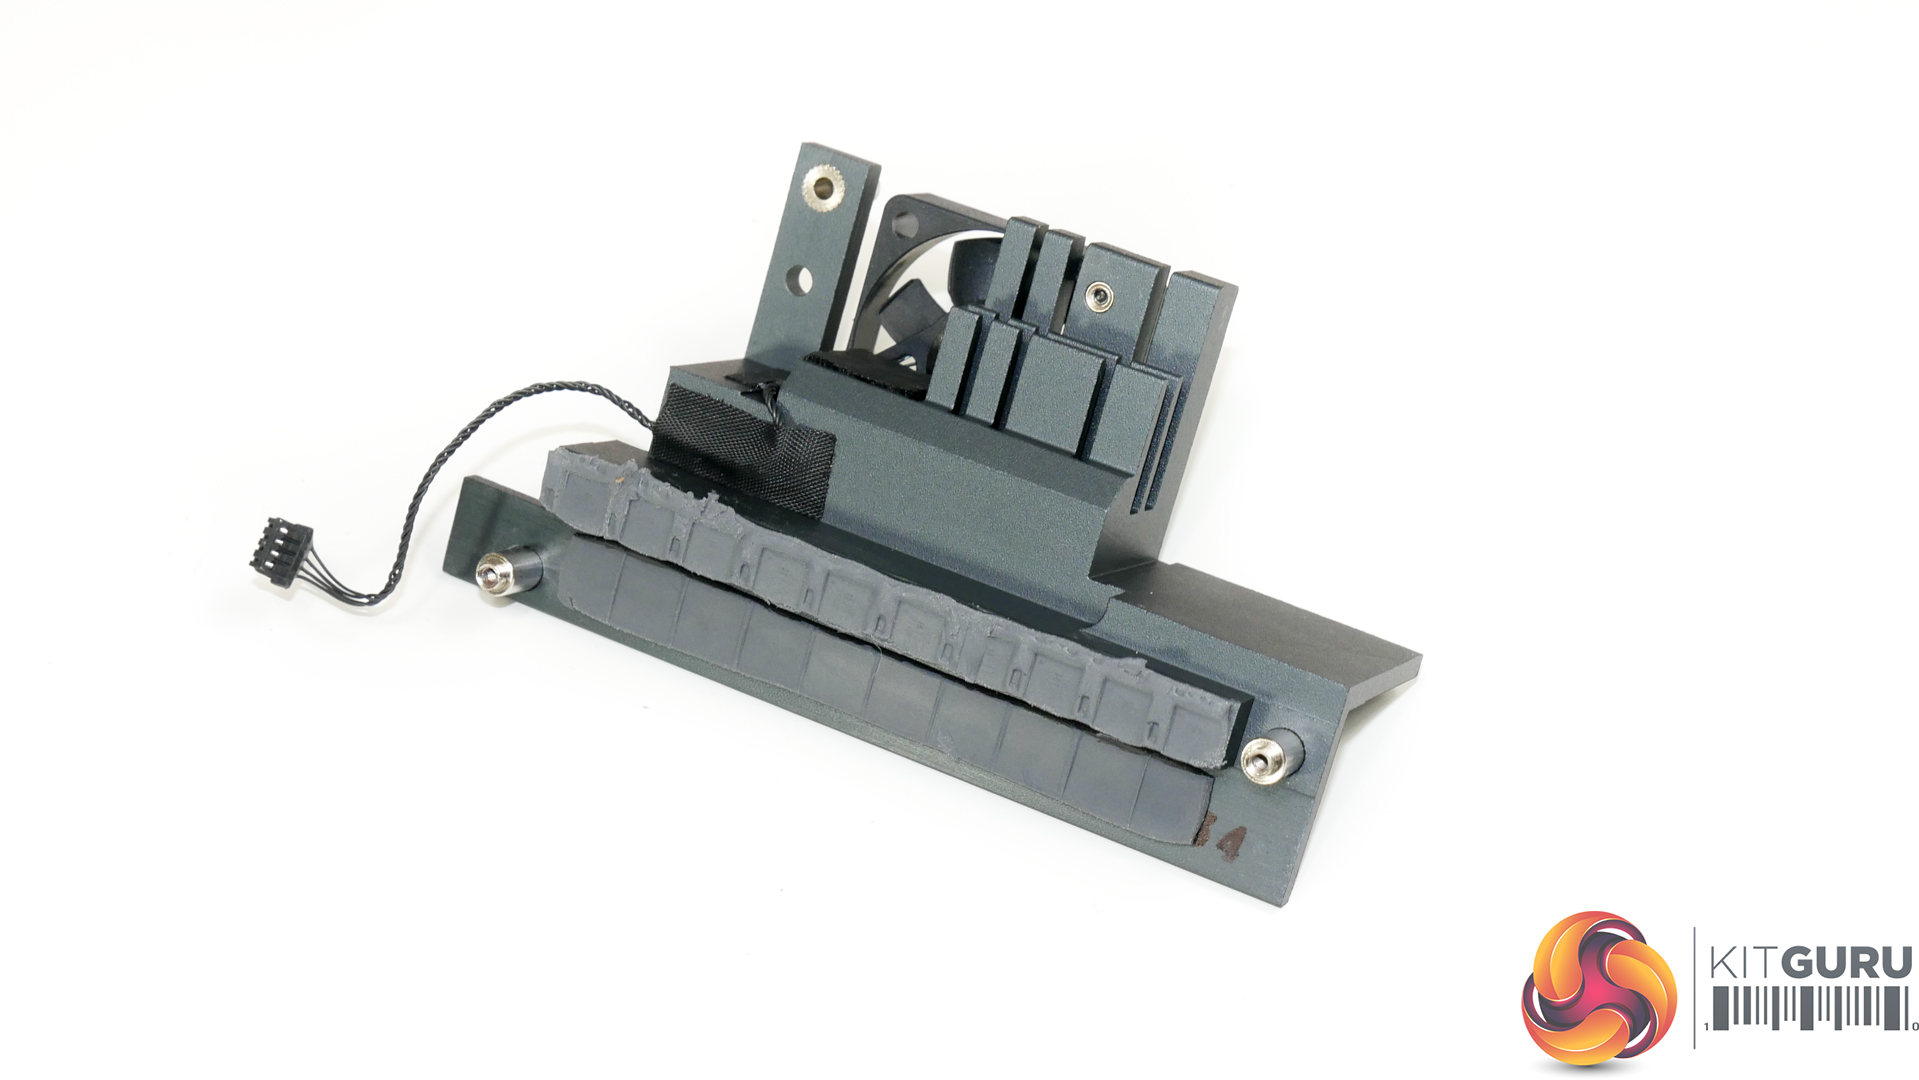
The single VRM heatsink is a modestly sized block of metal with a fan screwed to it. The heatsink features minimal effort to actually design it in the form of an efficient heatsink, but there is reasonable mass to the metal block which should aid with thermal capacitance. Surface area enhancers, such as fins, are few and far between, though.
Contact is made with the underlying ten power stages and the ten chokes via thermal pads. I like ASUS’ approach to connect with the chokes as this is not entirely necessary but it does increase the cooling surface area and capacity and can help to remove heat from the chokes when necessary.

A 30mm fan is used to force cooling air in the direction of the VRM heatsink. This fan remains idle when the VRM temperature is below 60°C and then spins up to around 5700 RPM when activated. The fan control seems to be simple DC, rather than a curve-driven PWM or voltage-based approach.
We only really saw the fan operating at 0 RPM, around 5700 RPM, or below 5700 RPM on its way down to the 0 RPM state. There does not seem to be any clever fan speed control. However, the unit is basically inaudible even when compared to the reasonably good noise output levels from our 280mm Fractal AIO cooler and 1500-1700 RPM fans.
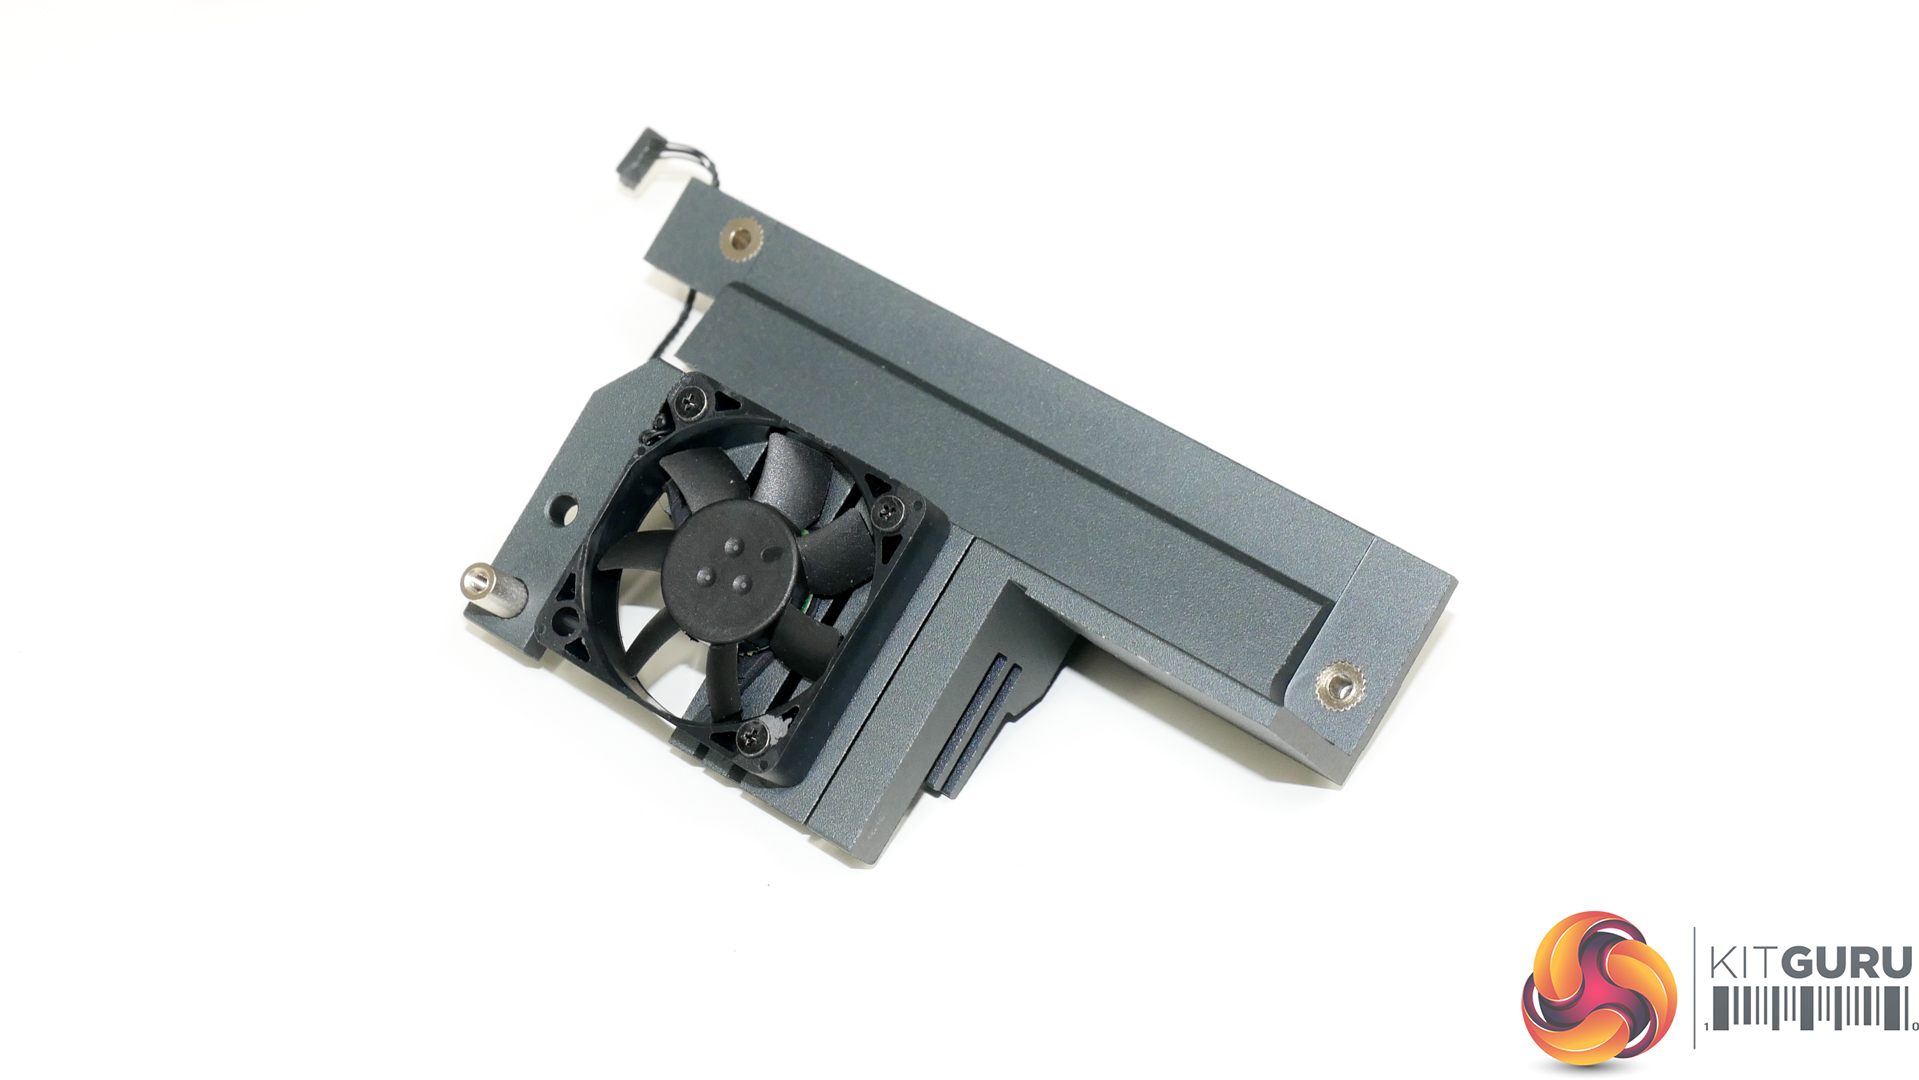
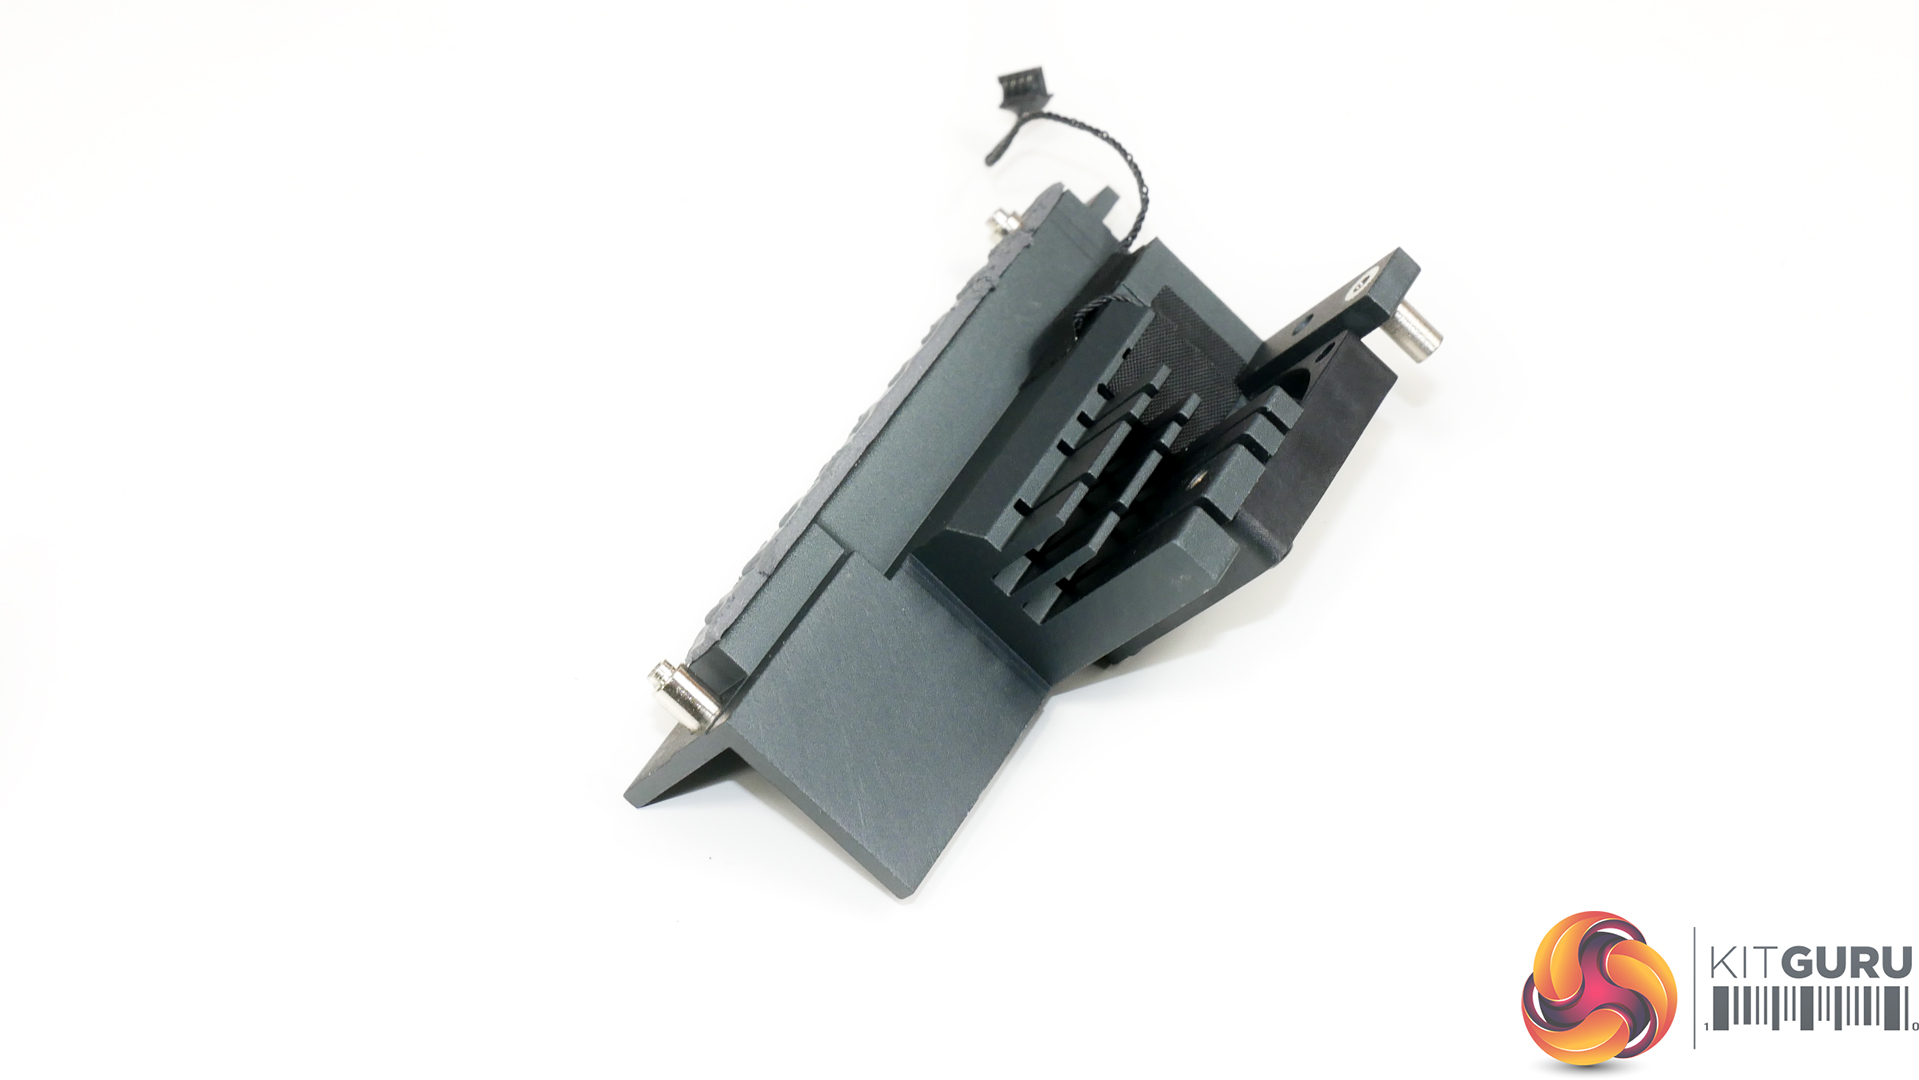
The 30mm VRM fan sits atop a half cut-out section of the metal heatsink. This, realistically, does not make much sense from a cooling perspective. You want the airflow from that fan to be hitting surfaces on the metal heatsink so that the thermal energy can be transferred and dissipated.
Instead, a sizeable section of the fan is simply moving cooling air towards the motherboard PCB beneath, thus not having all that much influence on VRM cooling in tandem with the heatsink.
I would give this VRM heatsink design mediocre marks for effort, design, and implementation. But we will have to see how it performs in our stress testing.
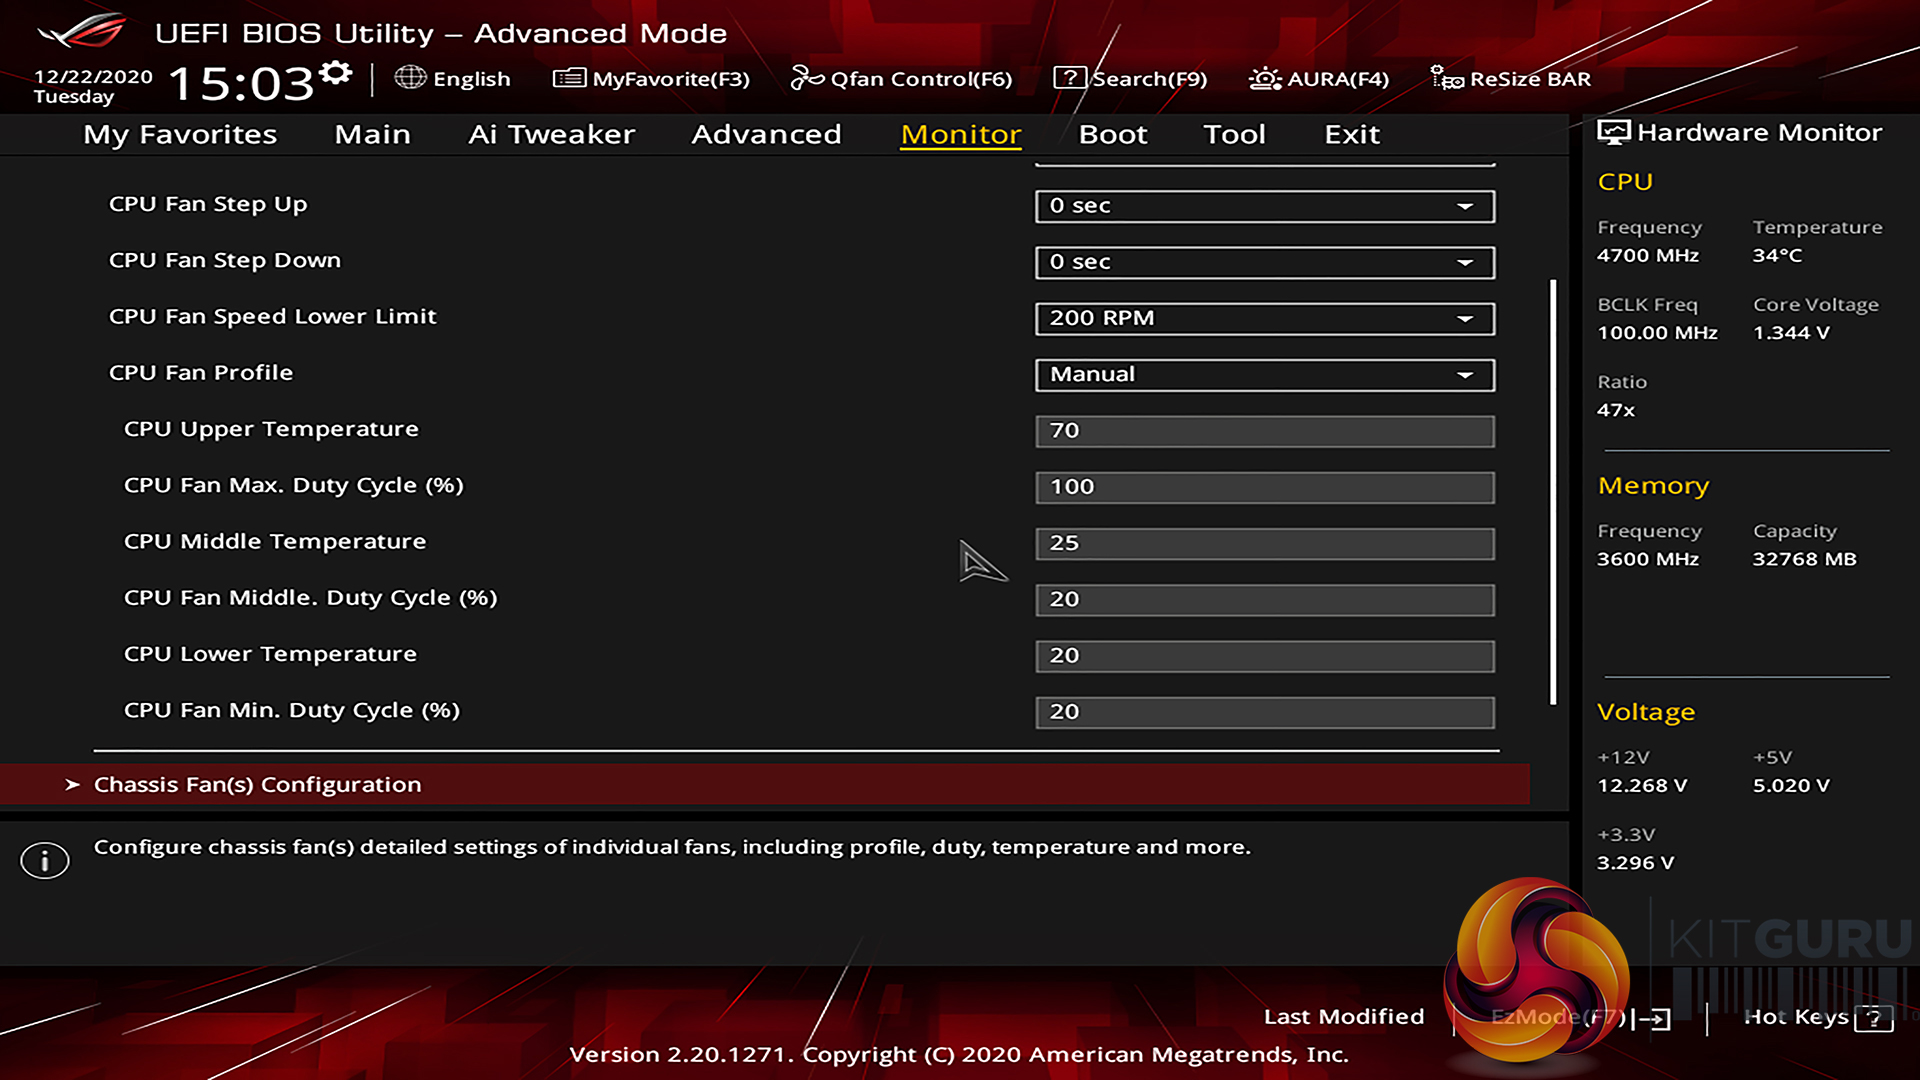
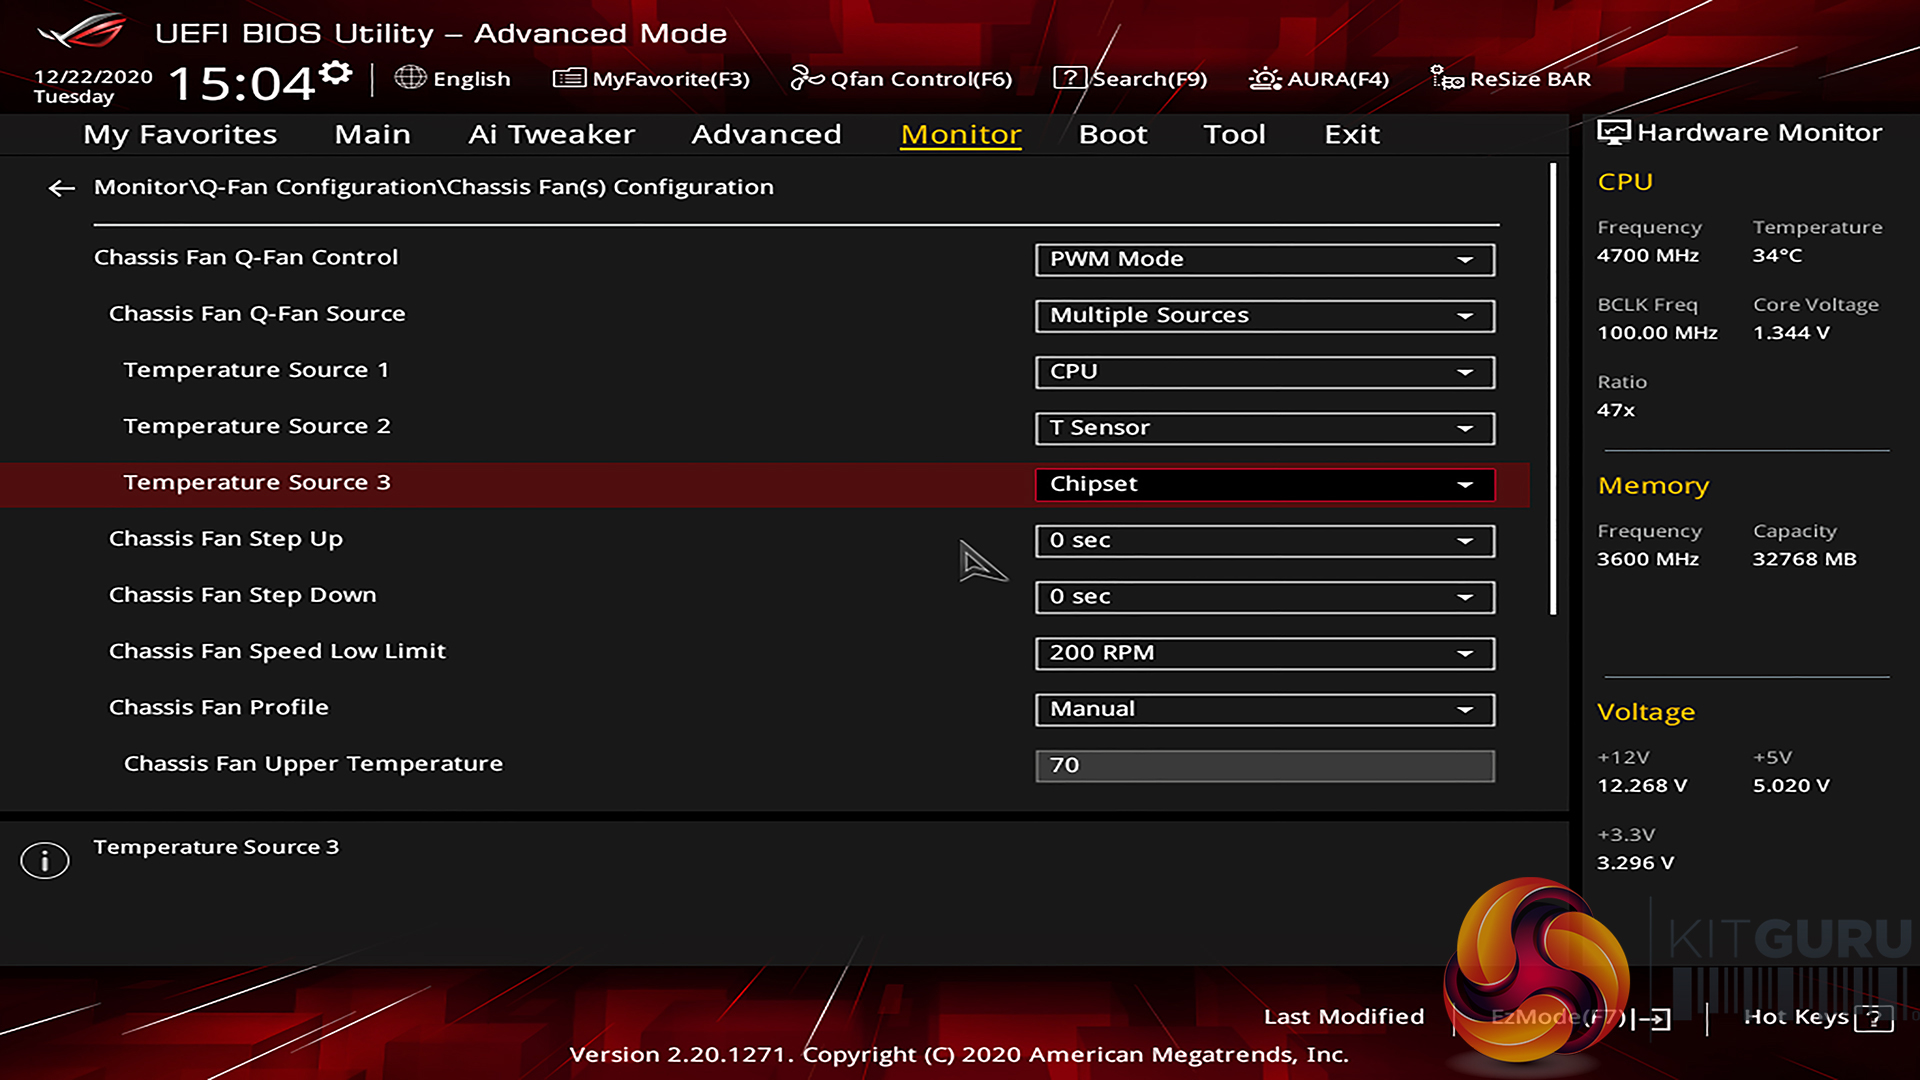
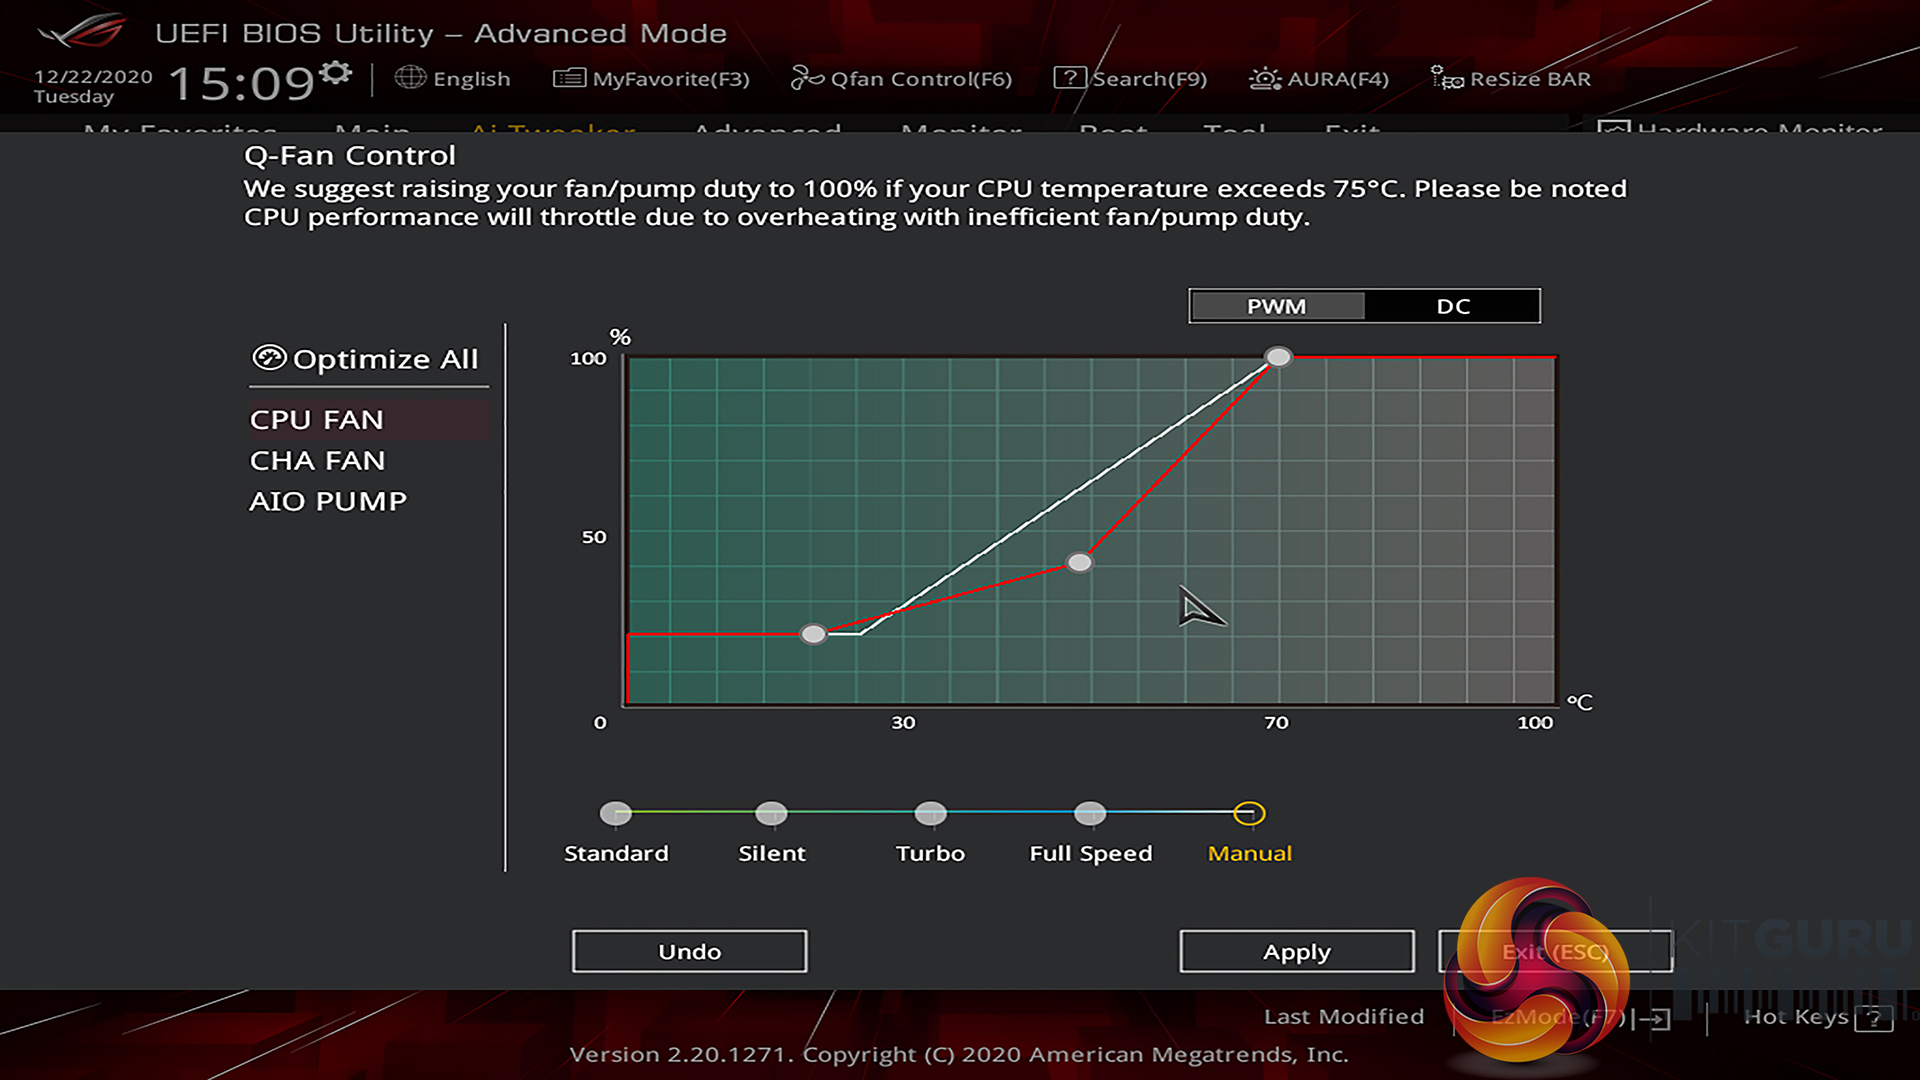
Taking a quick look at fan control within the ASUS UEFI, we see the abilities for managing the three onboard fan headers. Only 3 points on the curve can be managed when using the UEFI in written form or when using the Q-Fan Control GUI.
Minimum fan speed is 20% – not 0% – for PWM fan control. And there is a 60% minimum for DC control. However, DC allows fan stop mode whereas PWM does not. That is only for the chassis fan header, though, as there is no fan stop mode capability for the CPU fan or AIO pump headers in DC mode.
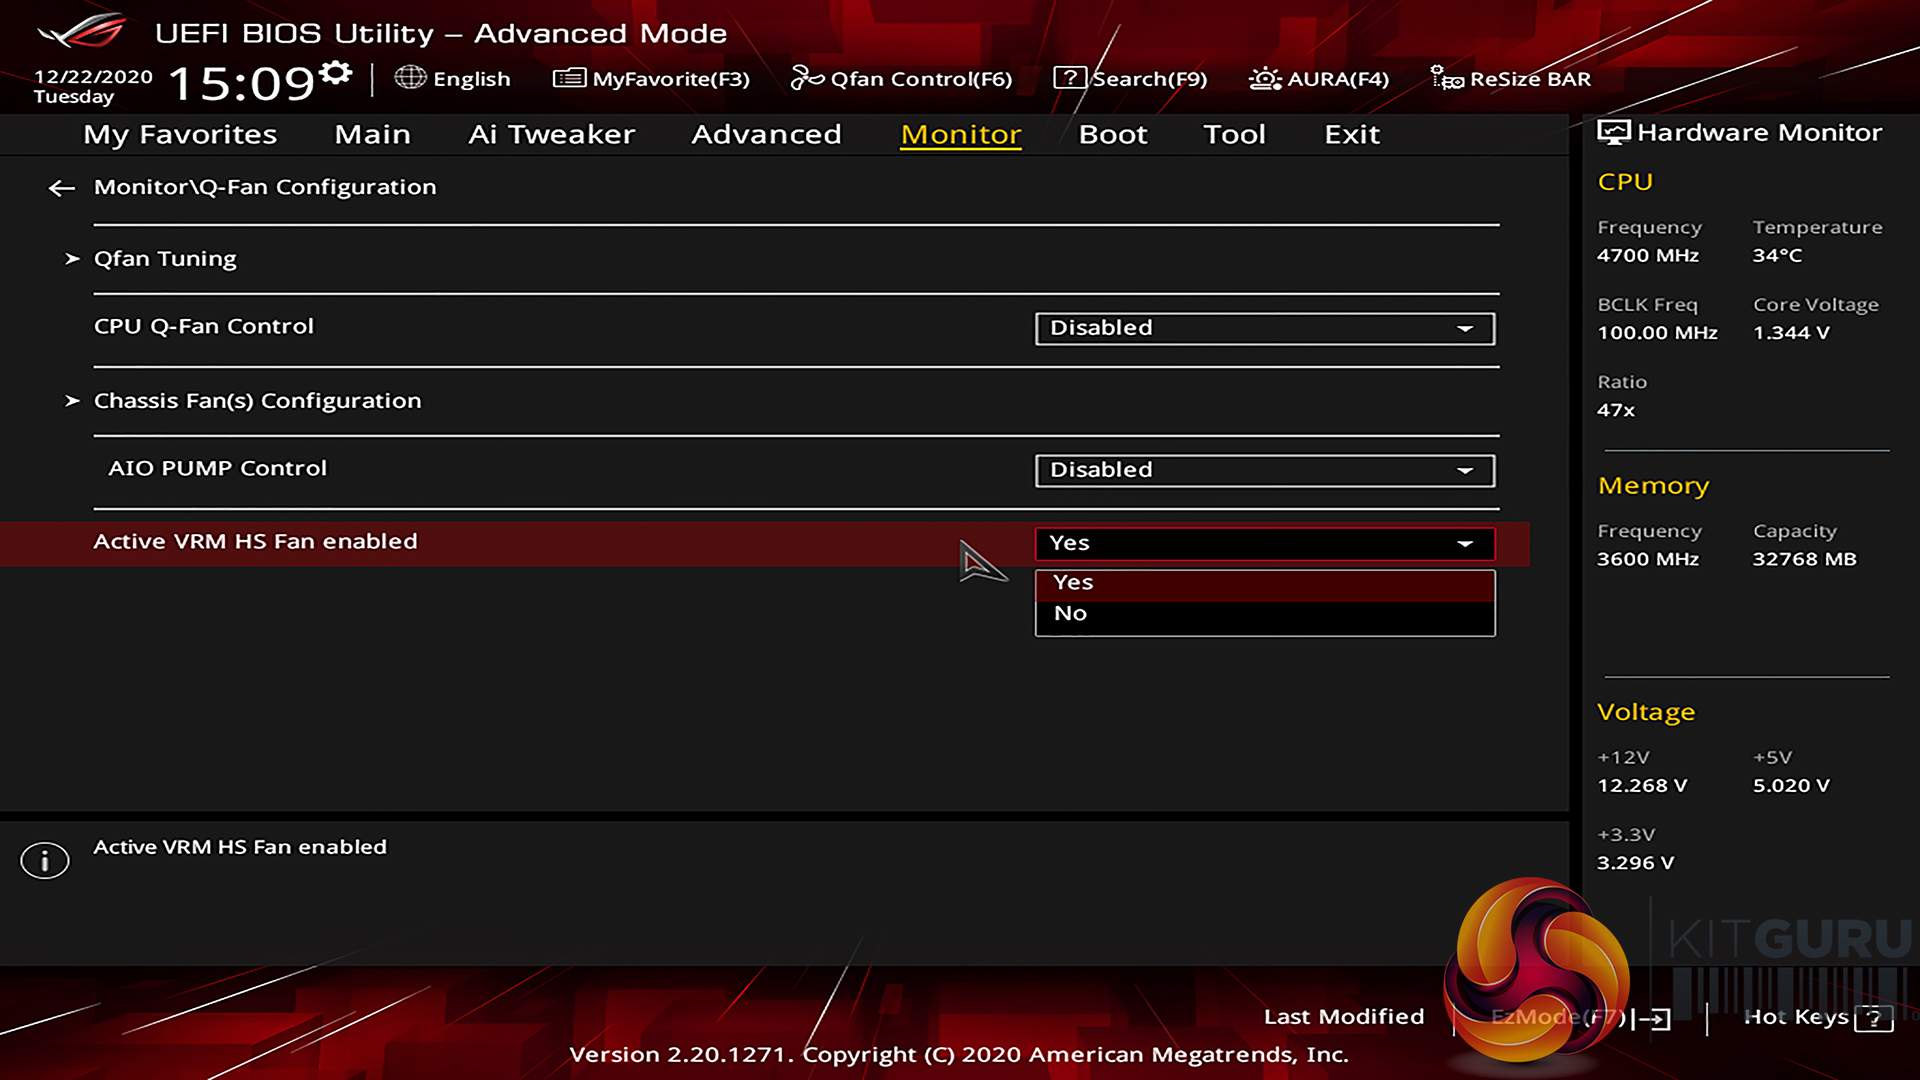
An ability to read input data from multiple sensors for the chassis fan or AIO pump is a strong positive. Step-Up and Step-Down hysteresis control is also another strong positive for ASUS. The control system gives an ability to enable or disable the VRM fan but there is no real speed control permitted.
Overall, we would say that the ASUS ROG STRIX B550-I Gaming has a solid fan control system that is very much comparable – and actually slightly better – than ASRock's competing system. But the ASUS functionality is not quite as good or as user customisable as Gigabyte Smart Fan 5.
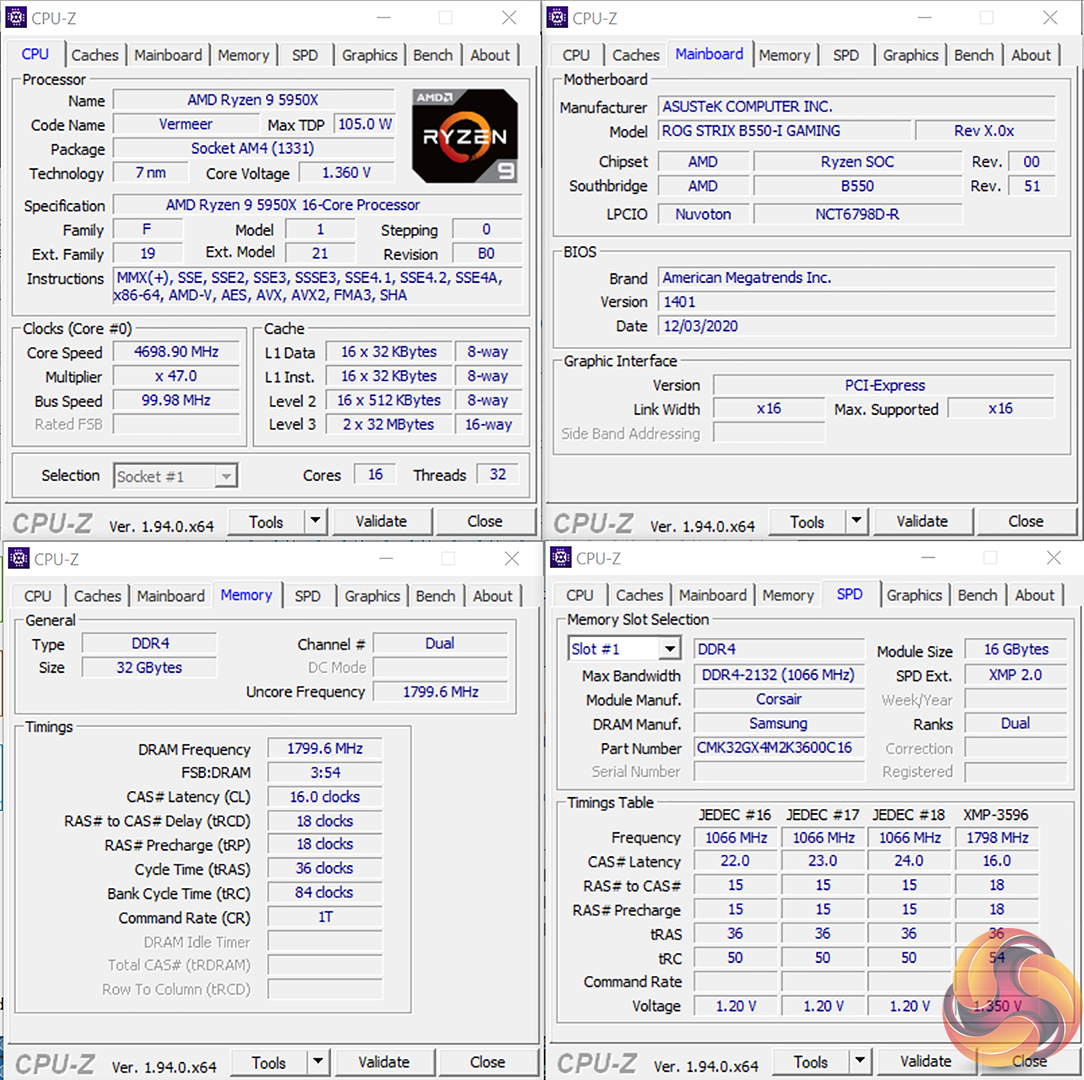
We will be outlining the ASUS ROG STRIX B550-I Gaming motherboard’s performance with the AMD Ryzen 9 5950X CPU, 32GB of 3600MHz C16 DDR4 memory, and a Gigabyte RTX 3080 Eagle OC graphics card.

AM4 Motherboard Test System:
- Processor: AMD Ryzen 9 5950X.
- Memory: 32GB (2x16GB) Corsair Vengeance LPX 3600MHz 16-18-18-36 DDR4 @ 1.35V.
- Graphics Card: Gigabyte RTX 3080 Eagle OC.
- System Drive: WD_Black SN750 PCIe 3.0 x4 NVMe M.2 SSD.
- Games and Test SSD: Aorus 2TB PCIe Gen 4 M.2 SSD.
- CPU Cooler: Fractal Celsius+ S28 Prisma 280mm AIO (full speed fans and pump to eliminate thermal throttling).
- Power Supply: Seasonic Prime TX-1000 1000W.
- Case: Lian Li Open-air Test Bench.
- Operating System: Windows 10 Pro 64-bit.
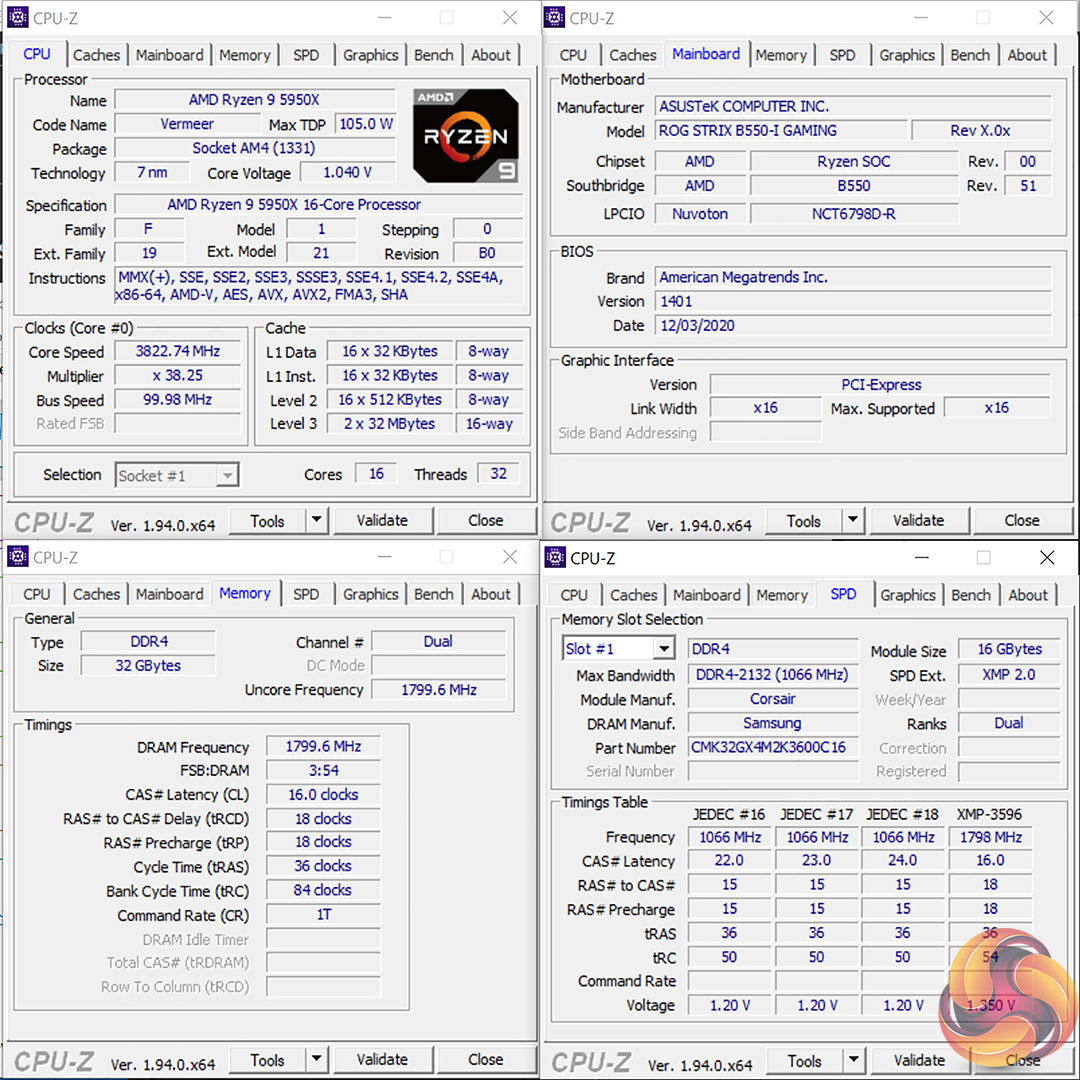
BIOS Version:
- 1401 (latest at the time of testing).
Comparison Motherboards:
Tests:
- Cinebench R20 – All-core & single-core CPU benchmark (CPU)
- Blender 2.90 – All-core rendering of the Classroom benchmark (CPU)
- SiSoft Sandra – Memory bandwidth (Memory)
- AIDA64 – Memory bandwidth, memory latency (Memory)
- 3DMark TimeSpy – Time Spy (1440p) test (Gaming)
- F1 2020 – 1920 x 1080, Ultra High quality preset with TAA, DX12 (Gaming)
- Shadow of the Tomb Raider – 1920 x 1080, Highest quality preset, no AA, DX12 version (Gaming)
- CrystalDiskMark– Storage transfer rates (Motherboard)
- Rightmark Audio Analyzer 6.4.5 – Record and playback test using a line-in to line-out loopback with a 3.5mm audio cable (Motherboard)
- HWiNFO – System sensor monitoring during stress test (Temperatures & Power Consumption)
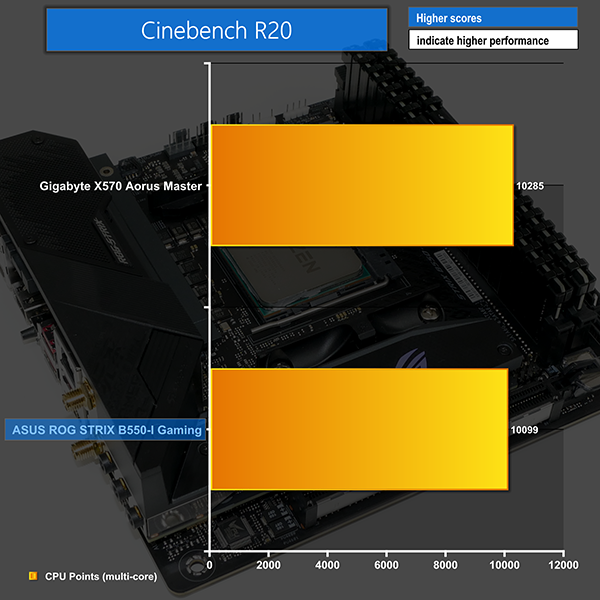
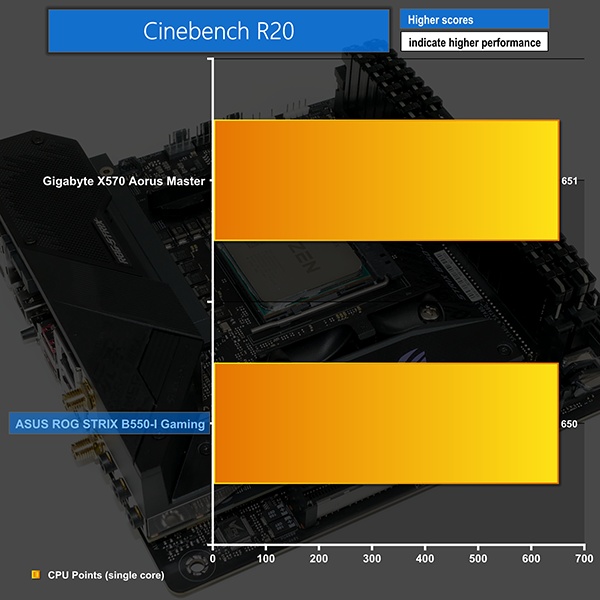
Cinebench R20
Blender Benchmark
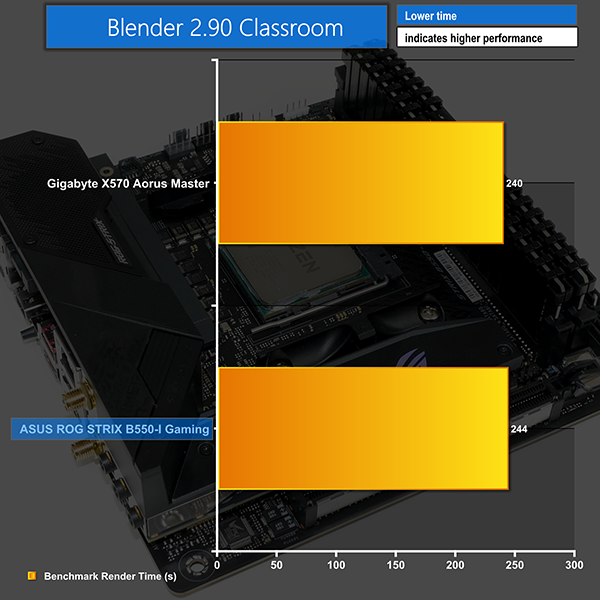
Starting out with CPU-heavy performance, we see the ASUS ROG STRIX B550-I Gaming motherboard competing handily with Gigabyte’s higher-end X570 offering from our Ryzen CPU test system.
There are small differences in the performance levels in heavily multi-threaded workloads such as Blender and Cinebench, but these differences are small enough to be attributed to BIOS and boost clock differences.
Speaking of boost clocks, we saw the ASUS board pushing our Ryzen 9 5950X at around 3.85-3.90GHz in Cinebench nT or 3.95GHz initially in Blender Classroom. The maximum 1T boost clock that we observed was a little over 5GHz, which is just as we would expect from the 5950X with a competent motherboard.
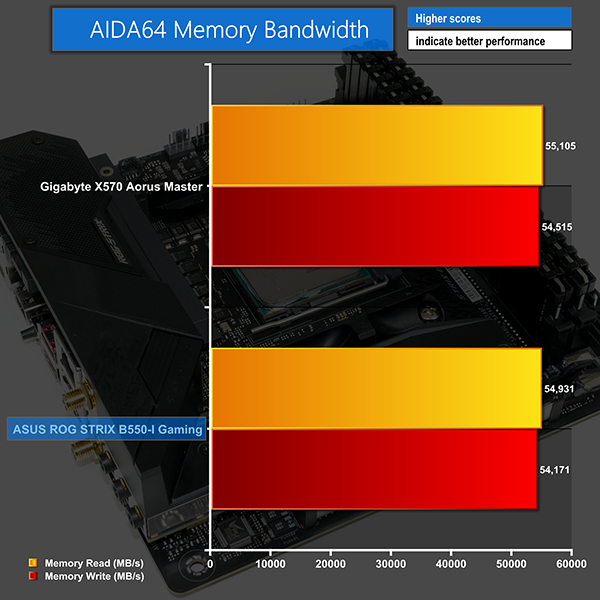
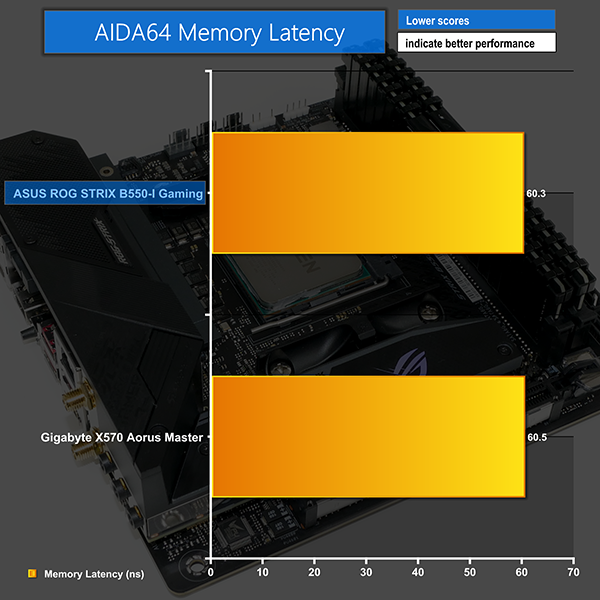
AIDA64 Engineer
Sandra Memory Bandwidth
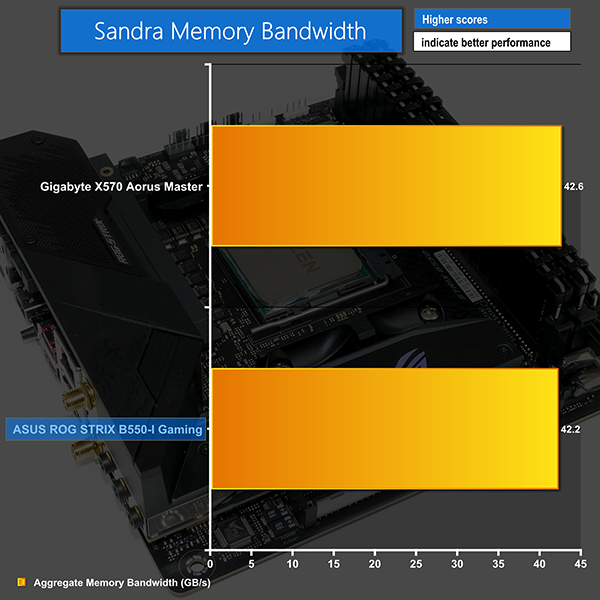
Memory performance is where we would expect for an AM4 motherboard with Ryzen 9 5950X and Corsair 3600 C16 DDR4 in tow. No complaints here.
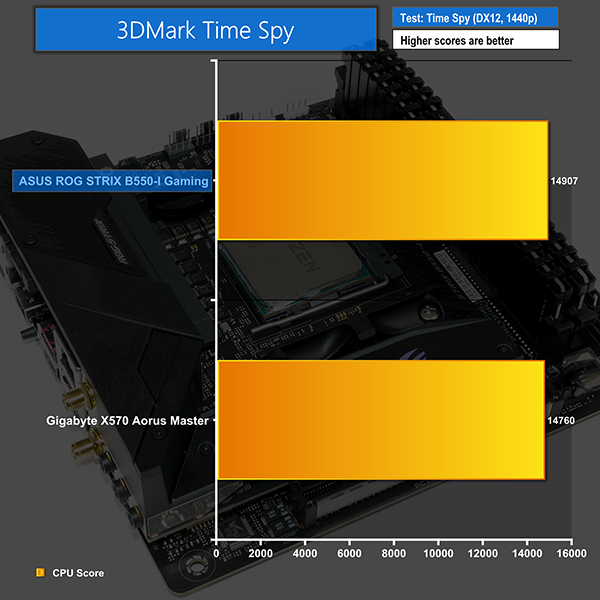
3DMark
3DMark is a multi-platform hardware benchmark designed to test varying resolutions and detail levels of 3D gaming performance. We run the Windows platform test and in particular the Time Spy benchmark, which is indicative of high-end 1440p PC Gaming.
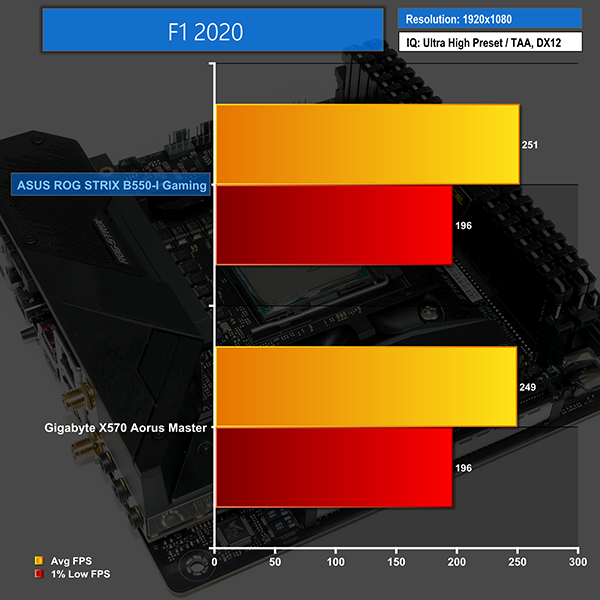
F1 2020
We run the game with quality set to Ultra High with TAA, VSync disabled, and DX12 mode.
Shadow of the Tomb Raider
We use the DirectX 12 mode, anti-aliasing disabled, and the Highest quality preset.
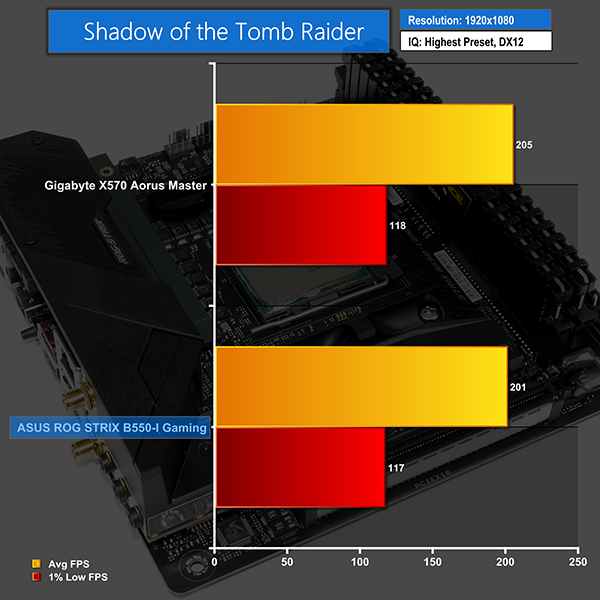
Gaming performance shows a small win and a small loss for the ASUS Mini-ITX B550 offering. F1 2020 runs slightly faster on the ASUS board in our testing, while Shadow of the Tomb Raider showed minor preference for the Gigabyte X570 comparison.
Either way, the gaming performance on ASUS’ B550-I Gaming is solid and shows no cause for concern.
M.2 PCIe Performance
We test M.2 PCIe performance using an Aorus PCIe Gen 4 2TB SSD. This SSD uses a Phison-based PCIe Gen 4 controller.
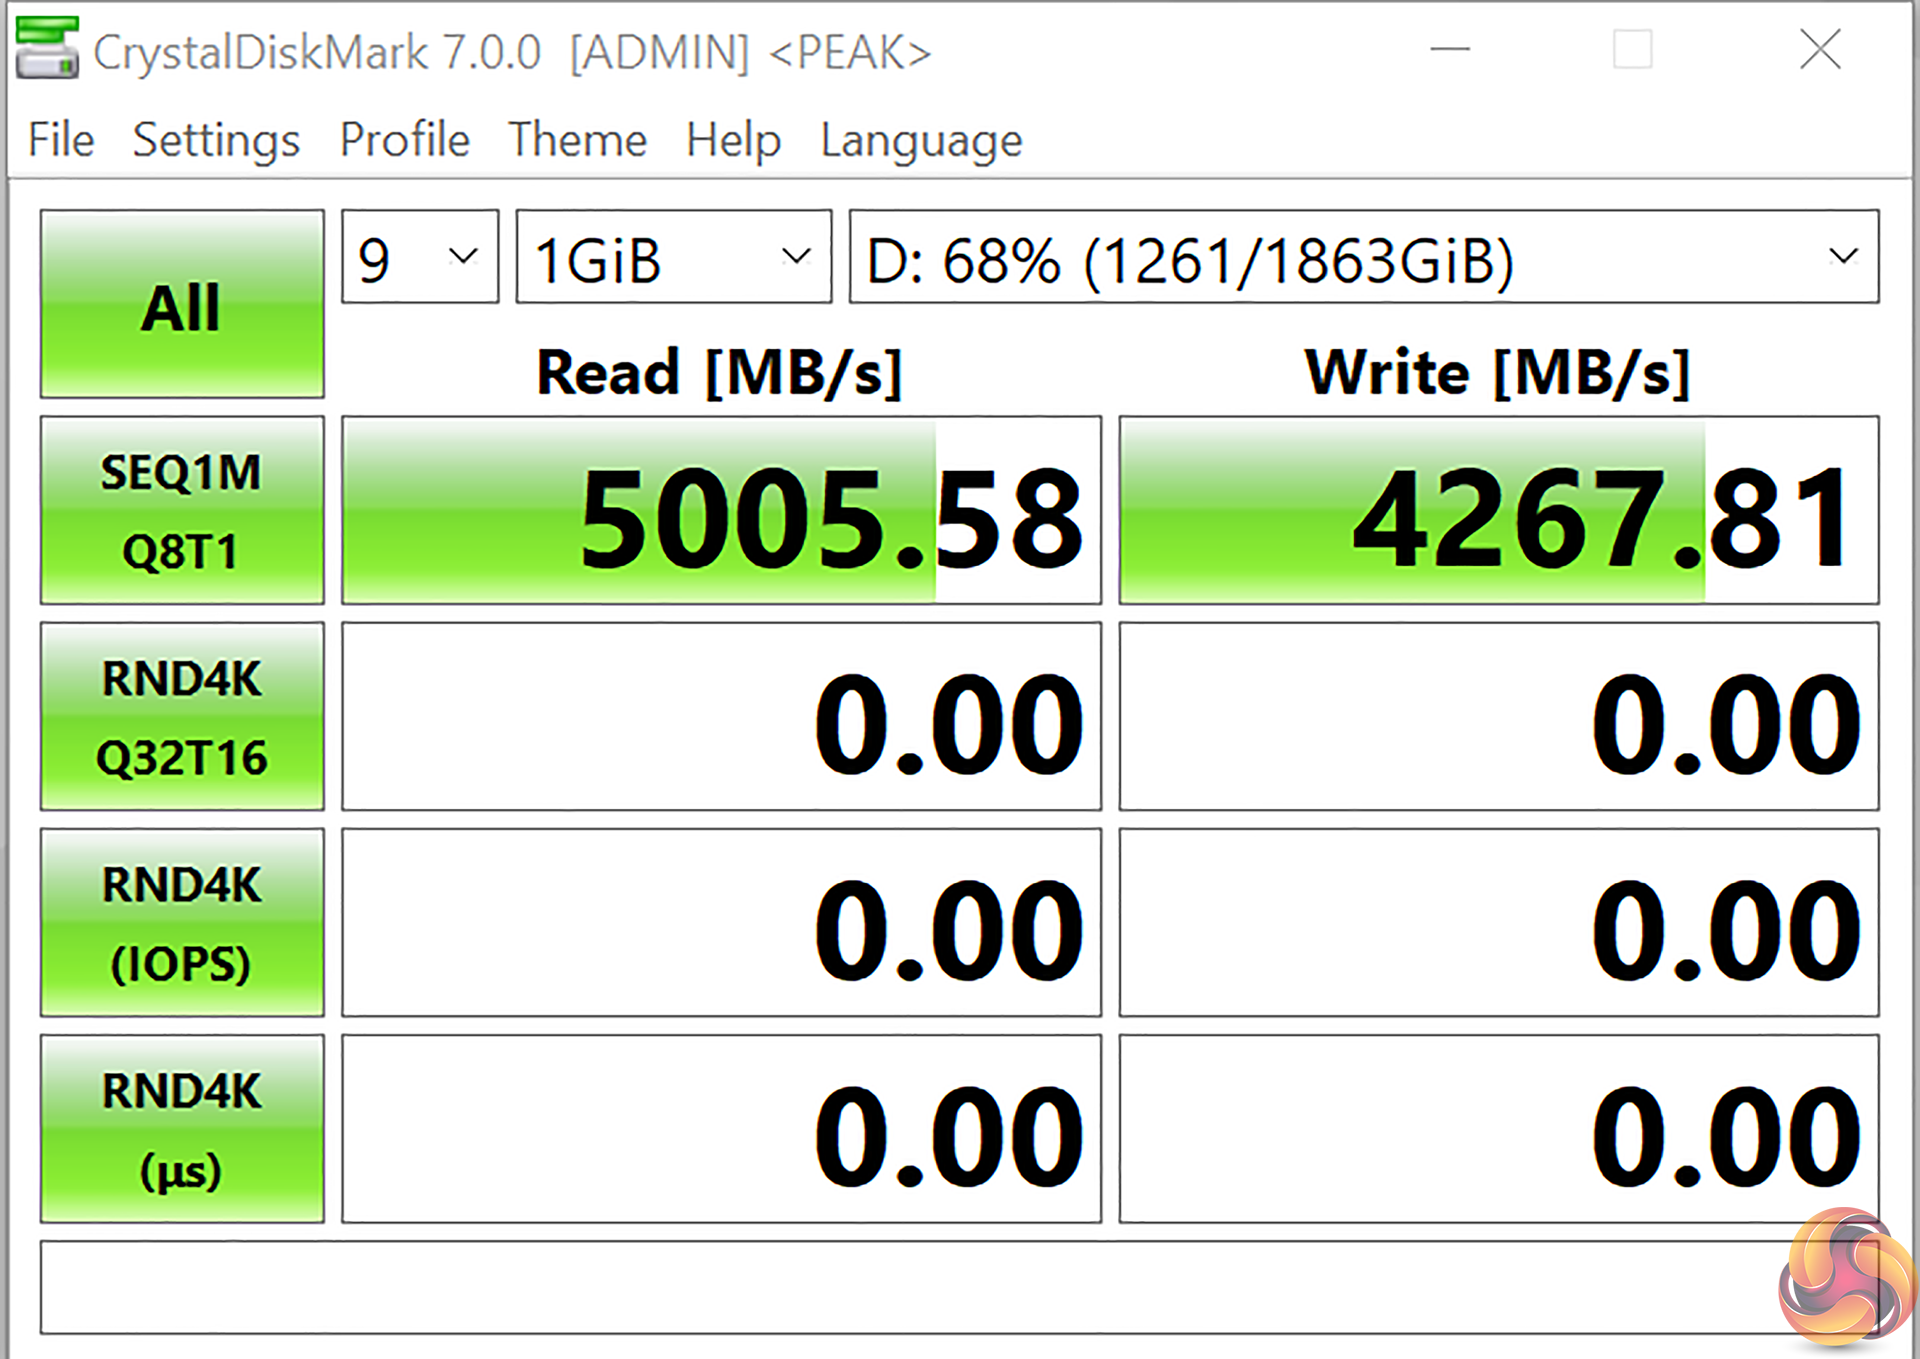
The usual 5GBps transfer speed was achieved on the heatsink cooled front-side PCIe Gen 4 M.2 SSD connection. Of course, any M.2 SSD installed in the rear mounted chipset-connected slot will be limited to PCIe Gen 3 x4 bandwidth and any CPU-to-chipset link speed restrictions.
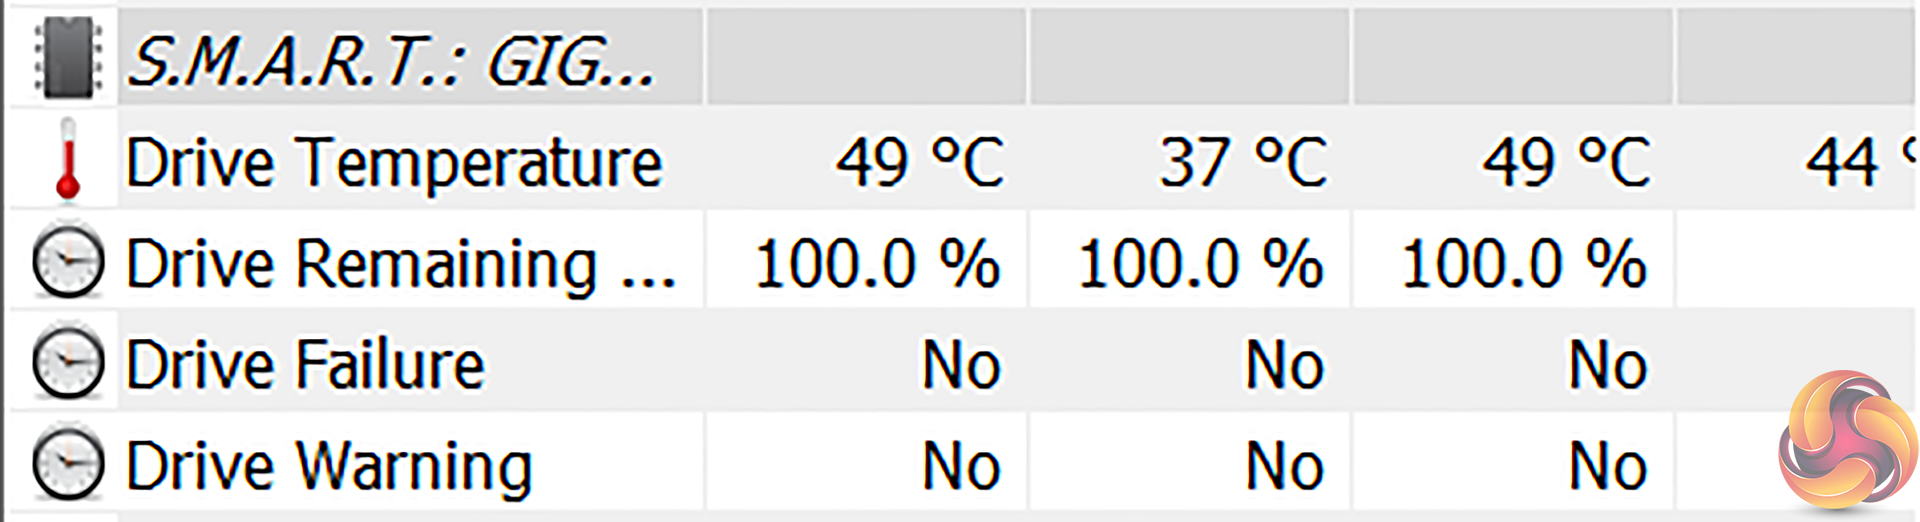
Thermal performance with M.2 SSDs continues to be a particular area of strength for ASUS; the heatsink performance from the M.2 cooling solution delivers even with hot drives and write-intensive workloads. We saw our SSD sitting comfortably around the 50°C mark.
Audio
Rightmark Audio Analyser is a freeware benchmarking utility designed to objectively test the performance characteristics of audio solutions. We setup a line-in line-out loop and execute the record/playback test before generating the results report you see below. A sampling mode of 24-bit, 192 kHz was tested.
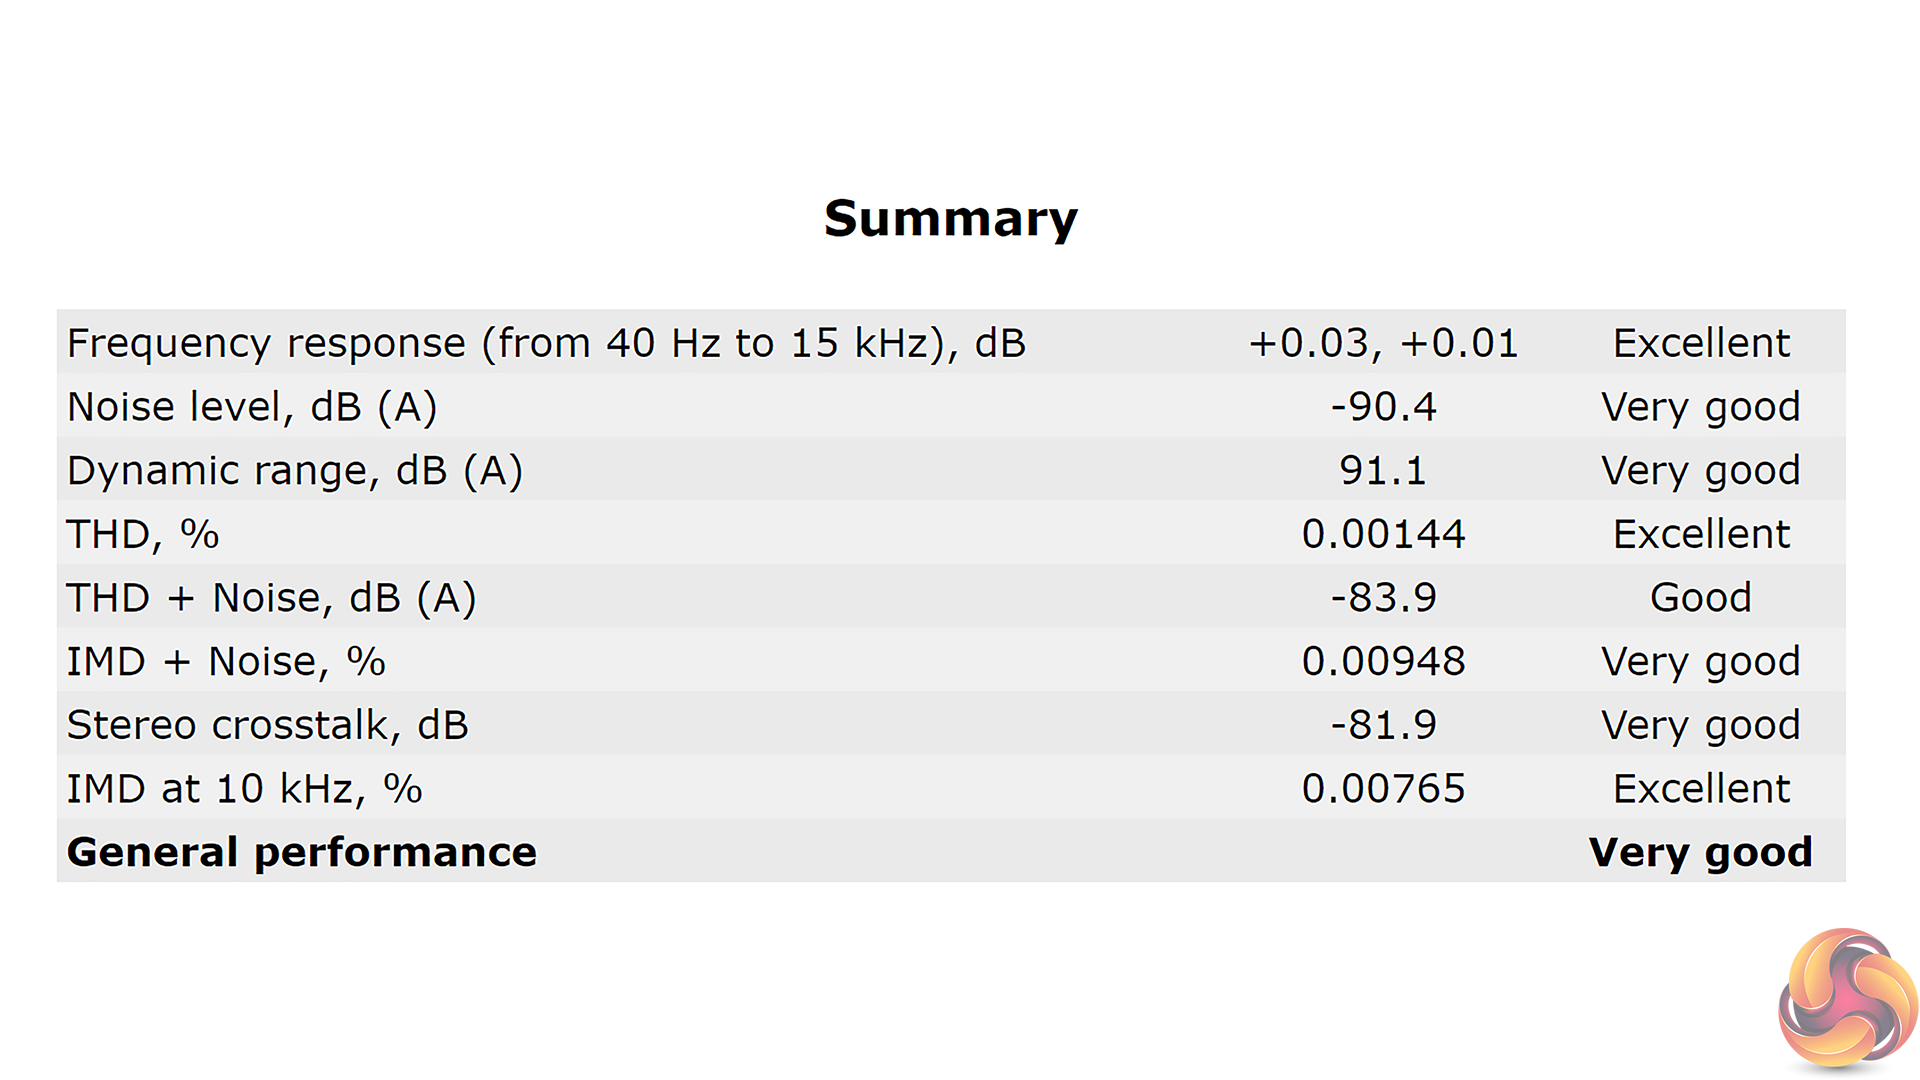
The S1220A-based SupremeFX audio solution scores highly in RightMark Audio Analyzer with a performance rating of ‘Very Good’.
Motherboard Sensors
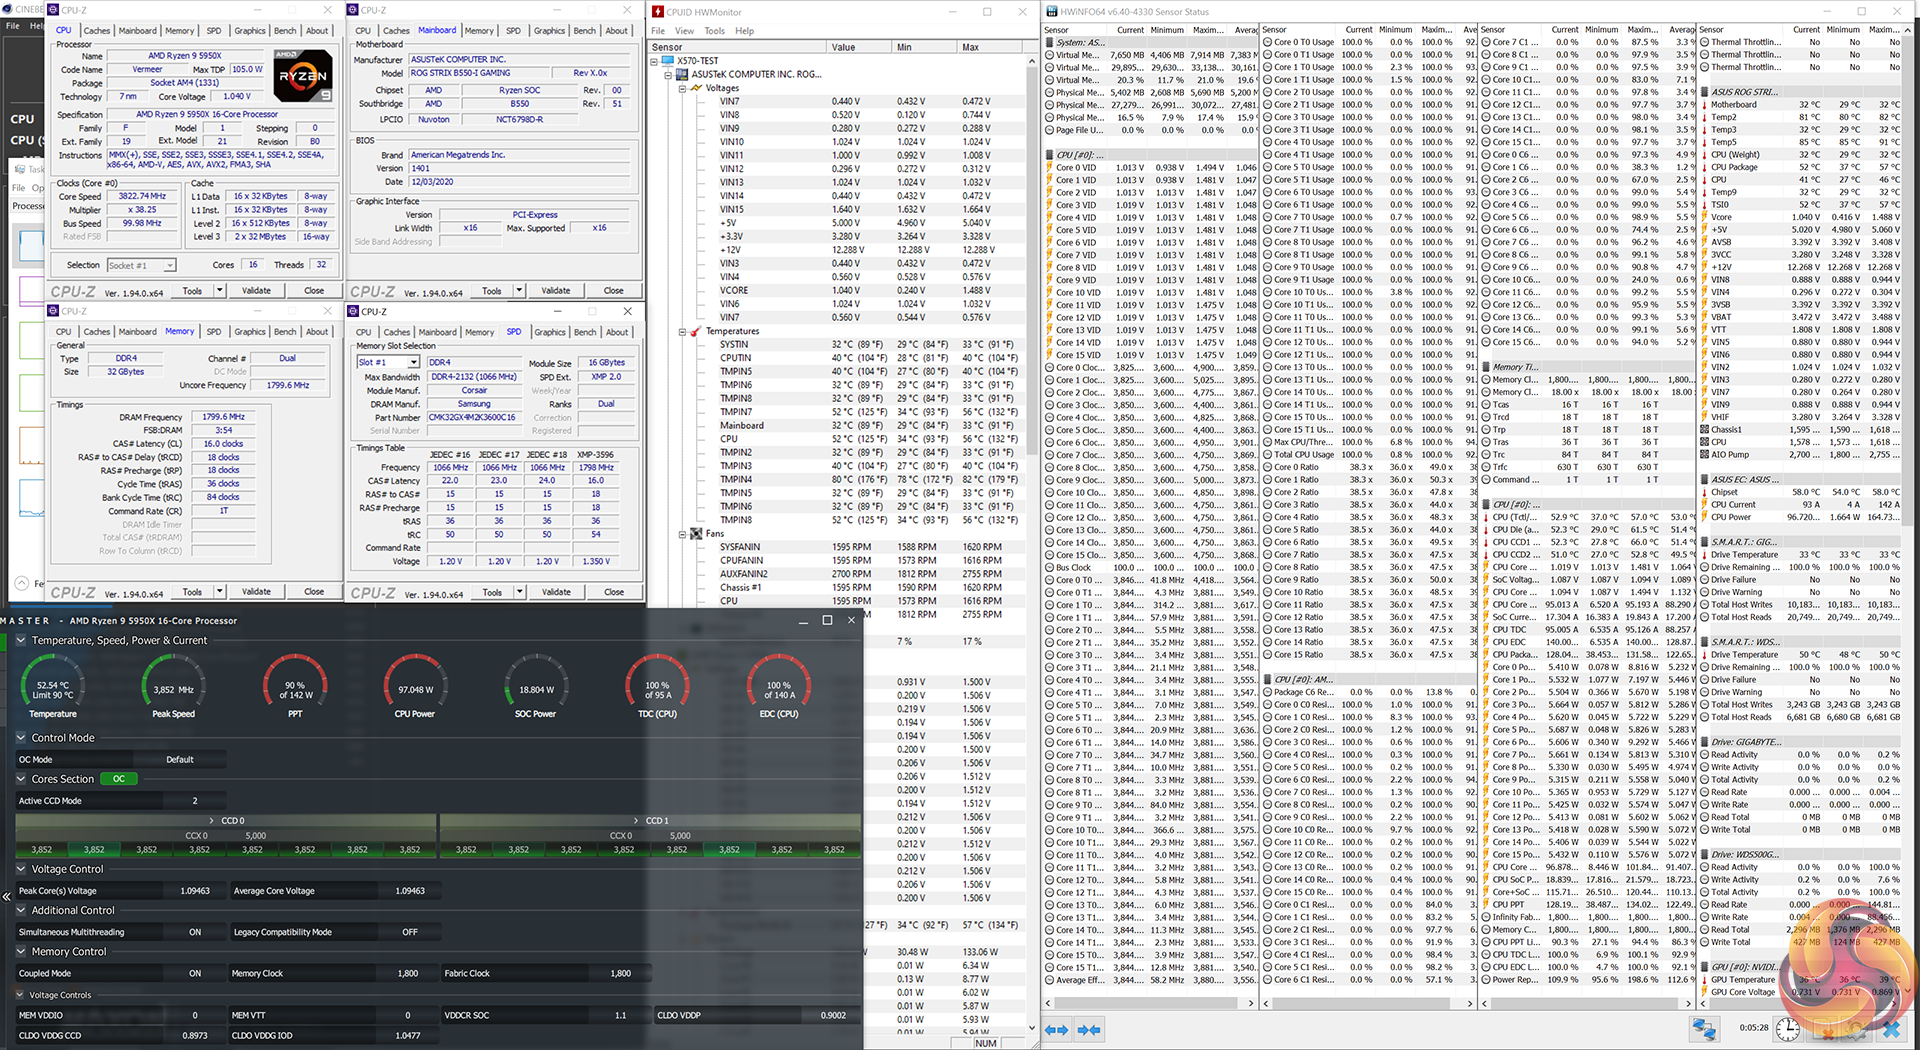
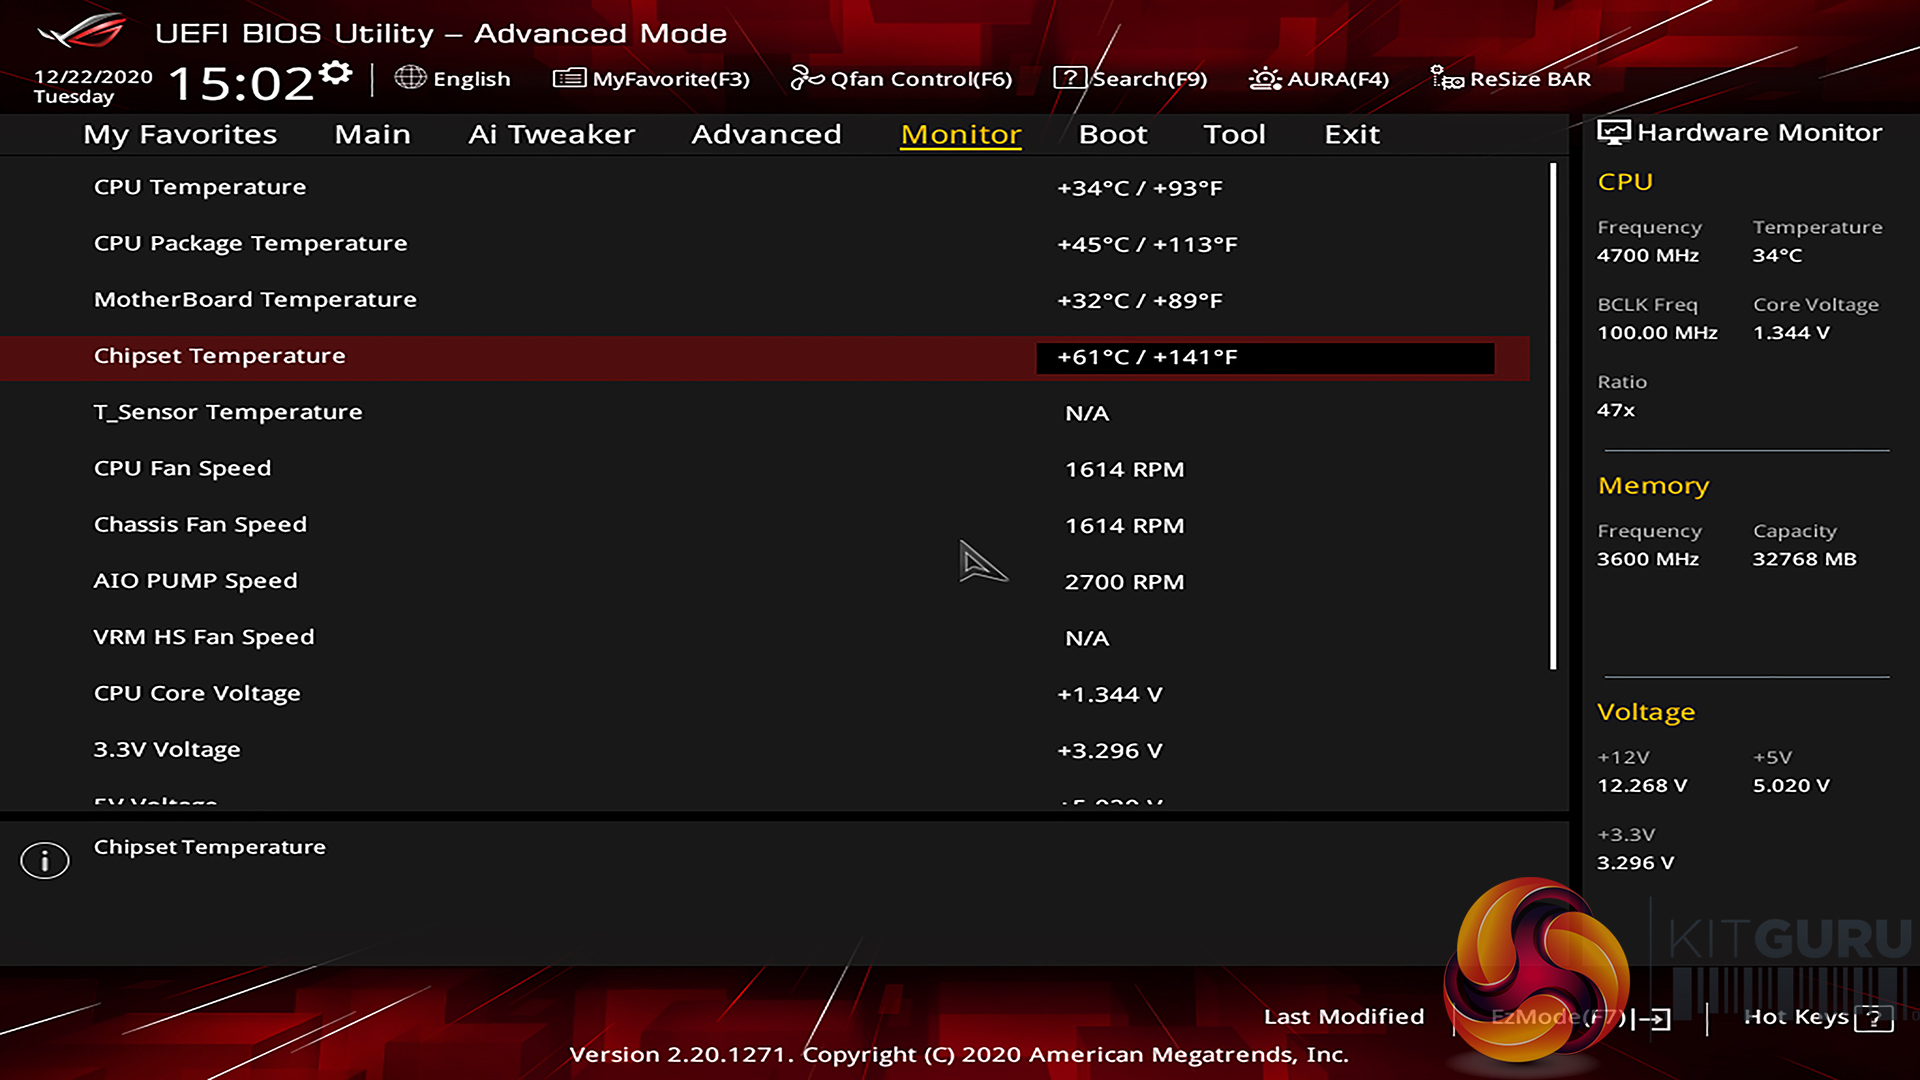
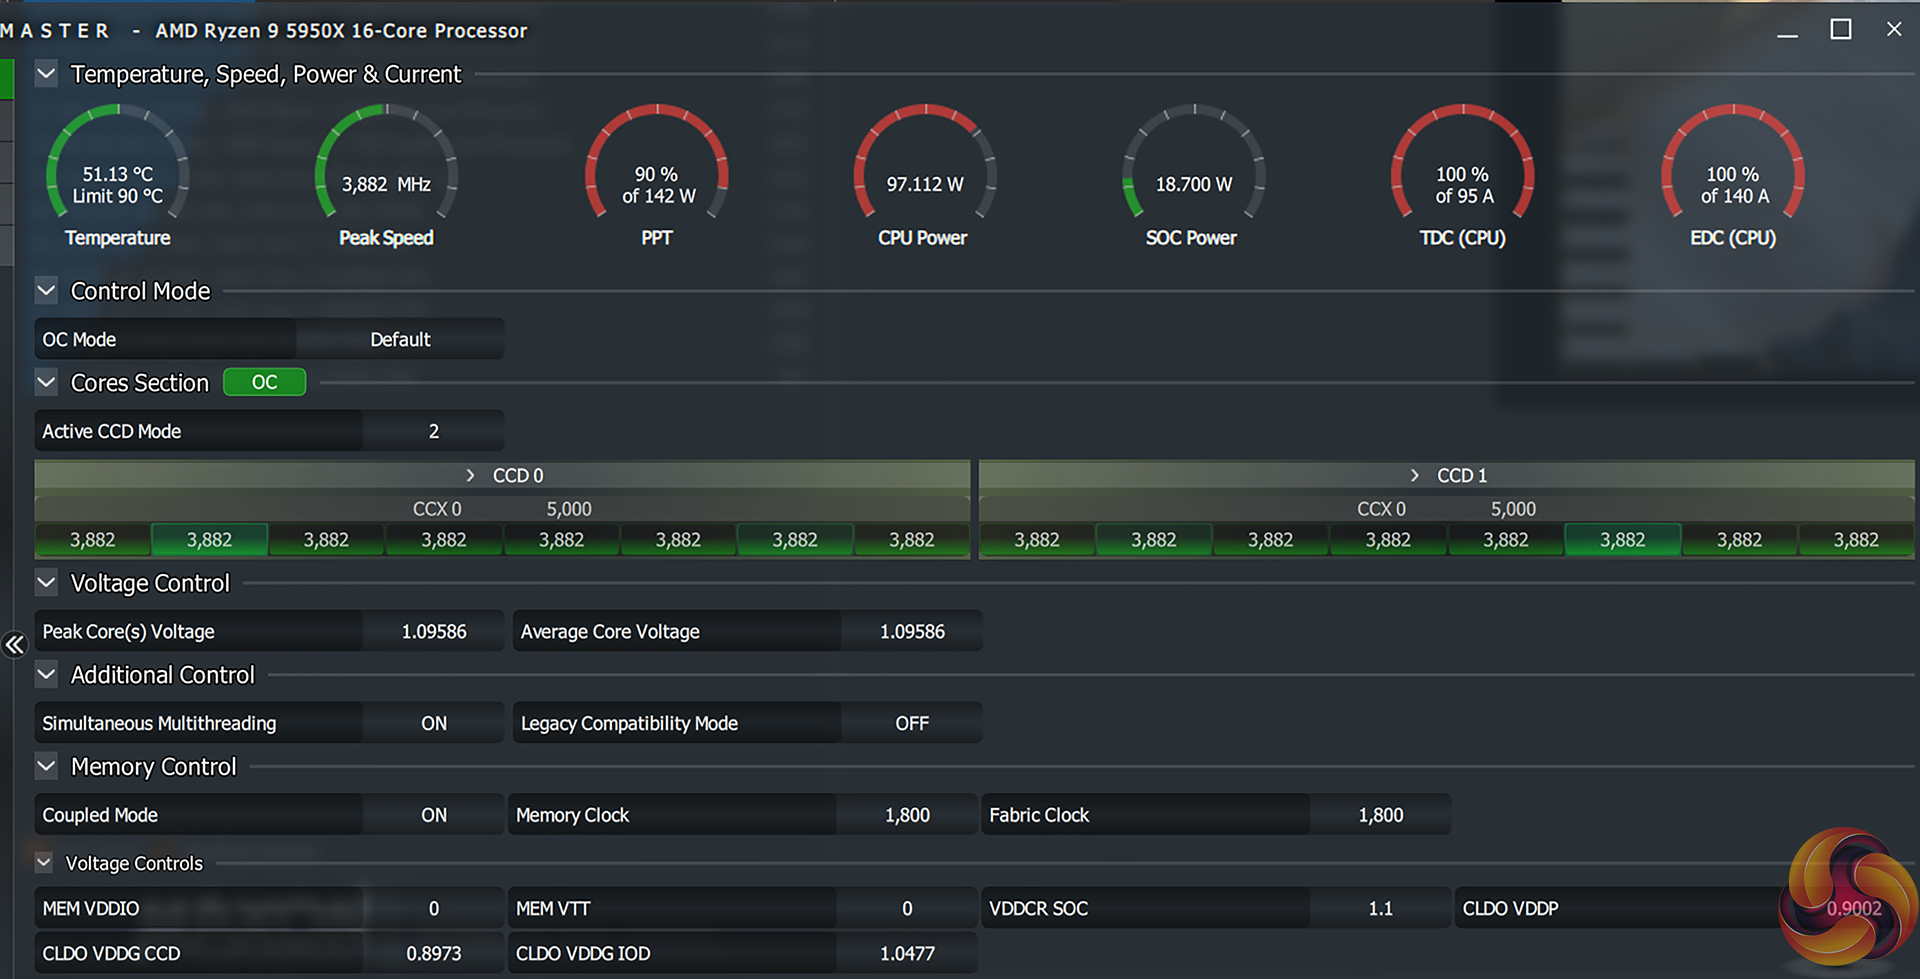
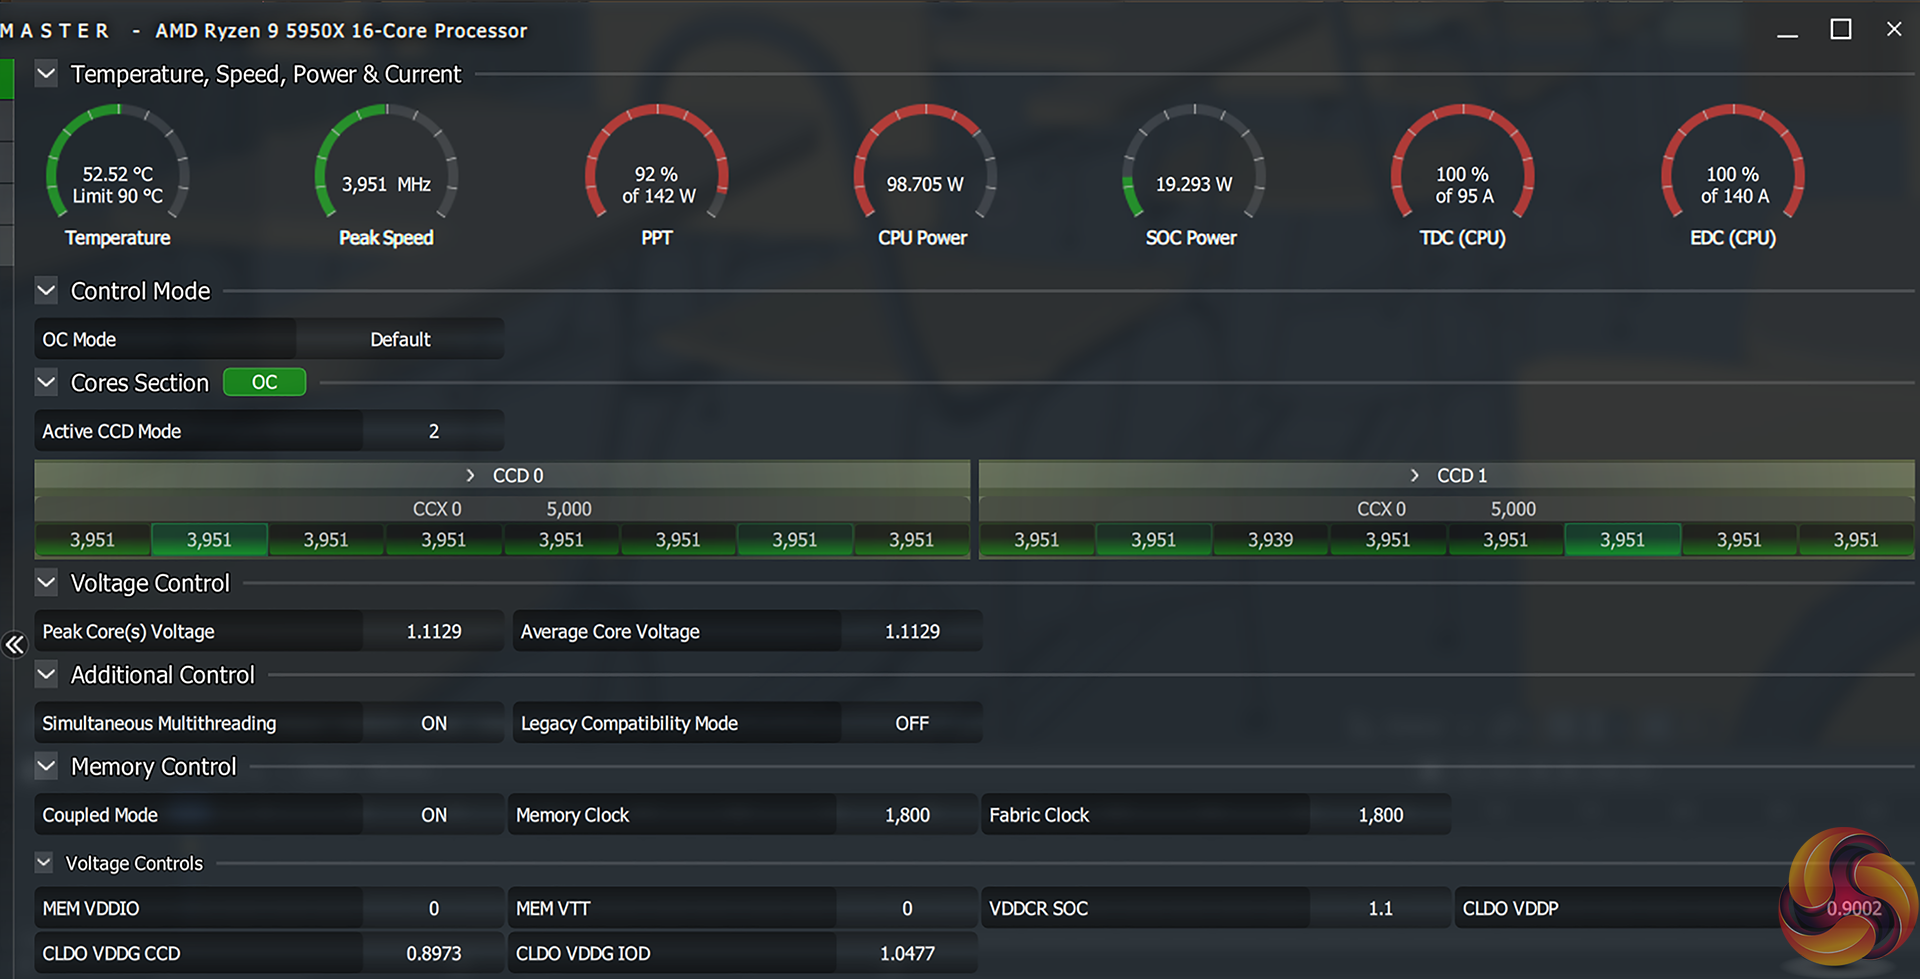
Temperature sensor readings for the motherboard through HWiNFO looked to be accurate and corroborated with Ryzen Master.
Under conventional operation, there is a complete lack of VRM temperature sensor data which is disappointing for a compact motherboard of this calibre. However, there is a VRM temperature sensor reading that kicks into display under HWiNFO once 60°C VRM temperature is reached and the VRM fan is triggered.
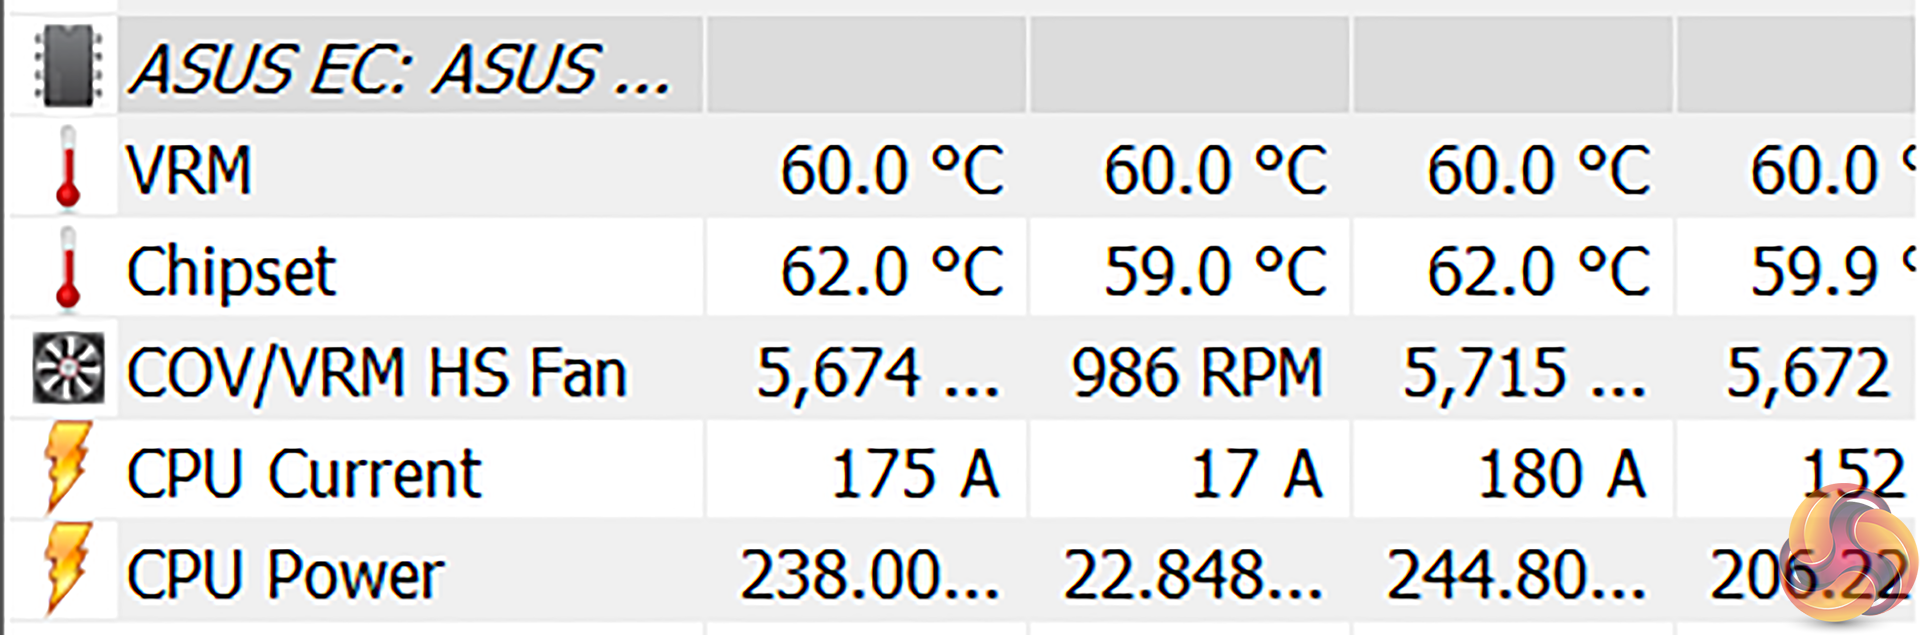
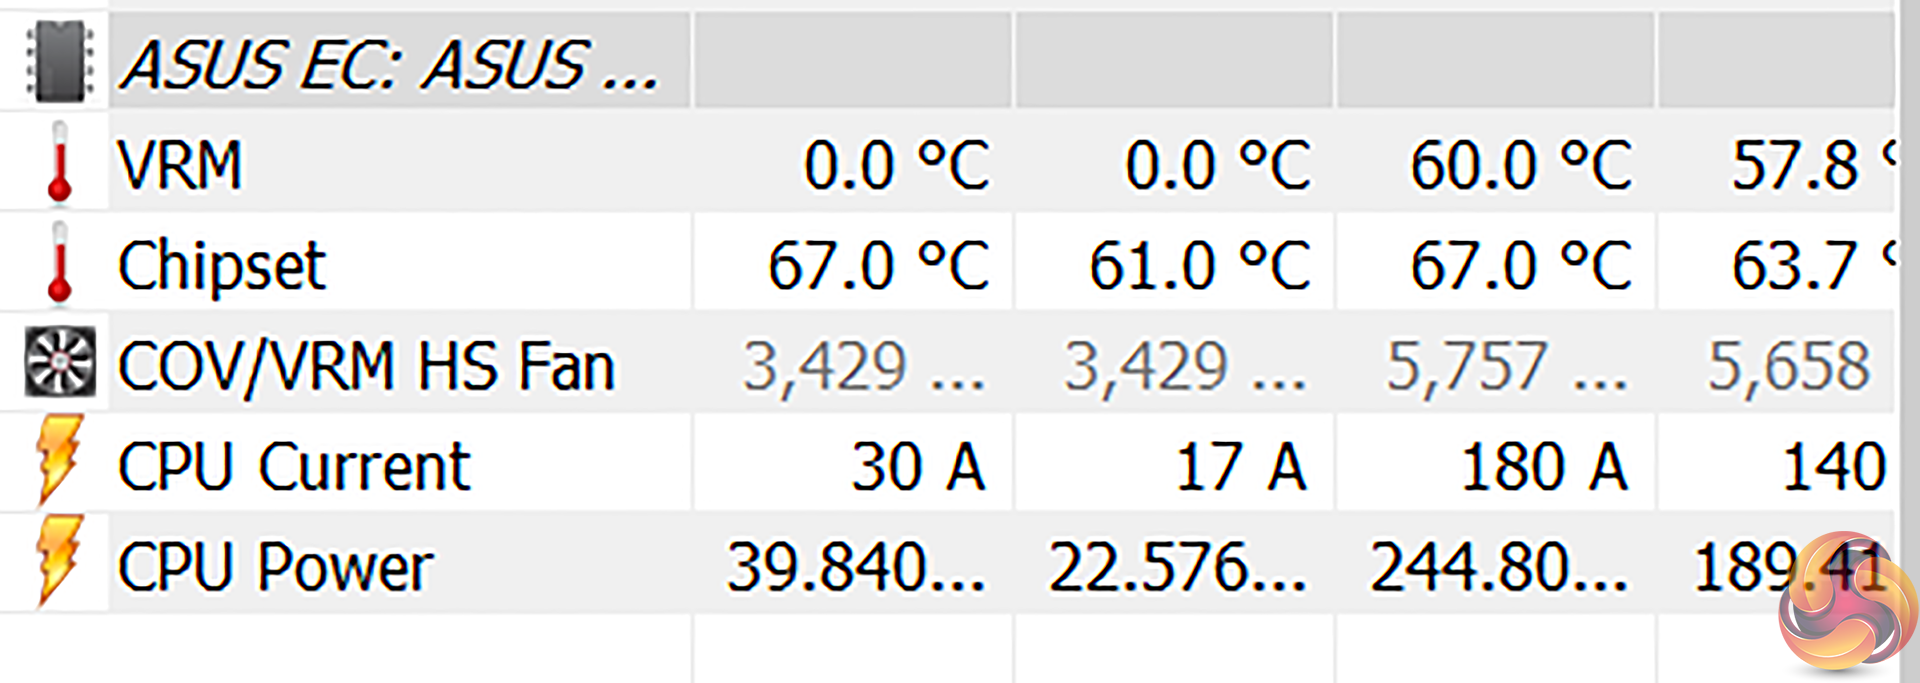
This seems good. Expect it is not. And that is because the ‘suggested’ VRM temperature sensor seems to be designed just to kick on the fan once 60°C VRM temperature is reached. It then continues to read 60°C until it drops below that level and the fan is triggered to turn off.
We disabled the fan to validate that the sensor’s data was inaccurate and indeed it was. Once 60°C is reached on the VRM sensor, the temperature will continue to rise with no fan for cooling, as highlighted by our manual surface readings. However, the VRM temperature sensor incorrectly stays glued at a 60°C reading.
This makes the sensor reading pretty pointless for users as it simply looks to be included, perhaps even by accident to the viewing consumers, as a VRM fan trigger. The only useful data you can realistically get from the sensor reading (or lack of) is whether your VRM is running at some level above 60°C and the data is displayed. Or at some level below 60°C and the data is not displayed.
A rather pointless and irritating quirk, it would seem. I still do not understand why ASUS does not simply make the VRM sensor data available through popular data tools such as HWiNFO.
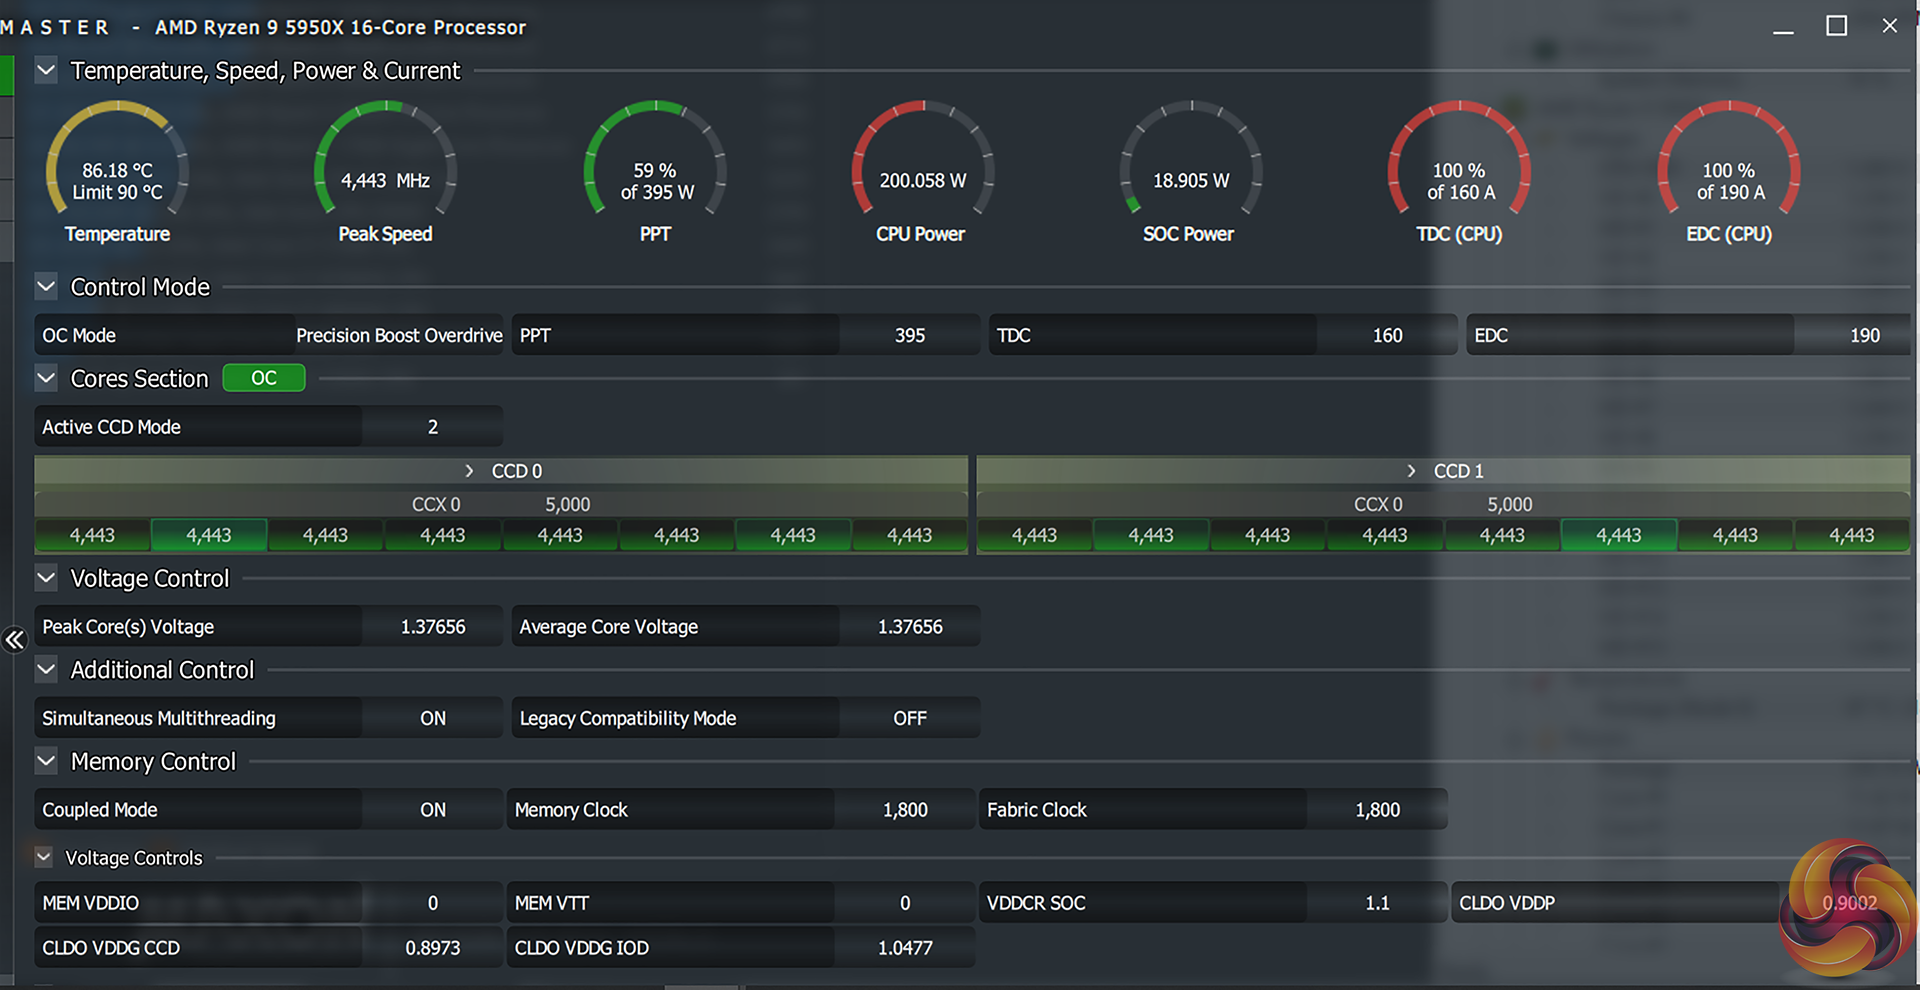
Manual CPU Overclocking:
To test the ASUS ROG STRIX B550-I Gaming motherboard’s CPU overclocking potential, we set the CPU Core Voltage to 1.3375V and applied the Level 1 LLC setting.
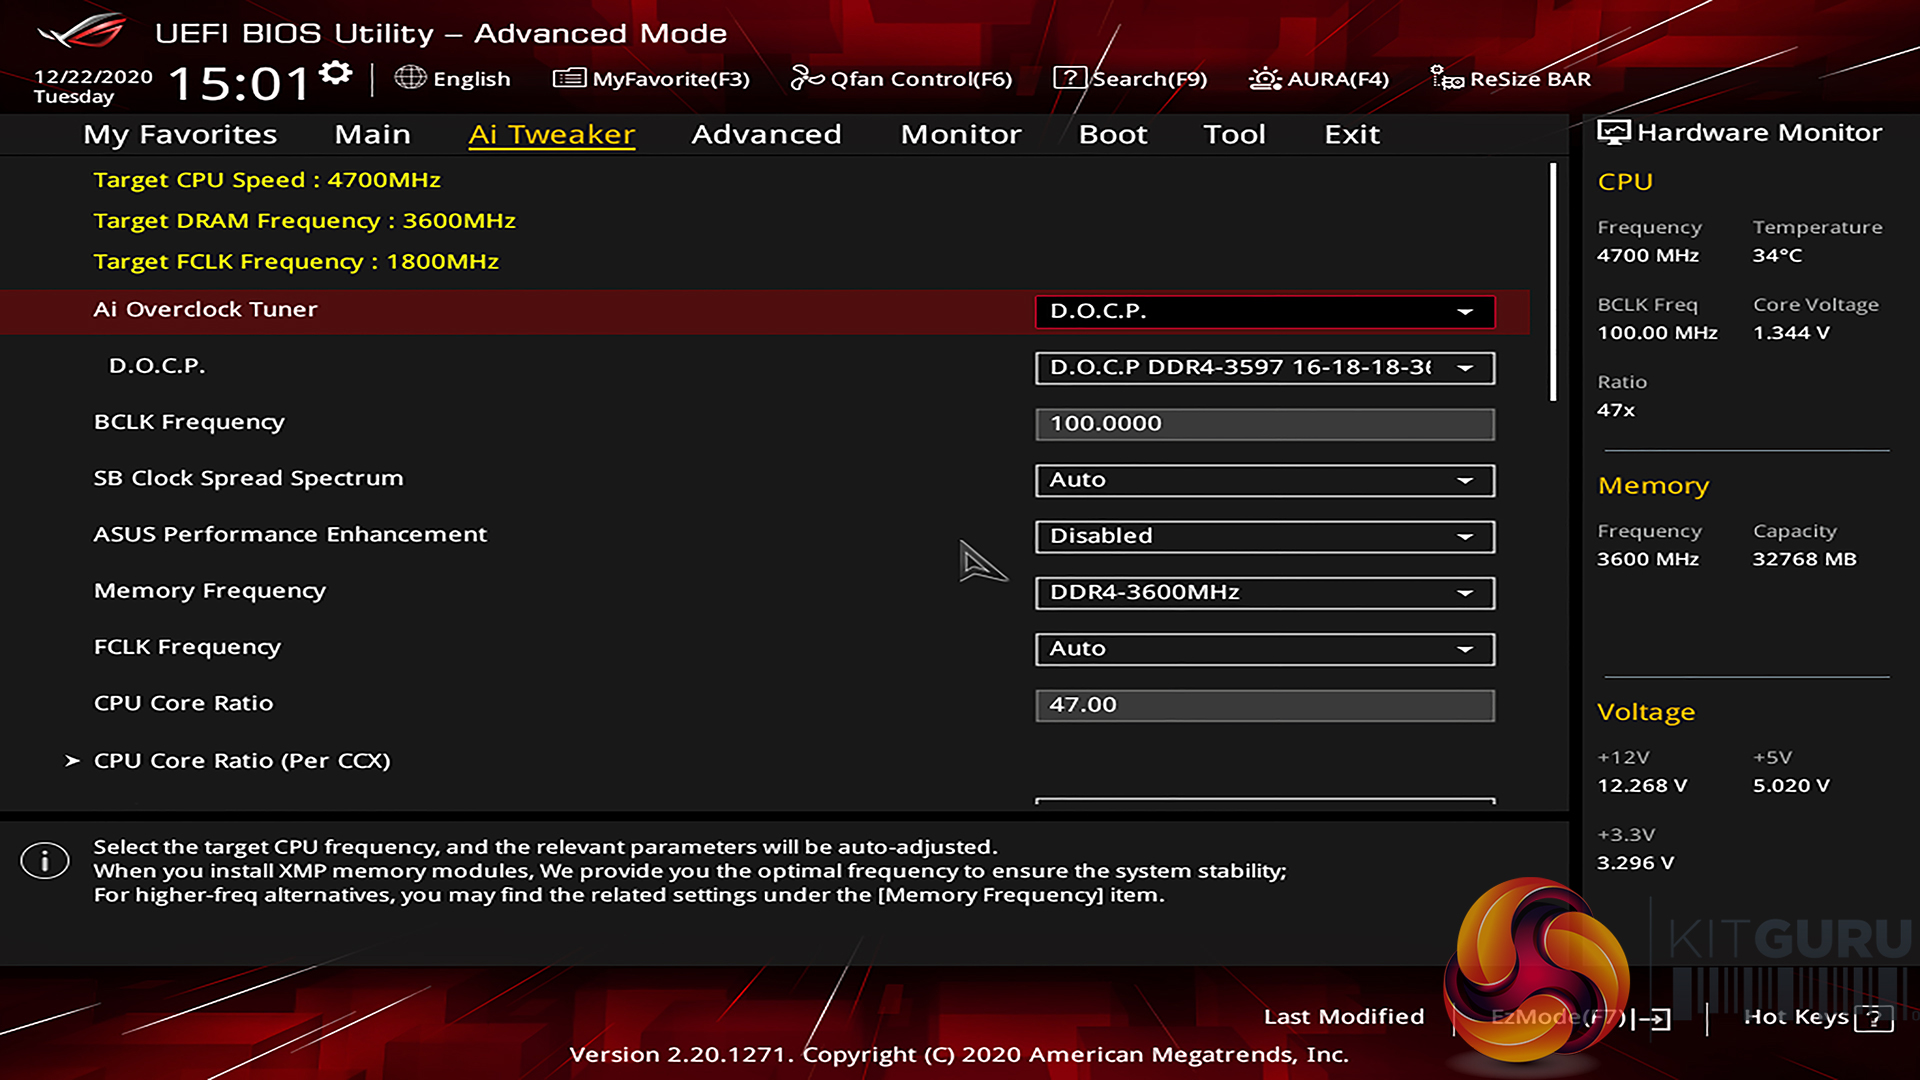
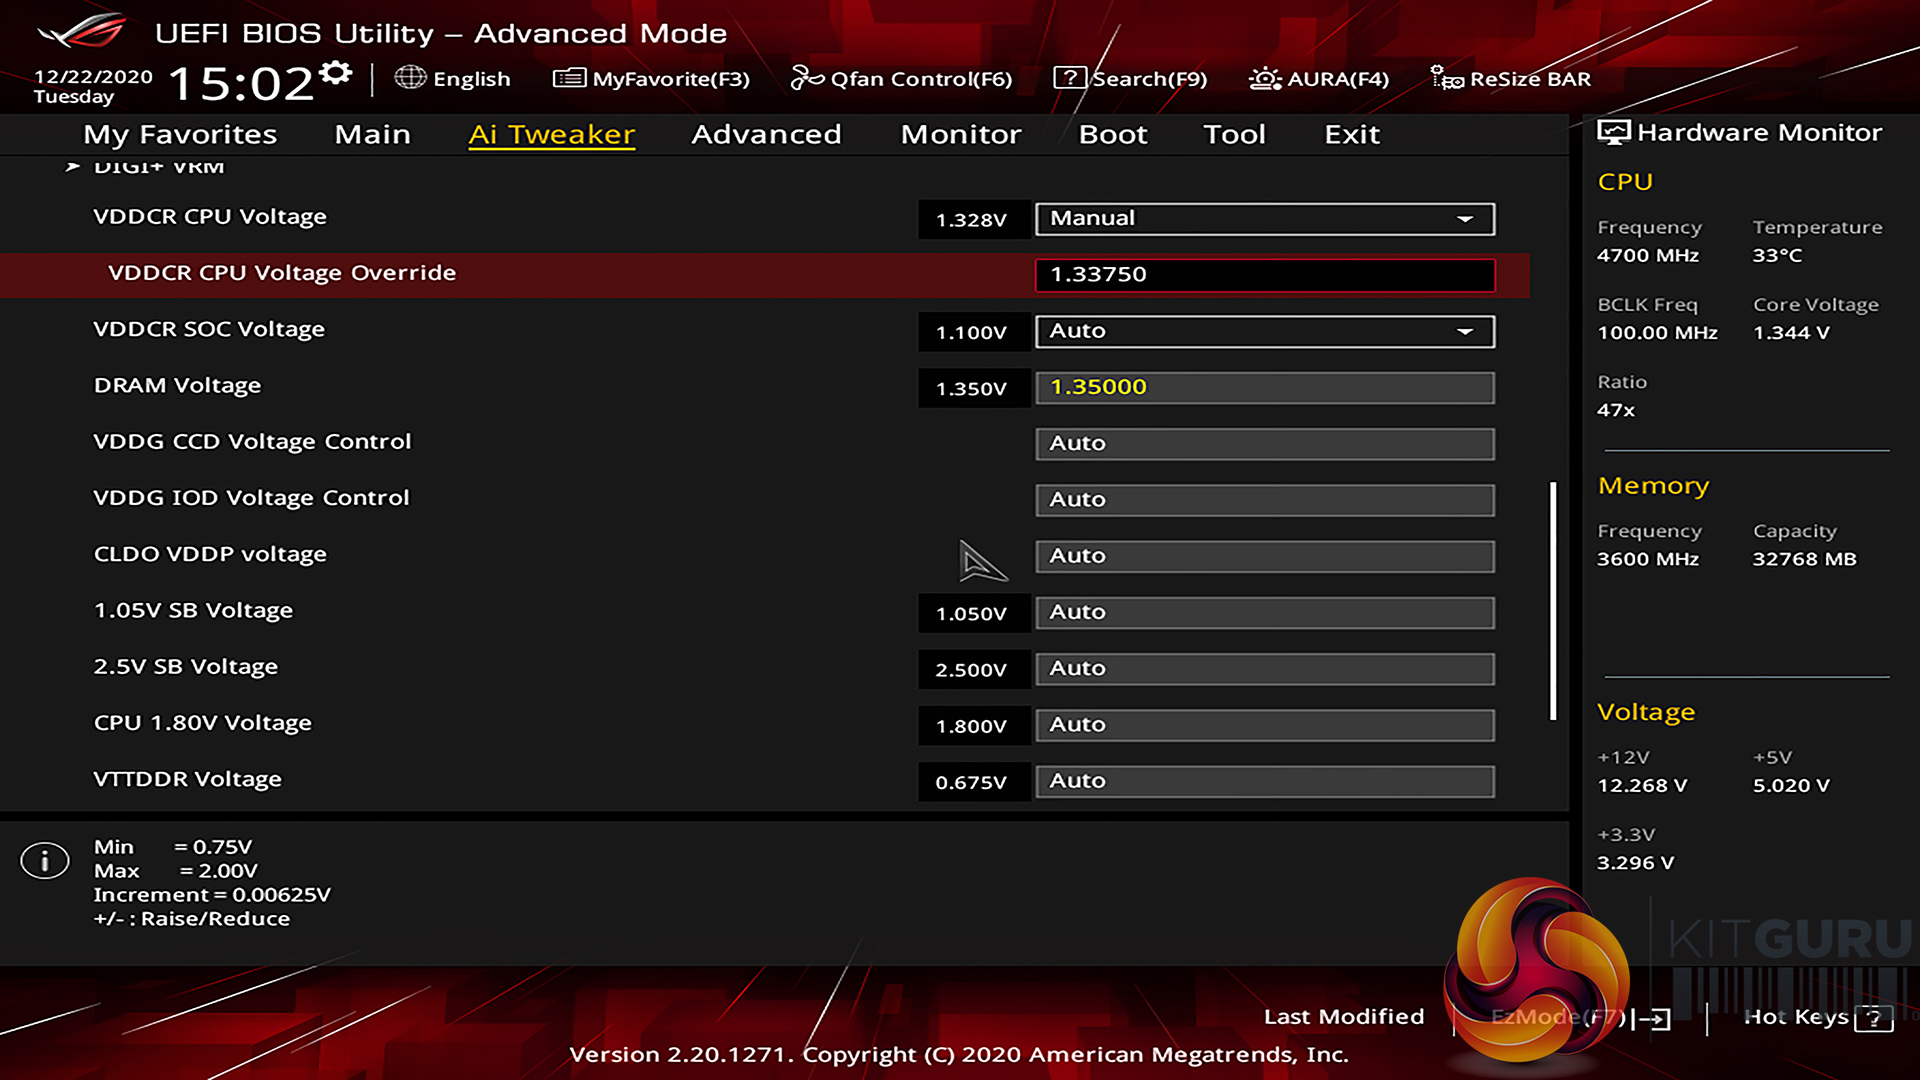
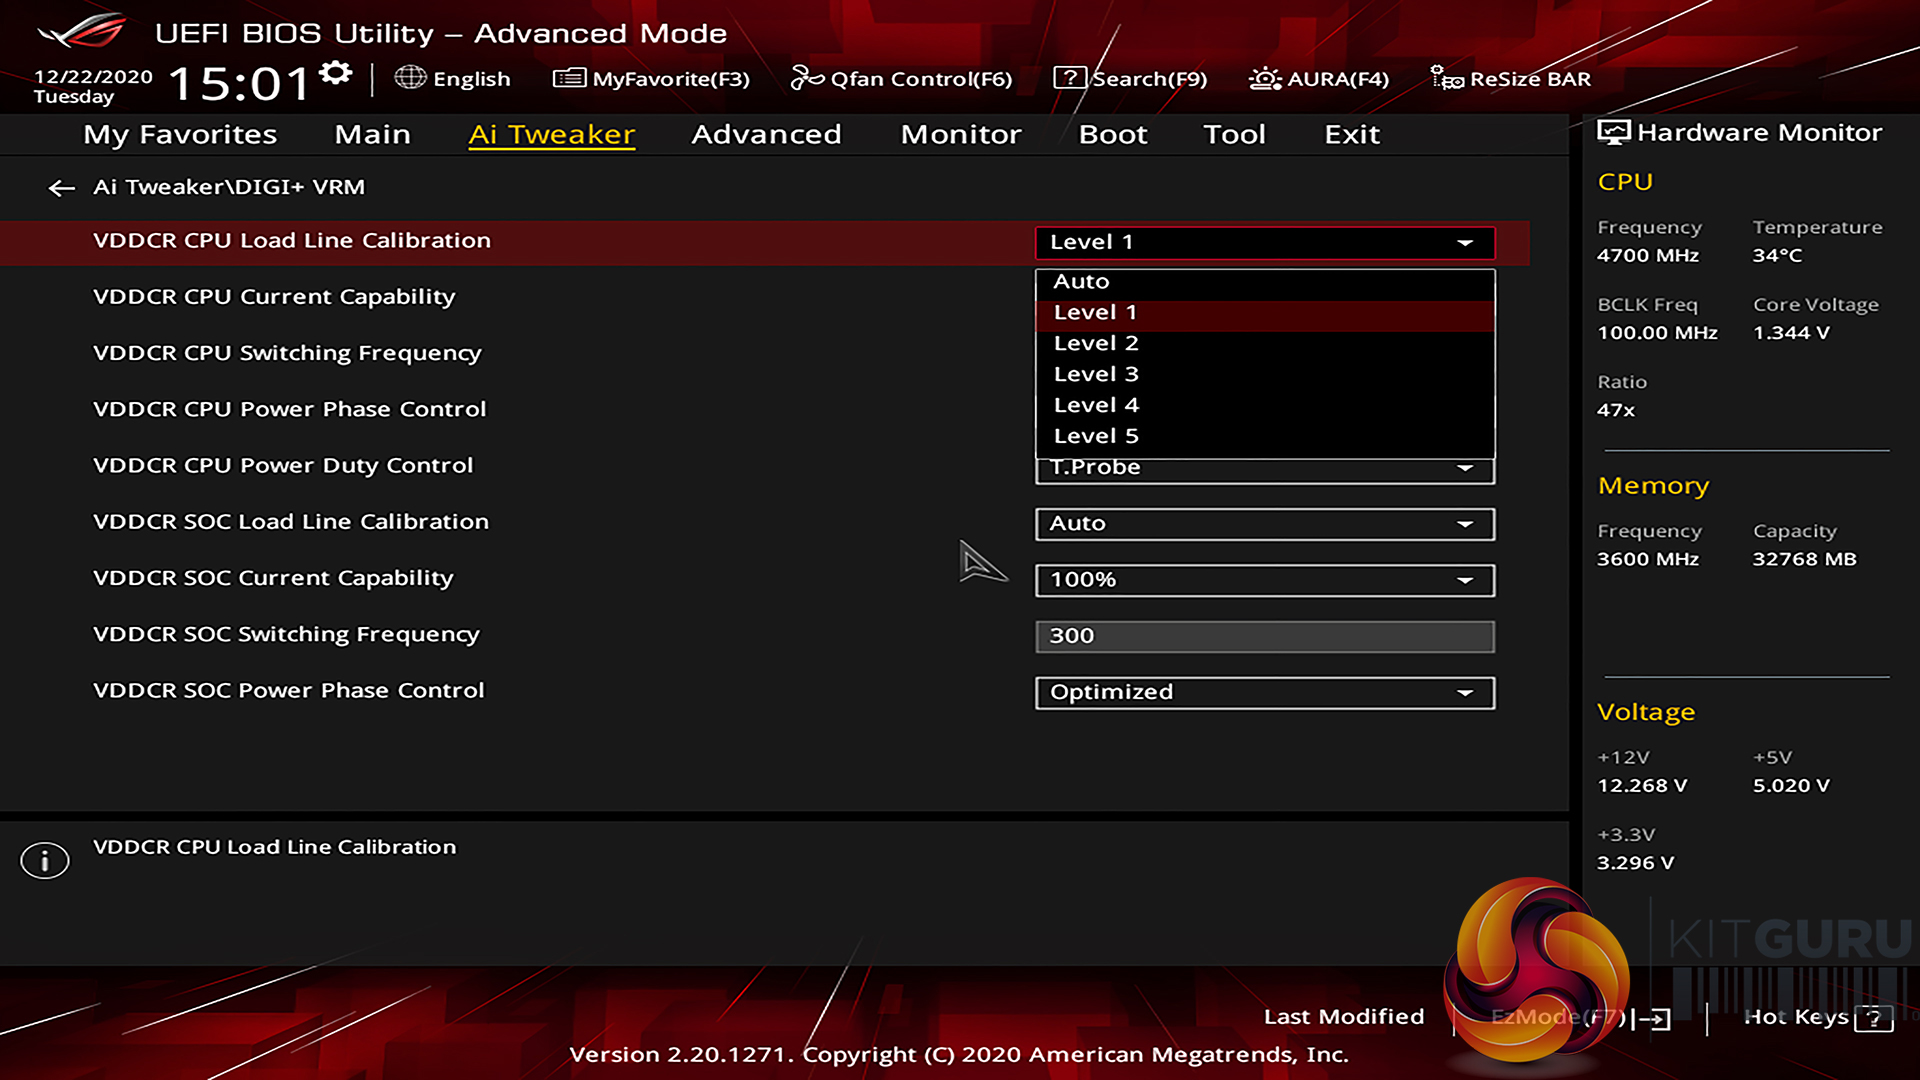
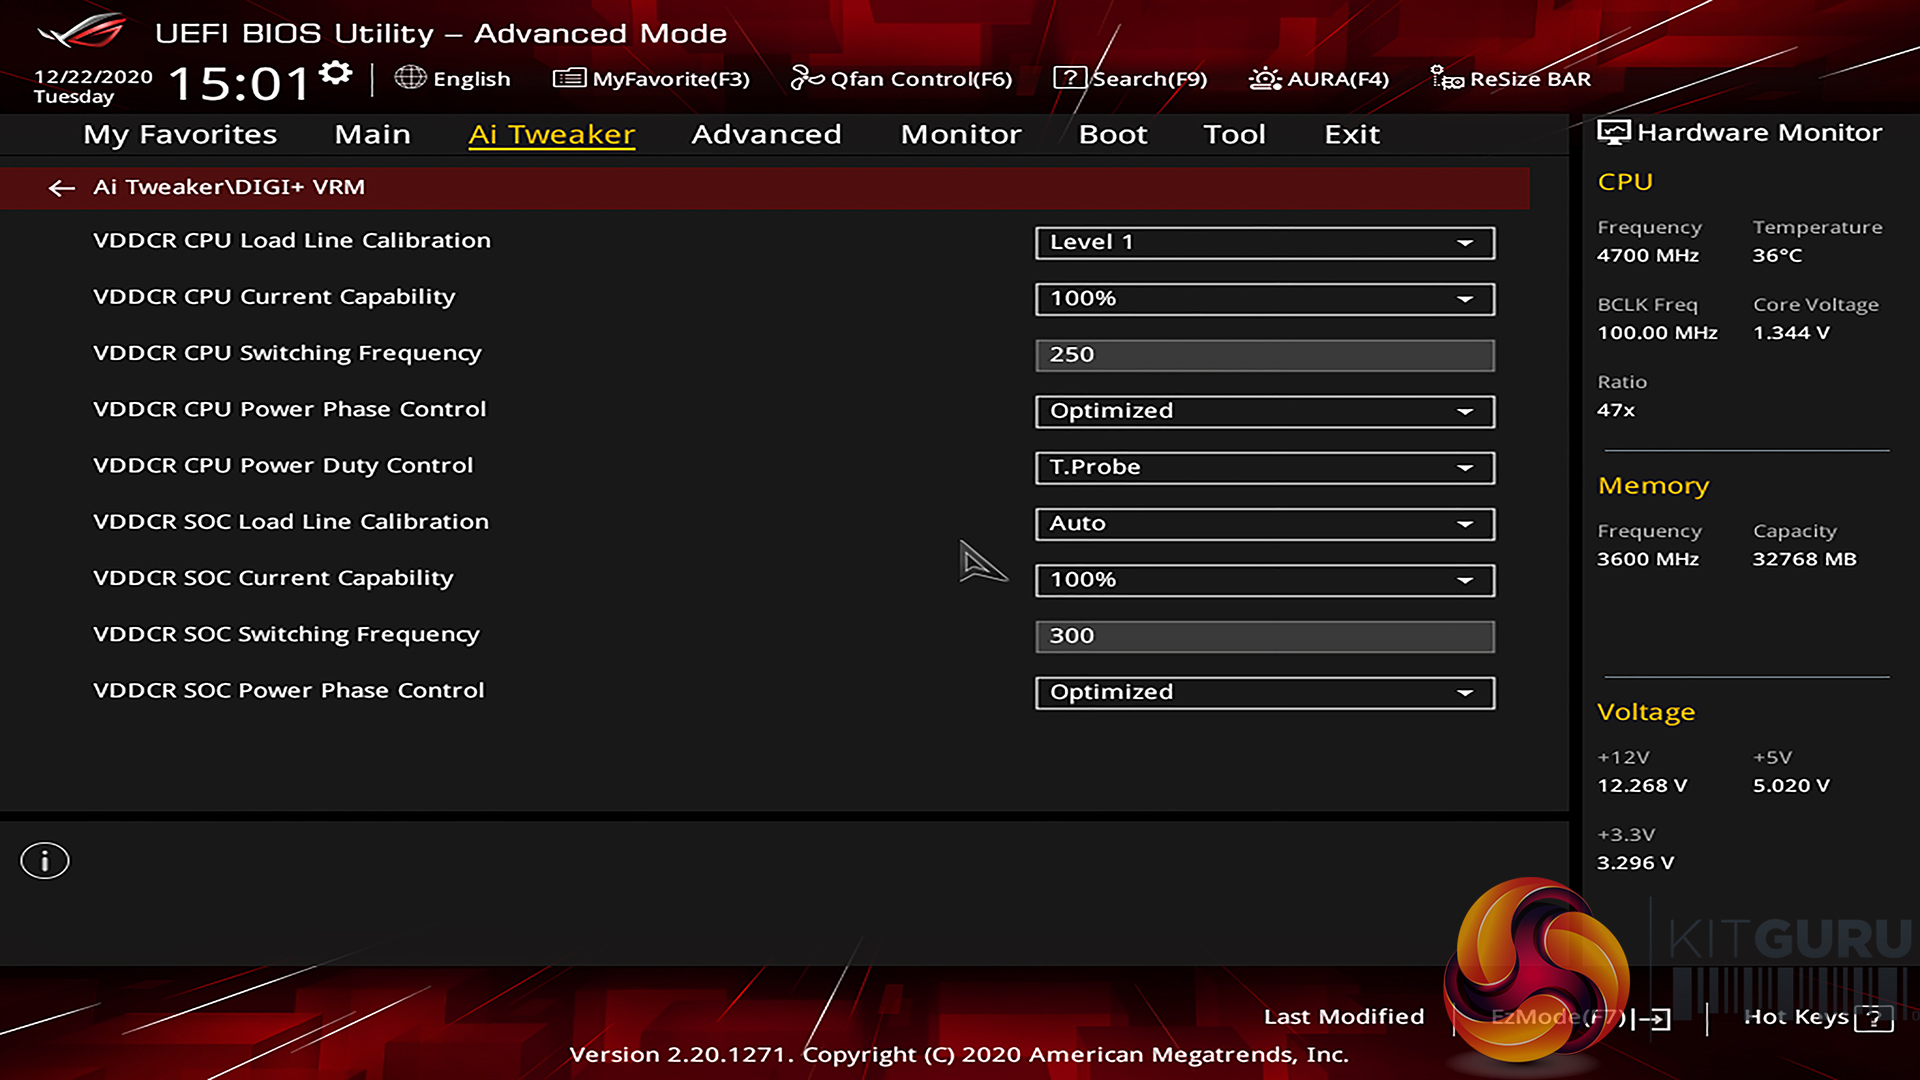
Manual overclocking using ASUS’ well laid out UEFI is generally easy, until it gets to selecting loadline calibration options. The multipliers and voltage settings are all logically laid out. And the sheer quantity of options available is impressive.
However, ASUS continues to use inconclusive loadline calibration settings with no graphical or written indication of how each level works. This makes overclocking using LLC tweaking a more time-consuming, trial-and-error based approach than it needs to be. A simple graph showing what each LLC option does, as competing vendors provide, would be a far simpler solution.
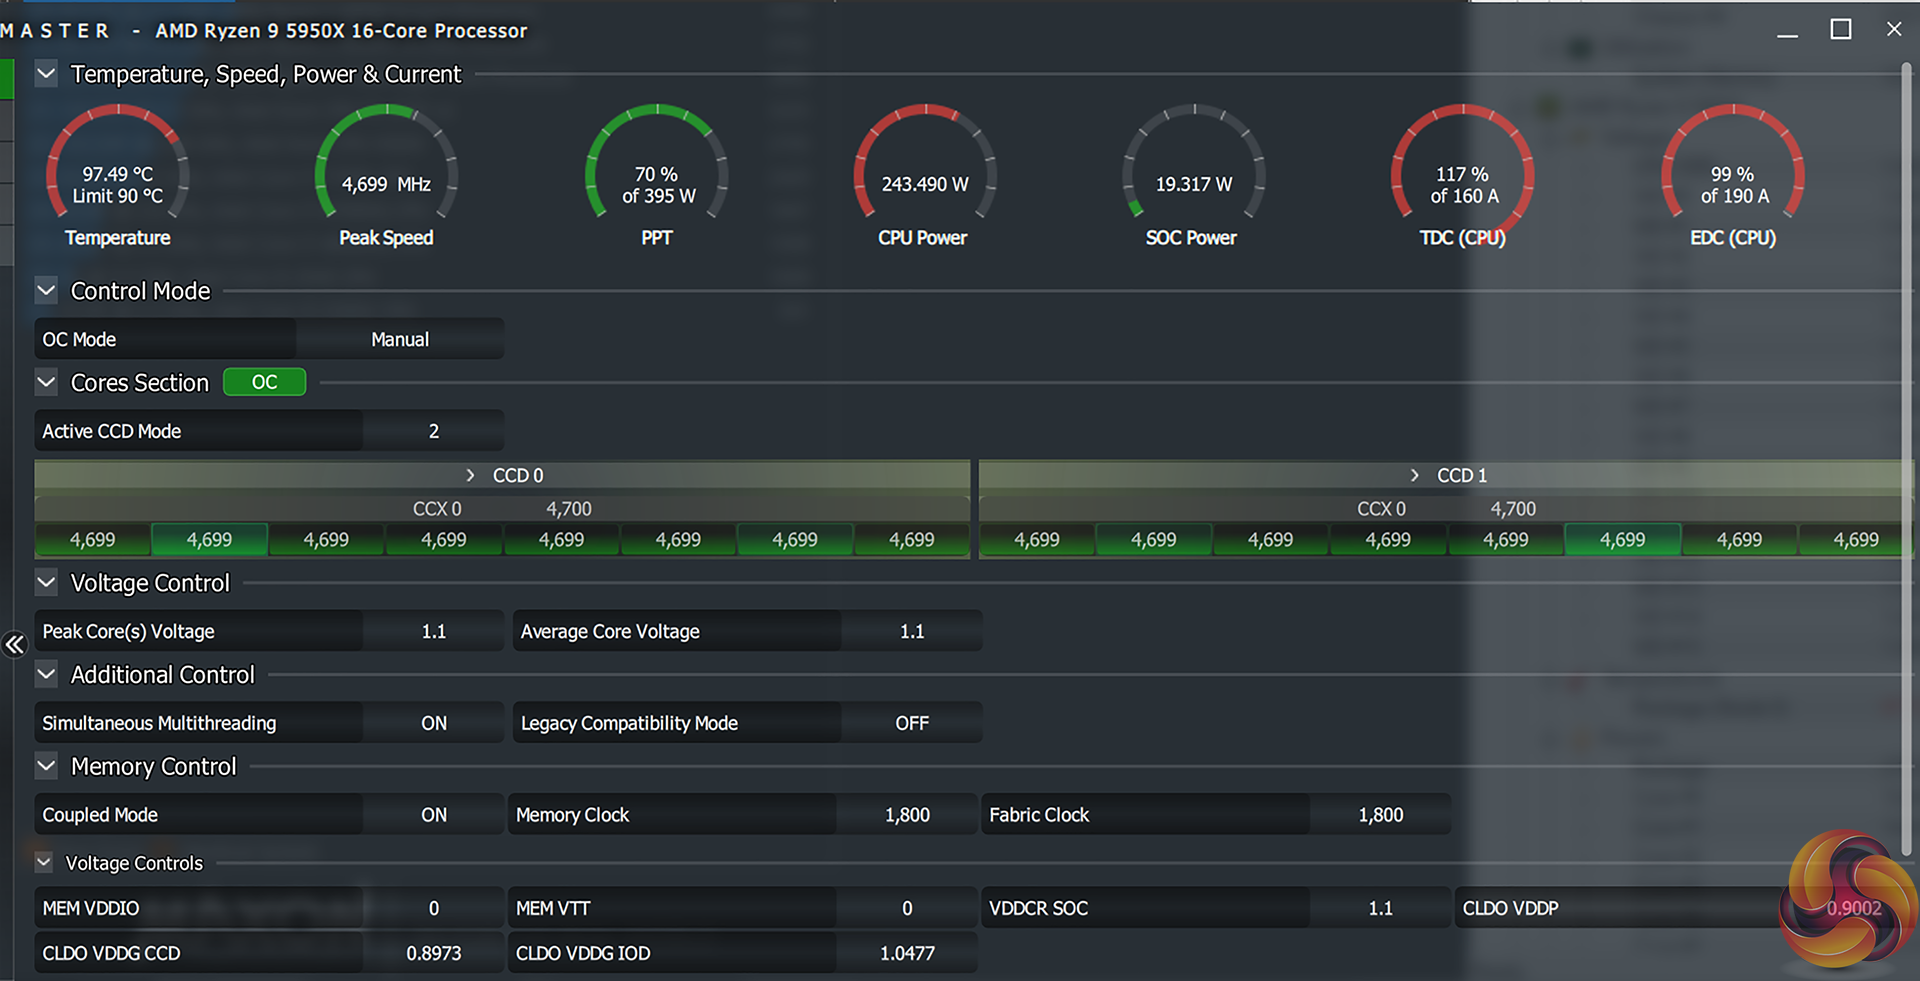
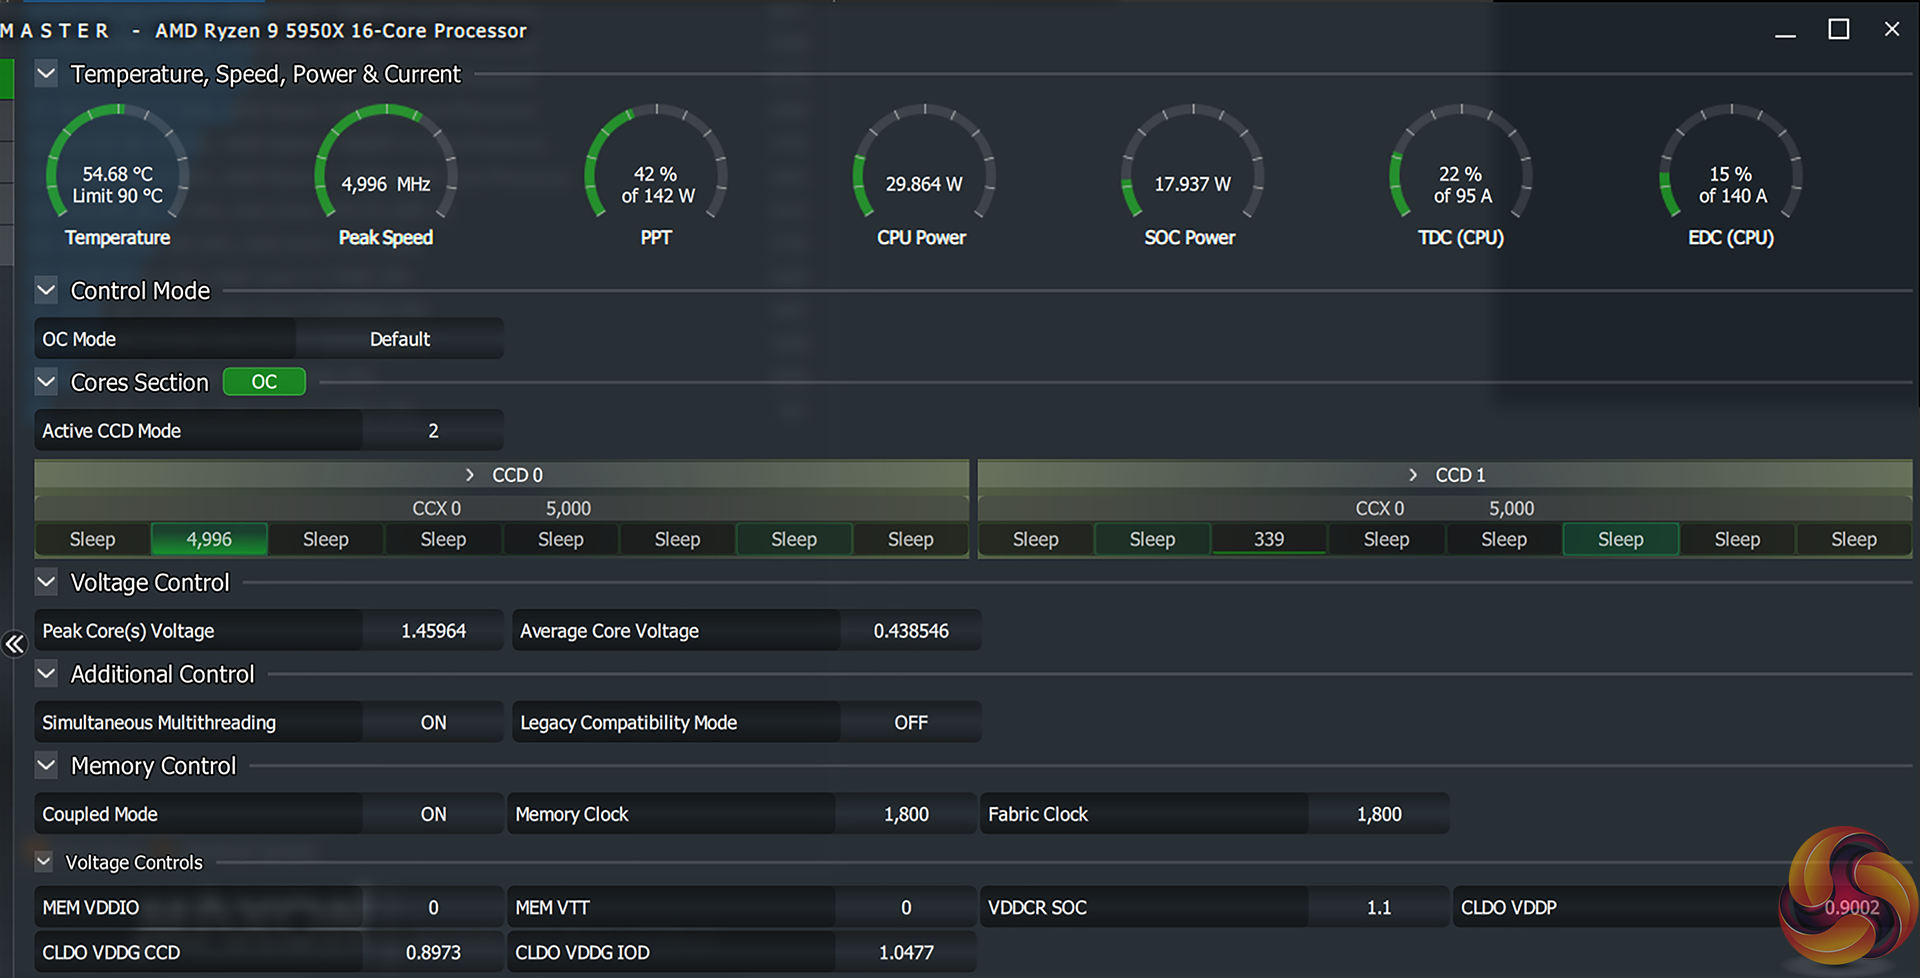
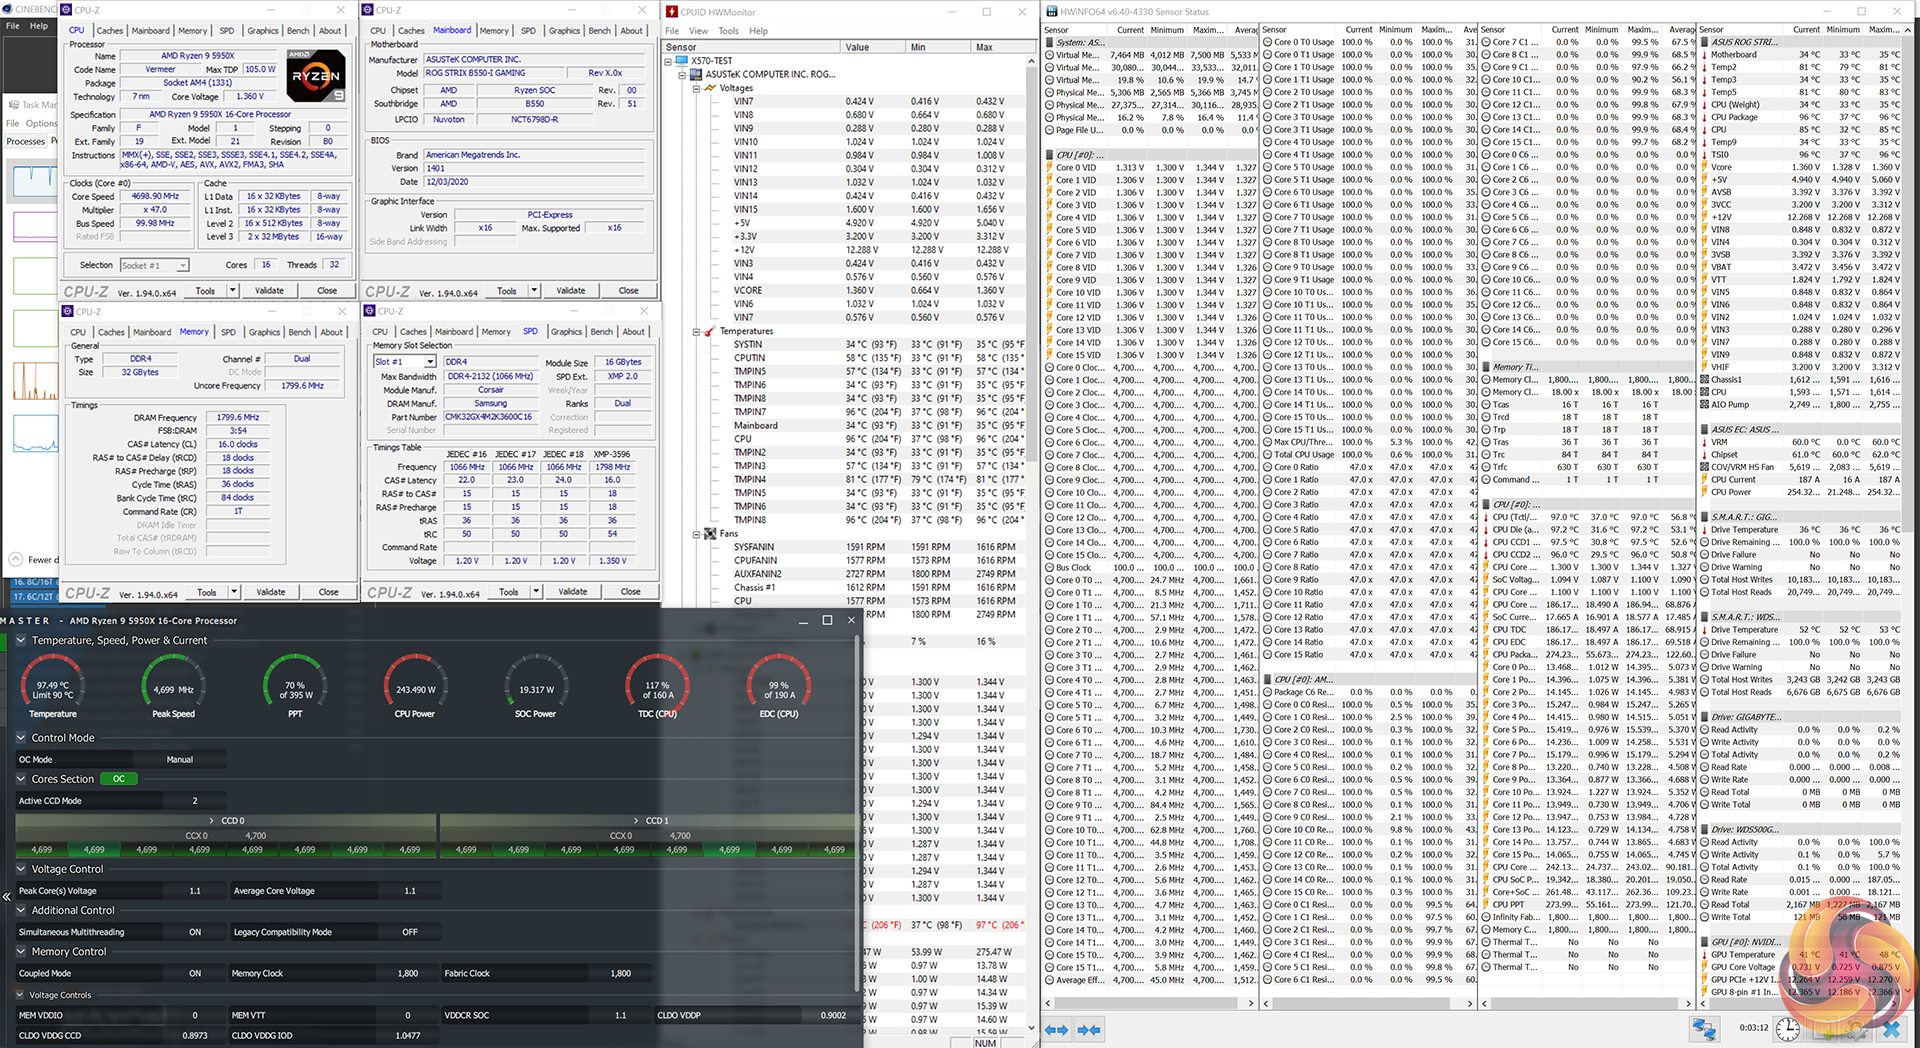
We managed to hit 4.7GHz with Level 1 LLC applied and the core voltage set to 1.33750V. This delivered a CPU voltage of around 1.34V under heavy system load and resulted in stability albeit whilst running very close to the thermal tipping point we are happy with of around 95°C.
Overclocked Performance

Using ASUS’ B550-I Gaming to overclock the 5950X CPU to 4.7GHz delivers a very healthy performance boost, albeit whilst teetering on the edge of system stability. As usual, your mileage may vary based upon the silicon lottery and accompanying cooling hardware.
System Power Consumption
We leave the system to idle on the Windows 10 desktop for 10 minutes before taking a reading. For CPU load results we run Cinebench R20 on loop and take readings. The power consumption of our entire test system (at the wall) is shown in the chart.
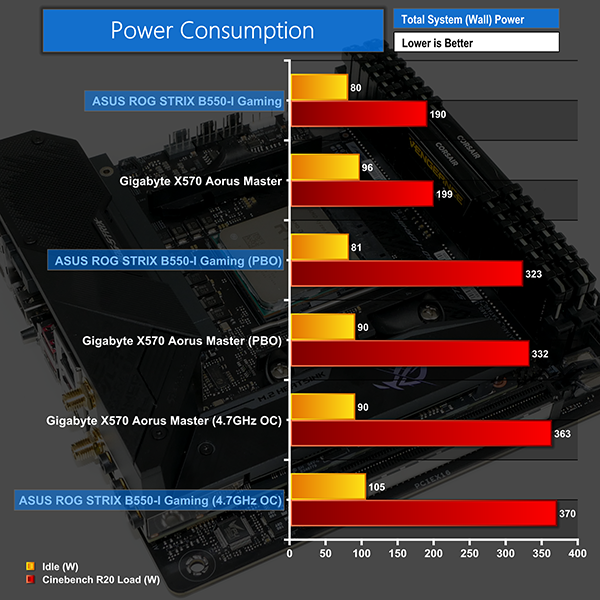
Likely driven by its use of the B550 chipset rather than the Gen 4-equipped X570 alternative, ASUS’ Mini-ITX board runs a little more efficiently than our Gigabyte comparison at stock.
Pushing hard with an overclock sees the VRM put under a heavy degree of stress that will challenge its efficiency levels. With that said, 370W of wall power draw shows the strong power delivery capability for ASUS’ ROG STRIX B550-I Gaming motherboard.
System Temperatures
We run a Cinebench nT loop stress test while recording the system data using HWiNFO. This data is then analysed to show the CPU temperatures and also the VRM temperatures.
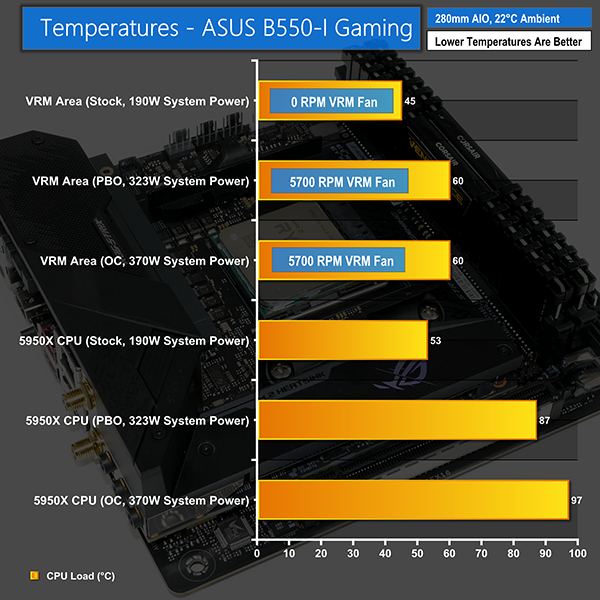
VRM temperatures are very good under the relatively easy to handle stock CPU loading conditions. Staying well below 50°C, never mind 60°C, the VRM fan did not need to spin at all throughout our stock-clocked testing.
Pushing with a heavy overclock saw the VRM running at 60°C, as validated using manual measurement tools given the previously mentioned VRM temperature sensor quirks. This required the fan to be cooling the VRM heatsink and the recorded level was 5700 RPM. That seems to be the VRM fan’s default on-state running speed.

Evidently, CPU temperature here are right on the edge of stability and would realistically require a dialling down in the overclock for proper usage. But as a stress scenario for our testing, the purpose is well served.
As a side note, the VRM surface temperature was manually read as 66°C after a 1-hour Cinebench stress test run using Precision Boost Overdrive. That was with a 325W wall power draw and 4.45GHz processor clock speed.
So, we have no cause for concerns when it comes to VRM temperatures, especially with that 30mm fan doing its job at a surprisingly tolerable 5700 RPM.
Out of the box performance from the ROG STRIX B550-I Gaming is strong, as we have come to expect from ASUS. We had no compatibility headaches or weird behaviours with respect to voltage or stability – just consistent, solid performance.
Overclocking performance throughout our testing was good, despite the awkward LLC settings. VRM performance was fine even when coupled with the mediocre heatsink and fan solution. The lack of a proper or accurate VRM temperature sensor is annoying, but the VRM heatsink and 30mm 5700 RPM fan worked well together to cool the eight CPU-focused Vishay SiC639 50A power stages beneath.
It is good that the VRM fan is semi-active, but not ideal that it has basically no user-defined control and no finesse to its fan speed curve. Thankfully, the VRM fan was inaudible above our Fractal 280mm AIO when both were at full whack, much to our surprise.
I would have liked to see a slightly better spread of fan headers and the more consistent use of 2A current ratings to better accommodate fan splitters. Thankfully, the UEFI fan control is reasonable overall but evidently not as strong as Gigabyte’s Smart Fan 5 solution. And onboard diagnostic LEDs are useful, as is the break-out front panel IO adapter and BIOS Flashback capability.
Priced at around £200 in the UK, ASUS' obvious competitor is the ASRock B550 Phantom Gaming-ITX/AX that we reviewed a few months ago. ASRock has the undeniably higher-quality VRM hardware and therefore has the flexibility to use a passive heatsink. But ASUS’ fan-based approach was not a real downside in our testing.
ASUS includes some useful features such as BIOS Flashback and outwards-facing SATA ports that are questionable design omissions by ASRock.
The ROG STRIX board’s UEFI-based fan control system is very comparable to ASRock’s alternative but ASUS’ is marginally better in some areas such as hysteresis control. However, ASRock deserves credit for including a couple of 2A-rated headers versus ASUS’ 1A-rated solutions throughout.
With both the ASUS and ASRock B550 Mini-ITX options priced very similarly, it is difficult to choose a winner between the two. Out of this pair, the one you will choose will be based on individual preference towards the few minor differentiating points. Both are solid options, even if they are priced very much on the high side for Mini-ITX B550.
![]()
The ASUS ROG STRIX B550-I Gaming is priced at £209.99 at Overclockers UK.
Discuss on our Facebook page, over HERE.
Pros:
- Excellent out of the box performance and stability.
- Strong overclocking capacity, despite the modest VRM power stage hardware.
- Plenty of 10Gbps USB connectors.
- Particularly good PCIe Gen 4 SSD cooling.
- Semi-active VRM fan works well and is quiet.
- USB BIOS flash capability.
- Break-out cables for front panel headers and USB-C audio are good inclusions.
Cons:
- 1A fan headers may restrict splitter usage.
- VRM temperature sensor is not displayed and/or not accurate.
- Power delivery component quality is inferior to ASRock's competing motherboard but does function adequately.
- Expensive versus other B550 and X570 Mini-ITX boards, but largely justified with the feature set.
KitGuru says: The ASUS ROG STRIX B550-I Gaming motherboard is a solid option with good all-round performance, strong overclocking capability, and a generally smart design.