The mini-ITX form factor continues to get more powerful as competition between AMD and Intel has driven up processor core counts over the past few years. With Intel's newest Core i9 9900K it is now possible to pack 8 cores and 16 threads into a diminutive mini-ITX motherboard. More cores mean more power consumption so concerns about reliable power delivery and quality construction are paramount, concerns Supermicro hopes to allay with the SuperO C9Z390-CG-IW.
This isn't Supermicro's first foray into mini-ITX territory, just last year the company released the C7Z370-CG-IW, its Z370 mini-ITX motherboard. On close inspection the differences between its Z370 and Z390 mini-ITX offerings are few and far between, nonetheless, Supermicro has used Intel's Z390 chipset as an opportunity to refresh the VRM design and tweak some aspects of the layout.
As with most mini-ITX motherboards geared towards a gaming audience there's precious little space for differentiation and product segmentation. Supermicro adds RGB lighting and a touch of SuperO branding as well as companion SuperO Booster software for overclocking, but beyond that it could easily be a workstation motherboard.
The main highlight of Supermicro's Z390 option, compared to the Z370 predecessor, is the re-designed VRM for handling higher power-draw processors. Unlike the “big four” motherboard vendors (ASRock, ASUS, Gigabyte and MSI) Supermicro is able to implement genuinely different VRM designs for the consumer space. Likely due to its historical supplier relationships in the enterprise and server markets.
In its previous generation Z370 mini-ITX motherboard the VRM was based on an unusual Monolithic Power Systems solution. With the new Z390 mini-ITX motherboard the implementation is based on a Infineon (Primarion) controller and MOSFETs, very similar to what Supermicro implemented on the SuperO C9X299-PG300, except on a smaller scale.
Prospective buyers can rest assured then that the Supermicro SuperO C9Z390-CG-IW will deliver on quality, but in the past it hasn't been component quality that has been Supermicro's Achilles' heel. Let's see how Supermicro gets on with another shot a conquering the consumer mini-ITX space.
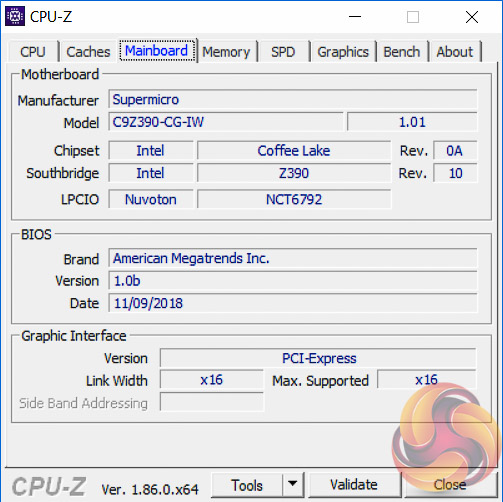
| Supermicro SuperO C9Z390-CG-IW | |
| Form Factor | mini-ITX, 17cm x 17cm |
| CPU Socket | LGA 1151 v2 |
| CPU VRM PWM |
Infineon Primarion PXE1520CDN 5+2 (VCore + iGPU) phase controller |
| CPU VRM MOSFETs |
7 x Infineon TDA21470 with 7 Inductors |
| Chipset | Intel Z390 |
| Memory | DDR4, 2 DIMMs, up to 32GB, up to 4000MHz+ with OC |
| On-board Graphics | Intel UHD Graphics (on supported CPUs) |
| Discrete Graphics | Single Graphics Card Configurations Only |
| Expansion Slots | 1 x PCIe 3.0 X16 |
| Storage | 2 x M.2 (Supports PCIe 3.0 x4 or SATA III, both up to 2280) 4 x SATA III 6Gbps (Intel Z390) |
| USB | 5 USB 3.1 (4 Rear [1 Type-C], 1 Front, via Intel Z390) 4 x USB 3.0 (2 Rear, 2 Front, via Intel Z390) |
| Networking | Intel I219V Gigabit LAN Intel Wireless-AC 9560 AC1730 Dual Band WiFi with Bluetooth 5.0 (CNVi) |
| Audio | Realtek ALC1220 7.1 channel HD Audio |
| RGB | 1 x 12v G R B 1 onboard RGB lighting zone (side strip near MB 24 pin) |
| Fan Headers | 2, all support 3/4 pin fans (1 x CPU, 1 x SYS) |
| Rear I/O | 1 x PS/2 Keyboard/Mouse Combo 2 x USB 3.0 5Gbps (Blue) 3 x USB 3.1 10Gbps (Red) 1 x USB 3.1 10Gbps Type-C 1 x DisplayPort 1.2 1 x HDMI 2.0 2 x WiFi/Bluetooth Antennae 5 x Analogue Audio Jacks 1 x S/PDIF Optical Audio 1 x RJ45 Gigabit LAN |
| UEFI | 128Mb UEFI AMI |
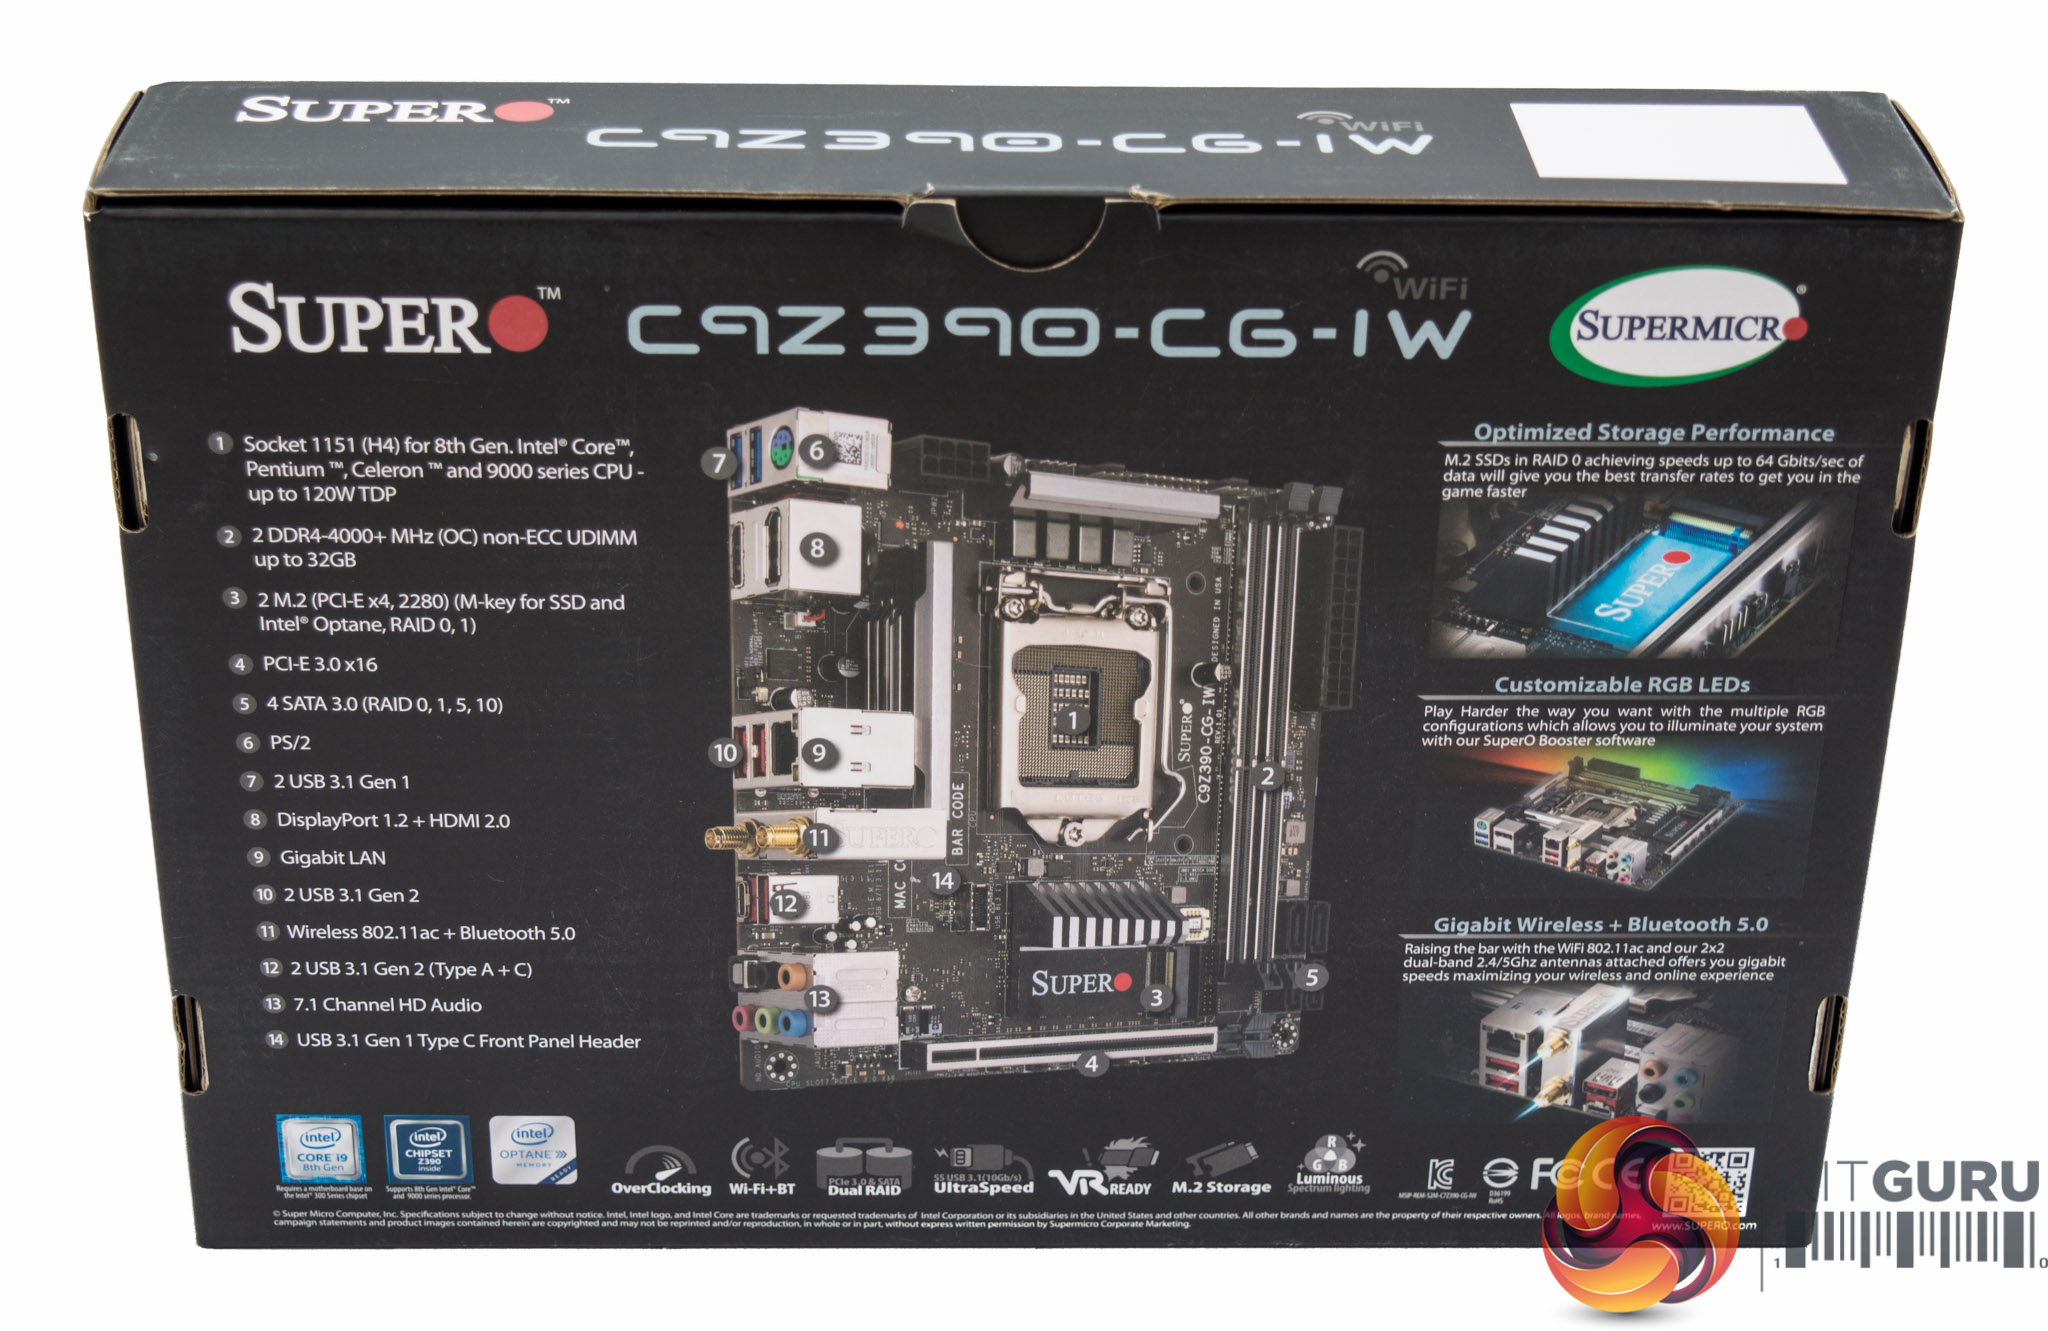
The packaging comes SuperO branded, which is Supermicro's gaming products brand, with several key features highlighted. These are the network connectivity, dual M.2 sockets with RAID support and customisable RGB LEDs.
Our particular media review sample came with no accessories, but Supermicro assured us that retail units ship with the following accessories:
- I/O shield
- Quick Reference Guide
- 2 x SATA cable
- Driver CD
- Metal badge
- Cable sticker
- 2 x WiFi+Bluetooth Antenna
- Front panel extension cable
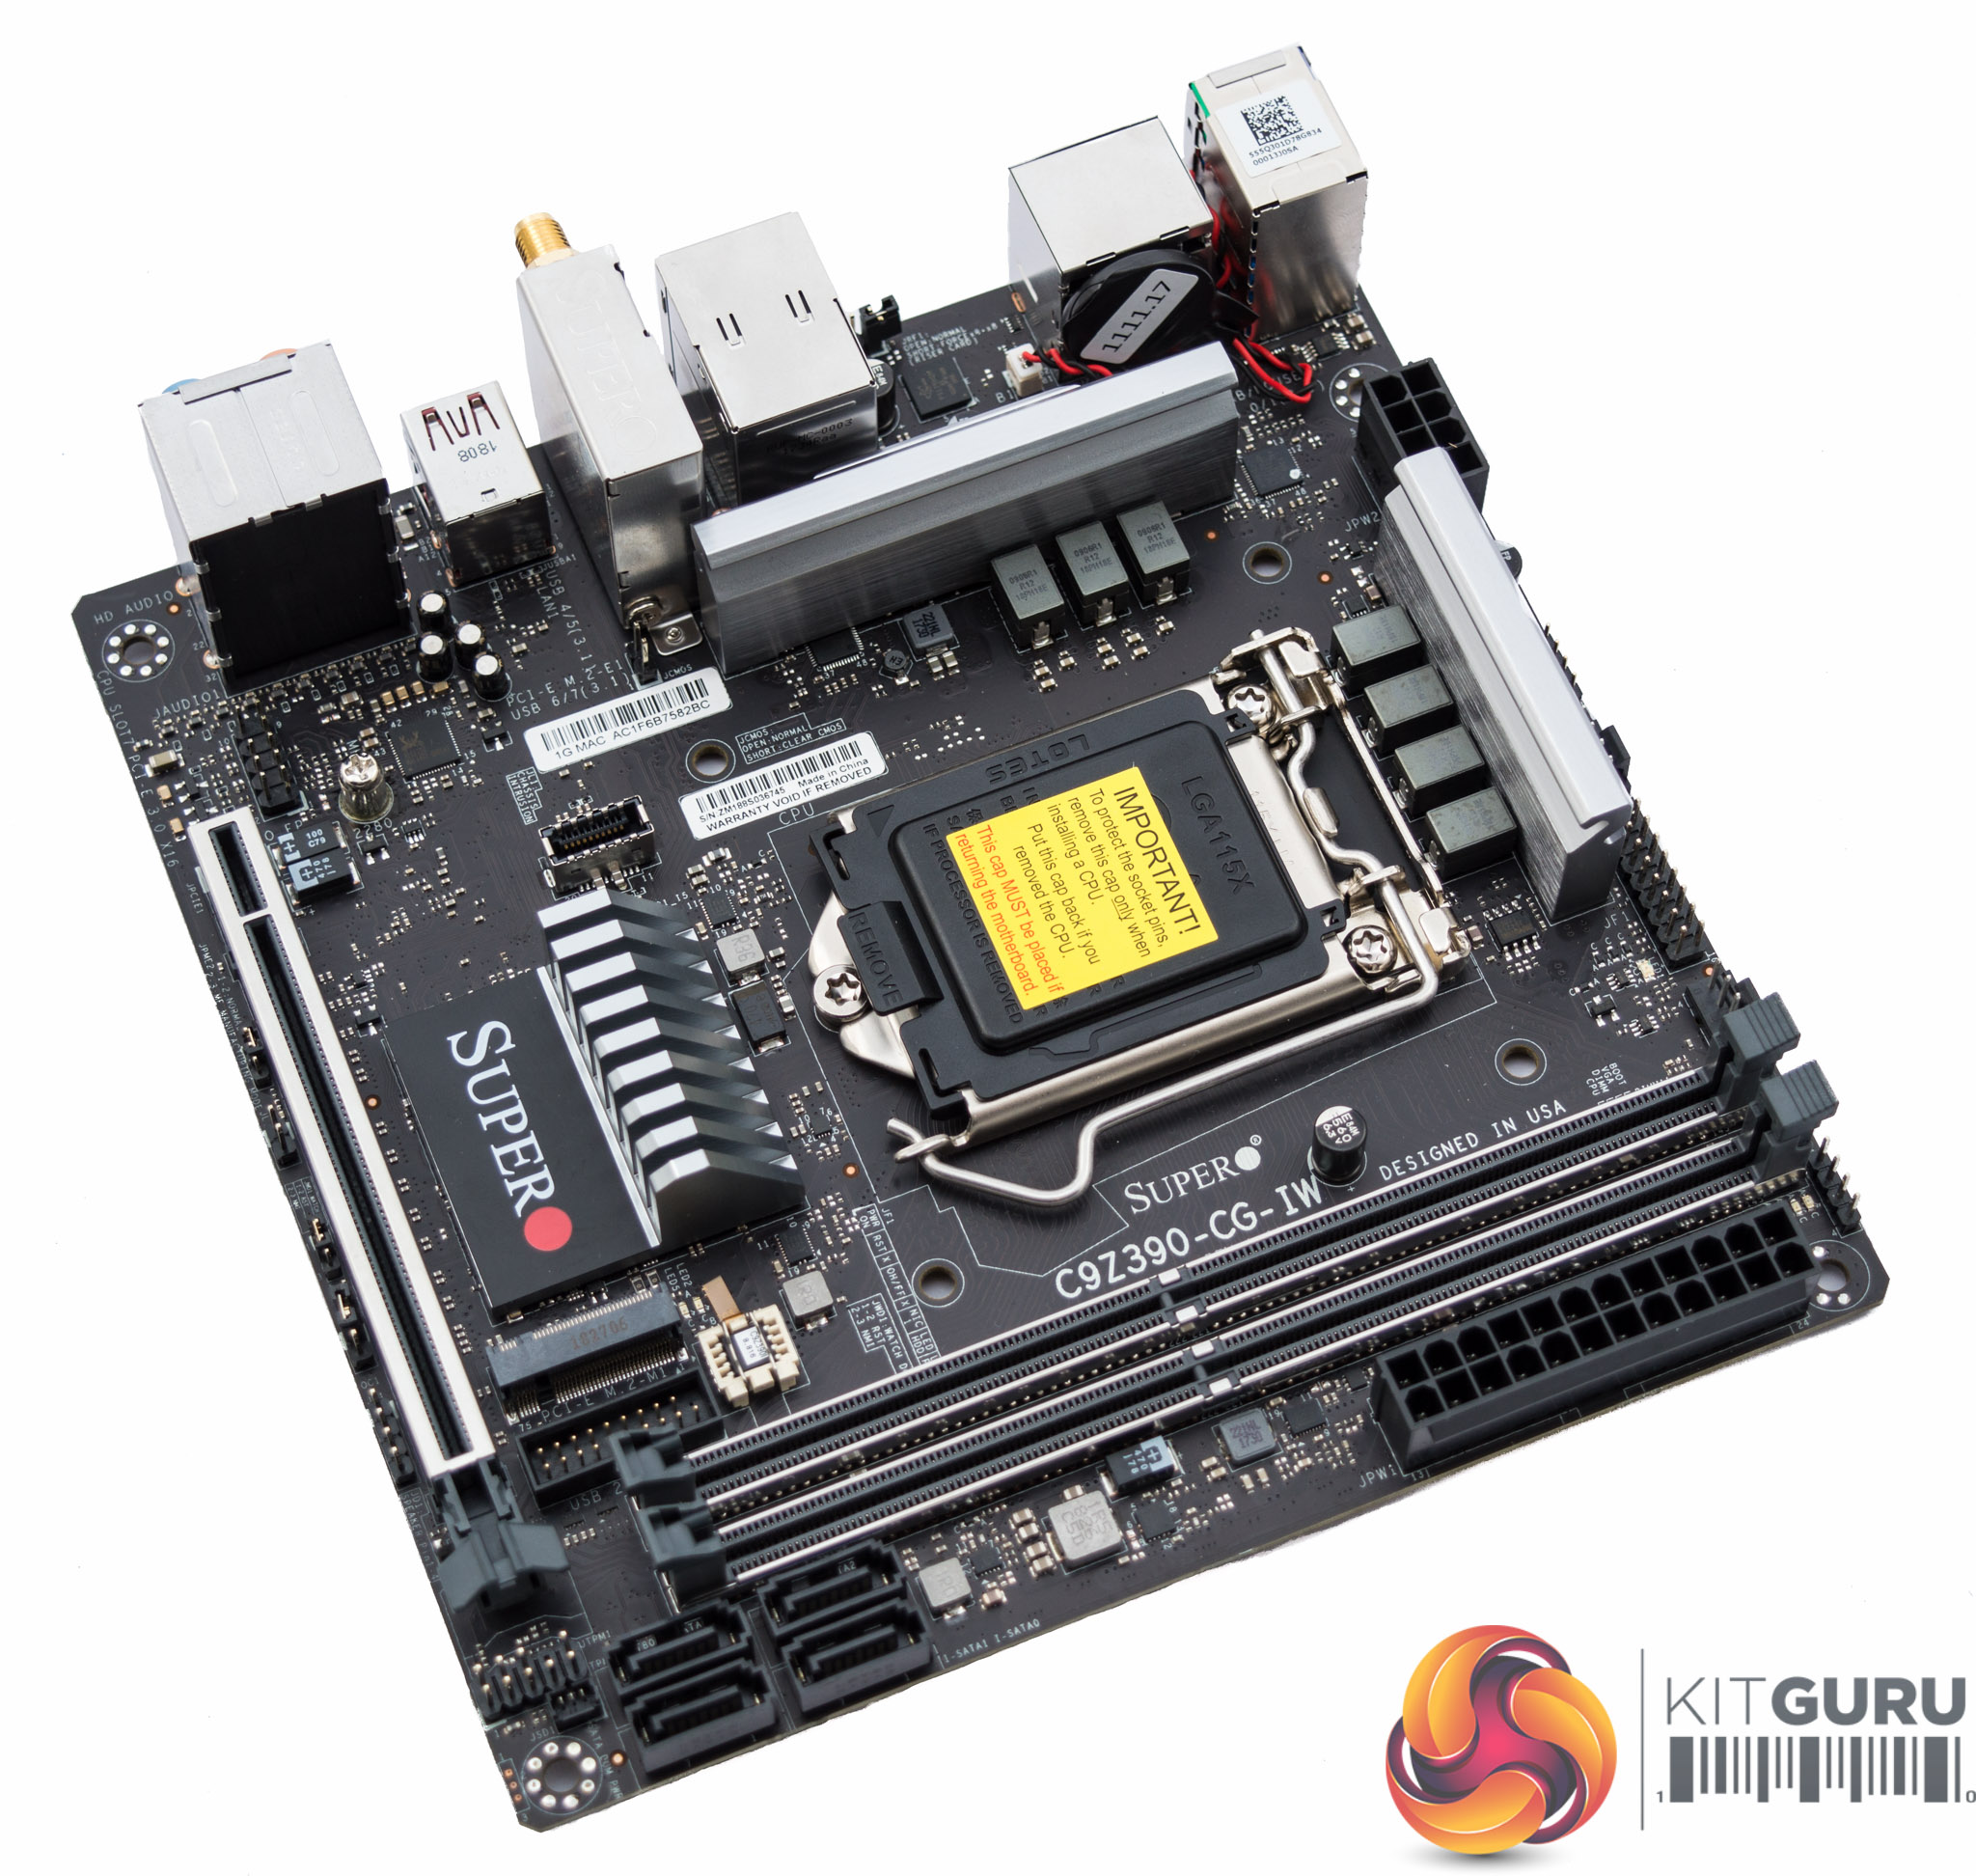
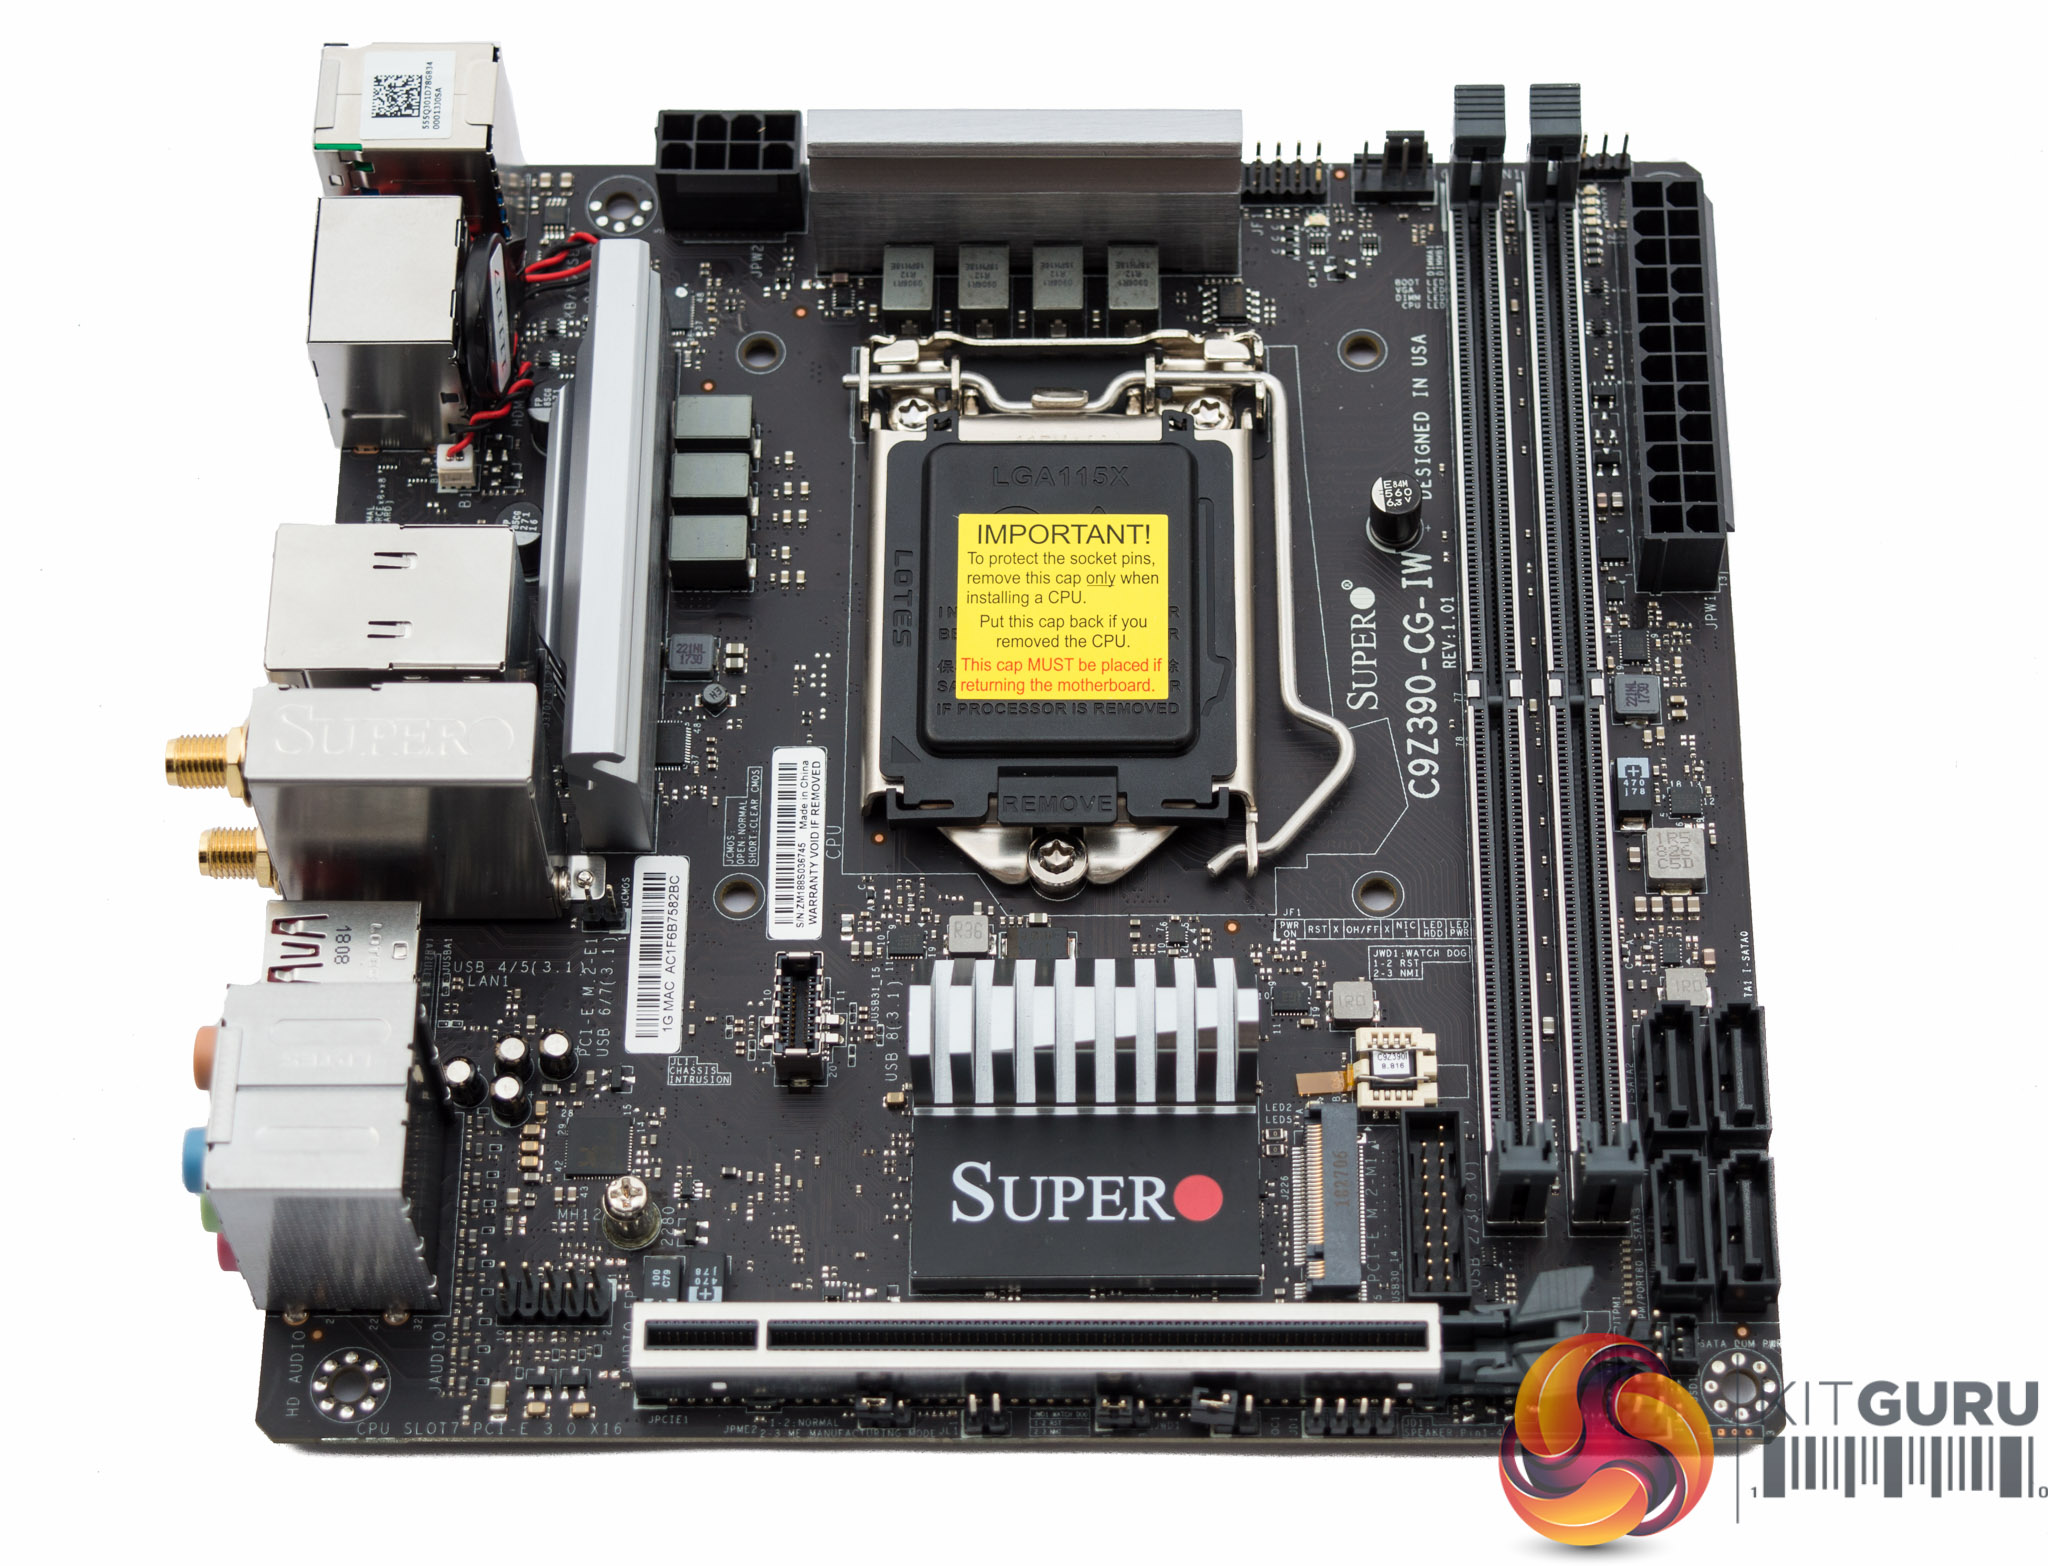
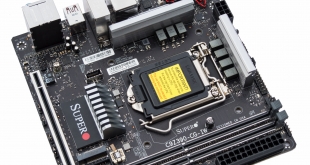
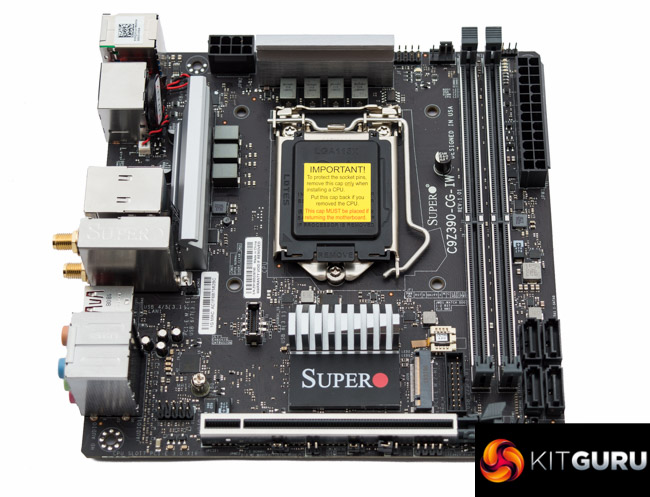
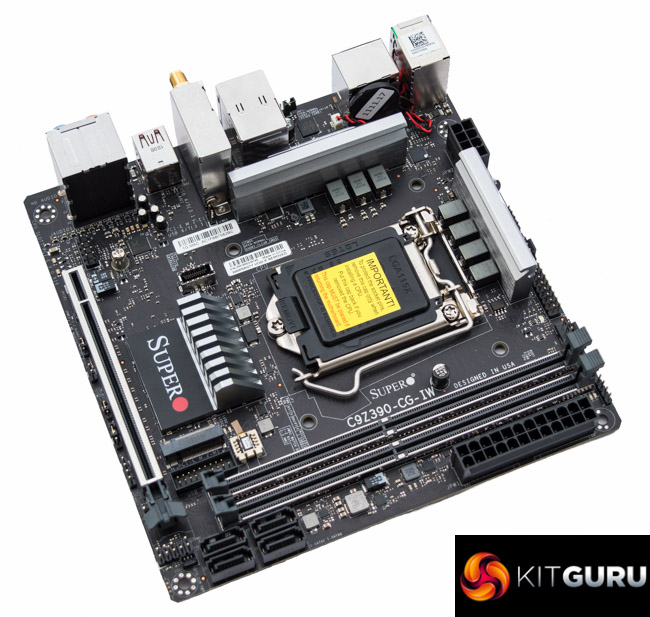
The styling of mini-ITX motherboards is always broadly similar given the limited space for customisation after placing non-negotiable elements like the CPU socket, PCIe lane and memory slots. Supermicro's SuperO C9Z390-CG-IW is particularly plain as there's no significant styling on the VRM heatsinks, neither on the chipset heatsink. That's no bad thing as there aren't many mini-ITX cases with large display windows. Even in a windowed-case this motherboard does fine with its mostly-black aesthetic and onboard RGB lighting.
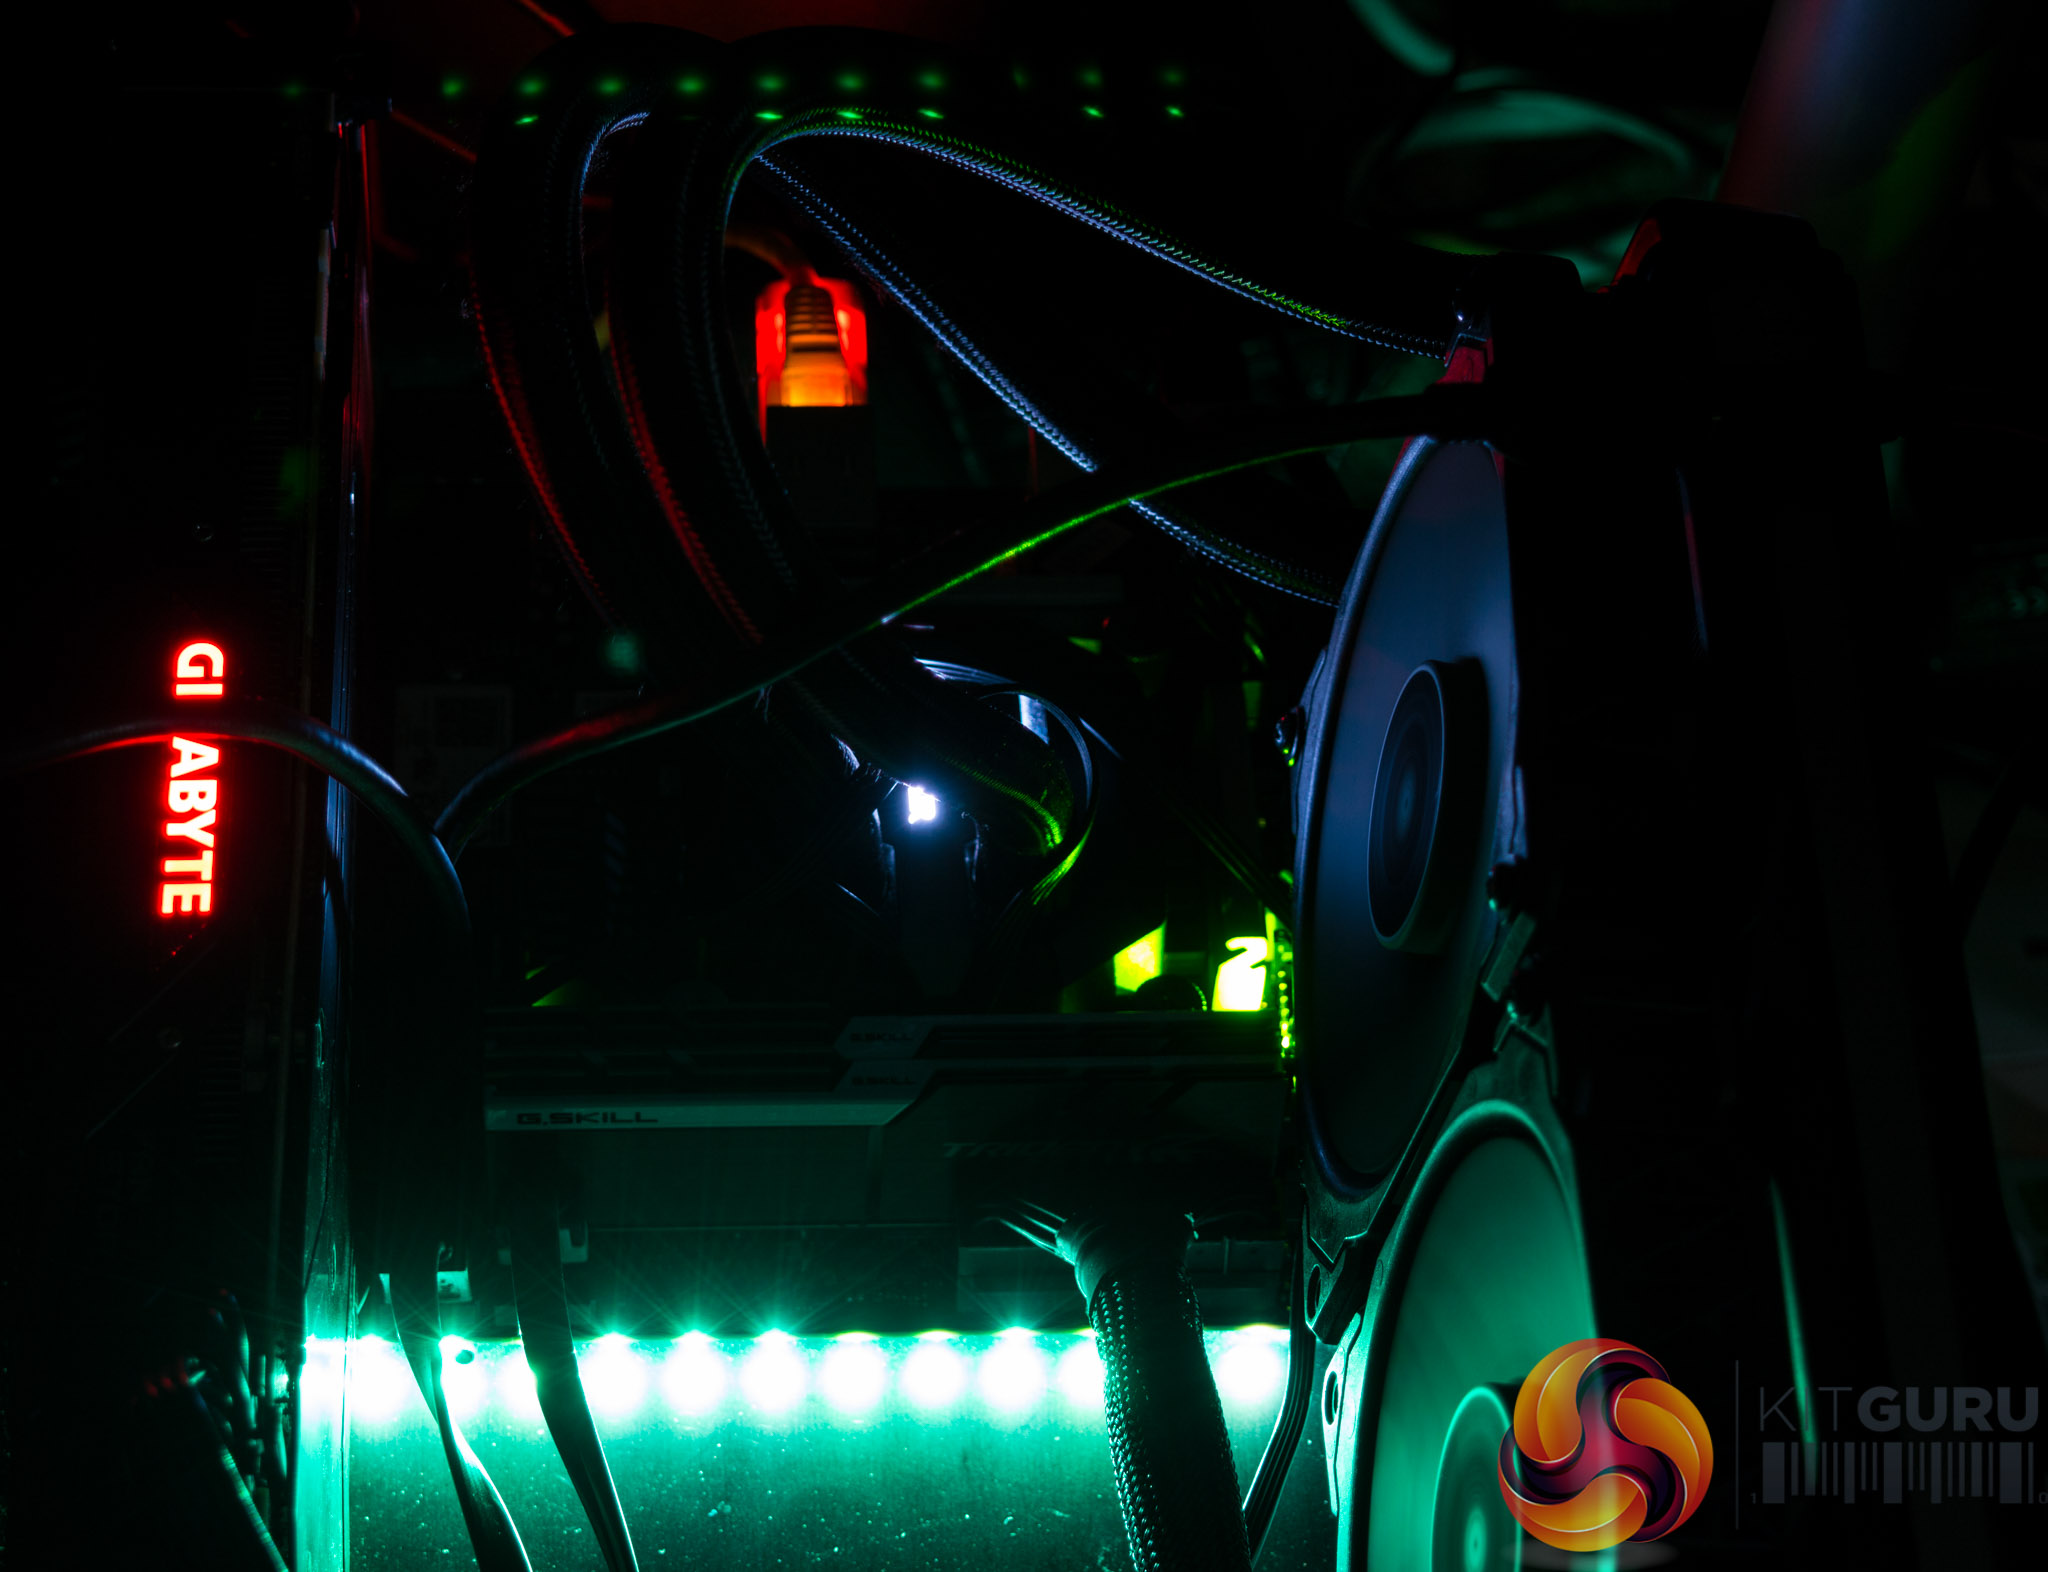
Onboard RGB lighting is provided in a single zone along the edge of the motherboard where the 24-pin connector resides. These LEDs are pleasingly bright and there's an optional 12V G R B connection for anyone wishing to add more RGB lighting flair.
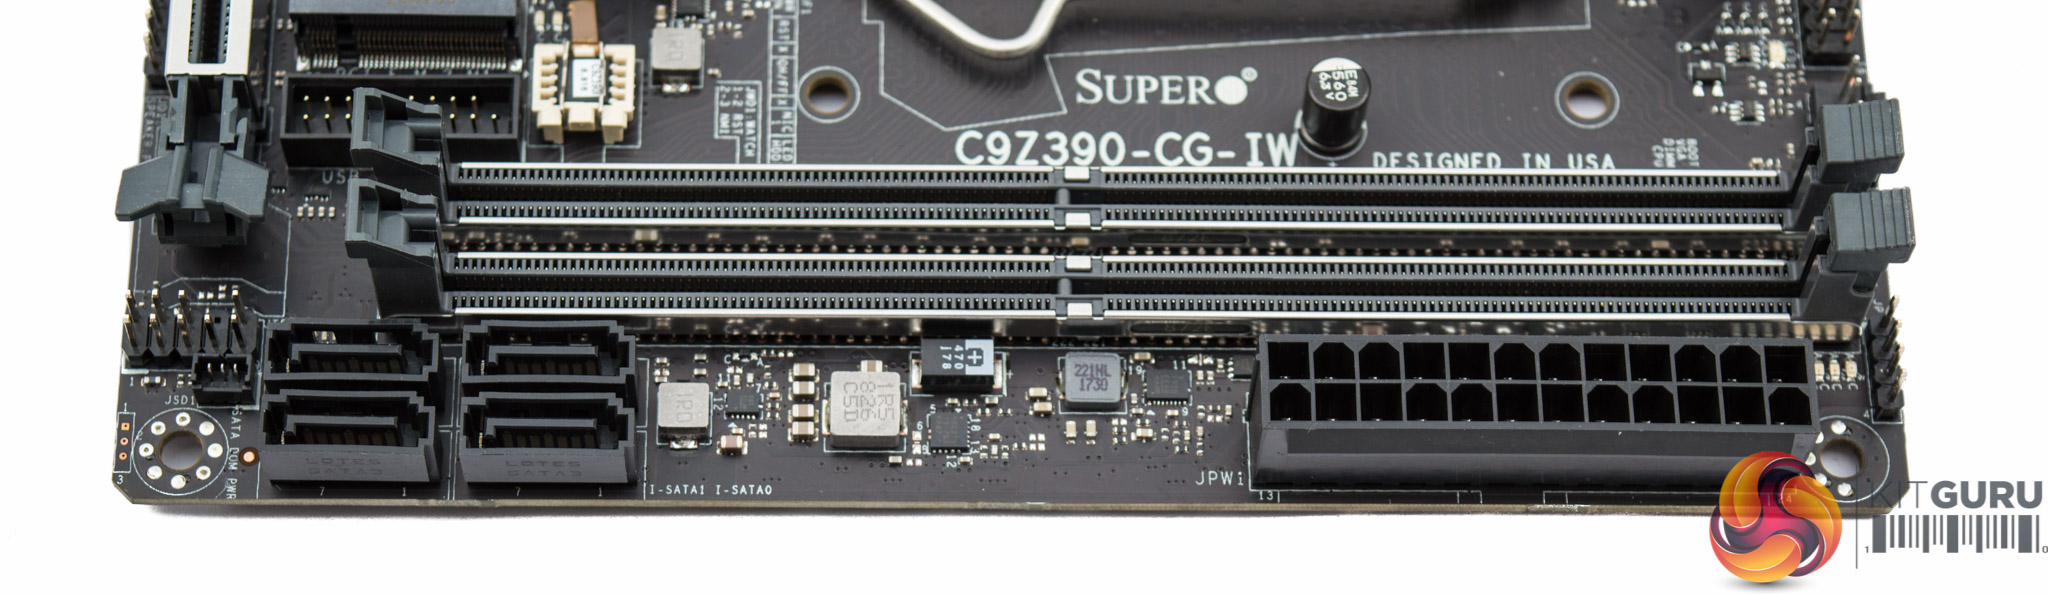
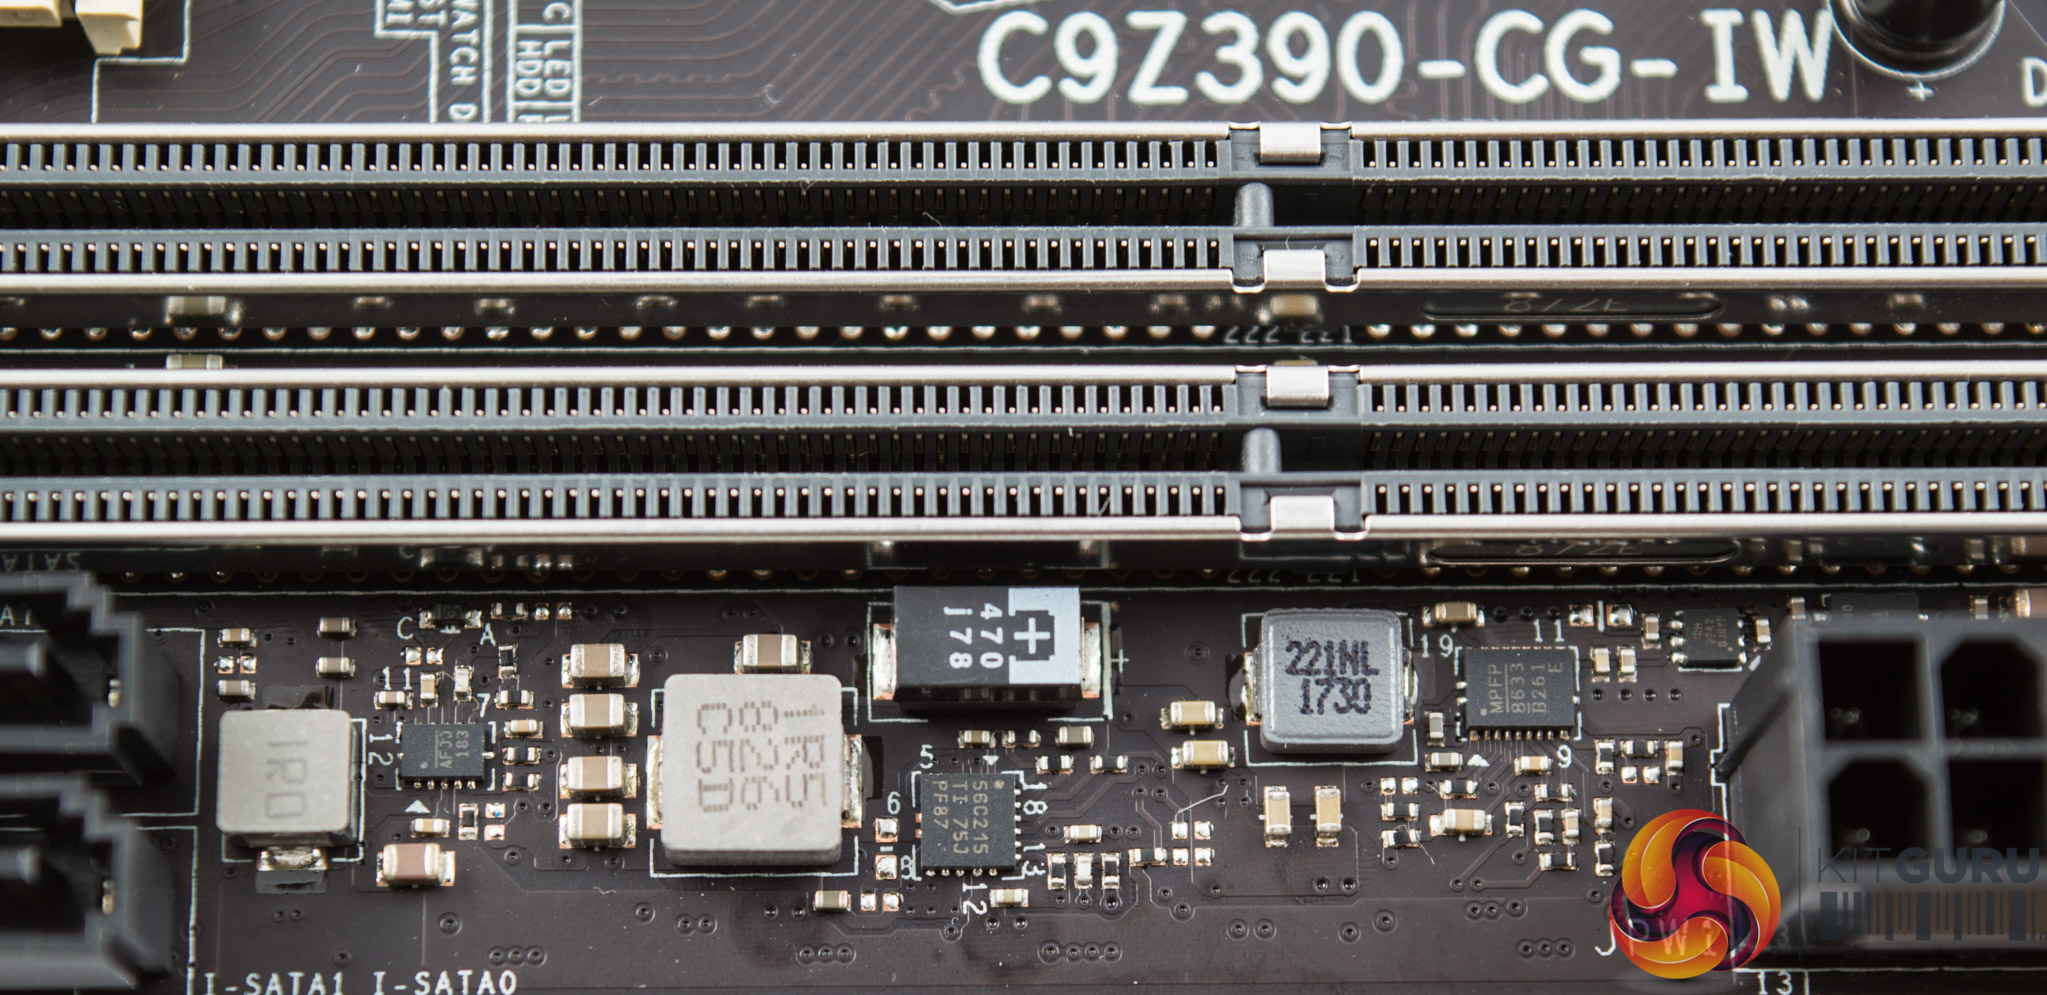
Supermicro implements only four of the six available SATA ports, presumably due to space limitations. This isn't necessarily a bad thing though as it means both M.2 slots can operate in SATA mode without deactivating any standard SATA ports, this way all six SATA port “lanes” can actually be used concurrently.
Hidden towards the motherboard 24pin is a debug LED section with four LEDs (BOOT/CPU/DIMM/VGA) for troubleshooting. There's also a power-on LED near the CPU socket and M.2 activity LEDs for the primary M.2 slot mounted on the top side of the motherboard.
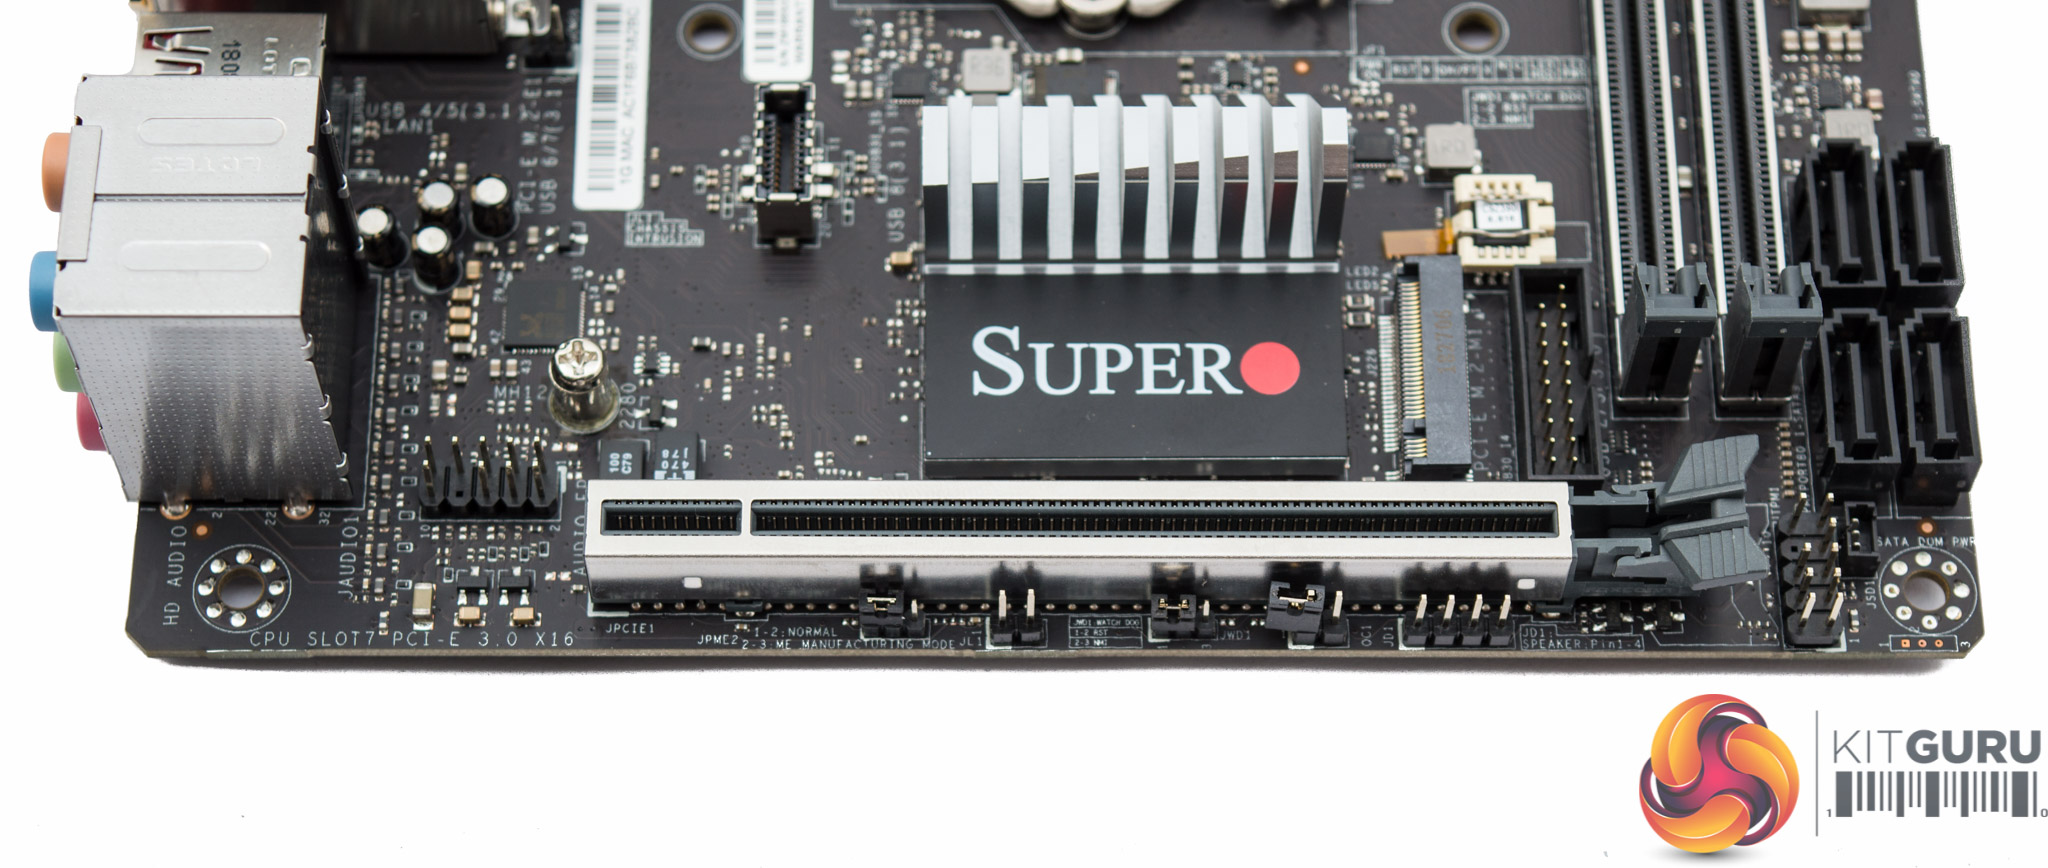
The single PCIe 3.0 16x lane features shielding for additional support. Beside the PCIe lane is the first of two M.2 slots, both of which have no cooling solution.
Around that same M.2 slot are the only two USB headers – one type USB 3.1 supplying a single USB 3.1 port and the other type USB 3.0 supplying up to two USB 3.0 ports.
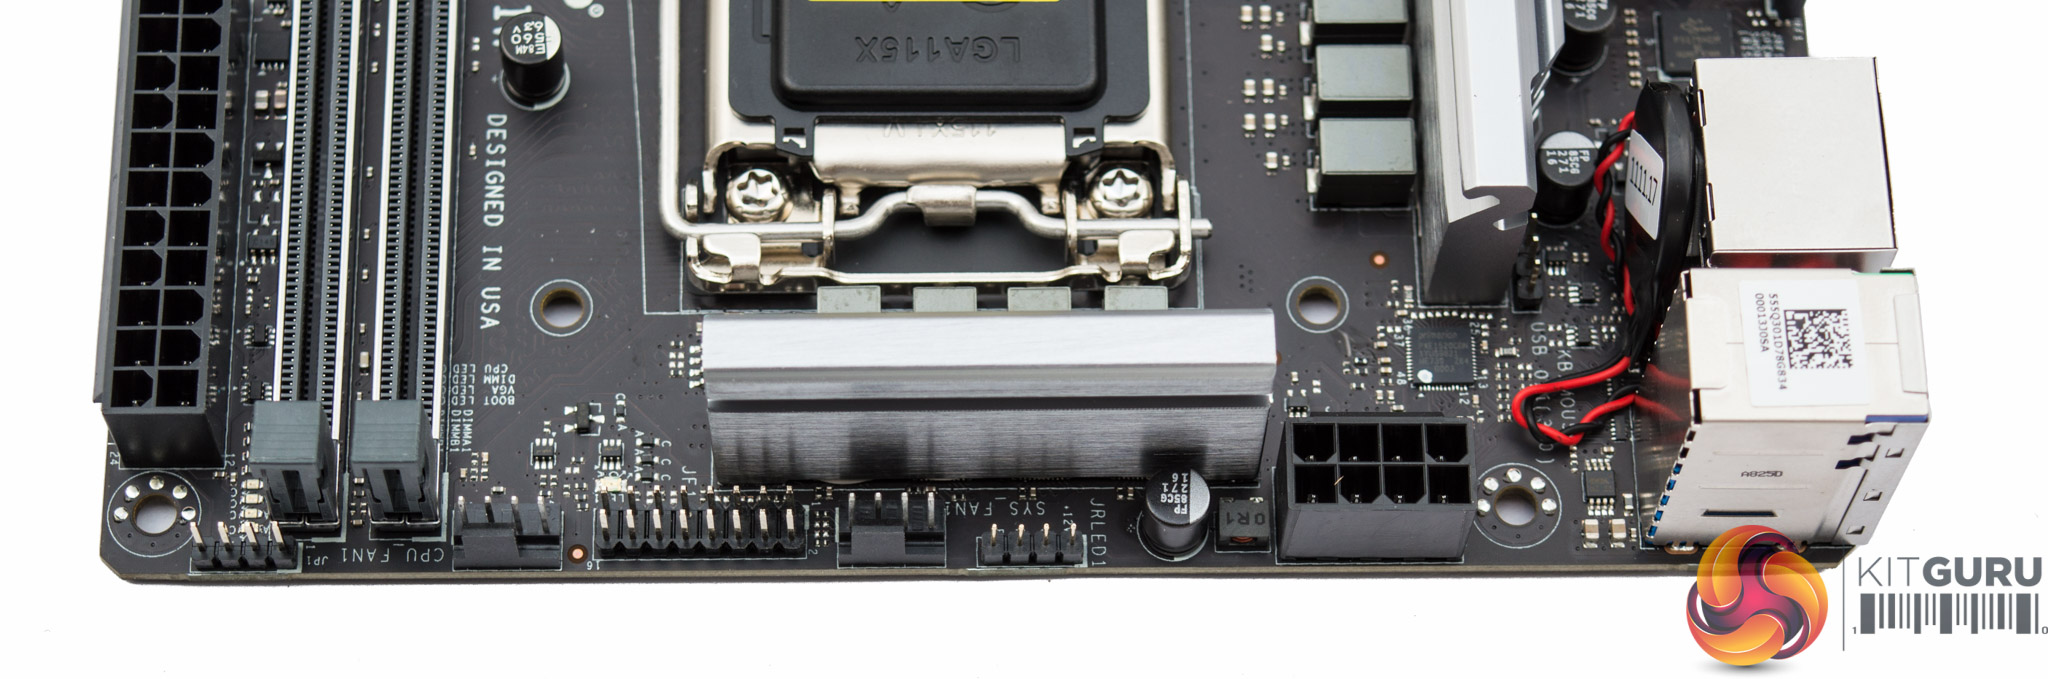
Around the CPU socket are the only two fan headers, marked CPU and System, as well as the single RGB LED connection. Power is drawn into the CPU VRM through an 8pin EPS connection.
Note the CMOS battery is mounted vertically to save space, a common practice on mini-ITX motherboards. However, in this instance there is no clear CMOS button to go with it meaning a failed overclock has to be recovered by unplugging the fiddly CMOS battery cable – which is less than ideal.
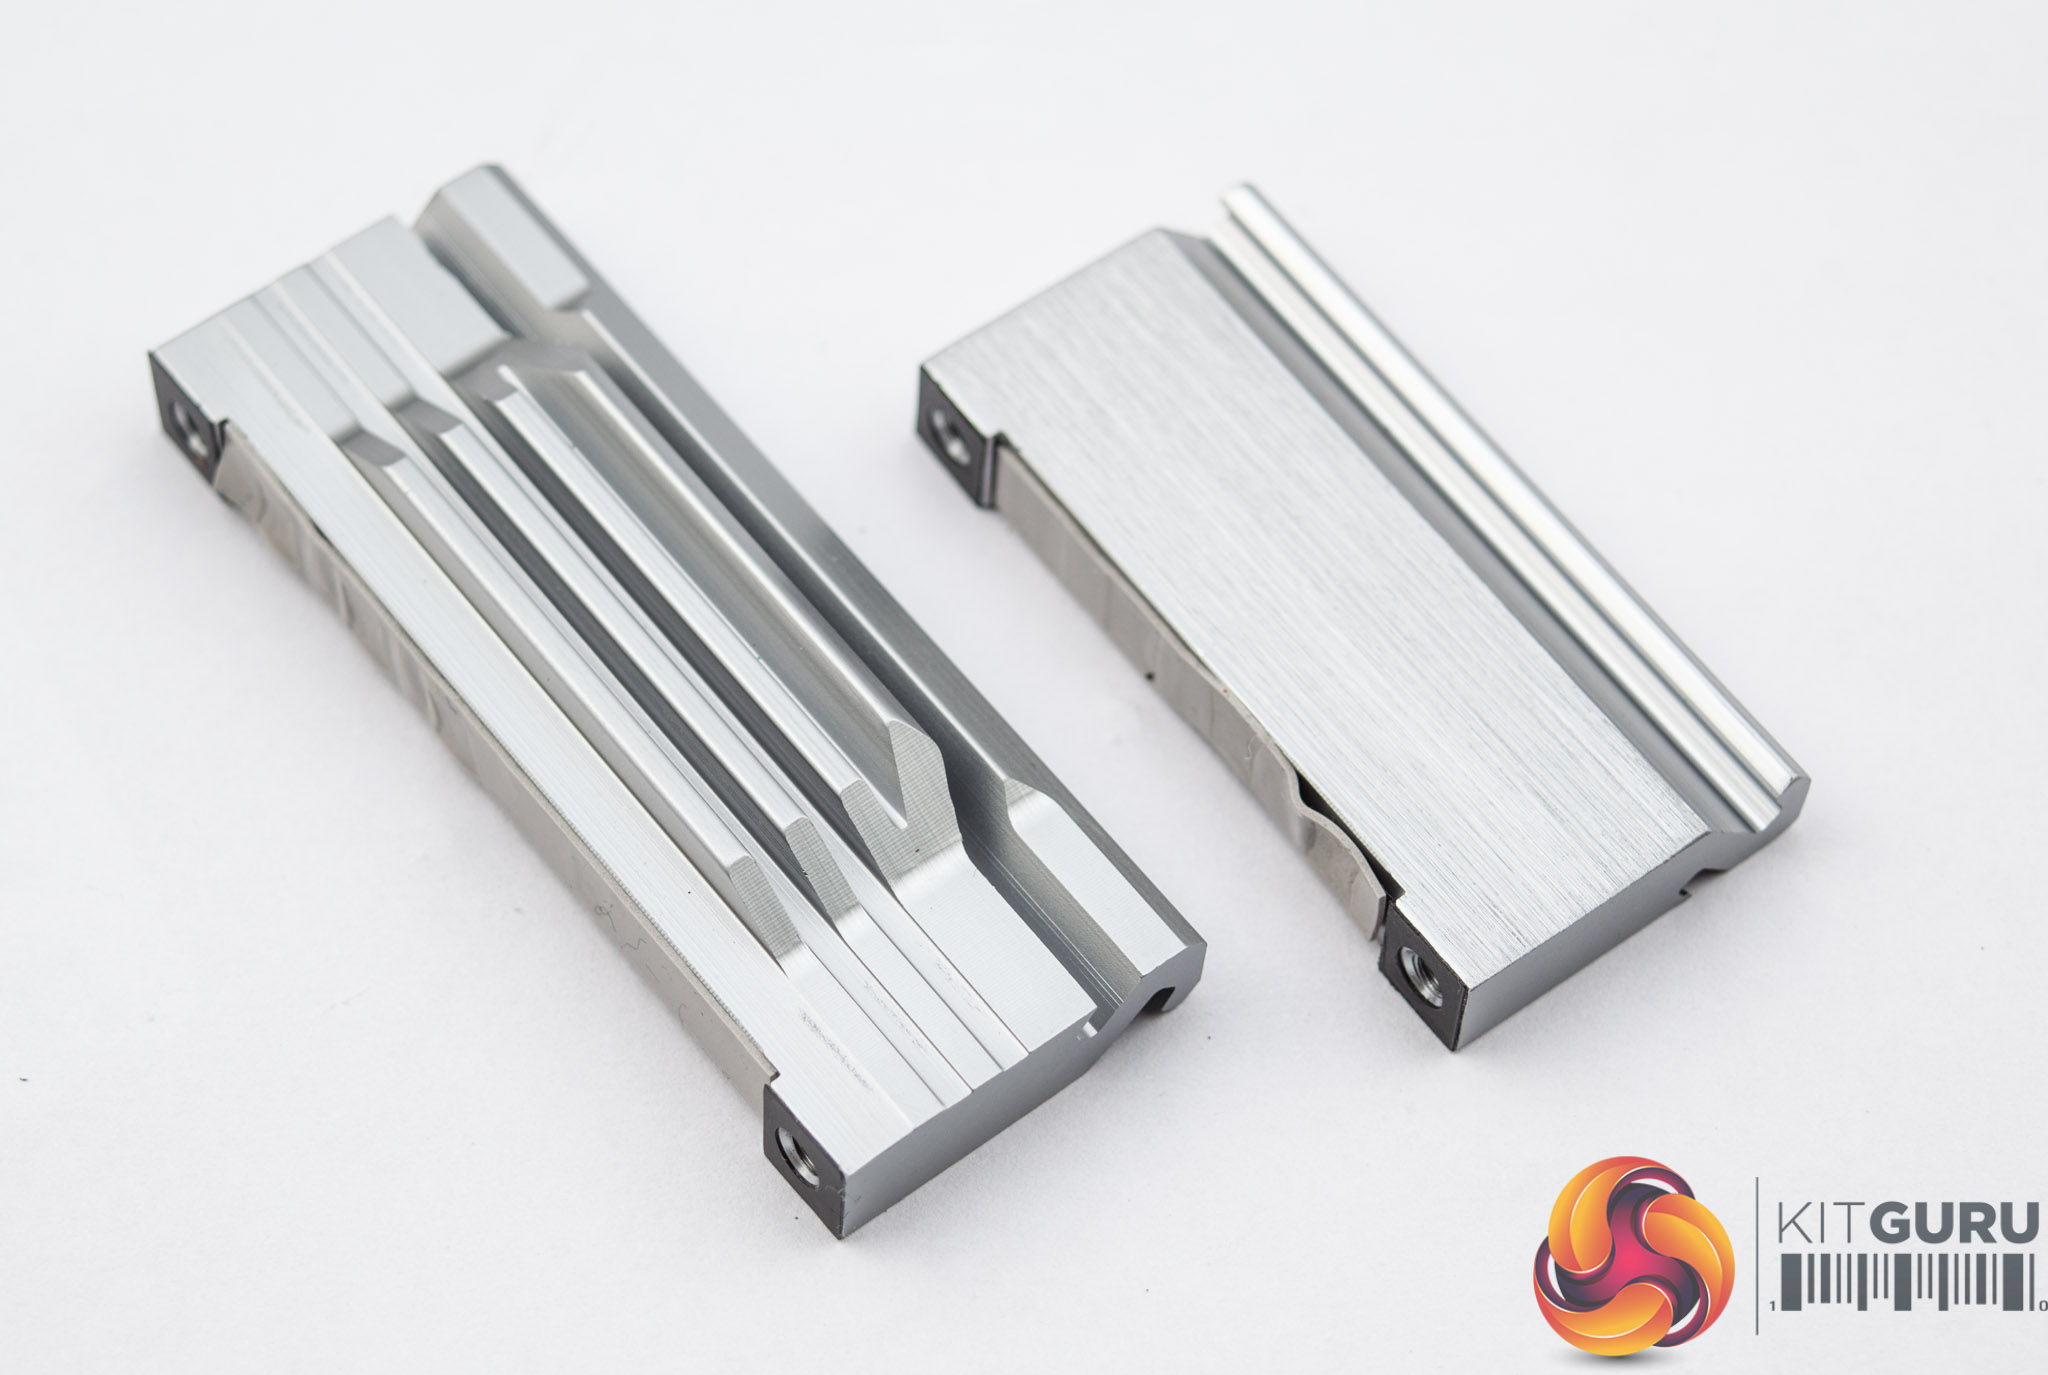
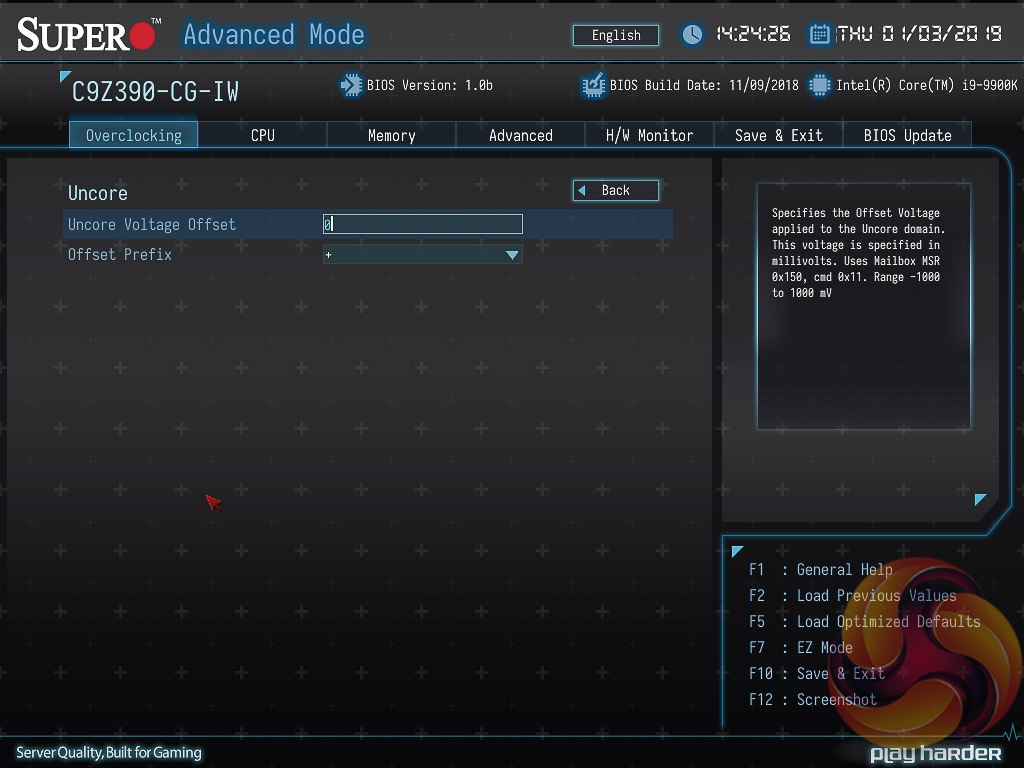
Unlike on Supermicro's Z370 model, there are two CPU VRM heatsinks for both MOSFET areas. On this motherboard Supermicro has split the VRM into 4 and 3, even though it operates as 5+2, which means both heatsinks cool the VCore VRM. This is important as the “+2” phases for the VCC GT (iGPU) do not get a great deal of use so having the heatsink also cooling part of the VCore makes a lot of sense, even if it's only 1 VCore phase.

The rear I/O is well balanced and includes the following ports:
- 1 x PS/2 Keyboard/Mouse Combo
- 2 x USB 3.0 5Gbps (Blue)
- 3 x USB 3.1 10Gbps (Red)
- 1 x USB 3.1 10Gbps Type-C
- 1 x DisplayPort 1.2
- 1 x HDMI 2.0
- 2 x WiFi/Bluetooth Antennae
- 5 x Analogue Audio Jacks
- 1 x S/PDIF Optical Audio
- 1 x RJ45 Gigabit LAN
There is a bit of space in the rear I/O, where it would be nice to see a clear CMOS button.
Supermicro has integrated a CNVi WiFi and Bluetooth combination module into the rear I/O for users looking for wireless connectivity.
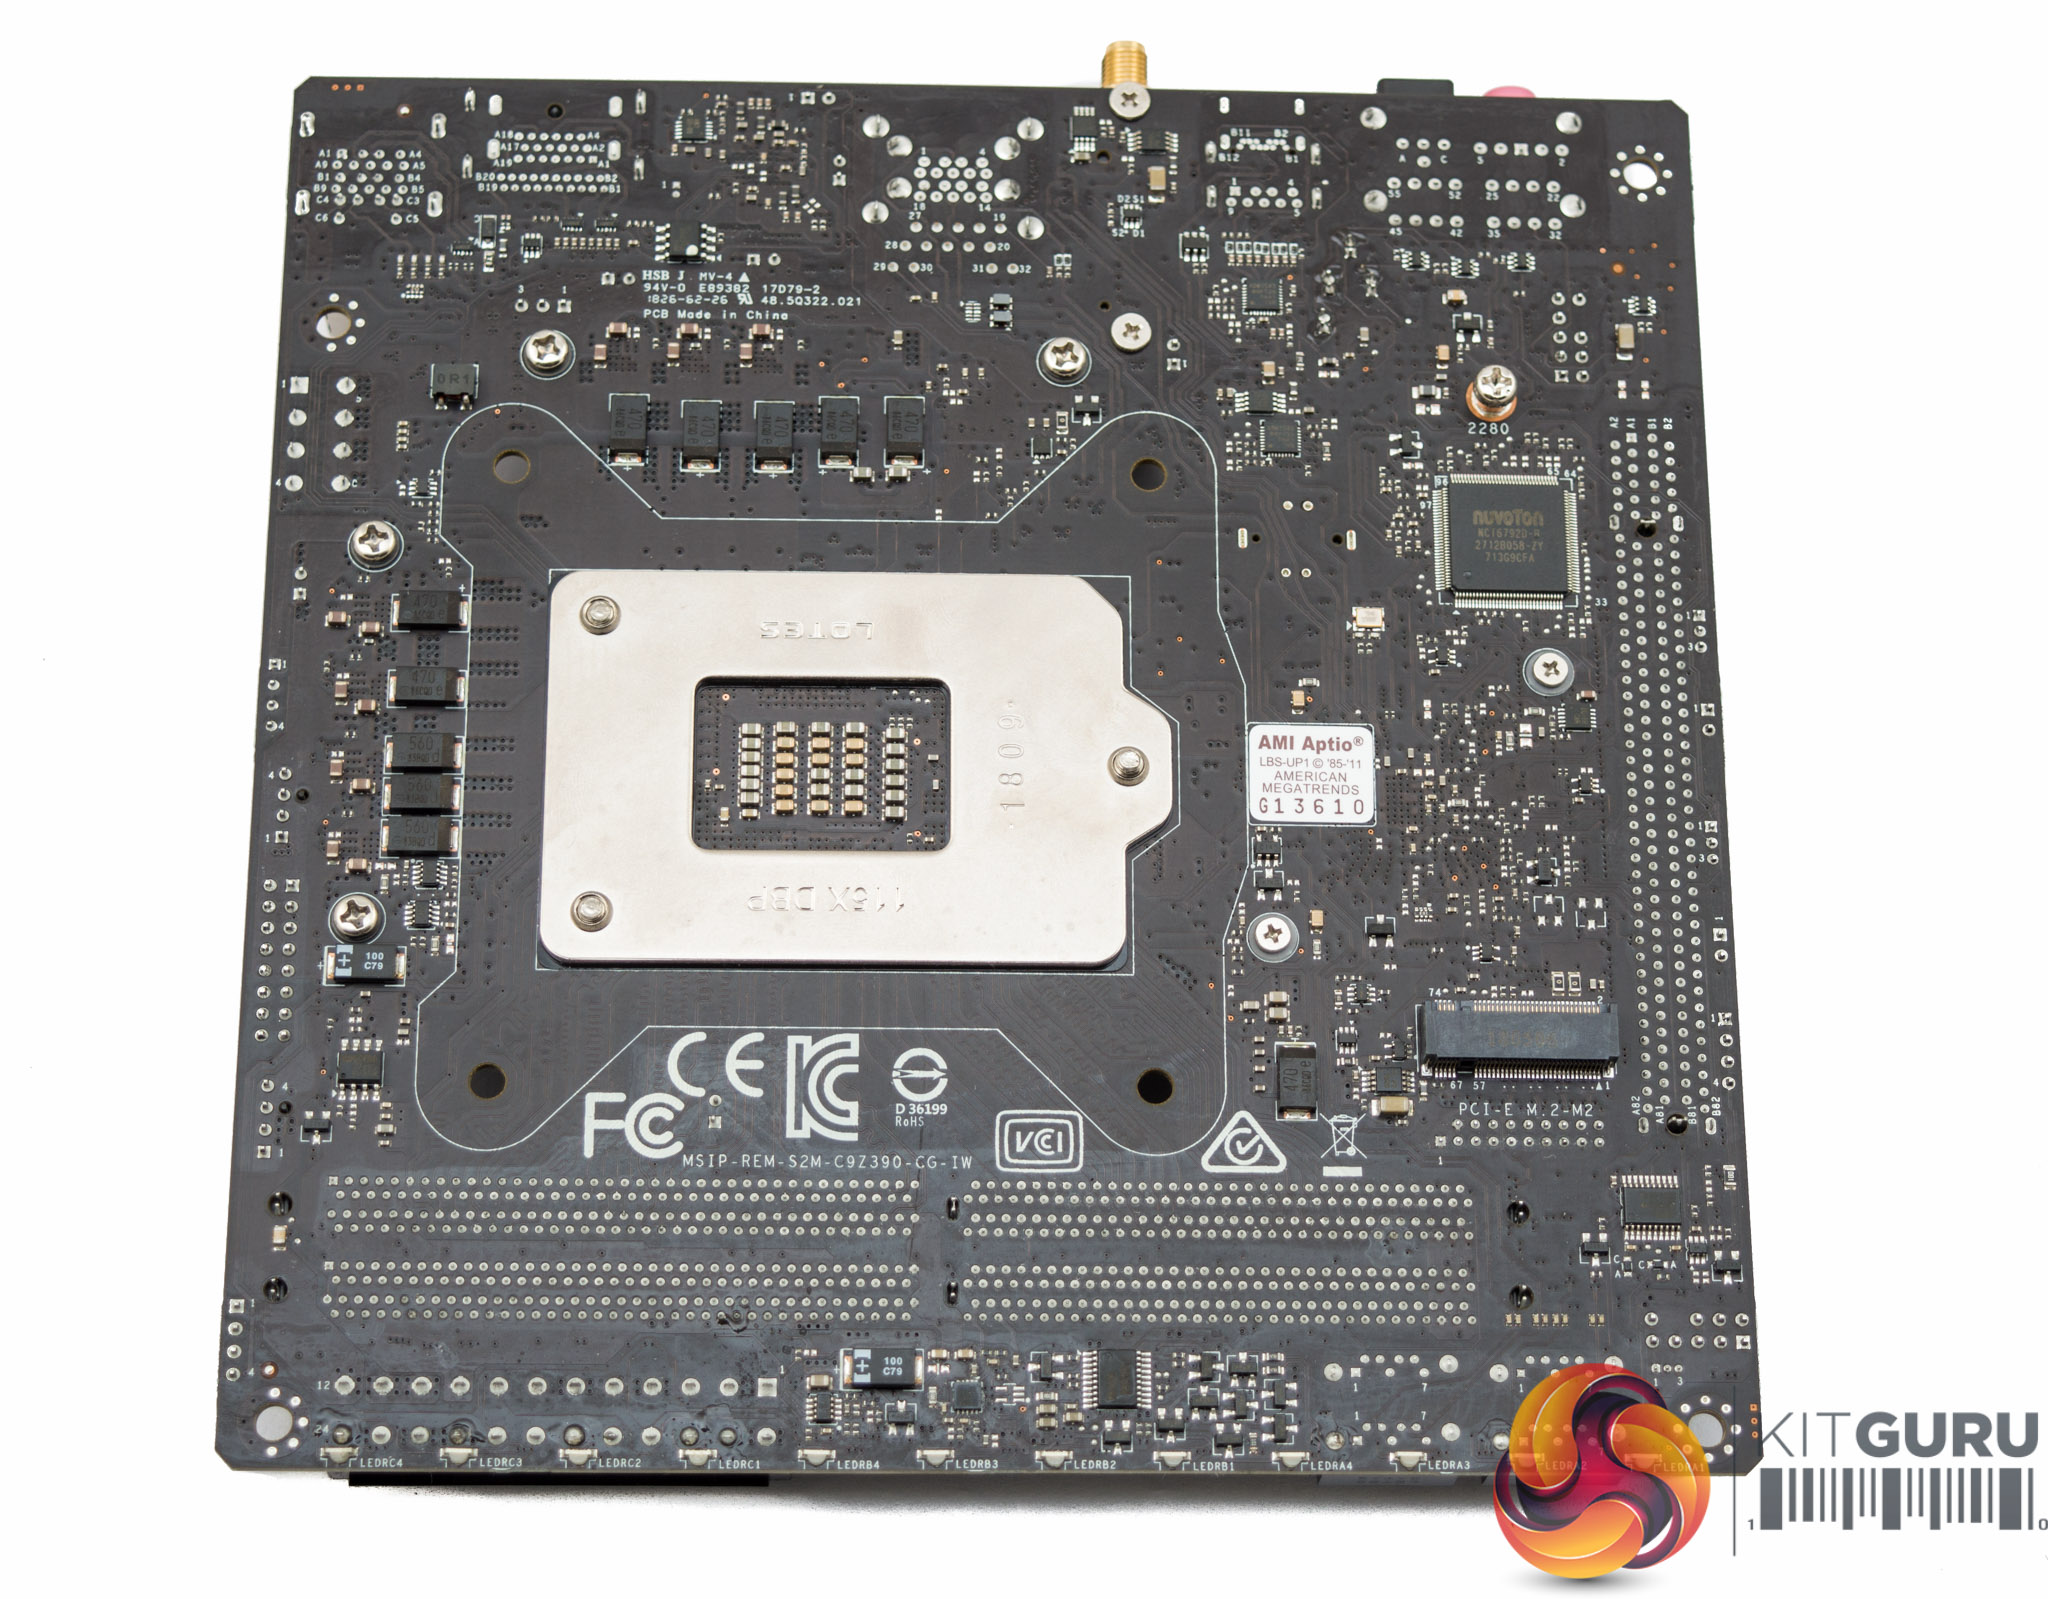
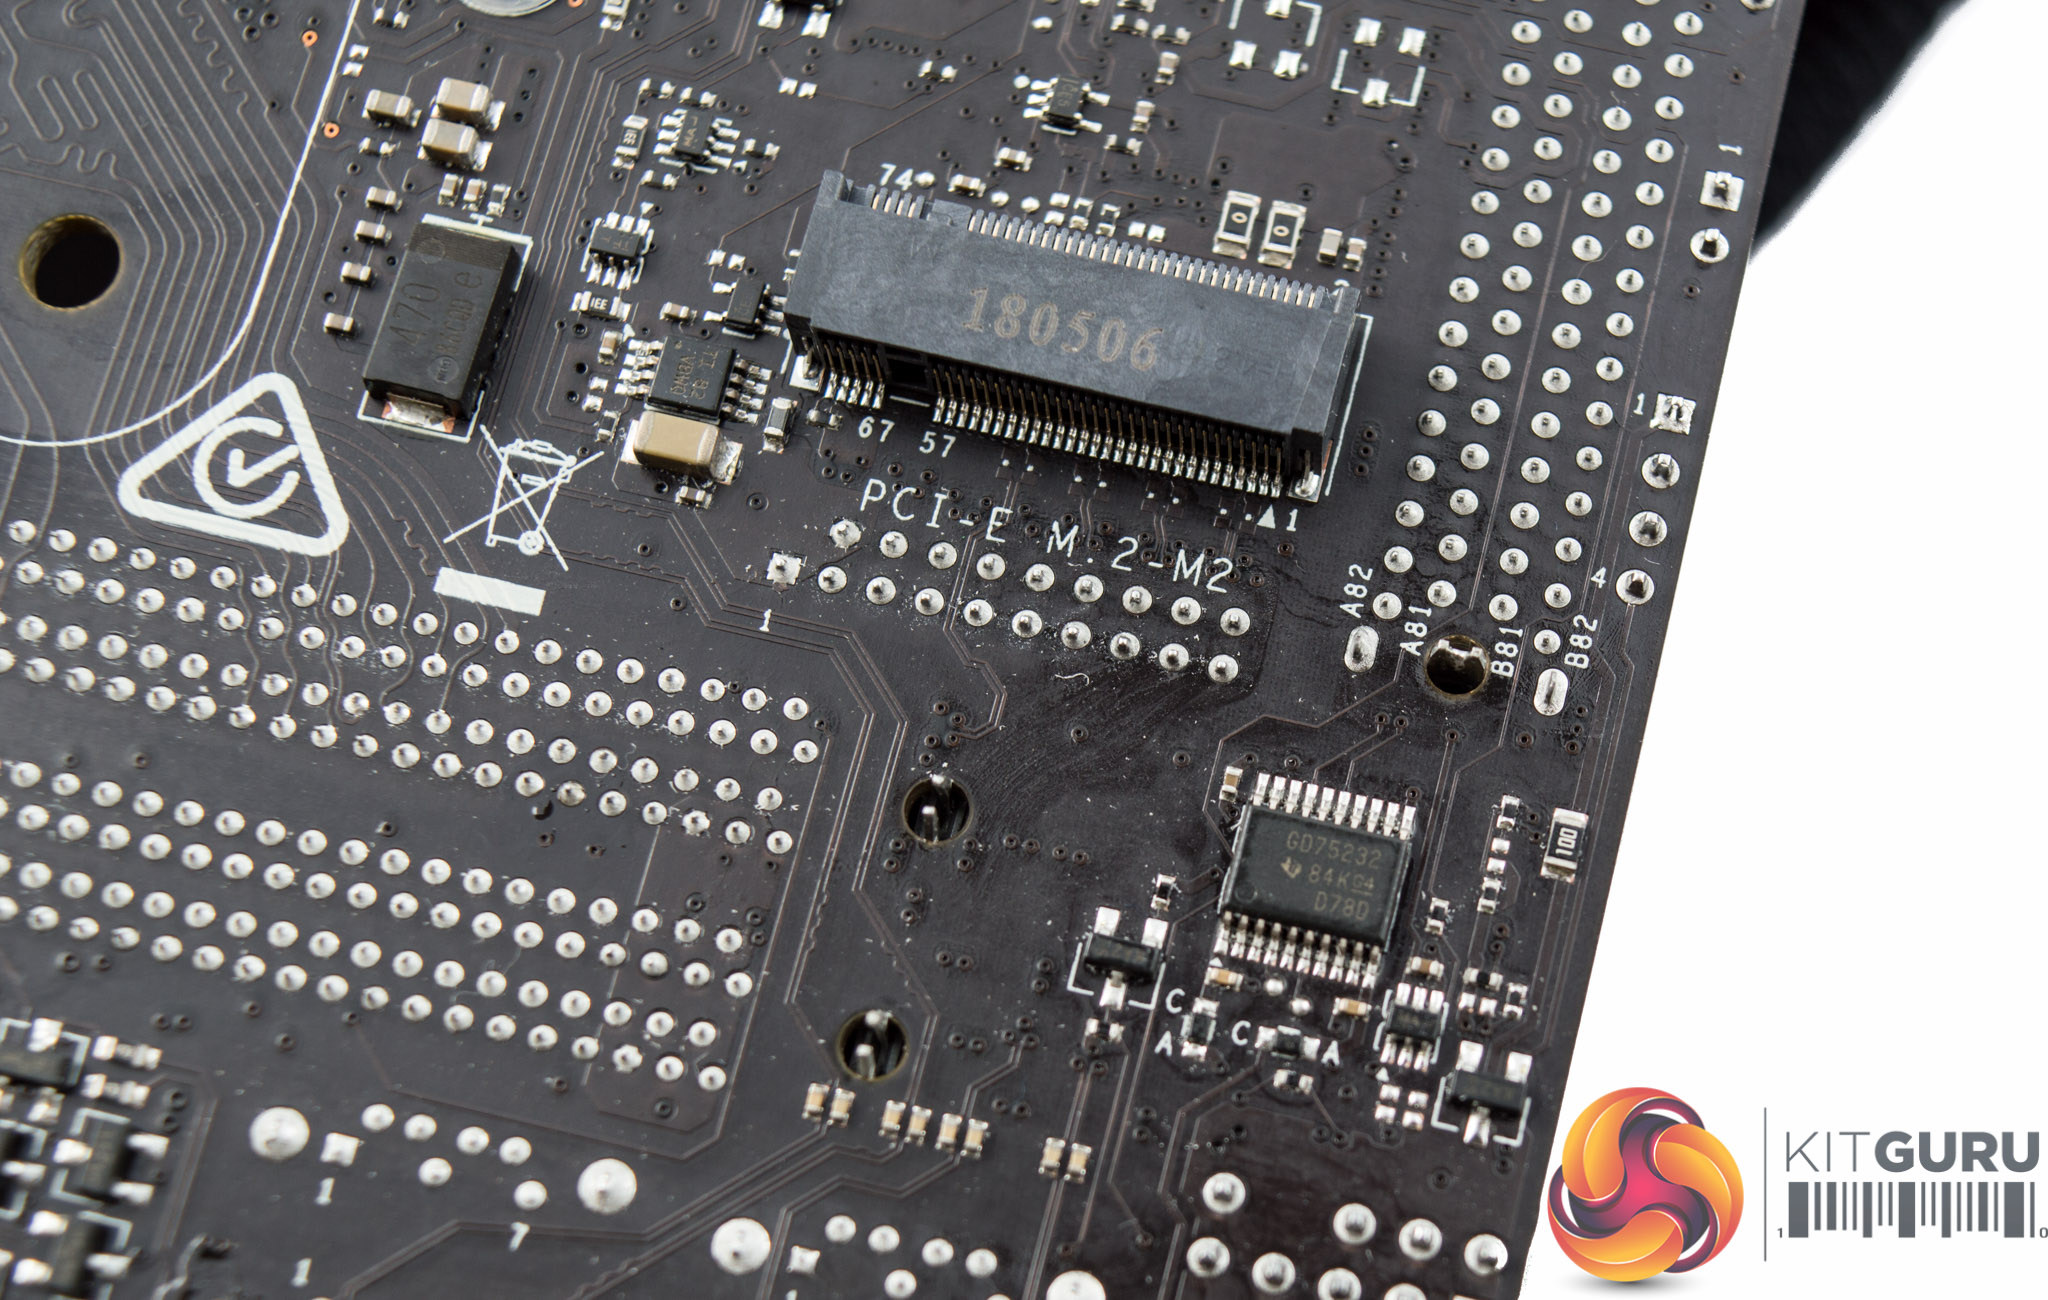
Underneath the motherboard is the second M.2 slot, which supports the same PCIe 3.0 X4 and SATA III modes as the M.2 slot above. There's also a number of cross-head screws for easy maintenance as well as a number of additional ICs and components that help with elements of power delivery and connectivity.
A Texas Instruments GD75232 chip sits underneath the header marked UTPM1, this chip is responsible for RS232 and UART communications.
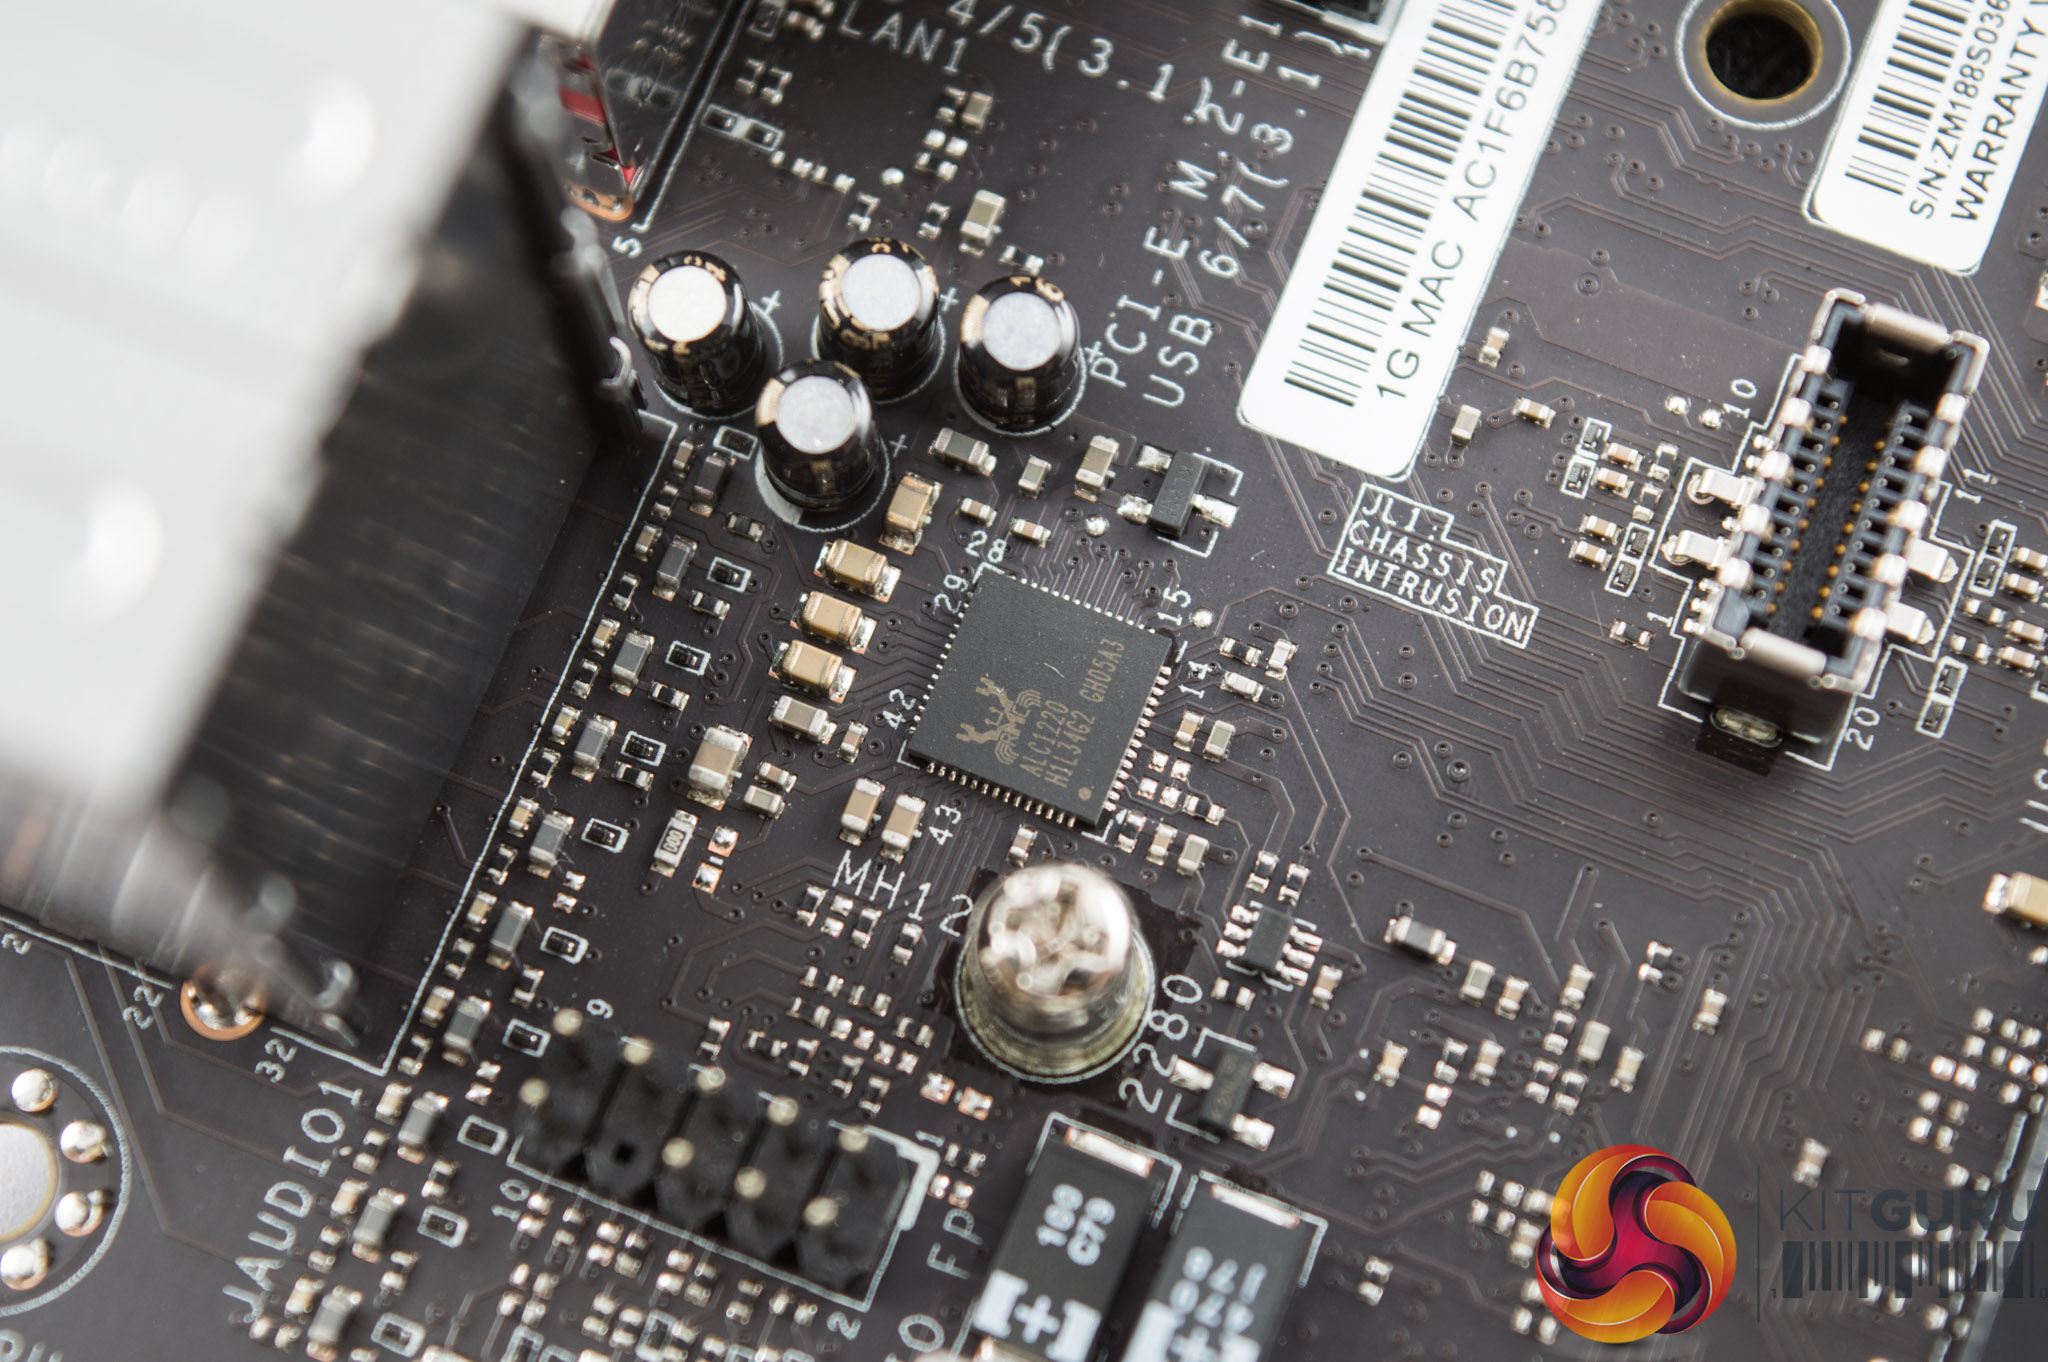
An unshielded Realtek ALC1220 codec provides the audio, it has four audio capacitors with it and is not on an isolated PCB.
A Renesas 10268ASP microcontroller underneath the memory lanes, near the LEDs, and likely provides the control functionality for the onboard RGBs.
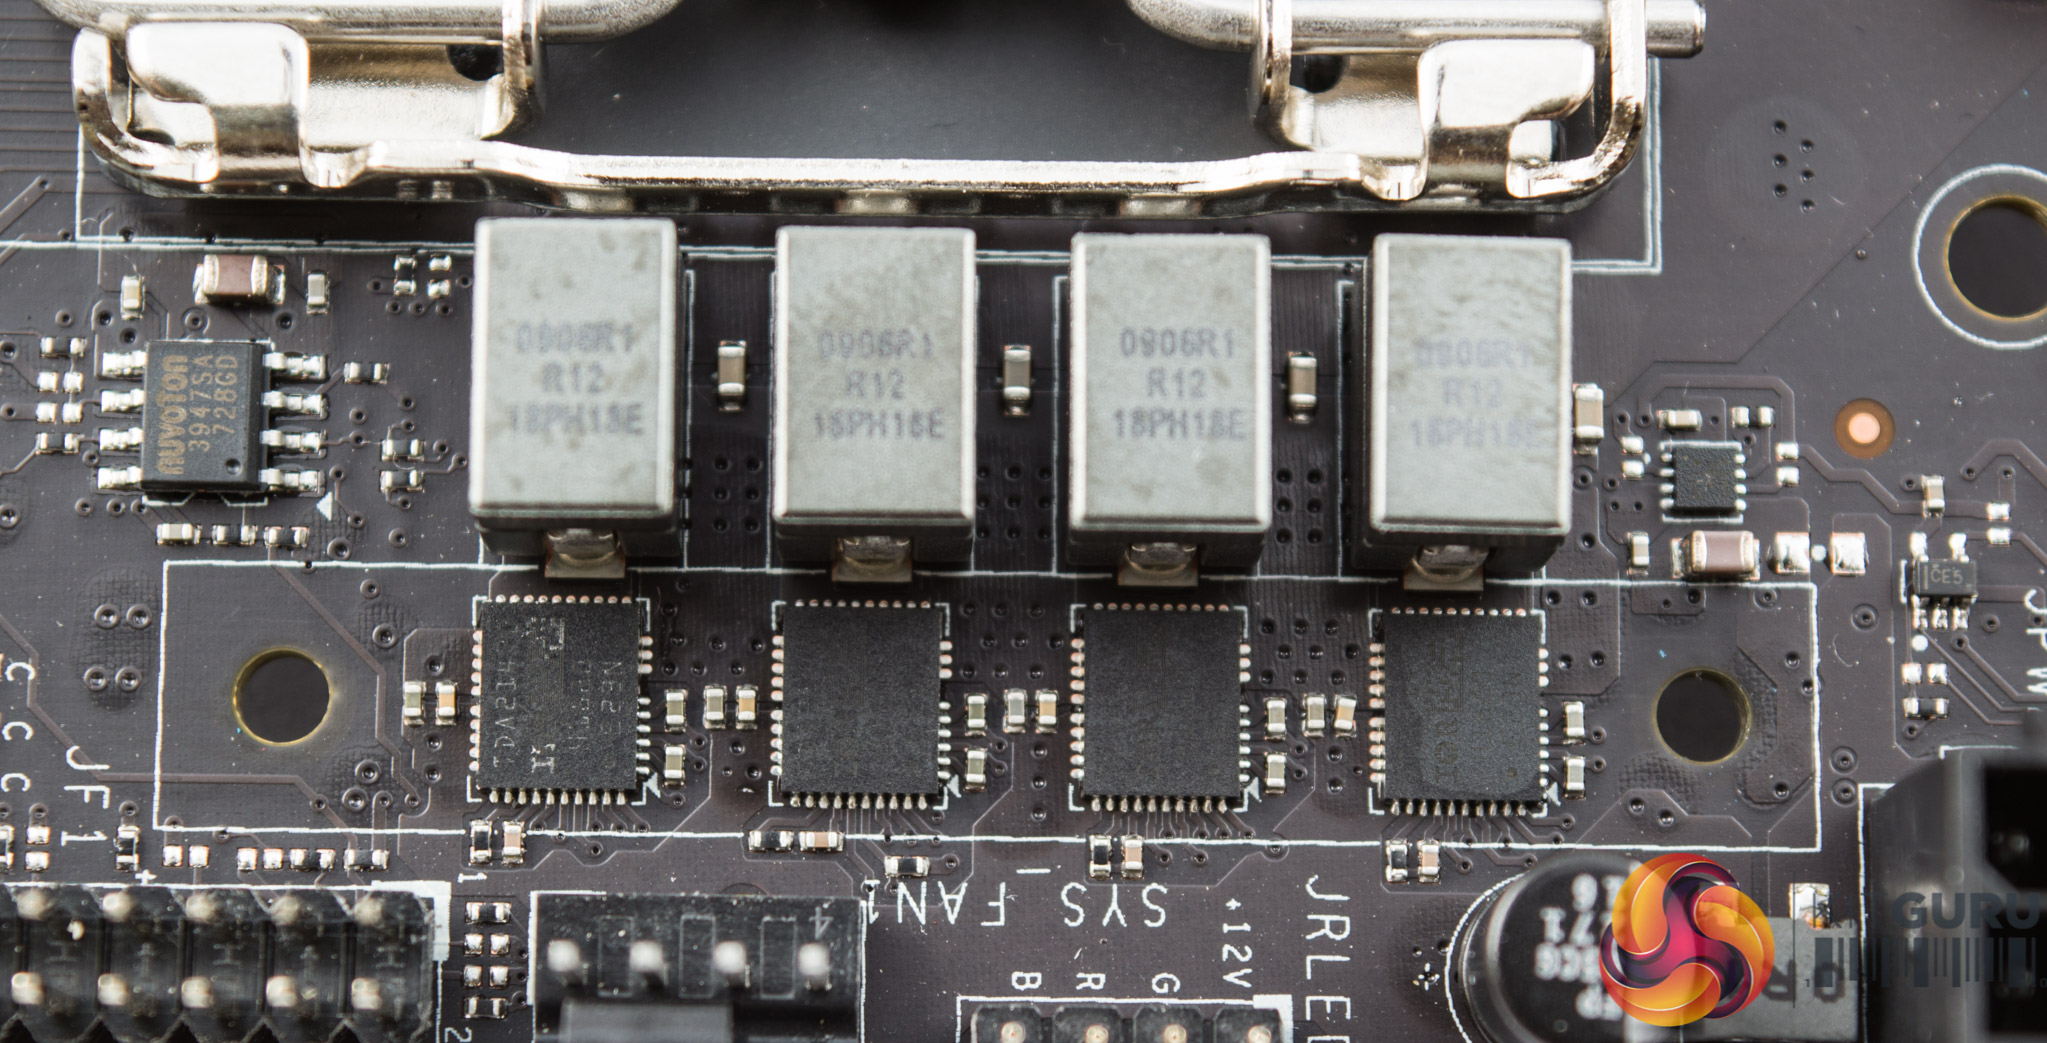
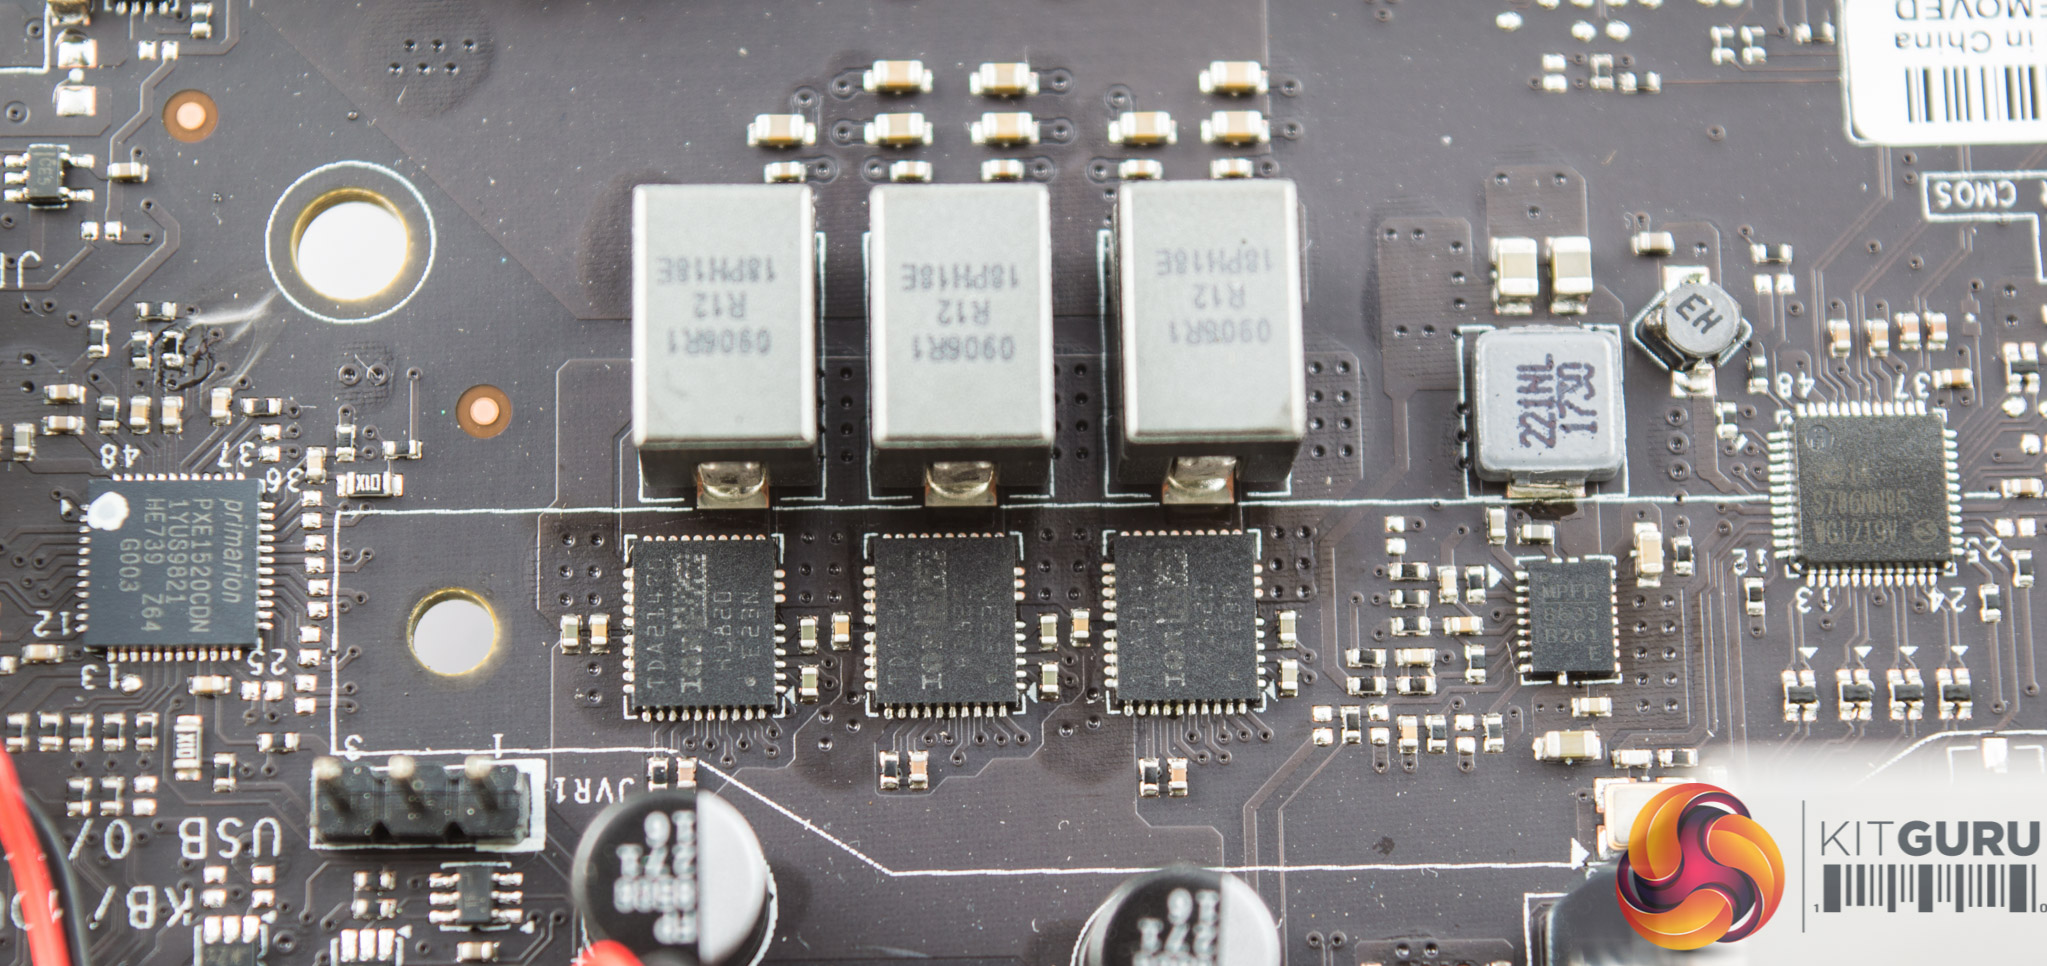
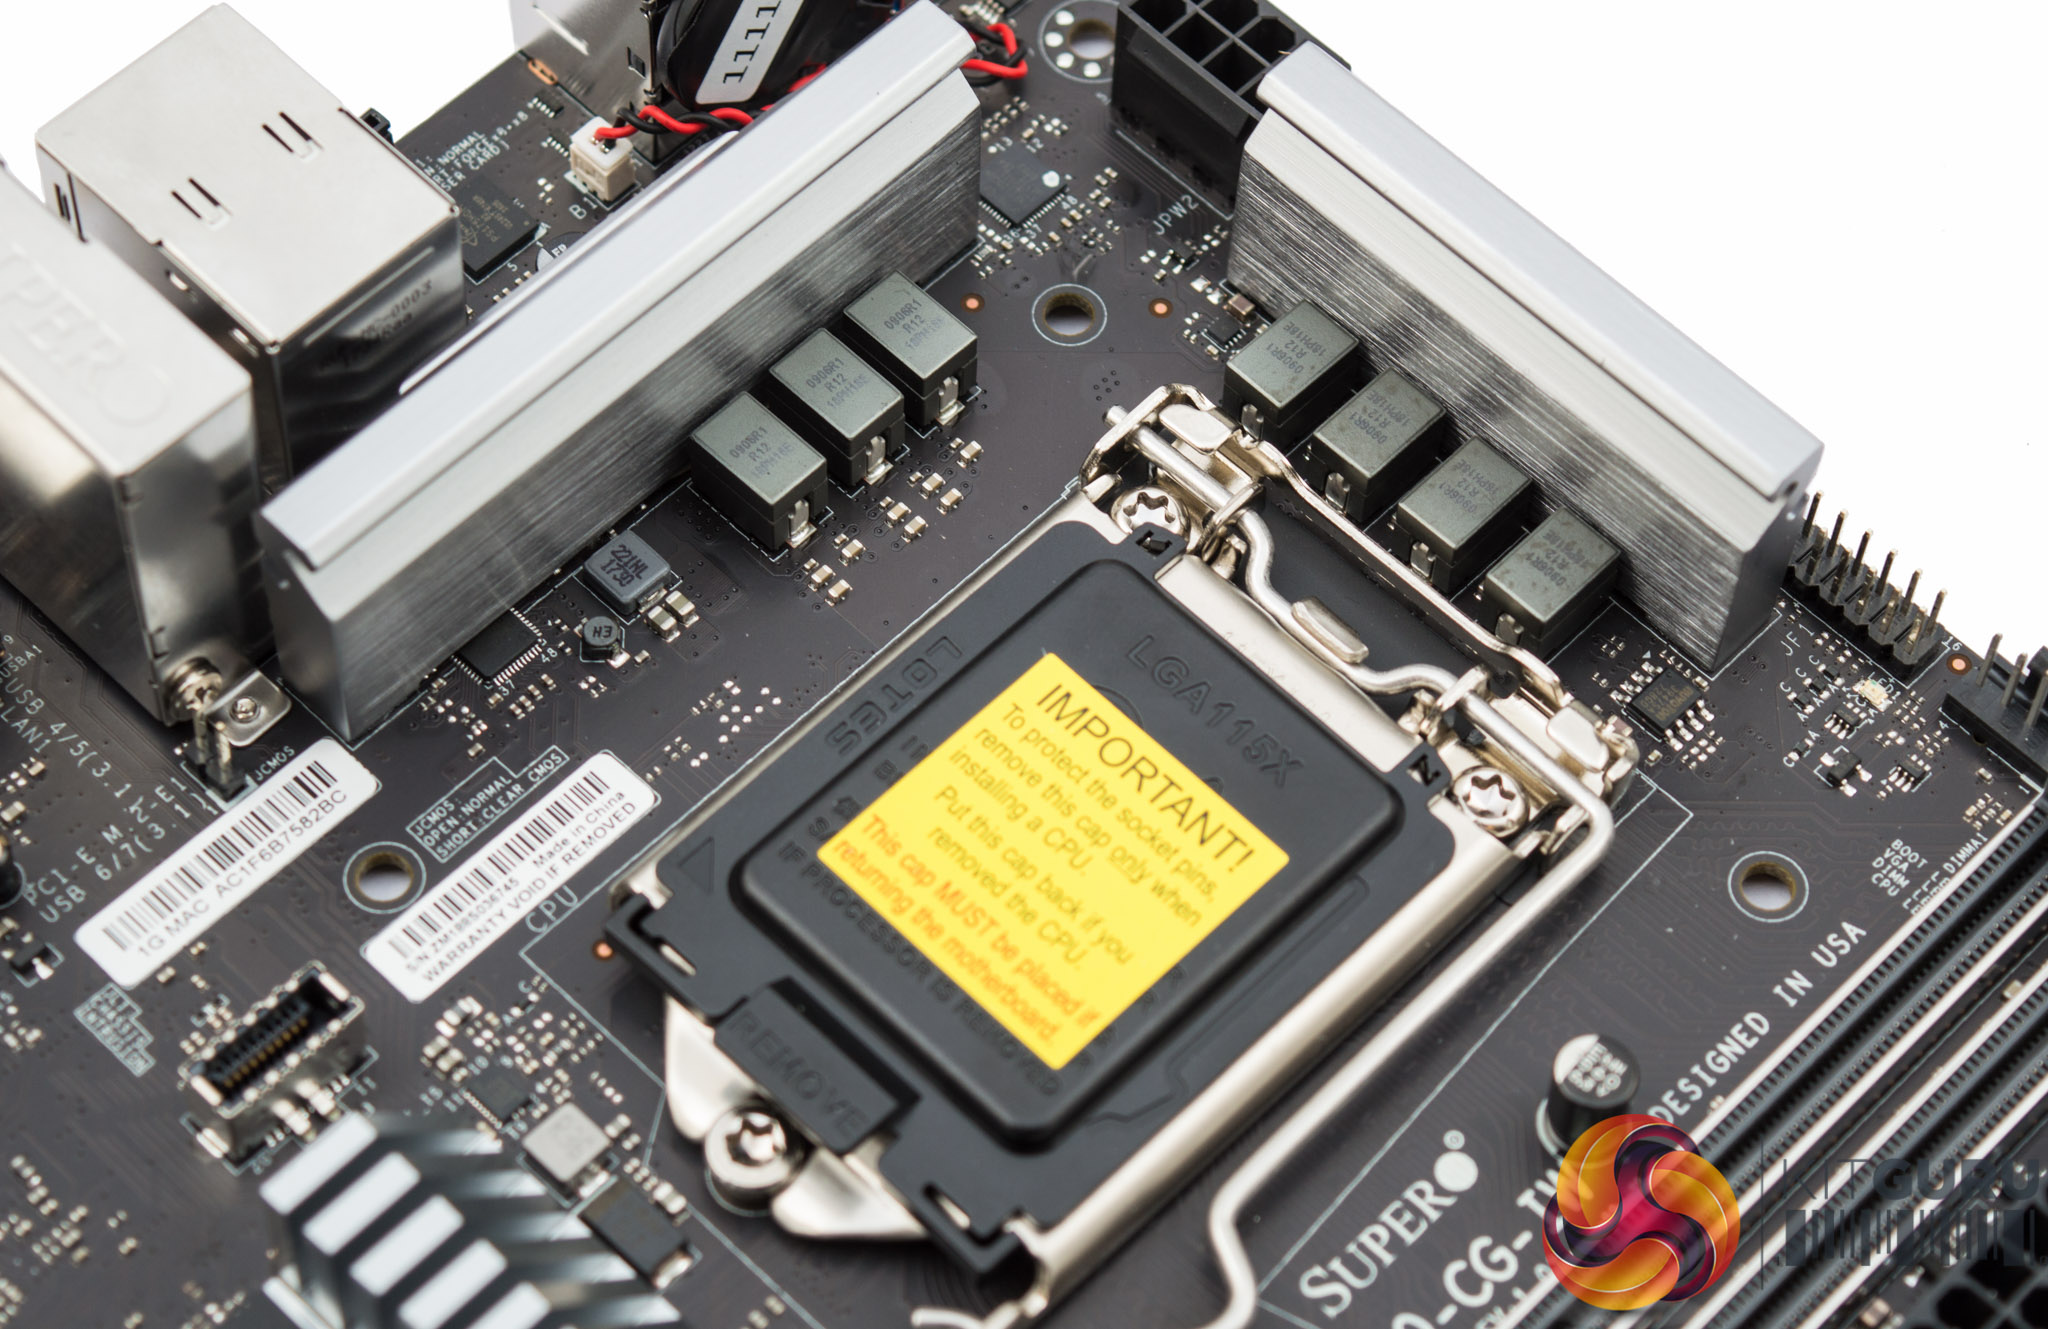
The CPU VRM is provided by the Infineon Primarion PX1520CDN. There's no easily accessible online datasheet for this controller but it is touted by various component resellers as being an “up to 5+2 phase” VRM controller.
It appears then to be a 5+2 phase configuration, VCore + iGPU (VCCGT), spread into 4+3 blocks so that both VRM heatsinks cool the CPU VRM.
The MOSFETs used are Infineon TDA21470, which combine the high- and low-side, and are up to 94% efficient according to the datasheet.
There are some additional MOSFETs and ICs around the CPU socket that could be responsible for the VCCSA and VCCIO. Alongside the block of 3 MOSFETs is a Monolithic Power MPQ8633B unit that is most likely stepping down a 12v supply to the VCCSA or VCCIO. There are another two MPQ8633B ICs around the chipset heatsink that could be doing something similar.
There's a Texas Instruments TPS56C215 step-down converter which likely takes direct 12v input and outputs to the required voltage range for the DRAM – somewhere between 1.1 and 1.5v.
The IC marked “MPFP 8633 B261 E” is yet another Monolithic Power MPQ8633B step-down converter, likely taking 12v input voltage and giving DRAM output voltage also.
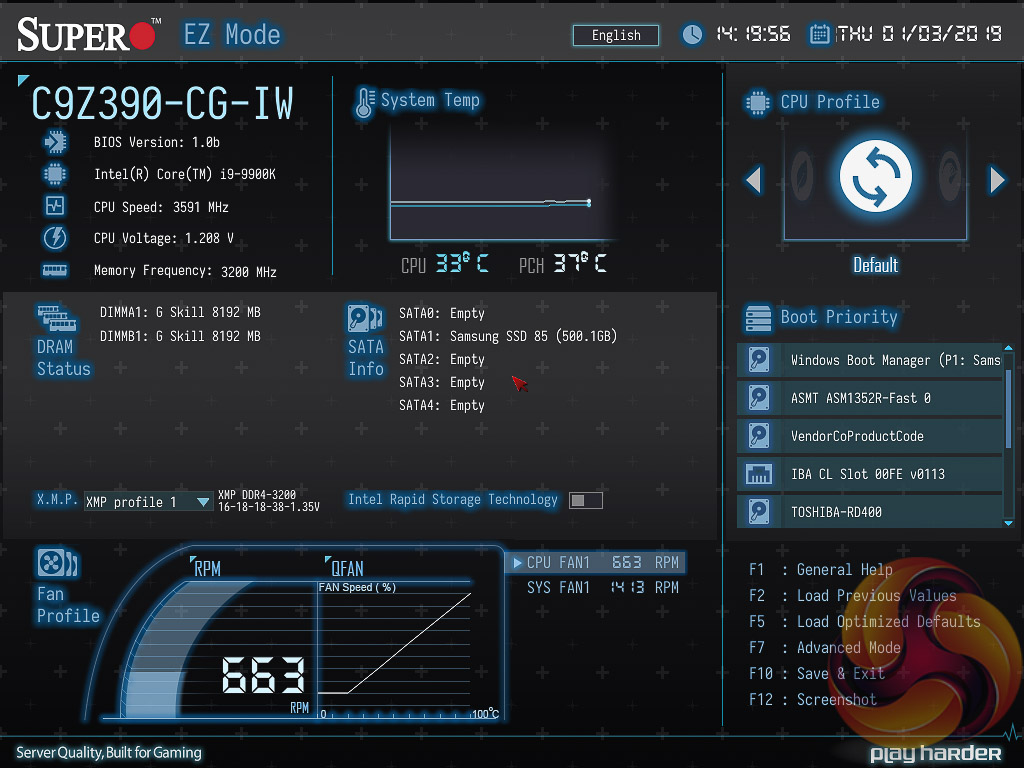
Supermicro's UEFI for its consumer SuperO gaming motherboards seems to be a work in progress. The iteration of that UEFI delivered with the SuperO C9Z390-CG-IW is similar to the C9X299-PG300 KitGuru tested late last year. Upon entering the UEFI the user is greeted with an “EZ Mode” splash screen with various common options like XMP, Boot Priority and summary information. Pressing F7 takes the user into the “Advanced Mode” of the UEFI.
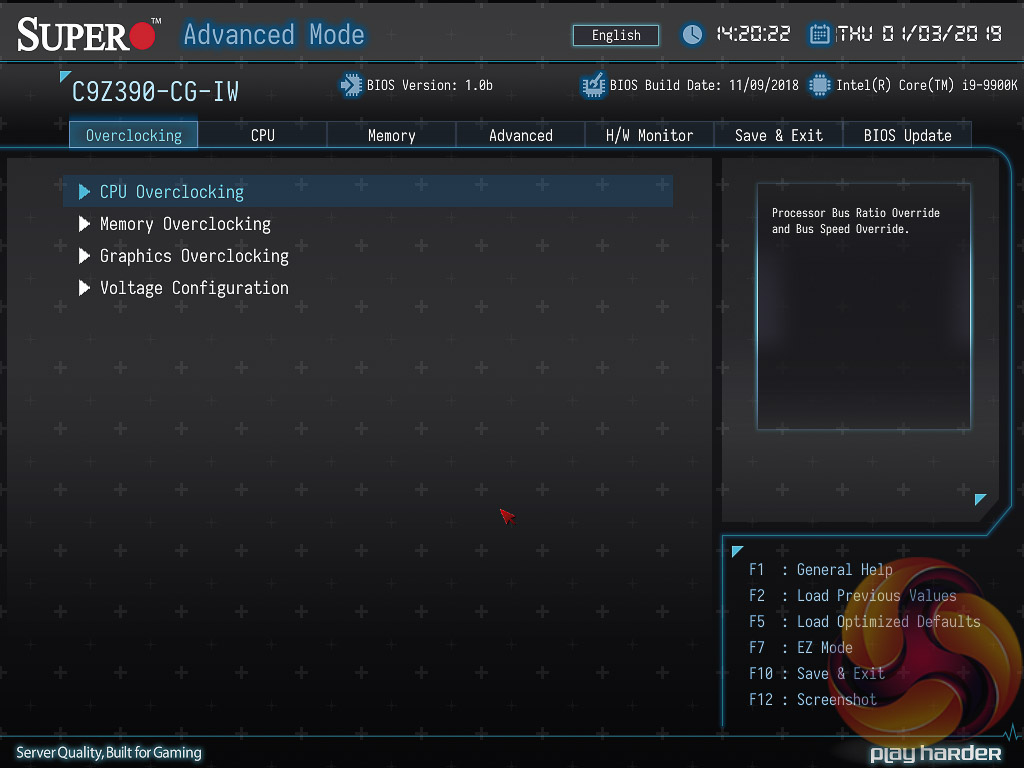
Within the main advanced mode UEFI there are several tabs to choose from:
- Overclocking
- CPU
- Memory
- Advanced
- H/W Monitor
- Save & Exit
- BIOS Update
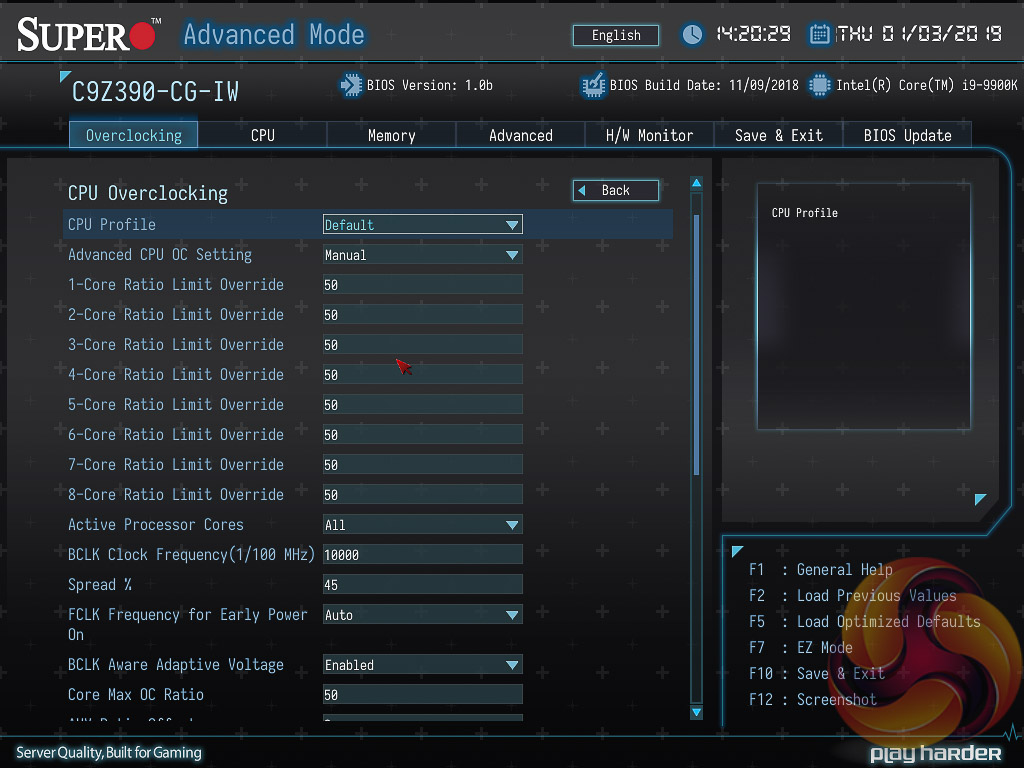
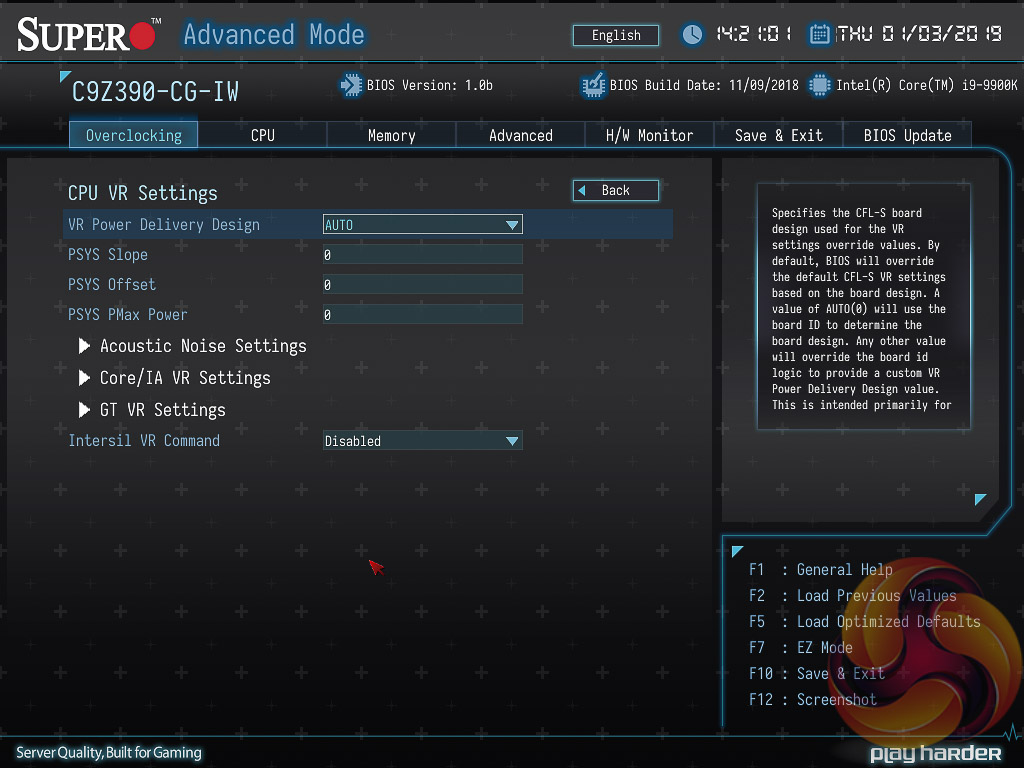
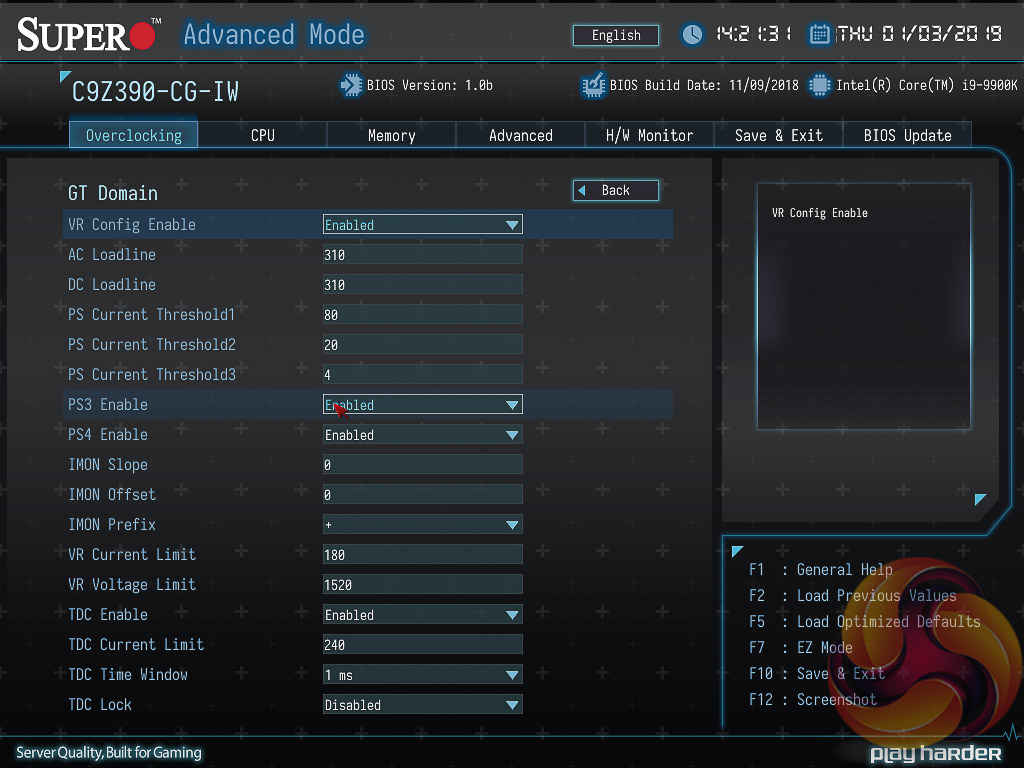
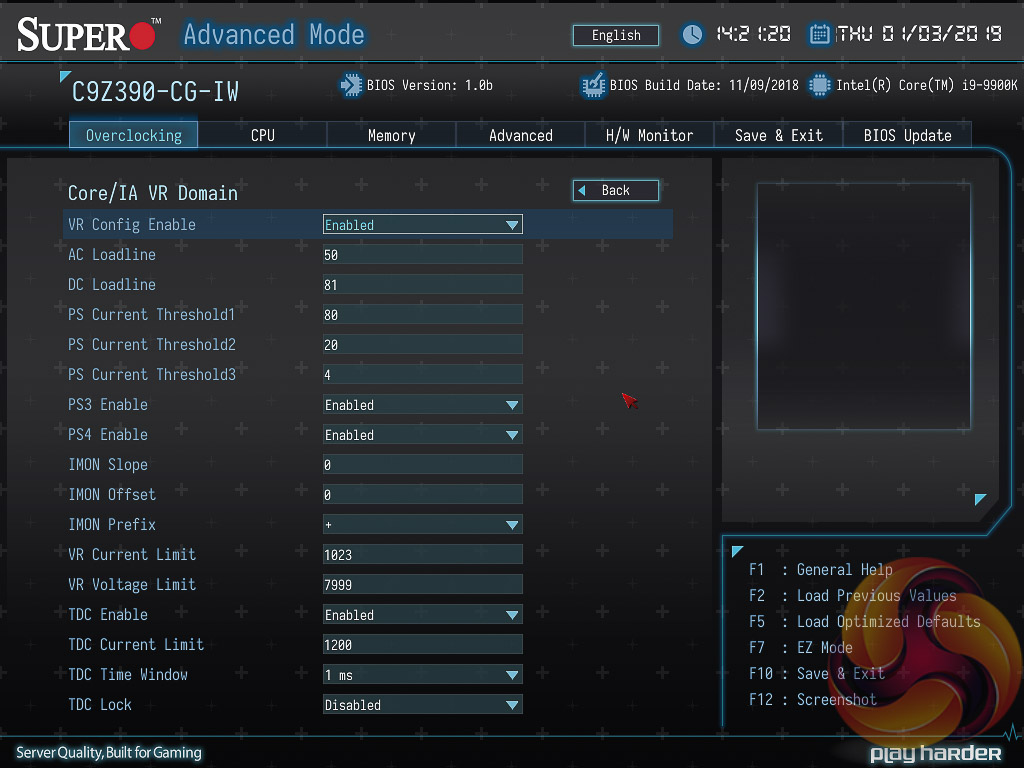
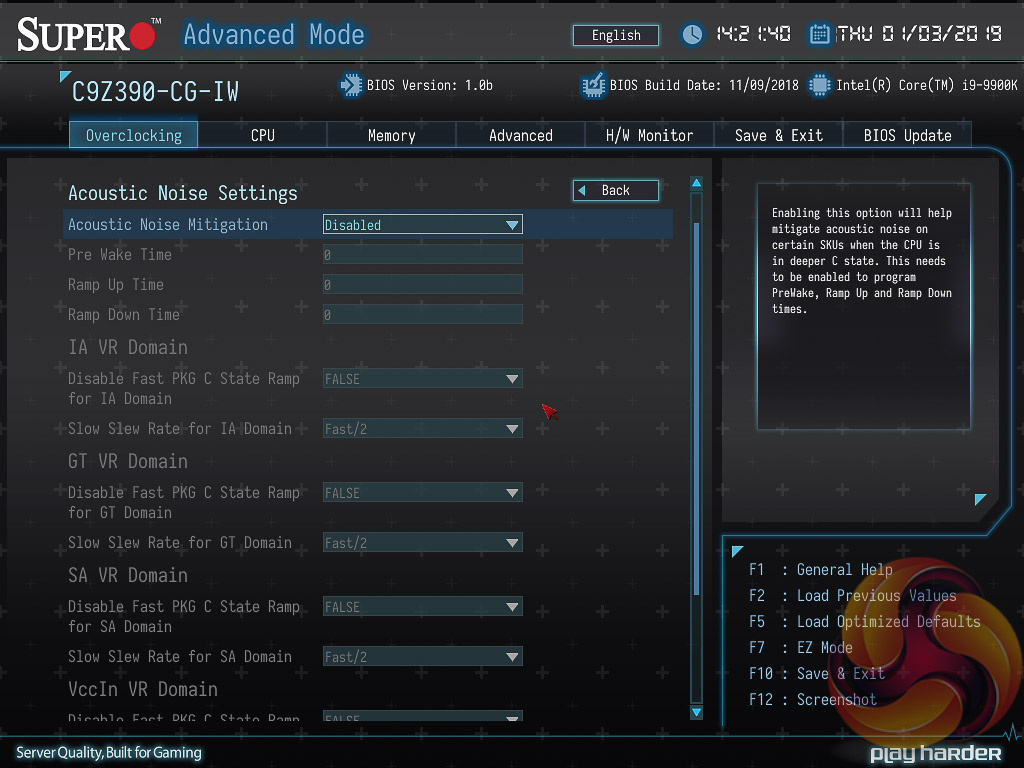
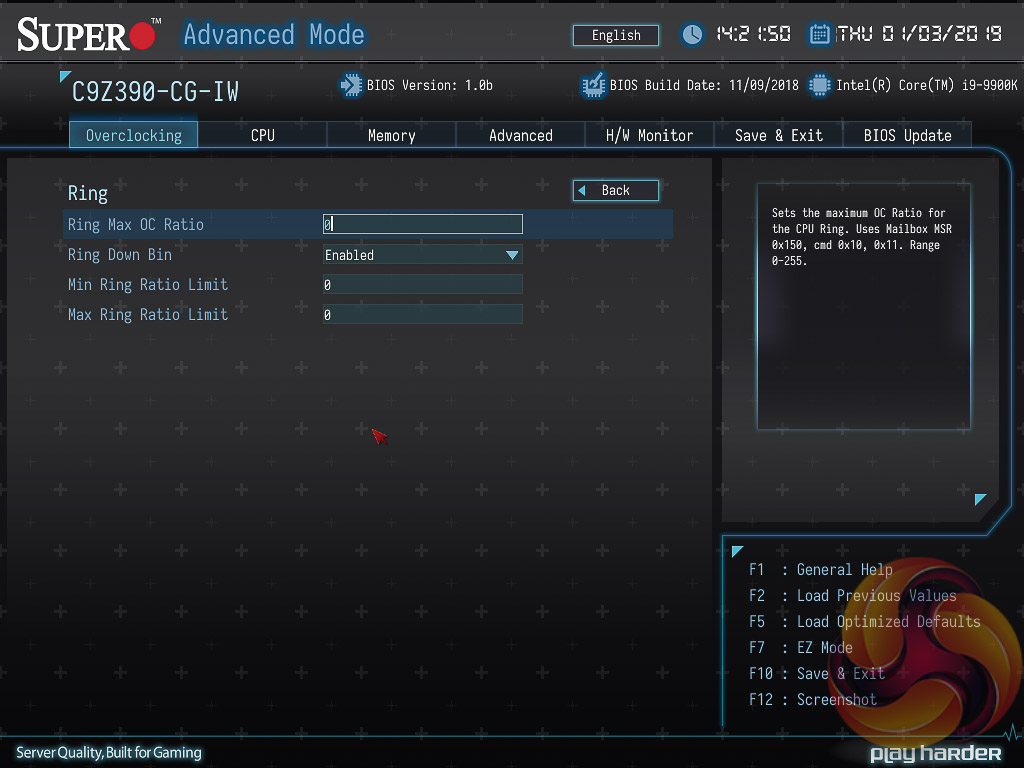
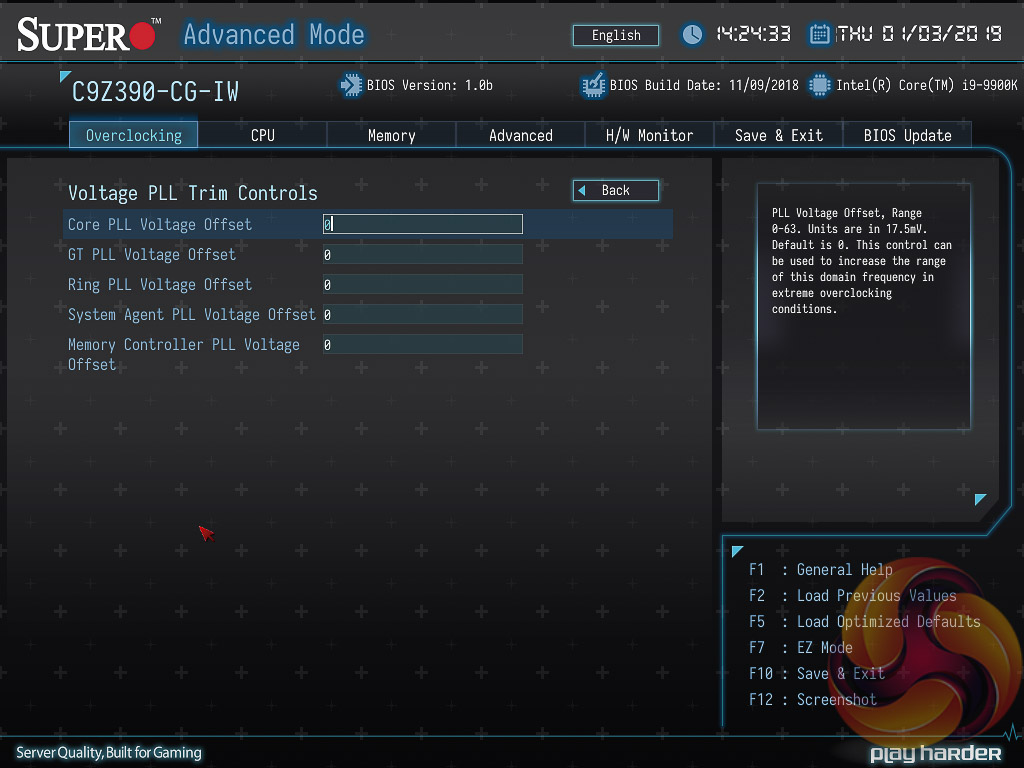
The first of those, Overclocking, is where the vast majority of performance tuning parameters and voltages can be found.
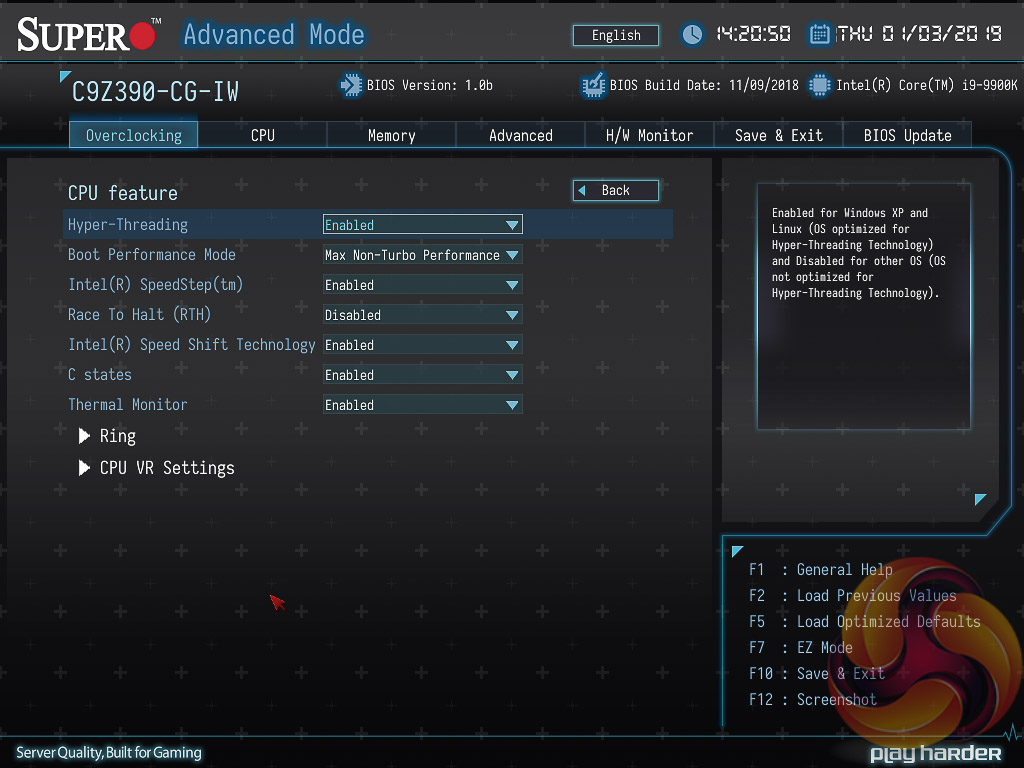
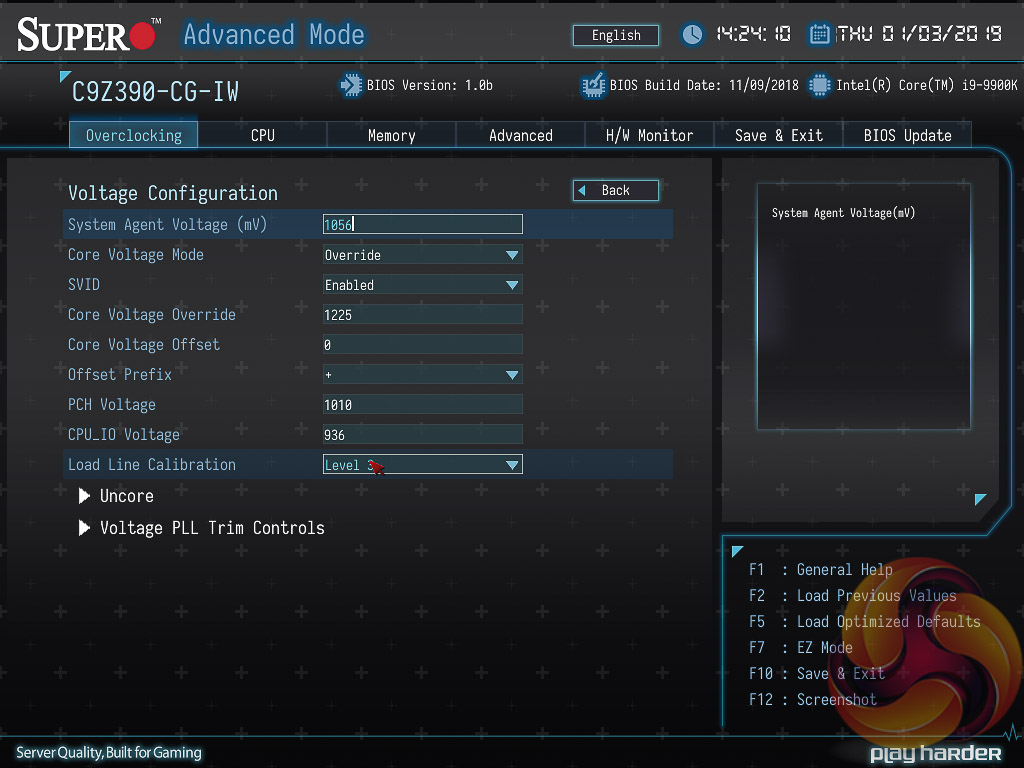
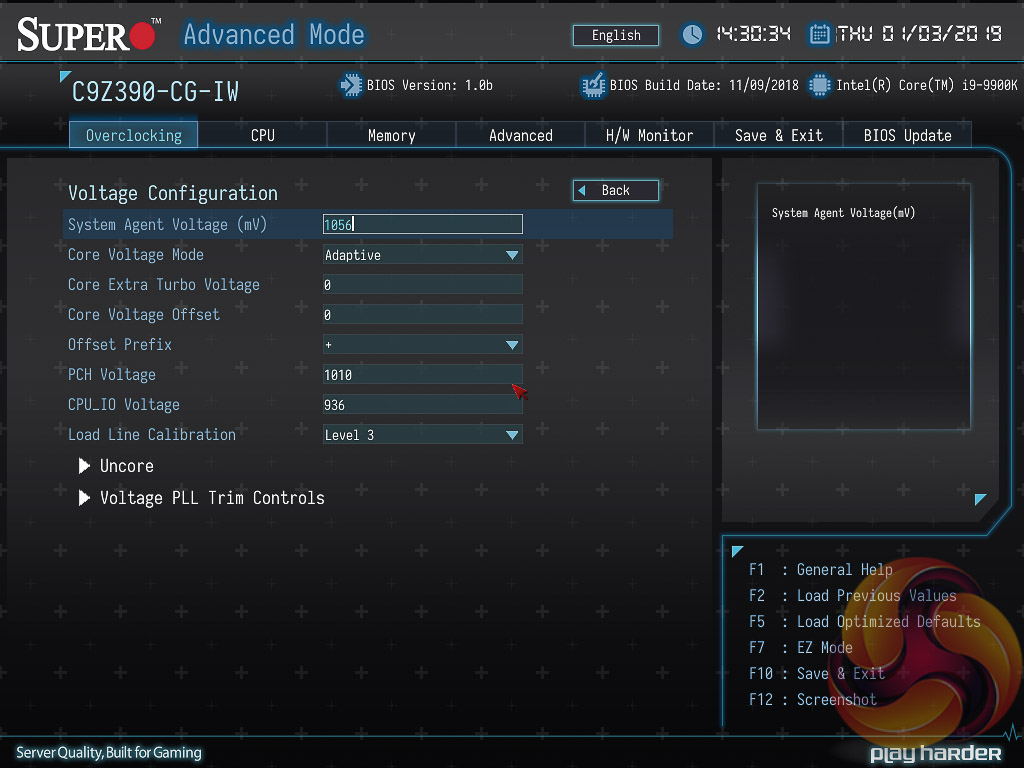
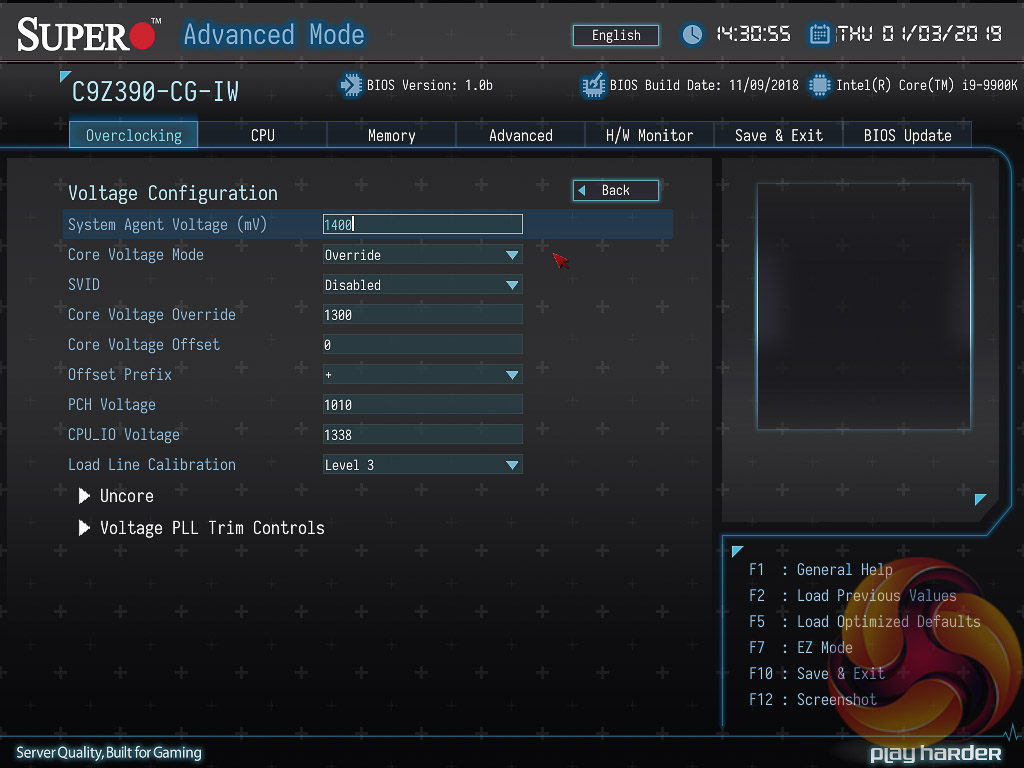
The Overclocking options are exhaustive and Supermicro appears to give the user just about every option that Intel’s hardware allows for. It can be a little intimidating at first but there’s no reason to treat overclocking any different to other motherboards – simply dial in a core voltage in the “Voltage Configuration” section, using the millivolt format (1.2v = 1200mv), and then set the core ratio in the main “CPU Overclocking” section by tweaking all the core ratios to the desired frequency.
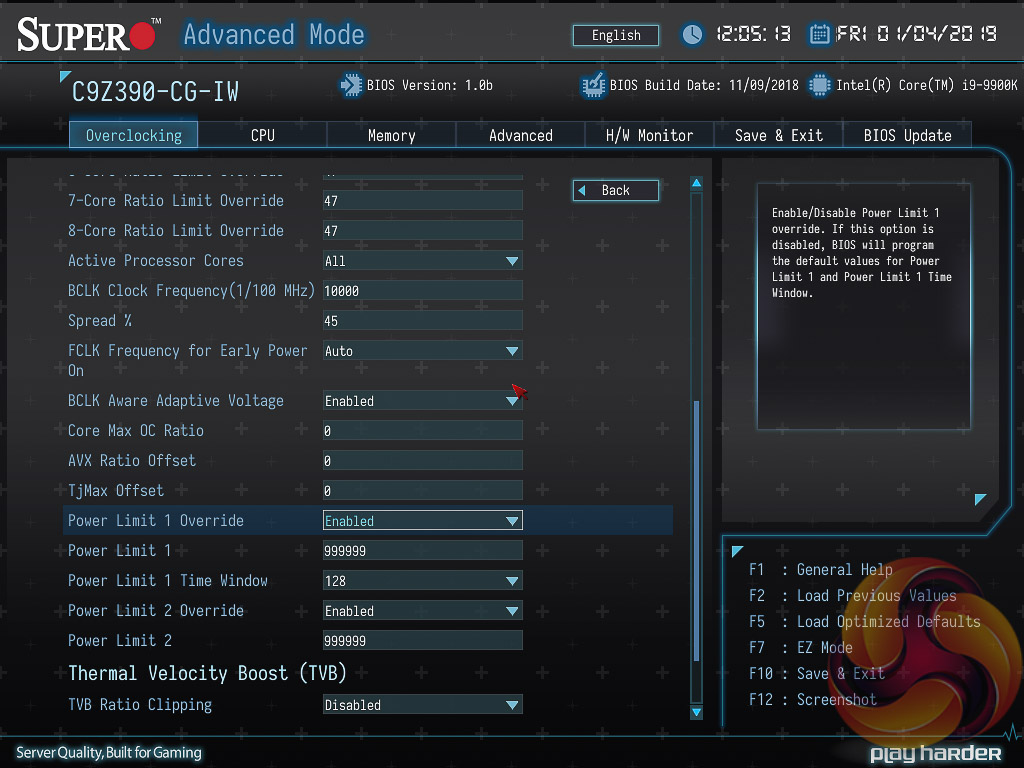
The most crucial setting to overclocking that the user should be aware of is the power limits, Power Limit 1 (PL1) and Power Limit 2 (PL2).
PL2 dictates the short term boost turbo for the processor. At stock operation this is usually 1.25 multiplied by the rated TDP, so for the i9 9900K that's 118.75W. Intel's Turbo specification isn't clearly stated but it appears that 32 seconds is the default time window for PL2 to run. Therefore a stock CPU will consume 118.75-watts for 32 seconds, and then drop to PL1, which is usually the rated TDP which is 95-watts for this CPU, where it can run at that power level forever.
Therefore when overclocking, you can simply set both power limits to sufficiently high numbers that the CPU Turbos without (feasible) power restrictions forever. As above we set the power limit to 999.999W, the largest value accepted (Supermicro's UEFI works in thousands so 95W = 95000, 999.999W = 999999), and then set our multiplier and core voltage accordingly.
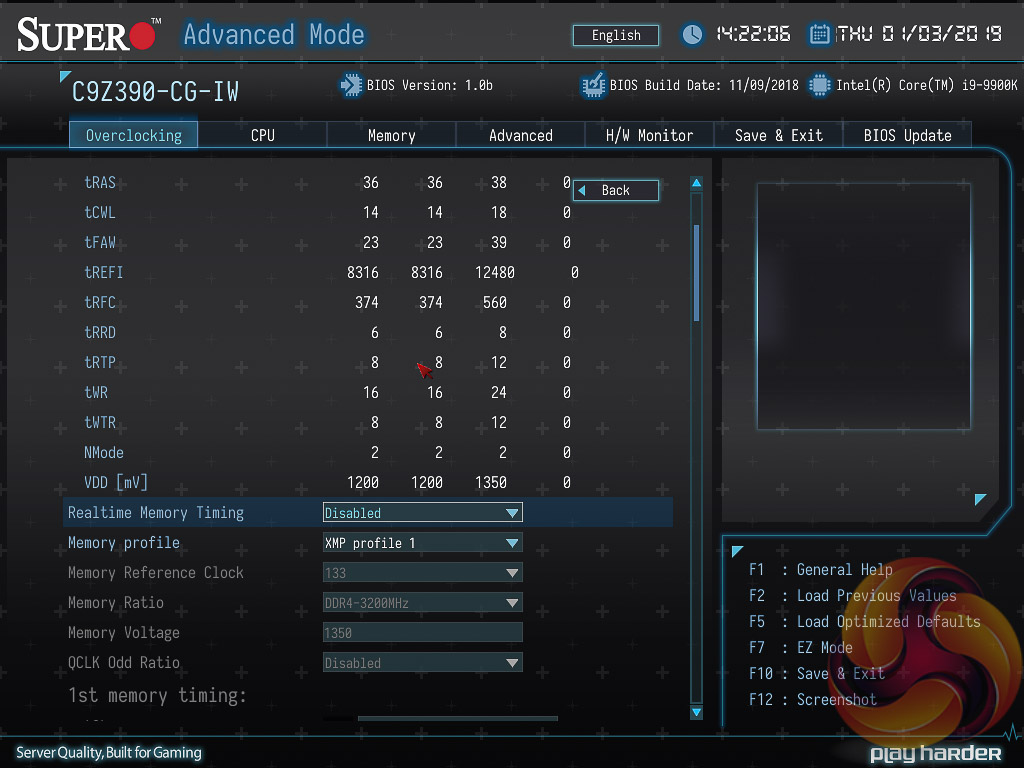
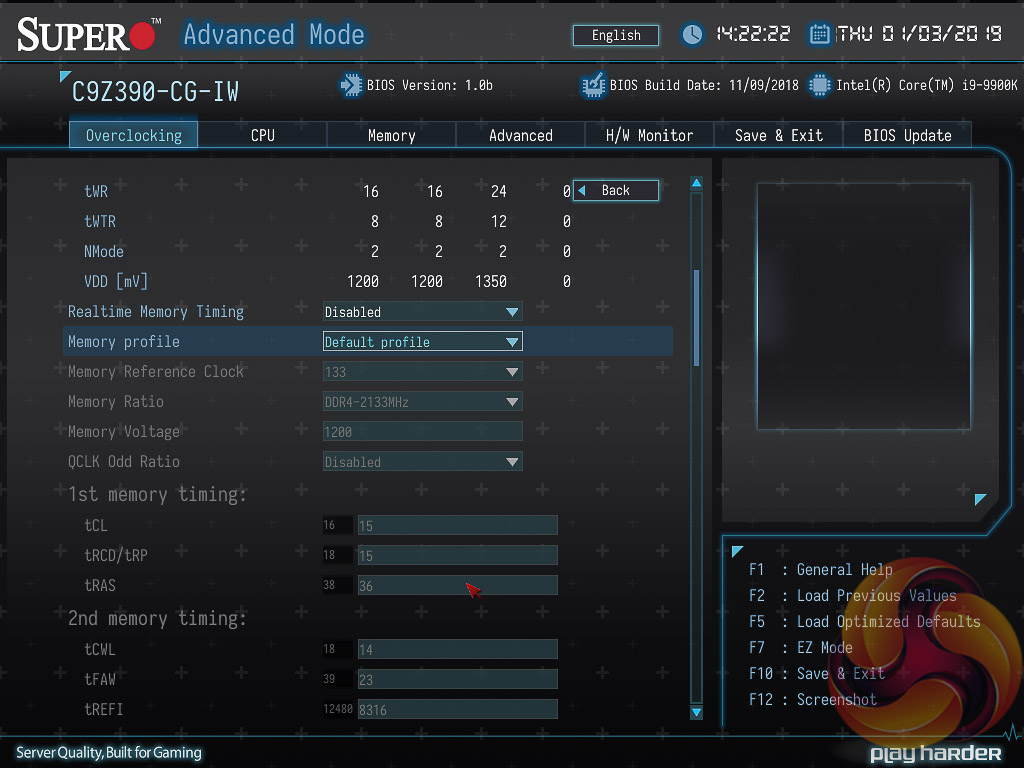
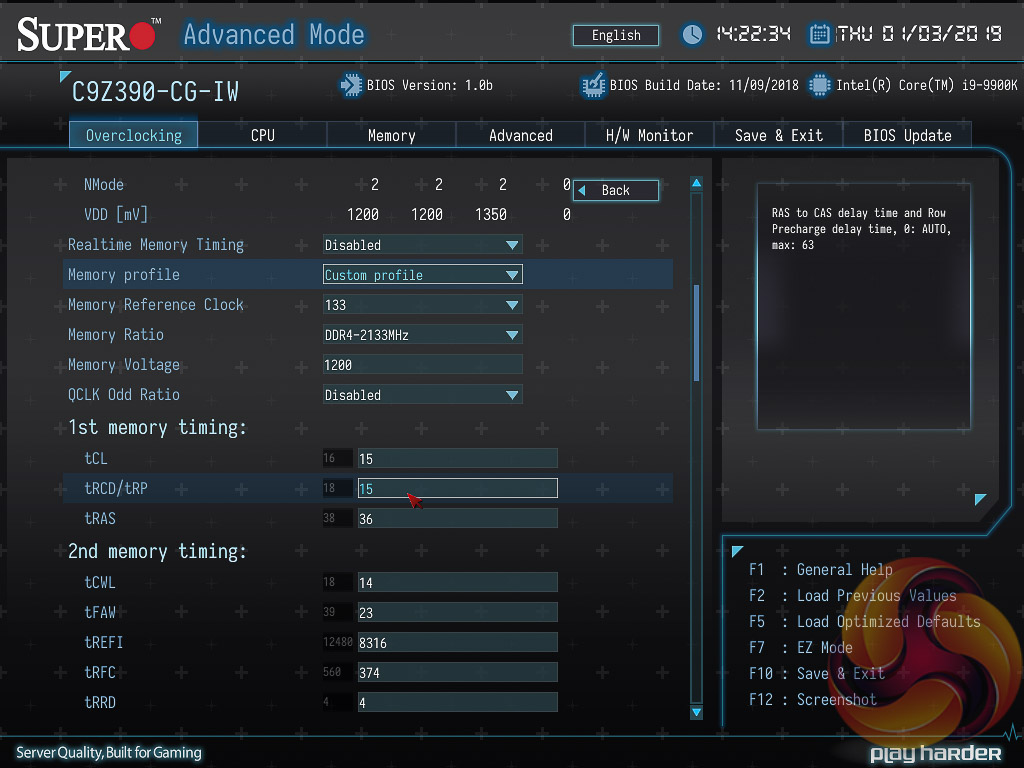
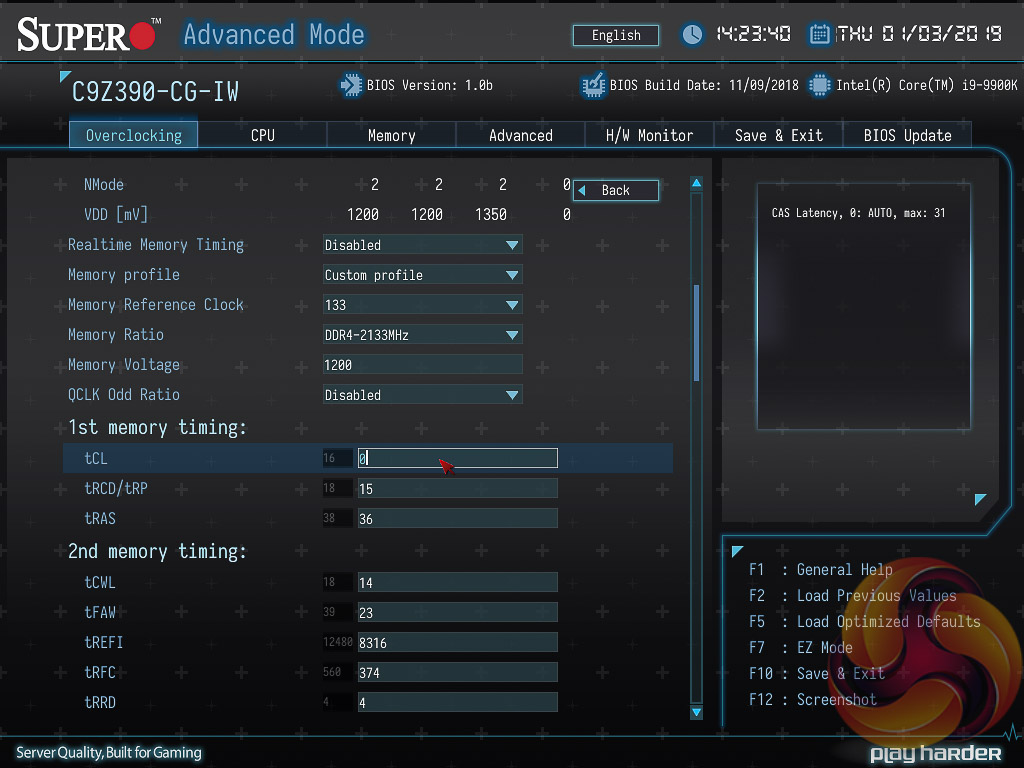
During our research and testing we read some complaints online about setting custom memory profiles, i.e. 2666MHz. It was mentioned that the user is responsible for setting every single timing and memory setting manually. It certainly appears that way at first glance, however, after further digging we found it is possible to set all the parameters to “Auto”, except Supermicro effectively uses “0” as Auto. Keying in 0 to all the boxes will give an automatic value for any given parameter.
In most cases, we suspect, the user will simply set the XMP profile rather than trying anything adventurous like custom memory settings.
Update 26th January 2019 – Supermicro issued a test UEFI version to KitGuru, still marked 1.0b but dated 5th January 2019, which sets the PL1 power limit to 180W and PL2 power limit to 250W when an XMP memory profile is used. This means the CPU does not throttle after setting an XMP profile, in fact it runs consistently at 4.7GHz across all cores and runs at an approximate 145W TDP, which is well outside of Intel's stock 95W specification. The performance has improved but this is at the expense of heat and power consumption, a trade-off other motherboard vendors have also been silently making without informing consumers. This new BIOS is not yet available for public download but Supermicro informs us it will be made available soon.
One issue we noticed, which can significantly affect stock performance, is the way Supermicro handles the CPU voltage after the user sets an XMP profile. Initially, using optimised defaults, the CPU runs on an adaptive core voltage and this translates into an all-core Turbo speed of approximately 4.3GHz within the CPU's 95W TDP. This all core Turbo speed varies between 5GHz and 4.3GHz, depending on how many cores are in use (1 to 8).
However, after setting XMP the UEFI automatically changes to override core voltage with 1.3 volts but will still retain the 95W TDP restriction. This translates into an all-core Turbo speed of approximately 3.3GHz within the 95W TDP because the higher core voltage of the override compared to the adaptive means the CPU uses more power for the same frequency and has to “down-clock” to keep within the same power restraints.
Users can workaround this issue by manually reverting the core voltage changes made after XMP is set, as above. KitGuru notified Supermicro of this issue and they are investigating if it requires a new BIOS.
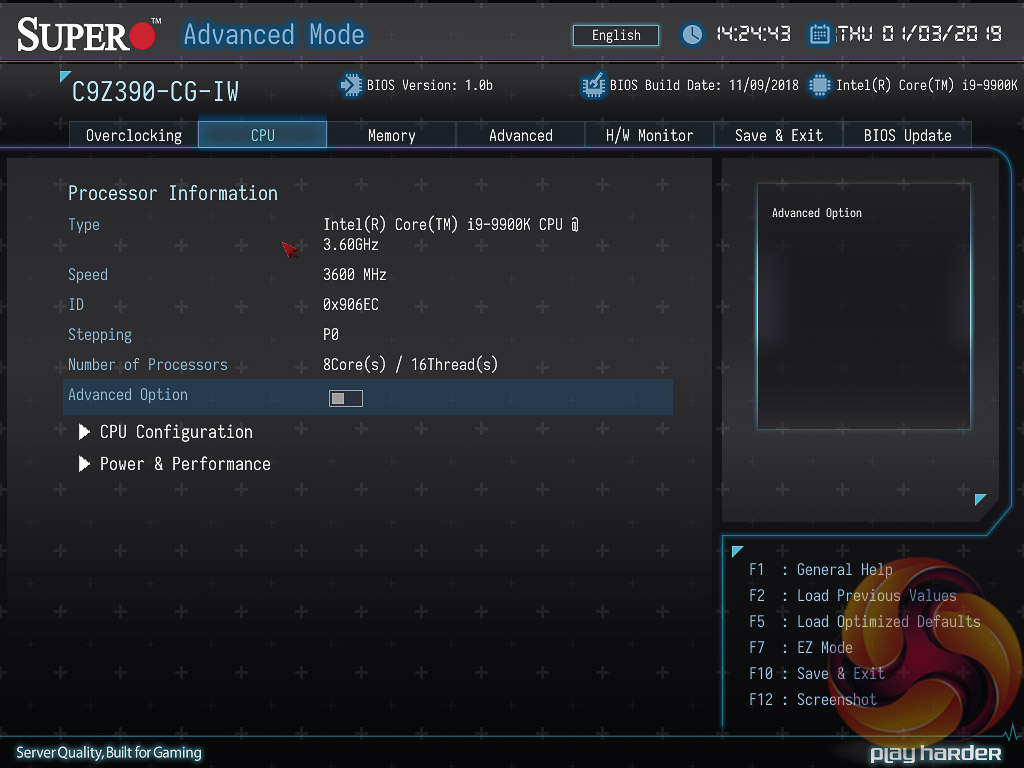
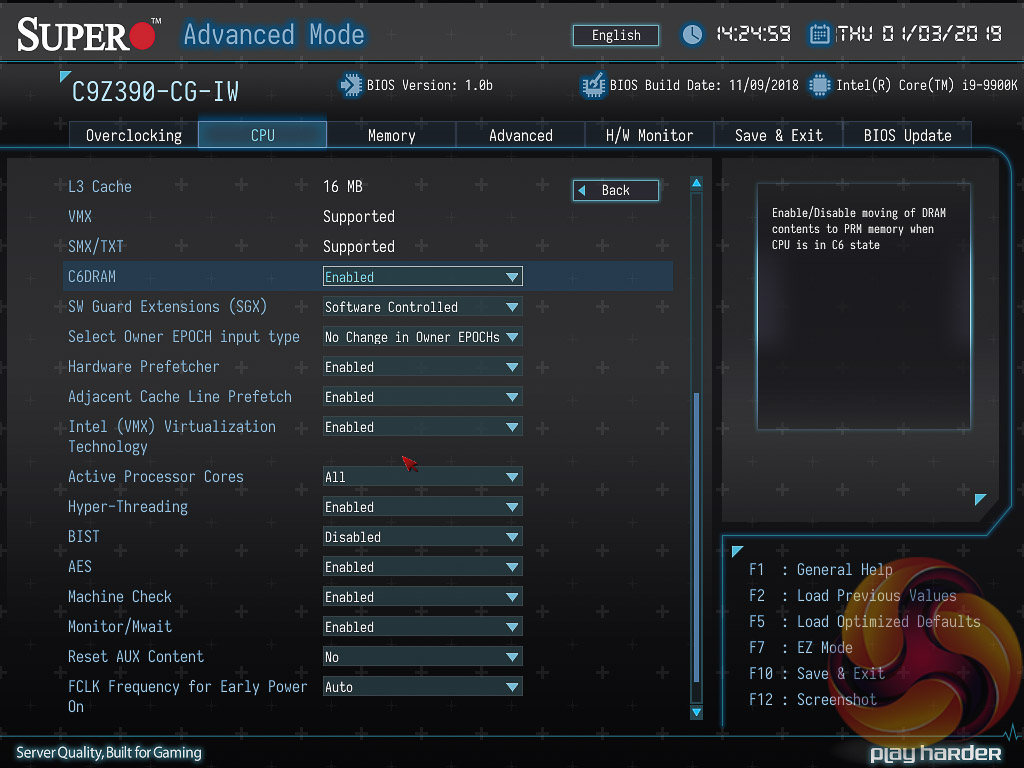
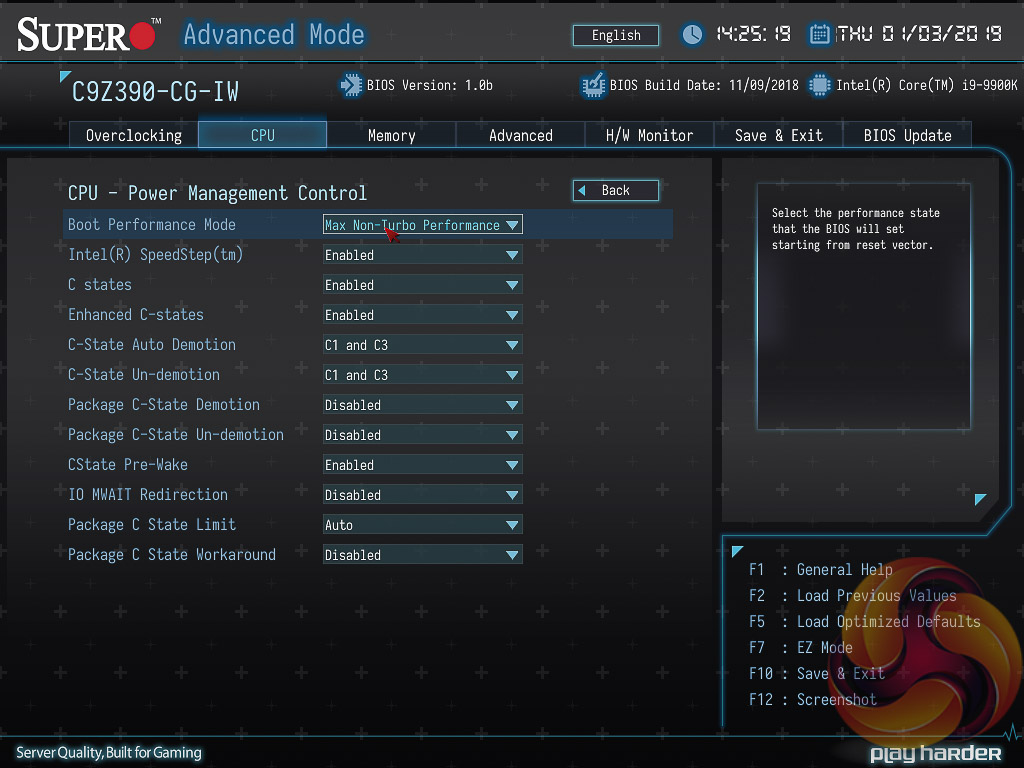

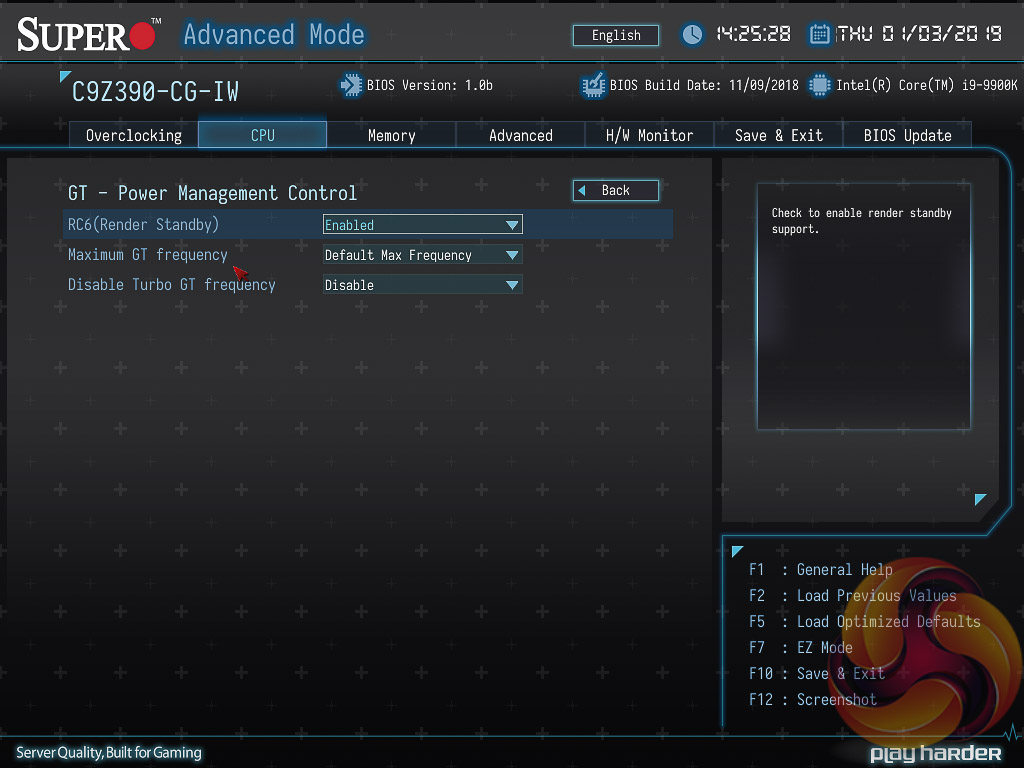
There are a number of additional CPU and integrated graphics options found in the CPU section.
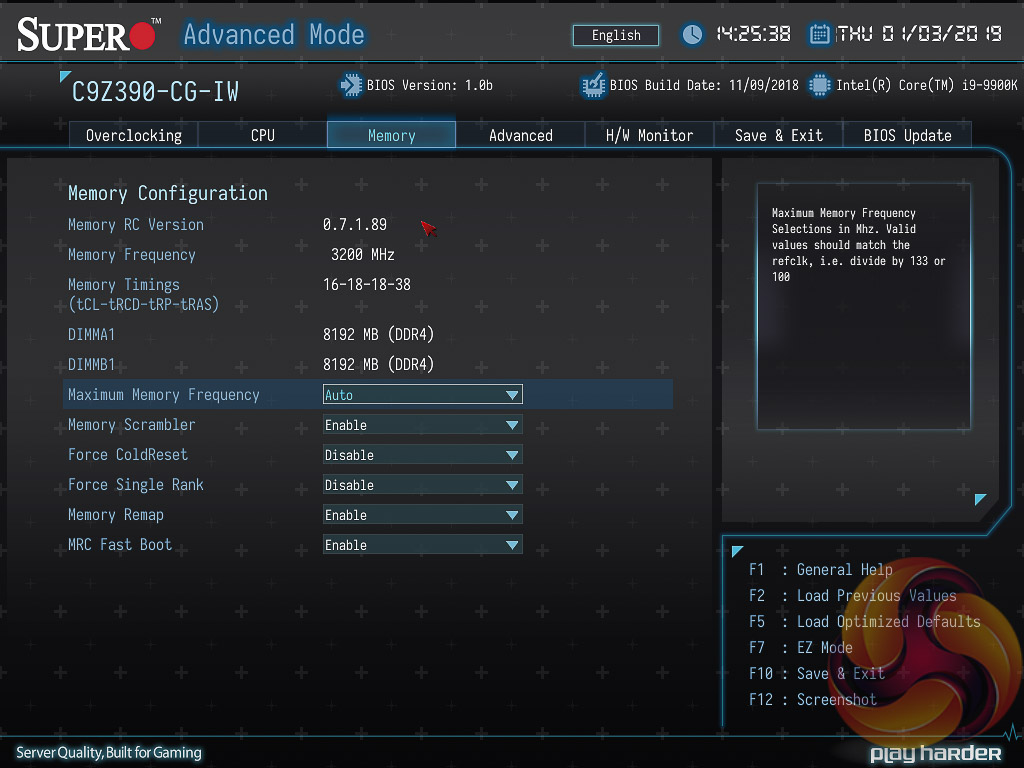
The memory section has a few more memory settings not held in the overclocking section.
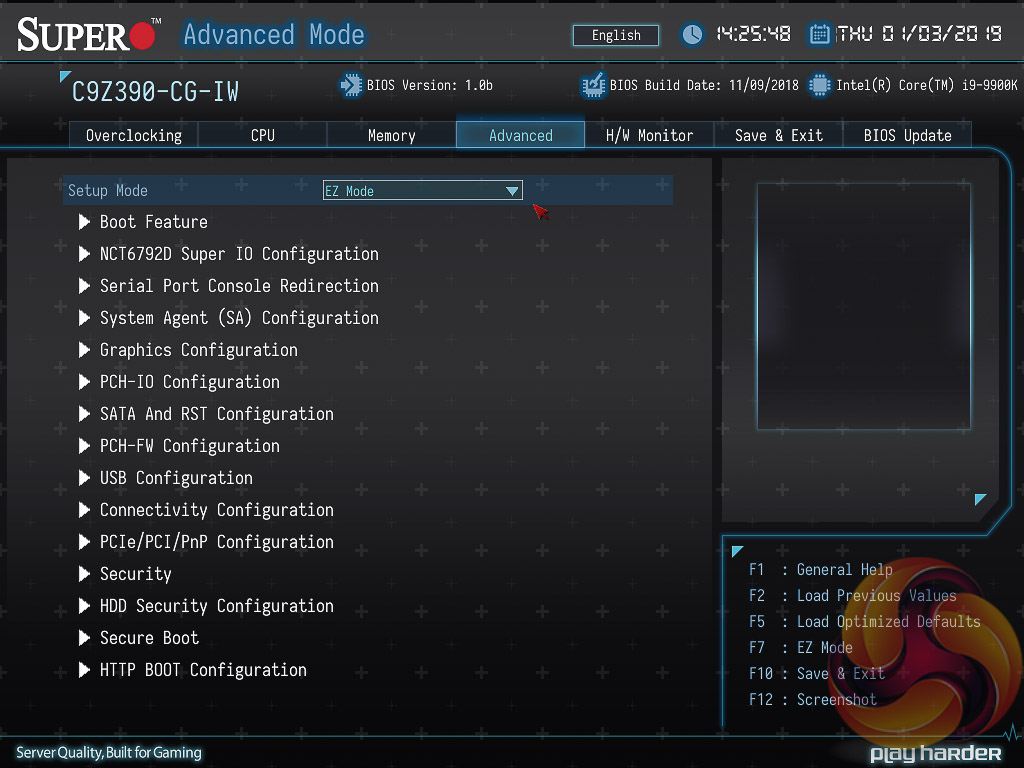
The Advanced section of the UEFI provides a long list of configuration items ranging from chipset configuration to direct interfacing with onboard ICs. There are a boat-load of configuration options here, most of which the average user is best leaving alone.
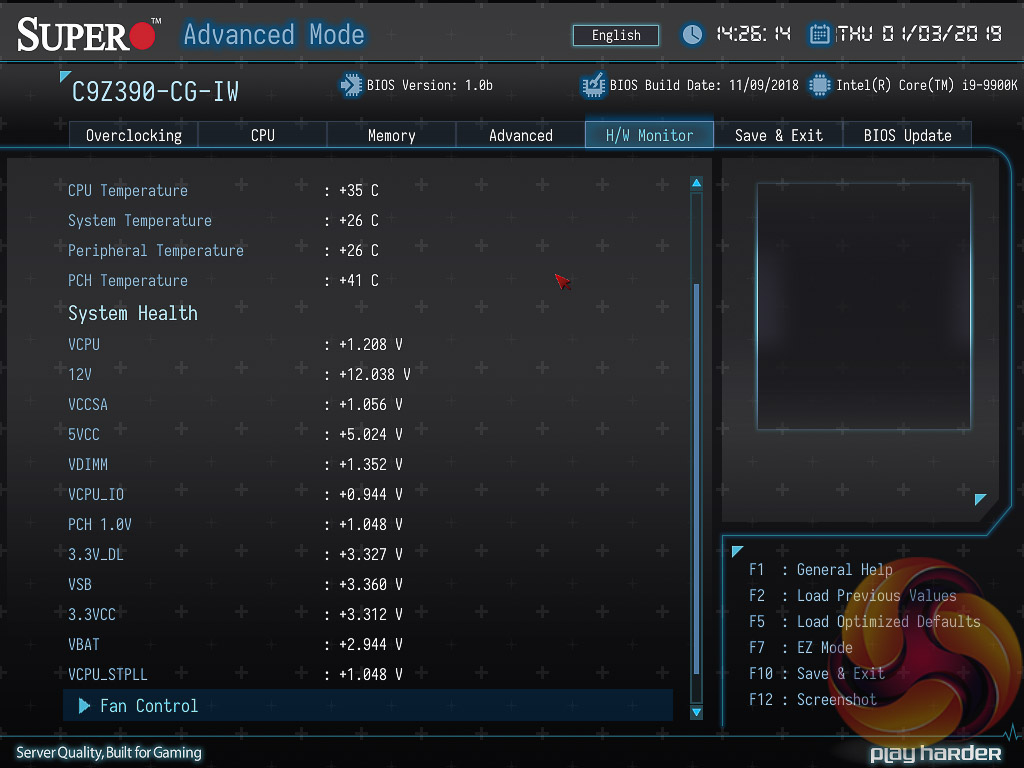
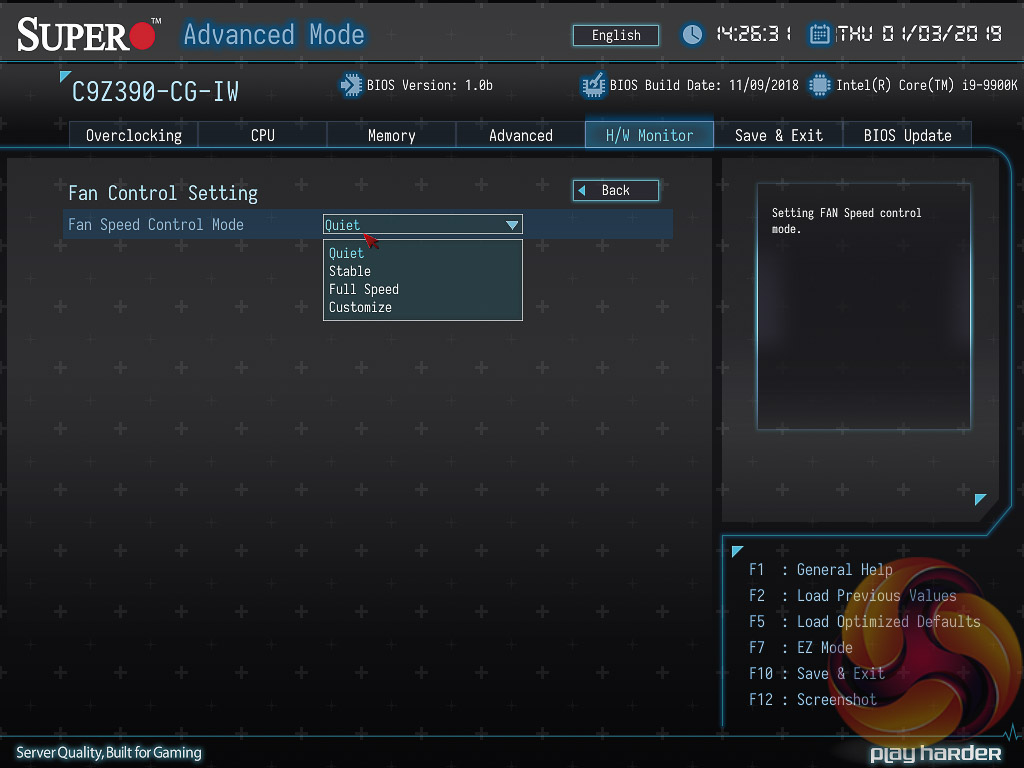
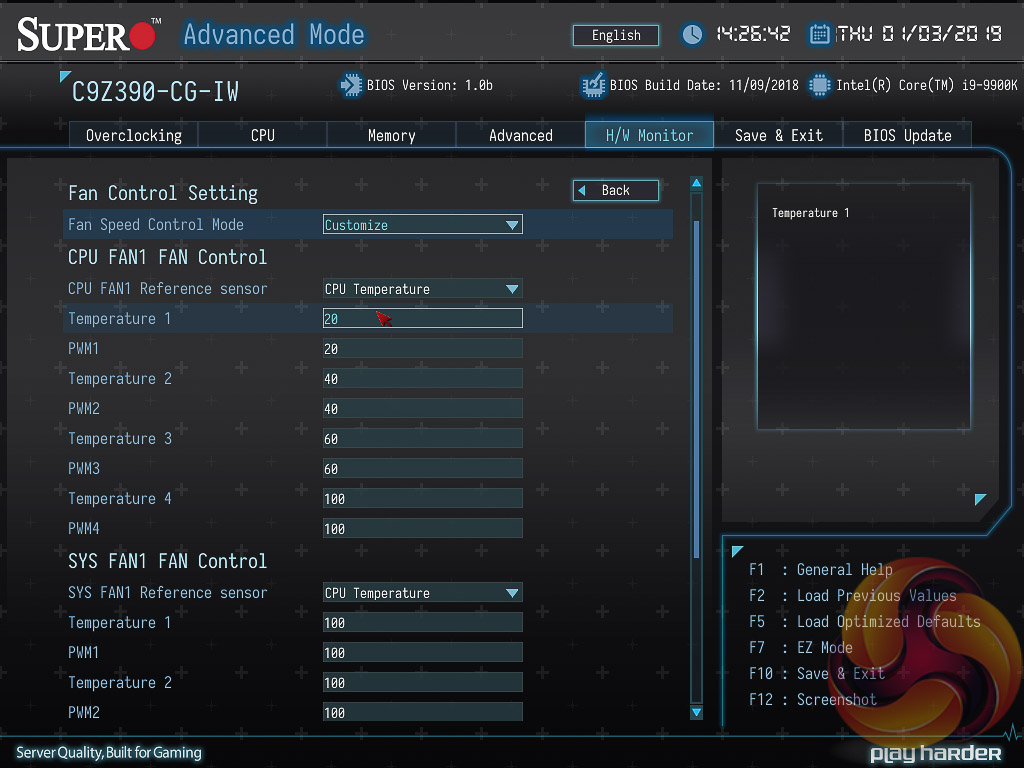
The H/W Monitor section holds the system monitoring data and fan controls. In the fan control section the setting needs to be set to “Customize” to allow the user to change the fan behaviour for each fan, each fan must be programmed manually and there are no default profiles. The “fan curves” have four temperature thresholds with four corresponding fan speeds, it is not possible to create smoother fan profiles than this or use any custom fan hysteresis settings (the time delay between speed changes).
It's quite a frustrating setup because if you want one fan on “Quiet” and another on “Full Speed” that's not possible to do, both have to be Quiet or both have to be Full Speed. The user can try and replicate the quiet and full speed profiles for each fan individually in the customise option, but this is a tedious process.
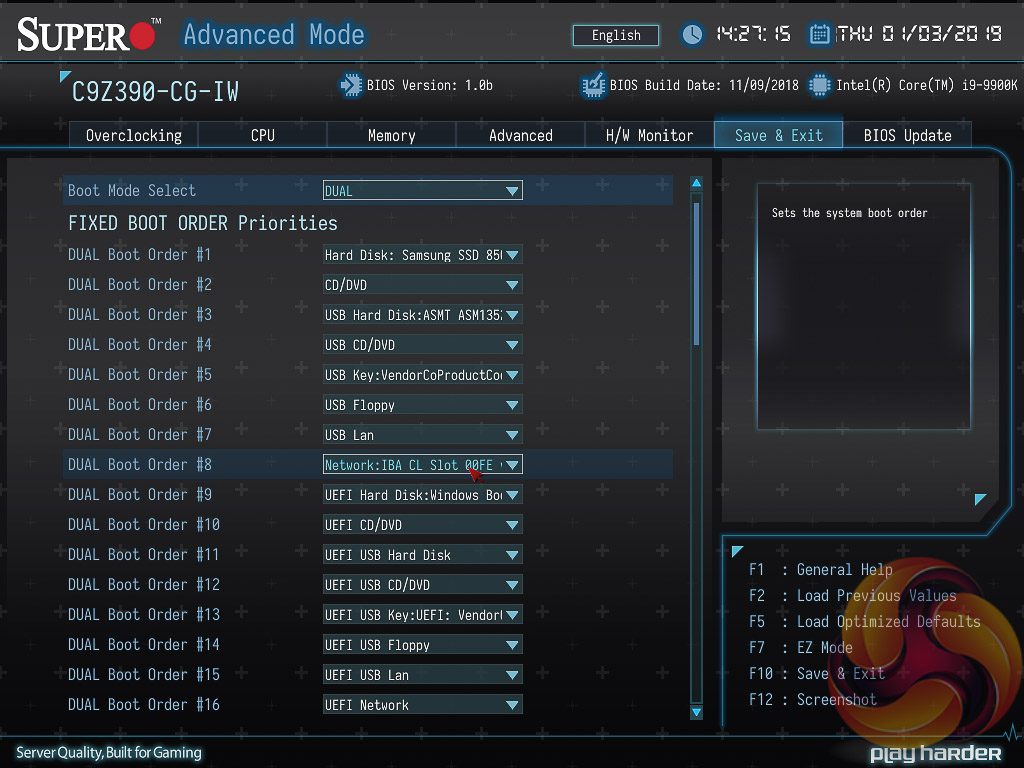
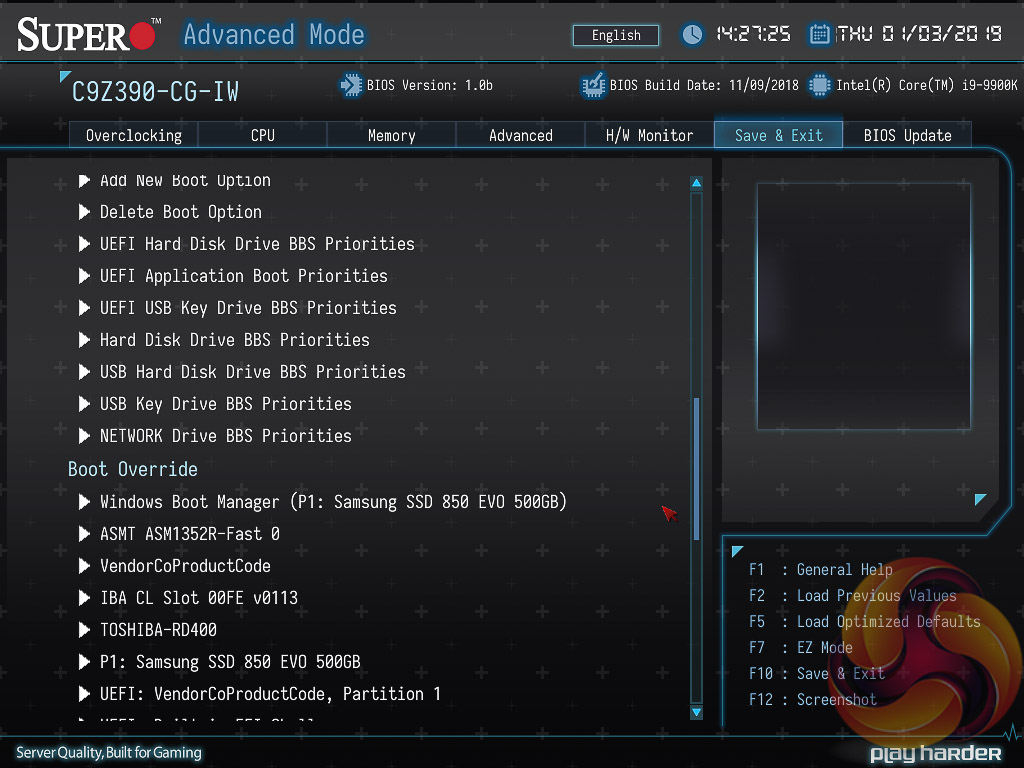

The Save & Exit section handles the boot order, boot override, has the BIOS profile options for saving and loading settings as well as the save and exit interface. It used to be called the Boot section, which made a bit more sense.
The default boot order puts the network boot device above UEFI Windows Hard Drives, which means after setting optimised defaults the system may just get stuck in an endless network boot loop until the user re-enters the BIOS and changes the boot order. It's a small issue but for a consumer user the UEFI and legacy Hard Drive options should definitely both be above network booting by default.
There is no summary of changes made in the session presented to the user upon exiting.
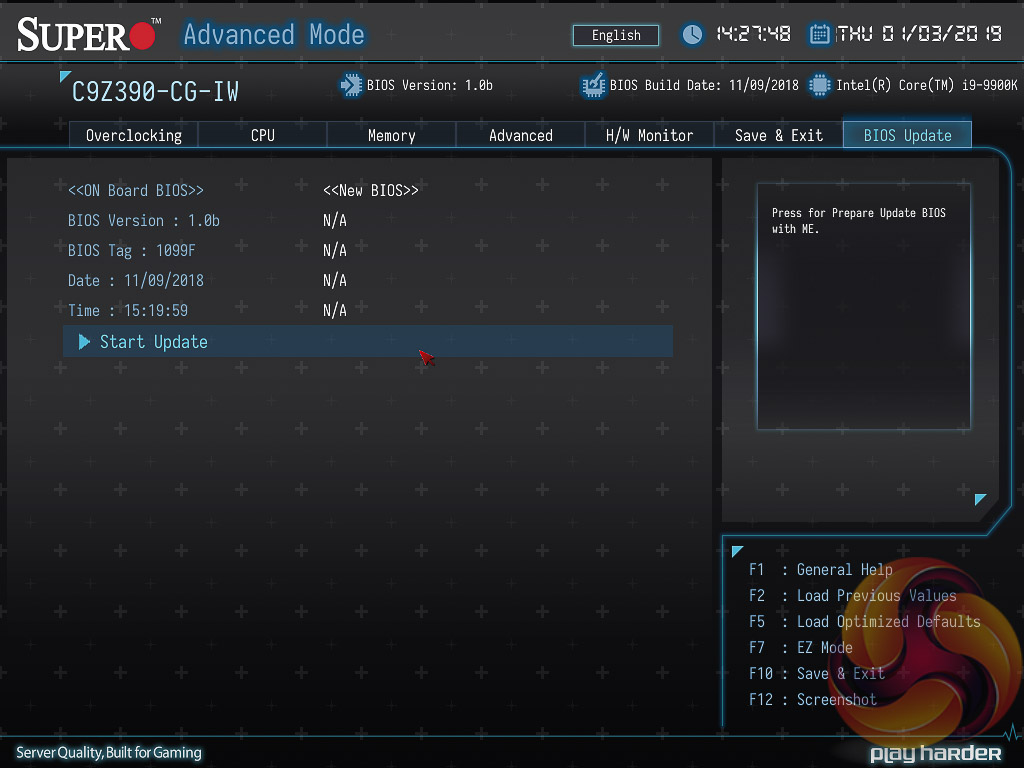

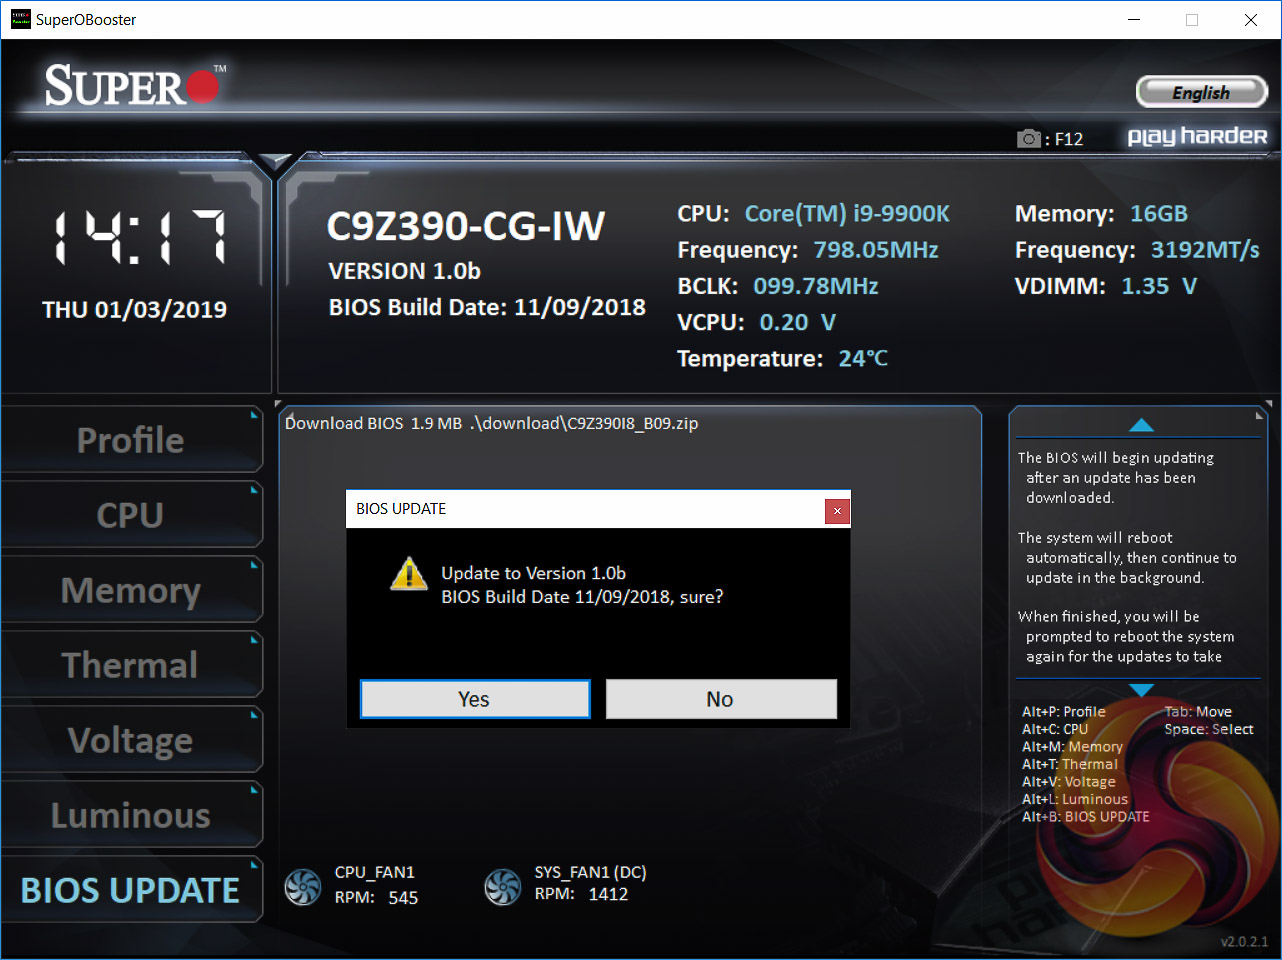
The BIOS Update window displays the current BIOS version and once “Start Update” is selected the system reboots back into the UEFI with new options available – select file and start flash. There is no internet update option from within the UEFI environment.
In our testing we noticed that sometimes after selecting Start Update the UEFI didn't always come back in, sometimes it booted into Windows. It seemed that this happened when the UEFI settings had been modified from the optimised defaults. The workaround that worked for us is to go back into the BIOS, set optimised defaults, save and exit, re-enter the BIOS, then go into the Start Update function again and this time it should boot back in correctly.
When updating the UEFI Supermicro gives the option to just update the UEFI or also update the Management Engine Firmware, it calls it the “ME FDT”. For this to work, the user also has to set the “JPME2” jumper into position 2 and 3 for it to work – so there is both a software and hardware check that both need to pass for this firmware update to happen.
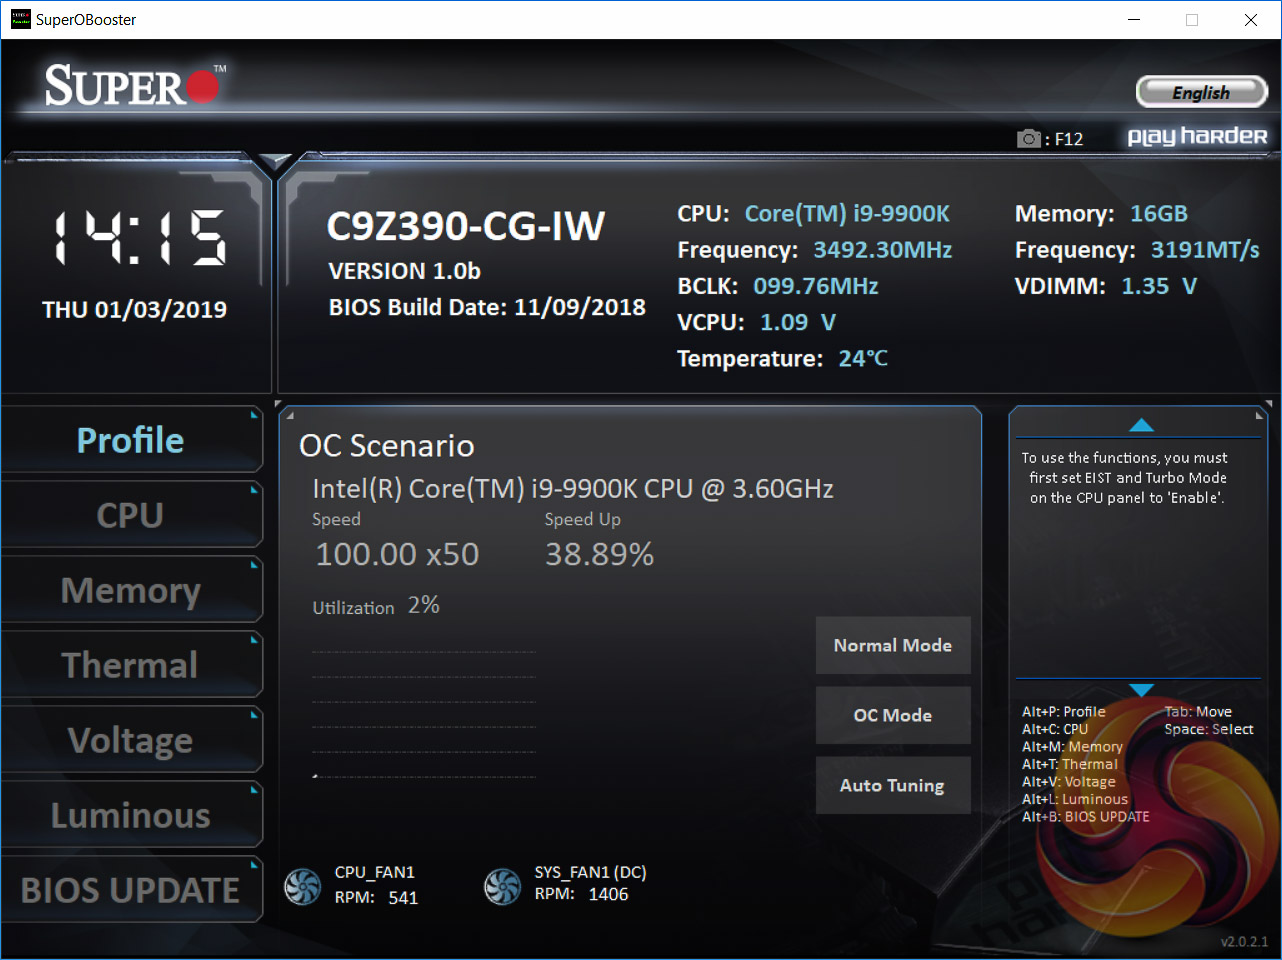

Supermicro’s SuperO Booster software is the main software package for the Supermicro C9Z390-CG-IW. It is a somewhat similar idea to the likes of ASUS AI Suite, ASRock A-Tuning/F-Stream, Gigabyte EasyTune and MSI Command Center, except better unified. Supermicro earns credit for convenience since all its relevant and useful functionality sits inside this single software package.
It can be difficult to find the download option since it wasn't on the SuperO product page, but there is a direct download link to the SuperO Booster utility on the Supermicro product page for this product.
The SuperO Booster software looks a lot like the Supermicro UEFI. It has a similar set of tabbed displays for different themes and users can change a whole host of settings in Windows such as CPU and memory performance parameters and fan speeds.
The Profile section has some pre-defined overclocking profiles and an auto-tuning function.
The CPU section permits on-the-fly adjustments to the multiplier and base clock.
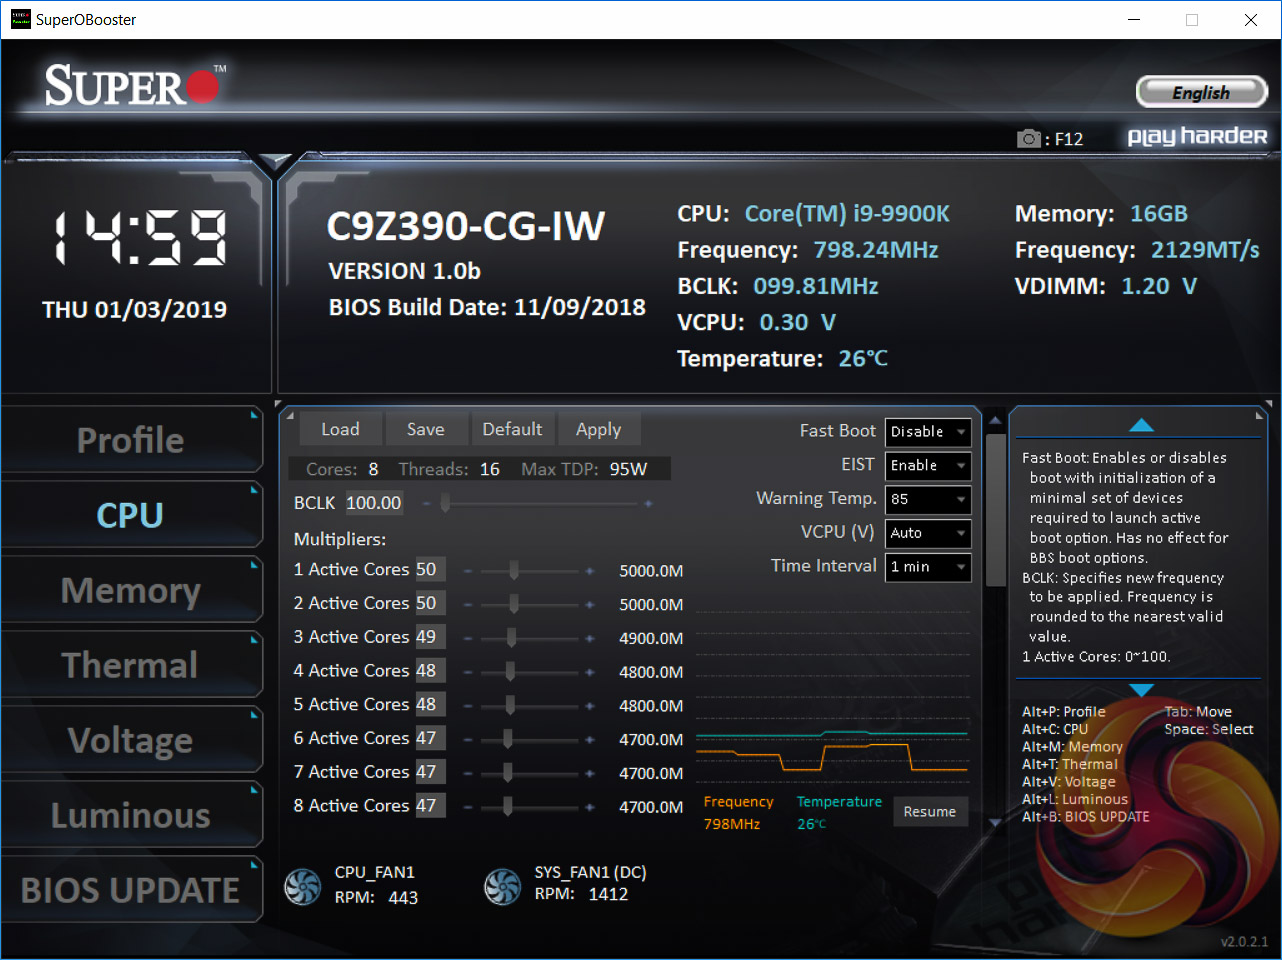
Using the software to illustrate, Supermicro's “optimised defaults” profile for the i9 9900K sets 1 & 2 core Turbo to 5GHz, 3 cores to 4.9GHz, 4 and 5 cores to 4.8GHz and 6 to 8 cores to 4.7GHz. That said, this is still subject to the PL1 and PL2 power limits explained in the UEFI section, so the actual clock speed can end up being lower. Typically, after the PL2 turbo duration expires the 8 core frequency is 4.3GHz, rather than 4.7GHz.
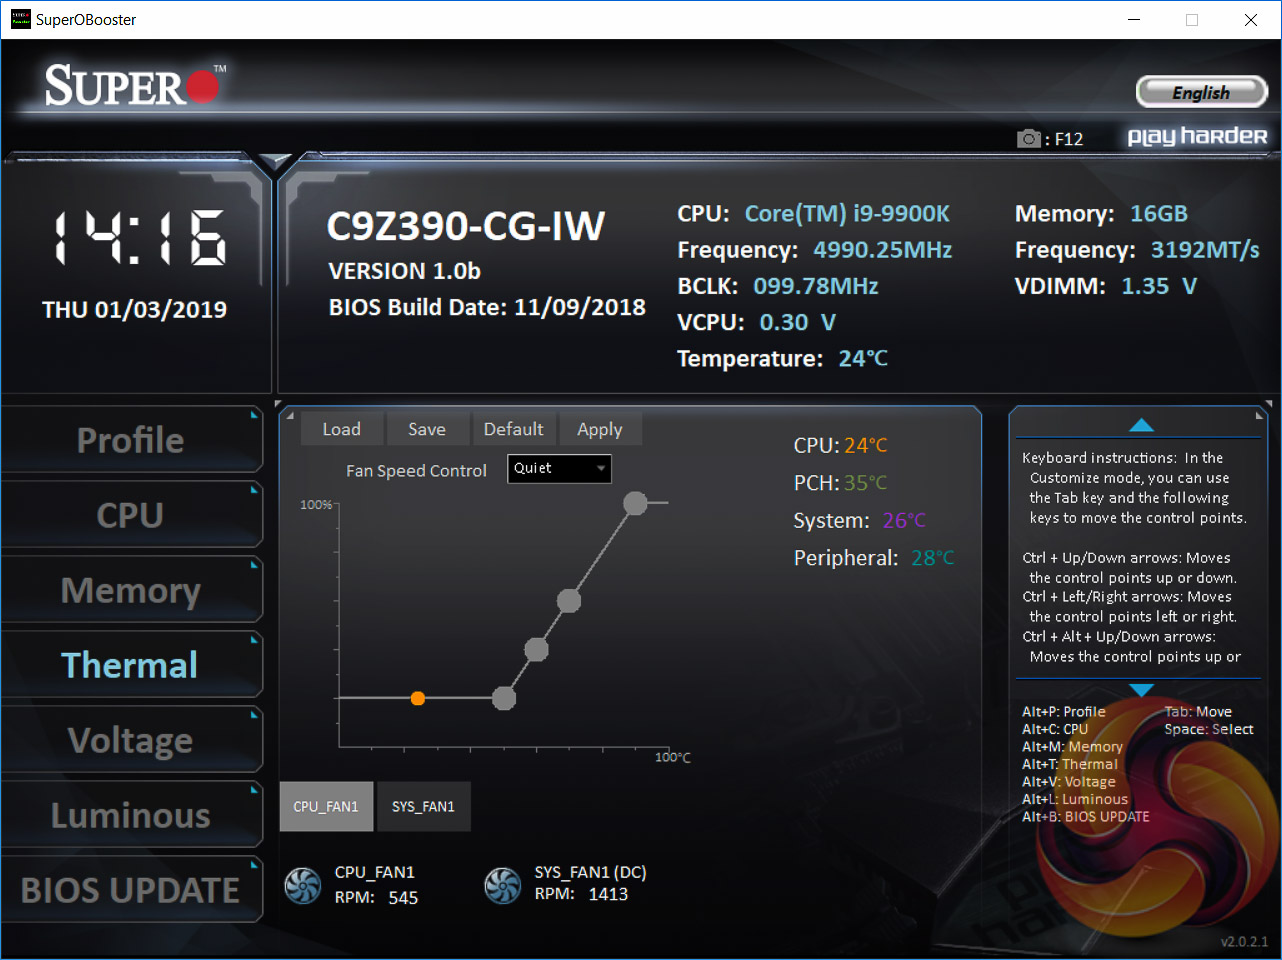
The fan speed controls, available under the Thermal section, are still the same 4 speed steps but the software does have a range of pre-defined profiles to choose from on a per-fan basis that the UEFI didn’t have.
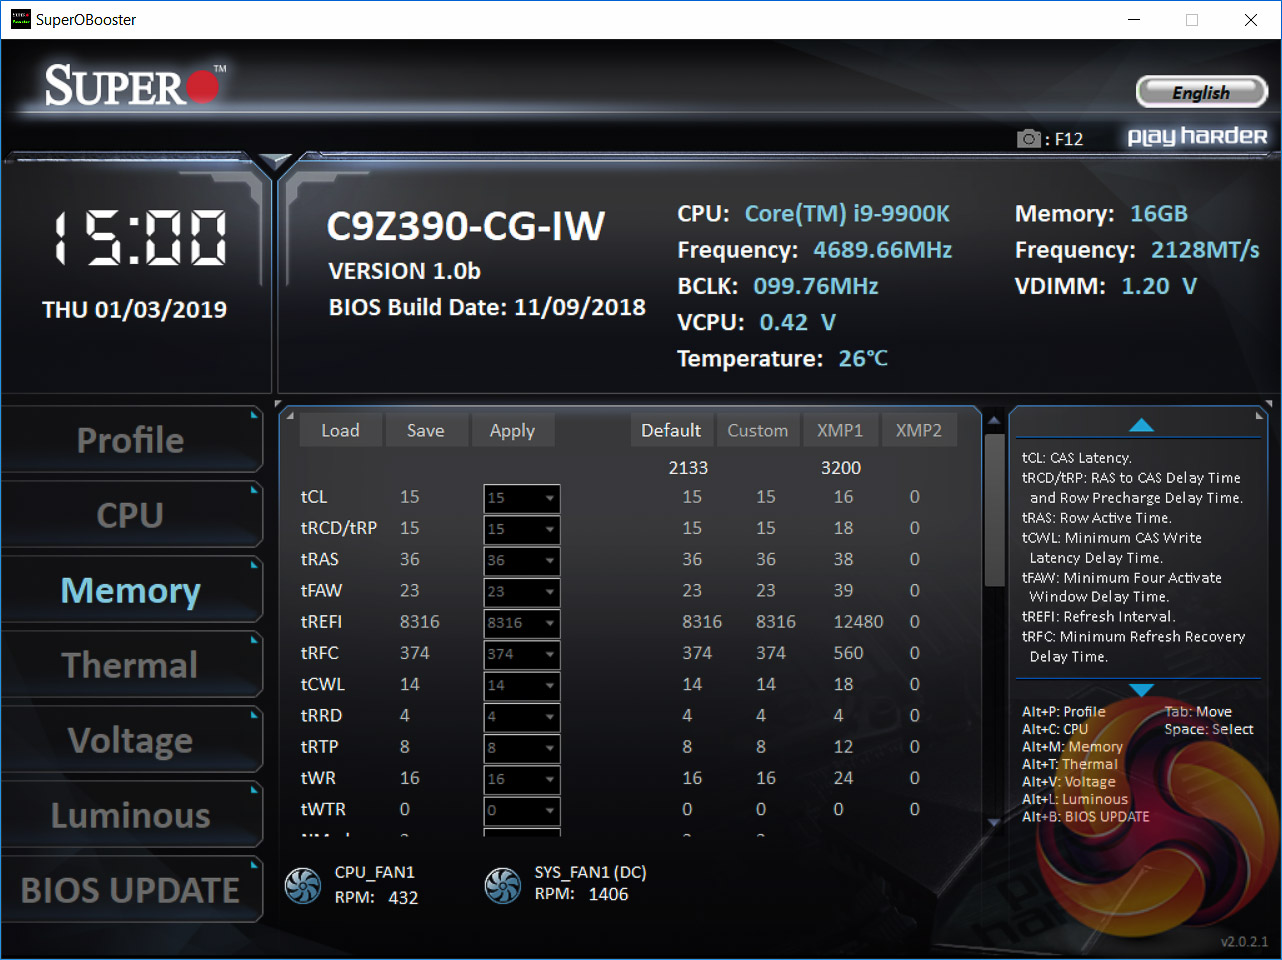
The memory section allows for adjustment to memory frequency and timings on-the-fly.
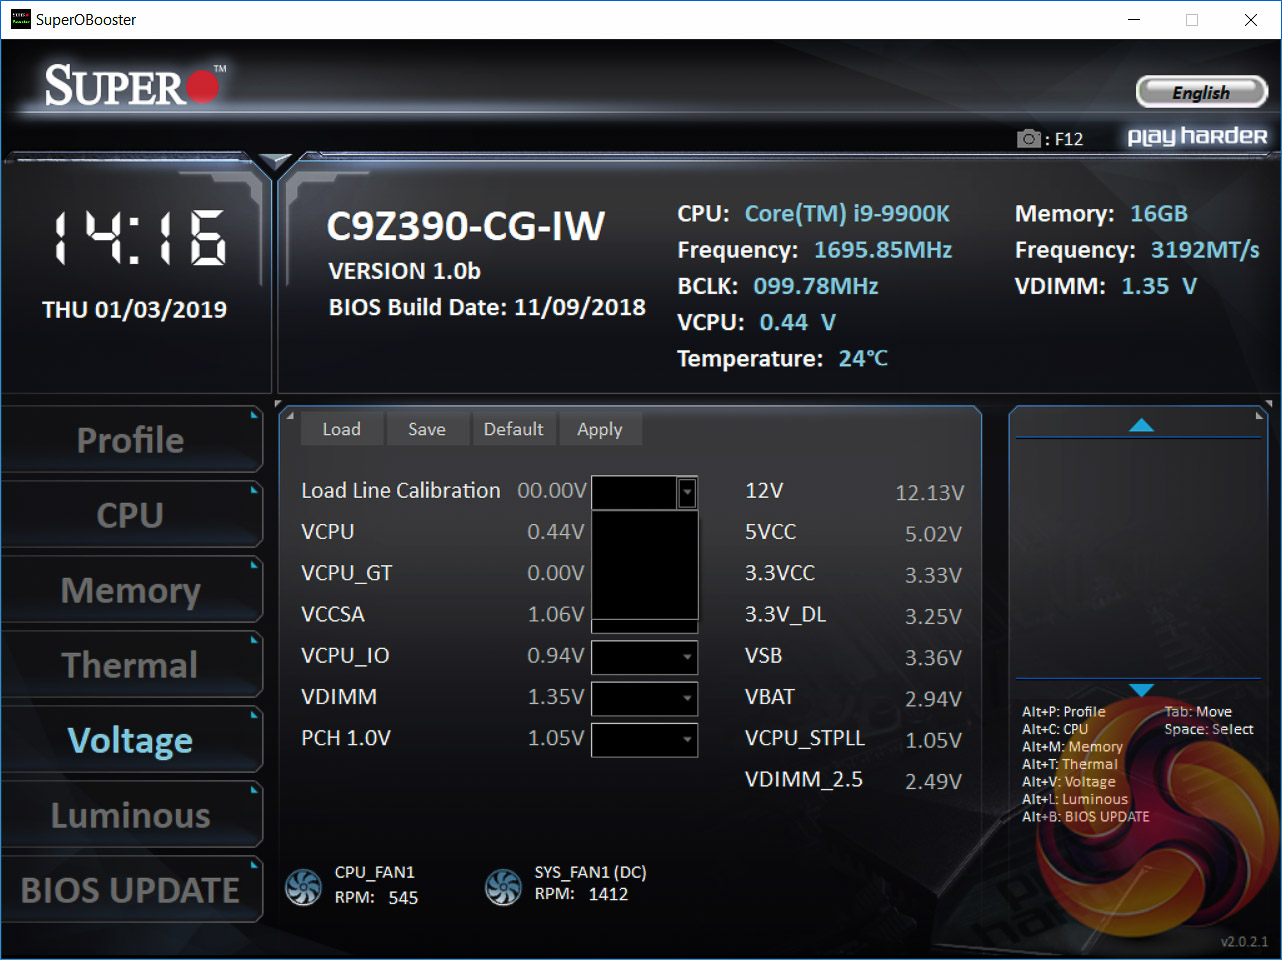
The voltage section is as it sounds, and allows for on-the-fly adjustments to the various key voltages used by the system. If the software displays blank values upon start-up, which it did for us on a couple of occasions, then it needs to be restarted.
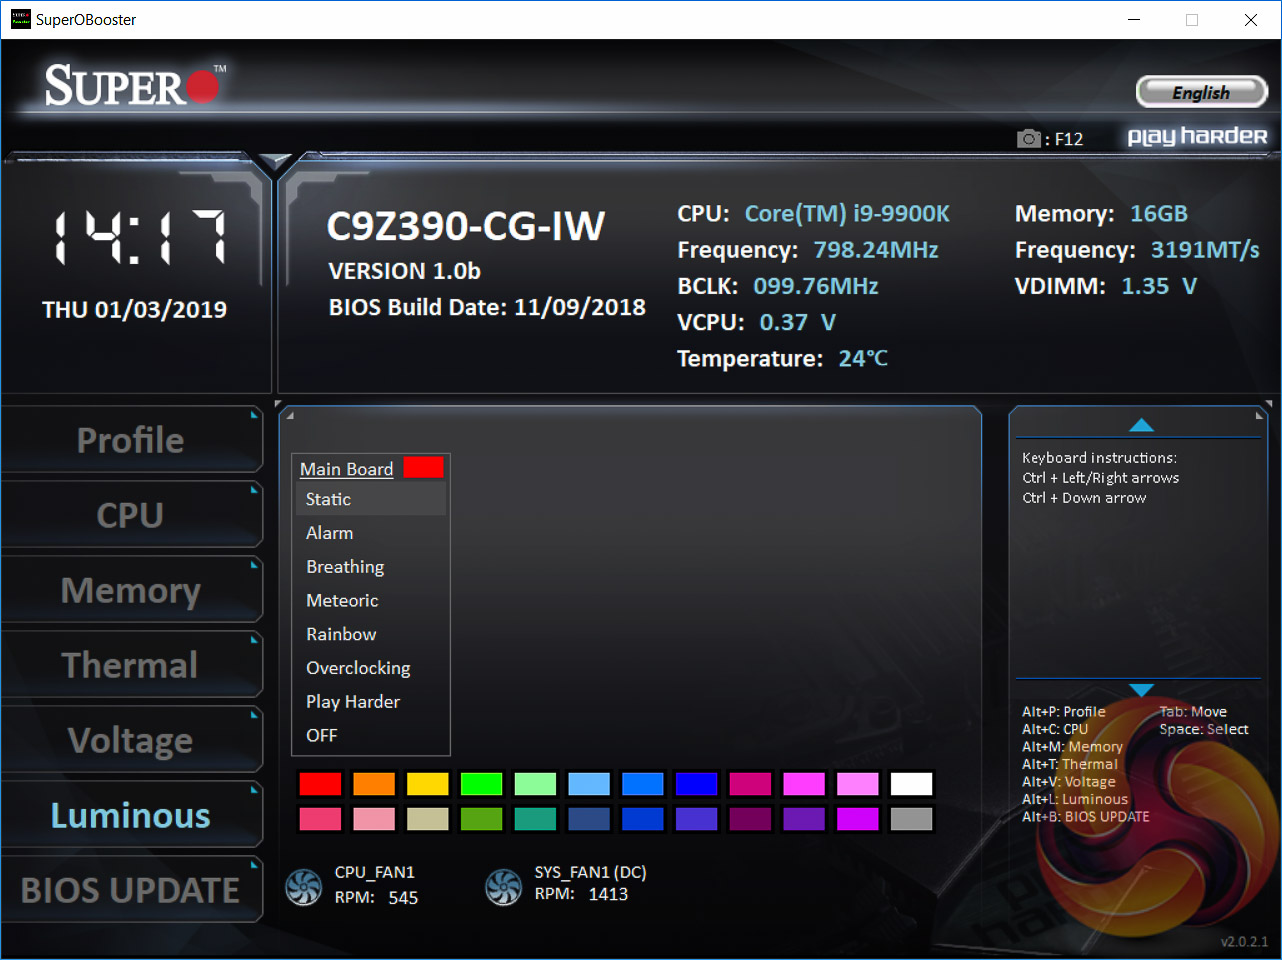
Luminous is the part of the software that allows for the customisation of the onboard RGB LEDs using a range of presets. These apply to both the single onboard RGB lighting zone and the optional RGB strip. It is not possible to customise these independently of each other. There's a decent selection of lighting modes and colours, though full RGB customisation, i.e. 16.6 million colours from 255*255*255, is not available.
The BIOS Update section allows the UEFI to be updated directly from the Supermicro website within Windows. However, we noticed it didn't recognise when the version on the Supermicro website was already installed on the motherboard and it would “update” to the same version i.e. 1.0b to 1.0b. It should be smarter and detect when the version on the website is the same as the version already installed, and simply give a message saying “Your BIOS is up to date”.
We will be outlining the Supermicro SuperO C9Z390-CG-IW motherboard's performance with the Intel Core i9 9900K CPU, 16GB* of 3,200MHz G.Skill Trident Z DDR4 memory and a Gigabyte GTX 1080 G1 Gaming.
*16GB for mini-ITX motherboards, 32GB for all other motherboards.
Z390 Motherboard Test System:
- Processor: Intel Core i9 9900K with Default Intel Turbo Behaviour where supported (varies depending on thermal and power conditions)
- Memory: 32GB (4x8GB*) G.Skill Trident Z XMP/DOCP/AMP (3,200MHz** 16-18-18-38 @ 1.35V), *2x8GB for mini-ITX motherboards
- Graphics Card: Gigabyte GeForce GTX 1080 G1 Gaming.
- System Drive: Samsung 850 EVO 500GB SSD
- CPU Cooler: Corsair H100i V2 with Two ML120 Pro Fans.
- Power Supply: Seasonic Platinum 760W SS-760XP.
- Operating System: Windows 10 Pro 64-bit
Comparison Z390 Motherboards:
- ASRock Z390 Phantom Gaming 9
- ASUS ROG Strix Z390-E Gaming
- Supermicro SuperO C9Z390-CG-IW
Drivers and UEFI:
- Intel 10.1.17695.8086 chipset drivers
- Nvidia GeForce 416.34 VGA drivers
- Supermicro UEFI 1.0b (9th November 2018)
Tests:
- Cinebench R15 – All-core CPU benchmark (CPU)
- SiSoft Sandra 2018.9.28.28 – Processor Arithmetic Test (CPU) and Memory Bandwidth Test (Memory)
- 7-Zip 18.05 x64 – Built-in 7-Zip benchmark test (CPU)
- AIDA64 Engineer 5.98.4800 – System cache & memory benchmark and stress test (Memory and Power Consumption)
- 3DMark v2.5.5029 64 & TimeSpy v1.1 – Time Spy (1440p) test (Gaming)
- Ashes of the Singularity: Escalation – Built-in benchmark tool CPU-Focused test, 1920 x 1080, Extreme quality preset, DX12 mode (Gaming)
- Deus Ex: Mankind Divided – Built-in benchmark tool, 1920 x 1080, Ultra quality preset, DX12 mode (Gaming)
- ATTO 3.05 – M.2, USB 3.0, USB 3.1, and SATA 6Gbps transfer rates (Motherboard)
- Rightmark Audio Analyzer 6.4.5 – Record and playback test using a line-in to line-out loopback with a 3.5mm audio cable (Motherboard)
- HWiNFO 5.91.3560 – System sensor monitoring during stress test (Power Consumption)
- Cybenetics Powenetics v2.2.0.0 – 12v EPS monitoring during stress test (Power Consumption)
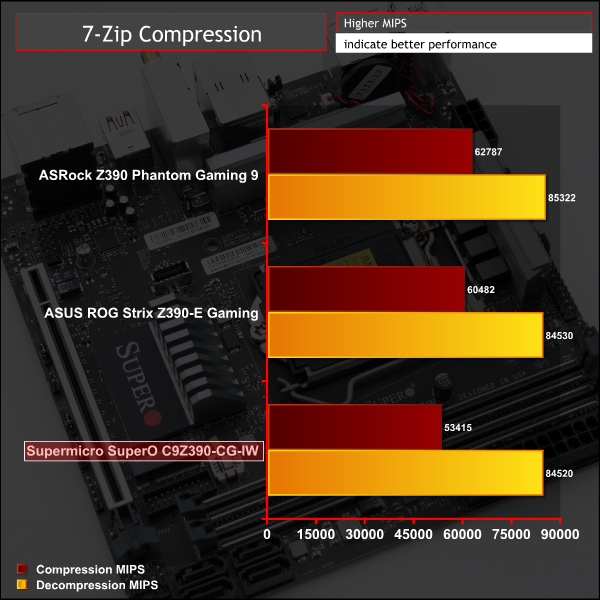
7-Zip
7-Zip is an open source Windows utility for manipulating archives. We measure the Total Rating performance using the built-in benchmark tool. The test stresses all CPU cores to 100% and shows an affinity for memory bandwidth.
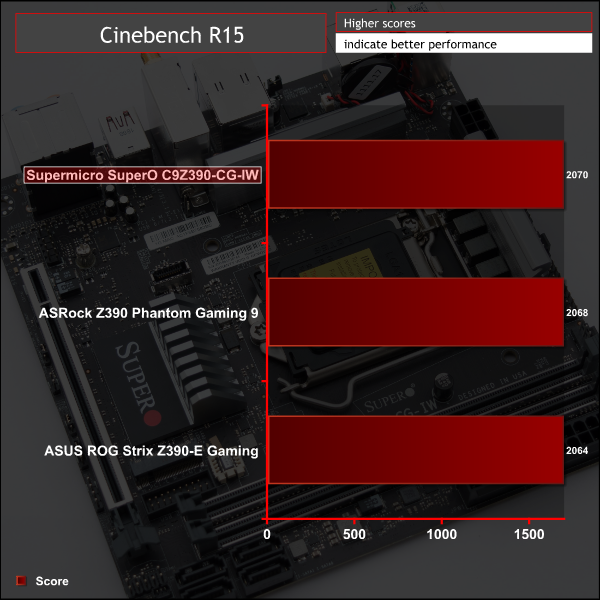
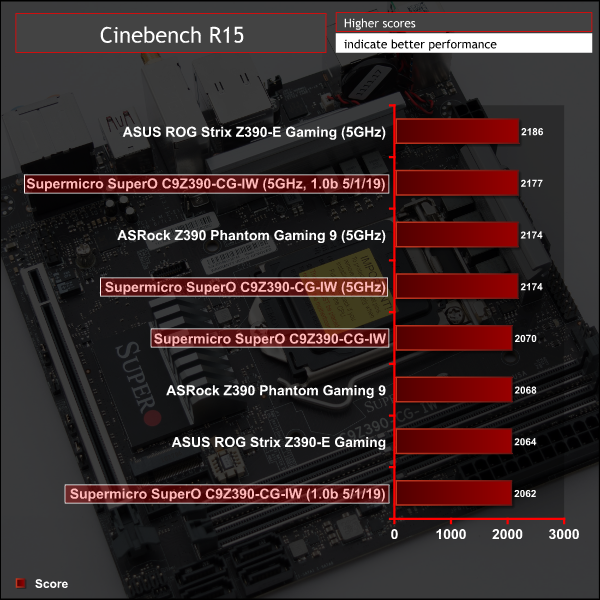
Cinebench R15
Cinebench is an application which renders a photorealistic 3D scene to benchmark a computer’s rendering performance, on one CPU core, all CPU cores or using the GPU. We run the test using the all core CPU mode.
Sandra Processor Arithmetic
SiSoft Sandra 2018 is a multi-function utility program that supports remote analysis, benchmarking and diagnostic features for PCs, servers, mobile devices and networks. We run the application’s processor arithmetic test to gauge the CPU performance on each tested motherboard.
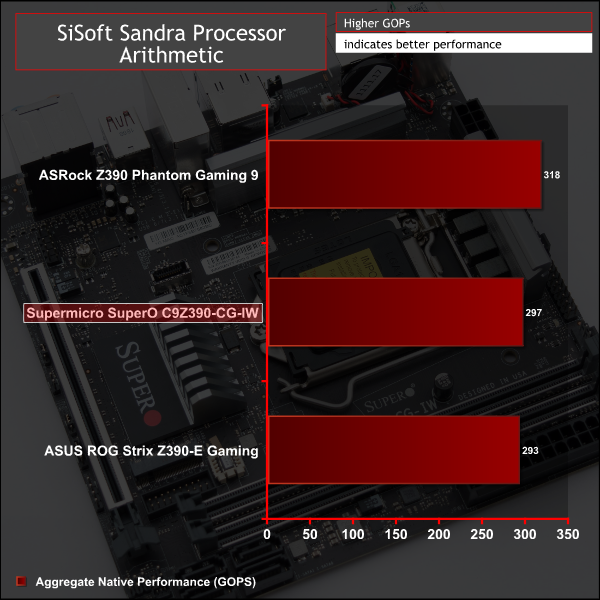
CPU performance for the Supermicro motherboard aligns well with the ASUS motherboard, both of which seem to respect stock Intel turbo specifications, unlike the ASRock motherboard.
The one caveat here for the Supermicro motherboard is that there was an issue where setting an XMP profile automatically increased the core voltage, causing heavy power based throttling that dropped the all-core turbo speed from 4.3GHz to 3.3GHz. This is detailed more in the UEFI page, for those that are interested. This testing shows the results after we corrected that UEFI anomaly manually.
For a rough guide of how CPU performance compares to other platforms please see our most recent reviews for the following platforms:
B450/X470 (Ryzen 7 2700)
Z370 (Intel Core i7 8700K)
X299 (Intel Core i9 7900X)
Please note software and driver versions have changed hence why we caution that results are not directly comparable.
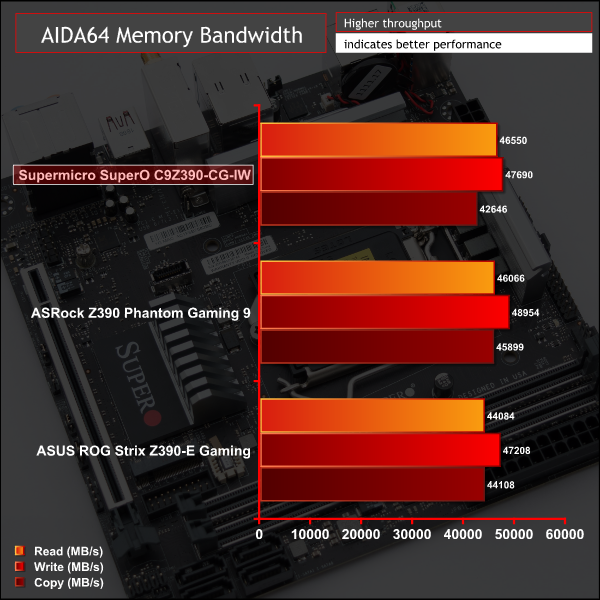
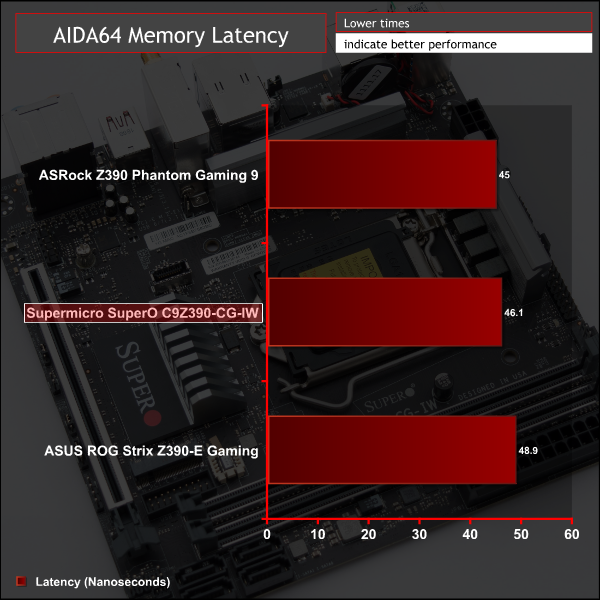
AIDA64 Engineer
AIDA64 Engineer is a multi-featured software suite for diagnostics, stress testing, benchmarking, software auditing and various other measurement parameters. We use AIDA64 Engineer to benchmark memory throughput and latency.
Sandra Memory Bandwidth
SiSoft Sandra 2018 is a multi-function utility program that supports remote analysis, benchmarking and diagnostic features for PCs, servers, mobile devices and networks. We use the SiSoft Sandra memory bandwidth test to provide a set of memory bandwidth results.
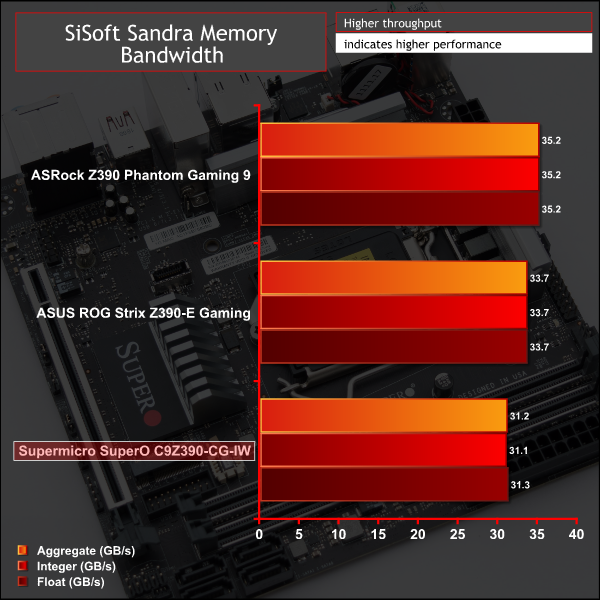
Memory performance is about right given the CPU performance, it does fall slightly behind others but all other motherboard are tested with four memory modules, whereas this is limited to two because of the mini-ITX form factor, and that does always seem to create a slight performance differential.
For a rough guide of how memory performance compares to other platforms please see our most recent reviews for the following platforms:
B450/X470 (Ryzen 7 2700)
Z370 (Intel Core i7 8700K)
X299 (Intel Core i9 7900X)
Please note software and driver versions have changed hence why we caution that results are not directly comparable.
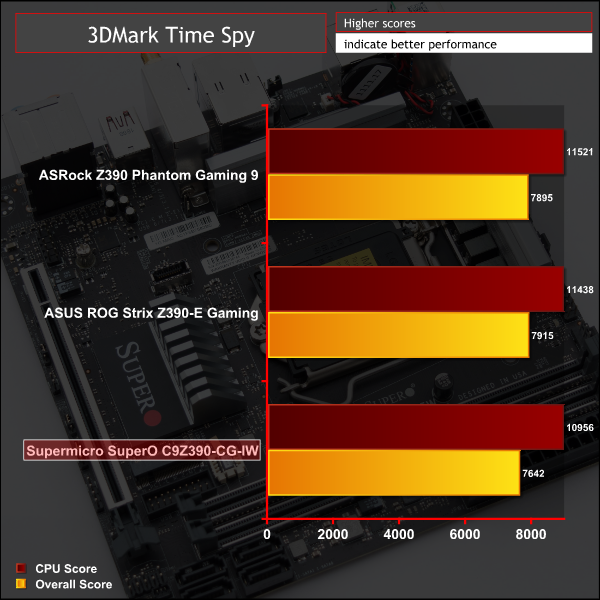
3DMark
3DMark is a multi-platform hardware benchmark designed to test varying resolutions and detail levels of 3D gaming performance. We run the Windows platform test and in particular the Time Spy benchmark, which is indicative of high-end 1440p PC Gaming.
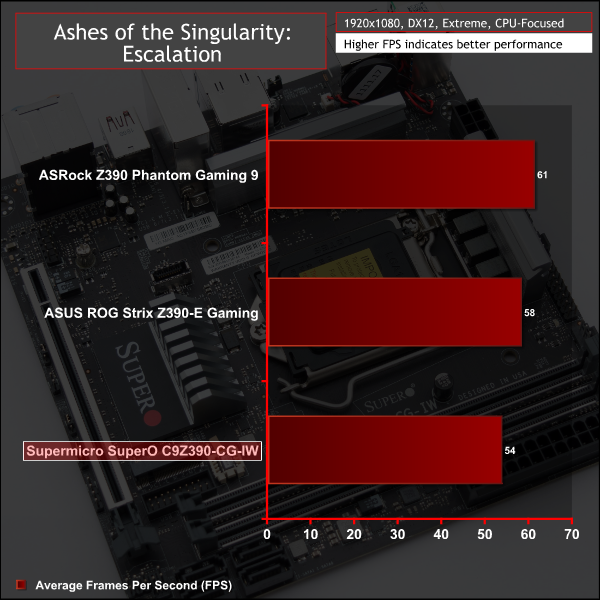
Ashes of the Singularity: Escalation
Ashes of the Singularity: Escalation is a Sci-Fi real-time strategy game built for the PC platform. The game includes a built-in benchmark tool and was one of the first available DirectX 12 benchmarks. We run the CPU-focused benchmark using DirectX 12, a 1080p resolution and the Extreme quality preset.
Deus Ex: Mankind Divided
Deus Ex: Mankind Divided is an action role-playing stealth video game released in August 2016. A built-in benchmark utility is included and we test using the Ultra quality preset and the DirectX 12 API at a 1080p resolution.
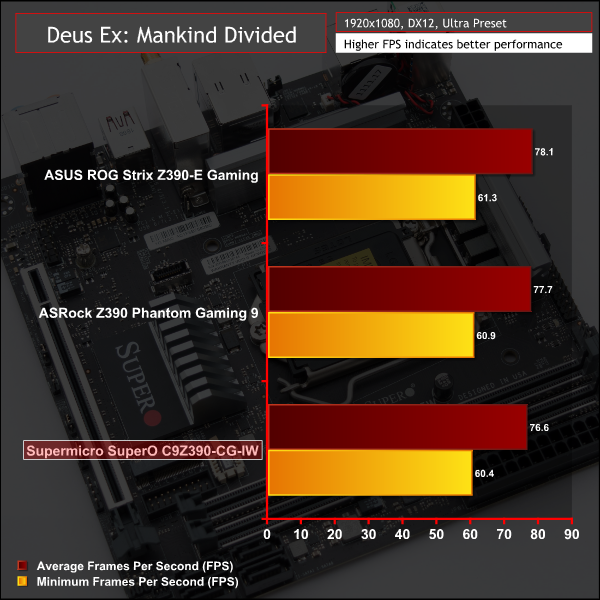
Gaming performance was slightly behind all other motherboards though we're unsure as to why. Part of the difference will be explained by the memory performance deficit, and perhaps the rest is explained by some quirk of CPU power management and how the motherboard vendors calculate this differently.
For a rough guide of how gaming performance compares to other platforms please see our most recent reviews for the following platforms:
B450/X470 (Ryzen 7 2700)
Z370 (Intel Core i7 8700K)
X299 (Intel Core i9 7900X)
Please note software and driver versions have changed hence why we caution that results are not directly comparable.
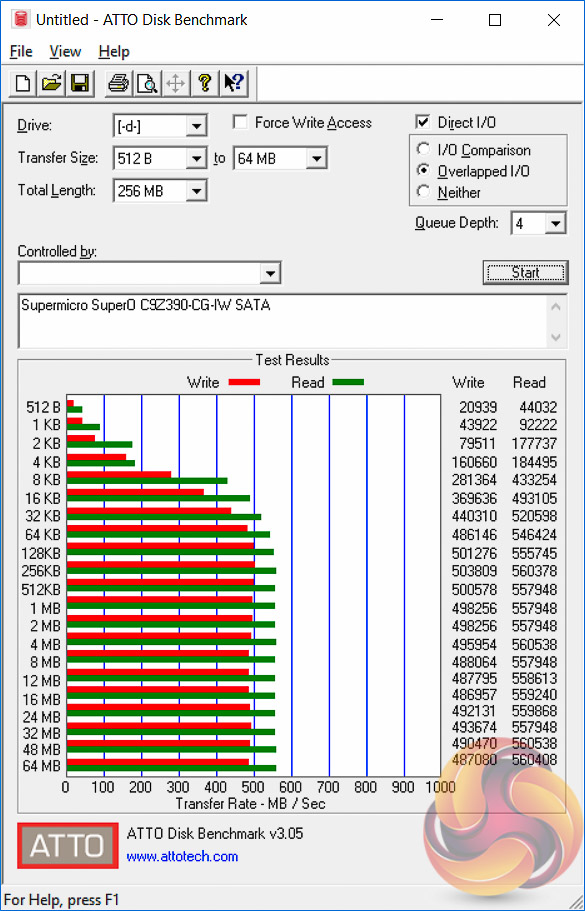
ATTO Disk Benchmark
The ATTO disk benchmark is a Windows-based utility for testing storage performance of any storage drive or controller. We use the default benchmark setup.
M.2 PCIe Performance
For M.2 testing we use a Toshiba OCZ RD400 256GB M.2 PCIe NVMe SSD.
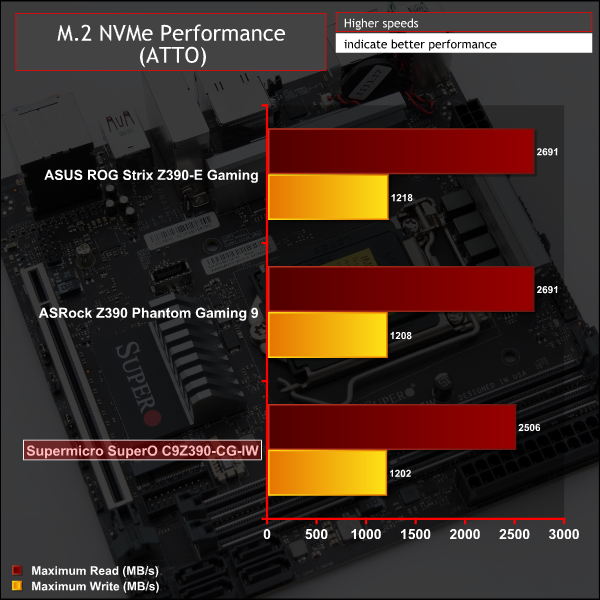
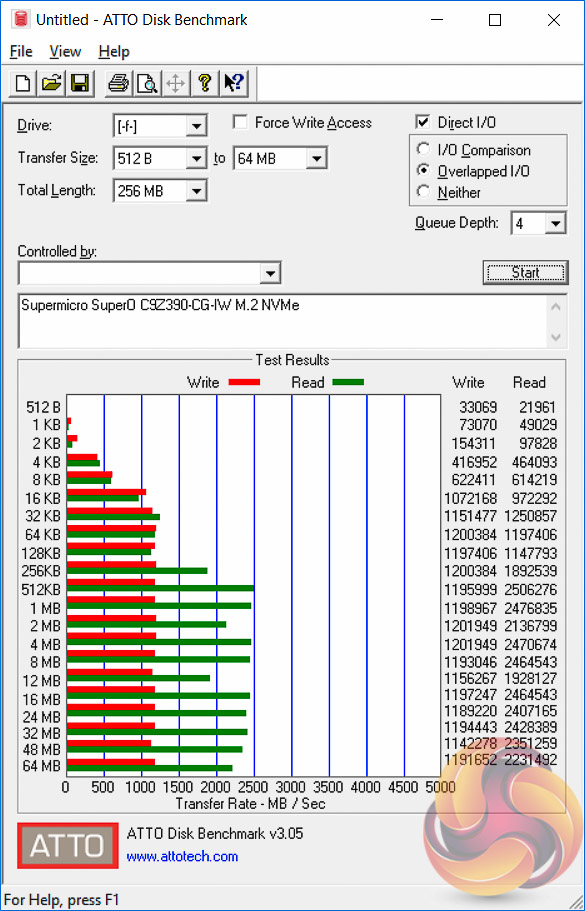
All storage performance (M.2, USB and SATA) on this motherboard was slightly behind everything else we've tested, both Z390 but also previous Z370 and X299 motherboards. Even after a clean copy of Windows 10 version 1809, the performance differential remained.
It's fairly small, around 5 to 15 per cent, but enough to notice in testing. KitGuru informed Supermicro about these results but KitGuru has not yet received an explanation or solution. We predict it could be a consequence of a UEFI setting, a bandwidth sharing issue, recent changes to Intel/Windows drivers that we've not yet discovered or some hardware quirk.
The M.2 drive did thermal throttle as there is no M.2 cooling solution.
USB Performance
We test USB 3.0 and 3.1 performance using a pair of Transcend SSD370S 512GB SSDs in RAID 0 connected to an RaidSonic Icy Box RD2253-U31 2-bay USB 3.1 enclosure powered by an ASMedia ASM1352R controller.
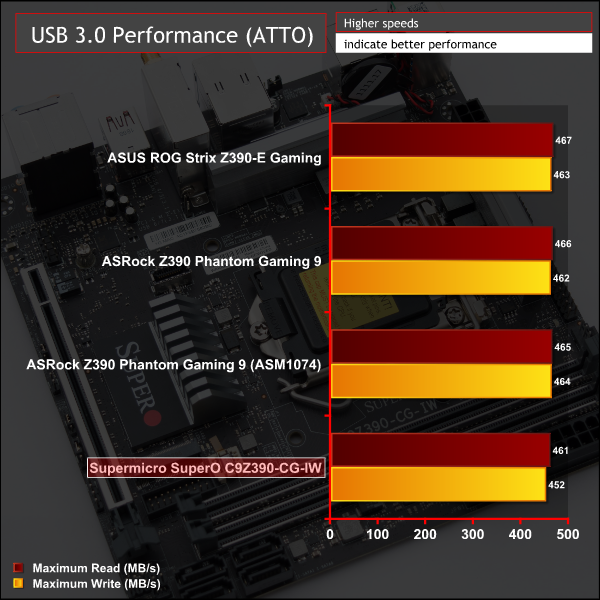

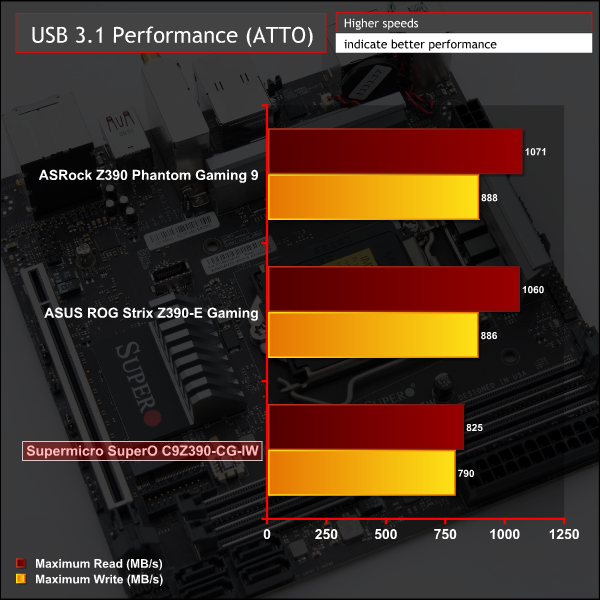
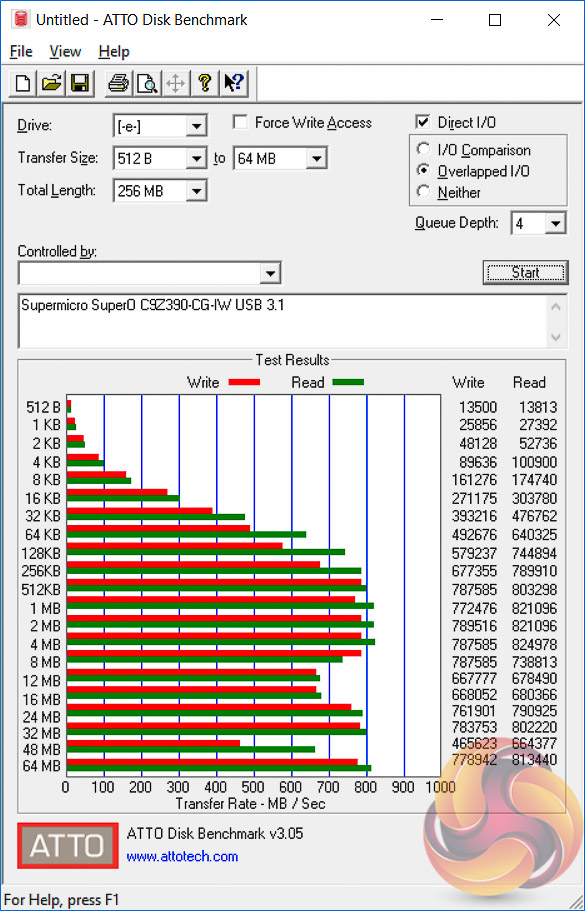
USB 3.0 and 3.1 performance were slightly behind competitors.
SATA III 6Gbps Performance
For SATA 6Gbps testing we use an OCZ Trion 150 480GB SSD.
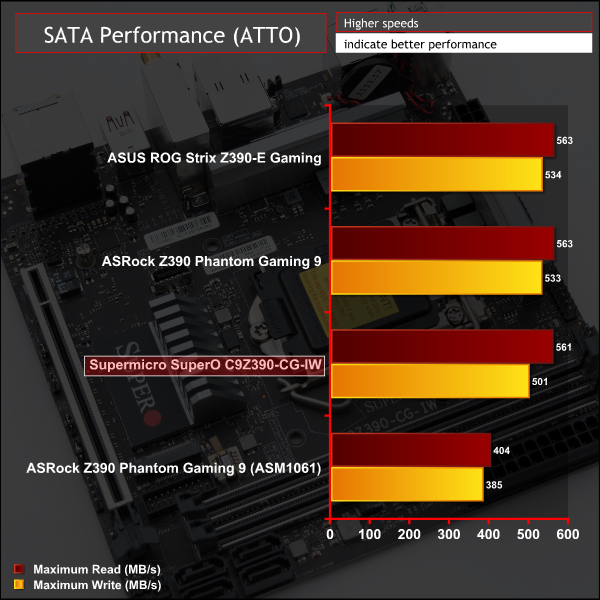
SATA performance was also a little behind the competition.
Audio
Rightmark Audio Analyser is a freeware benchmarking utility designed to objectively test the performance characteristics of audio solutions. We setup a line-in line-out loop and execute the record/playback test before generating the results report you see below. A sampling mode of 24-bit, 192 kHz is tested where available. If unavailable the closest alternative operating mode available is used and clearly marked.
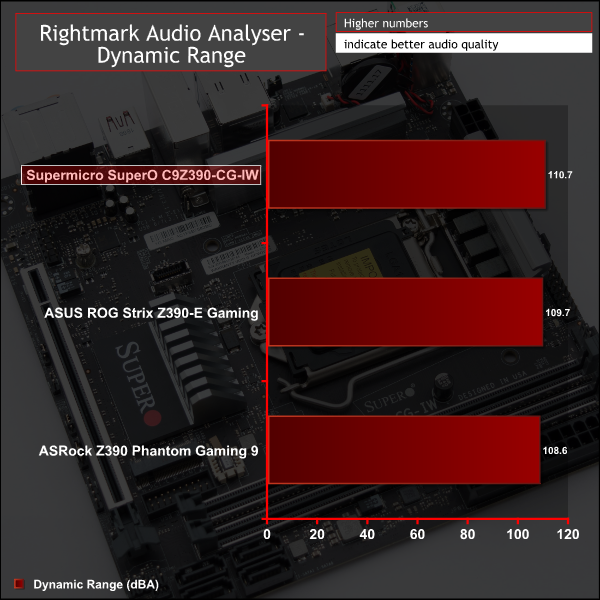
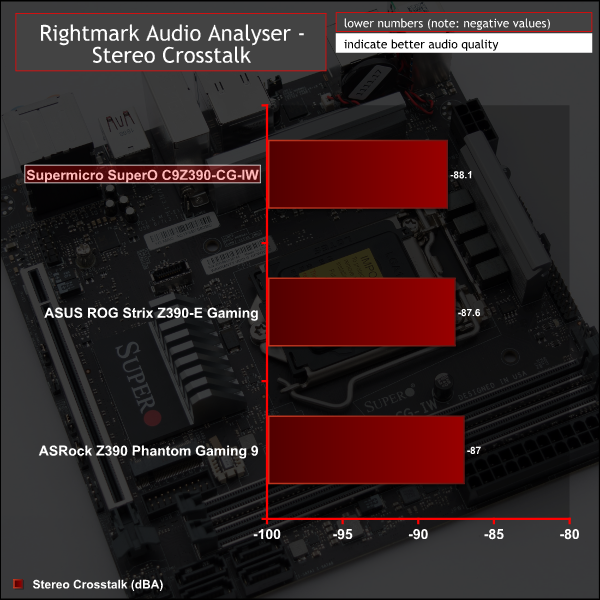
Audio performance was excellent and just goes to show that perhaps PCB separation, plentiful audio capacitors and additional operational amplifiers do not make as much difference as one might think.
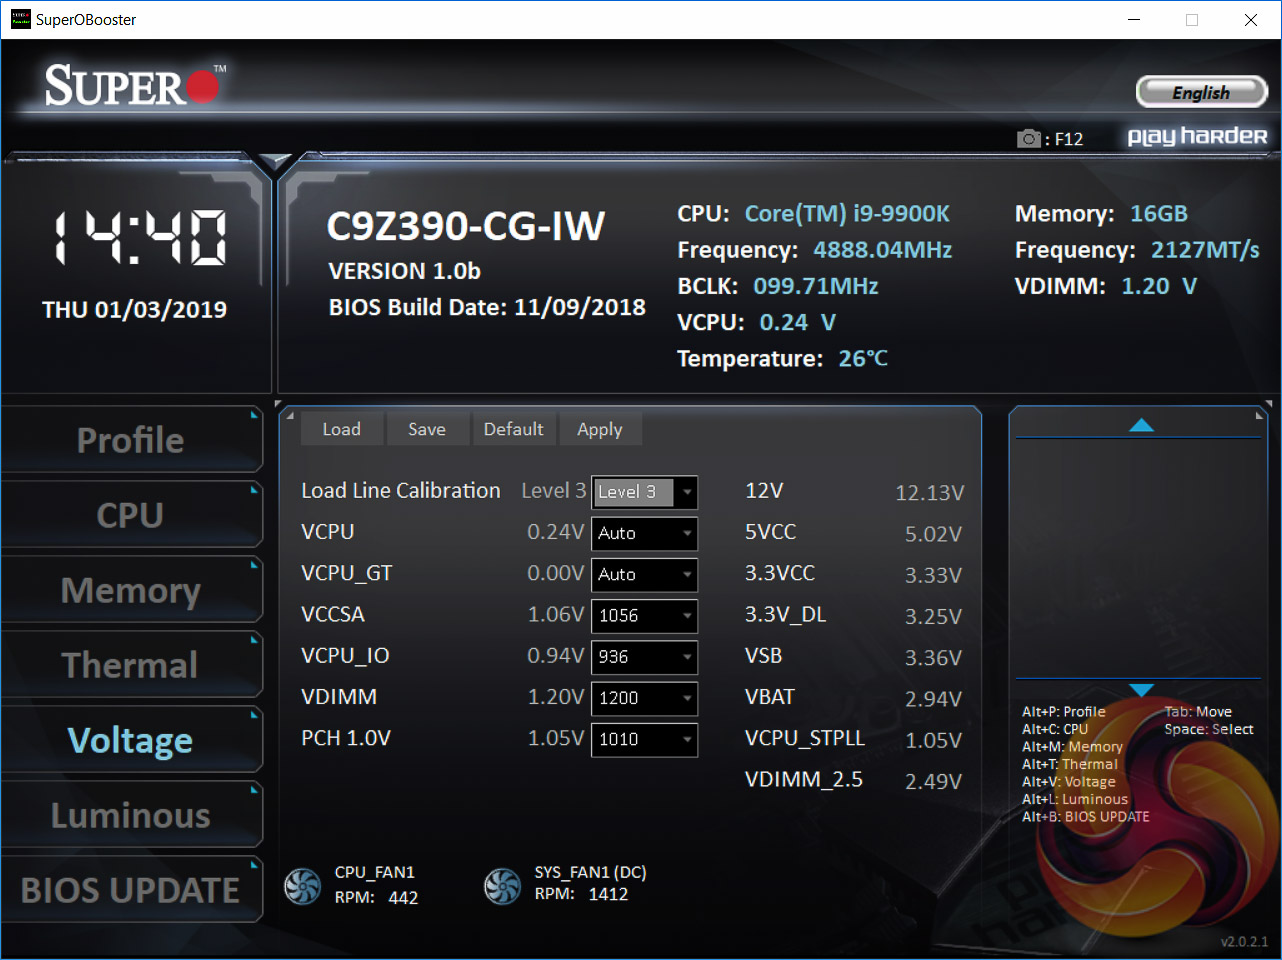
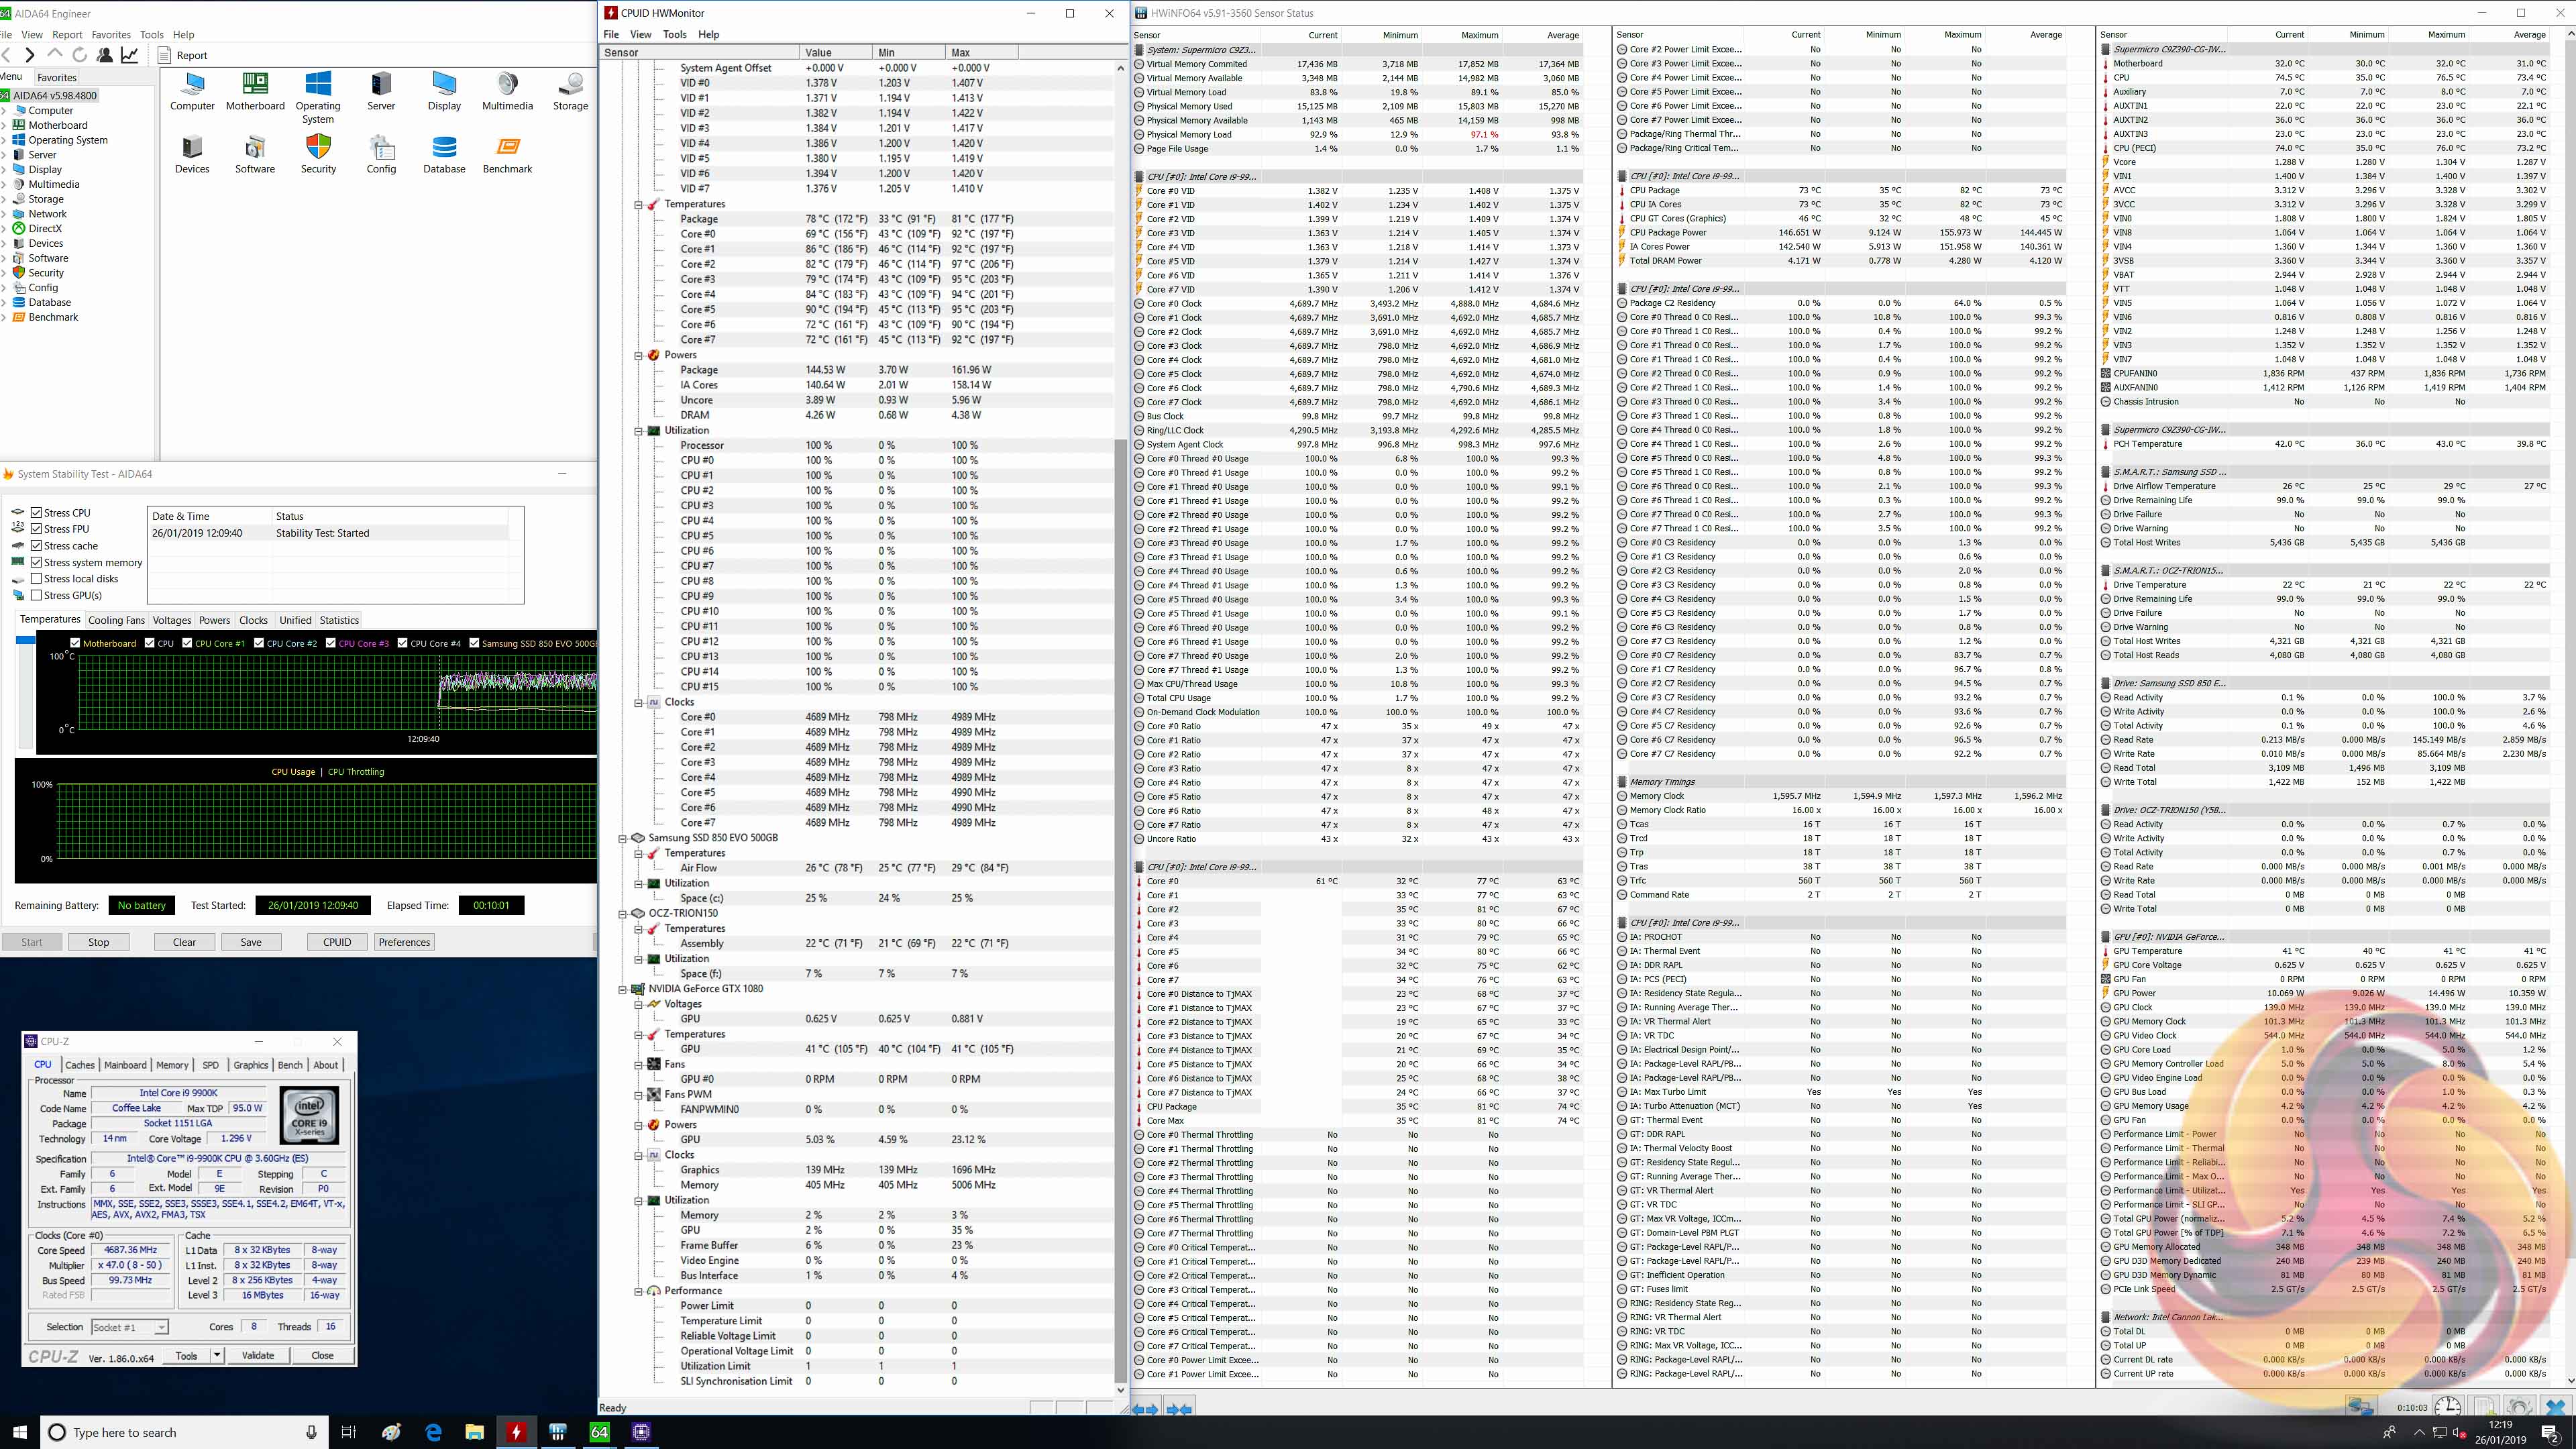
Manual CPU Overclocking:
To test the Supermicro SuperO C9Z390-CG-IW motherboard’s CPU overclocking potential, we set the CPU core voltage no higher than 1.3V and push for the highest stable clock speed. We maintain the DRAM frequency at 3200MHz to take memory stability out of the overclocking equation.
Our particular CPU is not stable at 5.1GHz even with 1.45v. The final stable overclock for almost all Z390 motherboards we may test should be 5GHz, unless there is something particularly wrong with the VRM that limits the voltage or power it can supply. In the case of the Supermicro SuperO C9Z390-CG-IW it achieved 5GHz at 1.28 volts with no significant issues.
During our testing, however, we did note the voltage behaviour to be somewhat peculiar. The first peculiarity was that the VID, Voltage Identification Digital, was generally lower than the VCore – something that's not happened on any other motherboard we've tested – Z370 or Z390. In theory, the VID and VCore should be fairly similar but we saw a differential under overclocking of 0.06v, 1.23v (VID) and 1.29v (VCore).
The second peculiarity is the VCore voltage “overshoot” at all LLC levels. For example, 1.3v override became 1.4v VCore using Auto LLC, 1.36v using Level 3 LLC and 1.34v using Level 1 LLC, Level 1 is the lowest level of LLC and it still overshoots.
To get our stable overclock of 5GHz at 1.28v VCore we actually used 1.225v override with a Level 3 LLC. Supermicro should make an effort to revise the UEFI so that the Automatic LLC doesn't overshoot the user-defined voltage by such a large margin.
Another peculiarity is that CPU temperatures were much higher for the same or lower voltages than they were on other motherboards. Again, it is not quite clear why this is the case as we keep the cooling solution consistent across all reviews. Using 1.3v VCore on the ASUS and ASRock motherboards reaped maximum temperatures around 85 degrees Celsius. For this motherboard those same maximum temperatures were more like 95 degrees Celsius, and that was using a lower 1.28v VCore.
Update 26th January 2019 – Supermicro issued a test UEFI version to KitGuru, still marked 1.0b but dated 5th January 2019, which has corrected the VID/VCore issue where the VID was lower than the VCore, when it should have been the reverse. The new BIOS has also resulted in a much better LLC performance. For example 1.3v using a Level 3 LLC now equates to 1.28v VCore, rather than previously when it was 1.36v for the same settings. The new BIOS also seems to have cleared up the high CPU temperature issues too.
Motherboard Sensors
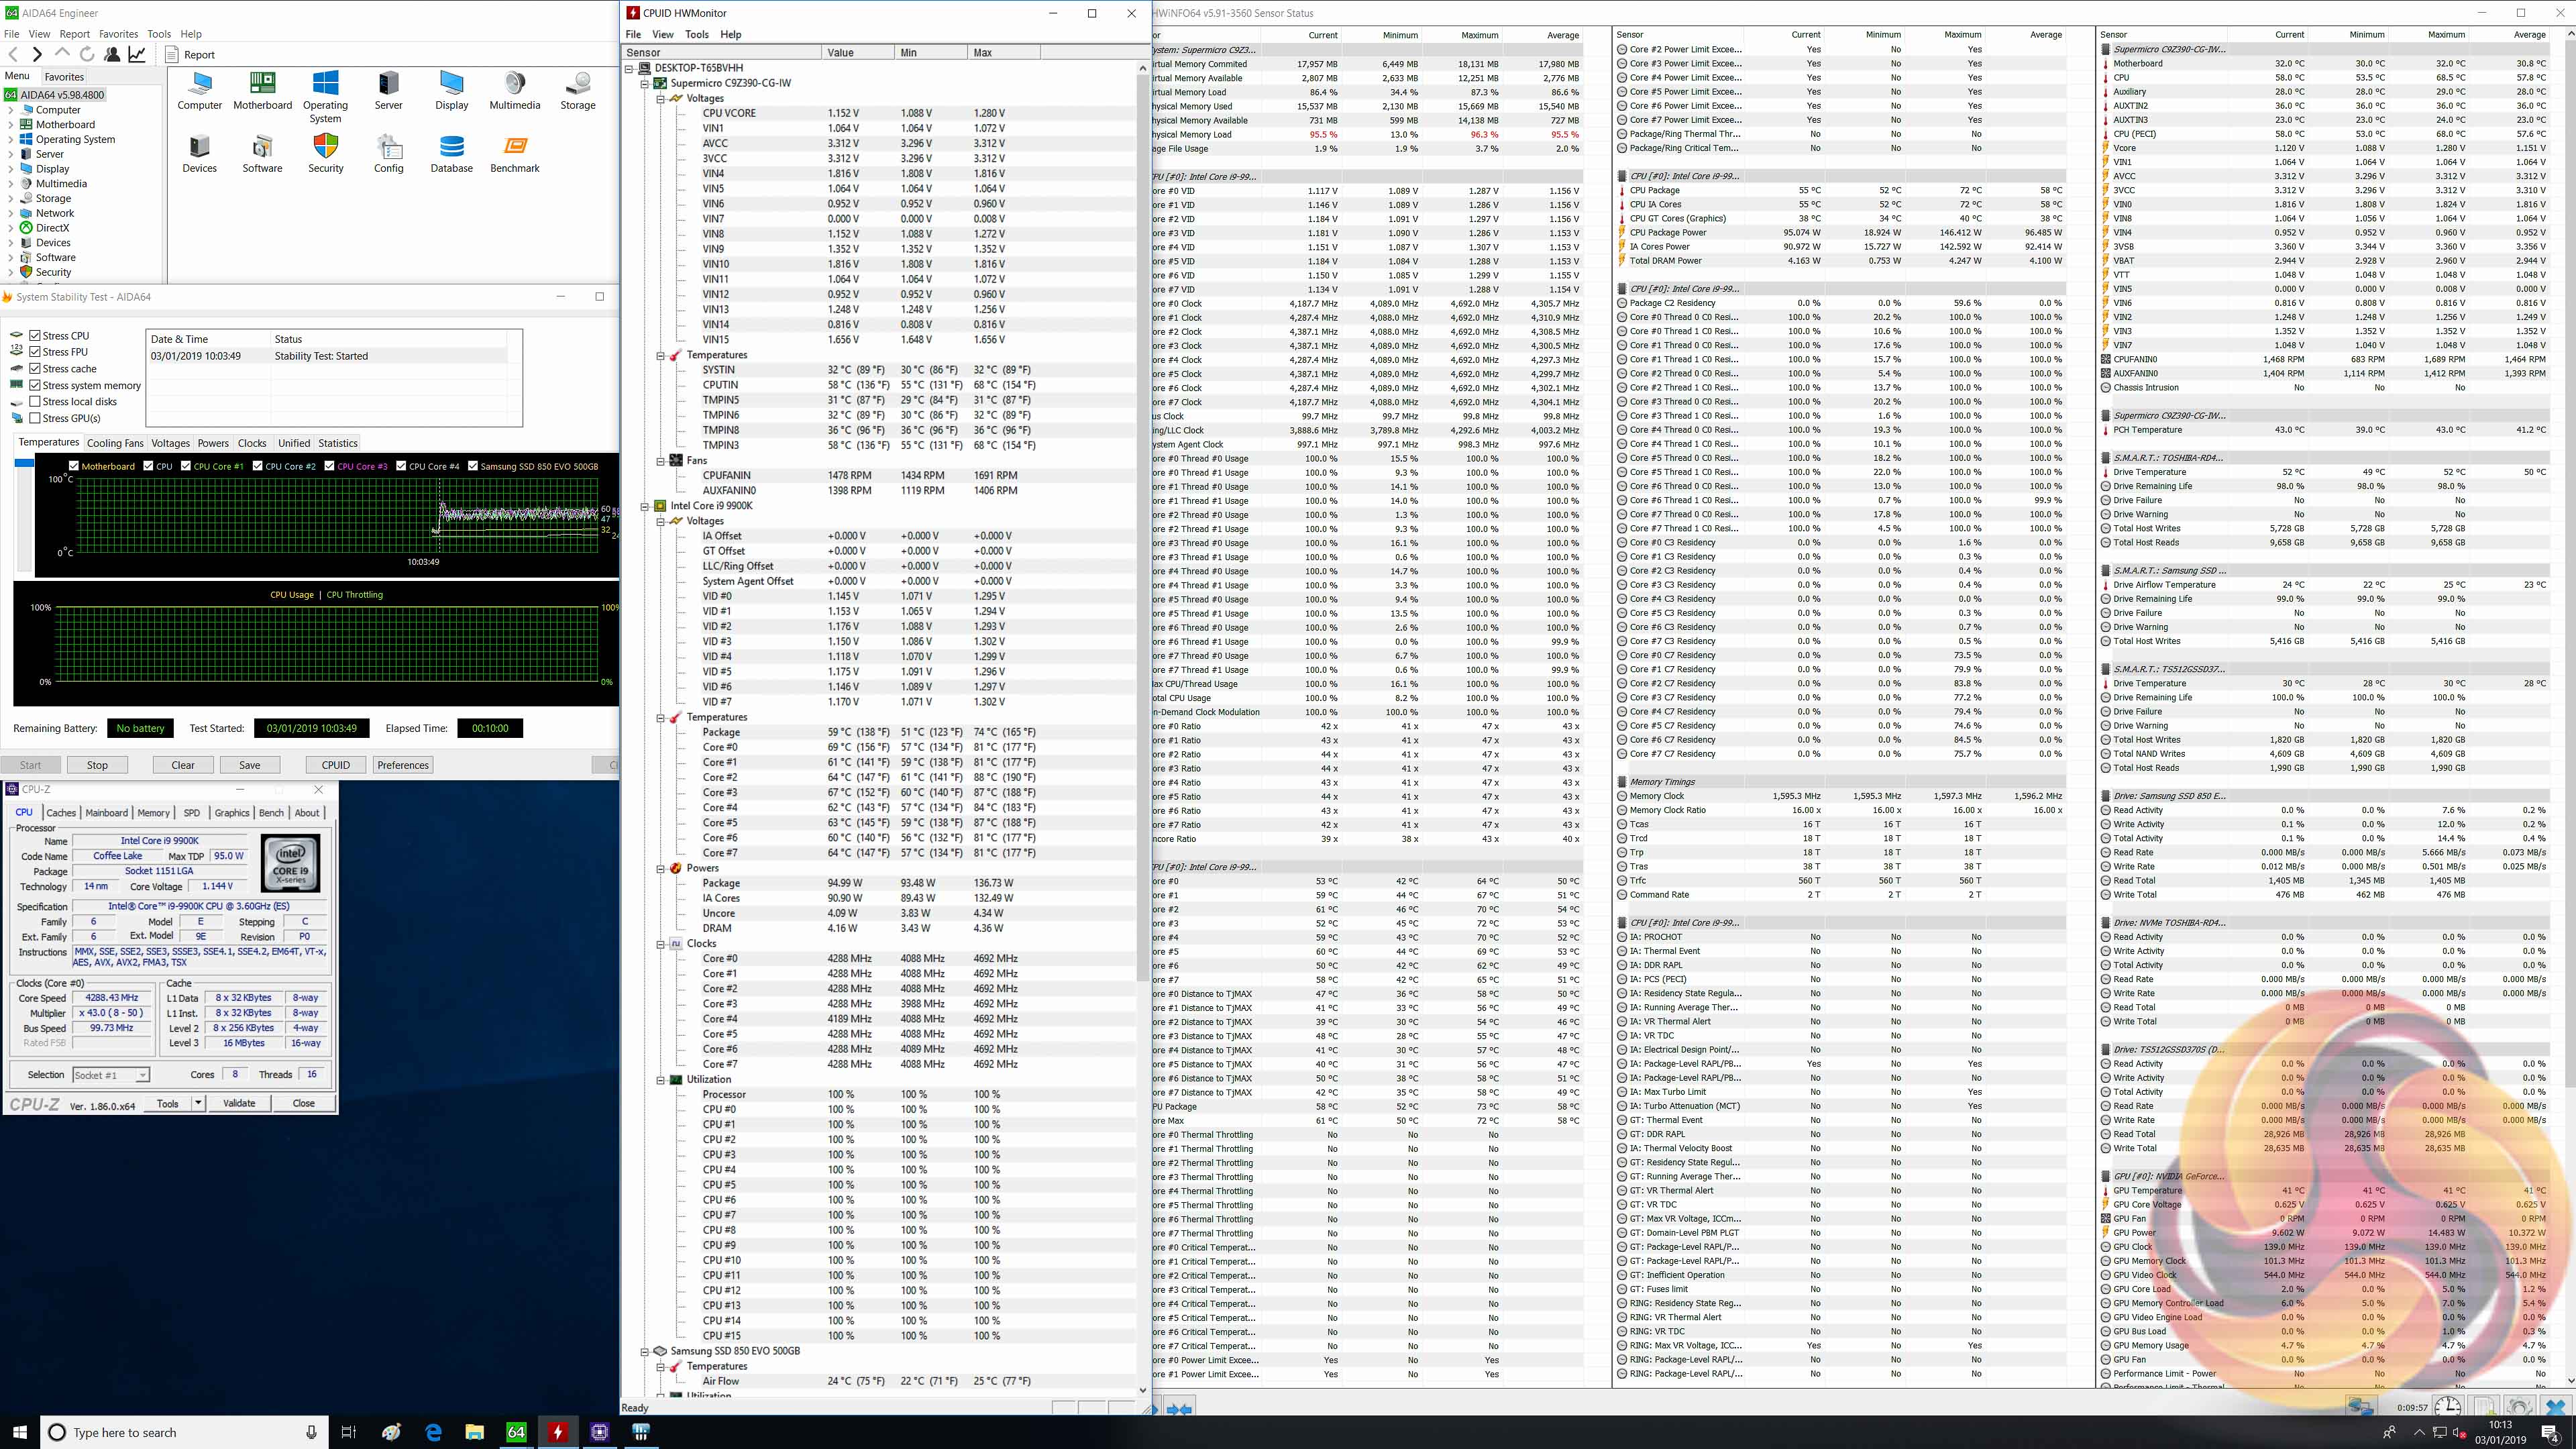
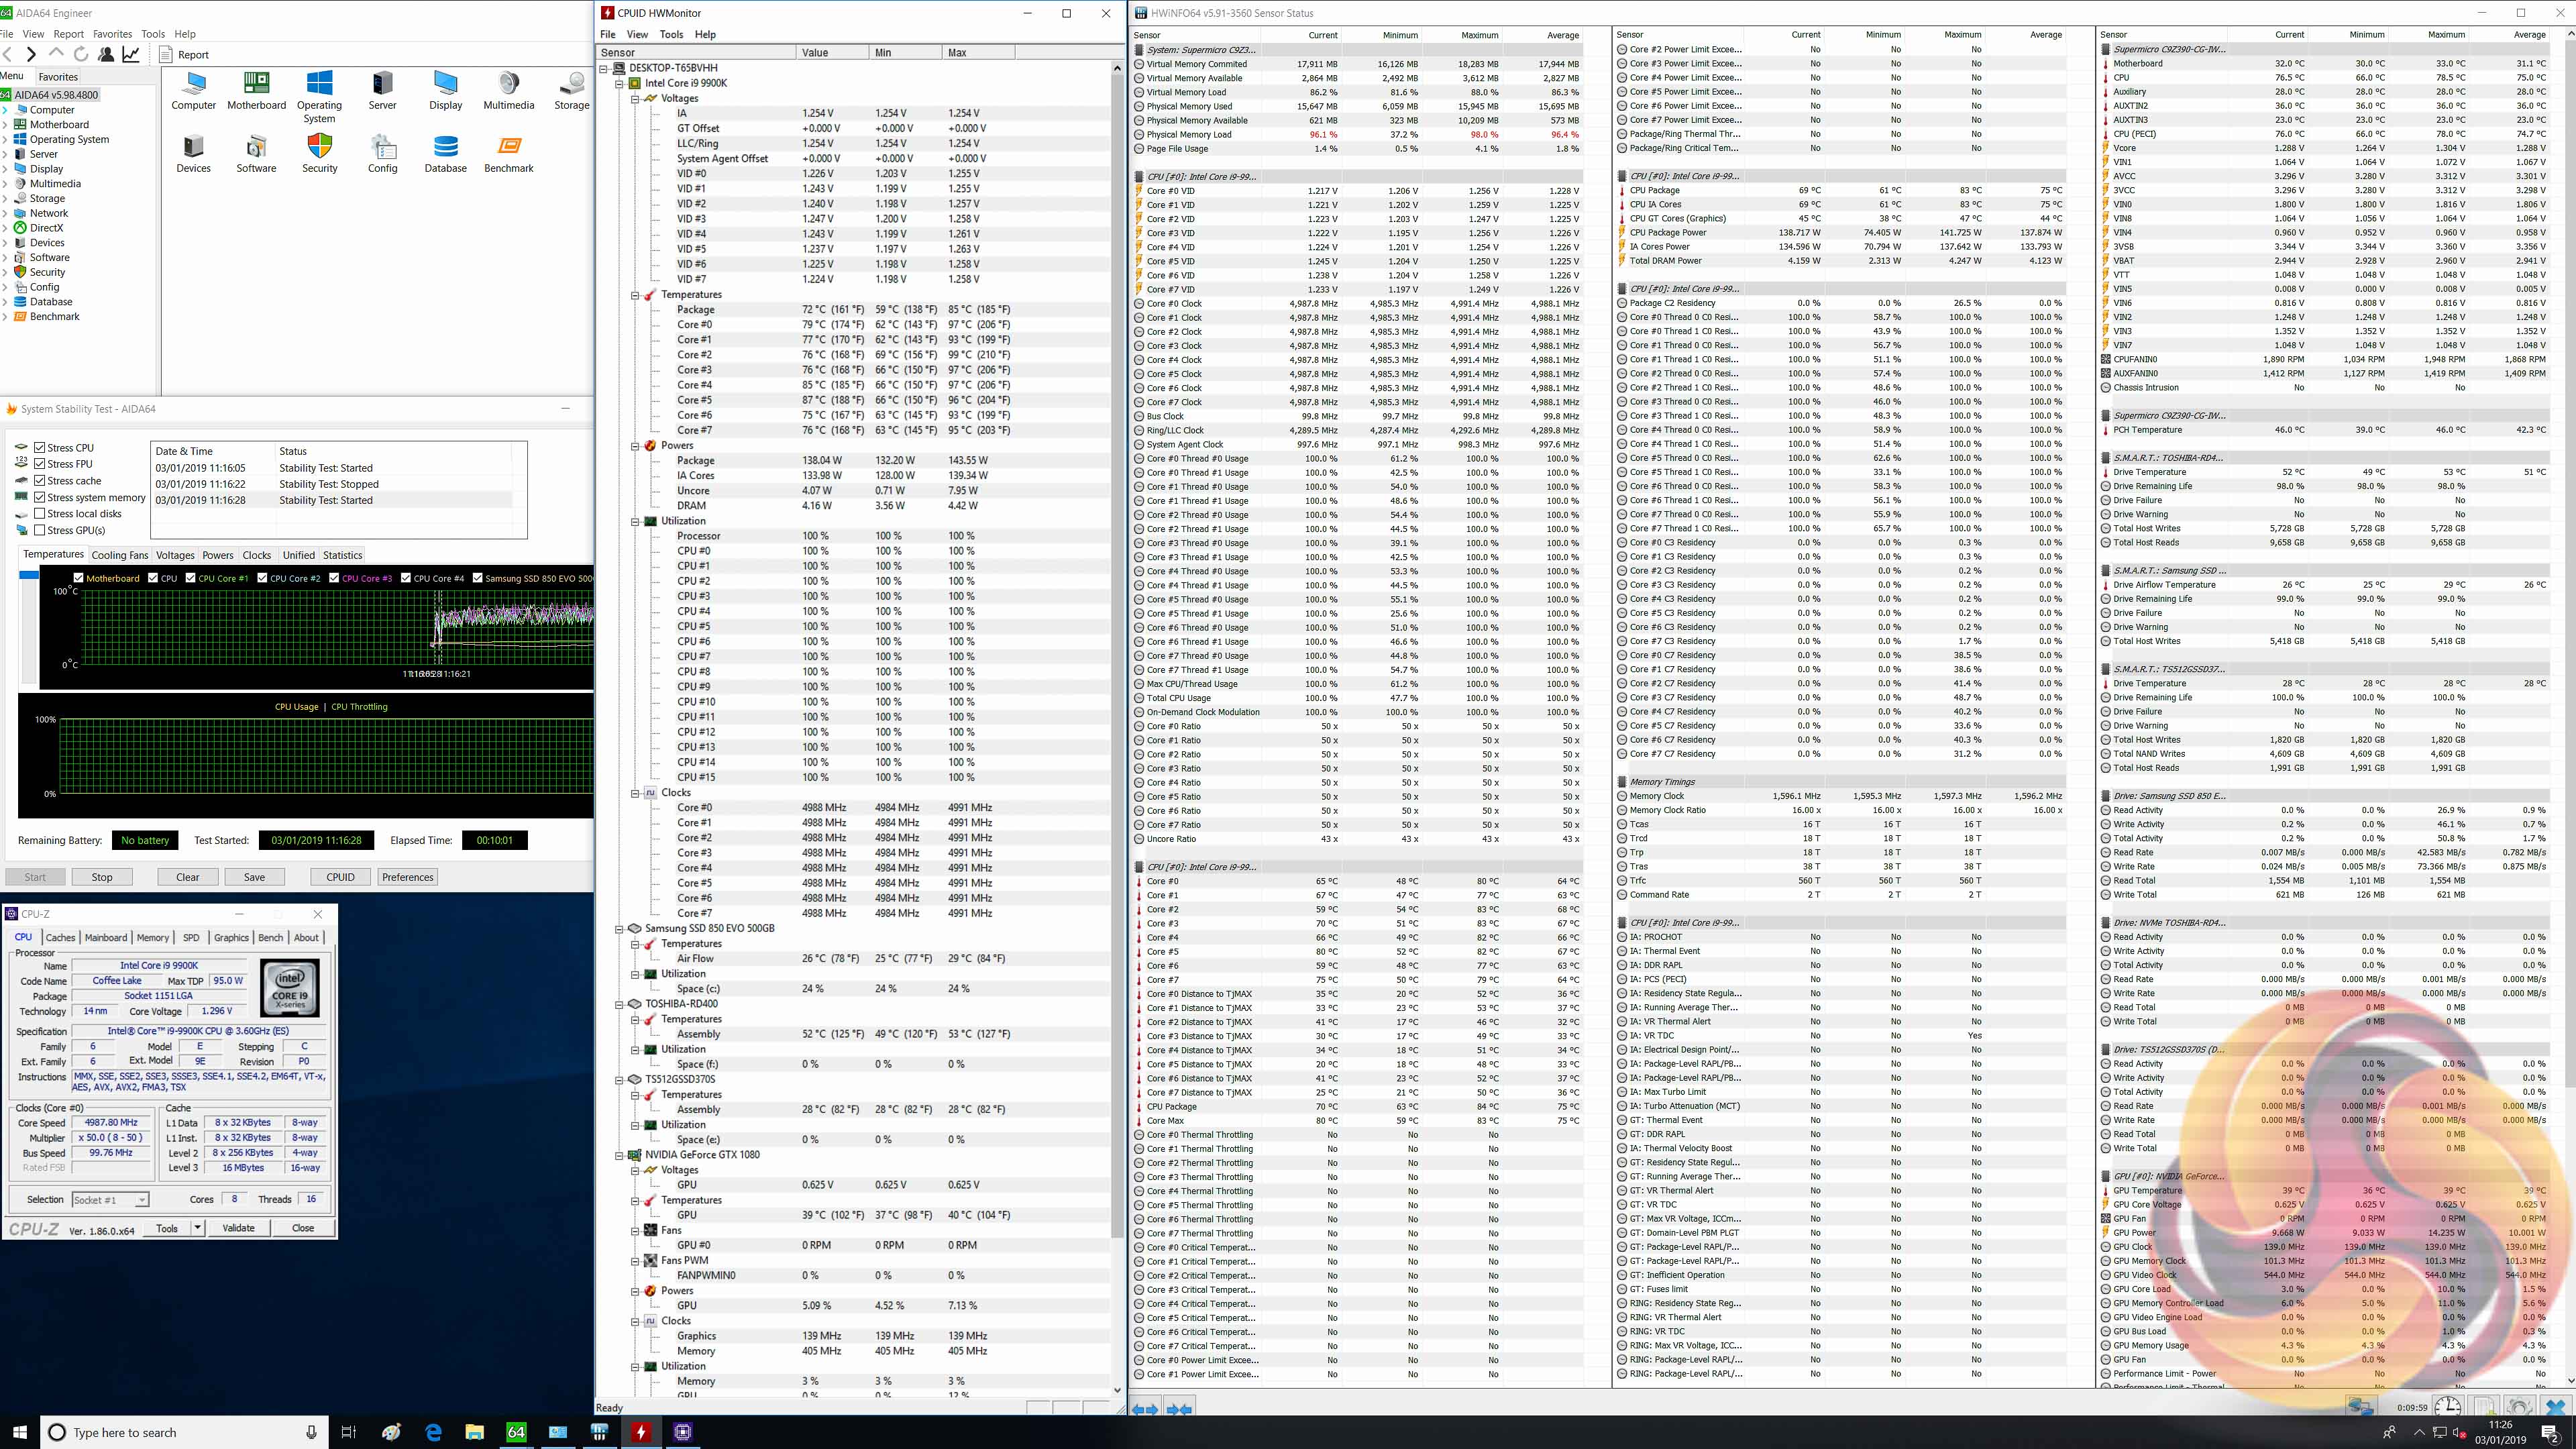
There's no temperature sensor marked as being for the VRM, so it's not possible to confirm the state of the VRM temperatures during testing.
In the above screenshots it's possible to see the average core frequency, VID, VCore, reported CPU power draw and temperature data we noted during stress testing at stock (left) and overclocked (right) loads.
Update 26th January 2019 – Supermicro issued a test UEFI version to KitGuru, still marked 1.0b but dated 5th January 2019, which sets the PL1 power limit to 180W and PL2 power limit to 250W when an XMP memory profile is used. This means the CPU does not throttle after setting an XMP profile, in fact it runs consistently at 4.7GHz across all cores and runs at an approximate 145W TDP, which is well outside of Intel's stock 95W specification. The performance has improved but this is at the expense of heat and power consumption, a trade-off other motherboard vendors have also been silently making without informing consumers. This new BIOS is not yet available for public download but Supermicro informs us it will be made available soon.
As a result of the new Supermicro BIOS the performance parameters change somewhat. For instance, at the new “stock” parameters, above left image, the average frequency under load is 4.7GHz rather than 4.3GHz, though this comes at the expense of power consumption which rises from an average package power of 96W to 144W.
The effect of the new BIOS on overclocked loads is negligible, aside from the new BIOS now seems to result in the correct relationship between VID and VCore, and LLC is more accurate with much less overshoot.
Overclocked Performance
Overclocked performance was right in line with expectations.
The new UEFI BIOS did not significantly alter performance in Cinebench, as this is a very short benchmark. However, in extended benchmarks the new BIOS will perform better at stock than previously since the sustained frequency is 4.7GHz rather than 4.3GHz.
System Power Consumption
We leave the system to idle on the Windows 10 desktop for 10 minutes before taking a reading. For CPU load results we run AIDA64 CPU, FPU, Cache and Memory stress tests and take a reading after 10 minutes. The power consumption of our entire test system (at the wall) is shown in the chart.
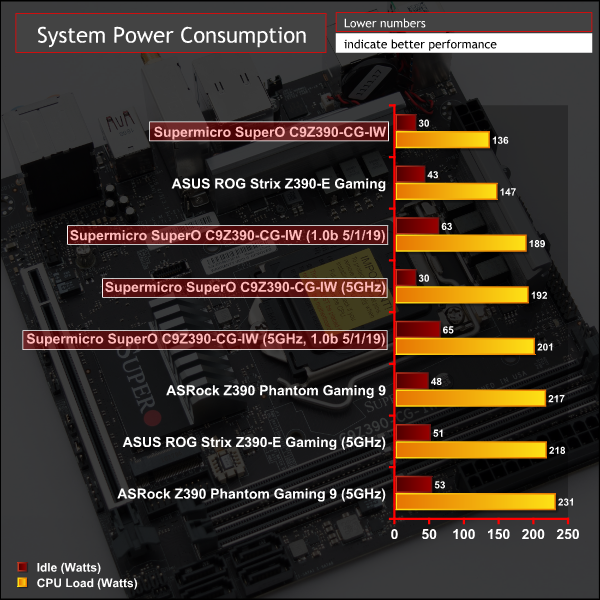
Power consumption was very low across the range of tests for the Supermicro motherboard. Part of this is down to the smaller footprint of the motherboard but also part may be down to Supermicro being more aggressive with power management and Intel TDP adherence.
It was observed that the new UEFI update increase idle power consumption by quite a significant amount, we could identify no explanation for this change.
12-volt EPS Power Consumption
During the 10-minute stress test as specified above, we record the direct CPU power consumption drawn through the EPS 8-pin socket using modified EPS 8-pin cables that have a Tinkerforge Voltage/Current 1.0 bricklet intercepting and monitoring the power flow from the power supply. That bricklet then reports its data to a Tinkerforge Master Brick. All the data collected by the Tinkerforge Master Brick is passed into an external laptop over a USB connection and analysed in the Cybenetics Powenetics Project software.
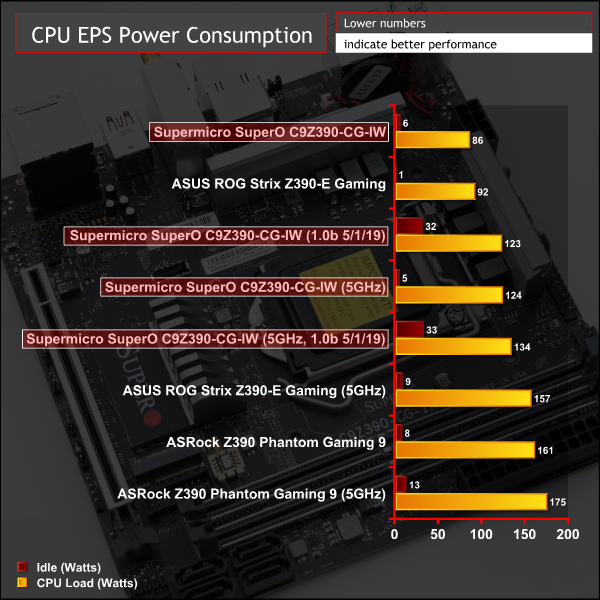
Continuing the theme of peculiarity we witnessed strange results from monitoring the 8pin EPS connection. On other motherboards the power measured at the 8pin CPU EPS cable has always been more than the power usage reported by the CPU since in theory all VRMs have an efficiency loss. To explain that simply, if a VRM is 90% efficient and the CPU reports using 95W we would expect the 8pin EPS to be supplying about 106W, with 11W “wasted” as heat or noise.
In the case of the Supermicro motherboard the EPS power was lower than the reported power usage by the CPU. For instance, the CPU reported using 95W at stock and 138W at overclocked loads, but the EPS only reported 86W and 124W, respectively. Since an efficiency greater than 100% is not possible for a VRM, the CPU and its associated components must be drawing power through the 24pin as well or incorrect data is being posted by the CPU. This is not necessarily an issue, but it is definitely unusual.
Due to this peculiarity we are not able to estimate VRM efficiency or VRM heat output.
Even after implementing Supermicro's UEFI update the relationship between EPS and CPU Package power consumption did not change. In all scenarios the package power consumption was higher than the EPS 8 pin power consumption, which doesn't make a great deal of sense. It was also observed that the new UEFI update increase idle power consumption by quite a significant amount, we could identify no explanation for this change.
The motherboard market is already highly competitive when just considering options from the main four motherboard vendors, adding Supermicro's offerings gives consumers even more choice. Supermicro knows it is a tough fight against well-established motherboard brands like ASUS and Gigabyte, not just in the UK but globally. Thus it comes to market with its unique slant of “Server Quality, Built for Gaming” to lure customers away from the mainstream motherboard brands.
In our opinion Supermicro pulled this off well with its SuperO C9X299-PG300, giving rival motherboard brands a run for their money with high quality server-grade VRMs and a plethora of interesting connectivity and features. Unfortunately, the same can't necessarily be said for the Supermicro SuperO C9Z390-CG-IW which could do better to find its footing in a crowded marketplace.
Supermicro has done well to deliver a product built from quality components that ticks most of the boxes for mini-ITX builders. The final product needs refinement on a number of smaller issues but thanks to some Supermicro work in the background the UEFI performs a lot better than it did when KitGuru first benchmarked it. Its UEFI does, however, still need more refinement to match the standard of the big four motherboard vendors.
Supermicro issued a test UEFI version to KitGuru, still marked as version 1.0b but dated 5th January 2019, which sets the PL1 power limit to 180W and PL2 power limit to 250W when an XMP memory profile is used thus correcting the XMP throttling issue we identified. However, at stock with XMP enabled the CPU now runs at 4.7GHz across all cores and runs at an approximate 145W TDP, which is well outside of Intel's stock 95W specification.
The performance has improved but this is at the expense of heat and power consumption, a trade-off other motherboard vendors have also been silently making without informing consumers. This new BIOS is not yet available for public download but Supermicro informs us it will be made available soon.
The new UEFI version also corrects a number of other issues we identified such as erratic LLC behaviour when setting manual VCore voltages, high CPU temperatures and erroneous VID/VCore readings.
For those with an appreciation for quality components, server heritage and design simplicity, the SuperO C9Z390-CG-IW is still a viable and capable option as long as the prospective buyer is aware of the product's limitations before purchasing.
The Supermicro SuperO C9Z390-CG-IW is not currently available to buy in the UK. However, it can be bought, including import taxes and shipping, for £193.19 from Newegg USA. The warranty for UK customers would be the same as the terms of the warranty available to customers in the USA.
In the USA it can be had for $203.74 at Newegg and has a peculiar 1 year warranty on parts with 3 years warranty on labour. For most customers this effectively means a “normal” 1 year warranty with parts-cost repairs in years 2 and 3, to quote the company's warranty policy directly:
“Supermicro has no obligation to repair or replace parts beyond the one-year warranty period; however, Supermicro may repair or replace provided that 1) Customer pays for the cost of obtaining the part(s) and 2) the part(s) are available for purchase.”
Pros:
- Two VRM heatsinks
- High quality VRM components
- Shielded PCIe and DDR4 slots
- Dual M.2
- USB 3.1 Type-A, Type-C and front panel
- High quality audio
- Onboard WiFi and Gigabit Ethernet
- Bright and easy to control RGB lighting
- Neat SuperO Booster software
- Debug, power and M.2 LEDs
Cons:
- Peculiar power monitoring data regarding the CPU
- New UEFI increases idle power consumption
- Below expected USB, SATA and M.2 throughput
- No M.2 cooling
- Only 2 fan headers
- RGB header and onboard RGB lighting are not independently controllable
- Clunky UEFI fan controls
- Clearing CMOS is fiddly with no button and vertical mount
- Only 1 year warranty
- Limited availability
KitGuru says: The SuperO C9Z390-CG-IW is a reasonable mini-ITX offering for Intel's Z390 chipset, but Supermicro's “pint-sized powerhouse” needs a bit more polish.