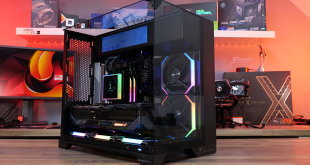
Gigabyte's new Aorus range of Z270 motherboards spans from the ultra-high-end, £500 Gaming 9 all the way down to the mid-range, ~£170 Gaming K5. We are examining that mid-range Z270X-Gaming K5 to see how it performs and check whether Gigabyte's choice of features maintained on the more cost-effective SKU makes sense.
You can read our Kaby Lake Core i5-7600K and Core i7-7700K review HERE.

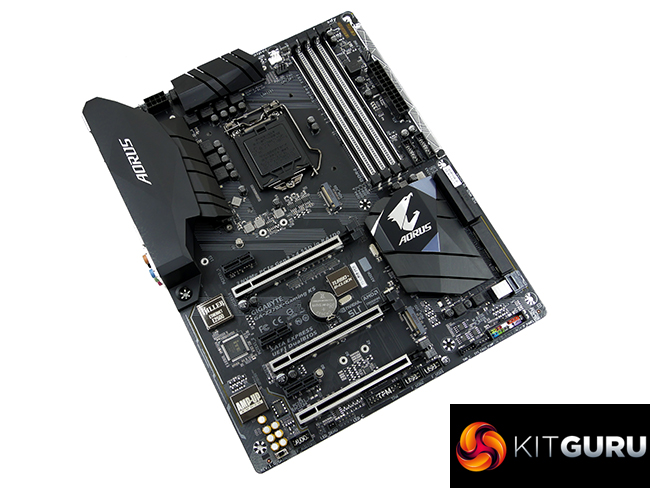
The Gaming K5 model for Gigabyte's Aorus Z270X range differs to its siblings (except the Gaming 8) by way of its colour scheme. Black and white styling found on the Gaming 7 and other boards is ditched in favour of a more neutral, primarily black appearance. Gigabyte is instead relying upon the significant number of onboard LEDs to add flair to this board's looks.
Despite the difference in styling, many of the Aorus range's key features are maintained for the Z270X-Gaming K5. RGB Fusion is present, even if the quantity of onboard LEDs is slightly reduced compared to the higher-end SKUs (though they are still at a double-digit count). Smart Fan 5 is also present, giving users access to a superb fan control system that works as well with 4-pin PWM fans as it does with 3-pin DC fans and pumps.
USB 3.1 Gen 2 10Gbps is available in Type-A and Type-C form though this time it is powered by the ASMedia ASM2142 chipset, rather than Intel's competing solution seen on the Z270X-Gaming 7, which also offers 40Gbps Thunderbolt 3 support. Killer's E2500 NIC is the sole offering for the Gaming K5 and Realtek's new ALC1220 codec handles audio duties, as is common for Z270 motherboards in the price segment.
With support for multi-GPU configurations, and multiple high-speed storage drives through dual M.2 slots and onboard U.2, Gigabyte's Aorus Z270X-Gaming K5 is shaping up to be a strong gaming motherboard option at ~£170. Let's take a closer look at the design and see how it performs in our testing.
Features:
- Fast USB 3.1 Gen 2 with USB Type-C™ and Type-A
- Triple NVMe PCIe SSDs in RAID 0 Support
- NVMe PCIe Gen3 x4 U.2 Connector
- Dual Ultra-Fast M.2 with PCIe Gen3 x4 & SATA interface
- Sound Blaster X-Fi MB5 + ALC 1220 120dB SNR HD Audio
- Killer™ E2500 Gaming Network
- USB DAC-UP 2 with Adjustable Voltage
- RGB FUSION LED Light Show design
- Swappable Overlay for Accent LED
- Smart Fan 5 features Multiple Temperature Sensors and Hybrid Fan Headers

The Gigabyte Aorus Z270X-Gaming K5 ships in a black box that features the eagle branding logo on the front side and information relating to features on the rear.
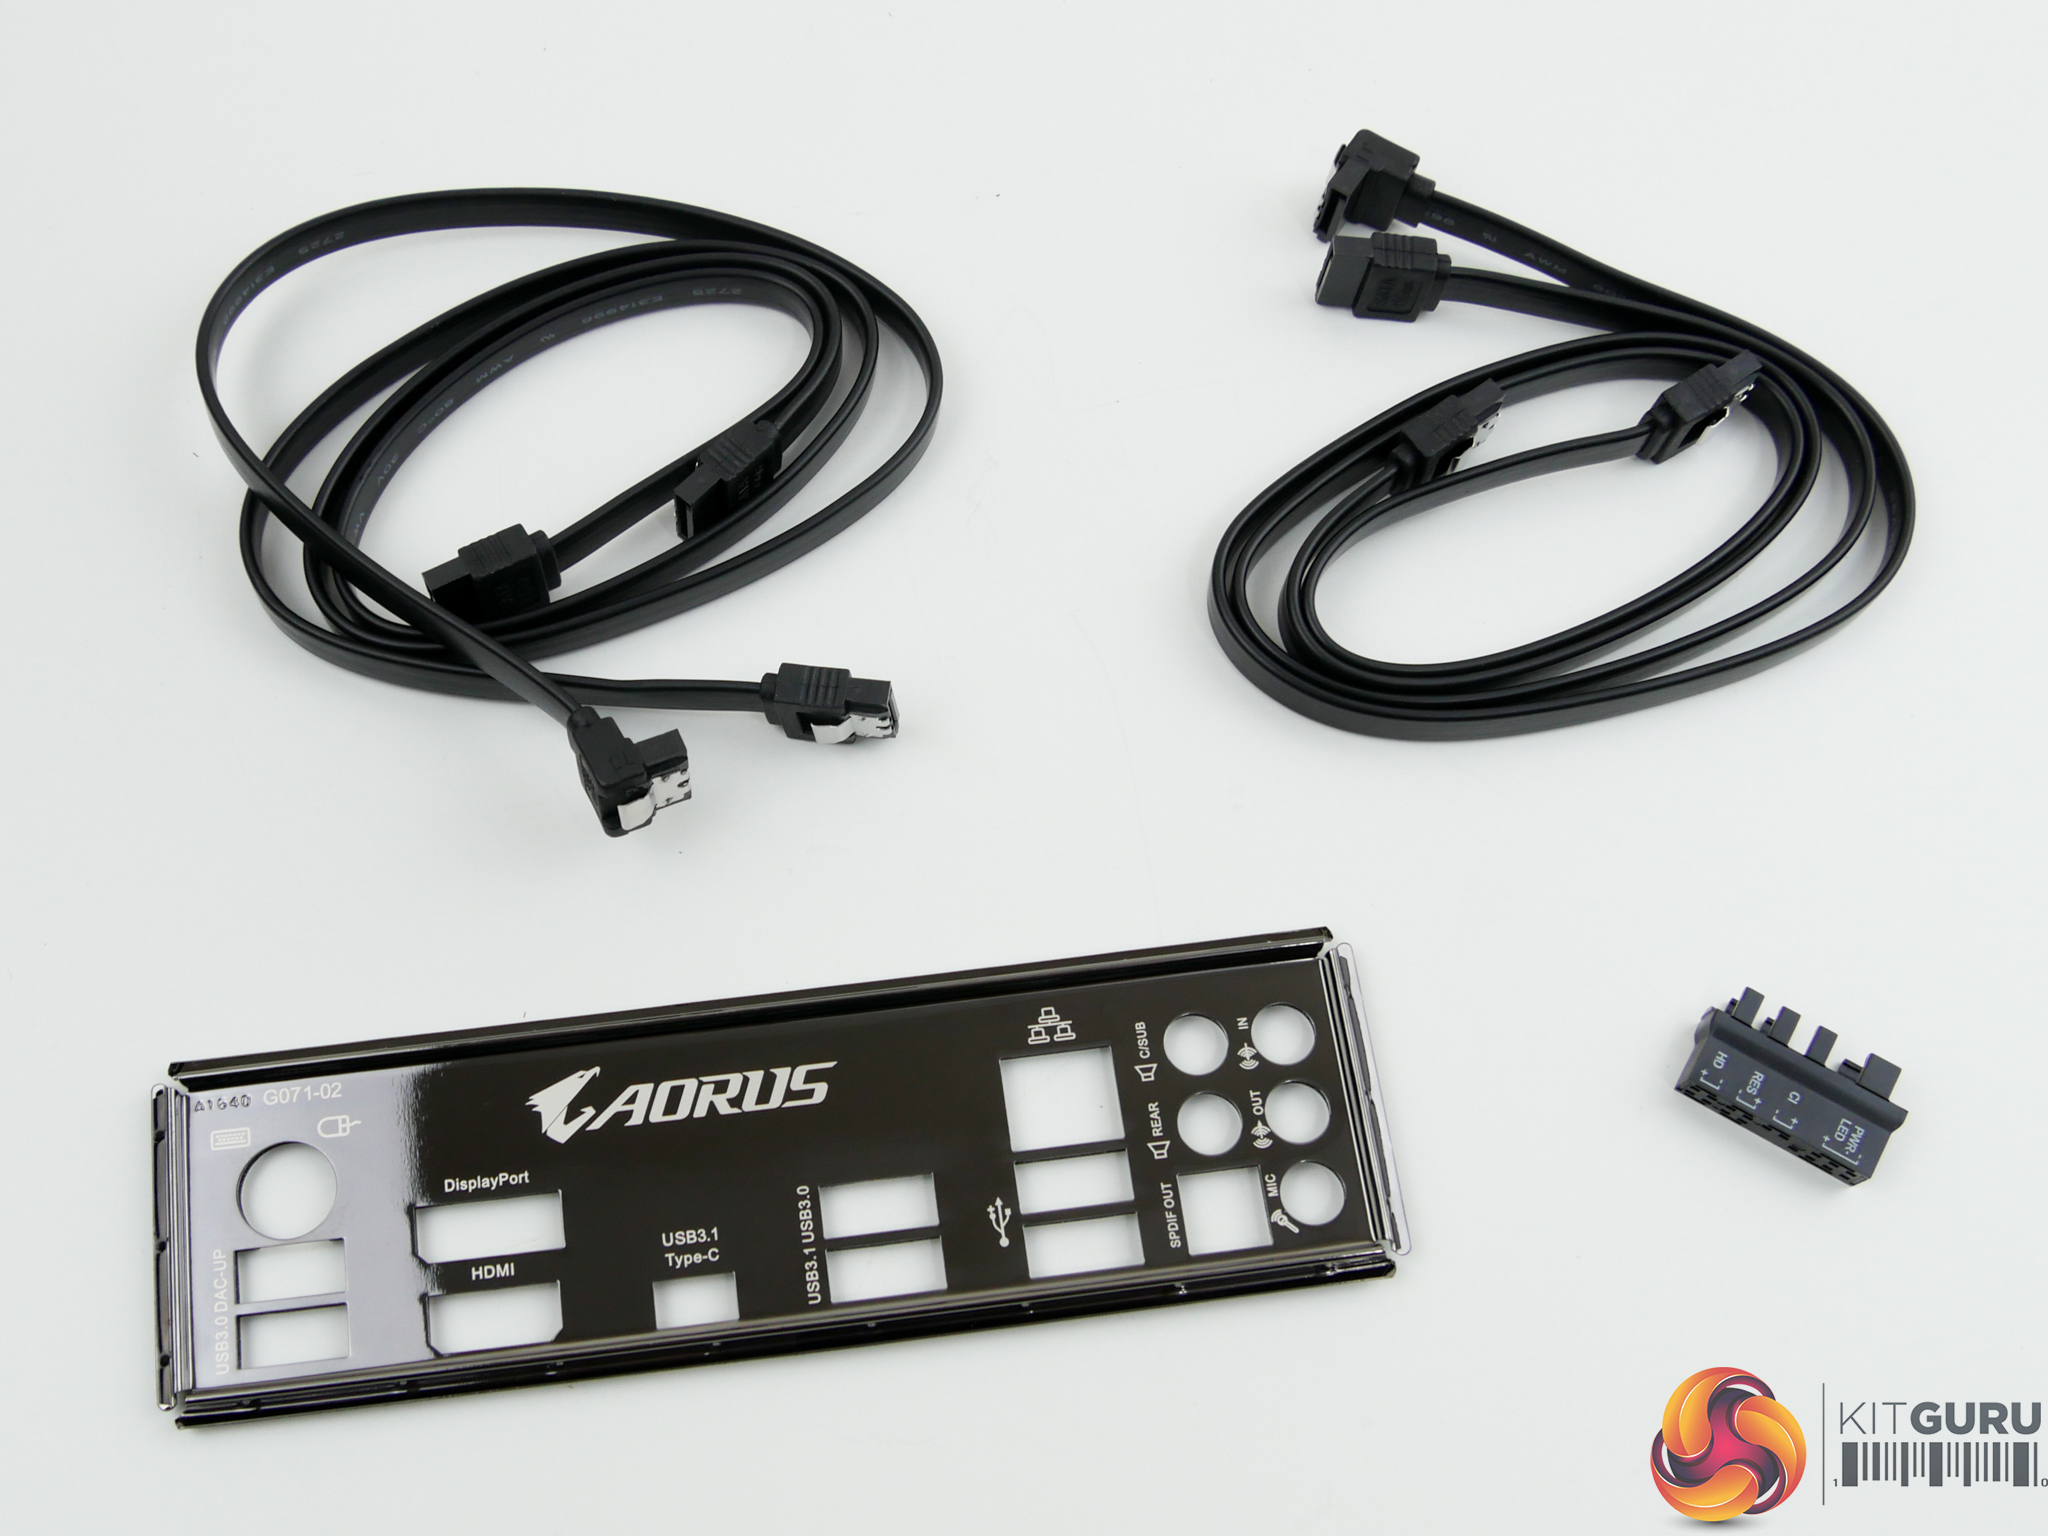
The accessory bundle consists of four SATA 6Gbps cables, the rear IO shield, and a quick connector block for front panel IO cables. An extension cable for RGB lighting strips would have been a welcomed addition to the package.
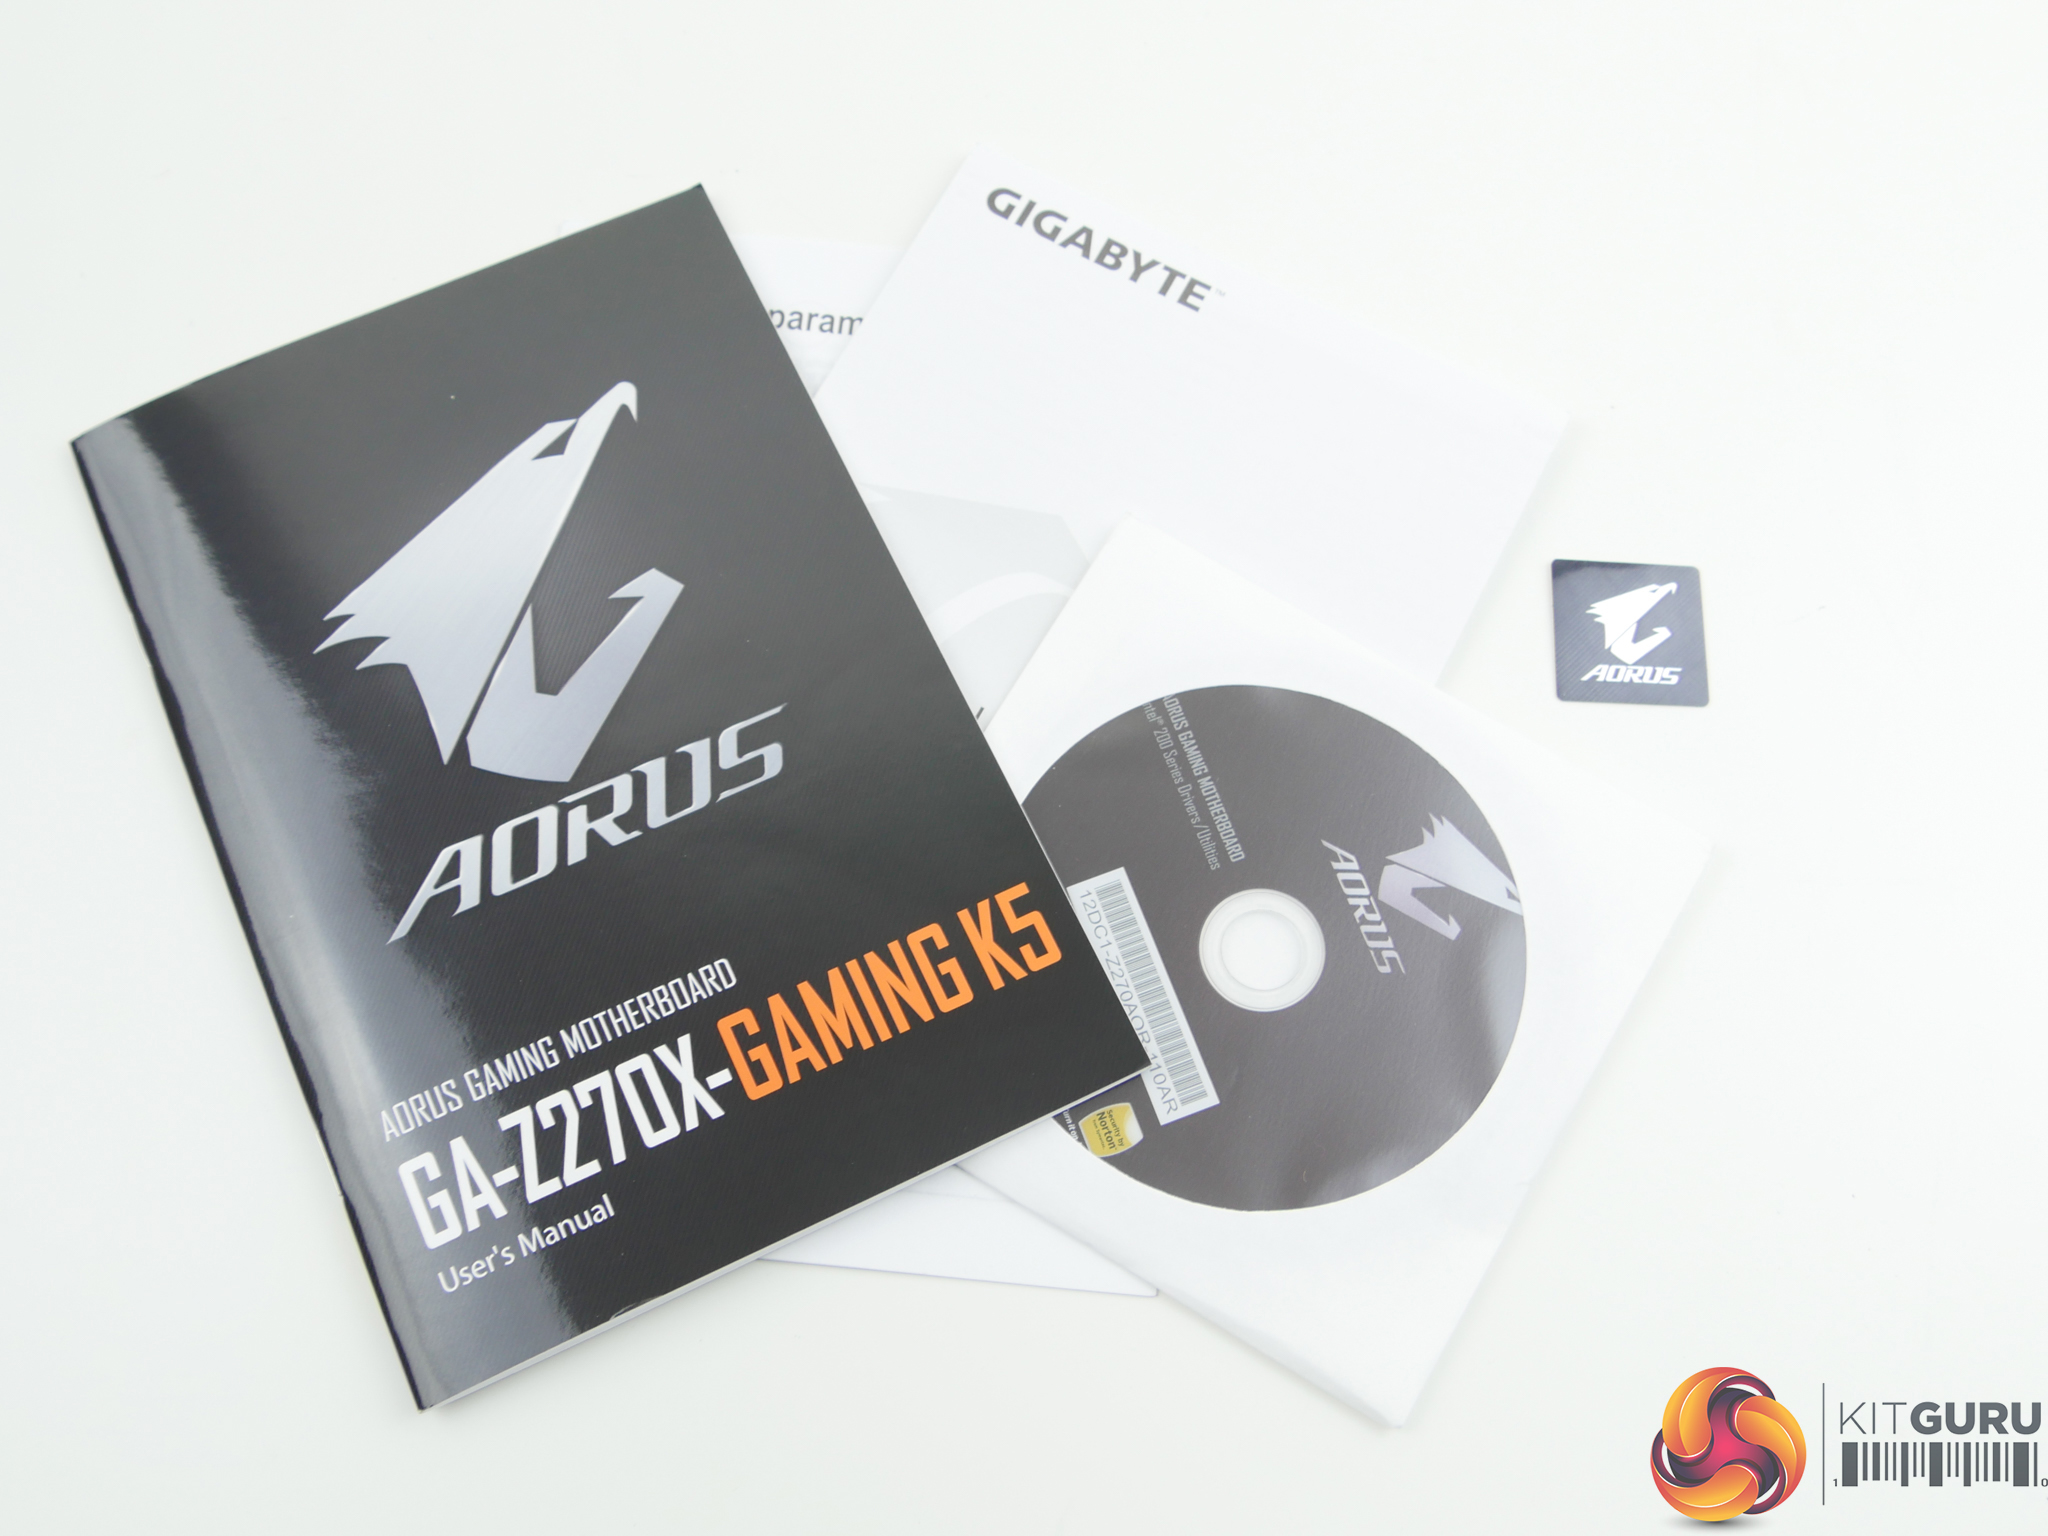
The usual set of documentation and drivers CD is accompanied by an Aorus case sticker.
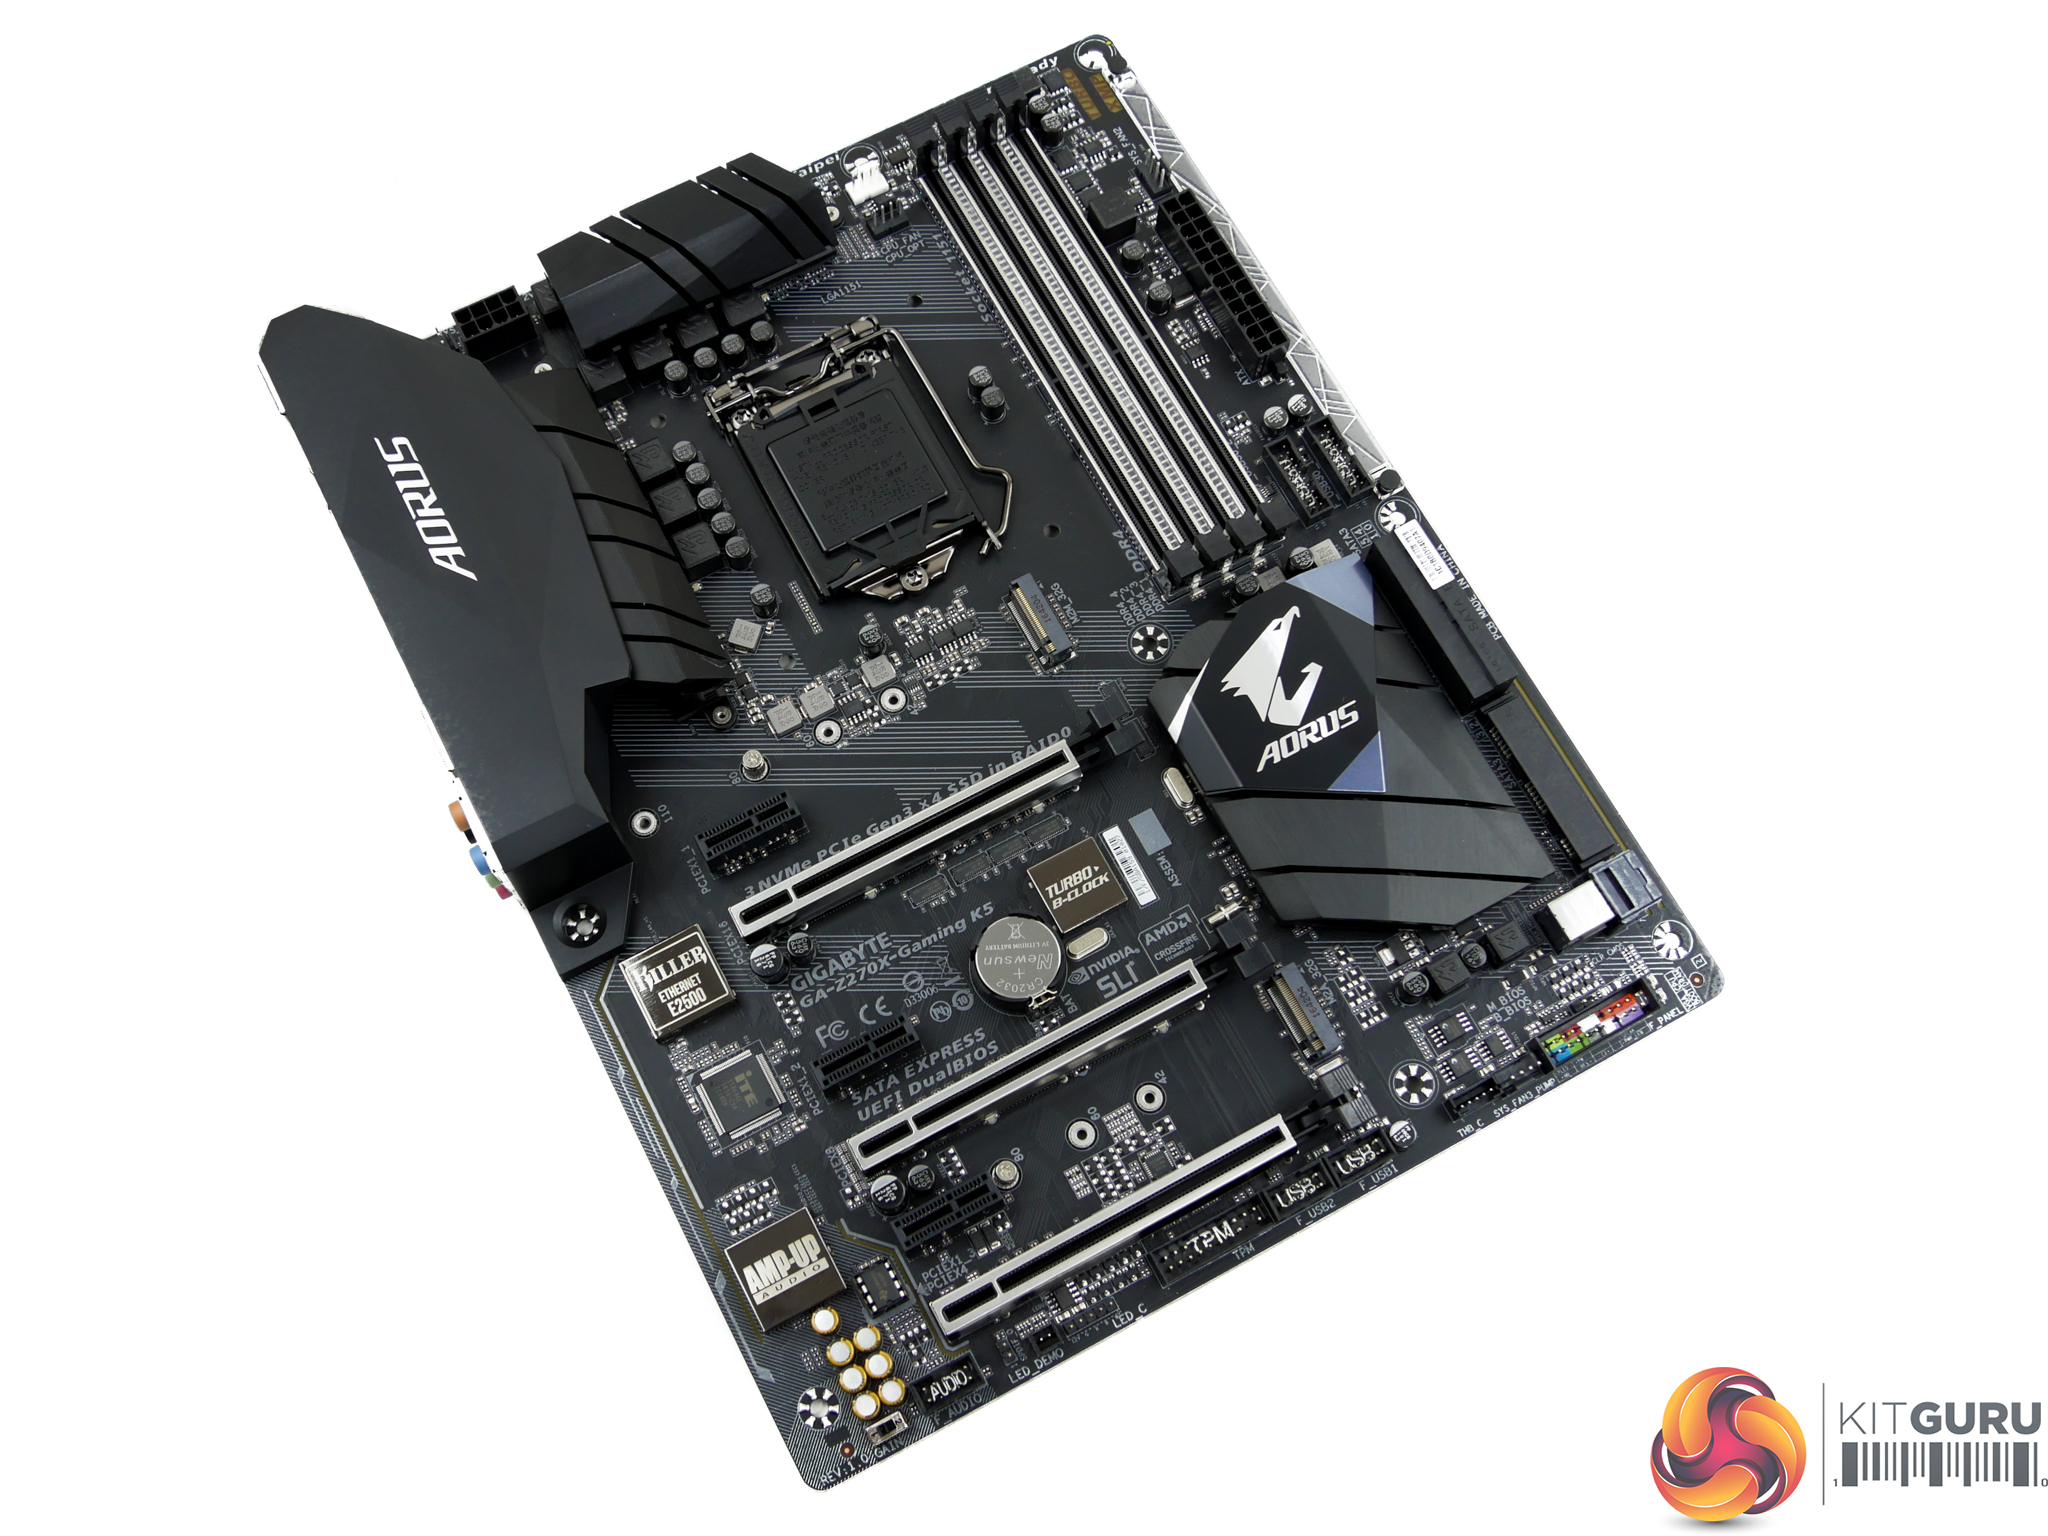
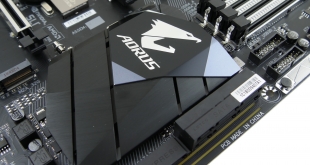
The Gigabyte Aorus Z270X-Gaming K5 uses primarily-black colouring, allowing the RGB LEDs to add unique styling tailored to individual preference. A solid black Aorus rear IO cover adds appeal to the board alongside the eye-catching Aorus chipset heatsink. Subjectively, this is a very aesthetically pleasing motherboard without even switching on the LEDs.
Gigabyte's Ultra Durable Armor PCIe slots are clearly visible with their stainless steel reinforcement designed to minimise GPU sag or slot damage. The same shielding approach is used for the DIMM slots which helps to minimise PCB flex during installation of memory modules.
There are no onboard buttons for power and reset and dedicated debug LEDs are favoured over the superior two-digit LED display.
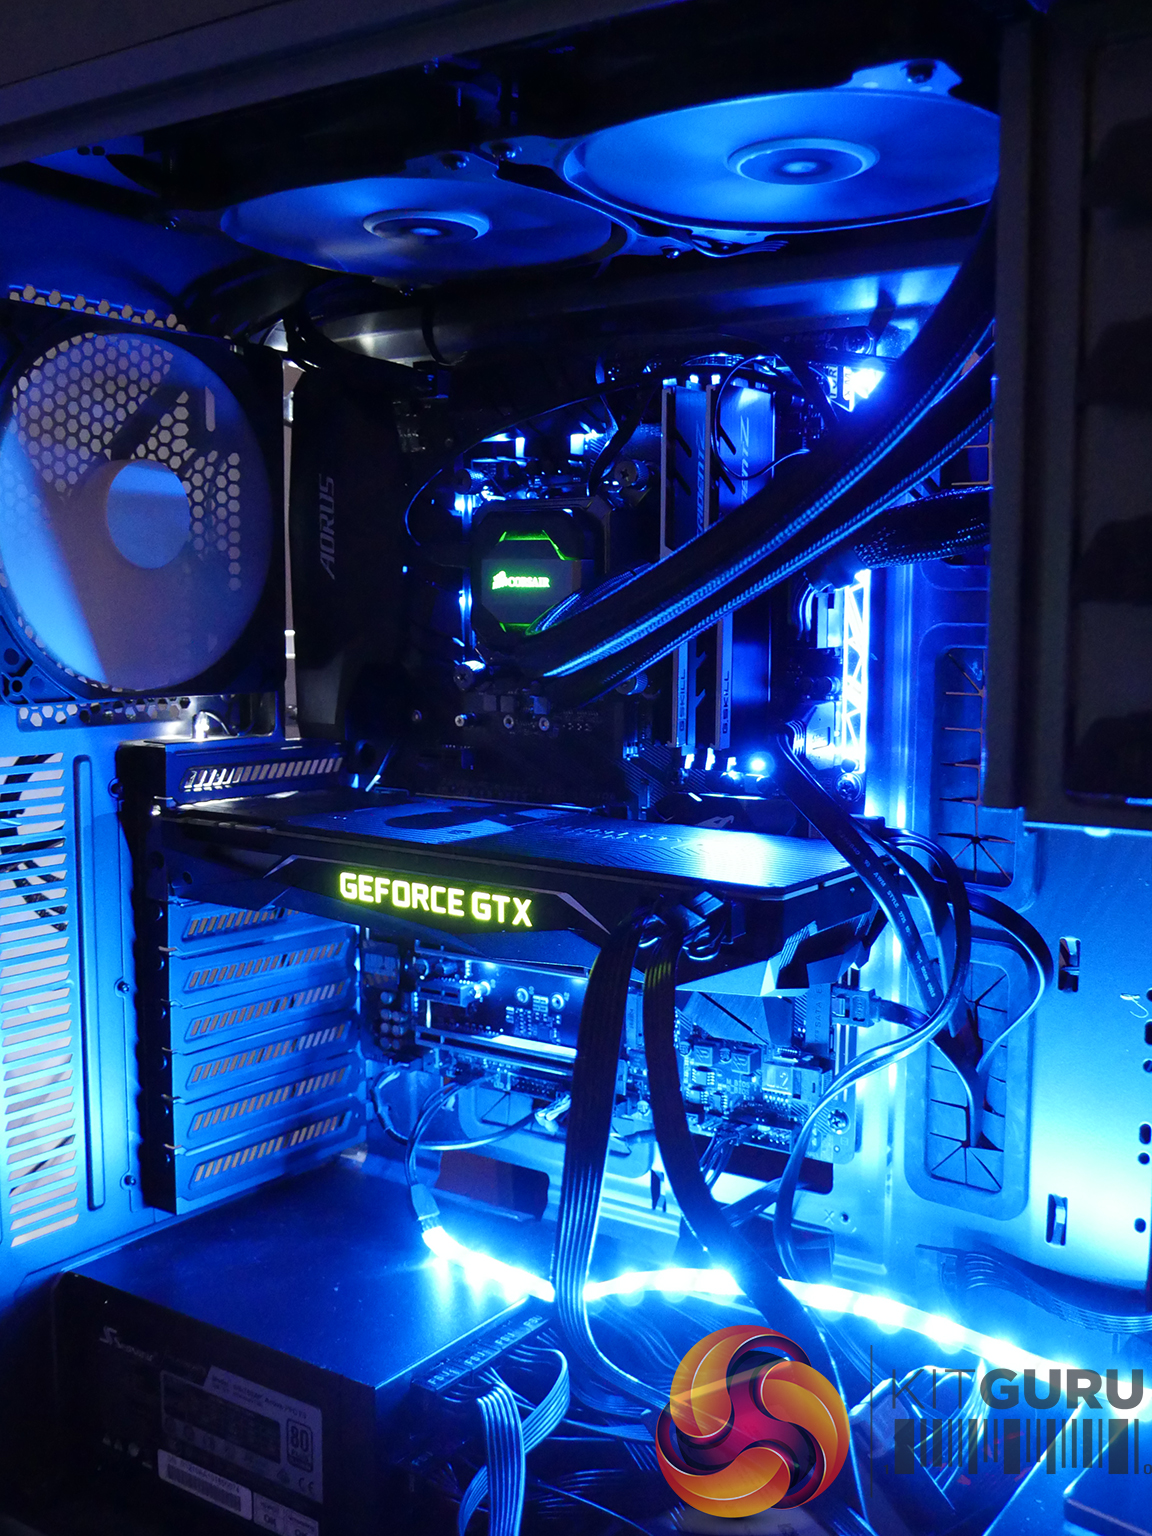
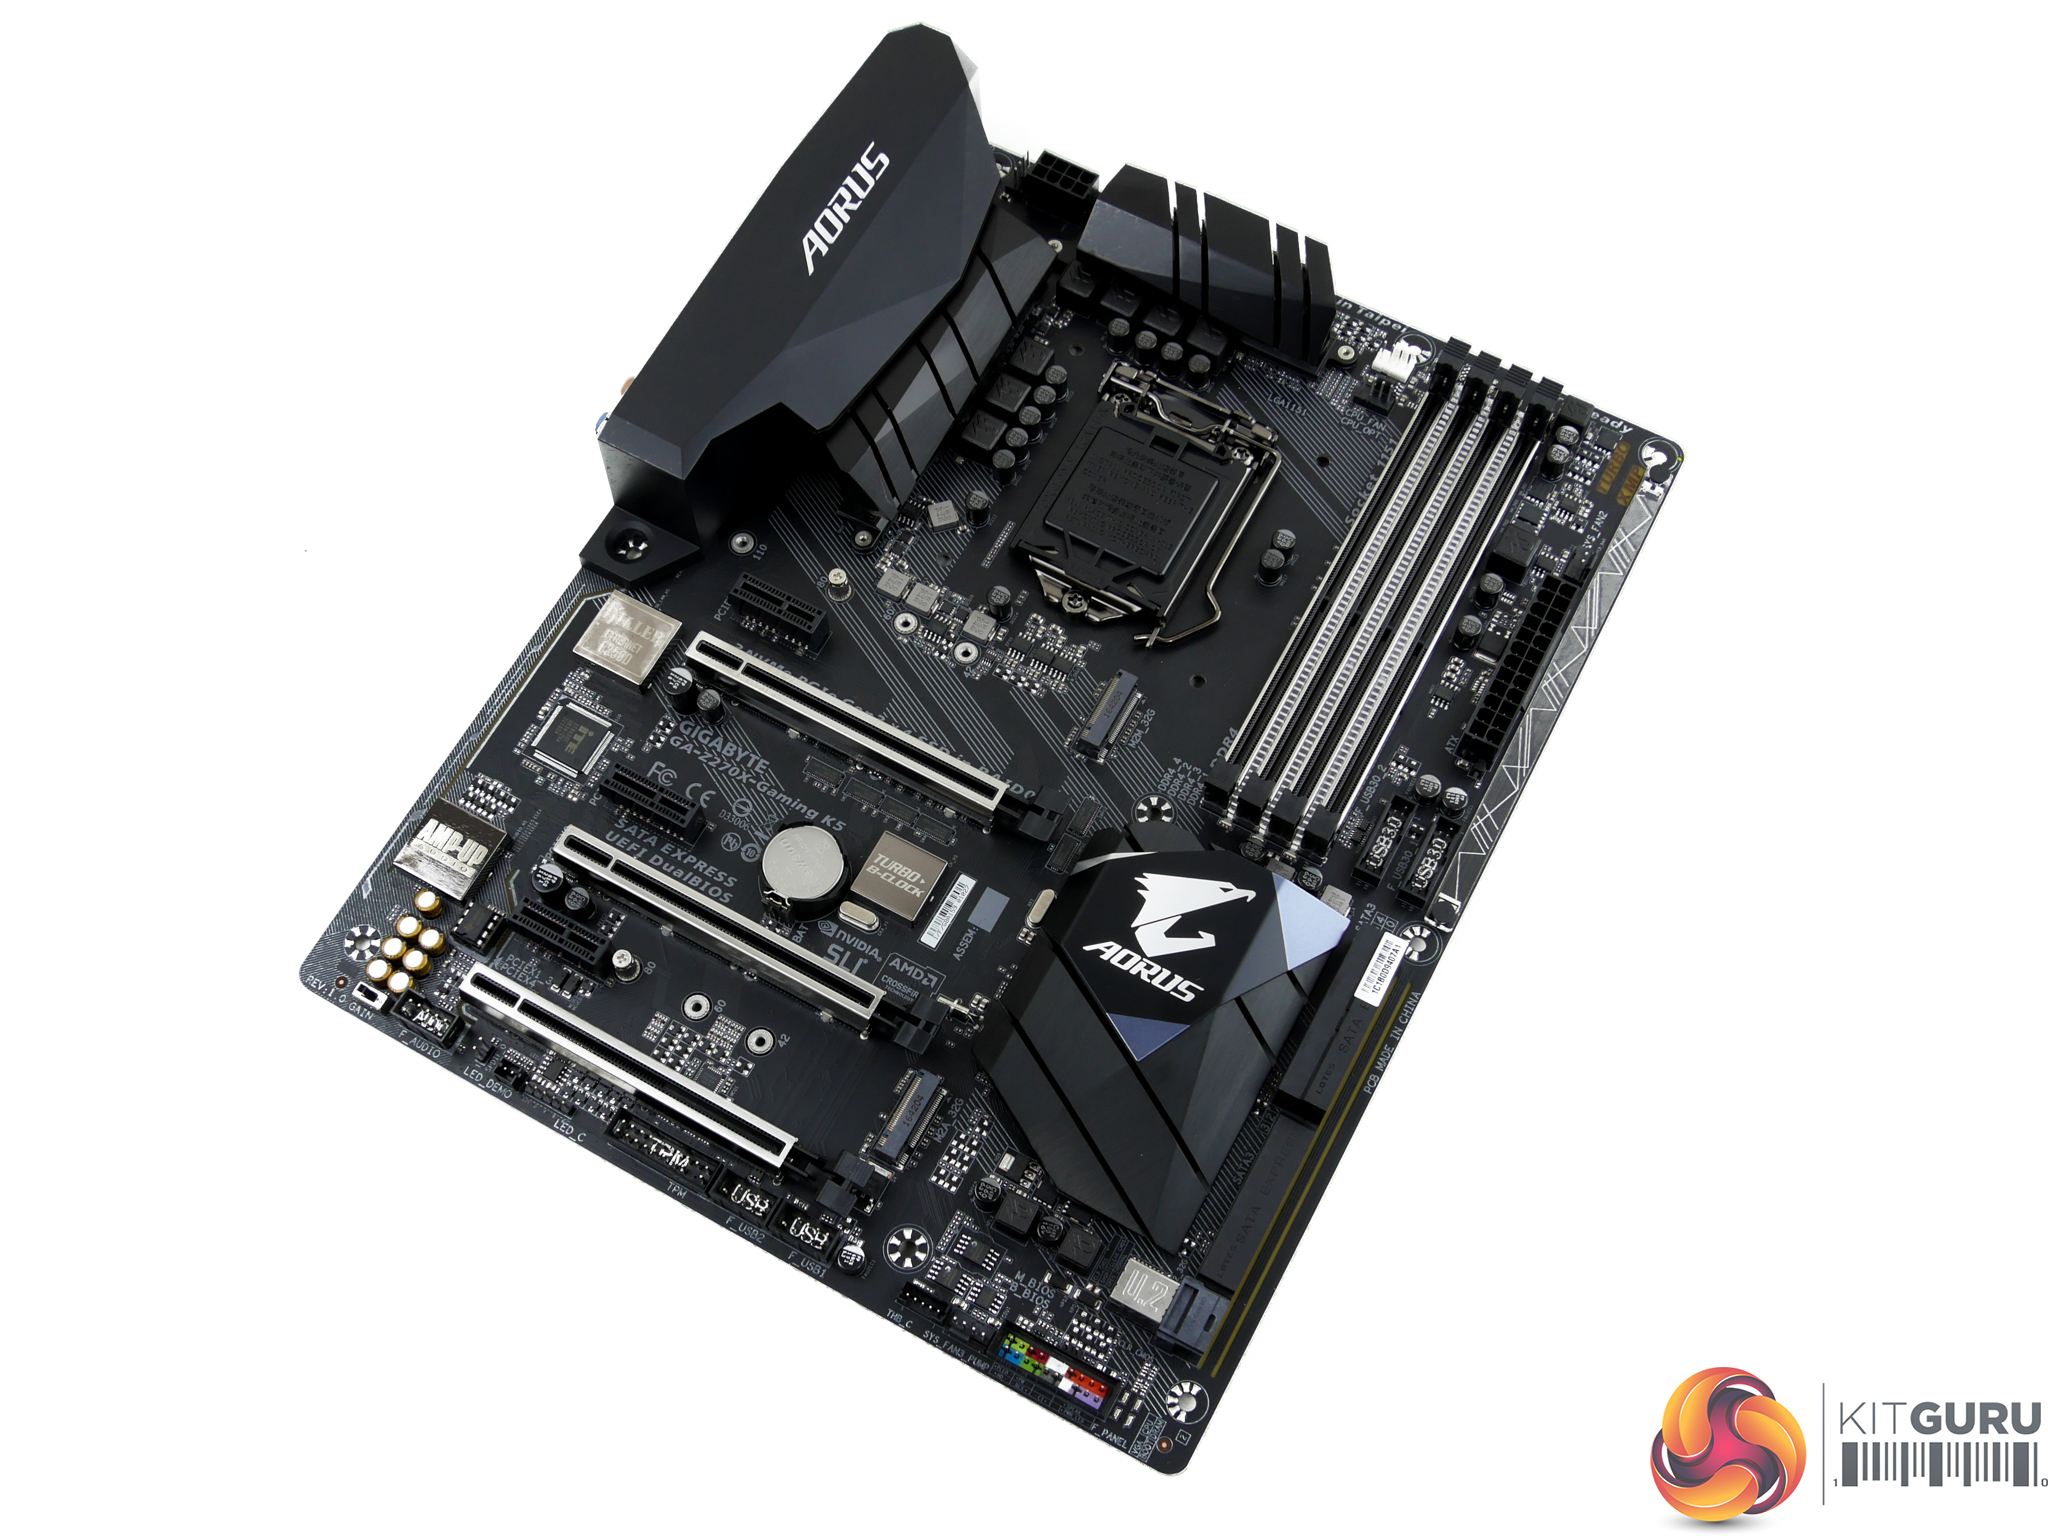
Six RGB lighting zones are found on the Z270X-Gaming K5. This is not quite as many zones as the higher-end Gaming 7 and the number of LEDs in zones such as the PCIe slot area is reduced. There is also the 5-pin RGBW strip header that worked very well with our CableMod RGB strip.
The individual lighting zones are:
- CPU VRM area
- Audio section
- PCIe slots
- SATA ports area
- DIMM slots
- Right-hand plastic strip
That plastic strip can be removed and replaced with a design tailored to a user's individual preference. There's also the possibility of 3D printing a custom plastic strip and screwing it onto the board.
Unlike the Gaming 7, the Gaming K5 cannot control the RGB lighting zones individually. As such, one colour is applied across the motherboard's RGB LED zones and a second, separate colour can be applied to the RGB(W) LED strip. This is hardly a negative against the Gaming K5 as its LED lighting system is still superior to that of price-matched offerings from ASUS, ASRock, and MSI.
Software-based control of the lighting modes is superb, the LEDs are bright, and there is an element of basic UEFI control for users who refuse to install any additional OS software beyond what is completely necessary.
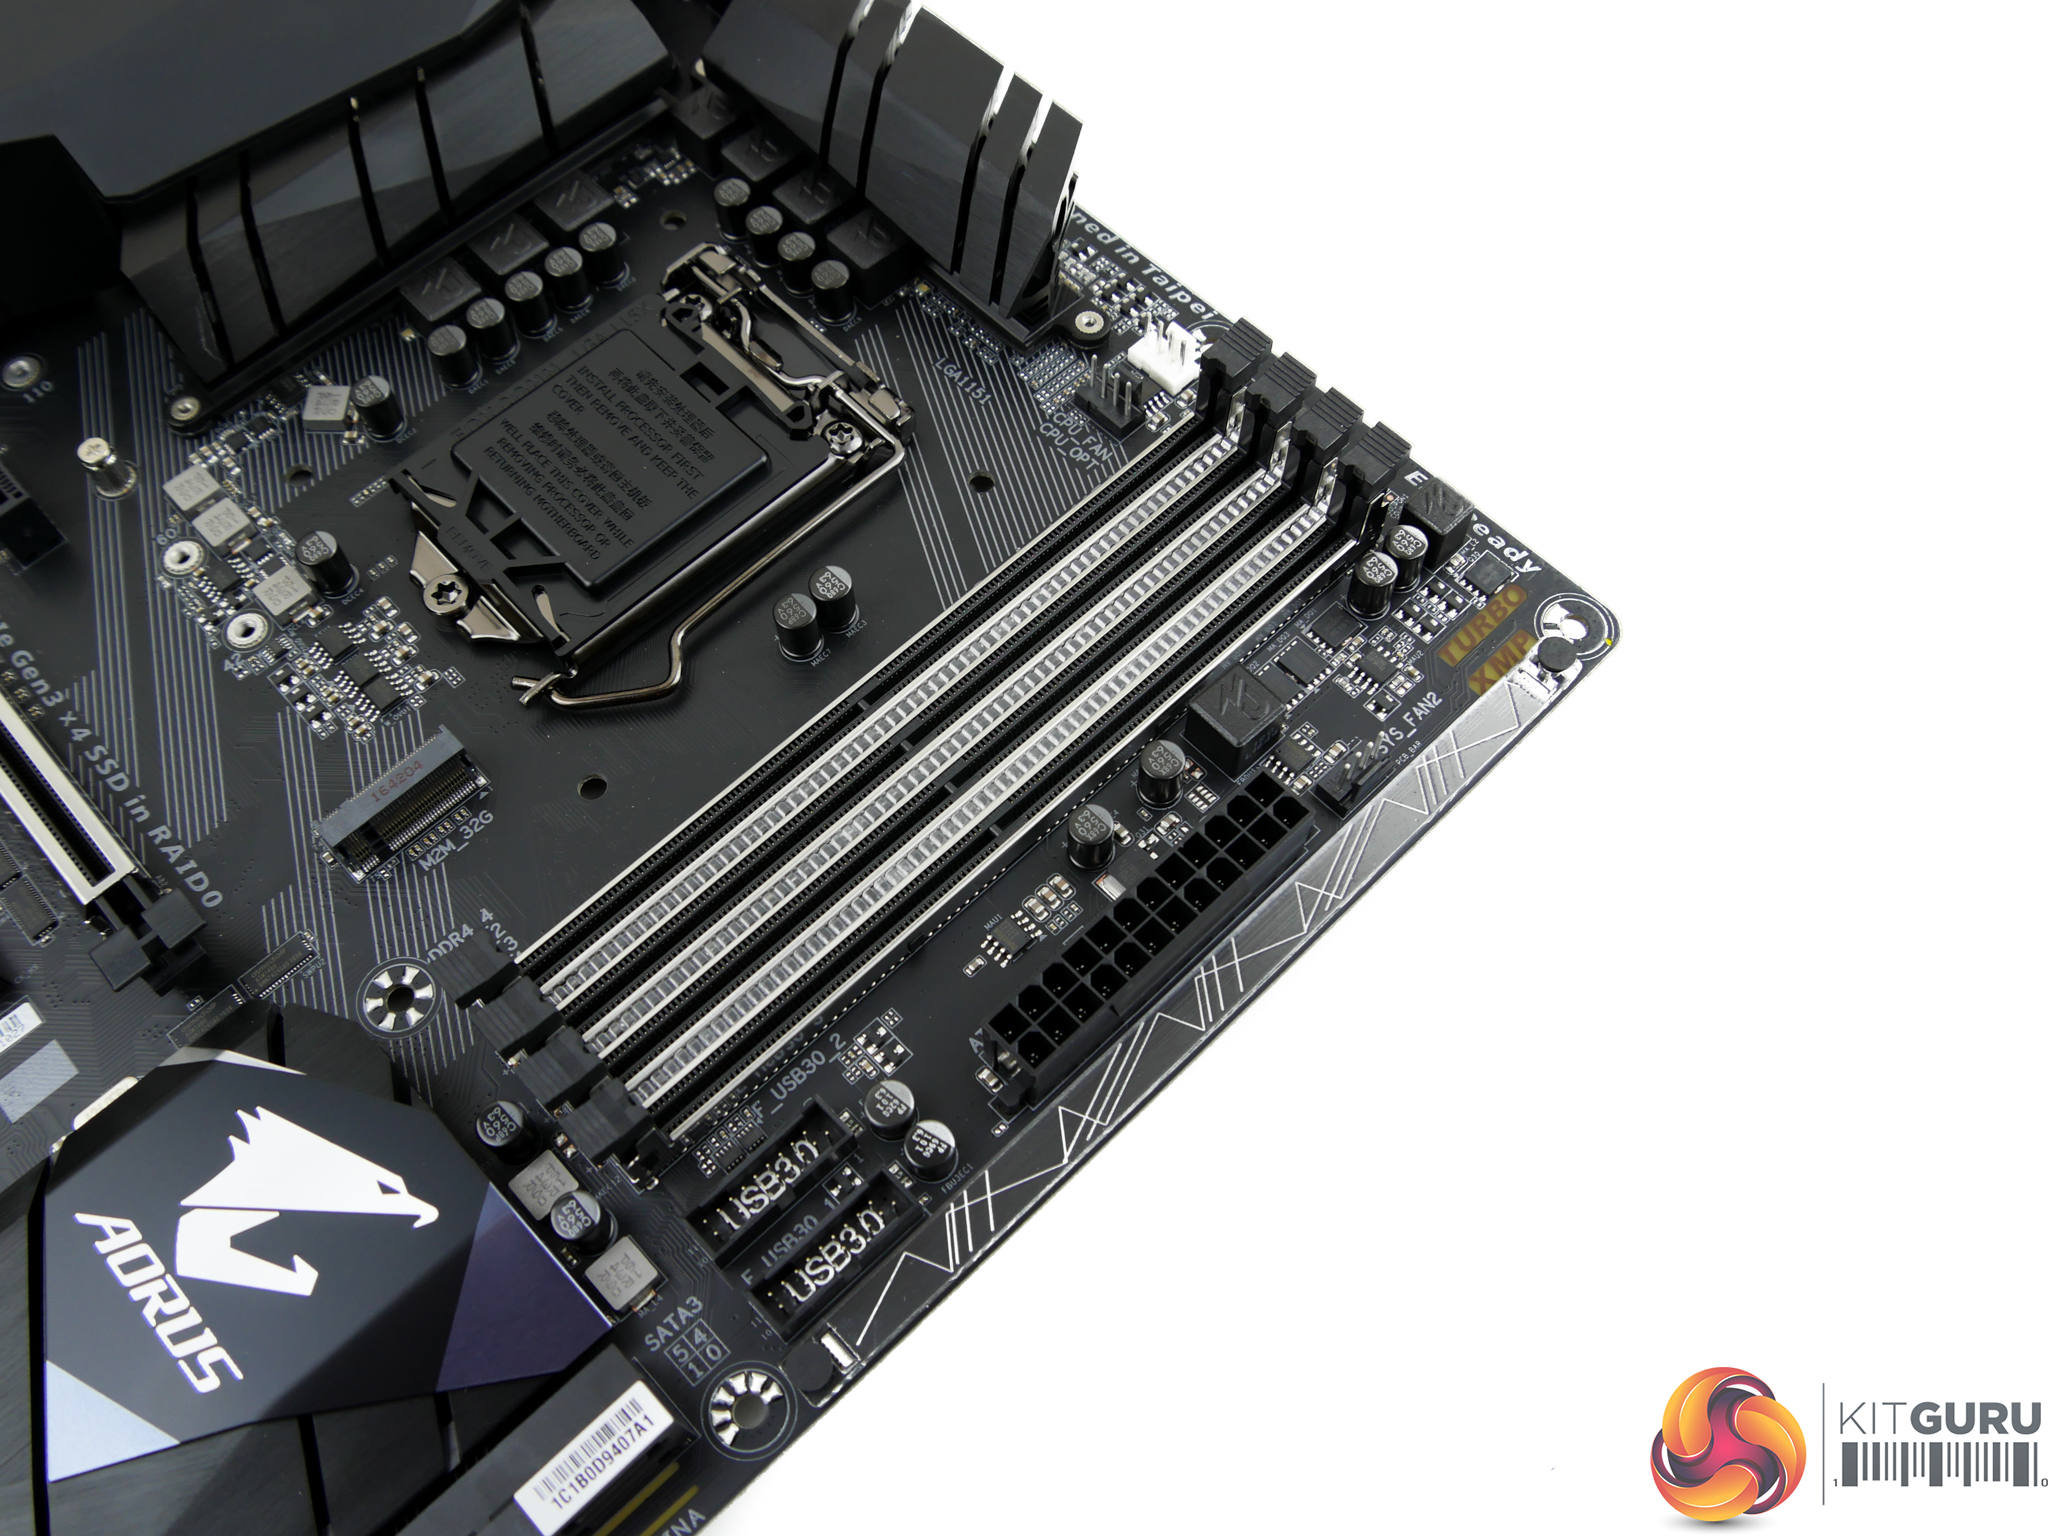
Four dual-latch DIMM slots have stainless steel reinforcement and RGB LEDs mounted between them. I like this lighting zone as it does a good job of illuminating the memory area without overpowering it with light.
Close to the DIMM slots are two internal USB 3.0 front panel headers. The inclusion of two headers, rather than one, is good as VR headsets such as the HTC Vive demand more and more front panel USB 3.0 ports. Both headers operate from the Z270 chipset.
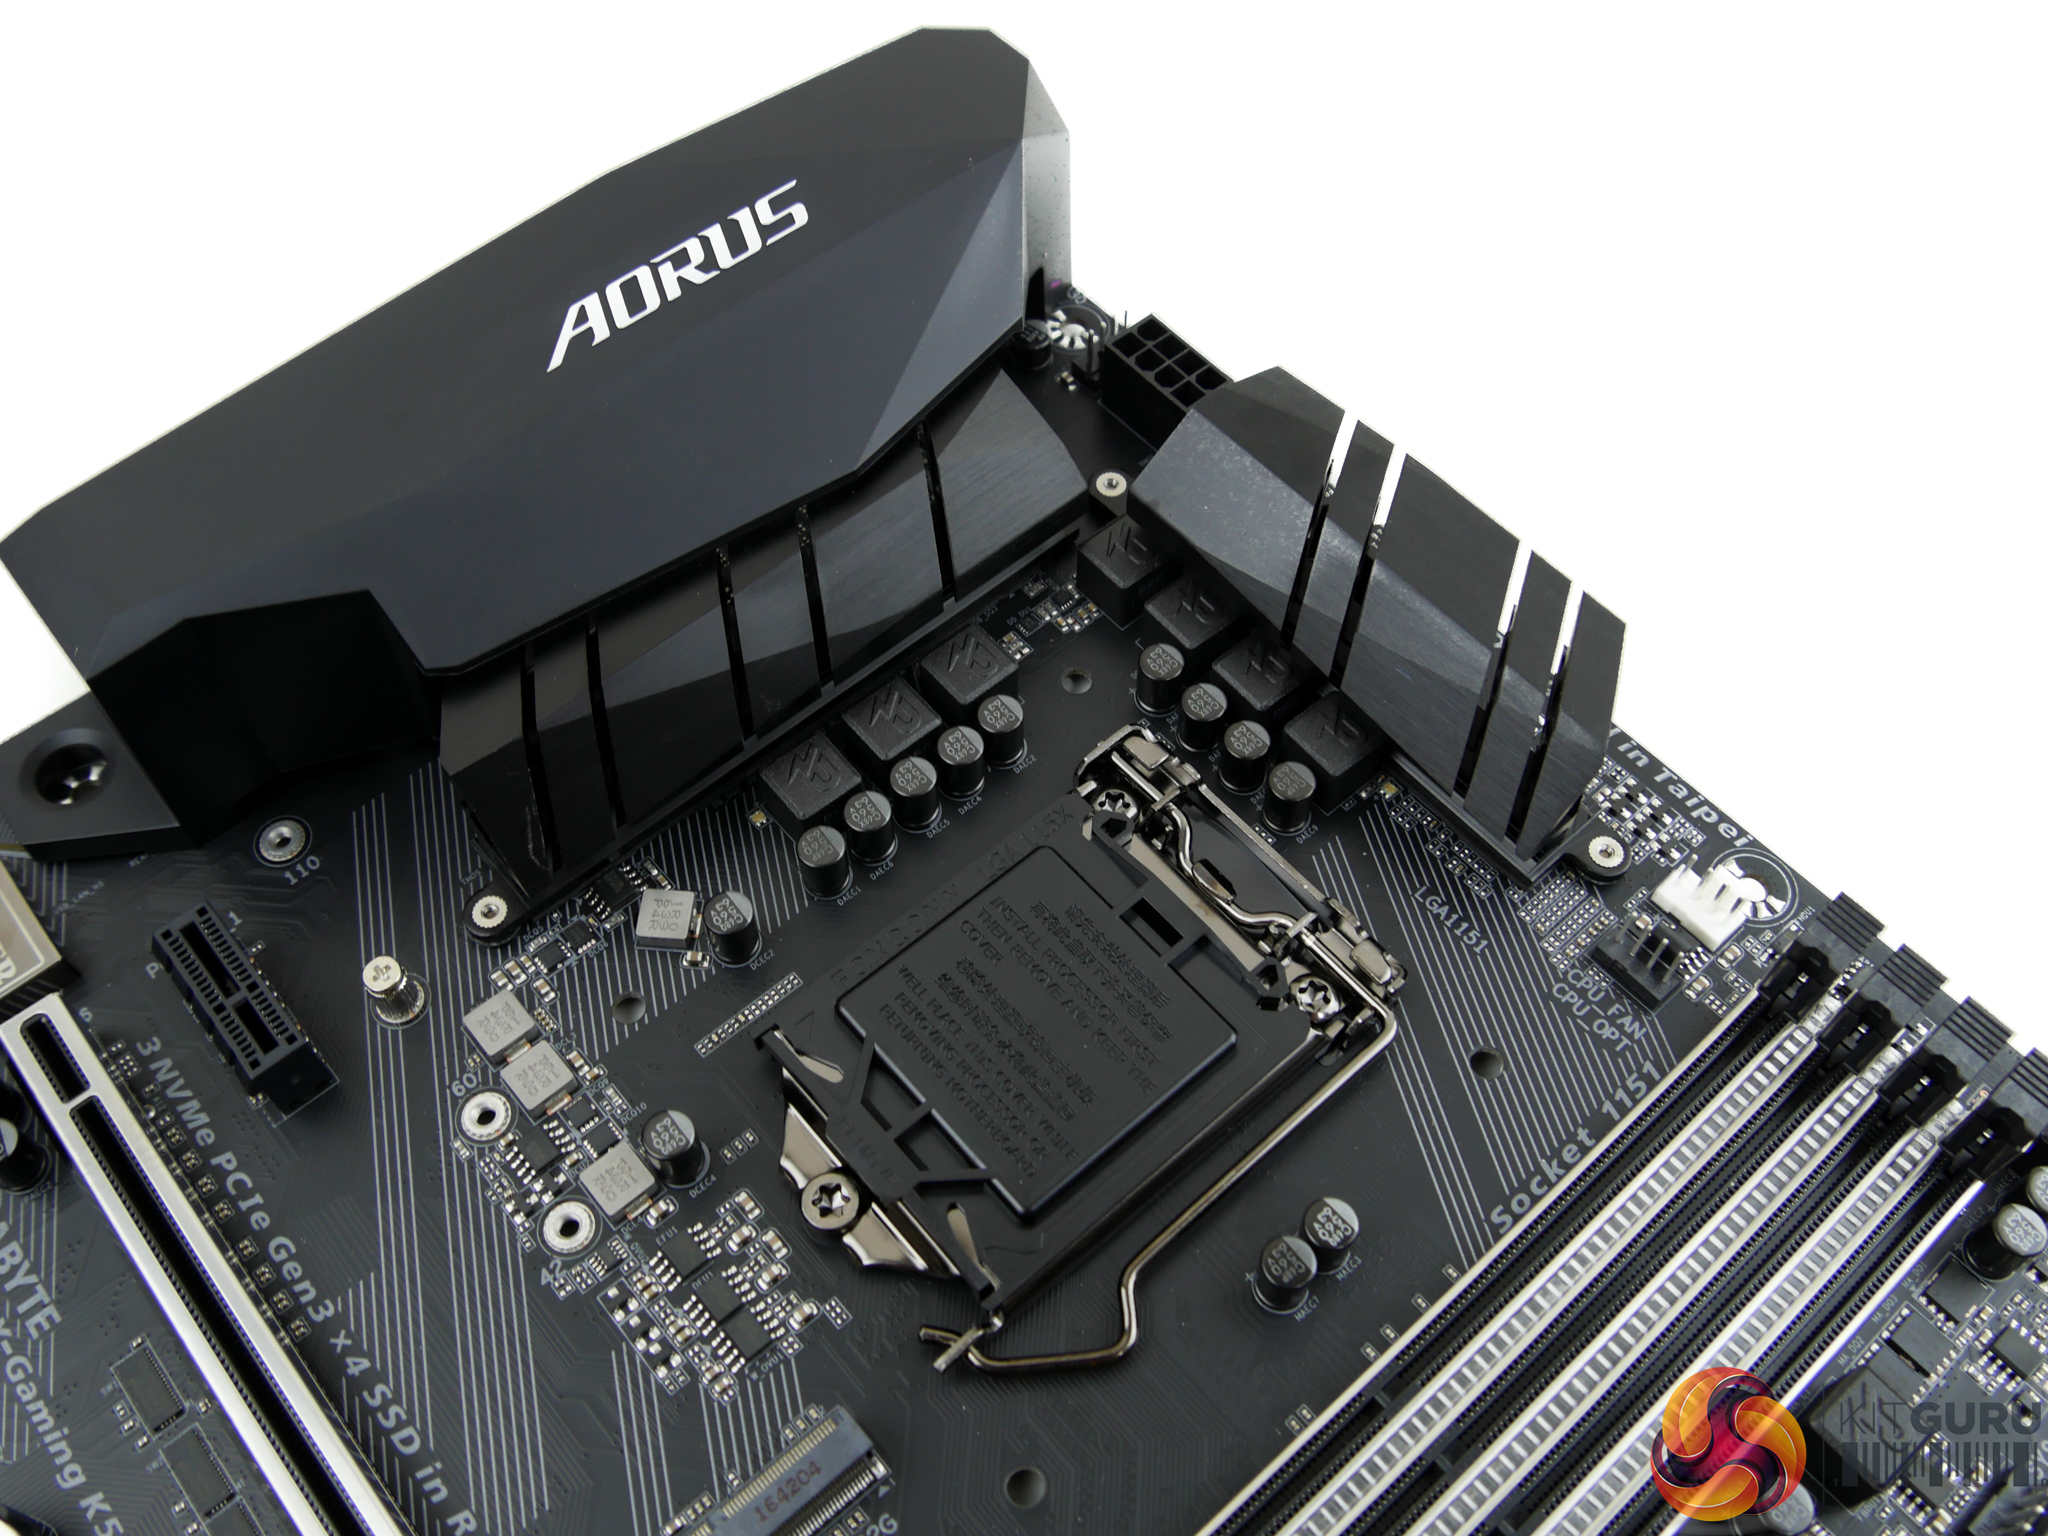
Eight power delivery phases feed the LGA 1151 CPU and supplementary system rails. Two well-sized metal heatsinks cool the MOSFETs without being overly intrusive.
For watercooling fans, EK offers a RGB Monoblock that is compatible with many of Gigabyte's Z270 motherboards, including the Gaming K5.
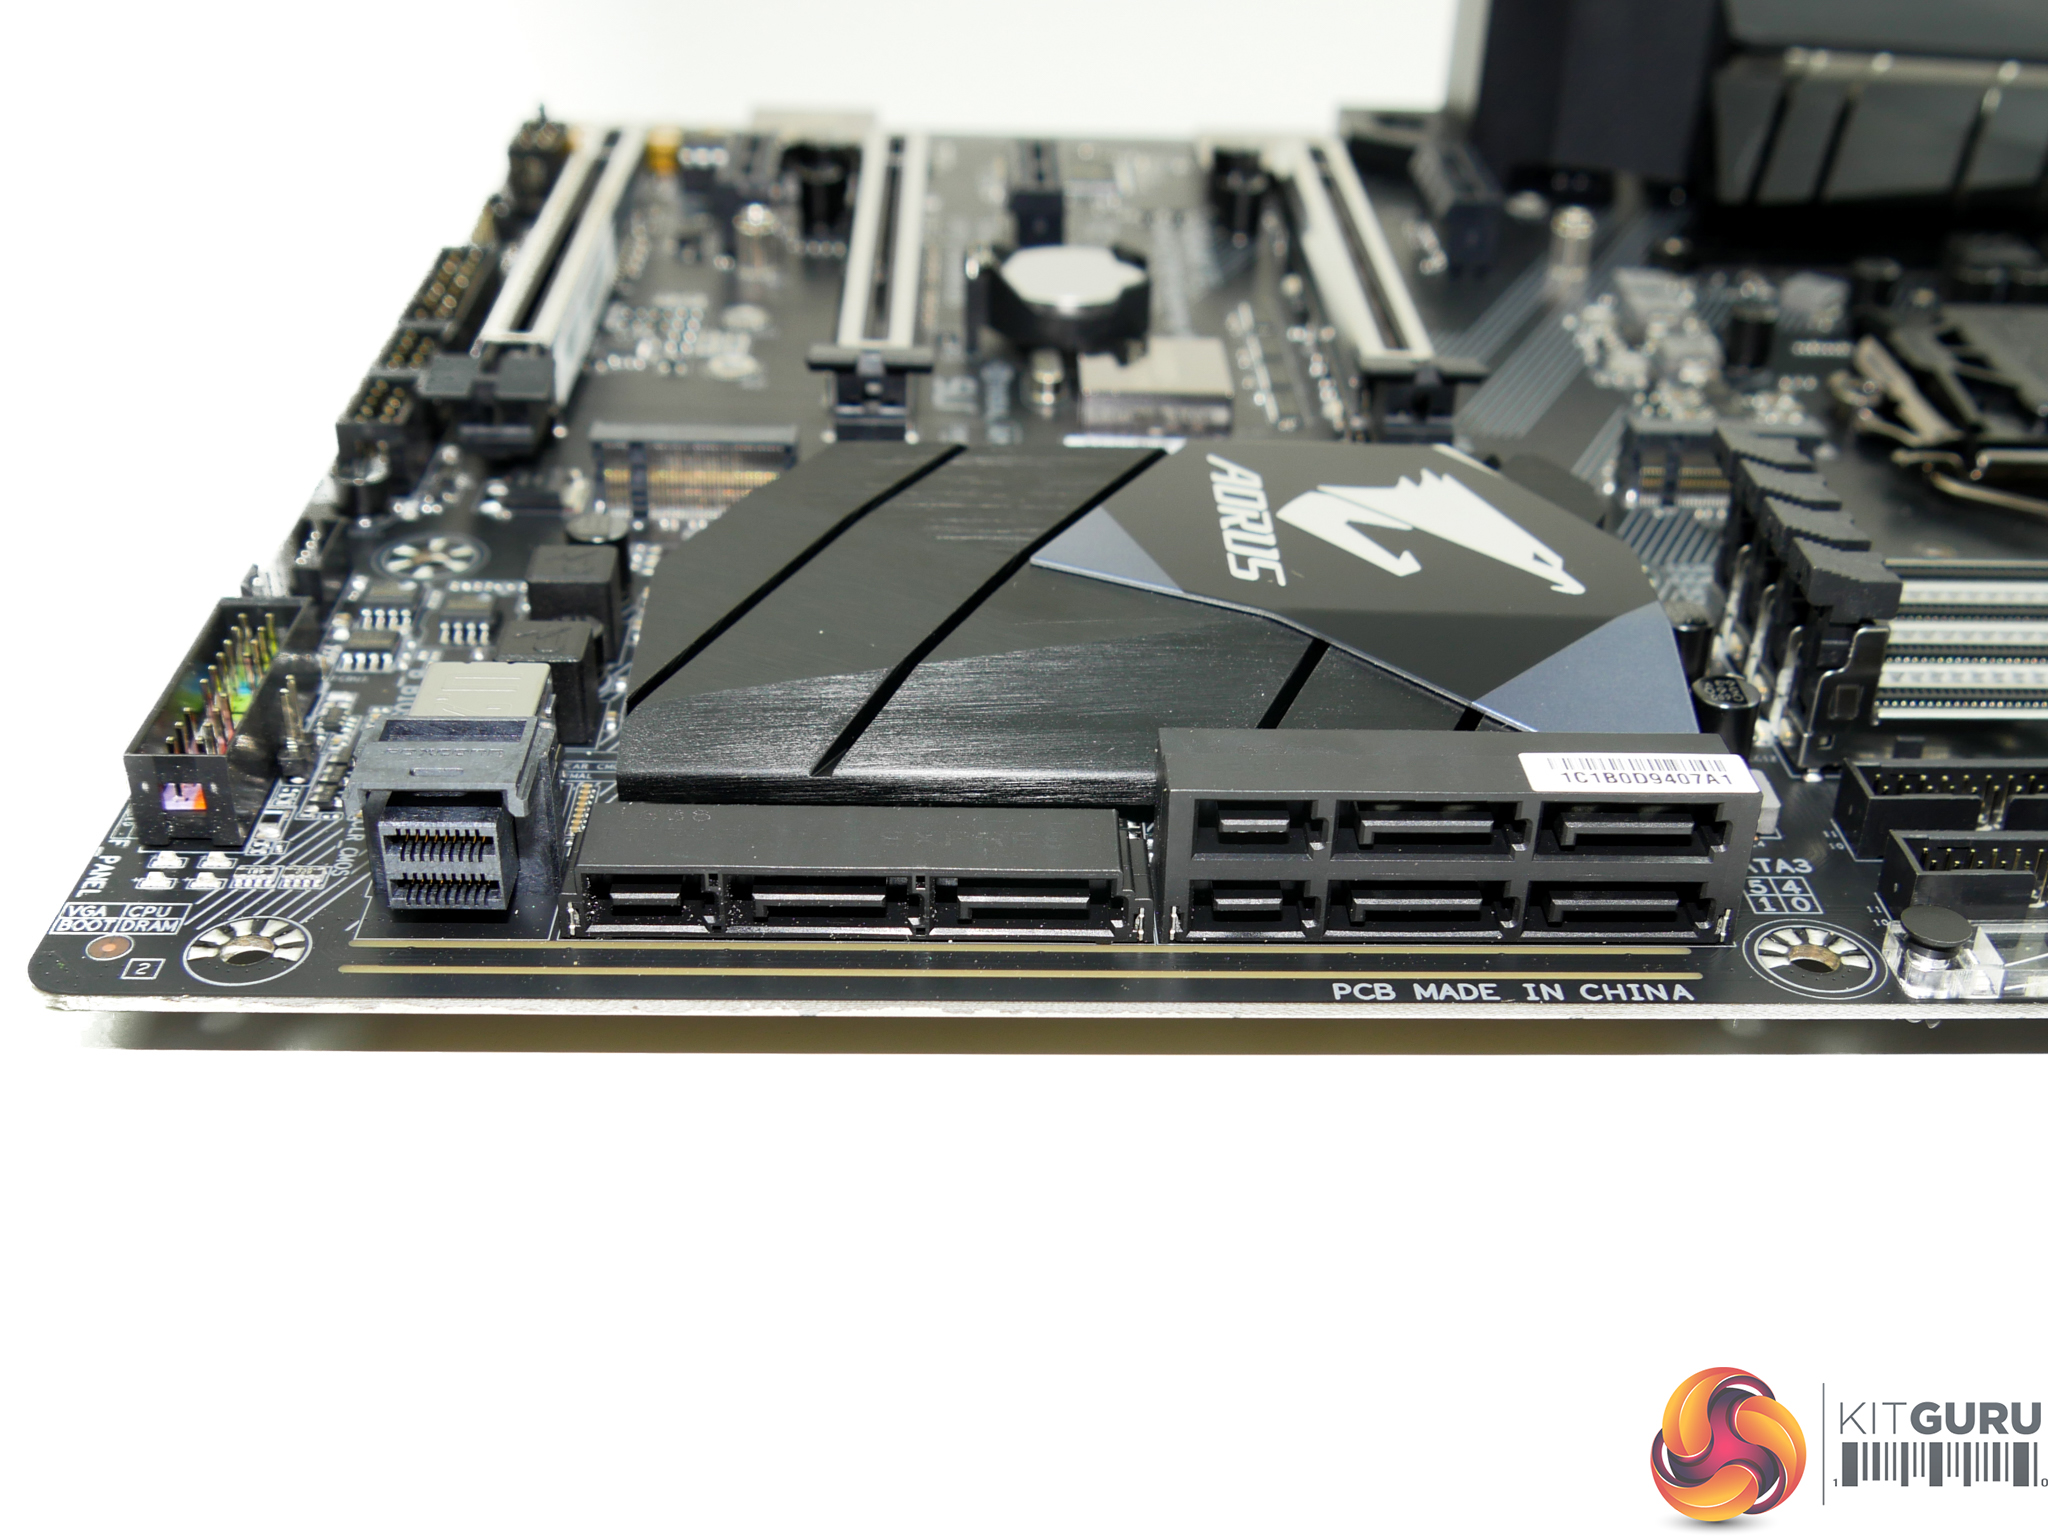
Six SATA 6 Gbps ports operate from the Z270 chipset, all of which combine to provide up to three 10Gbps SATA-Express ports. Gigabyte only includes the SATA-Express ports as they are basically free add-ons due to the functionality already being baked into the Z270 PCH. With that said, I still like SATA-Express for its ability to power front panel 10Gbps USB 3.1 connectors (until a new standard of connector, presumably based around USB Type-C, takes over).
Native 32Gbps U.2 is a surprise inclusion for a ~£170 motherboard but it's not a bad thing to see it. For somebody who may have been lucky enough to grab a bargain 400GB Intel 750 U.2 SSD, the onboard port is a far cleaner solution than using an M.2-based adapter and having an ugly cable trail across one's motherboard. Or you could get quirky and buy a U.2-to-M.2 adapter board to provide a third M.2 connector.
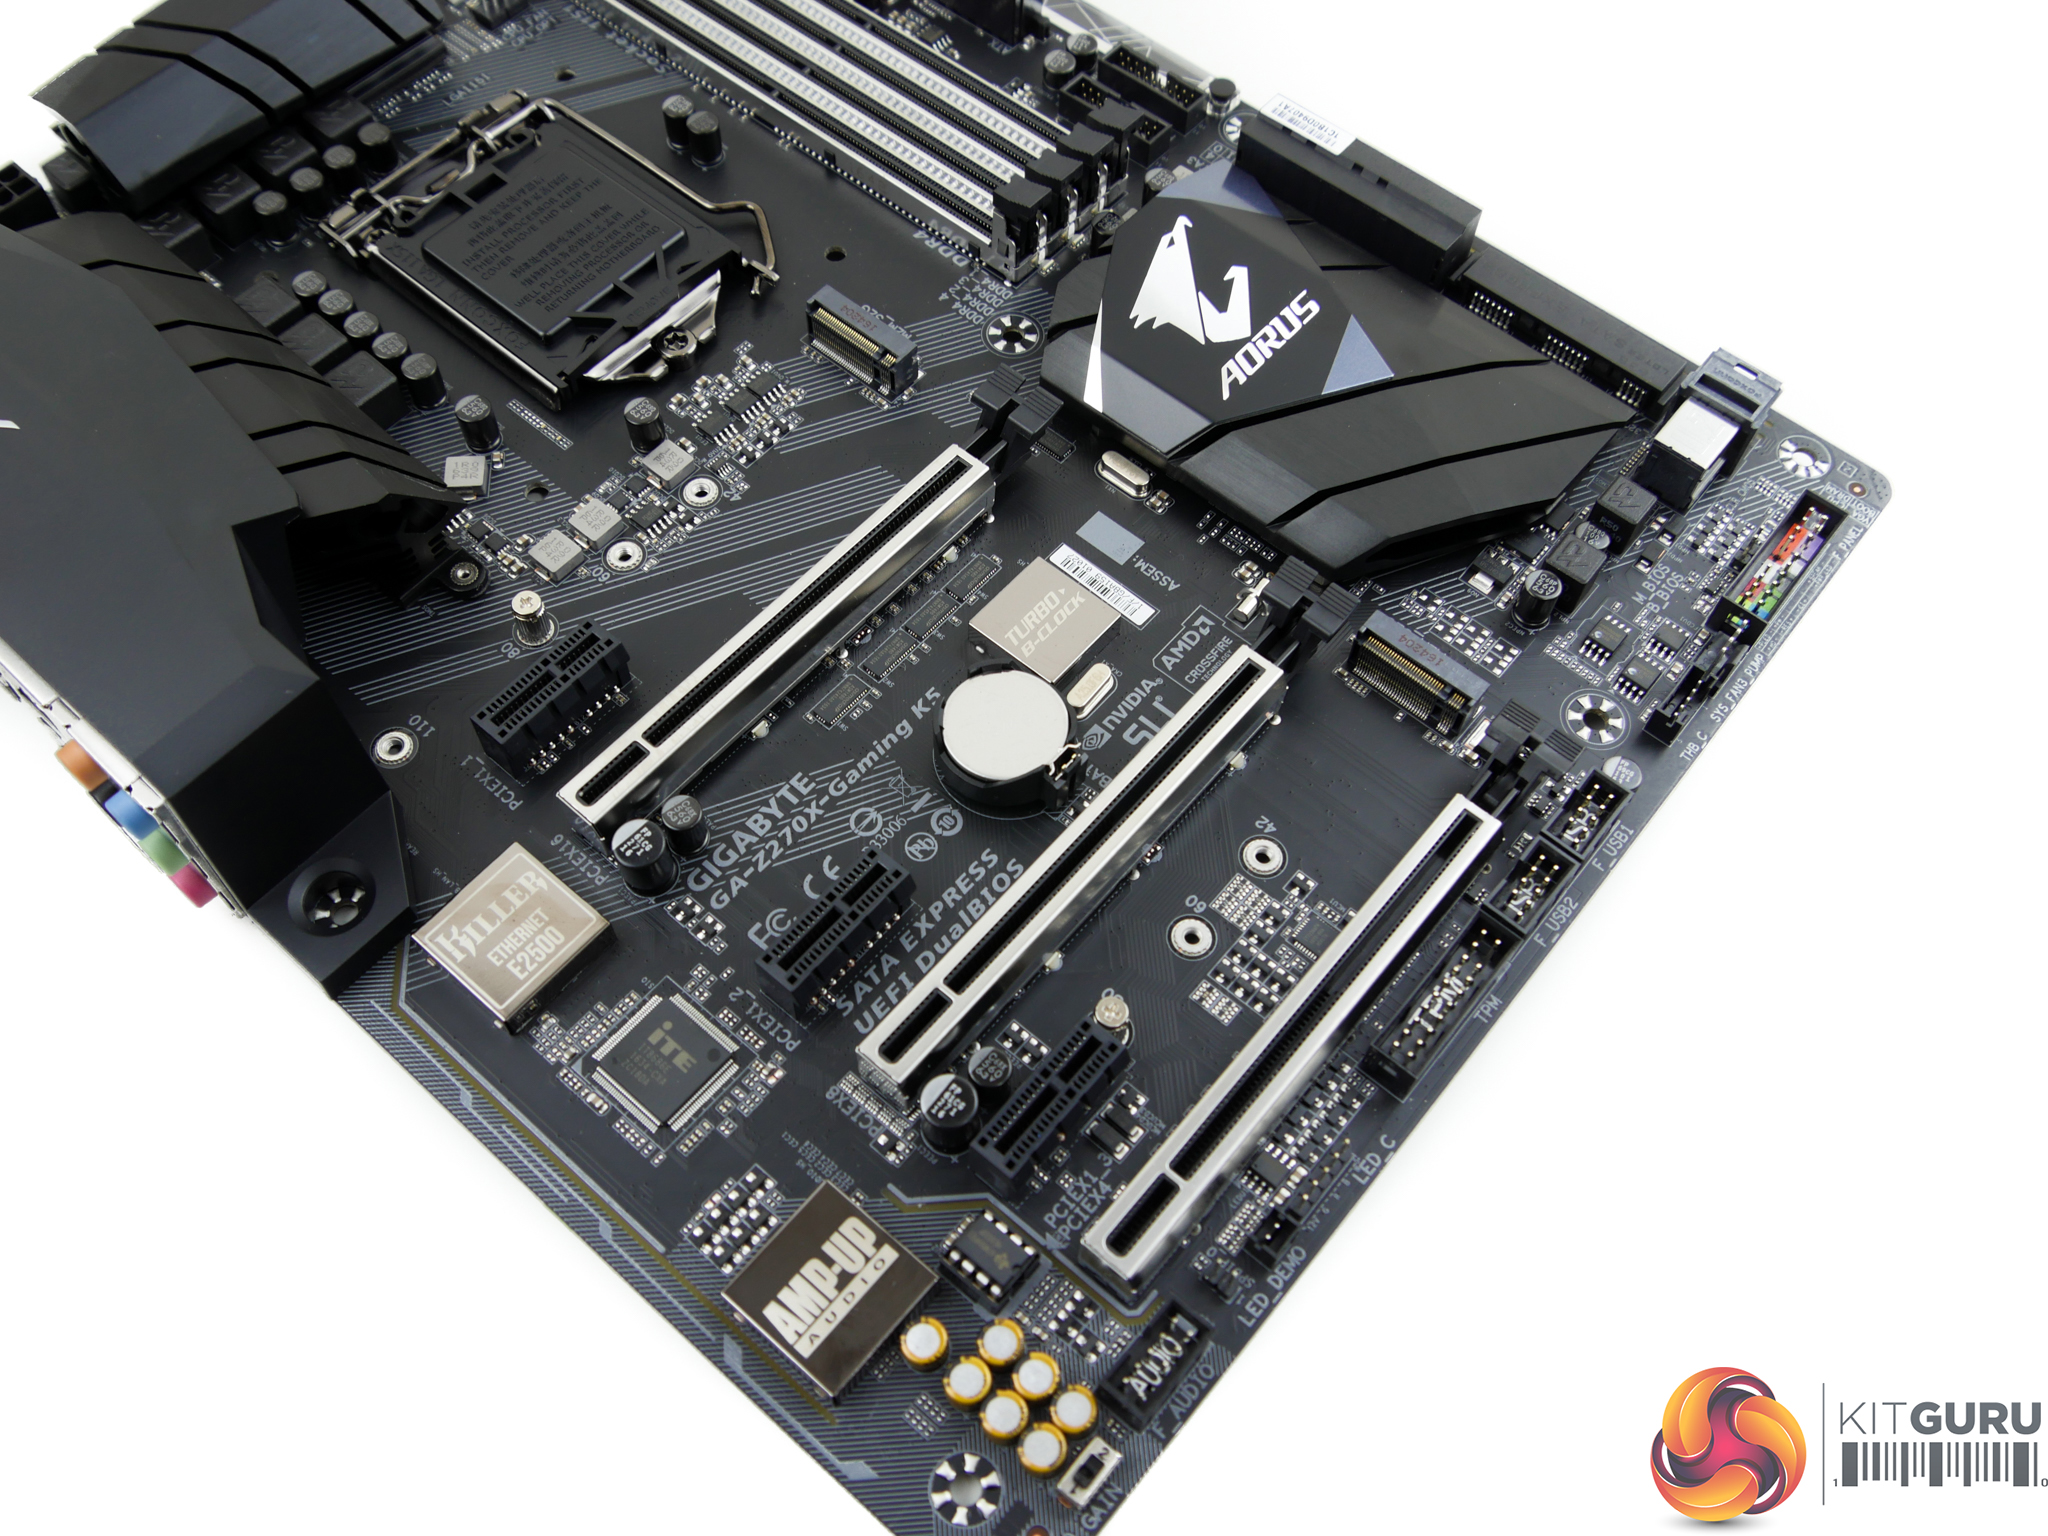
The pair of M.2 slots support both 32Gbps PCIe 3.0 x4 (or x2) NVMe SSDs as well as slower SATA 6Gbps M.2 SSDs. Both slots can be used simultaneously thanks to smart lane distributions, so if you fancy a pair of RAID 0 Samsung 960 EVO M.2 SSDs, go for it! In fact, you can add a third PCIe 3.0 x4 NVMe SSD connected to the U.2 port and run triple SSDs in RAID 0, though that would require the use of Intel 750 SSDs and a pair of M.2-to-U.2 adapters (unless a U.2 and M.2 compatible SSD is released in the future).
Gigabyte's lane distribution may be smart on the PCIe front but it isn't very efficient when it comes to the M.2 slots stealing bandwidth from SATA ports. A SATA/PCIe x2/PCIe x4 SSD in the upper M.2 slot renders SATA ports 4 and 5 unusable. The lower M.2 slot does not steal any SATA lanes except the one required from SATA port 0 to feed an M.2 SATA SSD, if installed. Put simply, you should use the lower M.2 slot first as it steals fewer SATA connections (possibly none), if cooling of your SSD isn't a problem.
Up to 110mm-long drives can be housed in the top slot while the lower is limited to (the more common) 80mm-long variants. It is disappointing to see that Gigabyte has not given M.2 SSD cooling any consideration, as MSI has done with its M.2 Shield. With that said, positioning of the upper M.2 slot (not below a GPU) means that one could manually attach a VRM-style heatsink to an M.2 SSD without worrying about vertical interference. Incidental airflow from an air CPU cooler would also help.
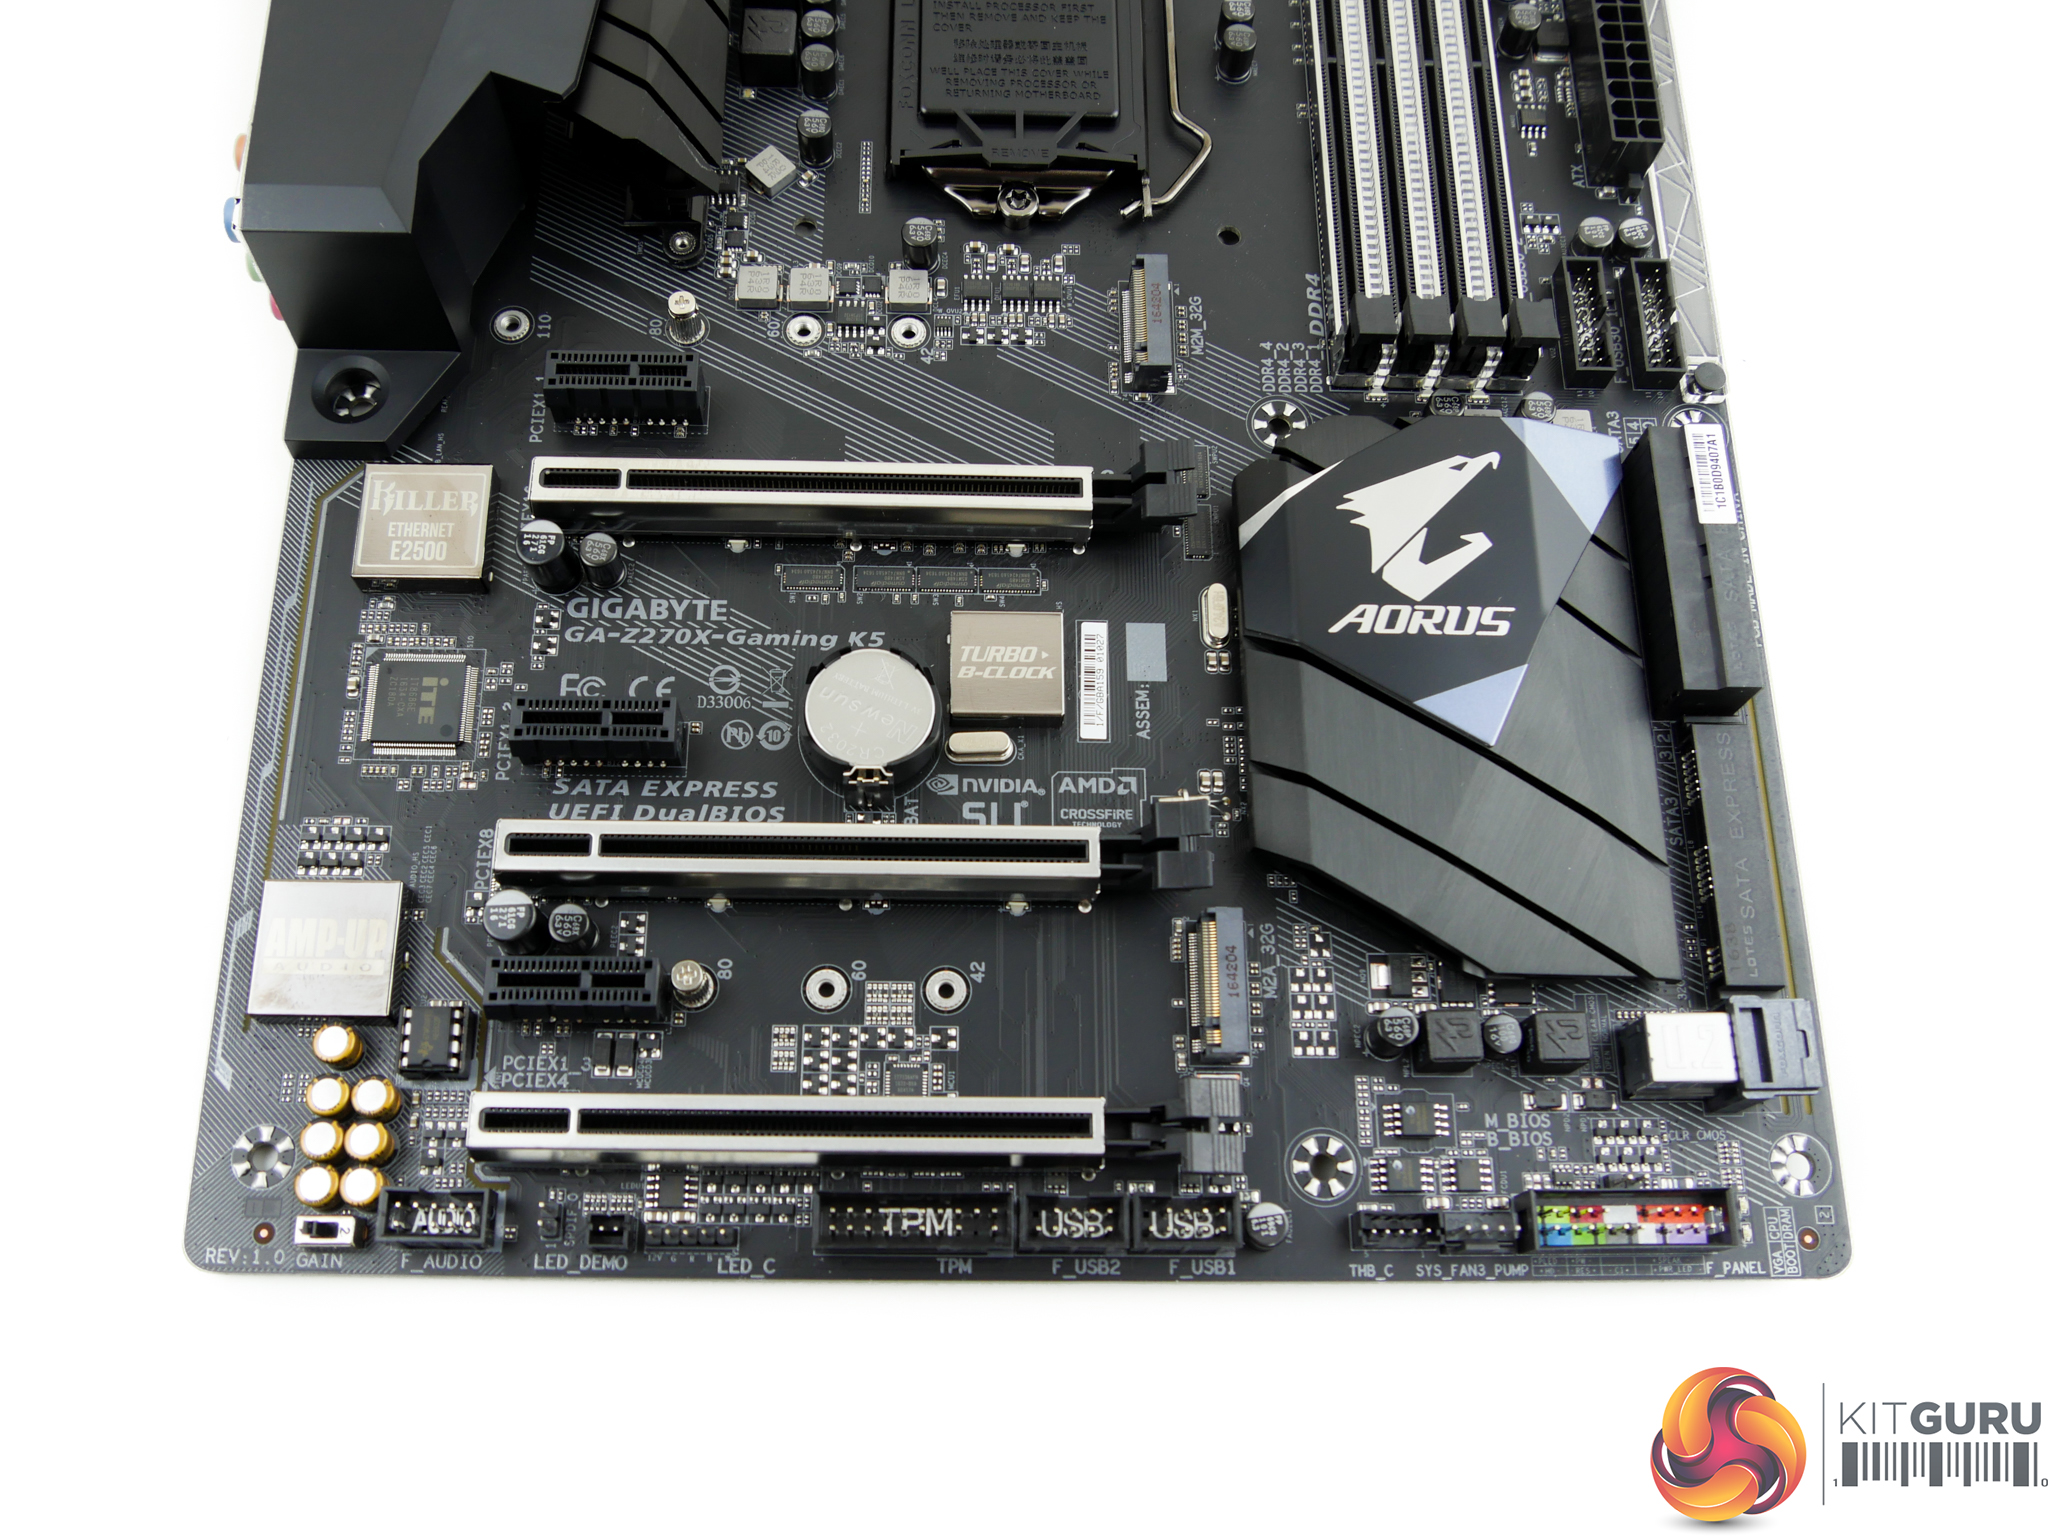
The upper two reinforced, full-length PCIe slot should be used for a pair of graphics cards. Bandwidth from the CPU lanes is split as x16/x0 or x8/x8. Slot spacing is smart as the upper slot is far enough away from the CPU socket and DIMM connectors to minimise interference. The two-slot gap to the next PCIe full-length slot is large enough to give a dual-width graphics cooler some breathing room.
That lower full-length PCIe slot receives four lanes of PCIe 3.0 bandwidth from the chipset and, despite technically supporting a third card in CrossFire, should realistically be reserved for use with a PCIe SSD or other high-speed add-in card such as a multi-port NIC. Before stuffing it with an add-on card, though, it should be noted that bandwidth is shared between the lower full-length PCIe slot and the three PCIe 3.0 x1 connectors. When any one of those x1 slots is used, the bottom full-length slot reduces to PCIe 3.0 x1 bandwidth.
Connectors along the bottom edge are generally the usual affair, except for the 5-pin RGBW LED header which offers pure-white support as well as software-reconfigurable pins to offer greater compatibility in the fragmented RGB LED strip market. A Thunderbolt AIC header is found just below the pair of soldered BIOS chips, next to a 4-pin PWM/DC configurable fan header.
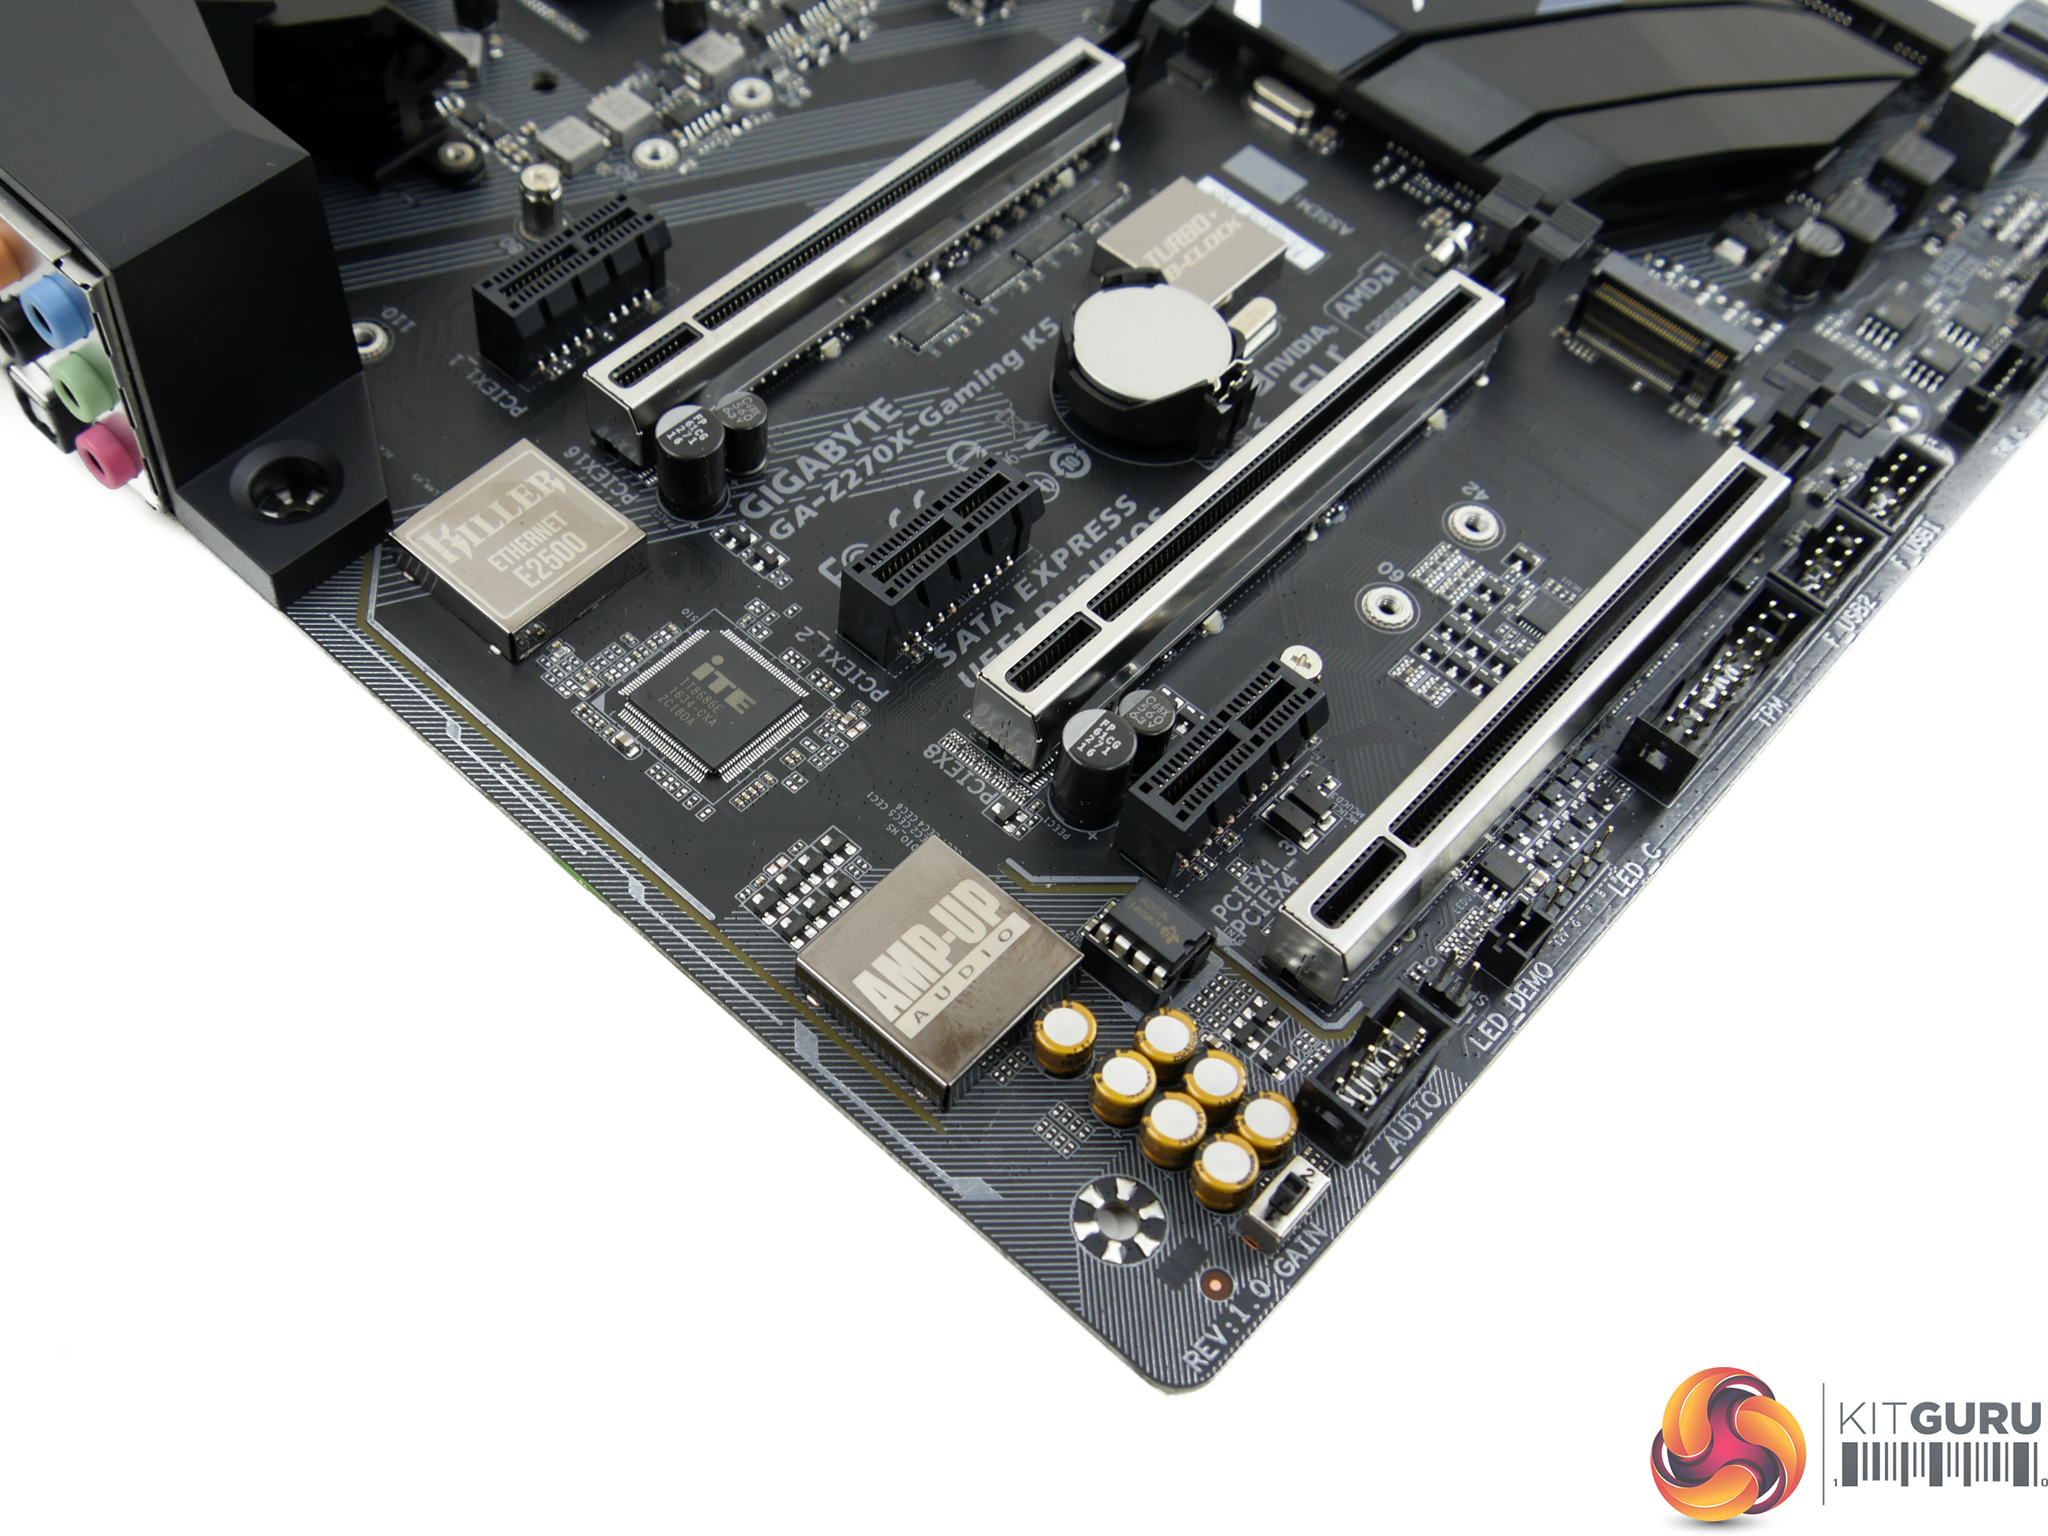
Gigabyte's AMP-UP audio system for the Aorus Z270X-Gaming K5 is based around the popular Realtek ALC1220 codec. Audio capacitors, codec shielding, and dedicated PCB traces aim to smooth out the signal and maintain its quality.
The socketed op-amp is a Texas Instruments Burr Brown NE5532P unit that is common for motherboards at this price point (though not in socketed form). Importantly, its socketed installation allows it to be upgraded at the desire of a user's individual preferences. A switch on the board's bottom edge controls gain to the audio system with two different levels.
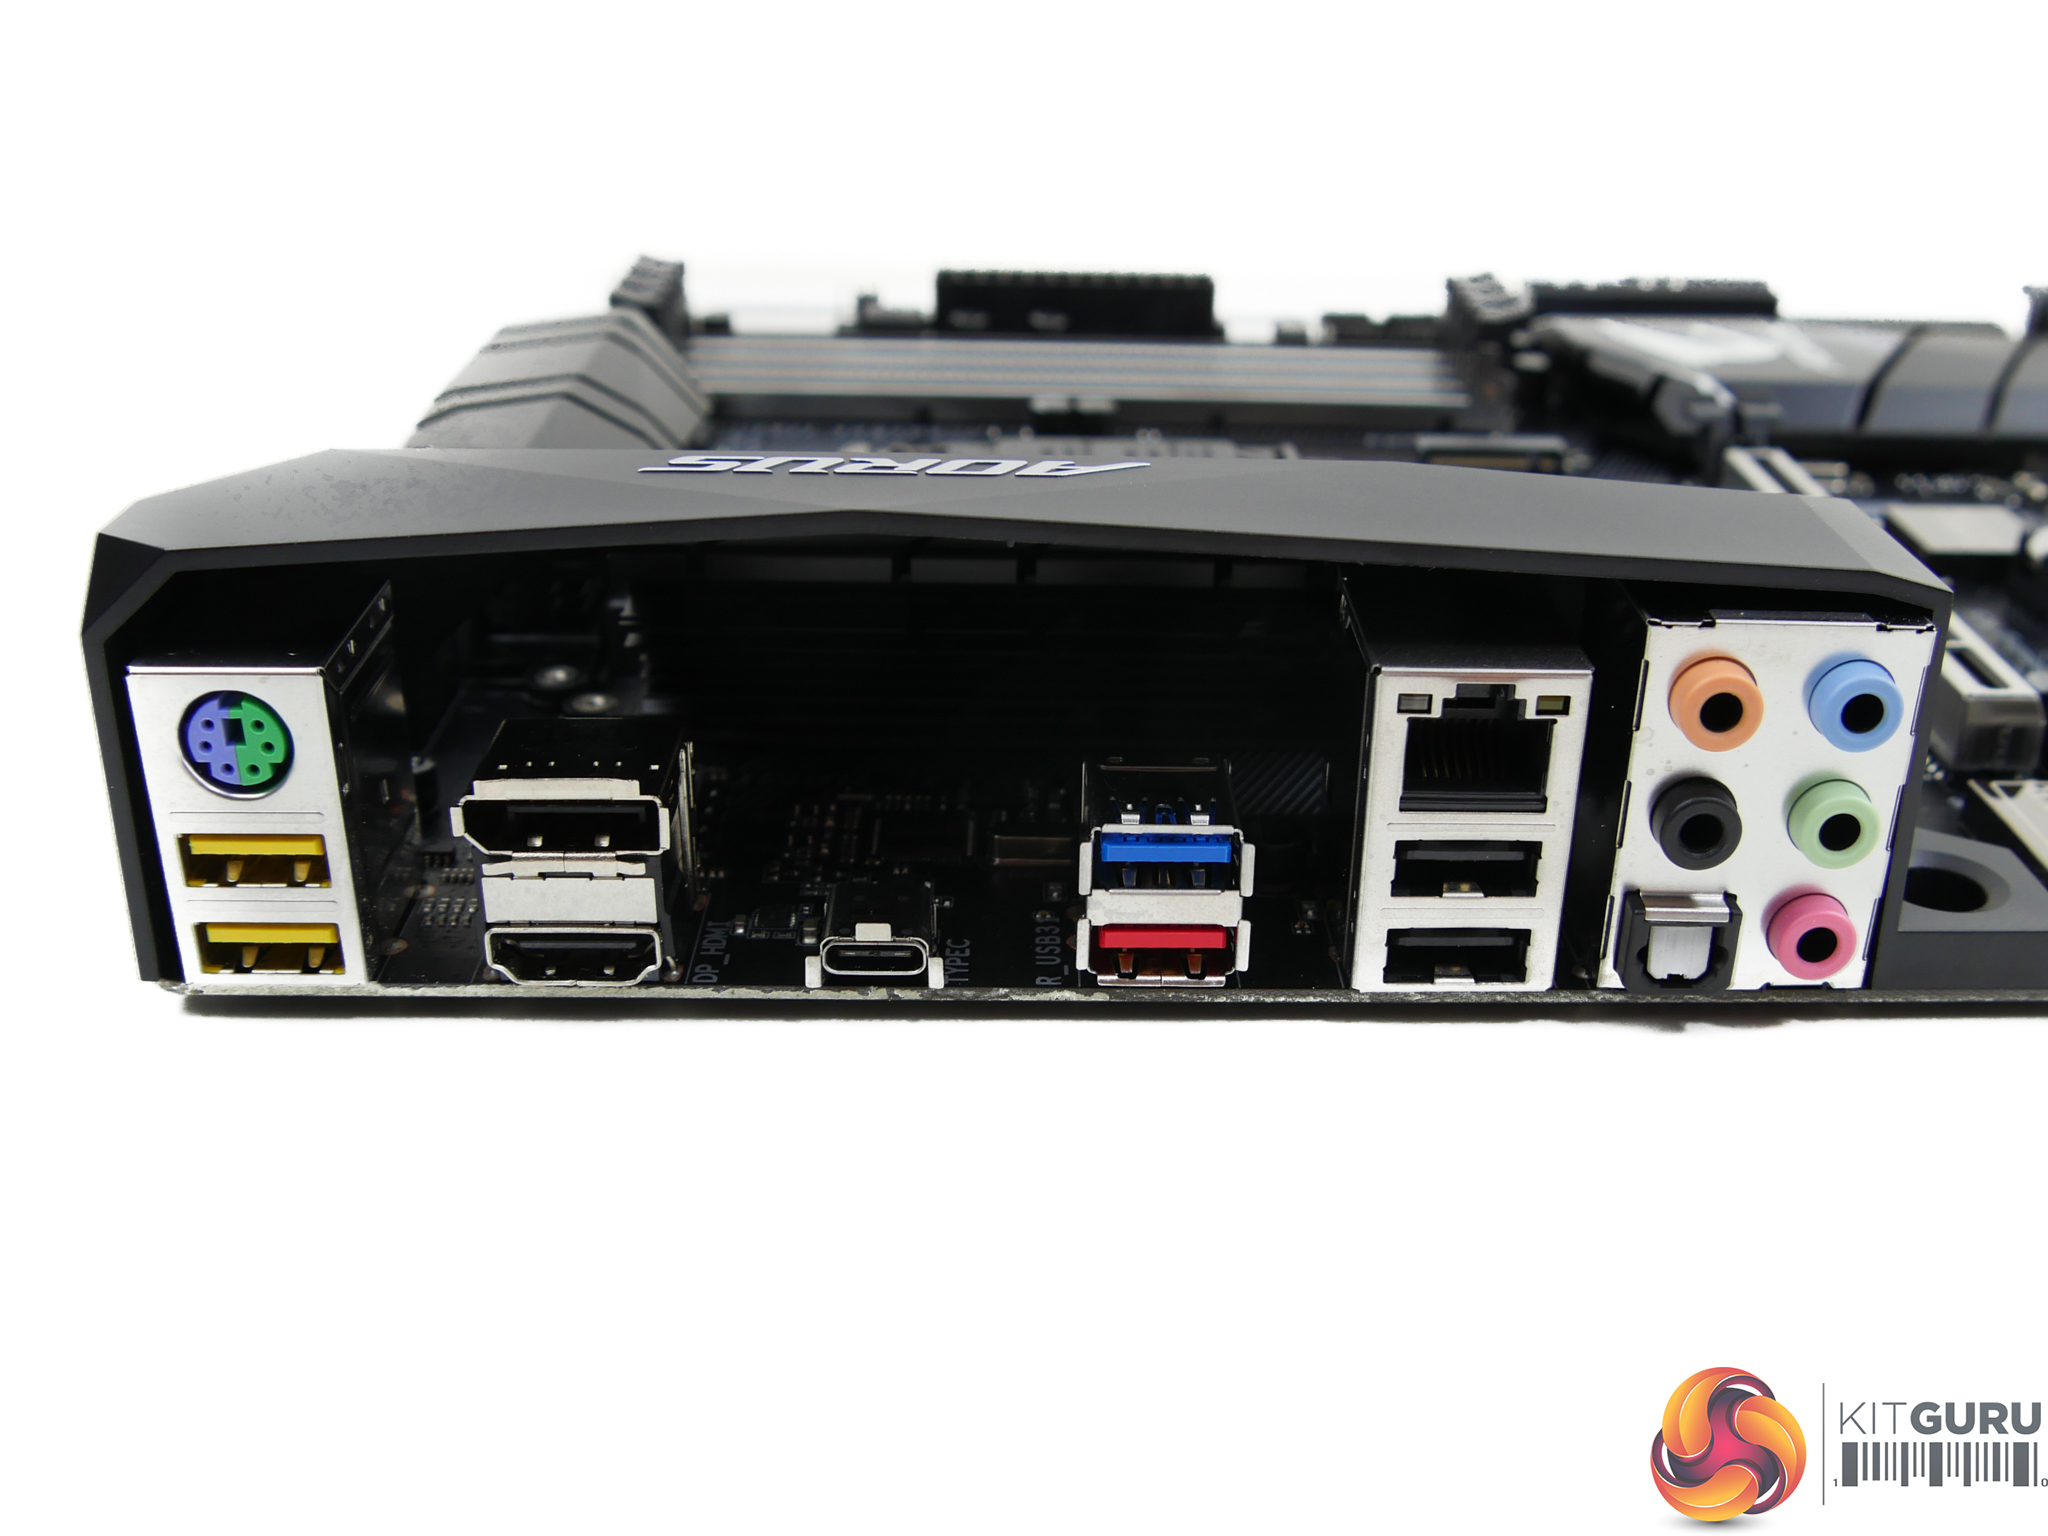
A total of six USB Type-A ports are found on the rear panel which is a fair number for most users wanting this calibre of motherboard (although another pair would have been welcomed). A PS/2 connector is mounted above the two yellow-coloured USB 3.1 Gen 1 5Gbps ports that also support Gigabyte's USB DAC-UP 2 feature to deliver cleaner power to USB headsets and audio peripherals. There's another 5Gbps USB 3.1 Gen 1 port mounted above the red, ASM2142-powered 10Gbps USB 3.1 Gen 2 Type-A port, next to the 10Gbps Type-C connector.
Two more Type-A ports, this time of USB 2.0 variety, are mounted below the Killer E2500 GbE NIC. Killer's NIC is a hate-it-or-love-it inclusion for gamers but the network management software can prove useful in many scenarios, especially if the motherboard vendor does not have software capable of providing management for competing NIC solutions.
Video output comes from DisplayPort 1.2 and HDMI 1.4, meaning that 4K60 can operate through the DP connector. No luck for users wanting 4K60 over HDMI, though (which will be a small percentage given the likelihood of this board being paired with a discrete GPU).

Five 4-pin fan headers are distributed across the motherboard. Five headers is borderline sufficient for a mid-range motherboard that is likely to be housed inside a system with numerous chassis fans.
Making up for the quantity, however, is the quality of Gigabyte's Smart Fan 5 control system for the 4-pin headers. DC and/or PWM control can be selected in addition to water pump operation with a current output of up to 2A. ITE's SuperIO chipset is to thank for the excellent fan management capabilities.
Gigabyte Z270 UEFI
The UEFI used for Gigabyte's Aorus Z270X-Gaming K5 is almost identical to that found on the Gaming 7. As such, we have re-used the bulk of our analysis from that review and updated the text where there are subtle differences.
Firstly, we are pleased to report that our generic wireless mouse worked correctly in the Gigabyte Z270 UEFI. Some mice can be troubling with UEFI support, so when a generic wireless unit functions correctly in the interface, that is usually a good sign for overall mouse support.
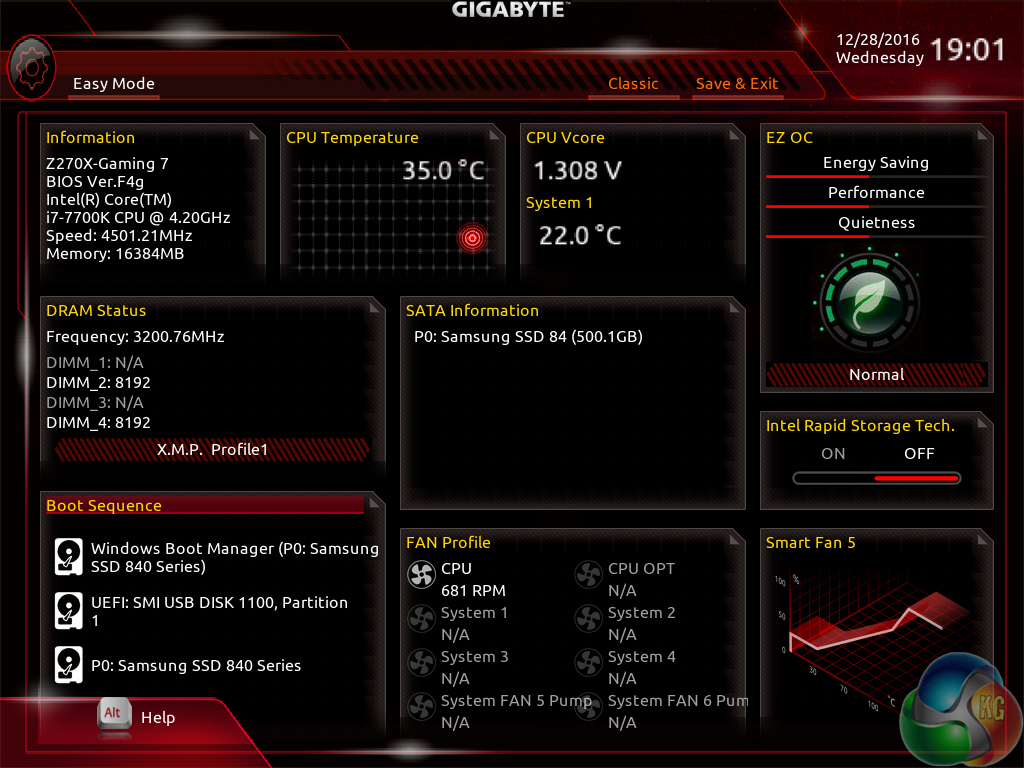
Gigabyte's Easy Mode page is a solid attempt at sectioning a handful of simple settings into a single section. Users can alter the boot sequence, check fan speeds, monitor temperatures and voltages, enable XMP, and change the performance mode without jumping into the deeper (and scarier for less experienced users) UEFI sections.
I don't have any complaints about Gigabyte's Easy Mode implementation. It is as good as the versions used by competing vendors.
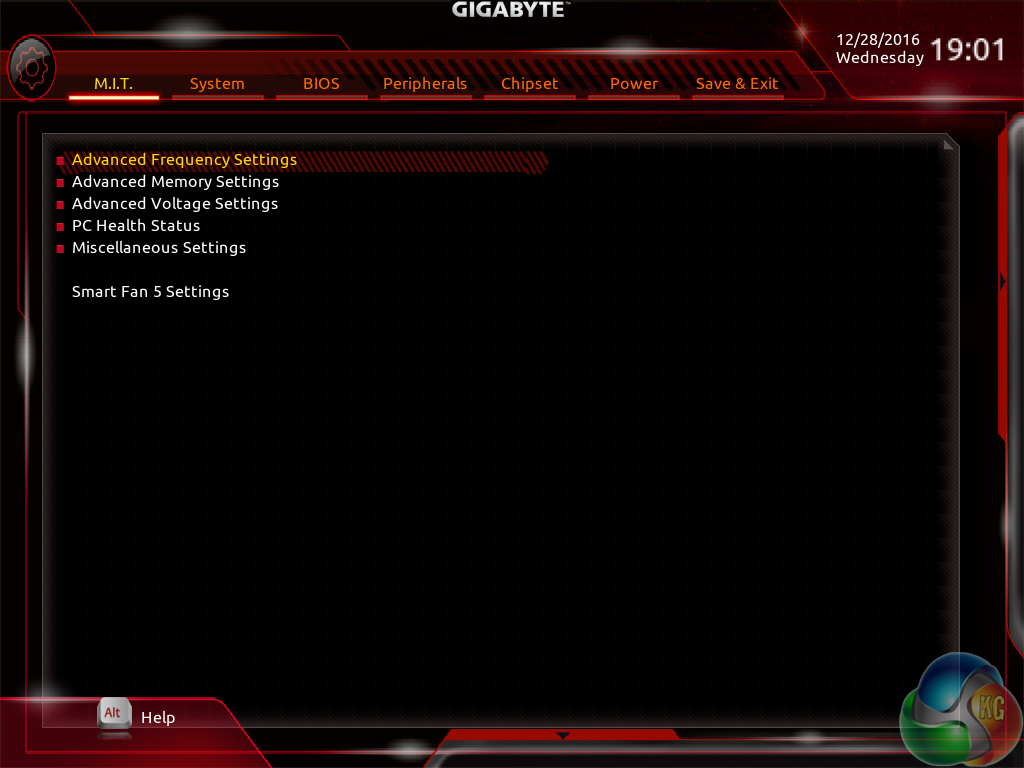

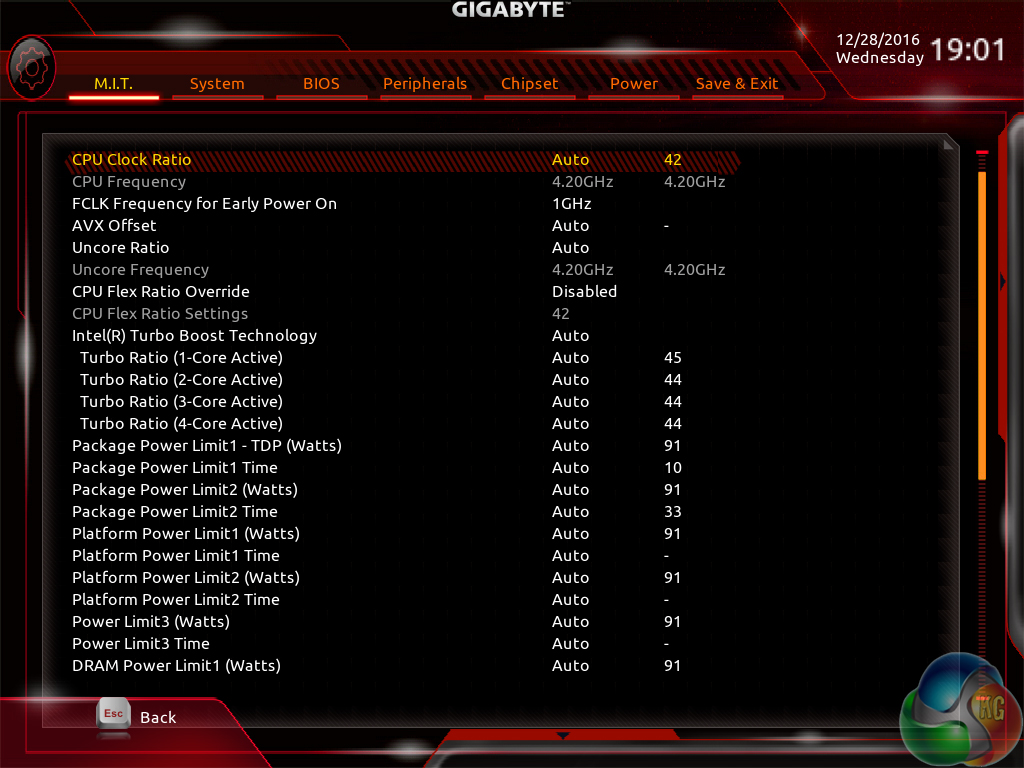
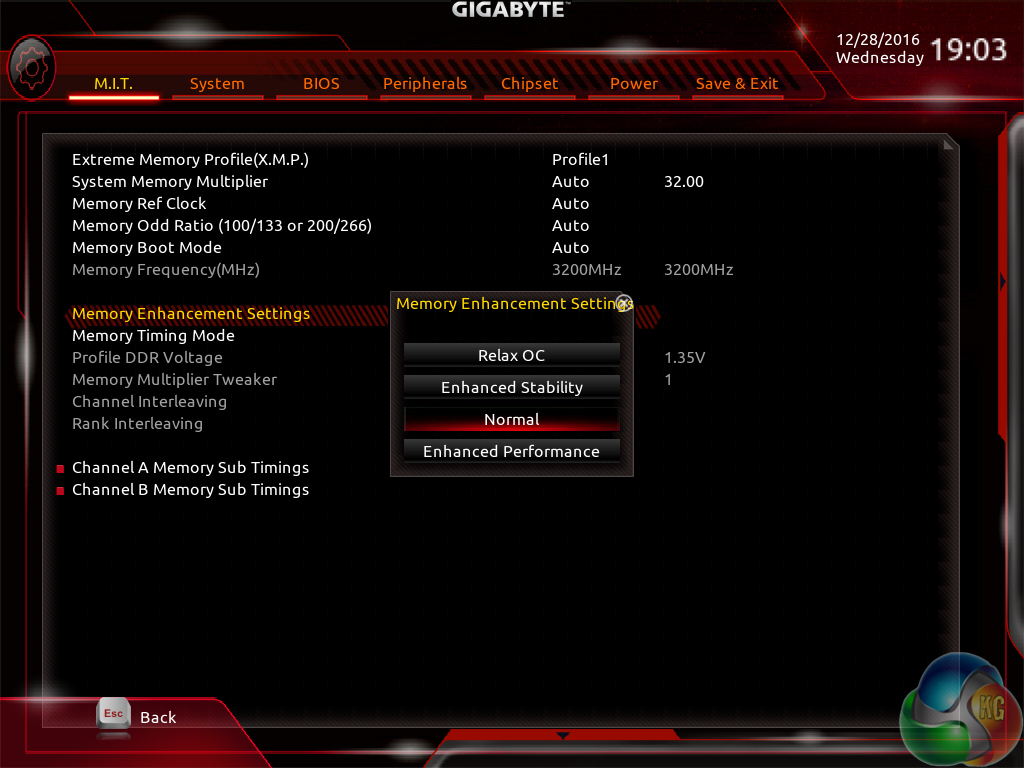
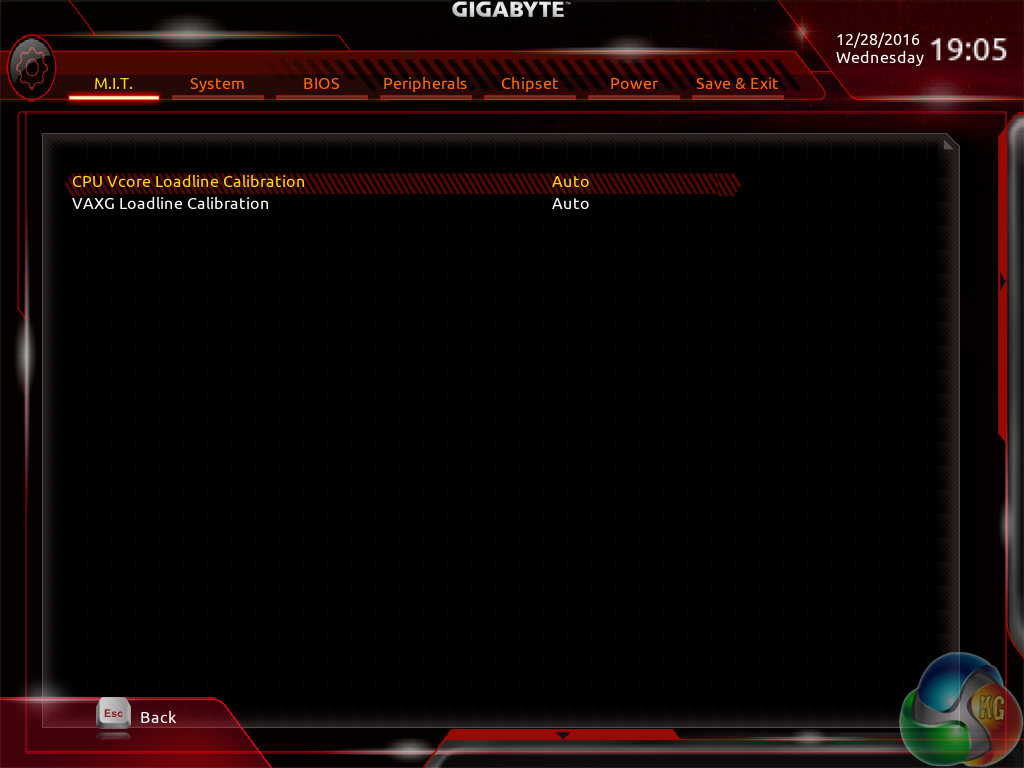
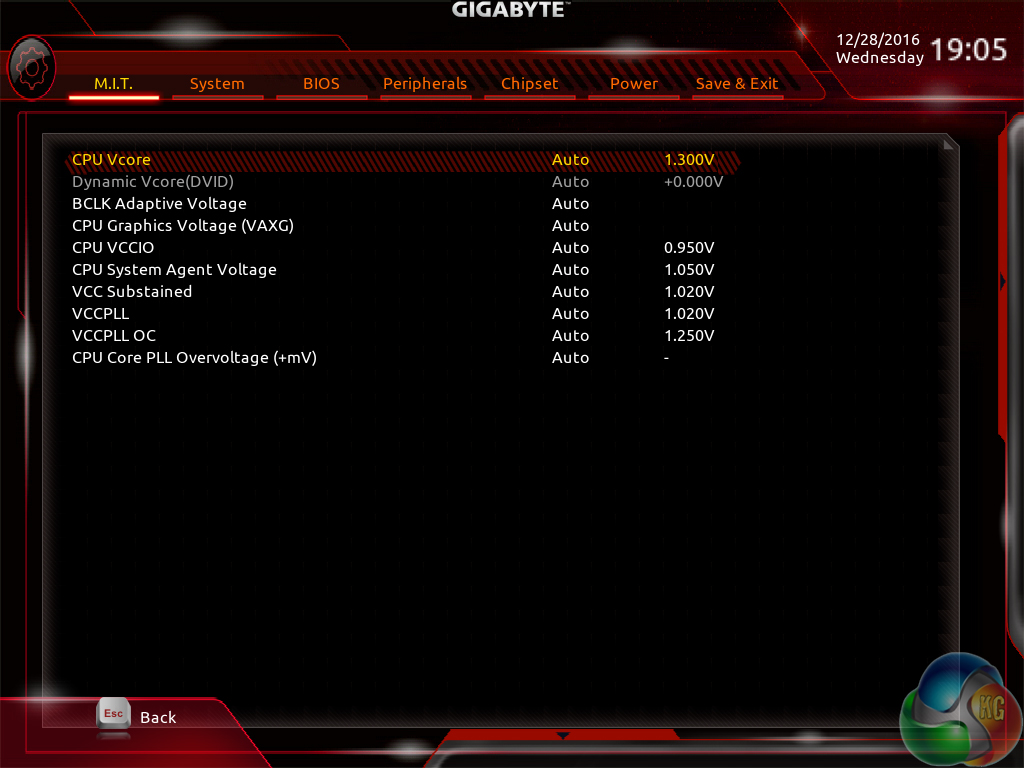
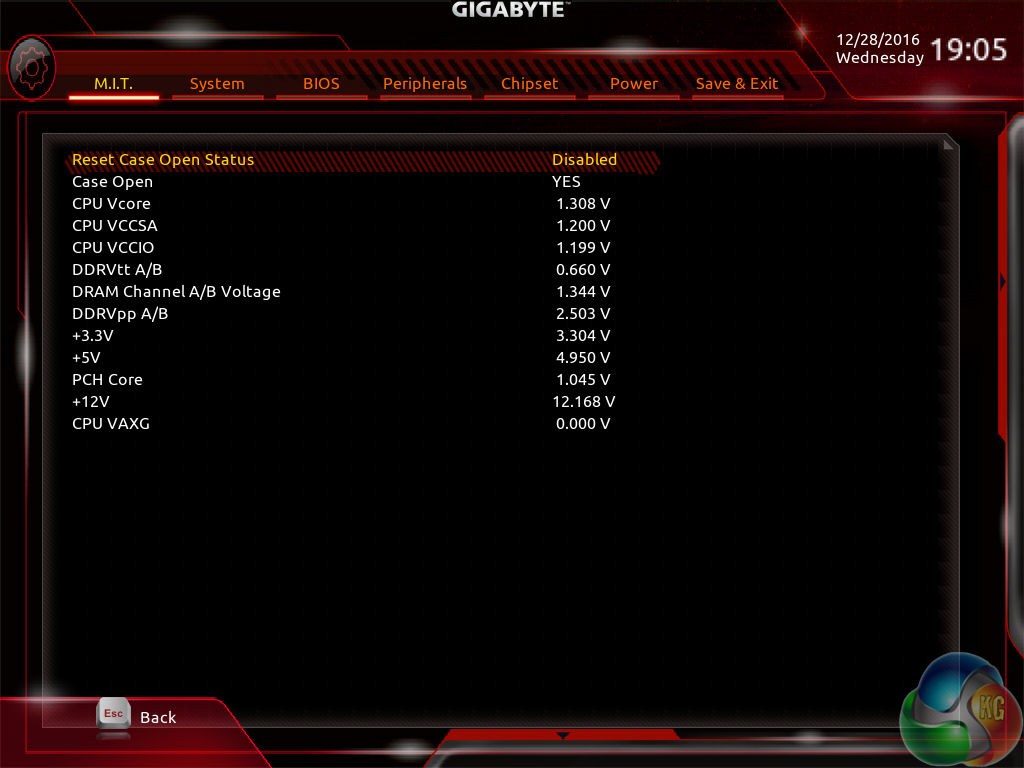
MIT is the main section where parameters relating to voltages, frequencies, and power settings for the system's main components are found. The Memory and Voltage sections are split from the Frequency subsection, which makes sense until one realises that an entire group of memory settings is replicated in both the Frequency and Memory subsections.
The subsection splitting does force a user to jump back and forth between pages but it also helps to keep the individual subsections tidy and without an overwhelming amount of information on one page (I'm looking at you, ASUS and MSI). Judging whether this sectioned layout or one where most settings are on a single page is better is down to individual preferences, as my colleague Ryan is not particularly fond of jumping between subsections but I personally prefer the segregation.
Standard, High, and Turbo LLC settings don't make any sense because there's no explanation (be it visual or written) as to how the voltage profile is adjusted with each mode. As it happens, our trial-and-error testing suggests that you should use the High LLC setting if you want CPU VCore to stay close to your applied numerical value without a significant overshoot (Turbo) or undershoot (Standard). Is this so hard for Gigabyte to write in the UEFI?
There is a help section on the right side of UEFI pages but it must be manually selected to be displayed. Competing motherboard vendors' approach of permanently displaying important information on the right side is better.
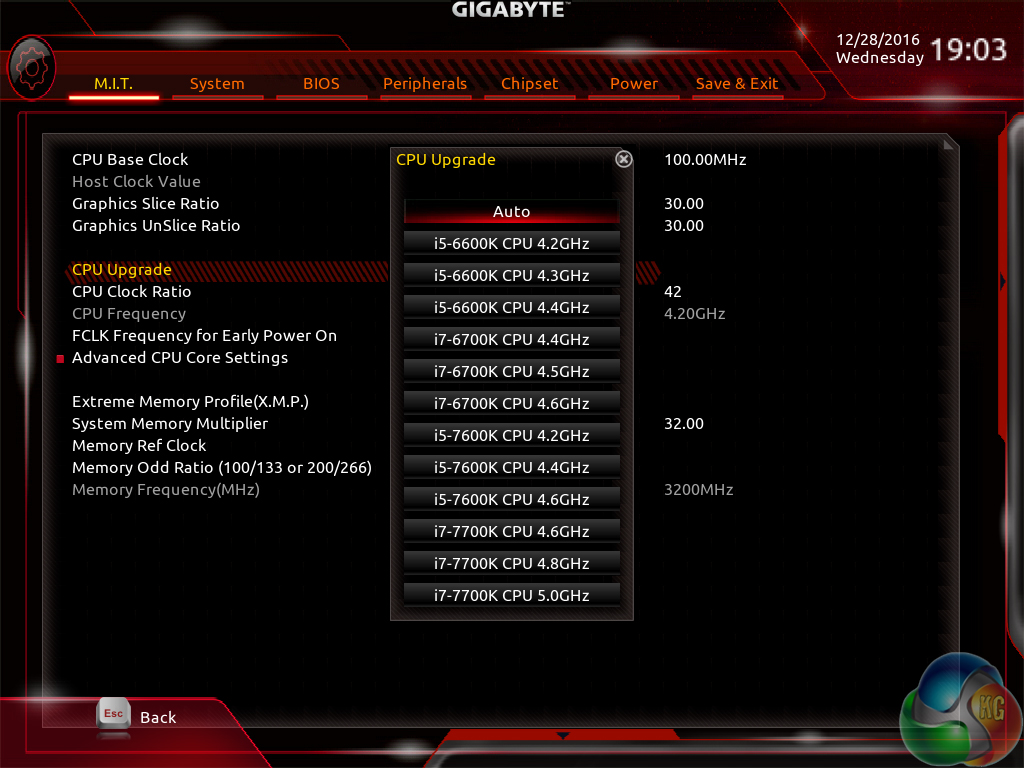
A dozen overclocking presets for Skylake and Kaby Lake unlocked i5 and i7 CPUs is great to see.
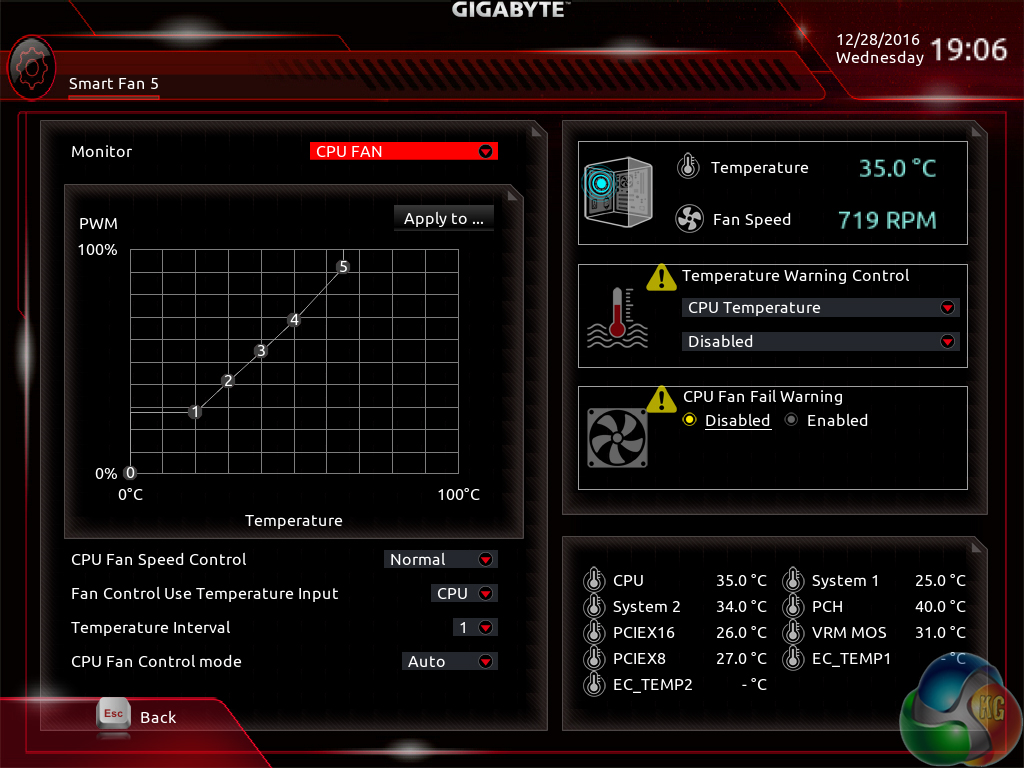
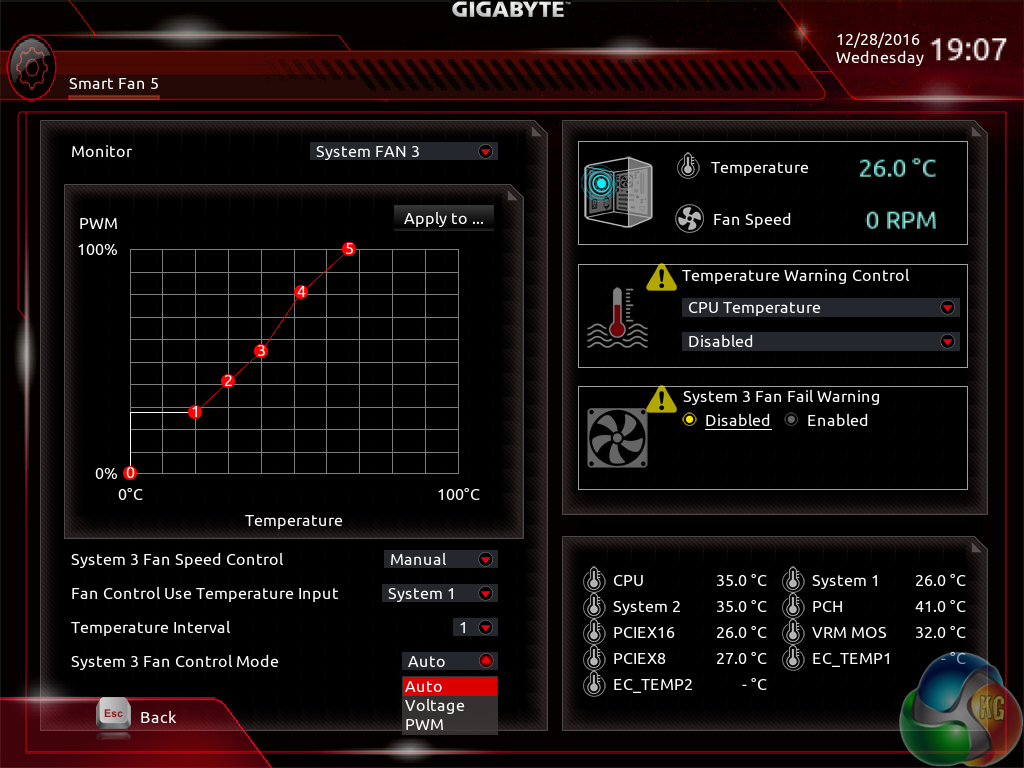
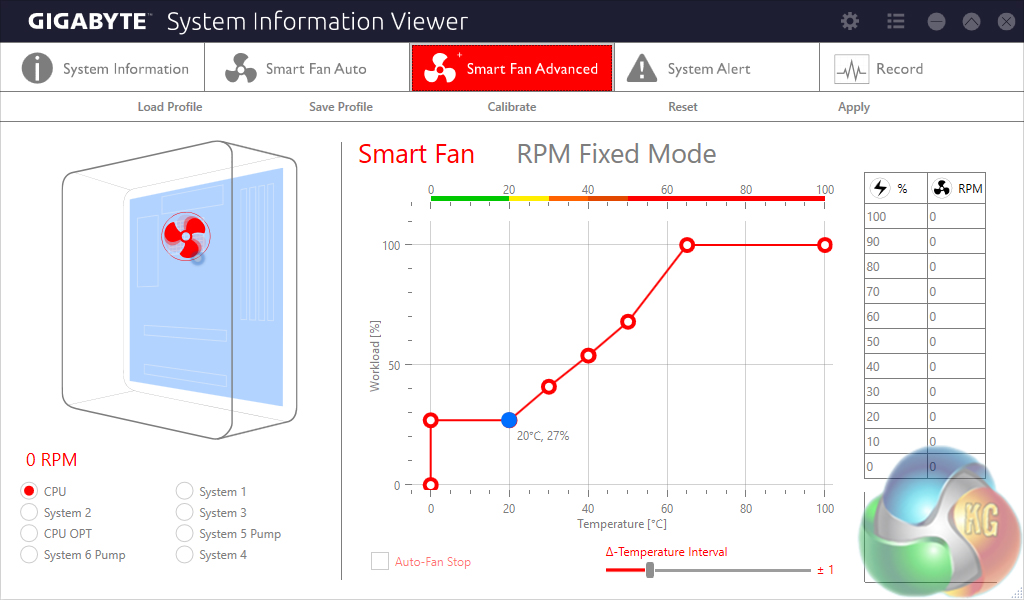
The Smart Fan 5 settings subsection can be accessed from the MIT page. This superb fan control system is the crown jewel for Gigabyte's Z270 UEFI.
All fan headers can be individually selected and their speed profiles can be tweaked. Gigabyte includes several preset fan speed control settings and a choice of temperature monitoring points. The headers can also be set to PWM or Voltage (DC) mode at will, which is ideal for feeding continuous current to a watercooling pump or letting PWM fans adjust in speed.
It's the manual fan speed tweaking mode where Smart Fan 5 really shows its worth. Six points on a graph can be used to create the fan speed curve. A level as low as 0% PWM speed down to 0°C is also supported, meaning that you can set the fan to switch off if the system is operating at ambient temperature (provided the fan is able to stop itself spinning).
I have also had positive experience of the motherboard automatically managing the speed profile of 3-pin and 4-pin PWM Noctua fans, as well as 4-pin PWM Cooler Master units.
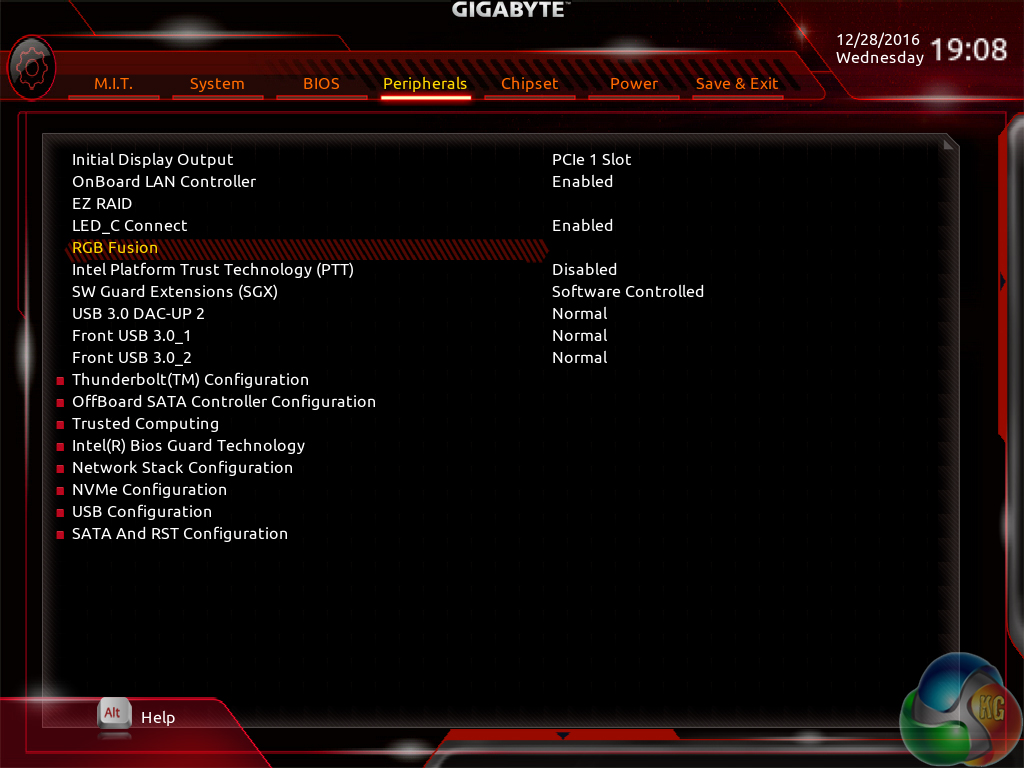
The Peripherals tab contains settings and information relating to onboard devices such as the SATA controller and NVMe configuration.
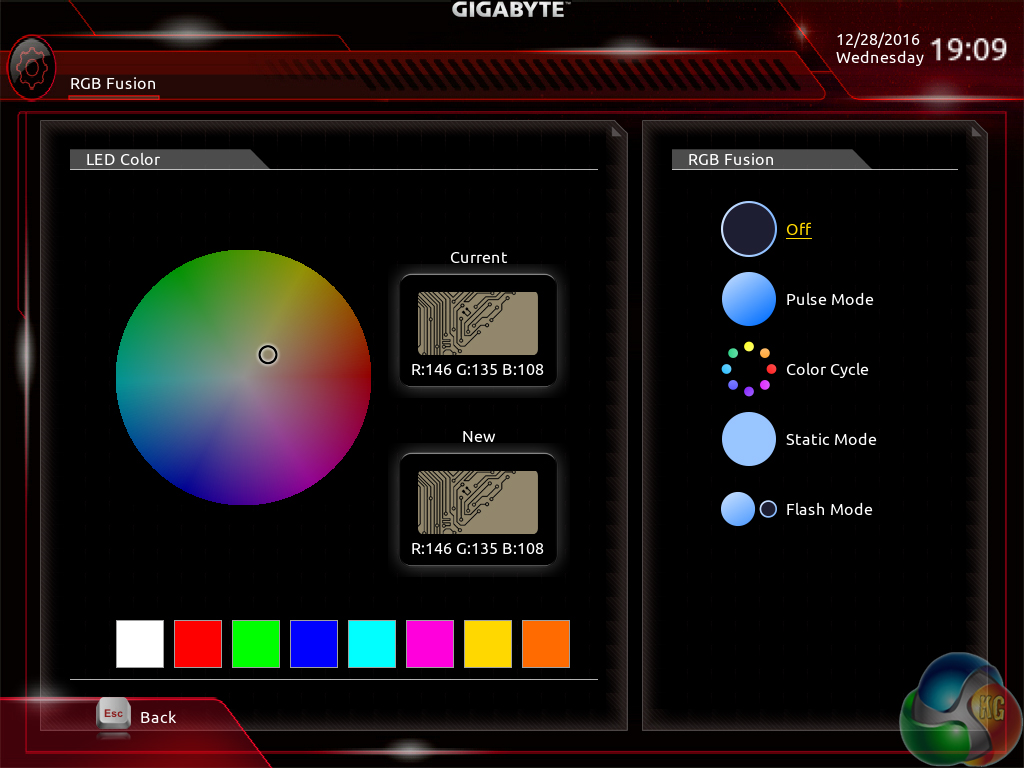
RGB Fusion is Gigabyte's basic UEFI-based LED colour control tool. Colours can be adjusted and the LED activation mode can be set, but that's about it. There is a limit to how complex the tool can be given its residence inside the UEFI and the OS version has greater functionality.
With that said, I like to see at least some form of LED control available in the UEFI as it helps to maintain user-defined parameters in the case of an OS reinstall or system corruption that damages the OS-based LED profiles.
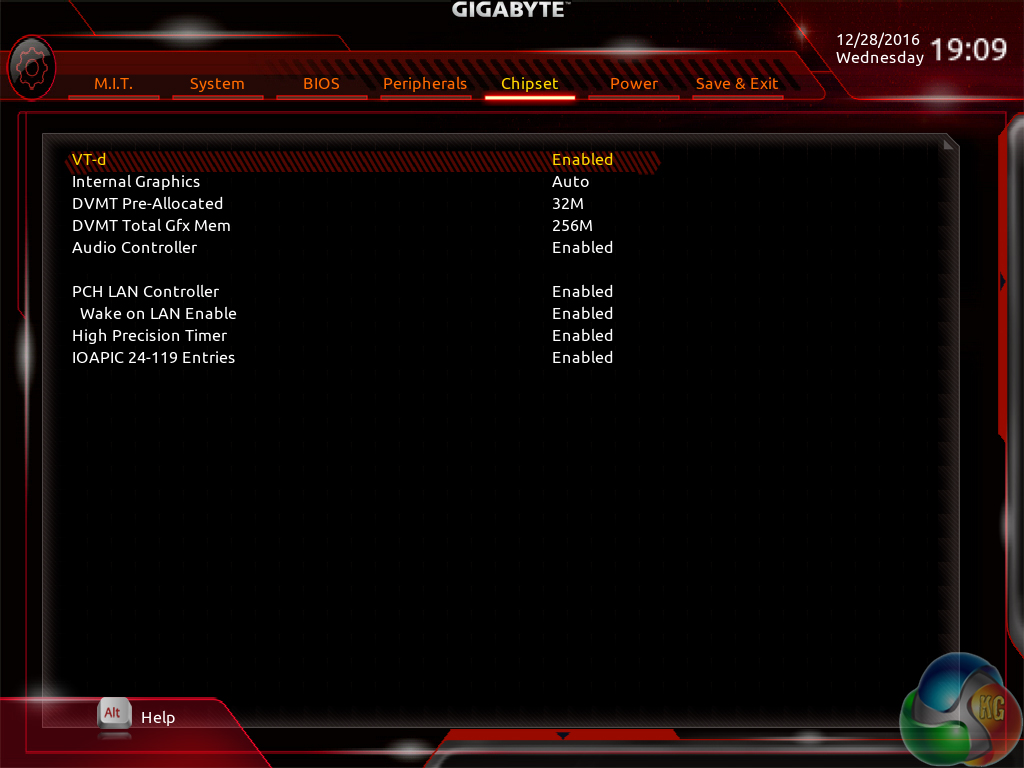
Settings relating to the internal graphics and virtualisation support, among others, can be tweaked in the Chipset page.
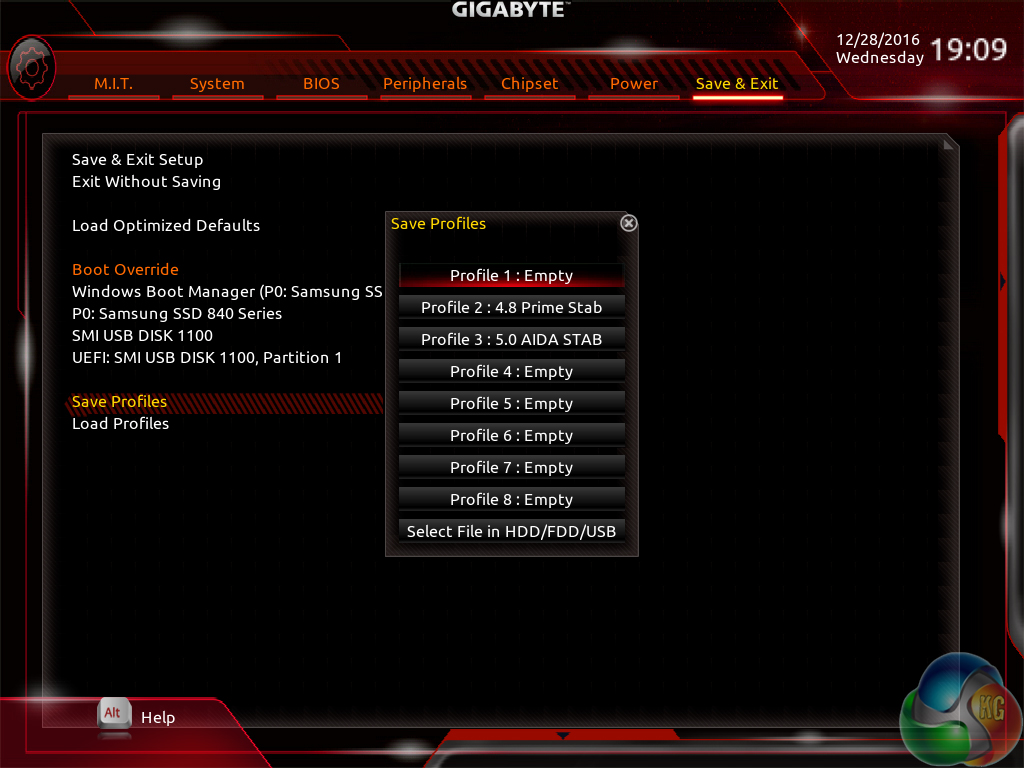
Up to 8 individual profiles can be saved to the board's internal memory. Further profiles can be transferred using a storage medium.
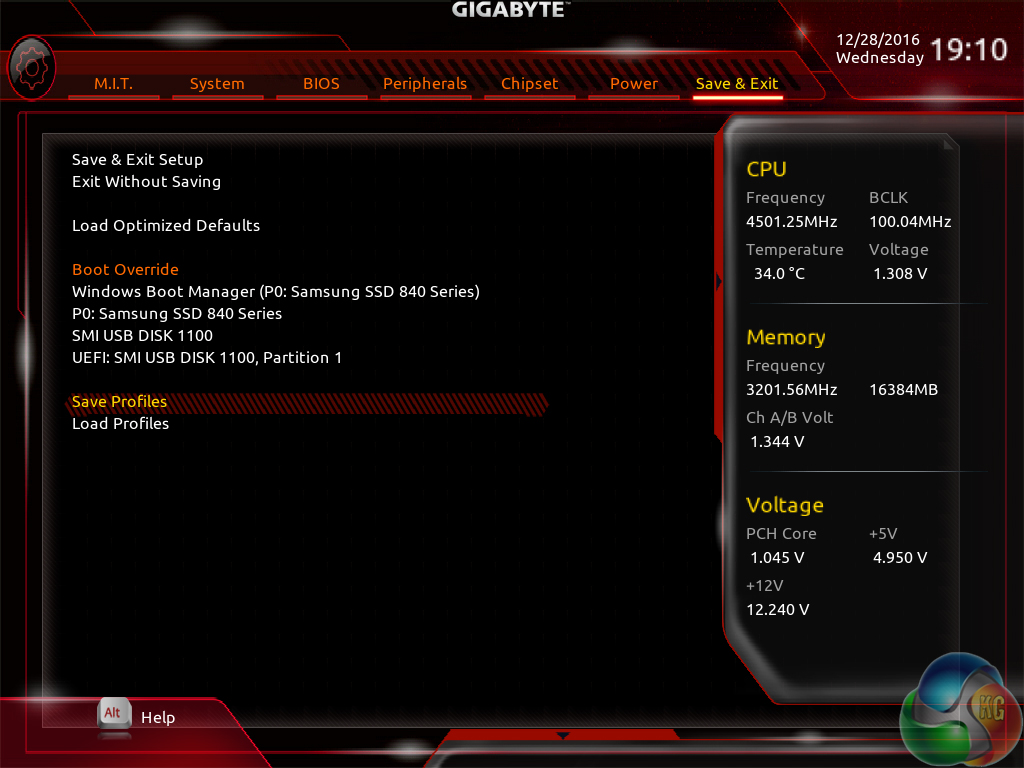
The profile manager is accessed through the Save & Exit page. I can see the logic in this location but I would prefer that the profiles were available in a more obvious section, perhaps MIT as this is where the bulk of parameter adjustment is conducted or BIOS as that would be logical.

Gigabyte's BIOS updating tool – Q-Flash – is accessed via a hidden tab on the bottom of the screen. I took a few minutes to find its location which was annoying as it would make more sense if there was some reference to it in one of the main pages, such as BIOS.
We were able to enter different folders within our USB drive using Q-Flash and then update the BIOS with ease. There's no internet-based BIOS update tool available through the Gigabyte UEFI, as we have seen some competing vendors offer.
UEFI Summary:
Good fan control options through Smart Fan 5 and an ability to control RGB LED settings, albeit in a basic manner, through RGB Fusion are positive points for Gigabyte's Z270 UEFI. The interface was stable throughout our testing and we didn't seem to be missing any glaring system tuning settings that limited our overclocking capabilities. That is, with the exception of LLC settings which make any sense or have an explanation tied to their operating mode.
Overall styling of the UEFI is older, less interactive, and far less appealing than the solutions by ASUS and ASRock in particular. I found myself relying upon the keyboard for parameter adjustments more than I do in competing UEFI implementations. There's no ‘special‘ UEFI feature like SSD Secure Erase with ASUS and MSI or ASRock's and MSI's System Browser and Board Explorer tools, respectively. And some tools are found in questionable locations (Profiles and Q-Flash).
Gigabyte's current Z270 UEFI is certainly a major improvement over the implementation seen on the early X99 boards and the Easy Mode page is a nice addition over Z170. But there's no denying that further work is required if Gigabyte wants a UEFI implementation that can wholeheartedly compete with those of ASRock, ASUS, and MSI in more than a small number of select areas. With that said, fan control functionality is superb and that may be enough of a positive for users to overlook the other negatives.
Software
The software used for Gigabyte's Aorus Z270X-Gaming K5 is almost identical to that available for the Gaming 7. As such, we have re-used the bulk of our analysis from that review and updated the text where there are subtle differences.
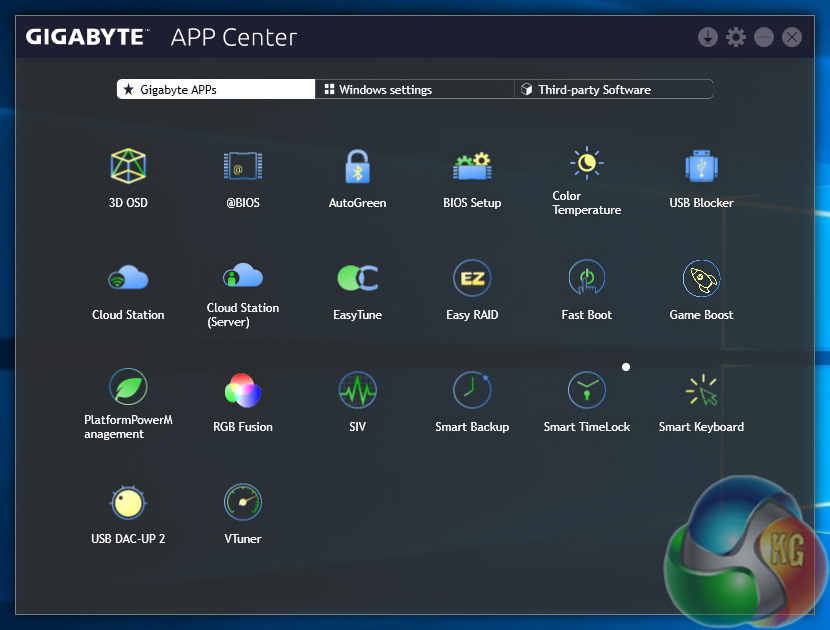
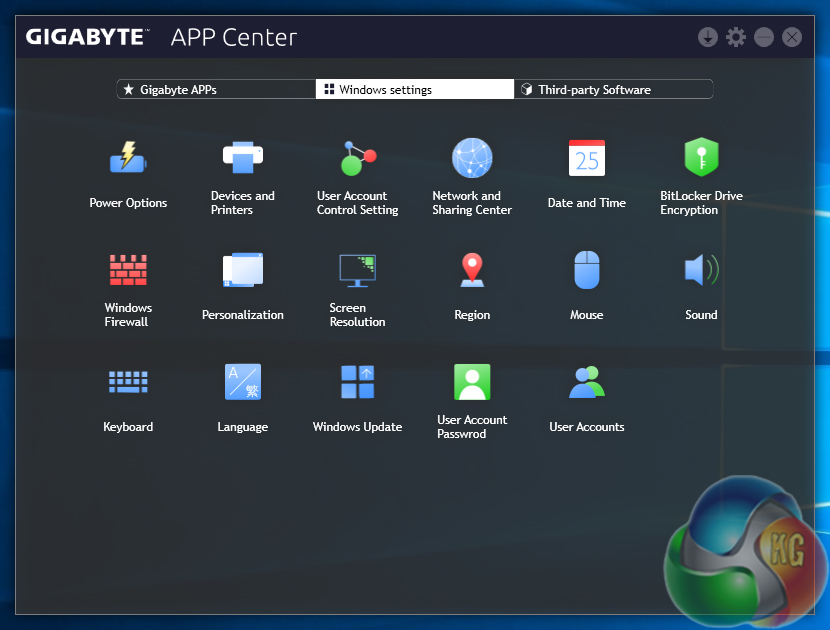
Gigabyte makes a vast number of software utilities available for installation with its Z270 motherboards. Thankfully, not all the tools have to be installed and APP Center is a very good method of managing the selected software, as well as third-party apps and Windows settings.
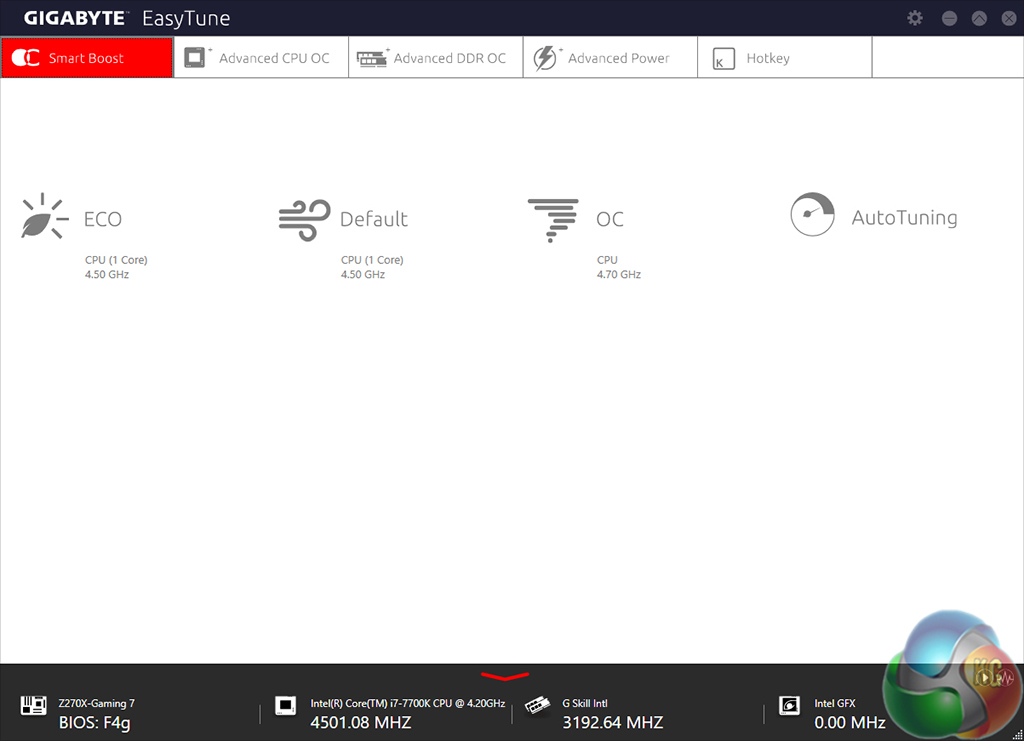
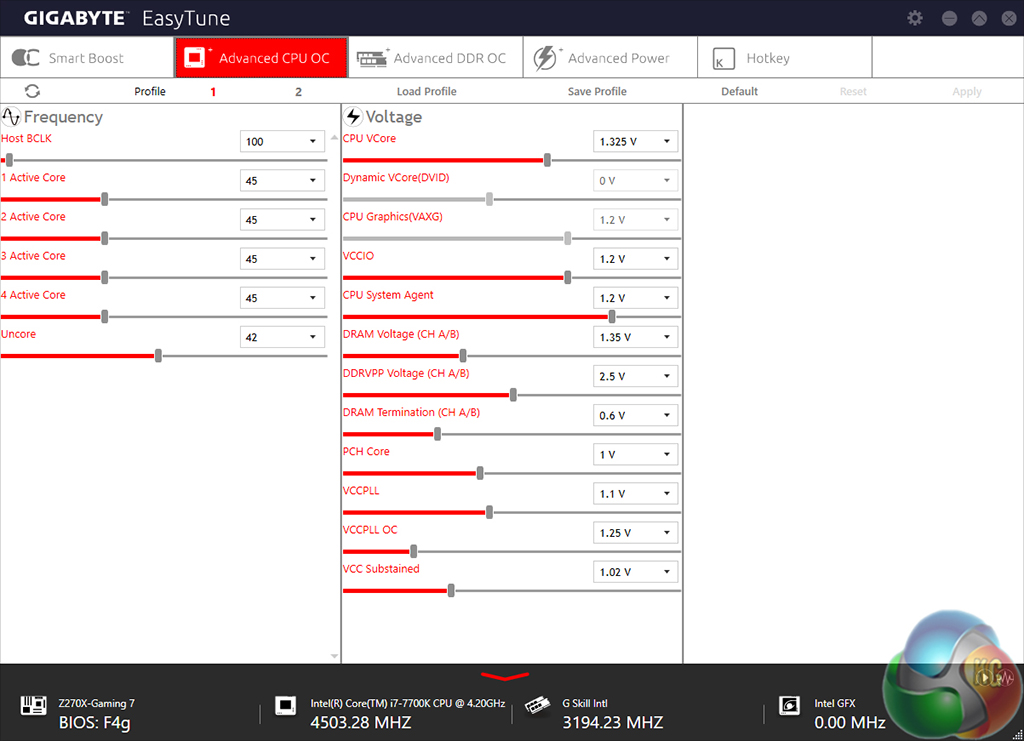
EasyTune is Gigabyte's tool for managing system operating parameters. The performance profile of the system can be adjusted using EasyTune and there's also the option to conduct automated system tuning.
Other system settings such as voltages, speeds, and ratios can also be adjusted and saved into profiles.
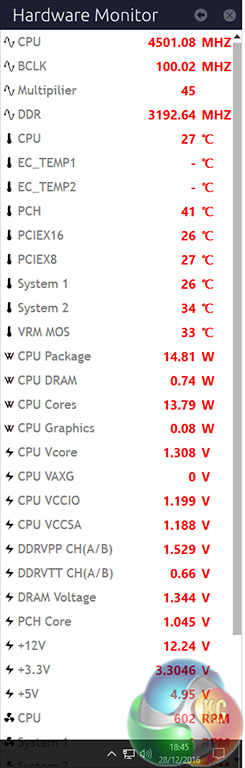
EasyTune Hardware Monitor break-out tab is an excellent way of reading a wealth of system information while inside the OS. The sheer quantity of information displayed is superb and we confirmed CPU VCore accuracy to be good when tested against a physical multimeter reading.

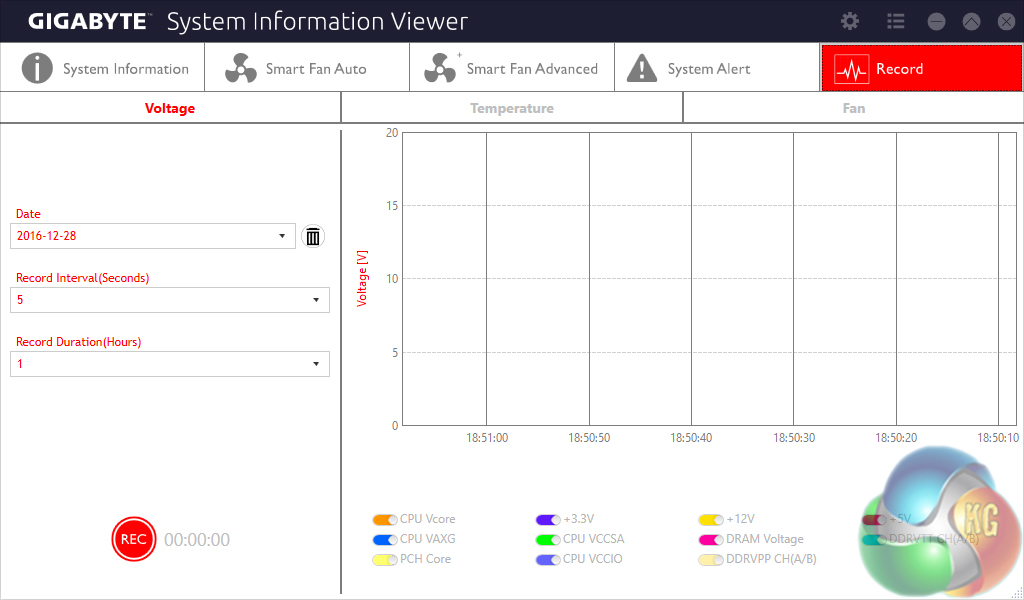
System Information Viewer (SIV) is a similar setup to EasyTune but it is geared towards fan control and system monitoring. Four fan speed profiles can be selected and manual fan control ability is provided in great detail. An 8-point curve can be set for all the motherboard's fan headers or, alternatively, an RPM-fixed mode can be applied (which custom liquid cooling enthusiasts may appreciate).
System recordings relating to voltages, temperatures, and fan speeds can also be made. This is particularly useful for analysing stability in the form of checking how your system behaves during an extended gaming or video rendering session, for example.
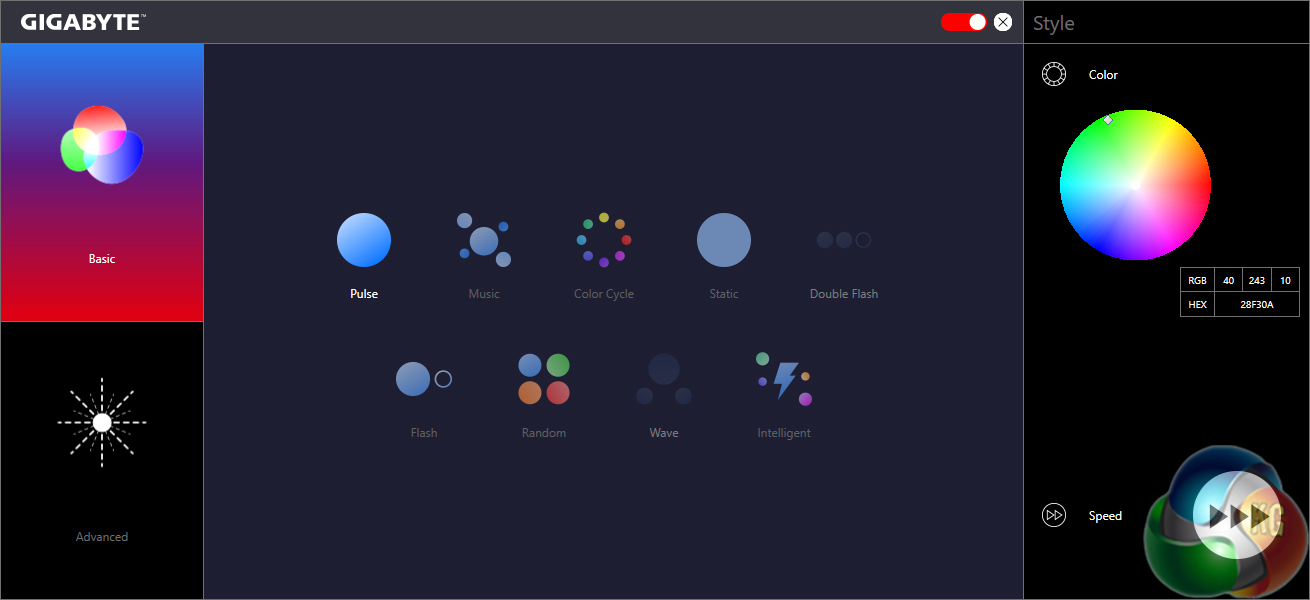
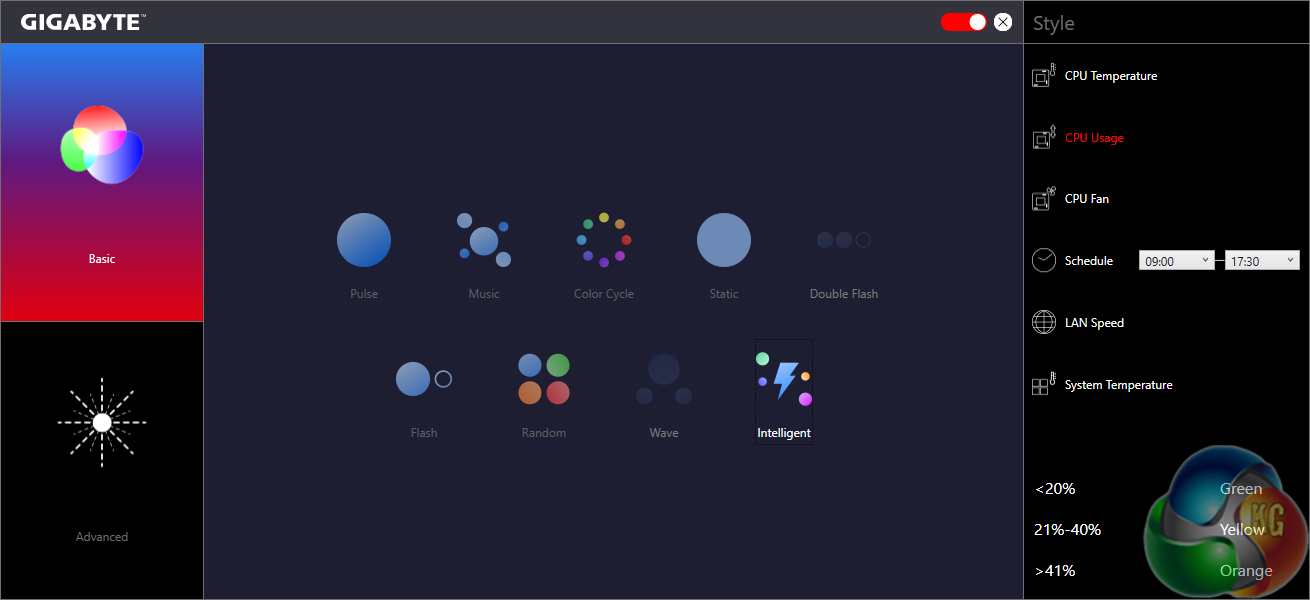
RGB Fusion is Gigabyte's in-depth LED control application. The Basic tab can be used to activate different LED operation modes and also tweak the RGB behaviour. I was particularly fond of the Intelligent mode which adjusts the LED colour profile based on statistics such as the CPU temperature or load, the LAN speed, or even a time schedule.
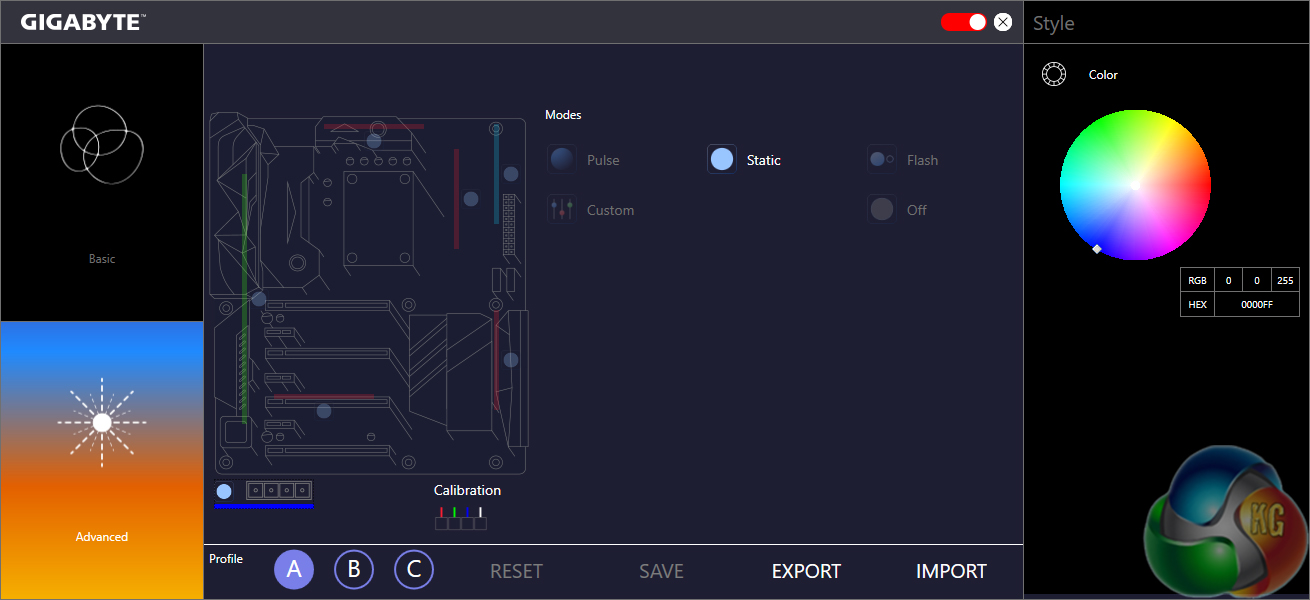
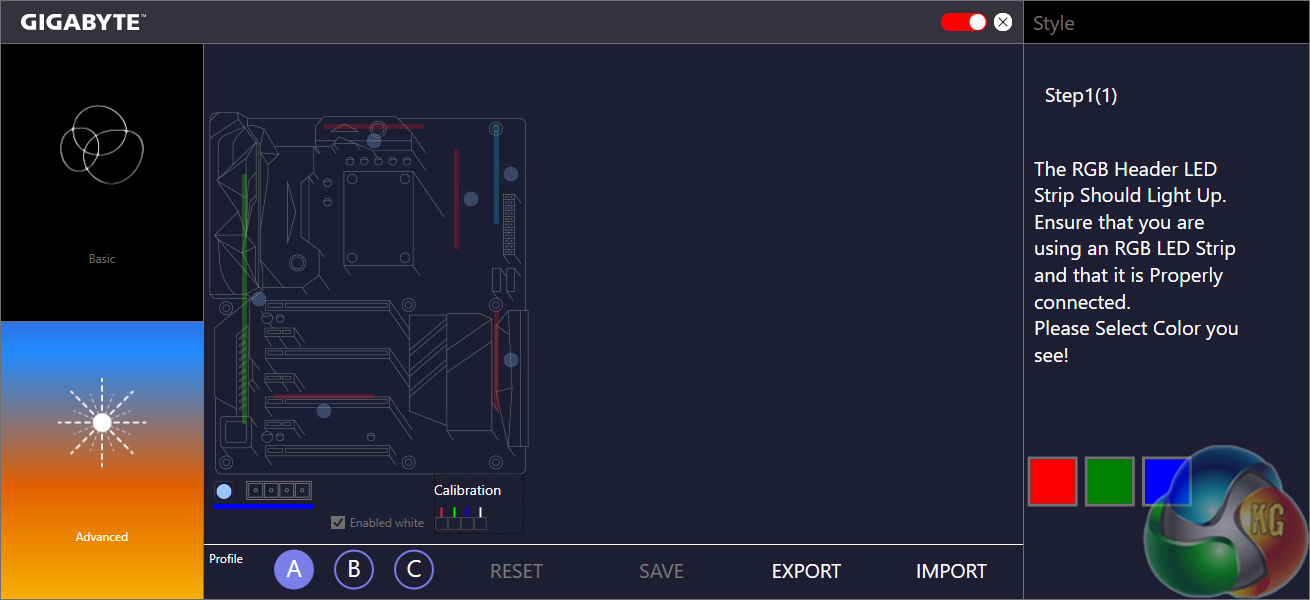
The Advanced section gives a greater degree of LED control, allowing users to adjust the lighting colour and behaviour for the board's numerous individual zones (and RGB header). The Z270X-Gaming K5 differs to its Gaming 7 brother in its ability to only change the single colour applied to each of the board's lighting zones, not individual colours for individual zones. The RGB strip can, however, be set as a different colour to the motherboard. A calibration tool is available for Gigabyte's unique 5-pin RGB header, allowing greater compatibility on the fragmented RGB LED strip market.
Three individual LED profiles can be saved and they can be exported/imported to share with friends or for backup purposes. RGB Fusion has the ability to control the LED profiles of partnering hardware such as an RGB-enabled graphics card.
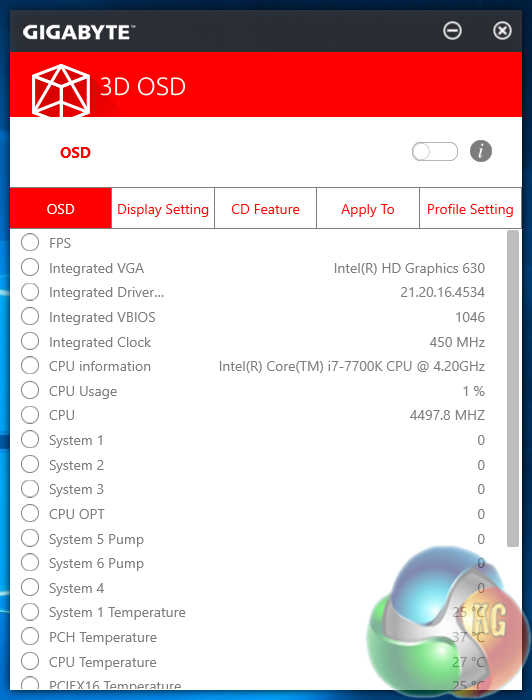
Focussing on some of the more useful tools, 3D OSD is a RivaTuner-like application that can be used to overlay system information on the screen. I don't see the need for this feature when RivaTuner is freely available alongside MSI Afterburner but it may prove useful for some people, nonetheless.
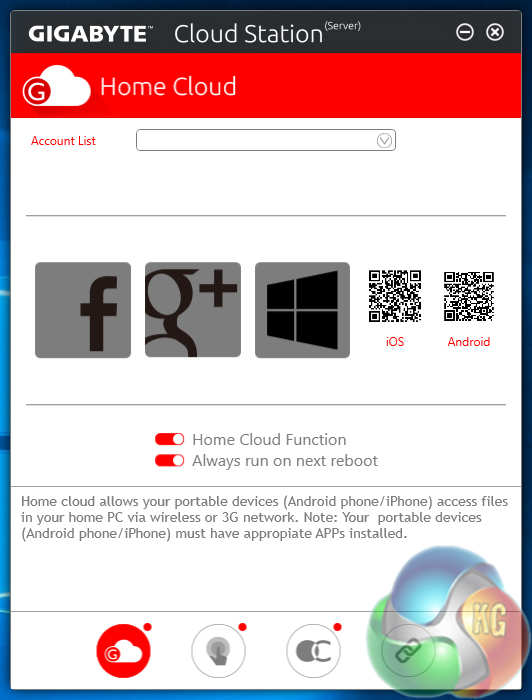
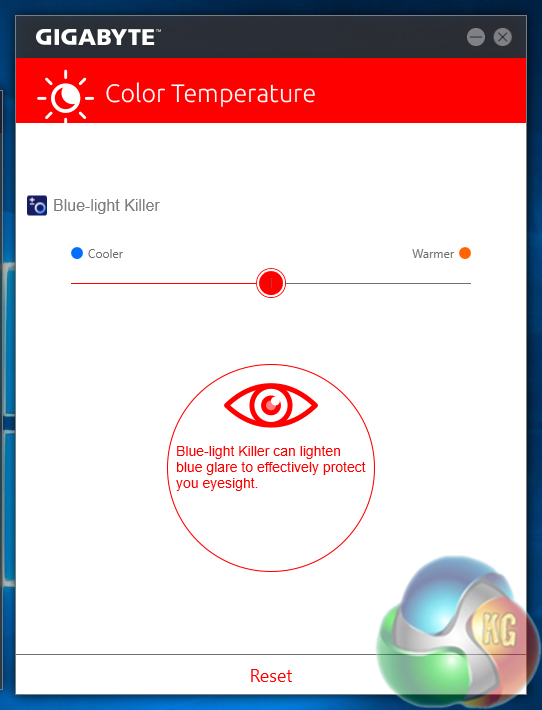
HomeCloud is a tool for allowing other devices to access your system's files. Color Temperature can be used to adjust the blue-light profile of one's monitor. I tested this feature with a basic BenQ G2222HDL monitor and it worked well.
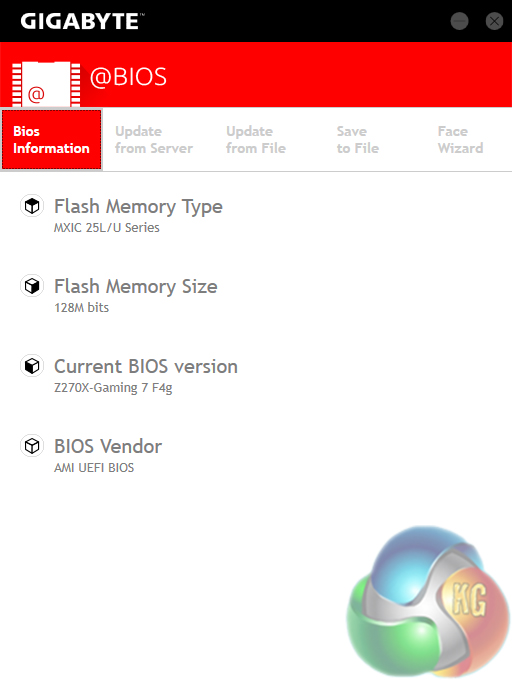
@BIOS makes up for limited UEFI-based updating methods with an ability to update the BIOS from an online server. BIOS information can also be used and the profile can be saved, both of which are useful troubleshooting and general usage features.

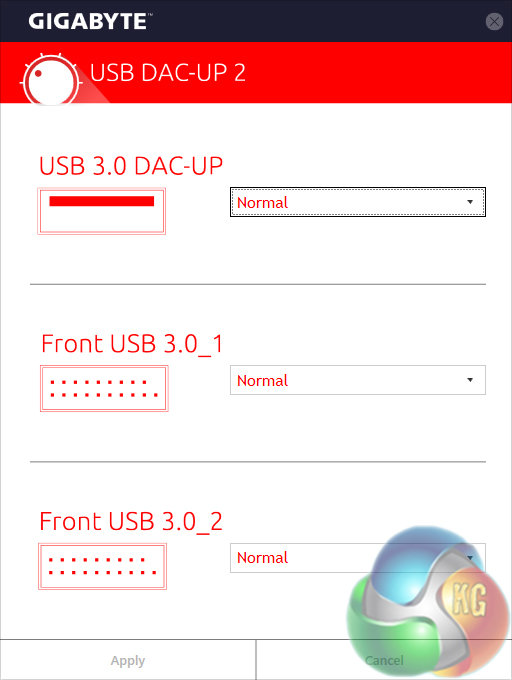
As the name suggests, EZ RAID is a simple tool for creating a software RAID array inside the OS. USB DAC-UP 2 can change the settings of certain USB ports in order to suit a user's preference with their audio hardware.
OS Software Summary:
Gigabyte's variety of available software tools is superb and the system for managing them through APP Center is smart and efficient.
EasyTune works well and the Hardware Monitor break-out tab provides a wealth of usable system readings. SIV is excellent for controlling fan speeds through an easy-to-use OS-based interface.
RGB Fusion is excellent and gives users a sizeable amount of flexibility for tuning their system's lighting conditions. The LED-adjusting tool is actually as good as ASUS' AURA software in general, and better in some respects (re-mappable RGB header pins, and the Intelligent RGB modes).
It's difficult to find criticism for Gigabyte's selection of OS-based software. Perhaps the only negative point that strikes me is that the apps border a little on the resource-heavy side and seemed to have a minor effect on performance numbers. Oh, and some form of RAM drive software tool would have been a nice addition.
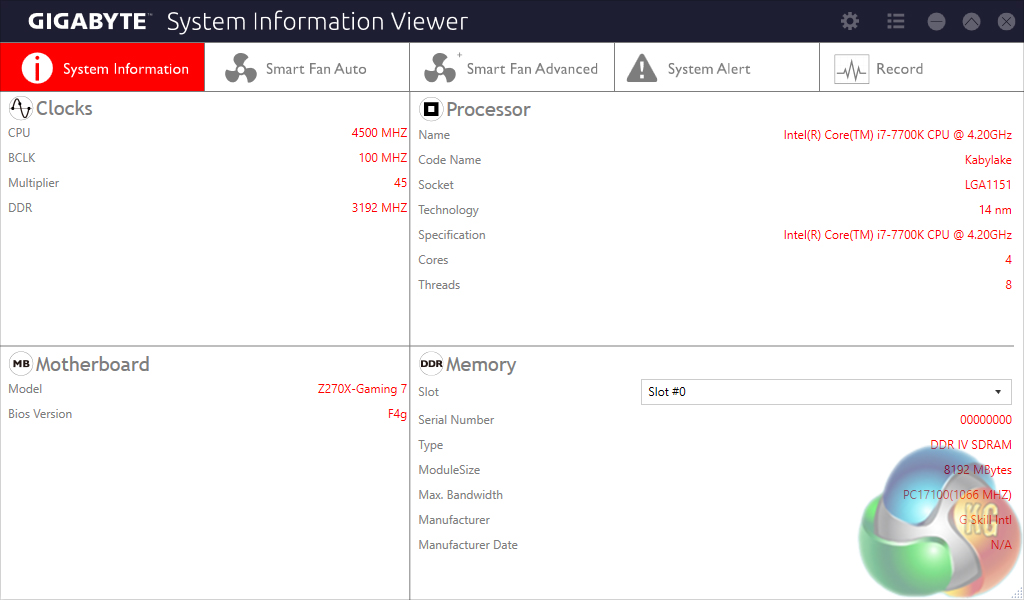
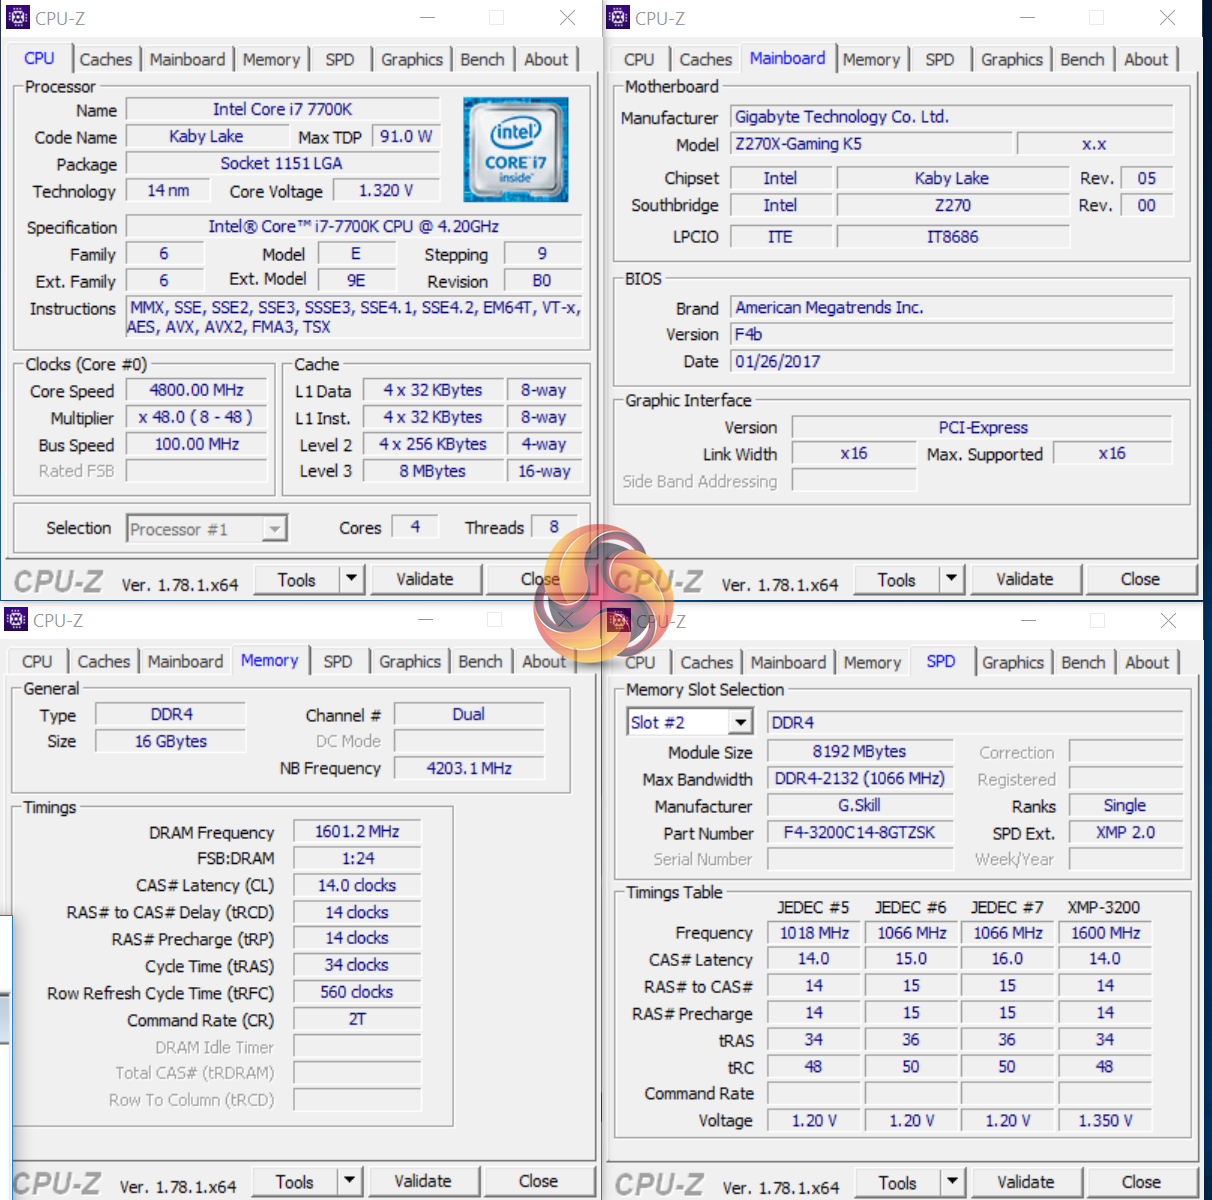
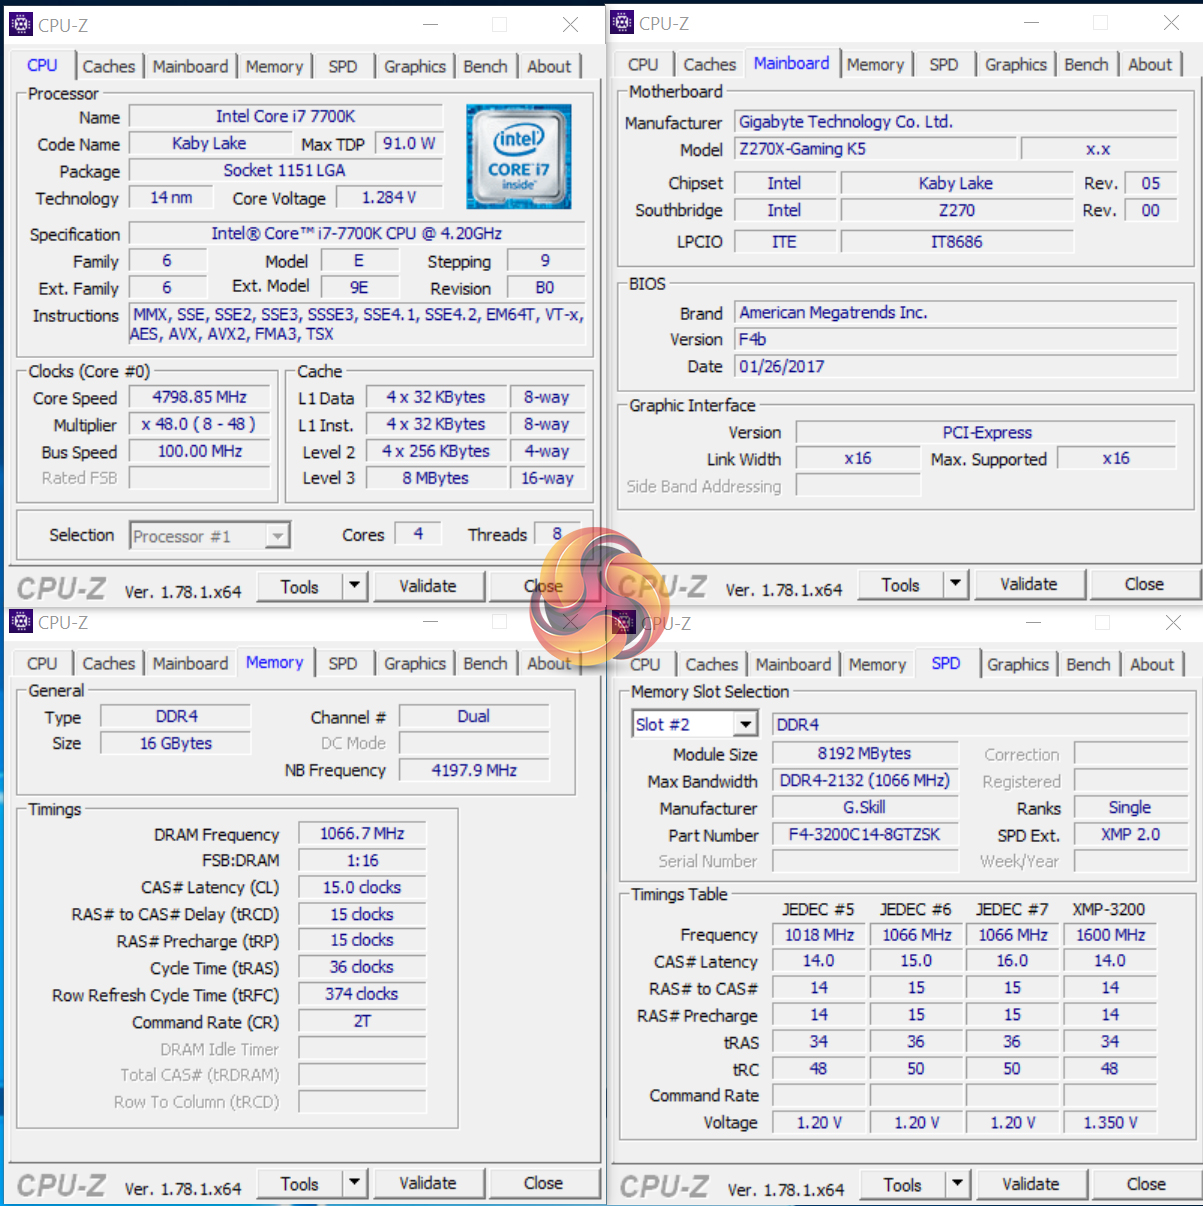
We will be outlining the Gigabyte Aorus Z270X-Gaming K5 motherboard’s performance with the Core i7 7700K CPU and 16GB of 3200MHz G.Skill TridentZ DDR4 memory.
By default, the Gigabyte Aorus Z270X-Gaming K5 motherboard applies a multi-core turbo (MCT) state and forces the 7700K to a constant 4.5GHz when XMP is enabled. Overclocked performance will be outlined later in the review.

Stock MCT voltage hovered around 1.225 under Prime 95 load (sometimes a few hundredths of a volt higher). This was using the latest F4b BIOS which seems to have addressed the high stock (MCT) VCore levels observed with the Gaming 7.
Good job, Gigabyte. This level of voltage doesn't give us any longevity concerns and can be cooled with a decent performance air cooler or better.
Z270 Motherboard Test System:
- Processor: Intel Core i7 7700K (4.5GHz Forced Turbo).
- Memory: 16GB (2x8GB) G.Skill TridentZ 3200MHz 14-14-14-34 DDR4 @ 1.35V.
- Graphics Card: Nvidia GTX Titan X Pascal (custom fan curve to eliminate thermal throttling).
- System Drive: 500GB Samsung 840 SATA 6Gbps SSD.
- Games Drive: 960GB SK Hynix SE3010 SATA 6Gbps SSD.
- CPU Cooler: Corsair H110i GT.
- Power Supply: Seasonic Platinum 760W SS-760XP.
- Operating System: Windows 10 Pro 64-bit (Anniversary Update).
Compared Z270 Motherboards:
- ASRock Fatal1ty Z270 Gaming K6.
- ASUS STRIX Z270F Gaming.
- Gigabyte Aorus Z270X-Gaming 7.
- MSI Z270 Gaming Pro Carbon.
Software:
- Gigabyte Aorus Z270X-Gaming K5 BIOS F4b (latest).
- GeForce 376.19 VGA drivers.
Tests:
- Cinebench R15 – All-core CPU benchmark (CPU)
- HandBrake 0.10.5 – Convert 6.27GB 4K video recording using the Normal Profile setting and MP4 container (CPU)
- SiSoft Sandra 2016 SP1 – Processor Arithmetic Test (CPU) and Memory Bandwidth Test (Memory)
- 7-Zip 16.04 – Built-in 7-Zip benchmark test (CPU & Memory)
- 3DMark Fire Strike v1.1 – Fire Strike (1080p) test (Gaming)
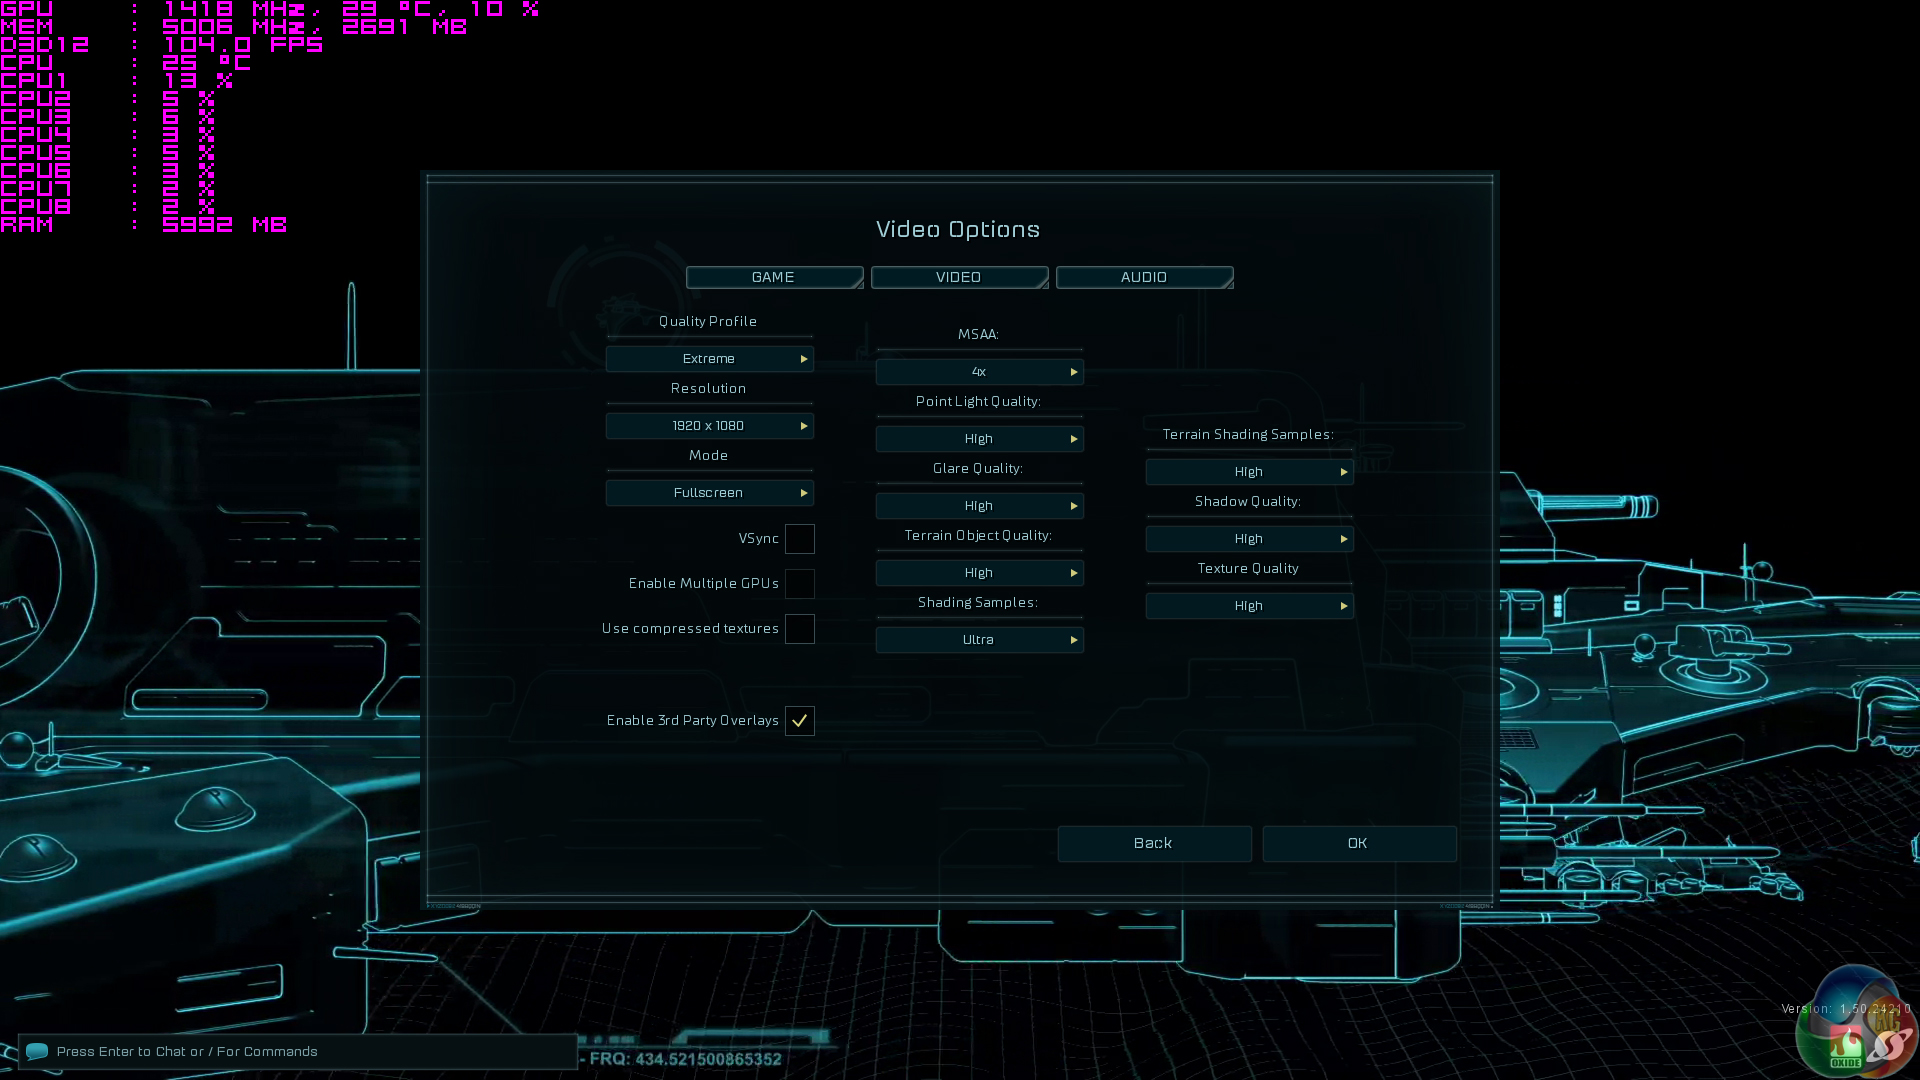
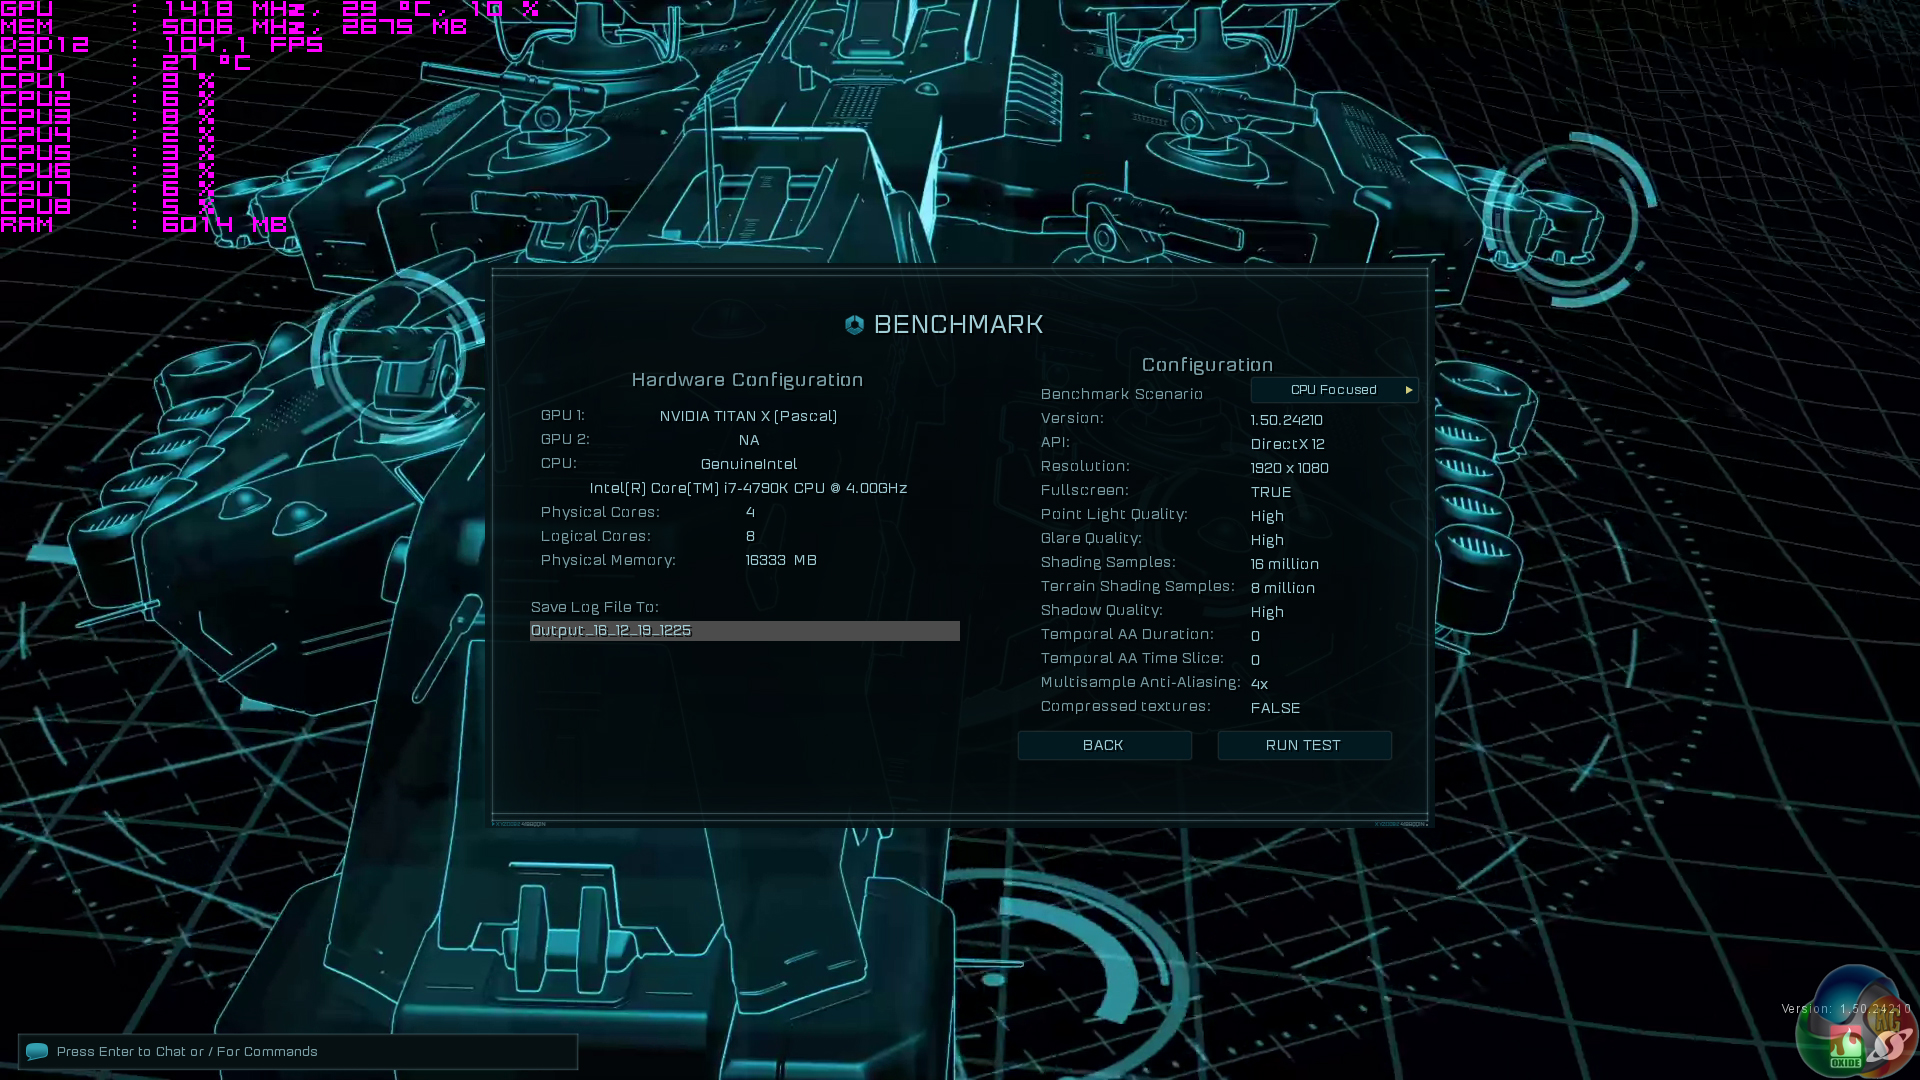
- Ashes of the Singularity – Built-in benchmark tool CPU-Focused test, 1920 x 1080, Extreme quality preset, DX12 version (Gaming)
- Grand Theft Auto V – Built-in benchmark tool, 1920 x 1080, Maximum quality settings, Maximum Advanced Graphics (Gaming)
- Metro: Last Light Redux – Built-in benchmark tool, 1920 x 1080, Very High quality, SSAA, AF 16X, Tessellation: High (Gaming)
- ATTO – M.2, USB 3.1, and SATA 6Gbps transfer rates (Motherboard)
- RightMark Audio Analyzer – Record and playback test using a line-in to line-out loopback with a 3.5mm audio cable (Motherboard)
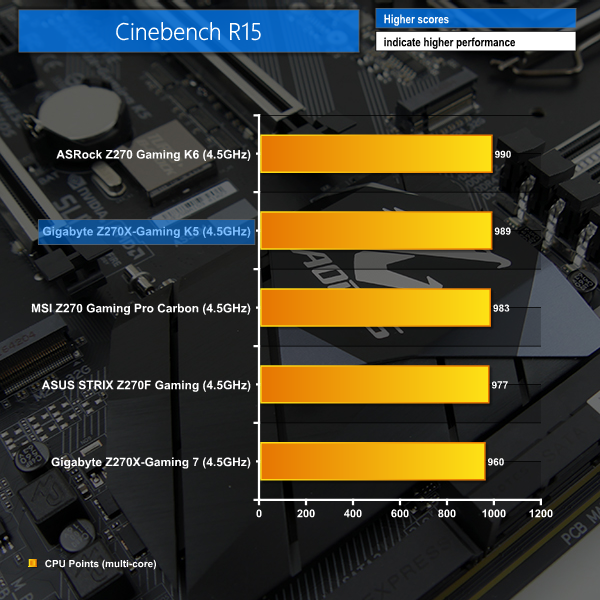
Cinebench R15
Cinebench is an application which renders a photorealistic 3D scene to benchmark a computer’s rendering performance, on one CPU core, all CPU cores or using the GPU. We run the test using the all core CPU mode.
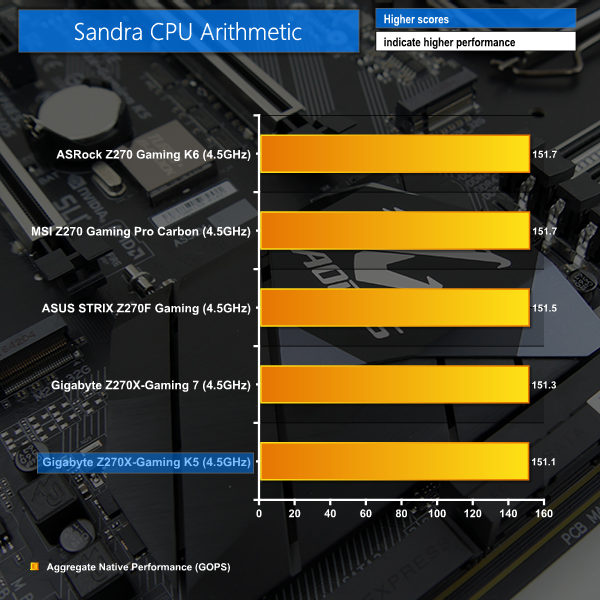
Sandra Processor Arithmetic
SiSoft Sandra 2016 is a multi-function utility program that supports remote analysis, benchmarking and diagnostic features for PCs, servers, mobile devices and networks. We run the application’s processor arithmetic test to gauge the CPU performance on each tested motherboard.
Handbrake Conversion
Handbrake is a free and open-source video transcoding tool that can be used to convert video files between different codecs, formats and resolutions. We measured the average frame rate achieved for a task of converting a 6.27GB 4K video using the Normal Profile setting and MP4 container. The test stresses all CPU cores to 100% and shows an affinity for memory bandwidth.
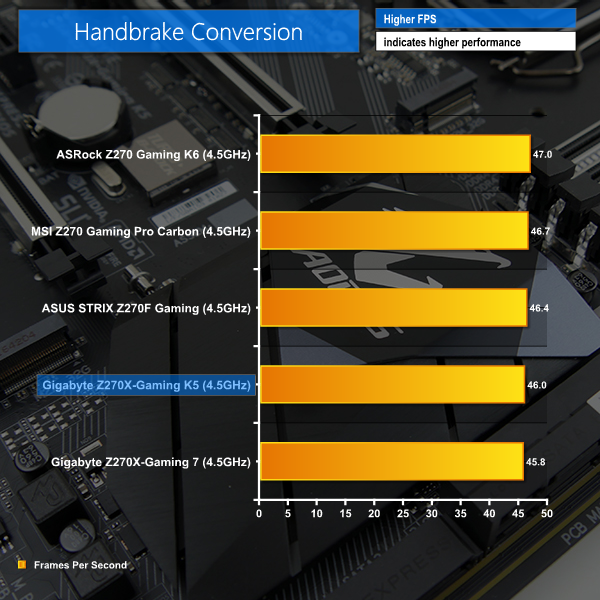
CPU performance from the Z270X-Gaming K5 does not highlight any cause for concern. Cinebench scores highly while the Handbrake and Sandra processor arithmetic numbers position the Aorus board closer to the chart's bottom. But the differences between each board are very minor.
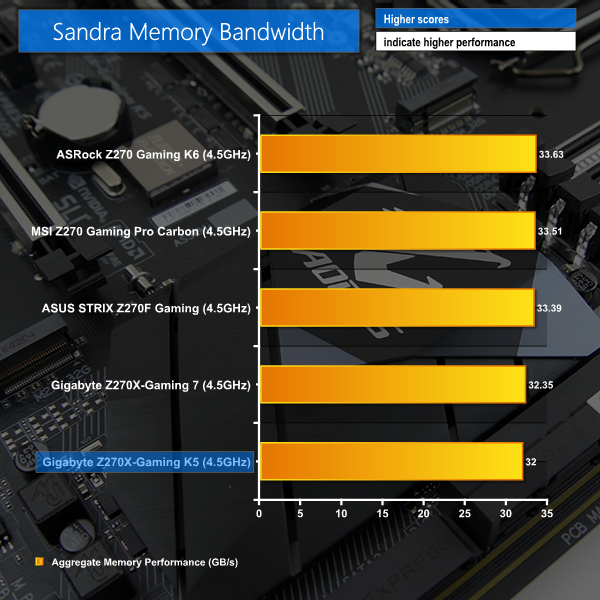
Sandra Memory Bandwidth
SiSoft Sandra 2016 is a multi-function utility program that supports remote analysis, benchmarking and diagnostic features for PCs, servers, mobile devices and networks. We use the SiSoft Sandra memory bandwidth test to provide a set of memory bandwidth results.
7-Zip
7-Zip is an open source Windows utility for manipulating archives. We measure the Total Rating performance using the built-in benchmark tool. The test stresses all CPU cores to 100% and shows an affinity for memory bandwidth.
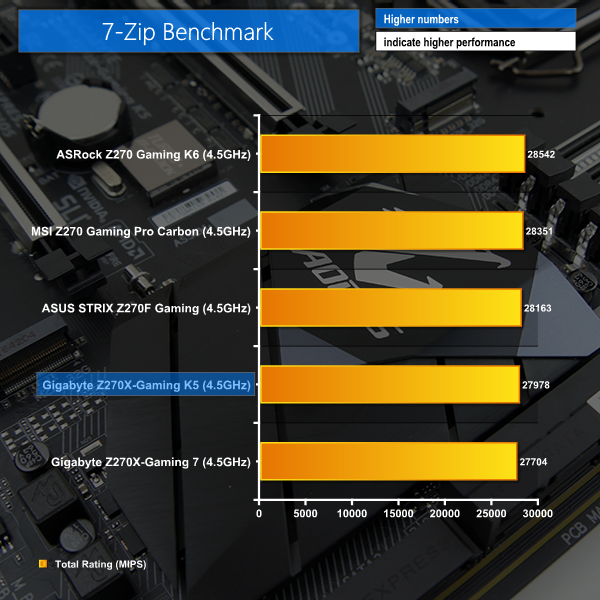
Memory bandwidth performance falls off the pace a little for the Gaming K5. This has a minor impact on the 7-Zip score, although the performance drop-off is realistically unnoticeable (less than 1%).
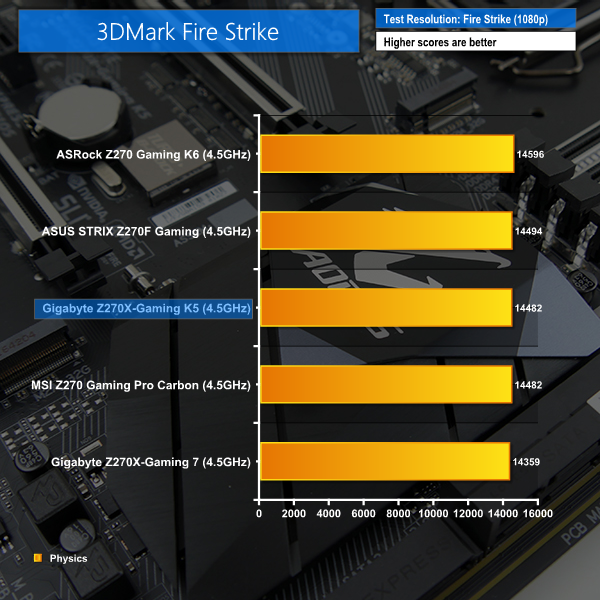
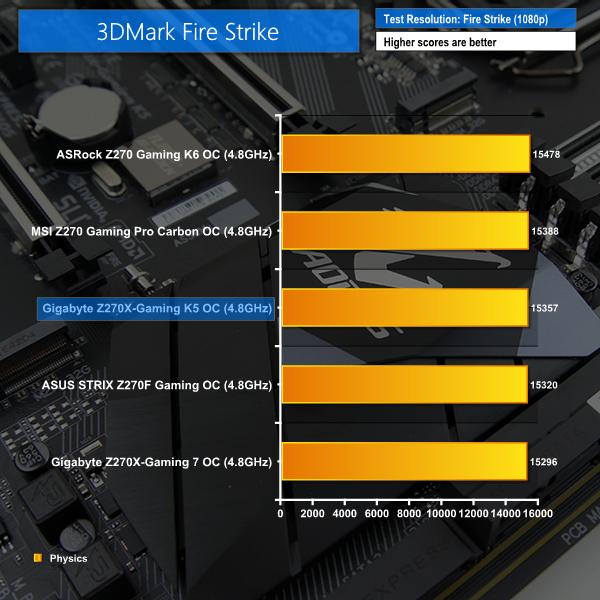
3DMark
3DMark is a multi-platform hardware benchmark designed to test varying resolutions and detail levels of 3D gaming performance. We run the Windows platform test and in particular the Fire Strike benchmark, which is indicative of high-end 1080p PC Gaming.
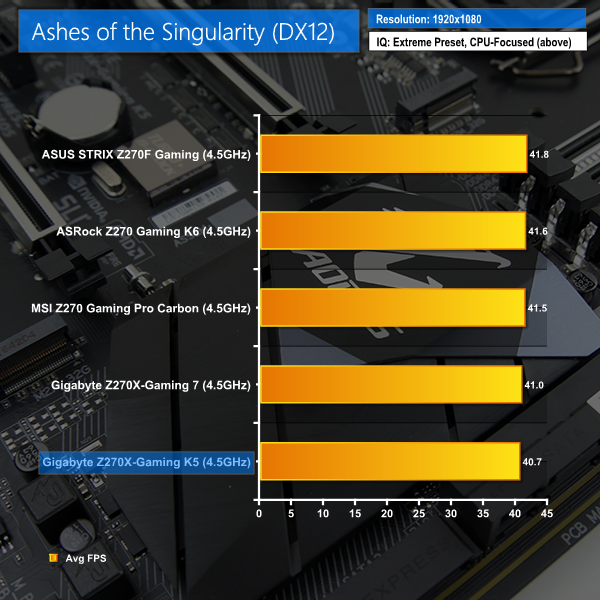
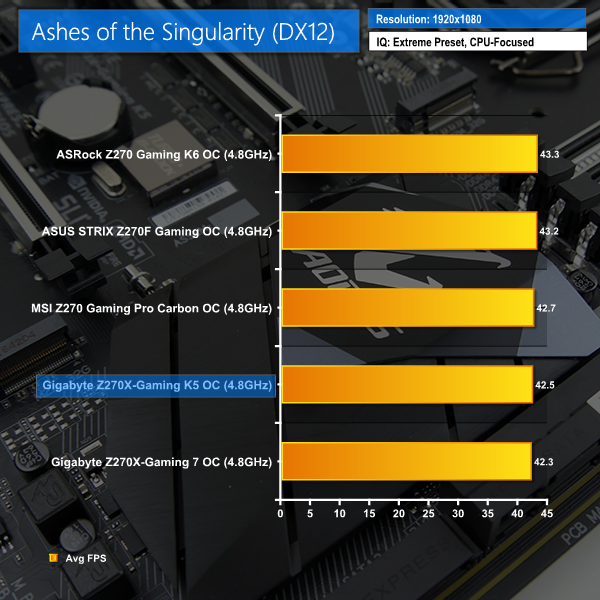
Ashes of the Singularity
Ashes of the Singularity is a Sci-Fi real-time strategy game built for the PC platform. The game includes a built-in benchmark tool and was one of the first available DirectX 12 benchmarks. We run the CPU-focused benchmark using DirectX 12, a 1080p resolution and the Extreme quality preset.
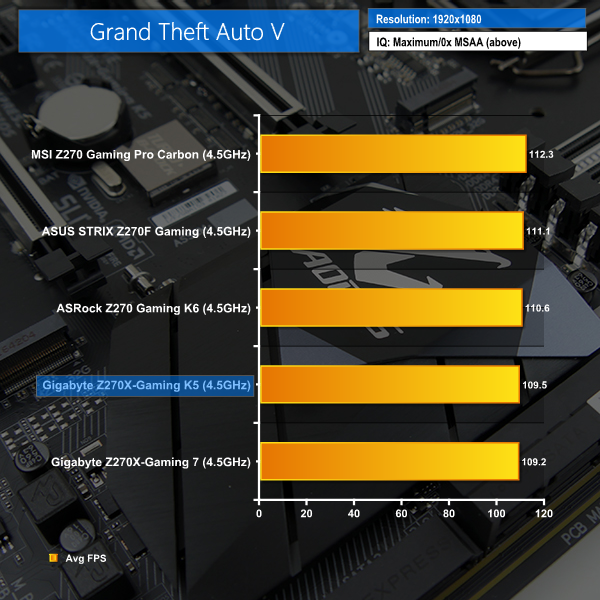
Grand Theft Auto V
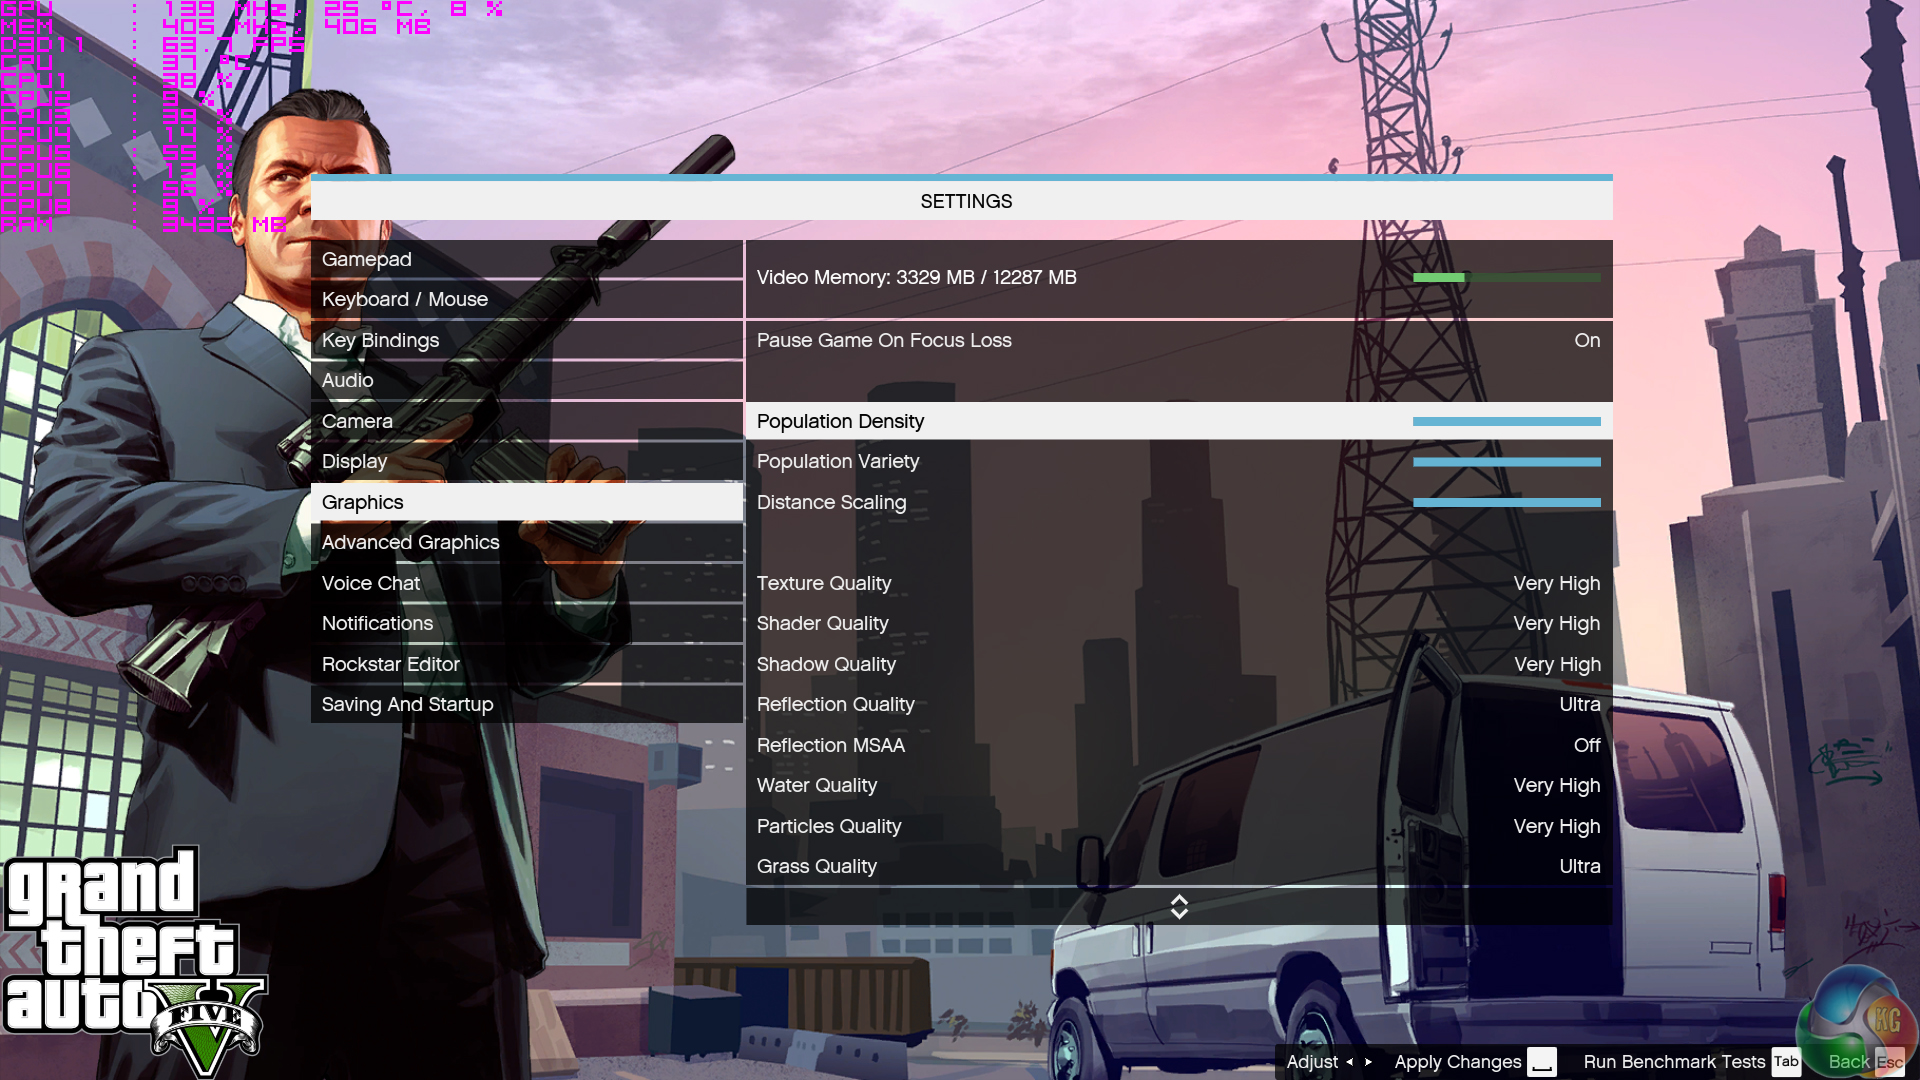
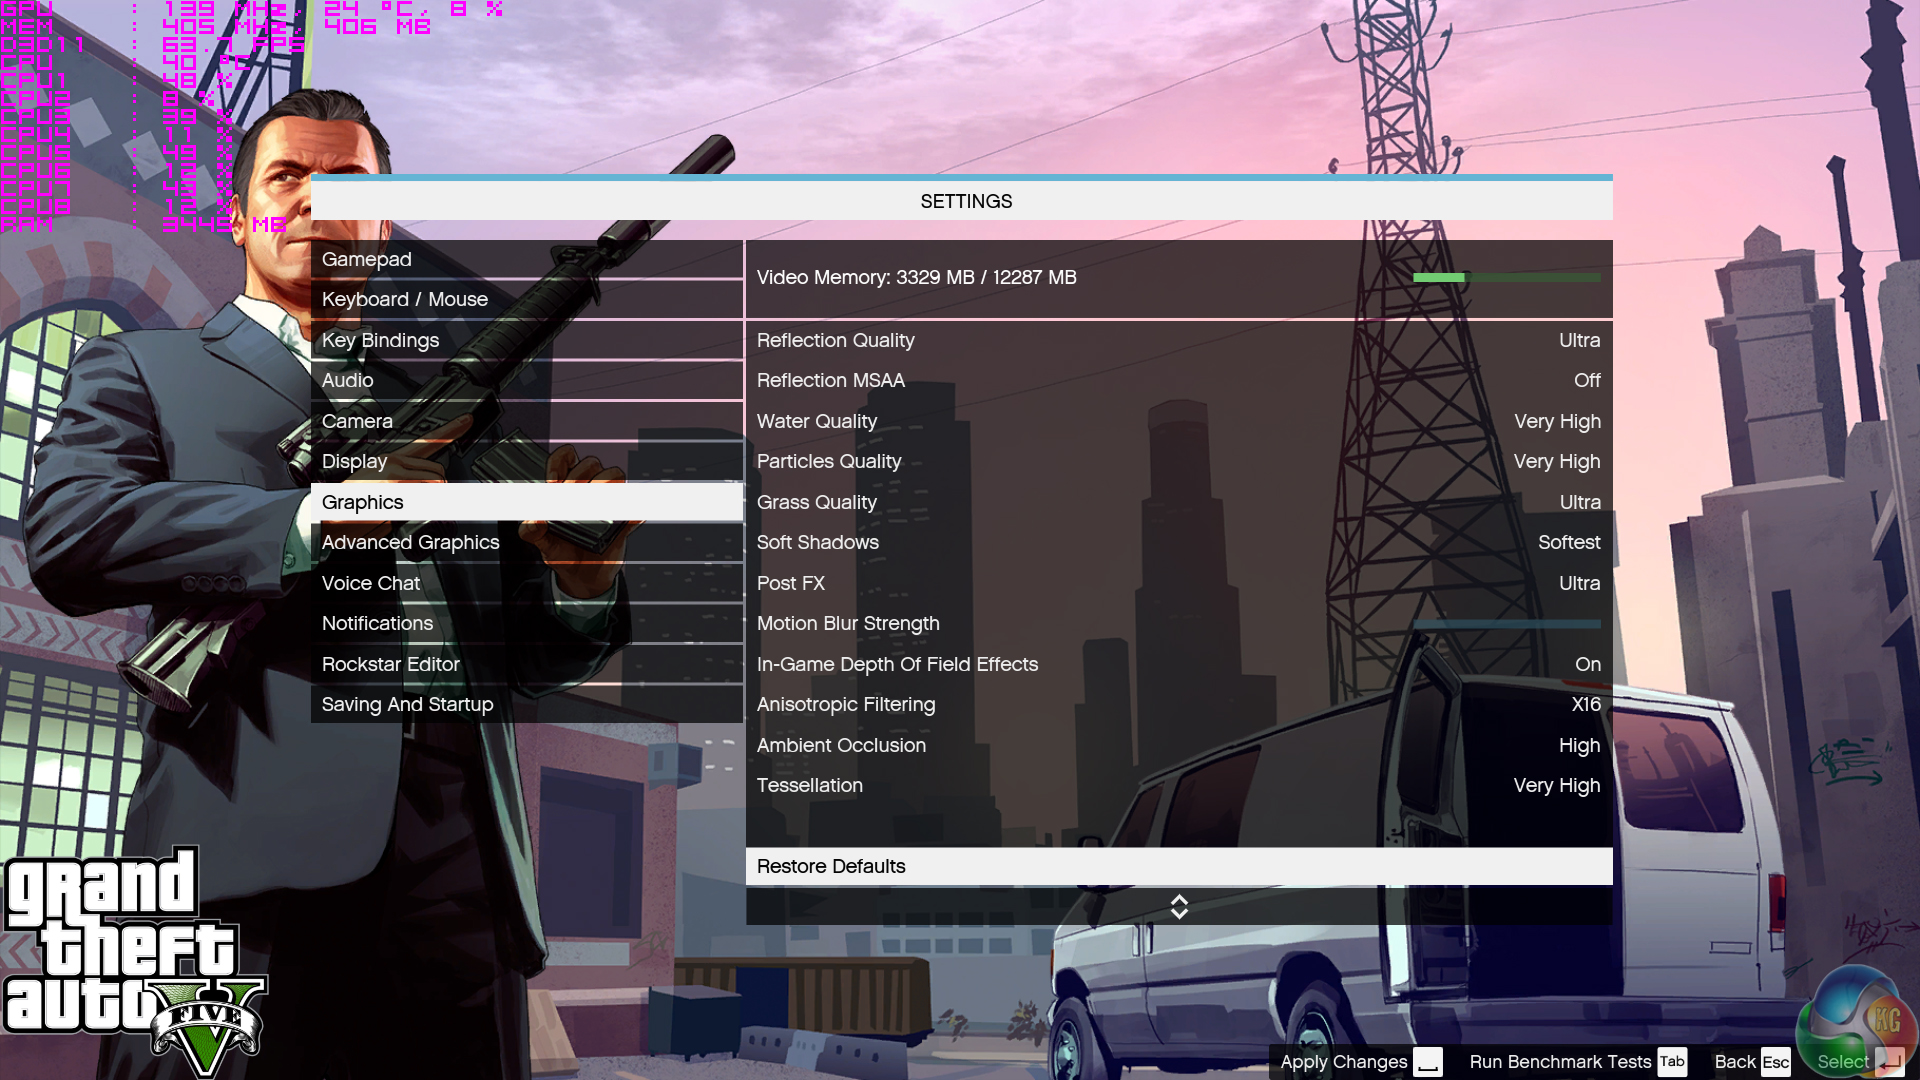
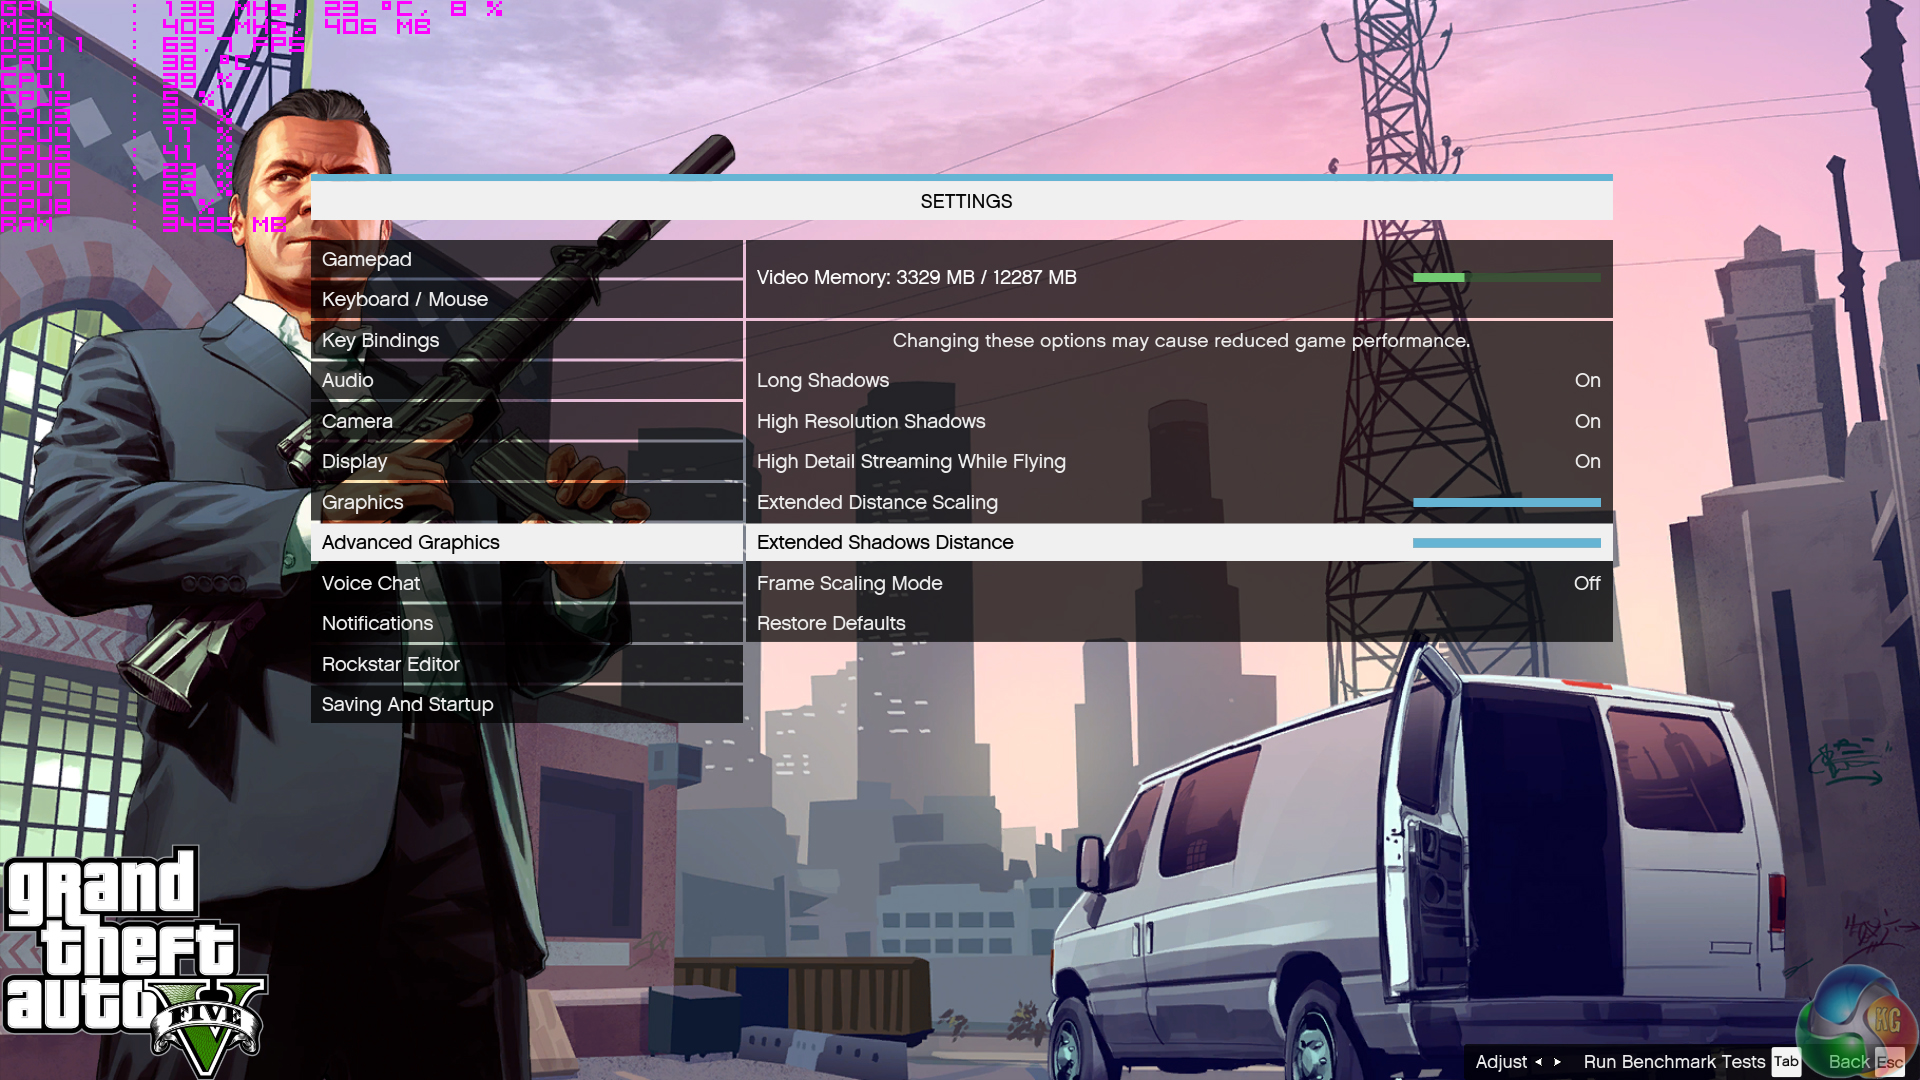
Grand Theft Auto V remains an immensely popular game for PC gamers and as such retains its place in our test suite. The well-designed game engine is capable of providing heavy stress to a number of system components, including the GPU, CPU, and Memory, and can highlight performance differences between motherboards. We run the built-in benchmark using a 1080p resolution and generally Maximum quality settings (including Advanced Graphics).

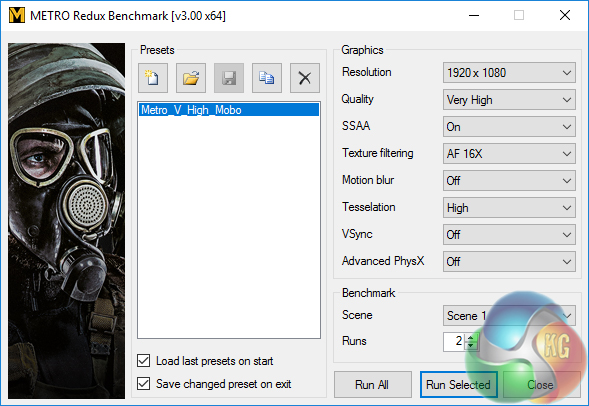
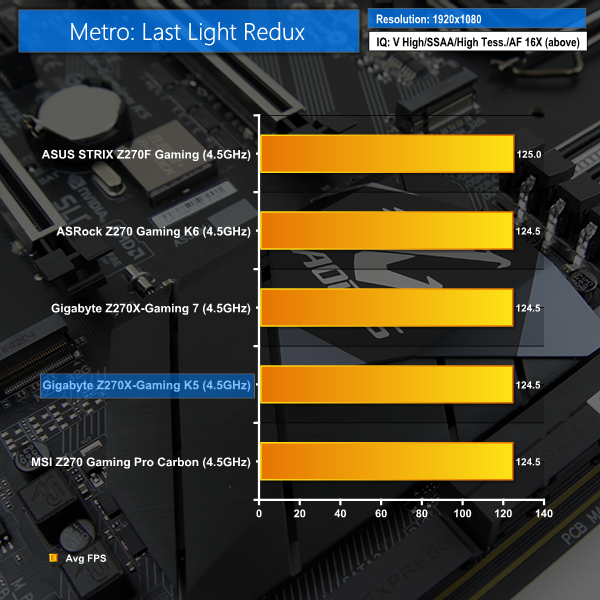
Metro: Last Light Redux
Despite its age, Metro: Last Light Redux remains a punishing title for modern computer hardware. We use the game's built-in benchmark with quality set to Very High, SSAA enabled, AF 16X, and High tessellation.
3DMark's Fire Strike test results in a decent score for the Gaming K5. However, this positivity is lessened when looking at Ashes of the Singularity and GTA V performance; the Aorus Z270X-Gaming K5 drops about 1-2% of the FPS performance in both of those titles compared to competing vendors' motherboards.
To put this in perspective, however, the performance difference is barely 1 FPS at ~40FPS in Ashes and around 1-2 FPS at over 100 FPS in GTA V. So, the differences aren't going to be highlighted as major issues and Metro: Last Light Redux generally isn't fussed for which motherboard it prefers.
Automatic CPU Overclocking – UEFI-based CPU Speed Profile:
Gigabyte gives two straightforward options for overclocking the system without requiring manual tuning. Those options are by using the CPU clock speed presets in the UEFI for Skylake and Kaby Lake multiplier-unlocked Core i5 and i7 chips. Alternatively, there is the option to use automated system tuning via Gigabyte's OS-based EasyTune software.
First up, we tested the 4.8GHz 7700K CPU preset found in the UEFI.
This result worked well and was extremely fast and easy to obtain. We simply hit the 4.8GHz 7700K option and exited the UEFI. The chip hovered around 1.32V under Prime95 load (and a few hundred millivolts higher) and XMP memory settings were maintained. I wouldn't have a concern using this preset on a day-to-day basis, provided my specific chip was stable with such settings.
Automatic CPU Overclocking – OS-based EasyTune Auto Tuning:
Next up, we tested the OS-based EasyTune automated overclocking tuning. The software reboots the system and tests frequencies which work until stability is met.
We got to the same 4.8GHz using EasyTune, though the load voltage was reduced below 1.3V (depending on the load program). This is a good CPU overclock, although your luck with such a voltage level will certainly depend upon the silicon lottery.
What was disappointing, however, was that XMP was disabled and our 3200MHz memory kit operated at a wasteful and slow 2133MHz.
Manual CPU Overclocking:
To test the Gigabyte Aorus Z270X-Gaming K5 motherboard’s CPU overclocking potential, we first increased the CPU VCore to 1.35V and applied the High LLC setting in order to deliver a voltage close to our intended 1.35V.
We maintained the DRAM frequency at 3200MHz to take its stability out of the overclocking equation. Cache frequency was maintained at its stock MCT value of 4.2GHz.
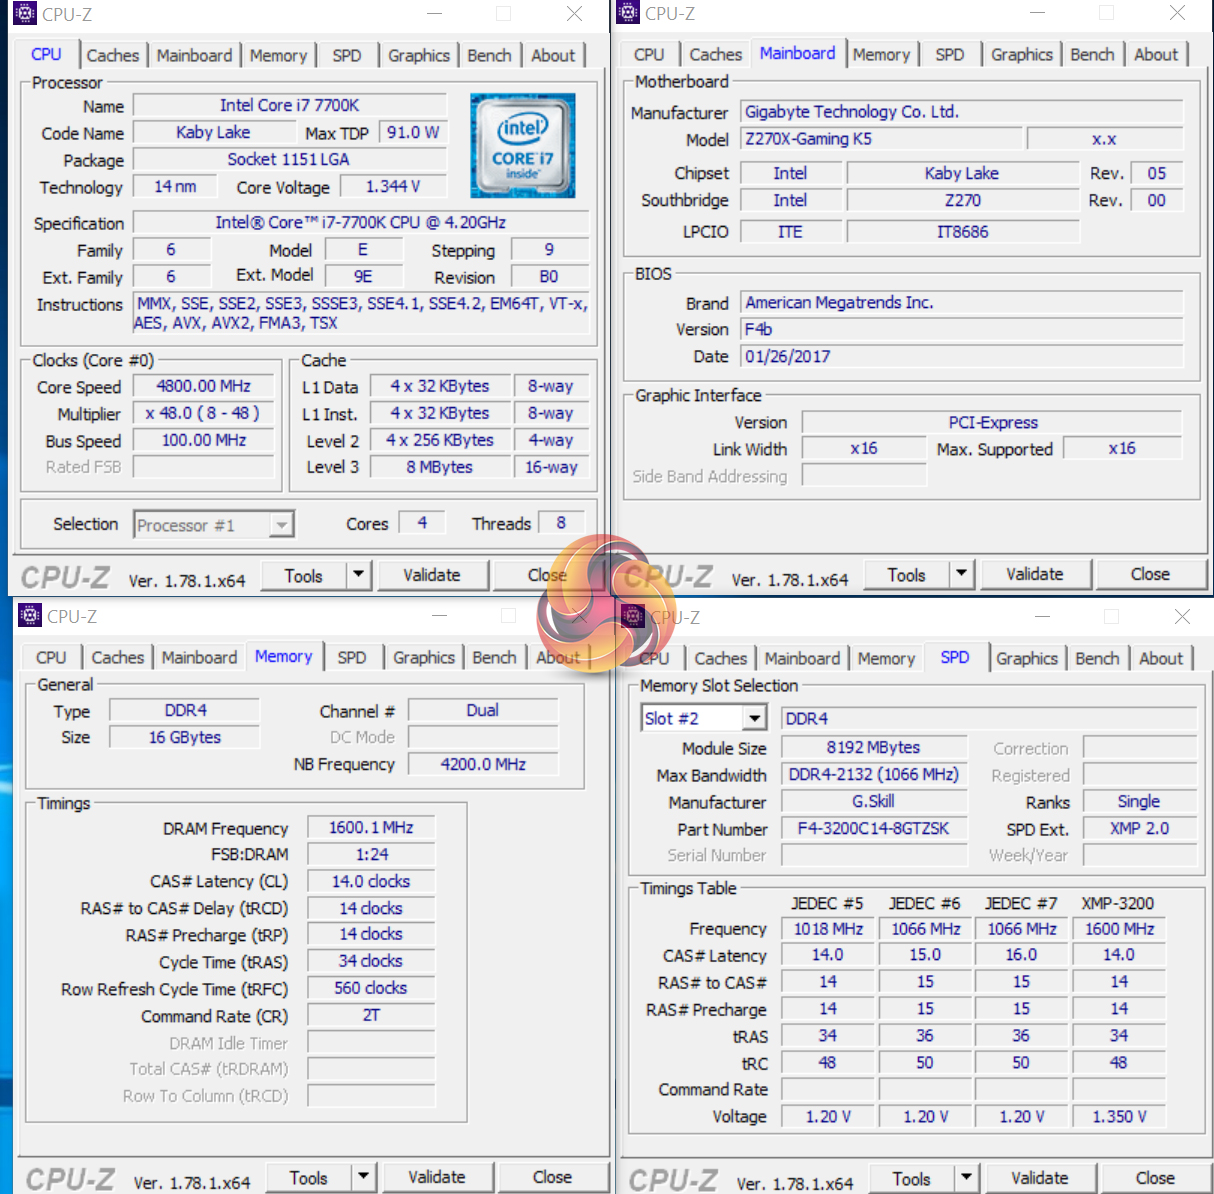
Hitting our maximum Prime-stable clock speed of 4.8GHz with the 7700K was relatively straightforward. Voltage accuracy was good as the chip was delivered with 0.006V less than our 1.350V target under Prime 95 load.
We criticised the Gaming 7 for the way in which its LLC setting varied CPU VCore away from our target level by a significant number. Based on this batch of testing, the issue has been addressed with the latest BIOS update for Gigabyte's Aorus Z270X-Gaming K5.
3600MHz XMP Memory:
We test the motherboard's ability to run G.Skill's high-speed 16GB DDR4 TridentZ kit at a 3600MHz XMP setting. High-speed XMP settings can prove a challenge for motherboard designers when optimising the settings for stability at the intended DRAM frequency.
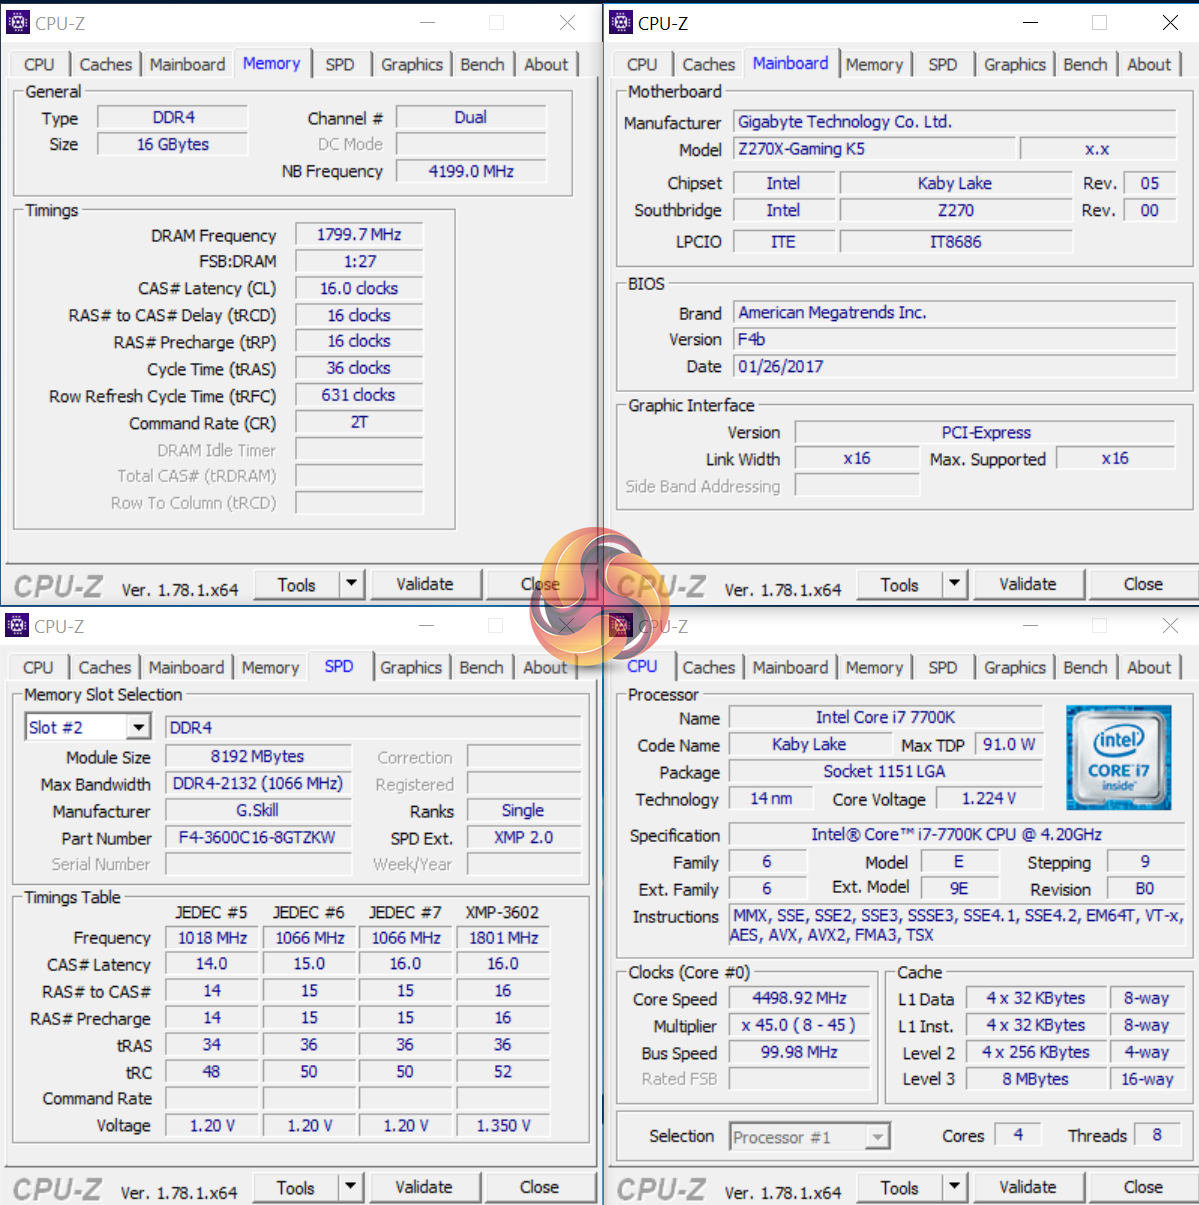
Our 3600MHz kit of G.Skill memory worked without issue by simply applying XMP in the UEFI.
Overclocked Performance
As a performance comparison, we have included the results from four other Z270 motherboards. The maximum overclocked configuration achieved with each board was a 4800MHz (48 x 100MHz) processor frequency whilst using 3200MHz CL14 memory.


Performance from the overclocked Aorus Z270X-Gaming K5 is good for CPU-intensive workloads but the gaming numbers are still a very small percentage off the pace set by ASRock, ASUS, and MSI competitors. With that said, a difference of 2-3 FPS at over 110 FPS is a small difference that is unlikely to be a deal-breaker.
Power
We leave the system to idle on the Windows 10 desktop for 5 minutes before taking a reading. For CPU load results we run AIDA64 CPU, FPU, and Cache stress tests and take a reading. The power consumption of our entire test system (at the wall) is shown in the chart.
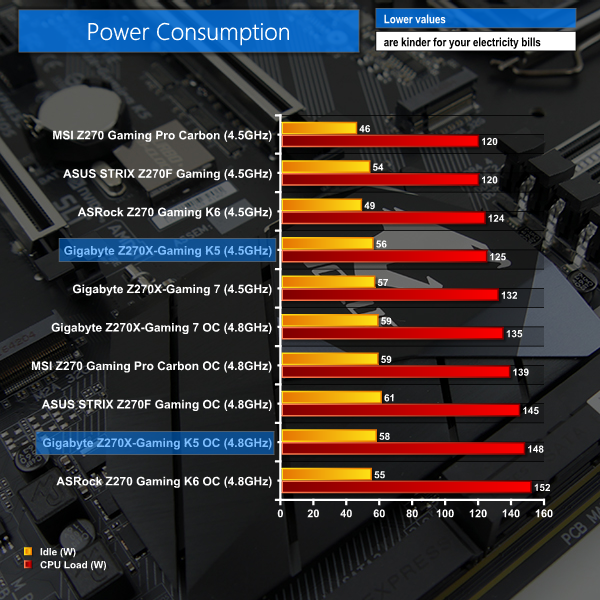
Gigabyte's latest BIOS fixed the high auto VCore levels that we observed with the Gaming 7 under stock forced-turbo conditions. Load power draw from Gigabyte's board is close to the levels shown by competing vendors' boards.
A 1.344V load voltage when overclocked sees power numbers from the wall kept below 150W when running Prime 95. Gigabyte's Aorus Z270X-Gaming K5 isn't quite as efficient as the MSI Z270 Gaming Pro Carbon when overclocked, although this difference is likely to be attributed to differing settings.
To put it simply, Gigabyte's Gaming K5 will not cause a spike in your power bills compared to any of the competing solutions.
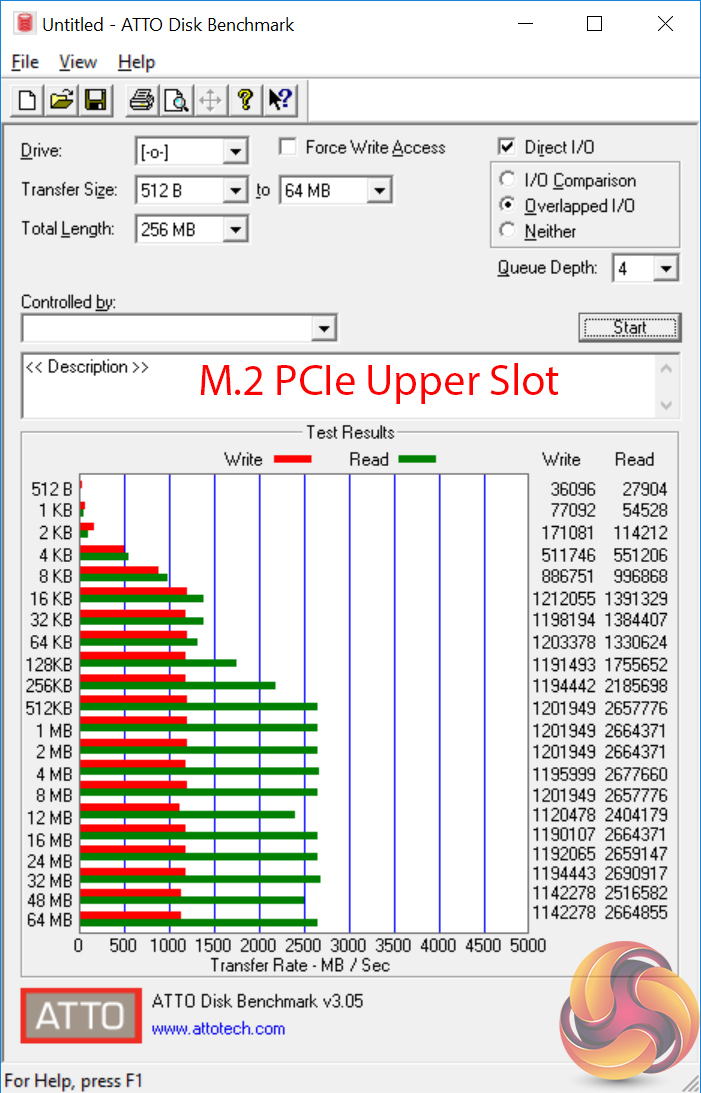
ATTO Disk Benchmark
The ATTO disk benchmark is a Windows-based utility for testing storage performance of any storage drive or controller. We use the default benchmark setup.
M.2 PCIe Performance
For M.2 testing we use a Toshiba OCZ RD400 256GB M.2 PCIe NVMe SSD.
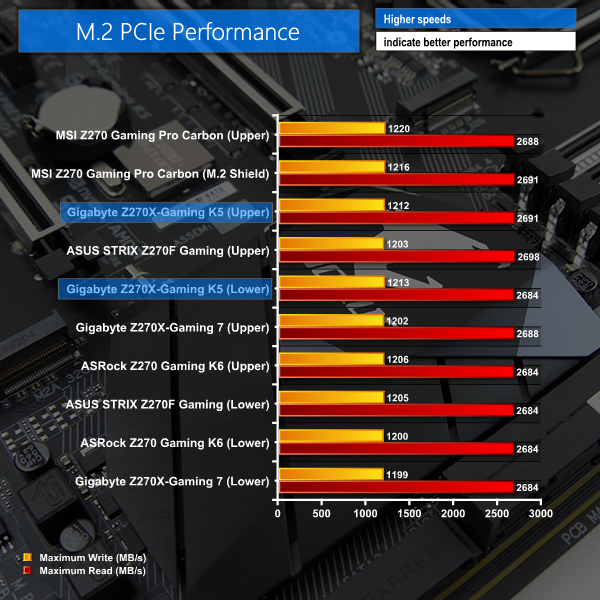

M.2 PCIe performance is good. Maximum transfer rates were only bested by MSI's Z270 Gaming Pro Carbon and its M.2 Shield cooling solution.
We didn't observe any major thermal throttling for our OCZ RD400 test SSD although there is a sign for the potential onset of throttling at the 12MB and 48MB test points. A more sustained heavy write operation would likely push the SSD into a thermal throttling situation due to the lack of cooling measures provided by Gigabyte.
USB 3.1 Performance
We test USB 3.1 performance using a pair of Corsair Force LE 120GB SSDs in RAID 0 connected to an Icy Box RD2253-U31 2-bay USB 3.1 enclosure powered by an ASMedia ASM1352R controller.
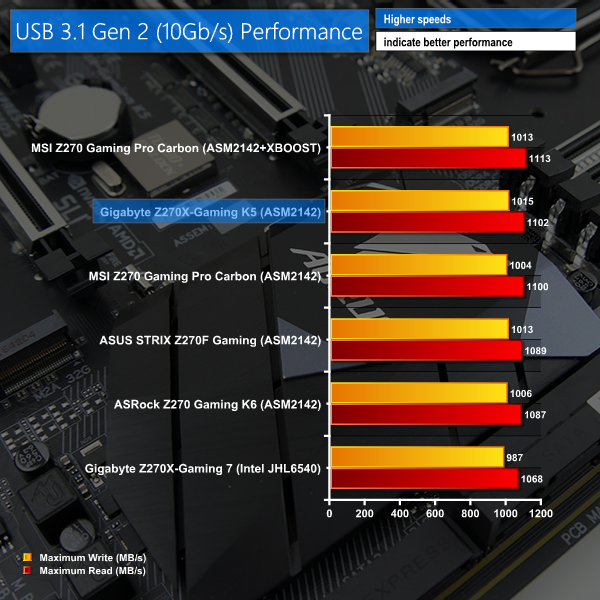
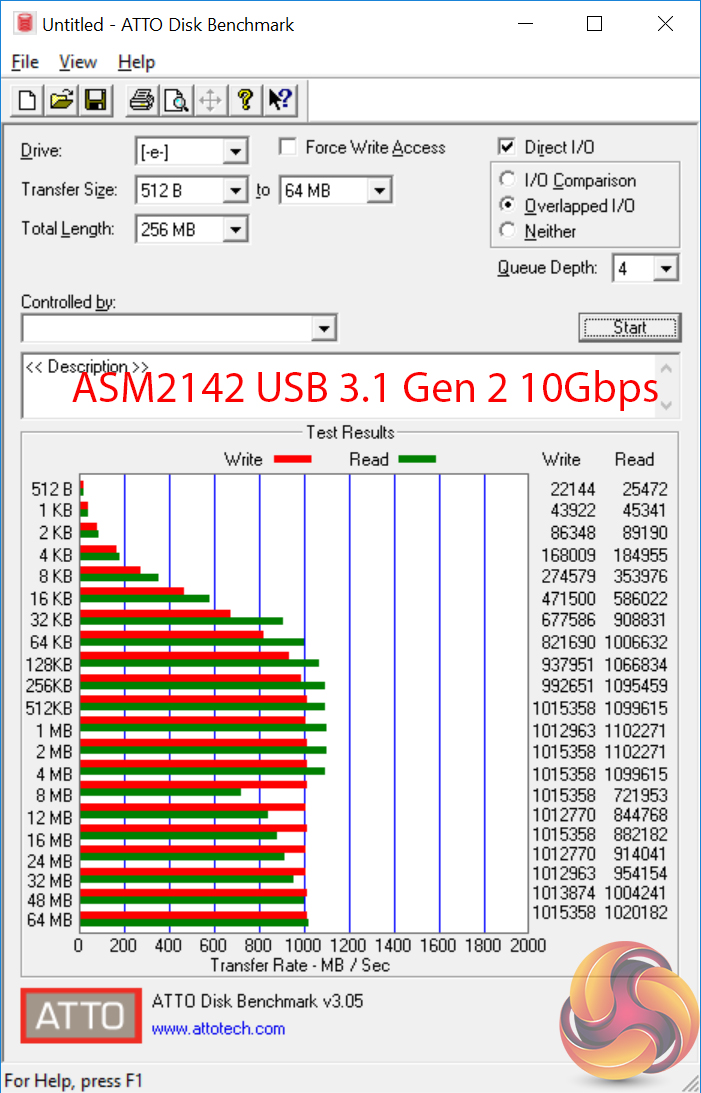
USB 3.1 performance from the ASMedia ASM2142 chipset is very strong. The more cost-effective solution actually outpaces the Intel alternative on Gigabyte's higher-end Z270X-Gaming 7 but the latter is fed with greater bandwidth that would see it pulling ahead if two USB 3.1 devices are transferring data simultaneously.
SATA 6Gbps Performance
For SATA 6Gbps testing we use a SK Hynix SE3010 960GB SSD.
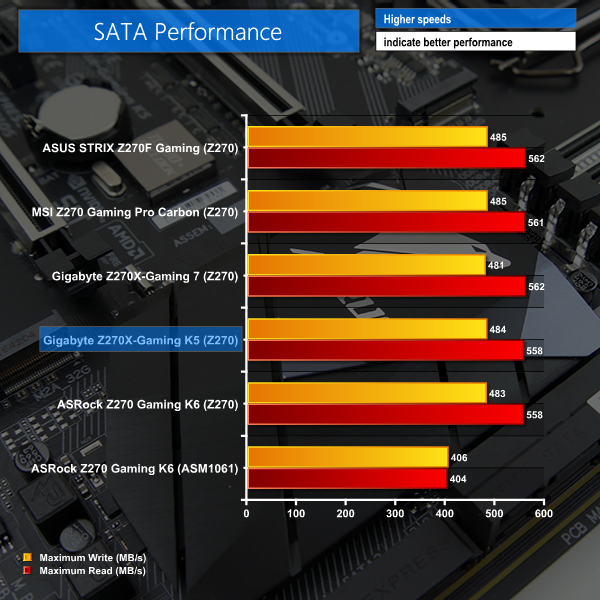
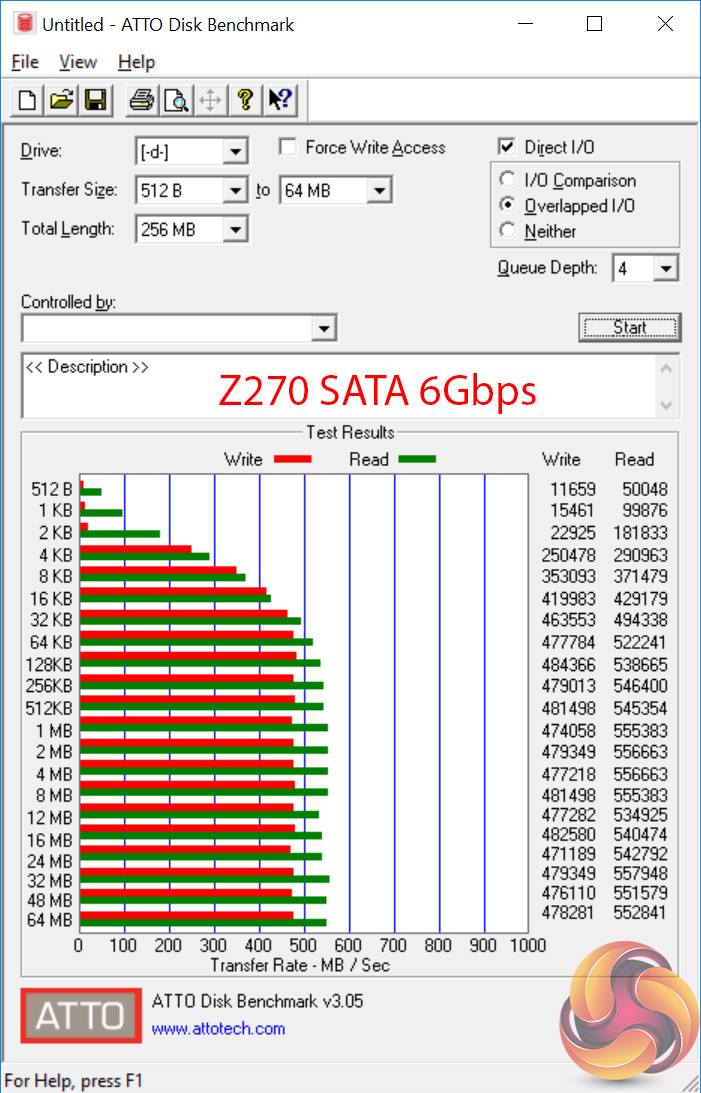
SATA performance is where one would expect for Z270-based ports.
Audio
Rightmark Audio Analyser is a freeware benchmarking utility designed to objectively test the performance characteristics of audio solutions. We setup a line-in line-out loop and execute the record/playback test before generating the results report you see below. A sampling mode of 24-bit, 192 kHz was tested.
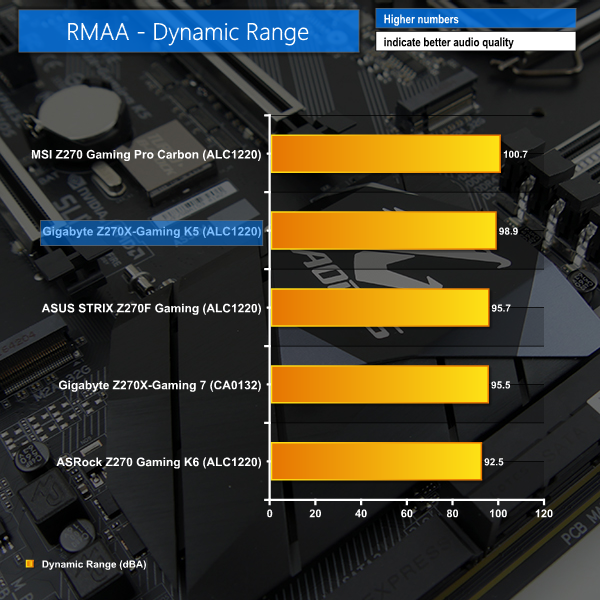
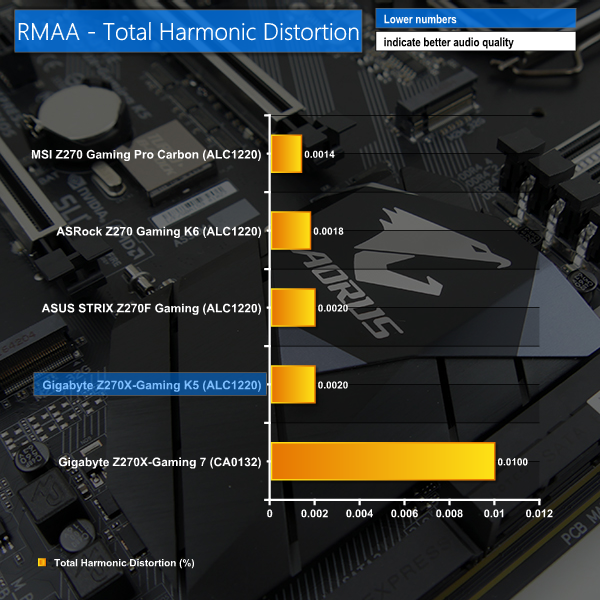
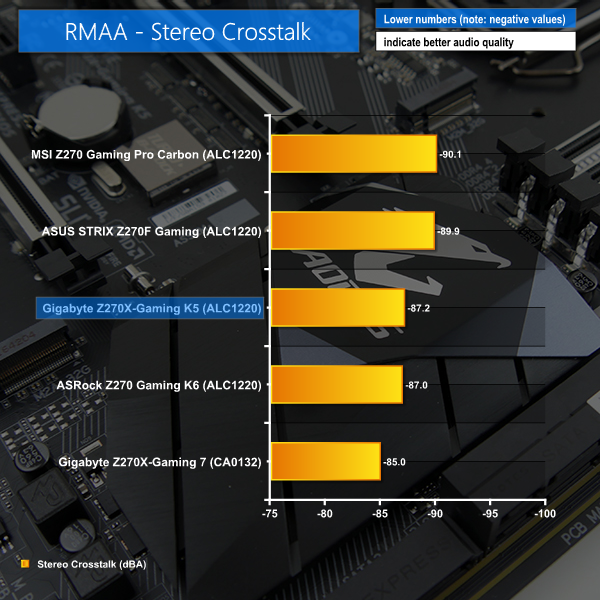
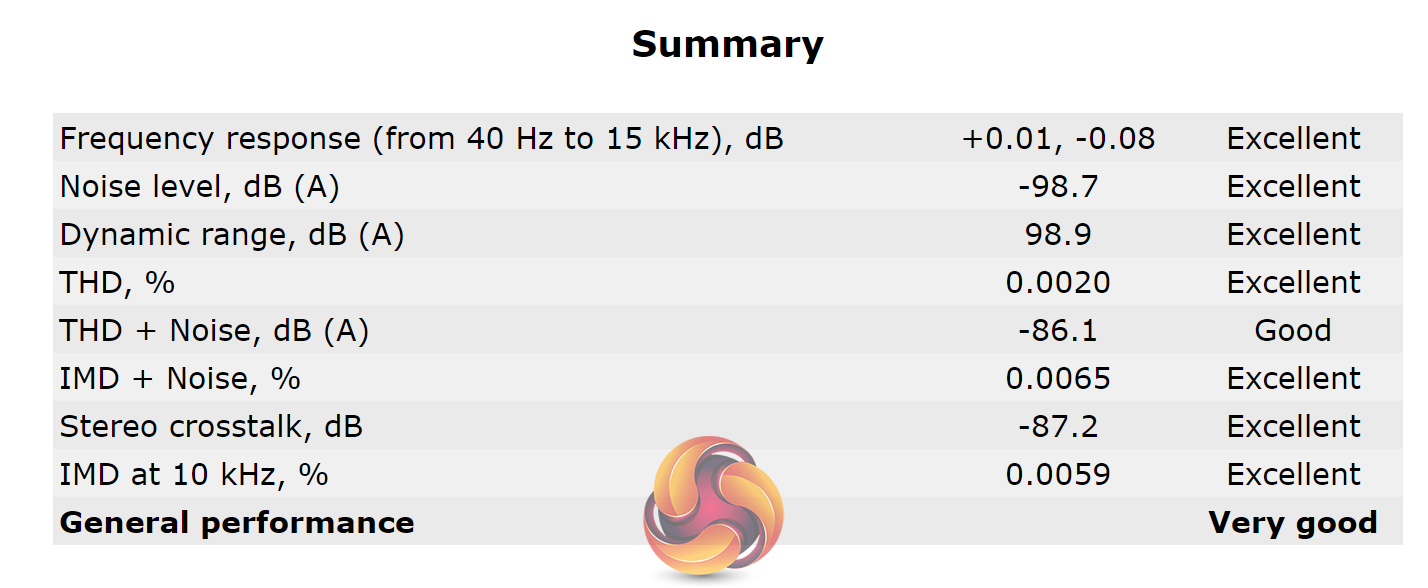
Audio performance from the Realtek ALC1220 solution is good but not chart-topping. MSI has the lead in this regard but Gigabyte's Gaming K5 puts in a solid show and is rated as Very Good overall by RMAA.
The Gigabyte Aorus Z270X-Gaming K5 is a well-balanced motherboard that ticks the core features boxes and adds superb fan control capabilities and extensive RGB lighting options into the mix.
Performance from the motherboard was generally fine. We had no problems with stability throughout our testing and overclocking capabilities through manual and preset methods were positive. 3600MHz XMP memory worked without hassle and the latest BIOS has addressed the silly voltage levels that we saw Gigabyte applying with the Aorus Z270X-Gaming 7 motherboard. However, GPU-intensive performance metrics, such as games, tended to be 1-2% slower than on competing vendors' motherboards.
Expansion potential is an area where Gigabyte's Aorus Z270X-Gaming K5 does well. A trio of PCIe SSDs can be used in RAID 0, or one can opt for two PCIe/SATA M.2 devices for more sane usage scenarios. Onboard U.2 is good to see and SATA-Express may tick the box for some buyers who still like to use front panel 10Gbps USB 3.1 Gen 2 boxes. It is also good that the lower full-length PCIe slot runs at x4 bandwidth without interference from M.2 slots, although bandwidth is shared with x1 PCIe connectors.
Gigabyte's UEFI is OK but nothing more. It works but the layout is uninspiring, navigation has room for improvement, and interactivity is minimal. With that said, control for the RGB LED lighting system through the UEFI is a strong positive and the same can be said about the fan control. Users can happily manage their fans and LEDs without the need to install OS-based software. Gigabyte has a vast number of OS-based software tools and monitoring and system control are clear strengths of the options.
Having tested the four ~£170 ‘gaming‘ options from ASUS, ASRock, MSI, and now Gigabyte, the Aorus Z270X-Gaming K5 is the product that offers the best balance of features. No, it doesn't have the M.2 cooling heatsink of MSI's alternative, nor are there additional SATA or GbE ports like on ASRock's board, and the UEFI or software package isn't as strong as ASUS'.
But the overall balance of features on Gigabyte's Aorus Z270X-Gaming K5 is what puts it in a strong position; the Smart Fan 5 fan control system is superb, RGB Fusion LED lighting is better than other options in this price range, and the added extra of native U.2 support is a small bonus over competing solutions.
![]()
The Gigabyte Aorus Z270X-Gaming K5 is available at Overclockers UK for £172.99.
Discuss on our Facebook page, over HERE.
Pros:
- Excellent fan configuration and control system through Smart Fan 5.
- RGB Fusion works very well and is better than competing solutions at this price point.
- The actual RGB LEDs are bright, colour-accurate, and span several zones on the board.
- Good feature set that includes native U.2 and a solid audio solution.
- Smart distribution of chipset lanes (triple PCIe SSD support, as well as a PCIe 3.0 x4 expansion device and dual graphics cards)
Cons:
- No consideration given to M.2 SSD cooling.
- UEFI needs more work to better compete with ASRock, ASUS, and MSI implementations.
KitGuru says: Gigabyte's Aorus Z270X-Gaming K5 is equipped with a smart balance of features alongside superb RGB LED and fan control systems to make it a very strong mid-range solution at around £170.